При работе на компьютере иногда возникает необходимость получить полный список файлов и папок в каталоге или даже целом томе. Понадобиться он может для самых разных целей, например, для каталогизации, для сравнения, для использования в какой-то базе данных и так далее. В большинстве случаев приходится иметь дело с большим числом объектов, поэтому нечего и думать, чтобы составить такой список вручную.
Если создание списка файлов вручную представляется едва ли возможным, то какая есть тому альтернатива, какие программные инструменты лучше всего подойдут для этих целей? Решений существует несколько, все они очень просты и удобны. Получить список файлов и папок можно с помощью обычной командной строки, с помощью PowerShell, штатного Проводника, любого браузера, а также с помощью сторонних специализированных утилит.
Получаем список файлов и папок в командной строке
Для чтения содержимого каталогов в старой доброй командной строке предусмотрена команда dir, её то как раз мы и будем использовать. Итак, запускаем консоль CMD, командой cd Буква диска:/путь (если нужно перейти в другой диск, добавляем после cd ключ /d) переходим в нужное расположение и выполняем эти две команды:
chcp 1251
dir /b /s > D:filelist.tхt
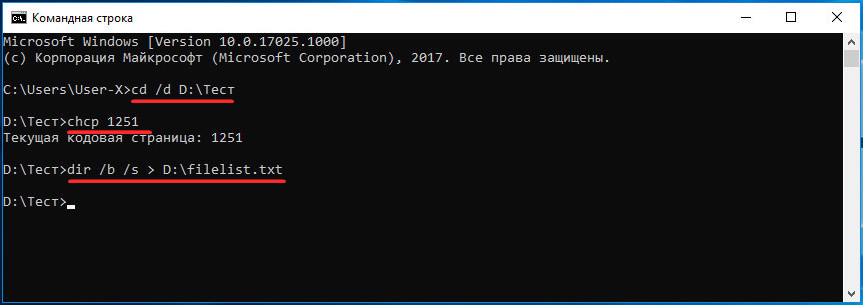
Первая команда устанавливает кириллическую кодировку, вторая сохраняет список всех файлов, папок и вложенных в них объектов в текстовый лог на диске D.
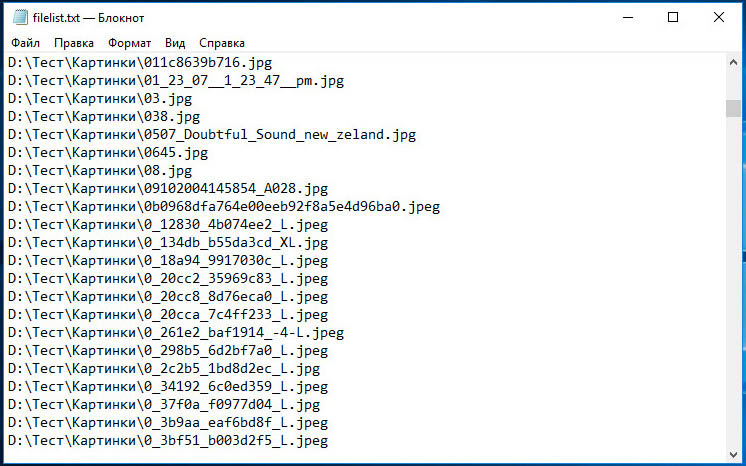
Если нужно получить список только файлов (без вложенных каталогов), достаточно использовать только ключ /b.
Примечание: в Windows 8.1 и 7 для быстрого перехода в папку в командной строке, зажмите Shift, кликните ПКМ по папке и выберите в контекстном меню опцию «Открыть окно команд».
Список файлов и папок в PowerShell
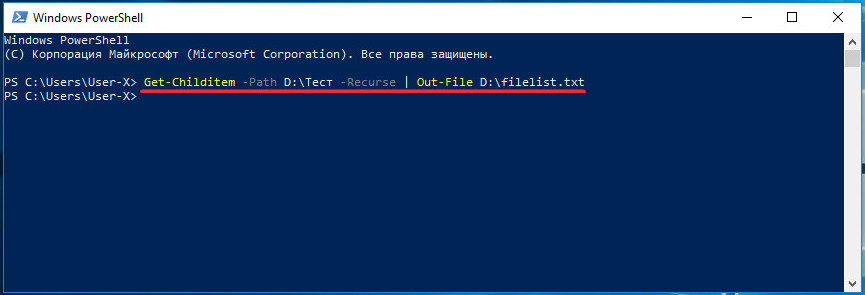
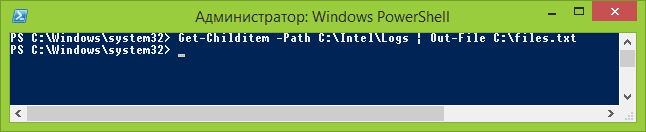
В Windows 10 командная строка заменена консолью PowerShell, для получения списка файлов можете использовать её. Для примера выведем в файл содержимое папки Тест с её подкаталогами:
Get-Childitem -Path D:Тест -Recurse | Out-File D:filelist.tхt
А можно и проще. Зажав Shift, кликаем по папке ПКМ, выбираем в меню «Открыть PowerShell здесь».
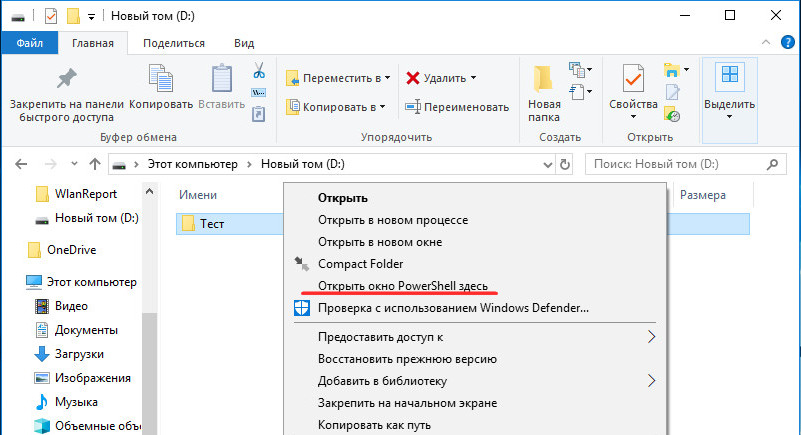
И выполняем в открывшемся окне консоли команду Get-Childitem -Recurse | Out-File D:filelist.tхt.
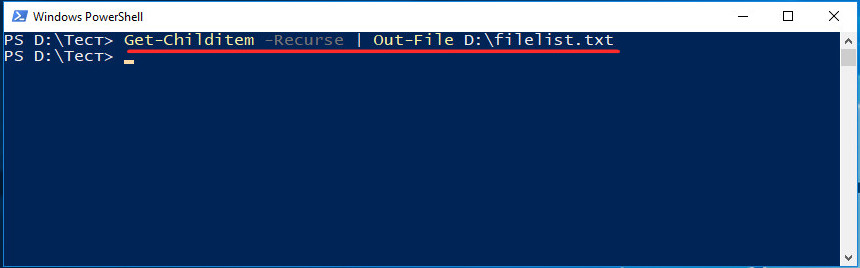
Необходимость использования параметра -Path с указанием пути в данном случае отпадает.
Получение списка файлов или папок в Проводнике
Этот способ позволяет получить список либо файлов, либо папок в конкретном расположении. Заходим в целевую папку, выделяем в ней все файлы или папки, зажимаем Shift, кликаем правой кнопкой мыши и выбираем в меню опцию «Копировать как путь».
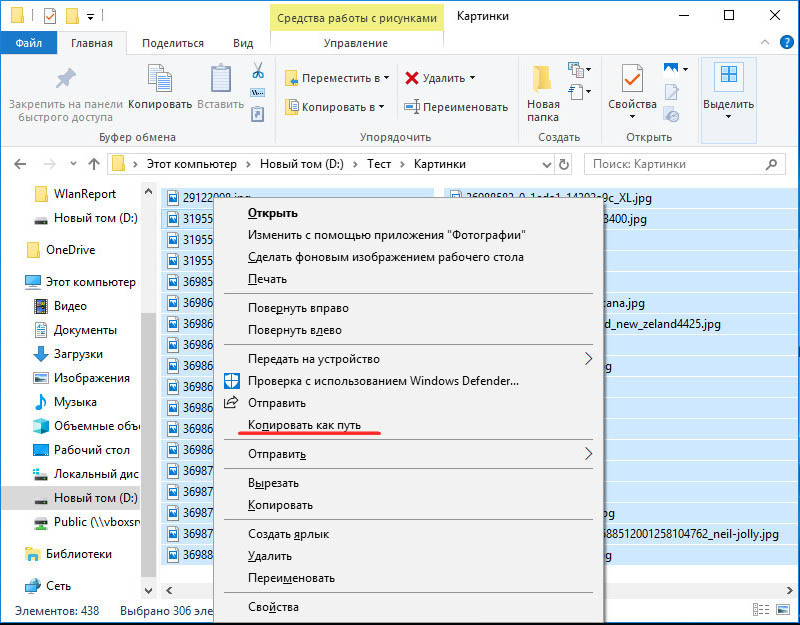
Пути и имена выделенных объектов будут переданы в буфер обмена, откуда вы уже сможете перенести их в текстовый файл.
Получение списка файлов с помощью DirLister
Для получения хорошо структурированного списка объектов файловой системы можно воспользоваться бесплатной портативной утилитой DirLister, скачав её с официального сайта:
www.barrysoft.it/blog/software/dirlister
Запустив утилиту, укажите в разделе «Directory To Scan» путь к сканируемому каталогу или диску, в разделе «Output File» выберите расположение для сохранения списка.
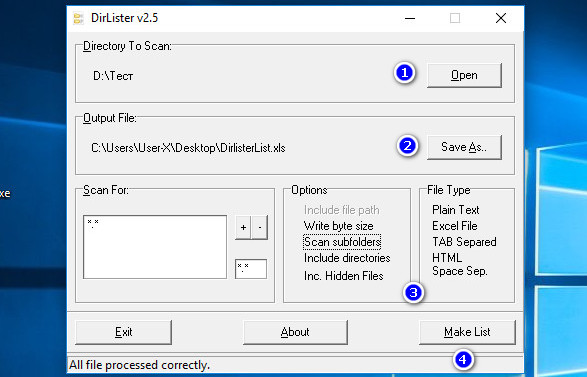
Здесь же можно задать параметры сканирования — выбрать формат, указать, нужно ли включать в список вложенные директории и скрытые объекты, задать поиск по маске. После нажатия кнопки «Make List» список будет сохранён в выбранном расположении.
Используем для получения списка файлов браузер
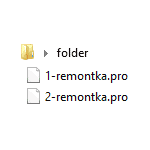
На худой конец для создания списка файлов и папок на диске можно воспользоваться любым браузером. Перетаскиваем папку или диск на новую вкладку браузера и получаем список имеющихся в ней файлов и каталогов.

Рекурсивно пройтись по всем вложенным каталогам, правда, не получится да и для копирования путей и имён файлов и переноса их в отдельный файл придется использовать Ctrl + C и Ctrl + V.
![]() Загрузка…
Загрузка…
 Когда ко мне обратились с вопросом о том, как быстро вывести список файлов в текстовый файл, я понял, что ответа я не знаю. Хотя задача, как оказалось, достаточно часто встречающаяся. Это может потребоваться для передачи списка файлов специалисту (для решения какой-то проблемы), самостоятельного ведения журнала содержимого папок и других целей.
Решено было устранить пробел и подготовить инструкцию на эту тему, в которой будет показано, как получить список файлов (и вложенных папок) в папке Windows средствами командной строки, а также о том, как автоматизировать этот процесс, если задача возникает часто.
Получение текстового файла с содержимым папки в командной строке
Сначала о том, как сделать текстовый документ, содержащий список файлов в нужной папке, вручную.
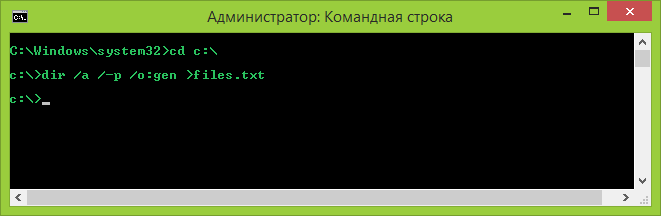
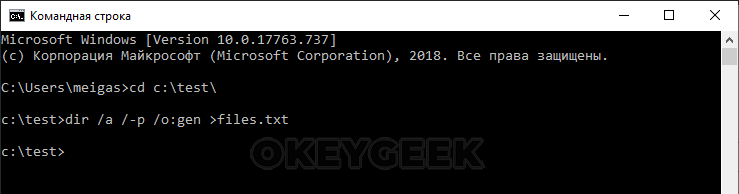
- Запустите командную строку от имени администратора.
- Введите cd x:folder где x:folder — полный путь к папке, список файлов из которой нужно получить. Нажмите Enter.
- Введите команду dir /a /-p /o:gen >files.txt (где files.txt — текстовый файл, в котором будет сохранен список файлов). Нажмите Enter.
- Если использовать команду с параметром /b (dir /a /b /-p /o:gen >files.txt), то в полученном списке будет отсутствовать любая дополнительная информация о размерах файлов или дате создания — только список имен.
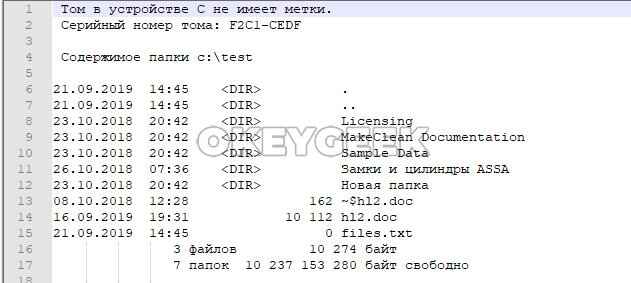
Готово. В результате будет создан текстовый файл, содержащий необходимую информацию. В команде выше, данный документ сохраняется в той же папке, список файлов из которой требуется получить. Можно также убрать вывод в текстовый файл, в этом случае список будет отображаться только в командной строке.

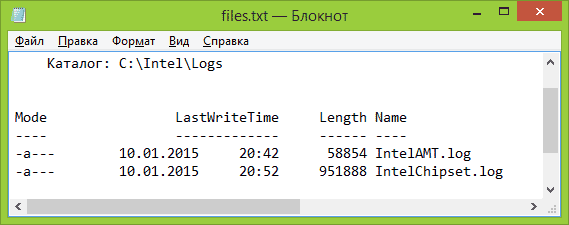
Кроме этого, для пользователей русскоязычной версии Windows следует учитывать то, что файл сохраняется в кодировке Windows 866, то есть в обычном блокноте вместо русских символов вы увидите иероглифы (но можно использовать альтернативный текстовый редактор для просмотра, например, Sublime Text).
Получаем список файлов с помощью Windows PowerShell
Вы также можете получить список файлов в папке используя команды Windows PowerShell. Если вы хотите сохранить список в файл, то запустите PowerShell от имени администратора, если просто просмотреть в окне — достаточно простого запуска.
Примеры команд:
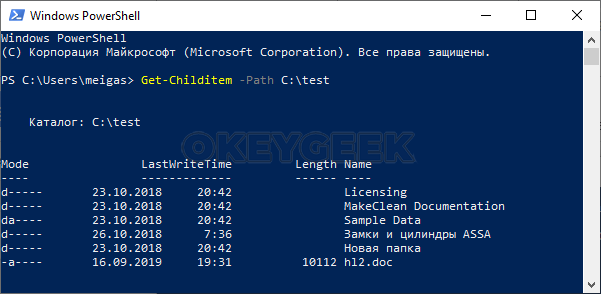
- Get-Childitem -Path C:Folder — вывод списка всех файлов и папок, находящихся в папке Folder на диске C в окне Powershell.
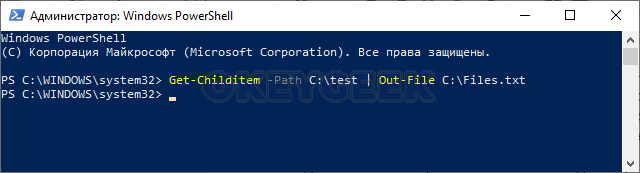
- Get-Childitem -Path C:Folder | Out-File C:Files.txt — создание текстового файла Files.txt со списком файлов в папке Folder.
- Добавление параметра -Recurse к первой описанной команде выводит в списке также содержимое всех вложенных папок.
- Параметры -File и -Directory позволяют получить список только файлов или только папок соответственно.
Выше перечислены далеко не все параметры Get-Childitem, но в рамках описываемой в этом руководстве задачи, думаю, их будет достаточно.
Утилита Microsoft Fix it для печати содержимого папки
На странице https://support.microsoft.com/ru-ru/kb/321379 присутствует утилита Microsoft Fix It, добавляющая в контекстное меню проводника пункт «Print Directory Listing», выводящий список файлов в папке на печать.

Несмотря на то, что программа предназначена только для Windows XP, Vista и Windows 7, она успешно сработала и в Windows 10, достаточно было запустить ее в режиме совместимости.
Дополнительно, на той же странице показан порядок ручного добавления команды вывода списка файлов в проводник, при этом вариант для Windows 7 подойдет и для Windows 8.1 и 10. А если вам не требуется вывод на печать, вы можете немного подправить предлагаемые Microsoft команды, удалив параметр /p в третьей строке и полностью убрав четвертую.
The dir command is a Command Prompt command used to display a list of the files and subfolders contained in a folder.
For each file or folder listed, the command will, by default, show the date and time the item was last changed, if the item is a folder (labeled with DIR) or file, the size of the file if applicable, and finally the name of the file or folder including the file extension.
Outside of the file and folder list, the dir command also displays the current drive letter of the partition, the volume label, volume serial number, total number of files listed, total size of those files in bytes, the number of subfolders listed, and the total bytes remaining free on the drive.
Dir Command Availability
The dir command is available from within the Command Prompt in all Windows operating systems including Windows 11, Windows 10, Windows 8, Windows 7, Windows Vista, and Windows XP.
Older versions of Windows include the dir command as well but with a few fewer options than we have listed below. The dir command is also a DOS command, available in all versions of MS-DOS.
The dir command can be found in offline Command Prompt versions, like the ones available from Advanced Startup Options and System Recovery Options. The dir command is also included in the Recovery Console in Windows XP.
The availability of certain dir command switches and other dir command syntax may differ from operating system to operating system.
Dir Command Syntax
dir [drive:][path][filename] [/a[[:]attributes]] [/b] [/c] [/d] [/l] [/n] [/o[[:]sortorder]] [/p] [/q] [/r] [/s] [/t[[:]timefield]] [/w] [/x] [/4]
See How to Read Command Syntax if you’re not sure how to interpret the syntax of the dir command as it’s written above or shown in the table below.
| Dir Command Options | |
|---|---|
| Item | Explanation |
| drive:, path, filename | This is the drive, path, and/or filename that you want to see results for. All three are optional since the command can be executed alone. Wildcards are allowed. See the Dir Command Examples section below if this isn’t clear. |
| /a |
When executed alone, this switch shows all types of files and folders, including those with file attributes that typically prevent them from showing up in Command Prompt or in Windows. Use /a with one or more of the following attributes (colon is optional, no spaces needed) to show only those types of files in the command result: a = archive files d = directories h = hidden files i = not content indexed files l = reparse points r = read-only files s = system files v = integrity files x = no scrub files — = Use this as a prefix to any of the above attributes to exclude items with those file attributes from the results. |
| /b | Use this option to show the dir results using «bare» format, which removes the typical header and footer information, as well as all the details on each item, leaving only the directory name or file name and extension. |
| /c | This switch forces the use of the thousands separator when the command is used in a way that shows file sizes. This is the default behavior on most computers, so the practical use is /-c to disable the thousands separator in results. |
| /d | Use /d to limit the items displayed to just folders (contained within brackets) and file names with their extensions. Items are listed top-to-bottom and then across columns. Standard dir command header and footer data remain the same. |
| /l | Use this option to show all folder and file names in lowercase. |
| /n | This switch produces a result with columns in the date > time > directory > file size > file or folder name column structure. Since this is the default behavior, the practical use is /-n which produces columns in the file or folder name > directory > file size > date > time order. |
| /o |
Use this option to specify a sort order for the results. When executed alone, /o lists directories first, followed by files, both in alphabetical order. Use this option with one or more of the following values (colon is optional, no spaces needed) to sort the dir command result in the specified manner: d = sort by date/time (oldest first) e = sort by extension (alphabetical) g = group directory first, followed by files n = sort by name (alphabetical) s = sort by size (smallest first) — = Use this as a prefix with any of the above values to reverse the order (-d to sort by newest first, -s for largest first, etc.). |
| /p | This option displays the results one page at a time, interrupted with a Press any key to continue… prompt. Using /p is very similar to using the dir command with the more command. |
| /q | Use this switch to display the owner of the file or folder in the results. The easiest way to view or change a file’s ownership from within Windows is via the Advanced button in the Security tab when looking at the file’s Properties. |
| /r | The /r option shows any alternate data streams (ADS) that are part of a file. The data stream itself is listed in a new row, under the file, and is always suffixed with $DATA, making them easy to spot. |
| /s | This option shows all the files and folders in the specified directory plus all of the files and folders contained within any subdirectories of that specified directory. |
| /t |
Use this option with one of the values below (colon is optional, no spaces needed) to specify a time field to be used when sorting and/or displaying results: a = last access c = created w = last written |
| /w | Use /w to show results in «wide format» which limits the items displayed to just folders (contained within brackets) and file names with their extensions. Items are listed left-to-right and then down rows. Standard dir command header and footer data remain the same. |
| /x | This switch shows the «short name» equivalent for files whose long names don’t comply with non-8dot3 rules. |
| /4 | The /4 switch forces the use of 4-digit years. At least in newer versions of Windows, the 4-digit year display is the default behavior and /-4 doesn’t result in a 2-digit year display. |
| /? | Use the help switch with the dir command to show details about the above options directly in the Command Prompt window. Executing dir /? is the same as using the help command to execute help dir. |
Dir Command Examples
Below are some of the different ways you can use the dir command:
Run Without Switches
dir
In this example, the dir command is used alone, without any drive:, path, filename specifications, nor any switches, producing a result like this:
C:>dirVolume in drive C has no label.Volume Serial Number is F4AC-9851Directory of C:09/02/2015 12:41 PM$SysReset05/30/2016 06:22 PM 93 HaxLogs.txt05/07/2016 02:58 AM PerfLogs05/22/2016 07:55 PM Program Files05/31/2016 11:30 AM Program Files (x86)07/30/2015 04:32 PM Temp05/22/2016 07:55 PM Users05/22/2016 08:00 PM Windows05/22/2016 09:50 PM Windows.old1 File(s) 93 bytes
As you can see, the dir command was executed from the root directory of C (i.e., C:>). Without specifying where exactly to list the folder and file contents from, the command defaults to displaying this information from where the command was executed.
List Hidden Items
dir c:users /ah
In the above example, we’re requesting that the dir command show results from the drive: and path of c:users, not from the location we’re running the command from. We’re also specifying, via the /a switch with the h attribute, that we’d like to only see hidden items, resulting in something like this:
C:>dir c:users /ahVolume in drive C has no label.Volume Serial Number is F4AC-9851Directory of c:users05/07/2016 04:04 AM All Users [C:ProgramData]05/22/2016 08:01 PMDefault05/07/2016 04:04 AM Default User [C:UsersDefault]05/07/2016 02:50 AM 174 desktop.ini1 File(s) 174 bytes
The small list of directories and the single file you see in the result above doesn’t make up the entirety of the c:users folder—just the hidden files and folders. To see all files and folders, you would execute dir c:users /a (removing the h) instead.
Search for File In Any Folder
dir c:*.csv /s /b > c:userstimdesktopcsvfiles.txt
In this slightly more complex, but much more practical, example for the dir command, we’re requesting that our entire hard drive be searched for CSV files and then the bare minimum results are outputted to a text document. Let’s look at this piece by piece:
- c:*.csv tells the dir command to look at all files (*) that end in the CSV (.csv) extension in the root of the c: drive.
- /s instructs it to go deeper than the root of c: and instead, search for files like this in every folder, as deep as the folders go.
- /b removes anything but the path and file name, essentially creating a readable «list» of these files.
- > is a redirection operator, meaning «send to» somewhere.
- c:userstimdesktopcsvfiles.txt is the destination for the > redirector, meaning that results will be written to the csvfiles.txt file instead of in Command Prompt, which will be created at the c:userstimdesktop location (i.e., the Desktop you see when you’re logged in).
When you redirect command output to a file, as we did here in this dir command example, Command Prompt doesn’t display anything. However, the exact output you would have seen is instead located inside that text file. Here’s what our csvfiles.txt looked like after the dir command had completed:
c:ProgramDataIntuitQuickenInetmerchant_alias.csvc:ProgramDataIntuitQuickenInetmerchant_common.csvc:UsersAll UsersIntuitQuickenInetmerchant_alias.csvc:UsersAll UsersIntuitQuickenInetmerchant_common.csvc:UsersTimAppDataRoamingcondition.2.csvc:UsersTimAppDataRoamingline.csvc:UsersTimAppDataRoamingmedia.csv
While you certainly could have skipped the file redirection, and even the «bare format» switch, the results would have been very difficult to work within the Command Prompt window, making it hard to get to what you were after.
Related Commands
The dir command is often used with the del command. After using dir to find the name and location of the file(s) in any particular folder(s), del can be used to delete files directly from the Command Prompt.
Similar is the rmdir /s command, and older deltree command, used to delete folders and files. The rmdir command (without the /s option) is useful for deleting empty folders that you find with the dir command.
As mentioned above, the dir command is also often used with a redirection operator.
Thanks for letting us know!
Get the Latest Tech News Delivered Every Day
Subscribe

Чтобы просмотреть или открыть файлы каталога или папки на вашем компьютере, выполните следующие действия для вашей операционной системы.
Содержание
- Показать файлы в папке Windows
- MS-DOS и командная строка Windows
- Пример вывода команды dir
- Вывести список файлов в каталоге Windows PowerShell
- Перечислите файлы в каталоге Linux и Unix
- Показать файлы на Apple MacOS
Показать файлы в папке Windows
Пользователи Microsoft Windows, которые хотят перечислить файлы на компьютере, могут открыть Мой компьютер или Проводник Windows и открыть диск C: . При попадании на диск C: все файлы и папки в корневом каталоге вашего основного жесткого диска отображаются в списке и должны напоминать пример, показанный ниже.
В Windows большинство ваших программ хранятся в папке Program Files, а ваши документы часто сохраняются в папке «Мои документы».

MS-DOS и командная строка Windows

Чтобы вывести список файлов в командной строке MS-DOS или в командной строке Windows, используйте команду dir.
Пример ниже является образцом того, как файлы перечислены при использовании команды dir. Смотрите справки команды dir для всех доступных ключей, которые могут быть добавлены к этой команде для выполнения различных функций.
Пример вывода команды dir
По умолчанию команда dir выводит список файлов и каталогов для текущего каталога. В приведенном ниже примере мы находимся в каталоге Windows, поэтому отображаются только файлы и каталоги в каталоге Windows.
C:  Windows>
Том dir на диске C не имеет метки.
 Серийный номер тома 6464-D47C

Каталог c:  windows

13.04.2016, 06:24 <DIR>.
13.04.2016, 06:24 <DIR> ..
30.10.2015 01:24 <DIR> addins
17.04.2016, 07:10 19 326 PFRO.log
30.10.2015 01:18 32 200 Professional.xml
23.12.2015, 04:30 <DIR> Подготовка
30.10.2015 01:17 320,512 regedit.exe
17.12.2015, 08:09 <DIR> Регистрация
18.04.2016 11:28 <DIR> rescache
17.12.2015, 08:04 <DIR> Ресурсы
07.06.2010 15:27 1 251 944 RtlExUpd.dll
...
13.07.2009 23:09 403 win.ini
17.04.2016, 07:10 <DIR> WinSxS
30.10.2015 01:18 11,264 write.exe
              32 файл (ов) 839,433,436 байт
              81 Dir (s) 341,846,921,216 байт бесплатно
Если в одном каталоге слишком много файлов, вы также можете показывать файлы по одной странице за раз, используя команду dir с ключом / p.
dir / p
Вы можете перечислить файлы, которые соответствуют только определенным критериям, используя подстановочные знаки в команде dir. Ниже приведены несколько дополнительных примеров команды dir с подстановочными знаками.
dir * .txt
В приведенном выше примере отображаются только файлы с расширением .txt.
реж *. *
В приведенном выше примере отображаются только файлы, начинающиеся с буквы «а».
Смотрите наше определение подстановочного знака для получения дополнительной информации об этом термине и дополнительных примерах.
dir c: windows
В приведенном выше примере эта команда выводит список файлов в каталоге C: Windows независимо от текущего каталога или диска.
Вывести список файлов в каталоге Windows PowerShell
Как и командная строка Windows, Windows PowerShell может использовать команду dir для вывода списка файлов в текущем каталоге. PowerShell также может использовать команды ls и gci для вывода списка файлов в другом формате.
Перечислите файлы в каталоге Linux и Unix

Чтобы вывести список файлов в командной строке Linux или Unix, используйте команду ls, как показано ниже. Если вам нужны дополнительные примеры и синтаксис команды ls, см. страницу справки команды ls.
[~ / public_html / rss] # ls
./ ../ history.rss questions.rss jargon.rss newjarg.rss newpages.rss newqa.rss
Рекомендуется использовать ls -laxo для просмотра файлов, так как он дает вам полную информацию о файлах и информацию о разрешениях в более простом и готовом формате.
Вы можете перечислить файлы, которые соответствуют только определенным критериям, используя подстановочные знаки в команде ls. Ниже приведены несколько дополнительных примеров команды dir с подстановочными знаками.
ls * .txt
В приведенном выше примере отображаются только файлы с расширением .txt.
ls r *
В вышеприведенном примере отображаются только файлы, начинающиеся с буквы «r».
ls [aeiou] *
В примере приведенном выше отображаются только файлы, начинающиеся с гласной (a, e, i, o, u).
ls ~ / public_html
В примере выше команда ls перечисляет все файлы в каталоге public_html, который является частью вашего домашнего каталога, который представлен тильдой. Если этот каталог не существует, вы получите сообщение об ошибке.
Тильда это ярлык. Без ярлыка вам нужно будет ввести полное имя каталога. Например, если ваше имя пользователя было «надежда», ваш домашний каталог будет / home / hope. Вы можете увидеть полный рабочий каталог, в котором вы находитесь, с помощью команды pwd.
Показать файлы на Apple MacOS
Пользователи Apple могут просматривать файлы через Finder. Если вы находитесь в Терминале, посмотрите шаги Linux, которые также работают в Терминале.
![]() Часто бывает, что пользователь не сортирует файлы при сохранении, и в одной папке у него могут быть сложены тысячи разных файлов, отличающихся друг от друга по названию, расширению. В такой ситуации может потребоваться получить полный список файлов, которые находятся в конкретной папке Windows. В рамках данной статьи рассмотрим несколько способов, как это можно сделать.
Часто бывает, что пользователь не сортирует файлы при сохранении, и в одной папке у него могут быть сложены тысячи разных файлов, отличающихся друг от друга по названию, расширению. В такой ситуации может потребоваться получить полный список файлов, которые находятся в конкретной папке Windows. В рамках данной статьи рассмотрим несколько способов, как это можно сделать.
Оглавление:
1. Получить список файлов в папке через командную строку
2. Получить список файлов в папке через Powershell
3. Получить список файлов в папке через Total Commander
Получить список файлов в папке через командную строку
Командная строка Windows дает возможность легко узнать, какие файлы находятся в той или иной папке на компьютере. Для этого достаточно знать полный адрес папки и прописать команду в командной строке.
Чтобы узнать полный адрес папки, список файлов в которой вы хотите определить, найдите эту папку в проводнике Windows, после этого зажмите на клавиатуре клавишу Shift, и на найденную папку нажмите правой кнопкой мыши. Появится контекстное меню, в котором нужно выбрать пункт “Скопировать как путь”.
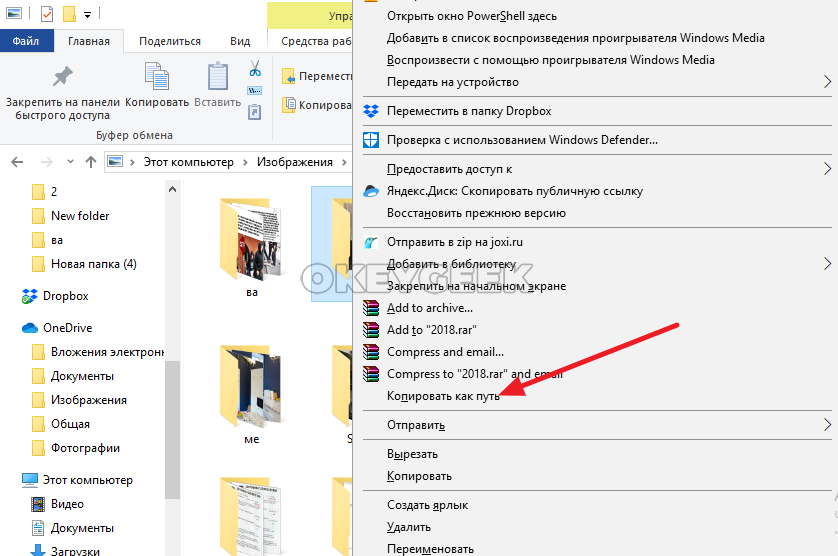
После этого в буфер обмена будет скопирован полный адрес папки.
Далее откройте командную строку. Введите команду cd c:papka, где c:papka — это пусть к папке, из которой нужно получить список файлов. В шаге выше данный путь копировался. Соответственно, можно просто нажать Ctrl+V, чтобы его вставить, но после этого необходимо удалить кавычки, которые копируются вместе с путем. Нажмите Enter, чтобы выполнить команду.
Далее пропишите команду dir /a /-p /o:gen >files.txt и нажмите Enter.
После этого будет создан файл files.txt в папке, в которой вы определяете список файлов.
Важно
Файл files.txt не получится открыть обычным блокнотом, поскольку информация в нем сохраняется в кодировке Windows 866. Необходимо предварительно конвертировать файл, либо открывать его с помощью приложений, которые поддерживают такую кодировку, например, Notepad++.
Получить список файлов в папке через Powershell
Консоль Powershell, которая частично копирует, а частично заменяет функциональность командной строки, дает возможность получить список файлов в папке. При этом есть два способа, как это сделать:
- Запустите консоль Powershell любым удобным способом, например, через поиск. После этого введите в ней команду Get-Childitem -Path C:papka, где C:papka — это путь до папки, список файлов которой вам нужно получить. При исполнении данной команды, список файлов будет отображен прямо в Powershell.

- Запустите консоль Powershell от имени администратора. Это можно сделать, если найти утилиту через поиск, после чего нажать на нее правой кнопкой мыши и выбрать вариант запуска от имени администратора. После этого введите команду Get-Childitem -Path C:papka | Out-File C:Files.txt, где C:papka — путь до папки, список файлов которой нужно получить, а C:Files.txt — это название файла и путь его сохранения, в котором будет находиться информация о списке файлов в папке.

Обратите внимание
В отличие от метода с командной строкой, созданный txt-файл утилитой Powershell будет открываться обычным блокнотом Windows без трудностей.
Получить список файлов в папке через Total Commander
Можно использовать и сторонние приложения, чтобы узнать список всех файлов в папке. Например, популярный файловый менеджер Total Commander позволяет это сделать.
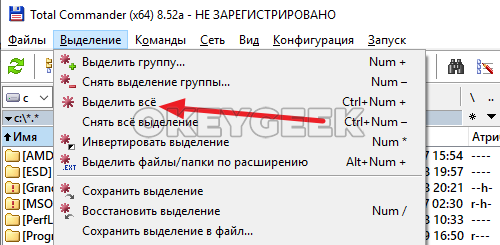
Запустите Total Commander и найдите папку, список файлов из которой вы хотите получить. В верхнем меню нажмите “Выделить” и выберите пункт “Выделить все”.
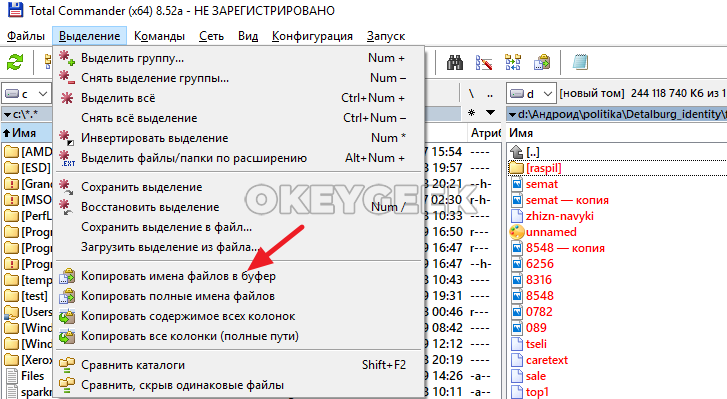
Файлы в папке выделятся красным. Далее необходимо нажать “Копировать имена файлов в буфер”.
После этого вставьте в любой текстовый редактор скопированную в буфер обмена информацию, используя команду “Вставить” из контекстного меню или комбинацию клавиш Ctrl+V.
Обратите внимание
Total Commander предлагает и ряд других команд для копирования информации. Например, можно сразу “Сохранить выделение в файл”, либо “Копировать содержимое всех колонок”.
![]()
![]()
![]()
![]()
![]() (12 голос., средний: 4,50 из 5)
(12 голос., средний: 4,50 из 5)
![]() Загрузка…
Загрузка…