DHCP means (Dynamic Host Configuration Protocol) its provided automatically IP on your subnet. The DHCP controlled by the DHCP Server distribute network configuration such as IP, subnetmask, gateway and dns information.
When client host request IP address for DHCP server then each computer assign same subnet IP address. Another way you can use Static IP Address on your machine.
★ How To Configure Static IP address On Ubuntu 18.04
★ How To Install Zabbix Server On Ubuntu 18.04
★ How To Install Zabbix Server 3.4.4 Into Ubuntu 17.04
★ How To Create Custom Boot Partition On Ubuntu 16.04 Server
Now I have to show using portable dhcp server your windows 10 machine.
Step #01: Goto download portable dhcp server then choose latest version and click download icon.
When completed download then using it very softly otherwise you can face many problem.
!Warning – Can’t install two dhcp server on your same network
Step #02: Now open dhcpwiz file for configure dhcp IP pool.
Click Next button select your network interface on LAN. Provide DNS server name or click Next button for dhcp main IP configuration.
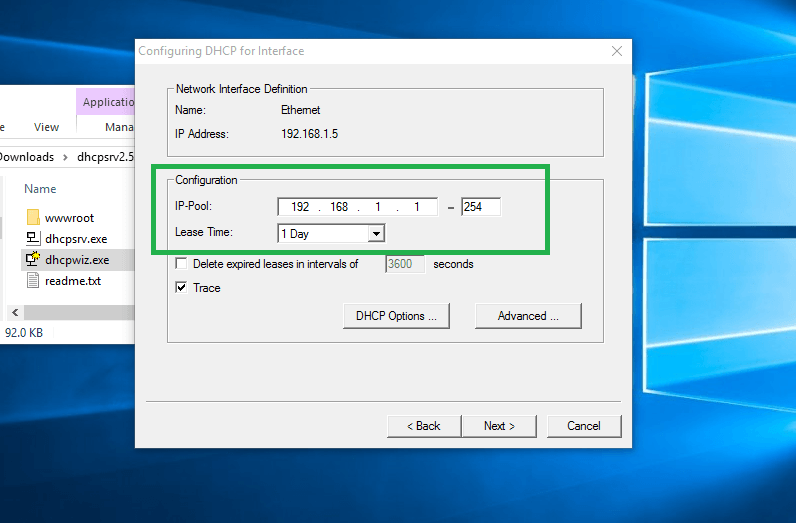
Type your network IP-Pool start and ending IP address then click Next button. See your configure as like below image.
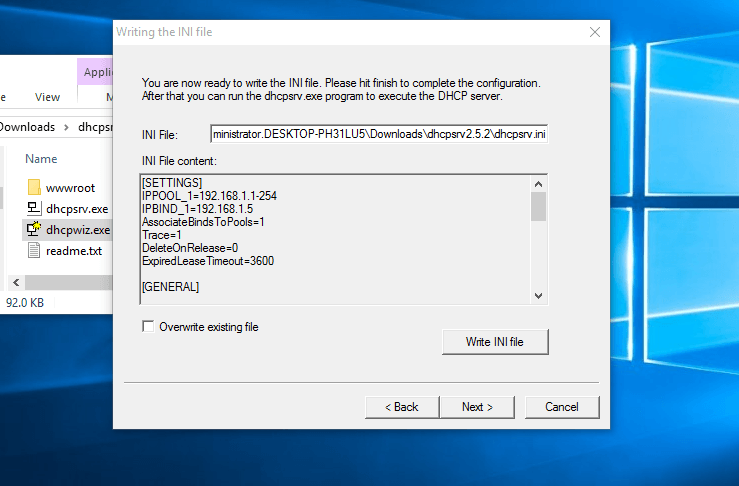
Finally click Next button without dhcpsrv.ini file and Finish. If you can check box Run dhcp server immediately.
Step #03: After configuration is ok then open dhcpsrv file for start and stop dhcp server.
Thank you for using portable dhcp server on your network.
- Author
- Recent Posts

I am system administrator as Windows and Linux platform. I have 4 years skilled from the professional period. I have to configure Linux based system such as an Asterisk VOIP system, Network monitoring tools (ZABBIX), Virtualization (XEN Server), Cloud computing (Apache CloudStack) etc. Now share my professional skill each interested person.
Thanks to all.

DHCP Server Open Source Freeware Windows/Linux. MultiSubnet DHCP Server supports Dynamic, Static Leases, Relay Agents, BOOTP, PXEBOOT. Global, Range and Client Specific Options. Supports filtering of ranges on Mac Address, Vendor and User Class.
Features
- Support all Industry Standard Feaures
- Dynamic and Static Leases
- Options can be Client Specific, Range Specific or Global
- Multisubnet supports Relay Agents and PXE Boot
- Lease Status in auto refreshing html page
- Supports Duplicated Replicated Operation
- Very simple to install and use, even by person not having DHCP concepts
- Very low memory and cpu use
Project Samples
License
GNU General Public License version 2.0 (GPLv2)
A dataset of resume, contact, social, and demographic information for over 1.5 Billion unique individuals, delivered to you at the scale you need it.
User Ratings
4.5
out of 5 stars
★★★★★
★★★★
★★★
★★
★
ease
1 of 5
2 of 5
3 of 5
4 of 5
5 of 5
4 / 5
features
1 of 5
2 of 5
3 of 5
4 of 5
5 of 5
4 / 5
design
1 of 5
2 of 5
3 of 5
4 of 5
5 of 5
3 / 5
support
1 of 5
2 of 5
3 of 5
4 of 5
5 of 5
3 / 5
User Reviews
- All
- ★★★★★
- ★★★★
- ★★★
- ★★
- ★
-
Great DHCP server. It is essentially helpful in a case of several sub-nets.
1 user found this review helpful.
-
Fantastic program. I use it to do troubleshooting in the network when dhcp details arise. It´s excellent for labs and demos. Supports several subnets. Easy to use and configure. Thanks.
2 users found this review helpful.
-
Good docs, easy to install, runs solid on windows (for a change lol)
1 user found this review helpful.
-
I haven’t use all the feature it claim, just very simple DHCPRange for Kali server. Good alternate to dnsmasq and ics-hdcp-sever without mess up with the network function.. Have to compile for x64 though. Global option is too lengthy should break down to category
1 user found this review helpful.
-
Does what it’s suppose to do, but poorly. Obviously not much time has been spend with this program. However its free, so no complains here.
Documentation is seriously outdated and inaccurate (2013; code is 2017), hence the 3 stars only. I found the hard way (looking through the code) that option 150 is completely not defined, although the doc says it’s called TFTPserverAddress. And surprise-surprise, option TFTPServerIPaddress is option 128 despite the PDF says is called TFTPPhoneServer.
Good that we can use the options by numbers, not by names.
Read more reviews >
Additional Project Details
Intended Audience
Advanced End Users, System Administrators
User Interface
Non-interactive (Daemon)
Programming Language
C++
Вопрос может быть глупый, но я отталкиваюсь от слов своего преподавателя. Было задание развернуть сетку с DHCP сервером на Windows 10, я не справился. После я стал искать, а можно ли вообще на обычной винде поднять DHCP. Ответа так и не нашёл. Решил задать этот вопрос здесь.
P.S. Только базовыми возможностями Windows 10, без доп софта
-
Вопрос задан19 мая 2022
-
3066 просмотров
Единственный вариант с Windows 10 и DHCP без использования дополнительного ПО — это, как уже сказали, включение Internet Connection Sharing. Но назвать это полноценным сервером тяжело.
Вообще говоря, специально для сетей без DHCP-сервера была разработана APIPA: https://docs.microsoft.com/en-us/windows-server/tr…
Пригласить эксперта
Препод немного гонит))
Можно сделать способом internet sharing, как уже сказали
Но полноценным dhcp это назвать крайне сложно
-
Показать ещё
Загружается…
08 февр. 2023, в 08:14
4500 руб./за проект
08 февр. 2023, в 07:27
500 руб./за проект
08 февр. 2023, в 06:45
50000 руб./за проект
Минуточку внимания
DHCPLite
A small, simple, configuration-free DHCP server for Windows.
Background
In 2001, I wrote DHCPLite to unblock development scenarios between Windows and prototype hardware we were developing on.
I came up with the simplest DHCP implementation possible and took all the shortcuts I could — but it was enough to get the job done!
Since then, I’ve heard from other teams using DHCPLite for scenarios of their own.
And recently, I was asked by some IoT devs to share DHCPLite with that community.
So I dug up the code, cleaned it up a bit, got it compiling with the latest toolset, and am sharing the result here.
I hope you find it useful!
Overview
For those times when you need a DHCP server but don’t have the right hardware or software: there’s DHCPLite!
DHCPLite is a small, simple, configuration-free DHCP (Dynamic Host Configuration Protocol) server that runs on Windows and will serve IP addresses to any RFC2131/2132 compliant device.
Warning!
Do NOT run DHCPLite when connected to a network that already has a DHCP server on it.
DHCPLite was not designed to cooperate with other DHCP servers and will cause serious problems.
Implementation Notes
- DHCPLite was designed to work alongside APIPA (Automatic Private IP Addressing (Auto-IP)).
If the host machine acquired its IP address in this manner, DHCPLite will not serve a new address to the host machine.
(Other machines on the network will be able to obtain IP addresses from DHCPLite.) - DHCPLite determines the range of addresses it will hand out based on the current IP address and subnet mask of the non-loopback network interface of the machine on which it is running.
In the case of a host configured by APIPA, this means an address of the form 169.254.x.x and a range of over 65,000 available addresses.
In the case of a host with a static IP address, the address and range can be changed by altering the static IP address and subnet mask settings on the machine. - Once it has assigned an IP address to a specific client, DHCPLite will always assign that same address to the client (until DHCPLite is shutdown and restarted).
This means it is possible to exhaust the available address space with either a large number of machines or a small address space. - In an attempt to mitigate possible misconfiguration problems, DHCPLite hands out address leases that are valid for only 1 hour.
Lease renewal is supported, so this should not be a problem for long-running scenarios (as long as DHCPLite is running to issue renewals). - DHCPLite requires the IP Helper API (implemented in
iphlpapi.dll).
Unsupported Scenarios
- Multi-homed host machines (i.e., host machines with more than one active network interface).
Because the WinSock API does not allow an application to disable routing of outbound datagrams (sockoptSO_DONTROUTEcan be silently ignored), DHCPLite would not be able to ensure all outgoing datagrams used the intended interface.
Unsupported DHCP Features
DHCPDECLINE,DHCPRELEASE, andDHCPINFORMmessages. (See notes above.)- Requested IP Address option. (Related to notes above.)
- Unicast to hardware address.
Because DHCPLite is a Windows client application, it does not have access to the underlying network drivers that would allow it to accomplish this.
Instead, broadcast messages are used and other DHCP clients are relied upon to ignore spurious DHCP messages.
saniaowner
Блог электролампочного хамелеона ![]()
11.11.2020
27.08.2022
Windows
После прочтения названия статьи Вы спросите, мол зачем нам DHCP сервер на Windows ?
Ответов может быть несколько:
— Нет под рукой роутера
— Слишком далеко до роутера
— Я так захотел
Сферы применения данной программы решать Вам. От себя лишь добавлю что программа часто выручает когда нужно настроить камеру и протестировать устройства без дополнительного оборудования.
Скачать программу можно на оф.сайте или с моего сервера.
Краткий мануал по использованию
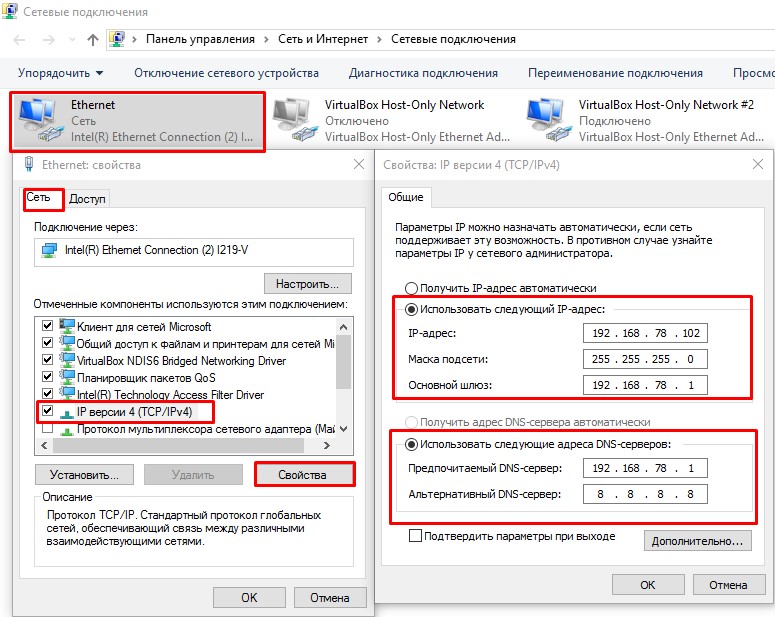
- Необходимо на интерфейсе Ethernet настроить статический IP адрес, который будет выступать в роли DHCP сервера и шлюза
- Распаковываем программу, очень желательно не на системный диск. Находим файл с названием dhcpwiz.exe, это пошаговый настройщик DHCP сервера. Нажимаем
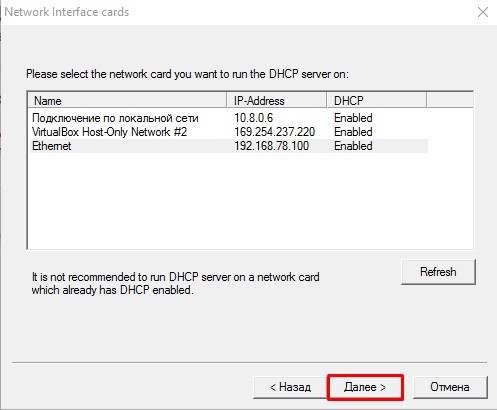
Далее - Выбираем сетевой интерфейс и нажимаем
Далее
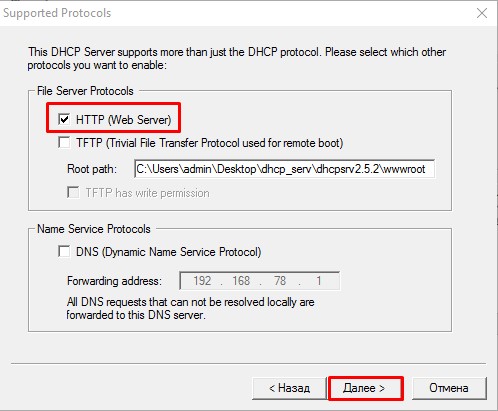
- Открывается новое окно, где нам предлагается дополнительно выбрать опцию загрузки WEB, TFTP сервера, и DNS. Выбираем HTTP (Web Server), это позволит просматривать список подключенных устройств к серверу. Затем нажимаем
Далее
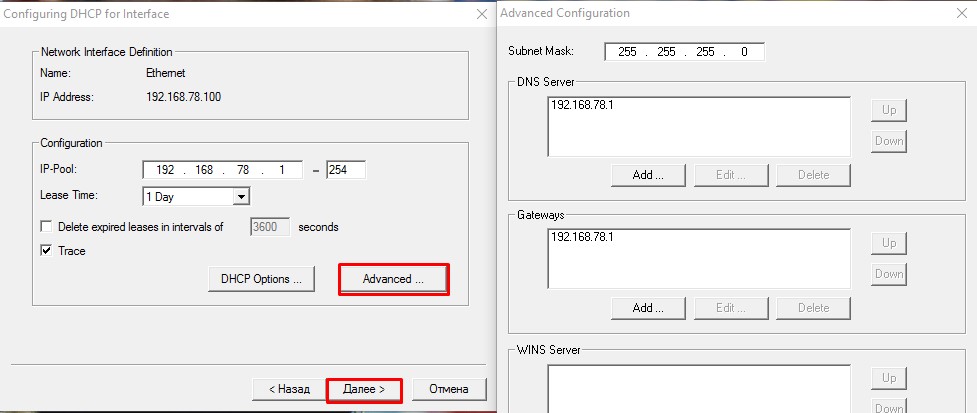
- Приступим к настройке DHCP сервера.
IP-Pool— количество IP адресов доступных для подключения. По умолчанию 253Lease Time— время жизни IP адреса. Включайте в зависимости от потребностей задачиTrace— системная трассировка
НажимаемAdvancedчтобы получить доступ к расширенной конфигурации. По умолчанию значения взяты с параметров сетевой карты ПК. НажимаемДалее
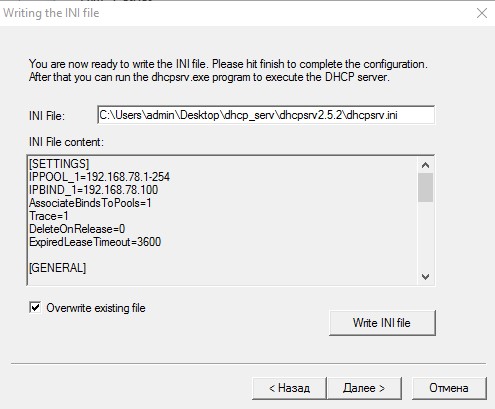
- Чтобы настройки применились отмечаем параметр
Overwrite existing file(перезаписать файл конфигурации) и подтверждаем перезапись кнопкойWrite INI file.
Снова нажимаемДалее
- Устанавливаем сервер нажатием
Installи запускаем всю эту радость кнопкойStart

- Список подключенных устройств можно посмотреть в браузере используй
localhostили127.0.0.1
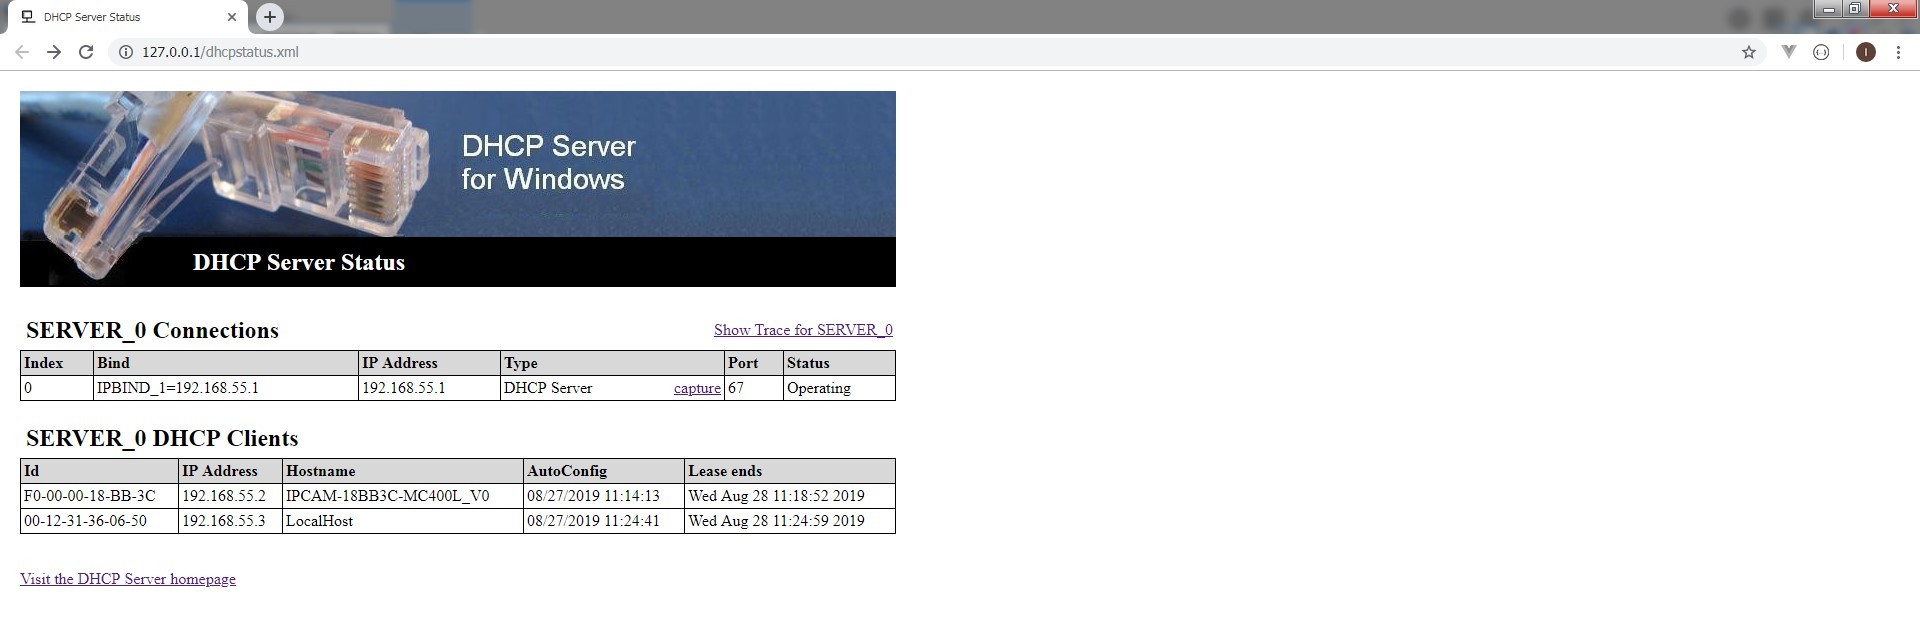
Такая вот цацка получилась:)

Данная статья описывает процедуру установки и настройки DHCP сервера на базе Windows Server 2019. В статье описаны особенности установки и настройки DHCP роли, создания областей DHCP, настройки их параметров и резервации статических адресов. Мы рассмотрим как привычный способ настройки параметров DHCP сервера через графическую консоль, так и настройку DHCP из командной строки PowerShell.
Протокол DHCP (Dynamic Host Configuration Protocol) используется для автоматического назначения сетевых настроек (IP адрес, маска подсети, шлюз, DNS сервера и т.д.) устройствам в вашей сети (компьютеры, ноутбуки, сканеры, принтеры и т.д.). Также DHCP сервер позволяет более эффективно использовать адресное пространство, избегать конфликта IP адресов в сети и централизованно управлять сетевыми параметрами на клиентских устройствах.
Содержание:
- Установка роли DHCP сервера в Windows Server 2019/2016
- Настройка DHCP областей в Windows Server
- Резервация IP адресов на DHCP сервере
- Настройка и управление DHCP сервером с помощью PowerShell
Установка роли DHCP сервера в Windows Server 2019/2016
В этом примере мы установим DHCP сервер на хосте с Windows Server 2019 и IP адресом 192.168.13.4. Вы можете использовать как Server Core версию, так и Full GUI. В маленькой инфраструктуре допустимо устанавливать DHCP сервер на сервер с ролью контроллера домена Active Directory.
Обязательно назначьте статический IP адрес серверу с ролью DHCP сервер. При установке роли DHCP из консоли PowerShell на сервере с автоматическим получением IP адреса появляется предупреждение:
Configure at least one static IP address on your computer before installing DHCP.
WARNING: The following recommended condition is not met for DHCP: No static IP addresses were found on this computer. If the IP address changes, clients might not be able to contact this server. Please configure a static IP address before installing DHCP Server.
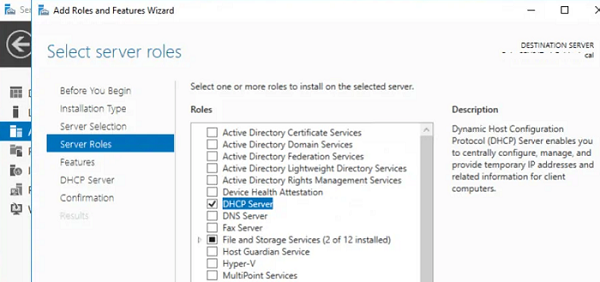
Установить роль DHCP Server можно из консоли Server Manager (Add Roles and Features -> Server Roles).
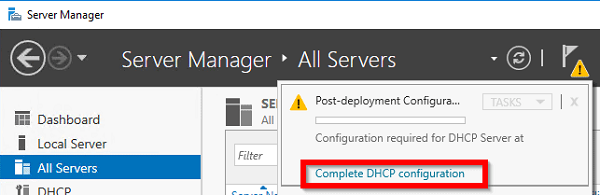
После установки роли DHCP роли нужно выполнить Post-Deployment Configuration. Для этого в консоли Server Manager щелкните по уведомлению и выберите Complete DHCP configuration.
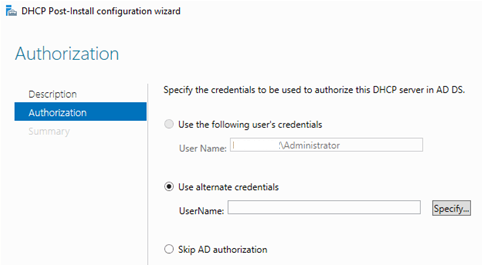
Вам будет предложено аутентифицировать новый DHCP сервер в Active Directory (экран Authorization). Для авторизации DHCP сервера в AD учетная запись должна состоять в доменной группе Enterprise Admins.
Если у вас нет прав на авторизацию DHCP в AD, вы можете указать, чтобы ваш DHCP сервер запускался без проверки авторизации в домене:
Set-ItemProperty -Path "HKLM:SYSTEMCurrentControlSetServicesDHCPServerParameters" -Name DisableRogueDetection -Value 1 -Force
Также вы можете установить и настроить DHCP роль в Windows Server из консоли PowerShell.
Установка роли DHCP:
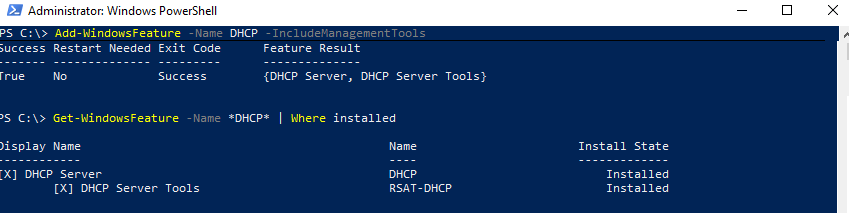
Install-WindowsFeature DHCP –IncludeManagementTools
Проверьте, что роль и инструменты управления RSAT-DHCP установлены:
Get-WindowsFeature -Name *DHCP*| Where Installed
Авторизуйте DHCP сервер в Active Directory (укажите DNS имя сервера и IP адрес, который будет использоваться DHCP клиентами):
Add-DhcpServerInDC -DnsName hq-dc01.contoso.com -IPAddress 192.168.13.4
Создайте локальные группы безопасности DHCP сервера:
Add-DhcpServerSecurityGroup
Чтобы Server Manager перестал показывать уведомление о том, что DHCP роль требует настройки, выполните команду:
Set-ItemProperty -Path HKLM:SOFTWAREMicrosoftServerManagerRoles12 -Name ConfigurationState -Value 2
Перезапустите службу DHCPServer:
Restart-Service -Name DHCPServer -Force
База данных и логи DHCP сервера находятся в каталоге
%systemroot%system32dhcp
.
- dhcp.mdb — файл базы данных сервера DHCP’;
- j50.log – транзакционный журнал (используется при восстановлении конфигурации DHCP);
- j50.chk — файл контрольной точки;
- tmp.edb — временный рабочий файл DHCP-сервера.
Настройка DHCP областей в Windows Server
После установки роли DHCP вам нужно создать DHCP области (Scopes), которые описывают диапазоны IP адресов и другие настройки, выдающиеся сервером клиентам.
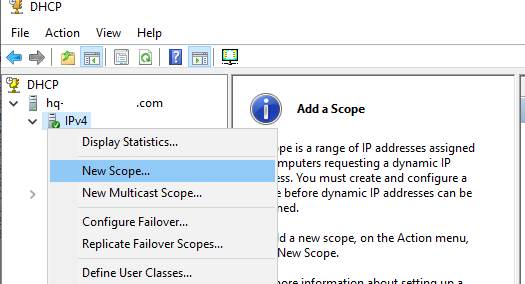
Для управления сервером DHCP используется консоль dhcpmgmt.msc (вы можете управлять DHCP сервером локально или с удаленного компьютера с установленным RSAT). Запустите консоль DHCP, разверните ваш сервер -> IPv4.
Чтобы создать новую область выберите New Scope.
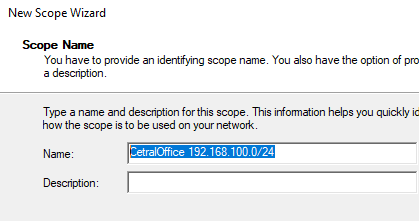
Укажите название DHCP области.
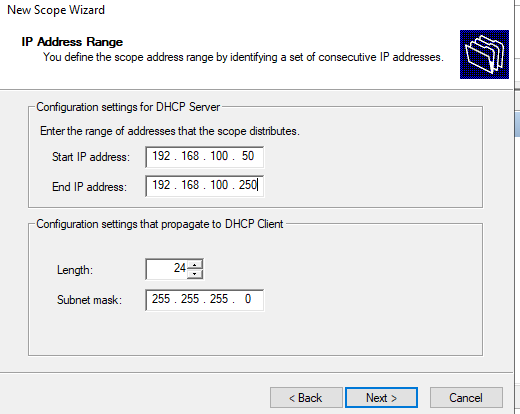
Укажите диапазон IP адресов, который будет выдаваться этой областью и маску сети. В этом примере я хочу использовать эту DHCP область для обслуживания подсети 192.168.100.0/24. В рамках этой сети DHCP сервером будет назначаться динамические IP адреса из диапазона 192.168.100.50 — 192.168.100.250. В следующем окне можно добавить исключения в этот диапазон (Add Exclusions and Delay).
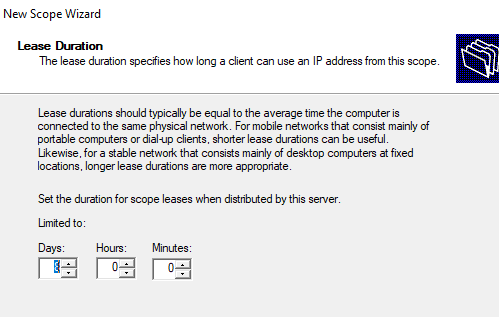
Далее нужно указать длительность аренды (Lease Duration) IP адреса DHCP клиентом (по умолчанию 8 дней, менять без особой необходимости не нужно).
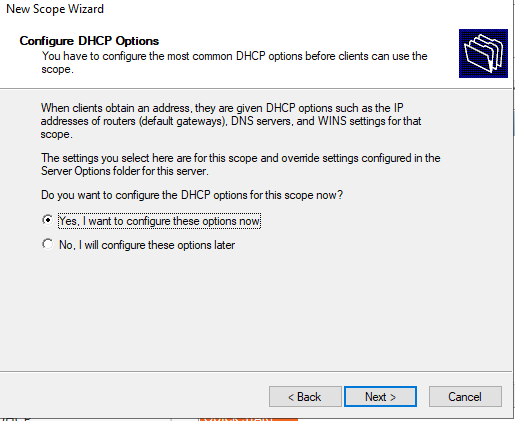
Укажите, что вы хотите настроить дополнительный параметры DHCP области.
 .
.
Укажите IP адрес шлюза в подсети, который должен назначаться клиентам (в нашем примере это 192.168.100.1).

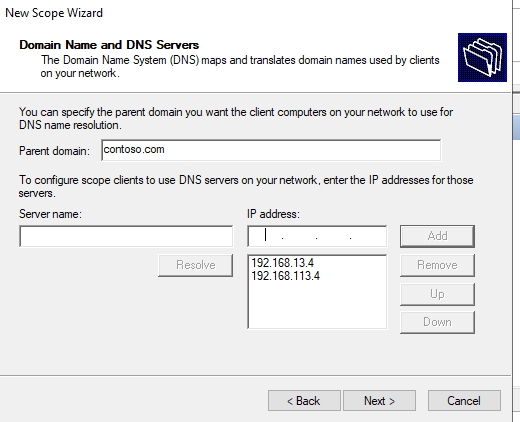
Затем укажите имя домена и адреса DNS серверов, которые будут назначены клиентам DHCP.
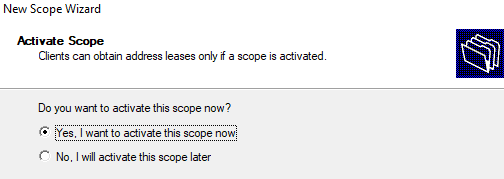
Осталось активировать DHCP область (разрешить ей обслуживать клиентов).
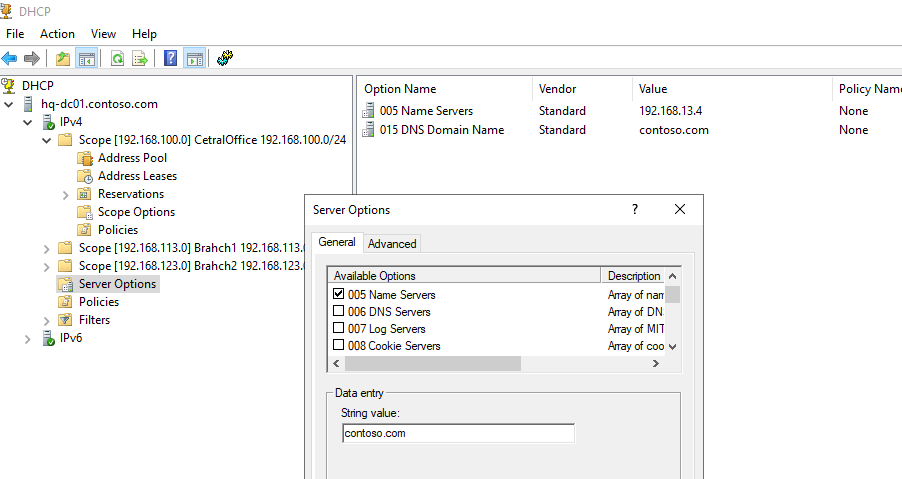
DHCP сервер может выдавать клиентам различный настройки (кроме IP адреса). Для этого используются Scope Options.
В Windows Server DHCP можно настроить глобальные настройки области или Scope Options для каждой области.

Ранее мы уже настроили три опции области:
-
003 Router -
006 DNS Server -
015 DNS Domain Name
Можно добавить и другие опции (NTP сервера, PXE и т.д.).
В разделе Server Options DHCP сервера можно настроить глобальные опции, которые будут наследуются всеми областями. Но вы можете переопределить глобальные настройки в настройках каждой области (опции области имеют приоритет над опциями сервера).
Один DHCP сервер может обслуживать сотни удаленных подсетей и VLAN. Поэтому вы можете создать на нем несколько областей. Главное, чтобы в каждой из подсетей был настроен ретранслятор (DHCP relay agent), который пересылает широковещательные DHCP-запросы на указанный DHCP сервер. В терминах Cisco DHCP ретранслятор называется ip helper. Вы можете настроить DHCP Relay даже на Windows Server.
Протокол DHCP в качестве транспорта использует протокол UDP. Пакеты от клиента к серверу передаются по порту 67 UDP, обратно через UDP 68
Резервация IP адресов на DHCP сервере
По умолчанию DCHP сервер выдает клиентам динамические адреса. Это означает что IP адрес у любого клиента может меняться. Если вы хотите, чтобы определенные устройства всегда получали от DHCP сервера один и тот же адрес, вы можете его зарезервировать (например, для сетевых принтеров, которые настроены у пользователей).
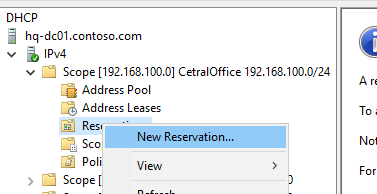
Для DHCP резервации выберите область и перейдите в секции Reservation. В меню выберите New Reservation.
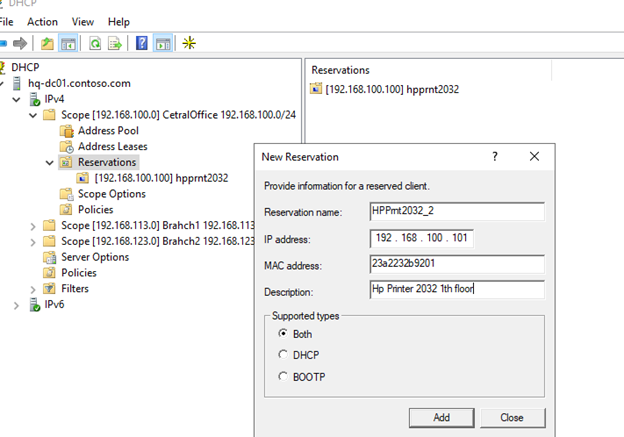
При создании резервации нужно указать IP адрес, который нужно сохранить за клиентом и его MAC адрес (уникальное значение). MAC адрес в Windows можно получить из результатов команды
ipconfig /all
или с помощью PowerShell
get-netadapter|select name,macaddress
). Опционально можно указать имя и описание устройства.
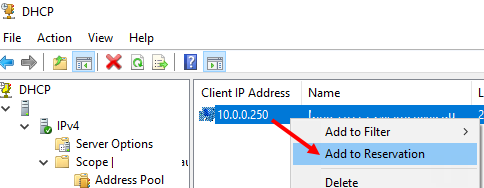
Также вы можете зарезервировать текущий динамический адрес за устройством, найдя его в разделе Address Leases. Щелкните по устройству и выберите Add to Reservation.
Настройка и управление DHCP сервером с помощью PowerShell
Все операции по настройке и управлению DHCP сервером на Windows Server 2019/2016 можно выполнять из консоли PowerShell. Рассмотрим основные команды управления DHCP. Для этого используется модуль DHCPServer. Импортируйте модуль в сессию:
Import-Module DHCPServer
Вывести полный список командлетов в моделе DHCP можно так:
Get-Command -Module DHCPServer

Следующая команда выведет список авторизованных DHCP серверов в Active Directory:
Get-DhcpServerInDC

Вывести список DHCP областей на указанном сервере:
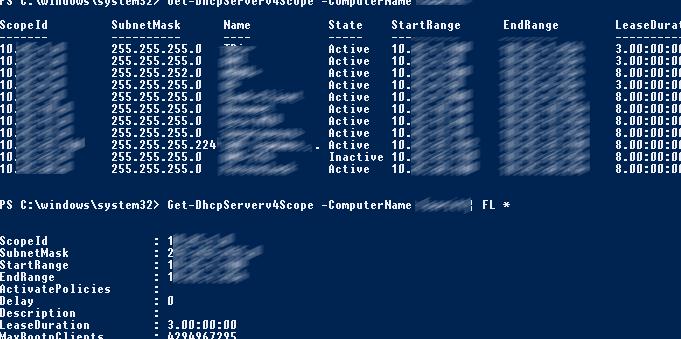
Get-DhcpServerv4Scope –ComputerName msk-dhcp1
Если нужно показать все параметры области (Delay, Description, Name и т.д.):
Get-DhcpServerv4Scope –ComputerName msk-dhcp1| FL *
Если нужно отобразить данные о IPv6 областях:
Get-DHCPServerv6Scope
Получить настройки для конкретной области:
Get-DhcpServerv4Scope –ComputerName msk-dhcp1 –ScopeID 10.10.1.0
Создадим новую (неактивную) область с диапазоном адресов с 192.168.113.50 до 192.168.113.250:
Add-DhcpServerv4Scope -Name “Brahch1 192.168.113.0” -StartRange 192.168.113.50 -EndRange 192.168.113.250 -SubnetMask 255.255.255.0 -State InActive
Настроить следующие параметры DHCP сервера: DNS сервер, домен и адрес шлюза по-умолчанию:
Set-DhcpServerv4OptionValue -ScopeID 192.168.113.0 -DnsDomain contoso.com -DnsServer 192.168.13.4 -Router 192.168.113.1
Добавить исключения в DHCP область:
Add-DhcpServerv4ExclusionRange -ScopeID 192.168.113.0 -StartRange 192.168.113.90 -EndRange 192.168.113.100
Активировать DHCP область:
Set-DhcpServerv4Scope -ScopeID 192.168.113.0 -State Active

Для удобства можно использовать такую команду PowerShell при создании новой области:
$HashArgs = @{
'Name' = 'EKB Office Scope';
'Description' = 'workstations';
'StartRange' = '192.168.140.10';
'EndRange' = '192.168.140.200';
'SubnetMask' = '255.255.255.0';
'State' = 'Active';
'LeaseDuration' = '1.00:00:00';
}
Add-DhcpServerv4Scope @HashArgs
Опции для DHCP сервера добавляется так (к примеру, WPAD):
Add-DhcpServerv4OptionDefinition -ComputerName msk-dhcp1 -Name WPAD -OptionId 252 -Type String
Вывести список настроенных опций DHCP сервера можно так:
Get-DHCPServerv4OptionValue -ComputerName msk-dhcp1 | Format-List
Выведем список настроенных параметров зоны:
Get-DHCPServerv4OptionValue -ComputerName msk-dhcp1 -ScopeId 10.10.1.0 | Format-List
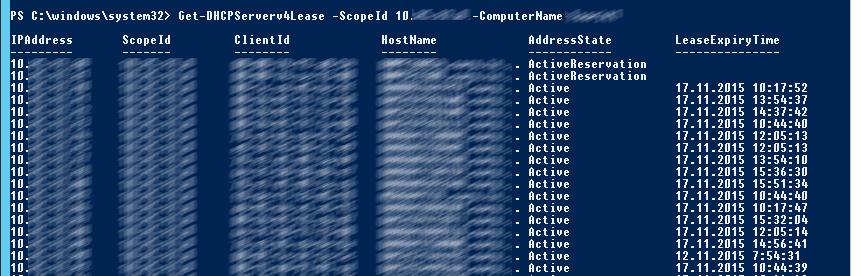
Показать текущий список арендованных адресов для области 10.10.1.0:
Get-DHCPServerv4Lease -ScopeId 10.10.1.0 -ComputerName msk-dhcp1
Создать DHCP резервацию для клиента, которому назначен динамический IP адрес 10.10.1.88 (конвертировать выданный адрес в зарезервированный):
Get-DhcpServerv4Lease -ComputerName msk-dhcp1 -IPAddress 10.10.1.88| Add-DhcpServerv4Reservation -ComputerName msk-dhcp1
Можно массово зарезервировать IP адреса для компьютеров по списку из csv файла. Для этого создайте текстовый файл в формате:
ScopeId,IPAddress,Name,ClientId,Description
10.10.1.0,10.10.1.88,Client1,ba-ab-5c-3d-4e-6f,Reservation PC-msk-s1
10.10.1.0,10.10.1.89,Client2,ba-ab-5c-5d-2e-3f,Reservation PC-msk-s2
Сохраните файл с именем
c:dhcpDHCPReservations.csv
и запустите следующую команду, которая импортирует данные из csv файла и создаст DHCP резервации для клиентов:
Import-Csv –Path c:dhcpDHCPReservations.csv | Add-DhcpServerv4Reservation -ComputerName msk-dhcp1
Отключить область на DHCP сервере:
Set-DhcpServerv4Scope -ComputerName msk-dhcp1-ScopeId 10.10.1.0-State InActive
Удалить область с DHCP сервера:
Remove-DHCPServerv4Scope -ComputerName msk-dhcp1-ScopeId 10.10.1.0 -Force
Возможно получить статистику DHCP сервера (количество областей, резерваций, процент использования адресов и пр.).
Get-DhcpServerv4Statistics -ComputerName msk-dhcp1
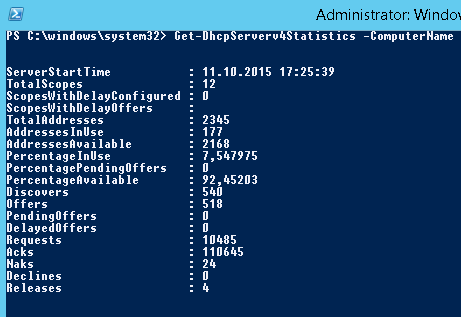
Аналогичная информация для конкретной области может быть получена с помощью командлета Get-DhcpServerv4ScopeStatistics.
Конфигурацию DHCP сервера можно экспортировать в указанный XML файл с помощью команды:
Export-DHCPServer -ComputerName msk-dhcp1 -File C:dhcpdhcp-export.xml
Совет. Заданием с такой командой в планировщике задач можно реализовать регулярное резервное копирование конфигурации DHCP сервера.
В дальнейшем эти настройки DHCP сервера можно импортировать (перенести) на другой DHCP сервер:
Import-DHCPServer -ComputerName msk-dhcp2 -File C:dhcpdhcp-export.xml -BackupPath C:dhcpbackup
Table of Contents
- Summary
- Objective
- Installation Procedure
- Install using PowerShell
- Install Using GUI
- DORA (Discover, Offer, Request Acknowledgment)
Summary
This article is about Dynamic Host Configuration Protocol (DHCP) is to assign network settings automatically to every workstation in the network by a central server rather than configuring them locally on each. A host configured
to use DHCP is enabled to configure itself completely and automatically according to directions from the server.
Objective
Main Functionality of DHCP server is to provide clients auto IP Address, Subnet mask, DNS Address and Gateway Address whenever clients request in the network in auto-configure mode. This document provides information on How to
install & Configure DHCP Server.
Installation Procedure
There are two methods of installation DHCP Server feature in the server manager.
- Install using PowerShell
- Role & Feature-based Installation
Install using PowerShell
DHCP role can be installed using the PowerShell. It is a command line interface for running command to perform the installation with minimal resources, the same installation which can be done in GUI based environment can be done
in PowerShell.
Follow the below instructions. Click the Windows button, then Windows PowerShell folder and Windows PowerShell as shown in the diagram.

The other way to open PowerShell is to click Windows button, then Server Manager and from the Server Manager window click the tools and select Windows PowerShell.

Write down the command add-WindowsFeature –IncludeManagementTools dhcp This will install the DHCP role with the following output.

Install Using GUI
To install the DHCP role in a GUI environment using the following instructions.
To start installation first click the Windows button and then Server Manager.

OIn the Server Manager window click Dashboard and then click Add roles and features.

In the Add roles and features Wizard, click Next.

Note: Read out the information on the screen that is relevant to the installation of roles and windows sever requirements.
First Select the installation type as role-based or feature-based installation as shown in the following diagram then click on Next.

Select the server from the server pool on which you are going to install the role as shown in following window then click Next.

In next screen you can select multiple roles here we will Click on DHCP Server then a new window appears which show that required tools to be added click on Add Feature.

Click Next to go to next step.

Click Next.

First click on the checkbox. Restart the destination server automatically if required, then click Yes and in the last click Install to start the installation process.

When the feature installation succeeded message shown under the progress bar Then click on Close to exit from the wizard.

After installation of the DHCP role, the next section is configuration, how and what IP addresses range to use, which gateway router and DNS server may be used and for how much time it should be used. Now to open DHCP Console
go to Window Button on the taskbar then click Server Manager.

In the server manager window Click on Tools then DHCP to open the DHCP configuration console.

DHCP scope has a valid range of IP addresses pool to be given to clients by leasing, the mac address reservation, exclusion and other scope option can be done. Further information is shared as follows with stepwise actions. In
the DHCP console right click on IPV4 then click on New Scope…to create a new scope.

The new scope wizard helps you set up scope for distributing IP addresses to network computers in the network. To continue further Click Next.

Here we define the scope name that will identify the scope. First, enter the Name of the scope the click Next.

Enter the range of IP address that client will have assigned as in the following diagram. The Length and Subnet mask can be customized also according to requirements. Click Next.

If there is an IP address that comes in the range of IP address given in DHCP server can be excluded by adding the range of IP addresses. Click Next.

The lease duration specifies how long a client can use an IP address from this scope. The default is 8 days time for leasing one IP address, this time is customization. Set the lease duration time then click Next.

If you have some other options like DNS servers WiNS you can add it here by choosing Yes radio button. Then click Next.

Here we can specify the routers, default gateways to be distributed by this scope. Enter the IP address of the Router or Gateway by typing the IP address in a text box, then click the Add button.

Now the IP address is added now click Next to continue to next step.

Enter the DNS server IP addresses according to set up that we want our client to use. Then click Next.

If there is no DNS server in the network the WINS server can be used, which convert the NetBIOS computer name to IP address. Enter the WINS server IP addresses according to your setup. Then click Next.

After almost creation of the scope at this step, the scope needs to be activated that clients can obtain address leases only if a scope is activated. Chose Yes, I want to activate this scope now then click Next to go to the last step.

The completing the new scope wizard show you have successfully completed the new wizard scope On successful configuration of scope click Finish.

The Scope is created and activated as well as shown in the following diagram.

DORA (Discover, Offer, Request Acknowledgment)
The process of obtaining automatic IP address on DHCP client.
- DHCPDiscover: whenever the computer turned on connected to LAN send a broadcast message and look for the DHCP server.
- DHCPOffer: when the DHCP server receives the Discover message, the DHCP server sends a broadcast message to the client that I have an offer(TCP/IP configuration) for you.
- DHCPRequest: when the client receives the offer broadcast then it sends a request that I am ready to accept the offer (TCP/IP configuration).
- DHCPACK: the request is entertained by DHCP server and sends an acknowledgment broadcast that you got it (TCP/IP configuration) but it will be with lease duration. The default lease duration is 8 days when 50%
of the time is consumed the DHCP client request DHCP server unicast the to renew the lease duration.
Further readings:-https://docs.microsoft.com/en-us/windows-server/networking/technologies/dhcp/dhcp-top
DHCP-сервер — это сервер протоколов для сетей TCP / IP, который предоставляет IP-адреса другим компьютерам. DHCP-сервер для Windows также поддерживает протоколы TFTP, DNS и HTTP, что делает хороший пакет для простых и простых в установке сетей, например, для удаленной загрузки и других целей. DHCP-сервер работает во всех операционных системах Windows с Win32, начиная с Windows 95 до Windows 7.
DHCP-сервер назначает IP-адреса клиентским компьютерам. Это очень часто используется в корпоративных сетях для сокращения усилий по настройке. Все IP-адреса всех компьютеров хранятся в базе данных, которая находится на сервере.
Это очень простая и простая в использовании реализация DHCP-сервера для систем на базе Windows, поддерживающая все операционные системы Windows от Windows 98 до Windows 7.
Данные конфигурации, а также клиентская «база данных» хранятся в INI-файле. Смотрите описание файла INI. DHCP-сервер работает мгновенно без установки в качестве службы или приложения. Смотрите запуск DHCP-сервера.
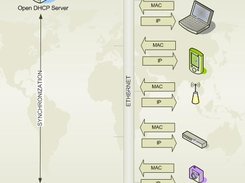
DHCP-сервер назначает IP-адреса нескольким клиентам
Скачать сейчас, это бесплатно.
Новейшая версия V2.1, V2.0, V1.9, V1.8, V1.7, V1.6, V1.5, V1.4
DHCP-сервер — это бесплатное программное обеспечение: его можно использовать и распространять как в учебных, так и в коммерческих целях абсолютно бесплатно. Там нет лицензионных отчислений или GNU-подобных ограничений «copyleft». Нет никаких требований, таких как сообщения об авторских правах или логотипы, связанные с использованием программного обеспечения. Программное обеспечение предоставляется «как есть», без каких-либо гарантий.
Вы можете пожертвовать на мой счет PayPal все, что, по вашему мнению, стоит программного обеспечения.