1. Resizing guest disk
General considerations
When you resize the disk of a VM, to avoid confusion and disasters think the process like adding or removing a disk platter.
If you enlarge the hard disk, once you have added the disk plate, your partition table and file system knows nothing about the new size, so you have to act inside the VM to fix it.
If you reduce (shrink) the hard disk, of course removing the last disk plate will probably destroy your file system and remove the data in it! So in this case it is paramount to act in the VM in advance, reducing the file system and the partition size. SystemRescueCD comes very handy for it, just add its iso as cdrom of your VM and set boot priority to CD-ROM.
Shrinking disks is not supported by the PVE API and has to be done manually.
Another page (deleted) with overlapping content was Resizing disks | Archive
qm command
You can resize your disks online or offline with command line:
qm resize <vmid> <disk> <size>
exemple: to add 5G to your virtio0 disk on vmid100:
qm resize 100 virtio0 +5G
For virtio disks:
Linux should see the new size online without reboot with kernel >= 3.6
Windows should see the new size online without reboot with last virtio drivers.
for virtio-iscsi disk:
Linux should see the new size online without reboot with kernel >= 3.7
Windows should see the new size online without reboot with last virtio drivers.
2. Enlarge the partition(s) in the virtual disk
Depending on the installed guest there is several diffent ways to resize the partions
Offline for all guests
Use gparted or similar tool (recommended)
In gparted and possibly most other tools, LVM and Windows dynamic disc is not supported
Boot the virtual machine with gparted or similar tool, enlarge the partion and optionally the file system. With som linux clients you often need to enlarge the extended partion, move the swappartion, shrink the extended partion and enlarge the root partion. (or simple delete the swap and partion andre create it again — but remember to activwate the swap agin (last step).
Gparted have some warnings about some specific operations not well supported with windows guest — outside the scope of this document but read the warnings in gparted.
Online for Windows Guests
- Guest is Windows 7, Windows Vista or Windows Server 2008
- logon as administrator and extend the disk and filesystem (Using Disk manager)
- For more info www.petri.co.il/extend-disk-partition-vista-windows-server-2008.htm
- Guest is Windows 10: logon as administrator and extend the disk and filesystem (Using Disk manager). If you do not see the ability to extend the disk (i.e. nothing seems to have happened as a result of using the resize command), go to the Windows command prompt and do a: shutdown -s -t 0 (This is a «normal» shutdown, as opposed to the «fast» shutdown that’s the default for Win 8 and onwards.) After a reboot, you’ll now see the ability to expand the disk.
Online for Linux Guests
Here we will enlarge a LVM PV partition, but the procedure is the same for every kind of partitions.
Note that the partition you want to enlarge should be at the end of the disk.
If you want to enlarge a partition which is anywhere on the disk, use the offline method.
- Check that the kernel has detected the change of the hard drive size
(here we use VirtIO so the hard drive is named vda)
dmesg | grep vda
[ 3982.979046] vda: detected capacity change from 34359738368 to 171798691840
- Print the current partition table
fdisk -l /dev/vda | grep ^/dev
GPT PMBR size mismatch (67108863 != 335544319) will be corrected by w(rite).
/dev/vda1      34     2047     2014 1007K BIOS boot
/dev/vda2    2048   262143   260096  127M EFI System
/dev/vda3  262144 67108830 66846687 31.9G Linux LVM
- Resize the partition 3 (LVM PV) to occupy the whole remaining space of the hard drive)
parted /dev/vda
(parted) print
Warning: Not all of the space available to /dev/vda appears to be used, you can
fix the GPT to use all of the space (an extra 268435456 blocks) or continue
with the current setting?
Fix/Ignore? F
(parted) resizepart 3 100%
(parted) quit
- Check the new partition table
fdisk -l /dev/vda | grep ^/dev
/dev/vda1      34      2047      2014  1007K BIOS boot
/dev/vda2    2048    262143    260096   127M EFI System
/dev/vda3  262144 335544286 335282143 159.9G Linux LVM
3. Enlarge the filesystem(s) in the partitions on the virtual disk
If you did not resize the filesystem in step 2
Online for Linux guests with LVM
Enlarge the physical volume to occupy the whole available space in the partition:
pvresize /dev/vda3
Enlarge the logical volume and the filesystem (the file system can be mounted, works with ext4 and xfs)
lvresize --size +20G --resizefs /dev/xxxx/root #This command will increase the partition up by 20GB
lvresize --extents +100%FREE --resizefs /dev/xxxx/root #Use all the remaining space on the volume group
Online for Linux guests without LVM
Enlarge the filesystem (in this case root is on vda1)
resize2fs /dev/vda1
Over time a guest’s *.qcow2 disk files can grow larger than the actual data stored within them, this happens because the Guest OS normally only marks a deleted File as zero, it doesn’t gets actually deleted (performance reasons), so the underlying qcow2 file cannot differentiate between allocated and used and allocated but not used storage.
In order to shrink the *.qcow2 files you’ve two options, enable TRIM support or zero out all free space of the partitions contained within the guest and then reconvert the image with qemu-img.
IMPORTANT WARNING: Always have offsite backups ready, you never know!
Recommended Solution
The recommended version is to pass TRIM commands (known from SSDs) from the VM to the backing storage. This has the advantage that it works automatically, does not need to write the whole free parts of all disks to zero and must only be setup once.
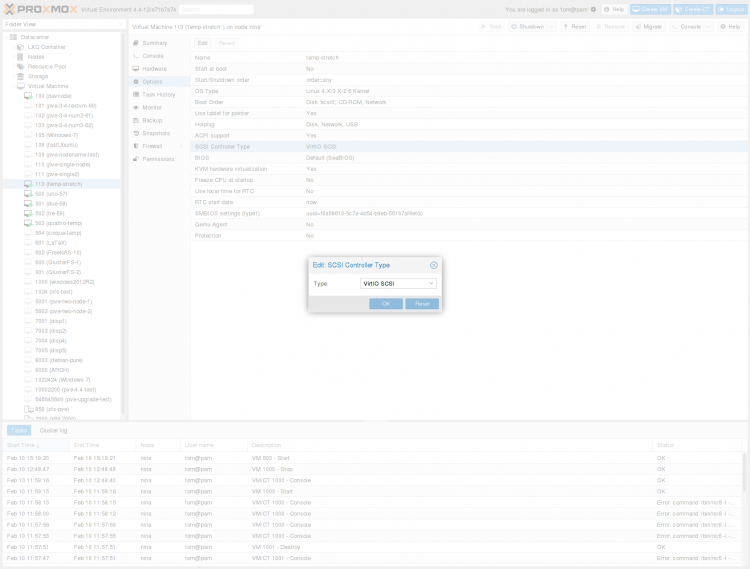
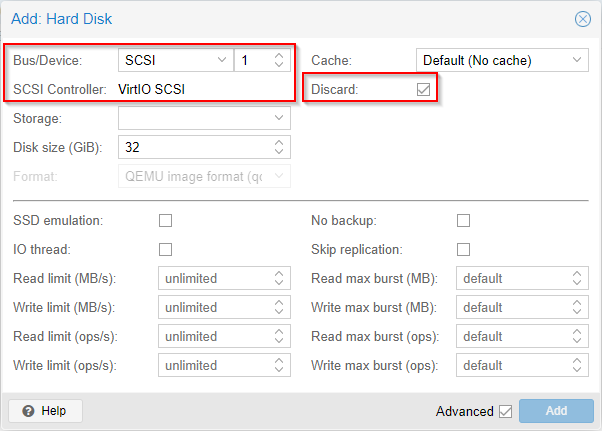
PVE Configuration
Requirements:
- Thin-provisioned backing storage (qcow2 disk, thin-lvm, zfs, …)
- Virtio-SCSI controller configured on guest.
- Guest scsi* disks with the discard option enabled
- See Qemu trim/discard and virtio scsi for configuration details.

Linux Guest Configuration
Modern Linux guest systems can use the well known fstrim command to trim a device and free all unused storage on the underlying device:
fstrim -av
Many modern Linux distributions have already setup a timer or cron job which executes a TRIM about once a week.
Windows Guest Configuration
For those Windows versions which support TRIM (Win7/2008R2 and up should be supported, see this) you should not have to setup anything, Windows should periodically trigger a TRIM to the disks.
You can see if TRIM is enabled with:
fsutil behavior query DisableDeleteNotify
This should output 0 (zero) else set it with:
fsutil behavior set DisableDeleteNotify 0
Manual Solution
This solution is no longer necessary and is only needed on Windows XP and earlier and older Linux distributions that don’t support fstrim.
Windows Guest Preparation
These steps are all performed within the Windows guest.
- Defragment your Windows guest’s drives either by using the built in defragment program or a 3rd party one such as Defraggler or UltraDefrag.
- Zero out the free space either using SDelete (recommended) or Eraser (using British HMG IS5 (Baseline) (1 pass)).
Zero Using SDelete
- Download SDelete and save it somewhere on your system (eg.
C:windowssystem32). - Run SDelete and zero free space:
sdelete -z
- If there is more than one partition, then for eg., drive E:, use:
sdelete -z e:
Linux Guest Preparation
Use the following command to zero out your disk:
dd if=/dev/zero of=/mytempfile
# that could take a some time
rm -f /mytempfile
Shrink the Disk File
- Shut down the VM.
- Log into the Proxmox node and go to the VM’s disk storage directory.
- IMPORTANT: Create a backup of your existing VM disk file:
cp image.qcow2 image.qcow2_backup
- Option #1: Shrink your disk without compression (better performance, larger disk size):
qemu-img convert -O qcow2 image.qcow2_backup image.qcow2
- Option #2: Shrink your disk with compression (smaller disk size, takes longer to shrink, performance impact on slower systems):
qemu-img convert -O qcow2 -c image.qcow2_backup image.qcow2
- Example: A 50GB disk file I shrank without compression to 46GB, but with compression to 25GB. Time to compress was almost twice as long as an uncompressed shrink.
- Boot your VM and verify all is working.
- When you verify all is well, it should be safe to either delete the backup of the original disk, or move it to an offline backup storage.
Увеличить раздел жесткого диска в Proxmox можно прямо из графического интерфейса, но вот уменьшить его можно только с помощью консоли.
Странно, что разработчики Proxmox не предусмотрели возможность изменение жесткого диска виртуальной машины в обратную сторону. Увеличить можно легко, а уменьшить — нет!
Все команды по уменьшению жесткого диска в Proxmox, выполняются непосредственно на машине-гипервизоре. Чтобы изменить раздел на жестком диске, нужно знать ID контейнера или ID виртуальной машины.
Нужно понимать, что все процедуры с уменьшением жесткого диска виртуальной машины на Proxmox, нужно делать после освобождения места на разделе виртуальной машины. Если мы хотим у виртуальной машины «отрезать» 20 Gb жесткого диска, то у виртуальной машины должно быть неразмечено 20Gb. В обратном случае все сломается и виртуальная машина не сможет запуститься.
Если жесткий диск виртуальной машины был расширили больше чем планировался, то уменьшить его легко можно командами ниже.
Уменьшаем размер HDD виртуальной машины в Proxmox
Для этого нам поможет команда qemu-img с параметром resize. К выполнению команды стоит отнестись очень серьезно, так как любое действие является необратимым. Необдуманное выполнение команд, приведет к проблемам.
В приведенных примерах ниже, мы изменяем размер жесткого диска в Proxmox для виртуальной машины с ID — 100. У Вас этот номер может быть другим.
Уменьшить на 20Gb
qemu-img resize /var/lib/vz/images/100/vm-100-disk-0.raw -20GЗдесь ключевой символ – — отнимаем от раздела 20Gb.
Увеличить на 20Gb
qemu-img resize /var/lib/vz/images/100/vm-100-disk-0.raw +20GЗдесь ключевой символ + — добавляем разделу 20Gb.
Сделать ровно 200Gb
qemu-img resize /var/lib/vz/images/100/vm-100-disk-0.raw 200GТеги: proxmox
и сервер Linux
Комментарии
У вас Гипервизор Proxmox и вы создали образ диска для гостевой виртуальной машины больше чем нужно. Со временем машина стала разрастаться, но вы вовремя это заметили и удалили данные внутри нее. Теперь задачка стоит как “сжать контейнер qcow2 виртуального диска”. Не проблема.
Дисклеймер: всегда делайте резервные копии, мало ли что!
Со временем файлы гоcтевых *.qcow2 дисков могут начать занимать больше места чем фактические данные, которые они хранят. Это происходит потому, что гостевые системы при удалении файлов обычно просто помечают их нулями, но не удаляют их по факту (по причинам производительности). Поэтому в содержащим данные qcow2 файле не видно разницы между распределенным и используемым и распределенным и неиспользуемым пространством.
Для того чтобы сжать *.qcow2 файл есть два выхода: включить поддержку TRIM или пометить нулями все свободное пространство гостевой системы, а затем переконвертировать образ диска с помощью qemu-img.
Рекомендуемый план действий:
- Добиваетесь, чтобы нужный диск был корректно подключен в Proxmox
- Запускаете на гостевой машине TRIM вместе с оптимизацией пространства
- PROFIT!
Рекомендуемое решение через использование TRIM
Решать проблему рекомендуется передачей команд TRIM (которые используются при работе с SSD) из VM в хранилище гипервизора. Преимущества такого подхода в том, что он работает в автоматическом режиме, не требует перезаписи всех свободных разделов всех дисков и настраивается только единожды.
Конфигурация PVE
Требования:
- Хранилище гипервизора должно быть thin-provisioned, то есть это должен быть qcow2 диск или thin-lvm или zfs …
- Диск должен быть подключен на гостевую систему через Virtio-SCSI контроллер
- На гостевых scsi* дисковых контейнерах должна быть включена опция discard
Нужны подробности? Посмотрите: Qemu trim/discard and virtio scsi
Еще раз. Чтобы все сработало, ваш диск должен быть подключен к гипервизору по шине SCSI к контроллеру Virtio SCSI и для него должна быть включена опция Discard:
Конфигурирование гостевых ОС Linux
Для того чтобы запустить TRIM и освободить все неиспользуемое пространство в современных ОС Linux используется распространенная команда:
fstrim -av
Большинство современных дистрибутивов Linux изначально имеют преднастроенный таймер cron, который выполняет TRIM примерно раз в неделю.
Конфигурирование гостевых ОС Windows
Для систем которые поддерживаю TRIM (Win7/2008R2 и позднее) ничего настраивать не нужно. Windows сама периодически запускает TRIM
Проверить, включен ли TRIM в ОС Windows
Можно командой:
fsutil behavior query DisableDeleteNotify
Она должна возвратить 0 если TRIM включен:
fsutil behavior set DisableDeleteNotify 0
Ручной запуск TRIM на ОС Windows
Запустить TRIM и очистку Windows вручную возможно через Powershell командой:
Optimize-Volume -DriveLetter БУКВА_ВАШЕГО_ДИСКА -ReTrim -Verbose
Где вместо БУКВА_ВАШЕГО_ДИСКА надо подставить соответственно букву диска который вы хотите оптимизировать.
Решение вручную
Этот путь больше не рекомендуется и может использоваться для устаревших систем типа Windows XP и более ранних и старых дистрибутивов Linux которые не поддерживают fstrim.
За ручным вариантом решения прочитайте официальную документацию Proxmox: https://pve.proxmox.com/wiki/Shrink_Qcow2_Disk_Files
Возможные проблемы и их решение
Виртуальный диск гостевой системы Proxmox всегда можно отключить и подключить заново с нужными параметрами. Для этого придется погасить виртуальную машину.
Ваш виртуальный диск был изначально подключен не по шине SCSI
В этом случае после включения гостевая ОС Windows может не загрузиться, так как не найдет драйверов SCSI.
Вам потребуется выключить машину, подключить новый SCSI диск любого размера и скачать и подключить диск с Virtio драйверами для гостевых систем. Затем нужно загрузить гостевую ОС в работающем режиме и установить SCSI драйвер для нового подключенного SCSI диска. После этого снова выключить гостевую машину, перевести “боевой” диск на SCSI и гостевая Windows запустится.
Ссылки
https://pve.proxmox.com/wiki/Shrink_Qcow2_Disk_Files
https://winaero.com/trim-ssd-windows-10/
Hello World,
Lately, as you might have noticed, I’m focusing on KVM Virtual machines running Windows operating systems (the recent versions). This post will again focus on KVM virtual machines. We will talk about resizing virtual disks.
It might happen that your virtual machine is running out of space or that you have provisioned too much disk space and you want to change this. This operation can be performed within a Proxmox VE (PVE) infrastructure but only from the command line (the Web interface does not provide this option yet – maybe in version 2.0)
The resizing process is basically a 2-step process and the order of these steps are different if you are increasing or shrinking the size of the disk.
To increase the size of the disk, you will perform the actions in the following order
- increase the size of the virtual disk (through the command line)
- Then, you will increase the size of the partition within the Operating system in order to reflect the changes in disk size.
To Shrink the size of the disk, you will perform the actions in the following order
- first,you will shrink the size of the partition within the Operating system in order to reflect the changes in disk size.
- and then you will reduce the size of the virtual disk (through the command line)
Resizing the Virtual Disk file- How To
Let have a look to the first part of the process.
Step 1 – Backup your Virtual Machine
Before performing this operation, you should first backup your virtual machine in case something goes bad – shouldn’t but you never know 🙂
Step 2 – Power off your Virtual Machine
You should power off your virtual machine before applying changes. This ensures that the modifications are committed correctly by the PVE infrastructure.
Step 3 – Resizing the virtual disk
As mentioned earlier, to perform this change, you need to go through the command line (no GUI available yet). You will need to connect to the PVE Console locally or remotely via putty for example. From the console, if you type the following command
qemu-img –help

Click to enlarge
You will see a list of supported options. If you have a recent Proxmox VE installation, you will see an option called resize. As the name implies, using this option will allow you to increase or shrink the size of the virtual disk in qcow2,raw or vmdk format. (that’s cool all supported format used by PVE). The command can be used as follow
qemu-img resize <%location of the file%> +| – <%size%>
Note : Wait before using this command – read this till end !!
Step 4 – Checking news the virtual disk size
You can use the ls –lh command to check that the file has been modified accordingly.
![]()
Click to enlarge
Or you can use the qemu-img info <%name of the virtual disk file%> to check that the file has been resized as required.

Click to enlarge
All in all the process is really not too difficult and you should be able to resizing disks image file as needed. Before closing this post, I thought that having practical examples might be useful.
Practical Examples
Example 1 – Increasing disk size
In this scenario, we have a virtual machine with the VMID 111 that has a c: drive partition set to 20 GB. We need to increase the size of the partition to 25 GB.

Click to enlarge
We shutdown the virtual machine and as described earlier, I’ll make a console connection (through putty) to the PVE host. I go to the folder holding all my virtual disks files (by default, all the virtual disks are located in /var/lib/vz/images) and then cd to the folder holding the virtual disk I want to resize. (In my case the vmid is 111 – view screenshot)
![]()
Click to enlarge
I need to increase the size of the disk up to 25 GB. I basically need to add 5 GB to the initial file. I’ll then type the following command
qemu-img resize vm-111-disk-1.raw +5GB
![]()
Click to enlarge
I can now reboot the virtual machine and you will see that the disk size has been set to 25 GB within the Operating system

Click to enlarge
Example 2 – Shrinking disk size
In this scenario, we have a virtual machine with the VMID 111 that has a c: drive partition set to 25 GB. We need to decrease the size of the partition to 20 GB.

Click to enlarge
Note :
You will first need to shrink the size of the disk in the Operating system first. To see how you can shrink the disk within the Operating System, check out the part II
I’ll shutdown the virtual machine, make a putty connection to the PVE host and go to the directory holding the virtual disk file I need to resize. To shrink a disk, you need to type the following command
qemu-img resize <%name of the virtual disk%> – – -5GB

Click to enlarge
If you boot your virtual machine, you will see that the disk has been reduced accordingly.
Note :
There is a difference in the notation between increasing and shrinking disk. If you type this command,
qemu-img resize <%name of the virtual disk%> -5GB
the new virtual disk will be only 5 GB in size. Pay attention when using the command to reduce the size. This is not what you want. Instead you need to type
qemu-img resize <%name of the virtual disk%> – – – 5GB
to shrink the size of the disk by 5 GB.
Source:
I have found the correct shrinking command here http://forum.proxmox.com/threads/6580-Shrink-a-disk-with-qemu-img-parsing-error
Final Notes
So far, we have just changed the size of the virtual disk. Proxmox VE knows now that disk size has been updated. However, we might still need to perform additional actions within the Operating system to apply these changes. This will be explained in the next part of this post
Till then
See ya
Увеличение
1) увеличить размер диска виртуальной машины:
— в web-интерфейсе выбрать VM, в разделе «Ресурсы» выбрать диск, нажать кнопку «Resize disk» и указать число XX Гб для увеличения (уменьшить размер lvm через web-интерфейс нельзя).
— в консоли:
qm resize 104 sata0 +1G
перезагрузить ВМ, чтобы «перечитать» диск нового размера (возможно как-либо можно пересканировать диск, чтобы он увидел новый размер и не упала ФС).
2) увеличить размер раздела (онлайн):
parted /dev/sda
(parted) print
Model: ATA QEMU HARDDISK (scsi)
Disk /dev/sda: 3221MB
Sector size (logical/physical): 512B/512B
Partition Table: msdos
Disk Flags:

Number  Start   End     Size    Type     File system  Flags
 1      1049kB  2147MB  2146MB  primary  ext4         boot

(parted) resizepart 1
100%
(parted) quit
3) увеличить размер ФС:
resize2fs /dev/sda1
Увеличить оффлайн — по примеру уменьшения размера.
Уменьшение
1) выключить виртуальную машину
2) уменьшить размер ФС до минимального размера:
kpartx -a /dev/vg/vm-VMID-disk-1
e2fsck -f /dev/mapper/vg-vm--VMID--disk--1p1
resize2fs -M /dev/mapper/vg-vm--VMID--disk--1p1
просмотр параметров ФС
dumpe2fs -h /dev/mapper/vg-vm--VMID--disk--1p1
3) уменьшить размер диска виртуальной машины:
lvreduce -L 2G /dev/mapper/vg-vm--VMID--disk--1
4) уменьшить размер раздела:
parted /dev/mapper/vg-vm--VMID--disk--1
(parted) resizepart 1
100%
(parted) quit
5) увеличить размер ФС до максимального размера:
e2fsck -f /dev/mapper/vg-vm--VMID--disk--1p1
resize2fs /dev/mapper/vg-vm--VMID--disk--1p1
kpartx -d /dev/vg/vm-VMID-disk-1
На чтение 9 мин Просмотров 2.5к. Опубликовано 25.11.2021
Содержание
- Contents
- 1. Resizing guest disk
- General considerations
- qm command
- 2. Enlarge the partition(s) in the virtual disk
- Offline for all guests
- Online for Windows Guests
- Online for Linux Guests
- 3. Enlarge the filesystem(s) in the partitions on the virtual disk
- Online for Linux guests with LVM
- Online for Linux guests without LVM
- Путь IT-шника, иногда сложнее, чем путь самурая…
- Смотрите так же:
- Изменение размеров дисков виртуальных машин Proxmox (KVM) на LVM : 3 комментария
- Добавить комментарий Отменить ответ
- Поиск по блогу
- 6 дек. 2016 г.
- Proxmox kvm — изменение размера lvm диска
Contents
1. Resizing guest disk
General considerations
When you resize the disk of a VM, to avoid confusion and disasters think the process like adding or removing a disk platter.
If you enlarge the hard disk, once you have added the disk plate, your partition table and file system knows nothing about the new size, so you have to act inside the VM to fix it.
If you reduce (shrink) the hard disk, of course removing the last disk plate will probably destroy your file system and remove the data in it! So in this case it is paramount to act in the VM in advance, reducing the file system and the partition size. SystemRescueCD comes very handy for it, just add its iso as cdrom of your VM and set boot priority to CD-ROM.
Shrinking disks is not supported by the PVE API and has to be done manually.
Another page (deleted) with overlapping content was Resizing disks | Archive
qm command
You can resize your disks online or offline with command line:
exemple: to add 5G to your virtio0 disk on vmid100:
For virtio disks:
Linux should see the new size online without reboot with kernel >= 3.6
Windows should see the new size online without reboot with last virtio drivers.
for virtio-iscsi disk:
Linux should see the new size online without reboot with kernel >= 3.7
Windows should see the new size online without reboot with last virtio drivers.
2. Enlarge the partition(s) in the virtual disk
Depending on the installed guest there is several diffent ways to resize the partions
Offline for all guests
Use gparted or similar tool (recommended)
In gparted and possibly most other tools, LVM and Windows dynamic disc is not supported
Boot the virtual machine with gparted or similar tool, enlarge the partion and optionally the file system. With som linux clients you often need to enlarge the extended partion, move the swappartion, shrink the extended partion and enlarge the root partion. (or simple delete the swap and partion andre create it again — but remember to activwate the swap agin (last step).
Gparted have some warnings about some specific operations not well supported with windows guest — outside the scope of this document but read the warnings in gparted.
Online for Windows Guests
- Guest is Windows 7, Windows Vista or Windows Server 2008
- logon as administrator and extend the disk and filesystem (Using Disk manager)
- For more info www.petri.co.il/extend-disk-partition-vista-windows-server-2008.htm
- Guest is Windows 10: logon as administrator and extend the disk and filesystem (Using Disk manager). If you do not see the ability to extend the disk (i.e. nothing seems to have happened as a result of using the resize command), go to the Windows command prompt and do a: shutdown -s -t 0 (This is a «normal» shutdown, as opposed to the «fast» shutdown that’s the default for Win 8 and onwards.) After a reboot, you’ll now see the ability to expand the disk.
Online for Linux Guests
Here we will enlarge a LVM PV partition, but the procedure is the same for every kind of partitions. Note that the partition you want to enlarge should be at the end of the disk. If you want to enlarge a partition which is anywhere on the disk, use the offline method.
- Check that the kernel has detected the change of the hard drive size
(here we use VirtIO so the hard drive is named vda)
- Print the current partition table
- Resize the partition 3 (LVM PV) to occupy the whole remaining space of the hard drive)
- Check the new partition table
3. Enlarge the filesystem(s) in the partitions on the virtual disk
If you did not resize the filesystem in step 2
Online for Linux guests with LVM
Enlarge the physical volume to occupy the whole available space in the partition:
Enlarge the logical volume and the filesystem (the file system can be mounted, works with ext4 and xfs)
Online for Linux guests without LVM
Enlarge the filesystem (in this case root is on vda1)
Путь IT-шника, иногда сложнее, чем путь самурая…
В данном посте речь пойдет о изменение размера дисков у виртуальных машин под Proxmox (KVM) контейнеры которых расположены на томах LVM и внутри которых (машин) крутится Windows.
Чем проще готовая система виртуализации, чем она более полно охватывает все нужды администратора, тем меньше он разбирается в ее начинке. И от этого, у многих администраторов Proxmox проблемы с уменьшением жестких дисков системы, ибо в консоли они работать не умеют, или боятся что то делать в «замкнутой» системе. Поэтому я и решил сделать эту инструкцию.
Я надеюсь все в курсе, что Proxmox позволяет через свой интерфейс увеличивать размер жесткого диска машины, но вот уменьшить, не позволяет. Сделано это ИМХО для того, что бы не убить машину при заходе на файловую систему машины.
Если выключить машину, увеличить размер диска, а потом снова включить, машина ничего не заметит, но в управление дисками у жесткого диска появится не распределенное место. Растянуть файловую систему на свободное место начиная с висты можно стандартными средствами, для ХР можно применить образ Hiren и встроенные в него дисковые утилиты, по типу Partition Magic.
Увеличение диска совершенно безопасная процедура, ее даже можно делать на работающей машине, только вот изменения не применяться, причем даже после перезагрузки. Надо будет выключить машину, удалить диск, а потом кнопкой «Редактировать» вернуть его на прежнее место.
С уменьшением все точно так же, но через консоль.
Для примера уменьшим диск виртуальной машины с 2008 сервером на борту.

На данный момент размер диска 82G, я хочу уменьшить его до 30G. Диск виртуальной машины находится в LVM хранилище с именем VM.

Первым делом, сжимаем файловую систему до нужного размера.

Осталось 51,9G которые надо отрезать.
Заходим в консоль сервера и смотрим какие диски у нас есть, набрав команду lvs
Диск виден и имеет такой же размер, как в веб морде, все нормально, можно продолжать.
Набираем команду lvdisplay и в выводе ищем нужный нам диск.
Смотрим точку монтирования, в моем случае это /dev/vm/vm-107-disk-1
Теперь можно уменьшать диск, но надо учесть 2 вещи. Во первых, в отличие от увеличения диска, мы не указываем сколько хотим «отрезать» от диска, мы указываем размер диска, который должен получится. А во вторых, не в коем случае нельзя делать диск меньше чем файловая система, это уничтожит все данные внутри виртуального диска, причем может повезти так, что данные нельзя будет восстановить даже спец программами.
Поэтому, лучше пересчитать объем диска в мегабайты, накинуть сверху еще пару метров и уже до этой цифры уменьшать.

Уменьшаем размер диска командой lvreduce -L 30726M /dev/vm/vm-107-disk-1
После страшных пугалок системы и мокрых ладоней, можно посмотреть что получилось, с начало в консоле, командой lvs убеждаемся что диск нужного размера.
После этого надо запустить виртуальную машину и убедиться что она стартует, если все нормально, гасим машину и продолжаем с веб мордой.
В настройках самой машины, размер диска не изменился, как и внутри машины.

Но его размер изменился в хранилище VM.

Теперь надо в настройках виртуальной машины удалить диск, встать на получившийся «Неиспользуемый диск«, нажать кнопку «Редактировать» и вернуть диск на место, с теми же настройками.

Диск встанет на место уже с новым размером. На этом все, можно запускать машину и пользоваться ей дальше. Все счастливы, улыбаются и машут.
Смотрите так же:
Изменение размеров дисков виртуальных машин Proxmox (KVM) на LVM : 3 комментария
С динамическими дисками без предварительного бэкапа не советую делать, данные потеряете. Корректно срабатывает только с базовыми.
А вот с увеличением не все так ясно! Вы говорите, как о чем то очевидном, но как же увеличить объем диска? В proxmoxe нет кнопки увеличить размер.
Как же нет, есть она, на этой картинке ее даже видно http://cdn.itroad.ru/wp-content/uploads/2014/03/proxmox3.png
Resize disk называется
Добавить комментарий Отменить ответ
Этот сайт использует Akismet для борьбы со спамом. Узнайте как обрабатываются ваши данные комментариев.
Поиск по блогу
6 дек. 2016 г.
Proxmox kvm — изменение размера lvm диска
Увеличение
1) увеличить размер диска виртуальной машины:
— в web-интерфейсе выбрать VM, в разделе «Ресурсы» выбрать диск, нажать кнопку «Resize disk» и указать число XX Гб для увеличения (уменьшить размер lvm через web-интерфейс нельзя).
— в консоли:
перезагрузить ВМ, чтобы «перечитать» диск нового размера (возможно как-либо можно пересканировать диск, чтобы он увидел новый размер и не упала ФС).
2) увеличить размер раздела (онлайн):
3) увеличить размер ФС:
Увеличить оффлайн — по примеру уменьшения размера.
Уменьшение
1) выключить виртуальную машину
2) уменьшить размер ФС до минимального размера:
просмотр параметров ФС
3) уменьшить размер диска виртуальной машины:
4) уменьшить размер раздела:
5) увеличить размер ФС до максимального размера: