First published on TechNet on Nov 17, 2008
In my
first Pushing the Limits of Windows post
, I discussed physical memory limits, including the limits imposed by licensing, implementation, and driver compatibility. Here’s the index of the entire Pushing the Limits series. While they can stand on their own, they assume that you read them in order.
Pushing the Limits of Windows: Physical Memory
Pushing the Limits of Windows: Virtual Memory
Pushing the Limits of Windows: Paged and Nonpaged Pool
Pushing the Limits of Windows: Processes and Threads
Pushing the Limits of Windows: Handles
Pushing the Limits of Windows: USER and GDI Objects – Part 1
Pushing the Limits of Windows: USER and GDI Objects – Part 2
This time I’m turning my attention to another fundamental resource, virtual memory. Virtual memory separates a program’s view of memory from the system’s physical memory, so an operating system decides when and if to store the program’s code and data in physical memory and when to store it in a file. The major advantage of virtual memory is that it allows more processes to execute concurrently than might otherwise fit in physical memory.
While virtual memory has limits that are related to physical memory limits, virtual memory has limits that derive from different sources and that are different depending on the consumer. For example, there are virtual memory limits that apply to individual processes that run applications, the operating system, and for the system as a whole. It’s important to remember as you read this that virtual memory, as the name implies, has no direct connection with physical memory. Windows assigning the file cache a certain amount of virtual memory does not dictate how much file data it actually caches in physical memory; it can be any amount from none to more than the amount that’s addressable via virtual memory.
Process Address Spaces
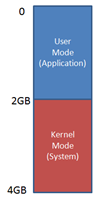
Each process has its own virtual memory, called an address space, into which it maps the code that it executes and the data that the code references and manipulates. A 32-bit process uses 32-bit virtual memory address pointers, which creates an absolute upper limit of 4GB (2^32) for the amount of virtual memory that a 32-bit process can address. However, so that the operating system can reference its own code and data and the code and data of the currently-executing process without changing address spaces, the operating system makes its virtual memory visible in the address space of every process. By default, 32-bit versions of Windows split the process address space evenly between the system and the active process, creating a limit of 2GB for each:
Applications might use Heap APIs, the .NET garbage collector, or the C runtime malloc library to allocate virtual memory, but under the hood all of these rely on the
VirtualAlloc
API. When an application runs out of address space then VirtualAlloc, and therefore the memory managers layered on top of it, return errors (represented by a NULL address). The Testlimit utility, which I wrote for the
4th Edition of Windows Internals
to demonstrate various Windows limits, calls VirtualAlloc repeatedly until it gets an error when you specify the –r switch. Thus, when you run the 32-bit version of Testlimit on 32-bit Windows, it will consume the entire 2GB of its address space:

2010 MB isn’t quite 2GB, but Testlimit’s other code and data, including its executable and system DLLs, account for the difference. You can see the total amount of address space it’s consumed by looking at its Virtual Size in
Process Explorer
:

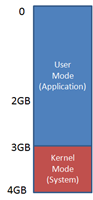
Some applications, like SQL Server and Active Directory, manage large data structures and perform better the more that they can load into their address space at the same time. Windows NT 4 SP3 therefore introduced a boot option,
/3GB
, that gives a process 3GB of its 4GB address space by reducing the size of the system address space to 1GB, and Windows XP and Windows Server 2003 introduced the /userva option that moves the split anywhere between 2GB and 3GB:
To take advantage of the address space above the 2GB line, however, a process must have the ‘large address space aware’ flag set in its executable image. Access to the additional virtual memory is opt-in because some applications have assumed that they’d be given at most 2GB of the address space. Since the high bit of a pointer referencing an address below 2GB is always zero, they would use the high bit in their pointers as a flag for their own data, clearing it of course before referencing the data. If they ran with a 3GB address space they would inadvertently truncate pointers that have values greater than 2GB, causing program errors including possible data corruption.
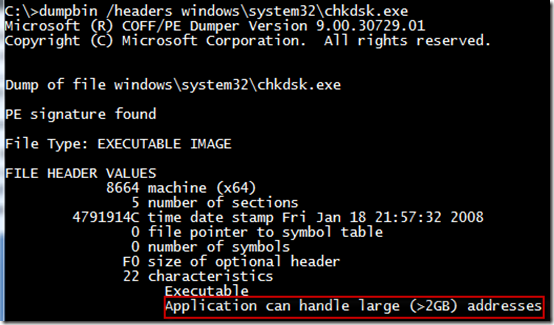
All Microsoft server products and data intensive executables in Windows are marked with the large address space awareness flag, including Chkdsk.exe, Lsass.exe (which hosts Active Directory services on a domain controller), Smss.exe (the session manager), and Esentutl.exe (the Active Directory Jet database repair tool). You can see whether an image has the flag with the Dumpbin utility, which comes with Visual Studio:
Testlimit is also marked large-address aware, so if you run it with the –r switch when booted with the 3GB of user address space, you’ll see something like this:

Because the address space on 64-bit Windows is much larger than 4GB, something I’ll describe shortly, Windows can give 32-bit processes the maximum 4GB that they can address and use the rest for the operating system’s virtual memory. If you run Testlimit on 64-bit Windows, you’ll see it consume the entire 32-bit addressable address space:

64-bit processes use 64-bit pointers, so their theoretical maximum address space is 16 exabytes (2^64). However, Windows doesn’t divide the address space evenly between the active process and the system, but instead defines a region in the address space for the process and others for various system memory resources, like system page table entries (PTEs), the file cache, and paged and non-paged pools.
The size of the process address space is different on IA64 and x64 versions of Windows where the sizes were chosen by balancing what applications need against the memory costs of the overhead (page table pages and translation lookaside buffer — TLB — entries) needed to support the address space. On x64, that’s 8192GB (8TB) and on IA64 it’s 7168GB (7TB — the 1TB difference from x64 comes from the fact that the top level page directory on IA64 reserves slots for Wow64 mappings). On both IA64 and x64 versions of Windows, the size of the various resource address space regions is 128GB (e.g. non-paged pool is assigned 128GB of the address space), with the exception of the file cache, which is assigned 1TB. The address space of a 64-bit process therefore looks something like this:

The figure isn’t drawn to scale, because even 8TB, much less 128GB, would be a small sliver. Suffice it to say that like our universe, there’s a lot of emptiness in the address space of a 64-bit process.
When you run the 64-bit version of Testlimit (Testlimit64) on 64-bit Windows with the –r switch, you’ll see it consume 8TB, which is the size of the part of the address space it can manage:

![]()
Committed Memory
Testlimit’s –r switch has it reserve virtual memory, but not actually
commit
it. Reserved virtual memory can’t actually store data or code, but applications sometimes use a reservation to create a large block of virtual memory and then commit it as needed to ensure that the committed memory is contiguous in the address space. When a process commits a region of virtual memory, the operating system guarantees that it can maintain all the data the process stores in the memory either in physical memory or on disk. That means that a process can run up against another limit: the
commit limit
.
As you’d expect from the description of the commit guarantee, the commit limit is the sum of physical memory and the sizes of the paging files. In reality, not quite all of physical memory counts toward the commit limit since the operating system reserves part of physical memory for its own use. The amount of committed virtual memory for all the active processes, called the
current commit charge
, cannot exceed the system commit limit. When the commit limit is reached, virtual allocations that commit memory fail. That means that even a standard 32-bit process may get virtual memory allocation failures before it hits the 2GB address space limit.
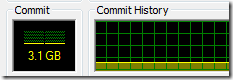
The current commit charge and commit limit is tracked by Process Explorer in its System Information window in the Commit Charge section and in the Commit History bar chart and graph:

Task Manager prior to Vista and Windows Server 2008 shows the current commit charge and limit similarly, but calls the current commit charge «PF Usage» in its graph:
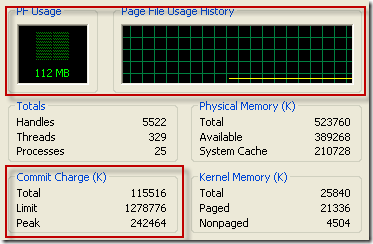
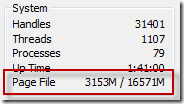
On Vista and Server 2008, Task Manager doesn’t show the commit charge graph and labels the current commit charge and limit values with «Page File» (despite the fact that they will be non-zero values even if you have no paging file):
You can stress the commit limit by running Testlimit with the -m switch, which directs it to allocate committed memory. The 32-bit version of Testlimit may or may not hit its address space limit before hitting the commit limit, depending on the size of physical memory, the size of the paging files and the current commit charge when you run it. If you’re running 32-bit Windows and want to see how the system behaves when you hit the commit limit, simply run multiple instances of Testlimit until one hits the commit limit before exhausting its address space.
Note that, by default, the paging file is configured to grow, which means that the commit limit will grow when the commit charge nears it. And even when when the paging file hits its maximum size, Windows is holding back some memory and its internal tuning, as well as that of applications that cache data, might free up more. Testlimit anticipates this and when it reaches the commit limit, it sleeps for a few seconds and then tries to allocate more memory, repeating this indefinitely until you terminate it.
If you run the 64-bit version of Testlimit, it will almost certainly will hit the commit limit before exhausting its address space, unless physical memory and the paging files sum to more than 8TB, which as described previously is the size of the 64-bit application-accessible address space. Here’s the partial output of the 64-bit Testlimit running on my 8GB system (I specified an allocation size of 100MB to make it leak more quickly):

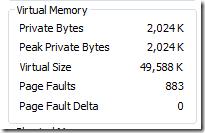
And here’s the commit history graph with steps when Testlimit paused to allow the paging file to grow:

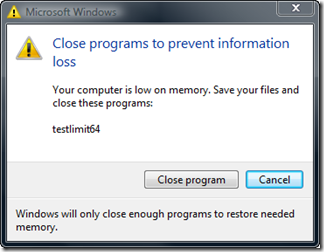
When system virtual memory runs low, applications may fail and you might get strange error messages when attempting routine operations. In most cases, though, Windows will be able present you the low-memory resolution dialog, like it did for me when I ran this test:
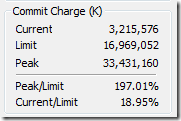
After you exit Testlimit, the commit limit will likely drop again when the memory manager truncates the tail of the paging file that it created to accommodate Testlimit’s extreme commit requests. Here, Process Explorer shows that the current limit is well below the peak that was achieved when Testlimit was running:
Process Committed Memory
Because the commit limit is a global resource whose consumption can lead to poor performance, application failures and even system failure, a natural question is ‘how much are processes contributing the commit charge’? To answer that question accurately, you need to understand the different types of virtual memory that an application can allocate.
Not all the virtual memory that a process allocates counts toward the commit limit. As you’ve seen, reserved virtual memory doesn’t. Virtual memory that represents a file on disk, called a file mapping view, also doesn’t count toward the limit unless the application asks for copy-on-write semantics, because Windows can discard any data associated with the view from physical memory and then retrieve it from the file. The virtual memory in Testlimit’s address space where its executable and system DLL images are mapped therefore don’t count toward the commit limit. There are two types of process virtual memory that do count toward the commit limit: private and pagefile-backed.
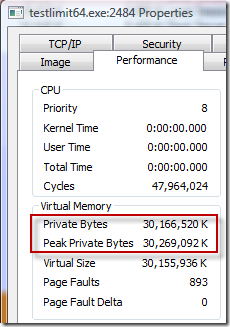
Private virtual memory is the kind that underlies the garbage collector heap, native heap and language allocators. It’s called private because by definition it can’t be shared between processes. For that reason, it’s easy to attribute to a process and Windows tracks its usage with the Private Bytes performance counter. Process Explorer displays a process private bytes usage in the Private Bytes column, in the Virtual Memory section of the Performance page of the process properties dialog, and displays it in graphical form on the Performance Graph page of the process properties dialog. Here’s what Testlimit64 looked like when it hit the commit limit:
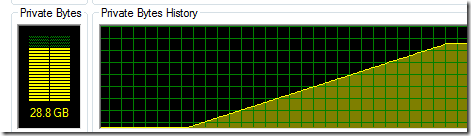
Pagefile-backed virtual memory is harder to attribute, because it can be shared between processes. In fact, there’s no process-specific counter you can look at to see how much a process has allocated or is referencing. When you run Testlimit with the -s switch, it allocates pagefile-backed virtual memory until it hits the commit limit, but even after consuming over 29GB of commit, the virtual memory statistics for the process don’t provide any indication that it’s the one responsible:
For that reason, I added the -l switch to Handle a while ago. A process must open a pagefile-backed virtual memory object, called a section, for it to create a mapping of pagefile-backed virtual memory in its address space. While Windows preserves existing virtual memory even if an application closes the handle to the section that it was made from, most applications keep the handle open. The -l switch prints the size of the allocation for pagefile-backed sections that processes have open. Here’s partial output for the handles open by Testlimit after it has run with the -s switch:
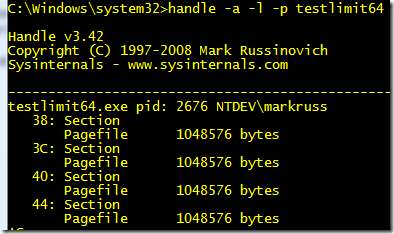
You can see that Testlimit is allocating pagefile-backed memory in 1MB blocks and if you summed the size of all the sections it had opened, you’d see that it was at least one of the processes contributing large amounts to the commit charge.
How Big Should I Make the Paging File?
Perhaps one of the most commonly asked questions related to virtual memory is, how big should I make the paging file? There’s no end of ridiculous advice out on the web and in the newsstand magazines that cover Windows, and even Microsoft has published misleading recommendations. Almost all the suggestions are based on multiplying RAM size by some factor, with common values being 1.2, 1.5 and 2. Now that you understand the role that the paging file plays in defining a system’s commit limit and how processes contribute to the commit charge, you’re well positioned to see how useless such formulas truly are.
Since the commit limit sets an upper bound on how much private and pagefile-backed virtual memory can be allocated concurrently by running processes, the only way to reasonably size the paging file is to know the maximum total commit charge for the programs you like to have running at the same time. If the commit limit is smaller than that number, your programs won’t be able to allocate the virtual memory they want and will fail to run properly.
So how do you know how much commit charge your workloads require? You might have noticed in the screenshots that Windows tracks that number and Process Explorer shows it: Peak Commit Charge. To optimally size your paging file you should start all the applications you run at the same time, load typical data sets, and then note the commit charge peak (or look at this value after a period of time where you know maximum load was attained). Set the paging file minimum to be that value minus the amount of RAM in your system (if the value is negative, pick a minimum size to permit the kind of crash dump you are configured for). If you want to have some breathing room for potentially large commit demands, set the maximum to double that number.
Some feel having no paging file results in better performance, but in general, having a paging file means Windows can write pages on the modified list (which represent pages that aren’t being accessed actively but have not been saved to disk) out to the paging file, thus making that memory available for more useful purposes (processes or file cache). So while there may be some workloads that perform better with no paging file, in general having one will mean more usable memory being available to the system (never mind that Windows won’t be able to write kernel crash dumps without a paging file sized large enough to hold them).
Paging file configuration is in the System properties, which you can get to by typing “sysdm.cpl” into the Run dialog, clicking on the Advanced tab, clicking on the Performance Options button, clicking on the Advanced tab (this is
really
advanced), and then clicking on the Change button:

You’ll notice that the default configuration is for Windows to automatically manage the page file size. When that option is set on Windows XP and Server 2003, Windows creates a single paging file that’s minimum size is 1.5 times RAM if RAM is less than 1GB, and RAM if it’s greater than 1GB, and that has a maximum size that’s three times RAM. On Windows Vista and Server 2008, the minimum is intended to be large enough to hold a kernel-memory crash dump and is RAM plus 300MB or 1GB, whichever is larger. The maximum is either three times the size of RAM or 4GB, whichever is larger. That explains why the peak commit on my 8GB 64-bit system that’s visible in one of the screenshots is 32GB. I guess whoever wrote that code got their guidance from one of those magazines I mentioned!
A couple of final limits related to virtual memory are the maximum size and number of paging files supported by Windows. 32-bit Windows has a maximum paging file size of 16TB (4GB if you for some reason run in non-PAE mode) and 64-bit Windows can having paging files that are up to 16TB in size on x64 and 32TB on IA64. Windows 8 ARM’s maximum paging file size is is 4GB. For all versions, Windows supports up to 16 paging files, where each must be on a separate volume.
|
|
|
|
|
|
|
|
Windows 7 |
4 GB |
16 TB |
16 TB |
||
|
Windows 8 |
16 TB |
4 GB |
16 TB |
||
|
Windows Server 2008 R2 |
16 TB |
32 TB |
|||
|
Windows Server 2012 |
16 TB |
По запросу в любой поисковой системе «файл подкачки windows» можно получить тысячу-другую скопированных друг у друга, либо немного отличающихся ответов по выбору оптимальных размеров для pagefile.sys.
Самые распространенные советы выглядят примерно следующим образом: для машин с маленьким ОЗУ нужно задавать размер файла подкачки k*RAM, где RAM — объем физической памяти, k — какой-нибудь коэффициент, коих много самых разнообразных. И 1,5, и 2, и даже 3 встречал. Если же планок памяти стоит на 4Гб и больше, то «смело отключайте виртуальную память в принципе».
Статья о том, стоит ли верить ли этим советам, и если да, то насколько.
Что такое файл подкачки?
pagefile.sys, он же файл подкачки — файл, представляющий собой виртуальную память, которая позволяет одновременно выполняться большому количеству процессов, которые все сразу не смогли бы поместиться в физической памяти.
По умолчанию после установки Windows файл подкачки увеличивается автоматически при заполнении текущего объема.
Если отключить файл подкачки
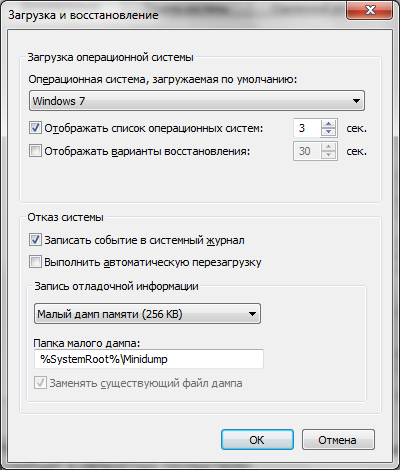
Если попытаться отключить файл подкачки в windows 7, система выдаст предупреждающее окно, в котором сообщит о неприятных последствиях:
Отсюда следует, что не стоит полностью отказываться от использования виртуальной памяти, иначе в случае краха не получится даже проанализировать причину сбоя. Указанный на скриншоте минимальный размер в 1МБ берется из расчета конфигурации дампа памяти в настройках «загрузка и восстановление»:
Если выбрать для записи отладочной информации полный дамп, то размер увеличивается на несколько порядков. У меня он составил 400МБ.
Кроме отсутствия возможности записи дампа, после отключения файла подкачки может появится назойливое сообщение о нехватке памяти. Появление его будет сопровождаться жуткими тормозами ресурсоемких приложений.
Если перенести файл подкачки на другой раздел
Куча статей по оптимизации вашей ОС рекомендует перенести файл подкачки на отдельно созданный и отформатированный в FAT32 раздел жесткого диска. При этом повышается быстродействие и уменьшается фрагментация этого файла.
При подобных манипуляциях не стоит забывать, что файл подкачки должен присутствовать в системном разделе для корректной записи отладочной информации. Выбирать приходится между быстродействием и возможностью сбора данных о возникших неприятностях.
Размер файла подкачки
Вернемся
к нашим апельсинам
к вопросу об оптимальном размере. Перекопав множество статей, информационных изданий и даже рекомендации Microsoft, я так и не нашел четкого и однозначного ответа на этот вопрос. Да и не нашел бы, как стало мне ясно после прочтения перевода статьи Марка Руссиновича Преодолевая ограничения Windows: виртуальная память. В заключении приведу ссылки на перевод и оригинал, а сейчас постараюсь объяснить, откуда же взять размер файла.
Для начала потребуется утилита Process Explorer, она является бесплатным аналогом дефолтного Task Manager’a, но обладает многими преимуществами. Скачать можно по ссылке.
После запуска Process Explorer’a выберите самые ресурсоемкие в плане используемой памяти приложения, которые используете в повседневной жизни, и запустите их все одновременно. В окне Process Explorer’a нажмите CTRL+I или выберите в меню View/System Information, из всего многообразия представленных в окне данных нужно выбрать область Commit Charge
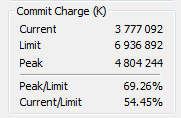
Значение Peak — пиковое значение выделенной памяти для всех приложений, складываемое из физической и виртуальной памяти.
Далее вооружаемся калькулятором и вычитаем из этого значения размер оперативной памяти. Если получается отрицательное значение — берем требуемые системой 400МБ (может быть другое значение), необходимые для создания дампа. Если получается положительное значение — выставляем таким минимальное и максимальное значение файла подкачки. Можно подстраховаться и установить «про запас» максимум выше, но тогда вырастет фрагментация файла в случае увеличения его размеров. Поэтому лучше зафиксировать на одном месте.
Литература
Статья Марка Руссиновича Pushing the Limits of Windows: Virtual Memory;
Перевод на русский язык Преодолевая ограничения Windows: виртуальная память;
Описание программы Process Explorer .
Это перевод Pushing the Limits of Windows: Physical Memory. Автор: Марк Руссинович.
Это первый пост в блоге из серии «Pushing the Limits of Windows», которую я буду писать ближайшие месяцы и в которой буду описывать как Windows и приложения используют конкретный ресурс, лицензионные и реализационные ограничения ресурса, как измерить использование ресурса и как диагностировать его утечки. Чтобы эффективно управлять своими Windows системами вам нужно понимать как Windows управляет физическими ресурсами, такими как процессоры (CPUs) и память (memory), а также логическими ресурсами, такими как виртуальная память (virtual memory), дескрипторы (handles) и объекты оконного менеджера (window manager objects). Знание пределов и ограничений этих ресурсов и методы слежения за ними позволит вам соотносить использование ресурсов с приложениями, которые их используют, эффективно изменять систему для определённой нагрузки и идентифицировать приложения с утечкой ресурсов.
Физическая память
Физическая память является одним из основных ресурсов компьютера. Менеджер памяти Windows является ответственным за заполнение памяти кодом и данными запущенных процессов, драйверов устройств и самой операционной системы. Поскольку большинство систем работают с большим объёмом кода и данных, чем может вместить в себя физическая память компьютера, то физическая память, по сути, является окном в используемые код и данные. Поэтому количество установленной памяти влияет на производительность, потому что если данные или код не присутствуют в физической памяти, то менеджеру памяти необходимо загрузить их с диска.
Кроме влияния на производительность, количество установленной физической памяти привносит и другие ограничения. Например, размер не подкачиваемого пула (non-paged pool) — буфера операционной системы — очевидно, ограничен физической памятью. Физическая память также влияет на ограничения системной виртуальной памяти, размер которой является грубой суммой физической памяти плюс максимальным размером всех файлов подкачки. Ещё Физическая память может неявно влиять на максимальное число одновременно работающих процессов, о чём я буду говорить в будущем посте, посвящённому ограничениям на процессы и потоки.
Ограничения памяти на серверных Windows
Поддержка физической памяти Windows диктуется ограничениями аппаратной части, лицензированием, структурами операционной системы и совместимостью драйверов. Страница Memory Limits for Windows Releases в MSDN описывает ограничения в различных версиях Windows, а также в пределах версий по редакциям (SKU).
Вы можете увидеть различия в поддержки памяти у разных редакций Windows, диктуемые лицензионными ограничениями. Например, 32-х битная Windows Server 2008 Standard поддерживает только 4 Гб, в то время как 32-х битная же Windows Server 2008 Datacenter поддерживает уже 64 Гб. Аналогично, 64-х битная Windows Server 2008 Standard поддерживает 32 Гб, а 64-х битная Windows Server 2008 Datacenter может оперировать целыми 2 Тб. Вокруг нас не так много систем с 2 Тб физической памяти на борту, но команда производительности Windows Server (Windows Server Performance Team) знает парочку, включая одну, которая была у них в лаборатории для тестов. Вот скриншот Менеджера Задач (Task Manager), работающего на такой системе:

Максимальное ограничение в 128 Гб на 32-х битных Windows, поддерживаемое редакцией Windows Server 2003 Datacenter, следует из того, что структуры, используемые менеджером памяти для отслеживания физической памяти, занимали бы слишком много виртуального адресного пространства на системах с большим количеством памяти. Менеджер памяти следит за каждой страницей (page) памяти, храня данные о ней в массиве, называемом базой данных PFN (PFN database), и (по соображениям производительности) проецируя всю базу данных PFN в виртуальную память. Поскольку в ней каждая страница физической памяти представлена структурой данных размером 28 байт, то вся БД PFN для системы с 128 Гб занимает около 930 Мб. 32-х битные Windows имеют 4 Гб виртуального адресного пространства, которое аппаратно делится на две части: пользовательскую, в котором выполняется процесс пользователя (например, Блокнот), и системную. Поэтому 980 Мб занимают практически половину их доступных 2 Гб из системной части виртуального адресного пространства, оставляя только 1 Гб для ядра, драйверов устройств, системного кэша и других системных структур данных, что делает совершенно неразумным дальнейшее увеличение размера БД:

По этой же причине в таблице с ограничениями также указываются пределы для той же редакции, но при загрузке с модификацией этих 4 Гб (опция называется 4GT и включается указанием в Boot.ini /3GB или /USERVA, а также опцией /Set IncreaseUserVa в Bcdedit), потому что опция 4GT передвигает границу между пользовательской и системной частью виртуального адресного пространства, что даёт до 3 Гб пользовательской части, но оставляет только 1 Гб для системы. Для улучшения производительности, 32-х битный Windows Server 2008 увеличивает зарезервированную часть для системного адресного пространства понижением максимального размера поддерживаемой памяти до 64 Гб.
Менеджер памяти мог бы поддерживать и больше памяти, проецируя БД PFN по кускам в адресное пространство по мере необходимости, но это добавило бы сложности и уменьшило производительность за счёт добавленных накладных расходов на операции проецирования и снятия проекции (map and unmap operations). Только недавно системы стали настолько большими, что нужно задумываться об этом, но поскольку размер адресного пространства не является ограничением для БД PFN на 64-х битных Windows, то поддержка большего количества памяти перекладывается на 64-х битные Windows.
Максимальный предел в 2 Тб на 64-х битном Windows Server 2008 Datacenter не следует из каких-либо ограничений реализации или аппаратной части, но Microsoft поддерживает только те конфигурации, который она может протестировать. Ко времени релиза Windows Server 2008, самая большая система в мире имела 2 Тб, поэтому Windows ограничивает свою поддержку памяти именно 2-мя Тб.
Ограничения памяти на клиентских Windows
64-ти битные клиентские редакции Windows поддерживают различное количество физической памяти как средство усиления различий между редакциями (SKU-differentiating feature) — от нижнего предела в 512 Мб для Windows XP Starter до 128 Гб для Vista Ultimate. Все 32-х битные клиентские редакции Windows, однако, (включая Windows Vista, Windows XP и Windows 2000 Professional) поддерживают максимум 4 Гб физической памяти. 4 Гб — это максимальный размер физической памяти, доступный из стандартного режима управления памятью на x86. В те времена не было необходимости даже рассматривать большее число памяти на клиентских системах, потому что даже сервера с таким количеством памяти были редкостью.
Однако, ко времени, когда Windows XP SP2 был в разработке, клиентские системы с более чем 4 Гб памяти появились в обозримом будущем, поэтому команда Windows начала широкомасштабное тестирование Windows XP на системах с памятью более 4 Гб. Windows XP SP2 также включал по-умолчанию поддержку Physical Address Extensions (PAE) на железе, которое реализовывало память no-execute, потому что оно требовалось для Data Execution Prevention (DEP), но оно же включало поддержку для памяти выше 4 Гб.
Но при этом разработчики Windows обнаружили, что многие системы начинали вылетать, зависать или вообще не загружаться, потому что некоторые драйвера устройств (часто это такие видео или аудио драйвера, которые обычно используются на клиентских системах, а не на серверах) не были запрограммированы работать с физическими адресами больше 4 Гб. В результате, драйвера обрезали такие адреса, приводя к порче памяти и побочным эффектам такой порчи. Серверные системы обычно имеют более общие устройства с простыми и более стабильными драйверами, а поэтому обычно не встречаются с подобными проблемами. Эта проблематичная экосистема клиентских драйверов привела к принятию решения об игнорировании памяти выше 4 Гб на клиентских редакциях, даже если система теоретически может адресовать столько памяти.
Реальные ограничения памяти на клиентских 32-х битных Windows
Хотя 4 Гб памяти заявлено как предел для 32-х битных редакций Windows, но реальный предел будет ниже и зависит от чипсета системы и подключенных устройств. Причина в том, что физическое адресное пространство включает в себя не только оперативную память (RAM), но также и память устройств, а системы x86 и x64 проецируют память устройств ниже границы в 4 Гб для обеспечения совместимости с 32-х битными операционными системами, которые не знают, как обращаться с адресами выше 4 Гб. Если система имеет 4 Гб оперативной памяти и устройства, типа видео, аудио или сетевых адаптеров, будут реализовывать окна в свою память (которая в сумме пусть будет равна 500 Мб), то 500 Мб памяти из 4-х Гб будут расположены выше границы в 4 Гб, как показано ниже:

В результате этого, если у вас есть система с 3 Гб или более памяти под управлением клиентской версии 32-х битной Windows, вы не сможете получить в своё распоряжение всю оперативную память. На Windows 2000, Windows XP и Windows Vista RTM вы можете узнать, сколько оперативной памяти доступно системе в диалоговом окне Свойства системы, странице Производительность Менеджера Задач и, в Windows XP и Windows Vista (включая SP1), в утилитах Msinfo32 и Winver. На Window Vista SP1 некоторые из этих мест теперь показывают установленную память, а не доступную для системы память, как указано в этой статье Knowledge Base.
На моём ноутбуке с 4 Гб памяти, когда я загружаю 32-х битную Vista, количество доступной физической памяти будет 3.5 Гб, как показано в утилите Msinfo32:

Вы можете посмотреть раскладку физической памяти с помощью утилиты Meminfo от Alex Ionescu (он также внёс вклад в 5-ю редакцию Windows Internals, которую я написал в соавторстве с Дэвидом Соломоном). Вот вывод Meminfo, которую я запустил на этой же системе с ключом -r для создания дампа диапазонов физической памяти:

Обратите внимание на пробел в адресном пространстве со страницы 9F000 до страницы 100000, и ещё один от DFE6D000 до FFFFFFFF (4 Гб). Однако, когда я загружаюсь на этой же системе в 64-х битной Vista, все 4 Гб показываются как доступные и вы можете видеть, как Windows использует ещё 500 Мб оперативной памяти, находящиеся выше границы в 4 Гб:

Откуда берутся эти пробелы ниже 4 Гб? На этот вопрос нам поможет ответить Диспетчер Устройств. Для проверки, запустите «devmgmt.msc», выберите «Ресурсы по подключению» в меню «Вид», и разверните узел «Память». На моём ноутбуке главным похитителем памяти стала, что и неудивительно, видеокарта, которая потребляет 256 Мб в диапазоне E0000000-EFFFFFFF:

Прочие девайсы занимают большинство оставшегося места, а шина PCI резервирует дополнительные диапазоны для устройств во время загрузки как часть консервативной оценки firmware этих устройств.
Потребление адресов памяти ниже 4 Гб может быть весьма значительным на топовых игровых конфигурациях, имеющими видеокарты с большими объёмами памяти. Например, я купил одну такую систему в бутике игрового стенда компании — она шла с 4 Гб памяти и двумя видеокартами по 1 Гб каждая. Я не уточнил версию ОС, полагая, что они сообразят поставить 64-х битную Виста, но система пришла с 32-х битной версией. В результате только 2.2 Гб памяти было доступно для Windows. Вы можете увидеть гигантскую дыру в памяти с адреса 8FEF0000 по FFFFFFFF в следующем выводе Meminfo с этой системы после того, как я поставил на неё 64-х битную версию Windows:

Диспетчер Устройств показывает, что 512 Мб из этой дыры в зарезервированно для видеокарт (256 Мб каждая), и похоже, что firmware просто зарезервировало больше памяти, либо для динамического проецирования, либо же в результате использования консервативных оценок:

С такими проблемами могут встретиться даже системы имеющие на борту только 2 Гб. Проблемы возникают из-за чипсетов, агрессивно резервирующих регионы памяти для устройств. Наш общий семейный компьютер, который мы купили всего несколько месяцев назад от известного OEM поставщика, сообщает о доступности только 1.97 Гб из 2-х установленных:

Диапазон физических адресов от 7E700000 до FFFFFFFF зарезервирован шиной PCI и устройствами, что оставляет теоретический максимум физического адресного пространства в 7E700000 байт (1.976 Гб), но даже часть из этого резервируется для памяти устройств, что оставляет Windows только 1.97 Гб.

Поскольку теперь производители устройств обязаны отправлять как 32-х битный, так и 64-х битный драйвера в лаборатории Windows Hardware Quality Laboratories (WHQL) для получения сертификата подписи, то большинство производителей устройств сегодня могли бы поддерживать физические адреса выше 4 Гб. Однако, 32-х битные Windows будут продолжать игнорировать память выше этой границы, потому что всё ещё существуют определённые сложности с измерением риска такого изменения, а производители OEM двигаются (или, по крайней мере, должны) в сторону перехода на 64-х битные Windows, где эта проблема просто не стоит.
Суть заключается в том, что вы можете использовать всю установленную у вас память (до предела, установленного редакцией системы) с 64-х битной Windows, вне зависимости от её количества, и если вы покупаете высокопроизводительную геймерскую систему, то вам определённо стоит попросить продавца установить на неё 64-х битную Windows.
Достаточно ли у вас памяти?
Вне зависимости от того, сколько памяти у вас есть, настоящий вопрос заключается в том, достаточно ли этой памяти? К сожалению, не существует какого-либо простого правила, с помощью которого вы точно узнаете ответ на этот вопрос. Хотя есть общее руководство, которое вы можете использовать, оно основано на мониторинге доступной системе памяти за промежуток времени, особенно в моменты работы приложений, требовательных к памяти. Windows определяет доступную память как физическую память, которая не была привязана к процессу, ядру или драйверу устройства. Как следует из этого названия, доступная память доступна для присвоения её по требованию процесса или системы. Системный менеджер памяти, конечно же, пытается использовать максимум памяти, используя свободную память как файловый кэш (список standby), как обнулённую память (список страниц, заполненных нулями), а функция Superfetch в Vista также использует её для предзагрузки (prefetch) данных и кода в списке standby и упорядочивает их по наибольшей вероятности использования в ближайшее время.
Когда доступная память становится дефицитом, это означает, что либо процессы, либо система активно используют физическую память, и если доступная память находится в районе нуля продолжительное время, то вы вероятно выиграете от установки большего количества памяти. Есть несколько способов отслеживать доступную память. В Windows Vista вы можете неявно следить за доступной памятью, наблюдая за историей использования физической памяти (Physical Memory Usage History) в Диспетчере Задач, Task Manager. Вот снимок экрана Диспетчера Задач на моём настольнике с 8 Гб памяти (хмм, я думаю, что у меня, пожалуй, даже слишком много памяти!):

На всех версиях Windows вы можете увидеть график доступной памяти, используя оснастку Производительность (Performance Monitor) и добавляя в ней счётчик Available Bytes из раздела Memory:

Вы также можете видеть мнгновенные значения в диалоге System Information утилиты Process Explorer, или, на версиях Windows до Vista, на вкладке Производительность Диспетчера Задач (Task Manager’s Performance page).
Преодолевая пределы
Из процессора (CPU), памяти и дисков — память обычно наиболее важна для общей производительности системы. Чем больше памяти — тем лучше. И 64-х битные Windows являются способом убедиться, что вы используете все возможности вашей системы. Кроме того, 64-х битные Windows могут иметь и другие бонусы в плане производительности, о которых я поговорю в следующем посте серии Pushing the Limits, когда я буду говорить о виртуальной памяти.
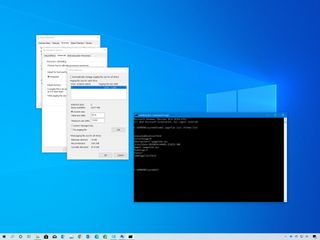
(Image credit: Windows Central)
On Windows 10, virtual memory (or paging file) is an essential component (hidden file) designed to remove and temporarily store less frequently use modified pages allocated in RAM (random-access memory) to the hard drive. Using this approach allows the system to prioritize faster physical memory for more frequent processes and applications, improving the overall performance and preventing the device from locking up in the event it runs out of system memory.
In addition, the paging file is important to support crash dumps during a system crash (Blue Screen of Death), as without a large enough page file, a dump with all the contents of the system memory won’t be created.
Although the system does a pretty good job managing the paging file size according to various factors automatically, sometimes, you may still need to increase the default virtual memory values manually. For instance, when you see the «Your system is low on virtual memory» message. You’re noticing slow performance over time, or a particular application requires specific parameters to work as intended.
If you’re experiencing issues with virtual memory, the device doesn’t have enough memory, or you’re trying to improve the system performance, Windows 10 allows you to increase the size of the virtual memory in at least two ways using the Settings app and Command Prompt.
In this Windows 10 guide, we’ll walk you through the steps to increase the size of the virtual memory to improve the system responsiveness.
- How to increase virtual memory using Settings
- How to increase virtual memory using Command Prompt
How to increase virtual memory using Settings
To adjust the virtual memory size on Windows 10, use these steps:
Warning: Although anyone can change the paging file size, it’s only recommended to use these instructions if you have a valid reason, and you know what you’re doing.
- Open Settings.
- Click on System.
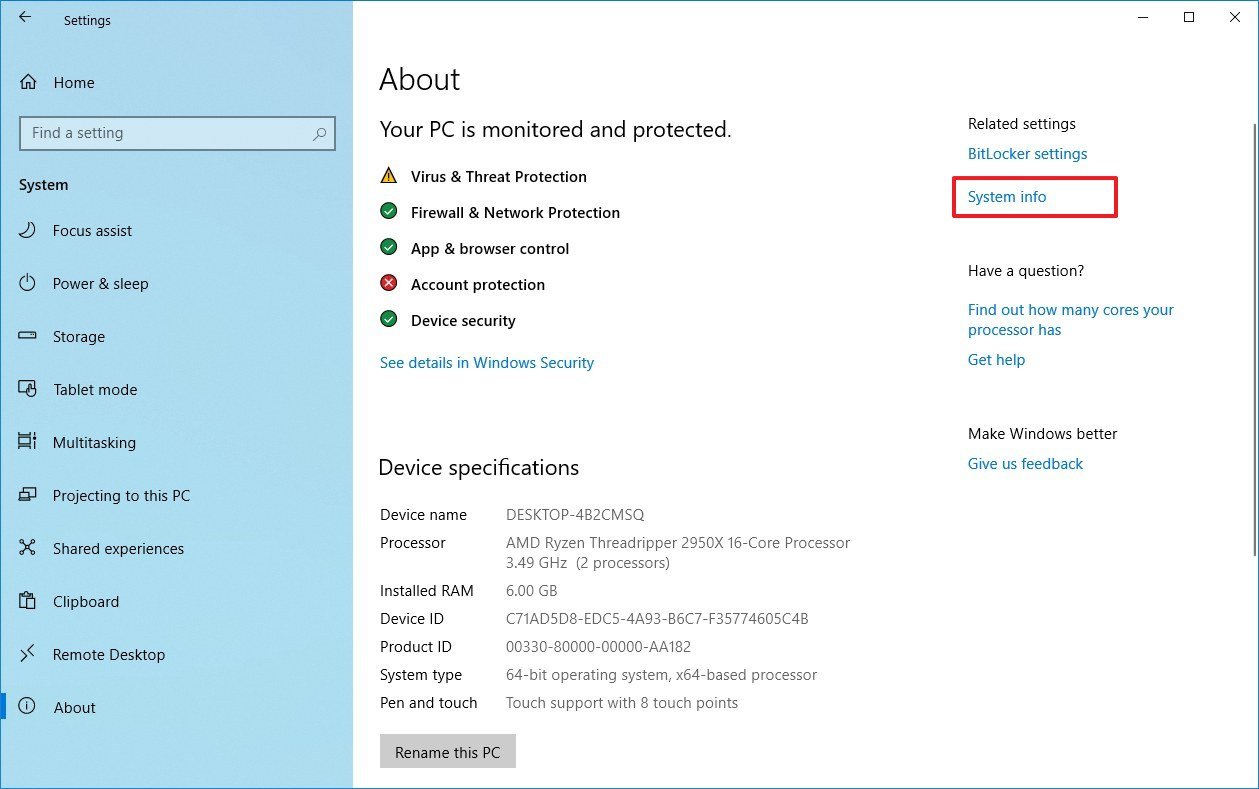
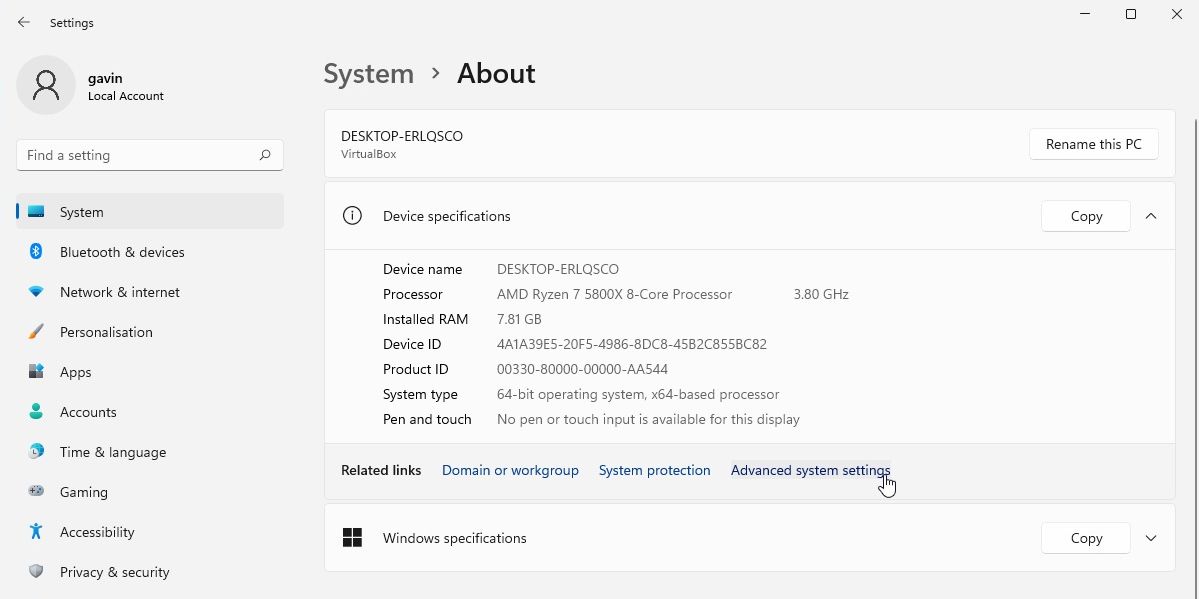
- Click on About.
- Under the «Related settings» section, click the System info option.
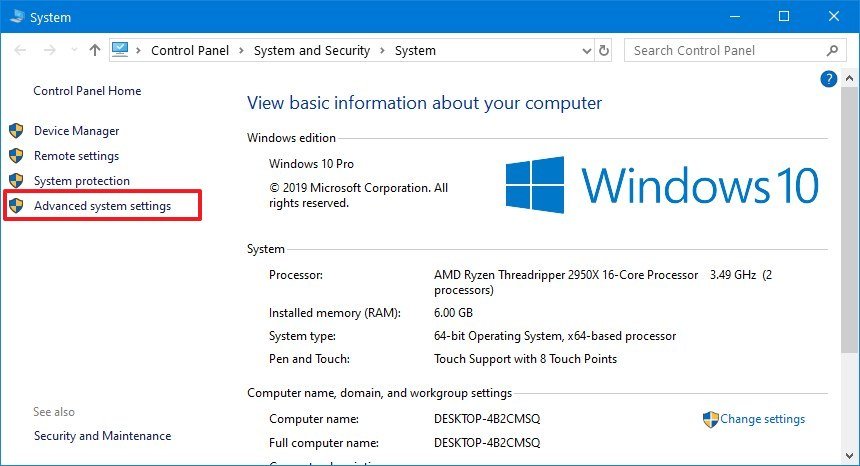
- Click the «Advanced system settings» option from the left pane.
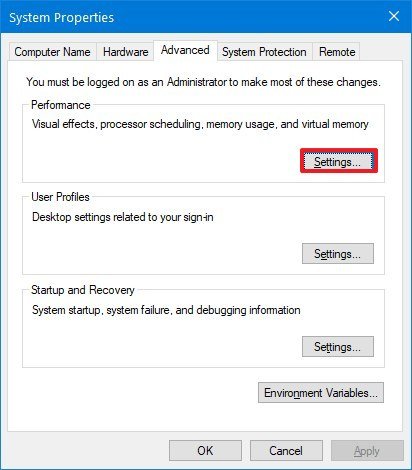
- Click the Advanced tab.
- Under the «Performance» section, click the Settings button.
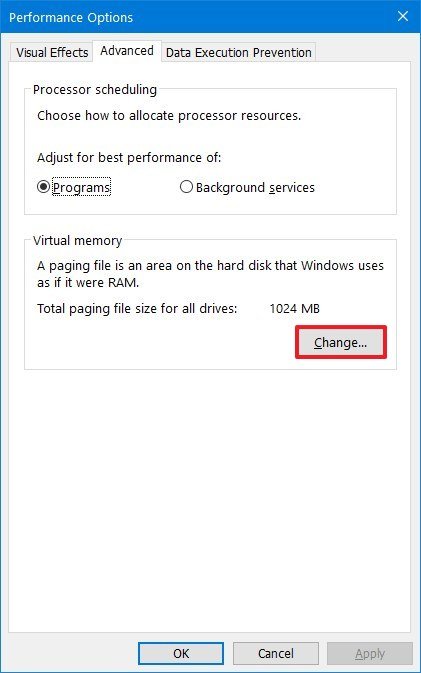
- Click the Advanced tab.
- Under the «Virtual memory» section, click the Change button.
- Clear the Automatically manage paging files size for all drives option.
- Select the Custom size option.
- Specify the initial and maximum size for the paging file in megabytes.Quick tip: The size of the virtual memory is unique to each device, and it can’t be generalized. However, usually, it’s recommended to use a number that’s one and a half times the total available memory for the «Initial size» and three times of available memory for the «Maximum size» when possible.
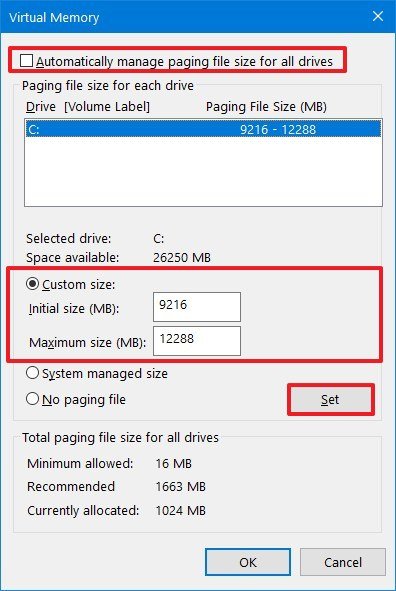
- Click the Set button.
- Click the OK button.
- Click the OK button again.
- Restart your device.
Once you complete the steps, you should notice an increase in performance when navigating Windows 10 as well as when running multiple apps at the same time.
If you need to revert the changes, you can use the same instructions, but on step No. 10, make sure to check the Automatically manage paging size for all drives option, and restart your device.
How to increase virtual memory using Command Prompt
To modify the paging file size with Command Prompt, use these steps:
- Open Start.
- Search for Command Prompt, right-click the top result, and select the Run as administrator option.
- Type the following command to understand the current status of the paging file and press Enter:
wmic pagefile list /format:list

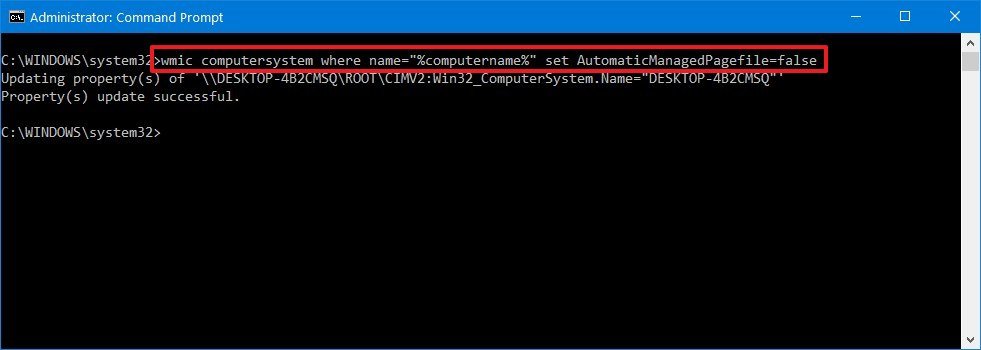
- Type the following command to switch form manage to custom virtual memory and press Enter:
wmic computersystem where name="%computername%" set AutomaticManagedPagefile=false
- Type the following command to set the initial and maximum size of the virtual memory and press Enter:
wmic pagefileset where name="C:\pagefile.sys" set InitialSize=YOUR-INIT-SIZE,MaximumSize=YOUR-MAX-SIZEThis example sets the paging file to «9216» and «12288» megabytes for the initial and maxium size:wmic pagefileset where name="C:\pagefile.sys" set InitialSize=9216,MaximumSize=12288

- Type the following command to restart your computer and press Enter:
shutdown -r -t 00
After you complete the steps, the device will start using the new values for virtual memory, which, if done correctly, should help to improve system performance.
If you no longer need to use the custom size for virtual memory, you can always revert the changes and allow Windows 10 to manage this feature using this command:
wmic computersystem where name="%computername%" set AutomaticManagedPagefile=trueand restarting your device.
While it’s recommended to use one and a half times the available memory for the initial and three times the memory for the maximum size, make sure to test the changes and adjust the values if you’re experiencing freezes, crashes, and other problems.
Although it’s possible to disable virtual memory on Windows 10, even when you have a large amount of system memory, it’s not recommended to disable this feature. Usually, if you disable paging file, some applications may stop working, some system features may not work efficiently, and you may end up with some weird behaviors.
Get the best of Windows Central in in your inbox, every day!
Mauro Huculak is technical writer for WindowsCentral.com. His primary focus is to write comprehensive how-tos to help users get the most out of Windows 10 and its many related technologies. He has an IT background with professional certifications from Microsoft, Cisco, and CompTIA, and he’s a recognized member of the Microsoft MVP community.
На чтение 6 мин. Просмотров 1.6k. Опубликовано 03.09.2019
Допустим, у вас есть компьютер, работающий под управлением Windows 10, который, кажется, не хватает памяти при использовании некоторых тяжелых программ, таких как игры, Visual Studio или AutoCAD. Когда Windows не хватает памяти для работы, она подключается к Виртуальной памяти , которая используется для хранения некоторых наименее используемых страниц памяти в файле с именем pagefile.sys.
Виртуальная память полезна во многих отношениях и помогает легко запускать программы, требующие больших ресурсов. Но иногда вы можете столкнуться с проблемами, связанными с виртуальной памятью, когда Windows 10 может не получить доступ к файлу pagefile.sys . В этом посте мы увидим, как можно легко внести некоторые изменения в настройки и избавиться от ошибки Слишком низкая виртуальная память Windows 10 .
Что является причиной ошибки Windows 10 Virtual Memory Too Low?
Изначально Windows устанавливает размер файла pagefile.sys в зависимости от объема ОЗУ на вашем компьютере. Допустим, у вас на компьютере физически около 8 ГБ ОЗУ. Теперь размер виртуальной памяти, установленный Windows, будет равен 2 ГБ или 32-разрядной системе и около 4 ГБ в 64-разрядной системе. Когда вы сталкиваетесь с ошибкой Windows 10 Virtual Memory на слишком низком уровне, это означает, что программа, которую вы пытаетесь использовать, требует много ресурсов, которые даже виртуальная память не может обработать.
Содержание
- Как исправить ошибку Windows 10 Virtual Memory Too Low?
- 1. Расширить виртуальную память
- 2. Получите больше оперативной памяти
- 3. Отключите приложения и программы, использующие память.
- 4.Сканирование компьютера на наличие вредоносных программ и других киберугроз
- 5. Восстановите ваш реестр
- 6. Проверьте свой диск на наличие ошибок
- 7. Очистите ваши временные файлы и папки
Как исправить ошибку Windows 10 Virtual Memory Too Low?
- Расширить виртуальную память
- Получите больше оперативной памяти
- Отключение памяти и приложений
- Сканирование компьютера на наличие вредоносных программ и других киберугроз
- Восстановите ваш реестр
- Проверьте свой диск на наличие ошибок
- Очистите ваши временные файлы и папки
1. Расширить виртуальную память
Причина, по которой я очистил причину этой ошибки выше, заключается в предоставлении очевидного решения. Это решение может быть легко устранено путем увеличения размера виртуальной памяти в вашей системе. В следующих шагах мы увеличим размер pagefile.sys , немного изменив настройки, и это поможет вам избавиться от этой проблемы.
- Нажмите Windows Key + R , чтобы начать диалог RUN .

- Теперь введите sysdm.cpl , и это откроет окно Свойства системы .

- Теперь в этом новом окне откройте вкладку Дополнительно и нажмите кнопку Настройки в разделе Эффективность .
- Откроется окно Параметры производительности , и теперь вам нужно перейти на вкладку Дополнительно .

- Теперь нажмите кнопку Изменить в разделе Виртуальная память , и откроется новое окно.
- Теперь нажмите на флажок в верхней части, который гласит: Автоматически управлять размером файла подкачки для всех дисков.

- Теперь нажмите кнопку Нестандартный размер . Здесь вы можете установить новый начальный размер pagefile.sys и максимальный размер.

- Нажмите ОК, , затем нажмите Применить в следующем окне, и теперь вам нужно перезагрузить компьютер, чтобы новые изменения вступили в силу.
Это должно исправить ошибку, связанную с нехваткой памяти в Windows 10. Тот же метод работает для Windows 7, Windows 8 или Windows 8.1, поэтому попробуйте и попробуйте, если вы столкнулись с такой проблемой.
2. Получите больше оперативной памяти
Ну, виртуальная память способна сделать так много. Также имейте в виду, что pagefile.sys использует пространство на жестком диске для создания виртуальной памяти, которая намного медленнее, чем фактическая оперативная память.
- ТАКЖЕ ПРОЧИТАЙТЕ: 4 лучших оптимизатора ОЗУ для Windows 10, чтобы ваш компьютер работал быстрее
3. Отключите приложения и программы, использующие память.
Проблемы с нехваткой памяти также могут быть вызваны некоторыми приложениями и программами, которые просто поглощают память компьютера. Самое быстрое решение, чтобы решить эту проблему, чтобы отключить эти программы. Но сначала вам нужно их идентифицировать.
- Перейдите в «Пуск»> введите «диспетчер задач»> дважды щелкните первый результат
-
Нажмите на вкладку Процессы> выберите Память, чтобы отфильтровать программы, которые используют слишком много памяти

- Щелкните правой кнопкой мыши по соответствующей программе> выберите Завершить задачу


4.Сканирование компьютера на наличие вредоносных программ и других киберугроз
Вредоносные программы, программное обеспечение для майнинга и другие подобные программы могут также вызвать нагрузку на память ПК. Проблема в том, что в фоновом режиме работают хитрые программы, и вы замечаете их только тогда, когда уже слишком поздно или их последствия стали слишком очевидными.
Используйте антивирус для запуска полной проверки системы. Вы также можете установить специальный инструмент для защиты от вредоносных программ для дополнительного уровня защиты.
Мы также рекомендуем установить анти-криптоминирующий инструмент, который обнаруживает и блокирует майнеры криптовалюты. Эти инструменты используют вычислительную мощность вашего компьютера для майнинга криптовалют без вашего согласия.
Лучшим средством защиты 2018 года считается Bitdefender. После того, как Nr. 1 антивирус, он также является отличным блокировщиком вредоносных программ, а также защищает ваш трафик и просмотр страниц.
- Загрузите антивирус Bitdefender по специальной цене со скидкой 50% .
5. Восстановите ваш реестр
Вредоносное ПО также может изменить некоторые ключи реестра, что может привести к тому, что ваш компьютер будет вести себя необычно. В этом случае вам необходимо восстановить реестр с помощью специального инструмента, такого как CCleaner или rybbubg, средство проверки системных файлов Microsoft для проверки повреждения системных файлов.
Не забудьте сначала сделать резервную копию вашего реестра на случай, если что-то пойдет не так, чтобы вы могли восстановить работающую версию ОС. Вот как запустить сканирование SFC:
1. Перейдите в Пуск>, введите cmd >, щелкните правой кнопкой мыши Командную строку> выберите Запуск от имени администратора.

2. Теперь введите команду sfc/scannow

3. Дождитесь завершения процесса сканирования и перезагрузите компьютер. Все поврежденные файлы будут заменены при перезагрузке.
6. Проверьте свой диск на наличие ошибок
Windows 10 позволяет проверять диск на наличие ошибок с помощью командной строки.
Запустите командную строку от имени администратора и введите команду chkdsk C:/f , а затем нажмите Enter. Замените C буквой раздела вашего жесткого диска.

Чтобы исправить физические и логические ошибки после выполнения этой команды, вам также необходимо выполнить команду r параметр .

7. Очистите ваши временные файлы и папки
Когда вы пользуетесь своим компьютером или просматриваете Интернет, ваш компьютер накапливает различные ненужные файлы, так называемые ненужные файлы. Они могут повлиять на скорость обработки, память и скорость отклика вашего компьютера. Самый простой и быстрый способ удалить ваши временные файлы и папки – использовать очистку диска.
1. Перейдите в Пуск> введите Очистка диска> запустите инструмент

2. Выберите диск, который вы хотите почистить> инструмент скажет вам, сколько места вы можете освободить

Таким образом, даже после выполнения описанных выше действий вы столкнетесь с той же ошибкой, тогда вам пора купить больше оперативной памяти, и это наверняка решит проблему для вас!
Примечание редактора . Этот пост был первоначально опубликован в феврале 2016 года и с тех пор был полностью переработан и обновлен для обеспечения свежести, точности и полноты.
Your computer slowing down isn’t a great feeling. Is it overheating? Is the CPU old? Or, is it that you’ve run out of memory?
Running out of memory affects your system from top to bottom, making regular tasks suddenly feel like walking through treacle.
If that sounds like your Windows 11 installation, it’s time to check out your virtual memory settings to make sure your system can cope with demand. So, here’s how you change the virtual memory size on Windows 11, along with a few tips on boosting your system performance.
What Is Virtual Memory?
We’ve previously explained virtual memory in more detail, but here is an outline to bring you up to speed.
Your hard drive is where your operating system lives, as well as your photos, music, games, documents, and otherwise. Your RAM stores program-specific data. It is much faster but also more volatile, acting as a working storage area for the programs and files you have open.
So, what is virtual memory?
Well, if you use all the RAM available to your system, it will utilize virtual memory—also known as a swap or paging file—to provide a temporary expansion. Your system’s virtual memory does this using part of your hard-drive memory to expand your RAM effectively. So, this virtual memory is extremely useful. It allows your system to handle more data for more programs than previously available.
When your RAM runs low, your system will call upon the paging file to handle some of the extra data. However, as your hard drive or even solid-state drive is much slower than your RAM, system performance will take a hit.
Windows 11 Is Running Low on Virtual Memory
Now, the thing is, virtual memory has its own limits. It isn’t an infinite well of additional yet slower memory you can call upon. If you begin to run out of virtual memory, Windows 11 will display the following error message:
Your system is low on virtual memory. Windows is increasing the size of your virtual memory paging file. During this process, memory requests for some applications may be denied. For more information, see help.
Windows 11 will automatically manage your virtual memory, ensuring that the paging file has enough capacity to handle your system demands. However, you can also manually increase the size of your paging file on Windows 11 if you’re comfortable making decisions regarding how much RAM you have installed.
Windows sets the initial virtual memory paging file equal to the amount of installed RAM. The paging file is a minimum of 1.5 times and a maximum of three times your physical RAM. You can use the following system to calculate your Windows 11 paging file (using a system with 8GB installed as the example), providing you know how much RAM you have installed.
- Minimum: 102481.5=12288 [1GB RAM x Installed RAM x Minimum]
- Maximum: 102483=24576 [1GB RAM x Installed RAM x Maximum]
Still, both of these values are high. Microsoft actually recommends «3 × RAM or 4 GB, whichever is larger,» which will protect your system from instability when you do use your paging file. However, Windows automatic paging file management might decide otherwise, so it’s typically best to let the operating system figure things out for itself. For example, in the image below, you can see that on my Windows 10 machine with 32GB RAM installed, the paging file is automatically set at just under 7GB.
Furthermore, remember that these values take up space on your hard drive, as Windows allocates the overall paging file space in case it needs it.
How to Increase Virtual Memory Size on Windows 11
If you want to go ahead and manually alter the paging file size on Windows 11 to remove the virtual memory low message, here’s how you go about it.
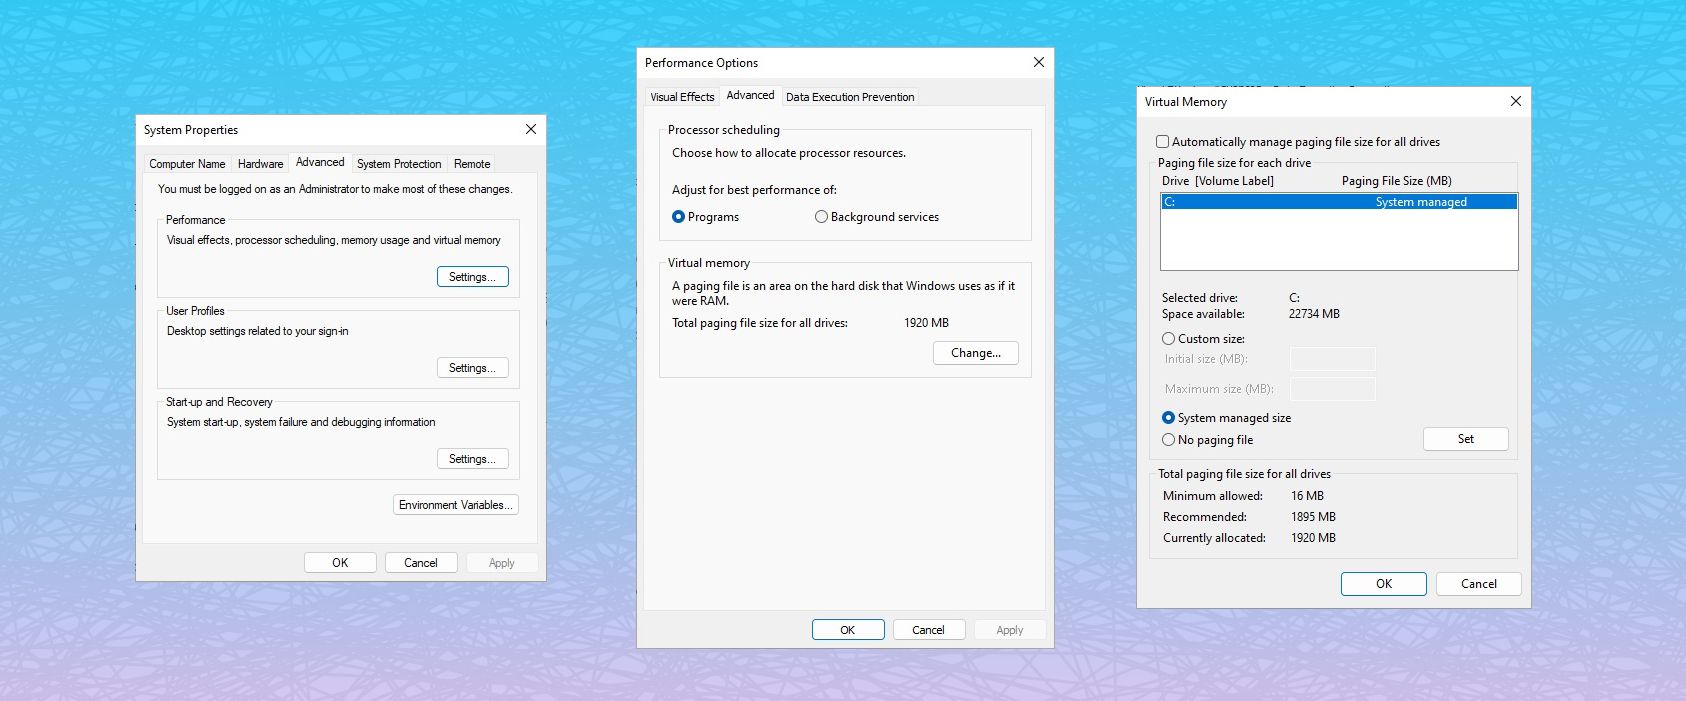
- Press Windows key + I to open the Settings app.
- Head to System > About.
- Select Advanced system settings.
- Under Performance, select Settings.
- Open the Advanced tab. Under Virtual memory, select Change. Here are your Virtual Memory options.
Keep in mind the virtual memory management tips in the previous section. It might seem like drastically increasing your paging file is a great idea, but it’s almost guaranteed to cause system instability when you least expect it.
Install More RAM to Boost Your System Performance
The only way to truly fix your low virtual memory issue is to install more RAM. The reason your system is turning to the paging file to begin with is that additional data is being palmed off.
The answer is to install more RAM, which in turn will give your whole system a boost as you’ll no longer run out of memory and have to use the slower paging file instead.