Онлайн-компиляторы Python хороши, когда нужно быстро протестировать что-то простое, но для полноценной работы их недостаточно. Чтобы использовать всю мощь Python, нужно установить его на свой компьютер, и тогда можно подключать к нему любые библиотеки и писать код любой сложности.
В этой статье покажем, как установить Python под Windows и как с ним работать. Для MacOS всё почти то же самое, а если у вас Linux, то вы лучше нас знаете, как это сделать.
Скачивание и установка
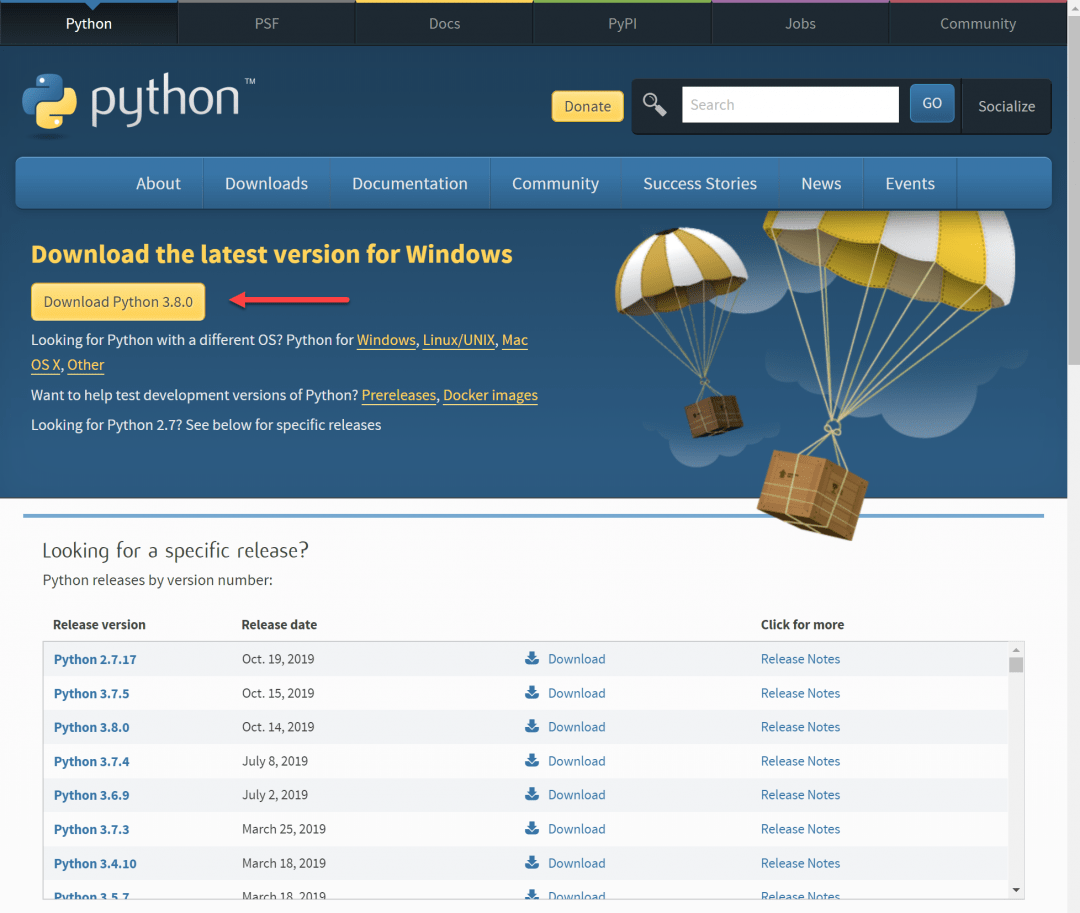
Для начала нам нужно скачать установщик с официального сайта — python.org. Если качать Python с других сайтов, можно подцепить вирус или троян. Скачивайте программы только с официальных сайтов.
Несмотря на то, что Python 3 вышел 10 лет назад, до сих пор многие спорят про то, какую версию лучше использовать — вторую или третью. Мы за прогресс, поэтому качаем Python 3, но вы можете выбрать любую другую.
На главной странице сразу видим большую жёлтую кнопку, на которой написано «Download Python». Нажимаем, сохраняем и запускаем файл. Он весит около 25 мегабайт.
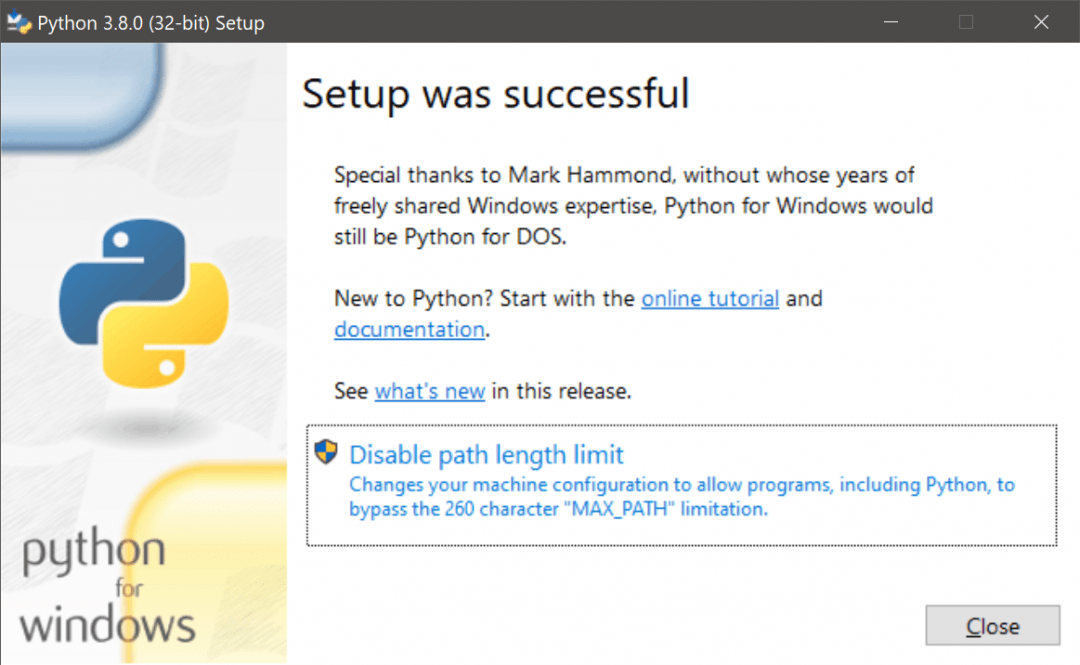
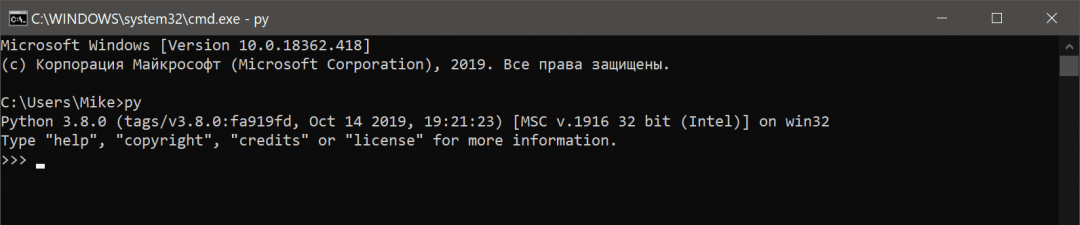
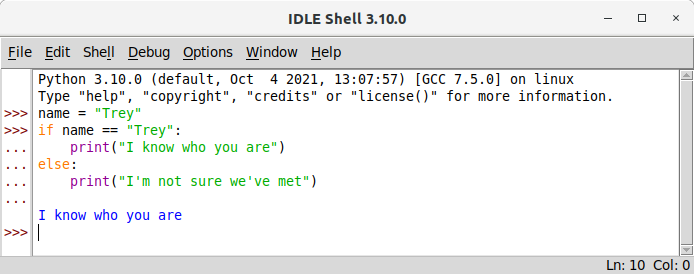
Когда установка закончится, нужно проверить, что всё было сделано правильно. Для этого в командной строке наберите py (латиницей) или python и нажмите клавишу ввода. Если всё хорошо, в ответ Python вам напишет номер своей версии и сборки и предложит несколько команд для знакомства с собой:
Запуск программ
Пока наш Python может работать только через командную строку — какие команды введёте, те он и выполнит. Многим разработчикам это нравится, но для старта это неудобно. Например, чтобы запустить программу, нужно написать в командной строке так:
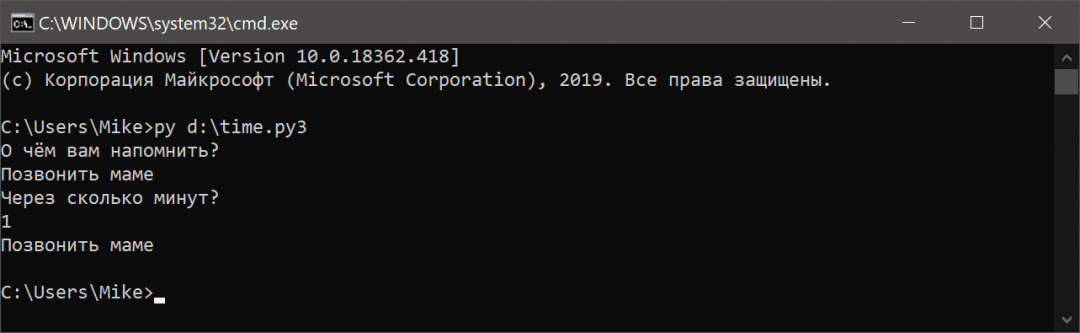
py полное_имя_файла
Полное имя означает, что нужно написать не только название файла, но и диск с папкой, где он находится. Чтобы было понятнее, давайте возьмём наш код из статьи про таймер на Python и сохраним его в файле time.py3 на диске D. Py3 означает, что внутри этого файла будет код на Python3. Можно просто назвать файл python.py, без тройки, но для некоторых моментов это может быть важно.
Теперь, чтобы запустить наш код, напишем в командной строке:
py D:time.py3
Результат работы — выполненный алгоритм:
Подключаем VS Code
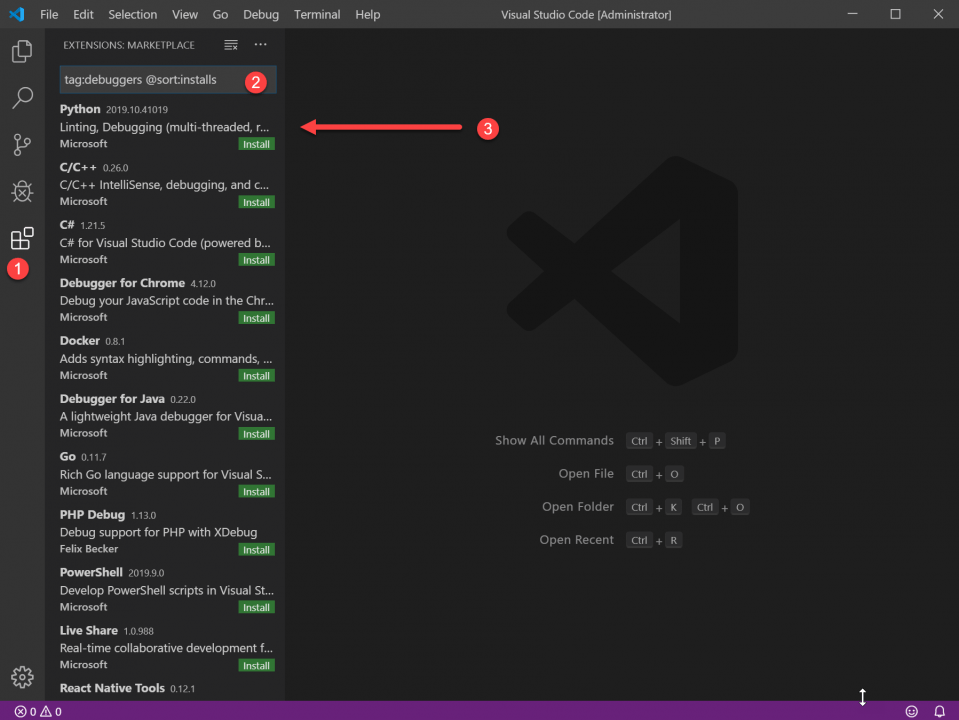
Мы уже рассказывали об этом редакторе кода — он быстрый, бесплатный и есть много плагинов. Чтобы работать с Python-файлами было проще, научим VS Code понимать и запускать их. Для этого нам нужно найти и установить специальный плагин для этого языка. Открываем вкладку Расширения (Extensions) и пишем такое:
tag:debuggers @sort:installs
В результатах поиска находим Python и нажимаем Install:
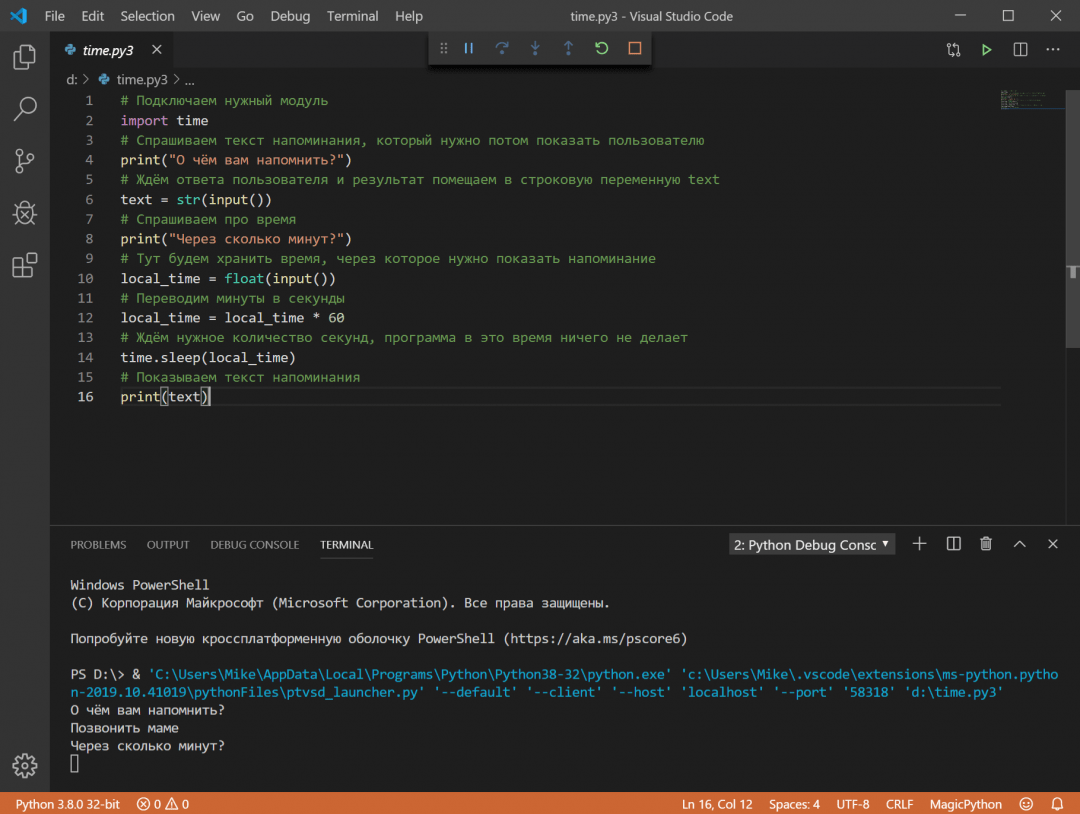
Затем то же самое делаем для подсветки синтаксиса: пишем в Расширениях команду ext:py3 и устанавливаем плагин MagicPython. После этого перезапускаем VS Code, открываем наш файл и нажимаем F5. Когда выпадающее окошко спросит, с чем будем работать — выбираем Python. В итоге мы получаем редактор кода с нужной нам подсветкой синтаксиса и результатом работы в том же окне. Красота!
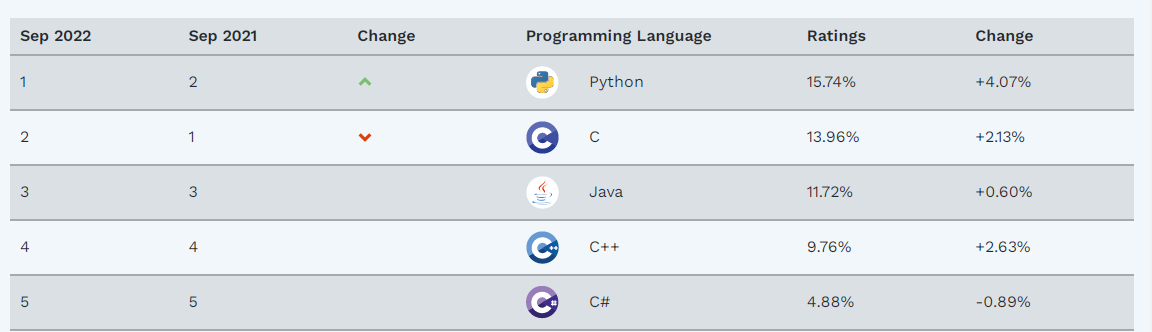
Python – перспективный и востребованный язык. Он был разработан в 1991 году, и с тех пор завоевал огромную популярность. Уже несколько лет Пайтон уверенно лидирует во всех рейтингах языков программирования. Это закономерно – язык удачно совместил в себе несколько важных преимуществ:
- Простоту изучения – Пайтон считается лучшим языком для начинающих.
- Понятный, гибкий, интуитивный синтаксис – код легко писать, читать и модифицировать.
- Универсальность – Python подходит для создания любых программ, кроме тех приложений, которым требуется высокая производительность и прямое взаимодействие с «железом».
- Возможность использования в самых перспективных сферах разработки – от искусственного интеллекта до интернета вещей.
- Беспроблемную интеграцию с любыми другими языками и технологиями:
- фрагменты Python-приложений, которым необходима высокая скорость исполнения, можно писать на C, C++ или Java;
- на Python часто пишут код, связывающий разнообразные службы и компоненты на крупных платформах;
- серверная часть веб-приложений на Python прекрасно сочетается с любыми фреймворками, на которых пишут пользовательские интерфейсы.
Очевидные преимущества языка привлекают внимание множества талантливых разработчиков. В результате экосистема Python постоянно пополняется новыми фреймворками, библиотеками и модулями, с помощью которых можно реализовать практически любой проект – от сложного веб-приложения до нейронной сети. Чаще всего Python применяют для разработки бэкенда (серверной части веб-приложений), в искусственном интеллекте, для анализа и визуализации больших данных, в автоматизации бизнес-процессов.
Помимо длинного списка преимуществ, Пайтон известен несколькими недостатками. Главные из них:
- Низкая (по сравнению с C++ и Java) производительность. По этой причине на Python не пишут игры и другие приложения, для которых критична максимальная скорость исполнения. Пайтон также не подходит для решения большинства олимпиадных задач, которые предусматривают ограничения по скорости выполнения и объему используемой памяти.
- Высокое потребление системных ресурсов. Даже самая простая игра на Пайтон будет загружать процессор и оперативную память гораздо сильнее, чем аналогичное приложение на C++ или Java.
- Выделение блоков кода пробелами. В отличие от других языков, функциональные блоки в Python выделяются пробелами. Использование табуляции допускается, но не рекомендуется, поскольку при смешивании пробелов и табуляции в одной программе интерпретатор выдает ошибку. Лишний или недостающий пробел также вызовет ошибку.
- Открытый, некомпилированный код готовых приложений и скриптов. Python – интерпретируемый язык, программы на нем обычно не компилируются в .exe файлы, и пользователи могут случайно повредить код. Кроме того, для запуска некомпилированных Пайтон-программ требуется установка интерпретатора. Эту проблему можно решить упаковкой Python-приложения в exe-файл, но такой метод не является компиляцией в полном смысле этого слова.
Где скачать Питон и как установить
Чтобы писать и запускать Python-программы на своем компьютере, нужно установить интерпретатор: он будет переводить инструкции на Python в понятный компьютеру машинный код. Интерпретатор Python можно установить любым из перечисленных ниже способов.
Способ 1: Отдельная установка. Понадобится установочный файл, скачанный с официального сайта. Выберите нужную платформу – в соответствующих разделах выложены релизы Python для Windows, для macOS и для других поддерживаемых ОС. Во время установки интерпретатора будет также установлена базовая среда разработки – ее можно запустить, кликнув в меню по IDLE. Но эта среда не отличается удобством и подходит лишь для запуска небольших скриптов.
Гораздо удобнее писать и запускать программы на Python в специализированной IDE (интегрированной среде разработки) вроде PyCharm или Wing, либо в универсальном редакторе кода – например, Sublime Text, Vim или Visual Studio Code. Редактор или IDE устанавливают после установки Python.
Способ 2: Установка в составе IDE. Минималистичная IDE Thonny автоматически устанавливает Python. Это оптимальный способ для начинающих:
- не нужно устанавливать дополнительные плагины, как при использовании универсальных редакторов;
- не придется выбирать нужную версию интерпретатора, как при установке PyCharm;
- не потребуются никакие дополнительные настройки – сразу после установки можно писать и запускать код.
Способ 3: Установка вместе с пакетом Anaconda или Miniconda. Эти пакеты, помимо интерпретатора Python, включают в себя множество модулей для научных расчетов, а в качестве IDE используют Spyder. Если вы не планируете писать программы для научных и инженерных вычислений, лучше остановить выбор на первом или втором способе.
Как установить Python на Windows
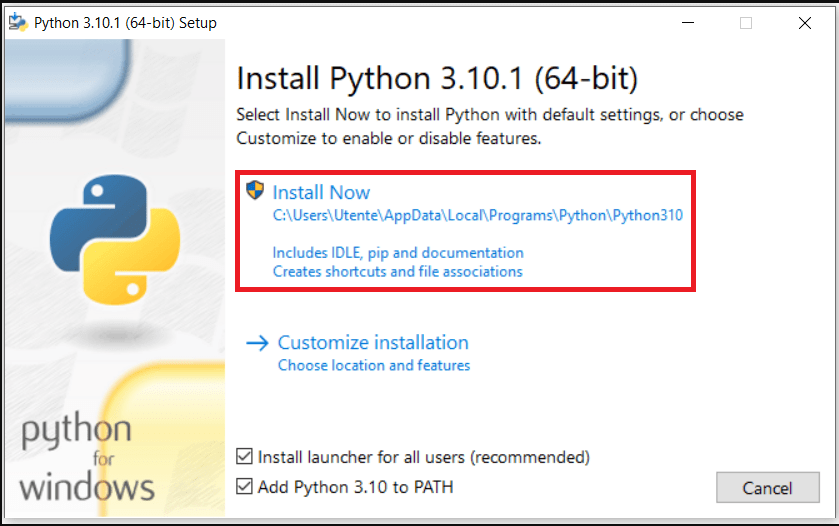
Установка Python в составе специализированной IDE вроде Thonny не вызовет затруднений – достаточно принять условия лицензионного соглашения и нажать кнопку Install. Если же вы хотите писать и запускать код в редакторе Visual Studio Code или в IDE PyCharm, сначала придется скачать и установить нужную версию интерпретатора. Установить Python на Windows очень просто:
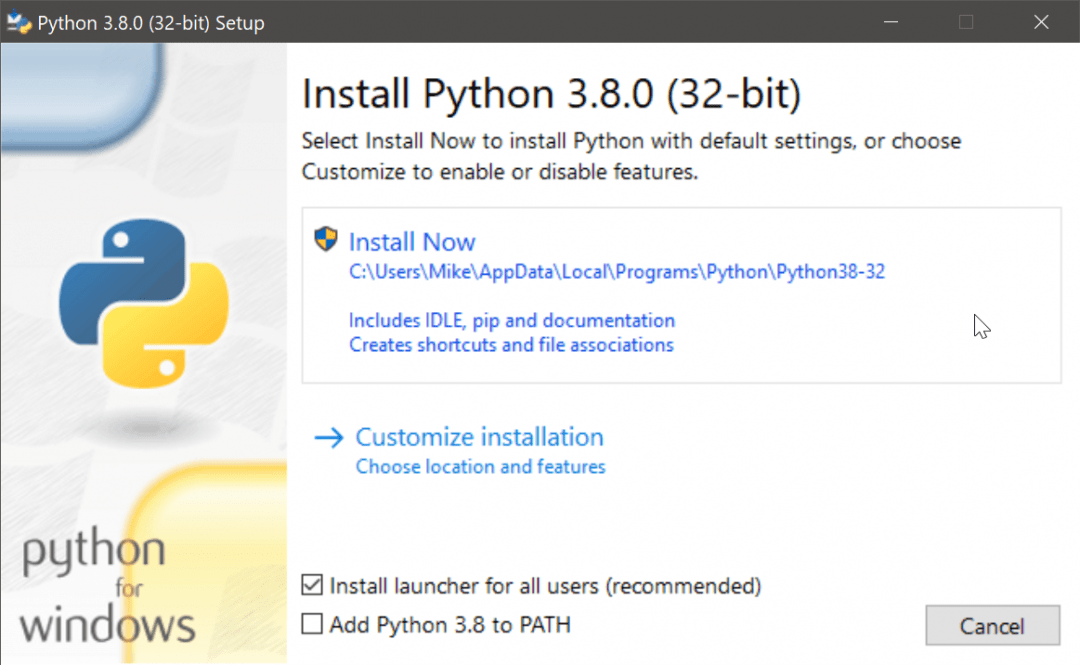
- кликните по скачанному с официального сайта файлу;
- выберите Install Now;
- не забудьте отметить опцию Add Python 3.x to PATH.
Обратите внимание: последняя версия, работающая на Windows 7 – Python 3.8.11.
Установка Python на macOS
Операционная система macOS включает интерпретатор Python по умолчанию. Но, скорее всего, версия окажется безнадежно устаревшей – macOS, начиная с 10.8 и заканчивая 12.3., поставлялась с Python 2.7. Проверить версию можно в терминале с помощью команды python --version.
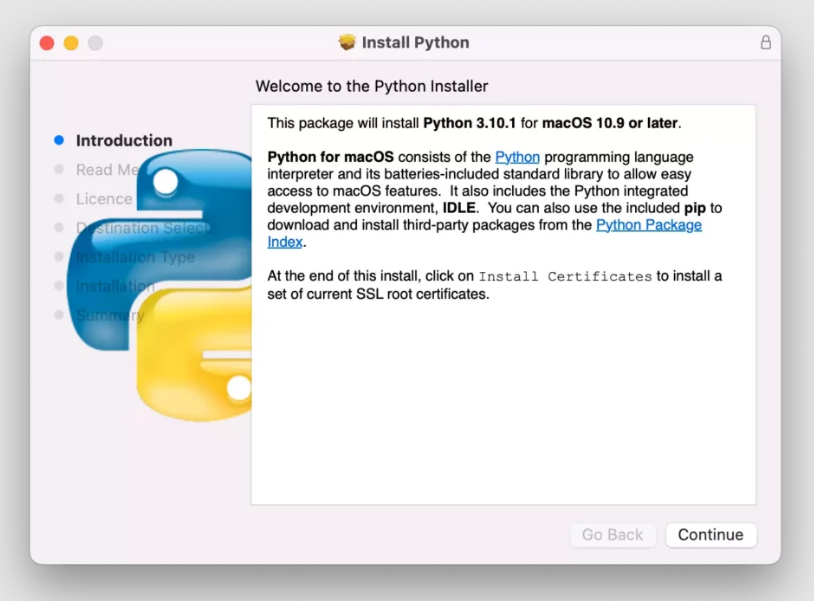
Чтобы установить свежий релиз Python, скачайте нужную версию с официального сайта и запустите установку, кликнув по файлу дважды. Нажмите кнопку Continue.
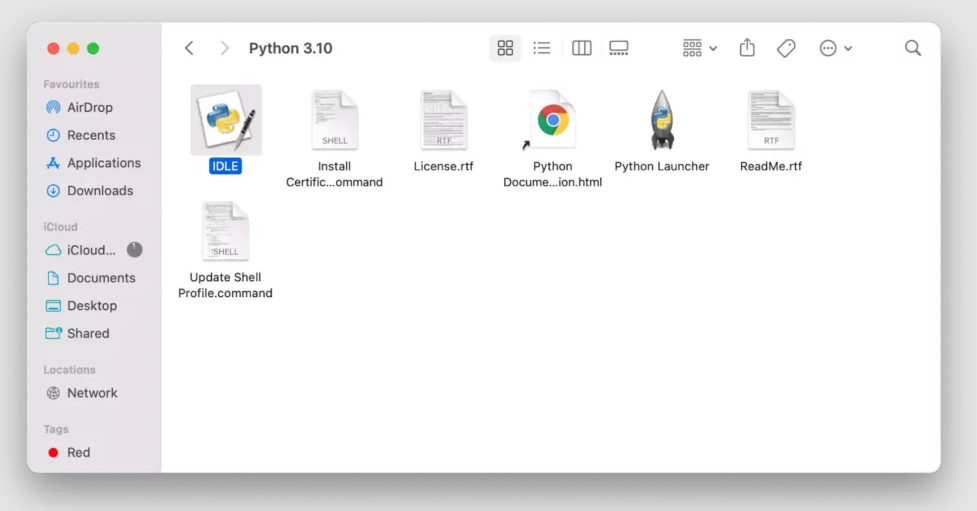
После завершения установки папка с Python откроется автоматически.
Установка Python на Ubuntu
Практически все ОС семейства Linux поставляются с Python. Проверить версию интерпретатора на Ubuntu можно с помощью команды: python3--version. Если нужна более свежая версия Python, интерпретатор придется обновить. Откройте терминал (CTRL + ALT + T) и выполните последовательно эти команды:
        sudo apt update && sudo apt upgrade -y
sudo apt install software-properties-common -y
sudo add-apt-repository ppa:deadsnakes/ppa
sudo apt install python3.10
Проверьте успешность установки:
        $ python3.10 --version
3.10.4
Настройка Visual Studio Code для работы с Python в среде macOS
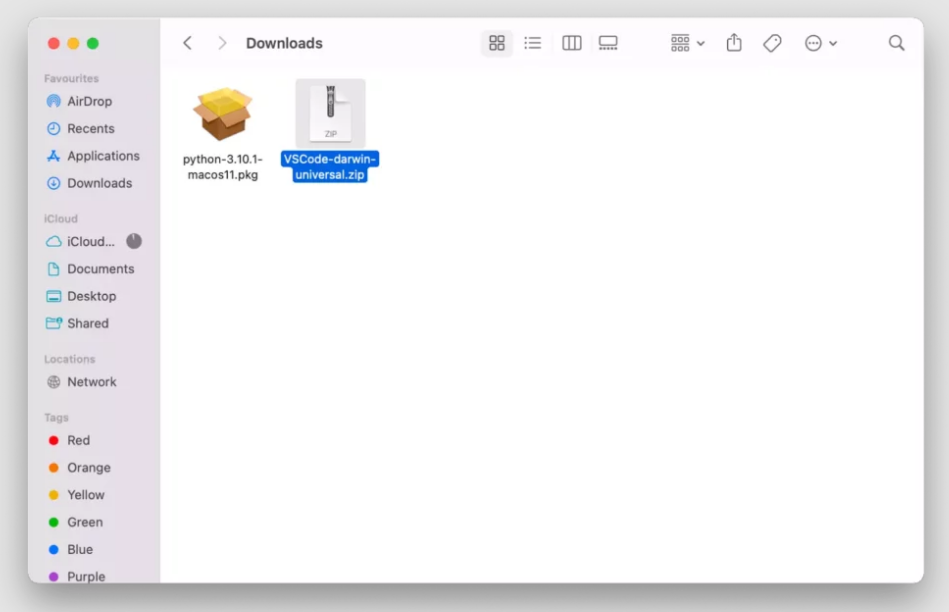
Visual Studio Code – один из самых популярных редакторов кода. VS Code также можно рассматривать, как простую IDE – там есть набор инструментов для автозавершения кода и отладки программ. Скачайте установочный файл, дважды кликните, чтобы открыть архив:
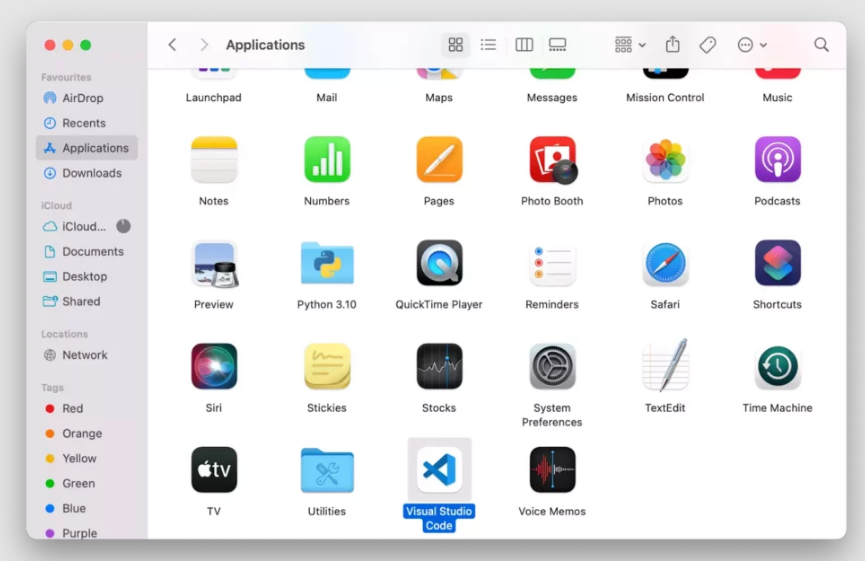
И перенесите редактор в приложения:
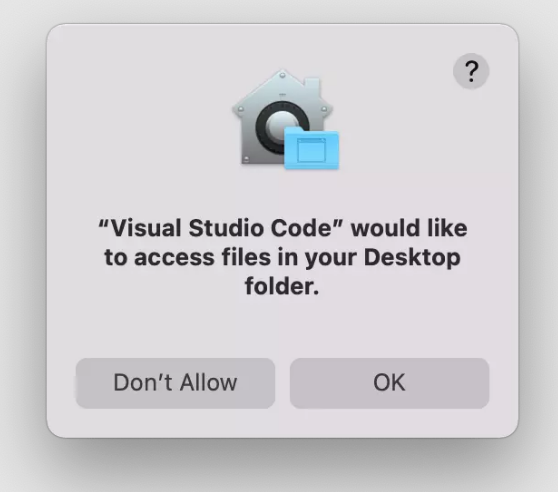
Теперь нужно открыть редактору доступ в папку, где хранятся программы и скрипты на Python. Создайте папку на рабочем столе, затем откройте ее в VS Code. Редактор запросит разрешение на доступ – нажмите ОК:
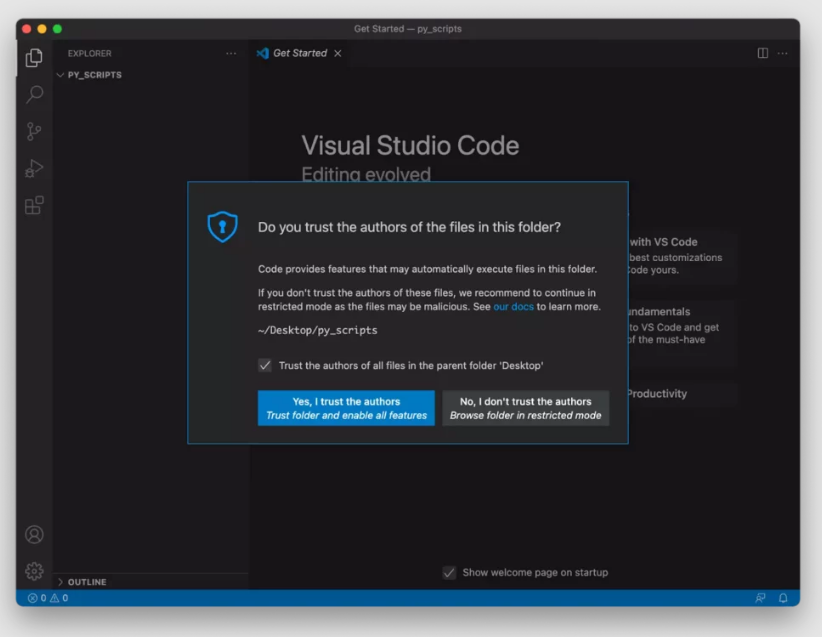
Если появится вопрос, доверяете ли вы авторам скриптов, находящихся в папке – ответьте утвердительно:
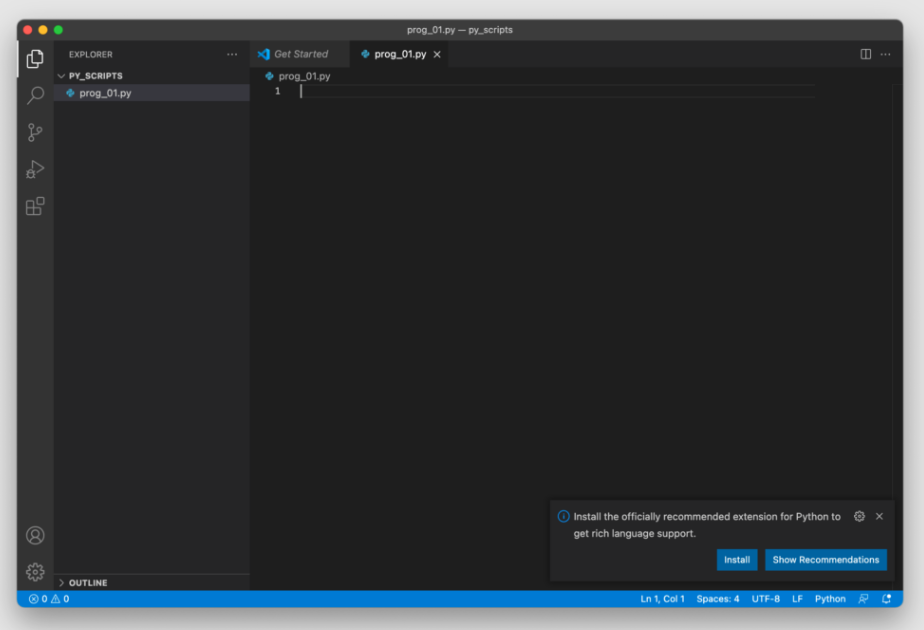
Теперь нужно установить расширение для работы с программами на Python. Проще всего предоставить редактору сделать это самостоятельно. Для этого создайте файл с расширением .py в папке, к которой уже предоставили доступ. VS Code автоматически обнаружит новый тип расширения и предложит установить плагин (справа внизу):
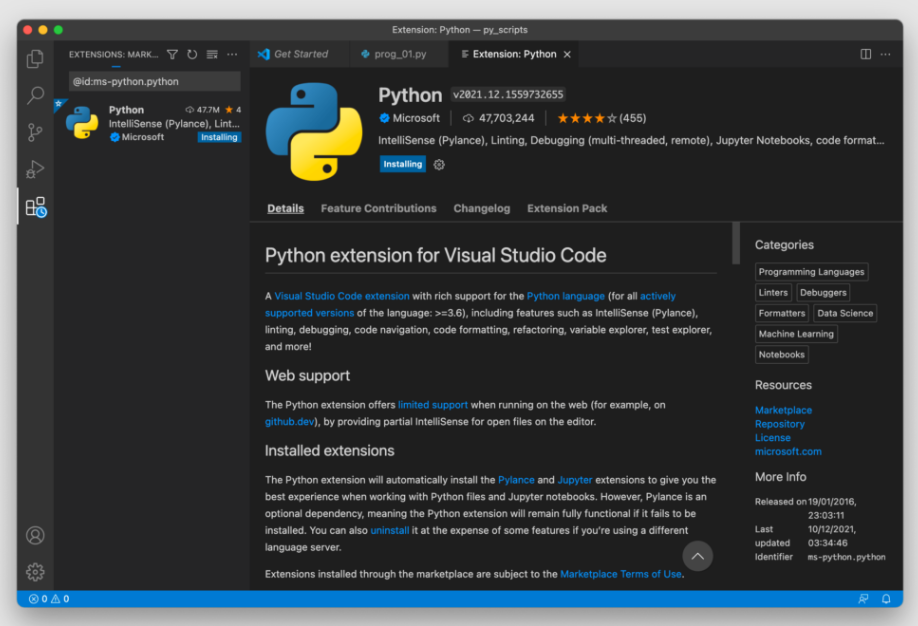
Нажмите Install для запуска установки:
Другой способ установить плагин для работы с Python-кодом – выбрать его из списка доступных расширений на маркетплейсе:

Осталось выбрать нужную версию интерпретатора Python. Нажмите на кнопку Select Python Interpreter:
Затем выберите рекомендованную (самую свежую версию) из доступных:
Второй способ подключить нужную версию интерпретатора – нажать CMD + SHIFT + P, напечатать Python, и выбрать Select Interpreter.
Настройка Visual Studio Code для работы с Python в среде Windows
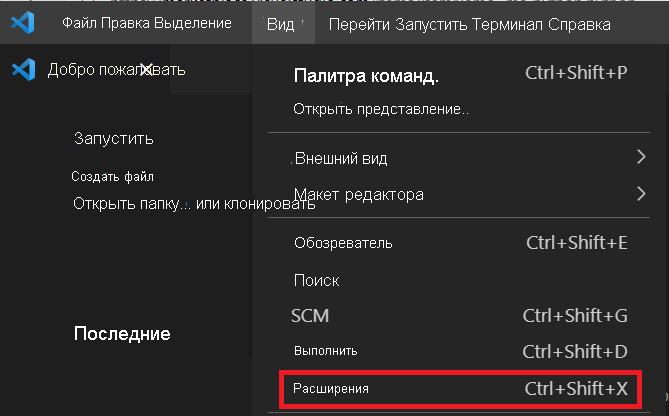
Скачайте установочный файл с официального сайта. Дважды кликните по файлу для запуска мастера установки. После завершения установки VS Code автоматически запустится. Нажмите комбинацию клавиш Ctrl + Shift + X, чтобы открыть Расширения. Это также можно сделать из меню – выберите Обзор и затем Расширения:
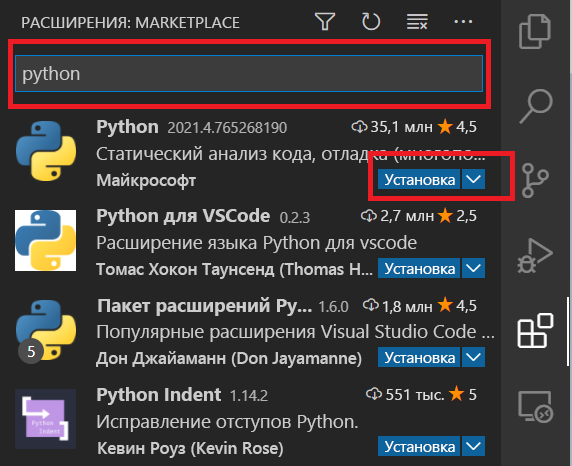
Введите python в поле поиска, затем выберите расширение Python, подписанное Майкрософт – обычно это первый плагин в списке найденных. Нажмите на кнопку Установка:
После установки расширения кнопка изменится на значок ⚙Параметры. Как правило, VS Code автоматически распознает интерпретатор Python. Если этого не произошло, либо нужно подключить другую версию – наберите Python: Select Interpreter в строке состояния (status bar) и выберите нужный вариант.
Настройка PyCharm
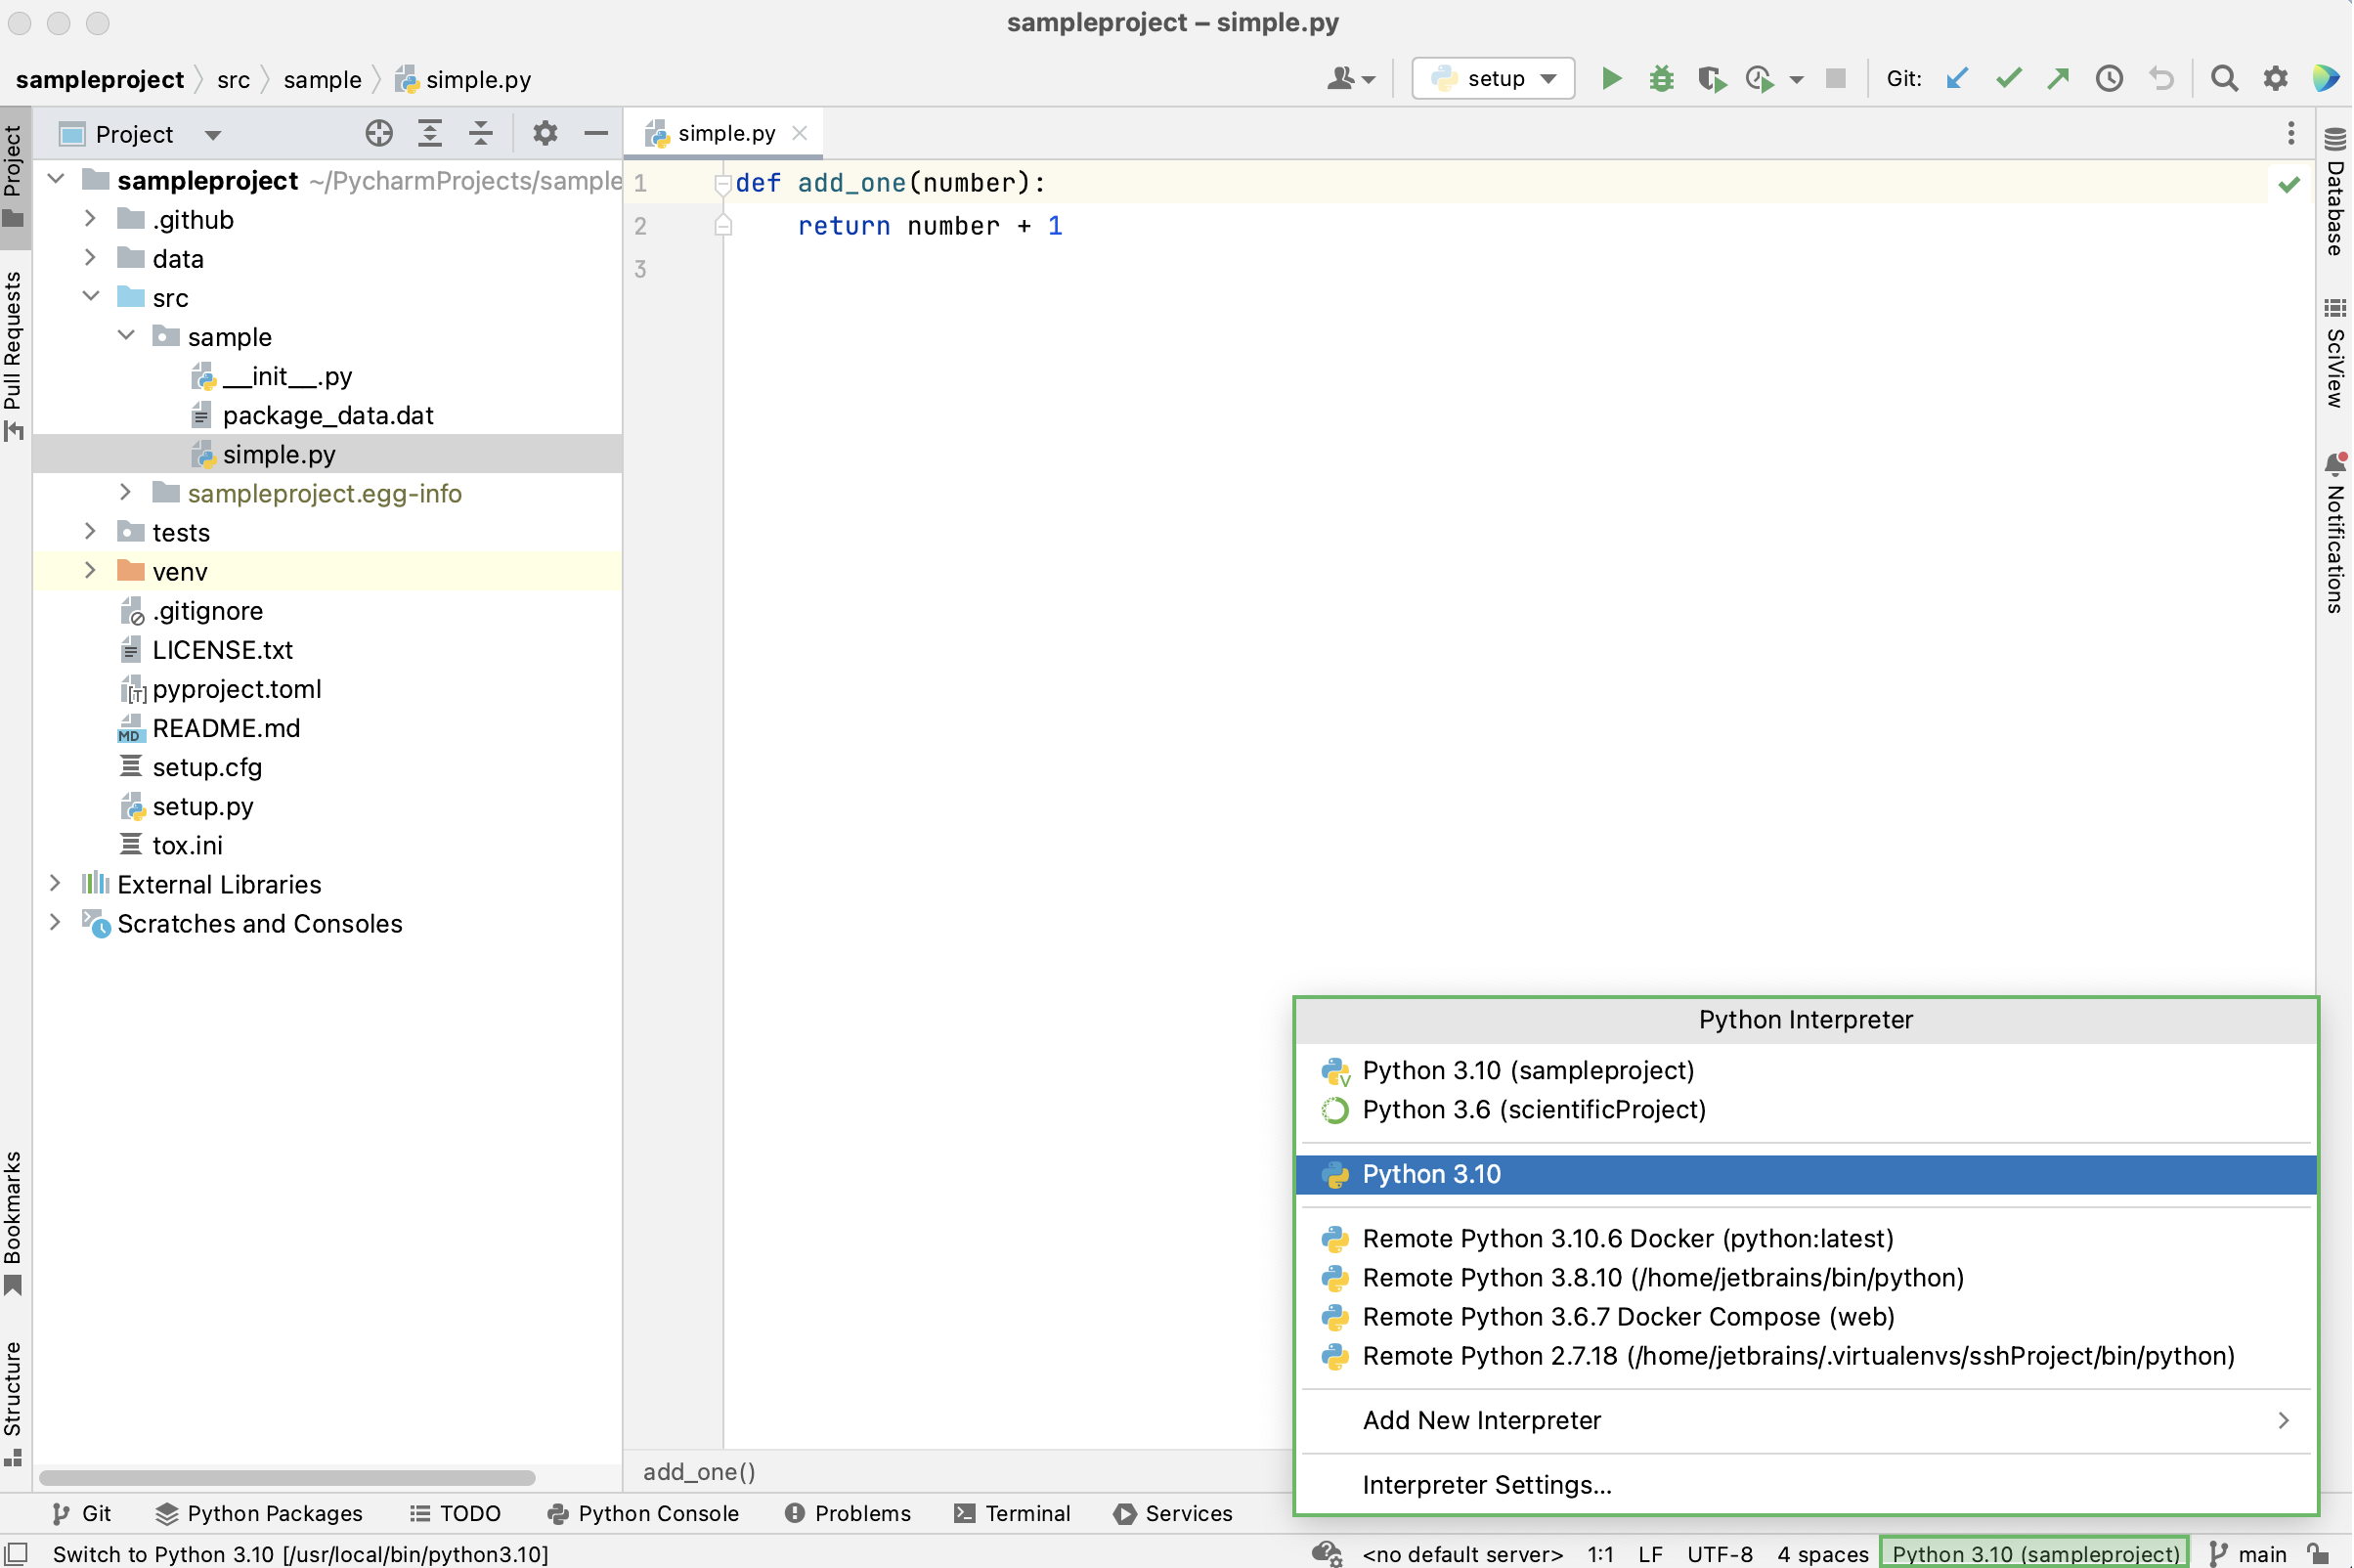
Эта IDE позволяет переключаться между несколькими версиями интерпретатора Python. При этом можно выбрать конкретный интерпретатор для любого отдельного проекта, либо выбрать интерпретатор по умолчанию для всех новых проектов.
Выбрать интерпретатор для отдельного проекта можно из строки состояния (status bar):
Также можно выбрать нужную версию Python, нажав Ctrl + Alt + S, и перейдя в настройки проекта: Project название проекта > Python Interpreter. Чтобы просмотреть список всех установленных интерпретаторов, нажмите Show All:

Чтобы выбрать интерпретатор для всех новых проектов по умолчанию:
- На Windows и Linux откройте в меню File > New Projects Setup > Settings for New Projects.
- На macOS перейдите в File > New Projects Setup > Preferences for New Projects.
Затем в настройках Python Interpreter выберите один из установленных интерпретаторов, либо кликните по значку-шестеренке, чтобы загрузить новый.
Интерпретаторы Python онлайн
Самый известный из таких интерпретаторов – проект Jupyter Notebook. Запускать программы на Питоне можно прямо на странице:

При желании Jupyter Notebook можно установить на свой компьютер с помощью команды pip install notebook. Если во время установки появится сообщение о том, что на компьютере нет Rust, его можно скачать здесь. Запускают Jupyter Notebook командой jupyter notebook, после чего блокнот можно открыть в браузере по ссылке http://localhost:8888/tree.
Онлайн-интерпретаторы особенно удобны в том случае, когда по каким-то причинам установить Python на собственное устройство нельзя. Таким интерпретатором можно пользоваться в любом браузере – на ноутбуке, рабочем компьютере, смартфоне или планшете. Вот небольшой список отличных онлайн IDE для работы с Python:
- Replit – позволяет подключать любые библиотеки, загружать нужные файлы и базы данных.
- Python Online Compiler – простой интерпретатор, отлично подойдет для новичков.
- Online Python – удобный и простой интерпретатор.
- Online Python 3 IDE – поддерживает совместную разработку.
- Online Python Interpreter – предоставляет возможность сохранять и скачивать проекты.
Подведем итоги
В первой части мы рассмотрели преимущества и недостатки Python, и обсудили все возможные способы запуска интерпретатора – с установкой и без. Во второй части мы расскажем о книгах, курсах, YouTube-каналах и других полезных ресурсах для самостоятельного изучения языка.
***
📖 Содержание самоучителя
- Особенности, сферы применения, установка, онлайн IDE
- Все, что нужно для изучения Python с нуля – книги, сайты, каналы и курсы
- Типы данных: преобразование и базовые операции
- Методы работы со строками
- Методы работы со списками и списковыми включениями
- Методы работы со словарями и генераторами словарей
- Методы работы с кортежами
- Методы работы со множествами
- Особенности цикла for
- Условный цикл while
- Функции с позиционными и именованными аргументами
- Анонимные функции
- Рекурсивные функции
- Функции высшего порядка, замыкания и декораторы
Getting Started with Python in VS Code
In this tutorial, you will use Python 3 to create the simplest Python «Hello World» application in Visual Studio Code. By using the Python extension, you make VS Code into a great lightweight Python IDE (which you may find a productive alternative to PyCharm).
This tutorial introduces you to VS Code as a Python environment — primarily how to edit, run, and debug code through the following tasks:
- Write, run, and debug a Python «Hello World» Application
- Learn how to install packages by creating Python virtual environments
- Write a simple Python script to plot figures within VS Code
This tutorial is not intended to teach you Python itself. Once you are familiar with the basics of VS Code, you can then follow any of the programming tutorials on python.org within the context of VS Code for an introduction to the language.
If you have any problems, you can search for answers or ask a question on the Python extension Discussions Q&A.
Prerequisites
To successfully complete this tutorial, you need to first setup your Python development environment. Specifically, this tutorial requires:
- Python 3
- VS Code application
- VS Code Python extension
Install Visual Studio Code and the Python Extension
-
If you have not already done so, install VS Code.
-
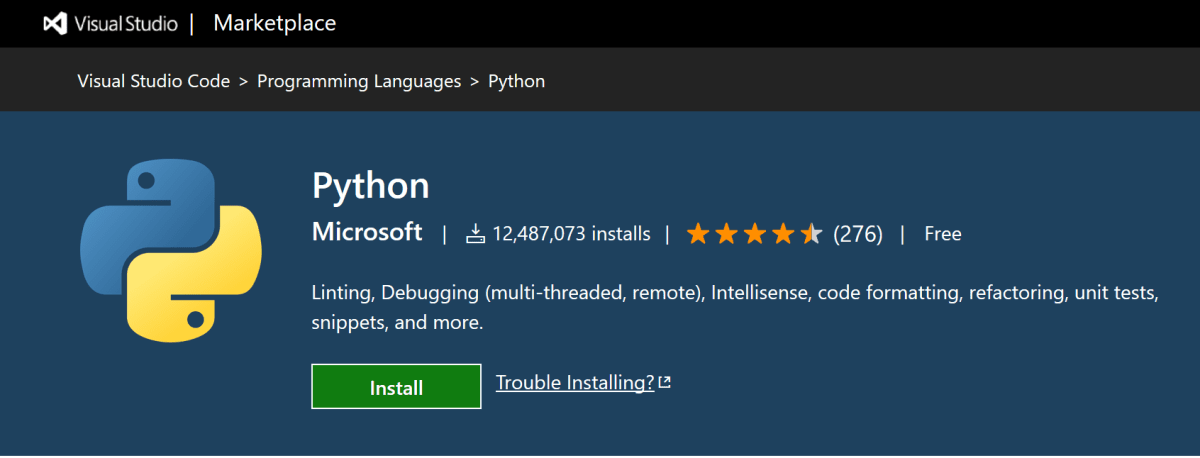
Next, install the Python extension for VS Code from the Visual Studio Marketplace. For additional details on installing extensions, see Extension Marketplace. The Python extension is named Python and it’s published by Microsoft.

Install a Python interpreter
Along with the Python extension, you need to install a Python interpreter. Which interpreter you use is dependent on your specific needs, but some guidance is provided below.
Windows
Install Python from python.org. You can typically use the Download Python button that appears first on the page to download the latest version.
Note: If you don’t have admin access, an additional option for installing Python on Windows is to use the Microsoft Store. The Microsoft Store provides installs of supported Python versions.
For additional information about using Python on Windows, see Using Python on Windows at Python.org
macOS
The system install of Python on macOS is not supported. Instead, a package management system like Homebrew is recommended. To install Python using Homebrew on macOS use brew install python3 at the Terminal prompt.
Note On macOS, make sure the location of your VS Code installation is included in your PATH environment variable. See these setup instructions for more information.
Linux
The built-in Python 3 installation on Linux works well, but to install other Python packages you must install pip with get-pip.py.
Other options
-
Data Science: If your primary purpose for using Python is Data Science, then you might consider a download from Anaconda. Anaconda provides not just a Python interpreter, but many useful libraries and tools for data science.
-
Windows Subsystem for Linux: If you are working on Windows and want a Linux environment for working with Python, the Windows Subsystem for Linux (WSL) is an option for you. If you choose this option, you’ll also want to install the WSL extension. For more information about using WSL with VS Code, see VS Code Remote Development or try the Working in WSL tutorial, which will walk you through setting up WSL, installing Python, and creating a Hello World application running in WSL.
Verify the Python installation
To verify that you’ve installed Python successfully on your machine, run one of the following commands (depending on your operating system):
-
Linux/macOS: open a Terminal Window and type the following command:
python3 --version -
Windows: open a command prompt and run the following command:
py -3 --version
If the installation was successful, the output window should show the version of Python that you installed.
Note You can use the
py -0command in the VS Code integrated terminal to view the versions of python installed on your machine. The default interpreter is identified by an asterisk (*).
Start VS Code in a workspace folder
By starting VS Code in a folder, that folder becomes your «workspace». VS Code stores settings that are specific to that workspace in .vscode/settings.json, which are separate from user settings that are stored globally.
Using a command prompt or terminal, create an empty folder called «hello», navigate into it, and open VS Code (code) in that folder (.) by entering the following commands:
mkdir hello
cd hello
code .
Note: If you’re using an Anaconda distribution, be sure to use an Anaconda command prompt.
Alternately, you can run VS Code through the operating system UI, then use File > Open Folder to open the project folder.
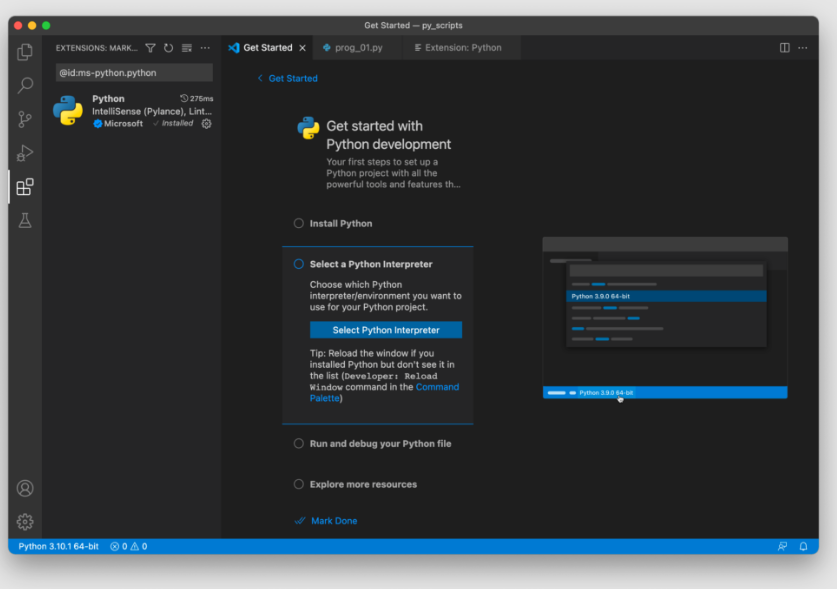
Select a Python interpreter
Python is an interpreted language. Thus, in order to run Python code and get Python IntelliSense, you must tell VS Code which interpreter to use.
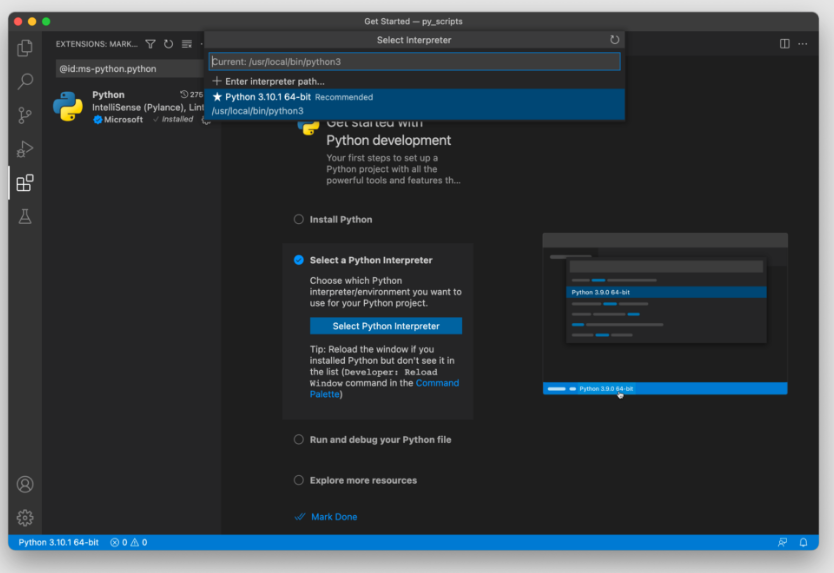
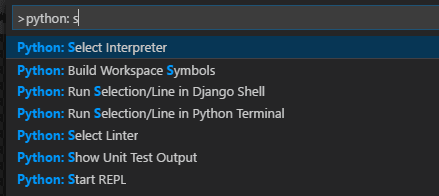
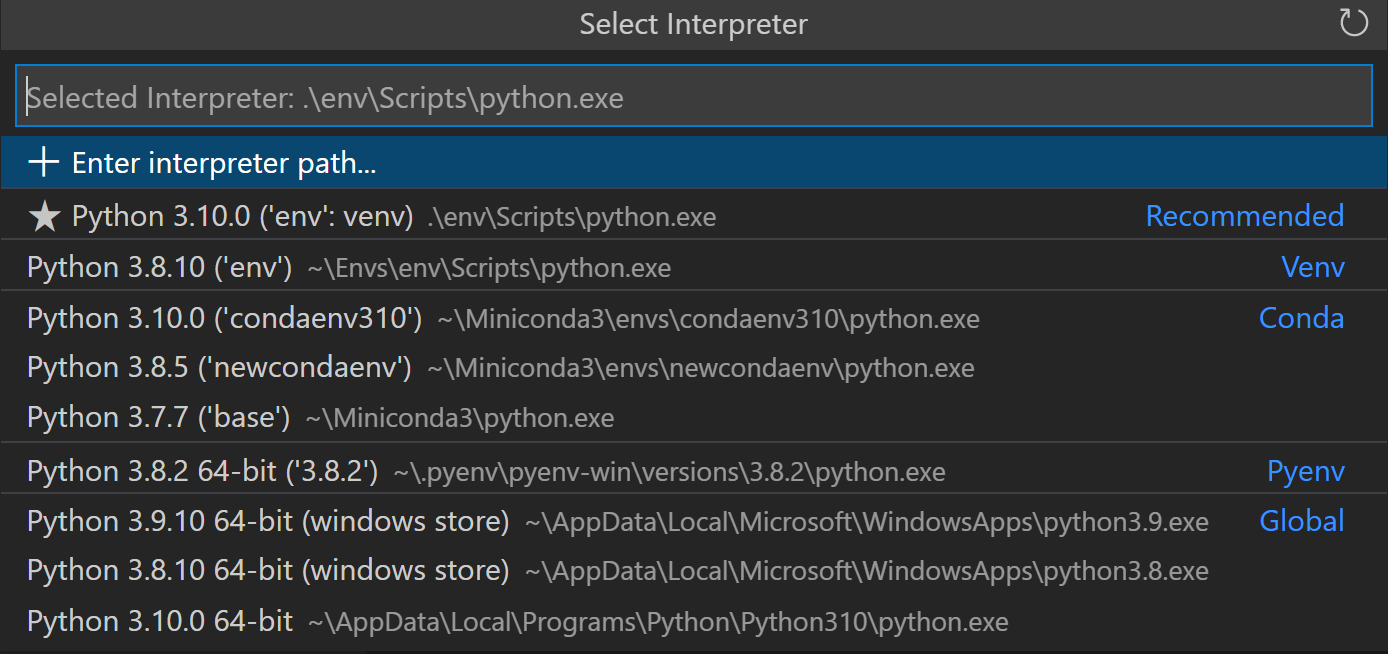
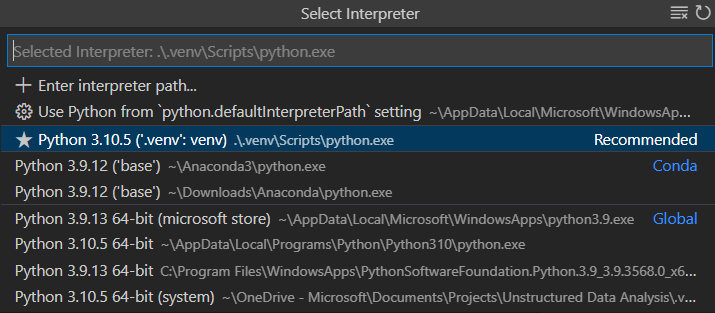
From within VS Code, select a Python 3 interpreter by opening the Command Palette (⇧⌘P (Windows, Linux Ctrl+Shift+P)), start typing the Python: Select Interpreter command to search, then select the command. You can also use the Select Python Environment option on the Status Bar if available (it may already show a selected interpreter, too):

The command presents a list of available interpreters that VS Code can find automatically, including virtual environments. If you don’t see the desired interpreter, see Configuring Python environments.
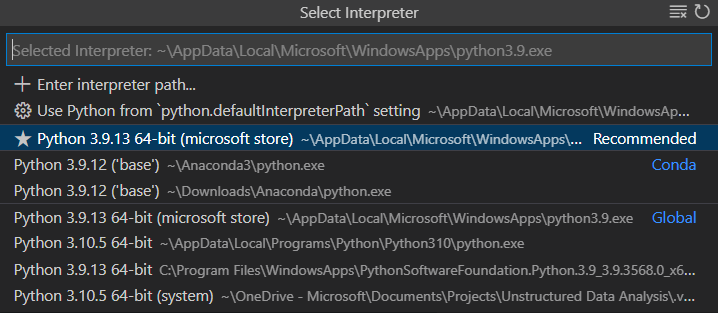
Note: When using an Anaconda distribution, the correct interpreter should have the suffix
('base':conda), for examplePython 3.7.3 64-bit ('base':conda).
Selecting an interpreter sets which interpreter will be used by the Python extension for that workspace.
Note: If you select an interpreter without a workspace folder open, VS Code sets
python.defaultInterpreterPathin User scope instead, which sets the default interpreter for VS Code in general. The user setting makes sure you always have a default interpreter for Python projects. The workspace settings lets you override the user setting.
Create a Python Hello World source code file
From the File Explorer toolbar, select the New File button on the hello folder:
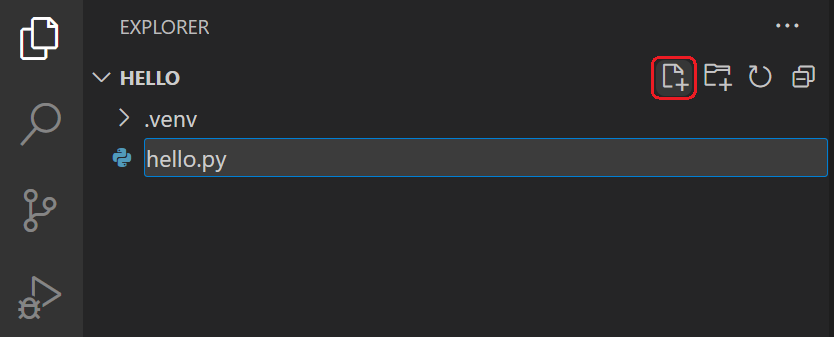
Name the file hello.py, and it automatically opens in the editor:
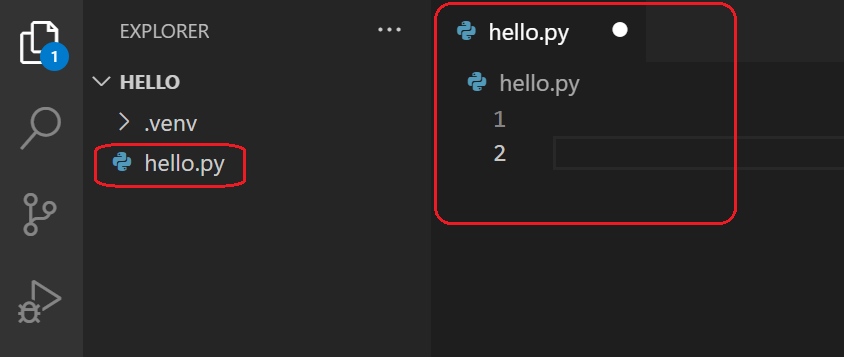
By using the .py file extension, you tell VS Code to interpret this file as a Python program, so that it evaluates the contents with the Python extension and the selected interpreter.
Note: The File Explorer toolbar also allows you to create folders within your workspace to better organize your code. You can use the New folder button to quickly create a folder.
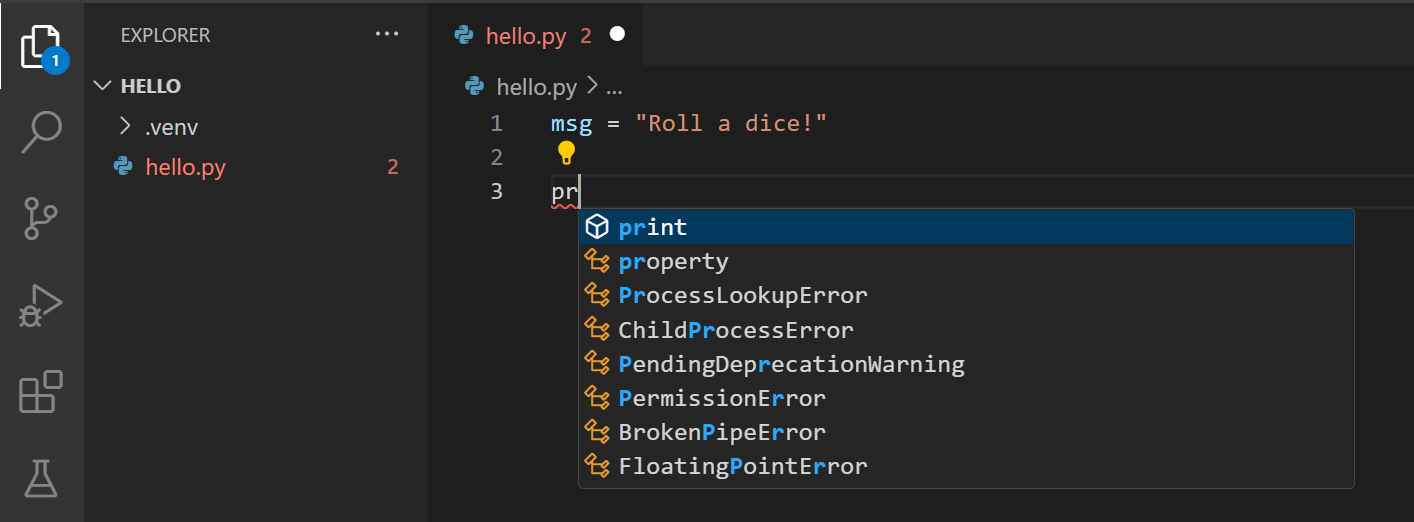
Now that you have a code file in your Workspace, enter the following source code in hello.py:
msg = "Hello World"
print(msg)
When you start typing print, notice how IntelliSense presents auto-completion options.
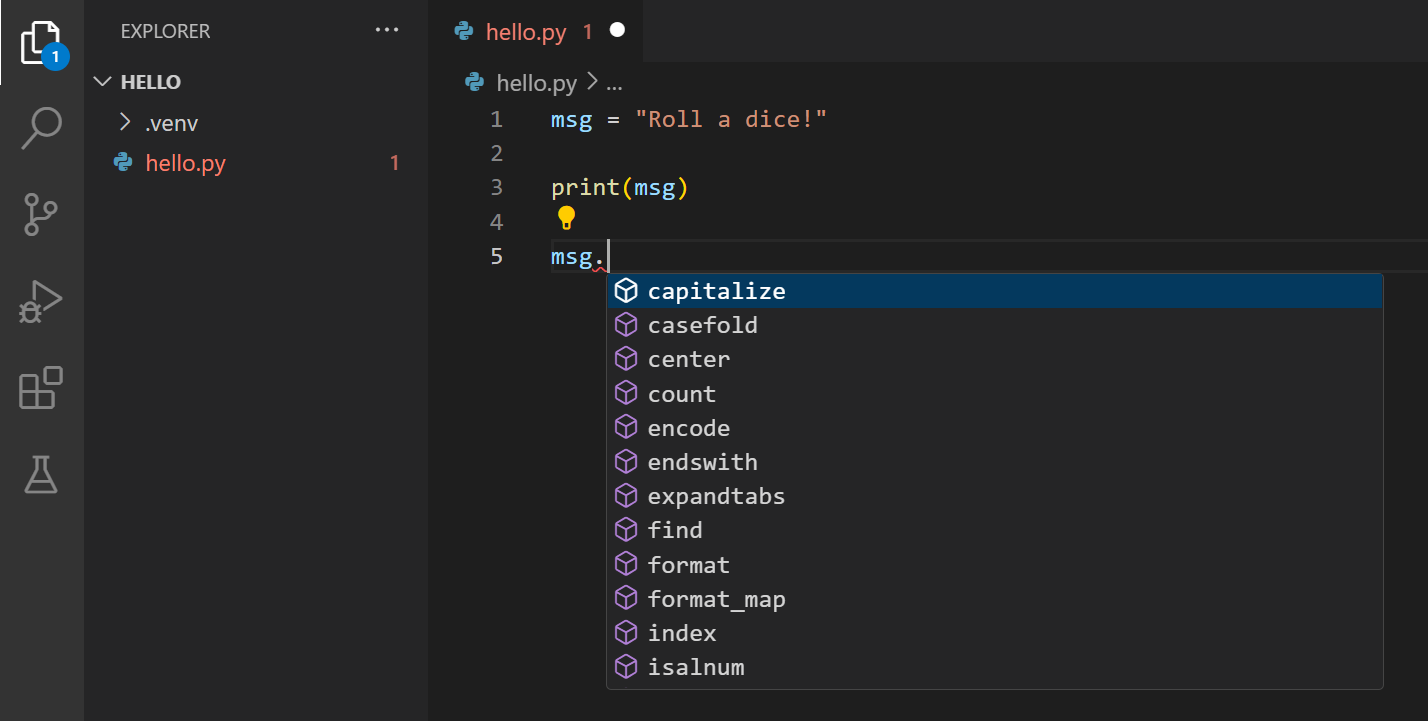
IntelliSense and auto-completions work for standard Python modules as well as other packages you’ve installed into the environment of the selected Python interpreter. It also provides completions for methods available on object types. For example, because the msg variable contains a string, IntelliSense provides string methods when you type msg.:
Feel free to experiment with IntelliSense some more, but then revert your changes so you have only the msg variable and the print call, and save the file (⌘S (Windows, Linux Ctrl+S)).
For full details on editing, formatting, and refactoring, see Editing code. The Python extension also has full support for Linting.
Run Hello World
It’s simple to run hello.py with Python. Just click the Run Python File in Terminal play button in the top-right side of the editor.
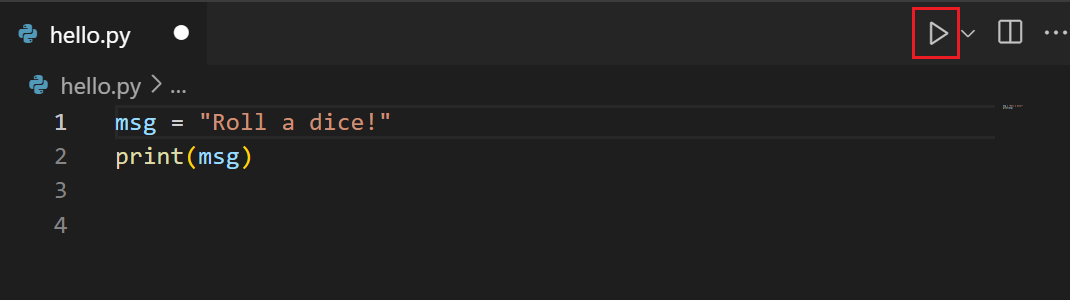
The button opens a terminal panel in which your Python interpreter is automatically activated, then runs python3 hello.py (macOS/Linux) or python hello.py (Windows):

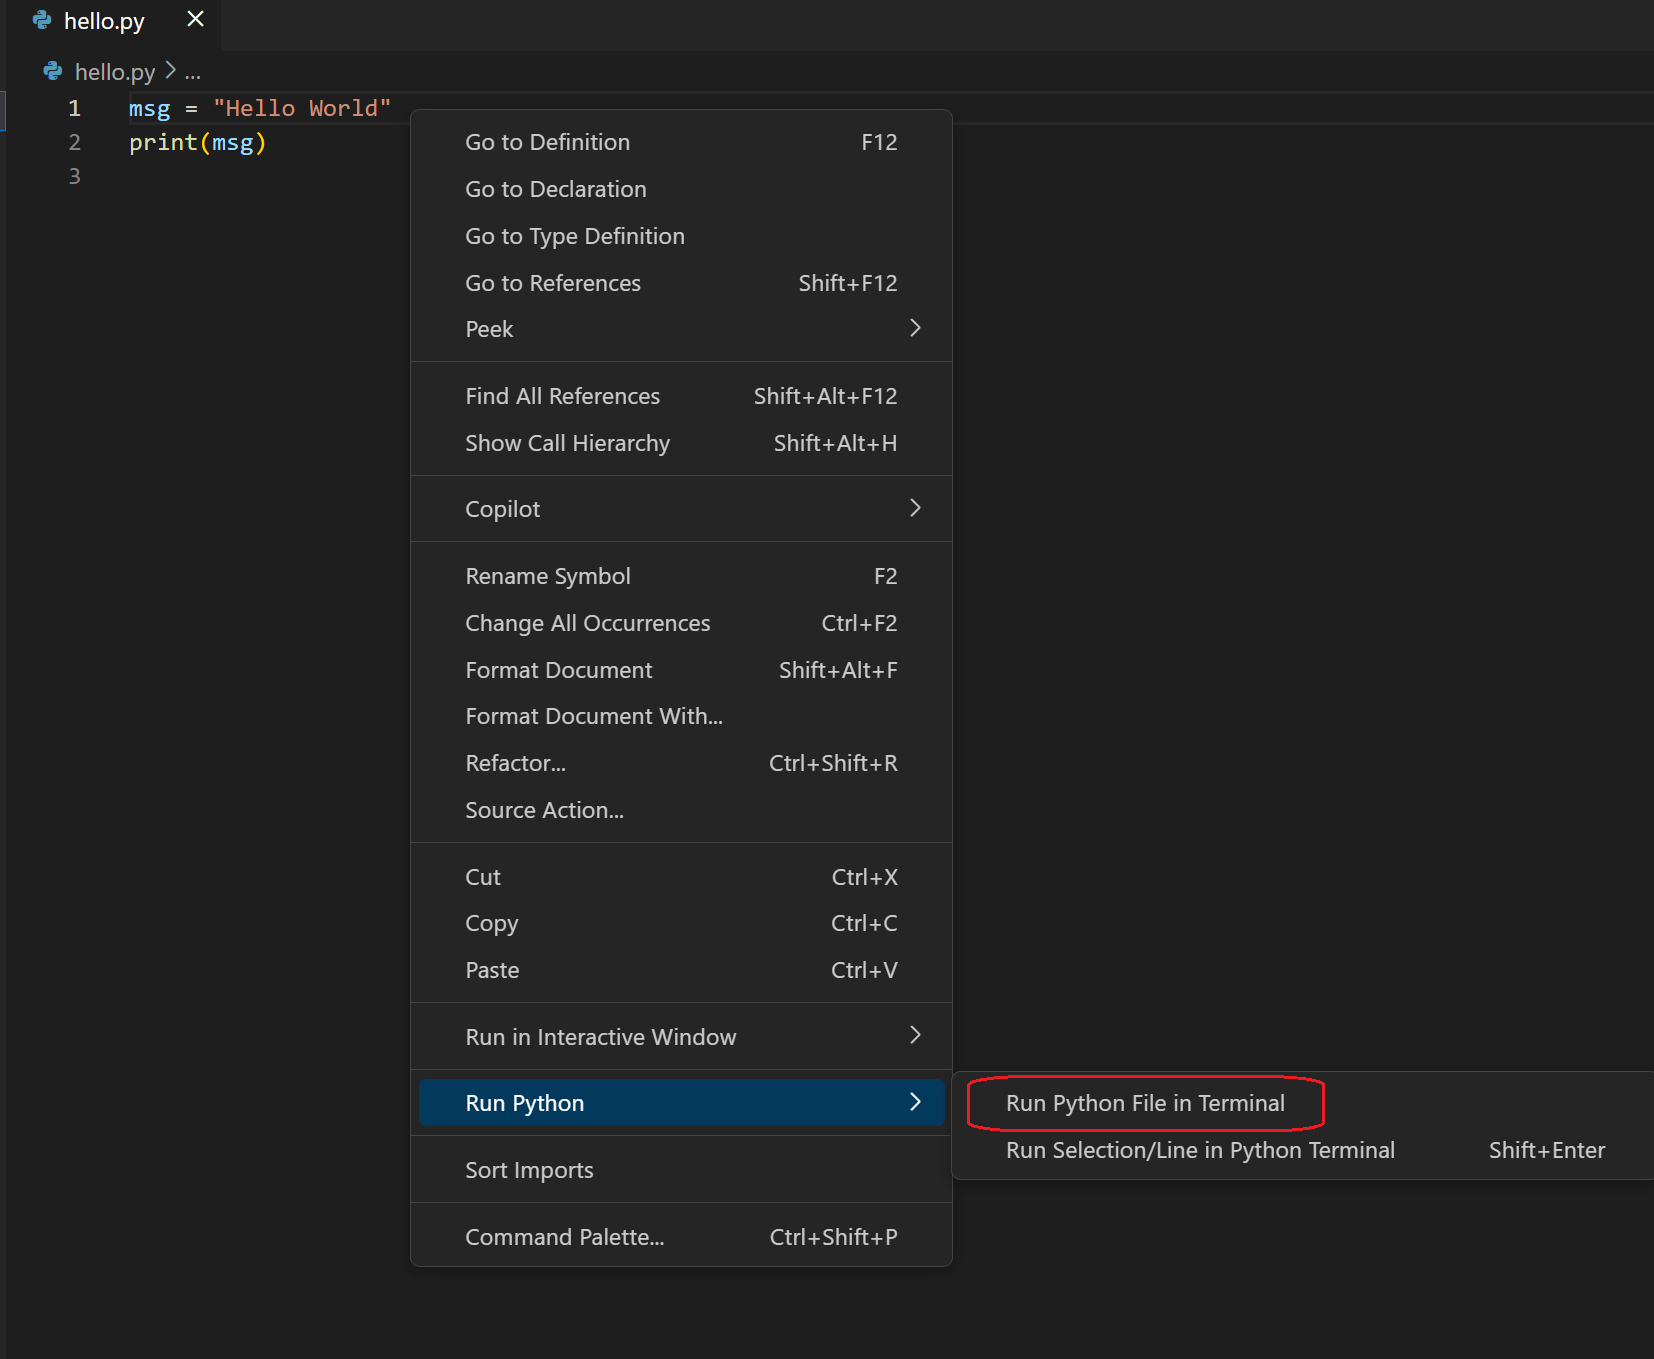
There are three other ways you can run Python code within VS Code:
-
Right-click anywhere in the editor window and select Run Python File in Terminal (which saves the file automatically):
-
Select one or more lines, then press Shift+Enter or right-click and select Run Selection/Line in Python Terminal. This command is convenient for testing just a part of a file.
-
From the Command Palette (⇧⌘P (Windows, Linux Ctrl+Shift+P)), select the Python: Start REPL command to open a REPL terminal for the currently selected Python interpreter. In the REPL, you can then enter and run lines of code one at a time.
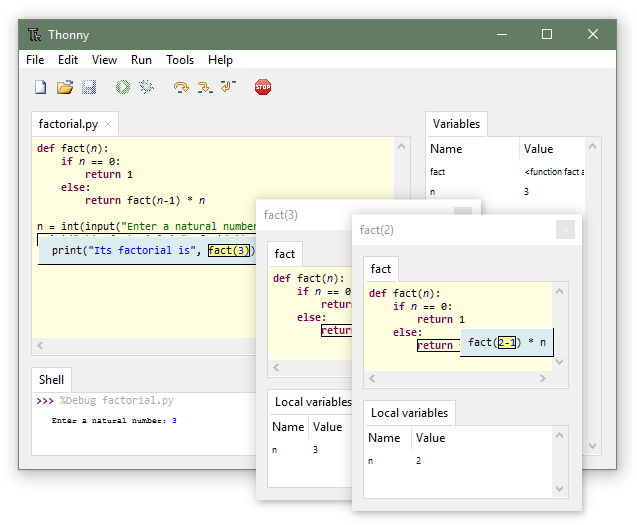
Configure and run the debugger
Let’s now try debugging our simple Hello World program.
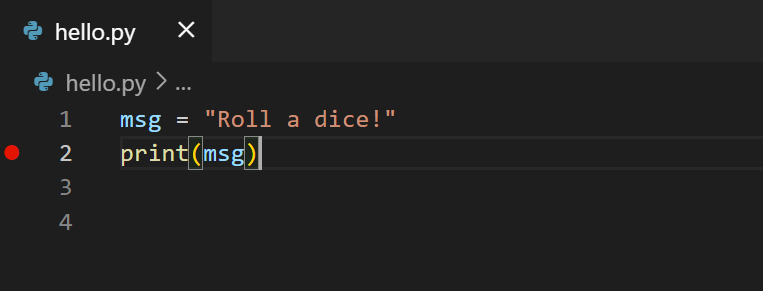
First, set a breakpoint on line 2 of hello.py by placing the cursor on the print call and pressing F9. Alternately, just click in the editor’s left gutter, next to the line numbers. When you set a breakpoint, a red circle appears in the gutter.
Next, to initialize the debugger, press F5. Since this is your first time debugging this file, a configuration menu will open from the Command Palette allowing you to select the type of debug configuration you would like for the opened file.

Note: VS Code uses JSON files for all of its various configurations; launch.json is the standard name for a file containing debugging configurations.
These different configurations are fully explained in Debugging configurations; for now, just select Python File, which is the configuration that runs the current file shown in the editor using the currently selected Python interpreter.
You can also start the debugger by clicking on the down-arrow next to the run button on the editor, and selecting Debug Python File in Terminal.

The debugger will stop at the first line of the file breakpoint. The current line is indicated with a yellow arrow in the left margin. If you examine the Local variables window at this point, you will see now defined msg variable appears in the Local pane.
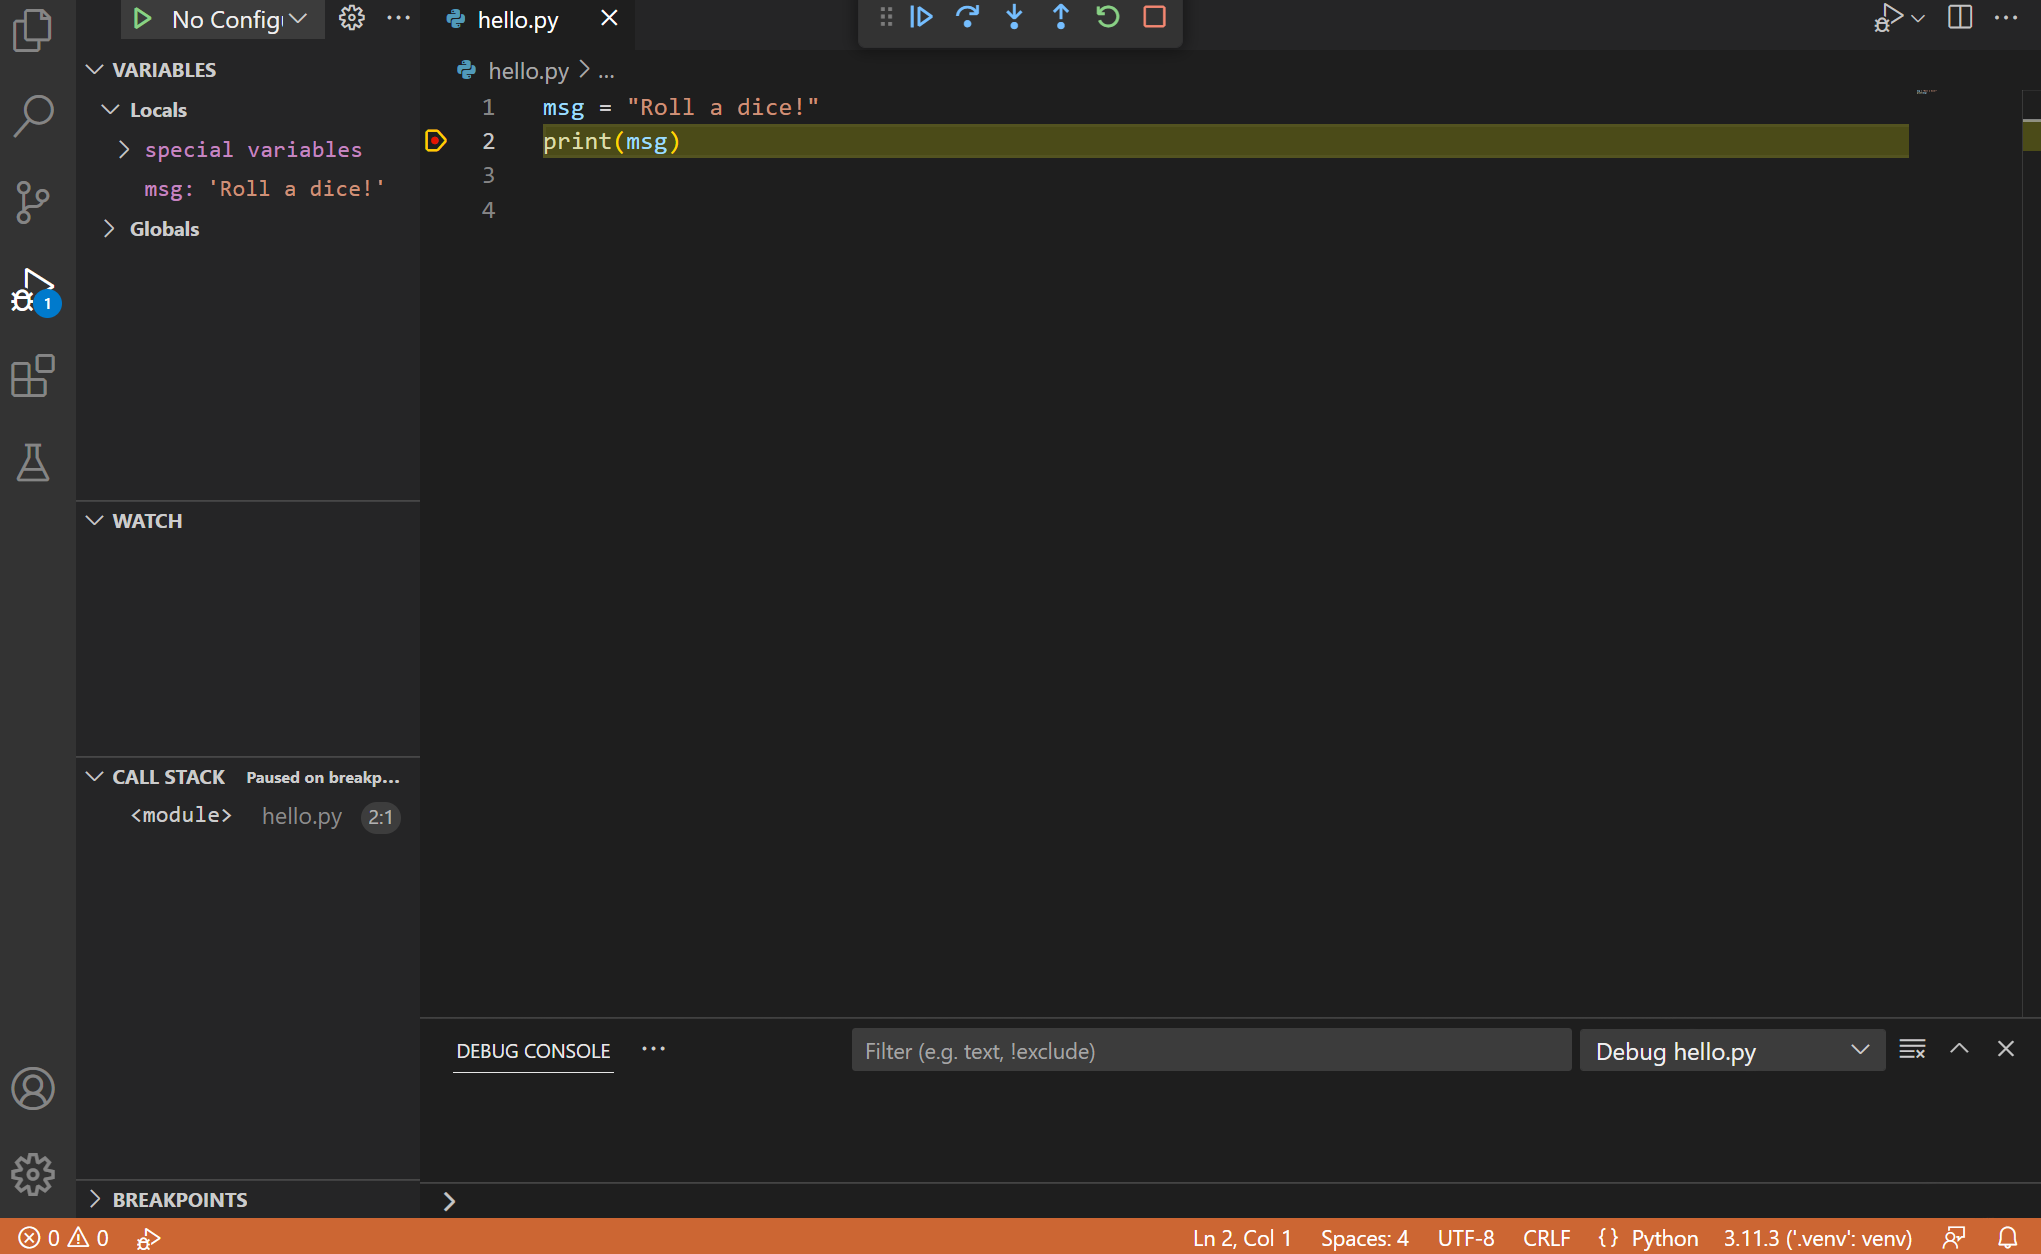
A debug toolbar appears along the top with the following commands from left to right: continue (F5), step over (F10), step into (F11), step out (⇧F11 (Windows, Linux Shift+F11)), restart (⇧⌘F5 (Windows, Linux Ctrl+Shift+F5)), and stop (⇧F5 (Windows, Linux Shift+F5)).

The Status Bar also changes color (orange in many themes) to indicate that you’re in debug mode. The Python Debug Console also appears automatically in the lower right panel to show the commands being run, along with the program output.
To continue running the program, select the continue command on the debug toolbar (F5). The debugger runs the program to the end.
Tip Debugging information can also be seen by hovering over code, such as variables. In the case of
msg, hovering over the variable will display the stringHello worldin a box above the variable.
You can also work with variables in the Debug Console (If you don’t see it, select Debug Console in the lower right area of VS Code, or select it from the … menu.) Then try entering the following lines, one by one, at the > prompt at the bottom of the console:
msg
msg.capitalize()
msg.split()

Select the blue Continue button on the toolbar again (or press F5) to run the program to completion. «Hello World» appears in the Python Debug Console if you switch back to it, and VS Code exits debugging mode once the program is complete.
If you restart the debugger, the debugger again stops on the first breakpoint.
To stop running a program before it’s complete, use the red square stop button on the debug toolbar (⇧F5 (Windows, Linux Shift+F5)), or use the Run > Stop debugging menu command.
For full details, see Debugging configurations, which includes notes on how to use a specific Python interpreter for debugging.
Tip: Use Logpoints instead of print statements: Developers often litter source code with
Install and use packages
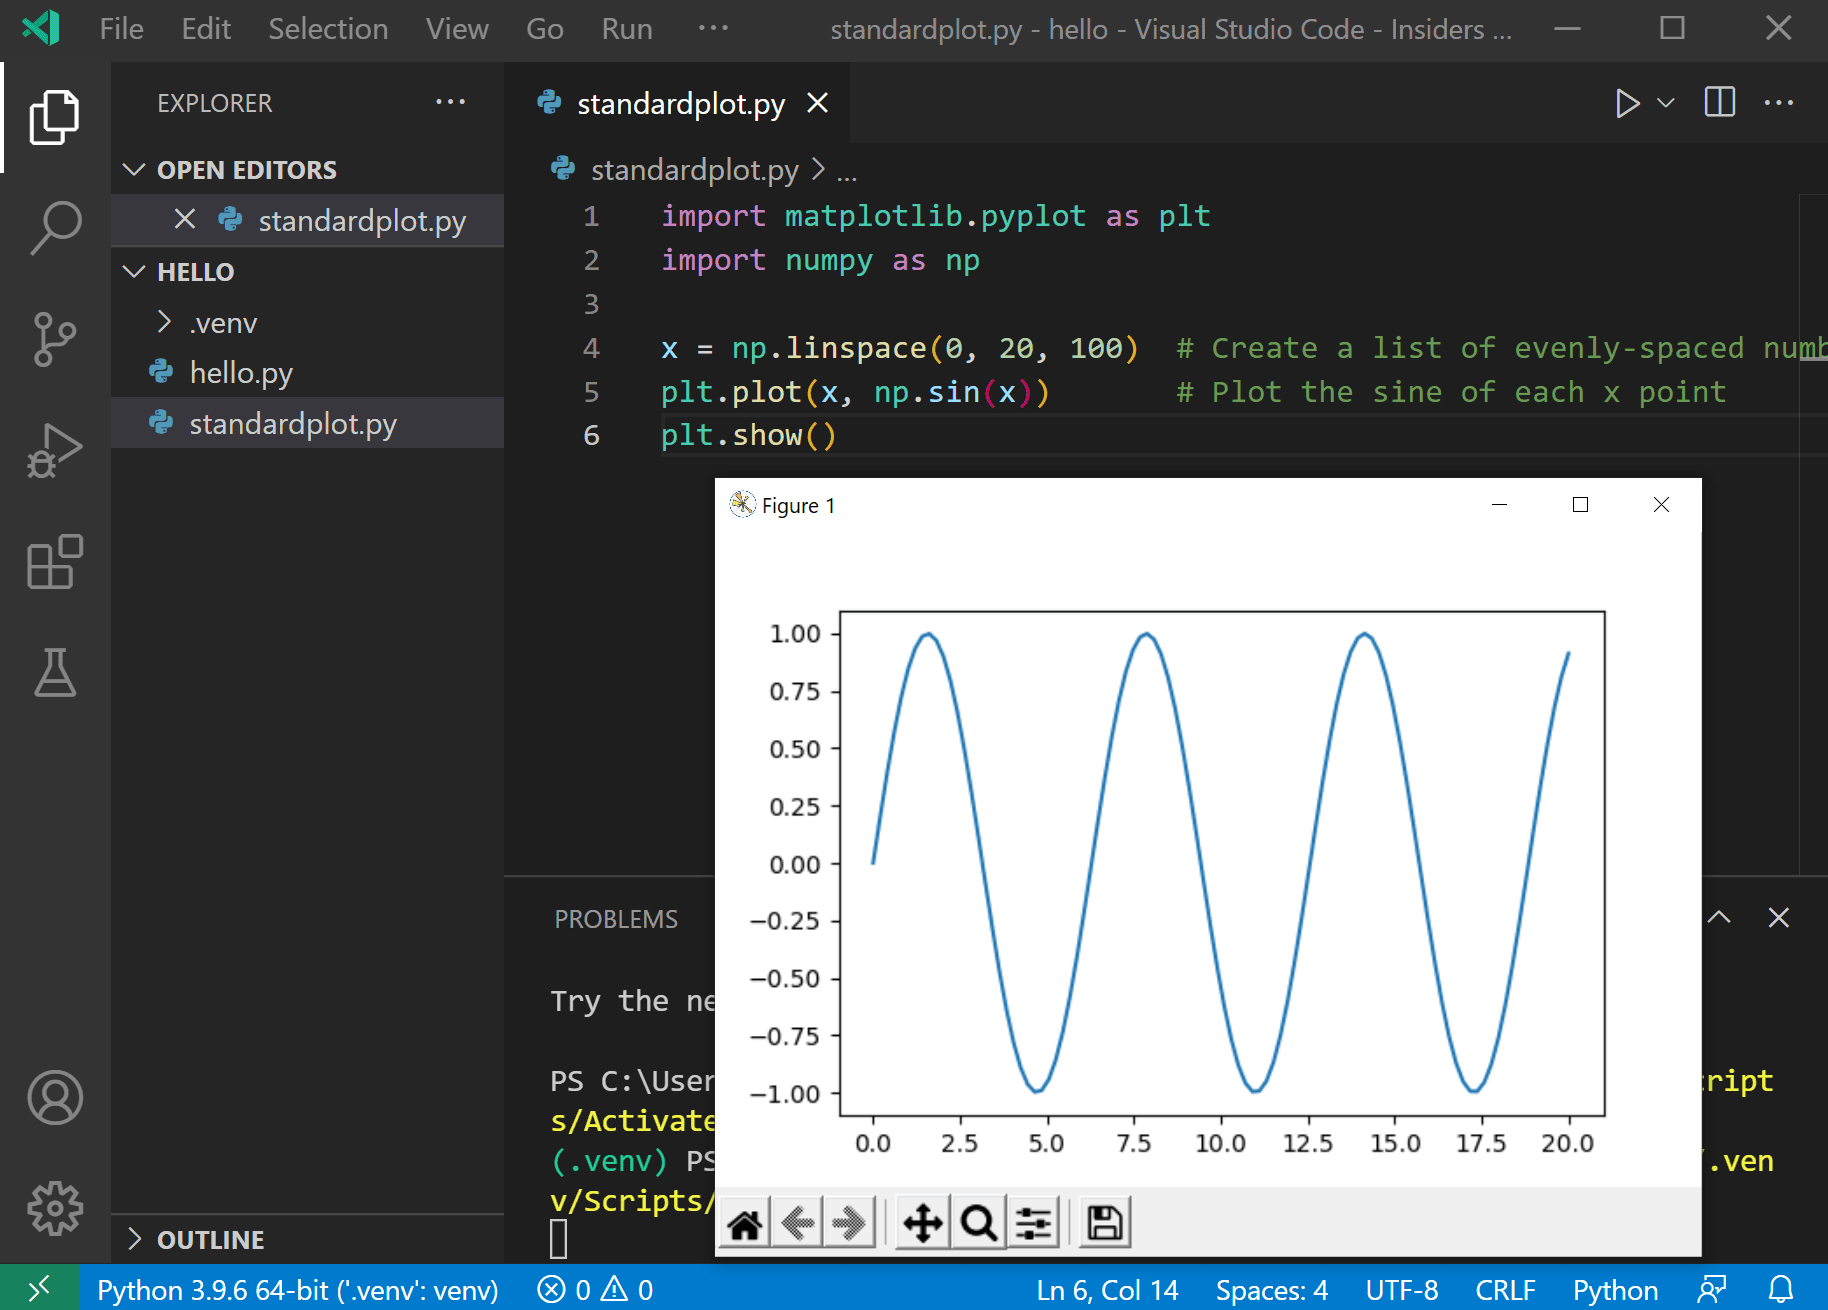
Let’s now run an example that’s a little more interesting. In Python, packages are how you obtain any number of useful code libraries, typically from PyPI. For this example, you use the matplotlib and numpy packages to create a graphical plot as is commonly done with data science. (Note that matplotlib cannot show graphs when running in the Windows Subsystem for Linux as it lacks the necessary UI support.)
Return to the Explorer view (the top-most icon on the left side, which shows files), create a new file called standardplot.py, and paste in the following source code:
import matplotlib.pyplot as plt
import numpy as np

x = np.linspace(0, 20, 100)  # Create a list of evenly-spaced numbers over the range
plt.plot(x, np.sin(x))       # Plot the sine of each x point
plt.show()                   # Display the plot
Tip: If you enter the above code by hand, you may find that auto-completions change the names after the
askeywords when you press Enter at the end of a line. To avoid this, type a space, then Enter.
Next, try running the file in the debugger using the «Python: Current file» configuration as described in the last section.
Unless you’re using an Anaconda distribution or have previously installed the matplotlib package, you should see the message, «ModuleNotFoundError: No module named ‘matplotlib'». Such a message indicates that the required package isn’t available in your system.
To install the matplotlib package (which also installs numpy as a dependency), stop the debugger and use the Command Palette to run Terminal: Create New Terminal (⌃⇧` (Windows, Linux Ctrl+Shift+`)). This command opens a command prompt for your selected interpreter.
A best practice among Python developers is to avoid installing packages into a global interpreter environment. You instead use a project-specific virtual environment that contains a copy of a global interpreter. Once you activate that environment, any packages you then install are isolated from other environments. Such isolation reduces many complications that can arise from conflicting package versions. To create a virtual environment and install the required packages, enter the following commands as appropriate for your operating system:
Note: For additional information about virtual environments, see Environments.
v
-
Create a virtual environment using the Create Environment command
From within VS Code, you can create non-global environments, using Venv or Anaconda, by opening the Command Palette (⇧⌘P (Windows, Linux Ctrl+Shift+P)), start typing the Python: Create Environment command to search, and then select the command. You can also trigger the Python: Create Environment command through the Getting Started with Python page.
The command presents a list of environment types, Venv or Conda. For this example, select Venv.
The command then presents a list of interpreters that can be used for your project.
After selecting the desired interpreter, a notification will show the progress of the environment creation and the environment folder will appear in your workspace.
The command will also install necessary packages outlined in a requirements/dependencies file, such as
requirements.txt,pyproject.toml, orenvironment.yml, located in the project folder.Note: If you want to create an environment manually, or run into error in the environment creation process, visit the Environments page.
-
Ensure your new environment is selected by using the Python: Select Interpreter command from the Command Palette.
-
Install the packages
# Don't use with Anaconda distributions because they include matplotlib already. # macOS python3 -m pip install matplotlib # Windows (may require elevation) python -m pip install matplotlib # Linux (Debian) apt-get install python3-tk python3 -m pip install matplotlib -
Rerun the program now (with or without the debugger) and after a few moments a plot window appears with the output:
-
Once you are finished, type
deactivatein the terminal window to deactivate the virtual environment.


For additional examples of creating and activating a virtual environment and installing packages, see the Django tutorial and the Flask tutorial.
Next steps
You can configure VS Code to use any Python environment you have installed, including virtual and conda environments. You can also use a separate environment for debugging. For full details, see Environments.
To learn more about the Python language, follow any of the programming tutorials listed on python.org within the context of VS Code.
To learn to build web apps with the Django and Flask frameworks, see the following tutorials:
- Use Django in Visual Studio Code
- Use Flask in Visual Studio Code
There is then much more to explore with Python in Visual Studio Code:
- Editing code — Learn about autocomplete, IntelliSense, formatting, and refactoring for Python.
- Linting — Enable, configure, and apply a variety of Python linters.
- Debugging — Learn to debug Python both locally and remotely.
- Testing — Configure test environments and discover, run, and debug tests.
- Settings reference — Explore the full range of Python-related settings in VS Code.
- Deploy Python to Azure App Service
- Deploy Python to Container Apps
1/20/2023