Эта статья посвящена теме, на вопросы по которой я часто натыкаюсь. С помощью wxPython реализовать возможность сворачивания вашего приложения в трей достаточно просто. Мы начнём с того, что разберёмся с кодом, создающим TaskBarIcon, а затем перейдём к созданию простого приложения, которое можно будет свернуть в системный трей.
Есть вопросы по Python?
На нашем форуме вы можете задать любой вопрос и получить ответ от всего нашего сообщества!
Telegram Чат & Канал
Вступите в наш дружный чат по Python и начните общение с единомышленниками! Станьте частью большого сообщества!
Паблик VK
Одно из самых больших сообществ по Python в социальной сети ВК. Видео уроки и книги для вас!
Создаём простую иконку панели задач
Создать иконку панели задач с помощью wxPython очень просто, особенно, если у вас уже есть готовый файл иконки. Давайте взглянем на один простой способ:
|
1 2 3 4 5 6 7 8 9 10 11 12 13 14 15 16 17 18 19 20 21 22 23 24 25 26 27 28 29 30 31 32 33 34 35 |
# custTray.py import wx class CustomTaskBarIcon(wx.TaskBarIcon): «»»»»» def __init__(self, frame): «»»Constructor»»» wx.TaskBarIcon.__init__(self) self.frame = frame icon = wx.Icon(‘python.ico’, wx.BITMAP_TYPE_ICO) self.SetIcon(icon, «Restore») self.Bind(wx.EVT_TASKBAR_LEFT_DOWN, self.OnTaskBarLeftClick) def OnTaskBarActivate(self, evt): «»»»»» pass def OnTaskBarClose(self, evt): «»» Уничтожает иконку панели задач и рамку в самой иконке панели задач «»» self.frame.Close() def OnTaskBarLeftClick(self, evt): «»» Создаёт меню, появляющееся при нажатии правой кнопки мыши «»» self.frame.Show() self.frame.Restore() |
Как вы видите, всё что нам нужно это указать путь к файлу иконки в wx.Icon, а затем сообщить о том, какой тип файла мы ему передали. Затем мы просто вызываем метод **SetIcon() в wx.TaskBarIcon, чтобы установить иконку. Если у вас нет файла иконки, то вы можете воспользоваться альтернативным методом, чтобы создать его из файла изображения другого типа:
|
img = wx.Image(«24×24.png», wx.BITMAP_TYPE_ANY) bmp = wx.BitmapFromImage(img) self.icon = wx.EmptyIcon() self.icon.CopyFromBitmap(bmp) self.SetIcon(self.icon, «Restore») |
В данном случае мы проделываем несколько операций, чтобы превратить PNG-изображение в формат, который смогут использовать методы wxPython. Вы заметите, что мы биндим EVT_TASKBAR_LEFT_DOWN, так что когда пользователь нажмёт на иконку, то приложение развернётся.
Примечание: Как я уже упоминал в прошлой статье, нам нужно будет обновить этот код, если вы собираете использовать его в wxPython Phoenix, так как класс TaskBarIcon был перемещён в wx.adv. Если вы используете wxPython Phoenix, то код должен выглядеть вот так:
|
1 2 3 4 5 6 7 8 9 10 11 12 13 14 15 16 17 18 19 20 21 22 23 24 25 26 27 28 29 30 31 32 33 34 35 36 |
# custTray_phoenix.py import wx import wx.adv class CustomTaskBarIcon(wx.adv.TaskBarIcon): «»»»»» def __init__(self, frame): «»»Constructor»»» wx.adv.TaskBarIcon.__init__(self) self.frame = frame icon = wx.Icon(‘python.ico’, wx.BITMAP_TYPE_ICO) self.SetIcon(icon, «Restore») self.Bind(wx.adv.EVT_TASKBAR_LEFT_DOWN, self.OnTaskBarLeftClick) def OnTaskBarActivate(self, evt): «»»»»» pass def OnTaskBarClose(self, evt): «»» Уничтожает иконку панели задач и рамку в самой иконке панели задач «»» self.frame.Close() def OnTaskBarLeftClick(self, evt): «»» Создаёт меню, которое появляется при нажатии правой кнопки мыши. «»» self.frame.Show() self.frame.Restore() |
Теперь у вас есть примеры обеих вариантов кода. Давайте же теперь перейдём к самому приложению, которое будет сворачиваться!
Делаем так, чтобы приложение сворачивалось в трей
Теперь мы готовы к тому, чтобы создать приложение, которое будет сворачиваться в трей. Давайте напишем немного кода:
|
1 2 3 4 5 6 7 8 9 10 11 12 13 14 15 16 17 18 19 20 21 22 23 24 25 26 27 28 29 30 31 32 33 34 35 36 37 38 39 40 41 42 |
import custTray_phoenix as custTray import wx class MainFrame(wx.Frame): «»»»»» def __init__(self): «»»Constructor»»» wx.Frame.__init__(self, None, title=«Minimize to Tray») panel = wx.Panel(self) self.tbIcon = custTray.CustomTaskBarIcon(self) self.Bind(wx.EVT_ICONIZE, self.onMinimize) self.Bind(wx.EVT_CLOSE, self.onClose) self.Show() def onClose(self, evt): «»» Уничтожает иконку панели задач и рамку «»» self.tbIcon.RemoveIcon() self.tbIcon.Destroy() self.Destroy() def onMinimize(self, event): «»» Во время сворачивания, делаем так, чтобы приложение оставило иконку в трее «»» if self.IsIconized(): self.Hide() def main(): «»»»»» app = wx.App(False) frame = MainFrame() app.MainLoop() if __name__ == «__main__»: main() |
Здесь мы биндим два события. Первое для EVT_CLOSE и второе для EVT_ICONIZE. Второе запускается, когда пользователь сворачивает приложение, чтобы поместить иконку в трей: проще говоря, оно просто прячет рамку. Первое же запускается, когда вы закрываете приложение, и вот на этот момент стоит обратить внимание.
Почему? Так, вам нужно отследить событие, отвечающее за закрытие, если пользователь пытается закрыть приложение, используя иконку в трее. И вам нужно быть уверенным, что вы удалили иконку И уничтожили её, или же ваше приложение не закроется, а просто будет висеть среди фоновых процессов.
Итоги
Теперь вы знаете как свернуть ваше приложение до иконки в системном трее. Я использовал данную возможность в простой программе для проверки электронной почты. У данного навыка есть масса сфер применения, например, проверка состояния выполнения задачи в приложении, свёрнутом в трей.

Являюсь администратором нескольких порталов по обучению языков программирования Python, Golang и Kotlin. В составе небольшой команды единомышленников, мы занимаемся популяризацией языков программирования на русскоязычную аудиторию. Большая часть статей была адаптирована нами на русский язык и распространяется бесплатно.
E-mail: vasile.buldumac@ati.utm.md
Образование
Universitatea Tehnică a Moldovei (utm.md)
- 2014 — 2018 Технический Университет Молдовы, ИТ-Инженер. Тема дипломной работы «Автоматизация покупки и продажи криптовалюты используя технический анализ»
- 2018 — 2020 Технический Университет Молдовы, Магистр, Магистерская диссертация «Идентификация человека в киберпространстве по фотографии лица»
Improve Article
Save Article
Improve Article
Save Article
In this article, we will learn how to create a System Tray application using PyQt.
System Tray(or menu bar) is an area on the taskbar in an operating system. You can find this system on the bottom right side of the desktop if you’re using windows, and top right if using macOS. The icons which are visible in this notification area are the ones that run in the foreground. Some of the famous applications which use system tray to function, and they are Windscribe(VPN application) and Adobe Creative Cloud.
Menu bar applications are also useful to minimally control the desktop application using the shortcuts provided in the menu bar icon. One can choose to not open the whole application and still work by just using the options provided on the System Tray. In this article, you will learn how to create these applications.
Below is an example of an application named Windscribe.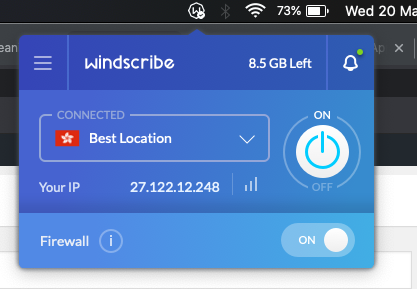
Code:
from PyQt5.QtGui import *
from PyQt5.QtWidgets import *
app = QApplication([])
app.setQuitOnLastWindowClosed(False)
icon = QIcon("icon.png")
tray = QSystemTrayIcon()
tray.setIcon(icon)
tray.setVisible(True)
menu = QMenu()
option1 = QAction("Geeks for Geeks")
option2 = QAction("GFG")
menu.addAction(option1)
menu.addAction(option2)
quit = QAction("Quit")
quit.triggered.connect(app.quit)
menu.addAction(quit)
tray.setContextMenu(menu)
app.exec_()
Output: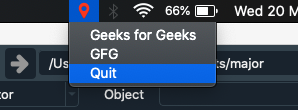
As you can see there is a marker icon on my mac menu bar, and there are three options visible namely Geeks for Geeks, GFG, and quit. By clicking on the last option(quit) you will exit the application.
Improve Article
Save Article
Improve Article
Save Article
In this article, we will learn how to create a System Tray application using PyQt.
System Tray(or menu bar) is an area on the taskbar in an operating system. You can find this system on the bottom right side of the desktop if you’re using windows, and top right if using macOS. The icons which are visible in this notification area are the ones that run in the foreground. Some of the famous applications which use system tray to function, and they are Windscribe(VPN application) and Adobe Creative Cloud.
Menu bar applications are also useful to minimally control the desktop application using the shortcuts provided in the menu bar icon. One can choose to not open the whole application and still work by just using the options provided on the System Tray. In this article, you will learn how to create these applications.
Below is an example of an application named Windscribe.
Code:
from PyQt5.QtGui import *
from PyQt5.QtWidgets import *
app = QApplication([])
app.setQuitOnLastWindowClosed(False)
icon = QIcon("icon.png")
tray = QSystemTrayIcon()
tray.setIcon(icon)
tray.setVisible(True)
menu = QMenu()
option1 = QAction("Geeks for Geeks")
option2 = QAction("GFG")
menu.addAction(option1)
menu.addAction(option2)
quit = QAction("Quit")
quit.triggered.connect(app.quit)
menu.addAction(quit)
tray.setContextMenu(menu)
app.exec_()
Output:
As you can see there is a marker icon on my mac menu bar, and there are three options visible namely Geeks for Geeks, GFG, and quit. By clicking on the last option(quit) you will exit the application.
notify.py
Cross platform desktop notifications for Python scripts and applications.
![]()
![]()
![]()


Docs
You can read the docs on this Git’s Wiki, or here
Supported Platforms.
- Windows 10/11
- macOS 10 >=10.10
- Linux (libnotify)
No dependencies are required other than loguru & jeepney (Only for linux/DBUS).
Install
Usage
Send Simple Notification
from notifypy import Notify

notification = Notify()
notification.title = "Cool Title"
notification.message = "Even cooler message."
notification.send()
Send Notification With Icon
from notifypy import Notify

notification = Notify()
notification.title = "Cool Title"
notification.message = "Even cooler message."
notification.icon = "path/to/icon.png"

notification.send()
Send Notification With Sound
from notifypy import Notify

notification = Notify()
notification.title = "Cool Title"
notification.message = "Even cooler message."
notification.audio = "path/to/audio/file.wav"

notification.send()
Sending Notifications without blocking
from notifypy import Notify

notification = Notify()
notification.send(block=False)
Sending with Default Notification Titles/Messages/Icons
from notifypy import Notify

notification = Notify(
  default_notification_title="Function Message",
  default_application_name="Great Application",
  default_notification_icon="path/to/icon.png",
  default_notification_audio="path/to/sound.wav"
)

def your_function():
  # stuff happening here.
  notification.message = "Function Result"
  notification.send()
CLI
A CLI is available when you install notify-py
notifypy --title --message --applicationName --iconPath --soundPath
You may need to add python3 -m to the beginning.
Important Caveats
-
As it stands (May 18, 2020), this is simply a notification service. There is no support for embedding custom actions (buttons, dialogs) regardless of platform. Other then telling you if the shell command was sent, there is also no confirmation on user action on the notification.
-
macOS does not support custom icons on the fly.. You will need to bundle a customized version of the notifier embedded with your custom icon.
Windows Specific.
- No support for balloon tips (pre Win10).. This will be changed in the future.
Contributors
- Leterax
- jnoortheen
- dynobo
- Xou
Inspiration and Special Thanks
-
https://github.com/go-toast/toast — Ported their Windows 10 toast notification to Python.
-
Vítor Galvão for https://github.com/vitorgalvao/notificator
-
https://notificationsounds.com/notification-sounds/done-for-you-612 example_notification_sound.wav
-
https://github.com/mikaelbr/node-notifier
Contributing
Contributions are welcome!
Please base your changes on the latest development branch and open a PR to that branch. PR will not be accepted to the master branch. Tests are ran against all platforms.
Setting Up Environment
- Install Poetry
poetry install
- Add patches/new features/bug fiexes
- Run tests
poetry run pytest tests/*
- Run lints
poetry run pylint --errors-only notifypy/
- Run Black Formatting
poetry run black notifypy
- Open PR to
devbranch. - Add your name to contributors list if you wish!
- 1. __main__.py
- 2. Видеоурок
Аналогичная статья на
Qt/C++
Одной из первых статей по работе с Qt была статья по работе с
QSystemTrayIcon
. А теперь настал черёд аналогичного материала, но уже на Python с применением библиотеки PyQt5.
В данной статье будет рассмотрено, как написать простейшее приложение на PyQt5, которое будет сворачиваться в системный трей как при нажатии пунктов меню в иконке системного трея, так и при нажатии кнопки закрытия окна.
Структура проекта в данном случае минимальна. Будет всего лишь один файл, который и будет запускаться. То есть файл
__main__.py
.
Само приложение будет выглядеть следующим образом.
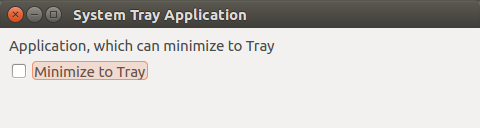
Если чекбокс отмечен, то приложение будет сворачиваться в трей, в противном случае приложение будет завершаться. Помимо этого имеется возможность сворачиваться приложение в трей с помощью контекстного меню иконки приложения в трее.
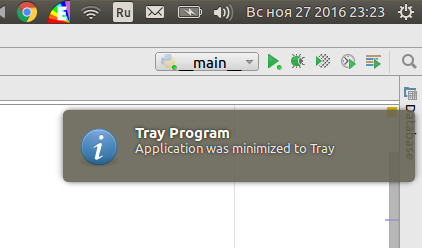
Когда приложение будет сворачиваться в системный трей по кнопке закрытия окна приложения, то будет отображаться сообщение об этом.
__main__.py
from PyQt5.QtWidgets import QApplication, QMainWindow, QLabel, QGridLayout, QWidget, QCheckBox, QSystemTrayIcon, QSpacerItem, QSizePolicy, QMenu, QAction, QStyle, qApp from PyQt5.QtCore import QSize class MainWindow(QMainWindow): """ Объявление чекбокса и иконки системного трея. Инициализироваться будут в конструкторе. """ check_box = None tray_icon = None # Переопределяем конструктор класса def __init__(self): # Обязательно нужно вызвать метод супер класса QMainWindow.__init__(self) self.setMinimumSize(QSize(480, 80)) # Устанавливаем размеры self.setWindowTitle("System Tray Application") # Устанавливаем заголовок окна central_widget = QWidget(self) # Создаём центральный виджет self.setCentralWidget(central_widget) # Устанавливаем центральный виджет grid_layout = QGridLayout(self) # Создаём QGridLayout central_widget.setLayout(grid_layout) # Устанавливаем данное размещение в центральный виджет grid_layout.addWidget(QLabel("Application, which can minimize to Tray", self), 0, 0) # Добавляем чекбокс, от которого будет зависеть поведение программы при закрытии окна self.check_box = QCheckBox('Minimize to Tray') grid_layout.addWidget(self.check_box, 1, 0) grid_layout.addItem(QSpacerItem(0, 0, QSizePolicy.Expanding, QSizePolicy.Expanding), 2, 0) # Инициализируем QSystemTrayIcon self.tray_icon = QSystemTrayIcon(self) self.tray_icon.setIcon(self.style().standardIcon(QStyle.SP_ComputerIcon)) ''' Объявим и добавим действия для работы с иконкой системного трея show - показать окно hide - скрыть окно exit - выход из программы ''' show_action = QAction("Show", self) quit_action = QAction("Exit", self) hide_action = QAction("Hide", self) show_action.triggered.connect(self.show) hide_action.triggered.connect(self.hide) quit_action.triggered.connect(qApp.quit) tray_menu = QMenu() tray_menu.addAction(show_action) tray_menu.addAction(hide_action) tray_menu.addAction(quit_action) self.tray_icon.setContextMenu(tray_menu) self.tray_icon.show() # Переопределение метода closeEvent, для перехвата события закрытия окна # Окно будет закрываться только в том случае, если нет галочки в чекбоксе def closeEvent(self, event): if self.check_box.isChecked(): event.ignore() self.hide() self.tray_icon.showMessage( "Tray Program", "Application was minimized to Tray", QSystemTrayIcon.Information, 2000 ) if __name__ == "__main__": import sys app = QApplication(sys.argv) mw = MainWindow() mw.show() sys.exit(app.exec())Видеоурок
Project description
# Windows 10 Toast Notifications
An easy-to-use Python library for displaying Windows 10 Toast Notifications which is useful for Windows GUI development.

[](https://app.fossa.io/projects/git%2Bgithub.com%2Fjithurjacob%2FWindows-10-Toast-Notifications?ref=badge_shield)
## Installation
«`
pip install win10toast
«`
## Requirements
### Installation of pywin32
«`
pypiwin32
setuptools
«`
## Example
«`
from win10toast import ToastNotifier
toaster = ToastNotifier()
toaster.show_toast(«Hello World!!!»,
«Python is 10 seconds awsm!»,
icon_path=»custom.ico»,
duration=10)
toaster.show_toast(«Example two»,
«This notification is in it’s own thread!»,
icon_path=None,
duration=5,
threaded=True)
# Wait for threaded notification to finish
while toaster.notification_active(): time.sleep(0.1)
«`
## License
[](https://app.fossa.io/projects/git%2Bgithub.com%2Fjithurjacob%2FWindows-10-Toast-Notifications?ref=badge_large)
Download files
Download the file for your platform. If you’re not sure which to choose, learn more about installing packages.