Содержание
- Установка QEMU
- Команды QEMU
- Основные
- Дополнительные
- Установка операционной системы в QEMU
- Запуск в QEMU образов LiveCD
- Qemu Manager
- Вопросы и ответы

Эмулятор QEMU является кроссплатформенным приложением, доступным в том числе для 32- и 64-битной версии Windows.
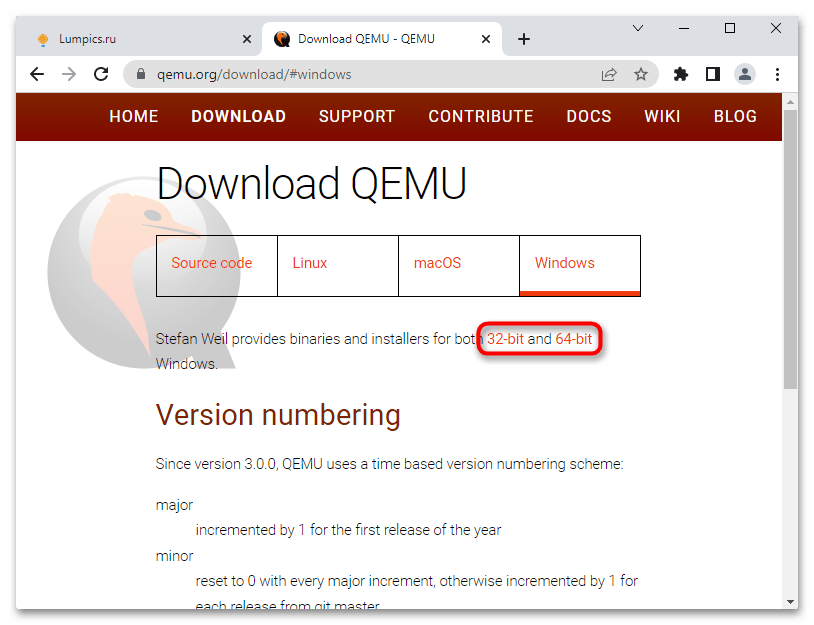
Скачать QEMU с официального сайта
- Откройте официальную страницу разработчика и выберите приложение нужной вам разрядности.
- Скачайте актуальную (последнюю) версию эмулятора.
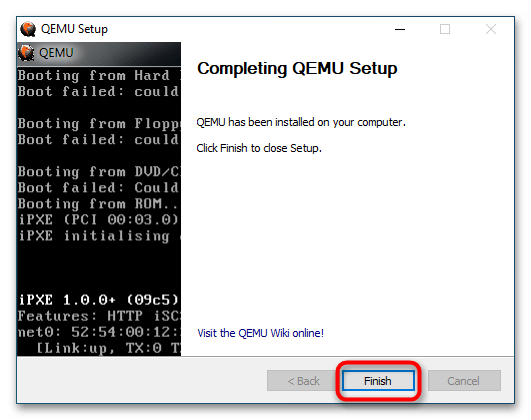
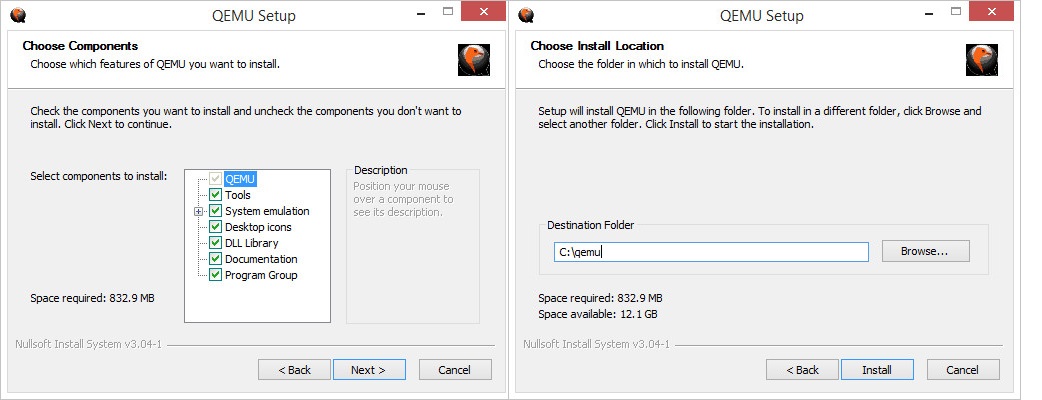
- Запустите исполняемый файл программы и проследуйте указаниям мастера-установщика. В ходе установки вам будет предложено выбрать язык (русский отсутствует), принять условия лицензии, выбрать компоненты и путь установки. Все настройки оставьте по умолчанию, по завершении процедуры инсталляции нажмите кнопку «Finish».
Команды QEMU
QEMU является консольным приложением, то есть для работы с ним вам придется использовать «Командную строку» и вводимые вручную текстовые команды. Команд и параметров много, но для начала достаточно выучить самые главные.
Основные
qemu-system-архитектура— определяет архитектуру эмулируемого устройства. Одноименные исполняемые файлы располагаются в папке установки эмулятора.qemu-img create— команда создает файл в формате IMG, являющийся виртуальным диском, на который производится установка системы. В качестве аргумента передается произвольное имя IMG-контейнера.-hdaи-hdb— параметр подключает созданный виртуальный жесткий диск, название которого передается в качестве аргумента.-m— задает объем оперативной памяти, выделяемый эмулируемому устройству.-boot— задает ресурс, с которого выполняется загрузка операционной системы. Имя ресурса должно соответствовать названию виртуального жесткого диска (без указания расширения).cdrom— эмулирует дисковод, используется для установки операционных систем и запуска LiveCD, то есть портативных ОС. В качестве аргумента передается путь к образу ISO.
Дополнительные
-usb— активирует поддержку USB.-smp— эмулирует мультипроцессорную архитектуру.-full-screen— запускает виртуальную машину в полноэкранном режиме.cpu— задает тип процессора.-k— задает раскладку клавиатуры по умолчанию.-soundhw— подключает аудиокарту.usbdevice— подключает устройства USB.
Установка операционной системы в QEMU
Предположим, вы хотите эмулировать компьютер с интеловским процессором и операционной системой Windows XP.
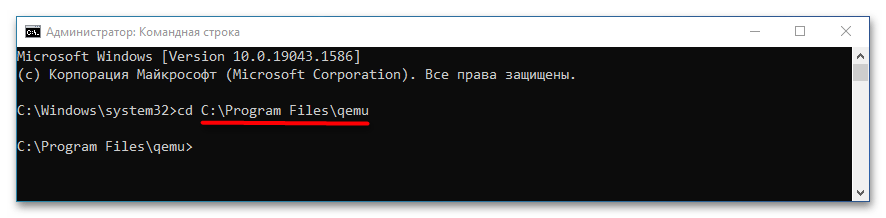
- Запустите классическую «Командную строку» и перейдите в расположение установки QEMU, для чего выполните команду
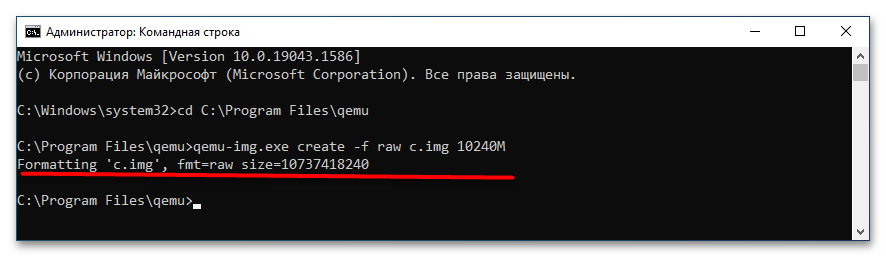
cd C:Program Filesqemu. Если эмулятор устанавливался в другую папку, после cd укажите путь к ней. - Создайте виртуальный жесткий диск, на который станет устанавливаться операционная система. Для этого выполните команду
qemu-img.exe create -f raw c.img 10240M, где c.img — название виртуального диска, а 10240 — его размер в мегабайтах. Размер диска-контейнера должен соответствовать требованиям запускаемой/устанавливаемой операционной системы. - Запустите установку дистрибутива операционной системы командой
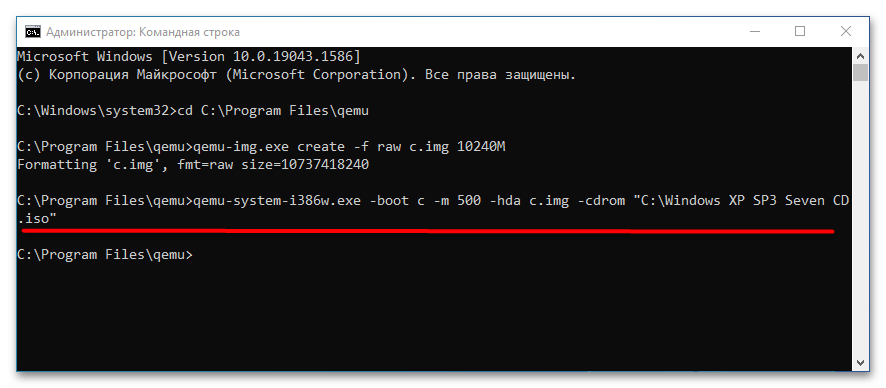
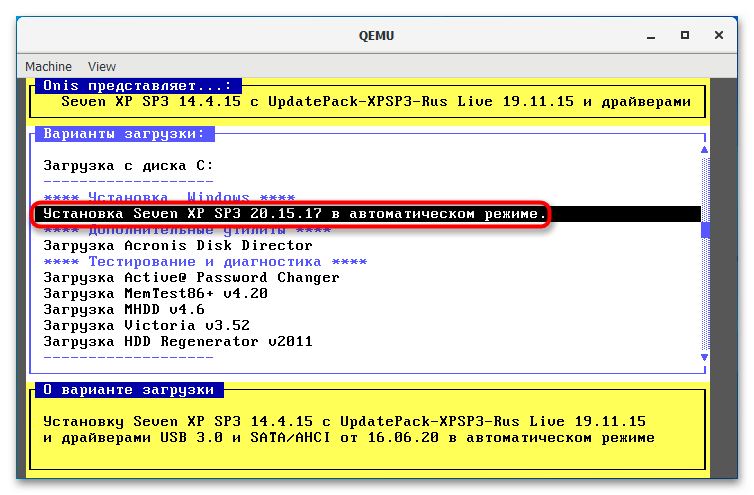
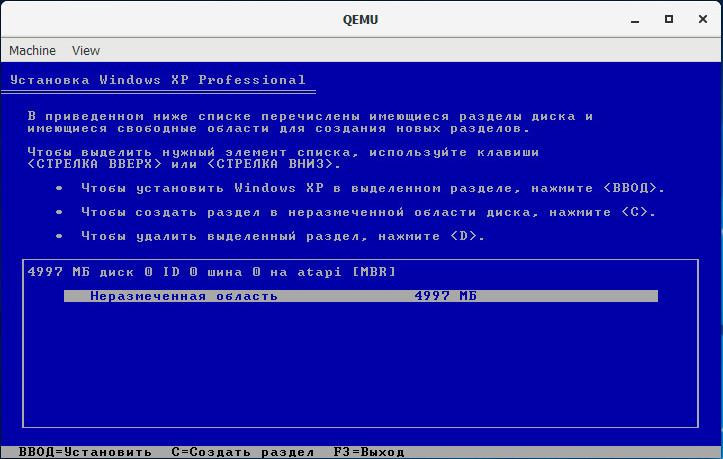
qemu-system-i386w.exe -boot c -m 512 -hda c.img -cdrom "C:Windows XP SP3 Seven CD.iso". -i386w в данном примере указывает, что виртуальная машина эмулирует архитектуру х86, -boot указывает загрузку с диска с названием «c», -m 512 выделяет виртуальной машине 512 МБ оперативной памяти, -hda c.img указывает, что система будет устанавливаться в файл-контейнер «c.img». Наконец, содержимое прямых кавычек после параметра –cdrom представляет собой путь к установочному образу. - В открывшемся окне QEMU выберите с помощью клавиш-стрелок вниз-вверх нужный пункт, в данном примере это установка операционной системы. Выполните традиционную процедуру установки системы на виртуальный жесткий диск.
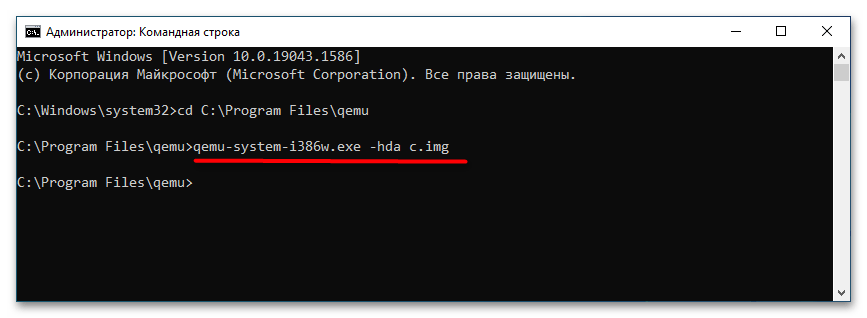
- По завершении установки системы вы сможете запускать последнюю командой
qemu-system-i386w.exe -hda c.img.
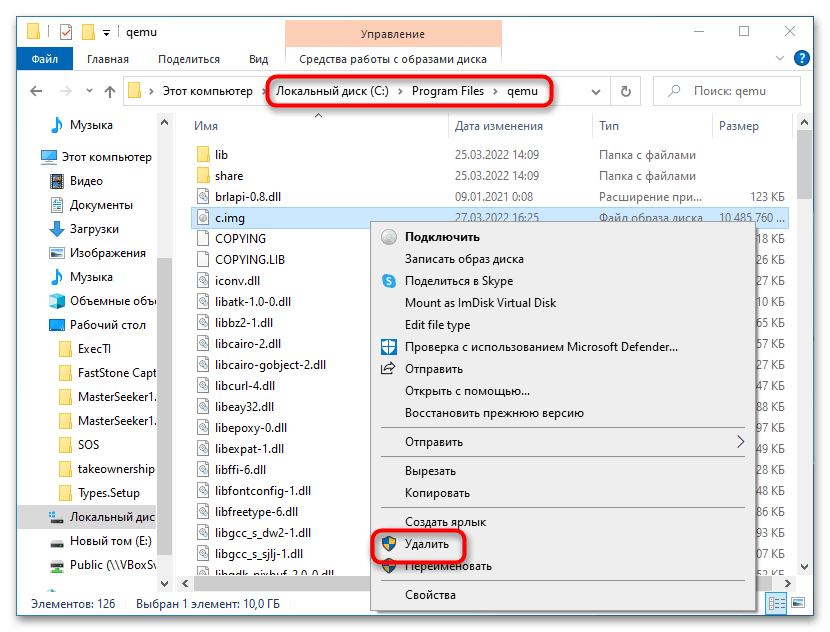
Если виртуальная система станет вам не нужна, удалите IMG-диск, на который она была установлена. По умолчанию файл диска IMG располагается в папке установки QEMU.
Запуск в QEMU образов LiveCD
Процедура запуска портативных операционных систем в QEMU намного проще, чтобы запустить в эмуляторе LiveCD, сформируйте и выполните команду следующего вида, заблаговременно перейдя в «Командной строке» в папку инсталляции эмулятора:
qemu-system-архитектура.exe -m 1024 -cdrom "путь к образу LiveCD"
Поскольку портативная ОС может загружаться в оперативную память, в предварительном создании виртуального диска нет необходимости.

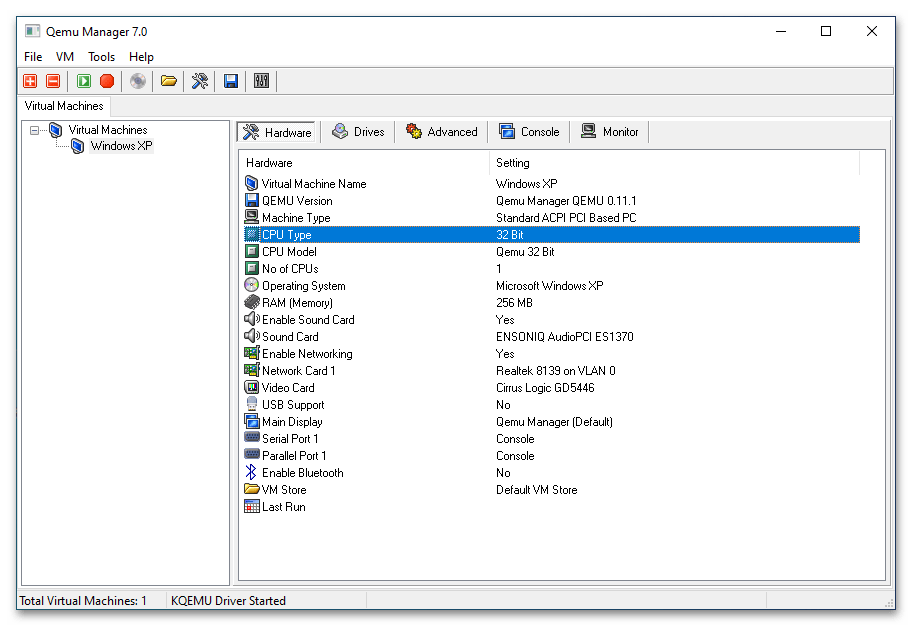
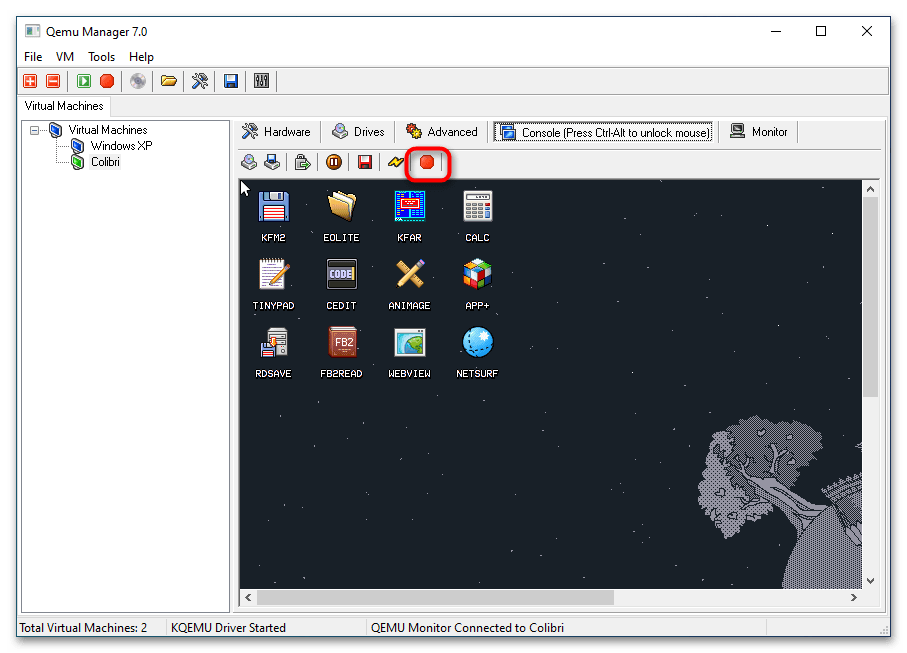
Qemu Manager
Если вы не имеете навыков работы со штатной программой «Командная строка», можете попробовать воспользоваться приложением Qemu Manager — графическую оболочкой для эмулятора Qemu. Ниже прилагается краткая инструкция по использованию приложения.
- Скачайте, установите и запустите Qemu Manager. В открывшемся окне настроек по умолчанию нажмите «Save & Finish».
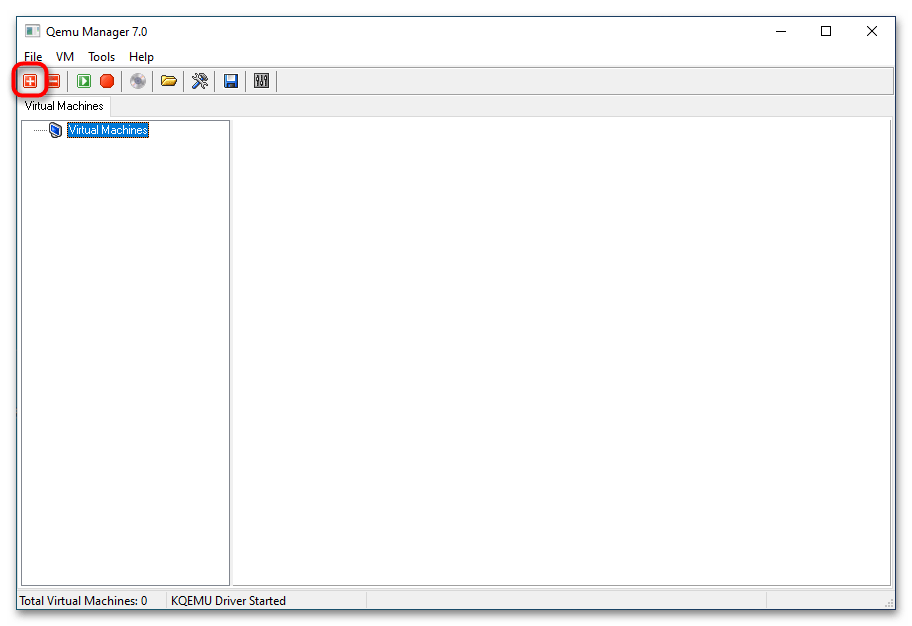
- В основном окне менеджера нажмите кнопку «+», чтобы приступить к созданию новой виртуальной машины (дальше VM).
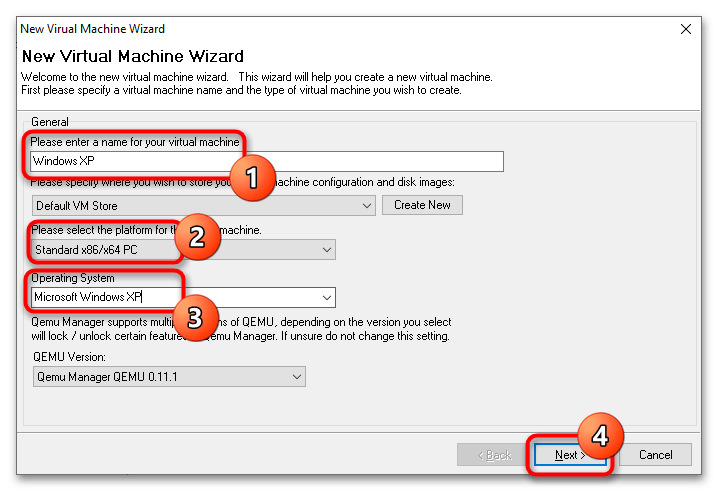
- В поле «Please enter a name for your virtual machine» введите произвольное название VM, в меню «Please select the platform for the virtual machine» укажите архитектуру VM, а из выпадающего списка «Operating System» выберите операционную систему.
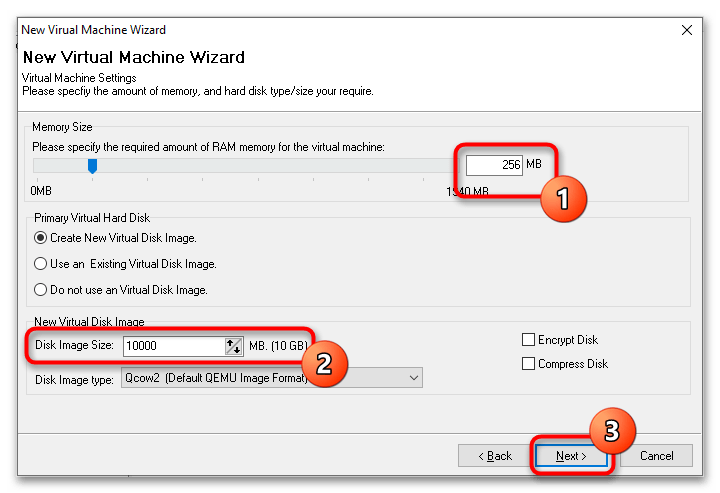
- Выделите с помощью ползунка «Memory Size» требуемый для VM объем оперативной памяти, а в меню «Disk Image Size» укажите размер виртуального диска. Если вы запускаете LiveCD, в настройках «Primary Virtual Hard Disk» следует выбрать опцию «Do not use an Virtual Disk Image».
- В следующем окне нажмите кнопку «Finish».
- В результате в основном окне менеджера появится новая виртуальная машина с конфигурацией по умолчанию. При желании вы можете отредактировать параметры VM: например, изменить архитектуру процессора, выделяемый объем памяти, включить поддержку USB, создать и подключить новый виртуальный жесткий диск и так далее.
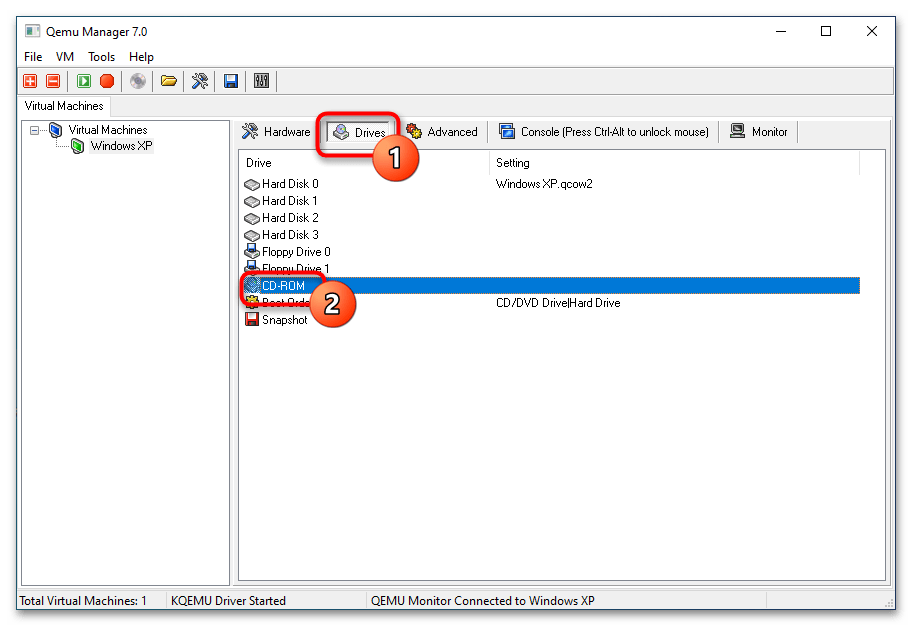
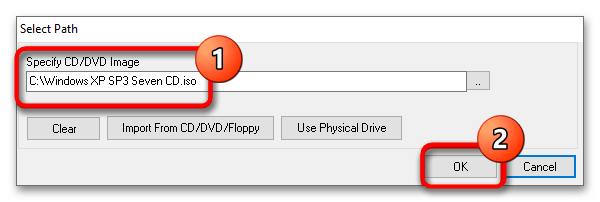
- Переключитесь на вкладку «Drives» и двойным кликом откройте настройку «CD-ROM».
- Укажите путь к установочному образу операционной системы или дистрибутиву LiveCD и сохраните настройки.
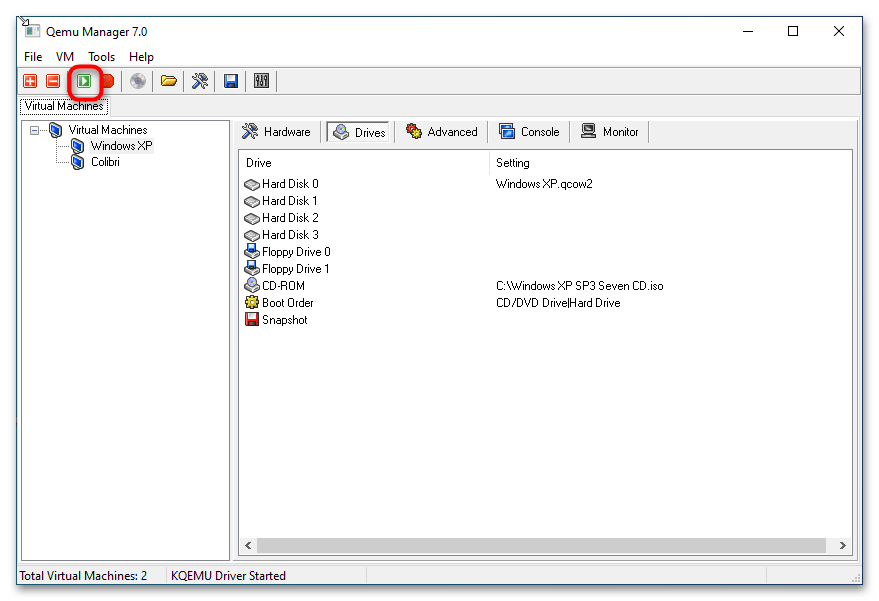
- Запустите виртуальную машину нажатием кнопки «Launch Selected VM». По умолчанию Qemu Manager захватывает мышку, так что она становится недоступной для хостовой операционной системы. Чтобы освободить курсор, нажмите комбинацию клавиш Ctrl + Alt.
- Чтобы завершить работу VM, нажмите кнопку «Quit Qemu».


Несмотря на отсутствие поддержки русского языка, Qemu Manager существенно упрощает работу с платформой Qemu. К сожалению, в настоящее время разработка данной программы прекращена, официальный сайт разработчика недоступен, но приложение по-прежнему доступно для скачивания из свободных источников.
Еще статьи по данной теме:
Помогла ли Вам статья?
Виртуализация — наиболее доступный способ запустить на одном ПК вторую операционную систему, не устанавливая ее непосредственно на жесткий диск. Вместо этого вторая ОС устанавливается на диск виртуальный, представленный специальным файлом-контейнером, созданным в гипервизоре — программе, позволяющей эмулировать работу гостевой системы в системе хостовой. Наибольшей популярностью среди домашних юзеров пользуются гипервизоры VirtualBox и VMware с мощным функционалом и наглядным GUI.
Но есть и другие, в чём-то даже более гибкие и продуктивные решения хотя и куда менее удобные в использовании. Например, QEMU — бесплатная программа с открытым исходным кодом, предназначенная для эмуляции программного обеспечения и операционных систем. Инструмент использует аппаратную виртуализацию, поддерживая два режима работы:
• Полная эмуляция — данный режим применяется для запуска операционных систем, в его рамках QEMU эмулирует физическое устройство со всеми его компонентами, встроенными и периферийными.
• Эмуляция пользовательского режима — дает возможность запускать программы, созданные для конкретной архитектуры на другой архитектуре, например, приложения ARM в x86. Режим доступен только в хостовой системе Linux.
QEMU поддерживается эмуляция архитектуры x86, ARM, MIPS, PowerPC, m68k, Alpha, SPARC, SH-4, CRISv2, MicroBlaze и это более солидный список, чем у того же Виртуалбокс.
Как установить QEMU в Windows
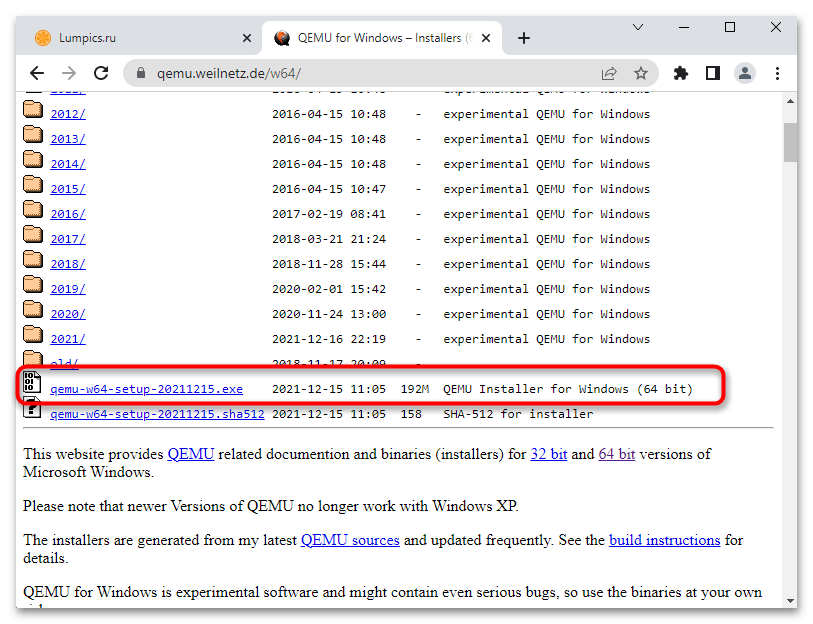
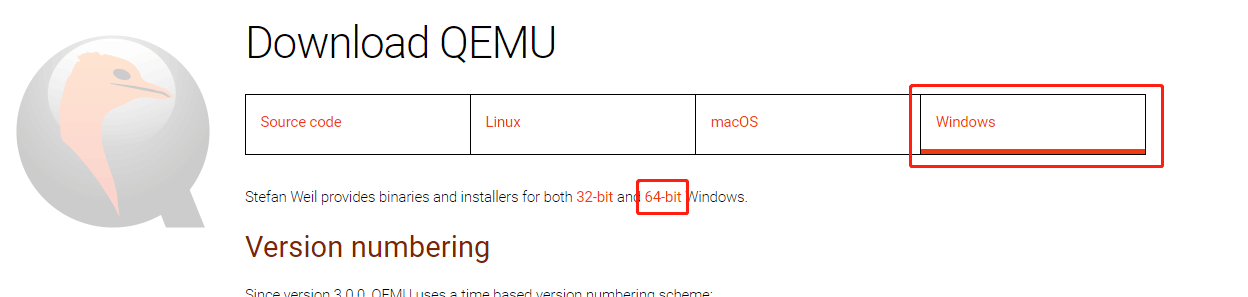
Скачать установочный файл эмулятора можно с официального сайта www.qemu.org/download/#windows,
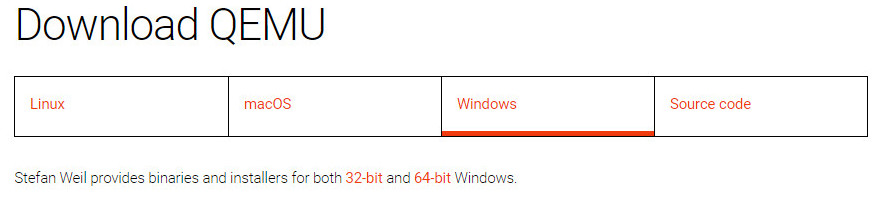
есть редакции 32-битные и 64-битные, версию выбираем последнюю.

Устанавливается QEMU как обычная программа в папку Program Filesqemu, но можно выбрать и другое расположение.
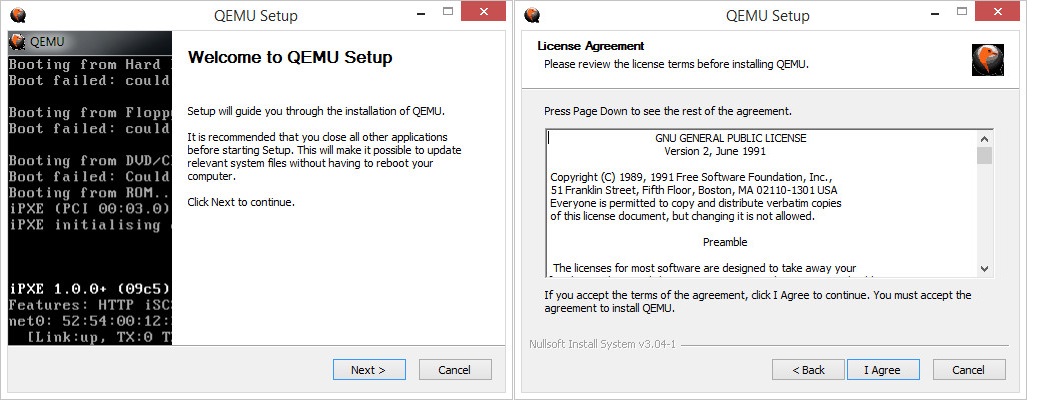
Установку выполняем с параметрами по умолчанию, ничего менять не нужно, просто жмем в окне мастера «Next».
Виртуализация операционных систем в QEMU
В отличие от VirtualBox и подобных гипервизоров, QEMU не имеет графического интерфейса, работа с ней ведется через командную строку. Команд и параметров для создания и управления виртуальными машинами много, но для начала вам нужно знать хотя бы эти шесть.
• qemu-system — задает архитектуру виртуальной машины.
• qemu-img create — создает файл виртуального IMG-диска, на который будет устанавливаться операционная система.
• -m — выделяет виртуальной ОС указанный объем оперативной памяти.
• -hda — подключает созданный виртуальный диск.
• -boot IMG — указывает, что загрузка должна производиться с виртуального диска, вместо IMG следует указать имя IMG-файла.
• cdrom — содержит путь к установочному образу ISO, эмулирует дисковод.
Примечание: для запуска операционных систем, работающих в режиме LiveCD достаточно будет трех команд/параметров — первой, третьей и шестой.
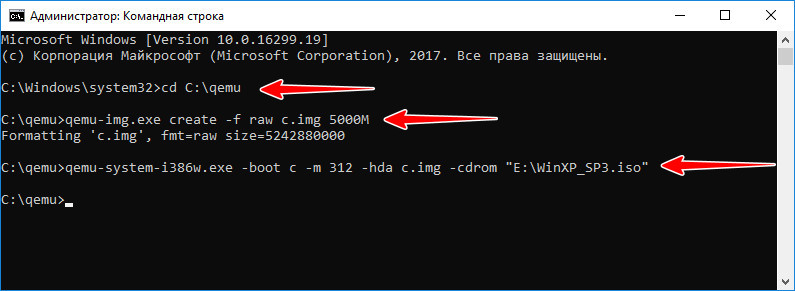
Чтобы вам стало всё немного понятнее, установим и запустим с помощью QEMU какую-нибудь операционную систему. Для примера мы выбрали Windows XP, так как она легкая и занимает на диске мало места. QEMU у нас уже установлен, открываем командную строку, переходим в каталог установки и создаем виртуальный жесткий диск следующей командой:
qemu-img.exe create -f raw c.img 5000M
Файл qemu-img.exe в эмуляторе отвечает за создание IMG-образов, с — это название образа, 5000 — размер виртуального диска в мегабайтах. По умолчанию образ будет создан в папке QEMU.
Теперь сформируем следующую команду:
qemu-system-i386w.exe -boot c -m 350 -hda c.img -cdrom «E:WinXP_SP3.iso»
Исполняемый файл в начале команды отвечает за создание виртуальной машины с архитектурой х86, -boot с ключом -с сообщает, что грузиться она будет с диска, в значение параметра -hda подставляем созданный образ, а в качестве значения параметра –cdrom указываем путь к дистрибутиву Windows.
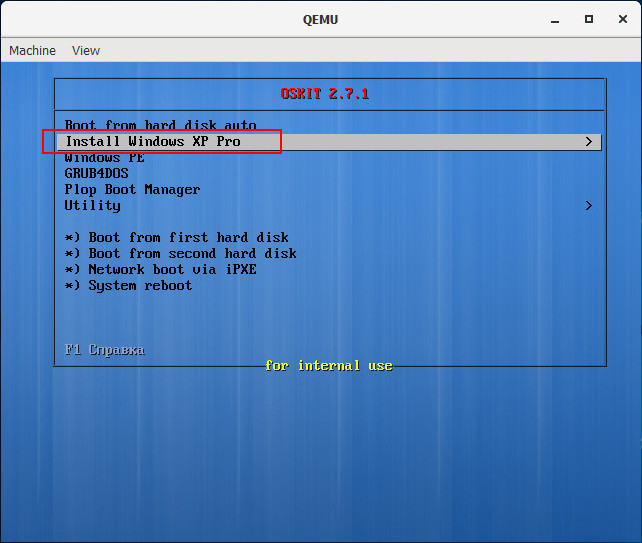
После выполнения команды появляется окошко QEMU с загрузочным меню, в котором мы выбираем установку на диск.
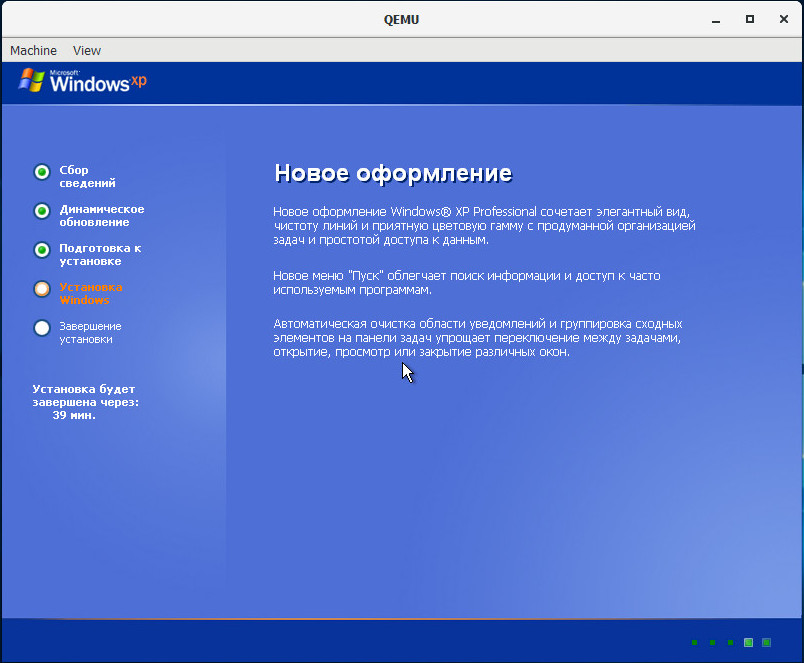
Далее проходим все этапы установки операционной системы вплоть до локальных настроек и загрузки рабочего стола.

Чтобы запустить закрытую виртуальную машину, выполните команду qemu-system-i386w.exe -hda name.img, где name — название вашего виртуального диска, чтобы удалить ставшую ненужной VM, просто удалите из каталога установки QEMU созданный IMG-образ.
Управлять QEMU можно с помощью клавиатуры и мыши, для переключения между эмулятором и хостовой машиной используйте комбинацию Ctrl+Alt+G. Запущенная с минимальными настройками ОС не будет иметь доступа к аудио- и сетевой карте, не будет также возможности обмена файлами между виртуальной и хостовой системами.
Нельзя сказать, что QEMU лучше или хуже VirtualBox либо VMware, это альтернативное средство виртуализации, имеющие как свои плюсы, так и минусы. QEMU менее удобен, требует знания документации и демонстрирует весьма небольшую производительность. Для ускорения работы в Windows требуется установка и настройка Диспетчера аппаратного ускорения HAXM, в Linux – подключение загружаемого модуля ядра KVM. С другой стороны, инструмент позволяет эмулировать работу устройств на базе разных архитектур, не поддерживаемые популярными гипервизорами.
![]() Загрузка…
Загрузка…
Do you want to use QEMU for Windows? This post from MiniTool shows you how to download and install the QEMU software on Windows. It also shows you how to use QEMU on Windows to create an Ubuntu VM.
What Is QEMU
QEMU, short for Quick Emulator, is a free open-source hosted virtual machine manager that can execute hardware virtualization. With the help of KVM (Kernel-based Virtual Machine), QEMU can offer fast running speed. Therefore, it develops fast and is going to replace VirtualBox and VMware on Linux.
Tip: On Linux, with the help of quickgui, QEMU can create some macOS, Windows, and Linux virtual machines without downloading the ISO files manually. Please refer to this post: How to Install macOS and Windows 11 Virtual Machines on Ubuntu.
However, on Windows, the advantages of QEMU are not significant, because the KVM technology is not applicable on the Windows host machine. In addition, the quickgui is also not available to Windows. But QEMU develops fast and many people still want to use this VM software on Windows.
QEMU for Windows Download and Install
1. Download QEMU for Windows
To use QEMU for Windows, you should download and install it first. Please refer to the following QEMU download guide:
Step 1: Go to the official QEMU website (https://www.qemu.org). Click the Download button at the top section. You will go to the QEMU download page.
Step 2: Click the Windows tab to get the QEMU Windows version. Click 32-bit or 64-bit according to what OS you are running (for me, I click the 64-bit because my OS is 64-bit).
Step 3: On the new page, click the .exe file to download it. This file is the installer file.

2. Install QEMU for Windows
After the installer file is downloaded, you can double-click it to run directly. Before doing that, I recommend you to create a partition separately for it. For any virtual machine software, I will recommend you create a separate partition to store the software and the VM files so that you can manage them better.
To create a separate partition, you can use the shrink feature in the Windows Disk Management tool. But this tool can’t help you move the location of partitions, so I recommend you to use MiniTool Partition Wizard.
If the free space of one partition is not enough, you can move/resize another partition to get more unallocated space and then gather the unallocated space together to create one partition. Here is the guide:
Free Download
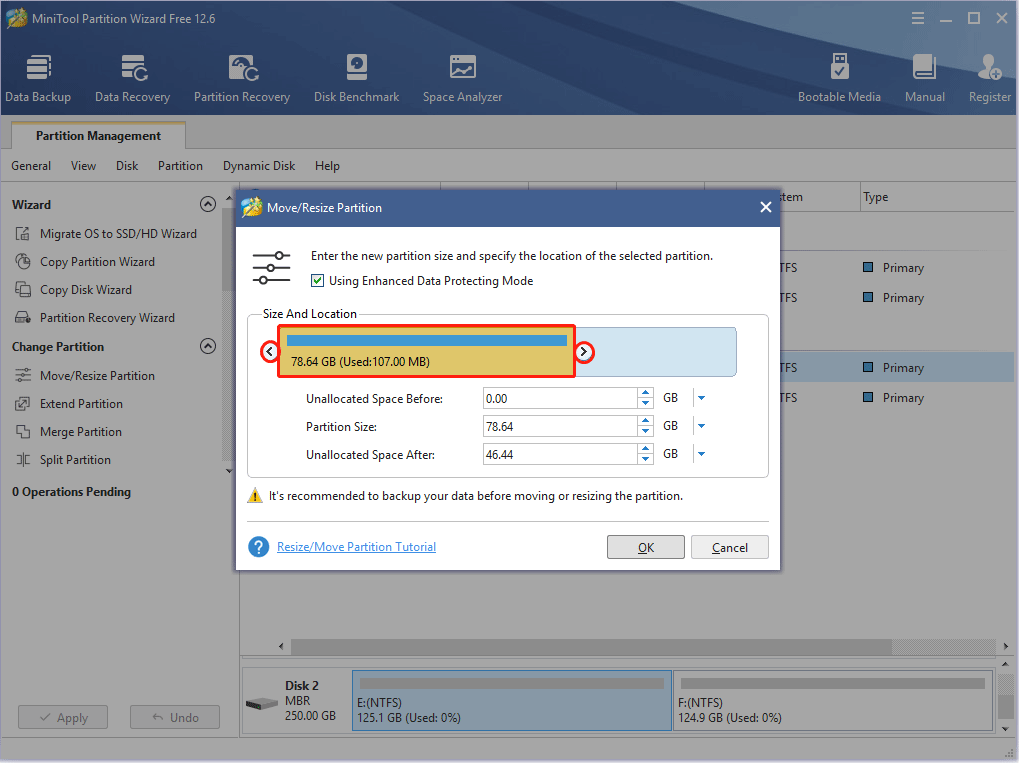
Step 1: Launch MiniTool Partition Wizard and go to its main interface. Right-click a partition and choose Move/Resize.
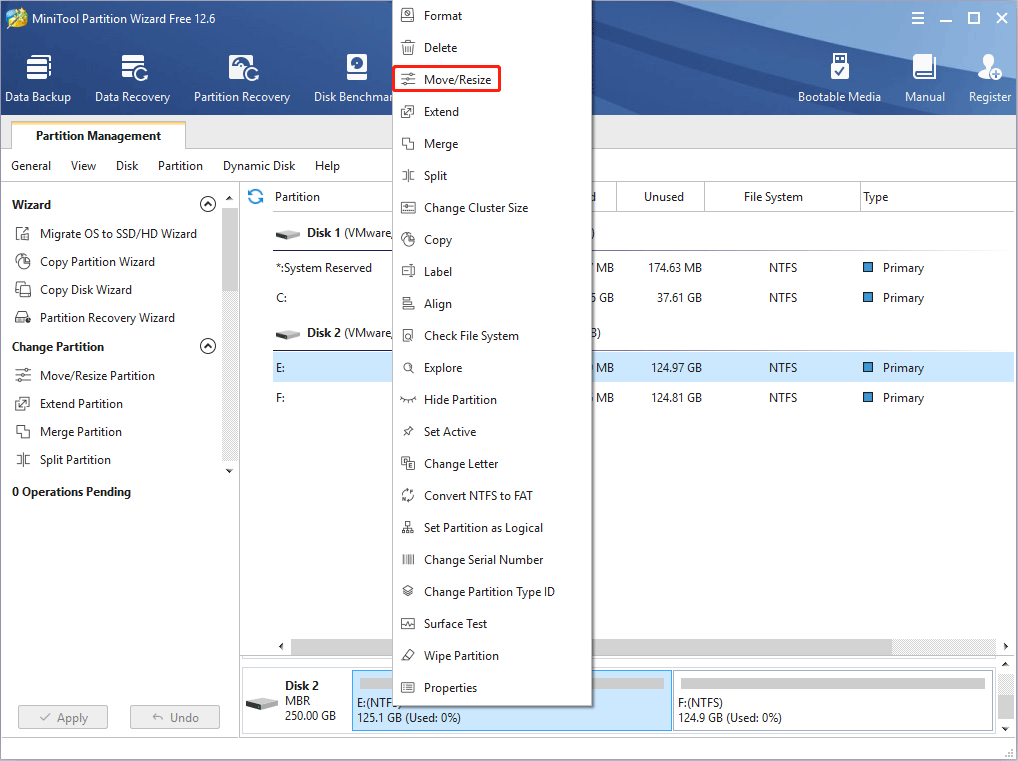
Step 2: Drag the two arrows on the two sides of the partition to shrink the partition, and then drag the block to move the location of the partition. Then, click the OK button. In this way, you can get unallocated space.
Step 3: Right-click the unallocated space and choose the Create button.

Step 4: Set parameters for the new partition. You can keep all of them to the default value if you don’t have specific demands. Then, click the OK button.

Step 5: Click the Apply button to execute pending operations.

How to Merge Unallocated Space in Windows 10 for a Large Drive
After the new partition is created, you can then double-click the QEMU installer file to install this VM software. You just need to follow the on-screen instructions to complete the installation.
Tip: When you are asked to choose the install location, please choose the newly-created partition (taking E drive as an example).

How to Use QEMU on Windows
After installing the QEMU Windows version, you may want to know how to use QEMU to create a virtual machine. Here are 2 ways and the 2nd way is better.
Way 1. Create a Virtual Machine Using Commands
QEMU doesn’t come with a GUI. If you don’t install a GUI manually, you need to use commands to run QEMU. Here is the guide on how to use QEMU on Windows to create a VM via commands (taking Ubuntu as an example).
Step 1: Download the Ubuntu ISO file from the official website.
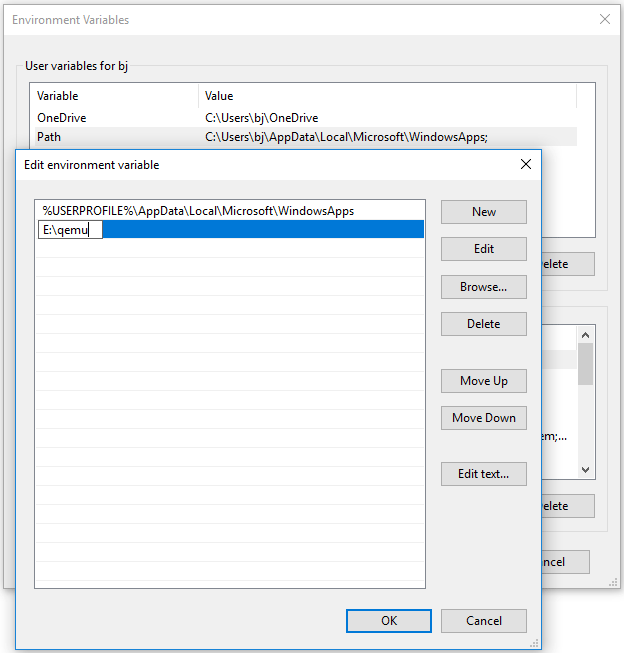
Step 2: Add QEMU path into Environment Variables.
- Open File Explorer, go to the QEMU installation location, and then copy the path (E:qemu).
- Right-click This PC / Computer, choose Properties, and then click Advanced system settings.
- Under the Advanced tab, click Environment Variables.
- In the User variables box, double-click the Path variable, click New, and then paste the QEMU path.
- Click the OK button to save changes, and then click the OK button again to save and exit the Environment Variables
Tip:
1. If you use Windows 7, the adding process may be a little different.
2. If there is no Path variable under the User box, you can create one, or you can add the QEMU path into the System variables.
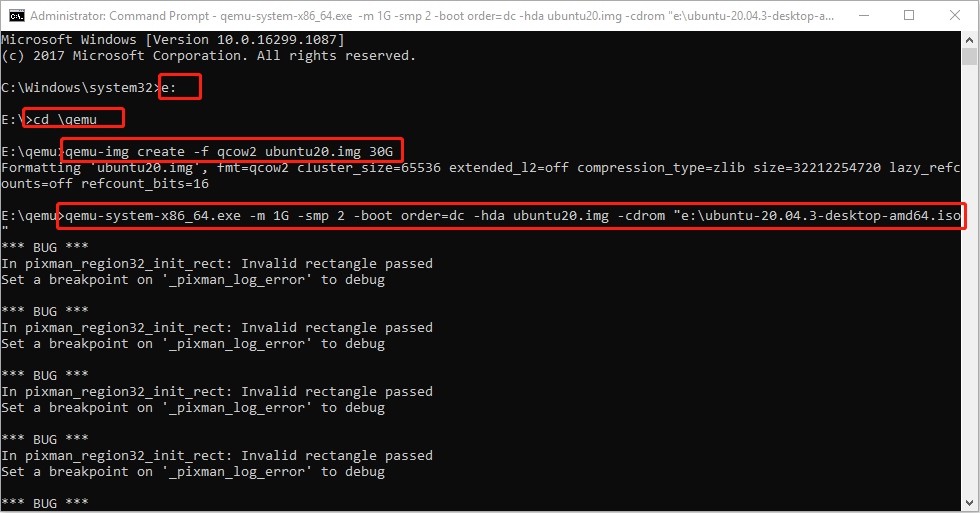
Step 3: Run Command Prompt as administrator and then execute the following commands.
- E: (this will open the e drive where QEMU is installed).
- cd qemu (this will open the qemu folder).
- qemu-img create -f qcow2 ubuntu20.img 30G (this will create a virtual hard drive of 30GB).
- qemu-system-x86_64.exe -m 1G -smp 2 -boot order=dc -hda ubuntu20.img -cdrom “e:ubuntu-20.04.3-desktop-amd64.iso” (this will run Ubuntu using CD/ROM).
Tip:
1. If you want to install other VMs (macOS, ARMs, etc.), the qemu-system may vary greatly.
2. The above commands are not perfect. If you have better commands, you can run them.
3. The QEMU installation path and the location of the Ubuntu ISO file in the above commands should be changed accordingly.
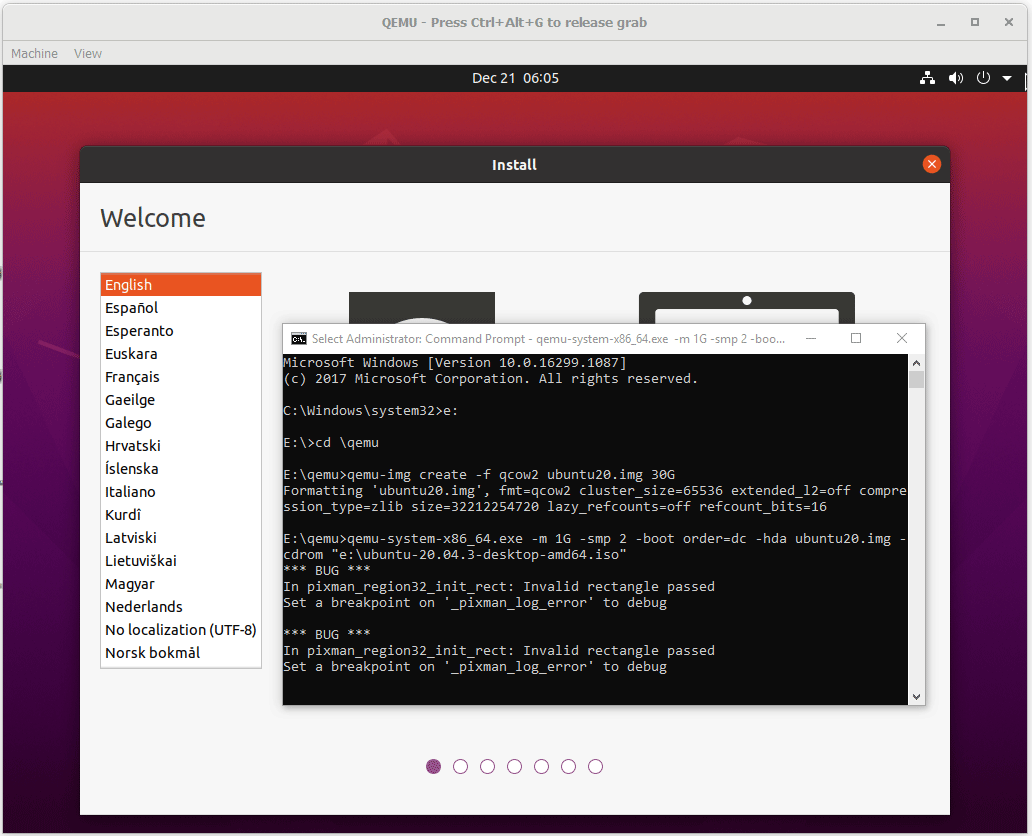
Step 4: Go through the Ubuntu installation process. Although there may be many bugs, I launch Ubuntu 20 successfully and then just need to complete the installation process.
How to Install Linux (Ubuntu) on Windows 10 [Ultimate Guide 2022]
Way 2. Create a Virtual Machine Using QtEmu
As you can see, creating a VM using QEMU via commands is a tough job. You need to search for various tutorials online. In addition, once errors occur, you may have no idea how to solve them. Therefore, I recommend you to use QtEmu, an open-source GUI for QEMU Windows.
How to use QEMU on Windows via QtEmu? Here is the guide:
Step 1: Download the Ubuntu ISO file and QtEmu. The QtEmu official website is https://qtemu.org and the QtEmu source is placed on https://gitlab.com/qtemu/gui. Go to the GitLab source page, scroll down to find the Downloads section, and click the first link to download the QtEmu installer.

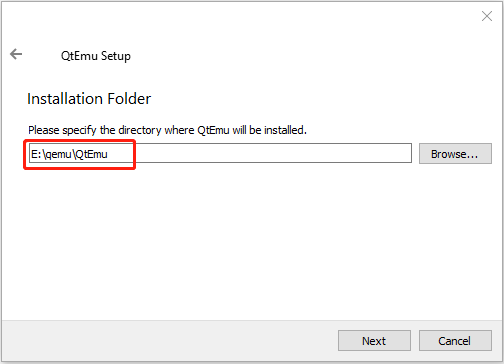
Step 2: Double-click the QtEmu installer file and go through the installation process. When you are asked to specify the installation location (where to create the QtEmu folder), please install the QtEmu under the QEMU folder. For me, I type: E:qemuQtEmu.
Step 3: After QtEmu is installed, go to E:qemuQtEmu. Right-click the qtemu.exe file and choose Send to > Desktop (create shortcut). Then, create a folder named VMs under the E drive to store all VM files to be created.
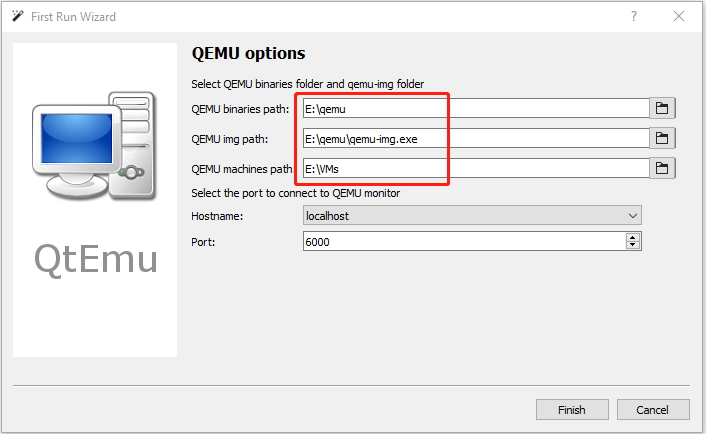
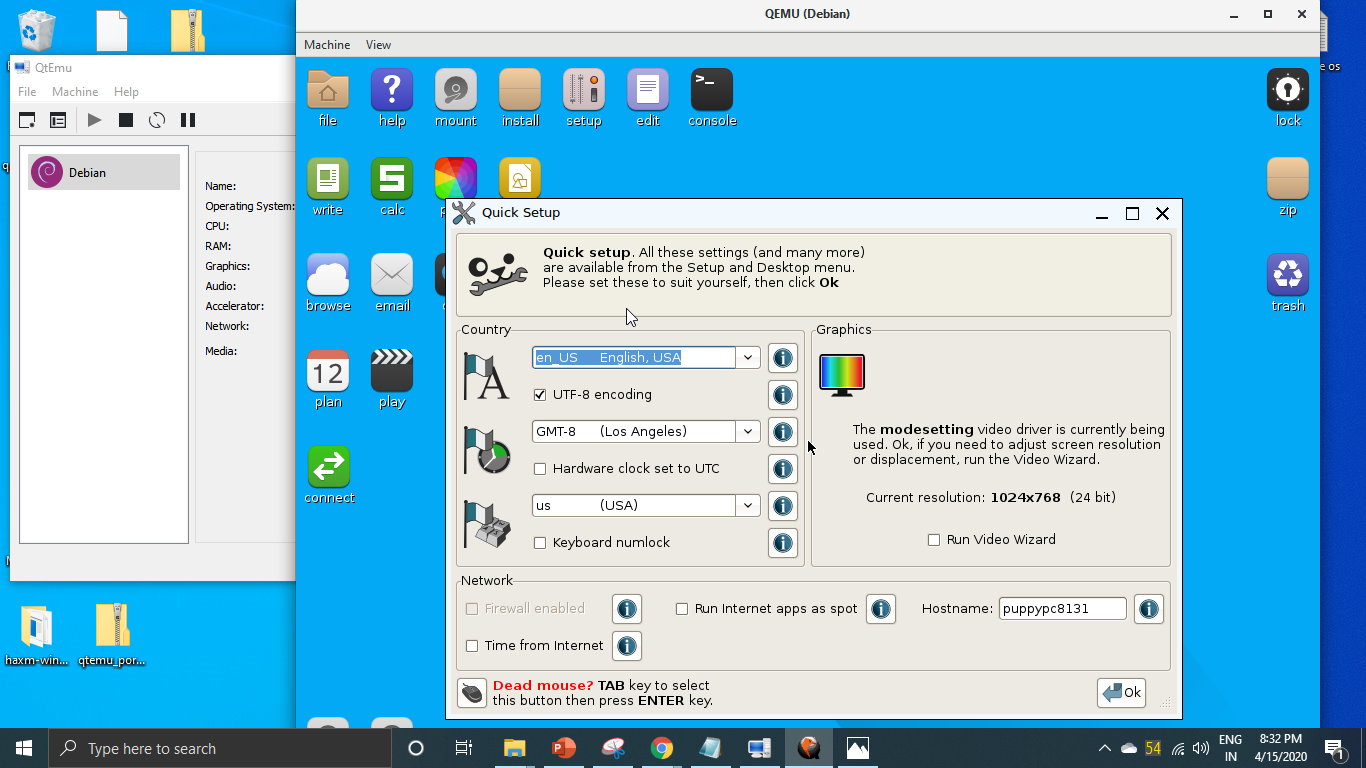
Step 4: Double-click the QtEmu shortcut to launch this software. In the QEMU options window, please set QEMU binaries path to E:qemu, set QEMU img path to E:qemu, and set QEMU machines path to E:VMs. Then, click the Finish button.
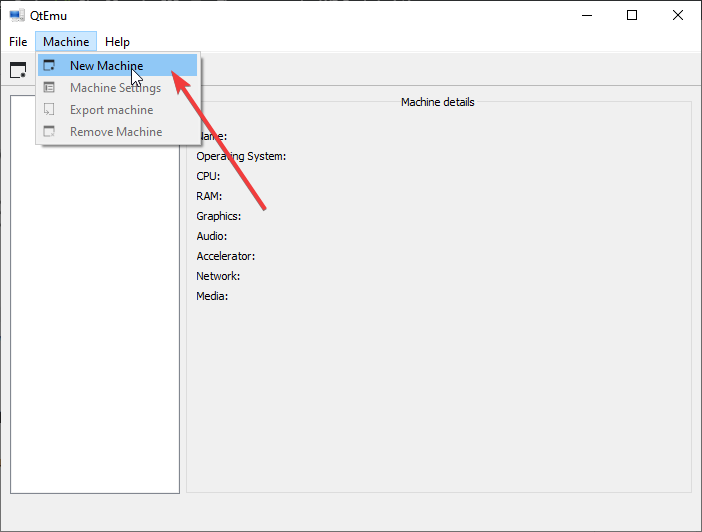
Step 5: Click Machine > New Machine. Then, give a name to the new machine (Ubuntu20), choose OS type (GNU/Linux), choose OS version (Ubuntu), and then click Next.
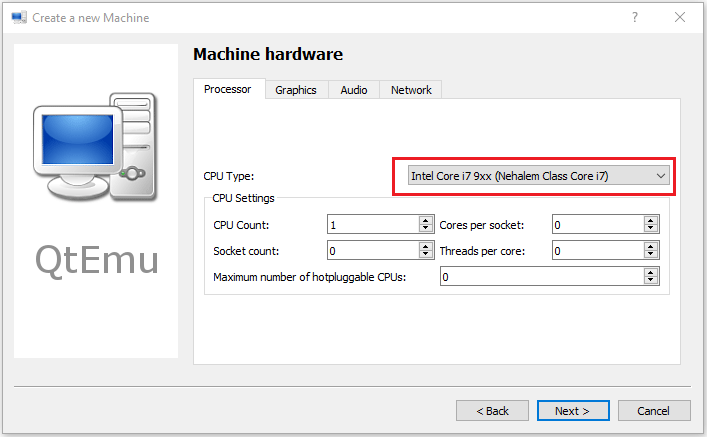
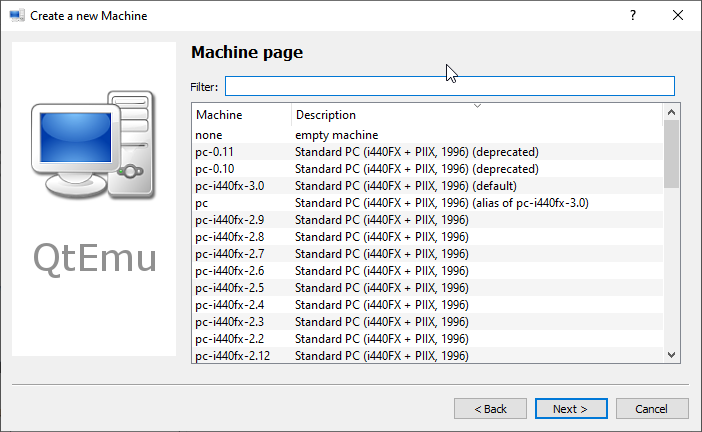
Step 6: On the Filter page, if you don’t need to specify certain motherboard chipsets, you can click the Next button directly to skip this step.
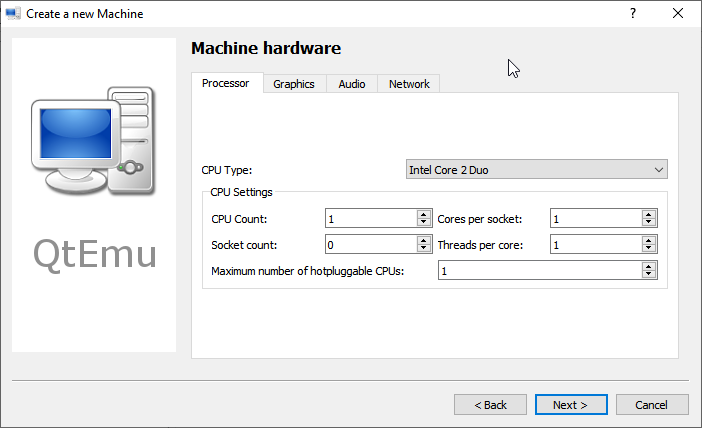
Step 7: Select a correct CPU Type, and set CPU, Graphics, Audio, and Network parameters. If all is OK, click the Next button.
Tip: The Ubuntu 20 version requires a 64-bit CPU. If you choose a 32-bit CPU, the VM may not boot.
What Is the Difference Between 32 Bit and 64 Bit (x86 vs x64)
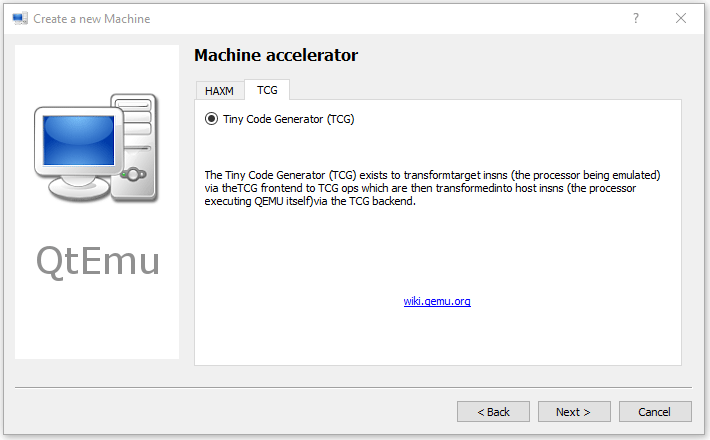
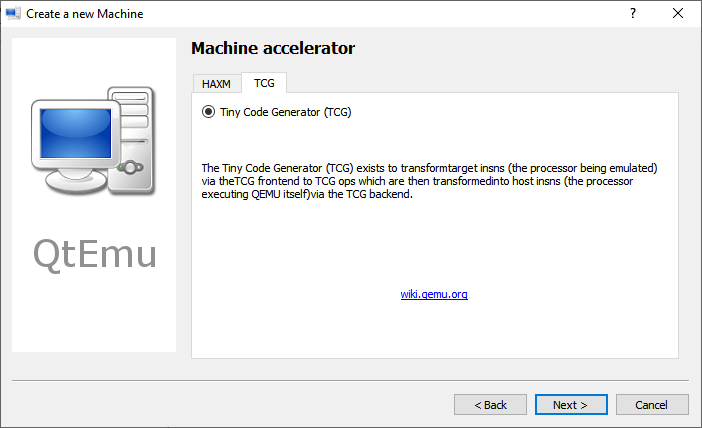
Step 8: Select the machine accelerator. HAXM is chosen by default. However, some computers may not support this technology. Therefore, I recommend you uncheck HAXM and then choose TCG instead. Then, click Next.
Tip: Some people report that nothing happens when they play the VM. The culprit is likely to be the HAXM. To ensure the VM can work on most PCs, TCG is recommended.
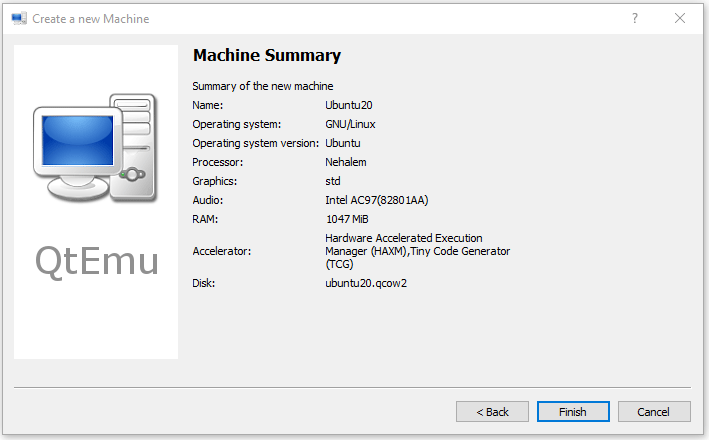
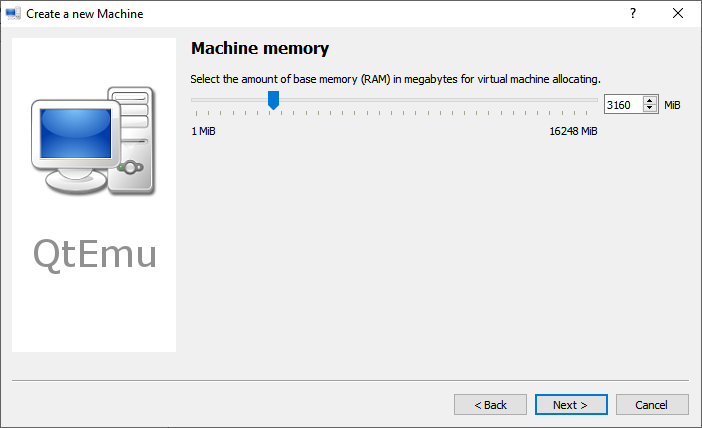
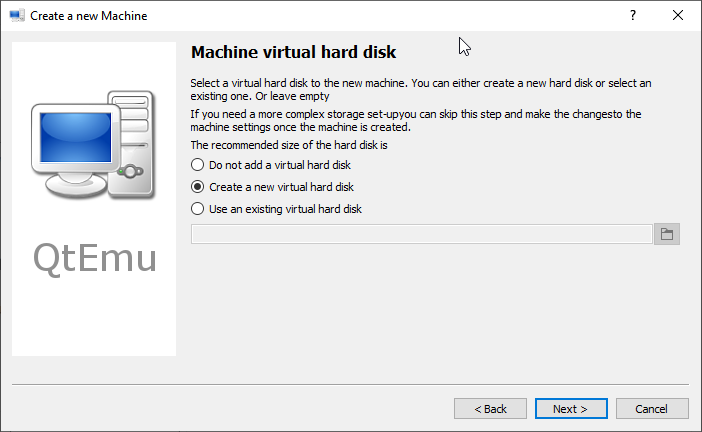
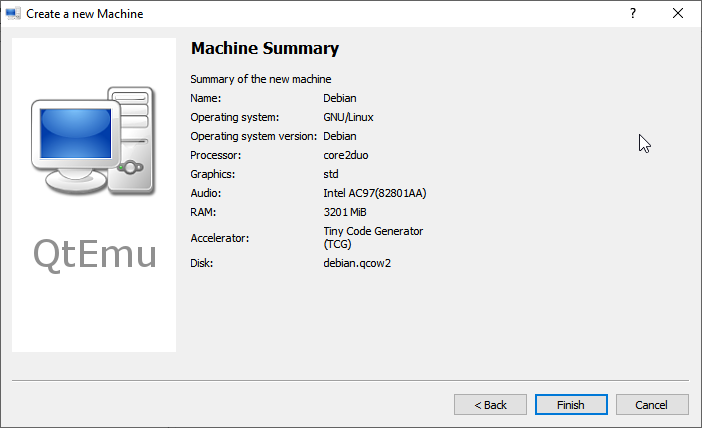
Step 9: Follow the on-screen wizard to set memory size, create a new virtual hard disk, set disk size and type, and then check the VM summary.
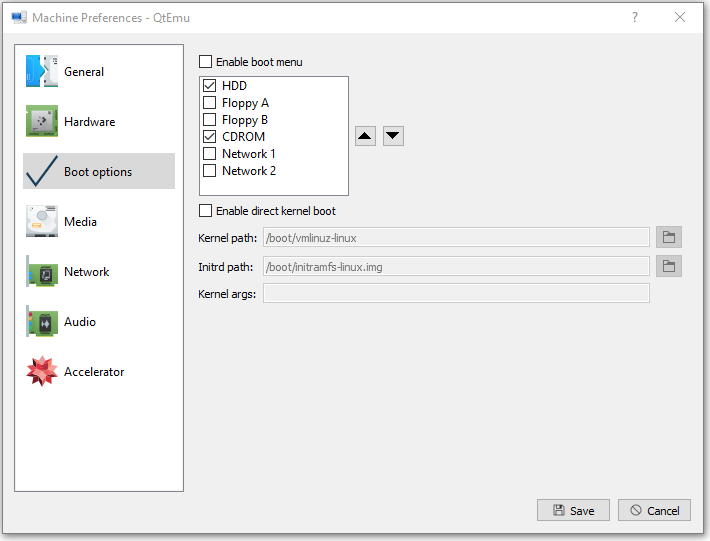
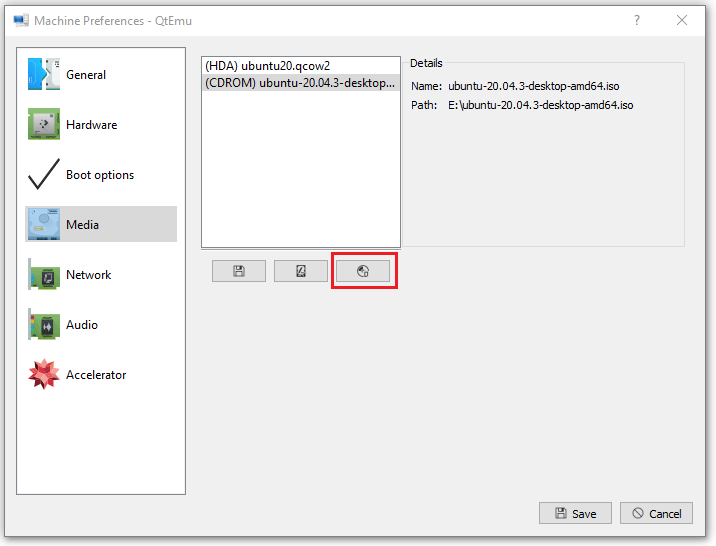
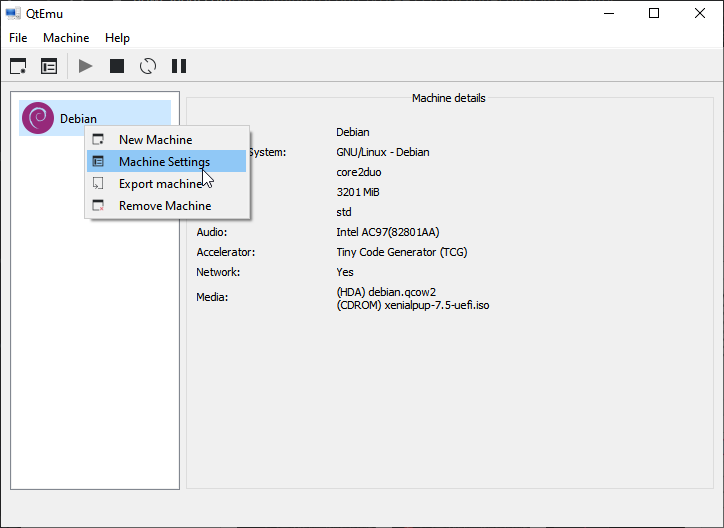
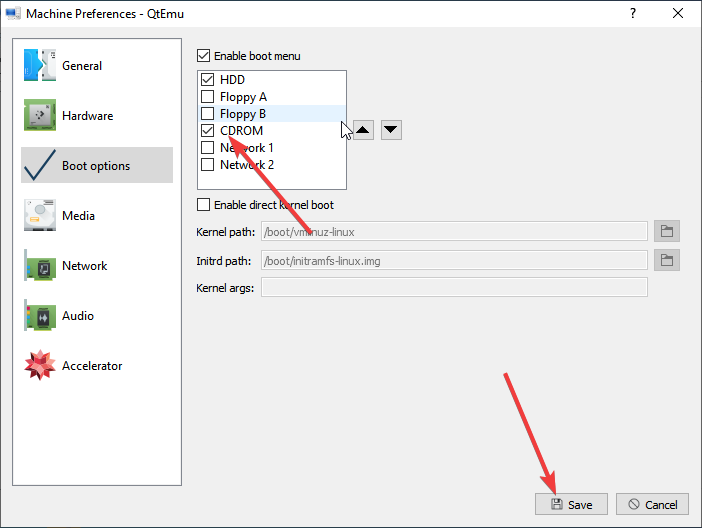
Step 10: Right-click on the newly-created VM and choose Machine Settings. Go to the Boot options tab, and tick CDROM.
Step 11: Go to the Media tab, click the disc icon, and select the Ubuntu ISO file. Then, click Save.
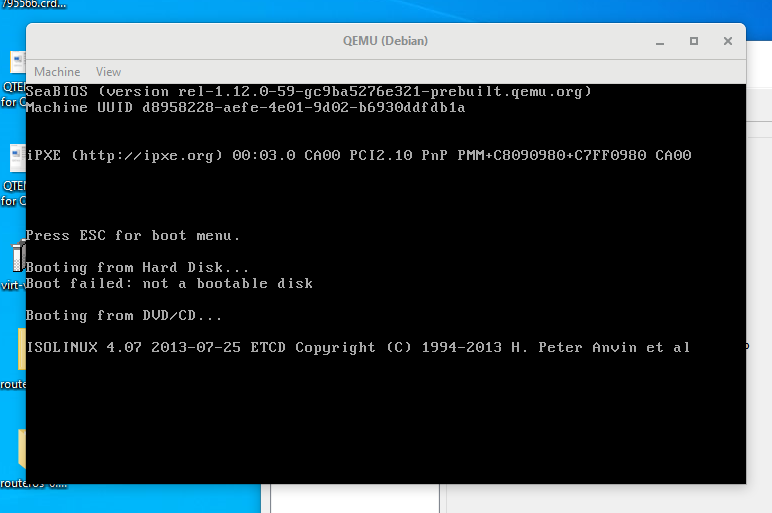
Step 12: Select the VM and then click the Play icon. Then, you may need to go through the Ubuntu installation process. After the installation process is completed, you can enjoy the VM.
Best Virtual Machine for Windows, Linux, and Mac Systems
Here is a post talking about how to download, install, and use QEMU on Windows. If you are interested in this software, this post may help you.Click to Tweet
Bottom Line
Is this post helpful to you? Do you have other ideas about how to run QEMU on Windows? Please leave a comment in the following zone for sharing. In addition, if you have difficulty in moving or resizing partitions, please feel free to contact us via [email protected]. We will get back to you as soon as possible.
Qemu is open-source software for virtualization on Windows 10/8/7, Linux, and macOS but with a command-line interface, lightweight, and low hardware requirements.
QEMU stands for “Quick Emulator” and is the standard tool for virtualization and CPU emulation under Linux, Windows, and macOS. On Linux systems, QEMU uses the functions of the Linux kernel for virtualization (KVM- Kernel Virtual Machine), which are not available under Windows.
Thus, the binaries of Qemu’s ported version for Windows by Stefan Weil couldn’t provide the performance as it gives on Linux OS with KVM. Thus VirtualBox or Vmware player will be the best alternative options; still, if you want to try then here in this Qemu tutorial, we will let know the way to download, install and use Qemu on Windows 10 or 7 using its GUI VM manager Qtemu, an open-source software.
Qemu installation on Windows 10 with Qtemu GUI
Step 1: Download Qemu for Windows
From the official website of the Qemu, we can download it easily even the source code. Visit it and click on the Windows tab, it will take you to another page https://qemu.weilnetz.de to download 32 bit or 64 bit of this virtualization platform. Here we are getting the 64 bit.
Step 2: Install Qemu
Now, like any other Windows 10/7 software, just double click on the downloaded setup of Qemu and follow the installation wizard.
- Accept the suggested language setting, by default it will be English. Select the “OK” button.
- Press the NEXT button.
- Confirm the usual license terms (GNU General Public License) with “Accept“.
- All modules required for QEMU have already been selected in the “Select components” dialogue. Confirm with “Next”.
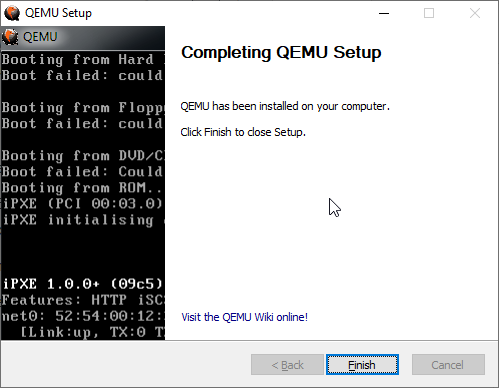
- Check the suggested destination folder and go to “Install“.
- Click on “Finish” to complete the setup of QEMU.
Step 3: Install GUI for QEMU on Windows 10
As we know the QEMU uses the command line to create virtual machines by default. But it would be not feasible for standard computer users using CLI to manage virtual machines, thus we install another open-source application to provide a Graphical user interface (GUI) to QEMU. This program is known as Qtemu which is a fork of a dead project available at https://qtemu.org.
Here are the links to download an active Qtemu project for Windows 10/8/7 available on Gitlab.
Windows x86_64 installer
If you don’t want to install it, go for the portable version.
Windows x86_64 portable
Gitlab Page Link of the project.
Step 4: Setup QEMU manager Qtemu GUI
After the installation of Qtemu run it from the Windows Start menu.
- In the first column “QEMU binaries path” copy-paste this: C:Program Filesqemu Or enter the path where you have installed the QEMU.
- For the second column enter the path of the Qemu-img file that is: C:Program Filesqemuqemu-img.exe
- Now create a folder anywhere on your computer where you want to save the virtual machines created by QEMU. And click on the folder icon given in the front of the third column to select that particular folder.
Note: You can change this configuration any time from the Qtemu Settings.

After that click on the Finish button.
Step 5: Create a Virtual machine
Now, from Qemu GUI manager Qtemu, simply click on Machine and select New Machine.
Leave the Machine which is meant to select some particular motherboard chipset.
Configure the Virtual Machine hardware, select the CPU type such as Core 2 Duo, Base, or any CPU that Qemu would be able to emulate on your system whereas setting the CPU count, cores, Thread as shown below screenshot.
By Default, the HAXM- Hardware Accelerated Execution will be selected in the Qtemu but in case the HAXM is not supported by your system or not available, thus uncheck it and check TCG- Tiny Code Generator.
Set the amount of RAM you want to assign to your VM.

Step 6: Set bootable medium CD/DVD
Now, everything is ready, we have created a Virtual machine, its time to set a bootable medium to CD; so that our ISO file could be used while booting the QEMU VM.
For that right-click on the created VM on the QTEMU interface and select Machine Settings.
There select the Boot options from the right-side panel and after that check the “Enable boot menu” and then the CD ROM option following the Save button.
Step 7: Insert ISO file in QEMU via Qtemu GUI
Under the Machine settings, go to the Media menu and click on the CD icon. This will open the Windows file explorer, navigate to the ISO file of the OS with which you want to boot in QEMU, and click on the Save button.

Step 8: Boot Qemu Virtual Machine via GUI
Now, on the main interface of the Qtemu GUI, select the created VM and click on the start button. This will open the boot screen.
Wait for a few minutes depending upon the OS distribution you are using, it will show the LIVE screen of the same. However, I tried to boot and install Windows 10 on Qemu using the GUI but it was quite sluggish and slow.
Verdict:
Although the CLI can be used to create and manage a Virtual machine on Windows 10 using the QEMU, with the Qtemu GUI tool it becomes quite easy, however, in my case it worked well with Lightweight Linux Distros but for Windows guest VMs quite slow and low performance. I recommend using VirtualBox instead. Yet, if someone wants to experience Qemu on Windows 10 this is the easiest possible way. Still, be cautious with Qtemu hardware configuration because slight here and there will not let you boot the VM.
Состояние перевода: На этой странице представлен перевод статьи QEMU. Дата последней синхронизации: 15 августа 2018. Вы можете помочь синхронизировать перевод, если в английской версии произошли изменения.
Related articles
- Category:Hypervisors (Русский)
- Libvirt
- QEMU/Guest graphics acceleration
- PCI passthrough via OVMF
Согласно странице о QEMU, «QEMU — универсальный с открытым исходным кодом эмулятор и виртуализатор.»
При использовании в качестве машинного эмулятора QEMU может запускать ОС и программы созданные для одной платформы (например для плат ARM) на других (например, на вашем ПК x86). Эмуляция происходит с хорошей производительностью, благодаря использованию динамической трансляции.
QEMU может использовать другие гипервизоры, такие как Xen или KVM, для использования расширений ЦП (HVM) для виртуализации. При использовании в качестве виртуализатора QEMU достигает производительность схожую с нативной путем исполнения гостевого кода напрямую на ЦП хост-ситемы.
Contents
- 1 Установка
- 2 Графические интерфейсы для QEMU
- 3 Создание новой виртуальной машины
- 3.1 Создание образа жесткого диска
- 3.1.1 Оверлейное хранилище изображений
- 3.1.2 Изменение размера образа
- 3.1.3 Преобразование образа
- 3.2 Подготовка установочного носителя
- 3.3 Установка операционной системы
- 3.1 Создание образа жесткого диска
- 4 Запуск виртуальной машины
- 4.1 Включение KVM
- 4.2 Включение поддержки IOMMU (Intel VT-d/AMD-Vi)
- 5 Перемещение данных между хостом и гостевой ОС
- 5.1 Сеть
- 5.2 Встроенный SMB-сервер QEMU
- 5.3 Монтирование раздела внутри образа raw диска
- 5.3.1 С указанием байтового смещения вручную
- 5.3.2 С loop модулем автоопределение разделов
- 5.3.3 С kpartx
- 5.4 Монтирование раздела внутри образа qcow2
- 5.5 Использование любого реального раздела в качестве единственного основного раздела образа жесткого диска
- 5.5.1 Указываем ядро и initrd вручную
- 5.5.2 Имитация виртуального диска с MBR с использованием линейного RAID
- 5.5.2.1 Альтернатива: использовать nbd-сервер
- 6 Сетевые топологии
- 6.1 Предупреждение об уровне адресации
- 6.2 Пользовательский режим сети
- 6.3 Tap networking with QEMU
- 6.3.1 Host-only networking
- 6.3.2 Internal networking
- 6.3.3 Bridged networking using qemu-bridge-helper
- 6.3.4 Creating bridge manually
- 6.3.5 Network sharing between physical device and a Tap device through iptables
- 6.4 Networking with VDE2
- 6.4.1 What is VDE?
- 6.4.2 Basics
- 6.4.3 Startup scripts
- 6.4.4 Alternative method
- 6.5 VDE2 Bridge
- 6.5.1 Basics
- 6.5.2 Startup scripts
- 6.6 Shorthand configuration
- 7 Графика
- 7.1 std
- 7.2 qxl
- 7.2.1 SPICE
- 7.2.1.1 Password authentication with SPICE
- 7.2.1.2 TLS encryption
- 7.2.1 SPICE
- 7.3 vmware
- 7.4 virtio
- 7.5 cirrus
- 7.6 none
- 7.7 vnc
- 8 Audio
- 8.1 Хост
- 8.2 Guest
- 9 Installing virtio drivers
- 9.1 Preparing an (Arch) Linux guest
- 9.2 Preparing a Windows guest
- 9.2.1 Block device drivers
- 9.2.1.1 New Install of Windows
- 9.2.1.2 Change Existing Windows VM to use virtio
- 9.2.2 Network drivers
- 9.2.3 Balloon driver
- 9.2.1 Block device drivers
- 9.3 Preparing a FreeBSD guest
- 10 QEMU Monitor
- 10.1 Accessing the monitor console
- 10.2 Sending keyboard presses to the virtual machine using the monitor console
- 10.3 Creating and managing snapshots via the monitor console
- 10.4 Running the virtual machine in immutable mode
- 10.5 Pause and power options via the monitor console
- 10.6 Taking screenshots of the virtual machine
- 11 Tips and tricks
- 11.1 Starting QEMU virtual machines on boot
- 11.1.1 With libvirt
- 11.1.2 Пользовательский скрипт
- 11.2 Mouse integration
- 11.3 Pass-through host USB device
- 11.4 USB redirection with SPICE
- 11.5 Enabling KSM
- 11.6 Multi-monitor support
- 11.7 Copy and paste
- 11.8 Windows-specific notes
- 11.8.1 Fast startup
- 11.8.2 Remote Desktop Protocol
- 11.1 Starting QEMU virtual machines on boot
- 12 Troubleshooting
- 12.1 Virtual machine runs too slowly
- 12.2 Mouse cursor is jittery or erratic
- 12.3 No visible Cursor
- 12.4 Unable to move/attach Cursor
- 12.5 Keyboard seems broken or the arrow keys do not work
- 12.6 Guest display stretches on window resize
- 12.7 ioctl(KVM_CREATE_VM) failed: 16 Device or resource busy
- 12.8 libgfapi error message
- 12.9 Kernel panic on LIVE-environments
- 12.10 Windows 7 guest suffers low-quality sound
- 12.11 Could not access KVM kernel module: Permission denied
- 12.12 «System Thread Exception Not Handled» when booting a Windows VM
- 12.13 Certain Windows games/applications crashing/causing a bluescreen
- 13 See also
Установка
Установите пакет qemu (или qemu-headless для версии без графического интерфейса пользователя) и необходимые вам дополнительные пакеты, перечисленные ниже:
- qemu-arch-extra — поддержка дополнительных архитектур
- qemu-block-gluster — поддержка блоков Glusterfs
- qemu-block-iscsi — поддержка блоков iSCSI
- qemu-block-rbd — поддержка блоков RBD
- samba — поддержка сервера SMB/CIFS
Графические интерфейсы для QEMU
QEMU не предоставляет графический интерфейс пользователя для управления виртуальными машинами (кроме окна, которое появляется при запуске виртуальной машины) в отличие от других программ виртуализации, таких как VirtualBox и VMware, а также не обеспечивает способ создания постоянных виртуальных машин с сохраненными настройками. Все параметры запуска виртуальной машины должны быть указаны в командной строке при каждом ее запуске, если только вы не создали собственный скрипт для запуска вашей виртуальной машины.
Libvirt предоставляет удобный способ управления виртуальными машинами QEMU. Для получения списка доступных графических интерфейсов смотрите список клиентов libvirt.
Другие графические интерфейсы для QEMU:
-
AQEMU — QEMU графический интерфейс, написанный на Qt5.
https://github.com/tobimensch/aqemu || aqemu
-
QtEmu — Графический интерфейс пользователя для QEMU, написанный на Qt4.
https://qtemu.org/ || qtemu
Создание новой виртуальной машины
Создание образа жесткого диска
Совет: Для получения дополнительной информации о образах QEMU смотрите QEMU Wikibook.
Чтобы запустить QEMU вам нужен образ жесткого диск, конечно, если вы не запускаете live систему через CD-ROM или сеть (и при этом ничего не делаете для установки операционной системы на образ диска). Образ жесткого диска — файл, хранящий содержимое эмулируемого жесткого диска.
Формат образа жесткого диска может быть raw’, так что он буквально одинаков побайтно по сравнению с тем, что отображается в госте. Он всегда будет использовать полную емкость гостевого жесткого диска на хосте. Этот способ обеспечивает наименьшие издержки ввода-вывода, но может занимать много места, поскольку неиспользуемое пространство в гостевой системе не может использоваться на хосте.
Кроме того, формат образа жесткого диска может быть таким как, qcow2, в котором выделяется пространство файлу образа только, когда гостевая операционная система фактически записывает эти сектора на своем виртуальном жестком диске. В гостевой системе отображается фактический размер образа, хотя на хост-системе он может занимать только очень небольшое пространство. Этот формат также поддерживает функцию снимков экрана (для получения дополнительной информации смотрите #Creating and managing snapshots via the monitor console). Но использование этого формата вместо raw может сказаться на производительности.
QEMU предоставляет команду qemu-img для создания образов жесткого диска. Например, чтобы создать образ с размером 4 Гб в формате raw, нужно выполнить:
$ qemu-img create -f raw *файл_образа* 4G
Вы можете использовать -f qcow2 для создания диска qcow2.
Примечание: Также вы можете просто создать образ raw, используя dd или fallocate для создания файла с нужным размером.
Важно: Если вы храните образы в файловой системе Btrfs, вам следует рассмотреть возможность отключения Copy-on-Write для каталогов перед созданием каких-либо образов.
Оверлейное хранилище изображений
Вы можете создать образ хранилища один раз (‘backing’ изображение), и QEMU сохранит изменения этого изображения в оверлейном изображении. Это позволяет вам вернуться к предыдущему состоянию этого образа. Вы можете вернуться, создав новое оверлейное изображение в то время, когда вы хотите восстановить его, основываясь на исходном backing изображении.
Чтобы создать оверлейное изображение, введите команду:
$ qemu-img create -o backing_file=*img1.raw*,backing_fmt=*raw* -f *qcow2* *img1.cow*
После этого вы можете запускать виртуальную машину QEMU как обычно (см. #Running virtualized system):
$ qemu-system-x86_64 *img1.cow*
Дальше backing изображение останется без изменений, и изменения в этом хранилище будут записаны в файл оверлейного изображения.
Если путь к фоновому изображению изменяется, требуется ремонт.
Warning: Абсолютный путь к backing изображению сохраняется в (двоичном) файле оверлейного изображения. Изменение пути backing изображения требует определенных усилий.
Убедитесь, что путь к исходному backing изображению существует. При необходимости сделайте символическую ссылку на исходный путь. Затем выполните команду так:
$ qemu-img rebase -b */new/img1.raw* */new/img1.cow*
На ваше усмотрение вы можете альтернативно выполнить «небезопасную» перебазировку, когда старый путь к резервному изображению не проверен:
$ qemu-img rebase -u -b */new/img1.raw* */new/img1.cow*
Изменение размера образа
Важно: Изменение размера образа, содержащего загрузочную файловую систему NTFS, может привести к тому, что установленная на нем операционная система станет незагружаемой. Для получения полного разъяснения этого и временного решения смотрите [1].
Исполняемый файл qemu-img имеет параметр resize, который позволяет легко изменить размер образа жесткого диска. Это работает для образов raw и qcow2. Например, чтобы увеличить пространство образа на 10 ГБ, выполните:
$ qemu-img resize *образ_диска* +10G
После увеличения, вы должны использовать файловую систему и инструменты разметки внутри виртуальной машины, чтобы начать использовать новое пространство. При сжатии образа диска вы должны сначала уменьшить выделенные файловые системы и размеры разделов, используя файловую систему и инструменты разбиения на виртуальной машине, а затем соответственно уменьшить размер образа диска, иначе сжатие образа диска приведет к потери данных!
Преобразование образа
Вы можете преобразовать образ в другие форматы, используя qemu-img convert. Этот пример показывает как конвертировать образ raw в qcow2:
$ qemu-img convert -f raw -O qcow2 *входной*.img *выходной*.qcow2
Это не удаляет изначальный образ.
Подготовка установочного носителя
Чтобы установить операционную систему на ваш образ диска, вам нужен установочный носитель (например, оптический диск, флешка USB или образ ISO) с ней. Не нужно его монтировать, потому что QEMU напрямую обращается к нему.
Совет: При использовании оптического диска рекомендуется сначала записать его содержимое в файл, так как это повышает производительность и не требует прямого доступа к устройствам (то есть вы можете запускать QEMU от обычного пользователя без необходимости изменять права доступа к медиа устройствам). Например, если CD-ROM обозначается как /dev/cdrom, вы можете записать его содержимое в файл командой: $ dd if=/dev/cdrom of=*образ_cd.iso*
Установка операционной системы
Это первый раз, когда вам нужно будет запустить эмулятор. Для установки операционной системы на образ диска, вы должны подключить образ диска и установочный носитель к виртуальной машине и загрузить его с установочного носителя.
Например, для гостевой системы i386 для установки из загрузочного файла ISO в качестве CD-ROM и образа диска raw, необходимо выполнить:
$ qemu-system-x86_64 -cdrom *образ_iso* -boot order=d -drive file=*образ_диска*,format=raw
Для получения дополнительной информации о загрузке с других типов носителей (например, дискет, образов дисков или физических дисков) смотрите qemu(1) и смотрите #Запуск виртуальной машины, чтобы узнать другие полезные параметры.
После завершения установки операционной системы, образ QEMU может быть загружен напрямую (смотрите #Запуск виртуальной машины).
Важно: По умолчанию для машины устанавливается только 128 МБ памяти. Объем памяти можно настроить с помощью параметра -m, например, -m 512M или -m 2G.
Совет:
- Вместо указания порядка загрузки
-boot order=x, некоторым пользователям, удобнее использовать загрузочное меню:-boot menu=on, по крайней мере, во время настройки и экспериментов. - Если вам нужно заменить дискету или CD во время установочного процесса, вы можете использовать монитор QEMU (нажмите
Ctrl+Alt+2в окне виртуальной машины) для излечения и подключения устройств хранения данных в виртуальной машине. Введитеinfo block, чтобы увидеть блочные устройства. Потом используйте команду по замене устройствchange. НажмитеCtrl+Alt+1, чтобы вернуться обратно в виртуальную машину.
Запуск виртуальной машины
Двоичные файлы qemu-system-* (например, qemu-system-i386 или qemu-system-x86_64 в зависимости от архитектуры гостя) используются для запуска ВМ. Использование:
$ qemu-system-x86_64 *параметры* *образ_диска*
Параметры одинаковы для всех двоичных файлов qemu-system-*, посмотрите документацию qemu(1), чтобы узнать все доступные параметры.
По умолчанию QEMU показывает виртуальную машину в отдельном окне. Поэтому нужно помнить о одной вещи: когда вы нажимаете внутри окна QEMU, курсор мыши захватывается. Чтобы отпустить его, нажмите Ctrl+Alt+g.
Важно: Никогда не нужно запускать QEMU от суперпользователя. Но если вам необходимо запустить его через скрипт от суперпользователя, используйте параметр -runas, чтобы понизить привилегии суперпользователя.
Включение KVM
Процессор и ядро должны поддерживать KVM, а также необходимые модули ядра должны быть загружены. Для получения дополнительной информации смотрите KVM.
Чтобы запустить QEMU в режиме KVM, добавьте -enable-kvm к дополнительным параметрам запуска. Для проверки работоспособности KVM для запущенной ВМ войдите в Монитор QEMU с помощью сочетания клавиш Ctrl+Alt+Shift+2 и там введите info kvm.
Примечание:
- Если вы запустили свою ВМ с помощью графического интерфейса и получили очень плохую производительность, проверьте поддержку KVM, поскольку QEMU может вернуться к программной эмуляции.
- Чтобы запустить Windows 7 и Windows 8 без синего экрана, необходимо включить KVM.
Включение поддержки IOMMU (Intel VT-d/AMD-Vi)
Сначала включите IOMMU, для получения дополнительной информации смотрите PCI passthrough via OVMF#Setting up IOMMU.
Для создания устройства IOMMU добавьте -device intel-iommu:
$ qemu-system-x86_64 **-enable-kvm -machine q35,accel=kvm -device intel-iommu** -cpu host ..
Примечание:
На системах с ЦП Intel создание устройства IOMMU в госте QEMU с параметром -device intel-iommu приведет к отключению PCI passthrough с ошибкой наподобие этой:
Device at bus pcie.0 addr 09.0 requires iommu notifier which is currently not supported by intel-iommu emulation
Добавление параметра ядра intel_iommu=on, пока все еще необходимо для переназначения ввода-вывода (например PCI passthrough с vfio-pci). Если PCI passthrough необходим, не используйте параметр -device intel-iommu.
Перемещение данных между хостом и гостевой ОС
Сеть
Данные могут быть разделены между хостом и гостевой ОС, используя любой сетевой протокол, который может передавать файлы, такие как NFS, SMB, NBD, HTTP, FTP, or SSH, при условии, что вы правильно настроили сеть и включили соответствующие службы.
Сеть в пользовательском режиме по умолчанию позволяет гостевой системе получить доступ к ОС хоста по IP-адресу 10.0.2.2. Любые серверы, которые вы используете в своей операционной системе, такие как сервер SSH или SMB, будут доступны по этому IP-адресу. Таким образом, на гостевой ОС вы можете смонтировать каталоги, экспортированные на хост через SMB или NFS, или вы можете получить доступ к HTTP-серверу хоста и т.д.
Хост-ОС не сможет получить доступ к серверам, работающим на гостевой ОС, но это может быть сделано с другими сетевыми конфигурациями (см. #Tap networking with QEMU).
Встроенный SMB-сервер QEMU
QEMU’s documentation says it has a «built-in» SMB server, but actually it just starts up Samba with an automatically generated smb.conf file located at /tmp/qemu-smb.*pid*-0/smb.conf and makes it accessible to the guest at a different IP address (10.0.2.4 by default). This only works for user networking, and this is not necessarily very useful since the guest can also access the normal Samba service on the host if you have set up shares on it.
To enable this feature, start QEMU with a command like:
$ qemu-system-x86_64 *disk_image* -net nic -net user,smb=*shared_dir_path*
where *shared_dir_path* is a directory that you want to share between the guest and host.
Then, in the guest, you will be able to access the shared directory on the host 10.0.2.4 with the share name «qemu». For example, in Windows Explorer you would go to \10.0.2.4qemu.
Note:
- If you are using sharing options multiple times like
-net user,smb=*shared_dir_path1* -net user,smb=*shared_dir_path2*or-net user,smb=*shared_dir_path1*,smb=*shared_dir_path2*then it will share only the last defined one. - If you cannot access the shared folder and the guest system is Windows, check that the NetBIOS protocol is enabled and that a firewall does not block ports used by the NetBIOS protocol.
Монтирование раздела внутри образа raw диска
Когда виртуальная машина не работает, можно смонтировать разделы, которые находятся внутри файла образа raw диска, настроив их в качестве устройств обратной связи. Это не работает с образами дисков в специальных форматах, таких как qcow2, хотя их можно смонтировать с помощью qemu-nbd.
Warning: You must make sure to unmount the partitions before running the virtual machine again. Otherwise, data corruption is very likely to occur.
С указанием байтового смещения вручную
Один из способов смонтировать раздел образа диска — это смонтировать образ диска с определенным смещением, используя следующую команду:
# mount -o loop,offset=32256 *disk_image* *mountpoint*
Параметр offset=32256 фактически передается программе losetup для настройки устройства loopback, которое начинается с 32256 байтового смещения и продолжается до конца. Это loopback устройство затем монтируется. Вы также можете использовать опцию sizelimit, чтобы указать точный размер раздела, но это обычно не требуется.
В зависимости от образа диска необходимый раздел может не начинаться со смещения 32256. Запустите fdisk -l *disk_image*, чтобы увидеть разделы в образе. fdisk делает начальное и конечное смещения в 512-байтовых секторах, поэтому умножьте на 512, чтобы получить правильное смещение для передачи в mount.
С loop модулем автоопределение разделов
Драйвер loop Linux поддерживает разделы в устройствах loopback, но по умолчанию он отключен. Чтобы включить его, сделайте следующее:
- Избавьтесь от всех ваших loopback устройств (размонтируйте все подключенные образы и т.д.).
- Загрузить модуль ядра
loopи загрузите его с набором параметровmax_part=15. Кроме того, максимальное количество loop устройств можно контролировать с помощью параметраmax_loop.
Совет: Вы можете поместить запись в /etc/modprobe.d, чтобы каждый раз загружать модуль loop с парометром max_part=15, или вы можете поместить loop.max_part=15 в командной строке ядра, в зависимости от того, встроен ли в ядро модуль loop.ko или нет.
Настройте свое изображение в качестве loopback устройства:
# losetup -f -P *disk_image*
Затем, если созданным устройством было /dev/loop0, автоматически будут созданы дополнительные устройства /dev/loop0pX, где X — номер раздела. Эти устройства с loopback можно монтировать напрямую.
Например:
# mount /dev/loop0p1 *mountpoint*
Чтобы смонтировать образ диска с помощью udisksctl, см. Udisks#Mount loop devices.
С kpartx
kpartx из пакета multipath-tools может прочитать таблицу разделов на устройстве и создать новое устройство для каждого раздела.
Например:
Это настроит устройство обратной связи и создаст необходимое устройство(а) раздел(ов) в /dev/mapper/.
Монтирование раздела внутри образа qcow2
Вы можете смонтировать раздел внутри образа qcow2, используя qemu-nbd. See Wikibooks.
Использование любого реального раздела в качестве единственного основного раздела образа жесткого диска
Иногда вы можете захотеть использовать один из ваших системных разделов внутри QEMU. Использование raw раздела для виртуальной машины повысит производительность, поскольку операции чтения и записи не проходят уровень файловой системы на физическом хосте. Такой раздел также обеспечивает возможность обмена данными между хостом и гостем.
В Arch Linux файлы устройств для raw разделов по умолчанию принадлежат root и группе disk. Если вы хотите, чтобы пользователь без полномочий root мог читать и записывать в необработанный раздел, вам нужно изменить владельца файла устройства раздела на этого пользователя.
Warning:
- Хотя это возможно, не рекомендуется разрешать виртуальным машинам изменять важные данные в хост-системе, например в корневом разделе.
- Вы не должны монтировать файловую систему на чтение и запись раздела одновременно на хосте и госте. В противном случае может произойти к повреждению данных.
После этого вы можете присоединить раздел к виртуальной машине QEMU как виртуальный диск.
Однако все немного сложнее, если вы хотите, чтобы «вся» виртуальная машина содержалась в разделе. В этом случае не будет никакого файла образа диска для фактической загрузки виртуальной машины, поскольку вы не можете установить загрузчик на раздел, который сам отформатирован как файловая система, а не как устройство с разделами MBR. Такая виртуальная машина может быть загружена либо путем указания kernel и initrd вручную, либо путем моделирования диска с MBR с использованием линейного RAID.
Указываем ядро и initrd вручную
QEMU поддерживает загрузку Linux kernels и init ramdisks напрямую, обходя таким образом загрузчики, такие как GRUB. Затем он может быть запущен с физическим разделом, содержащим корневую файловую систему в качестве виртуального диска, который не будет выглядеть как разделенный. Это делается с помощью команды, аналогичной следующей:
Примечание: В этом примере используются изображения ‘хоста'(в), а не гостевые. Если вы хотите использовать образы гостя, либо смонтируйте /dev/sda3 только для чтения (для защиты файловой системы от хоста) и укажите /full/path/to/images или используйте хакерскую программу kexec в гостевой системе для перезагрузки гостевого ядра (увеличивает время загрузки).
$ qemu-system-x86_64 -kernel /boot/vmlinuz-linux -initrd /boot/initramfs-linux.img -append root=/dev/sda /dev/sda3
В приведенном выше примере с физическим разделом, используемым для корневой файловой системы гостя, является /dev/sda3 на хосте, но на госте он будет отображается как /dev/sda.
Вы можете указать любое ядро и initrd, а не только те, которые поставляются с Arch Linux.
Когда есть несколько kernel parameters, которые нужно передать в опцию -append, они должны быть заключены в одинарные или двойные кавычки.
Например:
... -append 'root=/dev/sda1 console=ttyS0'
Имитация виртуального диска с MBR с использованием линейного RAID
A more complicated way to have a virtual machine use a physical partition, while keeping that partition formatted as a file system and not just having the guest partition the partition as if it were a disk, is to simulate a MBR for it so that it can boot using a bootloader such as GRUB.
You can do this using software RAID in linear mode (you need the linear.ko kernel driver) and a loopback device: the trick is to dynamically prepend a master boot record (MBR) to the real partition you wish to embed in a QEMU raw disk image.
Suppose you have a plain, unmounted /dev/hdaN partition with some file system on it you wish to make part of a QEMU disk image. First, you create some small file to hold the MBR:
$ dd if=/dev/zero of=*/path/to/mbr* count=32
Here, a 16 KB (32 * 512 bytes) file is created. It is important not to make it too small (even if the MBR only needs a single 512 bytes block), since the smaller it will be, the smaller the chunk size of the software RAID device will have to be, which could have an impact on performance. Then, you setup a loopback device to the MBR file:
# losetup -f */path/to/mbr*
Let us assume the resulting device is /dev/loop0, because we would not already have been using other loopbacks. Next step is to create the «merged» MBR + /dev/hdaN disk image using software RAID:
# modprobe linear
# mdadm --build --verbose /dev/md0 --chunk=16 --level=linear --raid-devices=2 /dev/loop0 /dev/hda*N*
The resulting /dev/md0 is what you will use as a QEMU raw disk image (do not forget to set the permissions so that the emulator can access it). The last (and somewhat tricky) step is to set the disk configuration (disk geometry and partitions table) so that the primary partition start point in the MBR matches the one of /dev/hda*N* inside /dev/md0 (an offset of exactly 16 * 512 = 16384 bytes in this example). Do this using fdisk on the host machine, not in the emulator: the default raw disc detection routine from QEMU often results in non-kilobyte-roundable offsets (such as 31.5 KB, as in the previous section) that cannot be managed by the software RAID code. Hence, from the the host:
Press X to enter the expert menu. Set number of ‘s’ectors per track so that the size of one cylinder matches the size of your MBR file. For two heads and a sector size of 512, the number of sectors per track should be 16, so we get cylinders of size 2x16x512=16k.
Now, press R to return to the main menu.
Press P and check that the cylinder size is now 16k.
Now, create a single primary partition corresponding to /dev/hda*N*. It should start at cylinder 2 and end at the end of the disk (note that the number of cylinders now differs from what it was when you entered fdisk.
Finally, ‘w’rite the result to the file: you are done. You now have a partition you can mount directly from your host, as well as part of a QEMU disk image:
$ qemu-system-x86_64 -hdc /dev/md0 *[...]*
You can, of course, safely set any bootloader on this disk image using QEMU, provided the original /dev/hda*N* partition contains the necessary tools.
Альтернатива: использовать nbd-сервер
Вместо линейного RAID вы можете использовать nbd-server (из пакета nbd) для создания оболочки MBR для QEMU.
Предполагая, что вы уже настроили файл-оболочку MBR, как описано выше, переименуйте его в wrapper.img.0. Затем создайте символическую ссылку с именем wrapper.img.1 в том же каталоге, указывая на ваш раздел. Затем поместите следующий скрипт в тот же каталог:
#!/bin/sh
dir="$(realpath "$(dirname "$0")")"
cat >wrapper.conf <<EOF
[generic]
allowlist = true
listenaddr = 127.713705
port = 10809

[wrap]
exportname = $dir/wrapper.img
multifile = true
EOF

nbd-server
    -C wrapper.conf
    -p wrapper.pid
    "$@"
Суффиксы .0 and .1 необходимы; остальное можно изменить. После запуска приведенного выше сценария (который может потребоваться запустить от имени пользователя root, чтобы nbd-сервер мог получить доступ к разделу), вы можете запустить QEMU с помощью:
qemu-system-x86_64 -drive file=nbd:127.713705:10809:exportname=wrap *[...]*
Сетевые топологии
Производительность виртуальных сетей должна быть лучше с устройствами и мостами(bridges), подключенными к сети, чем с сетью в пользовательском режиме или vde, потому что устройства и мосты с поддержкой сети реализованы в ядре.
Кроме того, производительность сети можно улучшить, назначив виртуальным машинам сетевое устройство virtio, а не эмуляцию по умолчанию для сетевой карты e1000. См. #Installing virtio drivers для получения дополнительной информации.
Предупреждение об уровне адресации
By giving the -net nic argument to QEMU, it will, by default, assign a virtual machine a network interface with the link-level address 52:54:00:12:34:56. However, when using bridged networking with multiple virtual machines, it is essential that each virtual machine has a unique link-level (MAC) address on the virtual machine side of the tap device. Otherwise, the bridge will not work correctly, because it will receive packets from multiple sources that have the same link-level address. This problem occurs even if the tap devices themselves have unique link-level addresses because the source link-level address is not rewritten as packets pass through the tap device.
Make sure that each virtual machine has a unique link-level address, but it should always start with 52:54:. Use the following option, replace X with arbitrary hexadecimal digit:
$ qemu-system-x86_64 -net nic,macaddr=52:54:*XX:XX:XX:XX* -net vde *disk_image*
Generating unique link-level addresses can be done in several ways:
-
Manually specify unique link-level address for each NIC. The benefit is that the DHCP server will assign the same IP address each time the virtual machine is run, but it is unusable for large number of virtual machines.
-
Generate random link-level address each time the virtual machine is run. Practically zero probability of collisions, but the downside is that the DHCP server will assign a different IP address each time. You can use the following command in a script to generate random link-level address in a
macaddrvariable:printf -v macaddr "52:54:%02x:%02x:%02x:%02x" $(( $RANDOM & 0xff)) $(( $RANDOM & 0xff )) $(( $RANDOM & 0xff)) $(( $RANDOM & 0xff )) qemu-system-x86_64 -net nic,macaddr="$macaddr" -net vde *disk_image* -
Use the following script
qemu-mac-hasher.pyto generate the link-level address from the virtual machine name using a hashing function. Given that the names of virtual machines are unique, this method combines the benefits of the aforementioned methods: it generates the same link-level address each time the script is run, yet it preserves the practically zero probability of collisions.qemu-mac-hasher.py#!/usr/bin/env python import sys import zlib if len(sys.argv) != 2: print("usage: %s <VM Name>" % sys.argv[0]) sys.exit(1) crc = zlib.crc32(sys.argv[1].encode("utf-8")) & 0xffffffff crc = str(hex(crc))[2:] print("52:54:%s%s:%s%s:%s%s:%s%s" % tuple(crc))In a script, you can use for example:
vm_name="*VM Name*"
qemu-system-x86_64 -name "$vm_name" -net nic,macaddr=$(qemu-mac-hasher.py "$vm_name") -net vde *disk_image*
Пользовательский режим сети
By default, without any -netdev arguments, QEMU will use user-mode networking with a built-in DHCP server. Your virtual machines will be assigned an IP address when they run their DHCP client, and they will be able to access the physical host’s network through IP masquerading done by QEMU.
Warning: This only works with the TCP and UDP protocols, so ICMP, including ping, will not work. Do not use ping to test network connectivity.
This default configuration allows your virtual machines to easily access the Internet, provided that the host is connected to it, but the virtual machines will not be directly visible on the external network, nor will virtual machines be able to talk to each other if you start up more than one concurrently.
QEMU’s user-mode networking can offer more capabilities such as built-in TFTP or SMB servers, redirecting host ports to the guest (for example to allow SSH connections to the guest) or attaching guests to VLANs so that they can talk to each other. See the QEMU documentation on the -net user flag for more details.
However, user-mode networking has limitations in both utility and performance. More advanced network configurations require the use of tap devices or other methods.
Note: If the host system uses systemd-networkd, make sure to symlink the /etc/resolv.conf file as described in systemd-networkd#Required services and setup, otherwise the DNS lookup in the guest system will not work.
Tap networking with QEMU
Tap devices are a Linux kernel feature that allows you to create virtual network interfaces that appear as real network interfaces. Packets sent to a tap interface are delivered to a userspace program, such as QEMU, that has bound itself to the interface.
QEMU can use tap networking for a virtual machine so that packets sent to the tap interface will be sent to the virtual machine and appear as coming from a network interface (usually an Ethernet interface) in the virtual machine. Conversely, everything that the virtual machine sends through its network interface will appear on the tap interface.
Tap devices are supported by the Linux bridge drivers, so it is possible to bridge together tap devices with each other and possibly with other host interfaces such as eth0. This is desirable if you want your virtual machines to be able to talk to each other, or if you want other machines on your LAN to be able to talk to the virtual machines.
Warning: If you bridge together tap device and some host interface, such as eth0, your virtual machines will appear directly on the external network, which will expose them to possible attack. Depending on what resources your virtual machines have access to, you may need to take all the precautions you normally would take in securing a computer to secure your virtual machines. If the risk is too great, virtual machines have little resources or you set up multiple virtual machines, a better solution might be to use host-only networking and set up NAT. In this case you only need one firewall on the host instead of multiple firewalls for each guest.
As indicated in the user-mode networking section, tap devices offer higher networking performance than user-mode. If the guest OS supports virtio network driver, then the networking performance will be increased considerably as well. Supposing the use of the tap0 device, that the virtio driver is used on the guest, and that no scripts are used to help start/stop networking, next is part of the qemu command one should see:
-device virtio-net,netdev=network0 -netdev tap,id=network0,ifname=tap0,script=no,downscript=no
But if already using a tap device with virtio networking driver, one can even boost the networking performance by enabling vhost, like:
-device virtio-net,netdev=network0 -netdev tap,id=network0,ifname=tap0,script=no,downscript=no,vhost=on
See http://www.linux-kvm.com/content/how-maximize-virtio-net-performance-vhost-net for more information.
Host-only networking
If the bridge is given an IP address and traffic destined for it is allowed, but no real interface (e.g. eth0) is connected to the bridge, then the virtual machines will be able to talk to each other and the host system. However, they will not be able to talk to anything on the external network, provided that you do not set up IP masquerading on the physical host. This configuration is called host-only networking by other virtualization software such as VirtualBox.
Tip:
- If you want to set up IP masquerading, e.g. NAT for virtual machines, see the Internet sharing#Enable NAT page.
- See Network bridge for information on creating bridge.
- You may want to have a DHCP server running on the bridge interface to service the virtual network. For example, to use the
172.20.0.1/16subnet with dnsmasq as the DHCP server:
# ip addr add 172.20.0.1/16 dev br0
# ip link set br0 up
# dnsmasq --interface=br0 --bind-interfaces --dhcp-range=172.20.0.2,172.20.255.254
Internal networking
If you do not give the bridge an IP address and add an iptables rule to drop all traffic to the bridge in the INPUT chain, then the virtual machines will be able to talk to each other, but not to the physical host or to the outside network. This configuration is called internal networking by other virtualization software such as VirtualBox. You will need to either assign static IP addresses to the virtual machines or run a DHCP server on one of them.
By default iptables would drop packets in the bridge network. You may need to use such iptables rule to allow packets in a bridged network:
# iptables -I FORWARD -m physdev --physdev-is-bridged -j ACCEPT
Bridged networking using qemu-bridge-helper
Note: This method is available since QEMU 1.1, see http://wiki.qemu.org/Features/HelperNetworking.
This method does not require a start-up script and readily accommodates multiple taps and multiple bridges. It uses /usr/lib/qemu/qemu-bridge-helper binary, which allows creating tap devices on an existing bridge.
Tip: See Network bridge for information on creating bridge.
First, create a configuration file containing the names of all bridges to be used by QEMU:
/etc/qemu/bridge.conf
allow *bridge0*
allow *bridge1*
...
Now start the VM. The most basic usage would be:
$ qemu-system-x86_64 -net nic -net bridge,br=*bridge0* *[...]*
With multiple taps, the most basic usage requires specifying the VLAN for all additional NICs:
$ qemu-system-x86_64 -net nic -net bridge,br=*bridge0* -net nic,vlan=1 -net bridge,vlan=1,br=*bridge1* *[...]*
Creating bridge manually
Tip: Since QEMU 1.1, the network bridge helper can set tun/tap up for you without the need for additional scripting. See #Bridged networking using qemu-bridge-helper.
The following describes how to bridge a virtual machine to a host interface such as eth0, which is probably the most common configuration. This configuration makes it appear that the virtual machine is located directly on the external network, on the same Ethernet segment as the physical host machine.
We will replace the normal Ethernet adapter with a bridge adapter and bind the normal Ethernet adapter to it.
-
Install bridge-utils, which provides
brctlto manipulate bridges. -
Enable IPv4 forwarding:
# sysctl net.ipv4.ip_forward=1
To make the change permanent, change net.ipv4.ip_forward = 0 to net.ipv4.ip_forward = 1 in /etc/sysctl.d/99-sysctl.conf.
-
Load the
tunmodule and configure it to be loaded on boot. See Kernel modules for details. -
Now create the bridge. See Bridge with netctl for details. Remember to name your bridge as
br0, or change the scripts below to your bridge’s name. -
Create the script that QEMU uses to bring up the tap adapter with
root:kvm750 permissions:
/etc/qemu-ifup
#!/bin/sh

echo "Executing /etc/qemu-ifup"
echo "Bringing up $1 for bridged mode..."
sudo /usr/bin/ip link set $1 up promisc on
echo "Adding $1 to br0..."
sudo /usr/bin/brctl addif br0 $1
sleep 2
- Create the script that QEMU uses to bring down the tap adapter in
/etc/qemu-ifdownwithroot:kvm750 permissions:
/etc/qemu-ifdown
#!/bin/sh

echo "Executing /etc/qemu-ifdown"
sudo /usr/bin/ip link set $1 down
sudo /usr/bin/brctl delif br0 $1
sudo /usr/bin/ip link delete dev $1
- Use
visudoto add the following to yoursudoersfile:
Cmnd_Alias      QEMU=/usr/bin/ip,/usr/bin/modprobe,/usr/bin/brctl
%kvm     ALL=NOPASSWD: QEMU
- You launch QEMU using the following
run-qemuscript:
run-qemu
#!/bin/bash
USERID=$(whoami)

# Get name of newly created TAP device; see https://bbs.archlinux.org/viewtopic.php?pid=1285079#p1285079
precreationg=$(/usr/bin/ip tuntap list | /usr/bin/cut -d: -f1 | /usr/bin/sort)
sudo /usr/bin/ip tuntap add user $USERID mode tap
postcreation=$(/usr/bin/ip tuntap list | /usr/bin/cut -d: -f1 | /usr/bin/sort)
IFACE=$(comm -13 <(echo "$precreationg") <(echo "$postcreation"))

# This line creates a random MAC address. The downside is the DHCP server will assign a different IP address each time
printf -v macaddr "52:54:%02x:%02x:%02x:%02x" $(( $RANDOM & 0xff)) $(( $RANDOM & 0xff )) $(( $RANDOM & 0xff)) $(( $RANDOM & 0xff ))
# Instead, uncomment and edit this line to set a static MAC address. The benefit is that the DHCP server will assign the same IP address.
# macaddr='52:54:be:36:42:a9'

qemu-system-x86_64 -net nic,macaddr=$macaddr -net tap,ifname="$IFACE" $*

sudo ip link set dev $IFACE down &> /dev/null
sudo ip tuntap del $IFACE mode tap &> /dev/null
Then to launch a VM, do something like this
$ run-qemu -hda *myvm.img* -m 512 -vga std
- It is recommended for performance and security reasons to disable the firewall on the bridge:
/etc/sysctl.d/10-disable-firewall-on-bridge.conf
net.bridge.bridge-nf-call-ip6tables = 0
net.bridge.bridge-nf-call-iptables = 0
net.bridge.bridge-nf-call-arptables = 0
Run sysctl -p /etc/sysctl.d/10-disable-firewall-on-bridge.conf to apply the changes immediately.
See the libvirt wiki and Fedora bug 512206. If you get errors by sysctl during boot about non-existing files, make the bridge module load at boot. See Kernel modules#Automatic module handling.
Alternatively, you can configure iptables to allow all traffic to be forwarded across the bridge by adding a rule like this:
-I FORWARD -m physdev --physdev-is-bridged -j ACCEPT
Network sharing between physical device and a Tap device through iptables
Bridged networking works fine between a wired interface (Eg. eth0), and it is easy to setup. However if the host gets connected to the network through a wireless device, then bridging is not possible.
See Network bridge#Wireless interface on a bridge as a reference.
One way to overcome that is to setup a tap device with a static IP, making linux automatically handle the routing for it, and then forward traffic between the tap interface and the device connected to the network through iptables rules.
See Internet sharing as a reference.
There you can find what is needed to share the network between devices, included tap and tun ones. The following just hints further on some of the host configurations required. As indicated in the reference above, the client needs to be configured for a static IP, using the IP assigned to the tap interface as the gateway. The caveat is that the DNS servers on the client might need to be manually edited if they change when changing from one host device connected to the network to another.
To allow IP forwarding on every boot, one need to add the following lines to sysctl configuration file inside /etc/sysctl.d:
net.ipv4.ip_forward = 1
net.ipv6.conf.default.forwarding = 1
net.ipv6.conf.all.forwarding = 1
The iptables rules can look like:
# Forwarding from/to outside
iptables -A FORWARD -i ${INT} -o ${EXT_0} -j ACCEPT
iptables -A FORWARD -i ${INT} -o ${EXT_1} -j ACCEPT
iptables -A FORWARD -i ${INT} -o ${EXT_2} -j ACCEPT
iptables -A FORWARD -i ${EXT_0} -o ${INT} -j ACCEPT
iptables -A FORWARD -i ${EXT_1} -o ${INT} -j ACCEPT
iptables -A FORWARD -i ${EXT_2} -o ${INT} -j ACCEPT
# NAT/Masquerade (network address translation)
iptables -t nat -A POSTROUTING -o ${EXT_0} -j MASQUERADE
iptables -t nat -A POSTROUTING -o ${EXT_1} -j MASQUERADE
iptables -t nat -A POSTROUTING -o ${EXT_2} -j MASQUERADE
The prior supposes there are 3 devices connected to the network sharing traffic with one internal device, where for example:
INT=tap0
EXT_0=eth0
EXT_1=wlan0
EXT_2=tun0
The prior shows a forwarding that would allow sharing wired and wireless connections with the tap device.
The forwarding rules shown are stateless, and for pure forwarding. One could think of restricting specific traffic, putting a firewall in place to protect the guest and others. However those would decrease the networking performance, while a simple bridge does not include any of that.
Bonus: Whether the connection is wired or wireless, if one gets connected through VPN to a remote site with a tun device, supposing the tun device opened for that connection is tun0, and the prior iptables rules are applied, then the remote connection gets also shared with the guest. This avoids the need for the guest to also open a VPN connection. Again, as the guest networking needs to be static, then if connecting the host remotely this way, one most probably will need to edit the DNS servers on the guest.
Networking with VDE2
What is VDE?
VDE stands for Virtual Distributed Ethernet. It started as an enhancement of uml_switch. It is a toolbox to manage virtual networks.
The idea is to create virtual switches, which are basically sockets, and to «plug» both physical and virtual machines in them. The configuration we show here is quite simple; However, VDE is much more powerful than this, it can plug virtual switches together, run them on different hosts and monitor the traffic in the switches. You are invited to read the documentation of the project.
The advantage of this method is you do not have to add sudo privileges to your users. Regular users should not be allowed to run modprobe.
Basics
VDE support can be installed via the vde2 package.
In our config, we use tun/tap to create a virtual interface on my host. Load the tun module (see Kernel modules for details):
Now create the virtual switch:
# vde_switch -tap tap0 -daemon -mod 660 -group users
This line creates the switch, creates tap0, «plugs» it, and allows the users of the group users to use it.
The interface is plugged in but not configured yet. To configure it, run this command:
# ip addr add 192.168.100.254/24 dev tap0
Now, you just have to run KVM with these -net options as a normal user:
$ qemu-system-x86_64 -net nic -net vde -hda *[...]*
Configure networking for your guest as you would do in a physical network.
Tip: You might want to set up NAT on tap device to access the internet from the virtual machine. See Internet sharing#Enable NAT for more information.
Startup scripts
Example of main script starting VDE:
/etc/systemd/scripts/qemu-network-env
#!/bin/sh
# QEMU/VDE network environment preparation script

# The IP configuration for the tap device that will be used for
# the virtual machine network:

TAP_DEV=tap0
TAP_IP=192.168.100.254
TAP_MASK=24
TAP_NETWORK=192.168.100.0

# Host interface
NIC=eth0

case "$1" in
  start)
        echo -n "Starting VDE network for QEMU: "

        # If you want tun kernel module to be loaded by script uncomment here
	#modprobe tun 2>/dev/null
	## Wait for the module to be loaded
 	#while ! lsmod | grep -q "^tun"; do echo "Waiting for tun device"; sleep 1; done

        # Start tap switch
        vde_switch -tap "$TAP_DEV" -daemon -mod 660 -group users

        # Bring tap interface up
        ip address add "$TAP_IP"/"$TAP_MASK" dev "$TAP_DEV"
        ip link set "$TAP_DEV" up

        # Start IP Forwarding
        echo "1" > /proc/sys/net/ipv4/ip_forward
        iptables -t nat -A POSTROUTING -s "$TAP_NETWORK"/"$TAP_MASK" -o "$NIC" -j MASQUERADE
        ;;
  stop)
        echo -n "Stopping VDE network for QEMU: "
        # Delete the NAT rules
        iptables -t nat -D POSTROUTING "$TAP_NETWORK"/"$TAP_MASK" -o "$NIC" -j MASQUERADE

        # Bring tap interface down
        ip link set "$TAP_DEV" down

        # Kill VDE switch
        pgrep -f vde_switch | xargs kill -TERM
        ;;
  restart|reload)
        $0 stop
        sleep 1
        $0 start
        ;;
  *)
        echo "Usage: $0 {start|stop|restart|reload}"
        exit 1
esac
exit 0
Example of systemd service using the above script:
/etc/systemd/system/qemu-network-env.service
[Unit]
Description=Manage VDE Switch

[Service]
Type=oneshot
ExecStart=/etc/systemd/scripts/qemu-network-env start
ExecStop=/etc/systemd/scripts/qemu-network-env stop
RemainAfterExit=yes

[Install]
WantedBy=multi-user.target
Change permissions for qemu-network-env to be executable
# chmod u+x /etc/systemd/scripts/qemu-network-env
You can start qemu-network-env.service as usual.
Alternative method
If the above method does not work or you do not want to mess with kernel configs, TUN, dnsmasq, and iptables you can do the following for the same result.
# vde_switch -daemon -mod 660 -group users
# slirpvde --dhcp --daemon
Then, to start the VM with a connection to the network of the host:
$ qemu-system-x86_64 -net nic,macaddr=52:54:00:00:EE:03 -net vde *disk_image*
VDE2 Bridge
Based on quickhowto: qemu networking using vde, tun/tap, and bridge graphic. Any virtual machine connected to vde is externally exposed. For example, each virtual machine can receive DHCP configuration directly from your ADSL router.
Basics
Remember that you need tun module and bridge-utils package.
Create the vde2/tap device:
# vde_switch -tap tap0 -daemon -mod 660 -group users
# ip link set tap0 up
Create bridge:
Add devices:
# brctl addif br0 eth0
# brctl addif br0 tap0
And configure bridge interface:
Startup scripts
All devices must be set up. And only the bridge needs an IP address. For physical devices on the bridge (e.g. eth0), this can be done with netctl using a custom Ethernet profile with:
/etc/netctl/ethernet-noip
Description='A more versatile static Ethernet connection'
Interface=eth0
Connection=ethernet
IP=no
The following custom systemd service can be used to create and activate a VDE2 tap interface for use in the users user group.
/etc/systemd/system/vde2@.service
[Unit]
Description=Network Connectivity for %i
Wants=network.target
Before=network.target

[Service]
Type=oneshot
RemainAfterExit=yes
ExecStart=/usr/bin/vde_switch -tap %i -daemon -mod 660 -group users
ExecStart=/usr/bin/ip link set dev %i up
ExecStop=/usr/bin/ip addr flush dev %i
ExecStop=/usr/bin/ip link set dev %i down

[Install]
WantedBy=multi-user.target
And finally, you can create the bridge interface with netctl.
Shorthand configuration
If you’re using QEMU with various networking options a lot, you probably have created a lot of -netdev and -device argument pairs, which gets quite repetitive. You can instead use the -nic argument to combine -netdev and -device together, so that, for example, these arguments:
-netdev tap,id=network0,ifname=tap0,script=no,downscript=no,vhost=on -device virtio-net,netdev=network0
…become:
-nic tap,ifname=tap0,script=no,downscript=no,vhost=on,model=virtio-net
Notice the lack of network IDs, and that the device was created with model=.... The first half of the -nic parameters are -netdev parameters, whereas the second half (after model=...) are related with the device. The same parameters (for example, smb=...) are used. There’s also a special parameter for -nic which completely disables the default (user-mode) networking:
See QEMU networking documentation for more information on parameters you can use.
Графика
QEMU может использовать следующие различные графические выходные данные: std, qxl, vmware, virtio, cirrus и none.
std
С -vga std вы можете получить разрешение до 2560 x 1600 пикселей без использования гостевых драйверов. Это значение по умолчанию, начиная с QEMU 2.2.
qxl
QXL — это виртуальный графический драйвер с поддержкой 2D. Чтобы использовать его, передайте параметр -vga qxl и установите драйверы в гостевой системе. Возможно, вы захотите использовать SPICE для улучшения графической производительности при использовании QXL.
В гостевых системах Linux модули ядра qxl и bochs_drm должны быть загружены для достижения достойной производительности.
SPICE
The SPICE project aims to provide a complete open source solution for remote access to virtual machines in a seamless way.
SPICE can only be used when using QXL as the graphical output.
The following is example of booting with SPICE as the remote desktop protocol, including the support for copy and paste from host:
$ qemu-system-x86_64 -vga qxl -spice port=5930,disable-ticketing -device virtio-serial-pci -device virtserialport,chardev=spicechannel0,name=com.redhat.spice.0 -chardev spicevmc,id=spicechannel0,name=vdagent
From the SPICE page on the KVM wiki: «The -device virtio-serial-pci option adds the virtio-serial device, -device virtserialport,chardev=spicechannel0,name=com.redhat.spice.0 opens a port for spice vdagent in that device and -chardev spicevmc,id=spicechannel0,name=vdagent adds a spicevmc chardev for that port. It is important that the chardev= option of the virtserialport device matches the id= option given to the chardev option (spicechannel0 in this example). It is also important that the port name is com.redhat.spice.0, because that is the namespace where vdagent is looking for in the guest. And finally, specify name=vdagent so that spice knows what this channel is for.«
Tip: Since QEMU in SPICE mode acts similarly to a remote desktop server, it may be more convenient to run QEMU in daemon mode with the -daemonize parameter.
Connect to the guest by using a SPICE client. virt-viewer is the recommended SPICE client by the protocol developers:
$ remote-viewer spice://127.0.0.1:5930
The reference and test implementation spice-gtk can also be used:
$ spicy -h 127.0.0.1 -p 5930
Other clients, including for other platforms, are also available.
Using Unix sockets instead of TCP ports does not involve using network stack on the host system, so it is reportedly better for performance. Example:
$ qemu-system-x86_64 -vga qxl -device virtio-serial-pci -device virtserialport,chardev=spicechannel0,name=com.redhat.spice.0 -chardev spicevmc,id=spicechannel0,name=vdagent -spice unix,addr=/tmp/vm_spice.socket,disable-ticketing
Then connect via:
$ remote-viewer spice+unix:///tmp/vm_spice.socket
or via:
$ spicy --uri="spice+unix:///tmp/vm_spice.socket"
For improved support for multiple monitors, clipboard sharing, etc. the following packages should be installed on the guest:
- spice-vdagent: Spice agent xorg client that enables copy and paste between client and X-session and more. Enable
spice-vdagentd.serviceafter installation. - xf86-video-qxl: Xorg X11 qxl video driver
- For other operating systems, see the Guest section on SPICE-Space download page.
Password authentication with SPICE
If you want to enable password authentication with SPICE you need to remove disable-ticketing from the -spice argument and instead add password=*yourpassword*. For example:
$ qemu-system-x86_64 -vga qxl -spice port=5900,password=*yourpassword* -device virtio-serial-pci -device virtserialport,chardev=spicechannel0,name=com.redhat.spice.0 -chardev spicevmc,id=spicechannel0,name=vdagent
Your SPICE client should now ask for the password to be able to connect to the SPICE server.
TLS encryption
You can also configure TLS encryption for communicating with the SPICE server. First, you need to have a directory which contains the following files (the names must be exactly as indicated):
ca-cert.pem: the CA master certificate.server-cert.pem: the server certificate signed withca-cert.pem.server-key.pem: the server private key.
An example of generation of self-signed certificates with your own generated CA for your server is shown in the Spice User Manual.
Afterwards, you can run QEMU with SPICE as explained above but using the following -spice argument: -spice tls-port=5901,password=*yourpassword*,x509-dir=*/path/to/pki_certs*, where */path/to/pki_certs* is the directory path that contains the three needed files shown earlier.
It is now possible to connect to the server using virt-viewer:
$ remote-viewer spice://*hostname*?tls-port=5901 --spice-ca-file=*/path/to/ca-cert.pem* --spice-host-subject="C=*XX*,L=*city*,O=*organization*,CN=*hostname*" --spice-secure-channels=all
Keep in mind that the --spice-host-subject parameter needs to be set according to your server-cert.pem subject. You also need to copy ca-cert.pem to every client to verify the server certificate.
Tip: You can get the subject line of the server certificate in the correct format for --spice-host-subject (with entries separated by commas) using the following command: $ openssl x509 -noout -subject -in server-cert.pem | cut -d' ' -f2- | sed 's////' | sed 's///,/g'
The equivalent spice-gtk command is:
$ spicy -h *hostname* -s 5901 --spice-ca-file=ca-cert.pem --spice-host-subject="C=*XX*,L=*city*,O=*organization*,CN=*hostname*" --spice-secure-channels=all
vmware
Хотя он немного глючит, он работает лучше, чем std и cirrus. Установите драйверы VMware xf86-video-vmware и xf86-input-vmmouse для гостевых ОС Arch Linux.
virtio
virtio-vga / virtio-gpu is a paravirtual 3D graphics driver based on virgl. Currently a work in progress, supporting only very recent (>= 4.4) Linux guests with mesa (>=11.2) compiled with the option --with-gallium-drivers=virgl.
To enable 3D acceleration on the guest system select this vga with -vga virtio and enable the opengl context in the display device with -display sdl,gl=on or -display gtk,gl=on for the sdl and gtk display output respectively. Successful configuration can be confirmed looking at the kernel log in the guest:
$ dmesg | grep drm
[drm] pci: virtio-vga detected
[drm] virgl 3d acceleration enabled
As of September 2016, support for the spice protocol is under development and can be tested installing the development release of spice (>= 0.13.2) and recompiling qemu.
For more information visit kraxel’s blog.
cirrus
Графический адаптер цирруса был по умолчанию before 2.2. Его не следует использовать в современных системах.
none
Это как ПК, у которого вообще нет VGA карты. Вы даже не сможете получить к нему доступ с помощью опции -vnc. Кроме того, это отличается от опции -nographic, которая позволяет QEMU эмулировать карту VGA, но отключает отображение SDL.
vnc
Given that you used the -nographic option, you can add the -vnc display option to have QEMU listen on display and redirect the VGA display to the VNC session. There is an example of this in the #Starting QEMU virtual machines on boot section’s example configs.
$ qemu-system-x86_64 -vga std -nographic -vnc :0
$ gvncviewer :0
When using VNC, you might experience keyboard problems described (in gory details) here. The solution is not to use the -k option on QEMU, and to use gvncviewer from gtk-vnc. See also this message posted on libvirt’s mailing list.
Audio
Хост
Драйвер аудио, используемый QEMU, устанавливается с помощью переменной среды QEMU_AUDIO_DRV:
$ export QEMU_AUDIO_DRV=pa
Выполните следующую команду, чтобы получить параметры конфигурации QEMU, связанные с PulseAudio:
$ qemu-system-x86_64 -audio-help | awk '/Name: pa/' RS=
Перечисленные параметры можно экспортировать как переменные среды, например:
$ export QEMU_PA_SINK=alsa_output.pci-0000_04_01.0.analog-stereo.monitor
$ export QEMU_PA_SOURCE=input
Guest
To get list of the supported emulation audio drivers:
$ qemu-system-x86_64 -soundhw help
To use e.g. hda driver for the guest use the -soundhw hda command with QEMU.
Note: Video graphic card emulated drivers for the guest machine may also cause a problem with the sound quality. Test one by one to make it work. You can list possible options with qemu-system-x86_64 -h | grep vga.
Installing virtio drivers
QEMU offers guests the ability to use paravirtualized block and network devices using the virtio drivers, which provide better performance and lower overhead.
- A virtio block device requires the option
-drivefor passing a disk image, with parameterif=virtio:
$ qemu-system-x86_64 -boot order=c -drive file=*disk_image*,if=virtio
- Almost the same goes for the network:
$ qemu-system-x86_64 -net nic,model=virtio
Note: This will only work if the guest machine has drivers for virtio devices. Linux does, and the required drivers are included in Arch Linux, but there is no guarantee that virtio devices will work with other operating systems.
Preparing an (Arch) Linux guest
To use virtio devices after an Arch Linux guest has been installed, the following modules must be loaded in the guest: virtio, virtio_pci, virtio_blk, virtio_net, and virtio_ring. For 32-bit guests, the specific «virtio» module is not necessary.
If you want to boot from a virtio disk, the initial ramdisk must contain the necessary modules. By default, this is handled by mkinitcpio’s autodetect hook. Otherwise use the MODULES array in /etc/mkinitcpio.conf to include the necessary modules and rebuild the initial ramdisk.
/etc/mkinitcpio.conf MODULES="virtio virtio_blk virtio_pci virtio_net"
Virtio disks are recognized with the prefix **v** (e.g. **v**da, **v**db, etc.); therefore, changes must be made in at least /etc/fstab and /boot/grub/grub.cfg when booting from a virtio disk.
Tip: When referencing disks by UUID in both /etc/fstab and bootloader, nothing has to be done.
Further information on paravirtualization with KVM can be found here.
You might also want to install qemu-guest-agent to implement support for QMP commands that will enhance the hypervisor management capabilities. After installing the package you can enable and start the qemu-ga.service.
Preparing a Windows guest
Note: The only (reliable) way to upgrade a Windows 8.1 guest to Windows 10 seems to be to temporarily choose cpu core2duo,nx for the install [2]. After the install, you may revert to other cpu settings (8/8/2015).
Block device drivers
New Install of Windows
Windows does not come with the virtio drivers. Therefore, you will need to load them during installation. There are basically two ways to do this: via Floppy Disk or via ISO files. Both images can be downloaded from the Fedora repository.
The floppy disk option is difficult because you will need to press F6 (Shift-F6 on newer Windows) at the very beginning of powering on the QEMU. This is difficult since you need time to connect your VNC console window. You can attempt to add a delay to the boot sequence. See qemu(1) for more details about applying a delay at boot.
The ISO option to load drivers is the preferred way, but it is available only on Windows Vista and Windows Server 2008 and later. The procedure is to load the image with virtio drivers in an additional cdrom device along with the primary disk device and Windows installer:
$ qemu-system-x86_64 ...
-drive file=*/path/to/primary/disk.img*,index=0,media=disk,if=virtio
-drive file=*/path/to/installer.iso*,index=2,media=cdrom
-drive file=*/path/to/virtio.iso*,index=3,media=cdrom
...
During the installation, the Windows installer will ask you for your Product key and perform some additional checks. When it gets to the «Where do you want to install Windows?» screen, it will give a warning that no disks are found. Follow the example instructions below (based on Windows Server 2012 R2 with Update).
- Select the option
Load Drivers. - Uncheck the box for «Hide drivers that aren’t compatible with this computer’s hardware».
- Click the Browse button and open the CDROM for the virtio iso, usually named «virtio-win-XX».
- Now browse to
E:viostor[your-os]amd64, select it, and press OK. - Click Next
You should now see your virtio disk(s) listed here, ready to be selected, formatted and installed to.
Change Existing Windows VM to use virtio
Modifying an existing Windows guest for booting from virtio disk is a bit tricky.
You can download the virtio disk driver from the Fedora repository.
Now you need to create a new disk image, which will force Windows to search for the driver. For example:
$ qemu-img create -f qcow2 *fake.qcow2* 1G
Run the original Windows guest (with the boot disk still in IDE mode) with the fake disk (in virtio mode) and a CD-ROM with the driver.
$ qemu-system-x86_64 -m 512 -vga std -drive file=*windows_disk_image*,if=ide -drive file=*fake.qcow2*,if=virtio -cdrom virtio-win-0.1-81.iso
Windows will detect the fake disk and try to find a driver for it. If it fails, go to the Device Manager, locate the SCSI drive with an exclamation mark icon (should be open), click Update driver and select the virtual CD-ROM. Do not forget to select the checkbox which says to search for directories recursively.
When the installation is successful, you can turn off the virtual machine and launch it again, now with the boot disk attached in virtio mode:
$ qemu-system-x86_64 -m 512 -vga std -drive file=*windows_disk_image*,if=virtio
Note: If you encounter the Blue Screen of Death, make sure you did not forget the -m parameter, and that you do not boot with virtio instead of ide for the system drive before drivers are installed.
Network drivers
Installing virtio network drivers is a bit easier, simply add the -net argument as explained above.
$ qemu-system-x86_64 -m 512 -vga std -drive file=*windows_disk_image*,if=virtio -net nic,model=virtio -cdrom virtio-win-0.1-74.iso
Windows will detect the network adapter and try to find a driver for it. If it fails, go to the Device Manager, locate the network adapter with an exclamation mark icon (should be open), click Update driver and select the virtual CD-ROM. Do not forget to select the checkbox which says to search for directories recursively.
Balloon driver
If you want to track you guest memory state (for example via virsh command dommemstat) or change guest’s memory size in runtime (you still won’t be able to change memory size, but can limit memory usage via inflating balloon driver) you will need to install guest balloon driver.
For this you will need to go to Device Manager, locate PCI standard RAM Controller in System devices (or unrecognized PCI controller from Other devices) and choose Update driver. In opened window you will need to choose Browse my computer… and select the CD-ROM (and don’t forget the Include subdirectories checkbox). Reboot after installation. This will install the driver and you will be able to inflate the balloon (for example via hmp command balloon *memory_size*, which will cause balloon to take as much memory as possible in order to shrink the guest’s available memory size to memory_size). However, you still won’t be able to track guest memory state. In order to do this you will need to install Balloon service properly. For that open command line as administrator, go to the CD-ROM, Balloon directory and deeper, depending on your system and architecture. Once you are in amd64 (x86) directory, run blnsrv.exe -i which will do the installation. After that virsh command dommemstat should be outputting all supported values.
Preparing a FreeBSD guest
Install the emulators/virtio-kmod port if you are using FreeBSD 8.3 or later up until 10.0-CURRENT where they are included into the kernel. After installation, add the following to your /boot/loader.conf file:
virtio_load="YES"
virtio_pci_load="YES"
virtio_blk_load="YES"
if_vtnet_load="YES"
virtio_balloon_load="YES"
Then modify your /etc/fstab by doing the following:
sed -i bak "s/ada/vtbd/g" /etc/fstab
And verify that /etc/fstab is consistent. If anything goes wrong, just boot into a rescue CD and copy /etc/fstab.bak back to /etc/fstab.
QEMU Monitor
While QEMU is running, a monitor console is provided in order to provide several ways to interact with the virtual machine running. The QEMU Monitor offers interesting capabilities such as obtaining information about the current virtual machine, hotplugging devices, creating snapshots of the current state of the virtual machine, etc. To see the list of all commands, run help or ? in the QEMU monitor console or review the relevant section of the official QEMU documentation.
Accessing the monitor console
When using the std default graphics option, one can access the QEMU Monitor by pressing Ctrl+Alt+2 or by clicking View > compatmonitor0 in the QEMU window. To return to the virtual machine graphical view either press Ctrl+Alt+1 or click View > VGA.
However, the standard method of accessing the monitor is not always convenient and does not work in all graphic outputs QEMU supports. Alternative options of accessing the monitor are described below:
- telnet: Run QEMU with the
-monitor telnet:127.0.0.1:*port*,server,nowaitparameter. When the virtual machine is started you will be able to access the monitor via telnet:
$ telnet 127.0.0.1 *port*
Note: If 127.0.0.1 is specified as the IP to listen it will be only possible to connect to the monitor from the same host QEMU is running on. If connecting from remote hosts is desired, QEMU must be told to listen 0.0.0.0 as follows: -monitor telnet:0.0.0.0:*port*,server,nowait. Keep in mind that it is recommended to have a firewall configured in this case or make sure your local network is completely trustworthy since this connection is completely unauthenticated and unencrypted.
- UNIX socket: Run QEMU with the
-monitor unix:*socketfile*,server,nowaitparameter. Then you can connect with either socat or openbsd-netcat.
For example, if QEMU is run via:
$ qemu-system-x86_64 *[...]* -monitor unix:/tmp/monitor.sock,server,nowait *[...]*
It is possible to connect to the monitor with:
$ socat - UNIX-CONNECT:/tmp/monitor.sock
Or with:
$ nc -U /tmp/monitor.sock
- TCP: You can expose the monitor over TCP with the argument
-monitor tcp:127.0.0.1:*port*,server,nowait. Then connect with netcat, either openbsd-netcat or gnu-netcat by running:
Note: In order to be able to connect to the tcp socket from other devices other than the same host QEMU is being run on you need to listen to 0.0.0.0 like explained in the telnet case. The same security warnings apply in this case as well.
- Standard I/O: It is possible to access the monitor automatically from the same terminal QEMU is being run by running it with the argument
-monitor stdio.
Sending keyboard presses to the virtual machine using the monitor console
Some combinations of keys may be difficult to perform on virtual machines due to the host intercepting them instead in some configurations (a notable example is the Ctrl+Alt+F* key combinations, which change the active tty). To avoid this problem, the problematic combination of keys may be sent via the monitor console instead. Switch to the monitor and use the sendkey command to forward the necessary keypresses to the virtual machine. For example:
(qemu) sendkey ctrl-alt-f2
Creating and managing snapshots via the monitor console
Note: This feature will only work when the virtual machine disk image is in qcow2 format. It will not work with raw images.
It is sometimes desirable to save the current state of a virtual machine and having the possibility of reverting the state of the virtual machine to that of a previously saved snapshot at any time. The QEMU monitor console provides the user with the necessary utilities to create snapshots, manage them, and revert the machine state to a saved snapshot.
- Use
savevm *name*in order to create a snapshot with the tag name. - Use
loadvm *name*to revert the virtual machine to the state of the snapshot name. - Use
delvm *name*to delete the snapshot tagged as name. - Use
info snapshotsto see a list of saved snapshots. Snapshots are identified by both an auto-incremented ID number and a text tag (set by the user on snapshot creation).
Running the virtual machine in immutable mode
It is possible to run a virtual machine in a frozen state so that all changes will be discarded when the virtual machine is powered off just by running QEMU with the -snapshot parameter. When the disk image is written by the guest, changes will be saved in a temporary file in /tmp and will be discarded when QEMU halts.
However, if a machine is running in frozen mode it is still possible to save the changes to the disk image if it is afterwards desired by using the monitor console and running the following command:
If snapshots are created when running in frozen mode they will be discarded as soon as QEMU is exited unless changes are explicitly commited to disk, as well.
Pause and power options via the monitor console
Some operations of a physical machine can be emulated by QEMU using some monitor commands:
system_powerdownwill send an ACPI shutdown request to the virtual machine. This effect is similar to the power button in a physical machine.system_resetwill reset the virtual machine similarly to a reset button in a physical machine. This operation can cause data loss and file system corruption since the virtual machine is not cleanly restarted.stopwill pause the virtual machine.contwill resume a virtual machine previously paused.
Taking screenshots of the virtual machine
Screenshots of the virtual machine graphic display can be obtained in the PPM format by running the following command in the monitor console:
(qemu) screendump *file.ppm*
Tips and tricks
Starting QEMU virtual machines on boot
With libvirt
If a virtual machine is set up with libvirt, it can be configured with virsh autostart or through the virt-manager GUI to start at host boot by going to the Boot Options for the virtual machine and selecting «Start virtual machine on host boot up».
Пользовательский скрипт
Для запуска виртуальных машин QEMU при загрузке вы можете использовать следующий системный модуль и конфигурацию.
/etc/systemd/system/qemu@.service
[Unit]
Description=QEMU virtual machine

[Service]
Environment="type=system-x86_64" "haltcmd=kill -INT $MAINPID"
EnvironmentFile=/etc/conf.d/qemu.d/%i
PIDFile=/tmp/%i.pid
ExecStart=/usr/bin/env qemu-${type} -name %i -nographic -pidfile /tmp/%i.pid $args
ExecStop=/bin/sh -c ${haltcmd}
TimeoutStopSec=30
KillMode=none

[Install]
WantedBy=multi-user.target
Note:
- According to systemd.service(5) and
5man pages it is necessary to use theKillMode=noneoption. Otherwise the main qemu process will be killed immediately after theExecStopcommand quits (it simply echoes one string) and your quest system will not be able to shutdown correctly. - It is necessary to use the
PIDFileoption. Otherwise systemd cannot tell whether the main qemu process was terminated and your quest system will not be able to shutdown correctly. On host shutdown it will proceed without waiting for the VM to shutdown.
Then create per-VM configuration files, named /etc/conf.d/qemu.d/*vm_name*, with the following variables set:
type

QEMU binary to call. If specified, will be prepended with `/usr/bin/qemu-` and that binary will be used to start the VM. I.e. you can boot e.g. `qemu-system-arm` images with `type="system-arm"`.

args

QEMU command line to start with. Will always be prepended with `-name ${vm} -nographic`.

haltcmd

Command to shut down a VM safely. In this example, the QEMU monitor is exposed via telnet using `-monitor telnet:..` and the VMs are powered off via ACPI by sending `system_powerdown` to monitor with the `nc` command. You can use SSH or some other ways as well.
Example configs:
/etc/conf.d/qemu.d/one
type="system-x86_64"

args="-enable-kvm -m 512 -hda /dev/vg0/vm1 -net nic,macaddr=DE:AD:BE:EF:E0:00
 -net tap,ifname=tap0 -serial telnet:localhost:7000,server,nowait,nodelay
 -monitor telnet:localhost:7100,server,nowait,nodelay -vnc :0"

haltcmd="echo 'system_powerdown' | nc localhost 7100" # or netcat/ncat

# You can use other ways to shut down your VM correctly
#haltcmd="ssh powermanager@vm1 sudo poweroff"
/etc/conf.d/qemu.d/two
args="-enable-kvm -m 512 -hda /srv/kvm/vm2.img -net nic,macaddr=DE:AD:BE:EF:E0:01
 -net tap,ifname=tap1 -serial telnet:localhost:7001,server,nowait,nodelay
 -monitor telnet:localhost:7101,server,nowait,nodelay -vnc :1"

haltcmd="echo 'system_powerdown' | nc localhost 7101"
To set which virtual machines will start on boot-up, enable the qemu@*vm_name*.service systemd unit.
Mouse integration
To prevent the mouse from being grabbed when clicking on the guest operating system’s window, add the options -usb -device usb-tablet. This means QEMU is able to report the mouse position without having to grab the mouse. This also overrides PS/2 mouse emulation when activated. For example:
$ qemu-system-x86_64 -hda *disk_image* -m 512 -vga std -usb -device usb-tablet
If that does not work, try the tip at #Mouse cursor is jittery or erratic.
Pass-through host USB device
To access physical USB device connected to host from VM, you can use the option: -usbdevice host:*vendor_id*:*product_id*.
You can find vendor_id and product_id of your device with lsusb command.
Since the default I440FX chipset emulated by qemu feature a single UHCI controller (USB 1), the -usbdevice option will try to attach your physical device to it. In some cases this may cause issues with newer devices. A possible solution is to emulate the ICH9 chipset, which offer an EHCI controller supporting up to 12 devices, using the option -machine type=q35.
A less invasive solution is to emulate an EHCI (USB 2) or XHCI (USB 3) controller with the option -device usb-ehci,id=ehci or -device nec-usb-xhci,id=xhci respectively and then attach your physical device to it with the option -device usb-host,.. as follows:
-device usb-host,bus=**controller_id**.0,vendorid=0x**vendor_id**,productid=0x**product_id**
You can also add the ...,port=*<n>* setting to the previous option to specify in which physical port of the virtual controller you want to attach your device, useful in the case you want to add multiple usb devices to the VM.
Note: If you encounter permission errors when running QEMU, see udev#About udev rules for information on how to set permissions of the device.
USB redirection with SPICE
When using #SPICE it is possible to redirect USB devices from the client to the virtual machine without needing to specify them in the QEMU command. It is possible to configure the number of USB slots available for redirected devices (the number of slots will determine the maximum number of devices which can be redirected simultaneously). The main advantages of using SPICE for redirection compared to the previously-mentioned -usbdevice method is the possibility of hot-swapping USB devices after the virtual machine has started, without needing to halt it in order to remove USB devices from the redirection or adding new ones. This method of USB redirection also allows us to redirect USB devices over the network, from the client to the server. In summary, it is the most flexible method of using USB devices in a QEMU virtual machine.
We need to add one EHCI/UHCI controller per available USB redirection slot desired as well as one SPICE redirection channel per slot. For example, adding the following arguments to the QEMU command you use for starting the virtual machine in SPICE mode will start the virtual machine with three available USB slots for redirection:
-device ich9-usb-ehci1,id=usb
-device ich9-usb-uhci1,masterbus=usb.0,firstport=0,multifunction=on
-device ich9-usb-uhci2,masterbus=usb.0,firstport=2
-device ich9-usb-uhci3,masterbus=usb.0,firstport=4
-chardev spicevmc,name=usbredir,id=usbredirchardev1
-device usb-redir,chardev=usbredirchardev1,id=usbredirdev1
-chardev spicevmc,name=usbredir,id=usbredirchardev2
-device usb-redir,chardev=usbredirchardev2,id=usbredirdev2
-chardev spicevmc,name=usbredir,id=usbredirchardev3
-device usb-redir,chardev=usbredirchardev3,id=usbredirdev3
Both spicy from spice-gtk (Input > Select USB Devices for redirection) and remote-viewer from virt-viewer (File > USB device selection) support this feature. Please make sure that you have installed the necessary SPICE Guest Tools on the virtual machine for this functionality to work as expected (see the #SPICE section for more information).
Warning: Keep in mind that when a USB device is redirected from the client, it will not be usable from the client operating system itself until the redirection is stopped. It is specially important to never redirect the input devices (namely mouse and keyboard), since it will be then difficult to access the SPICE client menus to revert the situation, because the client will not respond to the input devices after being redirected to the virtual machine.
Enabling KSM
Kernel Samepage Merging (KSM) is a feature of the Linux kernel that allows for an application to register with the kernel to have its pages merged with other processes that also register to have their pages merged. The KSM mechanism allows for guest virtual machines to share pages with each other. In an environment where many of the guest operating systems are similar, this can result in significant memory savings.
Note: Although KSM may reduce memory usage, it may increase CPU usage. Also note some security issues may occur, see Wikipedia:Kernel same-page merging.
To enable KSM:
# echo 1 > /sys/kernel/mm/ksm/run
To make it permanent, use systemd’s temporary files:
/etc/tmpfiles.d/ksm.conf
w /sys/kernel/mm/ksm/run - - - - 1
If KSM is running, and there are pages to be merged (i.e. at least two similar VMs are running), then /sys/kernel/mm/ksm/pages_shared should be non-zero. See https://www.kernel.org/doc/Documentation/vm/ksm.txt for more information.
Tip: An easy way to see how well KSM is performing is to simply print the contents of all the files in that directory: $ grep . /sys/kernel/mm/ksm/*
Multi-monitor support
The Linux QXL driver supports four heads (virtual screens) by default. This can be changed via the qxl.heads=N kernel parameter.
The default VGA memory size for QXL devices is 16M (VRAM size is 64M). This is not sufficient if you would like to enable two 1920×1200 monitors since that requires 2 × 1920 × 4 (color depth) × 1200 = 17.6 MiB VGA memory. This can be changed by replacing -vga qxl by -vga none -device qxl-vga,vgamem_mb=32. If you ever increase vgamem_mb beyond 64M, then you also have to increase the vram_size_mb option.
Copy and paste
To have copy and paste between the host and the guest you need to enable the spice agent communication channel. It requires to add a virtio-serial device to the guest, and open a port for the spice vdagent. It is also required to install the spice vdagent in guest (spice-vdagent for Arch guests, Windows guest tools for Windows guests). Make sure the agent is running (and for future, started automatically). See #SPICE for the necessary procedure to use QEMU with the SPICE protocol.
Windows-specific notes
QEMU can run any version of Windows from Windows 95 through Windows 10.
It is possible to run Windows PE in QEMU.
Fast startup
Note: An administrator account is required to change power settings.
For Windows 8 (or later) guests it is better to disable «Turn on fast startup (recommended)» from the Power Options of the Control Panel as explained in the following forum page, as it causes the guest to hang during every other boot.
Fast Startup may also need to be disabled for changes to the -smp option to be properly applied.
Remote Desktop Protocol
If you use a MS Windows guest, you might want to use RDP to connect to your guest VM. If you are using a VLAN or are not in the same network as the guest, use:
$ qemu-system-x86_64 -nographic -net user,hostfwd=tcp::5555-:3389
Then connect with either rdesktop or freerdp to the guest. For example:
$ xfreerdp -g 2048x1152 localhost:5555 -z -x lan
Troubleshooting
Virtual machine runs too slowly
There are a number of techniques that you can use to improve the performance of your virtual machine. For example:
- Use the
-cpu hostoption to make QEMU emulate the host’s exact CPU. If you do not do this, it may be trying to emulate a more generic CPU. - Especially for Windows guests, enable Hyper-V enlightenments:
-cpu host,hv_relaxed,hv_spinlocks=0x1fff,hv_vapic,hv_time. - If the host machine has multiple CPUs, assign the guest more CPUs using the
-smpoption. - Make sure you have assigned the virtual machine enough memory. By default, QEMU only assigns 128 MiB of memory to each virtual machine. Use the
-moption to assign more memory. For example,-m 1024runs a virtual machine with 1024 MiB of memory. - Use KVM if possible: add
-machine type=pc,accel=kvmto the QEMU start command you use. - If supported by drivers in the guest operating system, use virtio for network and/or block devices. For example:
$ qemu-system-x86_64 -net nic,model=virtio -net tap,if=tap0,script=no -drive file=*disk_image*,media=disk,if=virtio
- Use TAP devices instead of user-mode networking. See #Tap networking with QEMU.
- If the guest OS is doing heavy writing to its disk, you may benefit from certain mount options on the host’s file system. For example, you can mount an ext4 file system with the option
barrier=0. You should read the documentation for any options that you change because sometimes performance-enhancing options for file systems come at the cost of data integrity. - If you have a raw disk image, you may want to disable the cache:
$ qemu-system-x86_64 -drive file=*disk_image*,if=virtio,**cache=none**
- Use the native Linux AIO:
$ qemu-system-x86_64 -drive file=*disk_image*,if=virtio**,aio=native,cache.direct=on**
- If you use a qcow2 disk image, I/O performance can be improved considerably by ensuring that the L2 cache is of sufficient size. The formula to calculate L2 cache is: l2_cache_size = disk_size * 8 / cluster_size. Assuming the qcow2 image was created with the default cluster size of 64K, this means that for every 8 GB in size of the qcow2 image, 1 MB of L2 cache is best for performance. Only 1 MB is used by QEMU by default; specifying a larger cache is done on the QEMU command line. For instance, to specify 4 MB of cache (suitable for a 32 GB disk with a cluster size of 64K):
$ qemu-system-x86_64 -drive file=*disk_image*,format=qcow2,l2-cache-size=4M
- If you are running multiple virtual machines concurrently that all have the same operating system installed, you can save memory by enabling kernel same-page merging. See #Enabling KSM.
- In some cases, memory can be reclaimed from running virtual machines by running a memory ballooning driver in the guest operating system and launching QEMU using
--device virtio-balloon. - It is possible to use a emulation layer for an ICH-9 AHCI controller (although it may be unstable). The AHCI emulation supports NCQ, so multiple read or write requests can be outstanding at the same time:
$ qemu-system-x86_64 -drive id=disk,file=*disk_image*,if=none -device ich9-ahci,id=ahci -device ide-drive,drive=disk,bus=ahci.0
See http://www.linux-kvm.org/page/Tuning_KVM for more information.
Mouse cursor is jittery or erratic
If the cursor jumps around the screen uncontrollably, entering this on the terminal before starting QEMU might help:
$ export SDL_VIDEO_X11_DGAMOUSE=0
If this helps, you can add this to your ~/.bashrc file.
No visible Cursor
Add -show-cursor to QEMU’s options to see a mouse cursor.
If that still does not work, make sure you have set your display device appropriately.
For example: -vga qxl
Unable to move/attach Cursor
Replace -usbdevice tablet with -usb as QEMU option.
Keyboard seems broken or the arrow keys do not work
Should you find that some of your keys do not work or «press» the wrong key (in particular, the arrow keys), you likely need to specify your keyboard layout as an option. The keyboard layouts can be found in /usr/share/qemu/keymaps.
$ qemu-system-x86_64 -k *keymap* *disk_image*
Guest display stretches on window resize
To restore default window size, press Ctrl+Alt+u.
ioctl(KVM_CREATE_VM) failed: 16 Device or resource busy
If an error message like this is printed when starting QEMU with -enable-kvm option:
ioctl(KVM_CREATE_VM) failed: 16 Device or resource busy
failed to initialize KVM: Device or resource busy
that means another hypervisor is currently running. It is not recommended or possible to run several hypervisors in parallel.
libgfapi error message
The error message displayed at startup:
Failed to open module: libgfapi.so.0: cannot open shared object file: No such file or directory
Install glusterfs or ignore the error message as GlusterFS is a optional dependency.
Kernel panic on LIVE-environments
If you start a live-environment (or better: booting a system) you may encounter this:
[ end Kernel panic - not syncing: VFS: Unable to mount root fs on unknown block(0,0)
or some other boot hindering process (e.g. cannot unpack initramfs, cant start service foo). Try starting the VM with the -m VALUE switch and an appropriate amount of RAM, if the ram is to low you will probably encounter similar issues as above/without the memory-switch.
Windows 7 guest suffers low-quality sound
Using the hda audio driver for Windows 7 guest may result in low-quality sound. Changing the audio driver to ac97 by passing the -soundhw ac97 arguments to QEMU and installing the AC97 driver from Realtek AC’97 Audio Codecs in the guest may solve the problem. See Red Hat Bugzilla – Bug 1176761 for more information.
Could not access KVM kernel module: Permission denied
If you encounter the following error:
libvirtError: internal error: process exited while connecting to monitor: Could not access KVM kernel module: Permission denied failed to initialize KVM: Permission denied
Systemd 234 assign it a dynamic id to group kvm (see bug). A workground for avoid this error, you need edit the file /etc/libvirt/qemu.conf and change the line:
to
«System Thread Exception Not Handled» when booting a Windows VM
Windows 8 or Windows 10 guests may raise a generic compatibility exception at boot, namely «System Thread Exception Not Handled», which tends to be caused by legacy drivers acting strangely on real machines. On KVM machines this issue can generally be solved by setting the CPU model to core2duo.
Certain Windows games/applications crashing/causing a bluescreen
Occasionally, applications running in the VM may crash unexpectedly, whereas they’d run normally on a physical machine. If, while running dmesg -wH, you encounter an error mentioning MSR, the reason for those crashes is that KVM injects a General protection fault (GPF) when the guest tries to access unsupported Model-specific registers (MSRs) — this often results in guest applications/OS crashing. A number of those issues can be solved by passing the ignore_msrs=1 option to the KVM module, which will ignore unimplemented MSRs.
/etc/modprobe.d/kvm.conf
...
options kvm ignore_msrs=1
...
Cases where adding this option might help:
- GeForce Experience complaining about an unsupported CPU being present.
- StarCraft 2 and L.A. Noire reliably blue-screening Windows 10 with
KMODE_EXCEPTION_NOT_HANDLED. The blue screen information does not identify a driver file in these cases.
Warning: While this is normally safe and some applications might not work without this, silently ignoring unknown MSR accesses could potentially break other software within the VM or other VMs.
See also
- Official QEMU website
- Official KVM website
- QEMU Emulator User Documentation
- QEMU Wikibook
- Hardware virtualization with QEMU by AlienBOB (last updated in 2008)
- Building a Virtual Army by Falconindy
- Lastest docs
- QEMU on Windows
- Wikipedia
- Debian Wiki — QEMU
- QEMU Networking on gnome.org
- Networking QEMU Virtual BSD Systems
- QEMU on gnu.org
- QEMU on FreeBSD as host
- KVM/QEMU Virtio Tuning and SSD VM Optimization Guide
- Managing Virtual Machines with QEMU — OpenSUSE documentation
- KVM on IBM Knowledge Center