Цель статьи
Документирование получения системы кросс-компиляции под Linux для Windows x32/x64/static/shared и сборка последней на момент описания Qt 5.4.1 в лайт-версии (для указанных четырех целей). Для себя, глубоко-обожаемого, ну и для пользы обществу.
Назначение
Многие разработчики приходят к выводу, что использование *nix (в частности Linux) более предпочтительно для разработки приложений, используя фрэймворк Qt. И тому есть причины. Qt изначально ориентирована на *nix инструментарий, типа autotool, make, perl… И второй момент, под никсами есть прекрасный инструмент — valgrind, под виндой порта пока его не видел. Ну и последняя причина: просто удобно иметь набор инструментария для создания приложений под различные целевые платформы — в одном месте.
Почему лайт-версия Qt5
Фрэймворк-Qt имеет модульную структуру, но, увы, не совсем совершенную. Некоторые зависимости от внешних библиотек «вешаются» не на модуль, требующий эти библиотеки, а на Qt5Core. Иными словами, нужна вам эта библиотека, или нет — вынь да положЪ в дистрибутив. Пример тому «монстрик» — библиотека ICU. Весит она почти 25 метров! Зависимость вешается, как я упоминал выше, на Qt5Core… а требует ее модуль Qt5WebKit (который по сути в 99% случаев не используется, по крайней мере мной). Что делаем? Вырезаем и отрезаем. Хотите получить фулл-версию Qt5? Об этом упомяну в заключении. Поехали.
0. Сценарий сборки
Все шаги делаем последовательно. Желательно не объединять все скрипты в последовательную сборку по причине необходимости промежуточного «человечного» контроля. Разные дистрибутивы Линуха, разные среды исполнения, наборы инструментариев… Простой алгоритм: сделал очередной шаг, убедился в отсутствии ошибок, пошел делать следующий. Итак, сам сценарий:
- 1. Предварительная подготовка
- 2. Установка среды кросс-компиляции MXE
- 3. Загрузка и настройка Qt 5.4.1
- 4. Сборка комплектов Qt 5.4.1 для четырех целей (см. сабж)
- 5. Прописка собранного в QtCreator
1. Предварительная подготовка
У вас установлен дистрибутив Линукса. Желательно все это делать на на продакшен-компе (не на живом Линуксе), а установленном в виртуальную машину. Я например, пользуюсь VMWare, но это дело вкуса. Выбор дистрибутива Линукса — так же дело вкуса. Лично я предпочитаю Gentoo Linux, собственно под ним всю эту кухню и настраиваю. Если есть сложности в настройке, у меня есть небольшая статейка по этому вопросу: «Установка и настройка Linux Gentoo под VMWare».
Итак, у вас есть настроенный Линукс и вы работаете не под рутом! Для дальнейшей работы вам нужно проверить присутствие следующих установленных пакетов, или доустановить:
$ sudo emerge
app-arch/bzip2
app-arch/unzip
app-arch/xz-utils
app-shells/bash
dev-lang/ruby
dev-libs/libffi
dev-libs/openssl
dev-perl/XML-Parser
dev-util/cmake
dev-util/intltool
dev-util/pkgconfig
dev-util/scons
dev-vcs/git
sys-devel/autoconf
sys-devel/automake
sys-devel/bison
sys-devel/flex
sys-devel/gettext
sys-devel/libtool
sys-devel/patch
net-misc/ntp
www-client/lynx
Вся дальнейшая установка будет производиться в каталог $HOME/dev. Если у вас таковой присутствует — либо переименовываете его, либо внимательно правите скрипты, которые будут приведены далее. Для всех манипуляций со скачиваемыми внешними файлами/скриптами/библиотеками будет использован каталог $HOME/setup. Все замечания выше относительно $HOME/dev — в силе и к этому каталогу.
2. Установка среды кросс-компиляции MXE
Предварительное замечание об MXE. Это отличнейшая система сборки тулчейнов для кросс-компиляции. Но есть одно «но». В данный момент не существует стабильной ветки. Авторы до поры до времени вели две ветки в своем git-репозитарии — стабильную и «разработческую». Сейчас ветки объединены. Разработка идет ну очень активно — изменения сбрасываются чуть ли не раз 1-3 дня. А это чревато тем, что «то работает сборка, то не работает». Некоторые важные для меня библиотеки, в частности клиентская часть PostgreSQL, собираются без ошибок, но в нерабочем состоянии. Потратил неделю не исследование явных косяков. Исправляем эти «недочеты». Итак:
$ mkdir -p $HOME/setup
$ cd $HOME/setup
$ wget http://majestio.tk/stuff/setup-scripts.tar.xz
$ tar -xf setup-scripts.tar.xz
$ rm -f setup-scripts.tar.xz
Должны получить в каталоге $HOME/setup следующий набор скриптов:
1.setup-first.sh
#!/bin/sh

###########################################################################
##                                                                       ##
## Скрипт 1. Создание структуры каталогов для разворачивания системы     ##
##           кросс-компиляции средствами MXE (http://mxe.cc),            ##
##           собственно загрузку и первоначальную сборку                 ##
##                                                                       ##
##                                       Majestio (C) http://majestio.tk ##
###########################################################################

#
# Порядок установки:
#
# 1. Создать в $HOME подкаталог, например $HOME/Setup
# 2. Скопировать туда этот скрипт и запустить
# 3. Дождаться завершения
#
# Структура подкаталогов будет в $HOME/dev
# Набор тулчейнов MXE ищем в $HOME/dev/cross/mxe
#
# .........................................................................

if [ "$(whoami)" == 'root' ]; then
  echo "Ахтунг: под учетной записью рута работать отказываюсь!"
  exit 1
fi

RETDIR=`pwd`
MXEHOME=$HOME/dev/cross/mxe

# создаем структуру каталогов и вынимаем MXE из git-репозитария -----------

mkdir -p $HOME/dev/{cross,projests,src,stuff,tools}
cd $HOME/dev/cross

#    можно так:
# git clone https://github.com/mxe/mxe.git
#    но лучше так:
# wget http://majestio.tk/stuff/mxe-empty-26.05.2015.tar.xz
# tar -xf mxe-empty-26.05.2015.tar.xz
# rm -f mxe-empty-26.05.2015.tar.xz

wget http://majestio.tk/stuff/mxe-empty-26.05.2015.tar.xz
tar -xf mxe-empty-26.05.2015.tar.xz
rm -f mxe-empty-26.05.2015.tar.xz

# патчим файлик определения ABI проекта MXE -------------------------------

echo "#!/bin/sh" > $HOME/dev/cross/mxe/ext/config.guess
echo "echo "x86_64-pc-linux-gnu"" >> $HOME/dev/cross/mxe/ext/config.guess

# делаем первоначальную сборку MXE с типом нитей win32 --------------------

cd $MXEHOME
make MXE_TARGETS='x86_64-w64-mingw32.shared '`
                `'x86_64-w64-mingw32.static '`
                `'i686-w64-mingw32.shared '`
                `'i686-w64-mingw32.static ' gcc gmp winpthreads -j4 JOBS=4

# патчим mxe/src/gcc.mk на предмет добавления posix-threads ---------------

GCCMK=$MXEHOME/src/gcc.mk
PLTMP=$$-$RANDOM.pl
echo "open(F,"$GCCMK") || die "Holy shit!\n";"                                                 >  $PLTMP
echo "@In = <F>;"                                                                                   >> $PLTMP
echo "close(F);"                                                                                    >> $PLTMP
echo "open(F,">$GCCMK") || die "Holy shit!\n";"                                                >> $PLTMP
echo "foreach $I(@In) {"                                                                           >> $PLTMP
echo "  $I =~ s/^(\$(PKG)_DEPS.+)$/$1 winpthreads/;"                                         >> $PLTMP
echo "  $I =~ s/^(.+?--libdir='\$(PREFIX).+)$/$1n        --enable-shared=libstdc++ \/;" >> $PLTMP
echo "  $I =~ s/^(.+?--enable-threads=)win32(.*)$/$1posix$2/;"                                  >> $PLTMP
echo "  print F $I;"                                                                               >> $PLTMP
echo "}"                                                                                            >> $PLTMP
echo "close(F);"                                                                                    >> $PLTMP
perl $PLTMP && rm -f $PLTMP

# пересобираем GCC с поддержкой posix-threads -----------------------------

cd $MXEHOME
make MXE_TARGETS='x86_64-w64-mingw32.shared '`
                `'x86_64-w64-mingw32.static '`
                `'i686-w64-mingw32.shared '`
                `'i686-w64-mingw32.static ' gcc -j4 JOBS=4

# делаем промежуточный архив "пустой" системы кросс-компиляции ------------

echo "Делаем промежуточную архивацию ..."
cd ..
tar -cJf mxe-winpthreads-empty.tar.xz ./mxe

# собираем дополнительные либы --------------------------------------------

cd $MXEHOME
make MXE_TARGETS='x86_64-w64-mingw32.shared '`
                `'x86_64-w64-mingw32.static '`
                `'i686-w64-mingw32.shared '`
                `'i686-w64-mingw32.static ' zlib xz sqlite dbus
                libiconv libodbc++ -j4 JOBS=4

# патчим и собираем PostgreSQL --------------------------------------------

cd $MXEHOME/src
wget http://majestio.tk/stuff/postgresql-3-socket.patch
PQSQL=$MXEHOME/src/postgresql.mk
PLTMP=$$-$RANDOM.pl
echo "open(F,"$PQSQL") || die "Holy shit!\n";"                                                 >  $PLTMP
echo "@In = <F>;"                                                                                   >> $PLTMP
echo "close(F);"                                                                                    >> $PLTMP
echo "open(F,">$PQSQL") || die "Holy shit!\n";"                                                >> $PLTMP
echo "foreach $I(@In) {"                                                                           >> $PLTMP
echo "  $I =~ s/^(.+?--disable-rpath.+)$/$1n        --disable-thread-safety \/;"              >> $PLTMP
echo "  print F $I;"                                                                               >> $PLTMP
echo "}"                                                                                            >> $PLTMP
echo "close(F);"                                                                                    >> $PLTMP
perl $PLTMP && rm -f $PLTMP

cd $MXEHOME
make MXE_TARGETS='x86_64-w64-mingw32.shared '`
                `'x86_64-w64-mingw32.static '`
                `'i686-w64-mingw32.shared '`
                `'i686-w64-mingw32.static ' postgresql -j4 JOBS=4

for PREFIX in "x86_64-w64-mingw32.shared" "x86_64-w64-mingw32.static"
              "i686-w64-mingw32.shared" "i686-w64-mingw32.static" ; do
   echo "Description: PostgreSQL libpq library" > $MXEHOME/usr/$PREFIX/lib/pkgconfig/libpq.pc
   echo "Url: http://www.postgresql.org/" >> $MXEHOME/usr/$PREFIX/lib/pkgconfig/libpq.pc
   echo "Version: 9.2.4" >> $MXEHOME/usr/$PREFIX/lib/pkgconfig/libpq.pc
   echo "Requires: " >> $MXEHOME/usr/$PREFIX/lib/pkgconfig/libpq.pc
   echo "Requires.private: " >> $MXEHOME/usr/$PREFIX/lib/pkgconfig/libpq.pc
   echo "Cflags: -I$MXEHOME/usr/$PREFIX/include" >> $MXEHOME/usr/$PREFIX/lib/pkgconfig/libpq.pc
   echo "Libs: -L$MXEHOME/usr/$PREFIX/lib -lpq" >> $MXEHOME/usr/$PREFIX/lib/pkgconfig/libpq.pc
   echo "Libs.private:  -lssl -lcrypto -lshell32 -lwsock32 -lws2_32 -lsecur32" >> $MXEHOME/usr/$PREFIX/lib/pkgconfig/libpq.pc
   chmod 0644 $MXEHOME/usr/$PREFIX/lib/pkgconfig/libpq.pc
done

cd $RETDIR
2.setup-qt5.sh
#!/bin/sh

###########################################################################
##                                                                       ##
## Скрипт 2. Выкачка Qt 5.4.1 + небольшие косметические правки           ##
##                                                                       ##
##                                       Majestio (C) http://majestio.tk ##
###########################################################################

#
# Порядок установки:
#
# 1. Зайти в каталог установки $HOME/Setup
# 2. Скопировать туда этот скрипт и запустить
# 3. Дождаться завершения
#
# На выходе будет каталог qt5
#

# -------------------------------------------------------------------------

if [ "$(whoami)" == 'root' ]; then
  echo "Ахтунг: под учетной записью рута работать отказываюсь!"
  exit 1
fi

wget http://download.qt.io/official_releases/qt/5.4/5.4.1/single/qt-everywhere-opensource-src-5.4.1.tar.gz
tar -xf qt-everywhere-opensource-src-5.4.1.tar.gz
mv qt-everywhere-opensource-src-5.4.1 qt5
cd qt5/qtbase/mkspecs
wget http://majestio.tk/stuff/win32-g++.static.tar.xz
tar -xf win32-g++.static.tar.xz
rm -f win32-g++.static.tar.xz
cd ../..
wget http://majestio.tk/stuff/qt-5.4.1.patch
patch -p1 -u < qt-5.4.1.patch
rm -f qt-5.4.1.patch
cd ..
3.1.build-qt-x32-shared.sh
#!/bin/sh

###########################################################################
##                                                                       ##
## Скрипт 3.1 Создание сборки Qt 5.4.1 для Win x32 (shared)              ##
##                                                                       ##
##                                       Majestio (C) http://majestio.tk ##
###########################################################################

#
# Порядок установки:
#
# 1. Зайти в каталог установки $HOME/Setup
# 2. Скопировать туда этот скрипт и запустить
# 3. Дождаться завершения
#
# На выходе будет готовая сборка, размещенная в %HOME/dev/stuff
#

# -------------------------------------------------------------------------

if [ "$(whoami)" == 'root' ]; then
  echo "Ахтунг: под учетной записью рута работать отказываюсь!"
  exit 1
fi

TARGET="i686-w64-mingw32.shared"
MXE="$HOME/dev/cross/mxe/usr"
PREFIX="$HOME/dev/stuff/qt5-$TARGET"
export PATH=$MXE/bin:$PATH

PWD="`pwd`"
LOG="$PWD/$TARGET-qt5.log___________"

mkdir "$TARGET-qt5.build"
cd "$TARGET-qt5.build"

clear

OPENSSL_LIBS="`''"$TARGET"'-pkg-config' --libs-only-l openssl`"
PSQL_LIBS="-lpq -lsecur32 `''"$TARGET"'-pkg-config' --libs-only-l openssl` -lws2_32"
../qt5/configure -prefix $PREFIX
-opensource
-confirm-license
-release
-shared
-opengl desktop
-force-pkg-config
-no-use-gold-linker
-no-glib
-openssl
-dbus
-plugin-sql-psql
-plugin-sql-sqlite
-plugin-sql-odbc
-qt-libpng -qt-libjpeg -qt-pcre -zlib -qt-freetype -no-kms -no-pch
-nomake examples -nomake tests -silent -skip webkit
-xplatform win32-g++
-device-option CROSS_COMPILE=$TARGET-
-device-option PKG_CONFIG="$TARGET-pkg-config" 2>&1 | tee $LOG
make -j4 2>&1 | tee -a $LOG
make install 2>&1 | tee -a $LOG
3.2.build-qt-x32-static.sh
#!/bin/sh

###########################################################################
##                                                                       ##
## Скрипт 3.2 Создание сборки Qt 5.4.1 для Win x32 (static)              ##
##                                                                       ##
##                                       Majestio (C) http://majestio.tk ##
###########################################################################

#
# Порядок установки:
#
# 1. Зайти в каталог установки $HOME/Setup
# 2. Скопировать туда этот скрипт и запустить
# 3. Дождаться завершения
#
# На выходе будет готовая сборка, размещенная в %HOME/dev/stuff
#

# -------------------------------------------------------------------------

if [ "$(whoami)" == 'root' ]; then
  echo "Ахтунг: под учетной записью рута работать отказываюсь!"
  exit 1
fi

TARGET="i686-w64-mingw32.static"
MXE="$HOME/dev/cross/mxe/usr"
PREFIX="$HOME/dev/stuff/qt5-$TARGET"

PWD="`pwd`"
LOG="$PWD/$TARGET-qt5.log___________"

mkdir "$TARGET-qt5.build"
cd "$TARGET-qt5.build"
clear

export PATH=$MXE/bin:$PATH
#../qt5/configure --help|less
#exit
OPENSSL_LIBS="`''"$TARGET"'-pkg-config' --libs-only-l openssl`"
PSQL_LIBS="-lpq -lsecur32 `''"$TARGET"'-pkg-config' --libs-only-l openssl` -lws2_32"
../qt5/configure -prefix $PREFIX
-opensource
-confirm-license
-release
-static
-opengl desktop
-force-pkg-config
-no-use-gold-linker
-no-glib
-openssl-linked
-dbus-linked
-qt-sql-psql
-qt-sql-sqlite
-qt-sql-odbc
-qt-libpng -qt-libjpeg -qt-pcre -zlib -qt-freetype -no-kms -no-pch
-nomake examples -nomake tests -silent -skip webkit
-xplatform win32-g++
-device-option CROSS_COMPILE=$TARGET-
-device-option PKG_CONFIG="$TARGET-pkg-config" 2>&1 | tee $LOG
make -j4 2>&1 | tee -a $LOG
make install 2>&1 | tee -a $LOG
3.3.build-qt-x64-shared.sh
#!/bin/sh

###########################################################################
##                                                                       ##
## Скрипт 3.3 Создание сборки Qt 5.4.1 для Win x64 (shared)              ##
##                                                                       ##
##                                       Majestio (C) http://majestio.tk ##
###########################################################################

#
# Порядок установки:
#
# 1. Зайти в каталог установки $HOME/Setup
# 2. Скопировать туда этот скрипт и запустить
# 3. Дождаться завершения
#
# На выходе будет готовая сборка, размещенная в %HOME/dev/stuff
#

# -------------------------------------------------------------------------

if [ "$(whoami)" == 'root' ]; then
  echo "Ахтунг: под учетной записью рута работать отказываюсь!"
  exit 1
fi

TARGET="x86_64-w64-mingw32.shared"
MXE="$HOME/dev/cross/mxe/usr"
PREFIX="$HOME/dev/stuff/qt5-$TARGET"
export PATH=$MXE/bin:$PATH

PWD="`pwd`"
LOG="$PWD/$TARGET-qt5.log___________"

mkdir "$TARGET-qt5.build"
cd "$TARGET-qt5.build"

clear

OPENSSL_LIBS="`''"$TARGET"'-pkg-config' --libs-only-l openssl`"
PSQL_LIBS="-lpq -lsecur32 `''"$TARGET"'-pkg-config' --libs-only-l openssl` -lws2_32"
../qt5/configure -prefix $PREFIX
-opensource
-confirm-license
-release
-shared
-opengl desktop
-force-pkg-config
-no-use-gold-linker
-no-glib
-openssl
-dbus
-plugin-sql-psql
-plugin-sql-sqlite
-plugin-sql-odbc
-qt-libpng -qt-libjpeg -qt-pcre -zlib -qt-freetype -no-kms -no-pch
-nomake examples -nomake tests -silent -skip webkit
-xplatform win32-g++
-device-option CROSS_COMPILE=$TARGET-
-device-option PKG_CONFIG="$TARGET-pkg-config" 2>&1 | tee $LOG
make -j4 2>&1 | tee -a $LOG
make install 2>&1 | tee -a $LOG
3.4.build-qt-x64-static.sh
#!/bin/sh

###########################################################################
##                                                                       ##
## Скрипт 3.4 Создание сборки Qt 5.4.1 для Win x64 (static)              ##
##                                                                       ##
##                                       Majestio (C) http://majestio.tk ##
###########################################################################

#
# Порядок установки:
#
# 1. Зайти в каталог установки $HOME/Setup
# 2. Скопировать туда этот скрипт и запустить
# 3. Дождаться завершения
#
# На выходе будет готовая сборка, размещенная в %HOME/dev/stuff
#

# -------------------------------------------------------------------------

if [ "$(whoami)" == 'root' ]; then
  echo "Ахтунг: под учетной записью рута работать отказываюсь!"
  exit 1
fi

TARGET="x86_64-w64-mingw32.static"
MXE="$HOME/dev/cross/mxe/usr"
PREFIX="$HOME/dev/stuff/qt5-$TARGET"

PWD="`pwd`"
LOG="$PWD/$TARGET-qt5.log___________"

mkdir "$TARGET-qt5.build"
cd "$TARGET-qt5.build"
clear

export PATH=$MXE/bin:$PATH
#../qt5/configure --help|less
#exit
OPENSSL_LIBS="`''"$TARGET"'-pkg-config' --libs-only-l openssl`"
PSQL_LIBS="-lpq -lsecur32 `''"$TARGET"'-pkg-config' --libs-only-l openssl` -lws2_32"
../qt5/configure -prefix $PREFIX
-opensource
-confirm-license
-release
-static
-opengl desktop
-force-pkg-config
-no-use-gold-linker
-no-glib
-openssl-linked
-dbus-linked
-qt-sql-psql
-qt-sql-sqlite
-qt-sql-odbc
-qt-libpng -qt-libjpeg -qt-pcre -zlib -qt-freetype -no-kms -no-pch
-nomake examples -nomake tests -silent -skip webkit
-xplatform win32-g++
-device-option CROSS_COMPILE=$TARGET-
-device-option PKG_CONFIG="$TARGET-pkg-config" 2>&1 | tee $LOG
make -j4 2>&1 | tee -a $LOG
make install 2>&1 | tee -a $LOG
Скрипты не будут иметь атрибута «исполняемый» просто в целях безопасности — предотвращения «непреднамеренного случайного» запуска. Запускаем первый скрипт 1.setup-first.sh. Он создаст структуру подкаталогов $HOME/dev…, выкачает систему кросс-компиляции mxe, делает двойную сборку gcc тулчейнов (для обеспечения поддержки posix-threads), соберет основные базовые библиотеки, пропатчит и соберет клиентскую часть библиотеки PostgreSQL.
Важно: Если ваша хостовая система по ABI отличается от «x86_64-pc-linux-gnu», в скрипте вручную удалите патч ABI. Ищем по комментарию «# патчим файлик определения ABI проекта MXE». А лучше пропишете ваш.
$ sh 1.setup-first.sh
3. Загрузка и настройка Qt 5.4.1
Запускаем скрипт 2.setup-qt5.sh. Его задача выкачать исходники Qt 5.4.1, развернуть их в подкаталог qt5/ и пропатчить нужное.
$ sh 2.setup-qt5.sh
4. Сборка комплектов Qt 5.4.1 для четырех целей
Для, собственно, сборки четырех видов Qt 5.4.1 предназначены остальные скрипты:
- 3.1.build-qt-x32-shared.sh
- 3.2.build-qt-x32-static.sh
- 3.3.build-qt-x64-shared.sh
- 3.4.build-qt-x64-static.sh
Запуск производиться точно так же как и в предыдущем пункте:
$ sh скрипт
Однако есть важное замечание, могущее помочь вам сэкономить время на сборку. Если у вас многоядерный компьютер — имеет смысл запускать сборки параллельно. Для этого вы открываете второй(третий, четвертый) терминал, и в терминале запускаете очередной скрипт. Лично мне удобно все действия проводить в дополнительном ssh-клиенте. Как показала практика, на моем Core i7 (4 ядра, с гипертрейдингом) — прирост общего времени сборки наблюдается при двух параллельно работающих сборках. Если более — производительность не возрастает, а чаще всего падает.
Итак, все четыре скрипта отработали. Что мы получили в результате?
$HOME/dev/cross/mxe/usr/bin — тут собраны исполняемые модули всех четырех тулчейнов
$HOME/dev/cross/mxe/usr/тулчейн — тут собраны заголовки и либы тулчейнов
$HOME/dev/stuff/сборки — тут собраны все виды Qt для последующей кросс-компиляции
Осталось все это подключить к использованию.
5. Прописка собранного в QtCreator
Самостоятельно выкачиваете Qt 5.4.1 для вашего линуха (ссылка на x32 или x64), самостоятельно производите установку. Проверяете работоспособность.
После этого регистрируете собранное вами. Открываем QtCreator, выбираем в главном меню «Инструменты» ► «Параметры» ► «Сборка и запуск». Далее, вся регистрация предусматривает три шага:
1) Регистрация компиляторов (Закладка «Компиляторы»)
2) Регистрация профилей Qt (Закладка «Профили Qt»)
3) Регистрация комплектов (Закладка «Комплекты»)
Шаг-1
Добавляя очередной компилятор, выбирайте тип «Особый». Нужный компилятор ищем в $HOME/dev/cross/mxe/usr/bin типа bla-bla-bla-g++. Ниже указываем путь к системной утилите make, типа /usr/bin/make. Далее выставляем ABI. Если выбрали static-версию, внизу добавьте mkspec — «win32-g++.static» (без кавычек). Остальные поля несущественны. Зарегали все четыре вида компиляторов, нажимаем «Применить»
Шаг-2
Переключаемся на закладку «Профили Qt». Добавляя профили ищем их в $HOME/dev/stuff/bla-bla-bla/bin/qmake. Зарегали все четыре профиля, нажимаем «Применить»
Шаг-3
Переключаемся на закладку «Комплекты». Добавляем очередной комплект, выбирая нужный компилятор + профиль Qt. В комплектах, где статическая сборка желательно прописать и mkspecs как на шаге-1. Зарегали все четыре комплекта, нажимаем «Применить»
Заключение
Вполне отдаю себе отчет — собранное может содержать определенные ошибки, т.к. собиралось далеко не автором ни Qt, ни PostgreSQL, даже не участником проекта MXE. Да и отсутствие простейших проверок во время сборки, не говоря уж о юнит-тестах, предполагает, что вы осознаете «сырость» сделанного. Тем не менее, после получения данного набора тулчейнов, я протестировал свои проекты, примеры из поставки Qt. В интересующих меня модулях (UI, PostgreSQL, http, QtScript, и ряда других) ошибок не обнаружил.
… Обещанное про фулл-сборку. Если вам очень повезет, и MXE, на момент вашего интереса будет в стабильном состоянии, получить фулл сборку очень просто:
$ mkdir -p $HOME/dev/{cross,src,stuff,projects}
$ cd $HOME/dev/cross
$ git clone https://github.com/mxe/mxe.git
$ make MXE_TARGETS='x86_64-w64-mingw32.shared' gcc -j4 JOBS=4
$ make MXE_TARGETS='x86_64-w64-mingw32.static' gcc -j4 JOBS=4
$ make MXE_TARGETS='i686-w64-mingw32.shared' gcc -j4 JOBS=4
$ make MXE_TARGETS='i686-w64-mingw32.static' gcc -j4 JOBS=4
#
# чтобы PostgreSQL-либа была рабочей - положите в каталог $HOME/dev/cross/mxe/src
# патчик, полученный из http://majestio.tk/stuff/postgresql-3-socket.patch
#
$ make MXE_TARGETS='x86_64-w64-mingw32.shared' qt5 -j4 JOBS=4
$ make MXE_TARGETS='x86_64-w64-mingw32.static' qt5 -j4 JOBS=4
$ make MXE_TARGETS='i686-w64-mingw32.shared' qt5 -j4 JOBS=4
$ make MXE_TARGETS='i686-w64-mingw32.static' qt5 -j4 JOBS=4
Вангую, по этому варианту сборки вас ждет разочарование с вероятностью 87.14%, но если все будет без косяков, то полученные сборки Qt5 будут размещены в $HOME/dev/cross/mxe/usr/<тулчейн>/qt5
Всем удачного кодинга.
I want to run a Qt application in Linux which is compiled on Windows using Qt Creator.
I tried googling but I did not get any answers regarding Qt creator. I found for Visual studio.
Can anyone please let me know if this can be done in Qt Creator in Windows7 ? Do I need to install any other compilers ?
Thanks in advance.
![]()
Nejat
31.2k12 gold badges104 silver badges132 bronze badges
asked Aug 21, 2014 at 10:50
![]()
3
If you don’t want to install Linux, I think the best way is using a Virtual Machine. That’s because even if the source code compiles for Linux, how could it be verified to run? You will need a real target environment to finally test your application.
From a complexity point of view, I think setting up a Linux machine (VM or not) and the necessary environment for Qt is a whole lot simpler than cross compiling bug hunting afterwards.
You can install Qt on the installed Linux, copy your project there, compile it and see the results in the real environment. This way you can cope with the minor differences when porting from one OS to another easily.
answered Aug 21, 2014 at 11:25
![]()
NejatNejat
31.2k12 gold badges104 silver badges132 bronze badges
2
- I have installed Qt for Ubuntu Linux in my virtual machine. The file
that I have used is qt-opensource-linux-x86-5.3.1.run.- I installed g++ and other dependent libraries in Ubuntu as compiler for Qt was
not available in this installation file. - Then I took the Qt project file that was build in Windows and build the same in Ubuntu.
- I installed g++ and other dependent libraries in Ubuntu as compiler for Qt was
Thanks and regards
Sid
answered Aug 22, 2014 at 11:58
![]()
SidSid
2456 silver badges18 bronze badges
Qt Creator
Qt Creator is a cross-platform, integrated development environment (IDE) for
application developers to create applications for multiple desktop, embedded,
and mobile device platforms.
The Qt Creator Manual is available at:
https://doc.qt.io/qtcreator/index.html
For an overview of the Qt Creator IDE, see:
https://doc.qt.io/qtcreator/creator-overview.html
Supported Platforms
The standalone binary packages support the following platforms:
- Windows 10 (64-bit) or later
- (K)Ubuntu Linux 20.04 (64-bit) or later
- macOS 10.14 or later
Contributing
For instructions on how to set up the Qt Creator repository to contribute
patches back to Qt Creator, please check:
https://wiki.qt.io/Setting_up_Gerrit
See the following page for information about our coding standard:
https://doc.qt.io/qtcreator-extending/coding-style.html
Compiling Qt Creator
Prerequisites:
- Qt 6.2 or later. The Qt version that you use to build Qt Creator defines the
minimum platform versions that the result supports
(Windows 10, RHEL/CentOS 8.4, Ubuntu 20.04, macOS 10.14 for Qt 6.2). - Qt WebEngine module for QtWebEngine based help viewer
- On Windows:
- MinGW with GCC 9 or Visual Studio 2019 or later
- Python 3.5 or later (optional, needed for the python enabled debug helper)
- Debugging Tools for Windows (optional, for MSVC debugging support with CDB)
- On Mac OS X: latest Xcode
- On Linux: GCC 9 or later
- LLVM/Clang 10 or later (optional, LLVM/Clang 14 is recommended.
See instructions on how to
get LLVM.
The ClangFormat plugin uses the LLVM C++ API.
Since the LLVM C++ API provides no compatibility guarantee,
if later versions don’t compile we don’t support that version.) - CMake
- Ninja (recommended)
The used toolchain has to be compatible with the one Qt was compiled with.
Linux and macOS
These instructions assume that Ninja is installed and in the PATH, Qt Creator
sources are located at /path/to/qtcreator_sources, Qt is installed in
/path/to/Qt, and LLVM is installed in /path/to/llvm.
Note that if you install Qt via the online installer, the path to Qt must
include the version number and compiler ABI. The path to the online installer
content is not enough.
Note that /path/to/Qt doesn’t imply the full path depth like:
$USER/Qt/6.2.4/gcc_64/lib/cmake/Qt6, but only $USER/Qt/6.2.4/gcc_64.
See instructions on how to
get LLVM.
mkdir qtcreator_build
cd qtcreator_build

cmake -DCMAKE_BUILD_TYPE=Debug -G Ninja "-DCMAKE_PREFIX_PATH=/path/to/Qt;/path/to/llvm" /path/to/qtcreator_sources
cmake --build .
Windows
These instructions assume that Ninja is installed and in the PATH, Qt Creator
sources are located at pathtoqtcreator_sources, Qt is installed in
pathtoQt, and LLVM is installed in pathtollvm.
Note that if you install Qt via the online installer, the path to Qt must
include the version number and compiler ABI. The path to the online installer
content is not enough.
Note that pathtoQt doesn’t imply the full path depth like:
c:Qt6.2.4msvc2019_64libcmakeQt6, but only c:/Qt/6.2.4/msvc2019_64.
The usage of slashes / is intentional, since CMake has issues with backslashes
in CMAKE_PREFX_PATH, they are interpreted as escape codes.
See instructions on how to
get LLVM.
Decide which compiler to use: MinGW or Microsoft Visual Studio.
MinGW is available via the Qt online installer, for other options see
https://wiki.qt.io/MinGW. Run the commands below in a shell prompt that has
<path_to_mingw>bin in the PATH.
For Microsoft Visual C++ you can use the «Build Tools for Visual Studio». Also
install the «Debugging Tools for Windows» from the Windows SDK installer. We
strongly recommend using the 64-bit version and 64-bit compilers on 64-bit
systems. Open the x64 Native Tools Command Prompt for VS <version> from the
start menu items that were created for Visual Studio, and run the commands
below in it.
md qtcreator_build
cd qtcreator_build

cmake -DCMAKE_BUILD_TYPE=Debug -G Ninja "-DCMAKE_PREFIX_PATH=/path/to/Qt;/path/to/llvm" pathtoqtcreator_sources
cmake --build .
Qt Creator can be registered as a post-mortem debugger. This can be done in the
options page or by running the tool qtcdebugger with administrative privileges
passing the command line options -register/unregister, respectively.
Alternatively, the required registry entries
HKEY_LOCAL_MACHINESOFTWAREMicrosoftWindows NTCurrentVersionAeDebug
HKEY_LOCAL_MACHINESOFTWAREWow6432NodeMicrosoftWindows NTCurrentVersionAeDebug
can be modified using the registry editor regedt32 to contain
qtcreator_buildbinqtcdebugger %ld %ld
When using a self-built version of Qt Creator as post-mortem debugger, it needs
to be able to find all dependent Qt-libraries and plugins when being launched
by the system. The easiest way to do this is to create a self-contained Qt
Creator by installing it and installing its dependencies. See «Options» below
for details.
Note that unlike on Unix, you cannot overwrite executables that are running.
Thus, if you want to work on Qt Creator using Qt Creator, you need a separate
installation of it. We recommend using a separate, release-built version of Qt
Creator to work on a debug-built version of Qt Creator.
Options
If you do not have Ninja installed and in the PATH, remove -G Ninja from
the first cmake call. If you want to build in release mode, change the build
type to -DCMAKE_BUILD_TYPE=Release. You can also build with release
optimizations but debug information with -DCMAKE_BUILD_TYPE=RelWithDebInfo.
You can find more options in the generated CMakeCache.txt file. For instance,
building of Qbs together with Qt Creator can be enabled with -DBUILD_QBS=ON.
Installation is not needed. It is however possible, using
cmake --install . --prefix /path/to/qtcreator_install
To create a self-contained Qt Creator installation, including all dependencies
like Qt and LLVM, additionally run
cmake --install . --prefix /path/to/qtcreator_install --component Dependencies
Perf Profiler Support
Support for the perf profiler
requires the perfparser tool that is part of the Qt Creator source package, and also
part of the Qt Creator Git repository in form of a submodule in src/tools/perfparser.
Compilation of perfparser requires ELF and DWARF development packages.
You can either download and extract a prebuilt package from
https://download.qt.io/development_releases/prebuilt/elfutils/ and add the
directory to the CMAKE_PREFIX_PATH when configuring Qt Creator,
or install the libdw-dev package on Debian-style Linux systems.
You can also point Qt Creator to a separate installation of perfparser by
setting the PERFPROFILER_PARSER_FILEPATH environment variable to the full
path to the executable.
Getting LLVM/Clang for the Clang Code Model
The Clang code model uses Clangd and the ClangFormat plugin depends on the
LLVM/Clang libraries. The currently recommended LLVM/Clang version is 14.0.
Prebuilt LLVM/Clang packages
Prebuilt packages of LLVM/Clang can be downloaded from
https://download.qt.io/development_releases/prebuilt/libclang/
This should be your preferred option because you will use the version that is
shipped together with Qt Creator (with backported/additional patches). In
addition, MinGW packages for Windows are faster due to profile-guided
optimization. If the prebuilt packages do not match your configuration, you
need to build LLVM/Clang manually.
If you use the MSVC compiler to build Qt Creator the suggested way is:
1. Download both MSVC and MinGW packages of libclang.
2. Use the MSVC version of libclang during the Qt Creator build.
3. Prepend PATH variable used for the run time with the location of MinGW version of libclang.dll.
4. Launch Qt Creator.
Building LLVM/Clang manually
You need to install CMake in order to build LLVM/Clang.
Build LLVM/Clang by roughly following the instructions at
http://llvm.org/docs/GettingStarted.html#git-mirror:
-
Clone LLVM/Clang and checkout a suitable branch
git clone -b release_130-based --recursive https://code.qt.io/clang/llvm-project.git -
Build and install LLVM/Clang
For Linux/macOS:
cmake
  -D CMAKE_BUILD_TYPE=Release
  -D LLVM_ENABLE_RTTI=ON
  -D LLVM_ENABLE_PROJECTS="clang;clang-tools-extra"
  -D CMAKE_INSTALL_PREFIX=<installation location>
  ../llvm-project/llvm
cmake --build . --target install
For Windows:
cmake ^
  -G Ninja ^
  -D CMAKE_BUILD_TYPE=Release ^
  -D LLVM_ENABLE_RTTI=ON ^
  -D LLVM_ENABLE_PROJECTS="clang;clang-tools-extra" ^
  -D CMAKE_INSTALL_PREFIX=<installation location> ^
  ..llvm-projectllvm
cmake --build . --target install
Clang-Format
The ClangFormat plugin depends on the additional patch
https://code.qt.io/cgit/clang/llvm-project.git/commit/?h=release_130-based&id=42879d1f355fde391ef46b96a659afeb4ad7814a
While the plugin builds without it, it might not be fully functional.
Note that the plugin is disabled by default.
Licenses and Attributions
Qt Creator is available under commercial licenses from The Qt Company,
and under the GNU General Public License version 3,
annotated with The Qt Company GPL Exception 1.0.
See LICENSE.GPL-EXCEPT for the details.
Qt Creator furthermore includes the following third-party components,
we thank the authors who made this possible:
YAML Parser yaml-cpp (MIT License)
https://github.com/jbeder/yaml-cpp
QtCreator/src/libs/3rdparty/yaml-cpp
Copyright (c) 2008-2015 Jesse Beder.
Permission is hereby granted, free of charge, to any person obtaining a copy
of this software and associated documentation files (the «Software»), to deal
in the Software without restriction, including without limitation the rights
to use, copy, modify, merge, publish, distribute, sublicense, and/or sell
copies of the Software, and to permit persons to whom the Software is
furnished to do so, subject to the following conditions:
The above copyright notice and this permission notice shall be included in
all copies or substantial portions of the Software.
THE SOFTWARE IS PROVIDED «AS IS», WITHOUT WARRANTY OF ANY KIND, EXPRESS OR
IMPLIED, INCLUDING BUT NOT LIMITED TO THE WARRANTIES OF MERCHANTABILITY,
FITNESS FOR A PARTICULAR PURPOSE AND NONINFRINGEMENT. IN NO EVENT SHALL THE
AUTHORS OR COPYRIGHT HOLDERS BE LIABLE FOR ANY CLAIM, DAMAGES OR OTHER
LIABILITY, WHETHER IN AN ACTION OF CONTRACT, TORT OR OTHERWISE, ARISING FROM,
OUT OF OR IN CONNECTION WITH THE SOFTWARE OR THE USE OR OTHER DEALINGS IN
THE SOFTWARE.
KSyntaxHighlighting
Syntax highlighting engine for Kate syntax definitions
This is a stand-alone implementation of the Kate syntax highlighting
engine. It’s meant as a building block for text editors as well as
for simple highlighted text rendering (e.g. as HTML), supporting both
integration with a custom editor as well as a ready-to-use
QSyntaxHighlighter sub-class.
Distributed under the:
MIT License
Permission is hereby granted, free of charge, to any person obtaining
a copy of this software and associated documentation files (the
«Software»), to deal in the Software without restriction, including
without limitation the rights to use, copy, modify, merge, publish,
distribute, sublicense, and/or sell copies of the Software, and to
permit persons to whom the Software is furnished to do so, subject to
the following conditions:
The above copyright notice and this permission notice shall be included
in all copies or substantial portions of the Software.
THE SOFTWARE IS PROVIDED «AS IS», WITHOUT WARRANTY OF ANY KIND,
EXPRESS OR IMPLIED, INCLUDING BUT NOT LIMITED TO THE WARRANTIES OF
MERCHANTABILITY, FITNESS FOR A PARTICULAR PURPOSE AND NONINFRINGEMENT.
IN NO EVENT SHALL THE AUTHORS OR COPYRIGHT HOLDERS BE LIABLE FOR ANY
CLAIM, DAMAGES OR OTHER LIABILITY, WHETHER IN AN ACTION OF CONTRACT,
TORT OR OTHERWISE, ARISING FROM, OUT OF OR IN CONNECTION WITH THE
SOFTWARE OR THE USE OR OTHER DEALINGS IN THE SOFTWARE.
The source code of KSyntaxHighlighting can be found here:
https://cgit.kde.org/syntax-highlighting.git
QtCreator/src/libs/3rdparty/syntax-highlighting
https://code.qt.io/cgit/qt-creator/qt-creator.git/tree/src/libs/3rdparty/syntax-highlighting
Clazy
https://github.com/KDE/clazy
Copyright (C) 2015-2018 Clazy Team
Distributed under GNU LIBRARY GENERAL PUBLIC LICENSE Version 2 (LGPL2).
Integrated with patches from
https://code.qt.io/cgit/clang/clazy.git/.
LLVM/Clang
https://github.com/llvm/llvm-project.git
Copyright (C) 2003-2019 LLVM Team
Distributed under the Apache 2.0 License with LLVM exceptions,
see https://github.com/llvm/llvm-project/blob/main/clang/LICENSE.TXT
With backported/additional patches from https://code.qt.io/cgit/clang/llvm-project.git
std::span implementation for C++11 and later
A single-header implementation of C++20’s std::span, conforming to the C++20
committee draft. It is compatible with C++11, but will use newer language
features if they are available.
https://github.com/tcbrindle/span
QtCreator/src/libs/3rdparty/span
Copyright Tristan Brindle, 2018
Distributed under the Boost Software License, Version 1.0.
(See accompanying file LICENSE.md or copy at http://boost.org/LICENSE_1_0.txt)
Open Source front-end for C++ (license MIT), enhanced for use in Qt Creator
Roberto Raggi roberto.raggi@gmail.com
QtCreator/src/libs/3rdparty/cplusplus
Copyright 2005 Roberto Raggi roberto@kdevelop.org
Permission to use, copy, modify, distribute, and sell this software and its
documentation for any purpose is hereby granted without fee, provided that
the above copyright notice appear in all copies and that both that
copyright notice and this permission notice appear in supporting
documentation.
The above copyright notice and this permission notice shall be included in
all copies or substantial portions of the Software.
THE SOFTWARE IS PROVIDED «AS IS», WITHOUT WARRANTY OF ANY KIND, EXPRESS OR
IMPLIED, INCLUDING BUT NOT LIMITED TO THE WARRANTIES OF MERCHANTABILITY,
FITNESS FOR A PARTICULAR PURPOSE AND NONINFRINGEMENT. IN NO EVENT SHALL THE
KDEVELOP TEAM BE LIABLE FOR ANY CLAIM, DAMAGES OR OTHER LIABILITY, WHETHER IN
AN ACTION OF CONTRACT, TORT OR OTHERWISE, ARISING FROM, OUT OF OR IN
CONNECTION WITH THE SOFTWARE OR THE USE OR OTHER DEALINGS IN THE SOFTWARE.
Open Source tool for generating C++ code that classifies keywords (license MIT)
Roberto Raggi roberto.raggi@gmail.com
QtCreator/src/tools/3rdparty/cplusplus-keywordgen
Copyright (c) 2007 Roberto Raggi roberto.raggi@gmail.com
Permission is hereby granted, free of charge, to any person obtaining a copy of
this software and associated documentation files (the «Software»), to deal in
the Software without restriction, including without limitation the rights to
use, copy, modify, merge, publish, distribute, sublicense, and/or sell copies of
the Software, and to permit persons to whom the Software is furnished to do so,
subject to the following conditions:
The above copyright notice and this permission notice shall be included in all
copies or substantial portions of the Software.
THE SOFTWARE IS PROVIDED «AS IS», WITHOUT WARRANTY OF ANY KIND, EXPRESS OR
IMPLIED, INCLUDING BUT NOT LIMITED TO THE WARRANTIES OF MERCHANTABILITY, FITNESS
FOR A PARTICULAR PURPOSE AND NONINFRINGEMENT. IN NO EVENT SHALL THE AUTHORS OR
COPYRIGHT HOLDERS BE LIABLE FOR ANY CLAIM, DAMAGES OR OTHER LIABILITY, WHETHER
IN AN ACTION OF CONTRACT, TORT OR OTHERWISE, ARISING FROM, OUT OF OR IN
CONNECTION WITH THE SOFTWARE OR THE USE OR OTHER DEALINGS IN THE SOFTWARE.
SQLite (version 3.8.10.2)
SQLite is a C-language library that implements a small, fast, self-contained,
high-reliability, full-featured, SQL database engine.
SQLite (https://www.sqlite.org) is in the Public Domain.
ClassView and ImageViewer plugins
Copyright (C) 2016 The Qt Company Ltd.
All rights reserved.
Copyright (C) 2016 Denis Mingulov.
Contact: http://www.qt.io
This file is part of Qt Creator.
You may use this file under the terms of the BSD license as follows:
«Redistribution and use in source and binary forms, with or without
modification, are permitted provided that the following conditions are
met:
* Redistributions of source code must retain the above copyright
notice, this list of conditions and the following disclaimer.
* Redistributions in binary form must reproduce the above copyright
notice, this list of conditions and the following disclaimer in
the documentation and/or other materials provided with the
distribution.
* Neither the name of The Qt Company Ltd and its Subsidiary(-ies) nor
the names of its contributors may be used to endorse or promote
products derived from this software without specific prior written
permission.
THIS SOFTWARE IS PROVIDED BY THE COPYRIGHT HOLDERS AND CONTRIBUTORS
«AS IS» AND ANY EXPRESS OR IMPLIED WARRANTIES, INCLUDING, BUT NOT
LIMITED TO, THE IMPLIED WARRANTIES OF MERCHANTABILITY AND FITNESS FOR
A PARTICULAR PURPOSE ARE DISCLAIMED. IN NO EVENT SHALL THE COPYRIGHT
OWNER OR CONTRIBUTORS BE LIABLE FOR ANY DIRECT, INDIRECT, INCIDENTAL,
SPECIAL, EXEMPLARY, OR CONSEQUENTIAL DAMAGES (INCLUDING, BUT NOT
LIMITED TO, PROCUREMENT OF SUBSTITUTE GOODS OR SERVICES; LOSS OF USE,
DATA, OR PROFITS; OR BUSINESS INTERRUPTION) HOWEVER CAUSED AND ON ANY
THEORY OF LIABILITY, WHETHER IN CONTRACT, STRICT LIABILITY, OR TORT
(INCLUDING NEGLIGENCE OR OTHERWISE) ARISING IN ANY WAY OUT OF THE USE
OF THIS SOFTWARE, EVEN IF ADVISED OF THE POSSIBILITY OF SUCH DAMAGE.»
Source Code Pro font
Copyright 2010, 2012 Adobe Systems Incorporated (http://www.adobe.com/),
with Reserved Font Name ‘Source’. All Rights Reserved. Source is a
trademark of Adobe Systems Incorporated in the United States
and/or other countries.
This Font Software is licensed under the SIL Open Font License, Version 1.1.
The font and license files can be found in QtCreator/src/libs/3rdparty/fonts.
JSON Library by Niels Lohmann
Used by the Chrome Trace Format Visualizer plugin instead of QJson
because of QJson’s current hard limit of 128 Mb object size and
trace files often being much larger.
The sources can be found in QtCreator/src/libs/3rdparty/json.
The class is licensed under the MIT License:
Copyright © 2013-2019 Niels Lohmann
Permission is hereby granted, free of charge, to any person obtaining a
copy of this software and associated documentation files (the “Software”), to
deal in the Software without restriction, including without limitation the
rights to use, copy, modify, merge, publish, distribute, sublicense, and/or sell
copies of the Software, and to permit persons to whom the Software is furnished
to do so, subject to the following conditions:
The above copyright notice and this permission notice shall be included
in all copies or substantial portions of the Software.
THE SOFTWARE IS PROVIDED “AS IS”, WITHOUT WARRANTY OF ANY KIND, EXPRESS
OR IMPLIED, INCLUDING BUT NOT LIMITED TO THE WARRANTIES OF MERCHANTABILITY,
FITNESS FOR A PARTICULAR PURPOSE AND NONINFRINGEMENT. IN NO EVENT SHALL THE
AUTHORS OR COPYRIGHT HOLDERS BE LIABLE FOR ANY CLAIM, DAMAGES OR OTHER
LIABILITY, WHETHER IN AN ACTION OF CONTRACT, TORT OR OTHERWISE, ARISING FROM,
OUT OF OR IN CONNECTION WITH THE SOFTWARE OR THE USE OR OTHER DEALINGS IN THE
SOFTWARE.
The class contains the UTF-8 Decoder from Bjoern Hoehrmann which is
licensed under the MIT License (see above). Copyright © 2008-2009 Björn
Hoehrmann bjoern@hoehrmann.de
The class contains a slightly modified version of the Grisu2 algorithm
from Florian Loitsch which is licensed under the MIT License (see above).
Copyright © 2009 Florian Loitsch
litehtml
The litehtml HTML/CSS rendering engine is used as a help viewer backend
to display help files.
The sources can be found in:
* QtCreator/src/plugins/help/qlitehtml
* https://github.com/litehtml
Copyright (c) 2013, Yuri Kobets (tordex)
Redistribution and use in source and binary forms, with or without
modification, are permitted provided that the following conditions are met:
- Redistributions of source code must retain the above copyright
notice, this list of conditions and the following disclaimer. - Redistributions in binary form must reproduce the above copyright
notice, this list of conditions and the following disclaimer in the
documentation and/or other materials provided with the distribution. - Neither the name of the nor the
names of its contributors may be used to endorse or promote products
derived from this software without specific prior written permission.
THIS SOFTWARE IS PROVIDED BY THE COPYRIGHT HOLDERS AND CONTRIBUTORS «AS IS» AND
ANY EXPRESS OR IMPLIED WARRANTIES, INCLUDING, BUT NOT LIMITED TO, THE IMPLIED
WARRANTIES OF MERCHANTABILITY AND FITNESS FOR A PARTICULAR PURPOSE ARE
DISCLAIMED. IN NO EVENT SHALL BE LIABLE FOR ANY
DIRECT, INDIRECT, INCIDENTAL, SPECIAL, EXEMPLARY, OR CONSEQUENTIAL DAMAGES
(INCLUDING, BUT NOT LIMITED TO, PROCUREMENT OF SUBSTITUTE GOODS OR SERVICES;
LOSS OF USE, DATA, OR PROFITS; OR BUSINESS INTERRUPTION) HOWEVER CAUSED AND
ON ANY THEORY OF LIABILITY, WHETHER IN CONTRACT, STRICT LIABILITY, OR TORT
(INCLUDING NEGLIGENCE OR OTHERWISE) ARISING IN ANY WAY OUT OF THE USE OF THIS
SOFTWARE, EVEN IF ADVISED OF THE POSSIBILITY OF SUCH DAMAGE.
gumbo
The litehtml HTML/CSS rendering engine uses the gumbo parser.
Copyright 2010, 2011 Google
Licensed under the Apache License, Version 2.0 (the «License»);
you may not use this file except in compliance with the License.
You may obtain a copy of the License at
http://www.apache.org/licenses/LICENSE-2.0
Unless required by applicable law or agreed to in writing, software
distributed under the License is distributed on an «AS IS» BASIS,
WITHOUT WARRANTIES OR CONDITIONS OF ANY KIND, either express or implied.
See the License for the specific language governing permissions and
limitations under the License.
gumbo/utf8.c
The litehtml HTML/CSS rendering engine uses gumbo/utf8.c parser.
Copyright (c) 2008-2009 Bjoern Hoehrmann bjoern@hoehrmann.de
Permission is hereby granted, free of charge, to any person obtaining a copy
of this software and associated documentation files (the «Software»), to deal
in the Software without restriction, including without limitation the rights
to use, copy, modify, merge, publish, distribute, sublicense, and/or sell
copies of the Software, and to permit persons to whom the Software is
furnished to do so, subject to the following conditions:
The above copyright notice and this permission notice shall be included in
all copies or substantial portions of the Software.
SourceCodePro fonts
Qt Creator ships with the following fonts licensed under OFL-1.1:
- SourceCodePro-Regular.ttf
- SourceCodePro-It.ttf
- SourceCodePro-Bold.ttf
SIL OPEN FONT LICENSE
Version 1.1 — 26 February 2007
PREAMBLE
The goals of the Open Font License (OFL) are to stimulate worldwide
development of collaborative font projects, to support the font creation
efforts of academic and linguistic communities, and to provide a free and
open framework in which fonts may be shared and improved in partnership
with others.
The OFL allows the licensed fonts to be used, studied, modified and
redistributed freely as long as they are not sold by themselves. The
fonts, including any derivative works, can be bundled, embedded,
redistributed and/or sold with any software provided that any reserved
names are not used by derivative works. The fonts and derivatives,
however, cannot be released under any other type of license. The
requirement for fonts to remain under this license does not apply
to any document created using the fonts or their derivatives.
DEFINITIONS
«Font Software» refers to the set of files released by the Copyright
Holder(s) under this license and clearly marked as such. This may
include source files, build scripts and documentation.
«Reserved Font Name» refers to any names specified as such after the
copyright statement(s).
«Original Version» refers to the collection of Font Software components as
distributed by the Copyright Holder(s).
«Modified Version» refers to any derivative made by adding to, deleting,
or substituting — in part or in whole — any of the components of the
Original Version, by changing formats or by porting the Font Software to a
new environment.
«Author» refers to any designer, engineer, programmer, technical
writer or other person who contributed to the Font Software.
PERMISSION & CONDITIONS
Permission is hereby granted, free of charge, to any person obtaining
a copy of the Font Software, to use, study, copy, merge, embed, modify,
redistribute, and sell modified and unmodified copies of the Font
Software, subject to the following conditions:
-
Neither the Font Software nor any of its individual components,
in Original or Modified Versions, may be sold by itself. -
Original or Modified Versions of the Font Software may be bundled,
redistributed and/or sold with any software, provided that each copy
contains the above copyright notice and this license. These can be
included either as stand-alone text files, human-readable headers or
in the appropriate machine-readable metadata fields within text or
binary files as long as those fields can be easily viewed by the user. -
No Modified Version of the Font Software may use the Reserved Font
Name(s) unless explicit written permission is granted by the corresponding
Copyright Holder. This restriction only applies to the primary font name as
presented to the users. -
The name(s) of the Copyright Holder(s) or the Author(s) of the Font
Software shall not be used to promote, endorse or advertise any
Modified Version, except to acknowledge the contribution(s) of the
Copyright Holder(s) and the Author(s) or with their explicit written
permission. -
The Font Software, modified or unmodified, in part or in whole,
must be distributed entirely under this license, and must not be
distributed under any other license. The requirement for fonts to
remain under this license does not apply to any document created
using the Font Software.
TERMINATION
This license becomes null and void if any of the above conditions are
not met.
DISCLAIMER
THE FONT SOFTWARE IS PROVIDED «AS IS», WITHOUT WARRANTY OF ANY KIND,
EXPRESS OR IMPLIED, INCLUDING BUT NOT LIMITED TO ANY WARRANTIES OF
MERCHANTABILITY, FITNESS FOR A PARTICULAR PURPOSE AND NONINFRINGEMENT
OF COPYRIGHT, PATENT, TRADEMARK, OR OTHER RIGHT. IN NO EVENT SHALL THE
COPYRIGHT HOLDER BE LIABLE FOR ANY CLAIM, DAMAGES OR OTHER LIABILITY,
INCLUDING ANY GENERAL, SPECIAL, INDIRECT, INCIDENTAL, OR CONSEQUENTIAL
DAMAGES, WHETHER IN AN ACTION OF CONTRACT, TORT OR OTHERWISE, ARISING
FROM, OUT OF THE USE OR INABILITY TO USE THE FONT SOFTWARE OR FROM
OTHER DEALINGS IN THE FONT SOFTWARE.
Qbs
Qt Creator installations deliver Qbs. Its licensing and third party
attributions are listed in Qbs Manual at
https://doc.qt.io/qbs/attributions.html
conan.cmake
CMake script used by Qt Creator’s auto setup of package manager dependencies.
The sources can be found in:
* QtCreator/src/share/3rdparty/package-manager/conan.cmake
* https://github.com/conan-io/cmake-conan
The MIT License (MIT)
Copyright (c) 2018 JFrog
Permission is hereby granted, free of charge, to any person obtaining a copy
of this software and associated documentation files (the «Software»), to deal
in the Software without restriction, including without limitation the rights
to use, copy, modify, merge, publish, distribute, sublicense, and/or sell
copies of the Software, and to permit persons to whom the Software is
furnished to do so, subject to the following conditions:
The above copyright notice and this permission notice shall be included in all
copies or substantial portions of the Software.
THE SOFTWARE IS PROVIDED «AS IS», WITHOUT WARRANTY OF ANY KIND, EXPRESS OR
IMPLIED, INCLUDING BUT NOT LIMITED TO THE WARRANTIES OF MERCHANTABILITY,
FITNESS FOR A PARTICULAR PURPOSE AND NONINFRINGEMENT. IN NO EVENT SHALL THE
AUTHORS OR COPYRIGHT HOLDERS BE LIABLE FOR ANY CLAIM, DAMAGES OR OTHER
LIABILITY, WHETHER IN AN ACTION OF CONTRACT, TORT OR OTHERWISE, ARISING FROM,
OUT OF OR IN CONNECTION WITH THE SOFTWARE OR THE USE OR OTHER DEALINGS IN THE
SOFTWARE.
TartanLlama/expected
Implementation of std::expected compatible with C++11/C++14/C++17.
https://github.com/TartanLlama/expected
To the extent possible under law, the author(s) have dedicated all
copyright and related and neighboring rights to this software to the
public domain worldwide. This software is distributed without any warranty.
http://creativecommons.org/publicdomain/zero/1.0/
|
39 / 39 / 17 Регистрация: 14.10.2013 Сообщений: 174 |
|
|
1 |
|
|
18.10.2013, 15:39. Показов 1787. Ответов 11
Доброго времени дня.
__________________
0 |

|
224 / 219 / 77 Регистрация: 24.09.2012 Сообщений: 511 Записей в блоге: 2 |
|
|
18.10.2013, 16:40 |
2 |
|
В интернете видел не одну статью для обратной процедуры, в линуксе компилить для винды, но как меня интересует не нашел. А можно ссылку?
0 |

|
921 / 638 / 198 Регистрация: 08.09.2013 Сообщений: 1,693 |
|
|
18.10.2013, 16:46 |
3 |
|
Кросс-компиляторов из виндоус под линукс я не встречал.
0 |
|
39 / 39 / 17 Регистрация: 14.10.2013 Сообщений: 174 |
|
|
18.10.2013, 16:54 [ТС] |
4 |
|
А можно ссылку? https://www.google.de/search?q… 2&ie=UTF-8
Кросс-компиляторов из виндоус под линукс я не встречал. Проект единичный. И с линуксом я вообще не знаком. На работе стоит машина с линусом, на которой будет в дальнейшем работать разрабатываемая прога. На нем стоит QT Designer 3, но мой проект из Creator 4 там корректно не открываеться
0 |
|
921 / 638 / 198 Регистрация: 08.09.2013 Сообщений: 1,693 |
|
|
18.10.2013, 17:17 |
5 |
|
На нем стоит QT Designer 3, но мой проект из Creator 4 там корректно не открываеться Думаю, правильно будет установить там недостающие библиотеки и скомпилировать программу.
0 |
|
kamre |
|
22.10.2013, 15:17
|
|
Не по теме:
Проект разработан в QT Creator 4 Как там в будущем? QtCreator 4 уже перешел на clang для парсинга исходников или все еще использует свой кривой недопарсер?
0 |
|
39 / 39 / 17 Регистрация: 14.10.2013 Сообщений: 174 |
|
|
22.10.2013, 16:20 [ТС] |
7 |
|
Вообщем после недели мучений толком у меня ничего не получилось. Опишу проблему еще раз, может кто что то посоветует: С самим линуксом я вообще незнаком и с Qt слабо. Буду очень признателен за любую помощь.
0 |
|
136 / 140 / 7 Регистрация: 22.08.2011 Сообщений: 485 |
|
|
22.10.2013, 17:56 |
8 |
|
админ говорит что то с библиотеками не потянет А может он ошибается = админы многим жизнь подпортили… ничего не делая… Может можно прогу скомпилировать на нормальной линуксовой машине, а потом
0 |
|
127 / 131 / 11 Регистрация: 25.12.2011 Сообщений: 443 |
|
|
22.10.2013, 18:05 |
9 |
|
Линукс какойто древний, переставить нельзя. Жуть то какая, как будто про МСВС. В любом случае очень удобно было бы заиметь виртуалку (образ для VirutalBox, например) с этим древним линуксом. И уже в этой виртуалке собирать под этот самый древний линукс. Кто знает какая там древность стоит (может расскажете?), вдруг и перенос сборки всего необходимого из более свежего линукс также не заработает из-за древней glibc.
0 |
|
921 / 638 / 198 Регистрация: 08.09.2013 Сообщений: 1,693 |
|
|
22.10.2013, 19:25 |
10 |
|
Вариант 1. Скомпилировать статически под ту же архитектуру (g++ -static)
0 |
|
39 / 39 / 17 Регистрация: 14.10.2013 Сообщений: 174 |
|
|
23.10.2013, 15:51 [ТС] |
11 |
|
Вообщем по словам людей линуск стоит РедХет 4.
0 |
|
39 / 39 / 17 Регистрация: 14.10.2013 Сообщений: 174 |
|
|
25.10.2013, 14:13 [ТС] |
12 |
|
Спасибо всем за внимание. Извиняюсь за беспокойство. Тему можно закрыть.
0 |
Предисловие
Как Вы возможно знаете на территории РФ более недоступен Qt. Также в этот момент мне потребовалось реализовать кросс-компиляцию своего проекта под разные ОС. В ходе реализации кросс-компиляции обнаружилось, что можно совершенно легально использовать Qt, да еще и реализовать кросс-компиляцию.
Windows 11
Используя метод проб и ошибок выяснилось, что наиболее хорошо подходит для данных целей Windows 11, т.к. под него есть X Server, причем абсолютно бесплатный. Также не может не радовать скорость работы WSL2 под данной ОС. Итак, не буду томить — переходим к реализации.
Установка WSL2 + X Server
Сразу оговорюсь, речь идет про системы на x64 архитектуре (Intel/AMD). На ARM тоже можно, но работоспособность не гарантируется.
Сперва рекомендую активировать WSL2, для этого можно выполнить команды PowerShell (напоминаю, что нужно запускать его от имени Администратора):
Enable-WindowsOptionalFeature -Online -FeatureName Microsoft-Windows-Subsystem-Linux
Enable-WindowsOptionalFeature -Online -FeatureName VirtualMachinePlatform
Также скачаем и установим сам WSL2 с официального сайта Microsoft
После выполненных действий рекомендую перезагрузить PC, т.к. изменения серьезные.
Сделаем WSL2 основным WSL через PowerShell
wsl --set-default-version 2Теперь можем установить Ubuntu из Windows Store
После запускаем и устанавливаем Ubuntu (данный процесс можете загуглить — там нет ничего сложного)
Затем поставим X Server, благодаря которой мы сможем запускать графические приложения Linux на Windows. Ссылка на Windows Store
Запустите Windows Subsystem for Linux (X Server) и дождитесь появления ввода окна команд — это требуется, чтоб X Server прописал все зависимости.
Ещё раз перезагрузим PC, т.к. опять же были внесены крупные изменения.
Установка Qt Creator
После перезагрузки открываем Windows Subsystem for Linux (X Server) и ждем появления окна ввода команд.
Активируем root доступ (да, можно все делать через sudo, но для новичков так проще)
sudo suПосле устанавливаем Qt
apt-get update && apt-get install build-essential qt5-default qtcreator qtbase5-examples qtdeclarative5-examples git mesa-common-dev -y(Код длинный, поэтому лучше копировать через Ctrl+A, Ctrl+C)
Выходим из root и запускаем Qt Creator
exit
qtcreator
Установка кросс-компилятора MXE
Да, вы уже можете писать приложения под Qt. Но все же они будут работать из под Linux. Чтобы иметь возможность компилировать под Windows — нужен кросс-компилятор.
Откроем Ubuntu терминал и скачаем MXE:
git clone https://github.com/mxe/mxe.gitУстановим необходимые пакеты:
sudo apt-get update && sudo apt-get install autoconf automake autopoint bash bison bzip2 flex g++ g++-multilib gettext git gperf intltool libc6-dev-i386 libgdk-pixbuf2.0-dev libltdl-dev libssl-dev libtool-bin libxml-parser-perl lzip make openssl p7zip-full patch perl python3 python3-mako ruby sed unzip wget xz-utils python-is-python3 g++-multilib libc6-dev-i386 texinfo wine -y(Код длинный, поэтому лучше копировать через Ctrl+A, Ctrl+C)
Перейдем в директорию mxe
cd mxeИ запускаем сборку x86 версии (можете пойти попить чайку — это займет 2-3 часа)
make qt5И запускаем сборку x64 версии (можете пойти попить чайку — это займет 2-3 часа)
make MXE_TARGETS=x86_64-w64-mingw32.static qt5После сборки — привязываем Qt к сборкам, аналогично как если бы была статическая компиляция.
Пути к сборкам: <mxe root>/usr/bin/<Build architecture>
Подробнее о привязке — можете посмотреть видео с YouTube (специально начало пропустил до привязки — по времени 16:12)
Итог
В итоге получим систему кросс-компиляции под Linux и Windows. А также совершенно легально (без VPN и прочем мути) установленный Qt Creator.
Послесловие
Изначально делал для себя, но метод очень понравился, поэтому решил поделиться. Если есть вопросы/предложения — пишите комментарии.
Спасибо за внимание!
С уважением,
Alrott SlimRG
- 1. Вступление
- 2. Для начала немного теории.
- 3. Зачем это нужно?
- 4. Теперь небольшое описание.
- 5. Возьмем пример.
- 6. MyApp (main.cpp)
- 7. MyApp (main.qml)
- 8. Общее
Вступление
В этой статье мы рассмотрим, как правильно собрать все зависимости qt для вашего приложения, которое было собрано динамически.
Для начала немного теории.
Зачем это нужно?
Существует несколько способов сборки приложений, основные из них:
-
Статическая сборка.
Статическая сборка предполагает создание бинарника, в котором будут все необходимые ссылки на него. Другими словами, в нем будет лежать все, что нужно для его работы. Этот подход подходит для небольших консольных приложений, у которых мало зависимостей, иначе размер конечного бинарного файла будет чрезвычайно большим. -
Динамичная сборка.
Отличается от статического тем, что в бинарнике будет только исходный код вашего приложения (размер бинарника будет минимальным), но при запуске такого приложения ему потребуются сторонние библиотеки, которые использовались при его написании.
Теперь небольшое описание.
Console-QtDeployer — это простая утилита, похожая на
windeployqt
и
macdeployqt
. Но в отличии от аналогов у него гораздо более гибкий интерфейс (флаги запуска) и более высокая скорость, к тому же он поддерживает 2 платформы windows и linux, а значит теперь мы можем строить зависимости для windows на линуксе и наоборот.
Возьмем пример.
Например, я написал простое qt-приложение с использованием qml — MyApp.
MyApp (main.cpp)
#include <QGuiApplication> #include <QQmlApplicationEngine> int main (int argc, char * argv []) { QCoreApplication :: setAttribute (Qt :: AA_EnableHighDpiScaling); QGuiApplication app (argc, argv); QQmlApplicationEngine engine; engine.load (QUrl (QStringLiteral ("qrc: /main.qml"))); if (engine.rootObjects (). isEmpty ()) return -1; return app.exec (); }MyApp (main.qml)
import QtQuick 2.9 import QtQuick.Controls 2.2 ApplicationWindow { visible: true width: 640 height: 480 title: qsTr ("Scroll") ScrollView { anchors.fill: parent ListView { width: parent.width model: 20 delegate: ItemDelegate { text: "Item" + (index + 1) width: parent.width } } } }MyApp подключается динамически, то есть для работы ему нужны библиотеки qt.
Если мы попытаемся запустить приложение, то сразу после сборки получим ошибку:~/build-MyApp-Desktop_Qt_5_11_1_GCC_64bit4-Release $ ./MyApp ./MyApp: /usr/lib/x86_64-linux-gnu/libQt5Qml.so.5: version `Qt_5 'not found (required by ./MyApp) ./MyApp: /usr/lib/x86_64-linux-gnu/libQt5Gui.so.5: version `Qt_5 'not found (required by ./MyApp) ./MyApp: /usr/lib/x86_64-linux-gnu/libQt5Core.so.5: version `Qt_5.11 'not found (required by ./MyApp) ./MyApp: /usr/lib/x86_64-linux-gnu/libQt5Core.so.5: version `Qt_5 'not found (required by ./MyApp)Из подобных текстов мы видим, что приложение зависит от графических библиотек qt и qml. Поиск и сборка всех ресурсов (библиотек и плагинов) займет много времени.
Для экономии времени и сил воспользуемся утилитой CQtDeployer (ее можно скачатьздесь
)
или установить в Snap Store
cqtdeployer -bin myApp -qmake /media/D/Qt/5.12.3/gcc_64/bin/qmake -qmlDir ./После выполнения этой команды вы получите полностью готовое приложение для работы с готовым лаунчером, который настроит все необходимые окружения для работы вашего приложения на всех машинах под управлением Linux.
Общее
После запуска Консоли QtDeployer содержимое папки с вашим приложением должно выглядеть так:
drwxr-xr-x 7 andrei andrei 4096 May 24 12:22 ./ drwxrwxr-x 3 andrei andrei 4096 May 24 12:22 ../ drwxr-xr-x 2 andrei andrei 4096 May 24 12:22 bin/ drwxr-xr-x 2 andrei andrei 4096 May 24 12:22 lib/ -rwx---rwx 1 andrei andrei 433 May 24 12:22 myApp.sh* drwxr-xr-x 6 andrei andrei 4096 May 24 12:22 plugins/ drwxr-xr-x 5 andrei andrei 4096 May 24 12:22 qml/ drwxr-xr-x 2 andrei andrei 4096 May 24 12:22 translations/


- myApp.sh — скрипт запуска вашего приложения
- bin — папка с вашим бинарником
- lib — папка со всеми необходимыми зависимостями вашего приложения.
- plugins — qt плагины, необходимые для работы приложения
- qml — qml зависимости.
- translations — стандартные переводы qt.
Таким образом, вы можете подготовить свое приложение к упаковке в deb или snap пакет, после чего можете приступить к его распространению. Обратите внимание, что после запуска cqtdeployer ваше приложение должно быть запущено с помощью скрипта sh, который настроит необходимое окружение для вашего приложения.
Tutorials > Porting > Porting a QT Application from Windows to Linux
This tutorial shows how to use the QT framework to create a basic application for Windows in Visual Studio and seamlessly port it to Linux. The use of cross-platform QT API ensures that the code written once will run on all platforms supported by QT.
To follow this tutorial you will need the following tools installed:
- Microsoft Visual Studio
- QT Libraries for Visual Studio and the QT Add-in
- VisualGDB 4.1 or later
We will create a basic QT application using the QT wizard, modify the main window, port the application to Linux and demonstrate the use of the cross-platform API provided by QT by listing files in the current directory.
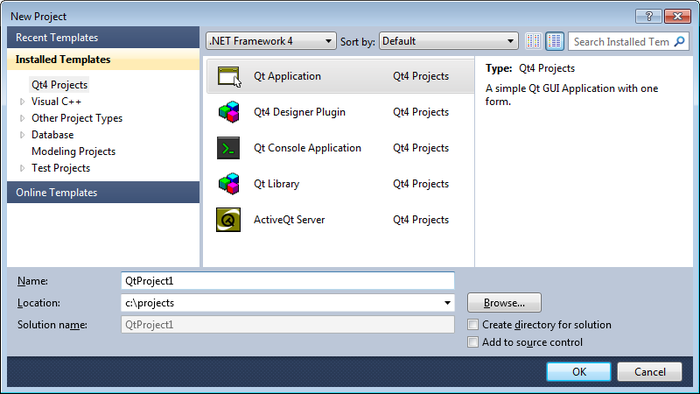
- Start Visual Studio. Begin creating a new project using the QT wizard:

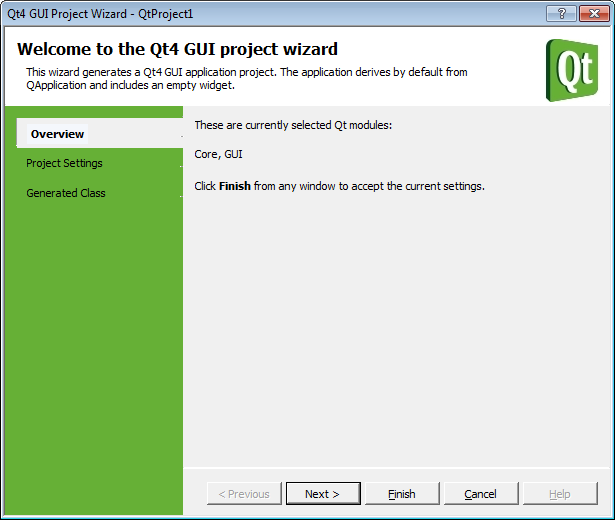
- The first page shows the summary about the created project. Press “next” to proceed:

- The second page allows selecting involved QT modules. Keep the default ones and press “Next”:
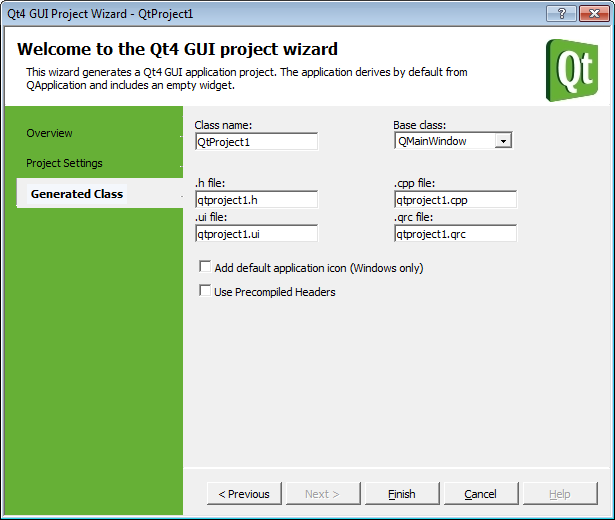
- The last page allows customizing the generated class names. We will keep the default ones and press “Finish”:
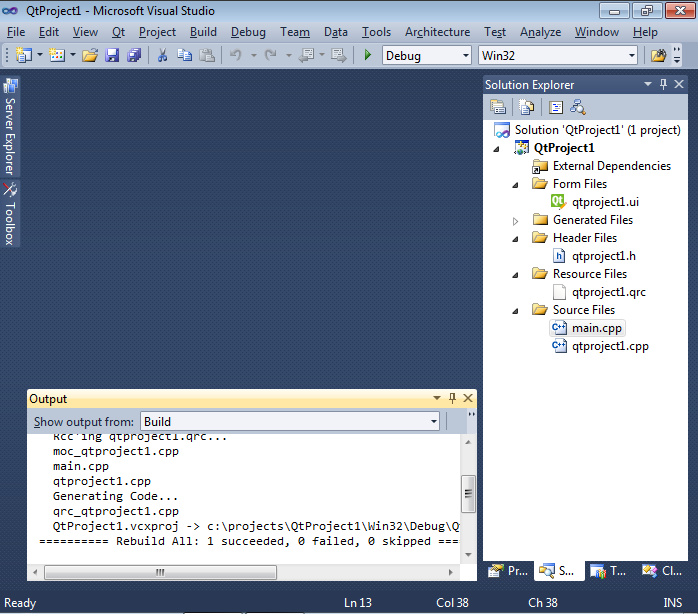
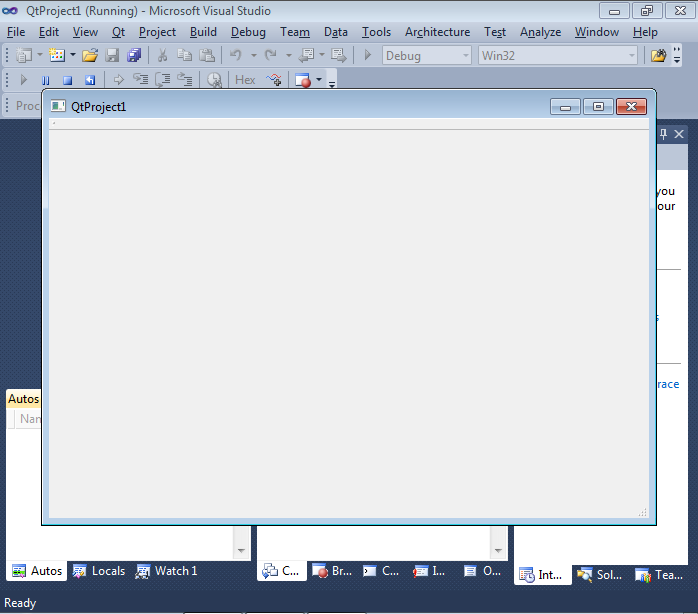
- The wizard has generated a QT project for Windows. It consists of a .pro file containing various project settings, a .ui file describing the main window and some source files. Press Ctrl-Shift-B to build it:

- Visual Studio will build the project using its own C++ compiler. Press F5 to start debugging it:
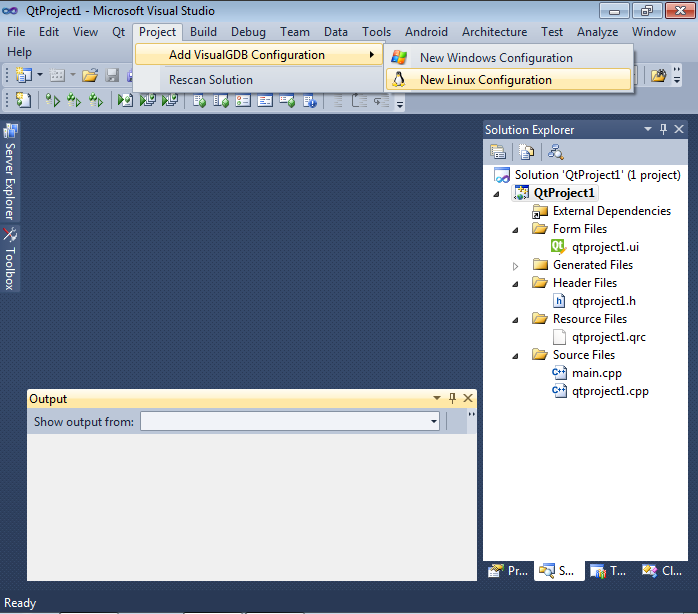
- QT framework allows building both Windows and Linux applications from the same source code. To create a new Linux configuration select “Project->Add VisualGDB Configuration->New Linux Configuration”:
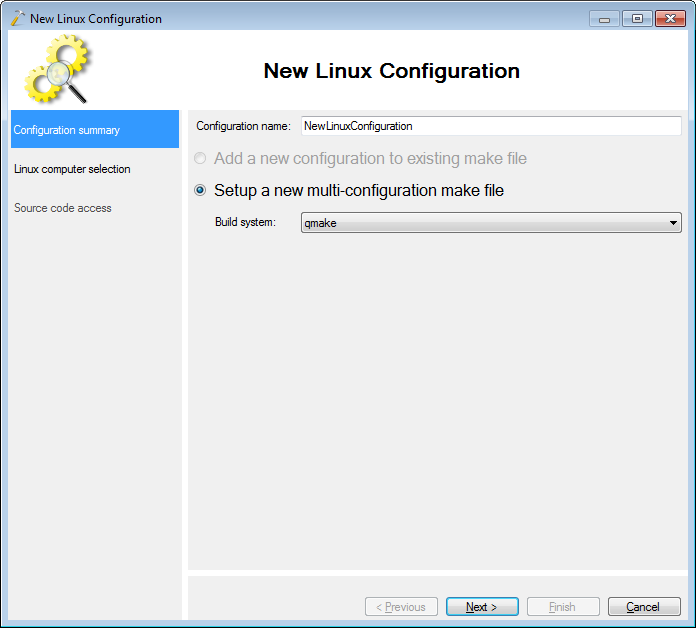
- On the first page of the wizard select “qmake” as the build system. This is required to ensure that the QT-specific files, such as .pro and .ui are handled correctly under Linux:

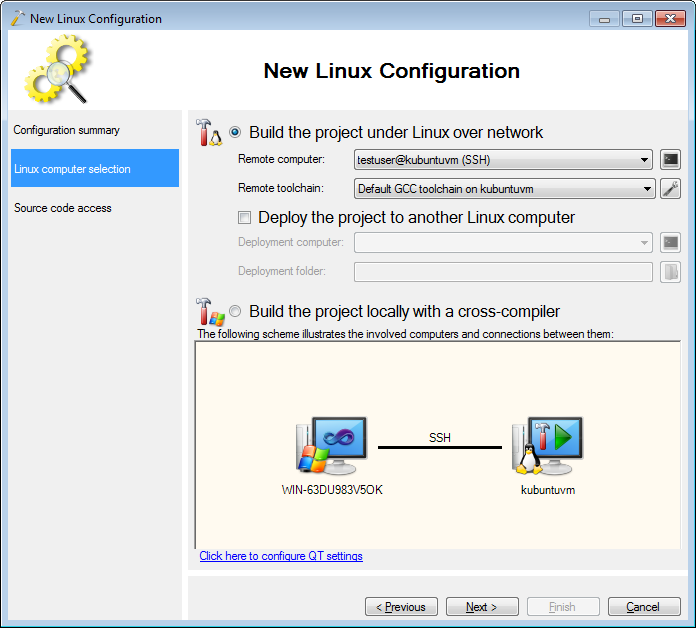
- On the next page select the Linux machine you are targeting. When you build your Linux configuration VisualGDB will transfer the source files to the Linux machine and build them there just like a normal Linux project:
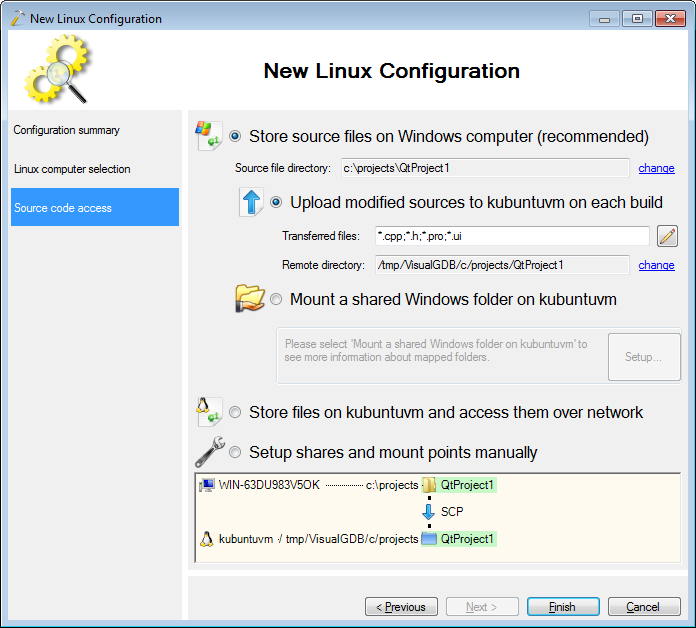
- On the last wizard page you can change the way source files are handled. By default they will be transferred to a subdirectory in /tmp and built there:
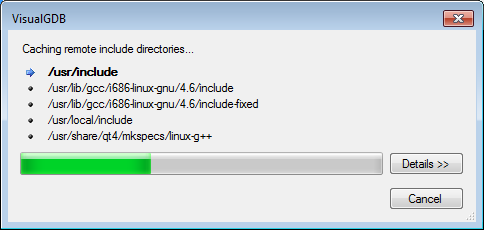
- Press “Finish” to complete the wizard. VisualGDB will download the QT Include directories from your Linux machine and configure IntelliSense to parse them:

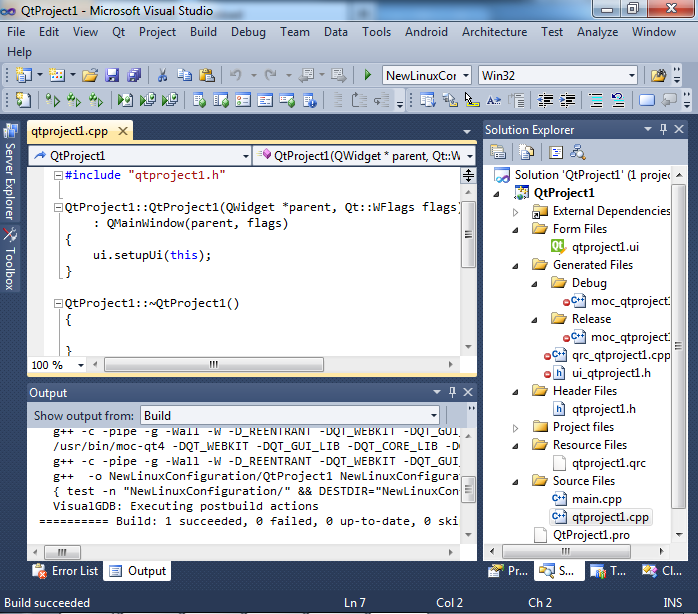
- Build your new Linux configuration by pressing Ctrl-Shift-B. The Output window will show how the files are transferred to the Linux machine and built there using qmake:
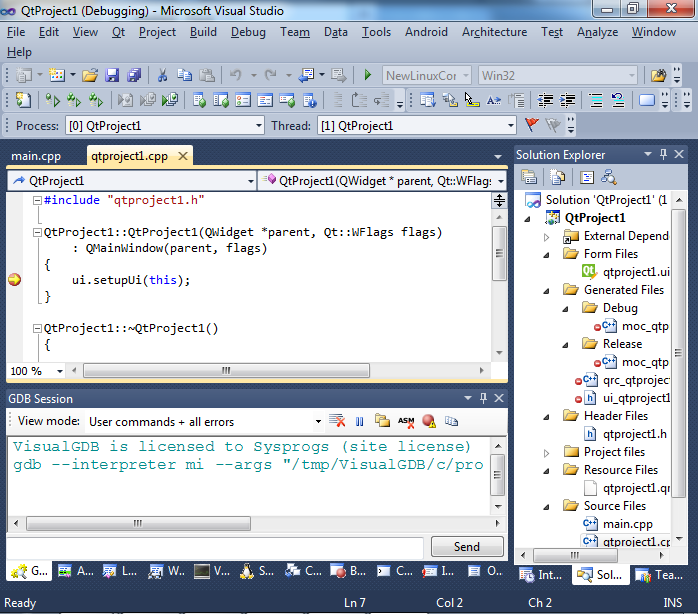
- Set a breakpoint in the constructor of the main window class and press F5 to start debugging. The debugging experience will be similar to debugging normal Windows apps. Additionally to that you can interact with the underlying GDB debugging using the GDB Session pane:
- Press F5 to continue debugging. The program running on the Linux machine will display the main window that will be shown on your Windows machine using the XMing window server. You can also switch to showing the windows on the Linux machine directly via VisualGDB Project Properties:

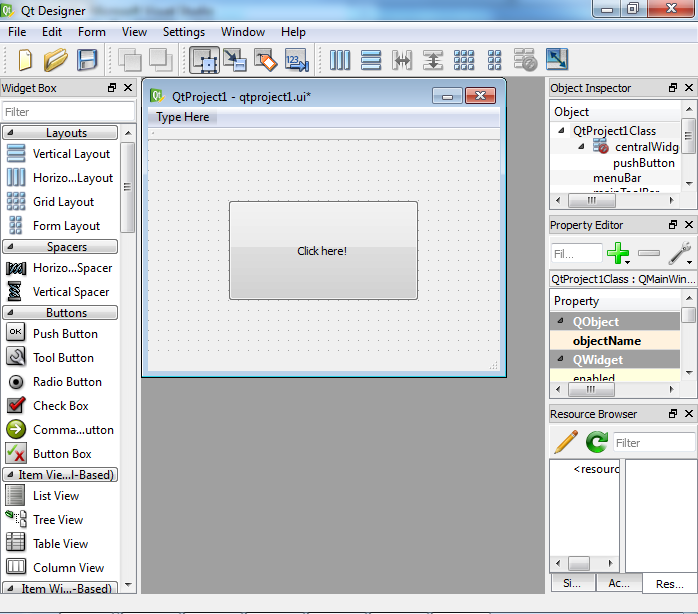
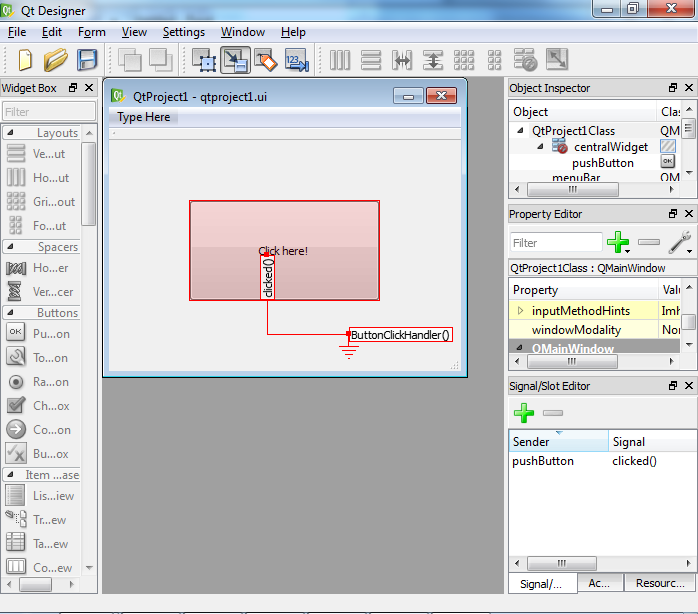
- Now we will add some functionality to our basic app. Double-click on the .ui file to launch QT Designer. Add a button to the main window:
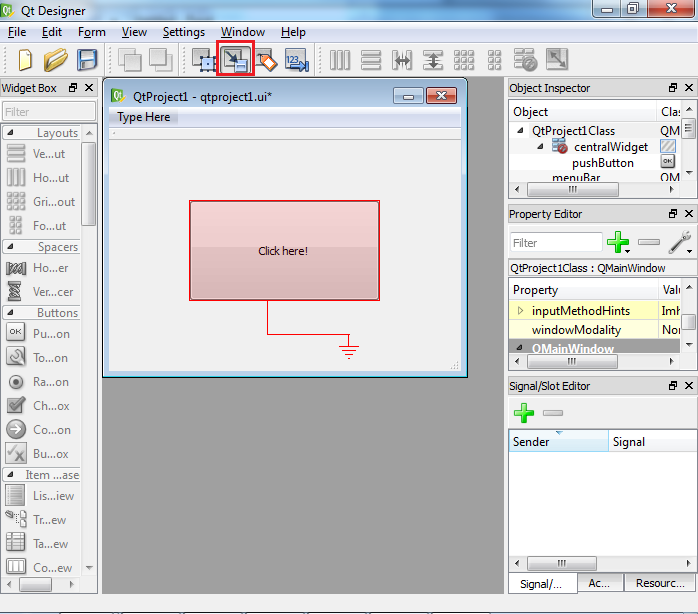
- Creating a click handler is a bit more complex than using Windows frameworks like MFC, WTL or WPF and requires two steps. First switch to the signal/slot mode (F4) click on the button and drag the signal connector to the form outside the button:
- QT Designer will start creating a new signal/slot connection. A signal is the event produced by the form. A slot is the handler method defined inside your form class:

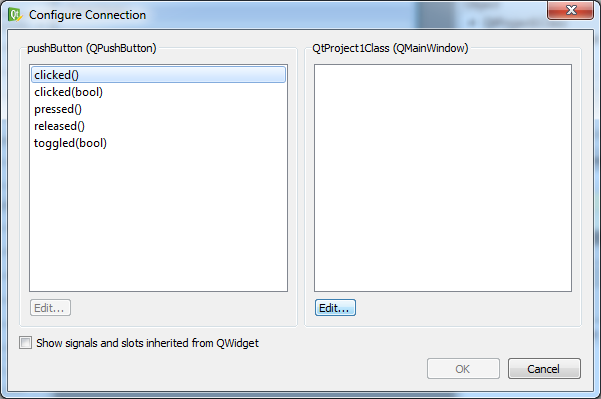
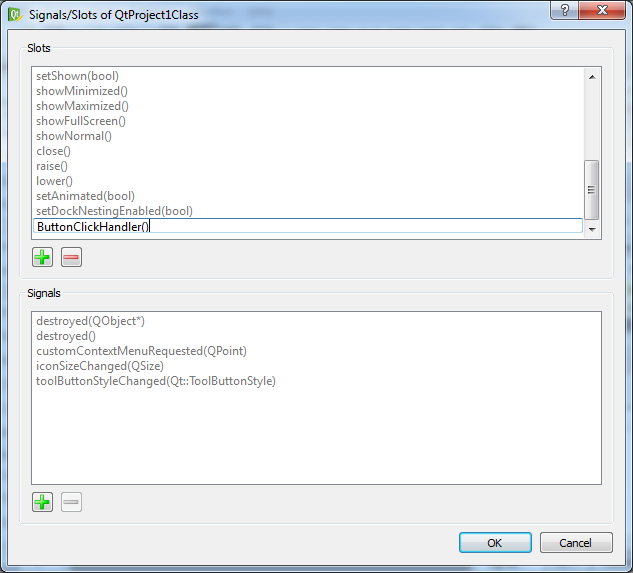
- Select “clicked()” on the left and click “Edit” on the right to add another slot. Click “+” and type in the new slot name: ButtonClickHandler():

- Press OK to finish creating the connection. Verify the results in the Configure Connection window:
- The QT Designer will show the newly created
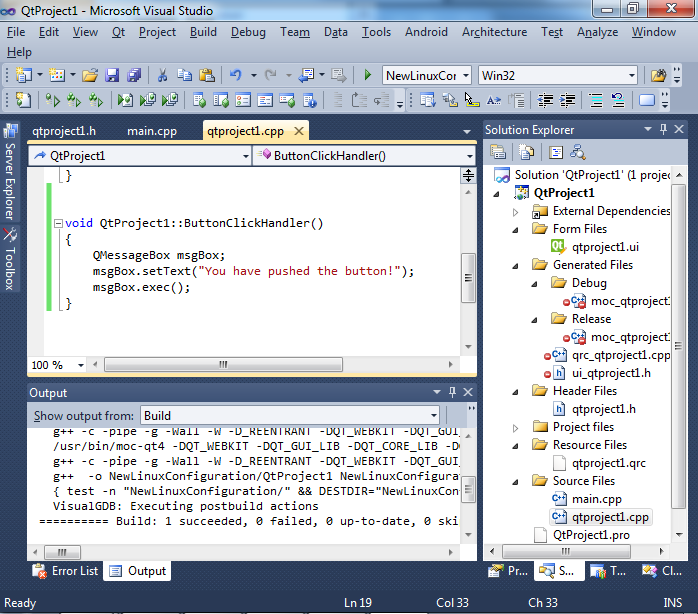
signal/slot connection: - Save the .ui file and close QT Designer. Go back to Visual Studio and add the following code inside the declaration of the QtProject1 class:
protected slots:
void ButtonClickHandler();
Then add the body of the method to QtProject1.cpp:
#include <QMessageBox>
//…
void QtProject1::ButtonClickHandler()
{
QMessageBox msgBox;
msgBox.setText(«You have pushed the button!»);
msgBox.exec();
}
Note that the method name should match the slot name created in Qt Designer.
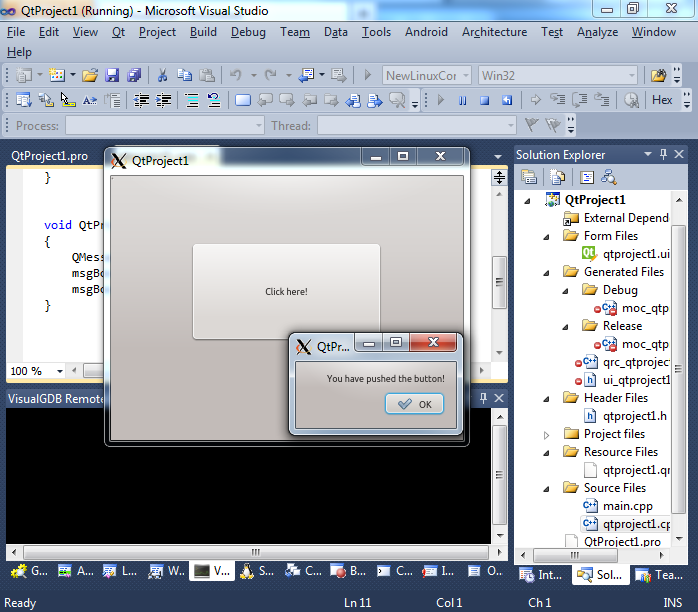
Build your project with the new code: - Press F5 to run the project. Click the button you added to see the message box:
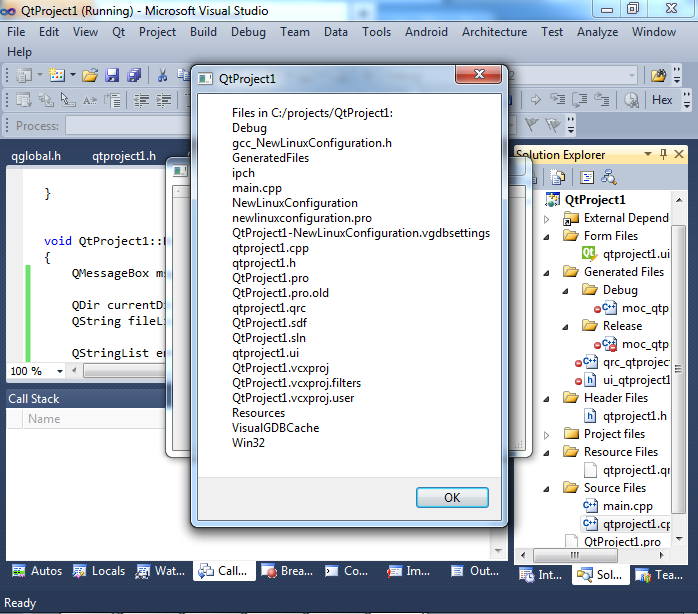
- Now we will demonstrate how to use cross-platform QT API. In this tutorial we will list all entries in the current directory and display them in the message box. Include <QtDir> in your .cpp file and replace the body of the button click handler with the following code:
QMessageBox msgBox;
QDir currentDir(«.»);
QString fileList = «Files in « + currentDir.absolutePath() + «:n»;
QStringList entries = currentDir.entryList();
foreach(QString fn, entries)
{
if(fn != tr(«.») && fn != tr(«..»))
{
fileList += fn + «n»;
}
}
msgBox.setText(fileList);
msgBox.exec();
Note that foreach is a preprocessor macro defined inside QT to simplify iterating over QT collections.
- Build the project and press F5. You will see the list of files on the Linux machine:
- Now simply select “Debug” from the configuration list, build and press F5 again. The same source code will be built for Windows and will show a Windows message box listing files in the Windows directory:


If you want to add more cross-platform functionality that will work on Windows, Linux and Linux-based systems such as Raspberry PI, simply implement it using QT API that is documented here. The QT framework will abstract out the differences between operating systems and let you write easily portable code.
Содержание
- Кросс-компиляция Qt5 под Linux для Win x32/x64/static/shared
- 0. Сценарий сборки
- 1. Предварительная подготовка
- 2. Установка среды кросс-компиляции MXE
- Deploying Qt5 application on Linux using static Qt build
- Build Qt Statically for Linux
- Qt Documentation
- Contents
- Step 1: Installing the License File (Commercially Licensed Qt Only)
- Step 2: Unpacking the Archive
- Step 3: Building the Library
- Step 4: Set the Environment Variables
- Step 5: Build the Qt Documentation
- Building static Qt 5
- Contents
- Introdution
- Linux/Mac OS X
- Install dependencies
- Download sources
- Unpack archive
- Remove a glitchy JPEG2000 library (for Qt 5.5.1 and older)
- Configure
- Build and install
- Usage
- Windows
- Download and install dependencies
- Download sources
- Unpack archive
- Create a build script
- Build and install
Кросс-компиляция Qt5 под Linux для Win x32/x64/static/shared
Документирование получения системы кросс-компиляции под Linux для Windows x32/x64/static/shared и сборка последней на момент описания Qt 5.4.1 в лайт-версии (для указанных четырех целей). Для себя, глубоко-обожаемого, ну и для пользы обществу.
Многие разработчики приходят к выводу, что использование *nix (в частности Linux) более предпочтительно для разработки приложений, используя фрэймворк Qt. И тому есть причины. Qt изначально ориентирована на *nix инструментарий, типа autotool, make, perl… И второй момент, под никсами есть прекрасный инструмент — valgrind, под виндой порта пока его не видел. Ну и последняя причина: просто удобно иметь набор инструментария для создания приложений под различные целевые платформы — в одном месте.
0. Сценарий сборки
Все шаги делаем последовательно. Желательно не объединять все скрипты в последовательную сборку по причине необходимости промежуточного «человечного» контроля. Разные дистрибутивы Линуха, разные среды исполнения, наборы инструментариев… Простой алгоритм: сделал очередной шаг, убедился в отсутствии ошибок, пошел делать следующий. Итак, сам сценарий:
1. Предварительная подготовка
У вас установлен дистрибутив Линукса. Желательно все это делать на на продакшен-компе (не на живом Линуксе), а установленном в виртуальную машину. Я например, пользуюсь VMWare, но это дело вкуса. Выбор дистрибутива Линукса — так же дело вкуса. Лично я предпочитаю Gentoo Linux, собственно под ним всю эту кухню и настраиваю. Если есть сложности в настройке, у меня есть небольшая статейка по этому вопросу: «Установка и настройка Linux Gentoo под VMWare».
Итак, у вас есть настроенный Линукс и вы работаете не под рутом! Для дальнейшей работы вам нужно проверить присутствие следующих установленных пакетов, или доустановить:
2. Установка среды кросс-компиляции MXE
Предварительное замечание об MXE. Это отличнейшая система сборки тулчейнов для кросс-компиляции. Но есть одно «но». В данный момент не существует стабильной ветки. Авторы до поры до времени вели две ветки в своем git-репозитарии — стабильную и «разработческую». Сейчас ветки объединены. Разработка идет ну очень активно — изменения сбрасываются чуть ли не раз 1-3 дня. А это чревато тем, что «то работает сборка, то не работает». Некоторые важные для меня библиотеки, в частности клиентская часть PostgreSQL, собираются без ошибок, но в нерабочем состоянии. Потратил неделю не исследование явных косяков. Исправляем эти «недочеты». Итак:
Источник
Deploying Qt5 application on Linux using static Qt build
I have built and installed a static build of Qt5.11 on ubuntu using the commands below:
The build finishes successfully.
I then try and link my project against this build but it fails. Here are the last few lines of output:
dialogs/qcolordialog.cpp:1738:41: note: the first difference of corresponding definitions is field ‘__pfn’
.moc/qcolordialog.moc:111:56: note: a field of same name but different type is defined in another translation unit lto1: note: type mismatch in parameter 1 dialogs/qcolordialog.cpp:179:7: note: type ‘struct QWellArray’ defined in anonymous namespace can not match type ‘struct QWellArray’
dialogs/qcolordialog.cpp:180:1: note: the incompatible type defined in anonymous namespace in another translation unit qicohandler.cpp:95:3: warning: type ‘struct BMP_INFOHDR’ violates one definition rule [-Wodr]
. and some more similar warnings..
The link does complete and generate the executable but it is not run-able. I can see the file is there with:
But trying to run it gives the error:
EDIT: I was able to reproduce this problem with the same static build of Qt 5.11 and a trivial (tiny) Qt application using the same libs. The application compiles and runs fine until I add the same QMAKE flags as for the my-gui-qt application above:
Reason being that a different interpreter is linked in to the exe:
So without the QMAKE_LFLAGS above
And runs fine. However with the flags it gives:
Источник
Build Qt Statically for Linux
In this post I’ll describe how to build a static version of Qt under Linux (Ubuntu flavor) and I will use Qt 5.7.0 and Ubuntu 16.04 64-Bit for that matter. Static builds ease the process of app deployment under Linux cause it is quite complex (much more complex than Windows and Mac OS X) so without further ado, here it is.
First you need to download Qt sources from the following link:
You usually need to get the latest sources and single module that contains all sources. In my case (Qt 5.7.0) it was here.
Download and extract it. (note that you might need to install p7zip if you don’t have it already)
Let’s say you extracted the sources in the folder below:
Open up a terminal and enter the following commands:
Next enter the following command and note that you need to replace “/home/amin/Qt570static” with your own folder for Qt build:
You will be asked to choose the edition of Qt. Type “o” to select the open source edition and press enter to proceed.
Then you will be asked to confirm the license. Type “yes” and press enter.
When configuration’s done, type the following command:
Now wait for awhile. Maybe quite a while if you use an old laptop for Linux development, like me.
After the build is finished, enter the following final command to get your static build kit under “/home/amin/Qt570static” folder that you provided to configure command.
Voila, it’s done. You have your Qt static build.
Источник
Qt Documentation
Contents
You can download the Qt 5 sources from the Downloads page. For more information, visit the Getting Started with Qt page.
Qt for X11 has some requirements that are given in more detail in the Qt for X11 Requirements document.
Step 1: Installing the License File (Commercially Licensed Qt Only)
Step 2: Unpacking the Archive
Unpack the archive if you have not done so already. For example, if you have the qt-everywhere-opensource-src-%VERSION%.tar.gz package, type the following commands at a command line prompt:
This creates the directory /tmp/qt-everywhere-opensource-src-%VERSION% containing the files from the archive. We only support the GNU version of the tar archiving utility. Note that on some systems it is called gtar.
Step 3: Building the Library
The Configure Options page contains more information about the configure options.
To create the library and compile all the examples, tools, and tutorials, type:
Note that on some systems the make utility is named differently, like gmake. The configure script tells you which make utility to use.
Note: Later, if you need to reconfigure and rebuild Qt from the same location, ensure that all traces of the previous configuration are removed. To do so, from the build directory, type make confclean before running configure again.
Step 4: Set the Environment Variables
To use Qt, some environment variables need to be extended.
This is done as follows:
If you use a different shell, modify your environment variables accordingly.
Step 5: Build the Qt Documentation
For the Qt reference documentation to be available in Qt Assistant, you must build it separately:
В© 2022 The Qt Company Ltd. Documentation contributions included herein are the copyrights of their respective owners. The documentation provided herein is licensed under the terms of the GNU Free Documentation License version 1.3 as published by the Free Software Foundation. Qt and respective logos are trademarks of The Qt Company Ltd. in Finland and/or other countries worldwide. All other trademarks are property of their respective owners.
Источник
Building static Qt 5
This is a detail guilde how to build the static version of the Qt framework. Static build of Qt allows you to build solid applications which will work without lots of additional *.DLL/*.SO or *.DYLIB files because everything will be hardcoded into your application.
Contents
Introdution
Static version of Qt allows you to build solid application files without packing of a lots of dependent libraries.
Don’t forget that with the static version of Qt, you can only legally release your GPL v3 licensed Open-Source applications! If you want to use the static Qt build in commercial development for closed-source applications, then you should buy the commercial license for that purpose.
Linux/Mac OS X
Install dependencies
Before start build you must install all necessary dependencies:
Install on Debian/Ubuntu/Mint
On Ubuntu 14.04 you also will need to install newer GCC compiler and CMake toolchain
Install on Mac OS X (before start you must have pre-installed latest version of XCode)
Download sources
At first, you must to download entire source code tarball from official Qt site:
Note: if this link is outdated, you can find newer version of Qt sources here:
Unpack archive
Remove a glitchy JPEG2000 library (for Qt 5.5.1 and older)
For Qt 5.6 and higher this step must be skipped because JPEG2000 and MNG since Qt 5.6 are already disabled by default for security reasons.
This library provides a support of JPEG2000 image format support, but at the Moondust Project it’s useless (main image formats in the Moondust Project were PNG, GIF and BMP), and also causes a random crashes of Qt applications built with your Qt build.
Same for OSX with gnu-sed:
Configure
Open console then change current directory to new folder which you has been unpacked. then Copy-paste this into console ans press ENTER:
 Important note: Qt 5.13.x, 5.14.0, 5.14.1, and 5.14.2 has a bug which will cause all your CMake projects to fail the configure to find the «Qt5::Zlib» module. To fix this annoying bug, you need to modify the «qtbase/mkspecs/features/data/cmake/Qt5BasicConfig.cmake.in» file and apply this patch before to configure the Qt.
Linux Mint / Debian (for Qt 5.8 and higher)
macOS Sierra (for Qt 5.8 and higher)
Linux Mint / Debian (for Qt 5.7 and Qt 5.7.X)
Linux Mint / Debian (for Qt 5.6 and lower)
Mac OS X (for Qt 5.7 and Qt 5.7.X)
then wait while configuring will be finished (you will need to wait
Build and install
Final step is installation which will copy all built components into target installation directory
Usage
Built Qt will be located at
/Qt/5.5.1_static_osx on Mac OS X. To configure your Qt application to be built with static Qt version, you need to call
/Qt/5.5.1_static/bin/qmake while you in your project folder, and other steps are same as you build with regular Qt version.
If you wants to plug static build of Qt into Qt Creator, just make a new toolchain with your default compiler (GCC, CLang or MinGW on Windows systems) and debugger, and with your static build of Qt (find QMake in the bin subdirectory of your static Qt build)
Note: Carefully transfer packages with a static build of Qt, you should keep same absolute path (because it is hardcoded) if you don’t want to rebuild Qt again.
Windows
Download and install dependencies
Before start building you must download and install all dependencies:
Download sources
To download latest version of source code just use this link (or find download link to latest version on official Qt site) Link to the latest version:
Unpack archive
When you will download archive, open it and unpack into any convenient directory (but note: path must not contain non-ASCII characters [for example, Cyrillic, Chinese or Latin characters with diacritical signs, etc.]).
Create a build script
To build Qt from sources need to make a right build script which will build static Qt.
Build script for Qt 5.8 and higher
Build script for Qt 5.7
Make a «build_static_qt.bat» in any convenient directory and paste contents shown above. Then replace paths in the top paths to fit script into your actual environment, then save it.
Build and install
When you done everything, run your «build_static_qt.bat» script and wait 1.5
3 hours (dependent to your CPU power) until everything will be built.
Источник