En
Ar
Bg
De
El
Es
Fa
Fi
Fr
Hi
Hu
It
Ja
Kn
Ko
Ms
Nl
Pl
Pt
Ru
Sq
Th
Tr
Uk
Zh
Contents
- 1 WARNING
- 1.1 Why a static Qt?
- 1.2 MinGW vs. MSVC
- 1.3 Target environment
- 1.4 Restrictions in a static environment
- 2 Prerequisites
- 2.1 Dynamic pre-built Qt environment
- 2.2 Windows PowerShell
- 2.3 7-Zip
- 2.4 Qt build dependancies
- 3 Building the Qt static environment
- 3.1 Using the Windows Powershell script
- 3.2 Command line syntax
- 3.3 Command line parameters
- 4 Using the Qt static environment
- 4.1 Using the Qt static environment with Qt Creator (recommended)
- 4.2 Command line
- 4.3 When to use a Static Qt build
WARNING
The information on this page is outdated!
Please refer to the official documentation for instructions how to build Qt on Windows: https://doc.qt.io/qt-6/windows-building.html
Also, the rationale why to use a static build is questionable. See https://doc.qt.io/qt-6/windows-deployment.html for how to deploy a Qt application on Windows.
If you still want a static build, add -static to the configure arguments.
Why a static Qt?
On Windows, the pre-built environments from qt.io are dynamically linked. This means that your Qt application dynamically references the Qt DLL’s which are installed with the pre-built environment.
This is probably the preferred environment for developing and debugging since everything is there and ready to use. However, when it comes to deploying an application on systems without pre-installed Qt environments, it becomes complicated. There are several DLL’s to deploy with the application. Even using the classical DLL Dependency Walker tool, you cannot find all required DLL’s since some of them are dynamically loaded at execution. So, when the application is ready to deploy, it is easier to build a static version of it. But building a static version of the application requires a static version of the Qt environment in addition to the pre-built dynamic Qt environment.
This article describes an automated way of downloading, building and installing a static Qt development environment using a Windows PowerShell script.
Note that building and installing a static version of Qt on Windows was somewhat problematic up to Qt 4. But Qt 5 has now a much better support for static builds on Windows and this article takes advantage of that.
MinGW vs. MSVC
On Windows, two pre-built environments can be downloaded: one using MinGW and one using Microsoft Visual Studio. The two environments are incompatible and cannot be mixed. You have to choose one.
This article describes how to build a static version of Qt in a MinGW environment. If you need a static Qt for MSVC, you may probably find some ideas here but there is definitely some extra work.
Target environment
When you develop Qt applications on Windows and need to deploy them later on «general purpose» Windows machines, the recommended Qt environment contains two distinct builds of the same version of Qt:
- A dynamic version, installed in C:Qt from a pre-built package.
- A static version, installed in C:QtStatic using the procedure which is described in this article.
The pre-built dynamic environment shall be used for development and debugging. In addition to the Qt command line tools (qmake, moc, uic, lupdate, lrelease, etc.), it contains the high-level GUI tools such as Qt Creator, Assistant, Linguist, etc. The installation is straightforward, everything is here, well integrated, working like a charm.
The static environment should only be used to release the deployment version of the application, after it has been fully developed and debugged using the dynamic environment. The static environment should only be compiled to contain the Qt command line tools. There are at least two reasons for not building static versions of the GUI tools. First, releasing a new version of an application is typically a task that you automate using a script and there is no need for GUI tools at this stage. Second, it is probably impossible to build a static version of Qt Creator because of the lack of support for plugins in a static environment.
Restrictions in a static environment
Although building a static version of your application makes it easier to deploy, there are some restrictions in a static environment. Be sure to check that your application complies with these constraints before going further.
- There are licensing issues in distributing applications embedding Qt code in a static link. See here and here for more details. While you are probably safe if your application is distributed according to the terms of a recognized free and open-source license, you should definitely check the licensing issue for proprietary or closed-source applications.
- The application cannot use a dynamic modular approach using plugins. But you cannot both ask for a static environment and for a dynamic loading of your own DLL’s.
Also note the following points:
- The static executable file of the application is bigger than the dynamic one since all used Qt code is copied into the executable. However, if your application has only one executable, the total deployed size is smaller since only the Qt code which is actually used is linked. When deploying a dynamic version of the application, you have to install all required Qt DLL’s with the application and the overall size of all these DLL’s is larger than the static application.
- A Qt static build means that no Qt or MinGW DLL’s are used. However, the static executable file of the application still references the Windows DLL’s such as kernel32.dll or user32.dll. These DLL’s, however, are installed with Windows and do not need to be deployed with the application.
Prerequisites
Dynamic pre-built Qt environment
You must have a pre-built Qt environment installed before you attempt to build a static version of the library with the Qt source code.
- Obtain the Qt Installer from qt.io and install the relevant pre-build Qt environment. For example, «Qt 5.15.2 MinGw 8.1.0 32-bit»
- Preferably plan the installation of the same version of Qt for the dynamic and static builds. This is not a strict requirement but it is a safe configuration.
- During installation, select the default installation location (C:). Be sure to add the MinGW environment in the installation (selectable in the «Tools» branch of the installation options).
If you have a separated MinGW environment that you prefer to use and do not install the one from the Qt package installer, be sure to specify the option -MingwDir in the static build script (see below).
Example image of the Qt Installer with what was selected to write this guide.
Windows PowerShell
The script which builds the static Qt environment is a PowerShell script. PowerShell version 3.0 or higher is required. It is recommended to use Windows 10 which comes with PowerShell version 5 and onwards.
7-Zip
The build script also requires 7-Zip to uncompress the downloaded Qt source code. Be sure to install it first.
Qt build dependancies
As per the README that is packaged with the qt-everywhere-* zip package, it is noted that for windows the following also need to be available (as at Qt version 5.15.2):
- Perl version 5.12 or later (http://www.activestate.com/activeperl/)
- Python version 2.7 or later (http://www.activestate.com/activepython/)
- Ruby version 1.9.3 or later (http://rubyinstaller.org/)
Building the Qt static environment
Using the Windows Powershell script
The PowerShell script aims to assist with the install of the qt source code and the compilation of Qt as a static binary. For the purposes of the below instructions, Qt version 5.15.2 is used with Windows 10.
1. Take a copy of the following PowerShell script on github: qt-windows-static-build.ps1
2. Edit the script as required to change the variables which define the Qt version and directory location of the Qt pre-built environment already installed. Specifically the lines:
[CmdletBinding()]
param(
    $QtSrcUrl = "https://download.qt.io/official_releases/qt/5.15/5.15.2/single/qt-everywhere-src-5.15.2.zip",
    $QtStaticDir = "C:QtStatic", # NO TRAILING SLASH
    $QtVersion = "5.15.2", #If you change this, you'll need to change the URL above to download as well...
    $MingwDir = "",
    [switch]$NoPause = $false
)
The script contains flags to ‘configure’ what to include in the Qt static build. By default it removes a lot of modules that probably are not required for most applications. However, if your requirements differ — modify this line of the script accordingly.
cmd /c "configure.bat -static -release -platform win32-g++ -opensource -confirm-license -prefix $QtDir -qt-zlib -qt-libpng -qt-webp -qt-libjpeg -qt-freetype -no-opengl -skip qt3d -skip qtactiveqt -skip qtandroidextras -skip qtcharts -skip qtconnectivity -skip qtdatavis3d -skip qtdeclarative -skip qtdoc -skip qtgamepad -skip qtlocation -skip qtlottie -skip qtmacextras -skip qtmultimedia -skip qtnetworkauth -skip qtpurchasing -skip qtquick3d -skip qtquickcontrols -skip qtquickcontrols2 -skip qtquicktimeline -skip qtremoteobjects -skip qtscript -skip qtsensors -skip qtspeech -skip qtsvg -skip qtwayland -skip qtwebglplugin -skip qtwebview -skip webengine -make libs -nomake tools -nomake examples -nomake tests"
3. Execute the script in Windows PowerShell as a non-administrator user:
.qt-windows-static-build.ps1
The PowerShell script will check to see if your path variable is configured correctly such that ‘powershell’, ‘ruby’, ‘python’ and ‘perl’ commands are avaialble. If not, you will need to double check what you installed as covered in ‘Qt build dependancies’. The PowerShell will now perform the following steps:
- Download the Qt everything source code.
- Build a static version of Qt using the MinGW compiler in the pre-built dynamic environment. It builds the libraries and the command line tools (qmake, moc, uic, lupdate, lrelease, etc.)
- Install the static version of Qt in C:QtStatic by default.
The execution of this script may take a couple of hours to complete, depending on your processing power. So you have to be patient. Qt is a complex framework with a very large amount of code.
Command line syntax
Alternatively, you can invoke the script from the PowerShell prompt using the following syntax:
windows-build-qt-static.ps1 [-QtSrcUrl url] [-QtStaticDir directory] [-QtVersion string] [-MingwDir directory] [-NoPause]
Command line parameters
-QtSrcUrl url
Specify the URL of the Qt source file archive.
-QtStaticDir directory
Specify the root directory where the static versions of Qt are installed. By default: C:.
-QtVersion string
Specify the Qt version. By default, the script tries to extract the version number from the Qt source file name. Usually, this is sufficient, the script will find «5.15.2» or «5.0.0-rc1» for instance. If the naming scheme of the Qt source file changes one day, you may need to specify an explicit value to this parameter.
-MingwDir directory
Specify the root directory of the MinGW environment. By default, use the version which was installed by the prebuilt Qt environment.
When the prebuilt environment for Qt 5.15.2 is installed for instance, the script locates MinGW in C:Qt5.15.2Toolsmingw492_32. If you chose not to install MinGW as part of the prebuilt environment for Qt, you have to specify the root directory of your MinGW installation.
-NoPause
Do not wait for the user to press enter at the end of execution. By default, the scripts executes a pause instruction at the end of execution, which is useful when the script was run from the Windows Explorer.
Using the Qt static environment
Using the Qt static environment with Qt Creator (recommended)
This section describes how to use the static Qt environment from Qt Creator.
Please note: Qt Creator is provided as part of the dynamic pre-built environment. By default, it builds the applications for this dynamic environment, but it is possible to configure projects to use the static Qt environment when required.
The following instructions are based on a standard Qt 5.15.2 / Qt Creator 4.14.2 installation. Change the version numbers to adapt to your configuration.
Qt Creator Configuration
- Open the Qt Creator
- Tools (menu) -> Option
- Select ‘Qt Versions’ tab. In the «qmake location» table, there must be an «Auto-detected» part and a «Manual» part. In the «Auto-detected» part, there should be one line named «Qt 5.15.2 MinGW 32bit C:QtQt5.15.25.5mingw492_32binqmake.exe» (or whatever version of Qt you are working with). The «Manual» part is initially empty.
- Click «Add», browse to C:QtStatic<your static build version>bin and select «qmake.exe». The version name is automatically set to «Qt 5.15.2 (5.15.2)». You should set a more meaningful name such as «Qt 5.15.2 MinGW Static 32bit»
- Then go to tab «Kits». Again, there must be an «Auto-detected» part and an initially empty «Manual» part.
- Click «Add».
- Set a meaningful name such as «Desktop Qt 5.15.2 MinGW Static 32bit». In the «Qt version» field towards the bottom, select your static environment, named «Qt 5.15.2 MinGW Static 32bit» if you followed the above advice. Qt Creator should auto populate the Compiler details.
Then click «OK» to terminate the options setup.
Your Project Configuration
- In each project you want to deploy with a static build, edit the project setup (select «Projects» in the left vertical pane).
- Click «Add Kit» in the upper left corner and select your static kit, named «Desktop Qt 5.15.2 MinGW Static 32bit» if you followed the above advice.
- The new kit for your project is configured. Note that, by default, there are distinct build directories for the dynamic and static versions of your project.
- Now you can build your application in any combination of static vs. dynamic and release vs. debug. In the bottom part of the left pane, the project selector (the computer icon with the name of your project and either «Release» or «Debug») lets you select the combination you want.
Command line
This section describes how to use the static Qt environment from the command line, either the traditional Windows command shell (cmd.exe) or the Windows PowerShell.
Simply add the bin subdirectory of the static Qt environment in front of the Path environment variable. For Qt 5.15.2, this is C:QtStatic5.15.2bin.
Do not forget to also include the MinGW environment in the path. With the dynamic pre-built Qt environment, you may want to add Qt Creator also.
The following commands summarize the command line setups for the various environments.
Dynamic pre-built Qt with the traditional Windows command shell:
set Path=C:Qt5.15.2mingw81_32bin;C:QtToolsmingw810_32bin;C:QtToolsQtCreatorbin;C:Perl64bin;C:Ruby27-x64bin;C:ActivePython3;
Dynamic pre-built Qt with the Windows PowerShell:
$env:Path=C:Qt5.15.2mingw81_32bin;C:QtToolsmingw810_32bin;C:QtToolsQtCreatorbin;C:Perl64bin;C:Ruby27-x64bin;C:ActivePython3;
Static Qt build with the traditional Windows command shell:
set Path=C:QtStatic5.15.2bin;C:Qt5.15.2mingw81_32bin;C:QtToolsmingw810_32bin;
Static Qt build with the Windows PowerShell:
$env:Path=C:QtStatic5.15.2bin;C:Qt5.15.2mingw81_32bin;C:QtToolsmingw810_32bin;
When to use a Static Qt build
It is recommended to only build release versions of the application with at static Qt environment. Avoid building a debug version of the application with the static Qt environment. There are several reasons for this:
- The recommended environment for the development, debug and test phase is the pre-built dynamic environment, not the static one.
- The size of a static application in debug mode is insanely huge. For a given application, the following sizes have been observed for the application executable file:
- Dynamic + Release: 1 MB
- Dynamic + Debug: 33 MB
- Static + Release: 16 MB
- Static + Debug: 297 MB
Qt is a cross-platform software development framework for C++ used to build software across all major industries. If you work at company that uses Qt you may have wondered how you can pack all dependencies of your application in a single executable. Yes, that is possible but only with static builds. Let me show you how to do it.
Disclaimer: According to the Qt license you may not deploy static builds with the open-source license. Deploying static builds is only allowed for companies who purchase Qt.
Does this image look familiar to you?
Yeah Qt has so many dependencies… with static builds Qt can generate a single executable file so, no more missing dependencies and no need to use external tools such as Qt’s windeployqt or Dependency Walker.
Unfortunately the only way to do static builds is to compile Qt itself statically first. I’ll show you how to do it and how to setup Qt Creator to do both shared and static builds:
Requirements
- A computer to develop Qt applications with Qt and Qt Creator already installed;
- A Windows 10 (64 bit) virtual machine to build a static version of Qt;
- Qt source code: https://www.qt.io/offline-installers > Offline Installers > Source packages > For Windows users as a single zip file.
- mingw-w64: https://sourceforge.net/projects/mingw-w64/files/Toolchains%20targetting%20Win32/Personal%20Builds/mingw-builds/installer/mingw-w64-install.exe/download
- Perl (64 bit): http://strawberryperl.com/
- Ruby (64 bit): https://rubyinstaller.org/downloads/
- Python 2.7: https://www.python.org/downloads/
Setup
In your virtual machine start by unpacking the Qt Source code to the root of the system, for instance C:qt-everywhere-src-5.14.2. Now install Perl, Python, Ruby and then MinGW with the following settings:
- Architecture:
x86_64 - Threads:
win32 - Installation path:
C:Qt-Staticmingw-w64
Make sure Perl, Python, Ruby and MinGW are in your system path and MinGW is the first one. This will avoid issues with the build in C compiler of Strawberry Perl. Example:
Compiling Qt Statically
Now that we have all dependencies open command prompt as admin and:
cd C:qt-everywhere-src-5.14.2
configure -debug-and-release -static -opengl desktop -qt-zlib -qt-pcre -qt-libpng -qt-libjpeg -qt-freetype -nomake examples -nomake tests
This will configure the source code for a static build capable of debug and release configurations. I’ve added OpenGL for desktop applications and most of the commonly used libraries. I’ve also excluded examples and tests – those are already available in our development machine. Now build and install Qt with:
mingw32-make
mingw32-make install
Qt will be installed to C:QtQt-5.14.2, now you may copy that directory over to our final destination C:Qt-StaticQt-5.14.2.
Configure Your Development Machine
Start by copying the static build folder C:Qt-Static from the virtual machine to the same path in your development machine. Open Qt Creator and go to Tools > Options > Kits.
Now under Compilers add the following:
- C Compiler:
- Name:
MinGW Static - Path:
C:Qt-Staticmingw-w64mingw64bingcc.exe
- Name:
- C++ Compiler:
- Name:
MinGW++ Static - Path:
C:Qt-Staticmingw-w64mingw64bing++.exe
- Name:
Under Qt Versions add a new version as:
- Version name:
Qt-Static %{Qt:Version} (Qt-5.14.2) - qmake location:
C:Qt-StaticQt-5.14.2binqmake.exe
Now go to Kits and add a Kit that uses the static Qt version and the compiler we’ve added before:
Project Configuration
In order to do static builds you still need to add the following to your project’s .pro file:
# Static Builds
QTPREFIX=$$[QT_INSTALL_PREFIX]
equals(QTPREFIX, "C:/Qt-Static/Qt-5.14.2"){
    message("--STATIC BUILD--")
    CONFIG += qt static
    QMAKE_LFLAGS += -static-libgcc -static-libstdc++
} else {
    message("--NON-STATIC BUILD--")
}
This configuration will detect whenever you’re building with the static Qt and make sure the proper flags are added.
Congratulations, you’re ready for your first static build.
Каталог статей
- Почему статическая компиляция (статическая ссылка)
- 1. Загрузка исходного кода
- 2. Скачать компилятор
- Выбор среды компилятора: MinGW / MSVC
- Perl
- Python
- Ruby
- 3. Скомпилировать
- 1. Измените файл `qtbase mkspecs common msvc-desktop.conf` в исходном коде.
- 2. Настройте файл конфигурации:
- 3.make
- 4.make install
- 4. Добавить в Qt Creator
- Добавить версии Qt
- Новый комплект для сборки
- Новый проект
- 5. Резюме
Эта статья была впервые опубликована в моем блоге Jekyll:Личный блог Qt 5.14-zhang0peter
Почему статическая компиляция (статическая ссылка)
По умолчанию при компиляции программы с помощью QtCreator используется динамическая компиляция. Скомпилированная программа должна добавить соответствующие файлы библиотеки Qt и множество файлов dll во время выполнения. Если вы хотите упаковать созданную программу вместе с необходимыми библиотеками в исполняемую программу, вам необходимо использовать статическую компиляцию. Qt официально не предоставляет статически скомпилированные установочные пакеты, поэтому нам необходимо статически компилировать на нашем собственном компьютере. И exe-файл будет намного меньше динамически скомпилированного.
1. Загрузка исходного кода
2020-2-25: Выходит версия Qt 5.14.1
Последняя версия Qt5.14.1Адрес загрузки исходного кода:Index of /archive/qt/5.14/5.14.1/single
Выберите файл:qt-everywhere-src-5.14.1.zip
Пакет сжатия исходного кода 849M, после распаковки 2.32G
2. Скачать компилятор
Для официальной документации Qt требуются инструменты компиляции:Qt for Windows — Requirements Qt 5.14
Откройте файл README в исходном каталоге, чтобы просмотреть инструменты, которые необходимо установить для компиляции в среде Windows, необходимой для текущей версии Qt:
   Windows:
   --------

     Open a command prompt.
     Ensure that the following tools can be found in the path:
     * Supported compiler (Visual Studio 2012 or later,
        MinGW-builds gcc 4.9 or later)
     * Perl version 5.12 or later   [http://www.activestate.com/activeperl/]
     * Python version 2.7 or later  [http://www.activestate.com/activepython/]
     * Ruby version 1.9.3 or later  [http://rubyinstaller.org/]
Выбор среды компилятора: MinGW / MSVC
В Windows есть две готовые среды на выбор: одна — это MinGW, а другая — Microsoft Visual Studio (MSVC). Эти две среды несовместимы и не могут быть смешаны. Вы должны выбрать один.
Разница между ними заключается в следующем:
Когда ваш проект использует компиляцию MinGW, возникнут проблемы, когда вы захотите использовать библиотеку, сгенерированную компиляцией MSVC. При использовании MinGW для компиляции проекта используемый Lib также должен быть скомпилирован MinGW. Если вы разрабатываете программное обеспечение только для платформы Window, лучше всего использовать комбинацию Qt MSVC, чтобы можно было использовать большое количество сторонних библиотек и множество инструкций по сборке. В конце концов, MSVC в окне — король.
Я выбираю MSVC и открываю MSCV, который был установлен при установке VS:x64 Native Tools Command Prompt for VS 2019
**********************************************************************
** Visual Studio 2019 Developer Command Prompt v16.4.5
** Copyright (c) 2019 Microsoft Corporation
**********************************************************************
[vcvarsall.bat] Environment initialized for: 'x64'

C:Program Files (x86)Microsoft Visual Studio2019Community>
Результат компиляции по умолчанию — 64-битный Qt
Если вы хотите скомпилировать 32-битную версию qt, вы можете выбратьx86 Native Tools Command Prompt for VS 2019
Предупреждение: не используйте командную строку разработчика для VS 2019
Если вы хотите скомпилировать Qt в системе Linux, обратитесь к этому вопросу и ответьте:c++ — How to compile Qt 5 under Windows or Linux, 32 or 64 bit, static or dynamic on Visual Studio or g++ — Stack Overflow
Perl
Официальный сайт Perl:Perl Download — www.perl.org
Среди них есть два типа версий Windows, которые можно загрузить, а именно:ActivePerlс участиемStrawberry Perl. среди нихActivePerlНужно скачать после регистрации,Strawberry PerlМожно скачать напрямую, рекомендуетсяStrawberry Perl.
Strawberry Perlссылка для скачивания:Strawberry Perl for Windows
ActivePerl будет добавлен в переменную среды по умолчанию во время установки.
Проверьте, успешно ли добавление:
Windows PowerShell
Авторское право (C) Корпорация Microsoft. все права защищены.

 Попробуйте новую кроссплатформенную оболочку PowerShell https://aka.ms/pscore6

PS C:/Users/peter> perl.exe -v

This is perl 5, version 30, subversion 1 (v5.30.1) built for MSWin32-x64-multi-thread

Copyright 1987-2019, Larry Wall

Perl may be copied only under the terms of either the Artistic License or the
GNU General Public License, which may be found in the Perl 5 source kit.

Complete documentation for Perl, including FAQ lists, should be found on
this system using "man perl" or "perldoc perl".  If you have access to the
Internet, point your browser at http://www.perl.org/, the Perl Home Page.
Python
Скачать Python:Python Releases for Windows Python.org
Рекомендуем скачать последнюю версию3.8.1
После установкиРуководствоДобавьте Python в переменные среды.
Проверьте, успешно ли добавление:
Windows PowerShell
 Авторское право (C) Корпорация Microsoft. все права защищены.

 Попробуйте новую кроссплатформенную оболочку PowerShell https://aka.ms/pscore6

PS C:/Users/peter> python.exe
Python 3.7.4 (default, Aug  9 2019, 18:34:13) [MSC v.1915 64 bit (AMD64)] :: Anaconda, Inc. on win32

Warning:
This Python interpreter is in a conda environment, but the environment has
not been activated.  Libraries may fail to load.  To activate this environment
please see https://conda.io/activation

Type "help", "copyright", "credits" or "license" for more information.
>>>
Ruby
Адрес загрузки Ruby:RubyInstaller for Windows
Ruby по умолчанию добавляется в переменные среды во время установки.
Проверьте, успешно ли добавление:
PS C:/Users/peter> ruby.exe -v
ruby 2.6.5p114 (2019-10-01 revision 67812) [x64-mingw32]
Уведомление об авторских правах: эта статья является оригинальной статьей блоггера, приложите ссылку на сообщение в блоге, если вы перепечатываете его:Полный процесс статической компиляции, установки и развертывания последней версии Qt 5.14 в среде Windows VS 2019-Qt static link build Windows
3. Скомпилировать
Создайте новый каталог на диске D для хранения скомпилированного содержимого:D:qt
вx64 Native Tools Command Prompt for VS 2019Терминал входит в каталог исходного кода Qt:
C:UserspeterDownloads>cd qt-everywhere-src-5.14.1
C:UserspeterDownloadsqt-everywhere-src-5.14.1>
1. Измените исходный код.qtbasemkspecscommonmsvc-desktop.confфайл
Измените -MD на -MT
перед установкой:
QMAKE_CFLAGS_RELEASE    = $$QMAKE_CFLAGS_OPTIMIZE -MD
QMAKE_CFLAGS_RELEASE_WITH_DEBUGINFO += $$QMAKE_CFLAGS_OPTIMIZE -Zi -MD
QMAKE_CFLAGS_DEBUG      = -Zi -MDd
После модификации:
QMAKE_CFLAGS_RELEASE    = $$QMAKE_CFLAGS_OPTIMIZE -MT
QMAKE_CFLAGS_RELEASE_WITH_DEBUGINFO += $$QMAKE_CFLAGS_OPTIMIZE -Zi -MT
QMAKE_CFLAGS_DEBUG      = -Zi -MTd
D означает динамическую компиляцию (динамическая ссылка), T означает статическую компиляцию (статическая ссылка).
На этом этапе официального руководства нет требований, но он написан во многих других руководствах, поэтому я добавил
2. Настройте файл конфигурации:
Команды настройки следующие:
configure.bat -static -prefix "D:qt" -confirm-license -opensource -debug-and-release -platform win32-msvc -nomake examples -nomake tests -plugin-sql-sqlite -plugin-sql-odbc -qt-zlib -qt-libpng -qt-libjpeg -opengl desktop -mp
Конкретное значение таково:
configure.bat
 -static # Указать статическую компиляцию
 -prefix "D:  qt" # Указать каталог установки
 -confirm-license -opensource # Укажите, что это версия qt с открытым исходным кодом
 -debug-and-release # Укажите, что требуется отладочная версия и версия выпуска, и версию выпуска можно выбрать отдельно
 -platform win32-msvc # Укажите использование msvc для компиляции, здесь win32 не относится к 32-битной
 -nomake examples -nomake tests # не компилировать примеры
 -plugin-sql-sqlite -plugin-sql-odbc -qt-zlib -qt-libpng -qt-libjpeg # необязательный плагин
 -opengl desktop # Использовать opengl, поставляемый с системой
 -mp # Многоядерная компиляция
C:UserspeterDownloadsqt-everywhere-src-5.14.1>configure.bat -static -prefix "D:qt" -confirm-license -opensource  -debug-and-release -platform win32-msvc  -nomake examples -nomake tests  -plugin-sql-sqlite -plugin-sql-odbc -qt-zlib -qt-libpng -qt-libjpeg -opengl desktop -mp
+ cd qtbase
+ C:UserspeterDownloadsqt-everywhere-src-5.14.1qtbaseconfigure.bat -top-level -static -prefix "D:qt" -confirm-license -opensource  -debug-and-release -platform win32-msvc  -nomake examples -nomake tests  -plugin-sql-sqlite -plugin-sql-odbc -qt-zlib -qt-libpng -qt-libjpeg -opengl desktop -mp

Notice: re-mapping requested qmake spec to unified 'win32-msvc'.

Bootstrapping qmake ...
....
Qt is now configured for building. Just run 'nmake'.
Once everything is built, you must run 'nmake install'.
Qt will be installed into 'D:qt'.

Prior to reconfiguration, make sure you remove any leftovers from
the previous build.
3.make
Как упоминалось выше, в Windows есть две готовые среды на выбор: одна — это MinGW, а другая — Microsoft Visual Studio (MSVC).
Я выбрал среду msvc и могу использовать команду nmake для компиляции.
nmake
В новой версии MSVC возможна многопоточная компиляция, старая версия MSVC поставляется с nmake без функции многопоточной компиляции, есть альтернативное программное обеспечениеjomВозможна многопоточная компиляция nmake.
Адрес загрузки jom:Jom — Qt Wiki
Запустите команду в терминале прямо сейчас:
D:/jom_1_1_3/jom.exe
Мой процессорi7-8565U, CPU работал на 100%, и это заняло около 3 часов.
Общий исходный код и скомпилированный код после make26G
4.make install
Используйте однопоточную установку nmake:
nmake install
После установки в папке QT есть 4G
4. Добавить в Qt Creator
Здесь необходимо объяснить, что Qt Creator больше не может напрямую загружать последнюю версию, вам необходимо установить онлайн:Index of /archive/online_installers/3.2
После загрузки установите последнюю версию Qt Creator4.9.
Добавить версии Qt

Новый комплект для сборки
Новый комплект сборки, версия Qt, выберите только что добавленную статическую версию, не забудьте выбрать компилятор, который вы использовали при компиляции.

Если выбрана неправильная версия компилятора, будет сообщено об ошибке:
qwindowsvistastyled.lib (main.obj): - 1: ошибка: LNK1112: тип компьютера модуля «x86» конфликтует с типом целевого компьютера «x64»
:-1: error: Symbolic links not supported: disabling -L.
Примечание. Если за выбранным компилятором следует компиляцияqmakeКогда компилятор другой, будет сообщено о многих ошибках
Если вы не знаете, какая версия вашего компилятора, попробуйте их все.
Новый проект
Создайте новый проект и успешно запустите:

Размер exe — 13M, включая все необходимое содержимое.
5. Резюме
Статический процесс компиляции Qt 5.14.1 довольно плавный. Следует отметить, что вы должны внимательно прочитать официальные документы перед компиляцией. В конце концов, многие учебники не обновлены, но официальные документы, как правило, актуальны.
Я поставил скомпилированный qt на сетевой диск Baidu, можете скачать при необходимости, не гарантируется работа:
Ссылка: https://pan.baidu.com/s/1qCWI5uYhWvwHVptFSSTEbw Код извлечения: 2333
1. Скачиваем архив исходников Qt для Windows (qt-everywhere-src-5.12.2.zip) с официального сайта.
2. Скачать утилиту jom и распаковать её в каталог «C:Qtjom».
3. Создаем каталог, например, c:QtQt5.15.2-x86-msvc2019-static5.15Src и распаковываем в него содержимое архива исходников. Сборка в дальнейшем будет привязана к данному каталогу и букве диска. Каталог qt-everywhere-opensource-src-5.15.2 не создаем, т.е. получим подкаталоги 5.15Srcqtbase, 5.15Srccoin и т.д.). msvc2019 – это выбранный компилятор.
4. Редактируем файл msvc-desktop.conf (находится в каталоге c:QtQt5.15.2-x86-msvc2019-static5.15Srcqtbasemkspecscommon):
нужно заменить в переменных QMAKE_CFLAGS_RELEASE, QMAKE_CFLAGS_RELEASE_WITH_DEBUGINFO и QMAKE_CFLAGS_DEBUG значения -MD на -MT (для release), и -MDd на -MTd (для debug).
5. Запускаем командную строку (cmd) с правами администратора и последовательно выполняем в ней следующие команды:
cd «c:Program Files (x86)Microsoft Visual Studio2019ProfessionalVCAuxiliaryBuild» vcvarsall.bat x86
set QTDIR=c:QtQt5.15.2-x86-msvc2019-static5.15Srcqtbase
set PATH=c:QtQt5.15.2-x86-msvc2019-static5.15Srcqtbasebin;%PATH%
cd c:QtQt5.15.2-x86-msvc2019-static5.15Srcqtbase
configure -debug-and-release -opensource -platform win32-msvc2019 -opengl desktop -static -nomake examples
C:Qtjomjom.exe -j 50
Аналогично делается для Microsoft Visual Studio 2010, 2013, 2015, 2017.
Статическая сборка на основе Qt 5.15.1 MinGWx64 в Windows 10
1. Запускаем qt-unified-windows-x86-4.2.0-online.exe
- Cкачать с сайта Qt
Qt устанавливать нужно на диск C
2. Запускаем установшики Python, Perl, Ruby (64 битные версии)
Cкачать последнюю версию с сайтов производителей:
- Python x64
- Perl x64
- Ruby x64 (WITHOUT DEVKIT)
Дальше нужно установить(Устанавливать нужно на диск C):
- Python
- Perl
- Ruby
3. Добавляем пути к программам и библиотекам в параметры системы:
Поиск➡️Система➡️Дополнительные параметры системы➡️Параметры среды➡️Системные переменные➡️Path➡️Изменить
- Создаём пути

4. Далее скачиваем исходник QT 5.15.1
- Cкачать с сайта Qt
Разархивируйте его в папку Qt, для удобства создайте папку Src и разархивируйте туда
- Должно получиться вот так, после разахивирования
C:QtSrcqt-everywhere-src-5.15.1
5. Запускаем cmd и переходим в папку
C:QtSrcqt-everywhere-src-5.15.1
- Команды для командной строки:
C:UsersCereg>cd..
C:Users>cd..
C:>cd Qt
C:Qt>cd Src
C:QtSrc>cd qt-everywhere-src-5.15.1
C:QtSrcqt-everywhere-src-5.15.1>
- В Командную строку вставляем это команду:
configure -static -debug-and-release -platform win32-g++ -qt-zlib -qt-pcre -qt-libpng -qt-libjpeg -qt-freetype -opengl desktop -no-angle -no-openssl -opensource -confirm-license -make libs -nomake tools -nomake examples -nomake tests -prefix C:Qt5.15.1mingw81_64_static
- После завершения проверки вставляем это команду:
mingw32-make -k -j16
(16 это количество ядер на компьютере)
- После завершения вставляем это команду:
mingw32-make -k install
ВЫПОЛНЕНИЕ МОЖЕТ ПРОХОДИТЬ ОЧЕНЬ ДОЛГО (4-6 ЧАСОВ), ВСЕ ЗАВИСИТ ОН МОЩНОСТЬИ ВАЩЕГО КОМПЬЮТЕРА , И ОТ КОЛИЧЕСТВА БИБЛИОТЕК КОТОРЫЕ ВАМ НУЖНЫ
6. После завершения процедуры переходим в Qt Creator и запускаем какой-то проект
- Переходим в:
Проекты➡️Управление➡️Профили Qt➡️Добавить
- Добавляем qmake.exe и для удобства называем
Qt (5.15.1) static

ЕСЛИ НЕ ХВАТАЕТ КАКОЙ-ТО БИБЛИОТЕКИ ИЛИ ФАЙЛА (ЭТО БУДЕТ НАПИСАНО ПОД qmake path), ТО ПЕРЕХОДИМ В
C:Qt5.15.1mingw81_64bin
И КОПИРУЕМ НЕОБХОДИМЫЕ ФАЙЛЫ(ФАЙЛЫ С ОДИНАКОВЫМ НАЗВАНИЕМ) В
C:Qt5.15.1mingw81_64_staticbin(БЕЗ ЗАМЕНЫ)
- Переходим в:
Проекты➡️Управление➡️Комплекты➡️Добавить
- Добавляем новую сборку

- Переходим в Проекты, и добавляем сборку в проект, нажать на зеленый плюсик

- Переходим в .pro файл и добавляем строку
QMAKE_LFLAGS_RELEASE += -static -static-libgcc
- И собираем проект для релиза
ЕСЛИ ВЫЛЕТАЮТ ОШИБКИ: cannot found -ltiff, cannot found -lwebp
Можно взять библиотеку tiff из этого репозитория или скачать
Можно взять библиотеку webp из этого репозитория или скачать
- Нужно в папку
C:QtToolsдобавить библиотеки - Разархивируйте их в папку
C:QtToolsи переменуйте папки вliftиlibwebp - И добавляем пути в систему, как в пункте 3

- Повторяем 5 пукнт и добавляем в команду
-qt-tiff -qt-webp, полная команду будет выглядить так:
configure -static -debug-and-release -platform win32-g++ -qt-zlib -qt-pcre -qt-libpng -qt-tiff -qt-webp -qt-libjpeg -qt-freetype -opengl desktop -no-angle -no-openssl -opensource -confirm-license -make libs -nomake tools -nomake examples -nomake tests -prefix C:Qt5.15.1mingw81_64_static
- И заново создаем сборщик, как в пункте 5
НО ЕСТЬ ГОТОВЫЙ СКОМПИЛИРОВАННЫЙ mingw81_64_static.rar
7. Документация QT
This is a detail guilde how to build the static version of the Qt framework. Static build of Qt allows you to build solid applications which will work without lots of additional *.DLL/*.SO or *.DYLIB files because everything will be hardcoded into your application.
Introduction
Static version of Qt allows you to build solid application files without packing of a lots of dependent libraries.
-
 WARNING: Don’t forget that with the static version of Qt, you can only legally release your GPL v2/v3 and LGPL v3 licensed Open Source applications!
If you want to use the static Qt build in commercial development for closed-source applications, then you should buy the commercial license for that purpose.
Linux/Mac OS X
Install dependencies
Before start build you must install all necessary dependencies:
Install on Debian/Ubuntu/Mint
sudo apt-get install gcc g++ make wget
sudo apt-get install build-essential
sudo apt-get install
"^libxcb.*" libx11-dev libx11-xcb-dev libxcursor-dev libxrender-dev libxrandr-dev
libxext-dev libxi-dev libxss-dev libxt-dev libxv-dev libxxf86vm-dev libxinerama-dev libxkbcommon-dev
libfontconfig1-dev libharfbuzz-dev
libasound2-dev libpulse-dev libdbus-1-dev udev mtdev-tools webp
libudev-dev libglm-dev libwayland-dev libegl1-mesa-dev mesa-common-dev
libgl1-mesa-dev libglu1-mesa-dev libgles2-mesa libgles2-mesa-dev libmirclient-dev
libproxy-dev libgtk2.0-dev libgtk-3-dev libcups2-dev
On Ubuntu 14.04 you also will need to install newer GCC compiler and CMake toolchain
sudo add-apt-repository ppa:ubuntu-sdk-team/ppa
sudo add-apt-repository ppa:ubuntu-toolchain-r/test
sudo add-apt-repository ppa:george-edison55/cmake-3.x
sudo apt-get update
sudo apt-get install gcc-8 g++-8 cmake
sudo update-alternatives --remove-all gcc
sudo update-alternatives --remove-all g++
sudo update-alternatives --install /usr/bin/gcc gcc /usr/bin/gcc-8 80
sudo update-alternatives --install /usr/bin/g++ g++ /usr/bin/g++-8 80
Install on Mac OS X
(before start you must have pre-installed latest version of XCode)
Via homebrew
brew install coreutils binutils gnu-sed
Via MacPorts
port install bunutils
port install coreutils
port install gsed
Download sources
At first, you must to download entire source code tarball from official Qt site:
https://download.qt.io/archive/qt/5.15/5.15.2/single/qt-everywhere-src-5.15.2.tar.xz
Note: if this link is outdated, you can find newer version of Qt sources here:
Qt open-source Download page
Unpack archive
Unpack everything from the tarball into any folder (on Linux or on Mac OS X):
tar -xvf qt-everywhere-opensource-src-5.8.0.tar.gz
Remove a glitchy JPEG2000 library (for Qt 5.5.1 and older)
For Qt 5.6 and higher this step must be skipped because JPEG2000 and MNG since Qt 5.6 are already disabled by default for security reasons.
This library provides a support of JPEG2000 image format support, but at the Moondust Project it’s useless (main image formats in the Moondust Project were PNG, GIF and BMP), and also causes a random crashes of Qt applications built with your Qt build.
To resolve next issues, recommended to remove building of JPE support:
because disabling of JPE building is not provided by ./configure script given with Qt sources, we must remove building of JPE weself:
- make a kill_jasper.sh file in parent folder of Qt sources folder
- on OS X: install via homebrew the coreutils and gnu-sed
- open a text editor (On OS X: Don’t use TextEditor.app, because it makes invalid code!, use text editor from XCode or use nano) and paste next content into it:
#!/bin/bash
QTP=qt-everywhere-opensource-src-5.5.1

sed -i 's/qtCompileTest(jasper)/#qtCompileTest(jasper)/g' $QTP'/qtimageformats/qtimageformats.pro'
sed -i 's/jp2 \/#jp2 \/g' $QTP'/qtimageformats/src/plugins/imageformats/imageformats.pro'
rm -f $QTP'/qtimageformats/src/3rdparty/jasper.pri'
rm -Rf $QTP'/qtimageformats/src/3rdparty/jasper'
read -n 1
- open command line and execute this script by «bash ./kill_jasper.sh» command
Same for OSX with gnu-sed:
#!/bin/bash
QTP=qt-everywhere-opensource-src-5.5.1

gsed -i 's/qtCompileTest(jasper)/#qtCompileTest(jasper)/g' $QTP'/qtimageformats/qtimageformats.pro'
gsed -i 's/jp2 \/#jp2 \/g' $QTP'/qtimageformats/src/plugins/imageformats/imageformats.pro'
rm -f $QTP'/qtimageformats/src/3rdparty/jasper.pri'
rm -Rf $QTP'/qtimageformats/src/3rdparty/jasper'
read -n 1
Configure
Open console then change current directory to new folder which you has been unpacked. then Copy-paste this into console ans press ENTER:
-
 Important note: Qt 5.13.x, 5.14.0, 5.14.1, and 5.14.2 has a bug which will cause all your CMake projects to fail the configure to find the «Qt5::Zlib» module. To fix this annoying bug, you need to modify the «qtbase/mkspecs/features/data/cmake/Qt5BasicConfig.cmake.in» file and apply this patch before to configure the Qt.
Linux Mint / Debian (for Qt 5.8 and higher)
./configure -static -release -silent
-prefix ~/Qt/5.9.0_static
-opensource -confirm-license -opengl
-nomake examples
-skip wayland -skip purchasing -skip serialbus -skip qtserialport -skip script -skip scxml -skip speech
-system-xcb -qt-libpng -no-libjpeg -qt-zlib -qt-pcre -gtk -system-freetype -system-harfbuzz
-pulseaudio -alsa
-
 Tip: if you getting failed to configure because of some library (libharfbuzz, libfreetype, etc., try to replace -system-harfbuzz argument with -qt-harfbuzz and also -system-freetype with -qt-freetype.)
macOS Sierra (for Qt 5.8 and higher)
./configure -static -release -silent
-prefix ~/Qt/5.9.0_static
-opensource -confirm-license -opengl
-nomake examples
-skip wayland -skip purchasing -skip serialbus -skip qtserialport -skip script -skip scxml -skip speech
-qt-libpng -no-libjpeg -qt-zlib -qt-pcre -qt-harfbuzz -qt-freetype
-
Tip: To use newer C++ standard than C++11 you add the flag -c++std c++14 or -c++std c++1z.
Linux Mint / Debian (for Qt 5.7 and Qt 5.7.X)
./configure -static -release -nomake examples -nomake tools -prefix ~/Qt/5.7.0_static -system-xcb
-qt-libpng -no-libjpeg -qt-zlib -qt-pcre -gtk -opensource -confirm-license -opengl
-qt-freetype -pulseaudio -alsa
Linux Mint / Debian (for Qt 5.6 and lower)
./configure -static -release -nomake examples -nomake tools -prefix ~/Qt/5.6.0_static -system-xcb
-qt-libpng -no-libjpeg -qt-zlib -qt-pcre -gtkstyle -opensource -confirm-license -gtkstyle -opengl
-qt-freetype -pulseaudio -alsa -c++11
Mac OS X (for Qt 5.7 and Qt 5.7.X)
./configure -static -release -nomake examples -nomake tools -prefix ~/Qt/5.7.0_static_osx
-qt-libpng -no-libjpeg -qt-zlib -qt-pcre -gtkstyle -opensource -confirm-license -gtkstyle -opengl -qt-freetype -no-ssse3
then wait while configuring will be finished (you will need to wait ~30…60 min)
Build and install
(you will wait ~1.2…2 hours)
Hint: you can speed-up building process with adding -r argument, and adding -j x (where x — number of concurrent jobs. For example -j 4)
Final step is installation which will copy all built components into target installation directory
(you will wait ~10..30 min)
Usage
Built Qt will be located at ~/Qt/5.5.1_static or ~/Qt/5.5.1_static_osx on Mac OS X. To configure your Qt application to be built with static Qt version, you need to call ~/Qt/5.5.1_static/bin/qmake while you in your project folder, and other steps are same as you build with regular Qt version.
If you wants to plug static build of Qt into Qt Creator, just make a new toolchain with your default compiler (GCC, CLang or MinGW on Windows systems) and debugger, and with your static build of Qt (find QMake in the bin subdirectory of your static Qt build)
Note: Carefully transfer packages with a static build of Qt, you should keep same absolute path (because it is hardcoded) if you don’t want to rebuild Qt again.
Windows
Download and install dependencies
Before start building you must download and install all dependencies:
- MinGW compiler taken through any way:
- Dynamic version of Qt (with included MinGW compiler)
- Separated installation of MinGW from official site
- MinGW-w64 installation
- 7-zip archivator (or any other which able to unpack 7z archives) to unpack source code
Download sources
To download latest version of source code just use this link (or find download link to latest version on official Qt site)
Link to the latest version:
- http://download.qt.io/official_releases/qt/5.10/5.10.1/single/qt-everywhere-src-5.10.1.zip
Unpack archive
When you will download archive, open it and unpack into any convenient directory (but note: path must not contain non-ASCII characters [for example, Cyrillic, Chinese or Latin characters with diacritical signs, etc.]).
Create a build script
To build Qt from sources need to make a right build script which will build static Qt.
- Where QtSrcDir — a full path to directory which contains our unpacked Qt source code (and contains configure.bat file)
- Where QtStaticDir — a target path where static Qt will be installed (will contain bin, lib, include, plugins, etc. directories).
- Where MingwDir — a full directory path to MinGW compiler folder (which contains bin, lib, include directories)
Build script for Qt 5.8 and higher
@echo off
rem ====================CONFIGURE BEFORE RUN SCRIPT!!======================
set QtSrcDir=%CD%qt-everywhere-opensource-src-5.9.0
set QtStaticDir=C:Qt5.9_Static
set MingwDir=C:QtToolsmingw530_32
set LANG = en
rem =======================================================================

PATH = %MingwDir%bin;%MingwDir%optbin;%SystemRoot%system32;%SystemRoot%

set FILE_TO_PATCH=%QtSrcDir%qtbasemkspecswin32-g++qmake.conf
echo %FILE_TO_PATCH%
if exist %FILE_TO_PATCH%.patched goto skipPatch
type %FILE_TO_PATCH%>%FILE_TO_PATCH%.patched
echo.>>%FILE_TO_PATCH%
echo QMAKE_LFLAGS += -static -static-libgcc>>%FILE_TO_PATCH%
echo QMAKE_CFLAGS_RELEASE -= -O2>>%FILE_TO_PATCH%
echo QMAKE_CFLAGS_RELEASE += -Os -momit-leaf-frame-pointer>>%FILE_TO_PATCH%
echo DEFINES += QT_STATIC_BUILD>>%FILE_TO_PATCH%
:skipPatch

set QT_INSTALL_PREFIX = %QtStaticDir%
set OldDir=%CD%
cd %QtSrcDir%
cmd /C "configure.bat -shared -release -platform win32-g++ -prefix %QtStaticDir% -opensource -confirm-license -c++std c++14 -nomake examples -skip wayland -skip purchasing -skip serialbus -skip qtserialport -skip script -skip scxml -skip speech -skip location -no-opengl -qt-zlib -qt-pcre -qt-libpng -no-libjpeg -qt-freetype -no-openssl"

if ERRORLEVEL 1 goto :error

mingw32-make -r -k -j4
if ERRORLEVEL 1 goto :error

mingw32-make -k install
if ERRORLEVEL 1 goto :error

set FILE_TO_PATCH=%QtStaticDir%mkspecswin32-g++qmake.conf
echo.>>%FILE_TO_PATCH%
echo CONFIG += static>>%FILE_TO_PATCH%

echo ============BUILT!============
goto exitX
:error
echo ============ERROR!============
:exitX
pause
cd %OldDir%
Build script for Qt 5.7
@echo off
rem ====================CONFIGURE BEFORE RUN SCRIPT!!======================
set QtSrcDir=%CD%qt-everywhere-opensource-src-5.7.0
set QtStaticDir=C:Qt5.7_Static
set MingwDir=C:QtToolsmingw530_32
set LANG = en
rem =======================================================================

PATH = %MingwDir%bin;%MingwDir%optbin;%SystemRoot%system32;%SystemRoot%

set FILE_TO_PATCH=%QtSrcDir%qtbasemkspecswin32-g++qmake.conf
echo %FILE_TO_PATCH%
if exist %FILE_TO_PATCH%.patched goto skipPatch
type %FILE_TO_PATCH%>%FILE_TO_PATCH%.patched
echo.>>%FILE_TO_PATCH%
echo QMAKE_LFLAGS += -static -static-libgcc>>%FILE_TO_PATCH%
echo QMAKE_CFLAGS_RELEASE -= -O2>>%FILE_TO_PATCH%
echo QMAKE_CFLAGS_RELEASE += -Os -momit-leaf-frame-pointer>>%FILE_TO_PATCH%
echo DEFINES += QT_STATIC_BUILD>>%FILE_TO_PATCH%
:skipPatch

set QT_INSTALL_PREFIX = %QtStaticDir%
set OldDir=%CD%
cd %QtSrcDir%
cmd /C "configure.bat -static -release -platform win32-g++ -prefix %QtStaticDir% -qt-zlib -qt-pcre -qt-libpng -qt-libjpeg -qt-freetype -opengl desktop -qt-sql-sqlite -no-openssl -opensource -confirm-license -make libs -nomake tools -nomake examples -nomake tests"
if ERRORLEVEL 1 goto :error

mingw32-make -r -k -j4
if ERRORLEVEL 1 goto :error

mingw32-make -k install
if ERRORLEVEL 1 goto :error

set FILE_TO_PATCH=%QtStaticDir%mkspecswin32-g++qmake.conf
echo.>>%FILE_TO_PATCH%
echo CONFIG += static>>%FILE_TO_PATCH%

echo ============BUILT!============
goto exitX
:error
echo ============ERROR!============
:exitX
pause
cd %OldDir%
Make a «build_static_qt.bat» in any convenient directory and paste contents shown above. Then replace paths in the top paths to fit script into your actual environment, then save it.
Build and install
When you done everything, run your «build_static_qt.bat» script and wait 1.5 ~ 3 hours (dependent to your CPU power) until everything will be built.
Usage
When script will finish it’s work, you will have to use the bin/qmake.exe from installation target directory to configure your qt projects to build with static Qt version. You can plug it into Qt Creator with adding reference to bin/qmake.exe from the «Settings» / «Building and debug» tab.
Не так давно вышел новый Qt, обещающий большое и светлое будущее, и я решил опробовать сие чудо. Но для начала работы с этим чудом мне понадобилось собрать его для моей установленной студии 2012 года из исходных файлов. А сборка оказалась далеко не тривиальной (хотя кривость моих рук никто не отменял – таким студентам, как я, руки необходимо об забор выпрямлять).
Как только вышла в конце прошлого года стабильная версия нового Qt5, я решил было его скачать и попробовать, но, к сожалению, те сборки, которые мне были нужны, а именно: для платформы Windows сборки под MinGW и Visual Studio 2012, — отсутствовали на сайте qt-project.org. Поэтому я скачал и установил готовую сборку для моего линукса: Ubuntu 12.04. Правда мной уже тогда были предприняты попытки (правильнее потуги) собрать хотя бы для MinGW библиотеку из sources. Однако все обернулось неудачей, расстройством и глубокой депрессией.
В конце января разработчики порадовали нас версией 5.0.1, исправленной и собранной для работы с MinGW 4.7. Однако для VS2012 они снова не выложили сборку. И тут я решил, стоит попробовать снова, а вдруг получится?
В поисках информации по интернету я наткнулся на несколько статей по сборке, но никак не под VS2012. Самой правдивой, на мой взгляд, оказалась версия на официальной вики страничке проекта, как бы странно это не звучало. Поэтому попробую описать весь этот процесс еще раз здесь, попутно комментируя и добавляя свои, нужные, на мой взгляд, пункты по сборке. Решил рискнуть и собрать как можно более полную библиотеку.
Что необходимо:
- Установленная Visual Studio 2012 (не Express Edition). Windows Development Kit 8 с DirectX должен быть уже в комплекте
- Установленный ActivePerl
- Установленный Python 2.7
- Установленный Ruby
- Установленный ICU. Примечание, сайт не официальный
- А также скачать собственно сами исходные файлы
Замечание, по какой-то, неизвестной мне причине, python версии 3.3.0 выдавал ошибку при трансляции файлов, хотя разработчиками заявлена работоспособность нового питона, поэтому пришлось ставить версию 2.7.
Мои действия даже мне до сих пор кажутся сильно шаманскими, поэтому я постараюсь подробно описать свои неумелые шаги, так как пересобрать заново всю эту махину мне не то чтобы не охота – время и нервы жалко. Надеюсь, что кто-то возьмется тоже собрать, и расскажет, что не получилось из моего метода, и совместными знаниями «добьем», так сказать, сие чудо. Рекомендую вначале ознакомиться со всей статьей во избежание мелких недоразумений во время сборки.
Итак, начнем.
Моя система – Windows 8 Pro with Media Center x64. Ноутбук марки eMachines E732ZG. Краткие характеристики: Intel Pentium P6200 (двухъядерный) 2.13 GHz на каждом ядре, 6 GB RAM DDR3, 320 GB HDD. Версия Visual Studio 2012 Ultimate Update 1. Kaspersky Internet Security 2013 был выключен на время сборки.
Все дополнительные программы я установил в C:Development. ICU был скачан не на официальном сайте, а на другом, но там была выложена сборка для vs2012.
В эту же папку были распакованы исходные файлы Qt5.0.1:
C:Developmentqt-everywhere-opensource-src-5.0.1
При установке были выбраны галочки для прописи perl, ruby и python в переменную окружения PATH. Думаю, что вариант их ручной прописи в командной строке, в которой мы будем собирать, тоже сгодится:
set PATH=C:DevelopmentPerl64bin;C:DevelopmentPython27;C:DevelopmentRuby193bin;%PATH%Запускаем Command Prompt VS 2012 (я запускал от имени Администратора). Эта штука прописывает все свои либы в пути, поэтому запускаем именно ее. Сам батник находится в
«C:Program Files (x86)Microsoft Visual Studio 11.0Common7ToolsVsDevCmd.bat».
Затем в ней задаем следующие переменные:
set CL=/MP
set INCLUDE=C:Developmenticu-50.1.2-shared-vs2012include;%INCLUDE%
set LIB=C:Developmenticu-50.1.2-shared-vs2012lib;%LIB%
set PATH=C:Developmenticu-50.1.2-shared-vs2012bin;%PATH%
Командой set CL=/MP мы указываем, скорее всего, утилите nmake что у нас несколько ядер: «Поэтому, пожалуйста, распараллеливайте задачи по компиляции».
Далее переходим в саму папку с sources:
cd C:Developmentqt-everywhere-opensource-src-5.0.1Следующие действия, я думаю, сделать сразу, так как иначе сборка qtwebkit проходит с ошибкой, точнее не проходит:
set PATH=%PATH%;%CD%gnuwin32bin
cd .qtwebkit
set WEBKITOUTPUTDIR=%CD%WebkitBuild
cd ..
Кстати, команда set WEBKITOUTPUTDIR=%CD%WebkitBuild под большим вопросом, нужна ли она здесь? Она была взята из мануала по отдельной компиляции qtwebkit.
Можете убедиться в правильности всех путей набрав следующее:
set INCLUDE && set LIB && set PATHКстати еще, можете сделать батник из этих команд и запускать его посредством той же Command Prompt 2012.
Конфигурация
Теперь нужно откофигурировать сборку. Для этого набираем следующее, находясь в директории C:Developmentqt-everywhere-opensource-src-5.0.1:
configure -prefix C:DevelopmentQt5.0.1_MSVC2012qtbase -opensource -platform win32-msvc2012 -debug-and-release -shared -c++11 -nomake examples -nomake tests -icu -confirm-license- Параметром
-prefix C:DevelopmentQt5.0.1_MSVC2012qtbaseмы задаем место инсталяции нашего Qt. -confirm-licenseпросто пропускает запрос о согласии с лицензией.-platform win32-msvc2012указываем ручками платформу. Мне кажется, что она может быть определена автоматически.-debug-and-releaseсобирает сразу два варианта, как для отладки так и без нее. Еще варианты:-debugили-release.-c++11. Странно, но почему-то этот параметр игнорируется, хотя в VS2012 заявлен новый стандарт. Кстати, при попытке собрать для MinGW 4.7 также игнорировался. Интересно, как обстоит дело на Linux для gcc?-nomake examples -nomake testsне собирают для нас пример и тесты – лишнее место, но если хотите, можете не указывать-shared. Этот параметр определяет будущее ваших будущих приложений на Qt (не знаю как сказать по-другому). Если он указан (хотя, по-моему, определен по умолчанию) то все собранные приложения будут зависеть от наличия установленных библиотек на машине. То есть с переносом даже на соседский компьютер будет беда. Для сборки независимых приложений следует указывать-static. Но будущие приложения существенно вырастут в размере (10 кб против 10 мб в простой программе helloworld с GUI).
Остальные параметры конфигурации можно узнать, набрав:
configure -helpЗдесь либо будут ошибки, которые еще просто исправить (каких-то путей не хватает или библиотек), либо все соберется хорошо. Процесс занимает не более 10 минут.
Компиляция и установка
Далее все менее радостно. Просто запускаем команду nmake и курим, пьем чай, готовим, спим и т.д. После многочасовой сборки (или многосуточной) можно запускать команду nmake install. Она скопирует вашу библиотеку в указанную директорию в параметре -prefix.
Опыт
У меня все было еще печальнее. Изначально в PATH стоял питон версии 3.3, а вот эту штуку я не делал:
set PATH=%PATH%;%CD%gnuwin32bin
Я не знаю, сколько длилась сборка, час, два или больше, но при попытке собрать qtwebkit утилита nmake вывалилась из-за отсутствия какого-то win_flex. Я психанул, так как это была моя уже третья попытка собрать всю библиотеку с qtwebkit, и просто ввел nmake install. Библиотека была скопирована, но не до конца. Опять же вывалилась при попытке скопировать не скомпилированный qtwebkit.
На мою студию к этому моменту уже было установлено расширение Visual Studio Add-in 1.2.0 for Qt5. В настройках я указал путь к установленной на половину библиотеке. Создал первое пробное приложение, но после удачной сборки но отказалось запускаться из-за отсутствия трех .dll от icu. Пришлось дописывать в PATH путь C:Developmenticu-50.1.2-shared-vs2012lib и перезапускать студию, в итоге в студии все запускается без проблем. QtCreator после до настройки на эту библиотеку отказался нормально запускать удачно собранные приложения. Они почему-то вылетали с ошибкой. Запустив собранное приложение из директории сборки, оказалось отсутствует D3DCOMPILER_46.dll Не знаю, что с этим делать. Буду рад, если подскажете.
Затем я начал искать способы собрать этот печальный модуль, и наткнулся на такую инструкцию:
set PATH=%PATH%;%CD%gnuwin32bin
cd .qtwebkit
set WEBKITOUTPUTDIR=%CD%WebkitBuild
perl ToolsScriptsbuild-webkit --qt --qmake=”%CD%\..\qtbase\bin\qmake.exe” --install-libs= (install der) --release --makeargs=%MAKEFLAGS%
Но nmake теперь сругался на MAKEFLAGS. Запустил без этого аргумента:
perl ToolsScriptsbuild-webkit --qt --qmake=”%CD%\..\qtbase\bin\qmake.exe” --install-libs= (install der) --releaseОднако теперь nmake стал ругаться на отсутствие MainThreadQt.moc. Поэтому я ввел nmake clean и вышел в общую папку qt. Уже оттуда я запустил nmake (теперь в path дописан %CD%gnuwin32bin), и, о чудо, оно работает, ОНО СОБИРАЕТСЯ. Причем с того момента, где вывалился (он проверил, что собранные либы уже существуют и дошел до первой несобранной). Правда через некоторое время он вывалился снова. Теперь меня подвел питон версии 3.3. Где-то в интернете я прочитал, что стоит поставить версию 2.7, что я и сделал. Перезапустил командную строку после установки и замены в переменной PATH пути до питона. Заново прописал все set и ввел nmake. Он продолжил свою работу.
Теперь сижу жду уже битый час окончания всей эпопеи. Последнее действие началось в около 14:00 МСК, где-то в 22:35 он закончил собирать qtwebkitwebcore версию debug_shared и начал «стряпать» release объектники, что займет тоже самое время. Плюсом, там, судя по-всему, была собрана еще не вся библиотека. Надеюсь, что за предстоящую ночь все сделается.
На момент написания основной части статьи, nmake собирал qtwebkit уже часов 8 к ряду. Сейчас прошло уже более суток с момента последнего запуска nmake. Спешу обрадовать (воспринимать двояко) – за сутки и 6 часов он собрал qtwebkit, еще 2 – 4 часа было потрачено в самом начале на сборку основной библиотеки. Еще 2 — 3 часа ушло на досборку утилит, таких как QtDesigner, Linguist и Assistant. Сборка завершилась удачно, без сбоев. Папка с исходными файлами выросла с 700 – 800 Мб, до 10 Гб!
Затем запустил nmake install. Копировал минут сорок. В итоге папка C:DevelopmentQt5.0.1_MSVC2012 весит 1.22 Гб. Через Visual Studio Add-in 1.2.0 for Qt5 к VS2012 все «цепляется» замечательно, только одна проблема, все скомпилированные Qt приложения, даже QtDesigner требуют какой-то D3DCOMPILER_46.dll. Его я нашел по адресу C:Program Files (x86)Windows Kits8.0RedistD3Dx86. А также еще требовались библиотеки icudt50.dll, icuin50.dll, icuuc50.dll, которые находятся в C:Developmenticu-50.1.2-shared-vs2012lib.
По какой-то непонятной мне причине designer и assistant из этой сборки не запускаются, даже после ручного добавления к ним D3DCOMPILER_46.dll. Кто-то может что-то по этому поводу что-нибудь дельного сказать?
P.S. Надеюсь, что вам данная статья поможет, и вы потратите меньше времени на выяснение причин неработоспособности.
Article catalog
-
- Preparation
-
- Download source code
- Install the necessary software
- Start compilation
-
- Modify the configuration file
- Configure compilation parameters
- Start compilation
-
- QT6 settings
- Configure Qtcreator
- Test compilation
Recently QT released the latest version 5.15.3 version, but unfortunately only published for commercial users, 5.15 no community version update, and 5.15.2 BUG patch will incorporate QT6 versions. This will be a long process, and the QT6 is currently unstable (perfect), and I have not encountered on the 5.15.2 version (
Maybe it’s too food.
), So we can use this version as the main version.
Second, QT official only provides a dynamic library version, that is, our compiled executable must bedllThe file is placed together to run. Is there a way to merge the dynamic library into the executable program? The answer is our own compilation of static library version.
Compilation toolsMSVCwithMinGW
{% note warning %}
Note: The library compiled by MSVC and MINGW can not be mixed, must be reported, usually use compiler to compile the source code
{% endnote %}
Preparation
Download source code
Qt Officially provides us with source code, we need to download the source code down
Qt official address
Tsinghua University Mirror Address
Domestic recommendation Tsinghua University mirror, basically full of broadband
Install the necessary software
- Click to download Perl(May need to log in)
- Click to download Ruby

- Click to download JOM(Multi-core compilation essential, if you want to tend to compile or compile QT6 version, you don’t need to download)


- You don’t need to install Python2, because Python2 is to compile WebEngine modules, but this module does not support static libraries, so no need
- Key: Must installVisual Studio 2019orVisual Studio 2017, This is the compilation tool
Start compilation
First, the downloaded source code compression package is extracted to a place to find, and I will take the QT6.0.2 version here, because his source package is relatively small, the compile is faster, and after I want to try the QT6 version. I will decompress it here: (the path should not be too long)

Modify the configuration file
Because we use the MSVC compiler, so enterD:SoftwareQt6.0.x6.0.2srcqtbasemkspecscommonThis path, findmsvc-desktop.confDocument, open, all-MD change into -MT, That is, the compilation is a static library.
Configure compilation parameters
First understand the parameters that need to be used when compiling
configure.bat
 -static // Indicates that it is static compile
-prefix "D:SoftwareQt6.0.x6.0.2msvc2019_64_static"  / / Indicate the installed directory, modify itself
 -confirm-license -opensource // Indicates that is an open source version of QT
 -debug-and-release // Requires the version, optional -debug and -reease
 -force-asserts // enable Q_ASSERT, even in Release Build
 -PLATFORM WIN32-MSVC / / Indicates compilation using MSVC
 -Nomake Examples -Nomake Tests // Does not compile
 -plugin-sql-sqlite -plugin-sql-odbc-qt-zlib -qt-libpng -qt-libjpeg // optional plugin
 -OpenGL Desktop // Regular Desktop OpenGL
 -MP // multi-core compilation, compilation speed will be faster, the single core is estimated to have a day...
 -skip qtserialbus -skip qtspeech // Skip Compile Some modules, risk
Modified
configure.bat -static -prefix "D:SoftwareQt6.0.x6.0.2msvc2019_64_static" -confirm-license -opensource -debug-and-release -platform win32-msvc -nomake examples -nomake tests -plugin-sql-sqlite -plugin-sql-odbc -qt-zlib -qt-libpng -qt-libjpeg -opengl desktop -mp
Mainly modify the installation path, the other is basically no tube, then openx64 Native Tools Command Prompt For VS2019(Determined according to the number of system bits is X86 or X64, basically choosing x64, pay attention to something wrong).

Then use the CD commandcdEnter the unzipped source folder, put the above configuration, enter!

Should run a while, there is no error, the configuration is successful. Warning can be ignored ~

Start compilation
Since NMAKE does not support multi-core compilation, the single core is too turtle, so we use Jom to compile, you can specify the number of cores (full core, rush)
JOM core number // such as Jom 16
{% note info%}
Remember to add environment variables before using JOM, or use absolute paths such asX:Jom/bin/jom.exe
{% endnote%}
QT6 settings
{%note warning%}
Good guy QT6 changed the compile and installation command, you need to compile and install using the cmake command, as follows:
{% endnote %}
CMake --Build. --- Parallel // Compile this directory, Parallel is parallel, that is, multi-core compilation
 cmake --install. // Installation Command

Grammatical error … No matter, first install the test and then say (note that there is an install..)

Configure Qtcreator
Open the qtcreator tool option, findQt version

Add a new path to findInstallation path /bin/qmake.exeAfter adding, click belowApplyThat is, otherwise it will not be refreshed.
Click on the topKitsAdd a new library, configure the following:

The compilation and configuration is completed, and the test begins below.
Test compilation
Create a new project, name free, compile KITS, choose Just new:

Select Release mode compilation, wait to open the compiled folder after compiling, you can see that the compiled file size is only 12.7MB, and only one file can be run, no need to add a QT dynamic library file

The tutorial is over here. Static compilation of true fragrance ~
Article original address:Static compilation of QT library using MSVC2019
Welcome to my blog
- Install Android Studio with SDK and NDK API Level 28.
- Install
strawberry-perl-5.26.2.1-64bit.msifirst (beforemingw-w64-install.exe) toE:PFiles - Install MinGW with
mingw-w64-install.exeonline installer. Select POSIX threads in the installer UI combobox, otherwise you will get:

- Extract the sources from QT archive
qt-everywhere-src-5.15.0.ziptoE:QtQt5.15.0and run the following script in QT root directory containingconfigure.bat:
rem This script is based on the steps decribed here: https://doc-snapshots.qt.io/qt5-5.15/android-building.html
rem Strawberry Perl and MinGW are already in PATH after install.

set "JDK_ROOT=C:Program FilesAndroidAndroid Studiojrebin"
set "MINGW_ROOT=E:PFilesmingw-w64x86_64-8.1.0-posix-seh-rt_v6-rev0mingw64bin"
set "PERL_ROOT=E:PFilesStrawberryperlbin"

set PATH=;%JDK_ROOT%;%PATH%
set PATH=;%MINGW_ROOT%;%PATH%
set PATH=;%PERL_ROOT%;%PATH%
set PATH=E:PFilesPython35;%PATH%

rem Check if the tools are in PATH
where gcc
where mingw32-make.exe
where perl.exe
where javac.exe
where python.exe

set "ANDROID_SDK_ROOT=C:UsersD-EfAppDataLocalAndroidSdk"
set "ANDROID_NDK_PATH=C:UsersD-EfAppDataLocalAndroidSdkndk-bundle"
rem See qtbasemkspecsandroid-clangqmake.conf
set "ANDROID_NDK_PLATFORM=android-21"
rem see %ANDROID_SDK_ROOT%build-tools folder
set "ANDROID_BUILD_TOOLS_REVISION=29.0.2"

rem QT_NO_EXCEPTIONS disables "try { } catch (...) {}" surrounding the user code in qthread_unix.cpp
configure.bat -prefix E:QtQt5.15.0android -DQT_NO_EXCEPTIONS -release -force-debug-info -platform win32-g++ -opengl es2 -xplatform android-clang ^
  -android-ndk %ANDROID_NDK_PATH% -android-sdk %ANDROID_SDK_ROOT% ^
  -opensource -confirm-license -nomake tests -nomake examples ^
  -skip networkauth -skip serialport -skip serialbus -skip activeqt -skip quick3d -skip quicktimeline -skip lottie -skip remoteobjects -skip scxml ^
  -skip websockets -skip webglplugin -skip webchannel -skip gamepad -skip 3d -skip wayland -skip connectivity -skip sensors -skip script ^
  -skip location -skip xmlpatterns -skip speech -skip virtualkeyboard -skip datavis3d -skip charts -skip webengine -skip webview -skip doc ^
  -skip macextras -skip x11extras -skip winextras

mingw32-make.exe -j4

mingw32-make install
this script uses NDK 21.2.6472646, but Qt Creator 4.12.1 installs NDK 21.1.6352462:
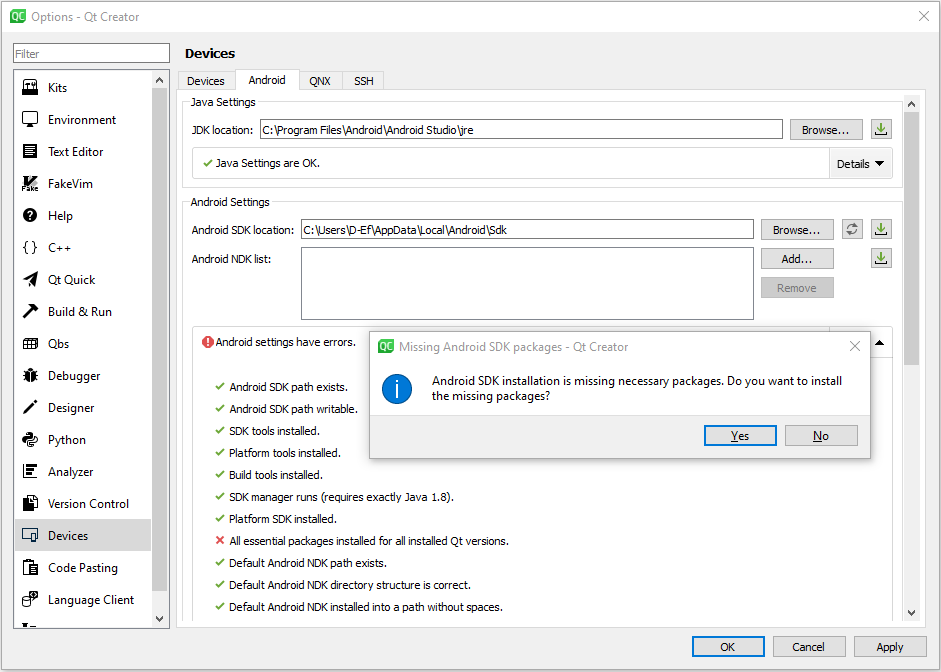

Building QT application
On my machine the above script built QT successfully, but when I tried to build my app in QT Creator I got:
18:49:58: Starting: "C:UsersD-EfAppDataLocalAndroidSdkndk21.1.6352462prebuiltwindows-x86_64binmake.exe" V=1 -j8
E:QtQt5.15.0androidbinrcc.exe -name qml ....examplessrcMyAppMyAppQtqml.qrc -o armeabi-v7aqrc_qml.cpp
E:QtQt5.15.0androidbinrcc.exe -name scene ....examplessrcMyAppMyAppQtscene.qrc -o armeabi-v7aqrc_scene.cpp
make: *** [Makefile:560: armeabi-v7aqrc_qml.cpp] Error -1073741515
make: *** Waiting for unfinished jobs....
make: *** [Makefile:564: armeabi-v7aqrc_scene.cpp] Error -1073741515
and when I started rcc.exe manually I got:
---------------------------
rcc.exe - System Error
---------------------------
The code execution cannot proceed because libgcc_s_seh-1.dll was not found. Reinstalling the program may fix this problem.
---------------------------
OK
---------------------------
Obviously, it requires MinGW to be in PATH:
set PATH=E:PFilesmingw-w64x86_64-8.1.0-posix-seh-rt_v6-rev0mingw64bin;%PATH%
So I updated Path environment variable in QT Creator:
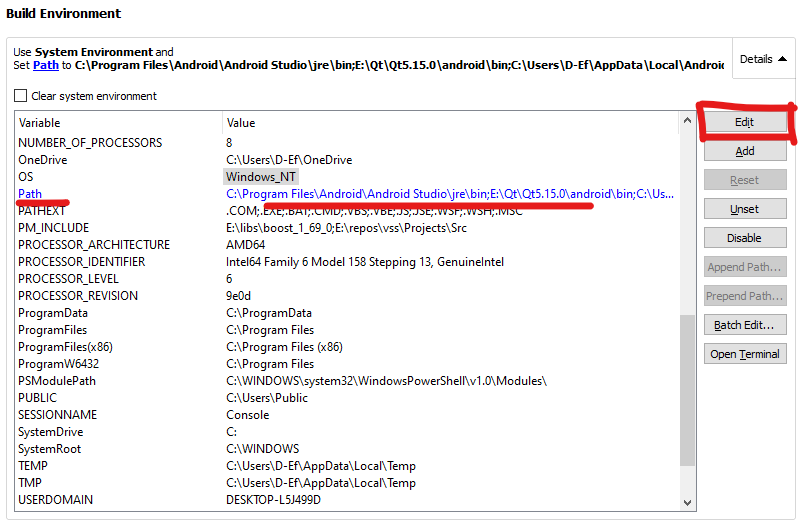
and the build succeeded and the application started successfully.
Also a possible solution is to copy MinGW dlls:
libgcc_s_seh-1.dll
libstdc++-6.dll
libwinpthread-1.dll
to QT binary directory.
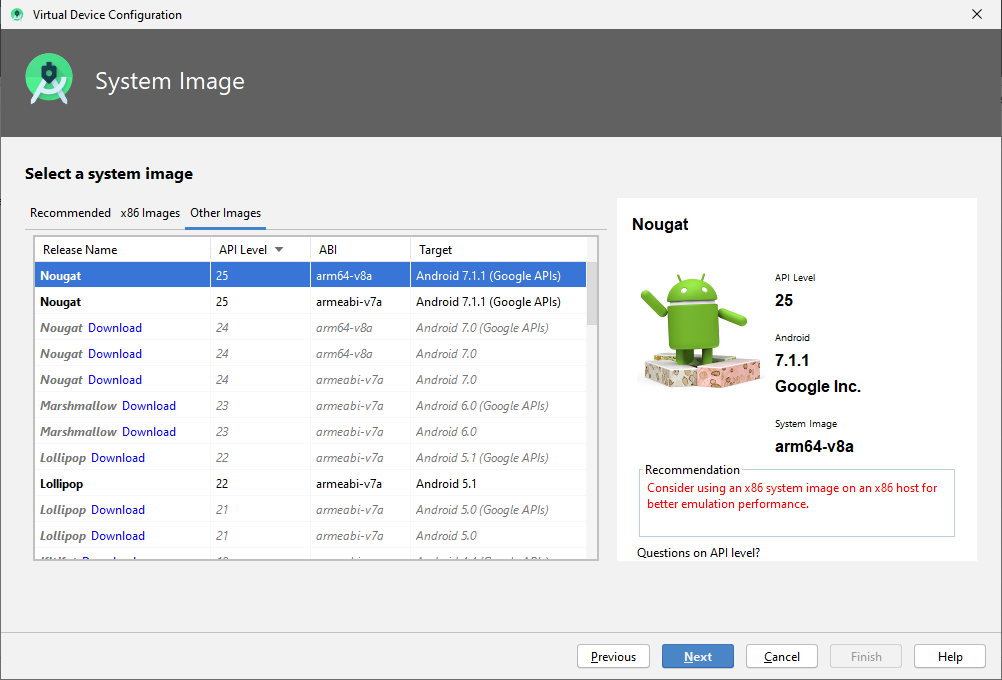
Testing the app
I tested the app with Android 10 x86 emulators and it seems it is OK, but it is not clear how to test it on ARM because I have ARM images till API 25 only:
Uploading the app to Google Play
When I published the app in Google Play for internal testing it passed the monkey test on all the devices except Android 5.0 armeabi-v7a, see Prelaunch Report:
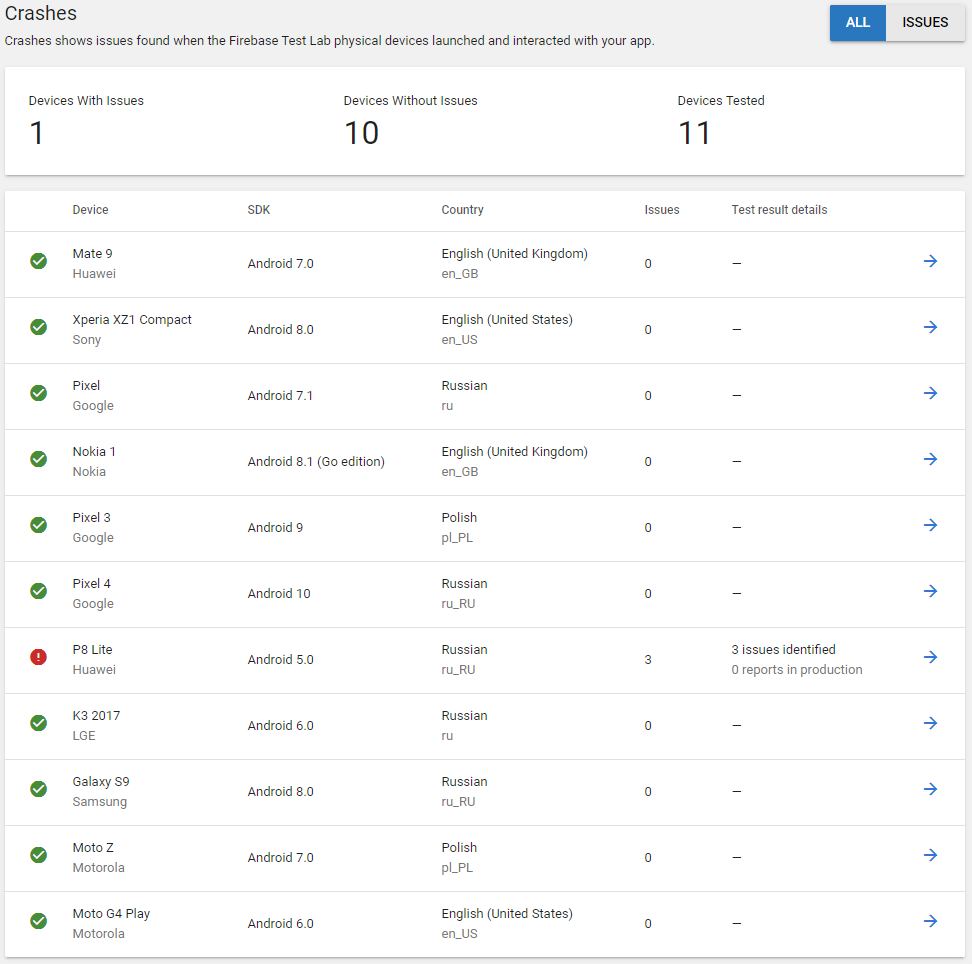
This crash stably repeated in 3 releases, see below for more information on it:
*** *** *** *** *** *** *** *** *** *** *** *** *** *** *** ***
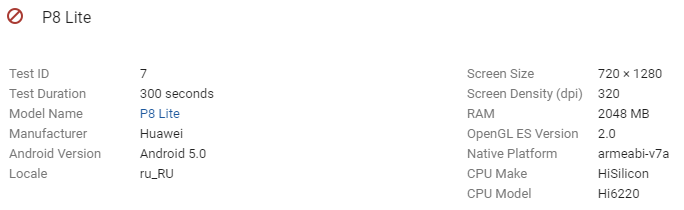
Build fingerprint: 'Huawei/ALE-L23/hwALE-H:5.0.1/HuaweiALE-L23/C605B150:user/release-keys'
Revision: '0'
ABI: 'arm64'
pid: 20596, tid: 20703, name: qtMainLoopThrea >>> com.domain.MyApp <<<
signal 6 (SIGABRT), code -6 (SI_TKILL), fault addr --------
Abort message: 'art/runtime/mirror/art_method.cc:377] Check failed: !IsFastNative() int java.lang.Character.digitImpl!(int, int)'
x0 0000000000000000 x1 00000000000050df x2 0000000000000006 x3 00000055a9bb4c00
x4 00000055a9bb4c00 x5 0000000000000005 x6 0000000000000001 x7 0000000000000020
x8 0000000000000083 x9 0000007f9795de18 x10 0000000000000003 x11 0000000000000001
x12 0000000000000001 x13 00000055a963f000 x14 e673a3bab54834e2 x15 0000000000000005
x16 0000007f97956798 x17 0000007f9791b1bc x18 0000000000000000 x19 00000055a9bb4c00
x20 0000007f7e89ebb0 x21 0000007f9795c000 x22 0000000000000002 x23 0000000000000006
x24 0000007f7e89d420 x25 00000055a9bb41e0 x26 0000000000000000 x27 00000055a9c2c950
x28 0000000070f128c8 x29 0000007f7e89d2a0 x30 0000007f978d8ee0
sp 0000007f7e89d2a0 pc 0000007f9791b1c4 pstate 0000000060000000
backtrace:
#00 pc 00000000000601c4 /system/lib64/libc.so (tgkill+8)
#01 pc 000000000001dedc /system/lib64/libc.so (pthread_kill+160)
#02 pc 000000000001f410 /system/lib64/libc.so (raise+28)
#03 pc 0000000000018ebc /system/lib64/libc.so (abort+60)
#04 pc 00000000002eafac /system/lib64/libart.so (art::Runtime::Abort()+300)
#05 pc 00000000000cdd38 /system/lib64/libart.so (art::LogMessage::~LogMessage()+2684)
#06 pc 000000000027f2e8 /system/lib64/libart.so (art::mirror::ArtMethod::RegisterNative(art::Thread*, void const*, bool)+452)
#07 pc 0000000000270e94 /system/lib64/libart.so (art::JNI::RegisterNativeMethods(_JNIEnv*, _jclass*, JNINativeMethod const*, int, bool)+616)
#08 pc 000000000000242c /system/lib64/libnativehelper.so (jniRegisterNativeMethods+124)
#09 pc 000000000001ac2c /system/lib64/libjavacore.so (JNI_OnLoad+100)
#10 pc 00000000001e2534 /data/app/com.domain.MyApp-1/lib/arm64/libQt5Core_arm64-v8a.so
#11 pc 00000000001df86c /data/app/com.domain.MyApp-1/lib/arm64/libQt5Core_arm64-v8a.so
#12 pc 00000000001df764 /data/app/com.domain.MyApp-1/lib/arm64/libQt5Core_arm64-v8a.so
#13 pc 00000000001df670 /data/app/com.domain.MyApp-1/lib/arm64/libQt5Core_arm64-v8a.so
#14 pc 00000000001dcacc /data/app/com.domain.MyApp-1/lib/arm64/libQt5Core_arm64-v8a.so (QFactoryLoader::instance(int) const+108)
#15 pc 0000000000123fb0 /data/app/com.domain.MyApp-1/lib/arm64/libQt5Gui_arm64-v8a.so
The list of the modules we build
Modules we build (see generated Makefile at QT root directory):
base
androidextras
imageformats - not sure we need it
svg
declarative - QML
purchasing
graphicaleffects
quickcontrols2
quickcontrols
multimedia
tools - command line tools like 'lrelease.exe'
translations
Notes
I have an impression that using
instead of
results in unstable behavior of the build script.
The content of qtbasemkspecsandroid-clangqmake.conf:
# qmake configuration for building with android-clang
MAKEFILE_GENERATOR      = UNIX
QMAKE_PLATFORM          = android
QMAKE_COMPILER          = gcc clang llvm

CONFIG                 += android_install unversioned_soname unversioned_libname plugin_with_soname android_deployment_settings

include(../common/linux.conf)
include(../common/gcc-base-unix.conf)
include(../common/clang.conf)

load(device_config)

# In early configure setup; nothing useful to be done here.
isEmpty(DEFAULT_ANDROID_NDK_ROOT): return()

NDK_ROOT = $$(ANDROID_NDK_ROOT)
isEmpty(NDK_ROOT): NDK_ROOT = $$DEFAULT_ANDROID_NDK_ROOT

!exists($$NDK_ROOT): error("You need to set the ANDROID_NDK_ROOT environment variable to point to your Android NDK.")

NDK_HOST = $$(ANDROID_NDK_HOST)
isEmpty(NDK_HOST): NDK_HOST = $$DEFAULT_ANDROID_NDK_HOST

ANDROID_PLATFORM = $$(ANDROID_NDK_PLATFORM)
isEmpty(ANDROID_PLATFORM): ANDROID_PLATFORM = $$DEFAULT_ANDROID_PLATFORM

ANDROID_SDK_ROOT = $$(ANDROID_SDK_ROOT)
isEmpty(ANDROID_SDK_ROOT): ANDROID_SDK_ROOT = $$DEFAULT_ANDROID_SDK_ROOT

ANDROID_SDK_BUILD_TOOLS_REVISION = $$(ANDROID_BUILD_TOOLS_REVISION)
isEmpty(ANDROID_SDK_BUILD_TOOLS_REVISION) {
    SDK_BUILD_TOOLS_REVISIONS = $$files($$ANDROID_SDK_ROOT/build-tools/*)
    for (REVISION, SDK_BUILD_TOOLS_REVISIONS) {
        BASENAME = $$basename(REVISION)
        greaterThan(BASENAME, $$ANDROID_SDK_BUILD_TOOLS_REVISION): ANDROID_SDK_BUILD_TOOLS_REVISION = $$BASENAME
    }
}

ALL_ANDROID_ABIS = $$(ALL_ANDROID_ABIS)
isEmpty(ALL_ANDROID_ABIS): ALL_ANDROID_ABIS = $$DEFAULT_ANDROID_ABIS
isEmpty(ALL_ANDROID_ABIS): ALL_ANDROID_ABIS = arm64-v8a armeabi-v7a x86_64 x86

CONFIG += $$ANDROID_PLATFORM

ANDROID_MIN_SDK_VERSION = $$replace(ANDROID_PLATFORM, "android-", "")
ANDROID_TARGET_SDK_VERSION = 28

...
Links
- Android 5.0 (API level 21) is supported.