Python — невероятно гибкий язык программирования, который хорошо интегрируется с существующими программами. Немало Python-кода написано в виде скриптов и интерфейсов командной строки (CLI).
Инструменты и интерфейсы командной строки — эффективная вещь, так как они позволяют автоматизировать практически всё что угодно. Как следствие, эти интерфейсы с течением времени могут стать довольно сложными.
Обычно всё начинается с простого скрипта на Python, который что-то делает. Например, получает доступ к веб-API и выводит результат в консоль:
# print_user_agent.py
import requests

json = requests.get('http://httpbin.org/user-agent').json()
print(json['user-agent'])
Вы можете запустить этот скрипт с помощью команды python3 print_user_agent.py, и он выведет имя user-agent, использованного для вызова API.
Как и было сказано, довольно простой скрипт.
Но что делать, когда подобная программа растёт и становится всё более сложной?
Решением этого вопроса мы сегодня и займёмся. Вы узнаете об основах написания интерфейсов командной строки на Python и о том, как click позволяет упростить этот процесс.
Используя эти знания, мы шаг за шагом перейдём от простого скрипта к интерфейсу командной строки с аргументами, опциями и полезными инструкциями по использованию. Всё это мы сделаем с помощью библиотеки click.
К концу этой статьи вы будете знать:
- Почему click — лучшая альтернатива argparse и optparse;
- Как с его помощью создать простой CLI;
- Как добавить обязательные аргументы командной строки в ваши скрипты;
- Как парсить флаги и опции командной строки;
- Как сделать ваши консольные приложения более удобными, добавив справочный текст.
Вы увидите, как сделать всё это с минимальным количеством шаблонного кода.
Примечание переводчика Код в данной статье написан на Python 3.6, работоспособность на более ранних версиях не гарантируется.
Итак, начнём!
Код выше — всего лишь пример, не очень полезный в реальной жизни. На самом деле скрипты бывают куда более сложные. Возможно, вы имели опыт с ними и знаете, что они могут быть важной частью нашей повседневной работы: некоторые скрипты остаются на протяжении всего времени жизни проекта, для которого они были написаны. Некоторые начинают приносить пользу другим командам или проектам. У них даже может расширяться функционал.
В этих случаях важно сделать скрипты более гибкими и настраиваемыми с помощью параметров командной строки. Они позволяют указать имя сервера, учётные данные или любую другую информацию скрипту.
Здесь приходят на выручку такие модули, как optparse и argparse, которые делают нашу жизнь на порядок проще. Но прежде чем мы с ними познакомимся, давайте разберёмся с терминологией.
Основы интерфейса командной строки
Интерфейс командной строки (CLI) начинается с имени исполняемого файла. Вы вводите имя в консоль и получаете доступ к главной точке входа скрипта, такого как pip.
В зависимости от сложности CLI обычно есть определённые параметры, которые вы можете передавать скрипту:
- Аргумент, который является обязательным параметром. Если его не передать, то CLI вернёт ошибку. Например, в следующей команде click является аргументом:
pip install click. - Опция — необязательный параметр, который объединяет имя и значение, например
--cache-dir ./my-cache. Вы говорите CLI, что значение./my-cacheдолжно использоваться как директория для кэша. - Флаг, который включает или выключает определённый сценарий. Вероятно, самым частым является
--help. Вы только указываете имя, а CLI самостоятельно интерпретирует значение.
С более сложными CLI, такими как pip или Heroku CLI, вы получаете доступ к набору функций, которые собраны под главной точкой входа. Они обычно называются командами или подкомандами.
Возможно, вы уже использовали CLI, когда устанавливали Python-библиотеку с помощью команды pip install <имя пакета>. Команда install говорит CLI, что вы хотите использовать функцию установки пакета, и даёт вам доступ к параметрам, характерным для этой функции.
Пакеты для работы с командной строкой, доступные в стандартной библиотеке Python 3.x
Добавление команд и параметров в ваши скрипты может сделать их значительно лучше, но парсить командную строку не так просто, как может показаться. Однако вместо того, чтобы пытаться самостоятельно решить эту проблему, лучше воспользоваться одним из многих пакетов, которые сделали это за вас.
Два наиболее известных пакета для этого — optparse и argparse. Они являются частью стандартной библиотеки Python и добавлены туда по принципу «всё включено».
По большей части они делают одно и то же и работают схожим образом. Главное отличие заключается в том, что optparse не используется начиная с Python 3.2, и argparse считается стандартом для создания CLI в Python.
Вы можете узнать о них больше в документации Python, но, чтобы иметь представление, как выглядит скрипт с argparse, посмотрите на пример ниже:
import argparse

parser = argparse.ArgumentParser(description='Process some integers.')
parser.add_argument('integers', metavar='N', type=int, nargs='+',
                    help='an integer for the accumulator')
parser.add_argument('--sum', dest='accumulate', action='store_const',
                    const=sum, default=max,
                    help='sum the integers (default: find the max)')

args = parser.parse_args()
print(args.accumulate(args.integers))
click против argparse: лучшая альтернатива?
Вероятно, вы смотрите на этот код и думаете: «Что это всё значит?» И это является одной из проблем argparse: код с ним неинтуитивен и сложночитаем.
Поэтому вам может понравиться click.
Click решает ту же проблему, что и optparse и argparse, но немного иначе. Он использует декораторы, поэтому ваши команды должны быть функциями, которые можно обернуть этими декораторами.
С click легко создавать многофункциональный CLI с небольшим количеством кода. И этот код будет легко читаться, даже когда ваш CLI вырастет и станет более сложным.
Пишем простой CLI на Python с помощью click
Вдоволь поговорив о CLI и библиотеках, давайте взглянем на пример, чтобы понять, как написать простой CLI с click. Как и в первом примере, мы создаём простой CLI, который выводит результат в консоль. Это несложно:
# cli.py
import click

@click.command()
def main():
    print("I'm a beautiful CLI ✨")

if __name__ == "__main__":
    main()
Не пугайтесь последних двух строк: это то, как Python запускает функцию main при исполнении файла как скрипта.
Как вы видите, всё, что нам нужно сделать — создать функцию и добавить к ней декоратор @click.command(). Он превращает функцию в команду, которая является главной точкой входа нашего скрипта. Теперь вы можете запустить скрипт через командную строку и увидеть что-то вроде этого:
$ python3 cli.py
I'm a beautiful CLI ✨
Что в click здорово, так это то, что мы получаем некоторые дополнительные возможности просто так. Мы не реализовывали справочную функцию, однако вы можете добавить флаг --help и увидеть базовое сообщение:
$ python3 cli.py --help
Usage: cli.py [OPTIONS]

Options:
  --help  Show this message and exit.
Более реалистичный пример CLI на Python с использованием click
Теперь, когда вы знаете, как click упрощает написание CLI, давайте взглянем на более реалистичный пример. Мы напишем программу, которая позволяет нам взаимодействовать с веб-API.
API, который мы дальше будем использовать, — OpenWeatherMap API. Он предоставляет информацию о текущей погоде, а также прогноз на пять дней для определённого местоположения. Мы начнём с тестового API, который возвращает текущую погоду для места.
Прежде чем мы начнём писать код, давайте познакомимся с API. Для этого можно использовать сервис HTTPie, включая онлайн-терминал.
Давайте посмотрим, что случится, когда мы обратимся к API с Лондоном в качестве местоположения:
$ http --body GET http://samples.openweathermap.org/data/2.5/weather
  q==London
  appid==b1b15e88fa797225412429c1c50c122a1
{
    "base": "stations",
    "clouds": {
        "all": 90
    },
    "cod": 200,
    "coord": {
        "lat": 51.51,
        "lon": -0.13
    },
    "dt": 1485789600,
    "id": 2643743,
    "main": {
        "humidity": 81,
        "pressure": 1012,
        "temp": 280.32,
        "temp_max": 281.15,
        "temp_min": 279.15
    },
    "name": "London",
    "sys": {
        "country": "GB",
        "id": 5091,
        "message": 0.0103,
        "sunrise": 1485762037,
        "sunset": 1485794875,
        "type": 1
    },
    "visibility": 10000,
    "weather": [
        {
            "description": "light intensity drizzle",
            "icon": "09d",
            "id": 300,
            "main": "Drizzle"
        }
    ],
    "wind": {
        "deg": 80,
        "speed": 4.1
    }
}
Если вы смущены наличием API-ключа в примере сверху, не переживайте, это тестовый API-ключ, предоставляемый сервисом.
Более важное наблюдение заключается в том, что мы отправляем два параметра (обозначаемые == при использовании HTTPie), чтобы узнать текущую погоду:
q— место, в котором мы хотим узнать погоду;appid— наш API-ключ.
Это позволяет нам создать простую реализацию на Python с использованием библиотеки requests (опустим обработку ошибок и неудачных запросов для простоты):
import requests

SAMPLE_API_KEY = 'b1b15e88fa797225412429c1c50c122a1'

def current_weather(location, api_key=SAMPLE_API_KEY):
    url = 'http://samples.openweathermap.org/data/2.5/weather'

    query_params = {
        'q': location,
        'appid': api_key,
    }

    response = requests.get(url, params=query_params)

    return response.json()['weather'][0]['description']
Эта функция делает простой запрос к API, используя два параметра. В качестве обязательного аргумента она принимает location (местоположение), которое должно быть строкой. Также мы можем указать API-ключ, передавая параметр api_key при вызове функции. Это необязательно, так как по умолчанию используется тестовый ключ.
И вот мы видим текущую погоду в Python REPL:
>>> current_weather('London')
'light intensity drizzle'  # впрочем, ничего нового ?
Парсим обязательные параметры с click
Простая функция current_weather позволяет нам создать CLI с местоположением, указанным пользователем. Это должно работать примерно так:
$ python3 cli.py London
The weather in London right now: light intensity drizzle.
Как вы, возможно, догадались, местоположение — это аргумент, поскольку оно является обязательным параметром для нашего погодного CLI.
Как нам сделать это при помощи click? Всё довольно просто, мы используем декоратор под названием argument. Кто бы мог подумать?
Давайте возьмём наш предыдущий пример и слегка изменим его, добавив аргумент location:
@click.command()
@click.argument('location')
def main(location):
    weather = current_weather(location)
    print(f"The weather in {location} right now: {weather}.")
Если этот print выглядит для вас странно, не волнуйтесь — это новый способ форматирования строк в Python 3.6+, который называется f-форматированием.
Как вы видите, всё, что нам нужно сделать, это добавить дополнительный декоратор к нашей функции main и дать ему имя. Click использует имя в качестве имени аргумента, переданного обёрнутой функции.
Примечание переводчика Имя аргумента, переданное click, должно совпадать с именем аргумента в объявлении функции.
В нашем случае значение аргумента командной строки location будет передано функции main в качестве аргумента location. Логично, не так ли?
Также вы можете использовать тире в именах, например api-key, которые click переведёт в snake case для имени аргумента в функции, например main(api_key).
Реализация main просто использует нашу функцию current_weather для получения погоды в указанном месте. И затем мы с помощью print выводим полученную информацию.
Готово!
Парсим опциональные параметры с click
Как вы, возможно, догадались, тестовый API ограничивает нас в возможностях. Поэтому, прежде чем мы продолжим, зарегистрируйтесь и получите настоящий API-ключ.
Первое, что нам нужно изменить, — URL, откуда берутся данные о текущей погоде. Это можно сделать, изменив значение переменной url в функции current_weather на URL, указанный в документации OpenWeatherMap:
def current_weather(location, api_key=SAMPLE_API_KEY):
    url = 'https://api.openweathermap.org/data/2.5/weather'

    # дальше всё остаётся как было
    ...
Это изменение приведёт к неработоспособности нашего CLI, так как указанный API-ключ не работает с реальным API. Поэтому давайте добавим новый параметр в наш CLI, который позволит нам указывать API-ключ. Но сначала мы должны решить, будет ли этот параметр аргументом или опцией. Мы сделаем его опцией, так как добавление параметра вроде --api-key делает его более явным и говорящим за себя.
Мы хотим, чтобы наша программа запускалась таким образом:
$ python3 cli.py --api-key  London
The weather in London right now: light intensity drizzle.
Проще простого. Посмотрим, как добавить опцию к нашей существующей команде:
@click.command()
@click.argument('location')
@click.option('--api-key', '-a')
def main(location, api_key):
    weather = current_weather(location, api_key)
    print(f"The weather in {location} right now: {weather}.")
И снова мы добавляем декоратор к нашей функции main. В этот раз мы используем декоратор с говорящим именем @click.option и указываем имя для нашей опции, начинающееся с двух тире. Как вы видите, мы также можем указать сокращение для нашей опции с одним тире, чтобы сэкономить пользователю немного времени.
Как было сказано ранее, click создаёт аргумент для передачи в функцию main из длинного варианта имени. В случае с опцией он убирает впередистоящие тире и переводит её в snake case. Таким образом, --api-key становится api_key.
Чтобы всё заработало, осталось лишь передать API-ключ в функцию current_weather.
Мы добавили возможность указывать свой собственный ключ и проверять погоду в любом месте:
$ python3 cli.py --api-key  Canmore
The weather in Canmore right now: broken clouds.
Добавляем автоматически генерируемые инструкции по использованию
Можете себя похвалить, вы создали отличный небольшой CLI почти без шаблонного кода. Однако прежде чем вы решите отдохнуть, давайте убедимся, что новый пользователь будет знать, как пользоваться нашим CLI, путём добавления документации. Не бойтесь, всё будет просто.
Сначала давайте проверим, что выведет флаг --help после всех сделанных изменений. Довольно неплохо, учитывая что мы не приложили к этому никаких усилий:
$ python3 cli.py --help
Usage: cli.py [OPTIONS] LOCATION

Options:
  -a, --api-key TEXT
  --help              Show this message and exit.
Первое, что нужно исправить, это добавить описание для нашей опции с API-ключом. Всё, что нам для этого нужно сделать, — добавить справочный текст в декоратор @click.option:
@click.command()
@click.argument('location')
@click.option(
    '--api-key', '-a',
    help='your API key for the OpenWeatherMap API',
)
def main(location, api_key):
    ...
Второе (и последнее), что мы сделаем, — добавим документацию для всей click-команды. Самый простой и самый питонический способ сделать это — добавить строку документации в нашу функцию main. Да, нам в любом случае нужно сделать это, поэтому это не лишняя работа:
...
def main(location, api_key):
    """
    A little weather tool that shows you the current weather in a LOCATION of
    your choice. Provide the city name and optionally a two-digit country code.
    Here are two examples:

    1. London,UK

    2. Canmore

    You need a valid API key from OpenWeatherMap for the tool to work. You can
    sign up for a free account at https://openweathermap.org/appid.
    """
    ...
Сложив всё вместе, мы получаем хороший вывод для нашего инструмента:
$ python3 cli.py --help
Usage: cli.py [OPTIONS] LOCATION

  A little weather tool that shows you the current weather in a LOCATION of
  your choice. Provide the city name and optionally a two-digit country
  code. Here are two examples:

  1. London,UK

  2. Canmore

  You need a valid API key from OpenWeatherMap for the tool to work. You can
  sign up for a free account at https://openweathermap.org/appid.

Options:
  -a, --api-key TEXT  your API key for the OpenWeatherMap API
  --help              Show this message and exit.
Подводим итоги
Итак, в этом уроке мы рассмотрели много всего. Можете гордиться собой, вы написали свой собственный CLI, и всё это с минимальным количеством шаблонного кода! Исходный код ниже доказывает это. Не стесняйтесь использовать его для собственных экспериментов:
import click
import requests

SAMPLE_API_KEY = 'b1b15e88fa797225412429c1c50c122a1'


def current_weather(location, api_key=SAMPLE_API_KEY):
    url = 'https://api.openweathermap.org/data/2.5/weather'

    query_params = {
        'q': location,
        'appid': api_key,
    }

    response = requests.get(url, params=query_params)

    return response.json()['weather'][0]['description']


@click.command()
@click.argument('location')
@click.option(
    '--api-key', '-a',
    help='your API key for the OpenWeatherMap API',
)
def main(location, api_key):
    """
    A little weather tool that shows you the current weather in a LOCATION of
    your choice. Provide the city name and optionally a two-digit country code.
    Here are two examples:
    1. London,UK
    2. Canmore
    You need a valid API key from OpenWeatherMap for the tool to work. You can
    sign up for a free account at https://openweathermap.org/appid.
    """
    weather = current_weather(location, api_key)
    print(f"The weather in {location} right now: {weather}.")


if __name__ == "__main__":
    main()
Перевод статьи «Writing Python Command-Line Tools With Click»
The newer subprocess.check_output and similar commands are supposed to replace os.system. See this page for details. While I can’t test this on Windows (because I don’t have access to any Windows machines), the following should work:
from subprocess import check_output
check_output("dir C:", shell=True)
check_output returns a string of the output from your command. Alternatively, subprocess.call just runs the command and returns the status of the command (usually 0 if everything is okay).
Also note that, in python 3, that string output is now bytes output. If you want to change this into a string, you need something like
from subprocess import check_output
check_output("dir C:", shell=True).decode()
If necessary, you can tell it the kind of encoding your program outputs. The default is utf-8, which typically works fine, but other standard options are here.
Also note that @bluescorpion says in the comments that Windows 10 needs a trailing backslash, as in check_output("dir C:\", shell=True). The double backslash is needed because is a special character in python, so it has to be escaped. (Also note that even prefixing the string with r doesn’t help if is the very last character of the string — r"dir C:" is a syntax error, though r"dir C: " is not.)
I tried something like this, but with no effect:
command = "cmd.exe"
proc = subprocess.Popen(command, stdin = subprocess.PIPE, stdout = subprocess.PIPE)
proc.stdin.write("dir c:\")
![]()
Sven Marnach
558k115 gold badges924 silver badges826 bronze badges
asked Mar 30, 2011 at 13:10
![]()
4
how about simply:
import os
os.system('dir c:\')
answered Mar 30, 2011 at 13:19
![]()
rmflowrmflow
4,3654 gold badges25 silver badges41 bronze badges
0
You probably want to try something like this:
command = "cmd.exe /C dir C:\"
I don’t think you can pipe into cmd.exe… If you are coming from a unix background, well, cmd.exe has some ugly warts!
EDIT: According to Sven Marnach, you can pipe to cmd.exe. I tried following in a python shell:
>>> import subprocess
>>> proc = subprocess.Popen('cmd.exe', stdin = subprocess.PIPE, stdout = subprocess.PIPE)
>>> stdout, stderr = proc.communicate('dir c:\')
>>> stdout
'Microsoft Windows [Version 6.1.7600]rnCopyright (c) 2009 Microsoft Corporatio
n.  All rights reserved.rnrnC:\Python25>More? '
As you can see, you still have a bit of work to do (only the first line is returned), but you might be able to get this to work…
![]()
AlG
14.5k4 gold badges42 silver badges54 bronze badges
answered Mar 30, 2011 at 13:17
![]()
Daren ThomasDaren Thomas
67k40 gold badges150 silver badges199 bronze badges
7
Try:
import os

os.popen("Your command here")
![]()
Wyetro
8,3699 gold badges47 silver badges64 bronze badges
answered Dec 6, 2014 at 7:39
![]()
vezon122vezon122
2312 silver badges2 bronze badges
1
Using ‘ and » at the same time works great for me (Windows 10, python 3)
import os
os.system('"some cmd command here"')
for example to open my web browser I can use this:
os.system(r'"C:Program Files (x86)GoogleChromeApplicationchrome.exe"')
(Edit)
for an easier way to open your browser I can use this:
import webbrowser
webbrowser.open('website or leave it alone if you only want to open the
browser')
![]()
answered Jan 22, 2020 at 2:48
![]()
AndrewMZAndrewMZ
1411 silver badge4 bronze badges
1
Try adding a call to proc.stdin.flush() after writing to the pipe and see if things start behaving more as you expect. Explicitly flushing the pipe means you don’t need to worry about exactly how the buffering is set up.
Also, don’t forget to include a "n" at the end of your command or your child shell will sit there at the prompt waiting for completion of the command entry.
I wrote about using Popen to manipulate an external shell instance in more detail at: Running three commands in the same process with Python
As was the case in that question, this trick can be valuable if you need to maintain shell state across multiple out-of-process invocations on a Windows machine.
![]()
answered Mar 30, 2011 at 14:33
![]()
ncoghlanncoghlan
39.4k10 gold badges71 silver badges79 bronze badges
1
Taking some inspiration from Daren Thomas’s answer (and edit), try this:
proc = subprocess.Popen('dir C:\', shell=True, stdin=subprocess.PIPE, stdout=subprocess.PIPE)
out, err = proc.communicate()
out will now contain the text output.
They key nugget here is that the subprocess module already provides you shell integration with shell=True, so you don’t need to call cmd.exe directly.
As a reminder, if you’re in Python 3, this is going to be bytes, so you may want to do out.decode() to convert to a string.
answered Feb 28, 2019 at 18:09
![]()
gkimseygkimsey
5196 silver badges13 bronze badges
Why do you want to call cmd.exe ? cmd.exe is a command line (shell). If you want to change directory, use os.chdir("C:\"). Try not to call external commands if Python can provide it. In fact, most operating system commands are provide through the os module (and sys). I suggest you take a look at os module documentation to see the various methods available.
answered Mar 30, 2011 at 13:25
![]()
kurumikurumi
24.9k4 gold badges44 silver badges51 bronze badges
It’s very simple. You need just two lines of code with just using the built-in function and also it takes the input and runs forever until you stop it. Also that ‘cmd’ in quotes, leave it and don’t change it. Here is the code:
import os
os.system('cmd')
Now just run this code and see the whole windows command prompt in your python project!
answered Jan 21, 2021 at 12:23
![]()
0
Here’s a way to just execute a command line command and get its output using the subprocess module:
import subprocess
# You can put the parts of your command in the list below or just use a string directly.
command_to_execute = ["echo", "Test"]

run = subprocess.run(command_to_execute, capture_output=True)

print(run.stdout) # the output "Test"
print(run.stderr) # the error part of the output
Just don’t forget the capture_output=True argument and you’re fine. Also, you will get the output as a binary string (b"something" in Python), but you can easily convert it using run.stdout.decode().
answered Sep 28, 2021 at 16:41
![]()
palschpalsch
4,9084 gold badges21 silver badges32 bronze badges
In Python, you can use CMD commands using these lines :
import os

os.system("YOUR_COMMAND_HERE")
Just replace YOUR_COMMAND_HERE with the command you like.
answered Nov 1, 2022 at 19:28
![]()
X1525X1525
251 silver badge7 bronze badges
From Python you can do directly using below code
import subprocess
proc = subprocess.check_output('C:WindowsSystem32cmd.exe /k %windir%System32\reg.exe ADD HKLMSOFTWAREMicrosoftWindowsCurrentVersionPoliciesSystem /v EnableLUA /t REG_DWORD /d 0 /f' ,stderr=subprocess.STDOUT,shell=True)
    print(str(proc))
in first parameter just executed User Account setting you may customize with yours.
![]()
Dharman♦
29.3k21 gold badges80 silver badges131 bronze badges
answered Nov 9, 2020 at 7:00
![]()
Abhishek ChaubeyAbhishek Chaubey
2,9601 gold badge17 silver badges24 bronze badges
Содержание
- Обработка аргументов командной строки. Запуск программы с аргументами
- Примеры без использования argparse
- Использование библиотеки argparse
- Простейший случай
- Добавляем именованные параметры
- Упражнение 1
- Декораторы
- Упражнение 2
- Передача декоратором аргументов в функцию
- Упражнение 3
- Упражнение 4
Обработка аргументов командной строки. Запуск программы с аргументами
Параметры запуска, задаваемые через командную строку, чаще всего используют консольные программы, хотя программы с графическим интерфейсом тоже не брезгуют этой возможностью. Наверняка в жизни каждого программиста была ситуация, когда приходилось разбирать параметры командной строки, как правило, это не самая интересная часть программы, но без нее не обойтись. Эта статья посвящена тому, как Python облегчает жизнь программистам при решении этой задачи благодаря своей стандартной библиотеке argparse.
Примеры без использования argparse
Путь для начала у нас есть простейший скрипт на Python. Для определенности назовем скрипт coolprogram.py, это будет классический Hello World, над которым мы будем работать
if __name__ == "__main__":
   print ("Привет, мир!")
Мы завершили эту сложнейшую программу и отдали ее заказчику, он доволен, но просит добавить в нее возможность указывать имя того, кого приветствуем, причем этот параметр может быть не обязательным. Т.е. программа может использоваться двумя путями:
$ python coolprogram.py
или
$ python coolprogram.py Вася
Мы можем воспользоваться переменной argv из модуля sys. sys.argv содержит список параметров, переданных программе через командную строку, причем нулевой элемент списка — это имя нашего скрипта. Т.е. если у нас есть следующий скрипт с именем params.py:
import sys

if __name__ == "__main__":
    for param in sys.argv:
        print (param)
и мы запускаем его с помощью команды
python params.py
то в консоль будет выведена единственная строка:
params.py
Если же мы добавим несколько параметров,
python params.py param1 param2 param3
то эти параметры мы увидим в списке sys.argv, начиная с первого элемента:
params.py
param1
param2
param3
Здесь можно обратить внимание на то, что ссылка на интерпретатор Python в список этих параметров не входит, хотя он также присутствует в строке вызова нашего скрипта.
Вернемся к нашей задаче. Погрузившись в код на неделю, мы могли бы выдать заказчику следующий скрипт:
import sys

if __name__ == "__main__":
    if len (sys.argv) > 1:
        print ("Привет, {}!".format (sys.argv[1] ) )
    else:
        print ("Привет, мир!")
Теперь, если программа вызывается с помощью команды
python coolprogram.py
то результат будет прежний
Привет, мир!
а если мы добавим параметр:
python coolprogram.py Вася
то программа поприветствует некоего Васю:
Привет, Вася!
Пока все легко и никаких проблем не возникает. Теперь предположим, что требования заказчика вновь изменились, и на этот раз он хочет, чтобы имя приветствуемого человека передавалось после именованного параметра —name или -n, причем нужно следить, что в командной строке передано только одно имя. С этого момента у нас начнется вермишель из конструкций if.
import sys

if __name__ == "__main__":
    if len (sys.argv) == 1:
        print ("Привет, мир!")
    else:
        if len (sys.argv) < 3:
            print ("Ошибка. Слишком мало параметров.")
            sys.exit (1)

        if len (sys.argv) > 3:
            print ("Ошибка. Слишком много параметров.")
            sys.exit (1)

        param_name = sys.argv[1]
        param_value = sys.argv[2]

        if (param_name == "--name" or
                param_name == "-n"):
            print ("Привет, {}!".format (param_value) )
        else:
            print ("Ошибка. Неизвестный параметр '{}'".format (param_name) )
            sys.exit (1)
Здесь мы проверяем ситуацию, что мы вообще не передали ни одного параметра, потом проверяем, что дополнительных параметров у нас ровно два, что они называются именно —name или -n, и, если нас все устраивает, выводим приветствие.
Как видите, код превратился в тихий ужас. Изменить логику работы в нем в дальнейшем будет очень сложно, а при увеличении количества параметров нужно будет срочно применять объектно-ориентированные меры по отделению логики работы программы от разбора командной строки. Разбор командной строки мы могли бы выделить в отдельный класс (или классы), но мы этого здесь делать не будем, поскольку все уже сделано в стандартной библиотеке Python, которая называется argparse.
Но перед тем, как перейти к библиотеке argparse, еще немного остановимся на sys.
Модуль sys обеспечивает доступ к некоторым переменным и функциям, взаимодействующим с интерпретатором python.
Самыми полезными являются:
- sys.argv — список аргументов командной строки, передаваемых сценарию Python. sys.argv[0] является именем скрипта (пустой строкой в интерактивной оболочке).
- sys.exit([arg]) — выход из Python. Функция exit принимает необязательный аргумент, обычно целое число, которое дает статус выхода. Ноль считается как успешное завершение. Обязательно проверьте, имеет ли ваша операционная система какие-либо особые значения для своих статусов выхода, чтобы вы могли следить за ними в своем собственном приложении. Обратите внимание на то, что когда вы вызываете exit, это вызовет исключение SystemExit, которое позволяет функциям очистки работать в конечных пунктах блоков try / except.
- sys.stdin — стандартный поток ввода.
- sys.stdout — стандартный поток вывода.
- sys.stderr — стандартный поток ошибок.
Stdin, stdout и stderr сопоставляются с файловыми объектами, которые соответствуют стандартным входам, выходам и потокам ошибок интерпретатора соответственно. Функция stdin используется для всех входов, используемых интерпретатором (за исключением скриптов), тогда как stdout используется для выходов операторов print. Эти потоки вывода можно переопределить, например для перенаправления логов вывода в графический интерфейс или в файл.- sys.__stdin__, sys.__stdout__, sys.__stderr__ — исходные значения потоков ввода, вывода и ошибок.
Использование библиотеки argparse
Простейший случай
Как как было сказано выше, стандартная библиотека argparse предназначена для облегчения разбора командной строки. На нее можно возложить проверку переданных параметров: их количество и обозначения, а уже после того, как эта проверка будет выполнена автоматически, использовать полученные параметры в логике своей программы.
Основа работы с командной строкой в библиотеке argparse является класс ArgumentParser. У его конструктора и методов довольно много параметров, все их рассматривать не будем, поэтому в дальнейшем рассмотрим работу этого класса на примерах, попутно обсуждая различные параметры.
Простейший принцип работы с argparse следующий:
- Создаем экземпляр класса ArgumentParser.
- Добавляем в него информацию об ожидаемых параметрах с помощью метода add_argument (по одному вызову на каждый параметр).
- Разбираем командную строку помощью метода parse_args, передавая ему полученные параметры командной строки (кроме нулевого элемента списка sys.argv).
- Начинаем использовать полученные параметры.
Для начала перепишем программу coolprogram.py с единственным параметром так, чтобы она использовала библиотеку argparse. Напомню, что данном случае мы ожидаем следующий синтаксис параметров:
python coolprogram.py [Имя]
Здесь [Имя] является необязательным параметром.
Наша программа с использованием argparse может выглядеть следующим образом:
import sys
import argparse

def createParser ():
    parser = argparse.ArgumentParser()
    parser.add_argument ('name', nargs='?')

    return parser


if __name__ == '__main__':
    parser = createParser()
    namespace = parser.parse_args()

    print (namespace)

    if namespace.name:
        print ("Привет, {}!".format (namespace.name) )
    else:
        print ("Привет, мир!")
На первый взгляд эта программа работает точно так же, как и раньше, хотя есть отличия, но мы их рассмотрим чуть позже. Пока разберемся с тем, что мы понаписали в программе.
Создание парсера вынесено в отдельную функцию, поскольку эта часть программы в будущем будет сильно изменяться и разрастаться. Сначала мы создали экземпляр класса ArgumentParser с параметрами по умолчанию. Что это за параметры, опять же, поговорим чуть позже.
Далее мы добавили ожидаемый параметр в командной строке с помощью метода add_argument. При этом такой параметр будет считаться позиционным, т.е. он должен стоять именно на этом месте и у него не будет никаких предварительных обозначений (мы их добавим позже в виде ‘-n’ или ‘—name’). Если бы мы не добавили именованный параметр nargs=’?’, то этот параметр был бы обязательным. nargs может принимать различные значения. Если бы мы ему присвоили целочисленное значение больше 0, то это бы означало, что мы ожидаем ровно такое же количество передаваемых параметров (точнее, считалось бы, что первый параметр ожидал бы список из N элементов, разделенных пробелами, этот случай мы рассмотрим позже). Также этот параметр может принимать значение ‘?’, ‘+’, ‘*’ и argparse.REMAINDER. Мы их не будем рассматривать, поскольку они важны в сочетании с необязательными именованными параметрами, которые могут располагаться как до, так и после нашего позиционного параметра. Тогда этот параметр будет показывать как интерпретировать список параметров, где будет заканчиваться один список параметров и начинаться другой.
Итак, мы создали парсер, после чего можно вызвать его метод parse_args для разбора командной строки. Если мы не укажем никакого параметра, это будет означать равносильно тому, что мы передадим в него все параметры из sys.argv кроме нулевого, который содержит имя нашей программы. т.е.
parser.parse_args (sys.argv[1:])
В качестве результата мы получим экземпляр класса Namespace, который будет содержать в качестве члена имя нашего параметра. Теперь посмотрим, чему же равны наши параметры.
Если мы это сделаем и запустим программу с переданным параметром
python coolprogram.py Вася
, то увидим его в пространстве имен.
Namespace(name='Вася')
Если же теперь мы запустим программу без дополнительных параметров, то это значение будет равно None:
Namespace(name=None)
Мы можем изменить значение по умолчанию, что позволит нам несколько сократить программу. Пусть по умолчанию используется слово ‘мир’, ведь мы его приветствуем, если параметры не переданы. Для этого воспользуемся дополнительным именованным параметром default в методе add_argument.
import sys
import argparse


def createParser ():
    parser = argparse.ArgumentParser()
    parser.add_argument ('name', nargs='?', default='мир')

    return parser


if __name__ == '__main__':
    parser = createParser()
    namespace = parser.parse_args (sys.argv[1:])

    # print (namespace)

    print ("Привет, {}!".format (namespace.name) )
Программа продолжает работать точно также, как и раньше. Вы, наверное, заметили, что в предыдущем примере в метод parse_args ередаются параметры командной строки из sys.argv. Это сделано для того, чтобы показать, что список параметров мы можем передавать явно, при необходимости мы его можем предварительно обработать, хотя это вряд ли понадобится, ведь почти всю обработку можно возложить на плечи библиотеки argparse.
Добавляем именованные параметры
Теперь снова переделаем нашу программу таким образом, чтобы использовать именованные параметры. Напомню, что согласно последнему желанию (в смысле, для данной программы) заказчика имя приветствуемого человека должно передаваться после параметра —name или -n. С помощью pyparse сделать это проще простого — достаточно в качестве первых двух параметров метода add_argument передать эти имена параметров.
import sys
import argparse


def createParser ():
    parser = argparse.ArgumentParser()
    parser.add_argument ('-n', '--name', default='мир')

    return parser


if __name__ == '__main__':
    parser = createParser()
    namespace = parser.parse_args(sys.argv[1:])

    # print (namespace)

    print ("Привет, {}!".format (namespace.name) )
Теперь, если мы запустим программу без параметров, то увидим знакомое «Привет, мир!», а если мы запустим программу с помощью команды
python coolprogram.py -n Вася
или
python coolprogram.py --name Вася
То приветствовать программа будет Васю. Обратите внимание, что теперь в методе add_argument мы убрали параметр nargs=’?’ , поскольку все именованные параметры считаются необязательными. А если они не обязательные, то возникает вопрос, как поведет себя argparse, если этот параметр не передан? Для этого уберем параметр default в add_argument.
import sys
import argparse

def createParser ():
    parser = argparse.ArgumentParser()
    parser.add_argument ('-n', '--name')

    return parser


if __name__ == '__main__':
    parser = createParser()
    namespace = parser.parse_args(sys.argv[1:])

    print ("Привет, {}!".format (namespace.name) )
Если теперь запустить программу без параметров, то увидим приветствие великого None:
Привет, None!
Таким образом, если значение по умолчанию не указано, то оно считается равным None.
До этого мы задавали два имени для одного и того же параметра: длинное имя, начинающееся с «—» (—name) и короткое сокращение, начинающее ся с «-» (-n). При этом получение значение параметра из пространства имен осуществляется по длинному имени:
print ("Привет, {}!".format (namespace.name) )
Если мы не зададим длинное имя, то придется обращаться к параметру через его короткое имя (n):
import sys
import argparse

def createParser ():
    parser = argparse.ArgumentParser()
    parser.add_argument ('-n')

    return parser


if __name__ == '__main__':
    parser = createParser()
    namespace = parser.parse_args(sys.argv[1:])

    print (namespace)

    print ("Привет, {}!".format (namespace.n) )
При этом пространство имен будет выглядеть как:
Namespace(n='Вася')
Хорошо, с уменьшением количества имен параметров разобрались, но мы можем еще и увеличить количество имен, например, мы можем добавить для того же параметра еще новое имя —username, для этого достаточно его добавить следующим параметром метода add_argument:
import sys
import argparse

def createParser ():
    parser = argparse.ArgumentParser()
    parser.add_argument ('-n', '--name', '--username')

    return parser


if __name__ == '__main__':
    parser = createParser()
    namespace = parser.parse_args(sys.argv[1:])

    print (namespace)

    print ("Привет, {}!".format (namespace.name) )
Теперь мы можем использовать три варианта передачи параметров:
python coolprogram.py -n Вася
python coolprogram.py —name Вася
python coolprogram.py —username Вася
Все три варианта равнозначны, при этом надо обратить внимание, что при получении значения этого параметра используется первое длинное имя, т.е. name. Пространство имен при использовании всех трех вариантов вызова программы будет выглядеть одинаково:
Namespace(name='Вася')
Для полного погружения во все сложные случаи разбора параметров, можете ознакомиться со статьей https://jenyay.net/Programming/Argparse
Упражнение 1
Напишите консольную программу, которой на вход подается единственное число N (без имени или с именем -n), а программа печатает значение Nго числа Фибоначчи
Декораторы
Декораторы в Python и примеры их практического использования.
Итак, что же это такое? Для того, чтобы понять, как работают декораторы, в первую очередь следует вспомнить, что функции в python являются объектами, соответственно, их можно возвращать из другой функции или передавать в качестве аргумента. Также следует помнить, что функция в python может быть определена и внутри другой функции.
Вспомнив это, можно смело переходить к декораторам. Декораторы — это, по сути, «обёртки», которые дают нам возможность изменить поведение функции, не изменяя её код.
Создадим свой декоратор «вручную»:
def my_shiny_new_decorator(function_to_decorate):
    # Внутри себя декоратор определяет функцию-"обёртку". Она будет обёрнута вокруг декорируемой,
    # получая возможность исполнять произвольный код до и после неё.
    def the_wrapper_around_the_original_function():
        print("Я - код, который отработает до вызова функции")
        function_to_decorate() # Сама функция
        print("А я - код, срабатывающий после")
    # Вернём эту функцию
    return the_wrapper_around_the_original_function

# Представим теперь, что у нас есть функция, которую мы не планируем больше трогать.
def stand_alone_function():
    print("Я простая одинокая функция, ты ведь не посмеешь меня изменять?")

stand_alone_function()
# Однако, чтобы изменить её поведение, мы можем декорировать её, то есть просто передать декоратору,
# который обернет исходную функцию в любой код, который нам потребуется, и вернёт новую,
# готовую к использованию функцию:
stand_alone_function_decorated = my_shiny_new_decorator(stand_alone_function)
stand_alone_function_decorated()
Возможно мы бы хотели, чтобы каждый раз, во время вызова stand_alone_function, вместо неё вызывалась stand_alone_function_decorated. Для этого просто перезапишем stand_alone_function:
stand_alone_function = my_shiny_new_decorator(stand_alone_function)
stand_alone_function()
Собственно, это и есть декораторы. Вот так можно было записать предыдущий пример, используя синтаксис декораторов:
@my_shiny_new_decorator
def another_stand_alone_function():
    print("Оставь меня в покое")

another_stand_alone_function()
То есть, декораторы в python — это просто синтаксическая обертка для конструкций вида:
another_stand_alone_function = my_shiny_new_decorator(another_stand_alone_function)
Можно использовать несколько декораций для функций:
def bread(func):
    def wrapper():
        print()
        func()
        print("<______/>")
    return wrapper

def ingredients(func):
    def wrapper():
        print("#помидоры#")
        func()
        print("~салат~")
    return wrapper

def sandwich(food="--ветчина--"):
    print(food)

sandwich()
sandwich = bread(ingredients(sandwich))
sandwich()
И аналогично через декораторы:
@bread
@ingredients
def sandwich(food="--ветчина--"):
    print(food)

sandwich()
Не забываем, что так как порядок вызова функций имеет значение, то и порядок проставление декораторов так же имеет значение.
Упражнение 2
Напишите функцию, которая получает на вход список чисел и выдает ответ сколько в данном списке четных чисел. Напишите декоратор, который меняет поведение функции следующим образом: если четных чисел нет, то пишет «Нет(» а если их больше 10, то пишет «Очень много»
Передача декоратором аргументов в функцию
Однако, все декораторы, которые мы рассматривали, не имели одного очень важного функционала — передачи аргументов декорируемой функции. Собственно, это тоже несложно сделать.
Текстовый данные в языке пайтон описываются классом str:
def a_decorator_passing_arguments(function_to_decorate):
    def a_wrapper_accepting_arguments(arg1, arg2):
        print("Смотри, что я получил:", arg1, arg2)
        function_to_decorate(arg1, arg2)
    return a_wrapper_accepting_arguments

# Теперь, когда мы вызываем функцию, которую возвращает декоратор, мы вызываем её "обёртку",
# передаём ей аргументы и уже в свою очередь она передаёт их декорируемой функции
@a_decorator_passing_arguments
def print_full_name(first_name, last_name):
    print("Меня зовут", first_name, last_name)

print_full_name("Vasya", "Pupkin")
А теперь попробуем написать декоратор, принимающий аргументы:
def decorator_maker():
    print("Я создаю декораторы! Я буду вызван только раз: когда ты попросишь меня создать декоратор.")
    def my_decorator(func):
        print("Я - декоратор! Я буду вызван только раз: в момент декорирования функции.")
        def wrapped():
            print ("Я - обёртка вокруг декорируемой функции.n"
                   "Я буду вызвана каждый раз, когда ты вызываешь декорируемую функцию.n"
                   "Я возвращаю результат работы декорируемой функции.")
            return func()
        print("Я возвращаю обёрнутую функцию.")
        return wrapped
    print("Я возвращаю декоратор.")
    return my_decorator

# Давайте теперь создадим декоратор. Это всего лишь ещё один вызов функции
new_decorator = decorator_maker()
# Теперь декорируем функцию
def decorated_function():
    print("Я - декорируемая функция.")

decorated_function = new_decorator(decorated_function)
# Теперь наконец вызовем функцию:
decorated_function()
Теперь перепишем данный код с помощью декораторов:
@decorator_maker()
def decorated_function():
    print("Я - декорируемая функция.")

decorated_function()
Вернёмся к аргументам декораторов, ведь, если мы используем функцию, чтобы создавать декораторы «на лету», мы можем передавать ей любые аргументы, верно?
def decorator_maker_with_arguments(decorator_arg1, decorator_arg2):
    print("Я создаю декораторы! И я получил следующие аргументы:",
           decorator_arg1, decorator_arg2)
    def my_decorator(func):
        print("Я - декоратор. И ты всё же смог передать мне эти аргументы:",
               decorator_arg1, decorator_arg2)
        # Не перепутайте аргументы декораторов с аргументами функций!
        def wrapped(function_arg1, function_arg2):
            print ("Я - обёртка вокруг декорируемой функции.n"
                   "И я имею доступ ко всем аргументамn"
                   "t- и декоратора: {0} {1}n"
                   "t- и функции: {2} {3}n"
                   "Теперь я могу передать нужные аргументы дальше"
                   .format(decorator_arg1, decorator_arg2,
                           function_arg1, function_arg2))
            return func(function_arg1, function_arg2)
        return wrapped
    return my_decorator

@decorator_maker_with_arguments("Леонард", "Шелдон")
def decorated_function_with_arguments(function_arg1, function_arg2):
    print ("Я - декорируемая функция и я знаю только о своих аргументах: {0}"
           " {1}".format(function_arg1, function_arg2))

decorated_function_with_arguments("Раджеш", "Говард")
Таким образом, мы можем передавать декоратору любые аргументы, как обычной функции.
- Некоторые особенности работы с декораторами
-
- Декораторы несколько замедляют вызов функции, не забывайте об этом.
- Вы не можете «раздекорировать» функцию. Безусловно, существуют трюки, позволяющие создать декоратор, который можно отсоединить от функции, но это плохая практика. Правильнее будет запомнить, что если функция декорирована — это не отменить.
- Декораторы оборачивают функции, что может затруднить отладку.
Упражнение 3
Напишите декоратор swap, который делает так, что задекорированная функция принимает все свои неименованные аргументы в порядке, обратном тому, в котором их передали (для аргументов с именем не вполне правильно учитывать порядок, в котором они были переданы).
Пример ожидаемого поведения:
@swap
def div(x, y, show=False):
    res = x / y
    if show:
        print(res)
    return res

div(2, 4, show=True)
>>> 2.0
Упражнение 4
- Напишите декоратор, который принимает в качестве аргумента путь к файлу. Если данный декоратор добавить к функции, то в указанный файл будет логироваться информация вида:
-
- Время вызова функции
- Входящие аргументы
- Ответ return (если есть, если нет то логгировать ‘-‘)
- Время завершения работы функции
- Время работы функции
Создания утилит командной строки на Python.
Модуль click — это пакет Python для создания красивых интерфейсов командной строки компонуемым способом с минимальным количеством кода, насколько это необходимо. Он легко настраивается, но по умолчанию поставляется с разумными настройками.
Он направлен на то, чтобы сделать процесс написания инструментов командной строки быстрым и увлекательным, а также предотвратить любое разочарование, вызванное невозможностью реализовать предполагаемый API CLI.
- Произвольное вложение команд.
- Автоматическое создание справки по параметрам командной строки.
- Поддерживает отложенную загрузку подкоманд во время выполнения.
- Меньшее количество кода по сравнению с
argparse.
Для быстрого создания утилит командной строки из имеющихся функций можно использовать сторонний модуль
fire.
Почему именно click, а не встроенный модуль argparse?
Модуль argparse имеет некоторые особенности поведения, которые затрудняют обработку произвольных интерфейсов командной строки:
-
argparseимеет встроенное поведение, которое пытается угадать, является ли что-то параметром или опцией. Такое поведение становится непредсказуемым при работе со сценариями, в которых не используется часть опций и/или параметров. -
argparseне поддерживает отключение перемежающихся аргументов. Без этой функции невозможно безопасно реализовать вложенный синтаксический анализ, например как вclick.
Установка модуля click в виртуальное окружение.
# создаем виртуальное окружение, если нет
$ python3 -m venv .venv --prompt VirtualEnv
# активируем виртуальное окружение
$ source .venv/bin/activate
# ставим модуль click
(VirtualEnv):~$ python3 -m pip install -U click
Содержание:
- Простой пример сценария с модулем
click;- Модуль
clickи пакетsetuptools;
- Модуль
- Базовые концепции модуля
click;- Создание команды;
- Функция
click.echo(); - Вложенные команды;
- Отложенная регистрация подкоманд;
- Добавление параметров командной строки.
Простой пример сценария с модулем click:
import click

@click.command()
@click.option('--count', default=1, help='Number of greetings.')
@click.option('--name', prompt='Your name', help='The person to greet.')
def hello(count, name):
    """Приветствует ИМЯ (`name`), несколько (`count`) раз."""
    for x in range(count):
        click.echo(f"Hello {name}!")

if __name__ == '__main__':
    hello()
Если запустить эту программу в командной строке то вывод будет следующим:
$ python hello.py --count=3
# Your name: John
# Hello John!
# Hello John!
# Hello John!
К тому же программа, на основе модуля click автоматически генерирует красивые справочные страницы:
$ python hello.py --help
# Usage: hello.py [OPTIONS]
#
#   Simple program that greets NAME for a total of COUNT times.
#
# Options:
#   --count INTEGER  Number of greetings.
#   --name TEXT      The person to greet.
#   --help           Show this message and exit.
Модуль click и пакет setuptools.
В коде программы, есть блок в конце файла, который выглядит следующим образом: if __name__ == '__main__' :. Традиционно так выглядит автономный файл Python, но есть способ cделать использование написанной утилиты командной строки лучше и проще с помощью инструментов |setuptools|.
:
Во-первых, setuptools автоматически генерирует исполняемые оболочки для Windows, следовательно утилиты командной строки работают и в Windows.
Вторая причина заключается в том, что сценарии setuptools работают с virtualenv в Unix без необходимости активации virtualenv. Это очень полезная концепция, которая позволяет объединить написанные скрипты со всеми зависимостями в виртуальную среду virtualenv.
Базовые концепции модуля click.
Создание команды.
Модуль click основан на объявлении команд через декораторы. Внутри модуля есть интерфейс без декоратора для сложных случаев использования, но он не рекомендуется для высокоуровневого кода.
Функция становится инструментом командной строки, если она декорируется с помощью @click.command(). В самом простом случае, если просто украсить функцию этим декоратором, то она превратится в вызываемый скрипт:
# hello.py
import click

@click.command()
def hello():
    click.echo('Hello World!')

if __name__ == '__main__':
    hello()
Происходит то, что декоратор @click.command() преобразует функцию в команду, которая затем может быть вызвана:
$ python hello.py
# Hello World!

# И соответствующая страница помощи
$ python hello.py --help
# Usage: hello.py [OPTIONS]
#
# Options:
#   --help  Show this message and exit.
Функция click.echo().
Почему в этом примере используется функция click.echo() вместо обычной функции print()? Ответ на этот вопрос заключается в том, что Модуль click пытается последовательно поддерживать различные среды и быть очень надежным, даже если среда настроена неправильно. Click спроектирован, что-бы быть функциональным, по крайней мере, на базовом уровне, даже если все полностью сломано.
Это означает, что функция click.echo() применяет некоторое исправления ошибок в случае, если кодировка терминала настроена неправильно.
Функция click.echo() также поддерживает цвет и другие стили вывода. Она автоматически удалит стили, если выходной поток является файлом. В Windows автоматически устанавливается и используется модуль colorama.
Вложенные команды.
Для простых сценариев командной строки можно автоматически присоединить и создать подкоманду, при помощи декоратора @click.group().
import click

# создаем группу команд `cli`
@click.group()
def test():
    pass

# обратите внимание на название
# декораторов для вложенных команд

# присоединяем команду `initdb`
@test.command()
def initdb():
    click.echo('Initialized the database')

# присоединяем команду `dropdb`
@test.command()
def dropdb():
    click.echo('Dropped the database')

if __name__ == '__main__':
    test()
В примере выше, декоратор @click.group() расположен над основной функцией/командой test() и создает объект Group с именем этой функции test, которому можно дать несколько подкоманд. Подкоманды украшаются декораторами @group.command(), в примере, это декоратор с именем @test.command().
Отложенная регистрация подкоманд.
Вместо использования декоратора @group.command(), подкоманды могут быть украшены простым декоратором @click.command() и позже зарегистрированы в группе при помощи group.add_command(). Такое поведение может быть использовано для разделения подкоманд на несколько модулей Python.
import click

# создаем команду, с именем `initdb`
@click.command()
def initdb():
    click.echo('Initialized the database')

# создаем команду, с именем `dropdb`
@click.command()
def dropdb():
    click.echo('Dropped the database')

# создаем группу команд, с именем `cli`
@click.group()
def test():
    pass

# добавляем `initdb` и `dropdb` как подкоманды сценария `test`
test.add_command(initdb)
test.add_command(dropdb)

if __name__ == '__main__':
    test()
Добавление параметров командной строки.
# hello.py
import click

@click.command()
@click.option('--count', default=1, help='number of greetings')
@click.argument('name', help='You name')
def hello(count, name):
    """
    This script prints "Hello <NAME>!" COUNT times.

    - <NAME> is your name.
    """
    for x in range(count):
        click.echo(f"Hello {name}!")

if __name__ == '__main__':
    hello()
Запускаем сценарий:
$ python hello.py --count=3 John
# Hello John!
# Hello John!
# Hello John!
Теперь с опцией --help:
$ python hello.py --help
# Usage: hello.py [OPTIONS] NAME
#
#   This script prints "Hello <NAME>!" COUNT times.
#
#   - <NAME> is your name.
#
# Options:
#   --count INTEGER  number of greetings
#   --help           Show this message and exit.
Watch Now This tutorial has a related video course created by the Real Python team. Watch it together with the written tutorial to deepen your understanding: Command Line Interfaces in Python
Adding the capability of processing Python command-line arguments provides a user-friendly interface to your text-based command line program. It’s similar to what a graphical user interface is for a visual application that’s manipulated by graphical elements or widgets.
Python exposes a mechanism to capture and extract your Python command-line arguments. These values can be used to modify the behavior of a program. For example, if your program processes data read from a file, then you can pass the name of the file to your program, rather than hard-coding the value in your source code.
By the end of this tutorial, you’ll know:
- The origins of Python command-line arguments
- The underlying support for Python command-line arguments
- The standards guiding the design of a command-line interface
- The basics to manually customize and handle Python command-line arguments
- The libraries available in Python to ease the development of a complex command-line interface
If you want a user-friendly way to supply Python command-line arguments to your program without importing a dedicated library, or if you want to better understand the common basis for the existing libraries that are dedicated to building the Python command-line interface, then keep on reading!
The Command-Line Interface
A command-line interface (CLI) provides a way for a user to interact with a program running in a text-based shell interpreter. Some examples of shell interpreters are Bash on Linux or Command Prompt on Windows. A command-line interface is enabled by the shell interpreter that exposes a command prompt. It can be characterized by the following elements:
- A command or program
- Zero or more command line arguments
- An output representing the result of the command
- Textual documentation referred to as usage or help
Not every command-line interface may provide all these elements, but this list isn’t exhaustive, either. The complexity of the command line ranges from the ability to pass a single argument, to numerous arguments and options, much like a Domain Specific Language. For example, some programs may launch web documentation from the command line or start an interactive shell interpreter like Python.
The two following examples with the Python command illustrates the description of a command-line interface:
$ python -c "print('Real Python')"
Real Python
In this first example, the Python interpreter takes option -c for command, which says to execute the Python command-line arguments following the option -c as a Python program.
Another example shows how to invoke Python with -h to display the help:
$ python -h
usage: python3 [option] ... [-c cmd | -m mod | file | -] [arg] ...
Options and arguments (and corresponding environment variables):
-b     : issue warnings about str(bytes_instance), str(bytearray_instance)
         and comparing bytes/bytearray with str. (-bb: issue errors)
[ ... complete help text not shown ... ]
Try this out in your terminal to see the complete help documentation.
The C Legacy
Python command-line arguments directly inherit from the C programming language. As Guido Van Rossum wrote in An Introduction to Python for Unix/C Programmers in 1993, C had a strong influence on Python. Guido mentions the definitions of literals, identifiers, operators, and statements like break, continue, or return. The use of Python command-line arguments is also strongly influenced by the C language.
To illustrate the similarities, consider the following C program:
 1// main.c
 2#include <stdio.h>
 3
 4int main(int argc, char *argv[]) {
 5    printf("Arguments count: %dn", argc);
 6    for (int i = 0; i < argc; i++) {
 7        printf("Argument %6d: %sn", i, argv[i]);
 8    }
 9    return 0;
10}
Line 4 defines main(), which is the entry point of a C program. Take good note of the parameters:
argcis an integer representing the number of arguments of the program.argvis an array of pointers to characters containing the name of the program in the first element of the array, followed by the arguments of the program, if any, in the remaining elements of the array.
You can compile the code above on Linux with gcc -o main main.c, then execute with ./main to obtain the following:
$ gcc -o main main.c
$ ./main
Arguments count: 1
Argument      0: ./main
Unless explicitly expressed at the command line with the option -o, a.out is the default name of the executable generated by the gcc compiler. It stands for assembler output and is reminiscent of the executables that were generated on older UNIX systems. Observe that the name of the executable ./main is the sole argument.
Let’s spice up this example by passing a few Python command-line arguments to the same program:
$ ./main Python Command Line Arguments
Arguments count: 5
Argument      0: ./main
Argument      1: Python
Argument      2: Command
Argument      3: Line
Argument      4: Arguments
The output shows that the number of arguments is 5, and the list of arguments includes the name of the program, main, followed by each word of the phrase "Python Command Line Arguments", which you passed at the command line.
The compilation of main.c assumes that you used a Linux or a Mac OS system. On Windows, you can also compile this C program with one of the following options:
- Windows Subsystem for Linux (WSL): It’s available in a few Linux distributions, like Ubuntu, OpenSUSE, and Debian, among others. You can install it from the Microsoft Store.
- Windows Build Tools: This includes the Windows command line build tools, the Microsoft C/C++ compiler
cl.exe, and a compiler front end namedclang.exefor C/C++. - Microsoft Visual Studio: This is the main Microsoft integrated development environment (IDE). To learn more about IDEs that can be used for both Python and C on various operating systems, including Windows, check out Python IDEs and Code Editors (Guide).
- mingw-64 project: This supports the GCC compiler on Windows.
If you’ve installed Microsoft Visual Studio or the Windows Build Tools, then you can compile main.c as follows:
You’ll obtain an executable named main.exe that you can start with:
C:/>main
Arguments count: 1
Argument      0: main
You could implement a Python program, main.py, that’s equivalent to the C program, main.c, you saw above:
# main.py
import sys

if __name__ == "__main__":
    print(f"Arguments count: {len(sys.argv)}")
    for i, arg in enumerate(sys.argv):
        print(f"Argument {i:>6}: {arg}")
You don’t see an argc variable like in the C code example. It doesn’t exist in Python because sys.argv is sufficient. You can parse the Python command-line arguments in sys.argv without having to know the length of the list, and you can call the built-in len() if the number of arguments is needed by your program.
Also, note that enumerate(), when applied to an iterable, returns an enumerate object that can emit pairs associating the index of an element in sys.arg to its corresponding value. This allows looping through the content of sys.argv without having to maintain a counter for the index in the list.
Execute main.py as follows:
$ python main.py Python Command Line Arguments
Arguments count: 5
Argument      0: main.py
Argument      1: Python
Argument      2: Command
Argument      3: Line
Argument      4: Arguments
sys.argv contains the same information as in the C program:
- The name of the program
main.pyis the first item of the list. - The arguments
Python,Command,Line, andArgumentsare the remaining elements in the list.
With this short introduction into a few arcane aspects of the C language, you’re now armed with some valuable knowledge to further grasp Python command-line arguments.
Two Utilities From the Unix World
To use Python command-line arguments in this tutorial, you’ll implement some partial features of two utilities from the Unix ecosystem:
- sha1sum
- seq
You’ll gain some familiarity with these Unix tools in the following sections.
sha1sum
sha1sum calculates SHA-1 hashes, and it’s often used to verify the integrity of files. For a given input, a hash function always returns the same value. Any minor changes in the input will result in a different hash value. Before you use the utility with concrete parameters, you may try to display the help:
$ sha1sum --help
Usage: sha1sum [OPTION]... [FILE]...
Print or check SHA1 (160-bit) checksums.

With no FILE, or when FILE is -, read standard input.

  -b, --binary         read in binary mode
  -c, --check          read SHA1 sums from the FILEs and check them
      --tag            create a BSD-style checksum
  -t, --text           read in text mode (default)
  -z, --zero           end each output line with NUL, not newline,
                       and disable file name escaping
[ ... complete help text not shown ... ]
Displaying the help of a command line program is a common feature exposed in the command-line interface.
To calculate the SHA-1 hash value of the content of a file, you proceed as follows:
$ sha1sum main.c
125a0f900ff6f164752600550879cbfabb098bc3  main.c
The result shows the SHA-1 hash value as the first field and the name of the file as the second field. The command can take more than one file as arguments:
$ sha1sum main.c main.py
125a0f900ff6f164752600550879cbfabb098bc3  main.c
d84372fc77a90336b6bb7c5e959bcb1b24c608b4  main.py
Thanks to the wildcards expansion feature of the Unix terminal, it’s also possible to provide Python command-line arguments with wildcard characters. One such a character is the asterisk or star (*):
$ sha1sum main.*
3f6d5274d6317d580e2ffc1bf52beee0d94bf078  main.c
f41259ea5835446536d2e71e566075c1c1bfc111  main.py
The shell converts main.* to main.c and main.py, which are the two files matching the pattern main.* in the current directory, and passes them to sha1sum. The program calculates the SHA1 hash of each of the files in the argument list. You’ll see that, on Windows, the behavior is different. Windows has no wildcard expansion, so the program may have to accommodate for that. Your implementation may need to expand wildcards internally.
Without any argument, sha1sum reads from the standard input. You can feed data to the program by typing characters on the keyboard. The input may incorporate any characters, including the carriage return Enter. To terminate the input, you must signal the end of file with Enter, followed by the sequence Ctrl+D:
 1$ sha1sum
 2Real
 3Python
 487263a73c98af453d68ee4aab61576b331f8d9d6  -
You first enter the name of the program, sha1sum, followed by Enter, and then Real and Python, each also followed by Enter. To close the input stream, you type Ctrl+D. The result is the value of the SHA1 hash generated for the text RealnPythonn. The name of the file is -. This is a convention to indicate the standard input. The hash value is the same when you execute the following commands:
$ python -c "print('RealnPythonn', end='')" | sha1sum
87263a73c98af453d68ee4aab61576b331f8d9d6  -
$ python -c "print('RealnPython')" | sha1sum
87263a73c98af453d68ee4aab61576b331f8d9d6  -
$ printf "RealnPythonn" | sha1sum
87263a73c98af453d68ee4aab61576b331f8d9d6  -
Up next, you’ll read a short description of seq.
seq
seq generates a sequence of numbers. In its most basic form, like generating the sequence from 1 to 5, you can execute the following:
To get an overview of the possibilities exposed by seq, you can display the help at the command line:
$ seq --help
Usage: seq [OPTION]... LAST
  or:  seq [OPTION]... FIRST LAST
  or:  seq [OPTION]... FIRST INCREMENT LAST
Print numbers from FIRST to LAST, in steps of INCREMENT.

Mandatory arguments to long options are mandatory for short options too.
  -f, --format=FORMAT      use printf style floating-point FORMAT
  -s, --separator=STRING   use STRING to separate numbers (default: n)
  -w, --equal-width        equalize width by padding with leading zeroes
      --help     display this help and exit
      --version  output version information and exit
[ ... complete help text not shown ... ]
For this tutorial, you’ll write a few simplified variants of sha1sum and seq. In each example, you’ll learn a different facet or combination of features about Python command-line arguments.
On Mac OS and Linux, sha1sum and seq should come pre-installed, though the features and the help information may sometimes differ slightly between systems or distributions. If you’re using Windows 10, then the most convenient method is to run sha1sum and seq in a Linux environment installed on the WSL. If you don’t have access to a terminal exposing the standard Unix utilities, then you may have access to online terminals:
- Create a free account on PythonAnywhere and start a Bash Console.
- Create a temporary Bash terminal on repl.it.
These are two examples, and you may find others.
The sys.argv Array
Before exploring some accepted conventions and discovering how to handle Python command-line arguments, you need to know that the underlying support for all Python command-line arguments is provided by sys.argv. The examples in the following sections show you how to handle the Python command-line arguments stored in sys.argv and to overcome typical issues that occur when you try to access them. You’ll learn:
- How to access the content of
sys.argv - How to mitigate the side effects of the global nature of
sys.argv - How to process whitespaces in Python command-line arguments
- How to handle errors while accessing Python command-line arguments
- How to ingest the original format of the Python command-line arguments passed by bytes
Let’s get started!
Displaying Arguments
The sys module exposes an array named argv that includes the following:
argv[0]contains the name of the current Python program.argv[1:], the rest of the list, contains any and all Python command-line arguments passed to the program.
The following example demonstrates the content of sys.argv:
 1# argv.py
 2import sys
 3
 4print(f"Name of the script      : {sys.argv[0]=}")
 5print(f"Arguments of the script : {sys.argv[1:]=}")
Here’s how this code works:
- Line 2 imports the internal Python module
sys. - Line 4 extracts the name of the program by accessing the first element of the list
sys.argv. - Line 5 displays the Python command-line arguments by fetching all the remaining elements of the list
sys.argv.
Execute the script argv.py above with a list of arbitrary arguments as follows:
$ python argv.py un deux trois quatre
Name of the script      : sys.argv[0]='argv.py'
Arguments of the script : sys.argv[1:]=['un', 'deux', 'trois', 'quatre']
The output confirms that the content of sys.argv[0] is the Python script argv.py, and that the remaining elements of the sys.argv list contains the arguments of the script, ['un', 'deux', 'trois', 'quatre'].
To summarize, sys.argv contains all the argv.py Python command-line arguments. When the Python interpreter executes a Python program, it parses the command line and populates sys.argv with the arguments.
Reversing the First Argument
Now that you have enough background on sys.argv, you’re going to operate on arguments passed at the command line. The example reverse.py reverses the first argument passed at the command line:
 1# reverse.py
 2
 3import sys
 4
 5arg = sys.argv[1]
 6print(arg[::-1])
In reverse.py the process to reverse the first argument is performed with the following steps:
- Line 5 fetches the first argument of the program stored at index
1ofsys.argv. Remember that the program name is stored at index0ofsys.argv. - Line 6 prints the reversed string.
args[::-1]is a Pythonic way to use a slice operation to reverse a list.
You execute the script as follows:
$ python reverse.py "Real Python"
nohtyP laeR
As expected, reverse.py operates on "Real Python" and reverses the only argument to output "nohtyP laeR". Note that surrounding the multi-word string "Real Python" with quotes ensures that the interpreter handles it as a unique argument, instead of two arguments. You’ll delve into argument separators in a later section.
Mutating sys.argv
sys.argv is globally available to your running Python program. All modules imported during the execution of the process have direct access to sys.argv. This global access might be convenient, but sys.argv isn’t immutable. You may want to implement a more reliable mechanism to expose program arguments to different modules in your Python program, especially in a complex program with multiple files.
Observe what happens if you tamper with sys.argv:
# argv_pop.py

import sys

print(sys.argv)
sys.argv.pop()
print(sys.argv)
You invoke .pop() to remove and return the last item in sys.argv.
Execute the script above:
$ python argv_pop.py un deux trois quatre
['argv_pop.py', 'un', 'deux', 'trois', 'quatre']
['argv_pop.py', 'un', 'deux', 'trois']
Notice that the fourth argument is no longer included in sys.argv.
In a short script, you can safely rely on the global access to sys.argv, but in a larger program, you may want to store arguments in a separate variable. The previous example could be modified as follows:
# argv_var_pop.py

import sys

print(sys.argv)
args = sys.argv[1:]
print(args)
sys.argv.pop()
print(sys.argv)
print(args)
This time, although sys.argv lost its last element, args has been safely preserved. args isn’t global, and you can pass it around to parse the arguments per the logic of your program. The Python package manager, pip, uses this approach. Here’s a short excerpt of the pip source code:
def main(args=None):
    if args is None:
        args = sys.argv[1:]
In this snippet of code taken from the pip source code, main() saves into args the slice of sys.argv that contains only the arguments and not the file name. sys.argv remains untouched, and args isn’t impacted by any inadvertent changes to sys.argv.
Escaping Whitespace Characters
In the reverse.py example you saw earlier, the first and only argument is "Real Python", and the result is "nohtyP laeR". The argument includes a whitespace separator between "Real" and "Python", and it needs to be escaped.
On Linux, whitespaces can be escaped by doing one of the following:
- Surrounding the arguments with single quotes (
') - Surrounding the arguments with double quotes (
") - Prefixing each space with a backslash (
)
Without one of the escape solutions, reverse.py stores two arguments, "Real" in sys.argv[1] and "Python" in sys.argv[2]:
$ python reverse.py Real Python
laeR
The output above shows that the script only reverses "Real" and that "Python" is ignored. To ensure both arguments are stored, you’d need to surround the overall string with double quotes (").
You can also use a backslash () to escape the whitespace:
$ python reverse.py Real Python
nohtyP laeR
With the backslash (), the command shell exposes a unique argument to Python, and then to reverse.py.
In Unix shells, the internal field separator (IFS) defines characters used as delimiters. The content of the shell variable, IFS, can be displayed by running the following command:
$ printf "%qn" "$IFS"
$' tn'
From the result above, ' tn', you identify three delimiters:
- Space (
' ') - Tab (
t) - Newline (
n)
Prefixing a space with a backslash () bypasses the default behavior of the space as a delimiter in the string "Real Python". This results in one block of text as intended, instead of two.
Note that, on Windows, the whitespace interpretation can be managed by using a combination of double quotes. It’s slightly counterintuitive because, in the Windows terminal, a double quote (") is interpreted as a switch to disable and subsequently to enable special characters like space, tab, or pipe (|).
As a result, when you surround more than one string with double quotes, the Windows terminal interprets the first double quote as a command to ignore special characters and the second double quote as one to interpret special characters.
With this information in mind, it’s safe to assume that surrounding more than one string with double quotes will give you the expected behavior, which is to expose the group of strings as a single argument. To confirm this peculiar effect of the double quote on the Windows command line, observe the following two examples:
C:/>python reverse.py "Real Python"
nohtyP laeR
In the example above, you can intuitively deduce that "Real Python" is interpreted as a single argument. However, realize what occurs when you use a single double quote:
C:/>python reverse.py "Real Python
nohtyP laeR
The command prompt passes the whole string "Real Python" as a single argument, in the same manner as if the argument was "Real Python". In reality, the Windows command prompt sees the unique double quote as a switch to disable the behavior of the whitespaces as separators and passes anything following the double quote as a unique argument.
For more information on the effects of double quotes in the Windows terminal, check out A Better Way To Understand Quoting and Escaping of Windows Command Line Arguments.
Handling Errors
Python command-line arguments are loose strings. Many things can go wrong, so it’s a good idea to provide the users of your program with some guidance in the event they pass incorrect arguments at the command line. For example, reverse.py expects one argument, and if you omit it, then you get an error:
 1$ python reverse.py
 2Traceback (most recent call last):
 3  File "reverse.py", line 5, in <module>
 4    arg = sys.argv[1]
 5IndexError: list index out of range
The Python exception IndexError is raised, and the corresponding traceback shows that the error is caused by the expression arg = sys.argv[1]. The message of the exception is list index out of range. You didn’t pass an argument at the command line, so there’s nothing in the list sys.argv at index 1.
This is a common pattern that can be addressed in a few different ways. For this initial example, you’ll keep it brief by including the expression arg = sys.argv[1] in a try block. Modify the code as follows:
 1# reverse_exc.py
 2
 3import sys
 4
 5try:
 6    arg = sys.argv[1]
 7except IndexError:
 8    raise SystemExit(f"Usage: {sys.argv[0]} <string_to_reverse>")
 9print(arg[::-1])
The expression on line 4 is included in a try block. Line 8 raises the built-in exception SystemExit. If no argument is passed to reverse_exc.py, then the process exits with a status code of 1 after printing the usage. Note the integration of sys.argv[0] in the error message. It exposes the name of the program in the usage message. Now, when you execute the same program without any Python command-line arguments, you can see the following output:
$ python reverse.py
Usage: reverse.py <string_to_reverse>

$ echo $?
1
reverse.py didn’t have an argument passed at the command line. As a result, the program raises SystemExit with an error message. This causes the program to exit with a status of 1, which displays when you print the special variable $? with echo.
Calculating the sha1sum
You’ll write another script to demonstrate that, on Unix-like systems, Python command-line arguments are passed by bytes from the OS. This script takes a string as an argument and outputs the hexadecimal SHA-1 hash of the argument:
 1# sha1sum.py
 2
 3import sys
 4import hashlib
 5
 6data = sys.argv[1]
 7m = hashlib.sha1()
 8m.update(bytes(data, 'utf-8'))
 9print(m.hexdigest())
This is loosely inspired by sha1sum, but it intentionally processes a string instead of the contents of a file. In sha1sum.py, the steps to ingest the Python command-line arguments and to output the result are the following:
- Line 6 stores the content of the first argument in
data. - Line 7 instantiates a SHA1 algorithm.
- Line 8 updates the SHA1 hash object with the content of the first program argument. Note that
hash.updatetakes a byte array as an argument, so it’s necessary to convertdatafrom a string to a bytes array. - Line 9 prints a hexadecimal representation of the SHA1 hash computed on line 8.
When you run the script with an argument, you get this:
$ python sha1sum.py "Real Python"
0554943d034f044c5998f55dac8ee2c03e387565
For the sake of keeping the example short, the script sha1sum.py doesn’t handle missing Python command-line arguments. Error handling could be addressed in this script the same way you did it in reverse_exc.py.
From the sys.argv documentation, you learn that in order to get the original bytes of the Python command-line arguments, you can use os.fsencode(). By directly obtaining the bytes from sys.argv[1], you don’t need to perform the string-to-bytes conversion of data:
 1# sha1sum_bytes.py
 2
 3import os
 4import sys
 5import hashlib
 6
 7data = os.fsencode(sys.argv[1])
 8m = hashlib.sha1()
 9m.update(data)
10print(m.hexdigest())
The main difference between sha1sum.py and sha1sum_bytes.py are highlighted in the following lines:
- Line 7 populates
datawith the original bytes passed to the Python command-line arguments. - Line 9 passes
dataas an argument tom.update(), which receives a bytes-like object.
Execute sha1sum_bytes.py to compare the output:
$ python sha1sum_bytes.py "Real Python"
0554943d034f044c5998f55dac8ee2c03e387565
The hexadecimal value of the SHA1 hash is the same as in the previous sha1sum.py example.
The Anatomy of Python Command-Line Arguments
Now that you’ve explored a few aspects of Python command-line arguments, most notably sys.argv, you’re going to apply some of the standards that are regularly used by developers while implementing a command-line interface.
Python command-line arguments are a subset of the command-line interface. They can be composed of different types of arguments:
- Options modify the behavior of a particular command or program.
- Arguments represent the source or destination to be processed.
- Subcommands allow a program to define more than one command with the respective set of options and arguments.
Before you go deeper into the different types of arguments, you’ll get an overview of the accepted standards that have been guiding the design of the command-line interface and arguments. These have been refined since the advent of the computer terminal in the mid-1960s.
Standards
A few available standards provide some definitions and guidelines to promote consistency for implementing commands and their arguments. These are the main UNIX standards and references:
- POSIX Utility Conventions
- GNU Standards for Command Line Interfaces
- docopt
The standards above define guidelines and nomenclatures for anything related to programs and Python command-line arguments. The following points are examples taken from those references:
- POSIX:
- A program or utility is followed by options, option-arguments, and operands.
- All options should be preceded with a hyphen or minus (
-) delimiter character. - Option-arguments should not be optional.
- GNU:
- All programs should support two standard options, which are
--versionand--help. - Long-named options are equivalent to the single-letter Unix-style options. An example is
--debugand-d.
- All programs should support two standard options, which are
- docopt:
- Short options can be stacked, meaning that
-abcis equivalent to-a -b -c. - Long options can have arguments specified after a space or the equals sign (
=). The long option--input=ARGis equivalent to--input ARG.
- Short options can be stacked, meaning that
These standards define notations that are helpful when you describe a command. A similar notation can be used to display the usage of a particular command when you invoke it with the option -h or --help.
The GNU standards are very similar to the POSIX standards but provide some modifications and extensions. Notably, they add the long option that’s a fully named option prefixed with two hyphens (--). For example, to display the help, the regular option is -h and the long option is --help.
In the following sections, you’ll learn more about each of the command line components, options, arguments, and sub-commands.
Options
An option, sometimes called a flag or a switch, is intended to modify the behavior of the program. For example, the command ls on Linux lists the content of a given directory. Without any arguments, it lists the files and directories in the current directory:
$ cd /dev
$ ls
autofs
block
bsg
btrfs-control
bus
char
console
Let’s add a few options. You can combine -l and -s into -ls, which changes the information displayed in the terminal:
$ cd /dev
$ ls -ls
total 0
0 crw-r--r--  1 root root       10,   235 Jul 14 08:10 autofs
0 drwxr-xr-x  2 root root             260 Jul 14 08:10 block
0 drwxr-xr-x  2 root root              60 Jul 14 08:10 bsg
0 crw-------  1 root root       10,   234 Jul 14 08:10 btrfs-control
0 drwxr-xr-x  3 root root              60 Jul 14 08:10 bus
0 drwxr-xr-x  2 root root            4380 Jul 14 15:08 char
0 crw-------  1 root root        5,     1 Jul 14 08:10 console
An option can take an argument, which is called an option-argument. See an example in action with od below:
$ od -t x1z -N 16 main
0000000 7f 45 4c 46 02 01 01 00 00 00 00 00 00 00 00 00  >.ELF............<
0000020
od stands for octal dump. This utility displays data in different printable representations, like octal (which is the default), hexadecimal, decimal, and ASCII. In the example above, it takes the binary file main and displays the first 16 bytes of the file in hexadecimal format. The option -t expects a type as an option-argument, and -N expects the number of input bytes.
In the example above, -t is given type x1, which stands for hexadecimal and one byte per integer. This is followed by z to display the printable characters at the end of the input line. -N takes 16 as an option-argument for limiting the number of input bytes to 16.
Arguments
The arguments are also called operands or parameters in the POSIX standards. The arguments represent the source or the destination of the data that the command acts on. For example, the command cp, which is used to copy one or more files to a file or a directory, takes at least one source and one target:
 1$ ls main
 2main
 3
 4$ cp main main2
 5
 6$ ls -lt
 7main
 8main2
 9...
In line 4, cp takes two arguments:
main: the source filemain2: the target file
It then copies the content of main to a new file named main2. Both main and main2 are arguments, or operands, of the program cp.
Subcommands
The concept of subcommands isn’t documented in the POSIX or GNU standards, but it does appear in docopt. The standard Unix utilities are small tools adhering to the Unix philosophy. Unix programs are intended to be programs that do one thing and do it well. This means no subcommands are necessary.
By contrast, a new generation of programs, including git, go, docker, and gcloud, come with a slightly different paradigm that embraces subcommands. They’re not necessarily part of the Unix landscape as they span several operating systems, and they’re deployed with a full ecosystem that requires several commands.
Take git as an example. It handles several commands, each possibly with their own set of options, option-arguments, and arguments. The following examples apply to the git subcommand branch:
git branchdisplays the branches of the local git repository.git branch custom_pythoncreates a local branchcustom_pythonin a local repository.git branch -d custom_pythondeletes the local branchcustom_python.git branch --helpdisplays the help for thegit branchsubcommand.
In the Python ecosystem, pip has the concept of subcommands, too. Some pip subcommands include list, install, freeze, or uninstall.
Windows
On Windows, the conventions regarding Python command-line arguments are slightly different, in particular, those regarding command line options. To validate this difference, take tasklist, which is a native Windows executable that displays a list of the currently running processes. It’s similar to ps on Linux or macOS systems. Below is an example of how to execute tasklist in a command prompt on Windows:
C:/>tasklist /FI "IMAGENAME eq notepad.exe"

Image Name                     PID Session Name        Session#    Mem Usage
========================= ======== ================ =========== ============
notepad.exe                  13104 Console                    6     13,548 K
notepad.exe                   6584 Console                    6     13,696 K
Note that the separator for an option is a forward slash (/) instead of a hyphen (-) like the conventions for Unix systems. For readability, there’s a space between the program name, taskslist, and the option /FI, but it’s just as correct to type taskslist/FI.
The particular example above executes tasklist with a filter to only show the Notepad processes currently running. You can see that the system has two running instances of the Notepad process. Although it’s not equivalent, this is similar to executing the following command in a terminal on a Unix-like system:
$ ps -ef | grep vi | grep -v grep
andre     2117     4  0 13:33 tty1     00:00:00 vi .gitignore
andre     2163  2134  0 13:34 tty3     00:00:00 vi main.c
The ps command above shows all the current running vi processes. The behavior is consistent with the Unix Philosophy, as the output of ps is transformed by two grep filters. The first grep command selects all the occurrences of vi, and the second grep filters out the occurrence of grep itself.
With the spread of Unix tools making their appearance in the Windows ecosystem, non-Windows-specific conventions are also accepted on Windows.
Visuals
At the start of a Python process, Python command-line arguments are split into two categories:
-
Python options: These influence the execution of the Python interpreter. For example, adding option
-Ois a means to optimize the execution of a Python program by removingassertand__debug__statements. There are other Python options available at the command line. -
Python program and its arguments: Following the Python options (if there are any), you’ll find the Python program, which is a file name that usually has the extension
.py, and its arguments. By convention, those can also be composed of options and arguments.
Take the following command that’s intended to execute the program main.py, which takes options and arguments. Note that, in this example, the Python interpreter also takes some options, which are -B and -v.
$ python -B -v main.py --verbose --debug un deux
In the command line above, the options are Python command-line arguments and are organized as follows:
- The option
-Btells Python not to write.pycfiles on the import of source modules. For more details about.pycfiles, check out the section What Does a Compiler Do? in Your Guide to the CPython Source Code. - The option
-vstands for verbose and tells Python to trace all import statements. - The arguments passed to
main.pyare fictitious and represent two long options (--verboseand--debug) and two arguments (unanddeux).
This example of Python command-line arguments can be illustrated graphically as follows:
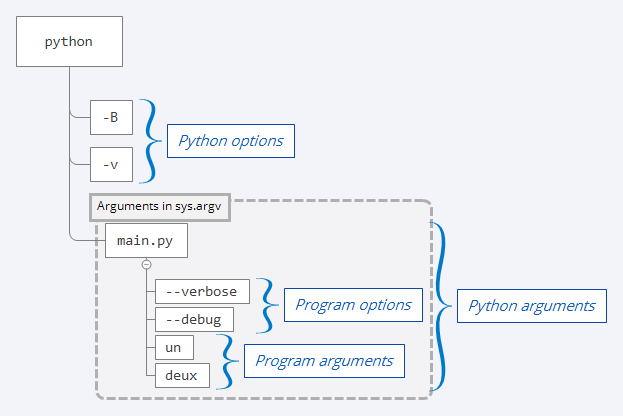
Within the Python program main.py, you only have access to the Python command-line arguments inserted by Python in sys.argv. The Python options may influence the behavior of the program but are not accessible in main.py.
A Few Methods for Parsing Python Command-Line Arguments
Now you’re going to explore a few approaches to apprehend options, option-arguments, and operands. This is done by parsing Python command-line arguments. In this section, you’ll see some concrete aspects of Python command-line arguments and techniques to handle them. First, you’ll see an example that introduces a straight approach relying on list comprehensions to collect and separate options from arguments. Then you will:
- Use regular expressions to extract elements of the command line
- Learn how to handle files passed at the command line
- Apprehend the standard input in a way that’s compatible with the Unix tools
- Differentiate the regular output of the program from the errors
- Implement a custom parser to read Python command-line arguments
This will serve as a preparation for options involving modules in the standard libraries or from external libraries that you’ll learn about later in this tutorial.
For something uncomplicated, the following pattern, which doesn’t enforce ordering and doesn’t handle option-arguments, may be enough:
# cul.py

import sys

opts = [opt for opt in sys.argv[1:] if opt.startswith("-")]
args = [arg for arg in sys.argv[1:] if not arg.startswith("-")]

if "-c" in opts:
    print(" ".join(arg.capitalize() for arg in args))
elif "-u" in opts:
    print(" ".join(arg.upper() for arg in args))
elif "-l" in opts:
    print(" ".join(arg.lower() for arg in args))
else:
    raise SystemExit(f"Usage: {sys.argv[0]} (-c | -u | -l) <arguments>...")
The intent of the program above is to modify the case of the Python command-line arguments. Three options are available:
-cto capitalize the arguments-uto convert the arguments to uppercase-lto convert the argument to lowercase
The code collects and separates the different argument types using list comprehensions:
- Line 5 collects all the options by filtering on any Python command-line arguments starting with a hyphen (
-). - Line 6 assembles the program arguments by filtering out the options.
When you execute the Python program above with a set of options and arguments, you get the following output:
$ python cul.py -c un deux trois
Un Deux Trois
This approach might suffice in many situations, but it would fail in the following cases:
- If the order is important, and in particular, if options should appear before the arguments
- If support for option-arguments is needed
- If some arguments are prefixed with a hyphen (
-)
You can leverage other options before you resort to a library like argparse or click.
Regular Expressions
You can use a regular expression to enforce a certain order, specific options and option-arguments, or even the type of arguments. To illustrate the usage of a regular expression to parse Python command-line arguments, you’ll implement a Python version of seq, which is a program that prints a sequence of numbers. Following the docopt conventions, a specification for seq.py could be this:
Print integers from <first> to <last>, in steps of <increment>.

Usage:
  python seq.py --help
  python seq.py [-s SEPARATOR] <last>
  python seq.py [-s SEPARATOR] <first> <last>
  python seq.py [-s SEPARATOR] <first> <increment> <last>

Mandatory arguments to long options are mandatory for short options too.
  -s, --separator=STRING use STRING to separate numbers (default: n)
      --help             display this help and exit

If <first> or <increment> are omitted, they default to 1. When <first> is
larger than <last>, <increment>, if not set, defaults to -1.
The sequence of numbers ends when the sum of the current number and
<increment> reaches the limit imposed by <last>.
First, look at a regular expression that’s intended to capture the requirements above:
 1args_pattern = re.compile(
 2    r"""
 3    ^
 4    (
 5        (--(?P<HELP>help).*)|
 6        ((?:-s|--separator)s(?P<SEP>.*?)s)?
 7        ((?P<OP1>-?d+))(s(?P<OP2>-?d+))?(s(?P<OP3>-?d+))?
 8    )
 9    $
10""",
11    re.VERBOSE,
12)
To experiment with the regular expression above, you may use the snippet recorded on Regular Expression 101. The regular expression captures and enforces a few aspects of the requirements given for seq. In particular, the command may take:
- A help option, in short (
-h) or long format (--help), captured as a named group calledHELP - A separator option,
-sor--separator, taking an optional argument, and captured as named group calledSEP - Up to three integer operands, respectively captured as
OP1,OP2, andOP3
For clarity, the pattern args_pattern above uses the flag re.VERBOSE on line 11. This allows you to spread the regular expression over a few lines to enhance readability. The pattern validates the following:
- Argument order: Options and arguments are expected to be laid out in a given order. For example, options are expected before the arguments.
- Option values**: Only
--help,-s, or--separatorare expected as options. - Argument mutual exclusivity: The option
--helpisn’t compatible with other options or arguments. - Argument type: Operands are expected to be positive or negative integers.
For the regular expression to be able to handle these things, it needs to see all Python command-line arguments in one string. You can collect them using str.join():
arg_line = " ".join(sys.argv[1:])
This makes arg_line a string that includes all arguments, except the program name, separated by a space.
Given the pattern args_pattern above, you can extract the Python command-line arguments with the following function:
def parse(arg_line: str) -> Dict[str, str]:
    args: Dict[str, str] = {}
    if match_object := args_pattern.match(arg_line):
        args = {k: v for k, v in match_object.groupdict().items()
                if v is not None}
    return args
The pattern is already handling the order of the arguments, mutual exclusivity between options and arguments, and the type of the arguments. parse() is applying re.match() to the argument line to extract the proper values and store the data in a dictionary.
The dictionary includes the names of each group as keys and their respective values. For example, if the arg_line value is --help, then the dictionary is {'HELP': 'help'}. If arg_line is -s T 10, then the dictionary becomes {'SEP': 'T', 'OP1': '10'}. You can expand the code block below to see an implementation of seq with regular expressions.
The code below implements a limited version of seq with a regular expression to handle the command line parsing and validation:
# seq_regex.py

from typing import List, Dict
import re
import sys

USAGE = (
    f"Usage: {sys.argv[0]} [-s <separator>] [first [increment]] last"
)

args_pattern = re.compile(
    r"""
    ^
    (
        (--(?P<HELP>help).*)|
        ((?:-s|--separator)s(?P<SEP>.*?)s)?
        ((?P<OP1>-?d+))(s(?P<OP2>-?d+))?(s(?P<OP3>-?d+))?
    )
    $
""",
    re.VERBOSE,
)

def parse(arg_line: str) -> Dict[str, str]:
    args: Dict[str, str] = {}
    if match_object := args_pattern.match(arg_line):
        args = {k: v for k, v in match_object.groupdict().items()
                if v is not None}
    return args

def seq(operands: List[int], sep: str = "n") -> str:
    first, increment, last = 1, 1, 1
    if len(operands) == 1:
        last = operands[0]
    if len(operands) == 2:
        first, last = operands
        if first > last:
            increment = -1
    if len(operands) == 3:
        first, increment, last = operands
    last = last + 1 if increment > 0 else last - 1
    return sep.join(str(i) for i in range(first, last, increment))

def main() -> None:
    args = parse(" ".join(sys.argv[1:]))
    if not args:
        raise SystemExit(USAGE)
    if args.get("HELP"):
        print(USAGE)
        return
    operands = [int(v) for k, v in args.items() if k.startswith("OP")]
    sep = args.get("SEP", "n")
    print(seq(operands, sep))

if __name__ == "__main__":
    main()
You can execute the code above by running this command:
This should output the following:
Try this command with other combinations, including the --help option.
You didn’t see a version option supplied here. This was done intentionally to reduce the length of the example. You may consider adding the version option as an extended exercise. As a hint, you could modify the regular expression by replacing the line (--(?P<HELP>help).*)| with (--(?P<HELP>help).*)|(--(?P<VER>version).*)|. An additional if block would also be needed in main().
At this point, you know a few ways to extract options and arguments from the command line. So far, the Python command-line arguments were only strings or integers. Next, you’ll learn how to handle files passed as arguments.
File Handling
It’s time now to experiment with Python command-line arguments that are expected to be file names. Modify sha1sum.py to handle one or more files as arguments. You’ll end up with a downgraded version of the original sha1sum utility, which takes one or more files as arguments and displays the hexadecimal SHA1 hash for each file, followed by the name of the file:
# sha1sum_file.py

import hashlib
import sys

def sha1sum(filename: str) -> str:
    hash = hashlib.sha1()
    with open(filename, mode="rb") as f:
        hash.update(f.read())
    return hash.hexdigest()

for arg in sys.argv[1:]:
    print(f"{sha1sum(arg)}  {arg}")
sha1sum() is applied to the data read from each file that you passed at the command line, rather than the string itself. Take note that m.update() takes a bytes-like object as an argument and that the result of invoking read() after opening a file with the mode rb will return a bytes object. For more information about handling file content, check out Reading and Writing Files in Python, and in particular, the section Working With Bytes.
The evolution of sha1sum_file.py from handling strings at the command line to manipulating the content of files is getting you closer to the original implementation of sha1sum:
$ sha1sum main main.c
9a6f82c245f5980082dbf6faac47e5085083c07d  main
125a0f900ff6f164752600550879cbfabb098bc3  main.c
The execution of the Python program with the same Python command-line arguments gives this:
$ python sha1sum_file.py main main.c
9a6f82c245f5980082dbf6faac47e5085083c07d  main
125a0f900ff6f164752600550879cbfabb098bc3  main.c
Because you interact with the shell interpreter or the Windows command prompt, you also get the benefit of the wildcard expansion provided by the shell. To prove this, you can reuse main.py, which displays each argument with the argument number and its value:
$ python main.py main.*
Arguments count: 5
Argument      0: main.py
Argument      1: main.c
Argument      2: main.exe
Argument      3: main.obj
Argument      4: main.py
You can see that the shell automatically performs wildcard expansion so that any file with a base name matching main, regardless of the extension, is part of sys.argv.
The wildcard expansion isn’t available on Windows. To obtain the same behavior, you need to implement it in your code. To refactor main.py to work with wildcard expansion, you can use glob. The following example works on Windows and, though it isn’t as concise as the original main.py, the same code behaves similarly across platforms:
 1# main_win.py
 2
 3import sys
 4import glob
 5import itertools
 6from typing import List
 7
 8def expand_args(args: List[str]) -> List[str]:
 9    arguments = args[:1]
10    glob_args = [glob.glob(arg) for arg in args[1:]]
11    arguments += itertools.chain.from_iterable(glob_args)
12    return arguments
13
14if __name__ == "__main__":
15    args = expand_args(sys.argv)
16    print(f"Arguments count: {len(args)}")
17    for i, arg in enumerate(args):
18        print(f"Argument {i:>6}: {arg}")
In main_win.py, expand_args relies on glob.glob() to process the shell-style wildcards. You can verify the result on Windows and any other operating system:
C:/>python main_win.py main.*
Arguments count: 5
Argument      0: main_win.py
Argument      1: main.c
Argument      2: main.exe
Argument      3: main.obj
Argument      4: main.py
This addresses the problem of handling files using wildcards like the asterisk (*) or question mark (?), but how about stdin?
If you don’t pass any parameter to the original sha1sum utility, then it expects to read data from the standard input. This is the text you enter at the terminal that ends when you type Ctrl+D on Unix-like systems or Ctrl+Z on Windows. These control sequences send an end of file (EOF) to the terminal, which stops reading from stdin and returns the data that was entered.
In the next section, you’ll add to your code the ability to read from the standard input stream.
Standard Input
When you modify the previous Python implementation of sha1sum to handle the standard input using sys.stdin, you’ll get closer to the original sha1sum:
# sha1sum_stdin.py

from typing import List
import hashlib
import pathlib
import sys

def process_file(filename: str) -> bytes:
    return pathlib.Path(filename).read_bytes()

def process_stdin() -> bytes:
    return bytes("".join(sys.stdin), "utf-8")

def sha1sum(data: bytes) -> str:
    sha1_hash = hashlib.sha1()
    sha1_hash.update(data)
    return sha1_hash.hexdigest()

def output_sha1sum(data: bytes, filename: str = "-") -> None:
    print(f"{sha1sum(data)}  {filename}")

def main(args: List[str]) -> None:
    if not args:
        args = ["-"]
    for arg in args:
        if arg == "-":
            output_sha1sum(process_stdin(), "-")
        else:
            output_sha1sum(process_file(arg), arg)

if __name__ == "__main__":
    main(sys.argv[1:])
Two conventions are applied to this new sha1sum version:
- Without any arguments, the program expects the data to be provided in the standard input,
sys.stdin, which is a readable file object. - When a hyphen (
-) is provided as a file argument at the command line, the program interprets it as reading the file from the standard input.
Try this new script without any arguments. Enter the first aphorism of The Zen of Python, then complete the entry with the keyboard shortcut Ctrl+D on Unix-like systems or Ctrl+Z on Windows:
$ python sha1sum_stdin.py
Beautiful is better than ugly.
ae5705a3efd4488dfc2b4b80df85f60c67d998c4  -
You can also include one of the arguments as stdin mixed with the other file arguments like so:
$ python sha1sum_stdin.py main.py - main.c
d84372fc77a90336b6bb7c5e959bcb1b24c608b4  main.py
Beautiful is better than ugly.
ae5705a3efd4488dfc2b4b80df85f60c67d998c4  -
125a0f900ff6f164752600550879cbfabb098bc3  main.c
Another approach on Unix-like systems is to provide /dev/stdin instead of - to handle the standard input:
$ python sha1sum_stdin.py main.py /dev/stdin main.c
d84372fc77a90336b6bb7c5e959bcb1b24c608b4  main.py
Beautiful is better than ugly.
ae5705a3efd4488dfc2b4b80df85f60c67d998c4  /dev/stdin
125a0f900ff6f164752600550879cbfabb098bc3  main.c
On Windows there’s no equivalent to /dev/stdin, so using - as a file argument works as expected.
The script sha1sum_stdin.py isn’t covering all necessary error handling, but you’ll cover some of the missing features later in this tutorial.
Standard Output and Standard Error
Command line processing may have a direct relationship with stdin to respect the conventions detailed in the previous section. The standard output, although not immediately relevant, is still a concern if you want to adhere to the Unix Philosophy. To allow small programs to be combined, you may have to take into account the three standard streams:
stdinstdoutstderr
The output of a program becomes the input of another one, allowing you to chain small utilities. For example, if you wanted to sort the aphorisms of the Zen of Python, then you could execute the following:
$ python -c "import this" | sort
Although never is often better than *right* now.
Although practicality beats purity.
Although that way may not be obvious at first unless you're Dutch.
...
The output above is truncated for better readability. Now imagine that you have a program that outputs the same data but also prints some debugging information:
# zen_sort_debug.py

print("DEBUG >>> About to print the Zen of Python")
import this
print("DEBUG >>> Done printing the Zen of Python")
Executing the Python script above gives:
$ python zen_sort_debug.py
DEBUG >>> About to print the Zen of Python
The Zen of Python, by Tim Peters

Beautiful is better than ugly.
Explicit is better than implicit.
Simple is better than complex.
Complex is better than complicated.
...
DEBUG >>> Done printing the Zen of Python
The ellipsis (...) indicates that the output was truncated to improve readability.
Now, if you want to sort the list of aphorisms, then execute the command as follows:
$ python zen_sort_debug.py | sort

Although never is often better than *right* now.
Although practicality beats purity.
Although that way may not be obvious at first unless you're Dutch.
Beautiful is better than ugly.
Complex is better than complicated.
DEBUG >>> About to print the Zen of Python
DEBUG >>> Done printing the Zen of Python
Errors should never pass silently.
...
You may realize that you didn’t intend to have the debug output as the input of the sort command. To address this issue, you want to send traces to the standard errors stream, stderr, instead:
# zen_sort_stderr.py
import sys

print("DEBUG >>> About to print the Zen of Python", file=sys.stderr)
import this
print("DEBUG >>> Done printing the Zen of Python", file=sys.stderr)
Execute zen_sort_stderr.py to observe the following:
$ python zen_sort_stderr.py | sort
DEBUG >>> About to print the Zen of Python
DEBUG >>> Done printing the Zen of Python

Although never is often better than *right* now.
Although practicality beats purity.
Although that way may not be obvious at first unless you're Dutch
....
Now, the traces are displayed to the terminal, but they aren’t used as input for the sort command.
Custom Parsers
You can implement seq by relying on a regular expression if the arguments aren’t too complex. Nevertheless, the regex pattern may quickly render the maintenance of the script difficult. Before you try getting help from specific libraries, another approach is to create a custom parser. The parser is a loop that fetches each argument one after another and applies a custom logic based on the semantics of your program.
A possible implementation for processing the arguments of seq_parse.py could be as follows:
 1def parse(args: List[str]) -> Tuple[str, List[int]]:
 2    arguments = collections.deque(args)
 3    separator = "n"
 4    operands: List[int] = []
 5    while arguments:
 6        arg = arguments.popleft()
 7        if not operands:
 8            if arg == "--help":
 9                print(USAGE)
10                sys.exit(0)
11            if arg in ("-s", "--separator"):
12                separator = arguments.popleft()
13                continue
14        try:
15            operands.append(int(arg))
16        except ValueError:
17            raise SystemExit(USAGE)
18        if len(operands) > 3:
19            raise SystemExit(USAGE)
20
21    return separator, operands
parse() is given the list of arguments without the Python file name and uses collections.deque() to get the benefit of .popleft(), which removes the elements from the left of the collection. As the items of the arguments list unfold, you apply the logic that’s expected for your program. In parse() you can observe the following:
- The
whileloop is at the core of the function, and terminates when there are no more arguments to parse, when the help is invoked, or when an error occurs. - If the
separatoroption is detected, then the next argument is expected to be the separator. operandsstores the integers that are used to calculate the sequence. There should be at least one operand and at most three.
A full version of the code for parse() is available below:
# seq_parse.py

from typing import Dict, List, Tuple
import collections
import re
import sys

USAGE = (f"Usage: {sys.argv[0]} "
         "[--help] | [-s <sep>] [first [incr]] last")

def seq(operands: List[int], sep: str = "n") -> str:
    first, increment, last = 1, 1, 1
    if len(operands) == 1:
        last = operands[0]
    if len(operands) == 2:
        first, last = operands
        if first > last:
            increment = -1
    if len(operands) == 3:
        first, increment, last = operands
    last = last + 1 if increment > 0 else last - 1
    return sep.join(str(i) for i in range(first, last, increment))

def parse(args: List[str]) -> Tuple[str, List[int]]:
    arguments = collections.deque(args)
    separator = "n"
    operands: List[int] = []
    while arguments:
        arg = arguments.popleft()
        if not len(operands):
            if arg == "--help":
                print(USAGE)
                sys.exit(0)
            if arg in ("-s", "--separator"):
                separator = arguments.popleft() if arguments else None
                continue
        try:
            operands.append(int(arg))
        except ValueError:
            raise SystemExit(USAGE)
        if len(operands) > 3:
            raise SystemExit(USAGE)

    return separator, operands

def main() -> None:
    sep, operands = parse(sys.argv[1:])
    if not operands:
        raise SystemExit(USAGE)
    print(seq(operands, sep))

if __name__ == "__main__":
    main()
Note that some error handling aspects are kept to a minimum so as to keep the examples relatively short.
This manual approach of parsing the Python command-line arguments may be sufficient for a simple set of arguments. However, it becomes quickly error-prone when complexity increases due to the following:
- A large number of arguments
- Complexity and interdependency between arguments
- Validation to perform against the arguments
The custom approach isn’t reusable and requires reinventing the wheel in each program. By the end of this tutorial, you’ll have improved on this hand-crafted solution and learned a few better methods.
A Few Methods for Validating Python Command-Line Arguments
You’ve already performed validation for Python command-line arguments in a few examples like seq_regex.py and seq_parse.py. In the first example, you used a regular expression, and in the second example, a custom parser.
Both of these examples took the same aspects into account. They considered the expected options as short-form (-s) or long-form (--separator). They considered the order of the arguments so that options would not be placed after operands. Finally, they considered the type, integer for the operands, and the number of arguments, from one to three arguments.
Type Validation With Python Data Classes
The following is a proof of concept that attempts to validate the type of the arguments passed at the command line. In the following example, you validate the number of arguments and their respective type:
# val_type_dc.py

import dataclasses
import sys
from typing import List, Any

USAGE = f"Usage: python {sys.argv[0]} [--help] | firstname lastname age]"

@dataclasses.dataclass
class Arguments:
    firstname: str
    lastname: str
    age: int = 0

def check_type(obj):
    for field in dataclasses.fields(obj):
        value = getattr(obj, field.name)
        print(
            f"Value: {value}, "
            f"Expected type {field.type} for {field.name}, "
            f"got {type(value)}"
        )
        if type(value) != field.type:
            print("Type Error")
        else:
            print("Type Ok")

def validate(args: List[str]):
    # If passed to the command line, need to convert
    # the optional 3rd argument from string to int
    if len(args) > 2 and args[2].isdigit():
        args[2] = int(args[2])
    try:
        arguments = Arguments(*args)
    except TypeError:
        raise SystemExit(USAGE)
    check_type(arguments)

def main() -> None:
    args = sys.argv[1:]
    if not args:
        raise SystemExit(USAGE)

    if args[0] == "--help":
        print(USAGE)
    else:
        validate(args)

if __name__ == "__main__":
    main()
Unless you pass the --help option at the command line, this script expects two or three arguments:
- A mandatory string:
firstname - A mandatory string:
lastname - An optional integer:
age
Because all the items in sys.argv are strings, you need to convert the optional third argument to an integer if it’s composed of digits. str.isdigit() validates if all the characters in a string are digits. In addition, by constructing the data class Arguments with the values of the converted arguments, you obtain two validations:
- If the number of arguments doesn’t correspond to the number of mandatory fields expected by
Arguments, then you get an error. This is a minimum of two and a maximum of three fields. - If the types after conversion aren’t matching the types defined in the
Argumentsdata class definition, then you get an error.
You can see this in action with the following execution:
$ python val_type_dc.py Guido "Van Rossum" 25
Value: Guido, Expected type <class 'str'> for firstname, got <class 'str'>
Type Ok
Value: Van Rossum, Expected type <class 'str'> for lastname, got <class 'str'>
Type Ok
Value: 25, Expected type <class 'int'> for age, got <class 'int'>
Type Ok
In the execution above, the number of arguments is correct and the type of each argument is also correct.
Now, execute the same command but omit the third argument:
$ python val_type_dc.py Guido "Van Rossum"
Value: Guido, Expected type <class 'str'> for firstname, got <class 'str'>
Type Ok
Value: Van Rossum, Expected type <class 'str'> for lastname, got <class 'str'>
Type Ok
Value: 0, Expected type <class 'int'> for age, got <class 'int'>
Type Ok
The result is also successful because the field age is defined with a default value, 0, so the data class Arguments doesn’t require it.
On the contrary, if the third argument isn’t of the proper type—say, a string instead of integer—then you get an error:
python val_type_dc.py Guido Van Rossum
Value: Guido, Expected type <class 'str'> for firstname, got <class 'str'>
Type Ok
Value: Van, Expected type <class 'str'> for lastname, got <class 'str'>
Type Ok
Value: Rossum, Expected type <class 'int'> for age, got <class 'str'>
Type Error
The expected value Van Rossum, isn’t surrounded by quotes, so it’s split. The second word of the last name, Rossum, is a string that’s handled as the age, which is expected to be an int. The validation fails.
Similarly, you could also use a NamedTuple to achieve a similar validation. You’d replace the data class with a class deriving from NamedTuple, and check_type() would change as follows:
from typing import NamedTuple

class Arguments(NamedTuple):
    firstname: str
    lastname: str
    age: int = 0

def check_type(obj):
    for attr, value in obj._asdict().items():
        print(
            f"Value: {value}, "
            f"Expected type {obj.__annotations__[attr]} for {attr}, "
            f"got {type(value)}"
        )
        if type(value) != obj.__annotations__[attr]:
            print("Type Error")
        else:
            print("Type Ok")
A NamedTuple exposes functions like _asdict that transform the object into a dictionary that can be used for data lookup. It also exposes attributes like __annotations__, which is a dictionary storing types for each field, and For more on __annotations__, check out Python Type Checking (Guide).
As highlighted in Python Type Checking (Guide), you could also leverage existing packages like Enforce, Pydantic, and Pytypes for advanced validation.
Custom Validation
Not unlike what you’ve already explored earlier, detailed validation may require some custom approaches. For example, if you attempt to execute sha1sum_stdin.py with an incorrect file name as an argument, then you get the following:
$ python sha1sum_stdin.py bad_file.txt
Traceback (most recent call last):
  File "sha1sum_stdin.py", line 32, in <module>
    main(sys.argv[1:])
  File "sha1sum_stdin.py", line 29, in main
    output_sha1sum(process_file(arg), arg)
  File "sha1sum_stdin.py", line 9, in process_file
    return pathlib.Path(filename).read_bytes()
  File "/usr/lib/python3.8/pathlib.py", line 1222, in read_bytes
    with self.open(mode='rb') as f:
  File "/usr/lib/python3.8/pathlib.py", line 1215, in open
    return io.open(self, mode, buffering, encoding, errors, newline,
  File "/usr/lib/python3.8/pathlib.py", line 1071, in _opener
    return self._accessor.open(self, flags, mode)
FileNotFoundError: [Errno 2] No such file or directory: 'bad_file.txt'
bad_file.txt doesn’t exist, but the program attempts to read it.
Revisit main() in sha1sum_stdin.py to handle non-existing files passed at the command line:
 1def main(args):
 2    if not args:
 3        output_sha1sum(process_stdin())
 4    for arg in args:
 5        if arg == "-":
 6            output_sha1sum(process_stdin(), "-")
 7            continue
 8        try:
 9            output_sha1sum(process_file(arg), arg)
10        except FileNotFoundError as err:
11            print(f"{sys.argv[0]}: {arg}: {err.strerror}", file=sys.stderr)
To see the complete example with this extra validation, expand the code block below:
# sha1sum_val.py

from typing import List
import hashlib
import pathlib
import sys

def process_file(filename: str) -> bytes:
    return pathlib.Path(filename).read_bytes()

def process_stdin() -> bytes:
    return bytes("".join(sys.stdin), "utf-8")

def sha1sum(data: bytes) -> str:
    m = hashlib.sha1()
    m.update(data)
    return m.hexdigest()

def output_sha1sum(data: bytes, filename: str = "-") -> None:
    print(f"{sha1sum(data)}  {filename}")

def main(args: List[str]) -> None:
    if not args:
        output_sha1sum(process_stdin())
    for arg in args:
        if arg == "-":
            output_sha1sum(process_stdin(), "-")
            continue
        try:
            output_sha1sum(process_file(arg), arg)
        except (FileNotFoundError, IsADirectoryError) as err:
            print(f"{sys.argv[0]}: {arg}: {err.strerror}", file=sys.stderr)

if __name__ == "__main__":
    main(sys.argv[1:])
When you execute this modified script, you get this:
$ python sha1sum_val.py bad_file.txt
sha1sum_val.py: bad_file.txt: No such file or directory
Note that the error displayed to the terminal is written to stderr, so it doesn’t interfere with the data expected by a command that would read the output of sha1sum_val.py:
$ python sha1sum_val.py bad_file.txt main.py | cut -d " " -f 1
sha1sum_val.py: bad_file.txt: No such file or directory
d84372fc77a90336b6bb7c5e959bcb1b24c608b4
This command pipes the output of sha1sum_val.py to cut to only include the first field. You can see that cut ignores the error message because it only receives the data sent to stdout.
The Python Standard Library
Despite the different approaches you took to process Python command-line arguments, any complex program might be better off leveraging existing libraries to handle the heavy lifting required by sophisticated command-line interfaces. As of Python 3.7, there are three command line parsers in the standard library:
argparsegetoptoptparse
The recommended module to use from the standard library is argparse. The standard library also exposes optparse but it’s officially deprecated and only mentioned here for your information. It was superseded by argparse in Python 3.2 and you won’t see it discussed in this tutorial.
argparse
You’re going to revisit sha1sum_val.py, the most recent clone of sha1sum, to introduce the benefits of argparse. To this effect, you’ll modify main() and add init_argparse to instantiate argparse.ArgumentParser:
 1import argparse
 2
 3def init_argparse() -> argparse.ArgumentParser:
 4    parser = argparse.ArgumentParser(
 5        usage="%(prog)s [OPTION] [FILE]...",
 6        description="Print or check SHA1 (160-bit) checksums."
 7    )
 8    parser.add_argument(
 9        "-v", "--version", action="version",
10        version = f"{parser.prog} version 1.0.0"
11    )
12    parser.add_argument('files', nargs='*')
13    return parser
14
15def main() -> None:
16    parser = init_argparse()
17    args = parser.parse_args()
18    if not args.files:
19        output_sha1sum(process_stdin())
20    for file in args.files:
21        if file == "-":
22            output_sha1sum(process_stdin(), "-")
23            continue
24        try:
25            output_sha1sum(process_file(file), file)
26        except (FileNotFoundError, IsADirectoryError) as err:
27            print(f"{sys.argv[0]}: {file}: {err.strerror}", file=sys.stderr)
For the cost of a few more lines compared to the previous implementation, you get a clean approach to add --help and --version options that didn’t exist before. The expected arguments (the files to be processed) are all available in field files of object argparse.Namespace. This object is populated on line 17 by calling parse_args().
To look at the full script with the modifications described above, expand the code block below:
# sha1sum_argparse.py

import argparse
import hashlib
import pathlib
import sys

def process_file(filename: str) -> bytes:
    return pathlib.Path(filename).read_bytes()

def process_stdin() -> bytes:
    return bytes("".join(sys.stdin), "utf-8")

def sha1sum(data: bytes) -> str:
    sha1_hash = hashlib.sha1()
    sha1_hash.update(data)
    return sha1_hash.hexdigest()

def output_sha1sum(data: bytes, filename: str = "-") -> None:
    print(f"{sha1sum(data)}  {filename}")

def init_argparse() -> argparse.ArgumentParser:
    parser = argparse.ArgumentParser(
        usage="%(prog)s [OPTION] [FILE]...",
        description="Print or check SHA1 (160-bit) checksums.",
    )
    parser.add_argument(
        "-v", "--version", action="version",
        version=f"{parser.prog} version 1.0.0"
    )
    parser.add_argument("files", nargs="*")
    return parser

def main() -> None:
    parser = init_argparse()
    args = parser.parse_args()
    if not args.files:
        output_sha1sum(process_stdin())
    for file in args.files:
        if file == "-":
            output_sha1sum(process_stdin(), "-")
            continue
        try:
            output_sha1sum(process_file(file), file)
        except (FileNotFoundError, IsADirectoryError) as err:
            print(f"{parser.prog}: {file}: {err.strerror}", file=sys.stderr)

if __name__ == "__main__":
    main()
To illustrate the immediate benefit you obtain by introducing argparse in this program, execute the following:
$ python sha1sum_argparse.py --help
usage: sha1sum_argparse.py [OPTION] [FILE]...

Print or check SHA1 (160-bit) checksums.

positional arguments:
  files

optional arguments:
  -h, --help     show this help message and exit
  -v, --version  show program's version number and exit
To delve into the details of argparse, check out Build Command-Line Interfaces With Python’s argparse.
getopt
getopt finds its origins in the getopt C function. It facilitates parsing the command line and handling options, option arguments, and arguments. Revisit parse from seq_parse.py to use getopt:
def parse():
    options, arguments = getopt.getopt(
        sys.argv[1:],                      # Arguments
        'vhs:',                            # Short option definitions
        ["version", "help", "separator="]) # Long option definitions
    separator = "n"
    for o, a in options:
        if o in ("-v", "--version"):
            print(VERSION)
            sys.exit()
        if o in ("-h", "--help"):
            print(USAGE)
            sys.exit()
        if o in ("-s", "--separator"):
            separator = a
    if not arguments or len(arguments) > 3:
        raise SystemExit(USAGE)
    try:
        operands = [int(arg) for arg in arguments]
    except ValueError:
        raise SystemExit(USAGE)
    return separator, operands
getopt.getopt() takes the following arguments:
- The usual arguments list minus the script name,
sys.argv[1:] - A string defining the short options
- A list of strings for the long options
Note that a short option followed by a colon (:) expects an option argument, and that a long option trailed with an equals sign (=) expects an option argument.
The remaining code of seq_getopt.py is the same as seq_parse.py and is available in the collapsed code block below:
# seq_getopt.py

from typing import List, Tuple
import getopt
import sys

USAGE = f"Usage: python {sys.argv[0]} [--help] | [-s <sep>] [first [incr]] last"
VERSION = f"{sys.argv[0]} version 1.0.0"

def seq(operands: List[int], sep: str = "n") -> str:
    first, increment, last = 1, 1, 1
    if len(operands) == 1:
        last = operands[0]
    elif len(operands) == 2:
        first, last = operands
        if first > last:
            increment = -1
    elif len(operands) == 3:
        first, increment, last = operands
    last = last - 1 if first > last else last + 1
    return sep.join(str(i) for i in range(first, last, increment))

def parse(args: List[str]) -> Tuple[str, List[int]]:
    options, arguments = getopt.getopt(
        args,                              # Arguments
        'vhs:',                            # Short option definitions
        ["version", "help", "separator="]) # Long option definitions
    separator = "n"
    for o, a in options:
        if o in ("-v", "--version"):
            print(VERSION)
            sys.exit()
        if o in ("-h", "--help"):
            print(USAGE)
            sys.exit()
        if o in ("-s", "--separator"):
            separator = a
    if not arguments or len(arguments) > 3:
        raise SystemExit(USAGE)
    try:
        operands = [int(arg) for arg in arguments]
    except:
        raise SystemExit(USAGE)
    return separator, operands

def main() -> None:
    args = sys.argv[1:]
    if not args:
        raise SystemExit(USAGE)
    sep, operands = parse(args)
    print(seq(operands, sep))

if __name__ == "__main__":
    main()
Next, you’ll take a look at some external packages that will help you parse Python command-line arguments.
A Few External Python Packages
Building upon the existing conventions you saw in this tutorial, there are a few libraries available on the Python Package Index (PyPI) that take many more steps to facilitate the implementation and maintenance of command-line interfaces.
The following sections offer a glance at Click and Python Prompt Toolkit. You’ll only be exposed to very limited capabilities of these packages, as they both would require a full tutorial—if not a whole series—to do them justice!
Click
As of this writing, Click is perhaps the most advanced library to build a sophisticated command-line interface for a Python program. It’s used by several Python products, most notably Flask and Black. Before you try the following example, you need to install Click in either a Python virtual environment or your local environment. If you’re not familiar with the concept of virtual environments, then check out Python Virtual Environments: A Primer.
To install Click, proceed as follows:
$ python -m pip install click
So, how could Click help you handle the Python command-line arguments? Here’s a variation of the seq program using Click:
# seq_click.py

import click

@click.command(context_settings=dict(ignore_unknown_options=True))
@click.option("--separator", "-s",
              default="n",
              help="Text used to separate numbers (default: \n)")
@click.version_option(version="1.0.0")
@click.argument("operands", type=click.INT, nargs=-1)
def seq(operands, separator) -> str:
    first, increment, last = 1, 1, 1
    if len(operands) == 1:
        last = operands[0]
    elif len(operands) == 2:
        first, last = operands
        if first > last:
            increment = -1
    elif len(operands) == 3:
        first, increment, last = operands
    else:
        raise click.BadParameter("Invalid number of arguments")
    last = last - 1 if first > last else last + 1
    print(separator.join(str(i) for i in range(first, last, increment)))

if __name__ == "__main__":
    seq()
Setting ignore_unknown_options to True ensures that Click doesn’t parse negative arguments as options. Negative integers are valid seq arguments.
As you may have observed, you get a lot for free! A few well-carved decorators are sufficient to bury the boilerplate code, allowing you to focus on the main code, which is the content of seq() in this example.
The only import remaining is click. The declarative approach of decorating the main command, seq(), eliminates repetitive code that’s otherwise necessary. This could be any of the following:
- Defining a help or usage procedure
- Handling the version of the program
- Capturing and setting up default values for options
- Validating arguments, including the type
The new seq implementation barely scratches the surface. Click offers many niceties that will help you craft a very professional command-line interface:
- Output coloring
- Prompt for omitted arguments
- Commands and sub-commands
- Argument type validation
- Callback on options and arguments
- File path validation
- Progress bar
There are many other features as well. Check out Writing Python Command-Line Tools With Click to see more concrete examples based on Click.
Python Prompt Toolkit
There are other popular Python packages that are handling the command-line interface problem, like docopt for Python. So, you may find the choice of the Prompt Toolkit a bit counterintuitive.
The Python Prompt Toolkit provides features that may make your command line application drift away from the Unix philosophy. However, it helps to bridge the gap between an arcane command-line interface and a full-fledged graphical user interface. In other words, it may help to make your tools and programs more user-friendly.
You can use this tool in addition to processing Python command-line arguments as in the previous examples, but this gives you a path to a UI-like approach without you having to depend on a full Python UI toolkit. To use prompt_toolkit, you need to install it with pip:
$ python -m pip install prompt_toolkit
You may find the next example a bit contrived, but the intent is to spur ideas and move you slightly away from more rigorous aspects of the command line with respect to the conventions you’ve seen in this tutorial.
As you’ve already seen the core logic of this example, the code snippet below only presents the code that significantly deviates from the previous examples:
def error_dlg():
    message_dialog(
        title="Error",
        text="Ensure that you enter a number",
    ).run()

def seq_dlg():
    labels = ["FIRST", "INCREMENT", "LAST"]
    operands = []
    while True:
        n = input_dialog(
            title="Sequence",
            text=f"Enter argument {labels[len(operands)]}:",
        ).run()
        if n is None:
            break
        if n.isdigit():
            operands.append(int(n))
        else:
            error_dlg()
        if len(operands) == 3:
            break

    if operands:
        seq(operands)
    else:
        print("Bye")

actions = {"SEQUENCE": seq_dlg, "HELP": help, "VERSION": version}

def main():
    result = button_dialog(
        title="Sequence",
        text="Select an action:",
        buttons=[
            ("Sequence", "SEQUENCE"),
            ("Help", "HELP"),
            ("Version", "VERSION"),
        ],
    ).run()
    actions.get(result, lambda: print("Unexpected action"))()
The code above involves ways to interact and possibly guide users to enter the expected input, and to validate the input interactively using three dialog boxes:
button_dialogmessage_dialoginput_dialog
The Python Prompt Toolkit exposes many other features intended to improve interaction with users. The call to the handler in main() is triggered by calling a function stored in a dictionary. Check out Emulating switch/case Statements in Python if you’ve never encountered this Python idiom before.
You can see the full example of the program using prompt_toolkit by expanding the code block below:
# seq_prompt.py

import sys
from typing import List
from prompt_toolkit.shortcuts import button_dialog, input_dialog, message_dialog

def version():
    print("Version 1.0.0")

def help():
    print("Print numbers from FIRST to LAST, in steps of INCREMENT.")

def seq(operands: List[int], sep: str = "n"):
    first, increment, last = 1, 1, 1
    if len(operands) == 1:
        last = operands[0]
    elif len(operands) == 2:
        first, last = operands
        if first > last:
            increment = -1
    elif len(operands) == 3:
        first, increment, last = operands
    last = last - 1 if first > last else last + 1
    print(sep.join(str(i) for i in range(first, last, increment)))

def error_dlg():
    message_dialog(
        title="Error",
        text="Ensure that you enter a number",
    ).run()

def seq_dlg():
    labels = ["FIRST", "INCREMENT", "LAST"]
    operands = []
    while True:
        n = input_dialog(
            title="Sequence",
            text=f"Enter argument {labels[len(operands)]}:",
        ).run()
        if n is None:
            break
        if n.isdigit():
            operands.append(int(n))
        else:
            error_dlg()
        if len(operands) == 3:
            break

    if operands:
        seq(operands)
    else:
        print("Bye")

actions = {"SEQUENCE": seq_dlg, "HELP": help, "VERSION": version}

def main():
    result = button_dialog(
        title="Sequence",
        text="Select an action:",
        buttons=[
            ("Sequence", "SEQUENCE"),
            ("Help", "HELP"),
            ("Version", "VERSION"),
        ],
    ).run()
    actions.get(result, lambda: print("Unexpected action"))()

if __name__ == "__main__":
    main()
When you execute the code above, you’re greeted with a dialog prompting you for action. Then, if you choose the action Sequence, another dialog box is displayed. After collecting all the necessary data, options, or arguments, the dialog box disappears, and the result is printed at the command line, as in the previous examples:

As the command line evolves and you can see some attempts to interact with users more creatively, other packages like PyInquirer also allow you to capitalize on a very interactive approach.
To further explore the world of the Text-Based User Interface (TUI), check out Building Console User Interfaces and the Third Party section in Your Guide to the Python Print Function.
If you’re interested in researching solutions that rely exclusively on the graphical user interface, then you may consider checking out the following resources:
- How to Build a Python GUI Application With wxPython
- Python and PyQt: Building a GUI Desktop Calculator
- Build a Mobile Application With the Kivy Python Framework
Conclusion
In this tutorial, you’ve navigated many different aspects of Python command-line arguments. You should feel prepared to apply the following skills to your code:
- The conventions and pseudo-standards of Python command-line arguments
- The origins of
sys.argvin Python - The usage of
sys.argvto provide flexibility in running your Python programs - The Python standard libraries like
argparseorgetoptthat abstract command line processing - The powerful Python packages like
clickandpython_toolkitto further improve the usability of your programs
Whether you’re running a small script or a complex text-based application, when you expose a command-line interface you’ll significantly improve the user experience of your Python software. In fact, you’re probably one of those users!
Next time you use your application, you’ll appreciate the documentation you supplied with the --help option or the fact that you can pass options and arguments instead of modifying the source code to supply different data.
Additional Resources
To gain further insights about Python command-line arguments and their many facets, you may want to check out the following resources:
- Comparing Python Command-Line Parsing Libraries – Argparse, Docopt, and Click
- Python, Ruby, and Golang: A Command-Line Application Comparison
You may also want to try other Python libraries that target the same problems while providing you with different solutions:
- Typer
- Plac
- Cliff
- Cement
- Python Fire
Watch Now This tutorial has a related video course created by the Real Python team. Watch it together with the written tutorial to deepen your understanding: Command Line Interfaces in Python