Table of Contents
- Enabling The Telnet Client
- Verifying The Install
- Summary
- See Also
The Telnet Client is a great tool for developers and administrators to help manage and test network connectivity. However, the Telnet Client application is disabled by default in Microsoft Windows 10. Attempts to use it before activation returns the error
message ’not recognized as an internal or external command, operable program or batch file’.

The following step-by-step shows you how to enable
Telnet.
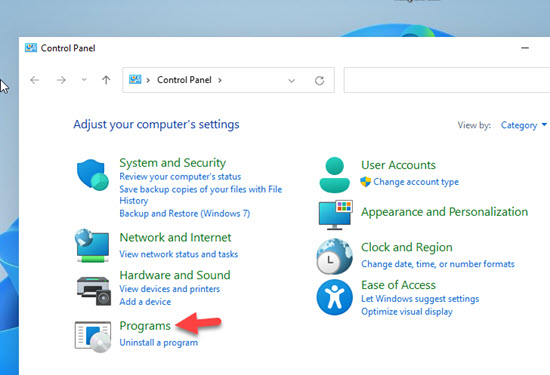
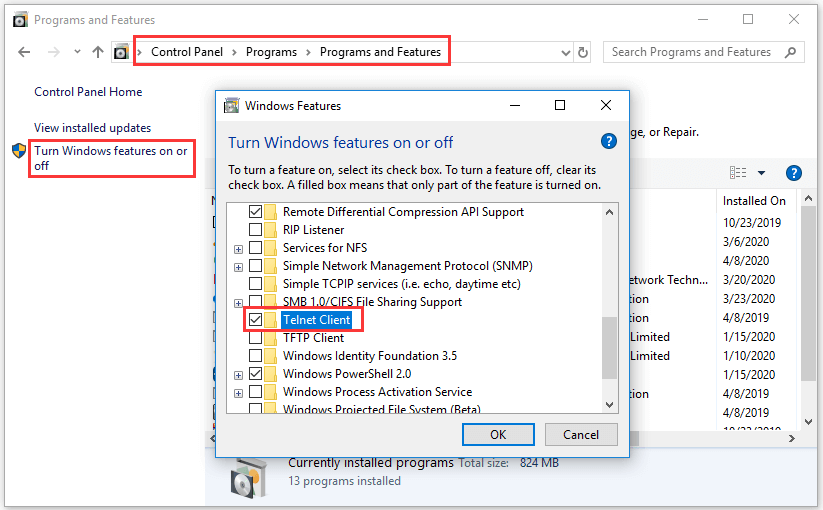
Enabling The Telnet Client
To enable Telnet Client on Windows 10, follow these steps:
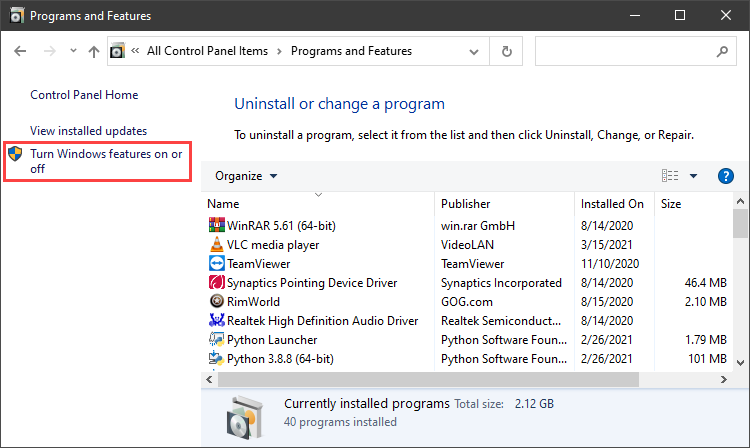
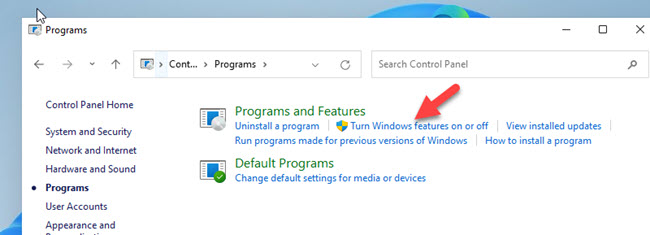
- Right-click the Start button and select Programs and Features.

- Click Turn Windows features on or off from the left-hand menu.
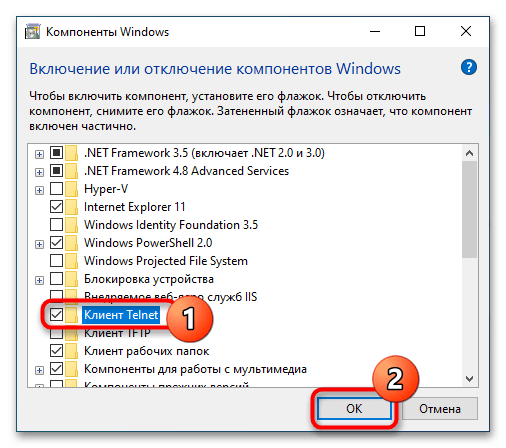
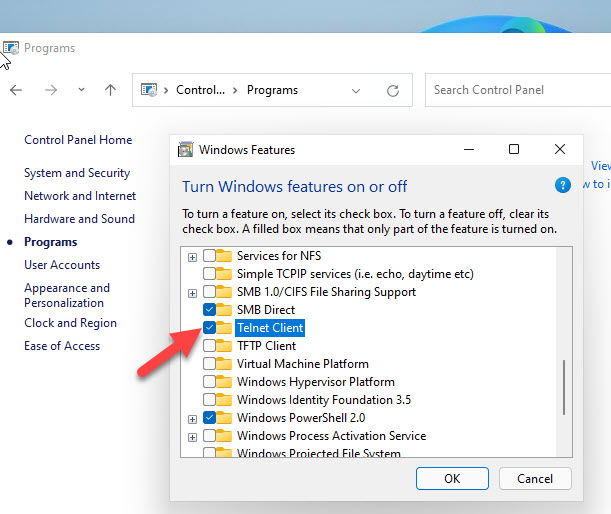
- The Windows Features dialog box appears. Scroll down and select Telnet Client. Click
OK.
- The Telnet Client installations begins.
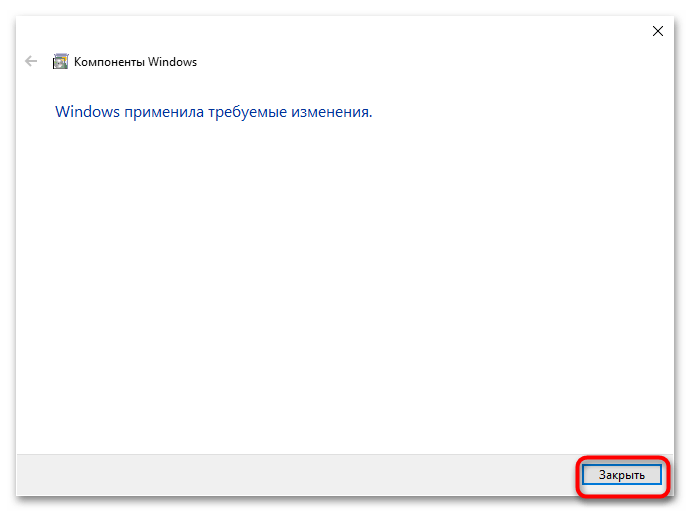
- Once complete, a success message appears.
- Click Close. There’s no need to restart your computer.


Verifying The Install
Once the installation completes, we can use the Telnet Client.
- Launch the Command Prompt by typing Command Prompt into the search box on the menu bar and clicking the app returned.
- Alternatively, you can also type Windows Key + R to open the
Run command dialog. Type cmd and hit the
Enter key. - Type telnet and hit Enter to access the Telnet Client.
- Type help to see the supported Telnet commands.
- Type q or quit to exit Telnet.
- Type telnet google.com 80 to Telnet into Google on port 80.


Summary
In this article, we have seen how to enable and use the Telnet Client in Windows 10.
See Also
- How To Enable Telnet in Windows Server 2012
- Windows 7: Enabling Telnet Client
Introduction
Telnet (teletype network) is a network protocol for two-way text-based communication through a CLI, allowing remote access. Telnet is vulnerable to cybersecurity attacks because it lacks encryption methods compared to the more modern SSH. However, it is still helpful for tasks that do not involve transmitting sensitive information.
This article teaches you what Telnet is as well as how to use Telnet on Windows to test for open ports.
Prerequisites
- Windows OS with administrator privileges
- Access to the command prompt
- An address and port to test
What is Telnet?
Telnet is a client-server protocol predating the TCP protocol. The network protocol allows a user to log into another computer within the same network through a TCP/IP connection.
A client machine running the Telnet client connects to a CLI on a remote device, most commonly a dedicated platform. Telnet is lightweight and fast, making it the preferred option in some use cases:
- Initial network hardware configuration.
- Remote access to trusted internal networks.
- Testing for open or used ports.
- Troubleshooting mail and web servers.
- Checking port forwarding.
How Does Telnet Work?
The Telnet protocol creates a communication path through a virtual terminal connection. The data distributes in-band with Telnet control information over the transmission control protocol (TCP).
Unlike other TCP/IP protocols, Telnet provides a log-in screen and allows logging in as the remote device’s actual user when establishing a connection on port 23. This type of access grants direct control with all the same privileges as the owner of the credentials.
Telnet comes with a command accessible from the command line in Windows. The telnet command also exists for macOS and Linux operating systems.
How to Enable Telnet on Windows 10?
In Windows systems, Telnet is disabled by default. To check if Telnet is already activated, open your command line, and run telnet:

If the command prompt does not recognize the command, there are two possible ways to enable the Telnet client in Windows.
Option 1: Enable Telnet using GUI
To activate the Telnet command using the GUI:
1. Open the Programs and Features options in Control Panel:

2. Click the Turn Windows features on or off setting:
3. Locate the Telnet Client option on the list, select it and click OK to install the feature:

4. When Windows completes the requested change, click Close.
5. Open the command prompt and run telnet to open the Microsoft Telnet Client:

6. Run quit to exit the Telnet client.
Option 2: Enable Telnet Using Command Prompt
To activate the Telnet client from the command prompt:
1. In the command prompt, run:
pkgmgr /iu:"TelnetClient"2. Restart the command prompt and run telnet to open the Microsoft Telnet Client.
3. Run quit to exit the client:

How to Use Telnet in Windows to Test Open Ports
The Telnet syntax for testing open ports is:
telnet <address> <port number>The command accepts both symbolic and numeric addresses. For example:
telnet towel.blinkenlights.nl 23Or alternatively:
telnet 127.0.0.1 80After running the command, one of the following three options happen:
1. The command throws an error, indicating the port is not available for connection:

2. The command goes to a blank screen, indicating the port is available.
3. Running the command on an open port 23 displays the screen of the telnet host, confirming an established Telnet connection:

Note: Learn how Telnet differs from SSH in our comparison article Telnet vs SSH.
Conclusion
The Telnet communication protocol provides a way to establish a direct connection with a remote host. Although not a secure option for most tasks, there are use cases where Telnet is a viable option.
For further reading, check out the more secure option and learn how to use SSH to connect to a remote server in Linux or Windows.

Здравствуйте, уважаемые читатели блога. Сегодня решил написать статью, которая полностью будет посвящена довольно — таки распространённому вопросу пользователей — как проводится установка Telnet Windows 10. Прочитав эту статью, вы за несколько минут сможете правильно и без киках — либо проблем установить клиент Telnet на ваш компьютер.
Что такое клиент Телнет?
- Как настроить OpenVPN на Windows 10
- Пропал звук на Windows 10 — испраляем ошибку
- Для чего нужен журнал событий в Windows 10
- Как установить несколько ОС Windows 7 8 10 на одну флешку
- Устраняем критическую ошибку меню «Пуск» на Windows 10
Telnet — достаточно распространённый сетевой протокол, который используется для реализации всего текстового интерфейса по сети при помощи транспорта TCP. Одна из его самых главных задач — это создание идеального взаимодействия между терминальными  процессами и терминальными устройствами.
Если говорить простым языком, то данный клиент являет собой простую программу, которая имеет текстовый интерфейс и даёт возможность выполнить быстрое подключение одного компьютера к другому при помощи интернета. Как правило, такой процесс осуществляется при помощи обычной командной строки. Месторасположения программы — диск C, папка Windows System32. А работает клиент примерно таким способом:
Администратор одного из компьютеров даёт разрешение на подключение к нему другого. При включении службы Telnet, она даёт возможность вводить все необходимые команды, использующиеся для доступа к программам и разнообразным службам на удалённом компьютере. Такой софт можно использовать для очень широкого круга процессов: для открытия доступа к электронной почте, баз данных, файлов или других заданий. За умолчанием данный сетевой протокол отключён, но провести его активацию можно быстро и достаточно легко.
Пошаговая инструкция процесса активации продукта
Включение компонентов Windows
- Запустите компьютер;
- Откройте панель управления;
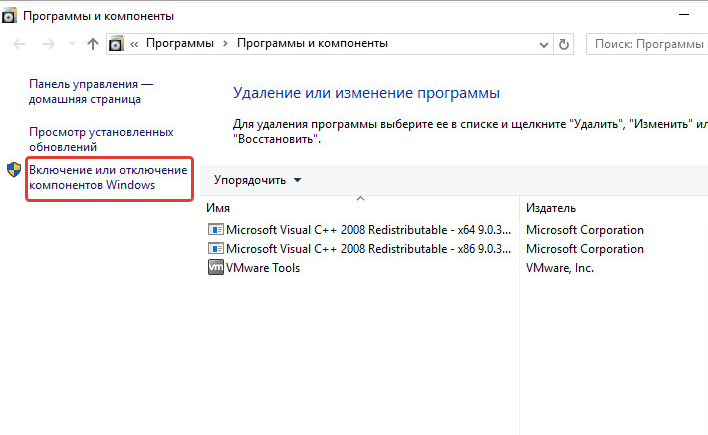
- Найдите вкладку «Программы и компоненты». В левом верхнем углу вкладки, которая откроется выберете пункт «Включение или отключение компонентов Windows».
Активация программного обеспечения
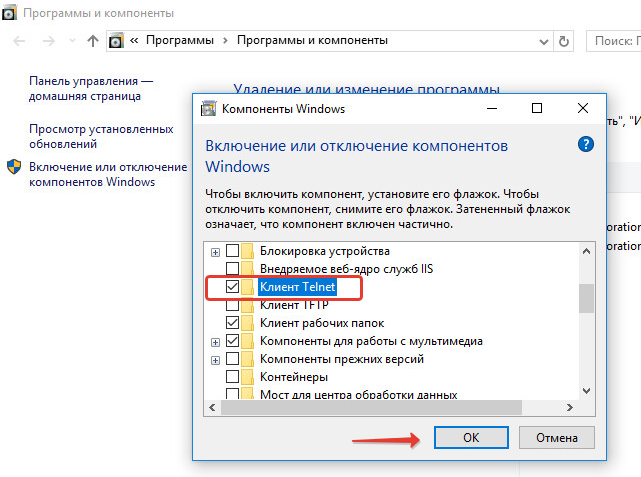
В появившемся списке доступных компонентов выберете папку «Telnet Client» (поставьте птичку возле нужной папки), нажмите «ОК».

ВАЖНО: В некоторых случаях нужно будет подождать одну или даже больше минут, пока произойдет полная установка клиента. Во время этого процесса не нужно думать, что ваш ПК завис и принимать какие — то меры по решению проблемы. Это может привести к ряду ошибок, благодаря которым может потребоваться повторная установка клиента.
Установка службы Телнет через CMD
В случаях, когда вы хотите произвести активацию через командную строку, вам стоит воспользоваться быстрой командой. Для этого:
- В поле «Выполнить «откройте командную строку (наберите команду «cmd»);
- В появившейся строке напечатайте следующую фразу:
start /w pkgmgr /iu:"TelnetClient"Нажмите клавишу «Enter». Через несколько секунд произойдет возврат на начальную командую строку. Чтобы начать пользоваться клиентом Telnet, просто перезагрузите её.

3. Есть еще один способ, но для этого нам понадобятся права администратора. Запускаем консоль с правами админа и вводим следующую команду:
dism /online /Enable-Feature /FeatureName:TelnetClient
Как включить и начать пользоваться программой?
Для начала откройте командную строку. Не стоит забывать, что сетевой протокол Telnet теперь запускается через командную строку. Чтобы совершить действие просто нажмите на клавишу «Win» и введите команду «Cmd» в поле «Выполнить». Далее наберите фразу «Telnet» и нажмите «Enter». Если всё было сделано верно, командная строка должна исчезнуть, вместо неё запустится линия Telnet, которая должна иметь примерно такой вид — «Microsoft Telnet».

Следующий этап — подключение к серверу. Как включить Telnet Windows 10?
В командной строке без ошибок введите команду:
open serveraddress [port]
При успешном завершении операции перед вами откроется окно запроса имени пользователя и пароля. После удачного подключение и пользования сервисом, всё, что осталось сделать — это правильно завершить сессию: откройте командную строку, пропишите в ней слово «quit» и нажмите «Enter».
Клиент запущен и доступен для пользования абсолютно бесплатно. Практически все доступные команды для пользования данным сетевым протокол можно скачать в интернете (close, display, set, st и другие).
Видео как установить Telnet
На этом хотел бы попрощаться с вами и завершить сегодняшнею статью. Чтобы решить раз и навсегда проблему с Telnet Windows 7 / 8 /10, весь текст разбил на детально разобранные пункты. Поэтому, очень надеюсь, что текст вам поможет и не вызовет никаких вопросов. Буду очень благодарен за подписку на мой блог и репост в социальных сетях.
С уважением, Виктор
Содержание
- Способ 1: «Программы и компоненты»
- Способ 2: «Командная строка / «Windows PowerShell»»
- Вопросы и ответы

В настоящее время протокол Telnet является устаревшим. Использовать его для удаленного управления компьютером небезопасно, поскольку весь трафик передается в незашифрованном виде. В современных версиях Windows вместо протокола Telnet рекомендуется использовать защищенный протокол SSH.
Способ 1: «Программы и компоненты»
Это самый простой и очевидный способ задействовать компонент «Telnet», предназначенный для удаленного управления компьютером. Чтобы открыть оснастку «Программы и компоненты», сделайте следующее:
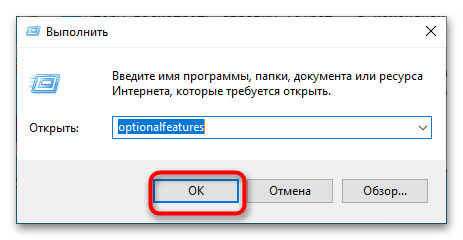
- Вызовите нажатием Win + R окошко быстрого выполнения команд, вставьте в него команду
optionalfeaturesи нажмите клавишу ввода. Также открыть оснастку можно через приложение «Параметры», перейдя в раздел «Приложения и возможности» → «Дополнительные компоненты» → «Другие компоненты Windows». - Отыщите в открывшемся окне оснастки пункт «Клиент Telnet», отметьте его флажком и нажмите кнопку «OK».
- Windows 10 выполнит поиск необходимых файлов и установит их.
Если Windows попросит перезагрузить компьютер, дайте согласие на перезагрузку.
Способ 2: «Командная строка / «Windows PowerShell»»
Для включения устаревшего клиента «Telnet» можно задействовать классическую «Командную строку» либо же консоль «PowerShell».
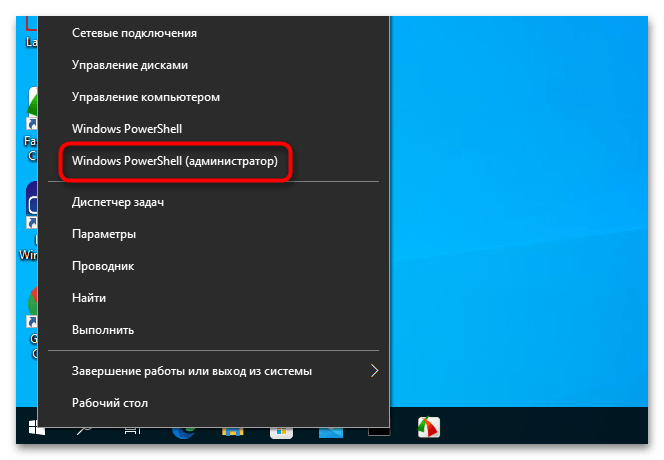
- Запустите ту или иную консоль от имени администратора любым удобным вам способом. Например, из контекстного меню кнопки «Пуск».
- Вставьте или введите в консоль команду
dism /online /Enable-Feature /FeatureName:TelnetClientи нажмите клавишу ввода.
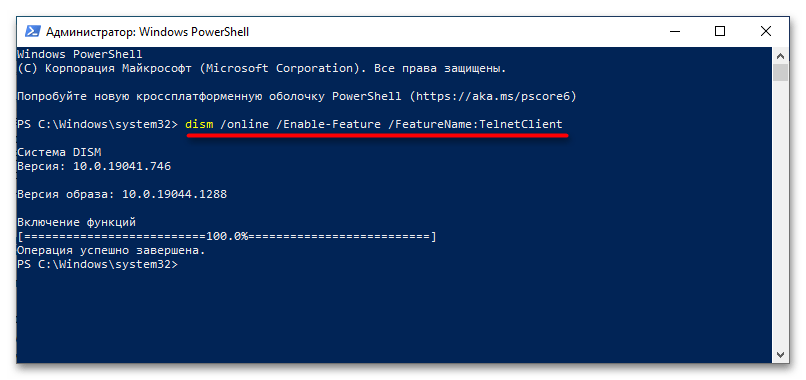
В случае удачного включения компонента команда вернет сообщение «Операция успешно завершена».
Еще статьи по данной теме:
Помогла ли Вам статья?
В данной статье показаны действия, с помощью которых можно включить компонент Telnet Client в операционной системе Windows 10, Windows 8.1 и Windows 7.
Telnet (teletype network) — сетевой протокол с помощью которого можно удаленно (через интернет или локальную сеть) подключиться и управлять различными сетевыми устройствами, например удаленные компьютеры, серверы, роутеры и другие устройства.
По умолчанию компонент Telnet Client в операционных системах Windows 10, Windows 8.1 и Windows 7 отключён, но при необходимости можно легко включить его используя любой из способов, которые представлены далее в этой инструкции.
Содержание
- Включение Telnet Client в окне «Компоненты Windows»
- Активация в командной строке
- Включение через Windows PowerShell
Включение Telnet Client в окне «Компоненты Windows»
Чтобы включить компонент Telnet Client, нажмите сочетание клавиш ![]() + R, в открывшемся окне Выполнить введите (скопируйте и вставьте) OptionalFeatures и нажмите клавишу Enter↵.
+ R, в открывшемся окне Выполнить введите (скопируйте и вставьте) OptionalFeatures и нажмите клавишу Enter↵.

В открывшемся окне «Компоненты Windows» установите флажок компонента Telnet Client и нажмите кнопку OK.

Через непродолжительное время Windows применит требуемые изменения и компонент Telnet Client будет включен.

Активация в командной строке
Вы можете включить или отключить компонент Telnet Client в командной строке используя DISM
Чтобы включить компонент Telnet Client, запустите командную строку от имени администратора и выполните следующую команду:
Dism /online /Enable-Feature /FeatureName:TelnetClient

Чтобы отключить компонент Telnet Client, запустите командную строку от имени администратора и выполните следующую команду:
Dism /online /Disable-Feature /FeatureName:TelnetClient

Включение через Windows PowerShell
Также включить или отключить компонент Telnet Client можно в консоли PowerShell
Чтобы включить компонент Telnet Client, откройте консоль Windows PowerShell от имени администратора и выполните следующую команду:
Enable-WindowsOptionalFeature –FeatureName «TelnetClient» -Online

Чтобы отключить компонент Telnet Client, откройте консоль Windows PowerShell от имени администратора и выполните следующую команду:
Disable-WindowsOptionalFeature –FeatureName «TelnetClient» -Online

После включения компонента Telnet Client можно использовать утилиту telnet для выполнения необходимых задач.

Если компонент Telnet Client отключен, то при вводе команды telnet в консоли командной строки вы увидите сообщение о том что:
«telnet» не является внутренней или внешней
командой, исполняемой программой или пакетным файлом.

Используя рассмотренные выше действия, можно включить или отключить компонент Telnet Client в операционной системе Windows 10, Windows 8.1 и Windows 7
Telnet is one of the famous network protocols widely used to manage network devices and other equipment that support this protocol. If you are a system or network administrator, I’m sure you know the importance of having a telnet client on your desktop or laptop. Since it is an optional feature, the latest Windows OS versions do not come with an installed telnet client. By default, you can’t use Windows 10 or Windows 11 to connect other network devices without installing the built-in or third-party telnet clients.
If you search for telnet in apps or type ’telnet’ in the command prompt, it will return an error message saying ’not recognized as an internal or external command’. Installing the Microsoft telnet client from the control panel in Windows 10 and 11 will solve this issue easily.

Any installation disks, ISO or downloads are not required for this purpose.
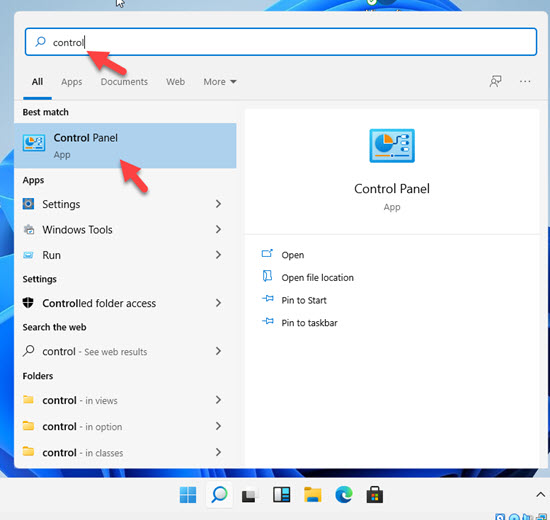
1) Go to Control Panel.
In Windows 10, you can use the start button to access the control panel. Right-click on the button and select Control Panel as shown below.

On Windows 8.1 and 8, you can use the charm bar (by moving the cursor to the top right corner or press the Windows key + I ) from the desktop then select Control Panel. It is easy to access the Control Panel from Windows 7.
 On Windows 11, you can search for the Control panel as shown below in the screenshot.
From here onwards, installing or enabling Telnet on Windows 11/10 or older versions remain similar.
2) In the ‘Category’ view, click ‘Programs’.
3) Click ‘Turn Windows features on or off’ on the next screen.
4) The earlier step will bring a dialogue box where you can select extra features to install. Select ‘Telnet Client’ by ticking the box. A small installation will run once you press OK.
That’s it, we do not need to restart the PC after the installation. We have successfully installed the telnet client on Windows 10/11.
Install From Command Prompt
Open the command prompt as Administrator and execute the below command.
pkgmgr /iu:”TelnetClient”

Alternatively, you can try the below command from command prompt or PowerShell.
dism /online /Enable-Feature /FeatureName:TelnetClient
Now if you try the telnet command or search in Apps, you will get the correct telnet prompt as below.

How to remove Telnet Client from Windows OS?
From the same place where we installed the feature (Control Panel -> Programs -> Turn Windows features on or off), untick the ‘Telnet Client’ and press OK to remove from Windows computer.
Alternates for Windows Telnet
The built-in telnet client in Windows Operating Systems is pretty basic. You can’t manage or use it with more devices easily. If you are a professional network administrator, the built-in Windows telnet client utility will not be suitable for you. You must have an alternate and professional telnet client.
PuTYY is a great telnet client which is freely available and fully compatible with Windows 10 and Windows 11.

Here we have listed the PuTTY alternatives that can be used to manage and customize telnet sessions from your computer. You can follow the same steps to install Telnet client on Windows Server Operating Systems such as Windows 2012 R2 and Windows 2016/2019 server versions.
На чтение 4 мин Просмотров 51.9к. Опубликовано 29.08.2018
По-умолчанию клиент Telnet клиент в операционных системах Microsoft Windows отключен, чего обычные пользователи вряд ли заметят. Сама возможность включить его в настольных системах присутствует. И поскольку это чрезвычайно полезный инструмент, который можно использовать для тестирования подключения TCP к внешним хостам на указанном порту, то разберемся как активировать данный функционал. Тем, кто дочитает статью до конца, покажу пару интересных вариантов использования команды telnet, о которых многие не догадываются.
Содержание
- Для чего нужен telnet клиент
- Активация Telnet клиента
- Включение клиента telnet с помощью командной строки
- Включение telnet клиент с помощью графического интерфейса
- Проверяем корректно ли установлен telnet клиент
- У вас уже установлен telnet клиент, но все еще не удается подключиться к сетевым ресурсам?
- Превращаем командную строку в web браузер
- Отправка письма из командной строки с помощью telnet
Для чего нужен telnet клиент
Замечательно, когда вы пытаетесь устранить проблемы с сетевыми подключениями, для примера у нас есть веб-сервер, который должен обрабатывать HTTP запросы на 80 порту. Используя telnet для подключения на веб-сервер на порт 80, мы можем проверить возможность подключения, даже когда мы не можем загрузить веб-страницу с помощью браузера.
Возможно, что с подключением все в порядке, но проблема связана с веб-сервером или что веб-сервер остановлен, и, например, порт вообще не прослушивается. С telnet мы можем лучше понять, что происходит.
Активация Telnet клиента
Для начала, нам необходимо включить telnet-клиент. Если не включить, то получим результат, аналогичный приведенному ниже при попытке его использования:
C:UsersMikroTik>telnet google.com 80
"telnet" не является внутренней или внешней командой, исполняемой программой или пакетным файлом.

Вы можете включить клиента либо из командной строки, либо с помощью графического интерфейса.
Включение клиента telnet с помощью командной строки
Запустите команду ниже в командной строке от имени администратора. В противном случае вы получите следующее сообщение системы:
dism /online /Enable-Feature /FeatureName:TelnetClient

Вот и все, через несколько секунд telnet клиент должен быть готов к работе.
Включение telnet клиент с помощью графического интерфейса
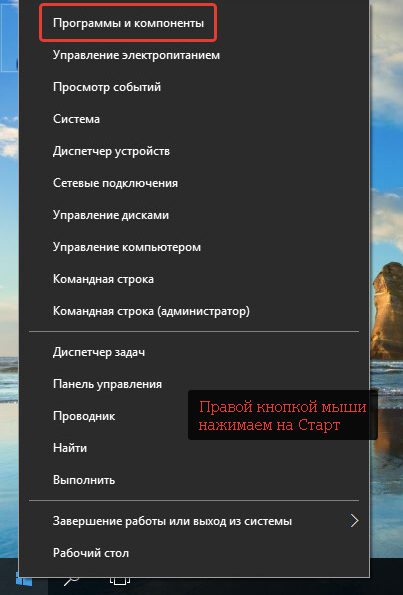
Щелкните правой кнопкой мыши на кнопку «Пуск» и выберите «Программы и компоненты».
Выберите «Включение или отключение компонентов Windows» в меню слева.
 Откроется окно «Копоненты Windows», прокрутите вниз и выберите «Клиент Telnet».
Нажмите кнопку «ОК», на экране отобразится ход установки клиента telnet. Дождитесь момента применения изменений и закройте окно.
Проверяем корректно ли установлен telnet клиент
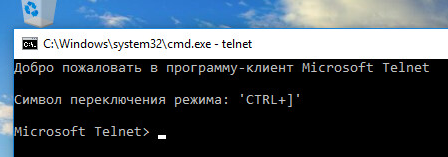
Просто откроем командную строку или powershell, введем «telnet» и нажмем клавишу «Ввод» на клавиатуре. Если все прошло успешно, то вы получите приглашение, подобное приведенному ниже:
Добро пожаловать в программу-клиент Microsoft Telnet

Символ переключения режима:  'CTRL+]'

Microsoft Telnet>
У вас уже установлен telnet клиент, но все еще не удается подключиться к сетевым ресурсам?
В некоторых случаях для выполнения команды telent вы должны запускать командную строку cmd или powershell с правами администратора. Иначе получите ошибку аналогичную отсутствующему в системе telnet клиенту.
Превращаем командную строку в web браузер
Возвращаясь к началу статьи, проверим, сможем ли мы подключиться по протоколу HTTP к web серверу google.com на 80 порт:

Появится пустой экран, необходимо ввести запрос «GET /», что равносильно запросу корневой web страницы. Получим следующий ответ от web сервера Google:

Теперь, когда вы включили компоненту telnet в своей системе, сможете сможете использовать данную команды для подключения к сетевым устройствам по различным протоколам.
Отправка письма из командной строки с помощью telnet
Например, при мы можем отправить письмо по SMTP протоколу из командной строки. Для этого введем команду
telnet smtp.mailserver.com 25
Если порт открыт, то получим приглашение от сервера на отправку команд. Нам интересно проверить отправку писем. Будьте внимательны при вводе последовательно следующих команд. Так как опечатки будут приводить к ошибкам, а команды удаления некорректных символов не работают.
- helo имя_вашего_хоста
- mail from: pochta@myhost.ru
- rcpt to: pochta@host.com (если не настроен почтовый relay, будьте внимательны при использовании домена, отличного от поддерживаемого на данном почтовом сервере)
- data
- subject: тема письма
- содержание письма
- . (точка с новой строки означает завершение ввода сообщения)
- quit (выход из сеанса связи)
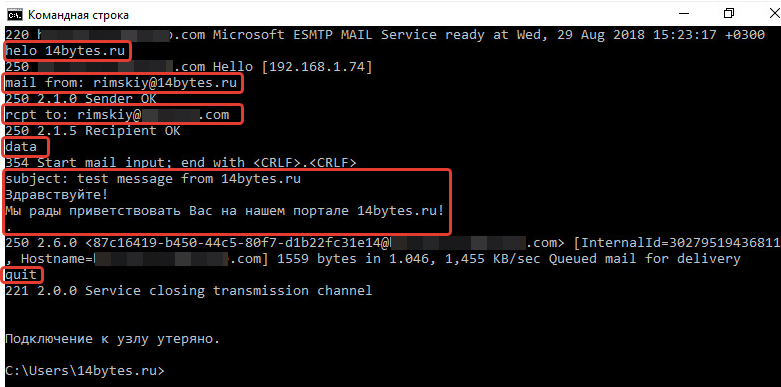
Таким образом мы использовали telnet для проверки работы сетевых сервисов HTTP и SMTP. Также не забывайте использовать инструмент для устранения неполадок TCP-подключений.
Telnet is a small application that can be used on your local device to communicate using a textbase, command line, bidirectional interactive terminal. Telnet use port 23 as the default telnet port to send and receive text data over the network.

In Short Answer:
To telnet a port you can use the following command: telnet <host/ip> <port>
Example: telnet openport.net 443
Here is a step by step guide:
Telnet was the chosen command line tool for communication over the network, you were able to open a connection using telnet to a remote device and, if the remote device had a telnet server installed on it you can run the command on that server.
In late time, telnet protocol is less in use due to lake of security, telnet sends a receive pure text that is not encrypted and that why most of the terminal communication move to the Secure Shell known as SSH.
Telnet uses a default port for communication, the default telnet port is 23, but you can use telnet on any other port you want. As telnet is a command line interface tool that expects parameters you can set the port you want to connect to.
How to telnet a port:
First, let’s check if telnet is installed on our system. To do so, we need to open the command line interface. You can do it in several ways.
Open the command line – option 1:
1) Press the Windows logo button on the keyboard.
2) Start typing cmd
3) You will see the command prompt app.
4) Open it

5) Once you press the Open the command line interface will open:

Open the command line – option 2:
1) Press the Windows+R combination (Windows logo button on the keyboard + R) to open the Run windows.
2) Type in cmd and press enter or click OK.

Running the telnet command:
Once you have your command line windows open you can type in telnet to check if telnet is installed on your system.
If telnet is not installed on your system, please refer to installing telnet on windows 10 section to installing it
In the following example, we use telnet /? command that will show us the help options for the telnet command.

If you only type telnet and it installed on your system it will enter you into the telnet interactive session. To exit from this terminal to the command prompt again type quit and press enter.
To telnet a port you can use the following command: telnet <host/ip> <port>
Example: telnet openport.net 443
How do you know if the port is open or not? from the return answer. If you see the following text in your command prompt screen it means that the remote port is close.
Could not open connection to the host, on port <PORT NUMBER>: Connect failed

If the connection was established you will see a blank screen. To exit this screen, you can try to type quit and press enter or wait for the time out. You can also close the command prompt screen by pressing the x.

Installing Telnet on Windows 10:
In case you need to install telnet client on your local Windows 10 device, you will see the following error message when trying to run the telnet command: ‘telnet’ is not recognized as an internal or external command, operable program or batch file.

You will have to install it, here are the steps to install telnet client on your system:
1) Press the Windows logo button on the keyboard.
2) Start typing turn features

3) Open the Turn Windows features option.
4) In the Windows Features window that is opening, wait for it to load and scroll down till you see telnet client.
5) Mark it and press OK.
6) It might take several minutes and telnet will be installed on your system.

Conclusions:
In this how to telnet to a port using telnet on Windows 10 article, we take you step by steps in how to use the telnet command line tool on windows 10 to check a remote port.
You were able to learn the following:
- Use telnet to check a remote port.
- Open the command prompt 2 methods.
- Install telnet client on your Windows 10 box (if telnet is not already installed).
You can refer to our guide article if you want to learn more.
-
MiniTool
-
MiniTool News Center
- 2 Ways to Enable/Install Telnet on Windows 10
By Alisa | Follow |
Last Updated April 13, 2020
![]()
This post introduces Telnet, how to enable Telnet on Windows 10 and how to use Telnet in Windows. You can easily install Telnet in Windows 10 via Control Panel or CMD. Check the detailed guides. MiniTool software also provides some useful Windows 10 software mates, incl. MiniTool Power Data Recovery, MiniTool Partition Wizard, MiniTool ShadowMaker, MiniTool MovieMaker, etc.
Telnet Windows 10 Introduction
Telnet is a network protocol. Telnet Client application allows developers and administrators to manage network connections. It is mainly used for remotely managing some devices like network hardware. Telnet was invented with a command-line interface.
Telnet is integrated in Windows 10 system, however, it is disabled by default. If you want, you can enable Telnet on Windows 10 via Command Prompt, PowerShell or Control Panel. Below is the detailed guide.
#1. How to Enable Telnet Windows 10 from Control Panel
Step 1. Open Control Panel in Windows 10. You can press Windows + R, type control panel, and press Enter to access Control Panel.
Step 2. Next click Programs -> Programs and Features. Click Turn Windows features on or off from the left panel.
Alternatively, you can press Windows + X and select Programs and Features to quickly access Programs and Features window.
Step 3. Find Telnet Client in the list and make sure it is checked. Click OK to enable Telnet on Windows 10. Wait until the Windows 10 install Telnet process is completed.
#2. How to Enable Telnet Windows 10 via CMD or PowerShell
You can also install Telnet on Windows 10 through Command Prompt or PowerShell. Check how to do it below.
Step 1. Open elevated Command Prompt in Windows 10. You can press Windows + R, type cmd, and press Ctrl + Shift + Enter to run CMD as administrator.
If you want to run Windows PowerShell, you can press Windows + X, and select Windows PowerShell (Admin).
Step 2. Next you can type this command line in Command Prompt or PowerShell window: dism /online /Enable-Feature /FeatureName:TelnetClient, and press Enter to enable Telnet in Windows 10.

How to Check If Telnet Windows 10 Is Enabled
Then you can check if Telnet Client is enabled in Windows 10 by following the operation below. Open Telnet Client in Windows 10 and use Telnet commands for remote management.
- Still, you can follow the same steps above to open elevated Command Prompt.
- Next type telnet in Command Prompt window, and press Enter. This should open the Telnet Client application command-line window.
- Then you can use the telnet commands to communicate with a remote computer that uses the Telnet protocol. You can type help command and press Enter to check all supported Telnet commands.
Bottom Line
You can easily enable Telnet on Windows 10 via Control Panel or CMD so as to manage network connections remotely.
If you unexpectedly deleted a file or lost some important files because of system crash or other computer problems, you can use MiniTool Power Data Recovery to easily recover deleted/lost files from Windows computer.
MiniTool Power Data Recovery also allows you to recover deleted/lost files from external hard drive, USB drive, SD card, etc. It helps you tackle different data loss situations. Extremely easy-to-use and 100% clean. To download and install MiniTool Power Data Recovery, you can go to MiniTool download center.
About The Author

Position: Columnist
Alisa is a professional English editor with 4-year experience. She loves writing and focuses on sharing detailed solutions and thoughts for computer problems, data recovery & backup, digital gadgets, tech news, etc. Through her articles, users can always easily get related problems solved and find what they want. In spare time, she likes basketball, badminton, tennis, cycling, running, and singing. She is very funny and energetic in life, and always brings friends lots of laughs.