Используемая вами версия браузера не рекомендована для просмотра этого сайта.
Установите последнюю версию браузера, перейдя по одной из следующих ссылок.
- Safari
- Chrome
- Edge
- Firefox
Веб Консоль Intel® RAID 3 (RWC3) для Windows*
Введение
Устанавливает веб-приложение для мониторинга и управления Intel RAID продукцией для Windows*.
Файлы, доступные для скачивания
-
Windows Server 2022 family*, Windows Server 2019 family*
-
Размер: 54.1 MB
-
SHA1: 6AAEAD4B8E82203907B01C2B7642A541E487A972
Подробное описание
Цель
Установите Веб Консоль Intel® RAID 3 (RWC3) — веб-приложение, которое выполняет мониторинг, обслуживание, поиск и устранение неисправностей, а также функции конфигурации для следующей Intel RAID продукции.
Модули и адаптеры трехре режимов
Intel® RAID Adapter RS3P4TF160F, RS3P4MF088F, RSP3DD080F, RSP3MD088F, RSP3TD160F, RSP3WD080E
Intel® RAID Module RMSP3AD160F, RMSP3CD080F RMSP3HD080E
Intel® Storage Adapter RS3P4QF160J¹, RS3P4GF016J¹, RSP3QD160J¹, RSP3GD016J¹
Intel® Storage Module RMSP3JD160J¹
Модули и адаптеры со скоростью 12 Гбит/с
Intel® Integrated RAID Module RMS3AC160, RMS3CC040, RMS3CC080, RMS3HC080, RMS3JC080¹, RMS3VC160¹
Intel® RAID Controller RS3DC040, RS3DC080, RS3FC044¹, RS3GC008¹, RS3MC044, RS3SC008, RS3UC080¹, RS3UC080J¹, RS3WC080
Платы моста со скоростью 12 Гбит/с и встроенные контроллеры
Интегрированный RAID-контроллер Intel® RS3YC (интегрированный контроллер на Intel Server Board S2600CW2SR / S2600CWTSR / S2600CW2S / S2600CWTS)
Интегрированный RAID-контроллер Intel® RMSP3LD060 (интегрированный контроллер на базе AHWBPBGB24R)
Intel RAID Controller RS3LC5 (встроенный контроллер AHWBP12GBGBR5 / AHWKPTP12GBGBR5)
Intel RAID Controller RS3LC (интегрированный контроллер на AHWBP12GBGB / AHWKPTP12GBGBR)
Intel RAID Controller RS3KC¹ (интегрированный контроллер на AHWBP12GBGBIT / AHWKPTP12GBGBIT)
Intel RAID Controller RS3PC¹ (интегрированный контроллер на AHWBPBGB24 для / FHWKPTPBGB24)
Intel® Embedded Server RAID Technology 2
Ограниченные поддерживаемые контроллеры:
Модули и адаптеры 6 Гбит/с
Intel® Integrated RAID Module RMS25PB080(N), RMS25PB040, RMS25CB080(N), RMS25CB040, RMS25JB040¹, RMS25JB080¹, RMS25KB040¹, RMS25KB080¹, RMS25LB080
Intel® RAID Controller RS25AB080, RS25SB008, RS25DB080, RS25NB008, RS25FB044¹, RS25GB008¹
¹RWC3 ограничивается отображением истории энергонезависимых событий только для этих контроллеров.
Другие темы
Веб Консоль Intel® RAID 3 Руководство по установке
Этот скачиваемый файл подходит для нижеуказанных видов продукции.
Отказ от ответственности1
Информация о продукте и производительности
Корпорация Intel находится в процессе удаления неинклюзивных формулировок из нашей текущей документации, пользовательских интерфейсов и кода. Обратите внимание, что обратные изменения не всегда возможны, и некоторые неинклюзивные формулировки могут остаться в старой документации, пользовательских интерфейсах и коде.
Содержание данной страницы представляет собой сочетание выполненного человеком и компьютерного перевода оригинального содержания на английском языке. Данная информация предоставляется для вашего удобства и в ознакомительных целях и не должна расцениваться как исключительная, либо безошибочная. При обнаружении каких-либо противоречий между версией данной страницы на английском языке и переводом, версия на английском языке будет иметь приоритет и контроль.
Посмотреть английскую версию этой страницы.
The browser version you are using is not recommended for this site.
Please consider upgrading to the latest version of your browser by clicking one of the following links.
- Safari
- Chrome
- Edge
- Firefox
How to Monitor a RAID Array Using Intel® RAID Web Console 2 (Intel® RWC2) on an In-Production VMware ESXi*-Based Server
Documentation
Content Type
Troubleshooting
Article ID
000023975
Last Reviewed
11/01/2022
What am I seeing?
I’m unable to monitor a RAID array from a Windows Virtual Machine running in a VMware ESXi* server.
What is included in the environment?
- Hardware Intel® RAID Controllers
- VMware ESXi (5.0, 5.5, 6.0, 6.5) already installed and in production
How to fix it:
You can use the Intel® RAID Web Console 2 (Intel® RWC2) to monitor a RAID array on a VMWare ESXi* server, however, it cannot be installed on ESXi* directly. You can install Intel® RWC2 on a remote or virtual machine running Windows* or Linux*.
Considering that ESXi* is already installed and in production, proceed as outlined below:
Verify that the hostname is not localhost. If the hostname of your machine is already different, make sure to write it down as you are going to need it later on. If you have not changed it, you need to:
- Press <F2> to enter the Customize System/View Logs. Authentication is required. Enter the root password.
- Scroll the arrows to Configure Management Network. The current hostname and IP address are displayed on the right side of the screen. Press <Enter> key to enter the network management configuration.
- Scroll the arrow to DNS configuration. Current DNS configuration information is displayed on the right side of the screen. Press key to the DNS configuration screen.
- Scroll the arrow to Hostname, and then enter the new hostname.
- Press <Enter> key to exit the DNS configuration. A restart is required. Press <Enter> key to save the changes.
After you change the hostname, you need to enable to ESXi Shell and ESXi SSH:
After you verify that the requirements mentioned above are met, download and install RWC2 on the remote Windows* machine that you will use to monitor the RAID.
You can find the VMWare* driver for your Intel® RAID Controller from VMWare*.
Next, download and install the SMI-S Provider on the ESXi machine.
After you have downloaded the file, unzip it and open the vib20/lsiprovider path. The LSI_bootbank_lsiprovider_xxx.xx.Vx.62-xxxx.vib (the x is actually a number that varies depending on the .vib file version) is needed shortly.
Download pscp.exe from the Download PuTTY page. See the example below:
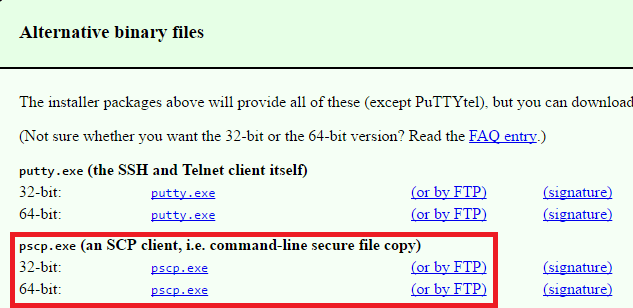
- Copy both pscp.exe and LSI_bootbank_lsiprovider_xxx.xx.Vx.62-xxxx.vib into the root of an empty USB flash drive. Access the Windows Virtual Machine where Intel® RAID Web Console 2 was installed and mount the USB flash drive, open the Windows Command Prompt, and change to the directory of the USB flash drive.
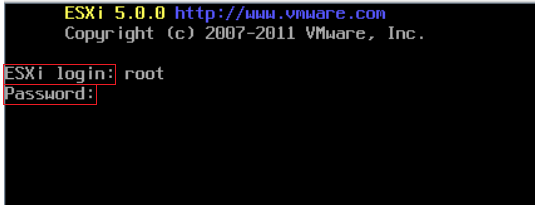
- Transfer the LSI Provider.vib file on client to the server using the pscp.exe LSI_bootbank_lsiprovider_xxx.xx.Vx.62-xxxx.vib root@192.168.1.200:/ command, where root is the logon user name of the ESXi server and 192.168.1.200 is the ESXi server IP. The password of the server is required during the transference. See the example below:

- Go to the ESXi Server. Press <Ctrl+F1> to enter the shell mode in ESXi. The user name and password are required.
- Use the ls command to show the contents of the root directory in ESXi. You can find the LSI Provider.vib file.
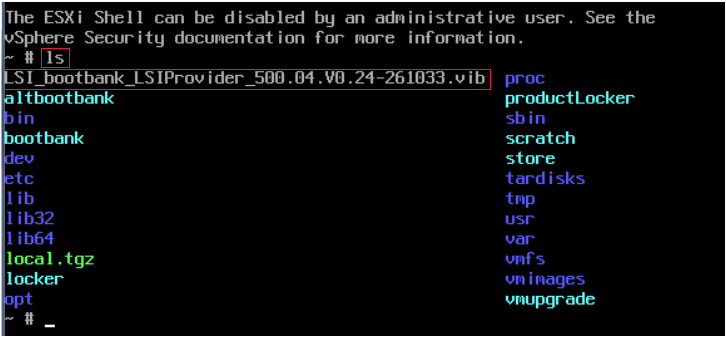
- Enter the esxcli software vib install -v / LSI_bootbank_lsiprovider_xxx.xx.Vx.62-xxxx.vib —force —maintenance-mode command to install the LSI Provider on ESXi.

- Reboot the ESXi after installing the LSI Provider.
After rebooting the ESXi, you need to change the client host file:
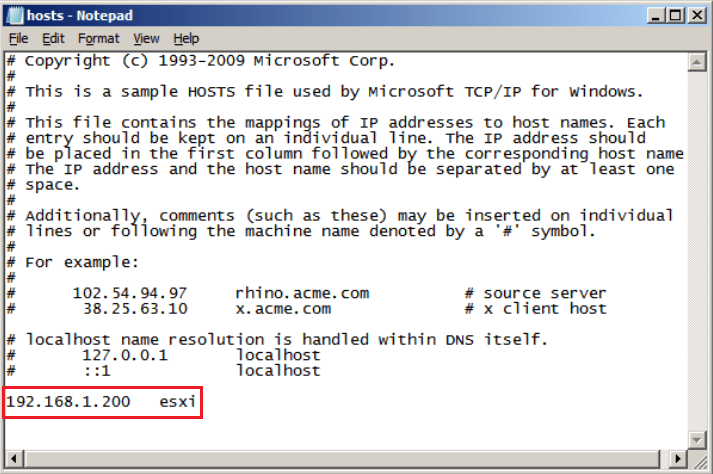
- Open the hosts file on client: Disk C—>Windows—>System32—>drivers—>etc—>hosts.
Edit the host file by adding the server information as is shown in figure below. 192.168.1.200 is the IP address of the server in the local network, and ESXi (or the name of the host if it is a different one) is the server hostname. The hostname is case insensitive.
| Note | In some scenarios where the network requires domain authentication, that domain should be included as well. |
- Save the host file. Restart the system a couple of times.
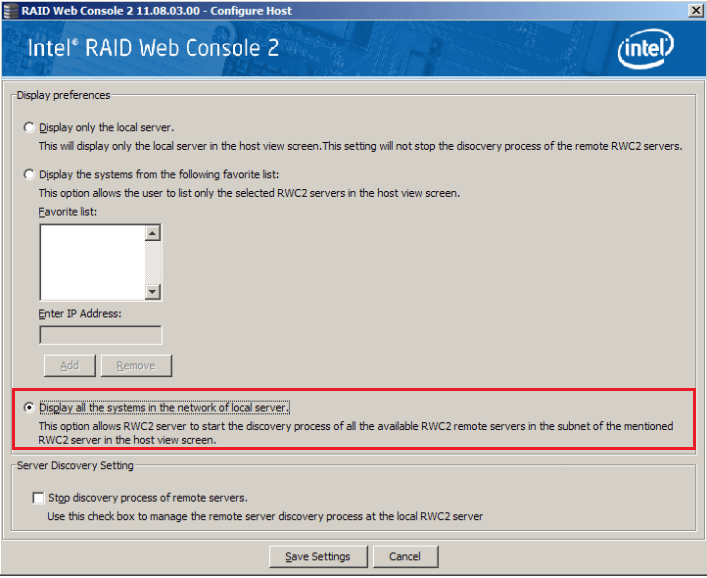
- Double-click the Intel® RAID Web Console 2 and open it. Click Configure Host. Choose Display all the systems in the network of local server, uncheck the Stop discovery process of remote servers box, and then click Save Settings to save the configuration as is shown in the figure below:
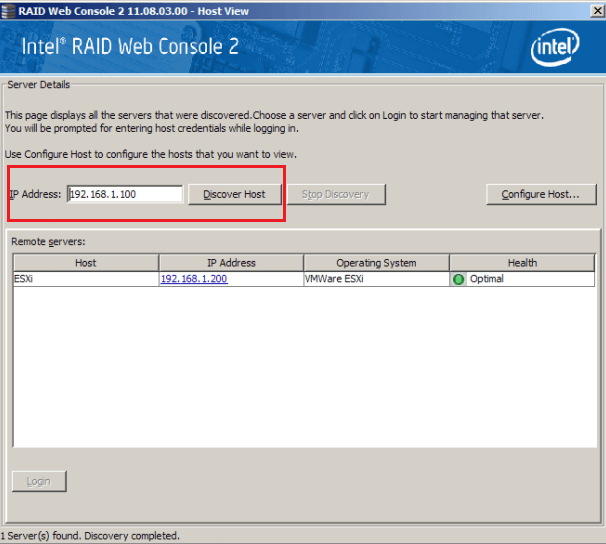
- Enter the IP Address of the server in Intel® RAID Web Console 2 and click Discover Host to search the host Intel® RAID Controller. The IP address of the server is returned. Double-click the IP address of the server to connect the Intel® RAID Controller.
- Enter the User Name and Password of the server and click Login to enter Intel® RAID Web Console 2 on the server.
Consider that the ESXi tips and tricks documents are a reference for this short guide. You can access the document at any time.
| Note | Any third party link in this article is being offered for your convenience and should not be viewed as an endorsement by Intel of the content, products, or services offered there. |
Related Products
This article applies to 35 products.
Discontinued Products
Need more help?
Give Feedback
 Application Intel RAID Web Console 2 16.05.04.00
 Brand
Brand
Intel
Title
RAID Web Console 2
Hardware category
 Carte contrôleur
Operating systems
") Windows 8.1 (32 bit, x86) Windows 8.1 (64 bit, x64) Windows 8 (32 bit, x86) Windows 8 (64 bit, x64)
Windows 8.1 (32 bit, x86) Windows 8.1 (64 bit, x64) Windows 8 (32 bit, x86) Windows 8 (64 bit, x64)") Windows 7 (32 bit, x86) Windows 7 (64 bit, x64)
Windows 7 (32 bit, x86) Windows 7 (64 bit, x64)") Windows Vista (32 bit, x86) Windows Vista (64 bit, x64)
Windows Vista (32 bit, x86) Windows Vista (64 bit, x64)") Windows XP (32 bit, x86) Windows XP (64 bit, x64) Windows Server 2012 R2 Windows Server 2012 Windows Server 2008 R2 Windows Server 2008 (32 bit, x86) Windows Server 2008 (64 bit, x64) Windows Server 2003 R2 (32 bit, x86) Windows Server 2003 R2 (64 bit, x64) Windows Server 2003 (32 bit, x86) Windows Server 2003 (64 bit, x64)
Windows XP (32 bit, x86) Windows XP (64 bit, x64) Windows Server 2012 R2 Windows Server 2012 Windows Server 2008 R2 Windows Server 2008 (32 bit, x86) Windows Server 2008 (64 bit, x64) Windows Server 2003 R2 (32 bit, x86) Windows Server 2003 R2 (64 bit, x64) Windows Server 2003 (32 bit, x86) Windows Server 2003 (64 bit, x64)") Linux (32 bit, x86) Linux (64 bit, x64)
Linux (32 bit, x86) Linux (64 bit, x64)
File type
Application
Version
16.05.04.00
Full version
Yes
Status
Official
Filename
RWC2_MR612.zip
Filesize
364 MB
Language
 English
Publication date on TousLesDrivers.com
09/05/2017
Publication date on Intel website
08/28/2017
Download

Additional informations
Application RAID Web Console 2 (RWC2) pour les cartes contrôleur Intel.
Cette application permet de configurer les contrôleurs RAID Intel, de visualiser les lecteurs connectés au contrôleur ou encore de créer les grappes RAID en utilisant l’interface graphique.
History of this version
- Correction de nombreux problèmes.
Supported hardware
- Integrated RAID Module RMS25CB040
- Integrated RAID Module RMS25CB080
- Integrated RAID Module RMS25CB080N
- Integrated RAID Module RMS25JB040
- Integrated RAID Module RMS25JB080
- Integrated RAID Module RMS25KB040
- Integrated RAID Module RMS25KB080
- Integrated RAID Module RMS25PB040
- Integrated RAID Module RMS25PB080
- Integrated RAID Module RMS25PB080N
- Integrated RAID Module RMS2AF040
- Integrated RAID Module RMS2AF080
- Integrated RAID Module RMS2LL040
- Integrated RAID Module RMS2LL080
- Integrated RAID Module RMS2MH080
- Integrated RAID Module RMS3CC040
- Integrated RAID Module RMS3CC080
- Integrated RAID Module RMS3JC080
- Integrated RAID Module RMSCC080
- Integrated RAID Module RMSHC080
- Integrated RAID Module RMSJC080
- Integrated RAID Module RMT3CB080
- Integrated RAID Module RMT3PB080
- Integrated Server RAID Module AXX4SASMOD
- RAID Controller RS25AB080
- RAID Controller RS25DB080
- RAID Controller RS25NB008
- RAID Controller RS25SB008
- RAID Controller RS2BL040
- RAID Controller RS2BL080
- RAID Controller RS2BL080DE
- RAID Controller RS2MB044
- RAID Controller RS2PI008
- RAID Controller RS2PI008DE
- RAID Controller RS2SG244
- RAID Controller RS2VB040
- RAID Controller RS2VB080
- RAID Controller RS2WC040
- RAID Controller RS2WC080
- RAID Controller RS2WG160
- RAID Controller RS3DC040
- RAID Controller RS3DC080
- RAID Controller RS3FC044
- RAID Controller RS3GC008
- RAID Controller RS3LC
- RAID Controller RS3MC044
- RAID Controller RS3SC008
- RAID Controller RS3UC080
- RAID Controller RS3WC080
- RAID Controller RS3YC
- RAID Controller RSCGC008
- RAID Controller RT3WB080
- RAID Controller SASMF8I
- RAID Controller SASUC8I
- RAID Controller SASWT4I
- RAID Controller SRCSAS144E
- RAID Controller SRCSAS18E
- RAID Controller SRCSASBB8I
- RAID Controller SRCSASJV
- RAID Controller SRCSASLS4I
- RAID Controller SRCSASPH16I
- RAID Controller SRCSASRB
- RAID Controller SRCSATAWB
- RAID Controller SROMBSAS18E
- RAID Controller SROMBSASFC
- RAID Controller SROMBSASMP2
- RAID Controller SROMBSASMR
- RAID SAS Controller FALSASMP2
- RAID SAS Riser Controller AFCSASRISER
- RAID SSD Cache Controller RCS25ZB040
- RAID SSD Cache Controller RCS25ZB040LX
 Back on the sheet of the brand Intel
Version Française de cette page
Actualités relatives
Fichiers relatifs
Dossiers relatifs
 Boîte à outils SanDisk SSD Dashboard
Les Solid-State Drive (SSD) bénéficient régulièrement de mises à jour de leur logiciel interne (firmware) afin d’améliorer leurs performances et leur compatibilité. Pour effectuer cette mise à jour simplement, SanDisk propose l’application SSD Dashboard qui offre également bien d’autres fonctionnalités de maintenance et d’optimisation que nous vous présentons dans ce dossier.
 Guide de mise à jour des SSD
Les SSD sont véritablement à l’heure actuelle le meilleur moyen de booster les performances d’un ordinateur. Pourtant, pour profiter au mieux d’un tel matériel, il est souvent nécessaire que son firmware soit mis à jour. Voici un guide qui explique pas à pas comment réaliser cette opération.
The browser version you are using is not recommended for this site.
Please consider upgrading to the latest version of your browser by clicking one of the following links.
- Safari
- Chrome
- Edge
- Firefox
How to Create a RAID Array Using the Intel® RAID Web Console 2
Documentation
Content Type
Install & Setup
Article ID
000023914
Last Reviewed
01/31/2020
What’s included in my environment?
- Intel® Server Board S1200BTL2x drives in a RAID 1 (boot drive)
- 1 drive as RAID 0
Are the methods different depending on which configuration I’m using?
The Intel® RAID Web Console 2 enables you to configure the Intel® RAID Controllers and disk drives installed on a system.
The following instructions focus on creating a virtual drive using the simple configuration and advanced configuration methods.
Creating a virtual drive using simple configuration
When you select simple configuration mode, the system creates the best configuration possible using the available drives.
Follow these steps to create a new storage configuration in simple configuration mode:
- Perform either of the following steps:
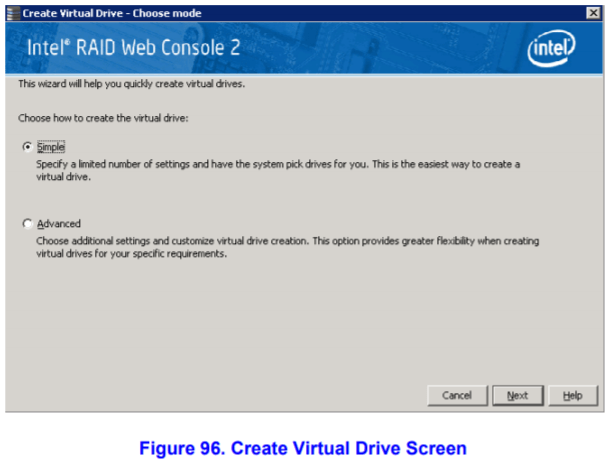
- Click Simple and press Next. The Create Virtual Drive screen appears:

- Select the RAID level desired for the virtual drive.
When you use simple configuration, the Intel® RAID Controller supports RAID levels 1, 5, and 6. In addition, it supports independent drives (configured as RAID 0). The screen text gives a brief description of the RAID level you select. The RAID levels you can choose depend on the number of drives available.
- Click the box next to Assign a hot spare if you want to assign a hot spare drive to the virtual drive. Hot spares are drives that are available to replace failed drives automatically in a redundant virtual drive (RAID 1, RAID 5, or RAID 6).
Note In the simple configuration procedure, you can assign dedicated hot spares to a maximum of 16 arrays at one time. This is because the dedicated hot spares can support only up to 16 drive groups. If you try to create more than 16 drive groups at one time, dedicated hot spares will not be assigned to drive groups beyond the first 16.
To create more than 16 drive groups with hot spares, you need at least 35 drives of the same capacity.
- Select the number of virtual drives that you want to create.
- Select the capacity for the virtual drives.
Each virtual drive has the same capacity. - Click Next.
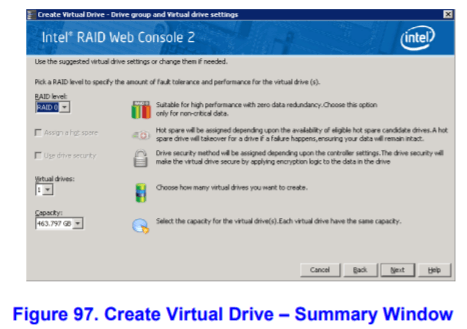
The Create Virtual Drive — Summary window appears, as shown in Figure 97. This window shows the selections you made for simple configuration.

- Click Back to return to the previous screen to change any selections or click Finish to accept and complete the configuration.
The new storage configuration will be created and initialized.
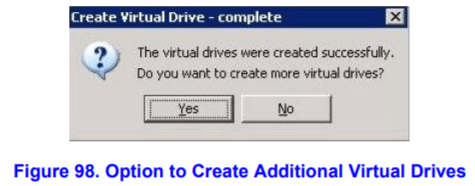
Note If you create a large configuration using drives that are in power save mode, it could take several minutes to spin up the drives. A progress bar appears as the drives spin up. If any of the selected unconfigured drives fail to spin up, a box appears to identify the drive or drives. After the configuration is completed, a dialog box may or may not notify (depending on different utility version) you that the virtual drives were created successfully, as shown in Figure 98. If more drive capacity exists, the dialog box asks whether you want to create more virtual drives. If no more drive capacity exists, you are prompted to close the configuration session.
- Select Yes or No to indicate whether you want to create additional virtual drives.
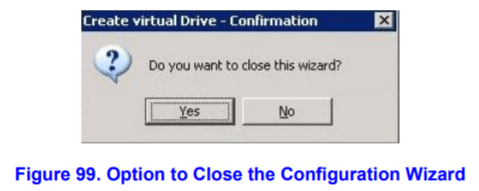
If you select Yes, the system takes you to the Create Virtual Drive screen. If you select No, the utility asks whether you want to close the wizard.
- If you selected No in step 9, select Yes or No to indicate whether to close the wizard.
If you select Yes, the configuration procedure closes. If you select No, the dialog box closes, and you remain on the same page.
Creating a virtual drive using advanced configuration
The advanced configuration procedure provides an easy way to create a new storage configuration. The advanced configuration gives you greater flexibility than simple configuration because you can select the drives and the virtual drive parameters when you
create a virtual drive. In addition, you can use the advanced configuration procedure to create spanned drive groups.
Follow these steps to create a new storage configuration in the advanced configuration mode. In this example, you create a spanned drive group.
- Perform either of the following steps:
- Click Advanced and press Next.
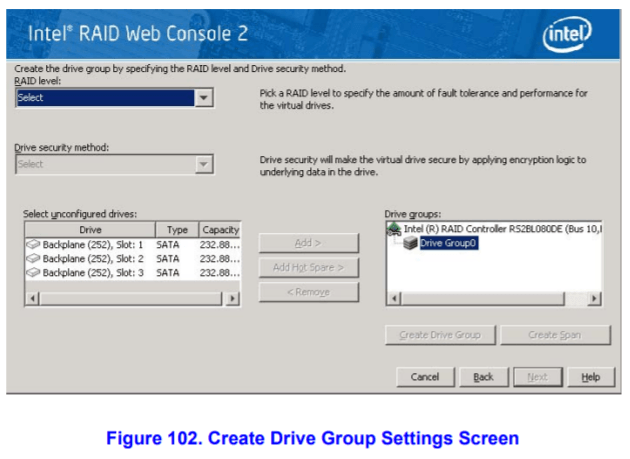
The Create Drive Group Settings screen appears:
- Select the following items on the Create Drive Group Settings screen:
- Select the RAID level desired for the drive group from the drop-down menu.
To make a spanned drive, select RAID 10, RAID 50, or RAID 60 in the RAID level field.
Drive Group 0 and Span 0 appear in the Drive groups field when you select RAID 10, 50, or 60.The Intel® RAID Controller supports RAID levels 1, 5, 6, 10, 50, and 60. In addition, it supports independent drives (configured as RAID 0 and RAID 00). The screen text gives a brief description of the RAID level you select. The RAID levels you can choose depend on the number of drives available.
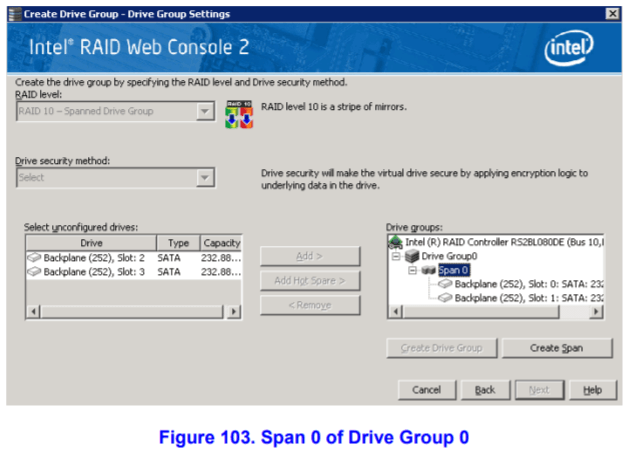
- Select unconfigured drives from the list of drives and click Add> to add them to the drive group.
The selected drives appear under Span 0 below Drive Group 0:

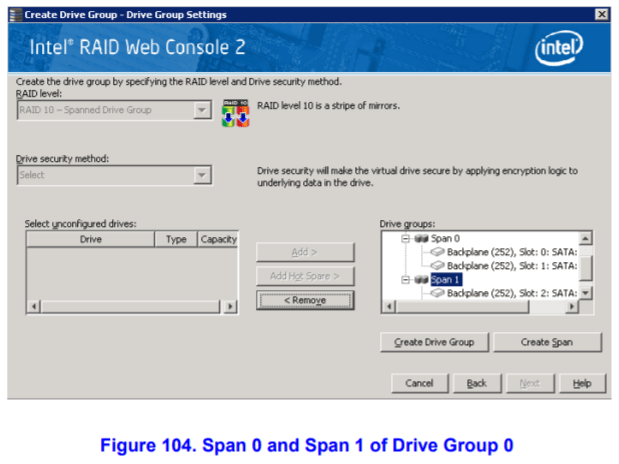
- Click Create Span to create a second span in the drive group.
- Select unconfigured drives from the list of drives and click Add> to add them to the drive group.
- The selected drives appear under Span 1 below Drive Group 0:

- Click Create Drive Group to make a drive group with the spans.
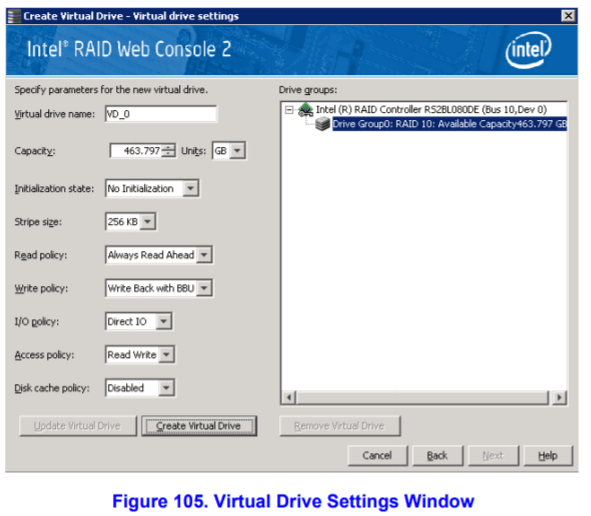
- Click Next to complete this step.
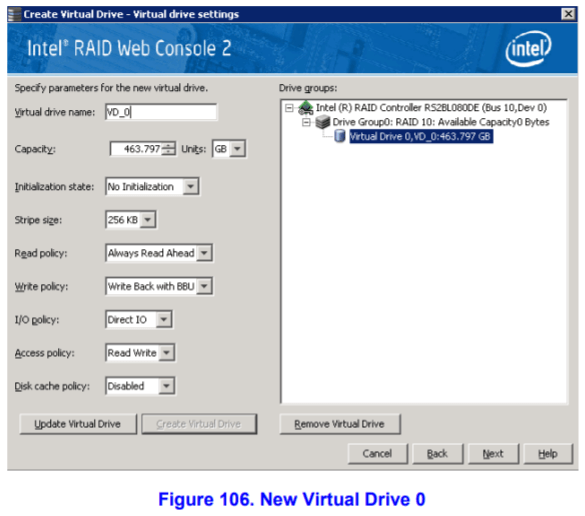
The Virtual drive settings window appears, as shown in Figure 105. The drive group and the default virtual drive settings appear. The options to update the virtual drive or remove the virtual drive are grayed out until you create the virtual drive.
- Select the RAID level desired for the drive group from the drop-down menu.
- Change any virtual drive settings, if desired.
- Click Create Virtual Drive.
The new virtual drive appears under the drive group, as shown in Figure 106. The options Update Virtual Drive and Remove Virtual Drive are now available. Update Virtual Drive allows you to change the virtual drive settings, and Remove Virtual Drive allows you to delete the virtual drive.
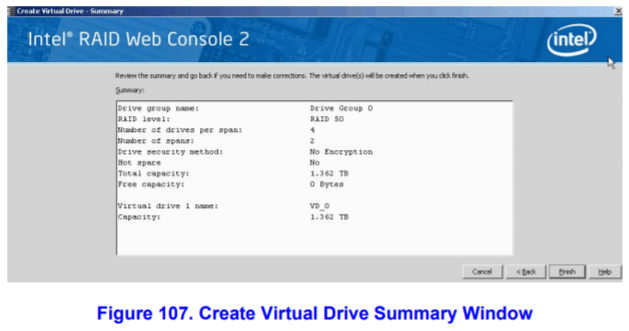
- Click Next. The Create Virtual Drive — Summary window appears, as shown in Figure 107. This window shows the selections you made for advanced configuration.

- Click Back to return to the previous screen to change any selections or click Finish to accept and complete the configuration.
The new storage configuration will be created and initialized.
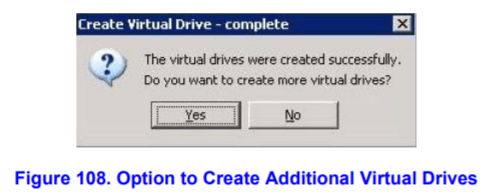
Note If you create a large configuration using drives that are in power save mode, it could take several minutes to spin up the drives. A progress bar appears as the drives spin up. If any of the selected unconfigured drives fail to spin up, a box appears to identify the drive or drives. - After the configuration is completed, a dialog box may or may not notify (depending on different utility version) you that the virtual drives were created successfully, as shown in Figure 108. If more drive capacity exists, the dialog box asks whether you want to create more virtual drives. If no more drive capacity exists, you are prompted to close the configuration session.
- Select Yes or No to indicate whether you want to create additional virtual drives.
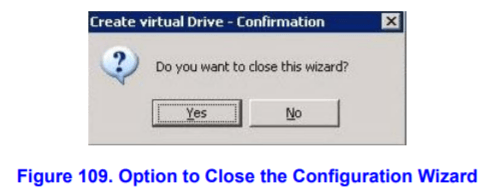
If you select Yes, the system takes you to the Create Virtual Drive screen, as shown in Figure 96 under the simple configuration step-through. If you select No, the utility asks whether you want to close the wizard, as Figure 109. - If you selected No in step 9, select Yes or No to indicate whether you want to close the wizard.
If you select Yes, the configuration procedure closes. If you select No, the dialog box closes, and you remain on the same page.