This tutorial will be showed how to create a simple graphical interface using C++ and Visual Studio 2019.
This tutorial can be a good kickstart for the future development of Graphical User Interfaces, using C++, Visual Studio 2019, and .Net Framework.
Parts Required
- Microsoft Visual Studio 2019;
- .NET Framework (automatically installed with Visual Studio).
Note: Below you can check a possible install configuration of Visual Studio. If you want to use the file you change the file (from “vsconfig.txt” to “.vsconfig“) and import when install or modify Microsoft Visual Studio 2019.
Create a new Project
1. Open Visual Studio 2019.

2. Select the type of project.

3. Type the desired name of the project.

Create a design
In order to have a graphical appearance, it is necessary to add Windows Forms to the project.
1. Go to “Project” and click on “Add New Item…“.
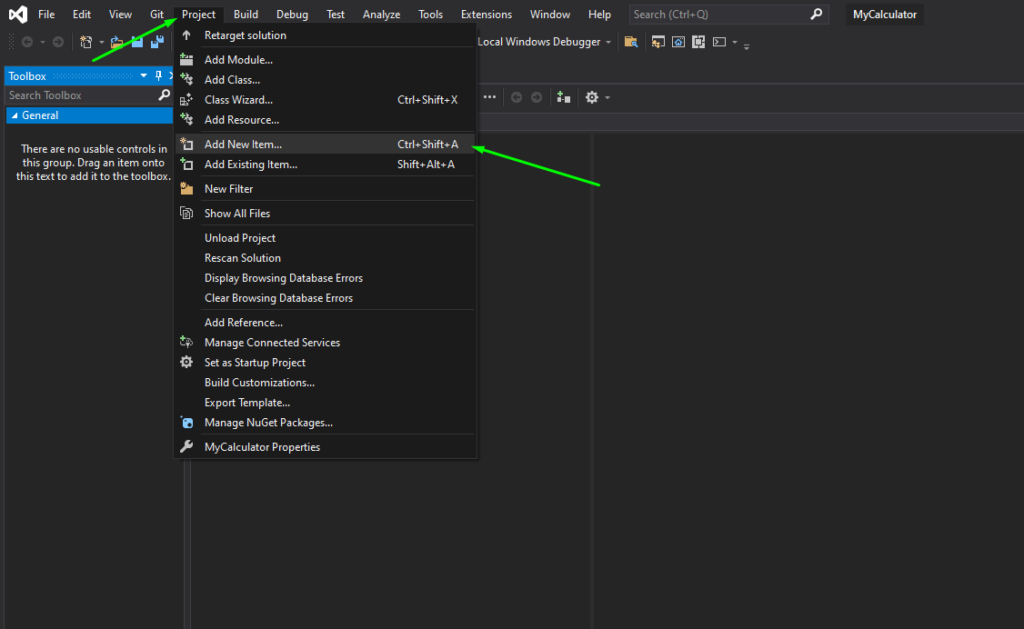
2. Select “Windows Form“, change the name of the file if you like, and press “Add“.

Note: If this message appears, restart the Visual Studio should get it away.


Design Configurations
Now it is necessary to add the necessary visual components in order to get the desired result. You will need 3 labels, 2 textbox, 1 button, 1 flow layout, and 4 checker boxes.
1. In “Toolbox” search for “label“. Then select the “Label” and drag it to “Design” and drop it wherever you want. (In all, 3 labels will be needed.)


2. Repeat the process for two “TextBox” and one button.

3. Add a “FlowLayoutPannel“.

4. Search for “CheckBox” and drop it inside of the “FlowLayoutPannel” (you will need 4 in total).


5. Select the “checkBox1” and go to “Properties” and change the “Name“. This name should not have spaces, because is the name used when coding to reference the checkbox.

6. Change “Text” to “+” because is this checkbox that will match the sum operation.

7. Repeat the process to others checkboxes.

8. Change the “Text” of “label1” to “My Calculator”.

9. Change the “Text” of “label2” to “Result:”.

10. Change the “Text” of “label3” to “No Input” and the “Name” to “result_output”.

11. Change the “Name” of “textBox1” to “value1_input” and the “Name” of “textBox2” to “value2_input”.


12. Change the “Text” of “button1” to “Calculate”.

On click event configuration
As the objective is to present the result of a certain operation, it is necessary to create an event that performs the desired operations.
1. Double click on the “Calculate” button, to generate a click event on “MyForm.h“.

2. After double click on the button “MyForm.h” file will open and the event will appear.

3. The button click event must have the following code, as it is in this event that the desired operations will be performed. Since the objective is to change the status of the label “result_output” and display the result of the operation in it.
private: System::Void button1_Click(System::Object^ sender, System::EventArgs^ e) {

		//Assign the value from TextBox to a float variable
		float value1 = (float)System::Convert::ToDouble(value1_input->Text);
		float value2 = (float)System::Convert::ToDouble(value2_input->Text);

		float result;

		//Check the CheckBoxes values and excute the respective operation
		if (bool(check_sum->CheckState)) {
			//Do the sum operation
			result = value1 + value2;
		}
		if (bool(check_sub->CheckState)) {
			//Do the subtraction operation
			result = value1 - value2;
		}
		if (bool(check_mult->CheckState)) {
			//Do the multiplication operation
			result = value1 * value2;
		}
		if (bool(check_div->CheckState)) {
			//Do the division operation
			result = value1 / value2;
		}

		//Update output label
		result_output->Text = System::Convert::ToString(result);

	}
Build configuration
Before building the project, it is necessary to perform some configurations. In the example case, the solution configuration corresponds to Debug mode and an x86 platform. But if you want to develop this project for another configuration (Release Mode, for example), or another platform (x64, for example), just change these fields and carry out the following procedures.
1. Before performing the project settings, there must be the main function so that the windows forms application can be executed. A simple way to do this is to copy and paste the following code into the “MyForm.cpp” file. This indicates how the form should be executed.
#include "MyForm.h"

using namespace System;
using namespace System::Windows::Forms;
[STAThreadAttribute]

void main(array<String^>^ args)
{
	Application::EnableVisualStyles();
	Application::SetCompatibleTextRenderingDefault(false);
	MyCalculator::MyForm form;
	Application::Run(% form);
}
2. On “Solution Explorer“, select your project and right-click on it.

3. In this pop-up, click on “Properties“.

4. Expand “Linker” configurations and click on “Advanced“. On “Entry Point” type “main“, because in this field it is necessary to specify the name of the input function, as an entry point for the file .exe or DLL (it is located in the file “MyForm.cpp”).

5. Select the “System” property on “Linker“. In the option “SubSystem“, select the “Windows” option. After that, click on “OK“.

6. Know it is possible to start without debugging and the GUI should pop up.


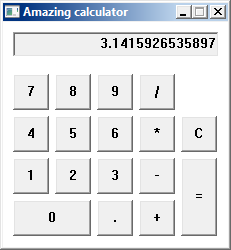
Results

Enjoy it!!!
Source code
Download Calculator.zip
Introduction
This is the first half of a tutorial on making Windows 8 apps. The goal is to learn how to use Visual Studio 2012, the Windows 8 APIs and the basic tools that they provides. The approach will be to make two simple apps from scratch. In doing so, we will cover some of the basic tools needed to make an interactive user interface. In the first part, we will make a simple calculator and in the second part, we will make a note-taking app.
I will be using C#/XAML in this tutorial, but note that you can use C++/XAML, C++/DirectX11 or Javascript/HTML to make Windows 8 apps also.
Prerequisites
The first part of this tutorial is meant to be accessible for people with little to no programming experience. Readers with experience with Windows Form, Windows Phone, Silverlight, WPF development, or similar technologies may prefer to skip to the second part. Knowledge of C# is not required: a good portion of the code I write will be easy to read as English and the reader can simply copy any syntax that is more complex.
Naturally, basic knowledge of C# does help. For this purpose, I recommend following the tutorial on C# Station. Lessons 1-5, 7 and 10 should be sufficient in the scope of this tutorial. This is only one of many options; there are other excellent tutorials out there.
Having Windows 8 installed is a requirement for making Windows 8 apps. Students can obtain it for free on Dreamspark. The other requirement is to have either the full Visual Studio 2012 or Visual Studio 2012 Express for Windows 8 installed. Both contain the essential features for making apps. The express version can be downloaded for free and students may have access to the full version from their school, via the Dreamspark/MSDN AA.
Creating a new project
1) Start by opening Visual Studio. Visual Studio is an integrated development environment (IDE), which will provides a convenient way to compile code and design an interface visually with drag-and-drop, as well as many other features and tools.
2) Visual Studio comes with a «light» theme and a «dark» theme. In this tutorial, I will be using the «light» theme. You can change it in Menu > Tools > Options > Environment > General > Color Theme, depending on your tastes.
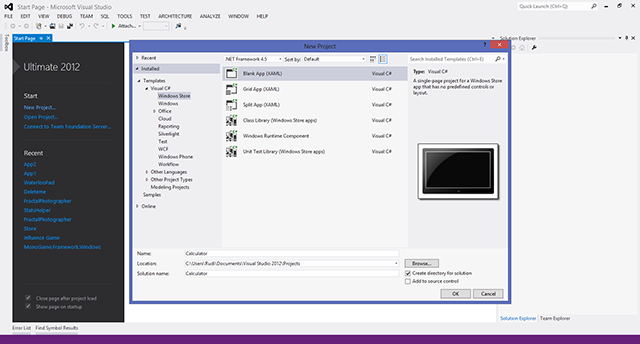
3) Create a new, blank project in File > New > Project … > Templates > Visual C# > Windows Store > Blank App (XAML). Let’s name it «Calculator».
4) A working template is automatically created. A template is a working application that you can compile and run immediately by pressing F5, though it contains nothing at the moment.
The two files of interest are MainPage.xaml and MainPage.xaml.cs which are located in the Solution Explorer on the right, which is where you find every file contained in the project. The former is the XAML code for your interface. It works like HTML and allows you to specify the location and properties of things such as buttons, menus, etc. The latter is the actual code for your project — code that is used when you interact with the interface. Double-click on MainPage,xaml to open the editor for your interface.
5) Take a look at the Toolbox on the left of your screen (it might be on auto-collapse by default). It contains useful «controls», interface elements that are premade for you and will make your life much easier. Try dragging a button into your editor.

Note : Click on the image to see the full size.
6) When the button that you just placed in the interface is selected, you can see a list of its Properties on the right of the screen, under Solution Explorer. You can change color of button, the text inside it, the size of that text, etc. Let’s do the following :
Change the Width to 200 and the Height to 150.
Change the Fontsize to 50.
Change the Content to «ADD».
Drag the button to the center of the screen.
7) Next we need to add another control that will display the answer of your calculation. TextBLOCK serves this purpose (not to be confused with TextBOX, which we will get to later). Drag a Textblock from the toolbox and place it under your button. You can play with its properties, increase its font size, etc. Name it OutputText.

 Notice that, under the interface editor, you can see that code has automatically been added (it may look slightly different for you, depending on the properties you’ve changed) :
<Grid Background="{StaticResource ApplicationPageBackgroundThemeBrush}">
    <Button Content="ADD" HorizontalAlignment="Left" Margin="590,302,0,0" VerticalAlignment="Top" Width="200" Height="150" FontSize="50"/>
    <TextBlock x:Name="OutputText" HorizontalAlignment="Left" Margin="590,478,0,0" TextWrapping="Wrap" Text="TextBlock" VerticalAlignment="Top" Height="43" Width="200" FontSize="30"/>
</Grid>
9) Double-click on the button in the interface editor. When you double-click on a control, it will create in the code editor a function that is called when the button is clicked. The following should have been created in your code (MainPage.xaml.cs) :
private void Button_Click_1(object sender, RoutedEventArgs e)
{

}
An alternative option is to click on the lightning symbol on the top-right of the properties pane, next to the tool symbol. It will list every possible interaction the control supports, called «events». You can click on the empty space next to an event for Visual Studio to create the function for you.
Note that you should rely on Visual Studio to do it for you. If you simply copy the code in your editor, it may not work, because Visual Studio needs some additional code that I won’t get into in this tutorial.
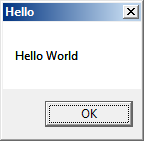
10) Before we create a calculator, let’s test our button by making the overused cliche, «Hello World». Don’t copy-paste the code below : type it yourself. Notice that as you are typing, Visual Studio suggests possible auto-completions. This feature is called Intellisense, which, in this case, brings up all the properties of a given object — OutputText.
private void Button_Click_1(object sender, RoutedEventArgs e)
{
    OutputText.Text = "Hello World!";
}

11) You can now test your app. To do so, either press F5 or click on the green arrow button in the menu, which should say «Local Machine» (choosing simulator will open an emulator for a tablet that supports rotation changes, but we don’t need that here). To exit your app, return to the desktop via Windows-D and terminate your app by pressing on the red square. If you don’t, the app is still running and you cannot make code changes.
12) Now let’s make a calculator. The user will need to enter two numbers. Drag two TextBOX from the toolbox to the editor, on top of your button. Name them Input1 and Input2. Change their properties, such as font size, if desired.

13) Finally, we will change the code for Button_Click_1. The user enters text in the two textboxes. We want to add numbers. So we will convert the input to numbers, add them, and convert it back to text again, using the build in «Convert» functions.
private void Button_Click_1(object sender, RoutedEventArgs e)
{
    OutputText.Text = Convert.ToString(Convert.ToInt32(Input1.Text) +
                Convert.ToInt32(Input2.Text));
}
14) Run your app and watch the magic happen.
Going further…
We would expect additional features in a calculator. Subtraction, multiplication and division follow the same concepts as addition. It would be redundant in this tutorial to repeat the same steps — however, as an exercise, I would suggest trying to implement those.
We have only using some of the properties of controls, mainly location, size and fontsize. Can you play with the controls in the editor, change their properties and try to make the calculator look better?
Source code
Download Calculator.zip
Introduction
This is the first half of a tutorial on making Windows 8 apps. The goal is to learn how to use Visual Studio 2012, the Windows 8 APIs and the basic tools that they provides. The approach will be to make two simple apps from scratch. In doing so, we will cover some of the basic tools needed to make an interactive user interface. In the first part, we will make a simple calculator and in the second part, we will make a note-taking app.
I will be using C#/XAML in this tutorial, but note that you can use C++/XAML, C++/DirectX11 or Javascript/HTML to make Windows 8 apps also.
Prerequisites
The first part of this tutorial is meant to be accessible for people with little to no programming experience. Readers with experience with Windows Form, Windows Phone, Silverlight, WPF development, or similar technologies may prefer to skip to the second part. Knowledge of C# is not required: a good portion of the code I write will be easy to read as English and the reader can simply copy any syntax that is more complex.
Naturally, basic knowledge of C# does help. For this purpose, I recommend following the tutorial on C# Station. Lessons 1-5, 7 and 10 should be sufficient in the scope of this tutorial. This is only one of many options; there are other excellent tutorials out there.
Having Windows 8 installed is a requirement for making Windows 8 apps. Students can obtain it for free on Dreamspark. The other requirement is to have either the full Visual Studio 2012 or Visual Studio 2012 Express for Windows 8 installed. Both contain the essential features for making apps. The express version can be downloaded for free and students may have access to the full version from their school, via the Dreamspark/MSDN AA.
Creating a new project
1) Start by opening Visual Studio. Visual Studio is an integrated development environment (IDE), which will provides a convenient way to compile code and design an interface visually with drag-and-drop, as well as many other features and tools.
2) Visual Studio comes with a «light» theme and a «dark» theme. In this tutorial, I will be using the «light» theme. You can change it in Menu > Tools > Options > Environment > General > Color Theme, depending on your tastes.
3) Create a new, blank project in File > New > Project … > Templates > Visual C# > Windows Store > Blank App (XAML). Let’s name it «Calculator».
4) A working template is automatically created. A template is a working application that you can compile and run immediately by pressing F5, though it contains nothing at the moment.
The two files of interest are MainPage.xaml and MainPage.xaml.cs which are located in the Solution Explorer on the right, which is where you find every file contained in the project. The former is the XAML code for your interface. It works like HTML and allows you to specify the location and properties of things such as buttons, menus, etc. The latter is the actual code for your project — code that is used when you interact with the interface. Double-click on MainPage,xaml to open the editor for your interface.
5) Take a look at the Toolbox on the left of your screen (it might be on auto-collapse by default). It contains useful «controls», interface elements that are premade for you and will make your life much easier. Try dragging a button into your editor.
Note : Click on the image to see the full size.
6) When the button that you just placed in the interface is selected, you can see a list of its Properties on the right of the screen, under Solution Explorer. You can change color of button, the text inside it, the size of that text, etc. Let’s do the following :
Change the Width to 200 and the Height to 150.
Change the Fontsize to 50.
Change the Content to «ADD».
Drag the button to the center of the screen.
7) Next we need to add another control that will display the answer of your calculation. TextBLOCK serves this purpose (not to be confused with TextBOX, which we will get to later). Drag a Textblock from the toolbox and place it under your button. You can play with its properties, increase its font size, etc. Name it OutputText.
Notice that, under the interface editor, you can see that code has automatically been added (it may look slightly different for you, depending on the properties you’ve changed) :
<Grid Background="{StaticResource ApplicationPageBackgroundThemeBrush}">
    <Button Content="ADD" HorizontalAlignment="Left" Margin="590,302,0,0" VerticalAlignment="Top" Width="200" Height="150" FontSize="50"/>
    <TextBlock x:Name="OutputText" HorizontalAlignment="Left" Margin="590,478,0,0" TextWrapping="Wrap" Text="TextBlock" VerticalAlignment="Top" Height="43" Width="200" FontSize="30"/>
</Grid>
9) Double-click on the button in the interface editor. When you double-click on a control, it will create in the code editor a function that is called when the button is clicked. The following should have been created in your code (MainPage.xaml.cs) :
private void Button_Click_1(object sender, RoutedEventArgs e)
{

}
An alternative option is to click on the lightning symbol on the top-right of the properties pane, next to the tool symbol. It will list every possible interaction the control supports, called «events». You can click on the empty space next to an event for Visual Studio to create the function for you.
Note that you should rely on Visual Studio to do it for you. If you simply copy the code in your editor, it may not work, because Visual Studio needs some additional code that I won’t get into in this tutorial.
10) Before we create a calculator, let’s test our button by making the overused cliche, «Hello World». Don’t copy-paste the code below : type it yourself. Notice that as you are typing, Visual Studio suggests possible auto-completions. This feature is called Intellisense, which, in this case, brings up all the properties of a given object — OutputText.
private void Button_Click_1(object sender, RoutedEventArgs e)
{
    OutputText.Text = "Hello World!";
}
11) You can now test your app. To do so, either press F5 or click on the green arrow button in the menu, which should say «Local Machine» (choosing simulator will open an emulator for a tablet that supports rotation changes, but we don’t need that here). To exit your app, return to the desktop via Windows-D and terminate your app by pressing on the red square. If you don’t, the app is still running and you cannot make code changes.
12) Now let’s make a calculator. The user will need to enter two numbers. Drag two TextBOX from the toolbox to the editor, on top of your button. Name them Input1 and Input2. Change their properties, such as font size, if desired.
13) Finally, we will change the code for Button_Click_1. The user enters text in the two textboxes. We want to add numbers. So we will convert the input to numbers, add them, and convert it back to text again, using the build in «Convert» functions.
private void Button_Click_1(object sender, RoutedEventArgs e)
{
    OutputText.Text = Convert.ToString(Convert.ToInt32(Input1.Text) +
                Convert.ToInt32(Input2.Text));
}
14) Run your app and watch the magic happen.
Going further…
We would expect additional features in a calculator. Subtraction, multiplication and division follow the same concepts as addition. It would be redundant in this tutorial to repeat the same steps — however, as an exercise, I would suggest trying to implement those.
We have only using some of the properties of controls, mainly location, size and fontsize. Can you play with the controls in the editor, change their properties and try to make the calculator look better?

8 May 2017
Progress: Complete
Why? Why would we want to go and do something like recreate windows calculator? I must admit that having bedded myself quite comfortably in the world of Javascript, where every user interface is instantly, universally cross-platform, diving into the Windows API does seem like a step backwards. But it’s educational. It’s one of those rights-of-passage things.
The Windows API lets you build graphical applications in C. In the past I’ve always used huge libraries for GUIs, but there’s a certain shame associated with it – even the simplest application usually ends up a good chunk of a megabyte. Doing the same with just the Windows API should produce an .exe file of only a couple kilobytes.
Like many things, once you get started you realize it’s actually quite easy. The first step is setting up the build environment. There are many C compilers out there, but the one I chose here was lcc-win32. This is an old, proprietary C compiler for windows, with an utterly abysmal IDE, but it’s extremely lightweight, the whole install was something like 20MB.
Windows API
All we need to do to start using windows API calls is include windows.h :
#include <windows.h>

int main(void) {
  MessageBox(NULL, "Hello World", "Hello", MB_OK);
  return 0;
}
Woohoo. The first parameter is the «parent window» which the message box belongs to. We haven’t made one yet so we leave it null (normally, if you click on the parent window while a message box is open, it flashes the title bar of the message again). The last parameter is a bitwise flag which can be used to change the styling.
Lcc-win32 is supposed to come with an offline reference for the Windows API, but I couln’t use it for some reason. So the only reference we have is MSDN, which is pretty bloated and slow. Generally just Googling «winapi messagebox» or whatever finds plenty of information on it. It may be an old technology, but that’s a good thing: every problem you encounter has probably been solved a dozen times already.
There’s a certain amount of terminology that we need to be aware of. Everything is a «window», even buttons or text edit boxes. What we’d call a «text input» or «textarea» in HTML are called an «EDIT» window, which needs the ES_MULTILINE flag set to be a textarea. ES stands for Edit Style.
Note that for all but the most trivial programs, we don’t use main() as our entry point function, rather WinMain(). No doubt some stuff goes on in the background. It also hands us some useful parameters.
Windows programming is generally event-based. Windows uses a message queue, messages come in, get looked at, then get dispatched again. These messages range from «this button was clicked» to «the screen is about to be redrawn». Unlike Javascript, the program’s message loop is part of our code, so we can change it or put code outside of it if needed.
  MSG Msg;

  while(GetMessage(&Msg, NULL, 0, 0) > 0)
  {
    TranslateMessage(&Msg);
    DispatchMessage(&Msg);
  }
GetMessage() blocks execution until the next message comes in; another function, PeekMessage() returns immediately if the queue is empty. TranslateMessage() specifically looks at keyboard events and generates new messages based on vitual key codes (i.e. independent of keyboard layout, which is usually more useful). DispatchMessage() sends the message to the window procedure – this is a function we need to provide when we create our window class.
If we want to create a button, we call CreateWindow() with the «BUTTON» class. If we want to make our own type of window, such as the main window of our application, we register our own window class. There are a bunch of trivial parameters to the window class, but the important one is the window procedure. This gets called whenever that window receives a message. Inside it, there is nearly always a big switch statement which splits the messages by ID, then possibly further by their parameters.
When we call CreateWindow with our window class, we can then give it lots of window style flags, such as if it’s resizeable, has min/maximize buttons in the top corner, etc. CreateWindow seems to have been superseded with a similar function, CreateWindowEx, which has an extra parameter, to accept even more style flags. There are extensive lists of possible styles on MSDN, but I’m not sure if it’s worth linking to since the URLs appear to keep changing.
There are many tutorials on the Windows API out there, this summary is mostly just to remind myself. So, let’s get started on our calculator.
The buttons and the display
There are two ways to fill our main window with child windows (the buttons). They can either be created manually, or loaded from a resource file. The resource file is a list of things that would be boring to type out, and most IDEs have resource editors so you can visually lay out your dialog boxes and such. But, I like to keep things simple, so, to hell with resource files.
In the main window procedure we process a message called WM_CREATE. At this point we can have a bunch more CreateWindow() calls to make our buttons. Since they’re all nearly identical I defined a macro for it.
#define makeButton(name,id,x,y,w,h) CreateWindow("BUTTON",name,WS_VISIBLE | WS_CHILD | BS_PUSHBUTTON, x,y,w,h, hwnd,(HMENU)(id),GetModuleHandle(NULL),NULL)
Notice that the ID parameter goes into the hMenu (handle to menu) argument, even needs to be cast to type HMENU. Don’t ask me why, but that’s where the ID goes. When the main window procedure receives the WM_COMMAND message, the wParam parameter will contain the ID of the button clicked.
It would be tedious to #define an ID for every button, so I just numbered them 100 to 109 for buttons 0 to 9.
We also need to create an EDIT control as the display. This will be disabled ( ES_READONLY ) but being a text box means the user can select and copy the text easily.
Some logic
A number button gets pressed, we need to push its value onto the display. We use GetWindowTextLength(), then GetDlgItemText() to load this into a char array. It’s a null terminated string, so to append all we need to do is set the last element (null) to the new number, and set the following element to null. Then SetDlgItemText() writes it back to the display.
To get the number from the ID, by the way I defined it (possibly lacking foresight) we need to subtract 100, then add the ascii value of the character zero.
When we start calculating, we need that number as a float. Or actually a long double float, since we want our calculator to be nice and precise. We can use the standard function strtold(), which is like strtof() but longer and doublier. To write values back to the display I used sprintf().
And with that a basic calculator appears to be functioning! There are some subtleties to the behaviour, for instance, pressing buttons in a nonsensical order has a defined behaviour in the real windows calculator. And pressing equals again repeats the last operation. I’ve been doing so much embedded programming lately that I always worry about efficiency, but here I have to remind myself that there is completely negligible cost in adding a few extra variables to keep track of these things.
Keyboard
The real windows calculator can be operated by keyboard events. In fact it’s pretty useless without it. We can listen to the WM_KEYDOWN messages to implement this. We could send the appropriate button-click message back into the queue in response, but instead I just put the case statement for the keydown events directly above the button click events, and let it fall through.
To find the keycodes I got it to open a message box with the parameter value on each keydown event. I may be doing this the hard way, but for the number 8, it could also be the asterisk which would correspond to multiply. This means we have to track shift as well, but that’s easy enough to do. A single line for the WM_KEYUP event zeros our shift variable.
With the keycode known, we then write new values into the wParam corresponding to the button ID, and let it fall into the WM_COMMAND case statement.
This works great until we start mixing mouse clicks with keyboard presses. The keydown message is sent to the window that has focus. At the beginning the main window has focus, but after a button is clicked, it’s the button that captures all the key events, and our keyboard code stops working. Trying to SetFocus() back to the main window doesn’t really work, since by the time the keyboard events come in, it’s too late, and doing it on button clicks causes them to not visually depress properly. Instead, I decided to modify the message loop:
  while(GetMessage(&Msg, NULL, 0, 0) > 0) {
    if (Msg.message == WM_KEYDOWN || Msg.message == WM_KEYUP) Msg.hwnd = hwnd;
    TranslateMessage(&Msg);
    DispatchMessage(&Msg);
  }
Doing this, all keyup and keydown events are now redirected to the main window (hwnd, declared earlier). In a remarkably satisfying way, this method works perfectly.
Conclusion
That about sums up my windows calculator experience. The windows API. Not so scary really. The full source code is below, just a single .c file, no resources or headers. Also, on the odd chance you want it and if you dare download it, the compiled .exe file.
#include <windows.h>
#include <stdio.h>

#define windowClassName "myWindowClass"
#define IDC_EDIT 500

int typing = 0;
BOOL final=0;
long double num1=0.0;
long double num2=0.0;
int op=0;
BOOL shift=0;

long double getScreen(HWND hwnd){
  int len = GetWindowTextLength(GetDlgItem(hwnd, IDC_EDIT));
  char buf[32];
  if (len>0) {
    GetDlgItemText(hwnd, IDC_EDIT, buf, len+1);
    return strtold(buf,NULL);
  }
  return 0.0;
};

void equate(HWND hwnd){
  switch (op) {
    case 110: num1 += num2; break;
    case 111: num1 -= num2; break;
    case 112: num1 *= num2; break;
    case 113: num1 /= num2; break;
  }
  char buf[32];
  sprintf(buf,"%.16Lg",num1);
  SetDlgItemText(hwnd, IDC_EDIT, buf);
}

//the Window Procedure
LRESULT CALLBACK WndProc(HWND hwnd, UINT msg, WPARAM wParam, LPARAM lParam) {

  switch(msg) {
    case WM_CREATE:
    {

      #define errorIfNull(x) if (NULL==x) MessageBox(hwnd, "Error: WM_CREATE", "Error", MB_OK | MB_ICONERROR);

      #define makeButton(name,id,x,y,w,h) errorIfNull(CreateWindow("BUTTON",name,WS_VISIBLE | WS_CHILD | BS_PUSHBUTTON, x,y,w,h, hwnd,(HMENU)(id),GetModuleHandle(NULL),NULL))

      errorIfNull(CreateWindowEx(
        WS_EX_CLIENTEDGE,
        "EDIT",
        "0",        // default text
        WS_CHILD | WS_VISIBLE | ES_AUTOHSCROLL | ES_RIGHT | ES_READONLY, // Disabled, right align
        10,         // x position
        10,         // y position
        206,        // width
        25,         // height
        hwnd,       // Parent window
        (HMENU)IDC_EDIT,  // menu handle = ID
        GetModuleHandle(NULL), NULL));

      makeButton(".",99, 94,178,36,36);
      makeButton("0",100,10,178,78,36);
      makeButton("1",101,10,136,36,36);
      makeButton("2",102,52,136,36,36);
      makeButton("3",103,94,136,36,36);
      makeButton("4",104,10,94,36,36);
      makeButton("5",105,52,94,36,36);
      makeButton("6",106,94,94,36,36);
      makeButton("7",107,10,52,36,36);
      makeButton("8",108,52,52,36,36);
      makeButton("9",109,94,52,36,36);

      makeButton("+",110,136,178,36,36);
      makeButton("-",111,136,136,36,36);
      makeButton("*",112,136,94,36,36);
      makeButton("/",113,136,52,36,36);

      makeButton("=",114,178,136,36,78);
      makeButton("C",115,178,94,36,36);

    }
    break;
    case WM_KEYUP:
      if (wParam==VK_SHIFT) shift=0;
    break;

    case  WM_KEYDOWN :
      if (shift) {
        if (wParam==0x38) wParam=112; // shift 8 = multiply
        else if (wParam==0xbb) wParam=110;
        else break;
      } else {
        if (wParam>=0x30 && wParam <=0x39) {
          wParam+= 100-0x30;
        } else if (wParam>=0x60 && wParam <=0x69) { //numpad
          wParam+= 100-0x60;
        } else switch (wParam){
          case VK_SHIFT: shift=1; return 0;
          case VK_MULTIPLY: wParam =112; break;
          case VK_SUBTRACT: case 0xbd: wParam =111; break;
          case VK_ADD: wParam =110; break;
          case VK_DIVIDE: case 0xbf: wParam =113; break;
          case VK_DECIMAL: case 0xbe: wParam =99; break;
          case VK_RETURN: case 0xbb: wParam = 114; break;
          case 0x2e: wParam = 115; break;

          default:
            return 0;
        }
      }

    // break; Fall through
    case WM_COMMAND:
    {
      switch (wParam) {
        case 99:
          if (typing==2) break;

        case 109:case 108:case 107:case 106:case 105:case 104:case 103:case 102:case 101:case 100:
        {
          char out[32];
          int len = GetWindowTextLength(GetDlgItem(hwnd, IDC_EDIT));

          if (typing) {
            GetDlgItemText(hwnd, IDC_EDIT, out, len+1);
          } else {
            typing=1;
            len=0;
          }
          if (len<=16) {
            if (wParam==99) {
              if (len==0) out[len++]='0';
              out[len]='.';
              typing=2;
            } else out[len] = '0'+(wParam-100);
            out[len+1] =0;
            SetDlgItemText(hwnd, IDC_EDIT, out);
          }

          if (final) op=0;
          final=0;

        }
        break;
        case 111:
        case 110:
        case 112:
        case 113:
          if (typing && op) {
            num2 = getScreen(hwnd);
            equate(hwnd);
          } else num1 = getScreen(hwnd);
          typing=0;
          op=wParam;
          final=0;

        break;
        case 114: // =
          if (!op) break;
          if (typing)
            num2 = getScreen(hwnd);
          typing=0;

          equate(hwnd);
          final=1;

        break;
        case 115: // Clear
          num1=0.0;
          num2=0.0;
          op=0;
          final=0;
          typing=0;
          SetDlgItemText(hwnd, IDC_EDIT, "0");
        break;
      }
    }
    break;
    case WM_CLOSE:
      DestroyWindow(hwnd);
    break;
    case WM_DESTROY:
      PostQuitMessage(0);
    break;
    default:
      return DefWindowProc(hwnd, msg, wParam, lParam);
  }
  return 0;
}

int WINAPI WinMain(HINSTANCE hInstance, HINSTANCE hPrevInstance, LPSTR lpCmdLine, int nCmdShow) {
  WNDCLASSEX wc;
  HWND hwnd;
  MSG Msg;

  wc.cbSize    = sizeof(WNDCLASSEX);
  wc.style     = 0;
  wc.lpfnWndProc   = WndProc;
  wc.cbClsExtra  = 0;
  wc.cbWndExtra  = 0;
  wc.hInstance   = hInstance;
  wc.hIcon     = LoadIcon(NULL, IDI_APPLICATION);
  wc.hCursor     = LoadCursor(NULL, IDC_ARROW);
  wc.hbrBackground = (HBRUSH)(COLOR_WINDOW+1);
  wc.lpszMenuName  = NULL;
  wc.lpszClassName = windowClassName;
  wc.hIconSm     = LoadIcon(NULL, IDI_APPLICATION);

  if(!RegisterClassEx(&wc)) {
    MessageBox(NULL, "Window Registration Failed!", "Error!", MB_ICONEXCLAMATION | MB_OK);
    return 0;
  }

  hwnd = CreateWindowEx(
    0,
    windowClassName,
    "Amazing calculator",
    WS_OVERLAPPED | WS_CAPTION | WS_SYSMENU | WS_MINIMIZEBOX,
    CW_USEDEFAULT, CW_USEDEFAULT, 231, 250,
    NULL, NULL, hInstance, NULL);

  if(hwnd == NULL) {
    MessageBox(NULL, "Window Creation Failed!", "Error!", MB_ICONEXCLAMATION | MB_OK);
    return 0;
  }

  ShowWindow(hwnd, nCmdShow);
  UpdateWindow(hwnd);

  while(GetMessage(&Msg, NULL, 0, 0) > 0) {
    if (Msg.message == WM_KEYDOWN || Msg.message == WM_KEYUP) Msg.hwnd = hwnd;
    TranslateMessage(&Msg);
    DispatchMessage(&Msg);
  }
  return Msg.wParam;
}
В статье «Делаем консольный калькулятор.» мы создавали небольшой калькулятор, который работает в консоли. В этой статье пришло время научиться создавать графический калькулятор на языке C# с помощью Windows Forms.
Сам по себе калькулятор довольно прост, но если вы совсем новичок в создании подобных приложений, тогда будет посложнее. Разработку калькулятора начнем с разработки формы (Windows Forms) приложения. Запускаем Visual Studio и создаем проект:

Интерфейс созданного проекта должен выглядеть так:

На интерфейсе мы видим: слева панель элементов для нашей формы, справа обозреватель решений и свойства выбранной формы/элемента и по середине виден сам конструктор с формой (по умолчанию он имеет имя «Form1»).
На форму нужно поместить кнопки, текстовое поле, а также надпись. Надпись нужна, чтобы пользователь видел первый операнд. Когда введет нужную цифру, нажмет кнопку, например «+», надпись будет содержать введенное значение.
Все нужные элементы можно найти слева в панели элементов. Чтобы найти текстовое поле просто введите в поиске «textBox» и с помощью мышки перенесите его на свою форму. Для добавления кнопок просто введите в поиске «Button» и перенесите нужное количество кнопок на свою форму. Также добавьте на «ListBox» один пустой «Label»:

Изменять свойства формы можно с помощью окна «Свойства» справа внизу. Для этого нажмите на нужную форму, например «Button1» и поменяйте ему свойство «text» на «С»:

Добавьте все нужные кнопки. Измените свойство «Font» для элементов TextBox и Label. Цвет кнопок и имя программы меняйте на свое усмотрение.

С помощью «MultiLine» измените ширину элемента TextBox:

В итоге у нас получилось 19 кнопок Button, 1 TextBox и ещё 1 пустой Label:

Теперь посмотрим, как работает калькулятор. Мы используем четыре члена класса. Напишем их в самое начало программы:
    float a, b;
    int oper;
    bool znak = true;
Первые два — это наши операнды, a и b. Третий — это выбранный пользователем оператор. Четвертый — признак знака. Запрограммируем обработчик кнопки «+/-«, изменяющий знак числа. Для этого в форме нажмите на нужную кнопку два раза. Visual Studio переведет вас в нужную секцию кода:
        private void button3_Click(object sender, EventArgs e)
        {

        }
В фигурных скобках пишем код:
            if (znak == true)
            {
                textBox1.Text = "-" + textBox1.Text;
                znak = false;
            }
            else if (znak==false)
            {
                textBox1.Text = textBox1.Text.Replace("-", "");
                znak = true;
            }
Если znak=true, мы меняем знак операнда в textBox1, а если false, то знак числа удаляется из текстового поля.
Для каждой цифровой кнопки обработчик будет следующий:
// Обработчик цифровой кнопки "0"

textBox1.Text = textBox1.Text + 0;
На основе этого кода повесьте на цифровые кнопки от 0 до 9 обработчик событий. Нажмите на нужную цифровую кнопку и впишите код.
Обработчик кнопки операторов «+, -, *, /». Нажмите на нужную кнопку с оператором и впишите код.
            // Обработчик оператора "+"

            a = float.Parse(textBox1.Text);
            textBox1.Clear();
            oper = 1;
            label1.Text = a.ToString() + "+";
            znak = true;
В данном коде мы в переменную «a» записываем значение из текстового поля, попутно преобразовав его в float посредством вызова метода float.Parse(). Далее мы очищаем текстовое поле, чтобы можно было вводить второй операнд. oper = 1 означает присвоение номера оператора (для + — это 1 и так далее по увеличению). Далее заносим в надпись информацию об операнде и операторе.
Обработчик кнопки «,» добавляет запятую в текстовое поле:
textBox1.Text = textBox1.Text + ",";
Далее нам понадобится создать функцию, которая будет применять нужные нам математические операции к числам. Назовём её calculate. Но перед этим мы кликнем дважды на кнопку «=» на форме и в коде к ней мы запишем:
// вызов функции
calculate();
label1.Text = "";
При нажатии пользователем на кнопку «=» выполнится функция подсчёта calculate, и, заодно, очистится Label, так как результат мы в будущем коде выведем в TextBox.
Функция calculate:
        private void calculate()
        {
            switch (oper)
            {
                case 1:
                    b = a + float.Parse(textBox1.Text);
                    textBox1.Text = b.ToString();
                    break;
                case 2:
                    b = a - float.Parse(textBox1.Text);
                    textBox1.Text = b.ToString();
                    break;
                case 3:
                    b = a * float.Parse(textBox1.Text);
                    textBox1.Text = b.ToString();
                    break;
                case 4:

                    if (float.Parse(textBox1.Text) == 0)
                    { textBox1.Text = "Делить на 0 нельзя!"; }
                    else
                    {
                        b = a / float.Parse(textBox1.Text);
                        textBox1.Text = b.ToString();
                    }
                    break;
                default:
                    break;
            }

        }
Здесь мы используем конструкцию switch-case. Нам осталось обработать две кнопки:
Обработчик кнопки «С». Данная кнопка будет очищать все записи из TextBox’a и Label’a. Код кнопки:
textBox1.Text = "";
label1.Text = "";
Кнопка «<–» будет удалять последнюю цифру записанного в TextBox’e числа. Код кнопки:
            int lenght = textBox1.Text.Length - 1;
            string text = textBox1.Text;
            textBox1.Clear();
            for (int i = 0; i < lenght; i++)
            {
                textBox1.Text = textBox1.Text + text[i];
            }
Мы вводим новую переменную lenght целочисленного типа и записываем в неё количество символов в TextBox’e минус один символ.
Также мы вводим новую переменную text, в которую полностью заносим текст из TextBox’а. Затем мы очищаем TextBox и вводим цикл for, через который записываем в TextBox строку text, но уже на символ короче.
Теперь наш графический калькулятор готов к работе. Скомпилируйте программу, нажав на «Пуск». Если все заработало и калькулятор делает вычисления, тогда вы все правильно сделали и теперь можете пользоваться свомим личным графическим калькулятором.

Методическая разработка по теме
«Создание простого калькулятора на языке С#
с использованием технологии Windows Forms».
Дисциплина:
Информационные технологии и платформы разработки информационных систем
Специальности
технического профиля
Курс: 4
Тип урока: практическая
работа
Ход практической работы
Для создания графического
проекта нам потребуется среда разработки Visual Studio. На компьютерах
установлена версия Visual Studio 2013.
Логотипом и иконкой Visual Studio 2013
является символ, похожий на математический символ «бесконечность», но
с неодинаковыми левой и правой частями, фиолетового цвета.
![]()
1.
Щелкнув по этой иконке на
панели инструментов, выполняем вход в Visual
Studio 2013.

В результате сначала
появляется вертикально расположенный баннер Visual Studio 2013 (черного цвета), а затем — стартовая
страница

2.
Создадим проект графического
приложения.
Для этого выберете пункт
Создать проект. После этого откроется диалоговое окно создания нового
проекта:

3.
В поле внизу задайте имя
данному проекту – ProstoCalculator. Нажмите ОК.
После этого Visual Studio
откроет наш проект с созданными по умолчанию файлами:

Большую часть пространства Visual Studio занимает графический
дизайнер, который содержит форму будущего приложения. Пока она пуста и имеет
только заголовок Form1. Справа находится окно файлов решения/проекта — Solution
Explorer (Обозреватель решений). Там и находятся все связанные с нашим приложением
файлы, в том числе файлы формы Form1.cs.
Внизу справа находится окно свойств — Properties. Так как в данный
момент выбрана форма как элемент управления, то в этом поле отображаются
свойства, связанные с формой.
4.
Теперь найдем в этом окне
свойство формы Text и изменим его значение на «Калькулятор»:

5.
Далее расположите все нужные
элементы на форме. Нам понадобятся три элемента TextBox и 4 кнопки – Button.
Для этого нажимаем Вид →
Панель элементов:

Появляется Панель
элементов, из которой будем брать необходимые элементы TextBox и Button
простым перетаскиванием.

Устанавливаем их так, как
показано на рисунке ниже и переименовываем кнопки в свойствах. Сделать это
можно, выделив элемент:


6.
Наш калькулятор основан на взаимодействии
двух чисел, поэтому математические операции будут следующие:
·
Сложение
·
Вычитание
·
Умножение
·
Деление
7.
Итак, после того, как с
графическим оформлением закончено, приступаем к самому коду.
Для всех вышеописанных
операций (Сложение, Вычитание, Умножение, Деление) мы должны создать отдельные
функции. Функции – это подпрограммы в самой программе, выполняющие отдельные
задачи. Они помогают сократить и облегчить код.
Вот так будут выглядеть
функции сложения, вычитания, умножения и деления:
|
1. public 2. { 3. return 4. } |
||
|
5. public static double razn(double a, double b) 6. { 7. return a — b; 8. } 9. public static double umnog(double a, double b) 10. { 11. return a * b; 12. } 13. public static double del(double a, double b) 14. { 15. return a / b; 16. } Данный фрагмент кода помещаем на форму. Для Кликните в любое пустое место формы Мы дополним код, разместив наш фрагмент private void button1_Click(object |
||

У вас должно получиться:

8.
Затем данные функции
привязываем к кнопкам в форме.
Дважды щёлкаем мышью в
форме на первую кнопку (Сложение).
Открывается та часть
кода, которая отвечает за событие, которое произойдет, когда пользователь
кликнет на данную кнопку. В теле этого события мы пишем:
|
· · · · |
||
|
Нажимаем на кнопку 2 (Вычитание): · · · · Нажимаем на кнопку 3 (Умножение): · · · · Нажимаем на кнопку 4 (Деление): · · · · У вас должно |

Вот и всё. Наш калькулятор готов!

Дальнейших успехов Вам!
1 2 3 4 5 6 7 8 9 10 11 12 13 14 15 16 17 18 19 20 21 22 23 24 25 26 27 28 29 30 31 32 33 34 35 36 37 38 39 40 41 42 43 44 45 46 47 48 49 50 51 52 53 54 55 56 57 58 59 60 61 62 63 64 65 66 67 68 69 70 71 72 73 74 75 76 77 78 79 80 81 82 83 84 85 86 87 88 89 90 91 92 93 94 95 96 97 98 99 100 101 102 103 104 105 106 107 108 109 110 111 112 113 114 115 116 117 118 119 120 121 122 123 124 125 126 127 128 129 130 131 132 133 134 135 136 137 138 139 140 141 142 143 144 145 146 147 148 149 150 151 152 153 154 155 156 157 158 159 160 161 162 163 164 165 166 167 168 169 170 171 172 173 174 175 176 177 178 179 180 181 182 183 184 185 186 187 188 189 190 191 192 193 194 195 196 197 198 199 200 201 202 203 204 205 206 207 208 209 210 211 212 213 214 215 216 217 218 219 220 221 222 223 224 225 226 227 228 229 230 231 232 233 234 235 236 237 238 239 240 241 242 243 244 245 246 247 248 249 250 251 252 253 254 255 256 257 258 259 260 261 262 263 264 265 266 267 268 269 270 271 272 273 274 275 276 277 278 279 280 281 282 283 284 285 286 287 288 289 290 291 292 293 294 295 296 297 298 299 300 301 302 303 304 305 306 307 308 309 310 311 312 313 314 315 316 317 318 319 320 321 322 323 324 325 326 327 328 329 330 331 332 333 334 335 336 337 338 339 340 341 342 343 344 345 346 347 348 349 350 351 352 353 354 355 356 357 358 359 360 361 362 363 364 365 366 367 368 369 370 371 372 373 374 375 376 377 378 379 380 381 382 383 384 385 386 387 388 389 390 391 392 393 394 395 396 397 398 399 400 401 402 403 404 405 406 407 408 409 410 411 412 413 414 415 416 417 418 419 420 421 422 423 424 425 426 427 428 429 430 431 432 433 434 435 436 437 438 439 440 441 442 443 444 445 446 447 448 449 450 451 452 453 454 455 456 457 458 459 460 461 462 463 464 465 466 467 468 469 470 471 472 473 474 475 476 477 478 479 480 481 482 483 484 485 486 487 488 489 490 491 492 493 494 495 496 497 498 499 500 501 502 503 504 505 506 507 508 509 510 511 512 513 514 515 516 517 |
// MFCCalcDlg.cpp : implementation file // // This is a part of the Microsoft Foundation Classes C++ library. // Copyright (C) 1992-1995 Microsoft Corporation // All rights reserved. // // This source code is only intended as a supplement to the // Microsoft Foundation Classes Reference and related // electronic documentation provided with the library. // See these sources for detailed information regarding the // Microsoft Foundation Classes product. #include "stdafx.h" #include "MFCCalc.h" #include "MFCCalcDlg.h" #ifdef _DEBUG #undef THIS_FILE static char BASED_CODE THIS_FILE[] = __FILE__; #endif ///////////////////////////////////////////////////////////////////////////// // CAboutDlg dialog used for App About class CAboutDlg : public CDialog { public: CAboutDlg(); // Dialog Data //{{AFX_DATA(CAboutDlg) enum { IDD = IDD_ABOUTBOX }; //}}AFX_DATA // Implementation protected: virtual void DoDataExchange(CDataExchange* pDX); // DDX/DDV support //{{AFX_MSG(CAboutDlg) virtual BOOL OnInitDialog(); //}}AFX_MSG DECLARE_MESSAGE_MAP() }; CAboutDlg::CAboutDlg() : CDialog(CAboutDlg::IDD) { //{{AFX_DATA_INIT(CAboutDlg) //}}AFX_DATA_INIT } void CAboutDlg::DoDataExchange(CDataExchange* pDX) { CDialog::DoDataExchange(pDX); //{{AFX_DATA_MAP(CAboutDlg) //}}AFX_DATA_MAP } BEGIN_MESSAGE_MAP(CAboutDlg, CDialog) //{{AFX_MSG_MAP(CAboutDlg) // No message handlers //}}AFX_MSG_MAP END_MESSAGE_MAP() ///////////////////////////////////////////////////////////////////////////// // CAboutDlg message handlers BOOL CAboutDlg::OnInitDialog() { CDialog::OnInitDialog(); // TODO: Add extra initialization here return TRUE; } ///////////////////////////////////////////////////////////////////////////// // CCalcDlg dialog IMPLEMENT_DYNCREATE(CCalcDlg, CDialog) BEGIN_DISPATCH_MAP(CCalcDlg, CDialog) //{{AFX_DISPATCH_MAP(CCalcDlg) DISP_PROPERTY_EX(CCalcDlg, "Accum", GetAccum, SetAccum, VT_I4) DISP_PROPERTY_EX(CCalcDlg, "Operand", GetOperand, SetOperand, VT_I4) DISP_PROPERTY_EX(CCalcDlg, "Operation", GetOperation, SetOperation, VT_I2) DISP_PROPERTY_EX(CCalcDlg, "Visible", GetVisible, SetVisible, VT_BOOL) DISP_FUNCTION(CCalcDlg, "Evaluate", Evaluate, VT_BOOL, VTS_NONE) DISP_FUNCTION(CCalcDlg, "Clear", Clear, VT_EMPTY, VTS_NONE) DISP_FUNCTION(CCalcDlg, "Display", Display, VT_EMPTY, VTS_NONE) DISP_FUNCTION(CCalcDlg, "Close", Close, VT_EMPTY, VTS_NONE) DISP_FUNCTION(CCalcDlg, "Button", Button, VT_BOOL, VTS_BSTR) //}}AFX_DISPATCH_MAP END_DISPATCH_MAP() #ifndef IMPLEMENT_OLECREATE_SINGLE // MFC will provide this macro in the future. For now, we define it. #define IMPLEMENT_OLECREATE_SINGLE(class_name, external_name, l, w1, w2, b1, b2, b3, b4, b5, b6, b7, b8) AFX_DATADEF COleObjectFactory class_name::factory(class_name::guid, RUNTIME_CLASS(class_name), TRUE, _T(external_name)); const AFX_DATADEF GUID class_name::guid = { l, w1, w2, { b1, b2, b3, b4, b5, b6, b7, b8 } }; #endif // {62C4DD10-F45E-11cd-8C3D-00AA004BB3B7} IMPLEMENT_OLECREATE_SINGLE(CCalcDlg, "mfccalc.calculator", 0x62c4dd10, 0xf45e, 0x11cd, 0x8c, 0x3d, 0x0, 0xaa, 0x0, 0x4b, 0xb3, 0xb7); CCalcDlg::CCalcDlg(CWnd* pParent /*=NULL*/) : CDialog(CCalcDlg::IDD, pParent) { //{{AFX_DATA_INIT(CCalcDlg) // NOTE: the ClassWizard will add member initialization here //}}AFX_DATA_INIT // Note that LoadIcon does not require a subsequent DestroyIcon in Win32 m_hIcon = AfxGetApp()->LoadIcon(IDR_MAINFRAME); m_bAutoDelete = TRUE; // default to auto-delete m_dwRegister = 0; // not registered as active by default // Note that LoadAccelerator does not require DestroyAcceleratorTable m_hAccel = LoadAccelerators(AfxGetInstanceHandle(), MAKEINTRESOURCE(IDD)); // clear the contents of the calculator and reset state OnClickedClear(); // enable this object for OLE automation EnableAutomation(); } CCalcDlg::~CCalcDlg() { if (m_dwRegister != 0) RevokeActiveObject(m_dwRegister, NULL); } void CCalcDlg::DoDataExchange(CDataExchange* pDX) { CDialog::DoDataExchange(pDX); //{{AFX_DATA_MAP(CCalcDlg) // NOTE: the ClassWizard will add DDX and DDV calls here //}}AFX_DATA_MAP } ///////////////////////////////////////////////////////////////////////////// // CCalcDlg implementation void CCalcDlg::PerformOperation() { if (m_errorState != ErrNone) return; if (m_bOperandAvail) { if (m_operator == OpNone) m_accum = m_operand; else if (m_operator == OpMultiply) m_accum *= m_operand; else if (m_operator == OpDivide) { if (m_operand == 0) m_errorState = ErrDivideByZero; else m_accum /= m_operand; } else if (m_operator == OpAdd) m_accum += m_operand; else if (m_operator == OpSubtract) m_accum -= m_operand; } m_bOperandAvail = FALSE; UpdateDisplay(); } void CCalcDlg::ClickedNumber(long l) { if (m_errorState != ErrNone) return; if (!m_bOperandAvail) m_operand = 0L; SetOperand(m_operand*10+l); UpdateDisplay(); } void CCalcDlg::UpdateDisplay() { if (GetSafeHwnd() == NULL) return; CString str; if (m_errorState != ErrNone) str.LoadString(IDS_ERROR); else { long lVal = (m_bOperandAvail) ? m_operand : m_accum; str.Format(_T("%ld"), lVal); } GetDlgItem(IDE_ACCUM)->SetWindowText(str); GetDlgItem(IDC_INVISIBLE_FOCUS)->SetFocus(); } BEGIN_MESSAGE_MAP(CCalcDlg, CDialog) //{{AFX_MSG_MAP(CCalcDlg) ON_WM_SYSCOMMAND() ON_WM_PAINT() ON_WM_QUERYDRAGICON() ON_COMMAND_RANGE(IDB_0, IDB_9, OnClickedNumber) ON_BN_CLICKED(IDB_CLEAR, OnClickedClear) ON_BN_CLICKED(IDB_DIVIDE, OnClickedDivide) ON_BN_CLICKED(IDB_EQUAL, OnClickedEqual) ON_BN_CLICKED(IDB_MINUS, OnClickedMinus) ON_BN_CLICKED(IDB_PLUS, OnClickedPlus) ON_BN_CLICKED(IDB_TIMES, OnClickedTimes) ON_EN_SETFOCUS(IDE_ACCUM, OnSetFocusAccum) //}}AFX_MSG_MAP #ifdef _MAC ON_BN_CLICKED(IDB_CLOSE, OnCancel) #endif END_MESSAGE_MAP() ///////////////////////////////////////////////////////////////////////////// // CCalcDlg message handlers BOOL CCalcDlg::OnInitDialog() { CDialog::OnInitDialog(); // Add "About..." menu item to system menu. // IDM_ABOUTBOX must be in the system command range. ASSERT((IDM_ABOUTBOX & 0xFFF0) == IDM_ABOUTBOX); ASSERT(IDM_ABOUTBOX < 0xF000); CMenu* pSysMenu = GetSystemMenu(FALSE); CString strAboutMenu; strAboutMenu.LoadString(IDS_ABOUTBOX); if (!strAboutMenu.IsEmpty()) { #ifdef _MAC // On the Macintosh, the "About..." menu item is already there. We // just need to rename it and attach it to the about command. pSysMenu->ModifyMenu(0, MF_BYPOSITION, IDM_ABOUTBOX, strAboutMenu); #else pSysMenu->AppendMenu(MF_SEPARATOR); pSysMenu->AppendMenu(MF_STRING, IDM_ABOUTBOX, strAboutMenu); #endif } #ifndef _MAC pSysMenu->RemoveMenu(SC_MAXIMIZE, MF_BYCOMMAND); pSysMenu->RemoveMenu(SC_SIZE, MF_BYCOMMAND); #endif // want focus to stay on the dialog itself (until a button is clicked) SetFocus(); return FALSE; } void CCalcDlg::OnSysCommand(UINT nID, LPARAM lParam) { if ((nID & 0xFFF0) == IDM_ABOUTBOX) { CAboutDlg dlgAbout; dlgAbout.DoModal(); } else { CDialog::OnSysCommand(nID, lParam); } } // If you add a minimize button to your dialog, you will need the code below // to draw the icon. For MFC applications using the document/view model, // this is automatically done for you by the framework. void CCalcDlg::OnPaint() { if (!IsIconic()) { CDialog::OnPaint(); return; } CPaintDC dc(this); // device context for painting SendMessage(WM_ICONERASEBKGND, (WPARAM) dc.GetSafeHdc(), 0); // Center icon in client rectangle int cxIcon = GetSystemMetrics(SM_CXICON); int cyIcon = GetSystemMetrics(SM_CYICON); CRect rect; GetClientRect(&rect); int x = (rect.Width() - cxIcon + 1) / 2; int y = (rect.Height() - cyIcon + 1) / 2; // Draw the icon dc.DrawIcon(x, y, m_hIcon); } // The system calls this to obtain the cursor to display while the user drags // the minimized window. HCURSOR CCalcDlg::OnQueryDragIcon() { return (HCURSOR)m_hIcon; } void CCalcDlg::OnClickedNumber(UINT nID) { ASSERT(nID >= IDB_0 && nID <= IDB_9); ClickedNumber(nID - IDB_0); } void CCalcDlg::OnClickedClear() { m_operator = OpNone; m_operand = 0L; m_accum = 0L; m_bOperandAvail = FALSE; m_errorState = ErrNone; UpdateDisplay(); } void CCalcDlg::OnClickedDivide() { PerformOperation(); m_operator = OpDivide; } void CCalcDlg::OnClickedEqual() { PerformOperation(); m_operator = OpNone; } void CCalcDlg::OnClickedMinus() { PerformOperation(); m_operator = OpSubtract; } void CCalcDlg::OnClickedPlus() { PerformOperation(); m_operator = OpAdd; } void CCalcDlg::OnClickedTimes() { PerformOperation(); m_operator = OpMultiply; } BOOL CCalcDlg::PreTranslateMessage(MSG* pMsg) { if (m_hAccel != NULL && TranslateAccelerator(m_hWnd, m_hAccel, pMsg)) return TRUE; return CDialog::PreTranslateMessage(pMsg); } void CCalcDlg::PostNcDestroy() { if (m_bAutoDelete) delete this; } void CCalcDlg::OnCancel() { DestroyWindow(); } void CCalcDlg::OnOK() { } void CCalcDlg::OnSetFocusAccum() { GetDlgItem(IDC_INVISIBLE_FOCUS)->SetFocus(); } ///////////////////////////////////////////////////////////////////////////// // CCalcDlg automation BOOL CCalcDlg::RegisterActive() { // attempt to register as the active object for the CCalcDlg CLSID return RegisterActiveObject(GetInterface(&IID_IUnknown), CCalcDlg::guid, NULL, &m_dwRegister) == NOERROR; } long CCalcDlg::GetAccum() { return m_accum; } void CCalcDlg::SetAccum(long nNewValue) { m_accum = nNewValue; } long CCalcDlg::GetOperand() { return m_operand; } void CCalcDlg::SetOperand(long nNewValue) { m_operand = nNewValue; m_bOperandAvail = TRUE; } short CCalcDlg::GetOperation() { return m_operator; } void CCalcDlg::SetOperation(short nNewValue) { m_operator = (Operator)nNewValue; } BOOL CCalcDlg::GetVisible() { return m_hWnd != NULL && (GetStyle() & WS_VISIBLE) != 0; } void CCalcDlg::SetVisible(BOOL bNewValue) { if (bNewValue == GetVisible()) return; if (bNewValue) { // create it if necessary if (m_hWnd == NULL && !Create(CCalcDlg::IDD)) return; // set up as the active window for the application if (AfxGetThread()->m_pMainWnd == NULL) AfxGetThread()->m_pMainWnd = this; // show it ShowWindow(SW_SHOWNORMAL); } else { if (m_hWnd != NULL) ShowWindow(SW_HIDE); } } BOOL CCalcDlg::Evaluate() { OnClickedEqual(); return m_errorState == ErrNone; } void CCalcDlg::Clear() { OnClickedClear(); } void CCalcDlg::Display() { UpdateDisplay(); } void CCalcDlg::Close() { if (m_hWnd == NULL) { AfxPostQuitMessage(0); return; } BOOL bAutoDelete = m_bAutoDelete; m_bAutoDelete = FALSE; DestroyWindow(); m_bAutoDelete = bAutoDelete; } BOOL CCalcDlg::Button(LPCTSTR szButton) { switch (szButton[0]) { case 'c': case 'C': OnClickedClear(); break; case '/': OnClickedDivide(); break; case '+': OnClickedPlus(); break; case '-': OnClickedMinus(); break; case '*': OnClickedTimes(); break; case '=': OnClickedEqual(); break; default: if (szButton[0] >= '0' && szButton[0] <= '9') ClickedNumber(szButton[0] - '0'); else return FALSE; break; } return TRUE; } |
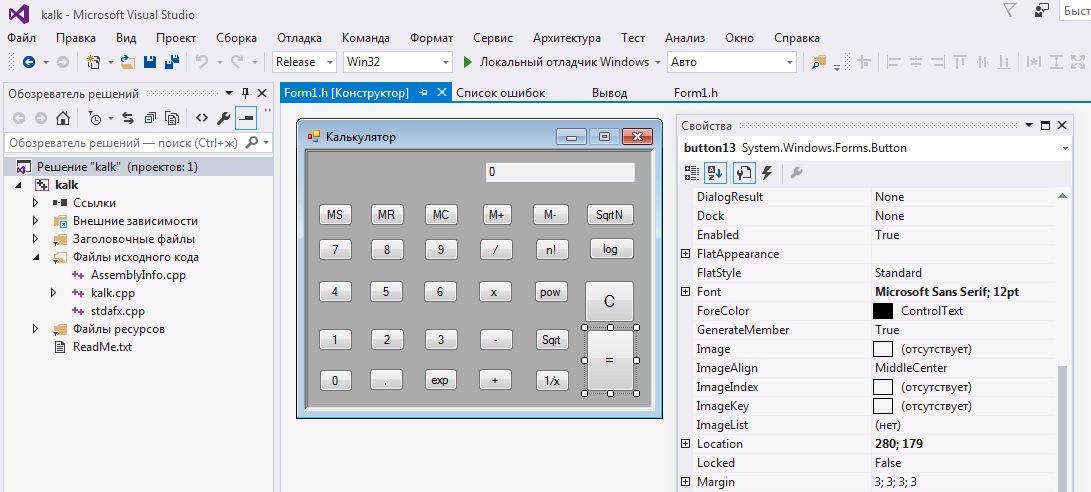
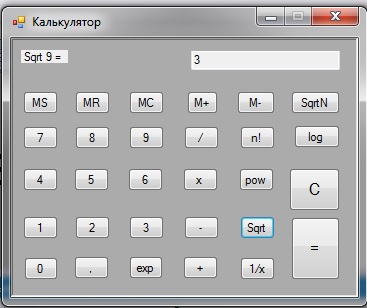
Одна из задач, задаваемых студентам по программированию, это создание калькулятора. Раскрою вам небольшой секрет: немало практических, курсовых и лабораторных работ на C++, C# и Java можно и не делать самостоятельно – есть готовые решения в сети. Однако, я был несколько удивлен, что для такого распространенного задания, как визуальный калькулятор на C++ нет такого готового решения. Ну что ж, нет, так нет, давайте напишем его сами.
Итак, как в большинстве проектов, все начинается с создания приложения Windows Forms, а уже в нем – с редактирования формы. У нас получилась вот такая:
Проект для VS2015
В чем будем считать и хранить числа? Я выбрал тип double – точности его нам вполне хватит; это все же студенческая работа, а не для точных инженерных расчетов. Дальше определимся с тем, сколько чисел и операций будем хранить в памяти. Предположим, штук двадцать: тогда надо создать два массива – один для чисел, а другой для операций между ними.
static array<double> ^mass = gcnew array<double>{0,0,0,0,0,0,0,0,0,0,0,0,0,0,0,0,0,0,0,0};
static array<int> ^ukaz = gcnew array<int>{0,0,0,0,0,0,0,0,0,0,0,0,0,0,0,0,0,0,0,0};
Почему мы воспользовались указателями, а не просто создали глобальные переменные за пределами windows forms? Дело в том, что, использование глобальных переменных – это плохой тон при программировании, и очень часто преподаватели против данной практики студентов.
В нашей программе будут три основных метода: vvod — принимает цифру (нажатую кнопку) в качестве аргумента и добавляет её к числу. ravno — нажатие на кнопку равно — все считает, ravno2 — это нажатие на кнопку знака. Факториал, деление единицы на число и корень квадратные — там реализуются методы сразу при нажатии все обрабатывается.
Добавим также флаг для памяти:
static int mem_flag=0;
И еще систему флагов:
//переменные для памяти
static double memory_znachenie = 0.0;
static int memory_status = 0;
//предыдущая клавиша
static int pred_klav = 0;
static int flag_ravno = 0;
static int put = 0;
Вот, например, как у нас будет выглядеть метод vvod():
//ввод цифр на экран
private: System::Void	vvod (double pr) {
if (pred_klav==0) {
String^ s = textBox1->Text;
int dl = s->Length;
if (dl<10) {
String^ st = s + Convert::ToString(pr);
textBox1->Text = st;
mass[mem_flag] = Convert::ToDouble(textBox1->Text);
textBox1->Text = Convert::ToString(mass[mem_flag]);
pred_klav = 0;
}
}
else {
String^ st = Convert::ToString(pr);
textBox1->Text = st;
mass[mem_flag] = Convert::ToDouble(textBox1->Text);
textBox1->Text = Convert::ToString(mass[mem_flag]);
pred_klav = 0;
}
}
Здесь мы проверяем, какая клавиша в нашем калькуляторе была нажата перед этим – цифра, арифметическая операция или знак равно. Далее получаем из текстбокса значение, конвертируем предыдущее из массива, конкатенируем строки, потом обратно в double и обновляем значение массива. Также в этом методе мы проверяем длину числа – мы поставили ограничение на 10 знаков.
Обработка кнопки равно – то есть метод вычисления – также не представляет сложности. Пользуясь оператором ветвления switch перебираем все варианты.
Также реализуем собственный класс для обработки ошибок. Зачем это надо? Дело в том, что мы оперируем с числами типа double, а они не выбрасывают некоторые стандартные исключения, например – деление на ноль. Также мы предусмотрим обработку переполнения и вычисления квадратного корня из отрицательного числа. На вход конструкторов этого класса будем принимать пару чисел. Выводятся ошибки при:
- взятии корня четной степени из отрицательного числа
- логарифмировании отрицательного числа и нуля
- делении на нуль.
- переполнении (калькулятор все же не бесконечный)
Также не забудем и обработку клавиши запятой. Для этого проверяем, есть ли она уже во введённом числе:
MarshalString(s, s2);
int pos = s2.find(",") ;
if (pos==-1) { }
Вот такие основные моменты надо знать для написания данной программы. Ну а если вы не можете самостоятельно написать визуальный калькулятор на C++, то обратитесь ко мне. Актуальную цену за архив с готовой программой и исходниками с подробными комментариями в настоящий моент 500 рублей. Это будет проект в Visual Studio C++ 2010 — он откроется в любой другой версии студии не ниже 2010. Также есть проект для Visual Studio 2015.
Мой калькулятор реализует все основные функции: сложение, вычитание, деление, умножение, факториал, возведение в степень, извлечение квадратного корня, вычисление 1/x, функции памяти (занести в память, вывести содержимое памяти, очистить память).
Обновление
Добавились новые функции в калькуляторе. А именно:
- Извлечение корня четной и нечетной степени из числа
- Вычисление логарифма по любому основанию
- Вычисление экспоненты
Если вам требуется реализация других функций, то это делается за отдельную плату. Пишите на почту up777up@yandex.ru, стучитесь vk.com/idup7, @upreadru или по другим контактам.

Автор этого материала — я — Пахолков Юрий. Я оказываю услуги по написанию программ на языках Java, C++, C# (а также консультирую по ним) и созданию сайтов. Работаю с сайтами на CMS OpenCart, WordPress, ModX и самописными. Кроме этого, работаю напрямую с JavaScript, PHP, CSS, HTML — то есть могу доработать ваш сайт или помочь с веб-программированием. Пишите сюда.
![]() статьи IT, си плюс плюс, visual studio, калькулятор
статьи IT, си плюс плюс, visual studio, калькулятор
Читайте также:
- Морской бой на Java с исходниками

Today let’s work around a new interesting visual C++ (cpp) calculator with Graphical User Interface (Windows Form Application). I made this source as easier as possible. You can compile the source by downloading the project source from below.
Why is it simple calculator? It has only the basic functions of a calculator such as addition, subtraction, multiplication,division and 2 others. First Entered number is taken to the first variable a. Then select and operator, enter the second number. Do the necessary operations and When you press “=” equals button, you can see the answer right where you expect it.
More than these basic operations, you can also find the square and square root of a number. I have added buttons for this. This program make use of “math.h” which contains “sqrt()” and “power()” functions for accomplishing these tasks.

|
| Visual Cpp Calculator |
Let me know your feedback in the comments.
Use visual c++ 2010 compiler for execution.
Download Calculator Visual C++ Project
Source……………………………Form1.h[design]
 #pragma once
 #include<conio.h> //For_getch()_function
 #include<math.h>
 double ans, a, b;
 int flag=0;
 using namespace std;
 namespace Calculator {
     using namespace System;
     using namespace System::ComponentModel;
     using namespace System::Collections;
     using namespace System::Windows::Forms;
     using namespace System::Data;
     using namespace System::Drawing;
     /// <summary>
     /// Summary for Form1
     /// </summary>
     public ref class Form1 : public System::Windows::Forms::Form
     {
     public:
        Form1(void)
        {
            InitializeComponent();
            //
            //TODO: Add the constructor code here
            //
        }
     protected:
        /// <summary>
        /// Clean up any resources being used.
        /// </summary>
        ~Form1()
        {
            if (components)
            {
               delete components;
            }
        }
     private: System::Windows::Forms::TextBox^ txtb;
     private: System::Windows::Forms::Button^ button1;
     private: System::Windows::Forms::Button^ button2;
     private: System::Windows::Forms::Button^ button3;
     private: System::Windows::Forms::Button^ button4;
     private: System::Windows::Forms::Button^ button5;
     private: System::Windows::Forms::Button^ button6;
     private: System::Windows::Forms::Button^ button7;
     private: System::Windows::Forms::Label^ label1;
     private: System::Windows::Forms::MenuStrip^ menuStrip1;
     private: System::Windows::Forms::ToolStripMenuItem^ menuToolStripMenuItem;
     private: System::Windows::Forms::ToolStripMenuItem^ exitToolStripMenuItem;
     protected:
     protected:
     protected:
     private:
        /// <summary>
        /// Required designer variable.
        /// </summary>
        System::ComponentModel::Container ^components;
 #pragma region Windows Form Designer generated code
        /// <summary>
        /// Required method for Designer support - do not modify
        /// the contents of this method with the code editor.
        /// </summary>
        void InitializeComponent(void)
        {
            System::ComponentModel::ComponentResourceManager^ resources = (gcnew System::ComponentModel::ComponentResourceManager(Form1::typeid));
            this->txtb = (gcnew System::Windows::Forms::TextBox());
            this->button1 = (gcnew System::Windows::Forms::Button());
            this->button2 = (gcnew System::Windows::Forms::Button());
            this->button3 = (gcnew System::Windows::Forms::Button());
            this->button4 = (gcnew System::Windows::Forms::Button());
            this->button5 = (gcnew System::Windows::Forms::Button());
            this->button6 = (gcnew System::Windows::Forms::Button());
            this->button7 = (gcnew System::Windows::Forms::Button());
            this->label1 = (gcnew System::Windows::Forms::Label());
            this->menuStrip1 = (gcnew System::Windows::Forms::MenuStrip());
            this->menuToolStripMenuItem = (gcnew System::Windows::Forms::ToolStripMenuItem());
            this->exitToolStripMenuItem = (gcnew System::Windows::Forms::ToolStripMenuItem());
            this->menuStrip1->SuspendLayout();
            this->SuspendLayout();
            //
            // txtb
            //
            this->txtb->BackColor = System::Drawing::Color::White;
            this->txtb->BorderStyle = System::Windows::Forms::BorderStyle::FixedSingle;
            this->txtb->Font = (gcnew System::Drawing::Font(L"Arial Rounded MT Bold", 26.25F, System::Drawing::FontStyle::Regular, System::Drawing::GraphicsUnit::Point,
               static_cast<System::Byte>(0)));
            this->txtb->ForeColor = System::Drawing::Color::Black;
            this->txtb->Location = System::Drawing::Point(32, 44);
            this->txtb->Margin = System::Windows::Forms::Padding(2, 3, 2, 3);
            this->txtb->Name = L"txtb";
            this->txtb->Size = System::Drawing::Size(300, 48);
            this->txtb->TabIndex = 0;
            this->txtb->TextAlign = System::Windows::Forms::HorizontalAlignment::Right;
            this->txtb->WordWrap = false;
            this->txtb->TextChanged += gcnew System::EventHandler(this, &Form1::txtb_TextChanged);
            //
            // button1
            //
            this->button1->Font = (gcnew System::Drawing::Font(L"Arial Rounded MT Bold", 27.75F, System::Drawing::FontStyle::Regular, System::Drawing::GraphicsUnit::Point,
               static_cast<System::Byte>(0)));
            this->button1->Location = System::Drawing::Point(32, 108);
            this->button1->Margin = System::Windows::Forms::Padding(2, 3, 2, 3);
            this->button1->Name = L"button1";
            this->button1->Size = System::Drawing::Size(98, 49);
            this->button1->TabIndex = 1;
            this->button1->Text = L"+";
            this->button1->UseVisualStyleBackColor = true;
            this->button1->Click += gcnew System::EventHandler(this, &Form1::button1_Click);
            //
            // button2
            //
            this->button2->Font = (gcnew System::Drawing::Font(L"Letterman-Solid", 15.75F, System::Drawing::FontStyle::Italic, System::Drawing::GraphicsUnit::Point,
               static_cast<System::Byte>(0)));
            this->button2->Location = System::Drawing::Point(234, 108);
            this->button2->Margin = System::Windows::Forms::Padding(2, 3, 2, 3);
            this->button2->Name = L"button2";
            this->button2->Size = System::Drawing::Size(98, 49);
            this->button2->TabIndex = 2;
            this->button2->Text = L"=";
            this->button2->UseVisualStyleBackColor = true;
            this->button2->Click += gcnew System::EventHandler(this, &Form1::button2_Click);
            //
            // button3
            //
            this->button3->Font = (gcnew System::Drawing::Font(L"Arial Rounded MT Bold", 27.75F, System::Drawing::FontStyle::Regular, System::Drawing::GraphicsUnit::Point,
               static_cast<System::Byte>(0)));
            this->button3->Location = System::Drawing::Point(32, 160);
            this->button3->Margin = System::Windows::Forms::Padding(2, 3, 2, 3);
            this->button3->Name = L"button3";
            this->button3->Size = System::Drawing::Size(98, 49);
            this->button3->TabIndex = 3;
            this->button3->Text = L"-";
            this->button3->UseVisualStyleBackColor = true;
            this->button3->Click += gcnew System::EventHandler(this, &Form1::button3_Click);
            //
            // button4
            //
            this->button4->Font = (gcnew System::Drawing::Font(L"Arial Rounded MT Bold", 27.75F, System::Drawing::FontStyle::Regular, System::Drawing::GraphicsUnit::Point,
               static_cast<System::Byte>(0)));
            this->button4->Location = System::Drawing::Point(32, 212);
            this->button4->Margin = System::Windows::Forms::Padding(2, 3, 2, 3);
            this->button4->Name = L"button4";
            this->button4->Size = System::Drawing::Size(98, 49);
            this->button4->TabIndex = 4;
            this->button4->Text = L"x";
            this->button4->UseVisualStyleBackColor = true;
            this->button4->Click += gcnew System::EventHandler(this, &Form1::button4_Click);
            //
            // button5
            //
            this->button5->Font = (gcnew System::Drawing::Font(L"Arial Rounded MT Bold", 27.75F, System::Drawing::FontStyle::Regular, System::Drawing::GraphicsUnit::Point,
               static_cast<System::Byte>(0)));
            this->button5->Location = System::Drawing::Point(32, 264);
            this->button5->Margin = System::Windows::Forms::Padding(2, 3, 2, 3);
            this->button5->Name = L"button5";
            this->button5->Size = System::Drawing::Size(98, 49);
            this->button5->TabIndex = 5;
            this->button5->Text = L"/";
            this->button5->UseVisualStyleBackColor = true;
            this->button5->Click += gcnew System::EventHandler(this, &Form1::button5_Click);
            //
            // button6
            //
            this->button6->Font = (gcnew System::Drawing::Font(L"Arial Rounded MT Bold", 12, System::Drawing::FontStyle::Regular, System::Drawing::GraphicsUnit::Point,
               static_cast<System::Byte>(0)));
            this->button6->Location = System::Drawing::Point(234, 161);
            this->button6->Margin = System::Windows::Forms::Padding(2, 3, 2, 3);
            this->button6->Name = L"button6";
            this->button6->Size = System::Drawing::Size(98, 49);
            this->button6->TabIndex = 6;
            this->button6->Text = L"ROOT";
            this->button6->UseVisualStyleBackColor = true;
            this->button6->Click += gcnew System::EventHandler(this, &Form1::button6_Click);
            //
            // button7
            //
            this->button7->Font = (gcnew System::Drawing::Font(L"Arial Rounded MT Bold", 12, System::Drawing::FontStyle::Regular, System::Drawing::GraphicsUnit::Point,
               static_cast<System::Byte>(0)));
            this->button7->Location = System::Drawing::Point(234, 212);
            this->button7->Margin = System::Windows::Forms::Padding(2, 3, 2, 3);
            this->button7->Name = L"button7";
            this->button7->Size = System::Drawing::Size(98, 49);
            this->button7->TabIndex = 7;
            this->button7->Text = L"SQUARE";
            this->button7->UseVisualStyleBackColor = true;
            this->button7->Click += gcnew System::EventHandler(this, &Form1::button7_Click);
            //
            // label1
            //
            this->label1->AutoSize = true;
            this->label1->BackColor = System::Drawing::SystemColors::HighlightText;
            this->label1->Font = (gcnew System::Drawing::Font(L"KabobExtrabold", 12, System::Drawing::FontStyle::Regular, System::Drawing::GraphicsUnit::Point,
               static_cast<System::Byte>(0)));
            this->label1->Location = System::Drawing::Point(123, 3);
            this->label1->Name = L"label1";
            this->label1->Size = System::Drawing::Size(135, 18);
            this->label1->TabIndex = 8;
            this->label1->Text = L"Simple Calculator";
            this->label1->Click += gcnew System::EventHandler(this, &Form1::label1_Click);
            //
            // menuStrip1
            //
            this->menuStrip1->Items->AddRange(gcnew cli::array< System::Windows::Forms::ToolStripItem^ >(1) {this->menuToolStripMenuItem});
            this->menuStrip1->LayoutStyle = System::Windows::Forms::ToolStripLayoutStyle::Flow;
            this->menuStrip1->Location = System::Drawing::Point(0, 0);
            this->menuStrip1->Name = L"menuStrip1";
            this->menuStrip1->Size = System::Drawing::Size(360, 23);
            this->menuStrip1->TabIndex = 10;
            this->menuStrip1->Text = L"menuStrip1";
            this->menuStrip1->ItemClicked += gcnew System::Windows::Forms::ToolStripItemClickedEventHandler(this, &Form1::menuStrip1_ItemClicked);
            //
            // menuToolStripMenuItem
            //
            this->menuToolStripMenuItem->DropDownItems->AddRange(gcnew cli::array< System::Windows::Forms::ToolStripItem^ >(1) {this->exitToolStripMenuItem});
            this->menuToolStripMenuItem->Name = L"menuToolStripMenuItem";
            this->menuToolStripMenuItem->Size = System::Drawing::Size(50, 19);
            this->menuToolStripMenuItem->Text = L"Menu";
            this->menuToolStripMenuItem->Click += gcnew System::EventHandler(this, &Form1::menuToolStripMenuItem_Click);
            //
            // exitToolStripMenuItem
            //
            this->exitToolStripMenuItem->Name = L"exitToolStripMenuItem";
            this->exitToolStripMenuItem->Size = System::Drawing::Size(92, 22);
            this->exitToolStripMenuItem->Text = L"Exit";
            this->exitToolStripMenuItem->Click += gcnew System::EventHandler(this, &Form1::exitToolStripMenuItem_Click);
            //
            // Form1
            //
            this->AutoScaleDimensions = System::Drawing::SizeF(6, 13);
            this->AutoScaleMode = System::Windows::Forms::AutoScaleMode::Font;
            this->BackgroundImage = (cli::safe_cast<System::Drawing::Image^ >(resources->GetObject(L"$this.BackgroundImage")));
            this->BackgroundImageLayout = System::Windows::Forms::ImageLayout::Stretch;
            this->ClientSize = System::Drawing::Size(360, 324);
            this->Controls->Add(this->label1);
            this->Controls->Add(this->button7);
            this->Controls->Add(this->button6);
            this->Controls->Add(this->button5);
            this->Controls->Add(this->button4);
            this->Controls->Add(this->button3);
            this->Controls->Add(this->button2);
            this->Controls->Add(this->button1);
            this->Controls->Add(this->txtb);
            this->Controls->Add(this->menuStrip1);
            this->DoubleBuffered = true;
            this->Font = (gcnew System::Drawing::Font(L"Microsoft Sans Serif", 8.25F, System::Drawing::FontStyle::Regular, System::Drawing::GraphicsUnit::Point,
               static_cast<System::Byte>(0)));
            this->ForeColor = System::Drawing::Color::Black;
            this->FormBorderStyle = System::Windows::Forms::FormBorderStyle::Fixed3D;
            this->MainMenuStrip = this->menuStrip1;
            this->Margin = System::Windows::Forms::Padding(2, 3, 2, 3);
            this->Name = L"Form1";
            this->Text = L"Form1";
            this->Load += gcnew System::EventHandler(this, &Form1::Form1_Load);
            this->menuStrip1->ResumeLayout(false);
            this->menuStrip1->PerformLayout();
            this->ResumeLayout(false);
            this->PerformLayout();
        }
 #pragma endregion
     private: System::Void txtb_TextChanged(System::Object^ sender, System::EventArgs^ e) {
               int temp;
                      if(Int32::TryParse(txtb->Text, temp))
                 a = float::Parse(txtb->Text);
            }
     private: System::Void button1_Click(System::Object^ sender, System::EventArgs^ e) {
               flag=1;
               b = double::Parse(txtb->Text);
               ans=a+b;
            }
 private: System::Void button3_Click(System::Object^ sender, System::EventArgs^ e) {
            flag=2;
             b = float::Parse(txtb->Text);
         }
     private: System::Void button2_Click(System::Object^ sender, System::EventArgs^ e) {
               if(a==0 && b==0)
               {
                   txtb->Text = "Enter Numbers";
               }
               if(flag==1)
               {
               ans=a+b;
                   txtb->Text = Convert::ToString(ans);
               }
               else if(flag==2)
               {
                  ans=b-a;
                  txtb->Text = Convert::ToString(ans);
               }
               else if(flag==3)
               {
                  ans=b*a;
                  txtb->Text = Convert::ToString(ans);
               }
               else if(flag==4)
               {
                  if(a==0)
                  {
                      MessageBox::Show("Divided By Zero Error");
                  }
                  ans=b/a;
                  txtb->Text = Convert::ToString(ans);
               }
            }
 private: System::Void button4_Click(System::Object^ sender, System::EventArgs^ e) {
            flag=3;
             b = double::Parse(txtb->Text);
         }
 private: System::Void button5_Click(System::Object^ sender, System::EventArgs^ e) {
            flag=4;
            b = double::Parse(txtb->Text);
         }
 private: System::Void button6_Click(System::Object^ sender, System::EventArgs^ e) {
            ans=sqrt(a);
            txtb->Text = Convert::ToString(ans);
         }
 private: System::Void button7_Click(System::Object^ sender, System::EventArgs^ e) {
         ans=a*a;
            txtb->Text = Convert::ToString(ans);
         }
 private: System::Void label1_Click(System::Object^ sender, System::EventArgs^ e) {
            MessageBox::Show("Created By :nn Muhammed Afsal.vn e-mail : [email protected]");
         }
 private: System::Void button8_Click(System::Object^ sender, System::EventArgs^ e) {
            a=b=0;
         }
 private: System::Void exitToolStripMenuItem_Click(System::Object^ sender, System::EventArgs^ e) {
            Application::Exit();
         }
 private: System::Void menuStrip1_ItemClicked(System::Object^ sender, System::Windows::Forms::ToolStripItemClickedEventArgs^ e) {
         }
 private: System::Void menuToolStripMenuItem_Click(System::Object^ sender, System::EventArgs^ e) {
         }
 private: System::Void Form1_Load(System::Object^ sender, System::EventArgs^ e) {
         }
 };
 }
———————————-Calculator.cpp
// Calculator.cpp : main project file.
 #include "stdafx.h"
 #include "Form1.h"
 using namespace Calculator;
 [STAThreadAttribute]
 int main(array<System::String ^> ^args)
 {
     // Enabling Windows XP visual effects before any controls are created
     Application::EnableVisualStyles();
     Application::SetCompatibleTextRenderingDefault(false);
     // Create the main window and run it
     Application::Run(gcnew Form1());
     return 0;
 }
———————————————————————————————————-
Screen Shots :-

|
| Screen_Shot_2 |
Создаем исходный код программы-калькулятора в Windows Forms на языке программирования C#.
Также имеется разбор более усовершенствованного калькулятора здесь и простой консольный калькулятор вот здесь.
Для начала нам надо расположить все нужные элементы на форме. Нам понадобятся три TextBox’a и 6 кнопок-Button. Устанавливаем их вот таким образом и переименовываем кнопки в свойствах:
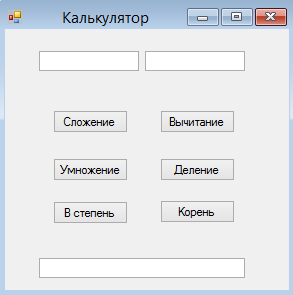
Наш калькулятор основан на взаимодействии двух чисел, поэтому математические операции будут следующие:
- Сложение
- Вычитание
- Умножение
- Деление
- Возведение первого числа в степень второго
- Взятие корня первого числа степени второго числа.
Итак, после того, как с графическим оформлением закончено, приступаем к самому коду.
Для всех вышеописанных операций мы создадим отдельные функции. Функции — это, так сказать, подпрограммы в самой программе, выполняющие отдельные задачи. Они помогают сократить и облегчить код.
Вот так у нас будет выглядеть функция сложения:
|
public static double sum(double a, double b) { return a + b; } |
Разберем этот код по частям:
Для начала мы объявляем программе, что создаем функцию (пишем public static), затем определяем тип функции(double — числовой тип повышенной точности с плавающей запятой, лучший вариант), после даём имя функции(sum) и в скобках записываем то, что, так сказать, получает функция от программы( double a и double b — первое и второе числа, которые мы запишем в первые два TextBox’a). Выражение return возвращает в функцию результат сложения a и b. То есть наша функция получает два числа от пользователя, который введет их в форме и, при помощи return’a, в неё же заносится результат вычисления.
Точно так же создаём функции остальных математических выражений:
|
1 2 3 4 5 6 7 8 9 10 11 12 13 14 15 16 17 18 19 20 21 22 23 24 |
public static double razn(double a, double b) { return a — b; } public static double umnog(double a, double b) { return a * b; } public static double del(double a, double b) { return a / b; } public static double step(double a, double b) { return Math.Pow(a, b); } public static double koren(double a, double b) { return Math.Pow(a, 1/b); } |
Функции созданы, сталось лишь привязать их к кнопкам в форме. Дважды щёлкаем мышью в форме на первую кнопку. Нас переносит в часть кода, которая отвечает за событие, которое произойдет, когда пользователь кликнет на данную кнопку. В теле этого события мы пишем:
|
private void button1_Click(object sender, EventArgs e) { textBox3.Text = Convert.ToString(sum(Convert.ToDouble(textBox1.Text), Convert.ToDouble(textBox2.Text))); } |
Разбор кода начнём, как ни странно, с конца. Мы помним, что при объявлении функции мы писали вот такую часть кода: sum(double a, double b). То есть функция может получить только значения типа double. Также мы помним, что эти значения мы получаем от пользователя, который, в свою очередь, вводит их в первый и второй TextBox’ы. Однако проблема в том, что значения из TextBox’ов воспринимаются программой как строки, то есть типом string. Поэтому их надо конвертировать в нужный нам double, что мы и делаем: sum(Convert.ToDouble(textBox1.Text), Convert.ToDouble(textBox2.Text))
Значения переведены, сумма посчитана. Осталось вывести её в TextBox3. Однако, у нас опять проблемы с типами. Наша посчитанная сумма принадлежит типу double, а TextBox принимает только string. Конвертируем sum в string и записываем её в TextBox3 как строку.
То же самое проделываем с остальными кнопками и функциями:
|
1 2 3 4 5 6 7 8 9 10 11 12 13 14 15 16 17 18 19 20 21 22 23 24 |
private void button2_Click(object sender, EventArgs e) { textBox3.Text = Convert.ToString(razn(Convert.ToDouble(textBox1.Text), Convert.ToDouble(textBox2.Text))); } private void button3_Click(object sender, EventArgs e) { textBox3.Text = Convert.ToString(umnog(Convert.ToDouble(textBox1.Text), Convert.ToDouble(textBox2.Text))); } private void button4_Click(object sender, EventArgs e) { textBox3.Text = Convert.ToString(del(Convert.ToDouble(textBox1.Text), Convert.ToDouble(textBox2.Text))); } private void button5_Click(object sender, EventArgs e) { textBox3.Text = Convert.ToString(step(Convert.ToDouble(textBox1.Text), Convert.ToDouble(textBox2.Text))); } private void button6_Click(object sender, EventArgs e) { textBox3.Text = Convert.ToString(koren(Convert.ToDouble(textBox1.Text), Convert.ToDouble(textBox2.Text))); } |
Вот и всё. Наш калькулятор готов!
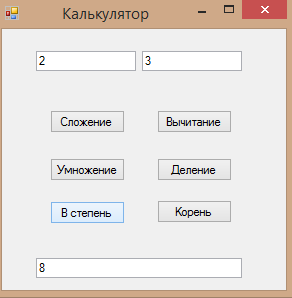
Исходный код калькулятора:
Скачать исходник