#статьи
- 25 июл 2022
-
0
Знакомимся с библиотекой и пишем кросс-платформенный калькулятор, который рассчитывает вес человека.
Иллюстрация: Merry Mary для Skillbox Media
Изучает Python, его библиотеки и занимается анализом данных. Любит путешествовать в горах.
Десктопные приложения пишут на разных языках программирования: C++, C#, C, Python и других. Начинающим разработчикам проще всего использовать Python и его библиотеки для работы над графическими интерфейсами.
Одна из таких библиотек — Tkinter. Она входит в стандартный пакет Python и позволяет создавать приложения для Windows, mac OS и Linux. Давайте разберёмся, как устроена эта библиотека, и напишем десктопный калькулятор, помогающий рассчитать вес человека.
GUI (Graphical User Interface) — это графический интерфейс пользователя, оболочка программы, с которой мы взаимодействуем с помощью клавиатуры и мыши. На современных операционных системах почти все программы работают с графическим интерфейсом, и мы каждый день сталкиваемся с GUI: читаем статьи в браузере, набираем текст в редакторе или играем в игры.
Противоположность графическому интерфейсу — командная строка, позволяющая управлять приложением с помощью текстовых команд. Такой интерфейс реализован в терминале macOS и командной строке Windows.
Для работы с GUI в Python есть четыре библиотеки:
- Tkinter;
- Kivy;
- Python QT;
- wxPython.
Мы выбрали Tkinter, потому что она не требует дополнительной установки и позволяет быстро создавать приложения с простым графическим интерфейсом.
Tkinter — это удобный интерфейс для работы со средствами Tk. Приложения, созданные на основе этой библиотеки, кросс-платформенные, то есть могут запускаться на разных операционных системах.
Схематично работу с Tkinter можно представить в виде четырёх шагов:
Что здесь происходит:
- Мы подключаем библиотеку Tkinter с помощью директивы import.
- Создаём главное окно приложения, в котором будут размещаться все графические элементы.
- Добавляем виджеты — визуальные элементы, выполняющие определённые действия.
- Создаём главный цикл событий — он включает в себя все события, происходящие при взаимодействии пользователя с интерфейсом.
Ключевые объекты в работе с Tkinter — виджеты. Это аналоги тегов из HTML, которые позволяют создавать интерактивные и неинтерактивные элементы, например надписи или кнопки. Всего их 18, но чаще всего используют следующие:
- Button — кнопки;
- Canvas — «холст», на котором рисуют графические фигуры;
- Entry — виджет для создания полей ввода;
- Label — контейнер для размещения текста или изображения;
- Menu — виджет для создания пунктов меню.
Понять работу с виджетами легче всего на практике. Но прежде чем к ней приступить, обсудим идею нашего первого десктопного приложения.
Мы напишем калькулятор индекса массы тела. ИМТ — это важный медицинский показатель, который позволяет оценить, есть ли у человека избыточный вес или ожирение. Он рассчитывается по следующей формуле:
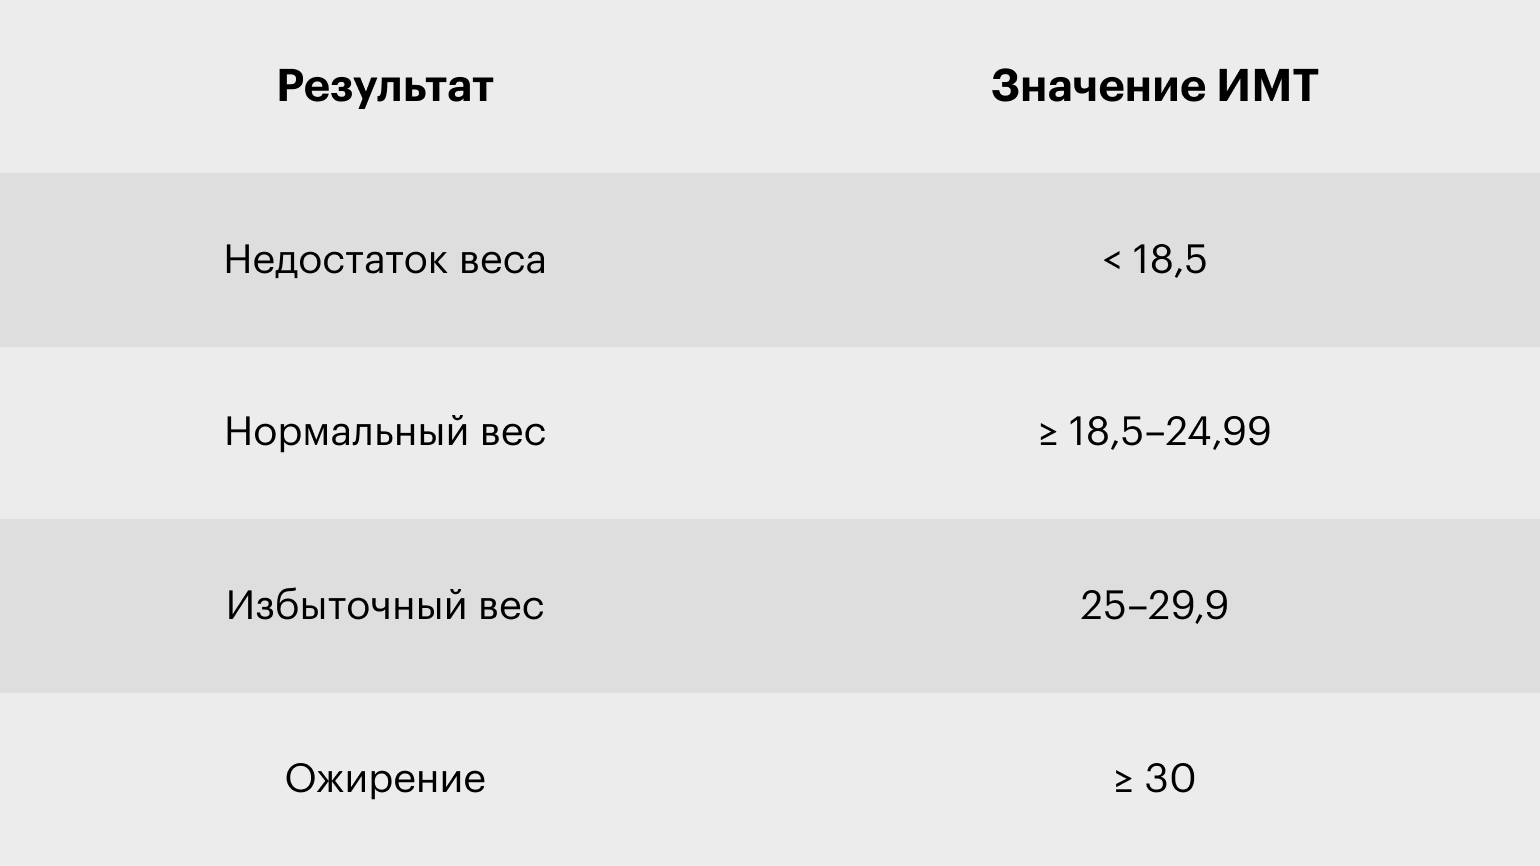
Результаты расчётов оценивают с помощью специальной таблицы. У врачей она имеет много градаций, мы же воспользуемся упрощённой версией:
Писать код на Python лучше всего в специальной IDE, например в PyCharm или Visual Studio Code. Они подсвечивают синтаксис и предлагают продолжение кода — это сильно упрощает работу программиста. Весь код из этой статьи мы писали в Visual Studio Code.
Библиотека Tkinter предустановлена в Python. Поэтому её нужно только импортировать:
import tkinter as tk
Теперь мы можем использовать любые модули из этой библиотеки.
Прежде чем писать код, необходимо ответить на несколько вопросов:
- Какие данные мы хотим получить от пользователя и в каком виде?
- Какое событие будет запускать расчёт ИМТ: нажатие кнопки, получение приложением всех необходимых данных или что-то другое?
- Как будем показывать результат?
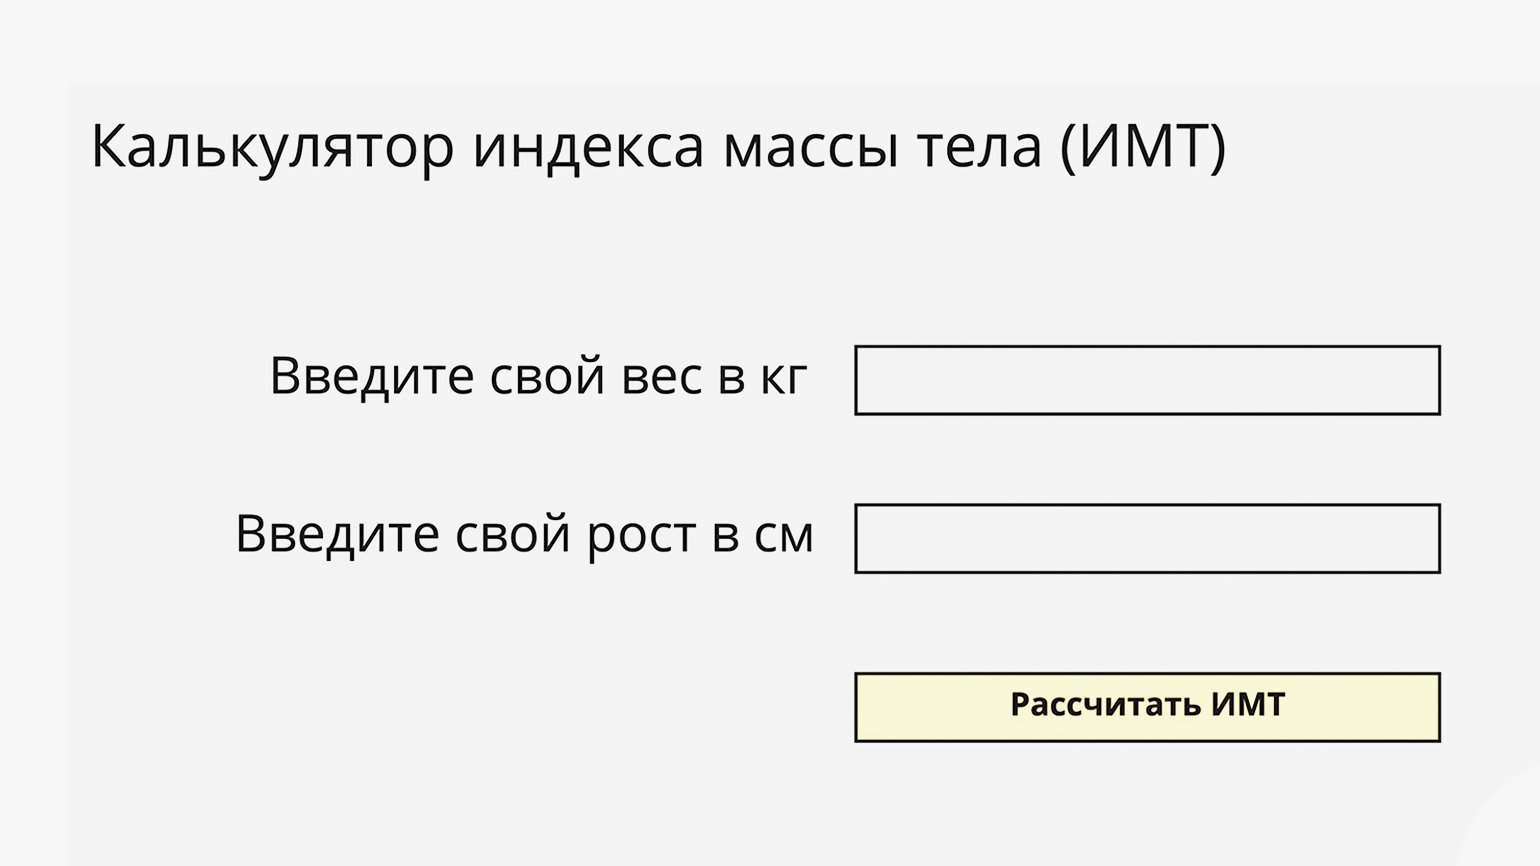
В нашем случае необходимо получить от пользователя вес и рост в виде целых чисел. При этом вес должен быть введён в килограммах, а рост — в сантиметрах. ИМТ будет рассчитываться по нажатии кнопки, а результат — выводиться во всплывающем окне в виде значения ИМТ и категории, к которой он относится.
Схематично графический интерфейс нашего калькулятора будет выглядеть так:
Теперь попробуем реализовать интерфейс и работу калькулятора с помощью Python и Tkinter.
После импорта библиотеки в Python загрузим её методы:
from tkinter import *
from tkinter import messagebox
Первая строка позволяет нам загрузить все методы Tkinter и использовать их в коде без ссылки на их наименование. Второй строкой мы явно импортируем метод messagebox, который будем использовать для вывода всплывающего окна с результатом. Это удобно, так как метод потребуется нам несколько раз.
Теперь создадим окно нашего приложения. Для этого воспользуемся модулем Tk. Приложение назовём «Калькулятор индекса массы тела (ИМТ)»:
window = Tk() #Создаём окно приложения.
window.title("Калькулятор индекса массы тела (ИМТ)") #Добавляем название приложения.
После запуска кода ничего не произойдёт. Это не ошибка. На самом деле код выполнился и окно закрылось. Необходимо явно указать, что окно приложения не должно закрываться до тех пор, пока пользователь сам не сделает этого. Для этого к коду добавим функцию window.mainloop(), указывающую на запуск цикла событий:
window.mainloop()
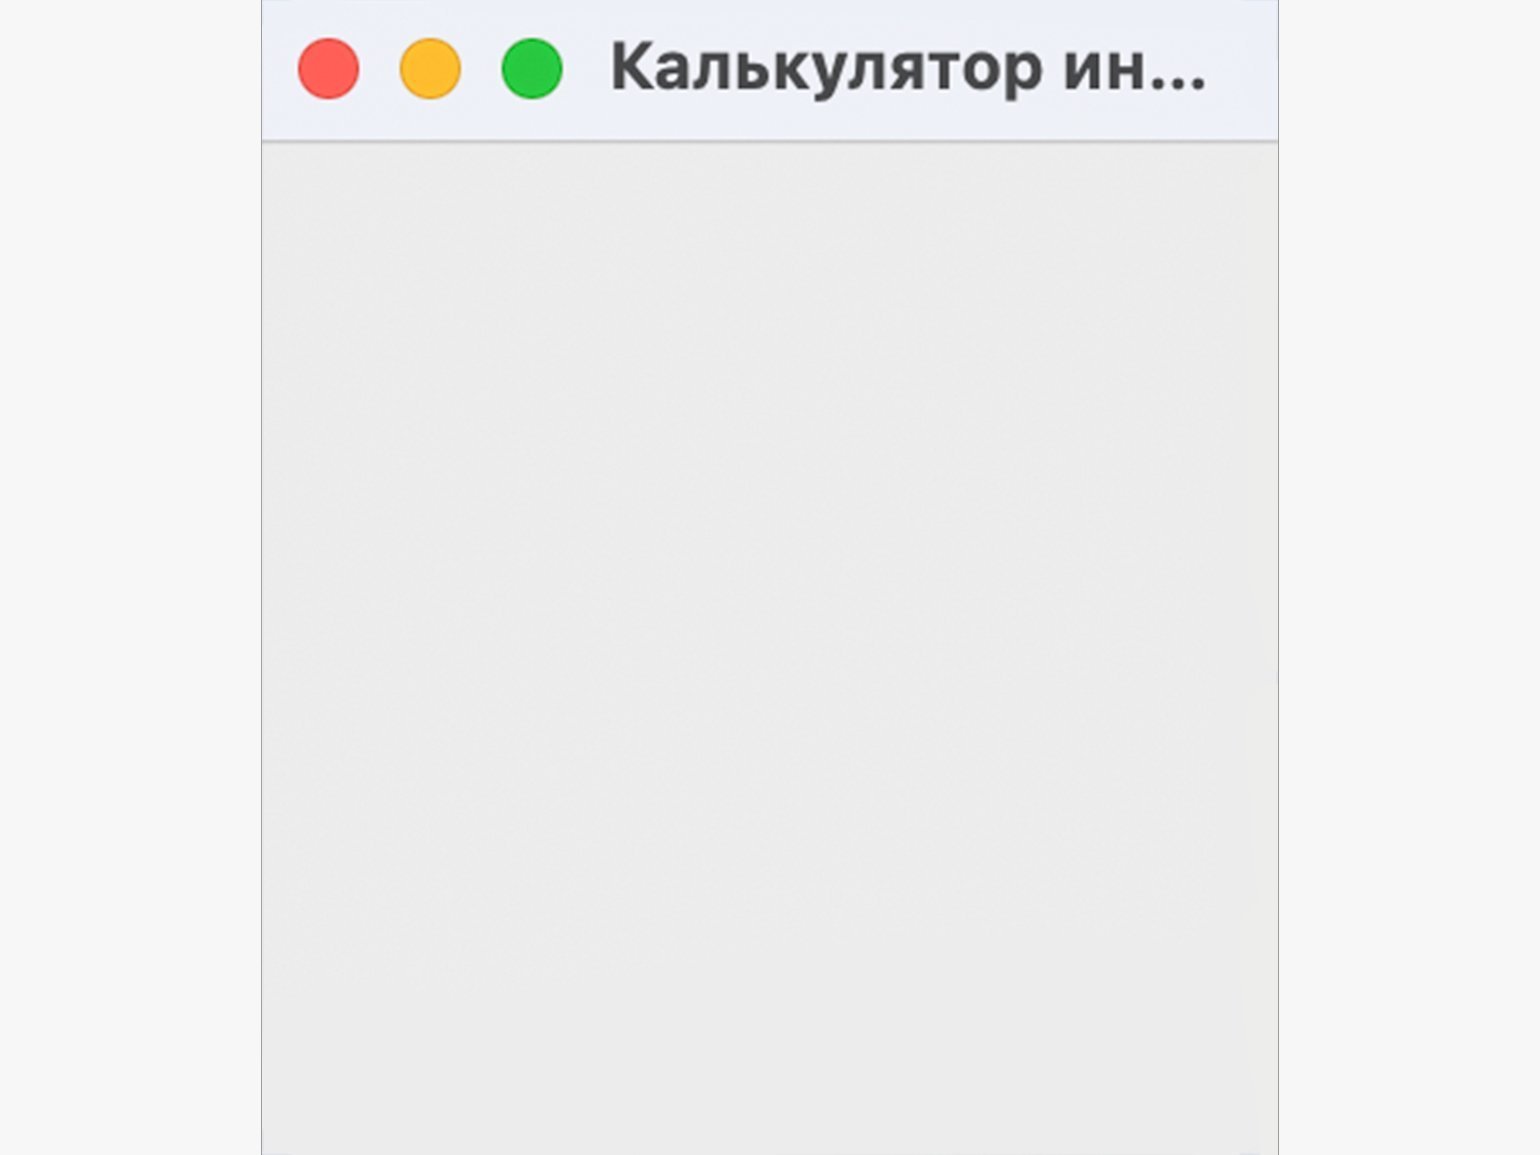
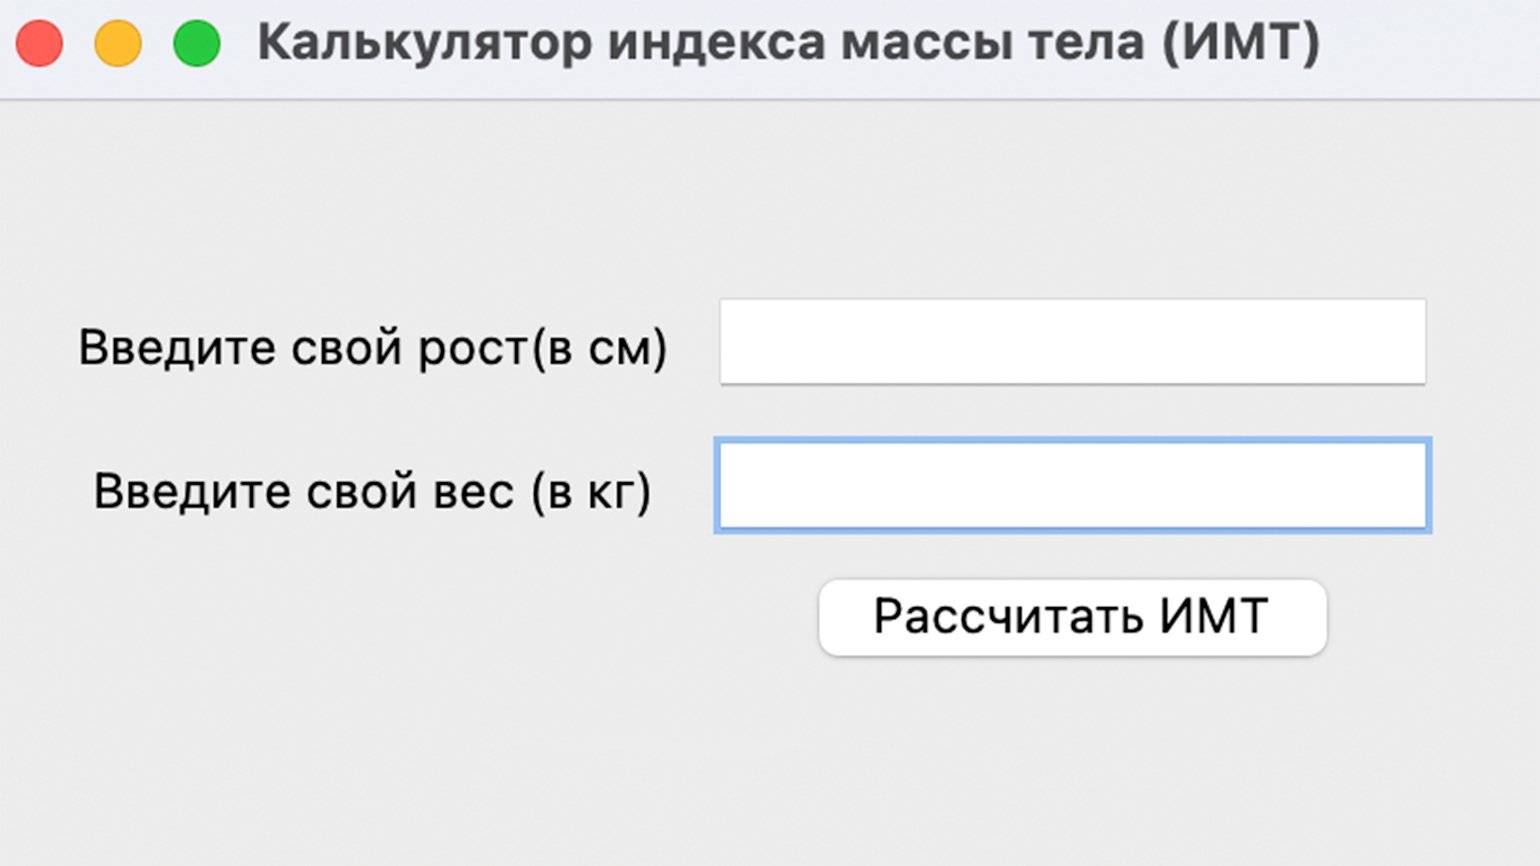
Запустив код, увидим экран приложения:
Мы не указали размер окна, поэтому название приложения не помещается в него полностью. Исправим это с помощью метода geometry:
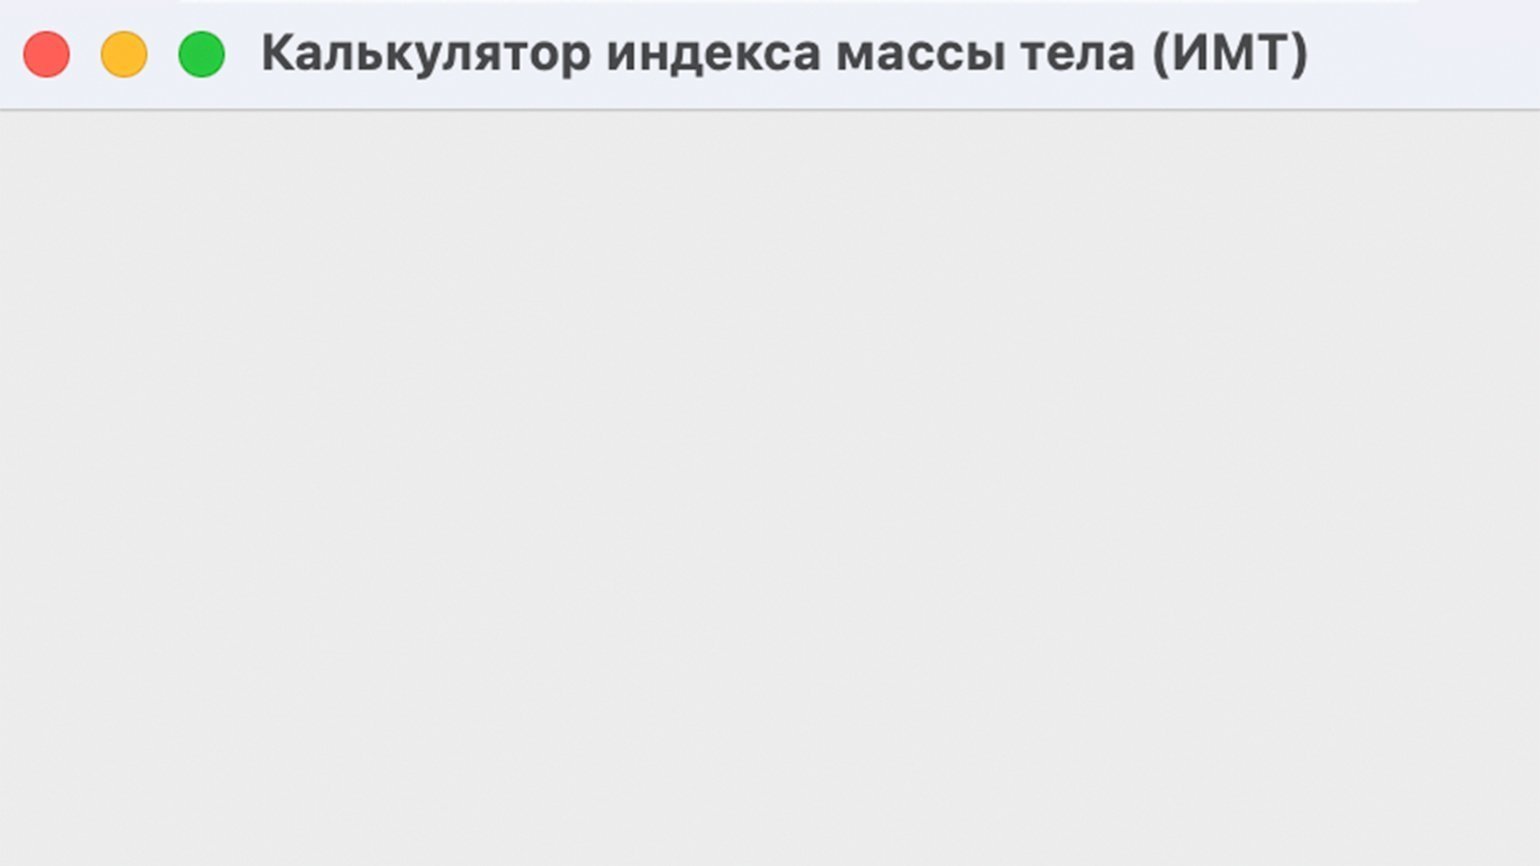
window.geometry('400x300')
Теперь название приложения видно полностью:
В окне приложения необходимо разместить несколько элементов с нашего эскиза: два поля ввода информации с подписями и одну кнопку. Важно, чтобы поля не накладывались друг на друга и не уходили за пределы окна. В Tkinter для этого есть несколько методов:
- pack — используется, когда мы работаем с контейнерами для элементов. Позволяет позиционировать кнопки, надписи или другие элементы внутри контейнеров.
- place — позволяет позиционировать элементы, указывая точные координаты.
- grid — размещает элементы по ячейкам условной сетки, разделяющей окно приложения.
Мы воспользуемся комбинацией методов pack и grid. Для начала создадим виджет Frame для размещения надписей, полей ввода и кнопок. Подробное описание работы виджета есть в документации. Мы же используем только два свойства: padx и pady.
Обозначим отступы по вертикали и горизонтали в 10 пикселей для элементов, которые будут расположены внутри Frame:
frame = Frame(
   window, #Обязательный параметр, который указывает окно для размещения Frame.
   padx = 10, #Задаём отступ по горизонтали.
   pady = 10 #Задаём отступ по вертикали.
)
frame.pack(expand=True) #Не забываем позиционировать виджет в окне. Здесь используется метод pack. С помощью свойства expand=True указываем, что Frame заполняет весь контейнер, созданный для него.
В окне приложения нам необходимо добавить три вида виджетов: поле для ввода информации (Entry), текстовые надписи (Label) и кнопку (Button).
Начнём с надписей. Воспользуемся виджетом Label:
height_lb = Label(
   frame,
   text="Введите свой рост (в см)  "
)
height_lb.grid(row=3, column=1)
Мы передаём виджету Label два параметра:
- frame — используем заготовку виджета Frame, в которой уже настроены отступы по вертикали и горизонтали.
- text — текст, который должен быть выведен на экран.
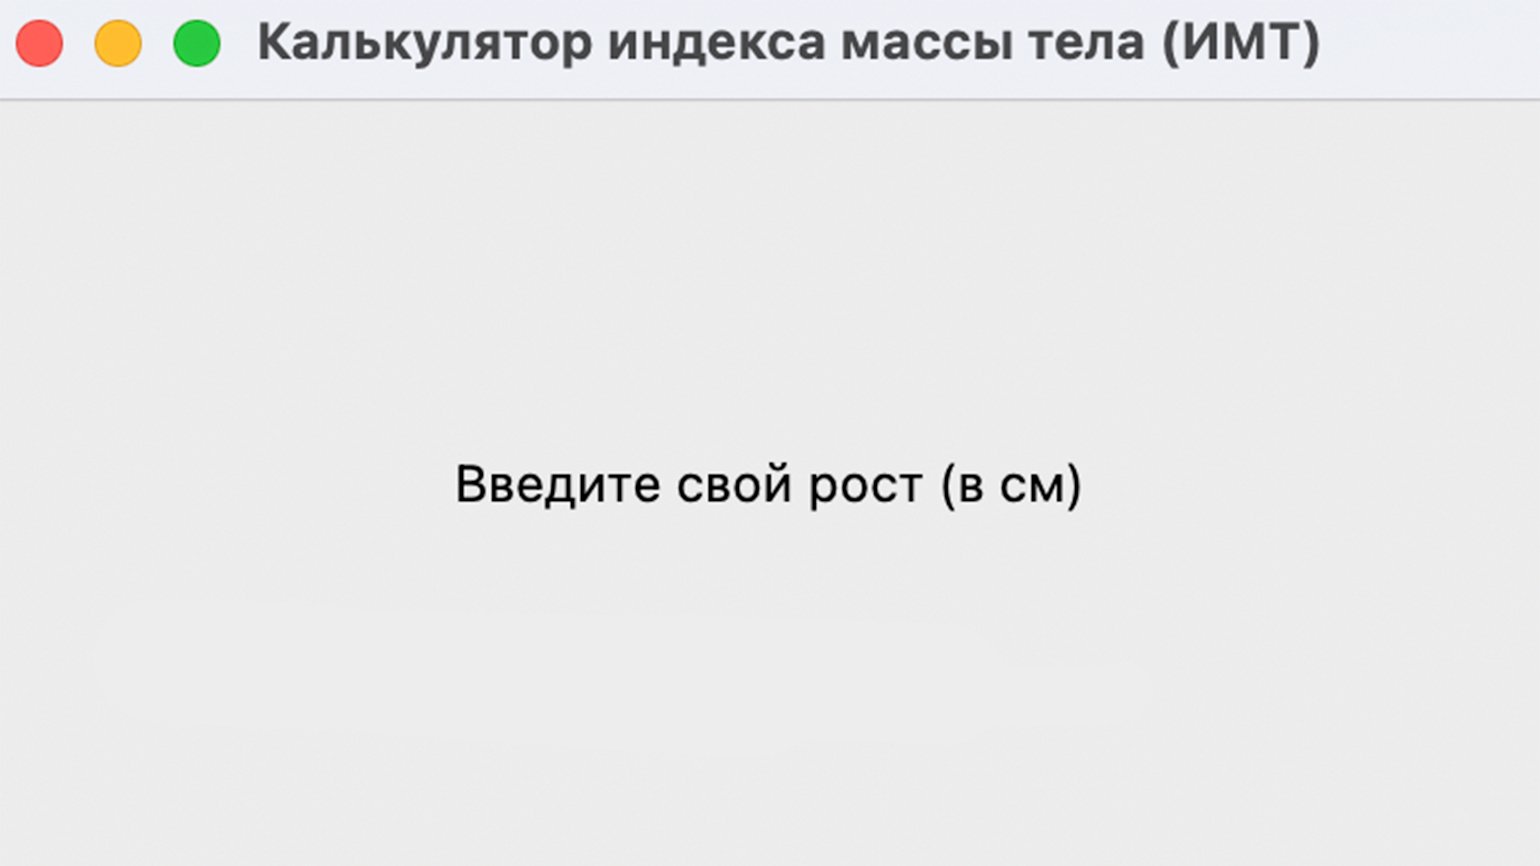
Для позиционирования виджета используем метод grid. Укажем, что текст должен располагаться в ячейке с координатами «3-я строка, 1-й столбец». Если запустим код, то увидим там единственный элемент:
Сейчас элемент расположен в центре окна, но он займёт правильное положение, когда мы напишем другие элементы.
Добавим вторую надпись о весе аналогичным образом, но при позиционировании в grid укажем следующую, четвёртую строку:
weight_lb = Label(
   frame,
   text="Введите свой вес (в кг)  ",
)
weight_lb.grid(row=4, column=1)
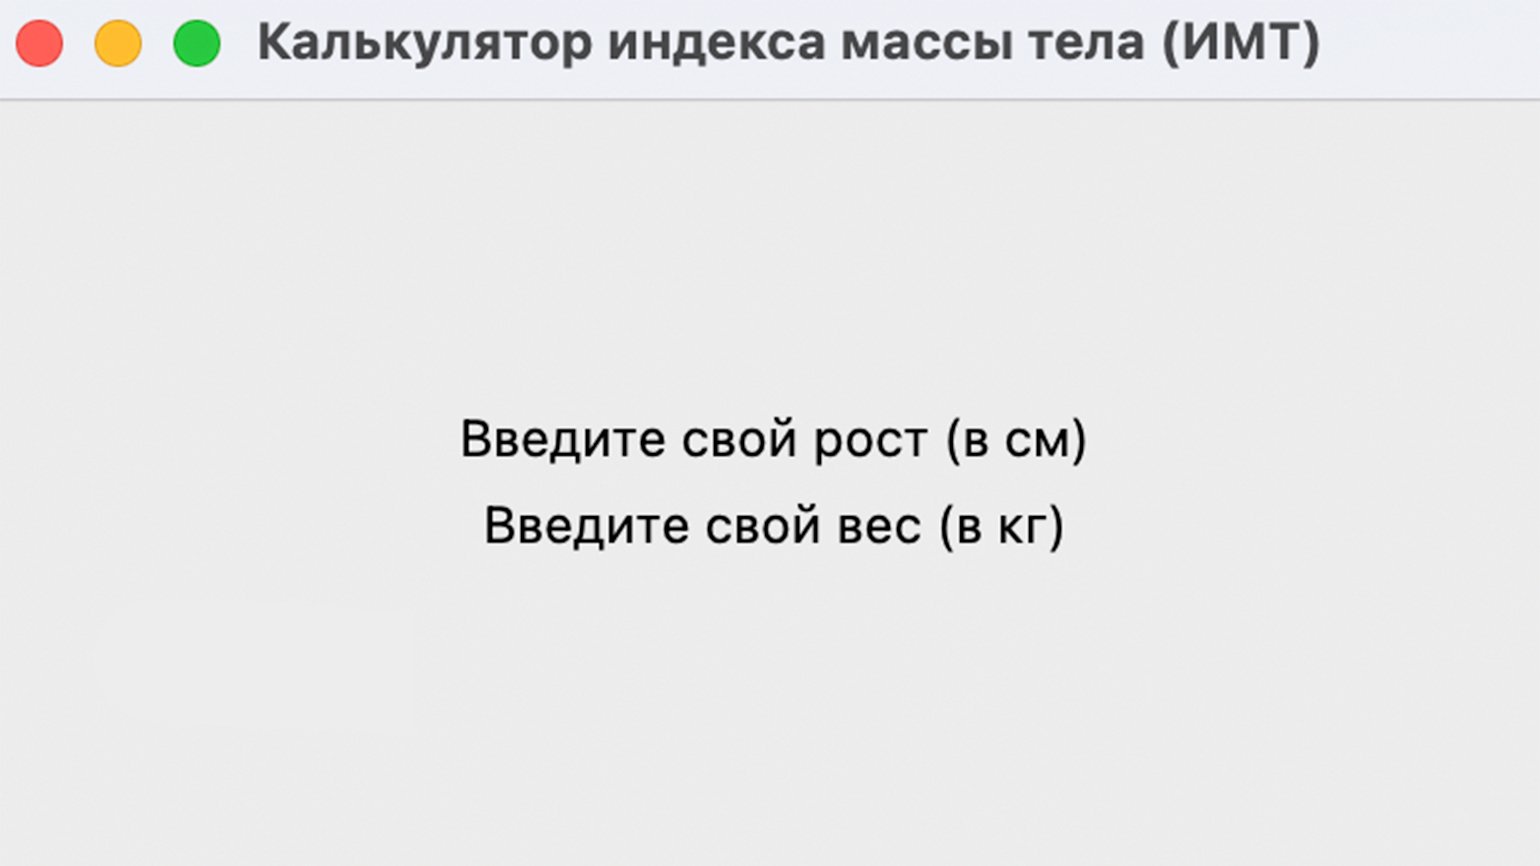
Запускаем код и смотрим на результат:
Теперь добавим поля для ввода пользовательской информации, используя виджет Entry:
height_tf = Entry(
   frame, #Используем нашу заготовку с настроенными отступами.
)
height_tf.grid(row=3, column=2)
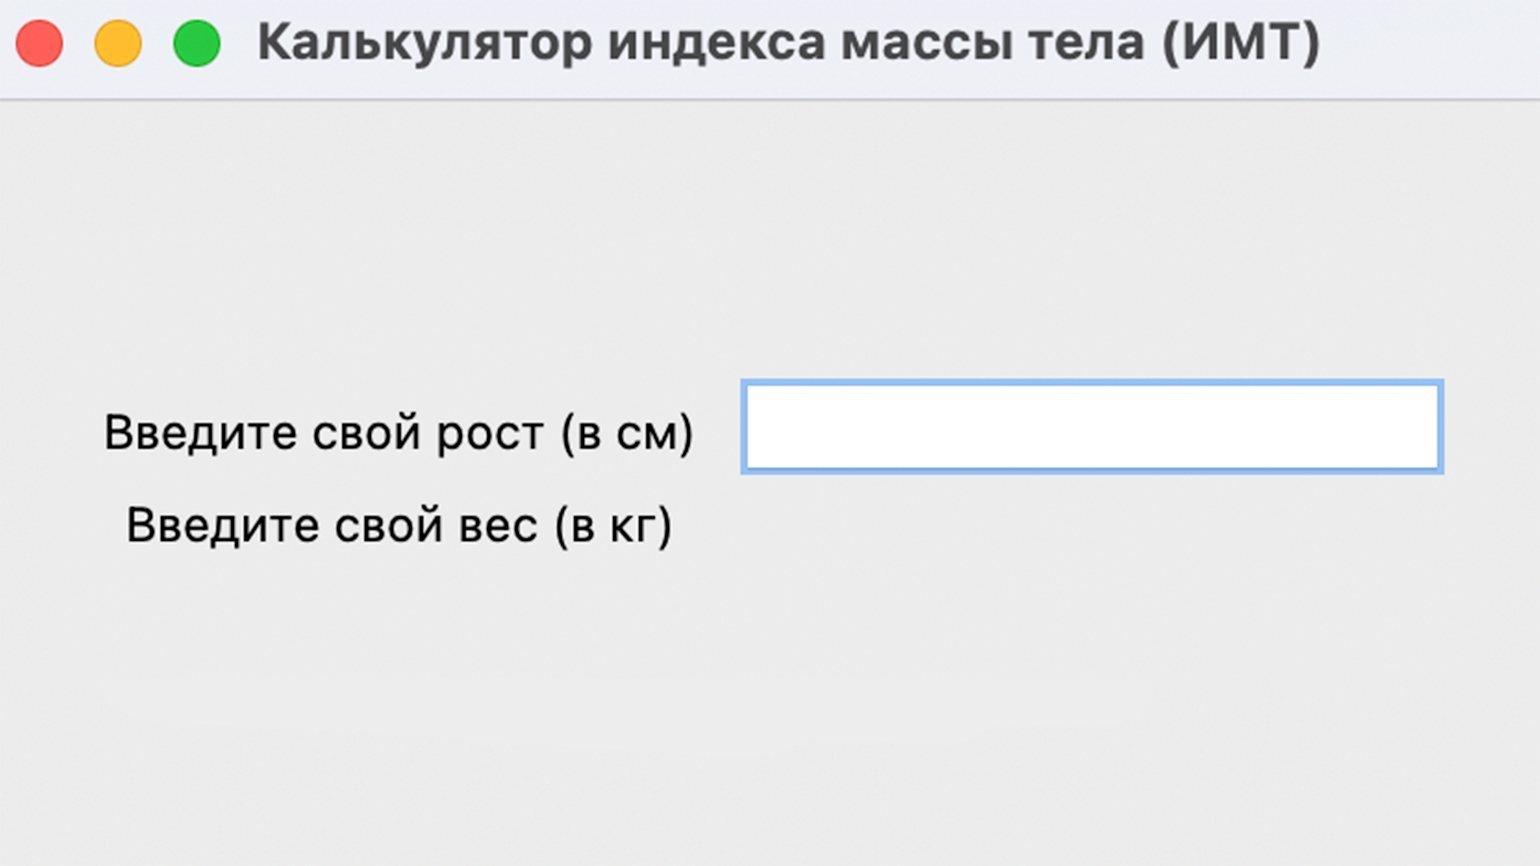
Для позиционирования мы также воспользовались методом grid. Обратите внимание, что наш элемент должен быть расположен напротив надписи «Введите свой рост (в см)». Поэтому мы используем ячейку в той же строке, но уже во втором столбце. Запустим код и посмотрим на результат:
Всё получилось. Остаётся по аналогии добавить поле ввода веса:
weight_tf = Entry(
   frame,
)
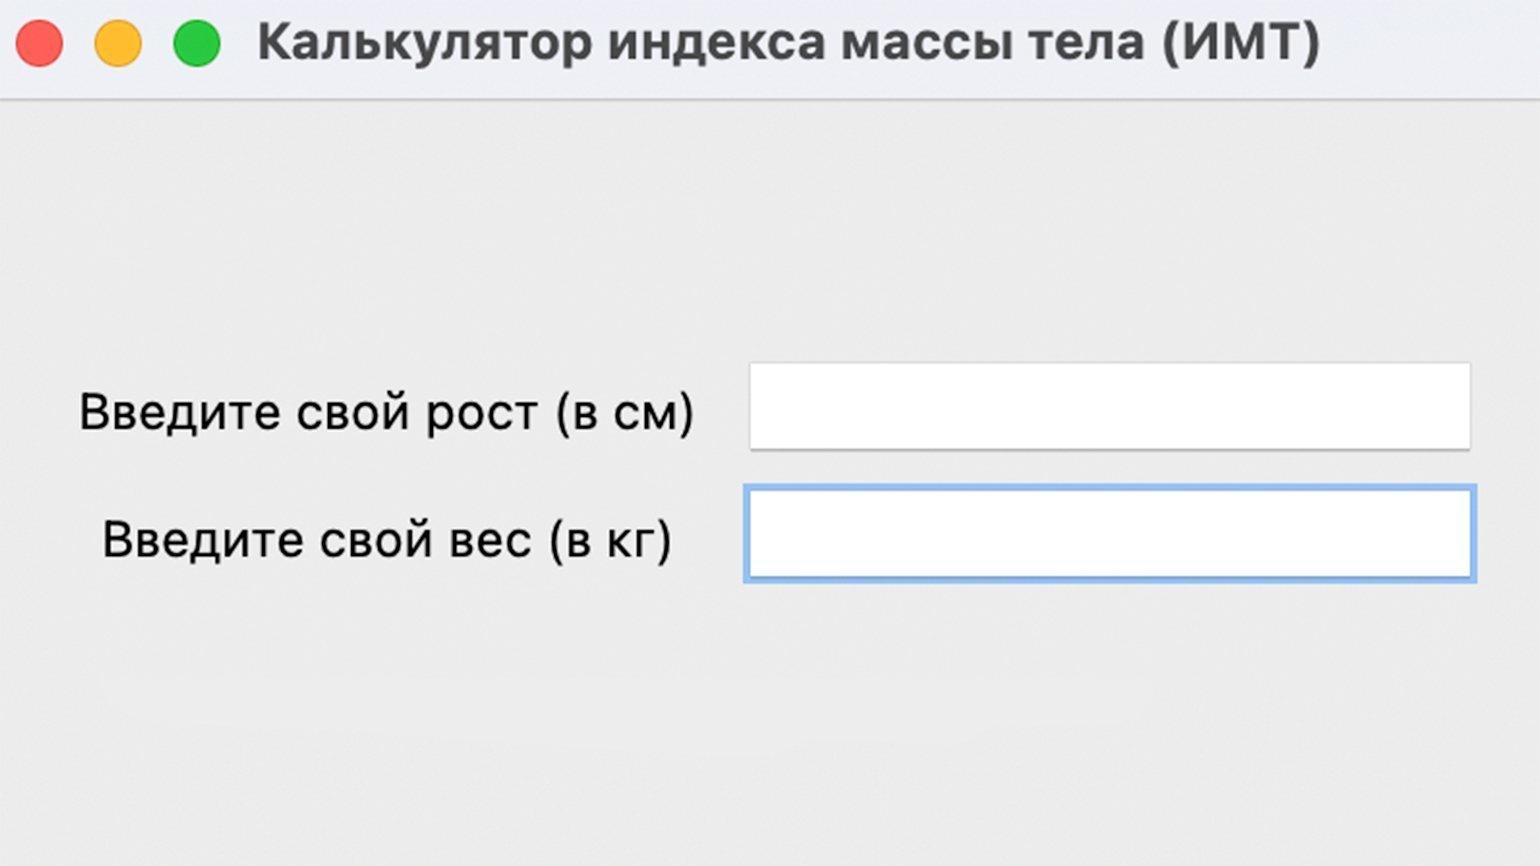
weight_tf.grid(row=4, column=2, pady=5)
Посмотрим на результат:
Теперь добавим кнопку, которая будет запускать расчёт ИМТ. Сделаем это с помощью виджета Button:
cal_btn = Button(
   frame, #Заготовка с настроенными отступами.
   text='Рассчитать ИМТ', #Надпись на кнопке.
)
cal_btn.grid(row=5, column=2) #Размещаем кнопку в ячейке, расположенной ниже, чем наши надписи, но во втором столбце, то есть под ячейками для ввода информации.
Посмотрим на результат:
Теперь в приложении есть все графические элементы. Остаётся лишь написать код, который будет получать информацию из виджетов Entry и рассчитывать индекс массы тела.
Напишем простую функцию и разберём её построчно:
def calculate_bmi(): #Объявляем функцию.
   kg = int(weight_tf.get()) #С помощью метода .get получаем из поля ввода с именем weight_tf значение веса, которое ввёл пользователь и конвертируем в целое число с помощью int().
   m = int(height_tf.get())/100 #С помощью метода .get получаем из поля ввода с именем height_tf значение роста и конвертируем в целое число с помощью int(). Обязательно делим его на 100, так как пользователь вводит рост в сантиметрах, а в формуле для расчёта ИМТ используются метры.
   bmi = kg/(m*m)#Рассчитываем значение индекса массы тела.
   bmi = round(bmi, 1) #Округляем результат до одного знака после запятой.
Функция готова. Но теперь нам необходимо оценить полученный результат расчёта и вывести сообщение для пользователя.
Дополним нашу функцию calculate_bmi. Воспользуемся условным оператором if, чтобы учесть полученные значения ИМТ, и методом Tkinter messagebox для отображения сообщения во всплывающем окне:
if bmi < 18.5:
       messagebox.showinfo('bmi-pythonguides', f'ИМТ = {bmi} соответствует недостаточному весу')
   elif (bmi > 18.5) and (bmi < 24.9):
       messagebox.showinfo('bmi-pythonguides', f'ИМТ = {bmi} соответствует нормальному весу')
   elif (bmi > 24.9) and (bmi < 29.9):
       messagebox.showinfo('bmi-pythonguides', f'ИМТ = {bmi} соответствует избыточному весу')
   else:
       messagebox.showinfo('bmi-pythonguides', f'ИМТ = {bmi} соответствует ожирению')
Остаётся последний шаг — наша функция должна запускаться при нажатии на кнопку «Рассчитать ИМТ». Для этого добавим свойство command в виджет Button:
cal_btn = Button(
   frame,
   text='Рассчитать ИМТ',
   command=calculate_bmi #Позволяет запустить событие с функцией при нажатии на кнопку.
)
cal_btn.grid(row=5, column=2)
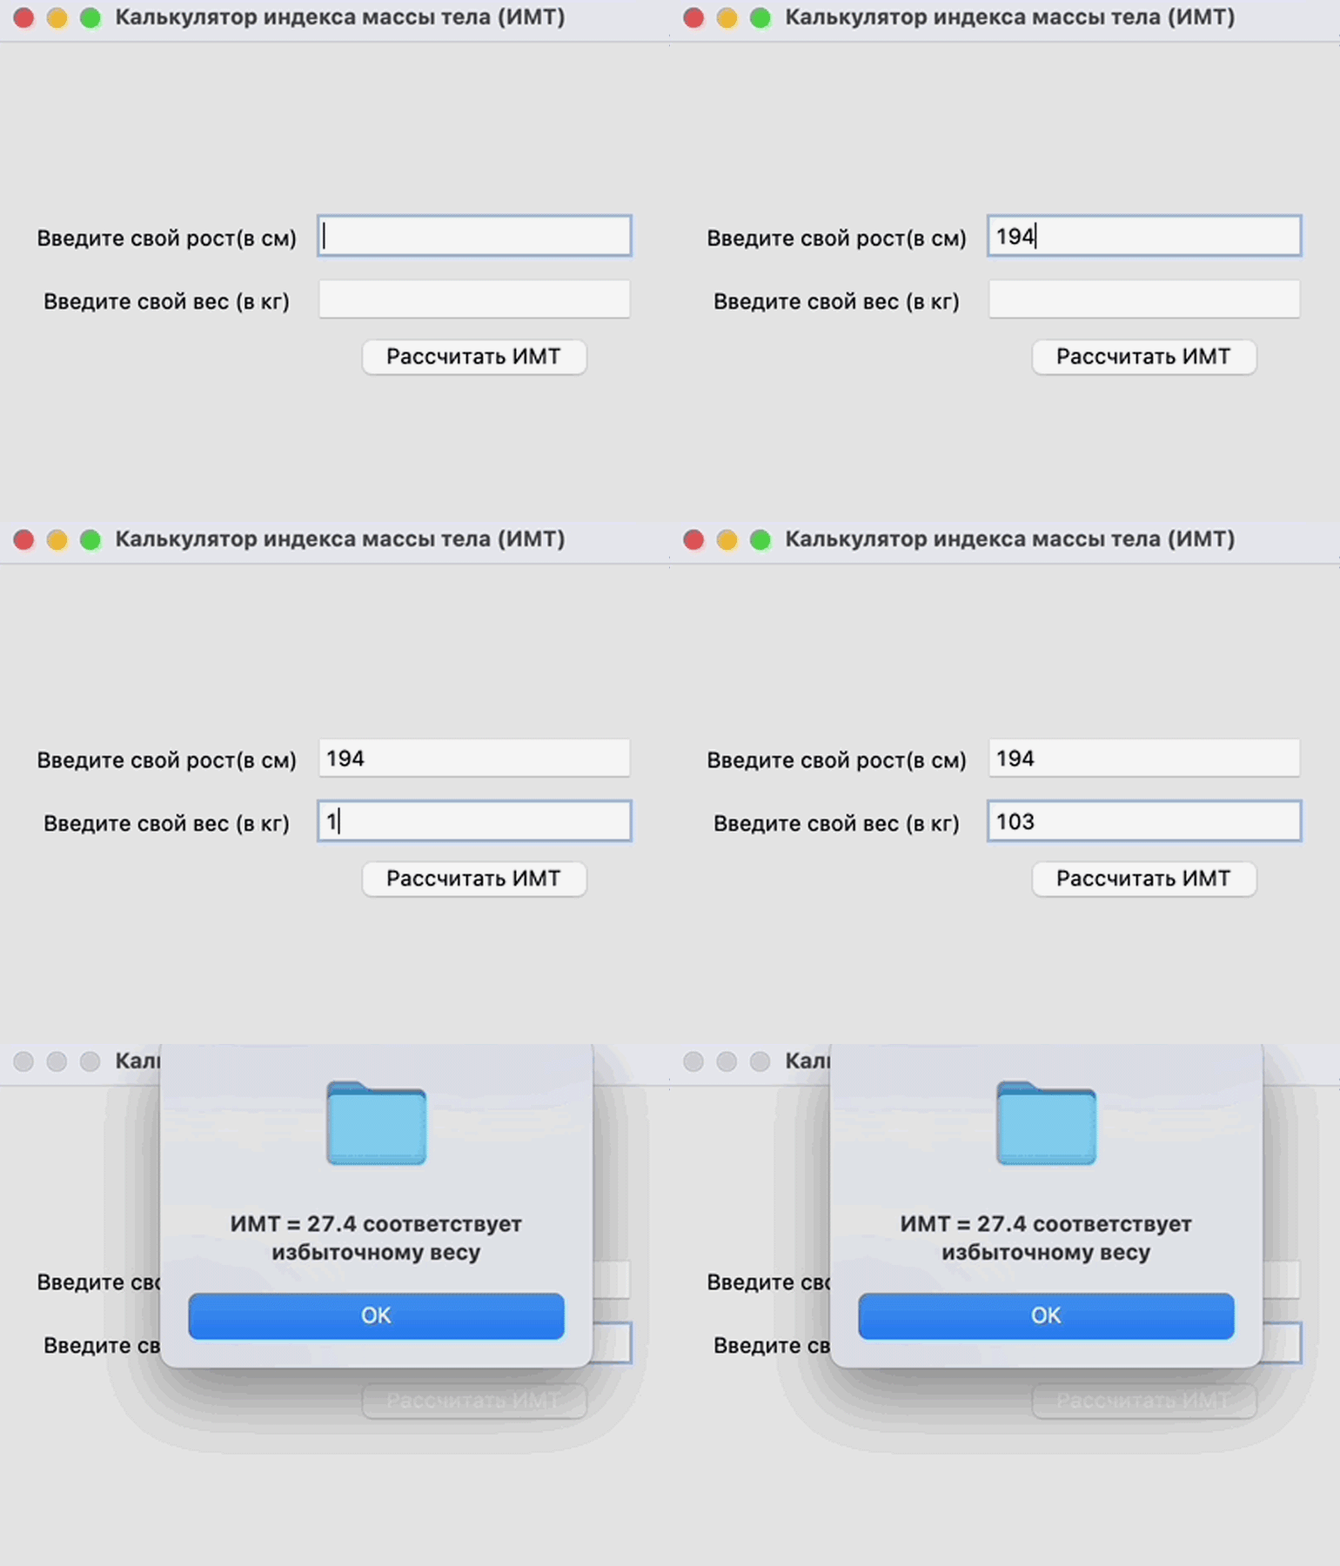
Запустим код и посмотрим на результат:
Всё работает. Функция получает данные из полей ввода и рассчитывает индекс массы тела, показывая результат на экране.
from tkinter import *
from tkinter import messagebox

def calculate_bmi():
   kg = int(weight_tf.get())
   m = int(height_tf.get())/100
   bmi = kg/(m*m)
   bmi = round(bmi, 1)

   if bmi < 18.5:
       messagebox.showinfo('bmi-pythonguides', f'ИМТ = {bmi} соответствует недостаточному весу')
   elif (bmi > 18.5) and (bmi < 24.9):
       messagebox.showinfo('bmi-pythonguides', f'ИМТ = {bmi} соответствует нормальному весу')
   elif (bmi > 24.9) and (bmi < 29.9):
       messagebox.showinfo('bmi-pythonguides', f'ИМТ = {bmi} соответствует избыточному весу')
   else:
       messagebox.showinfo('bmi-pythonguides', f'ИМТ = {bmi} соответствует ожирению')

window = Tk()
window.title('Калькулятор индекса массы тела (ИМТ)')
window.geometry('400x300')


frame = Frame(
   window,
   padx=10,
   pady=10
)
frame.pack(expand=True)


height_lb = Label(
   frame,
   text="Введите свой рост (в см)  "
)
height_lb.grid(row=3, column=1)

weight_lb = Label(
   frame,
   text="Введите свой вес (в кг)  ",
)
weight_lb.grid(row=4, column=1)

height_tf = Entry(
   frame,
)
height_tf.grid(row=3, column=2, pady=5)

weight_tf = Entry(
   frame,
)
weight_tf.grid(row=4, column=2, pady=5)

cal_btn = Button(
   frame,
   text='Рассчитать ИМТ',
   command=calculate_bmi
)
cal_btn.grid(row=5, column=2)

window.mainloop()
Узнать о возможностях Tkinter и особенностях работы с виджетами можно в официальной документации. А если хотите найти больше реальных примеров для практики, советуем две книги:
- Python GUI Programming with Tkinter. Develop responsive and powerful GUI applications with Tkinter, Алан Мур.
- Tkinter GUI Programming by Example, Дэвид Лав.

Учись бесплатно:
вебинары по программированию, маркетингу и дизайну.
Участвовать
Школа дронов для всех
Учим программировать беспилотники и управлять ими.
Узнать больше
Причиной написания статьи, явилось огромное количество постоянно возникающих у новичков вопросов такого содержания: «Как собрать проект c pyqt5», «Почему не работает», «Какой инструмент выбрать» и т.д. Сегодня научимся собирать проекты без мучений и танцев с бубном.
Как-то пришлось написать небольшое desktop-приложение. В качестве языка программирования для разработки был выбран python, поскольку для решения моей задачи он подходил идеально. В стандартную библиотеку Python уже входит библиотека tkinter, позволяющая создавать GUI. Но проблема tkinter в том, что данной библиотеке посвящено мало внимания, и найти в интернете курс, книгу или FAQ по ней довольно-таки сложно. Поэтому было решено использовать более мощную, современную и функциональную библиотеку Qt, которая имеет привязки к языку программирования python в виде библиотеки PyQT5. Более подробно про PyQT можете почитать здесь. В качестве примера я буду использовать код:
#!/usr/bin/python3
# -*- coding: utf-8 -*-

import sys
from PyQt5.QtWidgets import QApplication, QWidget
from PyQt5.QtGui import QIcon

class Example(QWidget):

    def __init__(self):
        super().__init__()

        self.initUI()

    def initUI(self):

        self.setGeometry(300, 300, 300, 220)
        self.setWindowTitle('Icon')
        self.setWindowIcon(QIcon('web.png'))

        self.show()

if __name__ == '__main__':

    app = QApplication(sys.argv)
    ex = Example()
    sys.exit(app.exec_())
Если вы более-менее опытный разработчик, то понимаете, что без интерпретатора код на python не запустить. А хотелось бы дать возможность каждому пользователю использовать программу. Вот здесь к нам на помощь и приходят специальные библиотеки позволяющие собирать проекты в .exe, которые можно потом без проблем запустить, как обычное приложение.
Существует большое количество библиотек, позволяющих это сделать, среди которых самые популярные: cx_Freeze, py2exe, nuitka, PyInstaller и др. Про каждую написано довольно много. Но надо сказать, что многие из этих решений позволяют запускать код только на компьютере, с предустановленным интерпретатором и pyqt5. Не думаю, что пользователь будет заморачиваться и ставить себе дополнительные пакеты и программы. Надеюсь, вы понимаете, что запуск программы на dev-среде и у пользователя это не одно и тоже. Также нужно отметить, что у каждого решения были свои проблемы: один не запускался, другой собирал то, что не смог потом запустить, третий вообще отказывался что-либо делать.
После долгих танцев с бубном и активным гуглением, мне все же удалось собрать проект с помощью pyinstaller, в полностью работоспособное приложение.
Немного о Pyinstaller
Pyinstaller собирает python-приложение и все зависимости в один пакет. Пользователь может запускать приложение без установки интерпретатора python или каких-либо модулей. Pyinstaller поддерживает python 2.7 и python 3.3+ и такие библиотеки как: numpy, PyQt, Django, wxPython и другие.
Pyinstaller тестировался на Windows, Mac OS X и Linux. Как бы там ни было, это не кросс-платформенный компилятор: чтобы сделать приложение под Windows, делай это на Windows; Чтобы сделать приложение под Linux, делай это на Linux и т.д.
PyInstaller успешно используется с AIX, Solaris и FreeBSD, но тестирование не проводилось.
Подробнее о PyInstaller можно почитать здесь: документация.
К тому же после сборки приложение весило всего около 15 мб. Это к слову и является преимуществом pyinstaller, поскольку он не собирает все подряд, а только необходимое. Аналогичные же библиотеки выдавали результат за 200-300 мб.
Приступаем к сборке
Прежде чем приступить к сборке мы должны установить необходимые библиотеки, а именно pywin32 и собственно pyinstaller:
pip install pypiwin32
pip install pyinstaller
Чтобы убедится, что все нормально установилось, вводим команду:
pyinstaller --versionдолжна высветиться версия pyinstaller. Если все правильно установилось, идем дальше.
В папке с проектом запускаем cmd и набираем:
pyinstaller myscript.pyСобственно это и есть простейшая команда, которая соберет наш проект.
Синтаксис команды pyinstaller таков:
pyinstaller [options] script [script …] | specfile
Наиболее часто используемые опции:
—onefile — сборка в один файл, т.е. файлы .dll не пишутся.
—windowed -при запуске приложения, будет появляться консоль.
—noconsole — при запуске приложения, консоль появляться не будет.
—icon=app.ico — добавляем иконку в окно.
—paths — возможность вручную прописать путь к необходимым файлам, если pyinstaller
не может их найти(например: —paths D:python35Libsite-packagesPyQt5Qtbin)
PyInstaller анализирует файл myscript.py и делает следующее:
- Пишет файл myscript.spec в той же папке, где находится скрипт.
- Создает папку build в той же папке, где находится скрипт.
- Записывает некоторые логи и рабочие файлы в папку build.
- Создает папку dist в той же папке, где находится скрипт.
- Пишет исполняемый файл в папку dist.
В итоге наша команда будет выглядеть так:
pyinstaller --onefile --icon=name.ico --noconsole myscript.pyПосле работы программы вы найдете две папки: dist и build. Собственно в папке dist и находится наше приложение. Впоследствии папку build можно спокойно удалить, она не влияет на работоспособность приложения.
Спасибо за внимание. Надеюсь статья была вам полезна.
Считается, что Python не лучший выбор для десктопных приложений. Однако, когда в 2016 году я собирался переходить от разработки сайтов к программному обеспечению, Google подсказал мне, что на Python можно создавать сложные современные приложения. Например blender3d, который написан на Python.
Но люди, не по своей вине используют уродливые примеры графического интерфейса, которые выглядят слишком старыми, и не понравятся молодёжи. Я надеюсь изменить это мнение в своем туториале. Давайте начнём.
Мы будем использовать PyQt (произносится «Пай-Кьют»). Это фреймворк Qt, портированный с C++. Qt известен тем, что необходим C++ разработчикам. С помощью этого фреймворка сделаны blender3d, Tableau, Telegram, Anaconda Navigator, Ipython, Jupyter Notebook, VirtualBox, VLC и другие. Мы будем использовать его вместо удручающего Tkinter.
Требования
- Вы должны знать основы Python
- Вы должны знать, как устанавливать пакеты и библиотеки с помощью pip.
- У вас должен быть установлен Python.
Установка
Вам нужно установить только PyQt. Откройте терминал и введите команду:
>>> pip install PyQt5Мы будем использовать PyQt версии 5.15. Дождитесь окончания установки, это займёт пару минут.
Hello, World!
Создайте папку с проектом, мы назовём его helloApp. Откройте файл main.py, лучше сделать это vscode, и введите следующий код:
import sys

from PyQt5.QtGui import QGuiApplication
from PyQt5.QtQml import QQmlApplicationEngine

app = QGuiApplication(sys.argv)

engine = QQmlApplicationEngine()
engine.quit.connect(app.quit)
engine.load('./UI/main.qml')

sys.exit(app.exec())
Этот код вызывает QGuiApplication и QQmlApplicationEngine которые используют Qml вместо QtWidget в качестве UI слоя в Qt приложении. Затем, мы присоединяем UI функцию выхода к главной функции выхода приложения. Теперь они оба закроются одновременно, когда пользователь нажмёт выход. Затем, загружаем qml файл для Qml UI. Вызов app.exec(), запускает приложение, он находится внутри sys.exit, потому что возвращает код выхода, который передается в sys.exit.
Добавьте этот код в main.qml:
import QtQuick 2.15
import QtQuick.Controls 2.15

ApplicationWindow {
    visible: true
    width: 600
    height: 500
    title: "HelloApp"

    Text {
        anchors.centerIn: parent
        text: "Hello, World"
        font.pixelSize: 24
    }

}
Этот код создает окно, делает его видимым, с указанными размерами и заголовком. Объект Text отображается в середине окна.
Теперь давайте запустим приложение:
>>> python main.pyВы увидите такое окно:
Давайте немного обновим UI, добавим фоновое изображение и время:
import QtQuick 2.15
import QtQuick.Controls 2.15

ApplicationWindow {
    visible: true
    width: 400
    height: 600
    title: "HelloApp"

Rectangle {
        anchors.fill: parent

Image {
            sourceSize.width: parent.width
            sourceSize.height: parent.height
            source: "./images/playas.jpg"
            fillMode: Image.PreserveAspectCrop
        }

Rectangle {
            anchors.fill: parent
            color: "transparent"
            Text {
                text: "16:38:33"
                font.pixelSize: 24
                color: "white"
            }
        }
    }
}
Внутри типа ApplicationWindow находится содержимое окна, тип Rectangle заполняет пространство окна. Внутри него находится тип Image и другой прозрачный Rectangle который отобразится поверх изображения.
Если сейчас запустить приложение, то текст появится в левом верхнем углу. Но нам нужен левый нижний угол, поэтому используем отступы:
Text {
                anchors {
                    bottom: parent.bottom
                    bottomMargin: 12
                    left: parent.left
                    leftMargin: 12
                }
                text: "16:38:33"
                font.pixelSize: 24
                ...
            }
После запуска вы увидите следующее:

Показываем текущее время
Модуль gmtime позволяет использовать структуру со временем, а strftime даёт возможность преобразовать её в строку. Импортируем их:
import sys
from time import strftime, gmtime
Теперь мы можем получить строку с текущим временем:
curr_time = strftime("%H:%M:%S", gmtime())Строка "%H:%M:%S" означает, что мы получим время в 24 часовом формате, с часами минутами и секундами (подробнее о strtime).
Давайте создадим property в qml файле, для хранения времени. Мы назовём его currTime.
property string currTime: "00:00:00"Теперь заменим текст нашей переменной:
Text {
    ...
    text: currTime  // used to be; text: "16:38:33"
    font.pixelSize: 48
    color: "white"
}
Теперь, передадим переменную curr_time из pyhton в qml:
engine.load('./UI/main.qml')
engine.rootObjects()[0].setProperty('currTime', curr_time)
Это один из способов передачи информации из Python в UI.
Запустите приложение и вы увидите текущее время.
Обновление времени
Для того чтобы обновлять время, нам нужно использовать потоки. Для этого я предлагаю использовать сигналы.
Чтобы использовать сигналы нам нужен подкласс QObject. Назовём его Backend.
...
from PyQt5.QtCore import QObject, pyqtSignal

class Backend(QObject):
    def __init__(self):
        QObject.__init__(self)
...
У нас уже имеется свойства для строки со временем curr_time, теперь создадим свойство backend типа QtObject в файле main.qml.
property string currTime: "00:00:00"
property QtObject backend
Передадим данные из Python в qml:
engine.load('./UI/main.qml')
back_end = Backend()
engine.rootObjects()[0].setProperty('backend', back_end)
В qml файле один объект QtObject может получать несколько функций (называемых сигналами) из Python.
Создадим тип Connections и укажем backend в его target. Теперь внутри этого типа может быть столько функций, сколько нам необходимо получить в backend.
...
Rectangle {
    anchors.fill: parent
    Image {
    ...
    }
    ...
}
Connections {
    target: backend
}
...
Таким образом мы свяжем qml и сигналы из Python.
Мы используем потоки, для того чтобы обеспечить своевременное обновление UI. Создадим две функции, одну для управления потоками, а вторую для выполнения действий. Хорошая практика использовать в названии одной из функций _.
...
import threading
from time import sleep
...
class Backend(QObject):

    def __init__(self):
        QObject.__init__(self)
    def bootUp(self):
        t_thread = threading.Thread(target=self._bootUp)
        t_thread.daemon = True
        t_thread.start()
    def _bootUp(self):
        while True:
            curr_time = strftime("%H:%M:%S", gmtime())
            print(curr_time)
            sleep(1)
...
Создадим pyqtsignal и назовём его updated, затем вызовем его из функции updater.
...
from PyQt5.QtCore import QObject, pyqtSignal
...
    def __init__(self):
        QObject.__init__(self)
    updated = pyqtSignal(str, arguments=['updater'])
    def updater(self, curr_time):
        self.updated.emit(curr_time)
    ...
В этом коде updated имеет параметр arguments, который является списком, содержащим имя функции «updater». Qml будет получать данные из этой функции. В функции updater мы вызываем метод emit и передаём ему данные о времени.
Обновим qml, получив сигнал, с помощью обработчика, название которого состоит из «on» и имени сигнала:
    target: backend
    function onUpdated(msg) {
        currTime = msg;
    }
Теперь нам осталось вызвать функцию updater. В нашем небольшом приложении, использовать отдельную функцию для вызова сигнала не обязательно. Но это рекомендуется делать в больших программах. Изменим задержку на одну десятую секунды.
curr_time = strftime("%H:%M:%S", gmtime())
            self.updater(curr_time)
            sleep(0.1)
Функция bootUp должна быть вызвана сразу же после загрузки UI:
engine.rootObjects()[0].setProperty('backend', back_end)
back_end.bootUp()
sys.exit(app.exec())
Всё готово
Теперь можно запустить программу. Время будет обновляться корректно. Для того, чтобы убрать рамку, вы можете добавить в qml файл следующую строку:
flags: Qt.FramelessWindowHint | Qt.WindowТак должен выглядеть файл main.py:
import sys
from time import strftime, gmtime
import threading
from time import sleep
from PyQt5.QtGui import QGuiApplication
from PyQt5.QtQml import QQmlApplicationEngine
from PyQt5.QtCore import QObject, pyqtSignal

class Backend(QObject):

    def __init__(self):
        QObject.__init__(self)
    updated = pyqtSignal(str, arguments=['updater'])
    def updater(self, curr_time):
        self.updated.emit(curr_time)
    def bootUp(self):
        t_thread = threading.Thread(target=self._bootUp)
        t_thread.daemon = True
        t_thread.start()
    def _bootUp(self):
        while True:
            curr_time = strftime("%H:%M:%S", gmtime())
            self.updater(curr_time)
            sleep(0.1)

app = QGuiApplication(sys.argv)
engine = QQmlApplicationEngine()
engine.quit.connect(app.quit)
engine.load('./UI/main.qml')
back_end = Backend()
engine.rootObjects()[0].setProperty('backend', back_end)
back_end.bootUp()
sys.exit(app.exec())
Вот содержимое файла main.qml:
import QtQuick 2.15
import QtQuick.Controls 2.15
ApplicationWindow {
    visible: true
    width: 360
    height: 600
    x: screen.desktopAvailableWidth - width - 12
    y: screen.desktopAvailableHeight - height - 48
    title: "HelloApp"
    flags: Qt.FramelessWindowHint | Qt.Window
    property string currTime: "00:00:00"
    property QtObject backend
    Rectangle {
        anchors.fill: parent
        Image {
            sourceSize.width: parent.width
            sourceSize.height: parent.height
            source: "./images/playas.jpg"
            fillMode: Image.PreserveAspectFit
        }
        Text {
            anchors {
                bottom: parent.bottom
                bottomMargin: 12
                left: parent.left
                leftMargin: 12
            }
            text: currTime
            font.pixelSize: 48
            color: "white"
        }
    }

    Connections {
        target: backend
        function onUpdated(msg) {
            currTime = msg;
        }
    }
}
Сборка приложения
Для сборки десктопного приложения на Python нам понадобится pyinstaller.
>>> pip install pyinstallerЧтобы в сборку добавились все необходимые ресурсы, создадим файл spec:
>>> pyi-makespec main.pyНастройки файла spec
Параметр datas можно использовать для того, чтобы включить файл в приложение. Это список кортежей, каждый из которых обязательно должен иметь target path(откуда брать файлы) и destination path(где будет находится приложение). destination path должен быть относительным. Чтобы расположить все ресурсы в одной папке с exe-файлами используйте пустую строку.
Измените параметр datas, на путь к вашей папке с UI:
a = Analysis(['main.py'],
             ...
             datas=[('I:/path/to/helloApp/UI', 'UI')],
             hiddenimports=[],
...
exe = EXE(pyz,
          a.scripts,
          [],
          ...
          name='main',
          debug=False,
          ...
          console=False )
coll = COLLECT(exe,
               ...
               upx_exclude=[],
               name='main')
Параметр console установим в false, потому что у нас не консольное приложение.
Параметр name внутри вызова Exe, это имя исполняемого файла. name внутри вызова Collect, это имя папки в которой появится готовое приложение. Имена создаются на основании файла для которого мы создали spec — main.py.
Теперь можно запустить сборку:
>>> pyinstaller main.specВ папке dist появится папка main. Для запуска программы достаточно запустить файл main.exe.
Так будет выглядеть содержимое папки с десктопным приложением на Python:
О том, как использовать Qt Designer для создания UI приложений на Python читайте в нашей статье.
Оригинал How to build your first Desktop Application in Python
Even though web and mobile applications appear to have taken over the software development market, there’s still demand for traditional graphical user interface (GUI) desktop applications. If you’re interested in building these kinds of applications in Python, then you’ll find a wide variety of libraries to choose from. They include Tkinter, wxPython, PyQt, PySide, and a few others.
In this tutorial, you’ll learn the basics of building GUI desktop applications with Python and PyQt.
In this tutorial, you’ll learn how to:
- Create graphical user interfaces with Python and PyQt
- Connect the user’s events on the app’s GUI with the app’s logic
- Organize a PyQt app using a proper project layout
- Create a fully functional GUI application with PyQt
For this tutorial, you’ll create a calculator app with Python and PyQt. This short project will help you grasp the fundamentals and get you up and running with this GUI library.
You can download the source code for the project and all examples in this tutorial by clicking on the link below:
Getting to Know PyQt
PyQt is a Python binding for Qt, which is a set of C++ libraries and development tools providing platform-independent abstractions for graphical user interfaces (GUIs). Qt also provides tools for networking, threads, regular expressions, SQL databases, SVG, OpenGL, XML, and many other powerful features.
Developed by RiverBank Computing Ltd, PyQt’s latest editions are:
- PyQt5: An edition that’s built against Qt 5.x only
- PyQt6: An edition that’s built against Qt 6.x only
In this tutorial, you’ll use PyQt6, as this version is the future of the library. From now on, be sure to consider any mention of PyQt as a reference to PyQt6.
PyQt6 is based on Qt v6. Therefore, it provides classes and tools for GUI creation, XML handling, network communication, regular expressions, threads, SQL databases, web browsing, and other technologies available in Qt. PyQt6 implements binding for many Qt classes in a set of Python modules, which are organized in a top-level Python package called PyQt6. For PyQt6 to work, you need Python 3.6.1 or later.
PyQt6 is compatible with Windows, Unix, Linux, macOS, iOS, and Android. This is an attractive feature if you’re looking for a GUI framework to develop multiplatform applications that have a native look and feel on each platform.
PyQt6 is available under two licenses:
- The Riverbank Commercial License
- The General Public License (GPL), version 3
Your PyQt6 license must be compatible with your Qt license. If you use the GPL license, then your code must also use a GPL-compatible license. If you want to use PyQt6 to create commercial applications, then you need a commercial license for your installation.
If you need more information about PyQt6 licensing, then check out the license FAQs page on the project’s official documentation.
Installing PyQt
You have several options for installing PyQt on your system or development environment. The recommended option is to use to use binary wheels. Wheels are the standard way to install Python packages from the Python package index, PyPI.
In any case, you need to consider that wheels for PyQt6 are only available for Python 3.6.1 and later. There are wheels for Linux, macOS, and Windows (64-bit).
All of these wheels include copies of the corresponding Qt libraries, so you won’t need to install them separately.
Another installation option is to build PyQt from source. This can be a bit complicated, so you might want to avoid it if possible. If you really need to build from source, then check out what the library’s documentation recommends in those cases.
Alternatively, you have the option of using package managers, such as APT on Linux or Homebrew on macOS, to install PyQt6. In the next few sections, you’ll go through some of the options for installing PyQt6 from different sources and on different platforms.
Virtual Environment Installation With pip
Most of the time, you should create a Python virtual environment to install PyQt6 in an isolated way. To create a virtual environment and install PyQt6 in it, run the following on your command line:
- Windows
- Linux + macOS
PS> python -m venv venv
PS> venvScriptsactivate
(venv) PS> python -m pip install pyqt6
$ python -m venv venv
$ source venv/bin/activate
(venv) $ python -m pip install pyqt6
Here, you first create a virtual environment using the venv module from the standard library. Then you activate it, and finally you install PyQt6 in it using pip. Note that you must have Python 3.6.1 or later for the install command to work correctly.
System-Wide Installation With pip
You’ll rarely need to install PyQt directly on your system Python environment. If you ever need to do this kind of installation, then run the following command on your command line or in your terminal window without activating any virtual environment:
$ python -m pip install pyqt6
With this command, you’ll install PyQt6 in your system Python environment directly. You can start using the library immediately after the installation finishes. Depending on your operating system, you may need root or administrator privileges for this installation to work.
Even though this is a fast way to install PyQt6 and start using it right away, it’s not the recommended approach. The recommended approach is to use a Python virtual environment, as you learned in the previous section.
Platform-Specific Installation
Several Linux distributions include binary packages for PyQt6 in their repositories. If this your case, then you can install the library using the distribution’s package manager. On Ubuntu, for example, you can use the following command:
$ sudo apt install python3-pyqt6
With this command, you’ll install PyQt6 and all of its dependencies in your base system, so you can use the library in any of your GUI projects. Note that root privileges are needed, which you invoke here with the sudo command.
If you’re a macOS user, then you can install PyQt6 using the Homebrew package manager. To do this, open a terminal and run the following command:
After running this command, you’ll have PyQt6 installed on your Homebrew Python environment, and it’ll be ready for you to use.
If you use a package manager on Linux or macOS, then there’s a chance you won’t get the latest version of PyQt6. A pip installation will be better if you want to ensure that you have the latest release.
Creating Your First PyQt Application
Now that you have a working PyQt installation, you’re ready to create your first GUI app. You’ll create a Hello, World! application with Python and PyQt. Here are the steps that you’ll follow:
- Import
QApplicationand all the required widgets fromPyQt6.QtWidgets. - Create an instance of
QApplication. - Create your application’s GUI.
- Show your application’s GUI.
- Run your application’s event loop, or main loop.
You can download the source code for the examples that you’ll code in this section by clicking the link below:
To kick things off, start by creating a new file called hello.py in your current working directory:
# hello.py

"""Simple Hello, World example with PyQt6."""

import sys

# 1. Import QApplication and all the required widgets
from PyQt6.QtWidgets import QApplication, QLabel, QWidget
First, you import sys, which will allow you to handle the application’s termination and exit status through the exit() function. Then you import QApplication, QLabel, and QWidget from QtWidgets, which is part of the PyQt6 package. With these imports, you’re done with step one.
To complete step two, you just need to create an instance of QApplication. Do this as you would create an instance of any Python class:
# hello.py
# ...

# 2. Create an instance of QApplication
app = QApplication([])
In this line of code, you create the instance of QApplication. You should create your app instance before you create any GUI object in PyQt.
Internally, the QApplication class deals with command-line arguments. That’s why you need to pass in a list of command-line arguments to the class constructor. In this example, you use an empty list because your app won’t be handling any command-line arguments.
Step three involves creating the application’s GUI. In this example, your GUI will be based on the QWidget class, which is the base class of all user interface objects in PyQt.
Here’s how you can create the app’s GUI:
# hello.py
# ...

# 3. Create your application's GUI
window = QWidget()
window.setWindowTitle("PyQt App")
window.setGeometry(100, 100, 280, 80)
helloMsg = QLabel("<h1>Hello, World!</h1>", parent=window)
helloMsg.move(60, 15)
In this code, window is an instance of QWidget, which provides all the features that you’ll need to create the application’s window, or form. As its names suggests, .setWindowTitle() sets the window’s title in your application. In this example, the app’s window will show PyQt App as its title.
You can use .setGeometry() to define the window’s size and screen position. The first two arguments are the x and y screen coordinates where the window will be placed. The third and fourth arguments are the window’s width and height.
Every GUI application needs widgets, or graphical components that make the app’s GUI. In this example, you use a QLabel widget, helloMsg, to show the message Hello, World! on your application’s window.
QLabel objects can display HTML-formatted text, so you can use the HTML element "<h1>Hello, World!</h1>" to provide the desired text as an h1 header. Finally, you use .move() to place helloMsg at the coordinates (60, 15) on the application’s window.
You’re done with step three, so you can continue with the final two steps and get your PyQt GUI application ready to run:
# hello.py
# ...

# 4. Show your application's GUI
window.show()

# 5. Run your application's event loop
sys.exit(app.exec())
In this code snippet, you call .show() on window. The call to .show() schedules a paint event, which is a request to paint the widgets that compose a GUI. This event is then added to the application’s event queue. You’ll learn more about PyQt’s event loop in a later section.
Finally, you start the application’s event loop by calling .exec(). The call to .exec() is wrapped in a call to sys.exit(), which allows you to cleanly exit Python and release memory resources when the application terminates.
You can run your first PyQt app with the following command:
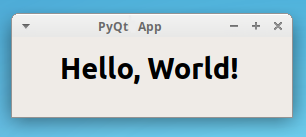
When you run this script, you’ll see a window that’ll look something like this:
Your application shows a window based on QWidget. The window displays the Hello, World! message. To show the message, it uses a QLabel widget. And with that, you’ve written your first GUI desktop application using PyQt and Python! Isn’t that cool?
Considering Code Styles
If you check the code of your sample GUI application from the previous section, then you’ll notice that PyQt’s API doesn’t follow PEP 8 coding style and naming conventions. PyQt is built around Qt, which is written in C++ and uses the camel case naming style for functions, methods, and variables. That said, when you start writing a PyQt project, you need to decide which naming style you’ll use.
In this regard, PEP 8 states that:
New modules and packages (including third party frameworks) should be written to these standards, but where an existing library has a different style, internal consistency is preferred. (Source)
In addition, the Zen of Python says:
…practicality beats purity. (Source)
If you want to write consistent PyQt-related code, then you should stick to the framework’s coding style. In this tutorial, you’ll follow the PyQt coding style for consistency. You’ll use camel case instead of the usual Python snake case.
Learning the Basics of PyQt
You’ll need to master the basic components of PyQt if you want to proficiently use this library to develop your GUI applications. Some of these components include:
- Widgets
- Layout managers
- Dialogs
- Main windows
- Applications
- Event loops
- Signals and slots
These elements are the building blocks of any PyQt GUI application. Most of them are represented as Python classes that live in the PyQt6.QtWidgets module. These elements are extremely important. You’ll learn more about them in the following few sections.
Widgets
Widgets are rectangular graphical components that you can place on your application’s windows to build the GUI. Widgets have several attributes and methods that allow you to tweak their appearance and behavior. They can also paint a representation of themselves on the screen.
Widgets also detect mouse clicks, keypresses, and other events from the user, the window system, and other sources. Each time a widget catches an event, it emits a signal to announce its state change. PyQt has a rich and modern collection of widgets. Each of those widgets serves a different purpose.
Some of the most common and useful PyQt widgets are:
- Buttons
- Labels
- Line edits
- Combo boxes
- Radio buttons
First up is the button. You can create a button by instantiating QPushButton, a class that provides a classic command button. Typical buttons are Ok, Cancel, Apply, Yes, No, and Close. Here’s how they look on a Linux system:
Buttons like these are perhaps the most commonly used widgets in any GUI. When someone clicks them, your app commands the computer to perform actions. This is how you can execute computations when a user clicks a button.
Up next are labels, which you can create with QLabel. Labels let you display useful information as text or images:
You’ll use labels like these to explain how to use your app’s GUI. You can tweak a label’s appearance in several ways. A label can even accept HTML-formatted text, as you saw earlier. You can also use labels to specify a keyboard shortcut to move the cursor focus to a given widget on your GUI.
Another common widget is the line edit, also known as the input box. This widget allows you to enter a single line of text. You can create line edits with the QLineEdit class. Line edits are useful when you need to get the user’s input as plain text.
Here’s how line edits look on a Linux system:
Line edits like these automatically provide basic editing operations like copy, paste, undo, redo, drag, drop, and so on. In the above figure, you can also see that the objects on the first row show placeholder text to inform the user what kind of input is required.
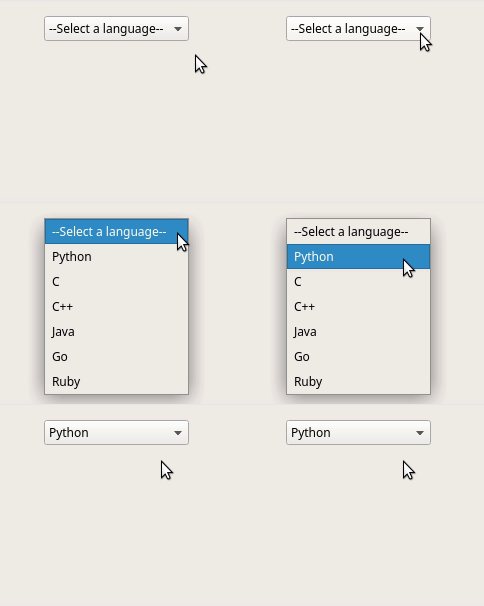
Combo boxes are another fundamental type of widget in GUI applications. You can create them by instantiating QComboBox. A combo box will present your user with a dropdown list of options in a way that takes up minimal screen space.
Here’s an example of a combo box that provides a dropdown list of popular programming languages:
This combo box is read-only, which means that users can select one of several options but can’t add their own options. Combo boxes can also be editable, allowing users to add new options on the fly. Combo boxes can also contain pixmaps, strings, or both.
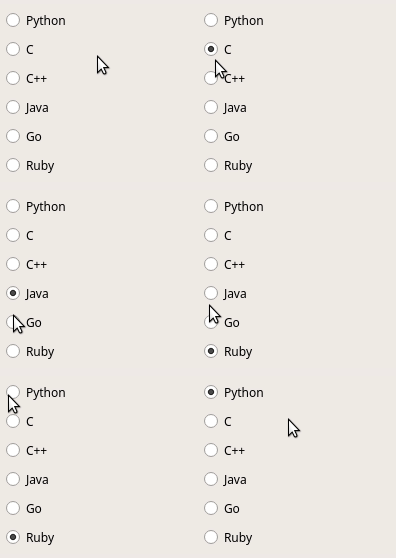
The last widget that you’ll learn about is the radio button, which you can create with QRadioButton. A QRadioButton object is an option button that you can click to switch on. Radio buttons are useful when you need the user to select one of many options. All options in a radio button are visible on the screen at the same time:
In this radio buttons group, only one button can be checked at a given time. If the user selects another radio button, then the previously selected button will switch off automatically.
PyQt has a large collection of widgets. At the time of this writing, there are over forty available for you to use to create your application’s GUI. Here, you’ve studied only a small sample. However, that’s enough to show you the power and flexibility of PyQt. In the next section, you’ll learn how to lay out different widgets to build modern and fully functional GUIs for your applications.
Layout Managers
Now that you know about widgets and how they’re used to build GUIs, you need to know how to arrange a set of widgets so that your GUI is both coherent and functional. In PyQt, you’ll find a few techniques for laying out the widgets on a form or window. For instance, you can use the .resize() and .move() methods to give widgets absolute sizes and positions.
However, this technique can have some drawbacks. You’ll have to:
- Do many manual calculations to determine the correct size and position of every widget
- Do extra calculations to respond to window resize events
- Redo most of your calculations when the window’s layout changes in any way
Another technique involves using .resizeEvent() to calculate the widget’s size and position dynamically. In this case, you’ll have similar headaches as with the previous technique.
The most effective and recommended technique is to use PyQt’s layout managers. They’ll increase your productivity, mitigate the risk of errors, and improve your code’s maintainability.
Layout managers are classes that allow you to size and position your widgets on the application’s window or form. They automatically adapt to resize events and GUI changes, controlling the size and position of all their child widgets.
PyQt provides four basic layout manager classes:
QHBoxLayoutQVBoxLayoutQGridLayoutQFormLayout
The first layout manager class, QHBoxLayout, arranges widgets horizontally from left to right, like with the hypothetical widgets in the following figure:
In the horizontal layout, the widgets will appear one next to the other, starting from the left. The code example below shows how to use QHBoxLayout to arrange three buttons horizontally:
 1# h_layout.py
 2
 3"""Horizontal layout example."""
 4
 5import sys
 6
 7from PyQt6.QtWidgets import (
 8    QApplication,
 9    QHBoxLayout,
10    QPushButton,
11    QWidget,
12)
13
14app = QApplication([])
15window = QWidget()
16window.setWindowTitle("QHBoxLayout")
17
18layout = QHBoxLayout()
19layout.addWidget(QPushButton("Left"))
20layout.addWidget(QPushButton("Center"))
21layout.addWidget(QPushButton("Right"))
22window.setLayout(layout)
23
24window.show()
25sys.exit(app.exec())
Here’s how this example creates a horizontal layout of buttons:
- Line 18 creates a
QHBoxLayoutobject calledlayout. - Lines 19 to 21 add three buttons to
layoutby calling the.addWidget()method. - Line 22 sets
layoutas your window’s layout with.setLayout().
When you run python h_layout.py from your command line, you’ll get the following output:
The above figure shows three buttons in a horizontal arrangement. The buttons are shown from left to right in the same order as you added them in your code.
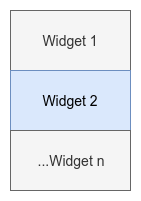
The next layout manager class is QVBoxLayout, which arranges widgets vertically from top to bottom, like in the following figure:
Each new widget will appear beneath the previous one. This layout allows you to to construct vertical layouts and organize your widgets from top to bottom on your GUI.
Here’s how you can create a QVBoxLayout object containing three buttons:
 1# v_layout.py
 2
 3"""Vertical layout example."""
 4
 5import sys
 6
 7from PyQt6.QtWidgets import (
 8    QApplication,
 9    QPushButton,
10    QVBoxLayout,
11    QWidget,
12)
13
14app = QApplication([])
15window = QWidget()
16window.setWindowTitle("QVBoxLayout")
17
18layout = QVBoxLayout()
19layout.addWidget(QPushButton("Top"))
20layout.addWidget(QPushButton("Center"))
21layout.addWidget(QPushButton("Bottom"))
22window.setLayout(layout)
23
24window.show()
25sys.exit(app.exec())
On line 18, you create an instance of QVBoxLayout called layout. In the next three lines, you add three buttons to layout. Finally, you use the layout object to arrange the widget in a vertical layout through the .setLayout() method on line 22.
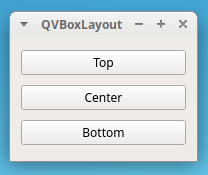
When you run this sample application, you’ll get a window that looks something like this:
This figure shows three buttons in a vertical arrangement, one below the other. The buttons appear in the same order as you added them to your code, from top to bottom.
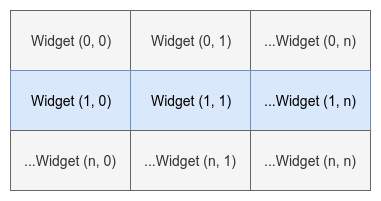
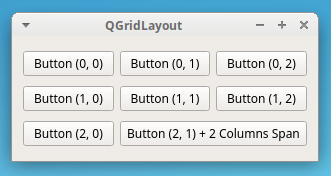
The third layout manager in your list is QGridLayout. This class arranges widgets in a grid of rows and columns. Every widget will have a relative position on the grid. You can define a widget’s position with a pair of coordinates like (row, column). Each coordinate must be an integer number. These pairs of coordinates define which cell on the grid a given widget will occupy.
The grid layout will look something like this:
QGridLayout takes the available space, divides it up into rows and columns, and puts each child widget into its own cell.
Here’s how to create a grid layout arrangement in your GUI:
 1# g_layout.py
 2
 3"""Grid layout example."""
 4
 5import sys
 6
 7from PyQt6.QtWidgets import (
 8    QApplication,
 9    QGridLayout,
10    QPushButton,
11    QWidget,
12)
13
14app = QApplication([])
15window = QWidget()
16window.setWindowTitle("QGridLayout")
17
18layout = QGridLayout()
19layout.addWidget(QPushButton("Button (0, 0)"), 0, 0)
20layout.addWidget(QPushButton("Button (0, 1)"), 0, 1)
21layout.addWidget(QPushButton("Button (0, 2)"), 0, 2)
22layout.addWidget(QPushButton("Button (1, 0)"), 1, 0)
23layout.addWidget(QPushButton("Button (1, 1)"), 1, 1)
24layout.addWidget(QPushButton("Button (1, 2)"), 1, 2)
25layout.addWidget(QPushButton("Button (2, 0)"), 2, 0)
26layout.addWidget(
27    QPushButton("Button (2, 1) + 2 Columns Span"), 2, 1, 1, 2
28)
29window.setLayout(layout)
30
31window.show()
32sys.exit(app.exec())
In this example, you create an application that uses a QGridLayout object to organize its widgets on the screen. Note that, in this case, the second and third arguments that you pass to .addWidget() are integer numbers defining each widget’s position on the grid.
On lines 26 to 28, you pass two more arguments to .addWidget(). These arguments are rowSpan and columnSpan, and they’re the fourth and fifth arguments passed to the function. You can use them to make a widget occupy more than one row or column, like you did in the example.
If you run this code from your command line, then you’ll get a window that looks something like this:
In this figure, you can see your widgets arranged in a grid of rows and columns. The last widget occupies two columns, as you specified on lines 26 to 28.
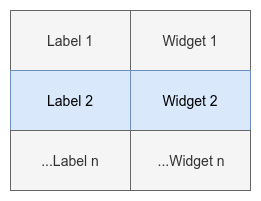
The last layout manager that you’ll learn about is QFormLayout. This class arranges widgets in a two-column layout. The first column usually displays messages in labels. The second column generally contains widgets like QLineEdit, QComboBox, QSpinBox, and so on. These allow the user to enter or edit data regarding the information in the first column.
The following diagram shows how form layouts work in practice:
The left column consists of labels, while the right column consists of input widgets. If you’re developing a database application, then this kind of layout can be a useful tool that’ll increase your productivity when creating input forms.
The following example shows how to create an application that uses a QFormLayout object to arrange its widgets:
 1# f_layout.py
 2
 3"""Form layout example."""
 4
 5import sys
 6
 7from PyQt6.QtWidgets import (
 8    QApplication,
 9    QFormLayout,
10    QLineEdit,
11    QWidget,
12)
13
14app = QApplication([])
15window = QWidget()
16window.setWindowTitle("QFormLayout")
17
18layout = QFormLayout()
19layout.addRow("Name:", QLineEdit())
20layout.addRow("Age:", QLineEdit())
21layout.addRow("Job:", QLineEdit())
22layout.addRow("Hobbies:", QLineEdit())
23window.setLayout(layout)
24
25window.show()
26sys.exit(app.exec())
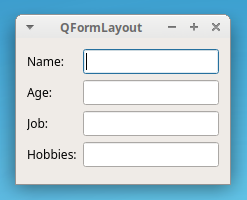
Lines 18 to 23 do the hard work in this example. QFormLayout has a convenient method called .addRow(). You can use this method to add a two-widget row to the layout. The first argument to .addRow() should be a label or a string. Then, the second argument can be any widget that allows the user to enter or edit data. In this specific example, you’ve used line edits.
If you run this code, then you’ll get a window that looks something like this:
The above figure shows a window that uses a form layout. The first column contains labels to ask the user for some information. The second column shows widgets that allow the user to enter or edit the required information.
Dialogs
With PyQt, you can develop two types of GUI desktop applications. Depending on the class that you use to create the main form or window, you’ll have one of the following:
- A main window–style application: The application’s main window inherits from
QMainWindow. - A dialog-style application: The application’s main window inherits from
QDialog.
You’ll start with dialog-style applications first. In the next section, you’ll learn about main window–style applications.
To develop a dialog-style application, you need to create a GUI class that inherits from QDialog, which is the base class of all dialog windows. A dialog window is a stand-alone window that you can use as the main window for your application.
A dialog is always an independent window. If a dialog has a parent, then it’ll display centered on top of the parent widget. Dialogs with a parent will share the parent’s task bar entry. If you don’t set parent for a given dialog, then the dialog will get its own entry in the system’s task bar.
Here’s an example of how you’d use QDialog to develop a dialog-style application:
 1# dialog.py
 2
 3"""Dialog-style application."""
 4
 5import sys
 6
 7from PyQt6.QtWidgets import (
 8    QApplication,
 9    QDialog,
10    QDialogButtonBox,
11    QFormLayout,
12    QLineEdit,
13    QVBoxLayout,
14)
15
16class Window(QDialog):
17    def __init__(self):
18        super().__init__(parent=None)
19        self.setWindowTitle("QDialog")
20        dialogLayout = QVBoxLayout()
21        formLayout = QFormLayout()
22        formLayout.addRow("Name:", QLineEdit())
23        formLayout.addRow("Age:", QLineEdit())
24        formLayout.addRow("Job:", QLineEdit())
25        formLayout.addRow("Hobbies:", QLineEdit())
26        dialogLayout.addLayout(formLayout)
27        buttons = QDialogButtonBox()
28        buttons.setStandardButtons(
29            QDialogButtonBox.StandardButton.Cancel
30            | QDialogButtonBox.StandardButton.Ok
31        )
32        dialogLayout.addWidget(buttons)
33        self.setLayout(dialogLayout)
34
35if __name__ == "__main__":
36    app = QApplication([])
37    window = Window()
38    window.show()
39    sys.exit(app.exec())
This application is a bit more elaborate. Here’s what this code does:
- Line 16 defines a
Windowclass for the app’s GUI by inheriting fromQDialog. - Line 18 calls the parent class’s
.__init__()method usingsuper(). This call allows you to properly initialize instances of this class. In this example, theparentargument is set toNonebecause this dialog will be your main window. - Line 19 sets the window’s title.
- Line 20 assigns a
QVBoxLayoutobject todialogLayout. - Line 21 assigns a
QFormLayoutobject toformLayout. - Lines 22 to 25 add widgets to
formLayout. - Line 26 calls
.addLayout()ondialogLayout. This call embeds the form layout into the global dialog layout. - Line 27 defines a button box, which provides a convenient space to display the dialog’s buttons.
- Lines 28 to 31 add two standard buttons,
OkandCancel, to the dialog. - Line 32 adds the button box to the dialog by calling
.addWidget().
The if __name__ == "__main__": construct wraps up the app’s main code. This kind of conditional statement is common in Python apps. It ensures that the indented code will only run if the containing file is executed as a program rather than imported as a module. For more about this construct, check out What Does if name == “main” Do in Python?.
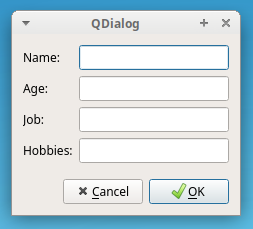
The above code example will show a window that looks something like this:
This figure shows the GUI that you’ve created using a QFormLayout object to arrange the widgets and a QVBoxLayout layout for the application’s global layout.
Main Windows
Most of the time, your GUI applications will be main window–style apps. This means that they’ll have a menu bar, some toolbars, a status bar, and a central widget that’ll be the GUI’s main element. It’s also common for your apps to have several dialogs to accomplish secondary actions that depend on a user’s input.
You’ll inherit from QMainWindow to develop main window–style applications. An instance of a class that derives from QMainWindow is considered the app’s main window and should be unique.
QMainWindow provides a framework for building your application’s GUI quickly. This class has its own built-in layout, which accepts the following graphical components:
| Component | Position on Window | Description |
|---|---|---|
| One menu bar | Top | Holds the application’s main menu |
| One or more toolbars | Sides | Hold tool buttons and other widgets, such as QComboBox, QSpinBox, and more |
| One central widget | Center | Holds the window’s central widget, which can be of any type, including a composite widget |
| One or more dock widgets | Around the central widget | Are small, movable, and hidable windows |
| One status bar | Bottom | Holds the app’s status bar, which shows status information |
You can’t create a main window without a central widget. You need a central widget even if it’s just a placeholder. When this is the case, you can use a QWidget object as your central widget.
You can set the window’s central widget with the .setCentralWidget() method. The main window’s layout will allow you to have only one central widget, but it can be a single or a composite widget. The following code example shows you how to use QMainWindow to create a main window–style application:
 1# main_window.py
 2
 3"""Main window-style application."""
 4
 5import sys
 6
 7from PyQt6.QtWidgets import (
 8    QApplication,
 9    QLabel,
10    QMainWindow,
11    QStatusBar,
12    QToolBar,
13)
14
15class Window(QMainWindow):
16    def __init__(self):
17        super().__init__(parent=None)
18        self.setWindowTitle("QMainWindow")
19        self.setCentralWidget(QLabel("I'm the Central Widget"))
20        self._createMenu()
21        self._createToolBar()
22        self._createStatusBar()
23
24    def _createMenu(self):
25        menu = self.menuBar().addMenu("&Menu")
26        menu.addAction("&Exit", self.close)
27
28    def _createToolBar(self):
29        tools = QToolBar()
30        tools.addAction("Exit", self.close)
31        self.addToolBar(tools)
32
33    def _createStatusBar(self):
34        status = QStatusBar()
35        status.showMessage("I'm the Status Bar")
36        self.setStatusBar(status)
37
38if __name__ == "__main__":
39    app = QApplication([])
40    window = Window()
41    window.show()
42    sys.exit(app.exec())
Here’s how this code works:
- Line 15 creates a class,
Window, that inherits fromQMainWindow. - Line 16 defines the class initializer.
- Line 17 calls the base class’s initializer. Again, the
parentargument is set toNonebecause this is your app’s main window, so it must not have a parent. - Line 18 sets the window’s title.
- Line 19 sets a
QLabelas the window’s central widget. - Lines 20 to 22 call non-public methods to create different GUI elements:
- Lines 24 to 26 create the main menubar with a drop-down menu called Menu. This menu will have a menu option to exit the app.
- Lines 28 to 31 create the toolbar, which will have a toolbar button to exit the app.
- Lines 33 to 36 create the app’s status bar.
When you implement GUI components using their own methods, like you did with the menu bar, toolbar, and status bar in this example, you’re making your code more readable and more maintainable.
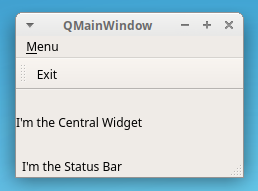
When you run the above sample application, you’ll get a window like the following:
As you can confirm, your main window–style application has the following components:
- One main menu generically called Menu
- One toolbar with an Exit tool button
- One central widget consisting of a
QLabelobject with a text message - One status bar at the window’s bottom
That’s it! You’ve learned how to build a main window–style application with Python and PyQt. Up to this point, you’ve learned about some of the more important graphical components in PyQt’s set of widgets. In the next few sections, you’ll study other important concepts related to building GUI applications with PyQt.
Applications
QApplication is the most foundational class that you’ll use when developing PyQt GUI applications. This class is the core component of any PyQt application. It manages the application’s control flow as well as its main settings.
In PyQt, any instance of QApplication is an application. Every PyQt GUI application must have one QApplication instance. Some of the responsibilities of this class include:
- Handling the app’s initialization and finalization
- Providing the event loop and event handling
- Handling most system-wide and application-wide settings
- Providing access to global information, such as the application’s directory, screen size, and so on
- Parsing common command-line arguments
- Defining the application’s look and feel
- Providing localization capabilities
These are just some of the core responsibilities of QApplication. So, this is a fundamental class when it comes to developing PyQt GUI applications.
One of the most important responsibilities of QApplication is to provide the event loop and the entire event handling mechanism. In the following section, you’ll take a closer look at what the event loop is and how it works.
Event Loops
GUI applications are event-driven. This means that functions and methods are called in response to user actions, like clicking on a button, selecting an item from a combo box, entering or updating the text in a text edit, pressing a key on the keyboard, and so on. These user actions are commonly known as events.
Events are handled by an event loop, also known as a main loop. An event loop is an infinite loop in which all events from the user, the window system, and any other sources are processed and dispatched. The event loop waits for an event to occur and then dispatches it to perform some task. The event loop continues to work until the application is terminated.
All GUI applications have an event loop. When an event happens, then the loop checks if it’s a terminate event. In that case, the loop finishes, and the application exits. Otherwise, the event is sent to the application’s event queue for further processing, and the loop iterates again. In PyQt6, you can run the app’s event loop by calling .exec() on the QApplication object.
For an event to trigger an action, you need to connect the event with the action that you want to execute. In PyQt, you can establish that connection with the signals and slots mechanism, which you’ll explore in the next section.
Signals and Slots
PyQt widgets act as event-catchers. This means that every widget can catch specific events, like mouse clicks, keypresses, and so on. In response to these events, a widget emits a signal, which is a kind of message that announces a change in its state.
The signal on its own doesn’t perform any action. If you want a signal to trigger an action, then you need to connect it to a slot. This is the function or method that’ll perform an action whenever its associated signal is emitted. You can use any Python callable as a slot.
If a signal is connected to a slot, then the slot is called whenever the signal is emitted. If a signal isn’t connected to any slot, then nothing happens and the signal is ignored. Some of the most relevant features of signals and slots include the following:
- A signal can be connected to one or many slots.
- A signal may also be connected to another signal.
- A slot may be connected to one or many signals.
You can use the following syntax to connect a signal and a slot:
widget.signal.connect(slot_function)
This will connect slot_function to widget.signal. From now on, whenever .signal is emitted, slot_function() will be called.
The code below shows how to use the signals and slots mechanism in a PyQt application:
 1# signals_slots.py
 2
 3"""Signals and slots example."""
 4
 5import sys
 6
 7from PyQt6.QtWidgets import (
 8    QApplication,
 9    QLabel,
10    QPushButton,
11    QVBoxLayout,
12    QWidget,
13)
14
15def greet():
16    if msgLabel.text():
17        msgLabel.setText("")
18    else:
19        msgLabel.setText("Hello, World!")
20
21app = QApplication([])
22window = QWidget()
23window.setWindowTitle("Signals and slots")
24layout = QVBoxLayout()
25
26button = QPushButton("Greet")
27button.clicked.connect(greet)
28
29layout.addWidget(button)
30msgLabel = QLabel("")
31layout.addWidget(msgLabel)
32window.setLayout(layout)
33window.show()
34sys.exit(app.exec())
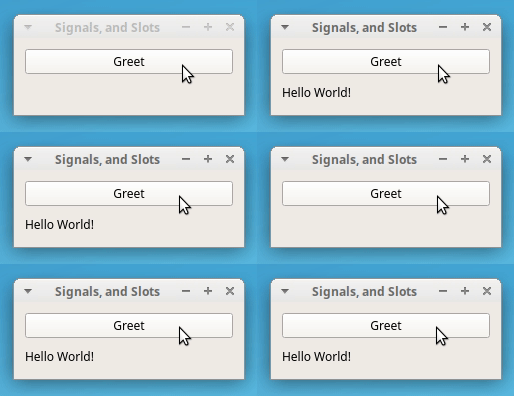
On line 15, you create greet(), which you’ll use as a slot. Then in line 27, you connect the button’s .clicked signal to greet(). This way, whenever the user clicks the Greet button, the greet() slot is called and the label object’s text alternates between Hello, World! and an empty string:
When you click the Greet button, the Hello, World! message appears and disappears on your application’s main window.
If your slot function needs to receive extra arguments, then you can pass them using functools.partial(). For example, you can modify greet() to take an argument, like in the following code:
# signals_slots.py
# ...

def greet(name):
    if msg.text():
        msg.setText("")
    else:
        msg.setText(f"Hello, {name}")

# ...
Now greet() needs to receive an argument called name. If you want to connect this new version of greet() to the .clicked signal, then you can do something like this:
# signals_slots.py

"""Signals and slots example."""

import sys
from functools import partial

# ...

button = QPushButton("Greet")
button.clicked.connect(partial(greet, "World!"))

# ...
For this code to work, you need to import partial() from functools first. The call to partial() returns a function object that behaves similarly to greet() when called with name="World!". Now, when the user clicks on the button, the message Hello, World! will appear in the label just like before.
The signals and slots mechanism is what you’ll use to give life to your PyQt GUI applications. This mechanism will allow you to turn user events into concrete actions. You can dive deeper into signals and slots by checking out the PyQt6 documentation on the topic.
Now you know the basics of several important concepts of PyQt. With this knowledge and the library’s documentation at hand, you’re ready to start developing your own GUI applications. In the next section, you’ll build your first fully functional GUI application.
Creating a Calculator App With Python and PyQt
In this section, you’ll develop a calculator GUI app using the Model-View-Controller (MVC) design pattern. This pattern has three layers of code, with each one having different roles:
-
The model takes care of your app’s business logic. It contains the core functionality and data. In your calculator app, the model will handle the input values and the calculations.
-
The view implements your app’s GUI. It hosts all the widgets that the end user would need to interact with the application. The view also receives a user’s actions and events. For your example, the view will be the calculator window on your screen.
-
The controller connects the model and the view to make the application work. Users’ events, or requests, are sent to the controller, which puts the model to work. When the model delivers the requested result, or data, in the right format, the controller forwards it to the view. In your calculator app, the controller will receive the target math expressions from the GUI, ask the model to perform calculations, and update the GUI with the result.
Here’s a step-by-step description of how your GUI calculator app will work:
- The user performs an action or request (event) on the view (GUI).
- The view notifies the controller about the user’s action.
- The controller gets the user’s request and queries the model for a response.
- The model processes the controller’s query, performs the required computations, and returns the result.
- The controller receives the model’s response and updates the view accordingly.
- The user finally sees the requested result on the view.
You’ll use this MVC design to build your calculator app with Python and PyQt.
Creating the Skeleton for Your PyQt Calculator App
To kick things off, you’ll start by implementing a minimal skeleton for your application in a file called pycalc.py. You can get this file and the rest of the source code for your calculator app by clicking the link below:
If you’d prefer to code the project on your own, then go ahead and create pycalc.py in your current working directory. Open the file in your favorite code editor or IDE and type the following code:
 1# pycalc.py
 2
 3"""PyCalc is a simple calculator built with Python and PyQt."""
 4
 5import sys
 6
 7from PyQt6.QtWidgets import QApplication, QMainWindow, QWidget
 8
 9WINDOW_SIZE = 235
10
11class PyCalcWindow(QMainWindow):
12    """PyCalc's main window (GUI or view)."""
13
14    def __init__(self):
15        super().__init__()
16        self.setWindowTitle("PyCalc")
17        self.setFixedSize(WINDOW_SIZE, WINDOW_SIZE)
18        centralWidget = QWidget(self)
19        self.setCentralWidget(centralWidget)
20
21def main():
22    """PyCalc's main function."""
23    pycalcApp = QApplication([])
24    pycalcWindow = PyCalcWindow()
25    pycalcWindow.show()
26    sys.exit(pycalcApp.exec())
27
28if __name__ == "__main__":
29    main()
This script implements all the boilerplate code that you’ll need to run a basic GUI application. You’ll use this skeleton to build your calculator app.
Here’s how this code works:
-
Line 5 imports
sys. This module provides theexit()function, which you’ll use to cleanly terminate the app. -
Line 7 imports the required classes from
PyQt6.QtWidgets. -
Line 9 creates a Python constant to hold a fixed window size in pixels for your calculator app.
-
Line 11 creates the
PyCalcWindowclass to provide the app’s GUI. Note that this class inherits fromQMainWindow. -
Line 14 defines the class initializer.
-
Line 15 calls
.__init__()on the super class for initialization purposes. -
Line 16 sets the window’s title to
"PyCalc". -
Line 17 uses
.setFixedSize()to give the window a fixed size. This ensures that the user won’t be able to resize the window during the app’s execution. -
Lines 18 and 19 create a
QWidgetobject and set it as the window’s central widget. This object will be the parent of all the required GUI components in your calculator app. -
Line 21 defines your calculator’s main function. Having a
main()function like this is a best practice in Python. This function provides the application’s entry point. Insidemain(), your program does the following:- Line 23 creates a
QApplicationobject namedpycalcApp. - Line 24 creates an instance of the app’s window,
pycalcWindow. - Line 25 shows the GUI by calling
.show()on the window object. - Line 26 runs the application’s event loop with
.exec().
- Line 23 creates a
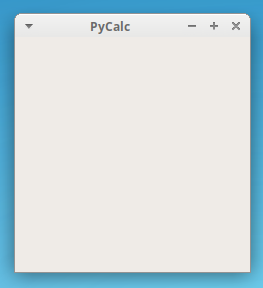
Finally, line 29 calls main() to execute your calculator app. When you run the above script, the following window appears on your screen:
That’s it! You’ve successfully built a fully functional app skeleton for your GUI calculator app. Now you’re ready to continue building the project.
Completing the App’s View
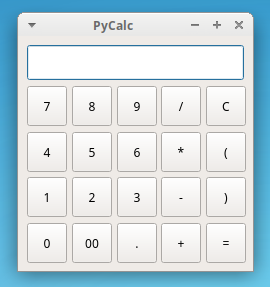
The GUI that you have at this point doesn’t really look like a calculator. You need to finish this GUI by adding a display to show the target math operation and a keyboard of buttons representing numbers and basic math operators. You’ll also add buttons representing other required symbols and actions, like clearing the display.
First, you need to update your imports like in the code below:
# pycalc.py

import sys

from PyQt6.QtCore import Qt
from PyQt6.QtWidgets import (
    QApplication,
    QGridLayout,
    QLineEdit,
    QMainWindow,
    QPushButton,
    QVBoxLayout,
    QWidget,
)

# ...
You’ll use a QVBoxLayout layout manager for the calculator’s global layout. To arrange the buttons, you’ll use a QGridLayout object. The QLineEdit class will work as the calculator’s display and QPushButton will provide the required buttons.
Now you can update the initializer for PyCalcWindow:
# pycalc.py
# ...

class PyCalcWindow(QMainWindow):
    """PyCalc's main window (GUI or view)."""

    def __init__(self):
        super().__init__()
        self.setWindowTitle("PyCalc")
        self.setFixedSize(WINDOW_SIZE, WINDOW_SIZE)
        self.generalLayout = QVBoxLayout()
        centralWidget = QWidget(self)
        centralWidget.setLayout(self.generalLayout)
        self.setCentralWidget(centralWidget)
        self._createDisplay()
        self._createButtons()

# ...
You’ve added the highlighted lines of code. You’ll use .generalLayout as the app’s general layout. In this layout, you’ll place the display at the top and the keyboard buttons in a grid layout at the bottom.
The calls to ._createDisplay() and ._createButtons() won’t work at this point, because you haven’t implemented those methods yet. To fix this issue, you’ll start by coding ._createDisplay().
Get back to your code editor and update pycalc.py like in the following code:
# pycalc.py
# ...

WINDOW_SIZE = 235
DISPLAY_HEIGHT = 35

class PyCalcWindow(QMainWindow):
    # ...

    def _createDisplay(self):
        self.display = QLineEdit()
        self.display.setFixedHeight(DISPLAY_HEIGHT)
        self.display.setAlignment(Qt.AlignmentFlag.AlignRight)
        self.display.setReadOnly(True)
        self.generalLayout.addWidget(self.display)

# ...
In this code snippet, you first define a new constant to hold the display height in pixels. Then you define ._createDisplay() inside PyCalcWindow.
To create the calculator’s display, you use a QLineEdit widget. Then you set a fixed height of thirty-five pixels for your display using the DISPLAY_HEIGHT constant. The display will have its text left-aligned. Finally, the display will be read-only to prevent direct editing by the user. The last line of code adds the display to the calculator’s general layout.
Next up, you’ll implement the ._createButtons() method to create the required buttons for your calculator’s keyboard. These buttons will live in a grid layout, so you need a way to represent their coordinates on the grid. Each coordinate pair will consist of a row and a column. To represent a coordinate pair, you’ll use a list of lists. Each nested list will represent a row.
Now go ahead and update the pycalc.py file with the following code:
# pycalc.py
# ...

WINDOW_SIZE = 235
DISPLAY_HEIGHT = 35
BUTTON_SIZE = 40

# ...
In this piece of code, you define a new constant called BUTTON_SIZE. You’ll use this constant to provide the size of your calculator’s buttons. In this specific example, all the buttons will have a square shape with forty pixels per side.
With this initial setup, you can code the ._createButtons() method. You’ll use a list of lists to hold the keys or buttons and their position on the calculator keyboard. A QGridLayout will allow you to arrange the buttons on the calculator’s window:
# pycalc.py
# ...

class PyCalcWindow(QMainWindow):
    # ...

    def _createButtons(self):
        self.buttonMap = {}
        buttonsLayout = QGridLayout()
        keyBoard = [
            ["7", "8", "9", "/", "C"],
            ["4", "5", "6", "*", "("],
            ["1", "2", "3", "-", ")"],
            ["0", "00", ".", "+", "="],
        ]

        for row, keys in enumerate(keyBoard):
            for col, key in enumerate(keys):
                self.buttonMap[key] = QPushButton(key)
                self.buttonMap[key].setFixedSize(BUTTON_SIZE, BUTTON_SIZE)
                buttonsLayout.addWidget(self.buttonMap[key], row, col)

        self.generalLayout.addLayout(buttonsLayout)

# ...
You first create the empty dictionary self.buttonMap to hold the calculator buttons. Then, you create a list of lists to store the key labels. Each row or nested list will represent a row in the grid layout, while the index of each key label will represent the corresponding column on the layout.
Then you define two for loops. The outer loop iterates over the rows and the inner loop iterates over the columns. Inside the inner loop, you create the buttons and add them to both self.buttonMap and buttonsLayout. Every button will have a fixed size of 40x40 pixels, which you set with .setFixedSize() and the BUTTON_SIZE constant.
Finally, you embed the grid layout into the calculator’s general layout by calling .addLayout() on the .generalLayout object.
Now your calculator’s GUI will show the display and the buttons gracefully. However, you have no way to update the information shown on the display. You’ll fix this by adding a few extra methods to PyCalcWindow:
| Method | Description |
|---|---|
.setDisplayText() |
Sets and updates the display’s text |
.displayText() |
Gets the current display’s text |
.clearDisplay() |
Clears the display’s text |
These methods will provides the GUI’s public interface and complete the view class for your Python calculator app.
Here’s a possible implementation:
# pycalc.py
# ...

class PyCalcWindow(QMainWindow):
    # ...

    def setDisplayText(self, text):
        """Set the display's text."""
        self.display.setText(text)
        self.display.setFocus()

    def displayText(self):
        """Get the display's text."""
        return self.display.text()

    def clearDisplay(self):
        """Clear the display."""
        self.setDisplayText("")

# ...
Here’s a breakdown of what each method does:
-
.setDisplayText()uses.setText()to set and update the display’s text. It also uses.setFocus()to set the cursor’s focus on the display. -
.displayText()is a getter method that returns the display’s current text. When the user clicks the equal sign (=) on the calculator’s keyboard, the app will use the return value of.displayText()as the math expression to be evaluated. -
.clearDisplay()sets the display’s text to an empty string ("") so that the user can introduce a new math expression. This method will be triggered every time the user presses the C button on the calculator’s board.
Now your calculator’s GUI is ready for use! When you run the application, you’ll get a window like the following:
You’ve completed the calculator’s GUI, which looks pretty sleek! However, if you try to do some calculations, then the calculator won’t respond as expected. That’s because you haven’t implemented the model and the controller components. In the next section, you’ll write the calculator’s model.
Implementing the Calculator’s Model
In the MVC pattern, the model is the layer of code that takes care of the business logic. In your calculator app, the business logic is all about basic math calculations. So, your model will evaluate the math expressions that your users introduced in the calculator’s GUI.
The calculator’s model also needs to handle errors. To this end, you’ll define the following global constant:
# pycalc.py
# ...

ERROR_MSG = "ERROR"
WINDOW_SIZE = 235
# ...
This ERROR_MSG constant is the message that the user will see on the calculator’s display if they introduce an invalid math expression.
With the above change, you’re ready to code your app’s model, which will be a single function in this example:
# pycalc.py
# ...

class PyCalcWindow(QMainWindow):
    # ...

def evaluateExpression(expression):
    """Evaluate an expression (Model)."""
    try:
        result = str(eval(expression, {}, {}))
    except Exception:
        result = ERROR_MSG
    return result

# ...
In evaluateExpression(), you use eval() to evaluate a math expression that comes as a string. If the evaluation is successful, then you return result. Otherwise, you return the predefined error message. Note that this function isn’t perfect. It has a couple of important issues:
- The
try…exceptblock doesn’t catch a specific exception, so it’s using a practice that’s discouraged in Python. - The function uses
eval(), which can lead to some serious security issues.
You’re free to rework the function to make it more reliable and secure. In this tutorial, you’ll use the function as is to keep the focus on implementing the GUI.
Creating the Controller Class for Your Calculator
In this section, you’re going to code the calculator’s controller class. This class will connect the view to the model that you just coded. You’ll use the controller class to make the calculator perform actions in response to user events.
Your controller class needs to perform three main tasks:
- Access the GUI’s public interface.
- Handle the creation of math expressions.
- Connect all the buttons’
.clickedsignals with the appropriate slots.
To perform all these actions, you’ll code a new PyCalc class in a moment. Go ahead and update pycalc.py with the following code:
# pytcalc.py

import sys
from functools import partial
# ...

def evaluateExpression(expression):
    # ...

class PyCalc:
    """PyCalc's controller class."""

    def __init__(self, model, view):
        self._evaluate = model
        self._view = view
        self._connectSignalsAndSlots()

    def _calculateResult(self):
        result = self._evaluate(expression=self._view.displayText())
        self._view.setDisplayText(result)

    def _buildExpression(self, subExpression):
        if self._view.displayText() == ERROR_MSG:
            self._view.clearDisplay()
        expression = self._view.displayText() + subExpression
        self._view.setDisplayText(expression)

    def _connectSignalsAndSlots(self):
        for keySymbol, button in self._view.buttonMap.items():
            if keySymbol not in {"=", "C"}:
                button.clicked.connect(
                    partial(self._buildExpression, keySymbol)
                )
        self._view.buttonMap["="].clicked.connect(self._calculateResult)
        self._view.display.returnPressed.connect(self._calculateResult)
        self._view.buttonMap["C"].clicked.connect(self._view.clearDisplay)

# ...
At the top of pycalc.py, you import partial() from functools. You’ll use this function to connect signals with methods that need to take extra arguments.
Inside PyCalc, you define the class initializer, which takes two arguments: the app’s model and its view. Then you store these arguments in appropriate instance attributes. Finally, you call ._connectSignalsAndSlots() to make all the required connections of signals and slots.
In ._calculateResult(), you use ._evaluate() to evaluate the math expression that the user has just typed into the calculator’s display. Then you call .setDisplayText() on the calculator’s view to update the display text with the computation result.
As its name suggests, the ._buildExpression() method takes care of building the target math expression. To do this, the method concatenates the initial display value with every new value that the user enters on the calculator’s keyboard.
Finally, the ._connectSignalsAndSlots() method connects all the buttons’ .clicked signals with the appropriate slots method in the controller class.
That’s it! Your controller class is ready. However, for all this code to work as a real calculator, you need to update the app’s main() function like in the code below:
# pytcalc.py
# ...

def main():
    """PyCalc's main function."""
    pycalcApp = QApplication([])
    pycalcWindow = PyCalcWindow()
    pycalcWindow.show()
    PyCalc(model=evaluateExpression, view=pycalcWindow)
    sys.exit(pycalcApp.exec())
This piece of code creates a new instance of PyCalc. The model argument to the PyCalc class constructor holds a reference to the evaluateExpression() function, while the view argument holds a reference to the pycalcWindow object, which provides the app’s GUI. Now your PyQt calculator application is ready to run.
Running the Calculator
Now that you’ve finished writing your calculator app with Python and PyQt, it’s time for a live test! If you run the application from your command line, then you’ll get something like this:
To use PyCalc, enter a valid math expression with your mouse. Then, press Enter or click the equal sign (=) button to compute and show the expression result on the calculator’s display. That’s it! You’ve developed your first fully functional GUI desktop application with Python and PyQt!
Additional Tools
PyQt6 offers a useful set of additional tools that can help you build solid, modern, and full-featured GUI applications. Some of the most remarkable tools related to PyQt include Qt Designer and the internationalization kit.
Qt Designer allows you to design and build graphical user interfaces using a drag-and-drop interface. You can use this tool to design widgets, dialogs, and main windows by using on-screen forms and a drag-and-drop mechanism. The following animation shows some of Qt Designer’s features:
Qt Designer uses XML .ui files to store your GUI designs. PyQt includes a module called uic to help with .ui files. You can also convert the .ui file content into Python code with a command-line tool called pyuic6.
PyQt6 also provides a comprehensive set of tools for the internationalization of apps into local languages. The pylupdate6 command-line tool creates and updates translation (.ts) files, which can contain translations of interface strings. If you prefer GUI tools, then you can use Qt Linguist to create and update .ts files with translations of interface strings.
Conclusion
Graphical user interface (GUI) applications still hold a substantial share of the software development market. Python offers a handful of frameworks and libraries that can help you develop modern and robust GUI applications.
In this tutorial, you learned how to use PyQt, which is one of the most popular and solid libraries for GUI application development in Python. Now you know how to effectively use PyQt to build modern GUI applications.
In this tutorial, you’ve learned how to:
- Build graphical user interfaces with Python and PyQt
- Connect the user’s events with the app’s logic
- Organize a PyQt application using a proper project layout
- Create a real-world GUI application with PyQt
Now you can use your Python and PyQt knowledge to give life to your own desktop GUI applications. Isn’t that cool?
You can get the source code of your calculator app project and all its associated resources by clicking the link below:
Further Reading
To dive deeper into PyQt and its ecosystem, check out some of the following resources:
- PyQt6’s documentation
- PyQt5’s documentation
- PyQt4’s documentation
- Qt v6’s documentation
- The PyQt wiki
- The Rapid GUI Programming with Python and Qt book
- The Qt Designer manual
- Qt for Python’s documentation
Although the PyQt6 Documentation is the first resource listed here, some important parts of it are still missing or incomplete. Fortunately, you can use the Qt documentation to fill in the blanks.
Tkinter is a Python Package for creating GUI applications. Python has a lot of GUI frameworks, but Tkinter is the only framework that’s built into the Python standard library. Tkinter has several strengths; it’s cross-platform, so the same code works on Windows, macOS, and Linux. Tkinter is lightweight and relatively painless to use compared to other frameworks. This makes it a compelling choice for building GUI applications in Python, especially for applications where a modern shine is unnecessary, and the top priority is to build something that’s functional and cross-platform quickly.
Here are some common use cases for Tkinter in more detail:
- Creating windows and dialog boxes: Tkinter can be used to create windows and dialog boxes that allow users to interact with your program. These can be used to display information, gather input, or present options to the user. To create a window or dialog box, you can use the Tk() function to create a root window, and then use functions like Label, Button, and Entry to add widgets to the window.
- Building a GUI for a desktop application: Tkinter can be used to create the interface for a desktop application, including buttons, menus, and other interactive elements. To build a GUI for a desktop application, you can use functions like Menu, Checkbutton, and RadioButton to create menus and interactive elements, and use layout managers like pack and grid to arrange the widgets on the window.
- Adding a GUI to a command-line program: Tkinter can be used to add a GUI to a command-line program, making it easier for users to interact with the program and input arguments. To add a GUI to a command-line program, you can use functions like Entry and Button to create input fields and buttons, and use event handlers like command and bind to handle user input.
- Creating custom widgets: Tkinter includes a variety of built-in widgets, such as buttons, labels, and text boxes, but it also allows you to create your own custom widgets. To create a custom widget, you can define a class that inherits from the Widget class and overrides its methods to define the behavior and appearance of the widget.
- Prototyping a GUI: Tkinter can be used to quickly prototype a GUI, allowing you to test and iterate on different design ideas before committing to a final implementation. To prototype a GUI with Tkinter, you can use the Tk() function to create a root window, and then use functions like Label, Button, and Entry to add widgets to the window and test different layout and design ideas.
Tkinter Alternatives
There are a number of libraries that are similar to Tkinter and can be used for creating graphical user interfaces (GUIs) in Python. Some examples include:
- PyQt: PyQt is a library that allows you to create GUI applications using the Qt framework. It is a comprehensive library with a large number of widgets and features.
- wxPython: wxPython is a library that allows you to create GUI applications using the wxWidgets framework. It includes a wide range of widgets and is cross-platform, meaning it can run on multiple operating systems.
- PyGTK: PyGTK is a library that allows you to create GUI applications using the GTK+ framework. It is a cross-platform library with a wide range of widgets and features.
- Kivy: Kivy is a library that allows you to create GUI applications using a modern, responsive design. It is particularly well-suited for building mobile apps and games.
- PyForms: PyForms is a library that allows you to create GUI applications using a simple, declarative syntax. It is designed to be easy to use and has a small footprint.
In summary, there are several libraries available for creating GUI applications in Python, each with its own set of features and capabilities. Tkinter is a popular choice, but you may want to consider other options depending on your specific needs and requirements.
To understand Tkinter better, we will create a simple GUI.
Getting Started
1. Import tkinter package and all of its modules.
2. Create a root window. Give the root window a title(using title()) and dimension(using geometry()). All other widgets will be inside the root window.
3. Use mainloop() to call the endless loop of the window. If you forget to call this nothing will appear to the user. The window will wait for any user interaction till we close it.
Example:
Python3
from tkinter import *
root = Tk()
root.title("Welcome to GeekForGeeks")
root.geometry('350x200')
root.mainloop()
Output:
Root Window
4. We’ll add a label using the Label Class and change its text configuration as desired. The grid() function is a geometry manager which keeps the label in the desired location inside the window. If no parameters are mentioned by default it will place it in the empty cell; that is 0,0 as that is the first location.
Example:
Python3
from tkinter import *
root = Tk()
root.title("Welcome to GeekForGeeks")
root.geometry('350x200')
lbl = Label(root, text = "Are you a Geek?")
lbl.grid()
root.mainloop()
Output:
Label inside root window
5. Now add a button to the root window. Changing the button configurations gives us a lot of options. In this example we will make the button display a text once it is clicked and also change the color of the text inside the button.
Example:
Python3
from tkinter import *
root = Tk()
root.title("Welcome to GeekForGeeks")
root.geometry('350x200')
lbl = Label(root, text = "Are you a Geek?")
lbl.grid()
def clicked():
lbl.configure(text = "I just got clicked")
btn = Button(root, text = "Click me" ,
fg = "red", command=clicked)
btn.grid(column=1, row=0)
root.mainloop()
Output:
Button added
After clicking “Click me”
6. Using the Entry() class we will create a text box for user input. To display the user input text, we’ll make changes to the function clicked(). We can get the user entered text using the get() function. When the Button after entering of the text, a default text concatenated with the user text. Also change button grid location to column 2 as Entry() will be column 1.
Example:
Python3
from tkinter import *
root = Tk()
root.title("Welcome to GeekForGeeks")
root.geometry('350x200')
lbl = Label(root, text = "Are you a Geek?")
lbl.grid()
txt = Entry(root, width=10)
txt.grid(column =1, row =0)
def clicked():
res = "You wrote" + txt.get()
lbl.configure(text = res)
btn = Button(root, text = "Click me" ,
fg = "red", command=clicked)
btn.grid(column=2, row=0)
root.mainloop()
Output:
Entry Widget at column 2 row 0
Displaying user input text.
7. To add a menu bar, you can use Menu class. First, we create a menu, then we add our first label, and finally, we assign the menu to our window. We can add menu items under any menu by using add_cascade().
Example:
Python3
from tkinter import *
root = Tk()
root.title("Welcome to GeekForGeeks")
root.geometry('350x200')
menu = Menu(root)
item = Menu(menu)
item.add_command(label='New')
menu.add_cascade(label='File', menu=item)
root.config(menu=menu)
lbl = Label(root, text = "Are you a Geek?")
lbl.grid()
txt = Entry(root, width=10)
txt.grid(column =1, row =0)
def clicked():
res = "You wrote" + txt.get()
lbl.configure(text = res)
btn = Button(root, text = "Click me" ,
fg = "red", command=clicked)
btn.grid(column=2, row=0)
root.mainloop()
Output :
Menu bar
This simple GUI covers the basics of Tkinter package. Similarly, you can add more widgets and change their configurations as desired.
Widgets
Tkinter provides various controls, such as buttons, labels and text boxes used in a GUI application. These controls are commonly called Widgets. The list of commonly used Widgets are mentioned below –
| S No. | Widget | Description |
| 1 | Label | The Label widget is used to provide a single-line caption for other widgets. It can also contain images. |
| 2 | Button | The Button widget is used to display buttons in your application. |
| 3 | Entry | The Entry widget is used to display a single-line text field for accepting values from a user. |
| 4 | Menu | The Menu widget is used to provide various commands to a user. These commands are contained inside Menubutton. |
| 5 | Canvas | The Canvas widget is used to draw shapes, such as lines, ovals, polygons and rectangles, in your application. |
| 6 | Checkbutton | The Checkbutton widget is used to display a number of options as checkboxes. The user can select multiple options at a time. |
| 7 | Frame | The Frame widget is used as a container widget to organize other widgets. |
| 8 | Listbox | The Listbox widget is used to provide a list of options to a user. |
| 9 | Menubutton | The Menubutton widget is used to display menus in your application. |
| 10 | Message | The Message widget is used to display multiline text fields for accepting values from a user. |
| 11 | Radiobutton | The Radiobutton widget is used to display a number of options as radio buttons. The user can select only one option at a time. |
| 12 | Scale | The Scale widget is used to provide a slider widget. |
| 13 | Scrollbar | The Scrollbar widget is used to add scrolling capability to various widgets, such as list boxes. |
| 14 | Text | The Text widget is used to display text in multiple lines. |
| 15 | Toplevel | The Toplevel widget is used to provide a separate window container. |
| 16 | LabelFrame | A labelframe is a simple container widget. Its primary purpose is to act as a spacer or container for complex window layouts. |
| 17 | tkMessageBox | This module is used to display message boxes in your applications. |
| 18 | Spinbox | The Spinbox widget is a variant of the standard Tkinter Entry widget, which can be used to select from a fixed number of values. |
| 19 | PanedWindow | A PanedWindow is a container widget that may contain any number of panes, arranged horizontally or vertically. |
Geometry Management
All Tkinter widgets have access to specific geometry management methods, which have the purpose of organizing widgets throughout the parent widget area. Tkinter exposes the following geometry manager classes: pack, grid, and place. Their description is mentioned below –
| S No. | Widget | Description |
| 1 | pack() | This geometry manager organizes widgets in blocks before placing them in the parent widget. |
| 2 | grid() | This geometry manager organizes widgets in a table-like structure in the parent widget. |
| 3 | place() | This geometry manager organizes widgets by placing them in a specific position in the parent widget. |


