Для включения RDP в Powershell нет готовых команд, но мы можем включить эту возможность помощью редактирование параметров реестра.
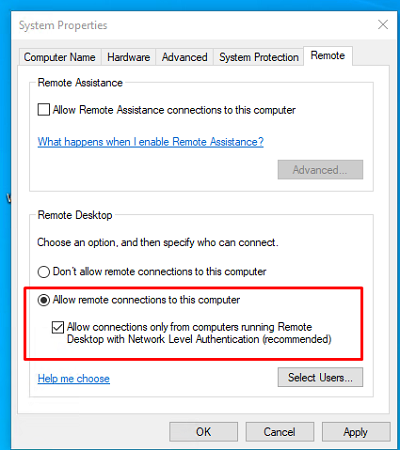
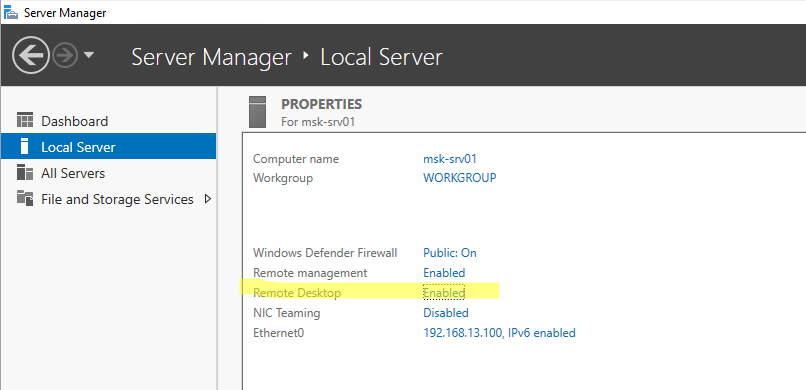
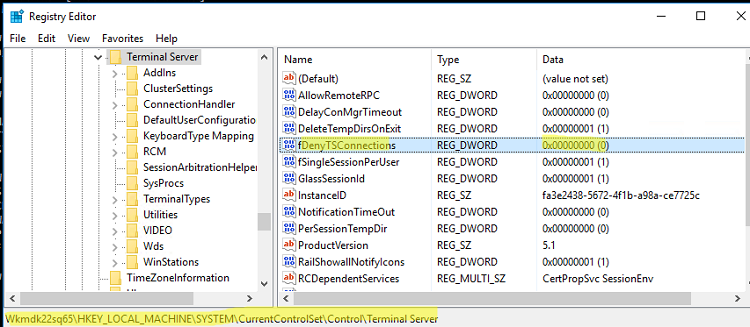
Свойства, которые мы будем редактировать выделены на скриншоте ниже:
Если вы хотите включить терминальные сеанс RDP на компьютере на котором в данный момент работаете нужно сделать следующее:
Set-ItemProperty -Path 'HKLM:SystemCurrentControlSetControlTerminal Server' -name "fDenyTSConnections" -Value 0Конечно консоль должна быть запущена от имени администратора либо под ним вы должны быть залогинены. Если вы измените значение на Value на 1, то мы отключим возможность RDP подключения.
Если мы хотим снять галку с «Allow connections only from computers running Remote Desktop with Network Level Authentication» подойдет следующий командлет:
Set-ItemProperty -Path 'HKLM:SystemCurrentControlSetControlTerminal ServerWinStationsRDP-Tcp' -name UserAuthentication -Value 0Возможно вы захотите сделать эту процедуру удаленно. Этот вопрос уже рассматривался в статье как выполнять команды Powershell удаленно и если вы столкнетесь с ошибками, то я бы советовал ее прочитать.
Рассмотрим пример удаленного выполнения команды в условиях где оба компьютера участники AD. Для этого нам нужно использовать имена компьютеров, а не IP. Если вы будете использовать IP, то смените проверку подлинности с Kerberos на NTLM и это потребует других настроек.
Для удаленного включения RDP в Powershell потребуется такая последовательность команд:
# Включения сервиса удаленного подключения в Powershell
Enable-PSRemoting
# Имена одного или нескольких компьютеров, на котором будет выполнена команда
$computer_name = 'AD1','AD2'
# Выполнение удаленной команды в сессии
Invoke-Command -ComputerName $computer_name -ScriptBlock {Set-ItemProperty -Path 'HKLM:SystemCurrentControlSetControlTerminal Server'-name "fDenyTSConnections" -Value 0}
В моем случае я выполнял команду от имени администратора обоих компьютеров, поэтому мне не нужно было вводить учетные данные. Если вы хотите выполнить команду от другого пользователя добавьте ключ со значением -Credential (Get-Credential) после переменной $computer_name, у вас запросят учетные данные.
После этого вам может понадобиться включить правило на фаерволе:
Enable-NetFirewallRule -DisplayGroup 'Remote Desktop'Если этого правила нет, можно создать:
# Powershell
New-NetFirewallRule -DisplayName 'allow RemoteDesktop' -Profile @('Domain', 'Private') -Direction Inbound -Action Allow -Protocol TCP -LocalPort @('3389')
# или netsh
netsh advfirewall firewall add rule name="allow RemoteDesktop" dir=in protocol=TCP localport=3389 action=allow
Ну и проверим, что порт открыт и работает:
Test-NetConnection -ComputerName 'AD1' -CommonTCPPort rdpЕсли пользователь не принадлежит к группе Администраторов компьютера, то может понадобиться его добавить в соответствующую группу:
Add-LocalGroupMember -Group "Remote Desktop Users" -Member 'Misha'Включение RDP в Powershell используя WMI
Так как мы можем работать с объектами WMI в Powershell, то можем включить настройки и таким способом. Если так мы можем увидеть состояние настройки на удаленном компьютере:
# Имя компьютера
$computer_name = 'AD1'
# Настройка powershell rdp sessions
Get-WmiObject -Class Win32_TerminalServiceSetting -Namespace rootCIMV2TerminalServices -Computer $computer_name -Authentication 6
То таким образом включим:
# Имя компьютера
$computer_name = 'AD1'
(Get-WmiObject -Class Win32_TerminalServiceSetting -Namespace rootCIMV2TerminalServices -Computer $computer_name -Authentication 6).SetAllowTSConnections(1,1)
Так как WMI использует другие порты, может потребоваться дополнительная настройка из статьи выше.
…
Теги:
#powershell
Протокол Remote Desktop Protocol (RDP) позволяет удаленно подключиться к рабочему столу компьютера с Windows и работать с ним, как будто это ваш локальный компьютер. По умолчанию RDP доступ в Windows запрещен. В этой статье, мы покажем, как включить и настроить RDP доступ в Windows 10 и Windows Server 2016/2019.
Содержание:
- Включаем удаленный рабочий стол в Windows 10
- Как включить RDP доступ с помощью PowerShell?
- RDP доступ к Windows Server 2016/2019
- Включение RDP с групповых политик в домене Active Direcrtory
- Как удаленно включить RDP на компьютере Windows?
Включаем удаленный рабочий стол в Windows 10
Самый простой способ включить RDP доступ в Windows – воспользоваться графическим интерфейсом.
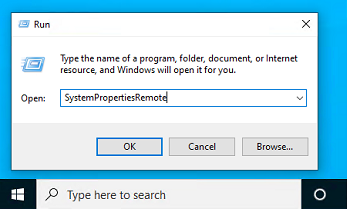
Откройте свойства системы через панель управления, или выполнив команду SystemPropertiesRemote.
Перейдите на вкладку Remote Settings (Удаленный доступ), включите опцию Allow remote connection to this computer (Разрешить удалённые подключения к этому компьютеру).
В целях безопасности желательно разрешить подключение только с клиентов RDP с поддержкой протокола NLA (Allow connections only from computers running Remote Desktop with Network Level Authentication/ Разрешить подключение только с компьютеров, на которых работает удаленный рабочий стол с проверкой подлинности на уровне сети).
Сохраните изменения, нажав ОК.
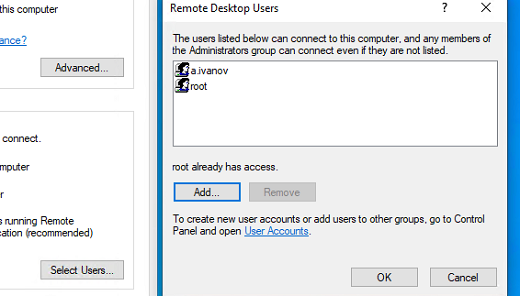
По умолчанию право на подключение к компьютеру через RDP есть только у членов группы локальных администраторов. Если вам нужно разрешить RDP доступ другим пользователям, нажмите кнопку Select Users.
Все пользователи, которых вы укажете здесь будет добавлены в локальную группу Remote Desktop Users. Вы можете в командной строке вывести список пользователей в этой группе:
net localgroup "Remote Desktop Users"
или
net localgroup “Пользователи удаленного рабочего стола”
Чтобы добавить нового пользователя в группу доступа RDP, выполните:
net localgroup "Remote Desktop Users" /add publicuser
В русской версии Windows измените название группы на “Пользователи удаленного рабочего стола”.
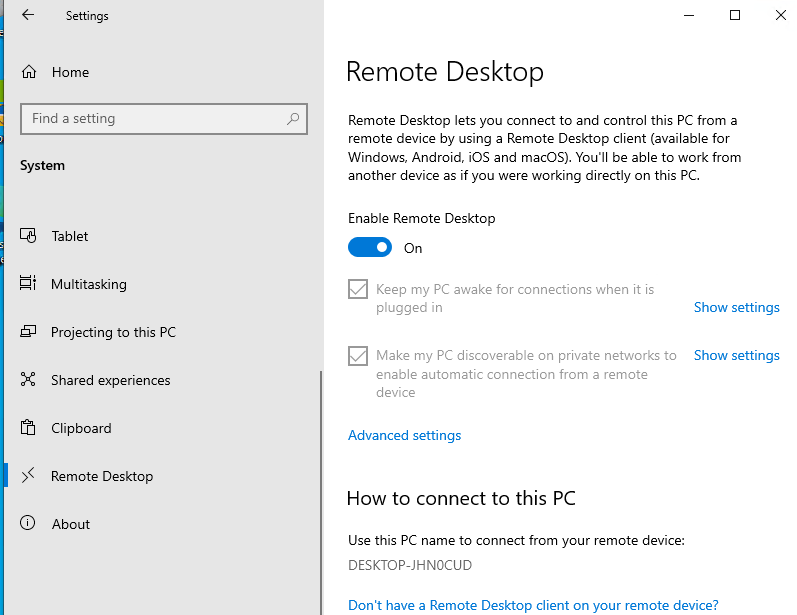
В новых билдах Windows 10 классическая панель для включения RDP доступа теперь спрятана и Microsoft рекомендует пользоваться новой панелью Setting.
- Перейдите в Settings -> System —> Remote Desktop;
- Включите опцию Enable Remote Desktop;
- Подтвердите включение RDP на компьютере.
Обратите внимание, что вы не можете включить RDP доступ к редакции Windows 10 Home. RDP сервер работает только на Windows 10 Pro и Enterprise. Впрочем, есть обходное решение.
Обратите внимание, что по умолчанию при включении Remote Desktop, включаются две опции:
- Keep my PC awake for connection when it is plugged in ;
- Make my PC discoverable on private networks to enable automatic connection from a remote device
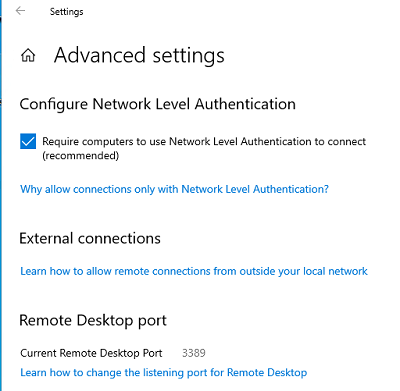
На жмите на ссылку “Advanced settings”. Здесь можно включить использование протокола “Network Level Authentication” для RDP подключений (рекомендуется).
Если на компьютере включен Windows Defender Firewall (брандмауэр), то нужно проверить, что в нем разрешены входящие RDP подключения. По умолчанию для RDP подключений используется порт TCP
3389
, а в последних билдах Windows также используется
UDP 3389
( см. статью про кейс с черным экраном вместо рабочего стола при RDP доступе).
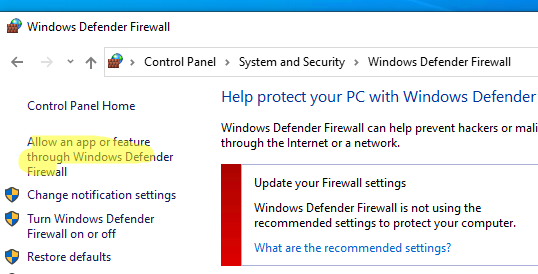
Перейдите в панель управления и выберите элемент Windows Defender Firewall. Откройте список стандартных правил брандмауэра Windows, щелкнув в левом столбце по ссылке Allow an app or feature through Windows Firewall.
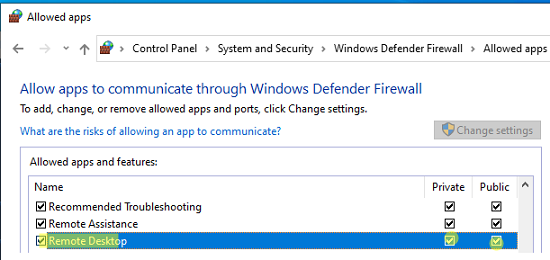
Проверьте, что правило Remote Desktop включено для профиля Private (домашняя или рабочая сеть) и, если необходимо, для профиля Public (общедоступные сети).
Подробнее про типы сетей и профили брандмауэра Windows здесь.
Если нужно, вы можете дополнительно ограничить длительность RDP сессий с помощью GPO.
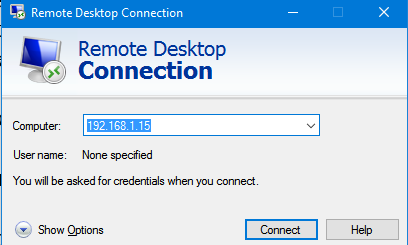
Теперь к данному компьютеру можно подключится с помощью RDP клиента. Встроенный RDP клиент Windows –
mstsc.exe
. Он сохраняет всю историю RDP подключений с компьютера. Поддерживается копирование файлов между локальным и удаленным компьютером прямо через буфер обмена RDP.
Также вы можете использовать менеджеры RDP подключений, такие как RDCMan или mRemoteNG, или альтернативные клиенты.
Для удобства пользователей пароль для RDP подключения можно сохранить в Windows Credential Manager.
Как включить RDP доступ с помощью PowerShell?
Вы можете включить RDP доступ в Windows с помощью пары PowerShell команд. Это гораздо быстрее:
- Запустите консоль PowerShell.exe с правами администратора;
- Включите RDP доступ в реестре с помощью командлета Set-ItemProperty:
Set-ItemProperty -Path 'HKLM:SystemCurrentControlSetControlTerminal Server' -name "fDenyTSConnections" -value 0Чтобы закрыть RDP доступ, измените значение fDenyTSConnections на 1.
- Разрешите RDP подключения к компьютеру в Windows Defender Firewall. Для этого включите предустановленное правило :
Enable-NetFirewallRule -DisplayGroup "Remote Desktop"
- Если нужно добавить пользователя в группу в локальную группу RDP доступа, выполните:
Add-LocalGroupMember -Group "Remote Desktop Users" -Member 'a.petrov'
Чтобы проверить, что на компьютере открыт RDP порт, воспользуйтесь командлетом Test-NetConnection:
Test-NetConnection -ComputerName deskcomp323 -CommonTCPPort rdp
RDP доступ к Windows Server 2016/2019
В отличии от десктопной редакции Windows 10, в Windows Server по умолчанию поддерживается два одновременных RDP подключения. Эти подключения используются администраторами для управления сервером.
Включается RDP в Windows Server аналогично. Через SystemPropertiesRemote, через Server Manager или командами PowerShell, рассмотренными выше.
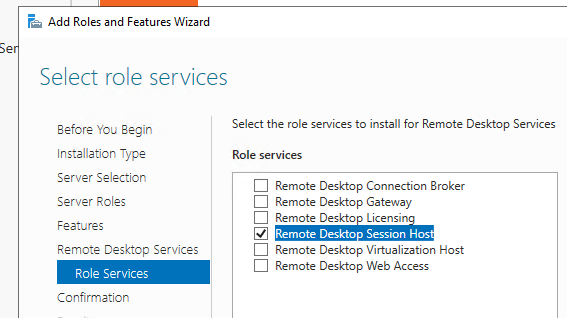
Вы можете использовать Windows Server в качестве терминального сервера. В этом случае множество пользователей могут одновременно подключаться к собственному рабочему столу на сервере. Для этого нужно установить и настроить на сервере роль Remote Desktop Session Host. Это требует приобретения специальных RDS лицензии (CAL). Подробнее о RDS лицензировании здесь.
Для дополнительно защиты RDP сессий можно использовать SSL/TLS сертификаты.
Включение RDP с групповых политик в домене Active Direcrtory
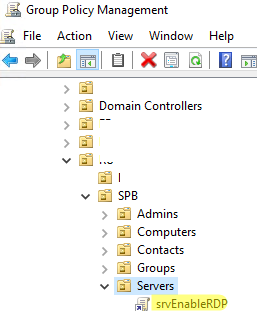
Если вам нужно включить RDP доступ сразу на большом количестве компьютеров, можно воспользоваться групповыми политиками (GPO). Мы подразумеваем, что все компьютеры включены в домен Windows.
- Запустите консоль управления доменными GPO
gpmc.msc
; - Создайте новую (или отредактируйте уже существующую) групповую политику и привяжите ее к целевой OU с компьютерами или серверами;
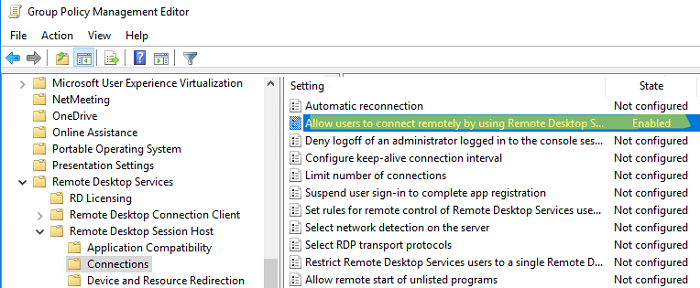
- Переключитесь в режим редактирования политики и перейдите в секцию GPO Computer Configuration -> Administrative Templates -> Windows Components -> Remote Desktop Services -> Remote Desktop Session Host -> Connections;
- Найдите и включите политику Allow Users to connect remotely by using Remote Desktop Services, установив ее в Enable;
- Обновите параметры групповых политик на клиентах;
- После применения данной политики вы сможете подключится ко всем компьютерам по RDP (политика применится как к десктопным клиентам с Windows 10, так и к Windows Server). Если нужно, вы можете более тонко нацелить политики на компьютеры с помощью WMI фильтров GPO.
- Если на компьютерах включен Windows Defender Firewall, нужно в этой же GPO разрешить RDP-трафик для доменного профиля. Для этого нужно активировать правило Windows Firewall: Allow inbound Remote Desktop Exceptions (находится в разделе Computer Configuration -> Administrative Templates -> Network -> Network Connections -> Windows Firewall -> Domain Profile).
Подробнее о настройке правил брандмаура Windows через GPO рассказано здесь.
Как удаленно включить RDP на компьютере Windows?
Также вы можете удаленно включить RDP на любом компьютере Windows. Для этого у вас должен быть удаленный доступ к этому компьютеру (через PowerShell или WMI) и ваша учетная запись состоять в группе локальных администраторов на этом компьютере.
Вы можете удаленно включить RDP через реестр. Для этого на удаленном компьютере должна быть включена служба Remote Registry (по умолчанию она отключена). Чтобы запустить службу:
- Запустите консоль управления службами (
services.msc
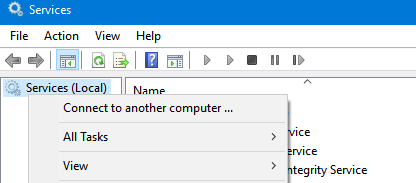
); - Выберите Connect to another computer и укажите имя удаленного компьютера;
- Найдите в списке службу Remote Registry, измените тип запуска на Manual (ручной) и затем запустите службу – Start.
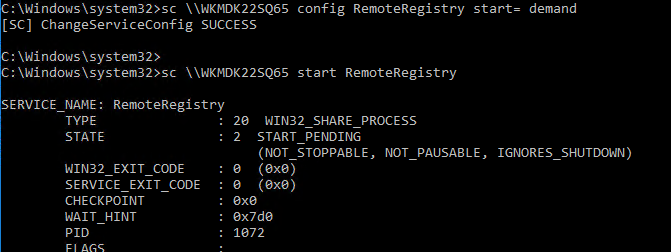
Тоже самое можно выполнить удаленно из командной строки с помощью встроенной утилиты
sc
(позволяет создавать, управлять или удалять службы Windows):
sc \WKMDK22SQ65 config RemoteRegistry start= demand
sc \WKMDK22SQ65 start RemoteRegistry
Затем на локальном компьютере
- Запустите редактор реестра
regedit.exe - Выберите в меню Файл пункт Connect Network Registry (Подключить сетевой реестр)
- Укажите имя или IP адрес удаленного компьютера, на котором нужно включить службу RDP;
- Перейдите в раздел
HKEY_LOCAL_MACHINESYSTEMCurrentControlSetControlTerminal Server
; - Найдите параметр fDenyTSConnections (тип REG_DWORD). Если данный ключ отсутствует – создайте его. Измените его значение на 0, чтобы включить RDP.
Для отключения RDP доступа нужно изменить значение fDenyTSConnections на 1.
Сразу после этого без перезагрузки удаленный компьютер должен стать доступным по RDP.
Но гораздо быстрее можно включить RDP в реестре удаленого компьютера через командную строку:
REG ADD "\WKMDK22SQ65HKLMSYSTEMCurrentControlSetControlTerminal Server" /v fDenyTSConnections /t REG_DWORD /d 0 /f
Если на удаленном компьютере настроен PowerShell remoting, вы можете выполнить на нем удаленную команду через Invoke-Command:
Invoke-Command -Computername WKMDK22SQ65 -ScriptBlock {Set-ItemProperty -Path "HKLM:SystemCurrentControlSetControlTerminal Server" -Name "fDenyTSConnections" –Value 0}
Если в Windows установлен OpenSSH сервер, вы можете подключиться к нему любым ssh клиентом и внести изменения в реестр в локальной ssh сессии.
Также вы можете подключиться к удаленному компьютеру и включить RDP через WMI:
$compname = “WKMDK22SQ65”
(Get-WmiObject -Class Win32_TerminalServiceSetting -Namespace rootCIMV2TerminalServices -Computer $compname -Authentication 6).SetAllowTSConnections(1,1)
30 марта 2020
В Windows 10 функция удаленного рабочего стола позволяет вам получить удаленный доступ к компьютеру, чтобы помочь другим пользователям или управлять службами без физического присутствия на месте. Хотя вы можете управлять этой функцией через приложение «Настройки» , вы также можете включить или отключить удаленный рабочий стол в Windows 10 с помощью PowerShell. Возможно, вы захотите использовать этот метод для создания сценария, который можно использовать для быстрой настройки удаленного рабочего стола на нескольких устройствах, или для отправки сценария пользователю, который может просто дважды щелкнуть мышью, чтобы настроить функцию автоматически без дополнительных действий.
В этом руководстве вы узнаете, как использовать PowerShell для включения или отключения удаленного рабочего стола в Windows 10, а также как открыть необходимые порты брандмауэра для успешного подключения.
Важно: Удаленный рабочий стол доступен только в Windows 10 Pro, эта функция недоступна в Windows 10 Home . Кроме того, перед тем, как продолжить, рекомендуется сделать полное резервное копирование вашего компьютера , поскольку неправильное изменение реестра может привести к необратимому повреждению вашей системы.
Используйте эти шаги для включения протокола удаленного рабочего стола с PowerShell:
- Откройте Пуск в Windows 10.
- Найдите PowerShell, щелкните правой кнопкой мыши верхний результат и выберите параметр « Запуск от имени администратора» .
- Введите следующую команду, чтобы включить протокол удаленного рабочего стола, и нажмите Enter:Set-ItemProperty -Path ‘HKLM:SystemCurrentControlSetControlTerminal Server’ -name «fDenyTSConnections» -value 0
- (Необязательно) Введите следующую команду, чтобы включить удаленный рабочий стол через брандмауэр Windows, и нажмите Enter:Enable-NetFirewallRule -DisplayGroup «Remote Desktop»
Выполнив эти шаги, вы сможете использовать современное приложение «Удаленный рабочий стол» или старое приложение «Подключение к удаленному рабочему столу» для удаленного доступа к компьютеру даже с включенным брандмауэром.
Как отключить удаленный рабочий стол с помощью PowerShell
Используйте эти шаги, чтобы отключить протокол удаленного рабочего стола с PowerShell:
- Откройте Пуск .
- Найдите PowerShell , щелкните правой кнопкой мыши верхний результат и выберите параметр « Запуск от имени администратора» .
- Введите следующую команду, чтобы отключить протокол удаленного рабочего стола, и нажмите Enter:Set-ItemProperty -Path ‘HKLM:SystemCurrentControlSetControlTerminal Server’ -name «fDenyTSConnections» -value 1
- (Необязательно) Введите следующую команду, чтобы отключить удаленный рабочий стол через брандмауэр Windows, и нажмите Enter :Disable-NetFirewallRule -DisplayGroup «Remote Desktop»
После выполнения этих действий функция удаленного рабочего стола будет отключена, а порт брандмауэра будет закрыт.
Метки: RDP
Опубликовано 30.03.2020 от evgeniyalf в категории «PowerShell
Обновлено 23.06.2019

Постановка задачи
Разобрать все методы, позволяющие вам включать RDP доступ на Windows системах, понимать какие ключи реестра за это отвечают и как это можно применять на практике.
Методы активации доступа по RDP
Я могу выделить вот такие способы:
- Классический метод с использованием оснастки свойств системы Windows
- С помощью оболочки и командлетов PowerShell
- Удаленное включение, через реестр Windows
- Через GPO политику
Как удаленно включить RDP
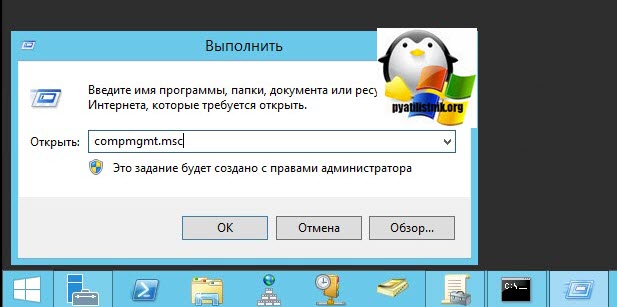
И так начну с более интересного метода. Предположим, что у вас есть сервер или компьютер, от которого у вас есть учетные данные для входа, но не активен вход через удаленный рабочий стол. И вам хотели бы его активировать. Делается все это просто. Тут мы воспользуемся удаленным доступом через консоль. Откройте окно выполнить (Сочетание клавиш WIN и R одновременно) и в открывшемся окне введите:
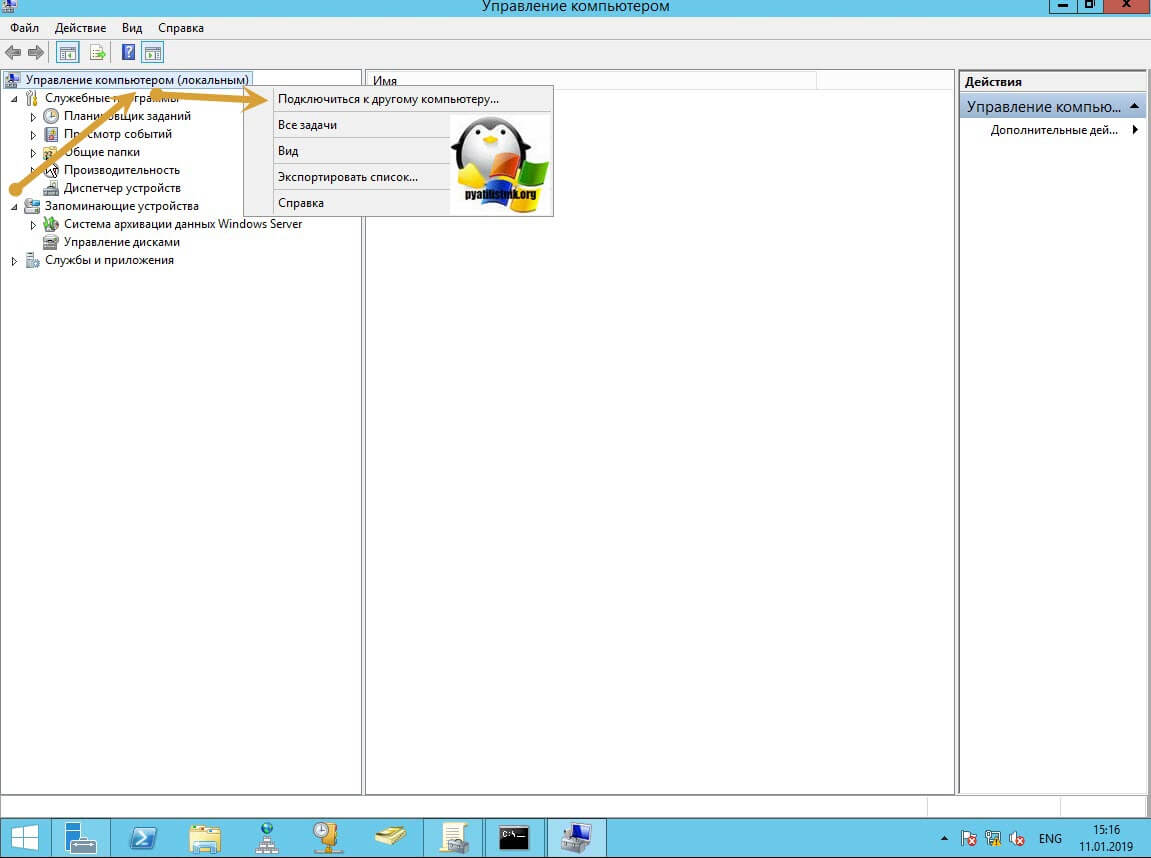
Далее щелкаете по корню «Управление компьютера (локальным)» правым кликом и в открывшемся окне выберите пункт «Подключиться к другому компьютеру»
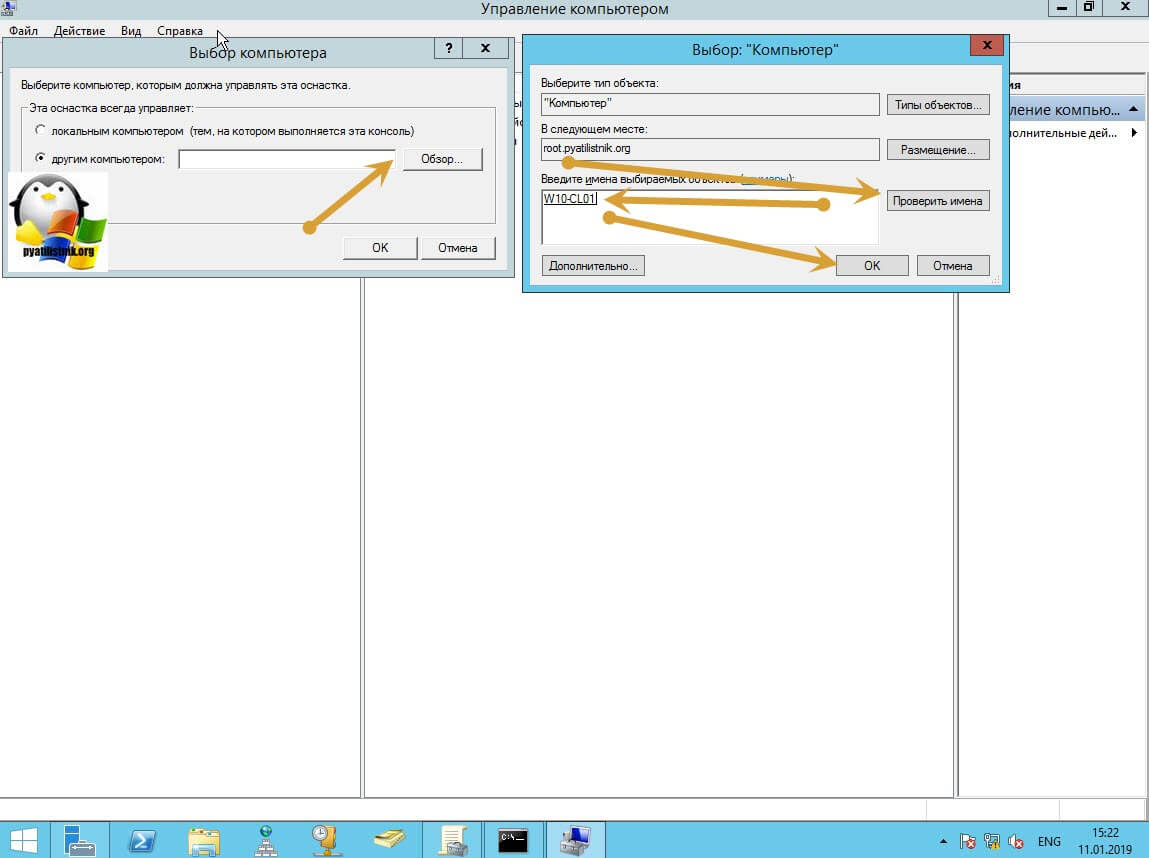
В окне выбора компьютера, вам необходимо нажать кнопку «Обзор», которое откроет второе окошко, где нужно выбрать необходимый компьютер, так как у меня доменная сеть, то мне еще проще. В моем примере это будет компьютер с операционной системой Windows 10 под DNS-именем W10-CL01. Нажимаем ок.
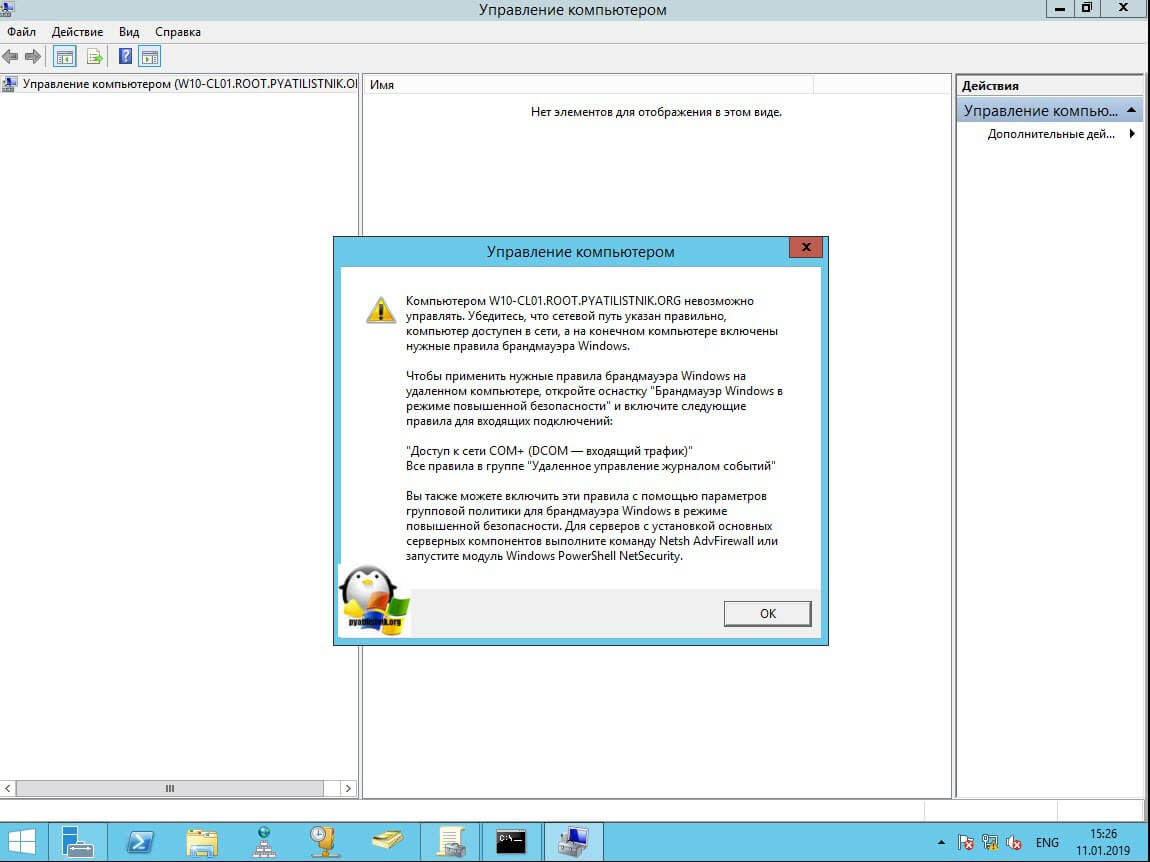
У вас будет произведено подключение к данному компьютеру. Если у вас выскочит ошибка:
Компьютером невозможно управлять. Убедитесь, что сетевой путь указан правильно, компьютер доступен в сети, а на конечном компьютере включены нужные правила брандмауэра Windows
В данном случае, нужно проверить две вещи:
- Доступен ли компьютер по сети, для этого проведите элементарный ping компьютера.
- Это нужно на этом компьютере в брандмауэре Windows разрешить «Удаленное управление журналом событий»
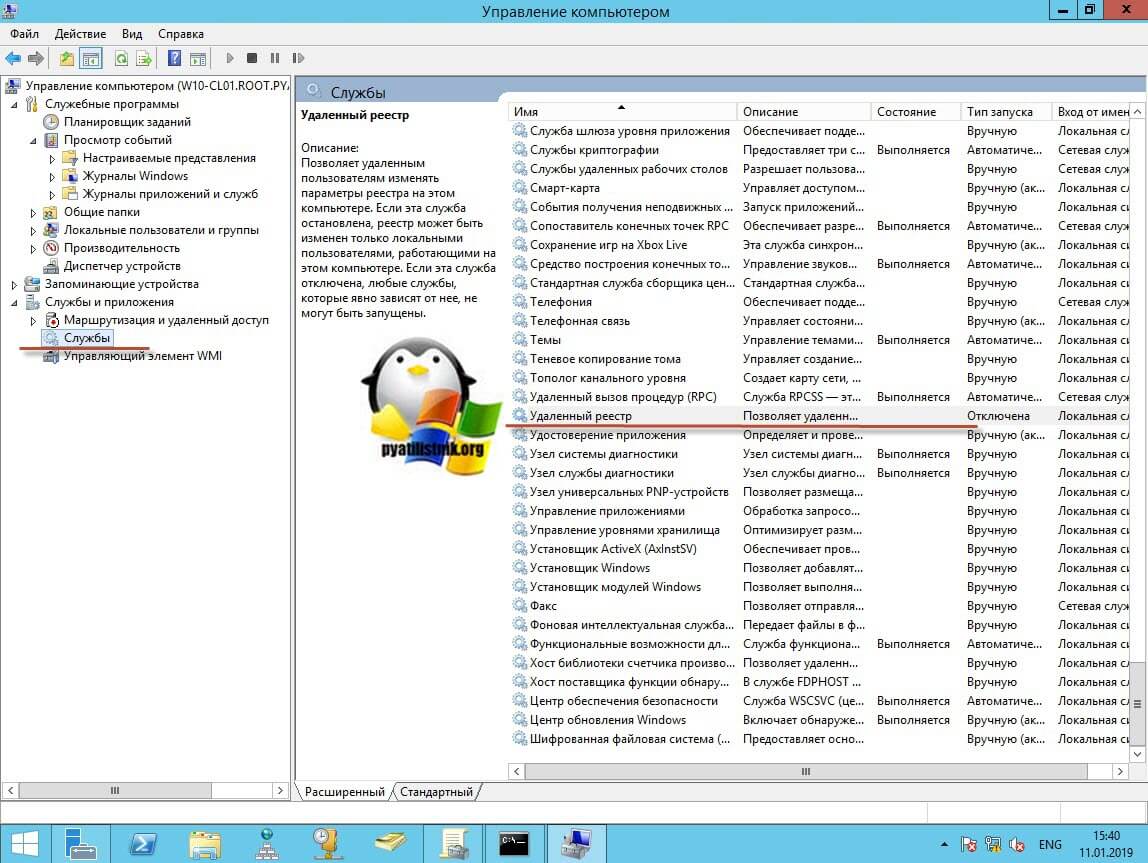
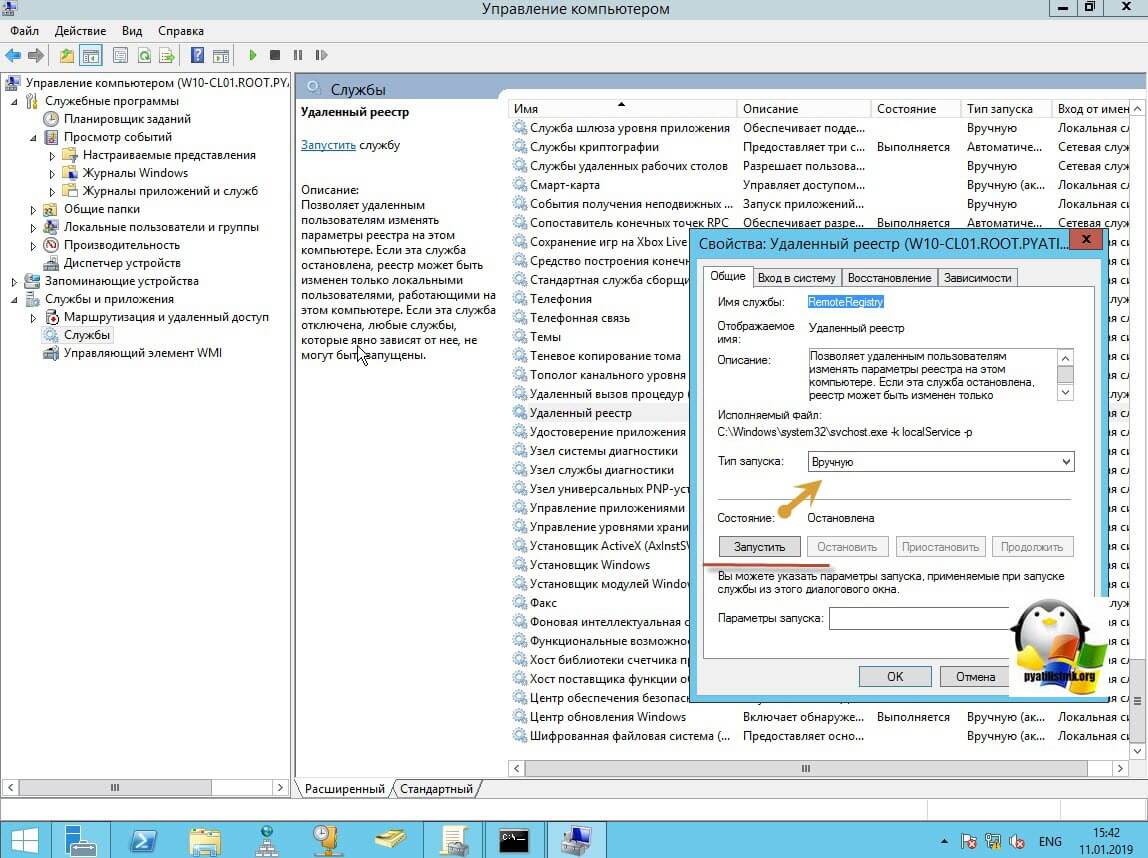
Про то как локально разрешать в брандмауэре службы и порты я говорил, посмотрите по ссылке. Если доступа нет, сделать, это локально, то ниже я приведу пример, как это сделать удаленно. Когда вы подключились к нужному компьютеру или серверу, вам необходимо перед удаленным включением RDP доступа, удостовериться, что у вас на вкладке службы, в активном состоянии запущен сервис «Удаленный реестр».
Вы так же можете из локальной оснастки «Службы», подключиться к удаленной, для этого в окне «Выполнить» введите services.msc и в открывшемся окне щелкните по корню правым кликом, где выберите соответствующий пункт
В моем примере я подключился к удаленным службам, через управление компьютером.
Если этого не сделать, то подключиться к реестру не получиться, и вы не сможете включить RDP по сети. Переходим в свойства данной службы и в типе запуска выставите вручную, после чего нажмите применить. После этого у вас станет активной кнопка запуска, нажимаем ее и проверяем, что сервис стартанул. После этого переходим к редактированию реестра по локальной сети.
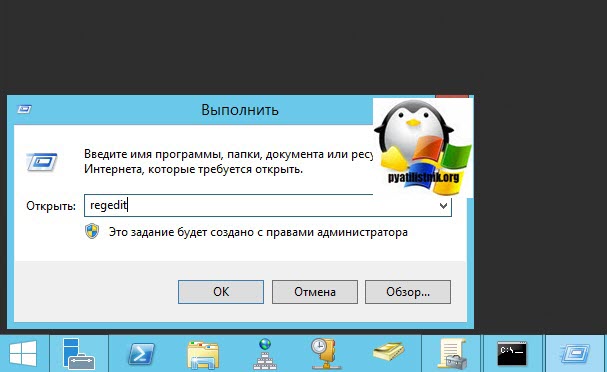
В окне выполнить введите regedit и у вас откроется реестр Windows .
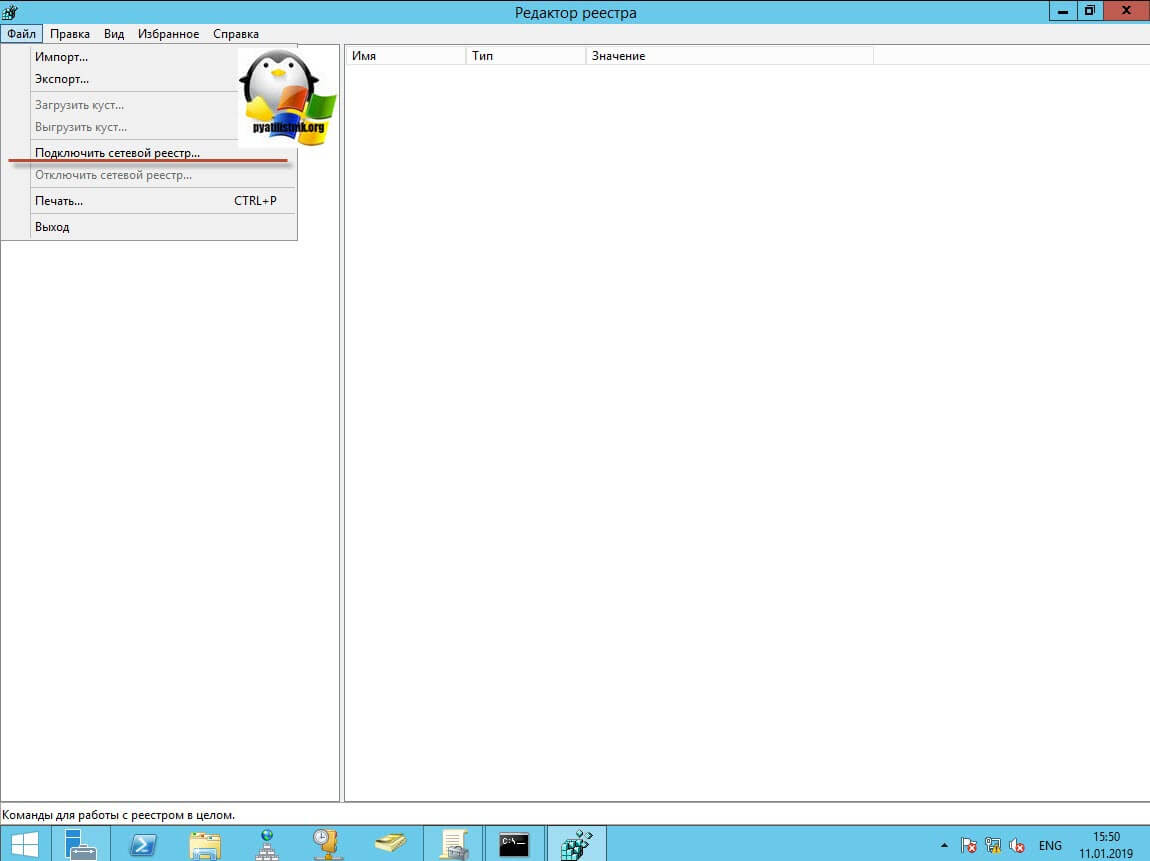
В самом верху есть меню файл, открыв его вам необходимо найти пункт «Подключить сетевой реестр».
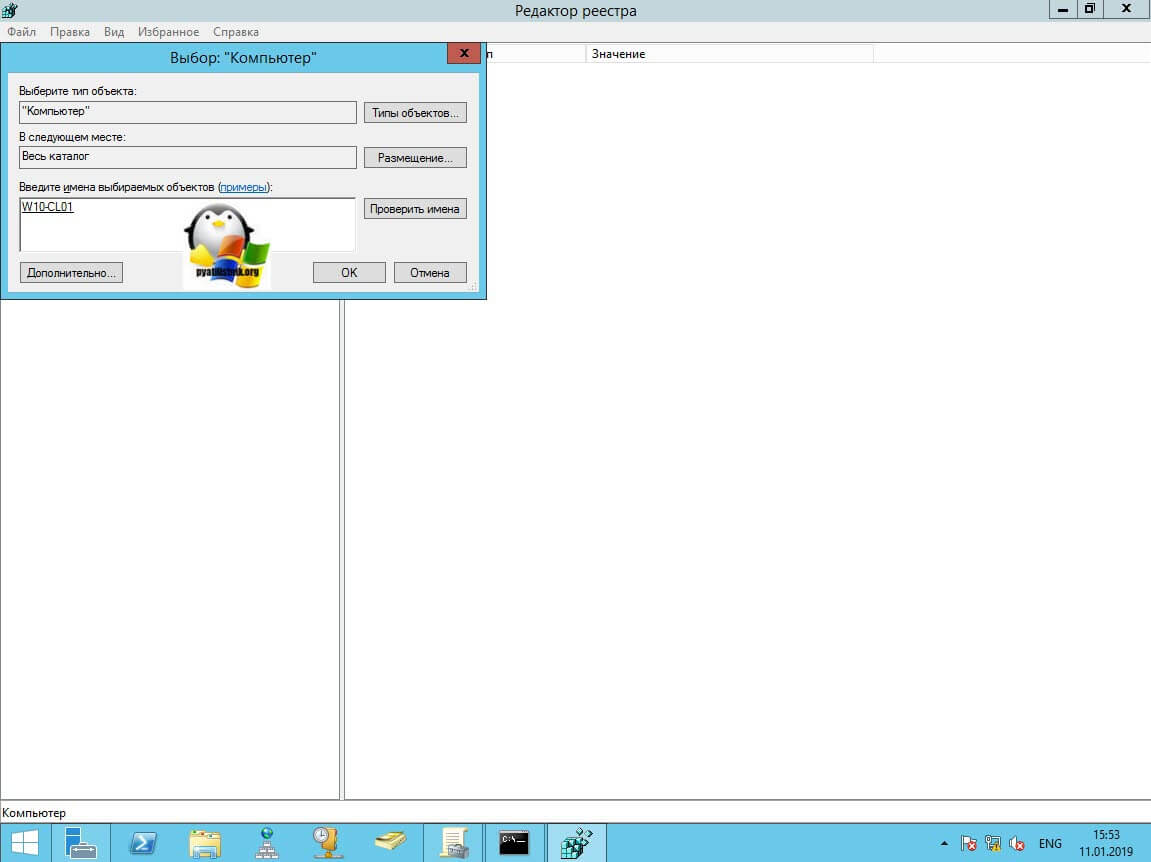
У вас откроется окно поиска, где вам необходимо найти нужный вам сетевой компьютер или сервер, после чего нажать ок.
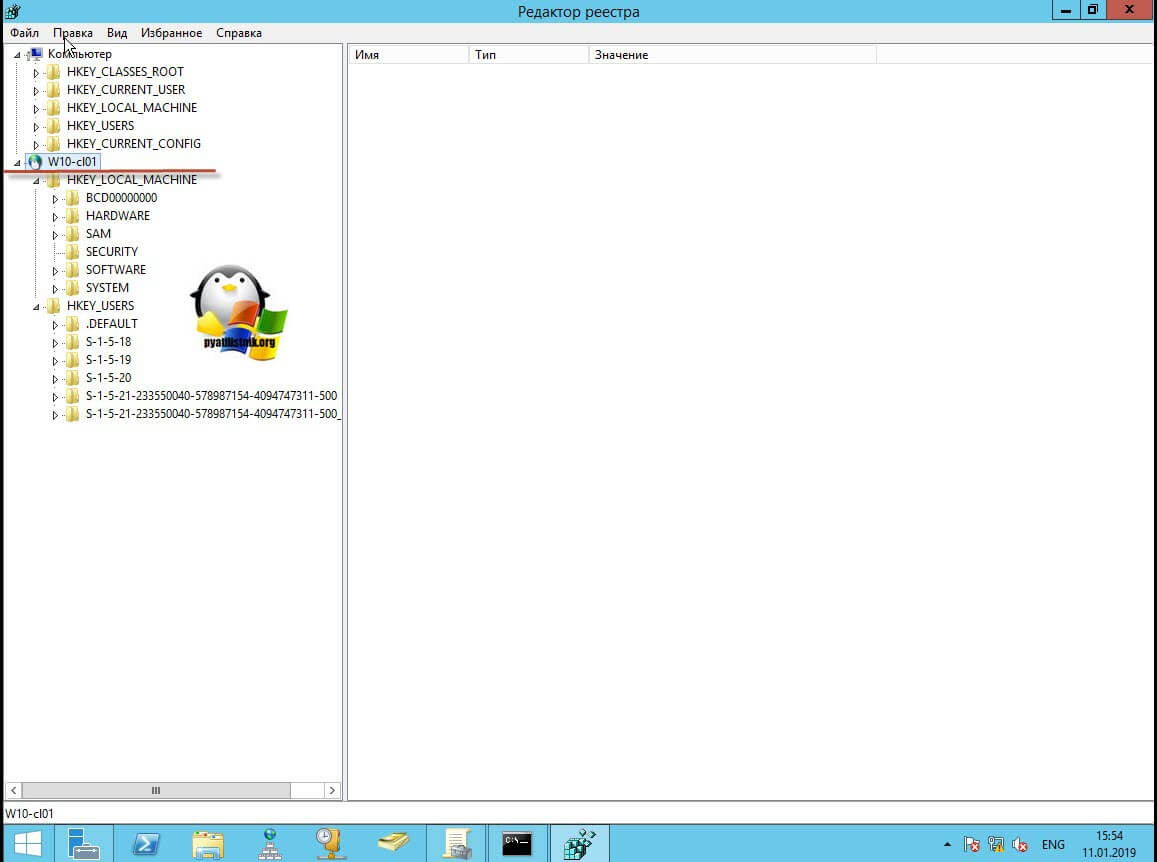
В итоге у вас в окне редактора реестра Windows появится еще один куст. Именно через данный реестр вы включите RDP службу на удаленной системе.
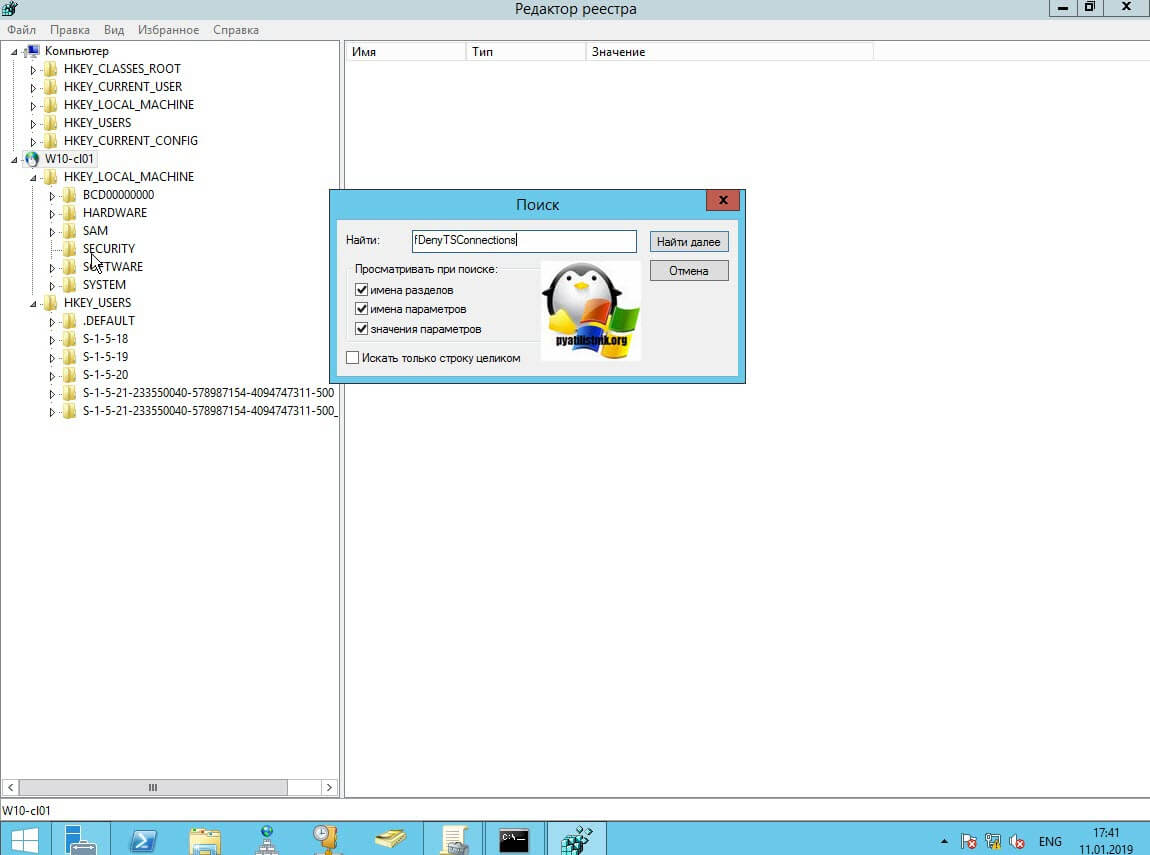
Теперь выбираем корень сетевого реестра Windows и нажимаем кнопку CTRL+F, у вас откроется форма поиска по нему. Тут вам необходимо найти ключ fDenyTSConnections.
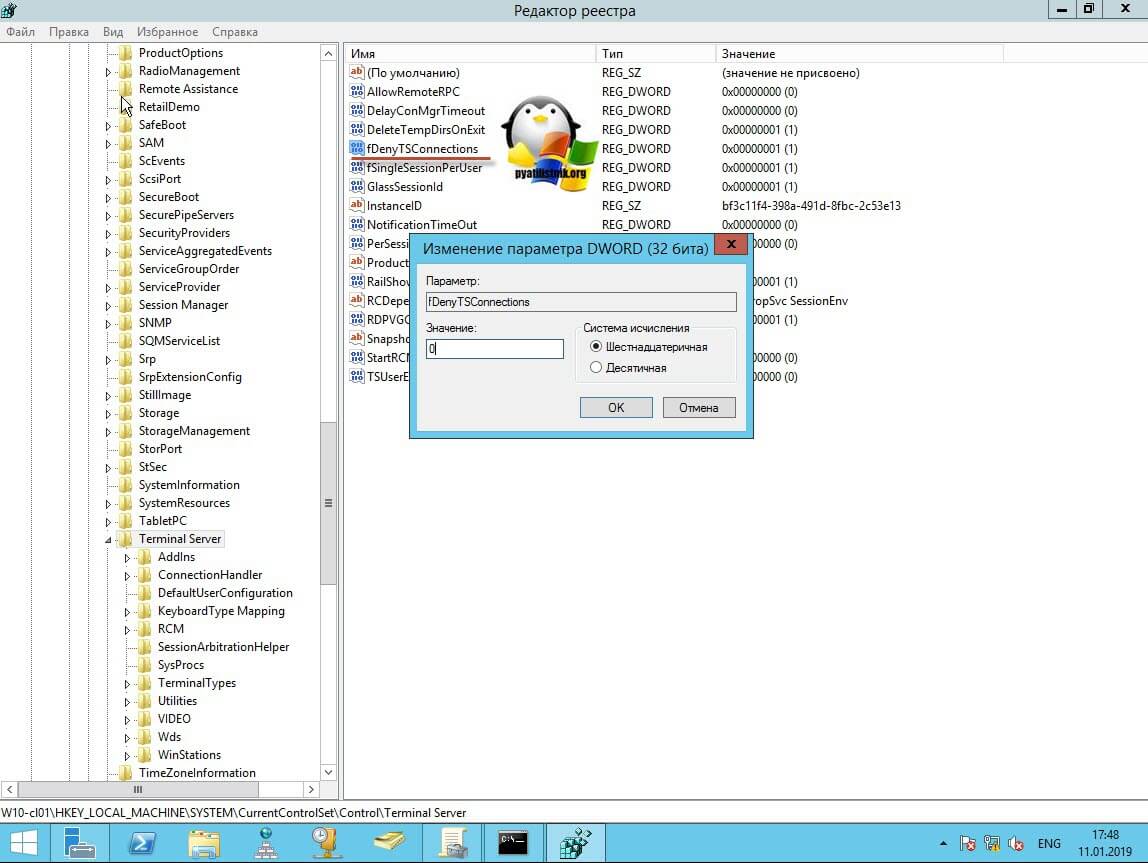
Он также по сути должен лежать по пути:
HKEY_LOCAL_MACHINESYSTEMCurrentControlSetControlTerminal ServerfDenyTSсonnections
Где ключу fDenyTSConnections вам необходимо изменить значение с 1 на 0, чтобы включить RDP доступ к удаленному компьютеру.
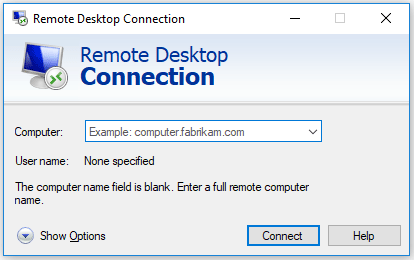
Пробуем произвести подключение, для этого откройте клиента подключения к удаленному рабочему столу (mstsc) и смотрим результат.
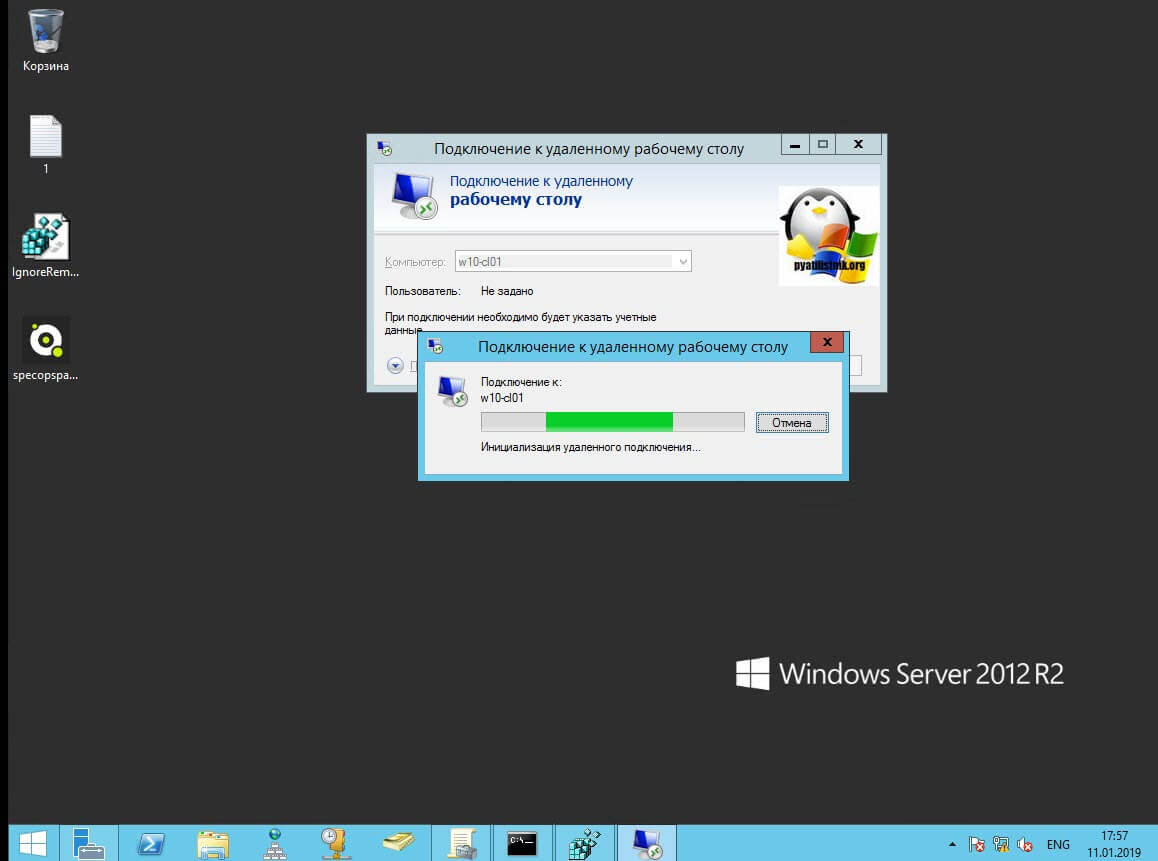
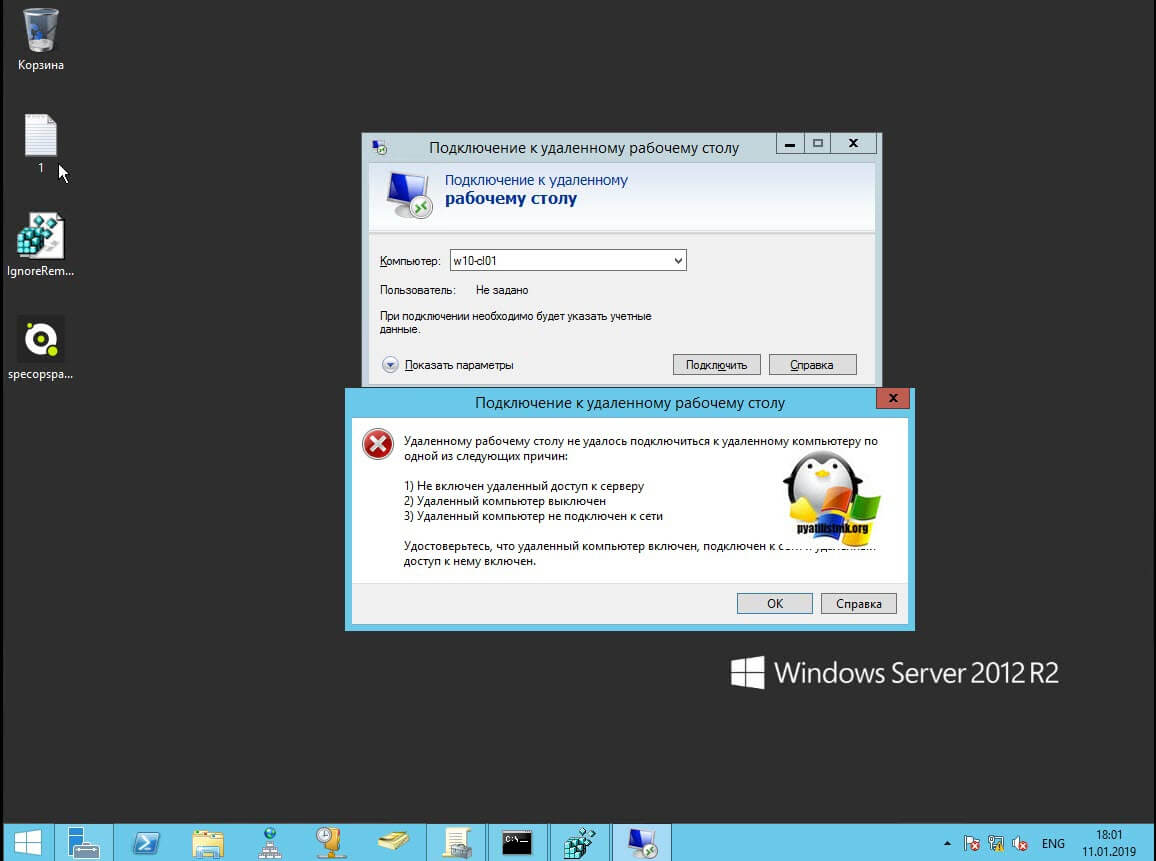
Если у вас будут закрыты порты, то вы увидите вот такую картину. При попытке подключиться у вас будет висеть инициализация удаленного подключения.
После чего вы увидите ошибку:
- Удаленному рабочему столу не удается подключиться к удаленному компьютеру по одной из следующих причин:
Не включен удаленный доступ к серверу - Удаленный компьютер выключен
- Удаленный компьютер не подключен к сети
Удостоверьтесь, что удаленный компьютер включен, подключен к сети и удаленный доступ к нему включен
Напоминаю, что вы можете проверить доступность порта , через утилиту Telnet. Проверять нам нужно порт 3389. Вероятнее всего он не ответит. Как я и писал выше откроем порты и создадим правило в брандмауэре. Для этого мы воспользуемся утилитой PSTools.
скачать PSTools с сайта Microsoft https://technet.microsoft.com/ru-ru/sysinternals/pstools.aspx?f=255&MSPPError=-2147217396
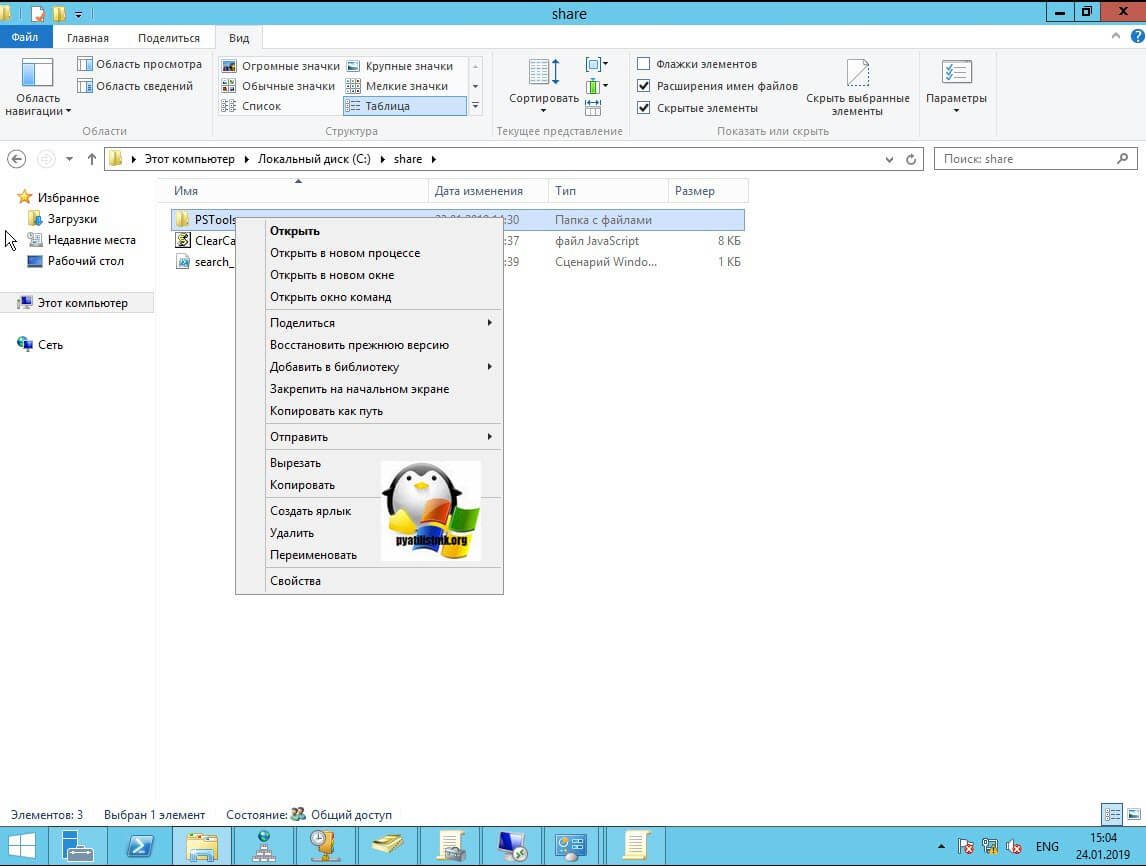
На выходе у вас будет архив с утилитами, который нужно будет распаковать через архиватор. Когда вы распакуйте его, зажмите клавишу Shift и кликните правым кликом по папке PSTools. Из контекстного меню выберите пункт «Открыть окно команд».
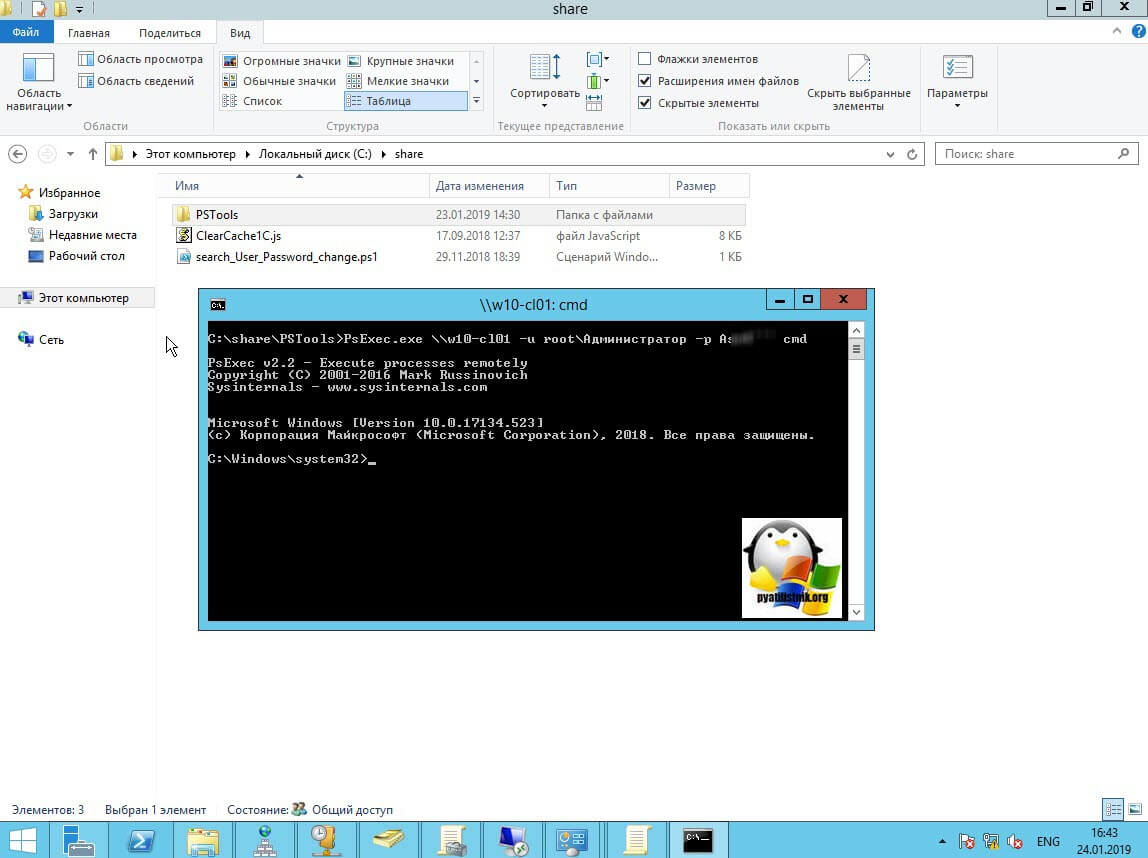
Введите вот такую команду:
PsExec.exe \IP-адрес или DNS-имя компьютера -u domainлогин -p пароль cmd
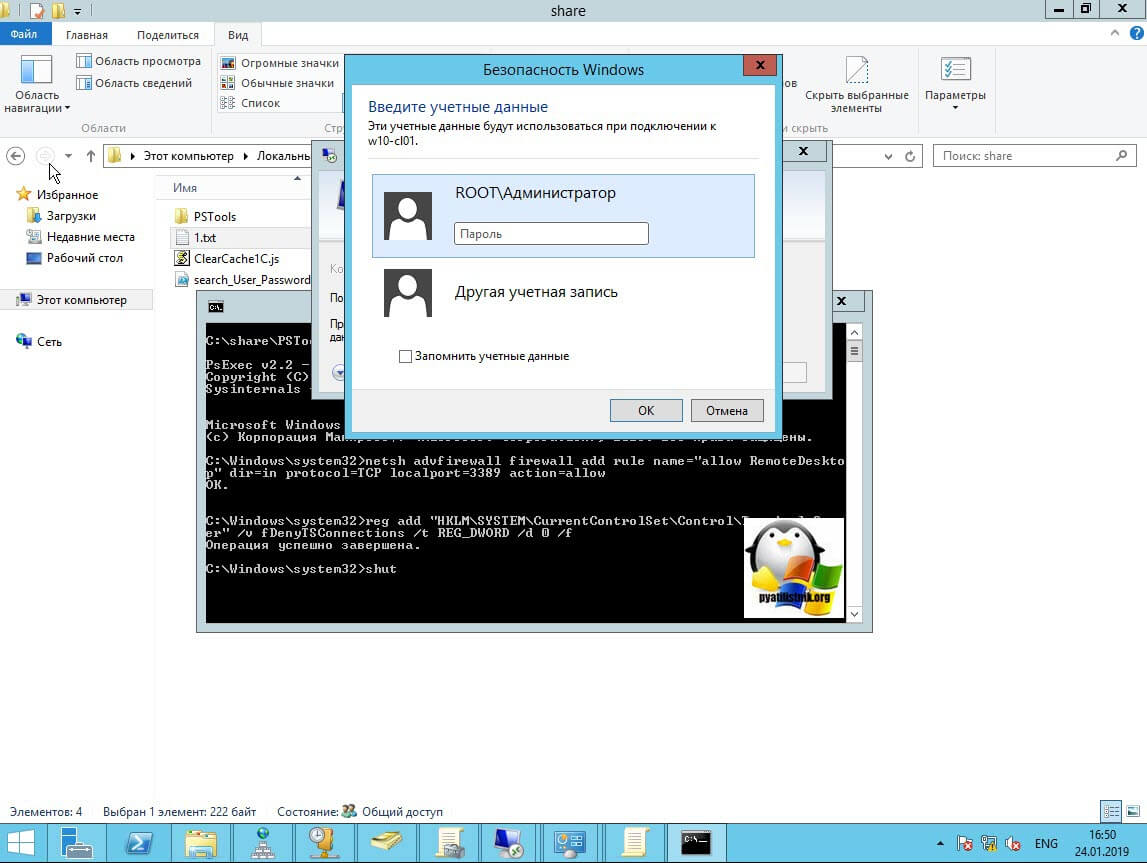
Мой пример: PsExec.exe \w10-cl01 -u rootАдминистратор -p пароль cmd
В итоге у вас будет произведено подключение к удаленному компьютеру, вы увидите в заголовке \dns-имя: cmd. Это означает, что вы успешно подключены.
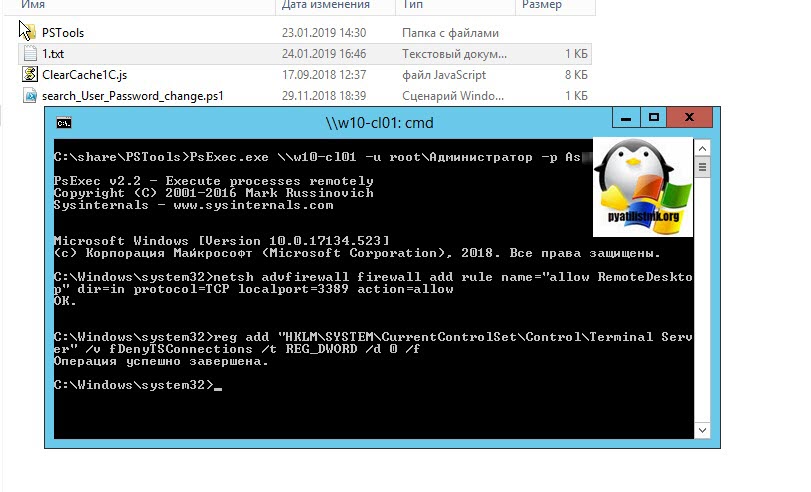
Далее вступает утилита командной строки netsh, благодаря ей мы создадим правило разрешающее входящие подключения по RDP.
netsh advfirewall firewall add rule name=»allow RemoteDesktop» dir=in protocol=TCP localport=3389 action=allow
Если вы до этого не включали через реестр доступ к удаленному рабочему столу, то так же это можно выполнить в PsExec.exe:
reg add «HKLMSYSTEMCurrentControlSetControlTerminal Server» /v fDenyTSConnections /t REG_DWORD /d 0 /f
По идее все должно работать сразу и без перезагрузки, но если она требуется, то выполните команду:
Классический метод включения удаленного рабочего стола
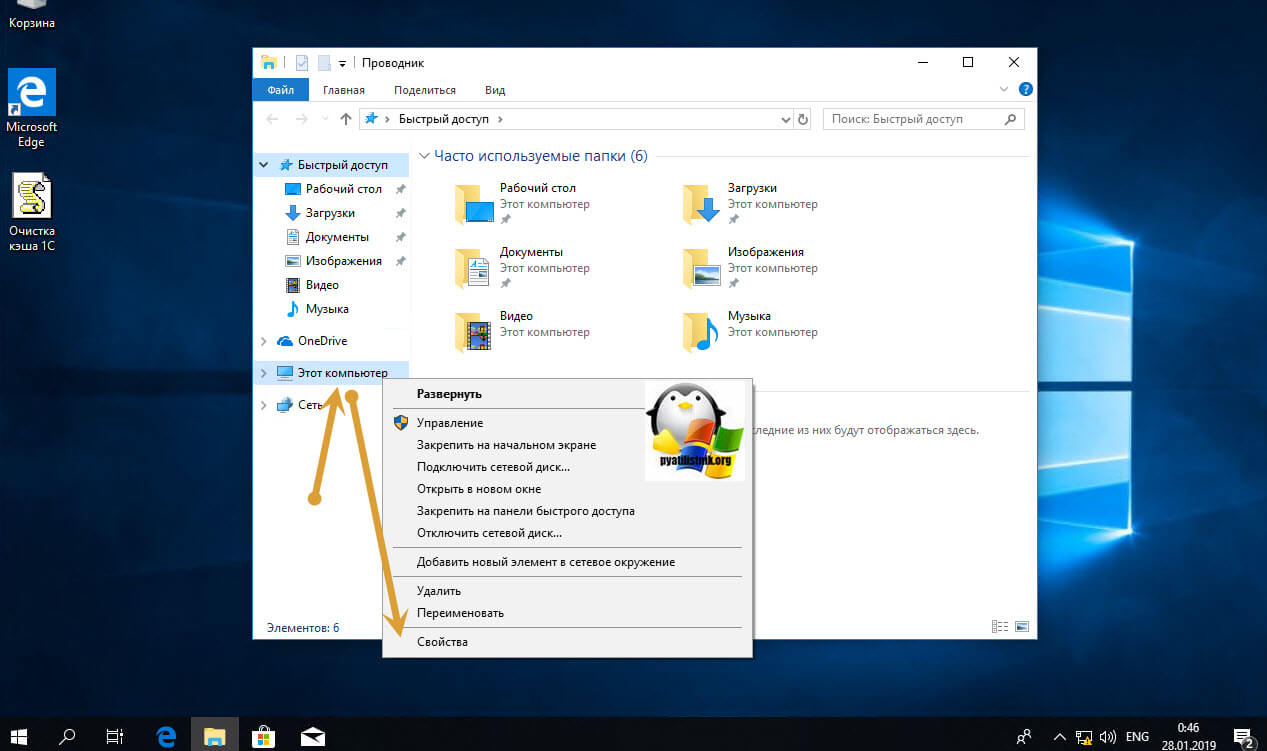
С удаленным включением служб RDP мы разобрались, теперь напомню для новичков, как можно локально его активировать. По умолчанию данная служба, как я и писал не работает. Чтобы это исправить есть два метода. Универсальный метод для любой версии Windows, я буду показывать на десятке, но для семерки, восьмерки, все будет одинаково. Откройте проводник Windows. Найдите в левой части объект «Этот компьютер (Мой компьютер)». Кликните по нему правым кликом и из контекстного меню перейдите в пункт «Свойства».
У вас откроется окно система. В правой части нажмите пункт «Настройка удаленного доступа», которое вызовет окно свойств системы. НА вкладке «Удаленный доступ», чтобы активировать службы удаленных рабочих столов Windows, вам нужно активировать пункт «Разрешить удаленные подключения к этому компьютеру». После этого у вас в системе сразу будет работать RDP доступ.
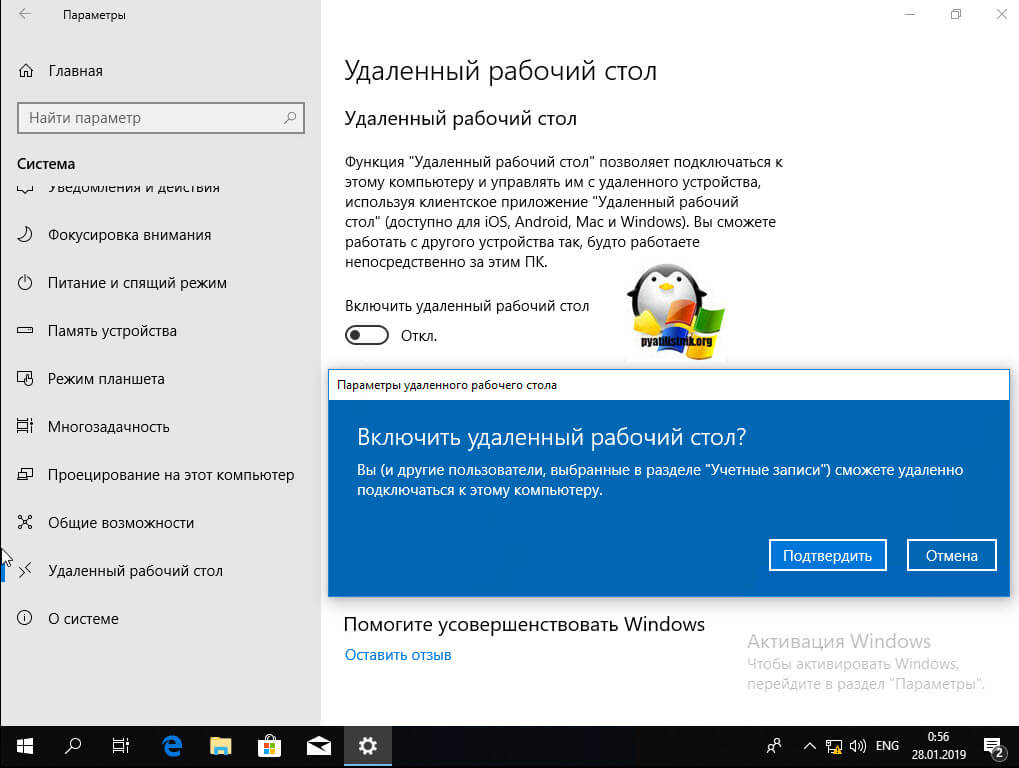
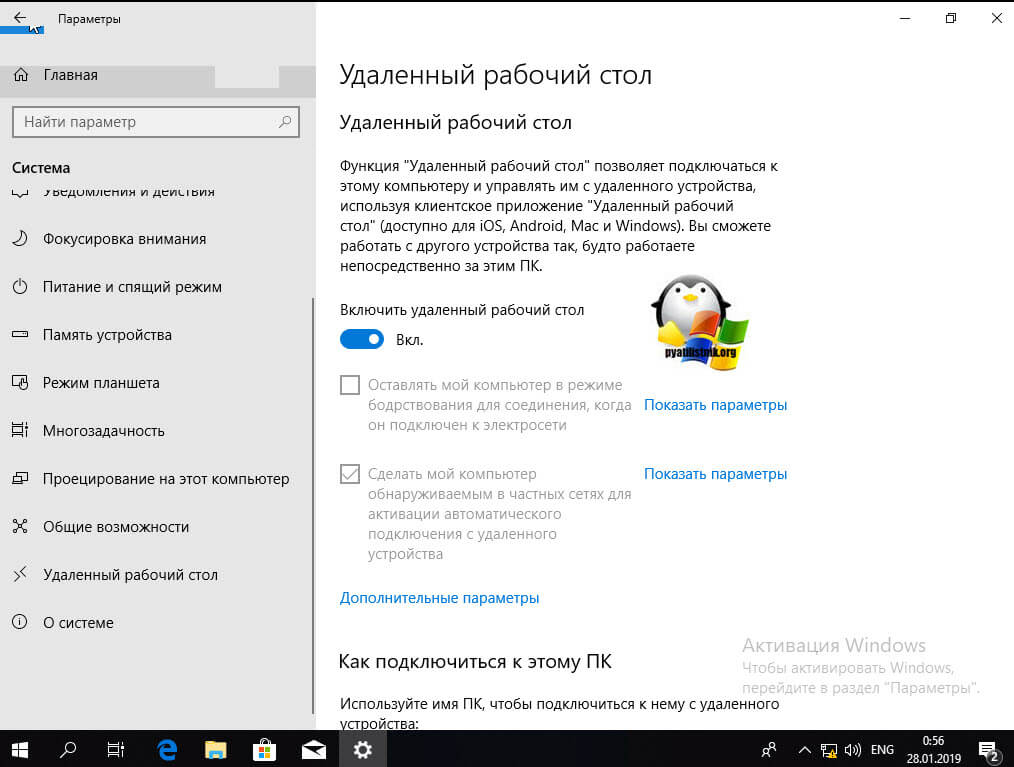
А вот метод исключительно для Windows 10 или Windows Server 2016 и выше. Вы открываете параметры Windows. Переходите в пункт система. В системе будет пункт «Удаленный рабочий стол». Активируем ползунок «Включить удаленный рабочий стол». Выскочит окно с подтверждением, говорим «Подтвердить».
Все функционал RDP активен, можно подключаться с других компьютеров. Данный метод по сути ставит все тужу галку, что мы видели и в классическом окне системы.
Этот подход можно с натяжкой назвать удаленным методом включения RDP, так как на той стороне вам потребуются руки которыми вы будите управлять по телефоны.
Как включить удаленный рабочий стол (RDP) через PowerShell
Открываем на компьютере, где необходимо включить RDP службу оснастку PowerShell.
Первая команда активирует галку «Разрешить удаленные подключения к этому компьютеру»
(Get-WmiObject Win32_TerminalServiceSetting -Namespace rootcimv2TerminalServices).SetAllowTsConnections(1,1)
Вторая команда активирует галку «Разрешить подключение только с компьютеров, на которых работает удаленный рабочий стол с проверкой подлинности на уровне сети»
(Get-WmiObject -Class «Win32_TSGeneralSetting» -Namespace rootcimv2TerminalServices -Filter «TerminalName=’RDP-tcp'»).SetUserAuthenticationRequired(0)
Третья команда, включает правило в Брандмауэре
Enable-NetFirewallRule -DisplayGroup «Remote Desktop»
Данные команды вы можете собрать в скрипт и распространить его через групповую политику при включении компьютера или автологоне пользователя.
Как удаленно включить RDP через групповую политику
Данный метод включения удаленного рабочего стола на нужном компьютере возможен за счет домена Active Directory, благодаря централизованному управлению рабочих станций ваших сотрудников. Откройте редактор управления групповыми политиками. Создайте новую политику и прилинкуйте ее к нужному организационному подразделению, которое содержит нужный компьютер. После чего зайдите в свойства данной политики и измените ее настройки. Перейдите по пути:
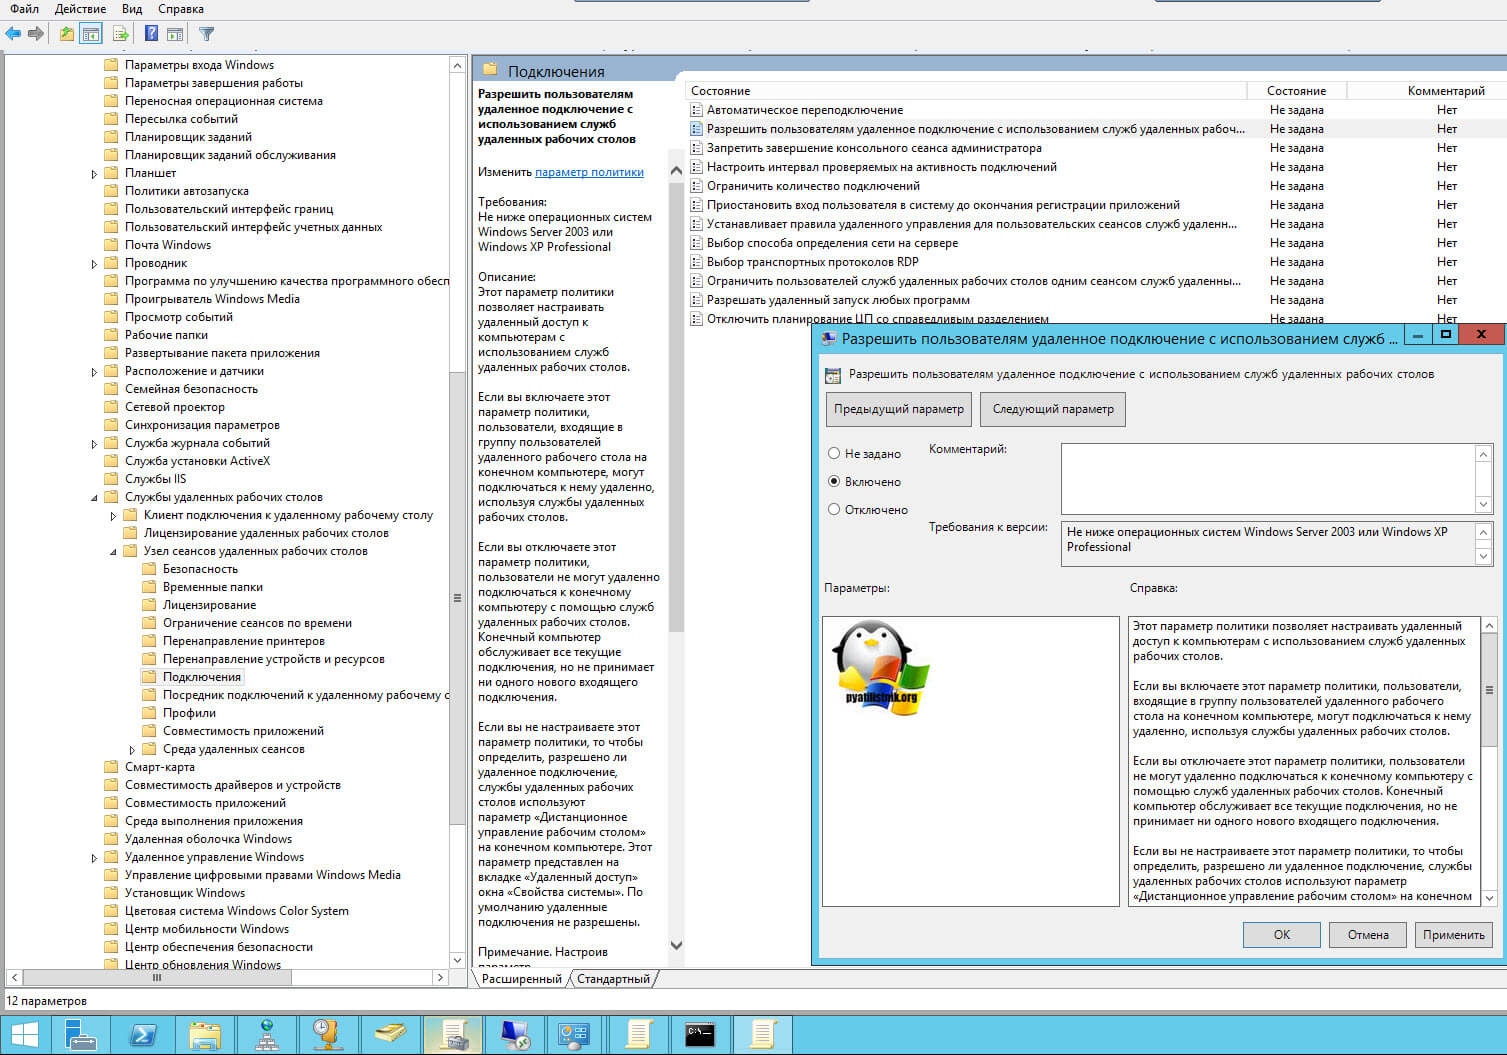
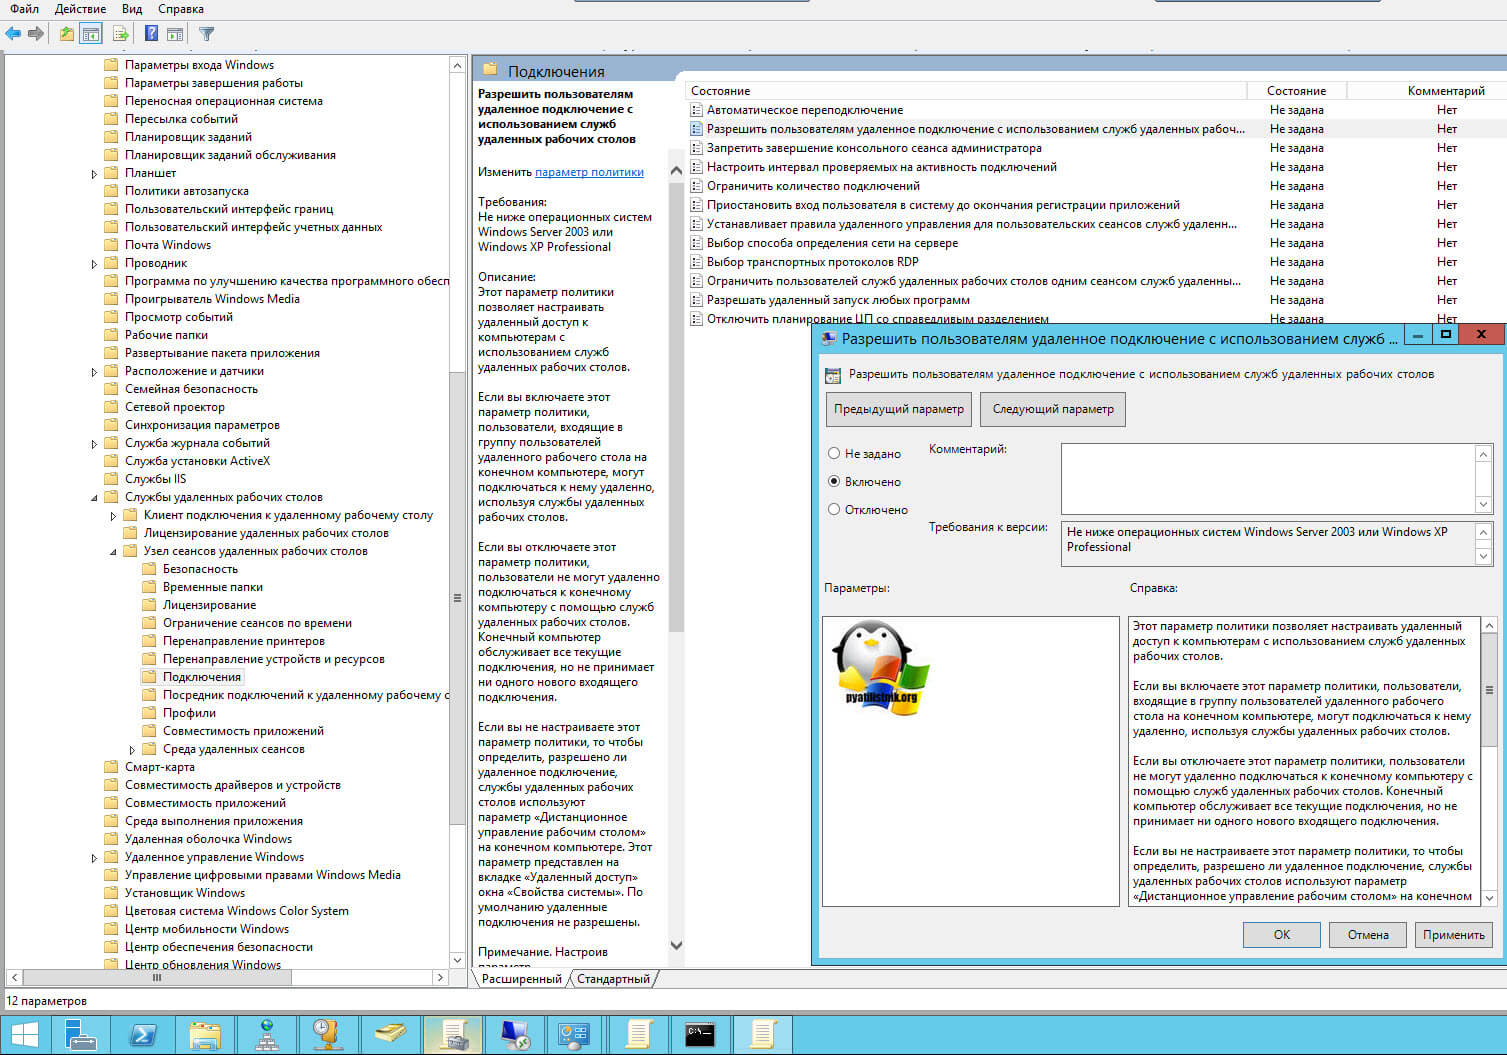
Конфигурация компьютера — Политики — Административные шаблоны — Компоненты Windows — Службы удаленных рабочих столов — Узел сеансов удаленных рабочих столов — Подключения — Разрешать удаленное подключение с использованием служб удаленных рабочих столов
Откройте эту настройку и включите ее. Не забываем после этого обновить групповую политику на нужном компьютере и не забываем там открыть порт для RDP. Так же политиками или локально.
Конфигурация компьютера — Политики — Административные шаблоны — Сеть — Сетевые подключения — Брандмауэр Windows — Профиль домена — Разрешить исключения для входящих сообщений удаленного управления рабочим столом
.
Включив настройку вы можете указать конкретные ip-адреса откуда можно производить подключение или же ввести *, это будет означать, для всех.
На этом у меня все, уверен, что есть еще какие-то методы позволяющие удаленно включить RDP службу удаленных рабочих столов, но мне лень гуглить и искать их, я пользуюсь вот такими. С вами был Иван Семин, автор и создатель блога Pyatilistnik.org.
Remote Desktop Protocol (RDP) is a popular, simple, and convenient way to connect to remote Windows computers. Thanks to RDP, you get full access to the graphical desktop environment of a remote computer and work with it just as if it was your own local device. By default, Remote Desktop is disabled on both desktop versions of Windows and Windows Server. In this article, we will look at several ways to enable RDP in Windows.
Enable and Disable Remote Desktop Locally
The most intuitive way to enable Remote Desktop on Windows 10 and 11 is to use a GUI. You can enable RDP:
However, this requires local access to the computer on which you want to enable RDP. You can usually ask the user for this (local administrator permissions required), or local technical support. However, what to do if no one in the remote branch office could enable the Remote Desktop locally?
Let’s look at several ways that allow you to remotely enable Remote Desktop (RDP) on a remote host (server or computer),
Enable RDP Using Remote Registry
You can enable Remote Desktop on a remote computer using Registry Editor. This requires:
- The remote computer must be accessible over the network;
- You must know the credentials of an account with local administrator permissions on the remote computer;
- The Remote Registry service must be running on the remote computer (you can enable it through the services.msc snap-in, GPO, or with the command sc \RemotePCName start RemoteRegistry).
So, to enable the remote desktop via remote registry, follow these steps:
- Press the Win + R key combination, type regedit.exe > OK;
- In the Registry Editor select File > Connect Network Registry;
- Specify the hostname or IP address of the remote computer. If the remote computer could not authorize you as the current user, you will be prompted to enter credentials;
- The registry of the remote computer will appear in the registry editor (only HKLM and HKEY_Users hives are accessible);
- Go to the following reg key on the remote computer: HKLMSYSTEMCurrentControlSetControlTerminal Server. Change the value of the fDenyTSConnections parameter (Type=REG_DWORD) from 1 to 0;
- If a firewall is enabled on the remote computer, you must enable the rule that allows remote desktop connections. You can enable it via GPO, via PowerShell Remoting, or using Psexec (check the next sections of this guide).
How to Enable RDP Remotely Using PsExec Tool?
You can use the PsExec cmd tool to enable Remote Desktop on a remote Windows device.
Download the PsExec toolkit from the Microsoft website and extract the PSTools.zip archive to a local folder.
Open a command prompt as an administrator and go to the PSTools directory:
CD c:PSPStools
In order to enable RDP on a remote computer in your domain using PSExec, run the command:
PsExec.exe /accepteula \RemoteComputerName_or_IP reg add "HKEY_LOCAL_MACHINESYSTEMCurrentControlSetControlTerminal Server" /v fDenyTSConnections /t REG_DWORD /d 0 /f
Then enable the rule to access the RDP port in Windows Defender Firewall:
PsExec.exe /accepteula \RemoteComputerName_or_IP netsh advfirewall firewall set rule group="remote desktop" new enable=Yes
If the remote computer is in a different domain or workgroup, you can provide a username with administrator permissions to connect to the remote computer:
PsExec.exe /accepteula \RemoteComputerName_or_IP -u administrator reg add "HKEY_LOCAL_MACHINESYSTEMCurrentControlSetControlTerminal Server" /v fDenyTSConnections /t REG_DWORD /d 0 /f
Then allow inbound connections to the RDP port (3389/TCP):
PsExec.exe /accepteula \RemoteComputerName_or_IP -u administrator netsh advfirewall firewall set rule group="remote desktop" new enable=Yes
Now try to connect to the remote computer via RDP.
Enable Remote Desktop Remotely Using PowerShell
To enable RDP remotely, you need to configure and run the WinRM service (Windows Remote Management) on the remote computer. The WinRM service is enabled by default in all versions of Windows Server starting with Windows Server 2012. However, WinRM is disabled by default in client operating systems such as Windows 10 or 11.
You can enable WinRM on domain-joined computers using GPO or locally using PowerShell. The easiest way to locally enable the WinRM service on Windows 10/11 and allow access via PowerShell Remoting is using the command:
Enable-PSRemoting
WinRM has been updated to receive requests.
WinRM service type changed successfully.
WinRM service started.
Next, you need to check if WinRM is enabled on the remote computer and if PSRemoting connections are allowed. Run the command:
Test-WsMan 192.168.31.102
If the WinRM service on the remote computer responds, you will receive this response:
If the service is disabled or access is blocked by Windows Defender Firewall, an error will appear:
Test-WsMan WSManFault: WinRM cannot complete the operation. Verify that the specified computer name is valid, that the computer is accessible over the network, and that a firewall exception for the WinRM service is enabled and allows access from this computer. By default, the WinRM firewall exception for public profiles limits access to remote computers within the same local subnet.
Thus, to enable Remote Desktop remotely via PowerShell, the remote computer must meet the following requirements:
- The WinRM service should be started;
- You must have administrator permissions on the remote device;
- Windows Defender Firewall with Advanced Security rules must accept PowerShell Remoting on WinRM ports TCP 5985 and 5986. You can enable the WinRM firewall rules with the command:
netsh advfirewall firewall set rule group=”Windows Remote Management” new enable=yes)
Suppose you want to remotely enable RDP on Windows Server 2022/2019/2016/2012R2. Open the PowerShell console on your computer and run the following command to connect to your server remotely:
Enter-PSSession -ComputerName server.domain.local -Credential domainadministrator
Tip. The Enter-PSSession and Invoke-Command cmdlets allow you to run PowerShell script on remote computer through WinRM.
So, you have established a remote session with a computer and now you can run PowerShell commands against it. To enable Remote Desktop, you just need to change the registry parameter fDenyTSConnections from 1 to 0. Run the command:
Set-ItemProperty -Path 'HKLM:SystemCurrentControlSetControlTerminal Server'-name "fDenyTSConnections" -Value 0
When RDP is enabled in this way (as opposed to the GUI method), you need to enable Windows Firewall rules for Remote Desktop manually. Run the command:
Enable-NetFirewallRule -DisplayGroup "Remote Desktop"
If for some reason this RDP firewall rule is missing, you can create it manually using netsh:
netsh advfirewall firewall add rule name="allow RemoteDesktop" dir=in protocol=TCP localport=3389 action=allow
or using Powershell:
New-NetFirewallRule -DisplayName 'Allow RemoteDesktop' -Profile @('Domain', 'Private') -Direction Inbound -Action Allow -Protocol TCP -LocalPort @('3389')
If you want to restrict hosts or subnets that are allowed to connect to Remote Desktop, you can create a custom rule that allows Windows Firewall to only accept incoming RDP connections from specific IP addresses, subnets, or IP ranges. In this case, instead of the previous command, you need to use the following one:
New-NetFirewallRule -DisplayName “Restrict_RDP_access" -Direction Inbound -Protocol TCP -LocalPort 3389 -RemoteAddress 192.168.1.0/24,192.168.2.100 -Action Allow
If you need to enable secure RDP authentication (NLA – Network Level Authentication), run the command:
Set-ItemProperty -Path 'HKLM:SystemCurrentControlSetControlTerminal ServerWinStationsRDP-Tcp' -name "UserAuthentication" -Value 1
Now you can check the availability of TCP port 3389 on the remote host from your computer. Run the command:
Test-NetConnection 192.168.1.11 -CommonTCPPort rdp
There should be a result like this:
ComputerName : 192.168.1.11

RemoteAddress : 192.168.1.11

RemotePort : 3389

InterfaceAlias : Ethernet0

SourceAddress : 192.168.1.90

TcpTestSucceeded : True
This means that RDP on the remote host is enabled and you can establish a remote desktop connection using mstsc.exe, RDCMan, or any alternative RDP client.
Hint. If you need to enable RDP on several remote computers at once, you can use the following PowerShell script:
$comps = “Server1”, “Server2”, “Server3”, “Server4”

Invoke-Command –Computername $comps –ScriptBlock {Set-ItemProperty -Path "HKLM:SystemCurrentControlSetControlTerminal Server" -Name "fDenyTSConnections" –Value 0}

Invoke-Command –Computername $comps –ScriptBlock {Enable-NetFirewallRule -DisplayGroup "Remote Desktop"}
By default, only members of the local Administrators group can connect via the RDP remotely. To allow RDP connections for non-admin users, just add domain user to Remote Desktop Group.
You can add the desired users to the Remote Desktop Users locally by using the Local Users and Groups MMC snap-in (LUSRMGR.MSC).
Or you can change RD Users group membership remotely using the Enter-PSSession. Use the following command to add the domain user ASmith to the local group:
net localgroup "remote desktop users" /add "contosoasmith”
Alternatively, instead of the Enter-PSSession cmdlet, you can use another PS Remoting command Invoke-Command:
Invoke-Command -Scriptblock {net localgroup "remote desktop users" /add "contosoasmith”} -Computer Server1.contoso.com
How to Check if Remote Desktop is Enabled on Remote Computers with PowerShell?
Consider a PowerShell script that allows you to remotely get the RDP status on multiple computers in your network. Set a variable that contains a list of remote computers on which you want to check if Remote Desktop is enabled:
$comps=’wks101’,’wks102’,’wks112’, ‘wks223’
You can also check if RDP is enabled on all computers in the Active Directory domain. To get a list of active computers in AD, you can use the Get-ADComputer cmdlet from the PowerShell Active Directory module:
$comps = (Get-ADComputer -Filter 'operatingsystem -like "*Windows 10*" -and enabled -eq "true"').Name
Now you need to get the status of the fDenyTSConnections registry parameter on the remote computers in your list.
$Report = @()

$comps ='localhost','localhost'

foreach ($comp in $comps) {

    $RDPRegistry = Invoke-Command $comp -ScriptBlock { (Get-ItemProperty 'HKLM:SYSTEMCurrentControlSetControlTerminal Server').fDenyTSConnections } -ErrorAction SilentlyContinue

    $RDPState = switch ($RDPRegistry)

        {

        '0' {"Enabled"}

        '1' {"Disabled"}

        Default {"n/a"}

        }

    $objReport = [PSCustomObject]@{

        ComputerName = $comp

        RDPState = $RDPState

    }

    $Report += $objReport

}

$Report
As a result, you have a cool report that shows which computers on the network have Remote Desktop enabled.
If you want to enable RDP on a remote computer where WinRM is disabled, you can use the WMI PowerShell command.
Tip. To access the WMI namespace on the remote computer, TCP port 135 must be open, and the account must have WMI and DCOM access permissions.
To check if RDP access is enabled on the remote computer 192.168.1.90, run the command (see the value of the AllowTSConnections property):
Get-WmiObject -Class Win32_TerminalServiceSetting -Namespace rootCIMV2TerminalServices -Computer 192.168.1.90 -Authentication 6
To enable RDP and add a Windows Firewall exception rule, run the following command:
(Get-WmiObject -Class Win32_TerminalServiceSetting -Namespace rootCIMV2TerminalServices -Computer 192.168.1.90 -Authentication 6).SetAllowTSConnections(1,1)
- About
- Latest Posts
I enjoy technology and developing websites. Since 2012 I’m running a few of my own websites, and share useful content on gadgets, PC administration and website promotion.
In this post I show you how you can enable Remote Desktop on Windows 10 via Group Policy, PowerShell, WMI, or psexec because even the geekiest CLI geek sometimes needs to RDP into a remote Windows machine.
Contents
- Allow Remote Desktop via Group Policy
- Enable Remote Desktop via PowerShell
- Enable Remote Desktop via WMI
- Enable RDP via psexec
- Conclusion
- Author
- Recent Posts
Michael Pietroforte is the founder and editor in chief of 4sysops. He has more than 35 years of experience in IT management and system administration.
You probably know you can enable Remote Desktop in the Windows 10 Control Panel’s System app. That’s quick to do if the computer is on your desk. However, if you want to access a remote machine and Remote Desktop is disabled for security reasons in your organization, you have to enable Remote Desktop access remotely.
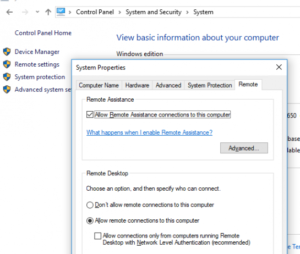
Allow remote connections in the Windows 10 Control Panel
Allow Remote Desktop via Group Policy
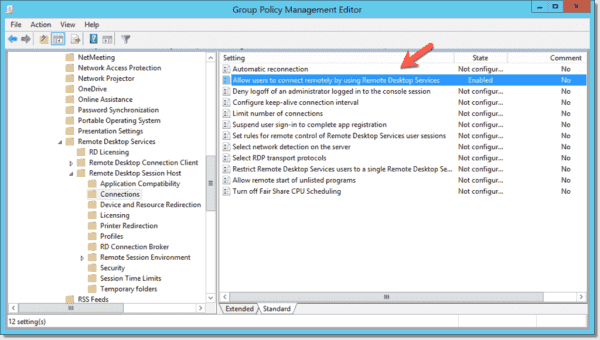
The easiest way certainly is to enable RDP access via Group Policy: Allow users to connect remotely using Remote Desktop Services
You can find the policy here:
Computer Configuration > Administrative Templates > Windows Components >Remote Desktop Services > Remote Desktop Session Host > Connections.
Allow users to connect remotely by using Remote Desktop Services
You will also have to allow RDP in the Windows Firewall on the remote Windows 10 computer:
Computer Configuration > Policies > Administrative Templates > Network > Network Connections > Windows Firewall > Domain Profile
Allow inbound Remote Desktop connections via Group Policy
The only problem is that Group Policy is sluggish, and if you want to log in quickly to a remote machine, it is often not an option. By contrast, on a PowerShell console, you can essentially get the job done with a single command.
Enable Remote Desktop via PowerShell
However, there is a catch—actually, two. Windows Firewall might get in your way, and if PowerShell remoting is not enabled on the machine, things can get a bit tricky. I know of two methods to enable Remote Desktop remotely via PowerShell. Which method you use mostly depends on your Windows Firewall configuration.
Let’s assume first that PowerShell remoting is enabled on the remote machine. If so, you can simply enable Remote Desktop by modifying a registry key on the remote machine:
Invoke-Command -Computername <computer name> -ScriptBlock {Set-ItemProperty -Path "HKLM:SystemCurrentControlSetControlTerminal Server" -Name "fDenyTSConnections" –Value 0 }
We are using Invoke-Command to execute the Set-ItemProperty remotely, which changes the value fDenyTSConnections to 0.
Most likely, Windows Firewall blocks RDP on the remote machine. To open the Remote Desktop port, you can use this PowerShell command:
Invoke-Command -Computername <computer name> -ScriptBlock {Enable-NetFirewallRule -DisplayGroup "Remote Desktop"}
We are using PowerShell remoting again to execute Enable-NetFirewallRule remotely.
Enable Remote Desktop via WMI
If PowerShell remoting is not enabled on the remote machine, you can still use PowerShell via WMI for the task. This can be useful if you need to enable RDP on multiple machines or if this task is part of a larger automation problem and your organization’s security guidelines don’t allow PowerShell remoting. Sitaram wrote a PowerShell script that uses the Get-WmiObject cmdlet. This allows you to manage computers remotely without PowerShell remoting.
I removed the part of the script that first checks via Test-Connection if the computer is online because this would require an additional firewall setting to make the script work.
[cmdletbinding()]
param(
	[parameter(ValueFromPipeline=$true,ValueFromPipelineByPropertyName=$true)]
	[string[]]$ComputerName = $env:computername,
	[ValidateScript({Test-Path $_})]
	[string]$OutFolder = "c:"
)

begin {
$SuccessComps = Join-Path $OutFolder "Successcomps.txt"
$FailedComps = Join-Path $OutFolder "FailedComps.txt"
}

process {
	foreach($Computer in $ComputerName) {

		try {
			$RDP = Get-WmiObject -Class Win32_TerminalServiceSetting `
								-Namespace rootCIMV2TerminalServices `
								-Computer $Computer `
								-Authentication 6 `
								-ErrorAction Stop

		} catch {
			Write-Host "$Computer : WMIQueryFailed"
			"$Computer : WMIQueryFailed" | Out-File -FilePath $FailedComps -Append
			continue
		}

		if($RDP.AllowTSConnections -eq 1) {
			Write-Host "$Computer : RDP Already Enabled"
			"$Computer : RDP Already Enabled" | Out-File -FilePath $SuccessComps -Append
			continue
		} else {
			try {
				$result = $RDP.SetAllowTsConnections(1,1)
				if($result.ReturnValue -eq 0) {
					Write-Host "$Computer : Enabled RDP Successfully"
					"$Computer : RDP Enabled Successfully" | Out-File -FilePath $SuccessComps -Append
				} else {
					Write-Host "$Computer : Failed to enabled RDP"
					"$Computer : Failed to enable RDP" | Out-File -FilePath $FailedComps -Append

				}

			} catch {
				Write-Host "$computer : Failed to enabled RDP"
				"$Computer : Failed to enable RDP" | Out-File -FilePath $FailedComps -Append
			}
		}
	}

}

end {}
To understand how the script works, please read Sitaram’s article. To use the script, you just have to save it to a file (Enable-RDPAccess.ps1) and then run this command:
.Enable-RDPAccess.ps1 -ComputerName <computer name>
Enable RDP via WMI
If you want to enable RDP on multiple Windows 10 computers, you can save the computer names in a text file and then use Get-Content to pipe the computer names to Enable-RDPAccess.ps1:
Get-Content <path to text file> | Enable-RDPAccess.ps1
Theoretically, you probably can also configure the Windows Firewall to allow the RDP connection with Get-WmiObject. However, I couldn’t find the corresponding class. If you know more, please post a comment below.
Nevertheless, I know another way to configure the firewall via WMI, and that is with the wmic command:
wmic /node:<computer name> process call create "cmd.exe /c netsh firewall set service RemoteDesktop enable"
Of course, you can also enable Remote Desktop with wmic:
wmic /node:<computer name> process call create 'cmd.exe /c reg add "HKEY_LOCAL_MACHINESYSTEMCurrentControlSetControlTerminal Server" /v fDenyTSConnections /t REG_DWORD /d 0 /f'
Remotely enable RDP on Windows 10 with wmic
Note that you have to configure the Windows Firewall of the remote machine to allow WMI access for the PowerShell script and for wmic to work. You could do this via Group Policy:
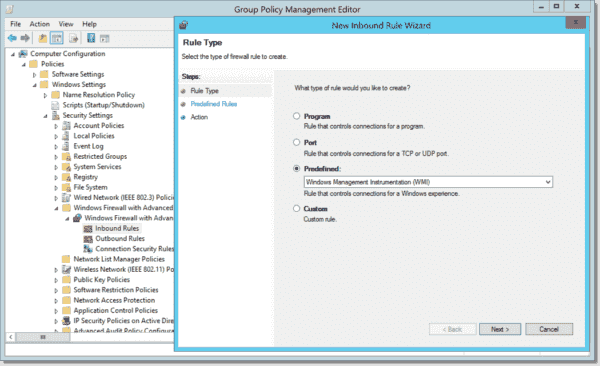
Computer Configuration > Policies > Windows Settings > Security Settings > Windows Firewall with Advanced Security.
Right-click Inbound Rules and then add the predefined rule Windows Management Instrumentation (WMI).
Enable WMI in Windows Firewall via Group Policy
But now we are where we were in the beginning. We could then just use Group Policy to enable RDP right away. However, if WMI is already enabled in your firewall for other reasons, using Get-WmiObject is an option.
Also, if you often have to enable RDP remotely on Windows 10 machines, but your company policy doesn’t allow you to work with PowerShell remoting, you could also consider opening WMI in your firewall permanently. I suppose it is less risky simply because WMI is more difficult to use than PowerShell remoting, and all the script kiddies who downloaded PowerShell scripts to hack into your systems will be in trouble.
Enable RDP via psexec
Yet another option is Microsoft’s free tool psexec. It also doesn’t require PowerShell remoting to be enabled. The only downside is that it is not as straightforward to use as Invoke-Command in PowerShell scripts. Psexec requires that Windows Firewall is open for File and Printer sharing, which is probably more common than open WMI ports or enabled PowerShell remoting:
Computer Configuration > Policies > Administrative Templates > Network > Network Connections > Windows Firewall > Domain Profile > Windows Firewall: Allow inbound file and printer sharing exception
Allow file and printer sharing in the Windows Firewall
To modify the registry to enable RDP with psexec, you have to run this command:
psexec.exe \<computer name> reg add "HKEY_LOCAL_MACHINESYSTEMCurrentControlSetControlTerminal Server" /v fDenyTSConnections /t REG_DWORD /d 0 /f
This command also just sets the registry key that disables Terminal Server access to 0.
To allow RDP connections in the Windows Firewall, you can also use psexec:
Subscribe to 4sysops newsletter!
psexec.exe \<computer name> netsh firewall set service RemoteDesktop enable
Enable Remote Desktop with psexec
Conclusion
If you have to enable Remote Desktop remotely, you have a variety of options. Which one you use depends on how quickly you need access and the Windows Firewall configuration on the remote machine. If all the firewall ports discussed in this post are closed, Group Policy is your only option. If someone is close to the computer, the person can reboot the machine to apply the GPO. Yes, you can also remotely reboot the machine. But if you don’t have a system management tool with this feature, you also have to open a couple of firewall ports for a remote reboot.
-
Partition Wizard
-
Partition Magic
- How to Enable Remote Desktop Windows 10 via CMD and PowerShell
By Vicky | Follow |
Last Updated December 02, 2020
Is Remote Desktop free? Is it secure? How do you know if Remote Desktop is enabled? In this post, MiniTool answers all the above questions. Furthermore, MiniTool also shows you how to enable this feature via Command Prompt and Windows PowerShell.
Windows 10 Remote Desktop
Remote Desktop is a feature that you can use to connect two computers or other devices so that you can access another computer remotely. With this feature, you can control other’s computer as if you have local access to the system in which you can move the mouse cursor, open programs, transfer files, and so on.
The Remote Desktop feature is quite useful if you run into some computer issues and you can ask help for your friends or other people to perform troubleshooting on your system without letting them visit your place.
But there is a pithy that this feature is unavailable on Windows 10 Home, but you can find it on Windows 10 Pro and Enterprise editions.
Is Remote Desktop Free and Secure?
The good news is that Microsoft asks for no charge of this feature. In terms of security, it can be said that the Remote Desktop feature offered by Microsoft is a perfectly viable option if you want to access other’s computer.
How to Know if Remote Desktop Is Enabled?
To check whether the Remote Desktop is enabled, you just need to complete the following steps.
Step 1: Right-click This PC or My Computer on your desktop and then select Properties from the menu.
Step 2: On the Properties window, click Remote settings on the left pane.
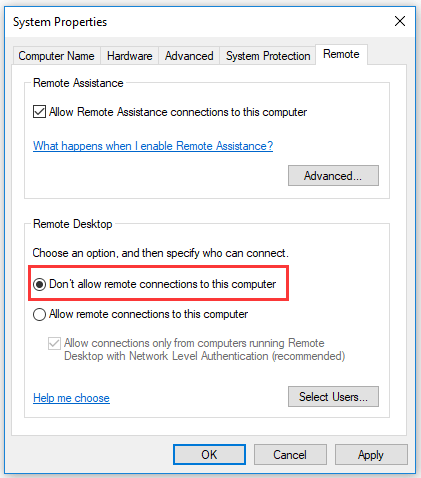
Step 3: Under the Remote tab, see if the box next to Don’t allow connections to this computer is checked to check if the Remote Desktop feature is enabled.
How to Enable Remote Desktop Windows 10?
If your Remote Desktop is not enabled on Windows 10, you can enable it now. You can enable this feature via Windows Settings, but some users ran into Windows Setting not working. So, in this post, I would like to show you how to enable Remote Desktop in two different ways, namely using Command Prompt and Windows PowerShell.
Enable Remote Desktop via Command Prompt
Step 1: Run Command Prompt as administrator.
- Type Command Prompt on the Cortana’s search bar.
- Right-click the result and then select Run as administrator.
Step 2: Type the following command on the Command Prompt window and then hit the Enter to run this command.
reg add «HKLMSYSTEMCurrentControlSetControlTerminal Server» /v fDenyTSConnections /t REG_DWORD /d 0 /f
Step 3: When the above command has been executed, you need to run another command and hit Enter to execute it. This command will add and update rules in the Firewall and after that, you can use Remote Desktop.
netsh advfirewall firewall set rule group=»remote desktop» new enable=yes
Enable Remote Desktop via Windows PowerShell
Step 1: Run Windows PowerShell as administrator.
- Type Windows PowerShell on the Cortana’s search bar.
- Right-click the result and then select Run as administrator.
Step 2: Type the following command and then hit the Enter key to run it.
Set-ItemProperty -Path ‘HKLM:SystemCurrentControlSetControlTerminal Server’-name «fDenyTSConnections» -Value 0
Step 3: Type another key and hit Enter.
Enable-NetFirewallRule -DisplayGroup «Remote Desktop»
If you want to disable the Remote Desktop feature on Windows 10, you can also run the following commands in Command Prompt and Windows PowerShell. Please do not forget to hit the Enter key after typing each command.
Disable Remote Desktop via Command Desktop:
- reg add «HKLMSYSTEMCurrentControlSetControlTerminal Server» /v fDenyTSConnections /t REG_DWORD /d 1 /f
- netsh advfirewall firewall set rule group=»remote desktop» new enable=No
Disable Remote Desktop via Windows PowerShell:
- Set-ItemProperty -Path ‘HKLM:SystemCurrentControlSetControlTerminal Server’-name «fDenyTSConnections» -Value 1
- Disable-NetFirewallRule -DisplayGroup «Remote Desktop»
About The Author
Position: Columnist
Vicky is a website editor who has been writing tech articles since she was graduated from university. Most of her articles talk about Windows PC and hard disk issues. Some of her articles also touch on YouTube usage and issues.
During her spare time, she likes to spend time reading, watching videos, and sitting on her Yoga mat to relax.
-
Partition Wizard
-
Partition Magic
- How to Enable Remote Desktop Windows 10 via CMD and PowerShell
By Vicky | Follow |
Last Updated December 02, 2020
Is Remote Desktop free? Is it secure? How do you know if Remote Desktop is enabled? In this post, MiniTool answers all the above questions. Furthermore, MiniTool also shows you how to enable this feature via Command Prompt and Windows PowerShell.
Windows 10 Remote Desktop
Remote Desktop is a feature that you can use to connect two computers or other devices so that you can access another computer remotely. With this feature, you can control other’s computer as if you have local access to the system in which you can move the mouse cursor, open programs, transfer files, and so on.
The Remote Desktop feature is quite useful if you run into some computer issues and you can ask help for your friends or other people to perform troubleshooting on your system without letting them visit your place.
But there is a pithy that this feature is unavailable on Windows 10 Home, but you can find it on Windows 10 Pro and Enterprise editions.
Is Remote Desktop Free and Secure?
The good news is that Microsoft asks for no charge of this feature. In terms of security, it can be said that the Remote Desktop feature offered by Microsoft is a perfectly viable option if you want to access other’s computer.
How to Know if Remote Desktop Is Enabled?
To check whether the Remote Desktop is enabled, you just need to complete the following steps.
Step 1: Right-click This PC or My Computer on your desktop and then select Properties from the menu.
Step 2: On the Properties window, click Remote settings on the left pane.
Step 3: Under the Remote tab, see if the box next to Don’t allow connections to this computer is checked to check if the Remote Desktop feature is enabled.
How to Enable Remote Desktop Windows 10?
If your Remote Desktop is not enabled on Windows 10, you can enable it now. You can enable this feature via Windows Settings, but some users ran into Windows Setting not working. So, in this post, I would like to show you how to enable Remote Desktop in two different ways, namely using Command Prompt and Windows PowerShell.
Enable Remote Desktop via Command Prompt
Step 1: Run Command Prompt as administrator.
- Type Command Prompt on the Cortana’s search bar.
- Right-click the result and then select Run as administrator.
Step 2: Type the following command on the Command Prompt window and then hit the Enter to run this command.
reg add «HKLMSYSTEMCurrentControlSetControlTerminal Server» /v fDenyTSConnections /t REG_DWORD /d 0 /f
Step 3: When the above command has been executed, you need to run another command and hit Enter to execute it. This command will add and update rules in the Firewall and after that, you can use Remote Desktop.
netsh advfirewall firewall set rule group=»remote desktop» new enable=yes
Enable Remote Desktop via Windows PowerShell
Step 1: Run Windows PowerShell as administrator.
- Type Windows PowerShell on the Cortana’s search bar.
- Right-click the result and then select Run as administrator.
Step 2: Type the following command and then hit the Enter key to run it.
Set-ItemProperty -Path ‘HKLM:SystemCurrentControlSetControlTerminal Server’-name «fDenyTSConnections» -Value 0
Step 3: Type another key and hit Enter.
Enable-NetFirewallRule -DisplayGroup «Remote Desktop»
If you want to disable the Remote Desktop feature on Windows 10, you can also run the following commands in Command Prompt and Windows PowerShell. Please do not forget to hit the Enter key after typing each command.
Disable Remote Desktop via Command Desktop:
- reg add «HKLMSYSTEMCurrentControlSetControlTerminal Server» /v fDenyTSConnections /t REG_DWORD /d 1 /f
- netsh advfirewall firewall set rule group=»remote desktop» new enable=No
Disable Remote Desktop via Windows PowerShell:
- Set-ItemProperty -Path ‘HKLM:SystemCurrentControlSetControlTerminal Server’-name «fDenyTSConnections» -Value 1
- Disable-NetFirewallRule -DisplayGroup «Remote Desktop»
About The Author
Position: Columnist
Vicky is a website editor who has been writing tech articles since she was graduated from university. Most of her articles talk about Windows PC and hard disk issues. Some of her articles also touch on YouTube usage and issues.
During her spare time, she likes to spend time reading, watching videos, and sitting on her Yoga mat to relax.
On Windows 10, the “Remote Desktop” feature allows you to access a computer remotely to help other users or manage services without physically being present at the location.
While you can manage this feature through the Settings app, you can also enable Remote Desktop on Windows 10 using PowerShell. You may want to use this method to create a script to configure Remote Desktop on multiple devices quickly or send an automated script to users to set up the feature automatically without additional steps.
This guide will teach you the steps to use PowerShell to enable (or disable) Remote Desktop on Windows 10 and open the required firewall ports for a successful connection.
- Enable Remote Desktop from PowerShell
- Disable Remote Desktop from PowerShell
Important: Remote Desktop is only available on Windows 10 Pro. It’s not a feature available on Windows 10 Home. Also, it’s recommended that you do a full backup of your computer before proceeding, as modifying the registry can cause irreversible damage to your system.
To enable the remote desktop protocol with PowerShell, use these steps:
-
Open Start on Windows 10.
-
Search for PowerShell, right-click the top result, and select the Run as administrator option.
-
Type the following command to enable Remote Desktop on Windows 10 and press Enter:
Set-ItemProperty -Path 'HKLM:SystemCurrentControlSetControlTerminal Server' -name "fDenyTSConnections" -value 0
-
(Optional) Type the following command to allow remote desktop through the Windows Firewall and press Enter:
Enable-NetFirewallRule -DisplayGroup "Remote Desktop"
Once you complete the steps, you can use the Remote Desktop modern app or the old Remote Desktop Connection app to access your computer remotely, even with the firewall enabled from Windows 10.
Disable Remote Desktop from PowerShell
To disable Remote Desktop from PowerShell on Windows 10, use these steps:
-
Open Start.
-
Search for PowerShell, right-click the top result, and select the Run as administrator option.
-
Type the following command to disable the remote desktop protocol and press Enter:
Set-ItemProperty -Path 'HKLM:SystemCurrentControlSetControlTerminal Server' -name "fDenyTSConnections" -value 1
-
(Optional) Type the following command to disable Remote Desktop through the Windows Firewall and press Enter:
Disable-NetFirewallRule -DisplayGroup "Remote Desktop"
After you complete the steps, the Remote Desktop feature will be disabled, and the firewall port will be closed.
We’re focusing this guide on PowerShell, but you can use these steps to perform the same tasks using Command Prompt.
We may earn commission for purchases using our links to help keep offering the free content. Privacy policy info.
All content on this site is provided with no warranties, express or implied. Use any information at your own risk. Always backup of your device and files before making any changes. Privacy policy info.
Самый простой способ включить Remote Desktop RD в семействе ОС Windows – это использовать графический интерфейс.
Для этого необходимо открыть элемент панели управления «Система», перейти на вкладку «Удаленные настройки» и включить опцию «Разрешить удаленные подключения к этому компьютеру» в разделе «Удаленный рабочий стол».
Однако для этого требуется локальный доступ к компьютеру, на котором вы хотите включить RDP.
Обычно вы можете запросить у пользователя (требуются права администратора) или местную техническую поддержку.
Однако что делать, если в удаленном офисе нет никого, кто мог бы включить удаленный рабочий стол локально?
По умолчанию удаленный рабочий стол отключен как в настольных версиях Windows, так и в Windows Server.
Если вы хотите удаленно включить удаленный рабочий стол (RDP) на удаленном хосте (сервере или компьютере), но у вас нет доступа к консоли локального устройства, мы покажем вам, как это сделать с помощью PowerShell.
Для этого на удаленном компьютере должна быть включена служба WinRM (удаленное управление Windows).
Служба WinRM включена по умолчанию во всех версиях Windows Server, начиная с Windows Server 2012 (однако WinRM по умолчанию отключена в клиентских операционных системах, таких как Windows 10).
Таким образом, для удаленного включения RD через PowerShell удаленный компьютер должен соответствовать следующим требованиям:
- Служба WinRM должна быть запущена;
- Вы должны иметь права администратора на удаленном устройстве;
- Брандмауэр Windows должен быть отключен или должны быть включены правила, разрешающие удаленный доступ через PowerShell Remoting.
Удаленное включение удаленного рабочего стола с помощью PowerShell
Предположим, вы хотите удаленно включить RDP в Windows Server 2012 R2 / 2016 / 2019.
На вашем компьютере откройте консоль PowerShell и выполните следующую команду для удаленного подключения к вашему серверу:
Enter-PSSession -ComputerName server.domain.local -Credential domainadministrator
Итак, вы установили удаленный сеанс с компьютером и теперь можете выполнять на нем команды PowerShell.
Чтобы включить удаленный рабочий стол, вам просто нужно изменить параметр реестра fDenyTSConnections с 1 на 0 на удаленном компьютере.
Запустите команду:
Set-ItemProperty -Path 'HKLM:SystemCurrentControlSetControlTerminal Server'-name "fDenyTSConnections" -Value 0
Когда RDP включен таким способом (в отличие от метода GUI), правило, разрешающее удаленные RDP-подключения, не включается в правила брандмауэра Windows.
Чтобы разрешить входящие RDP-подключения в брандмауэре Windows, выполните команду:
Enable-NetFirewallRule -DisplayGroup "Remote Desktop"
Если по какой-либо причине это правило брандмауэра удалено, вы можете создать его вручную:
netsh advfirewall firewall add rule name="allow RemoteDesktop" dir=in protocol=TCP localport=3389 action=allow
Если вам нужно включить безопасную аутентификацию RDP (NLA – аутентификация сетевого уровня), выполните команду:
Set-ItemProperty -Path 'HKLM:SystemCurrentControlSetControlTerminal ServerWinStationsRDP-Tcp' -name "UserAuthentication" -Value 1
Теперь со своего компьютера вы можете проверить, что порт TCP 3389 на удаленном хосте стал доступен. Запустите команду:
Test-NetConnection 192.168.1.11 -CommonTCPPort rdp
Должен быть такой результат:
ComputerName : 192.168.1.11
RemoteAddress : 192.168.1.11
RemotePort : 3389
InterfaceAlias : Ethernet0
SourceAddress : 192.168.1.90
TcpTestSucceeded : True
Это означает, что RDP на удаленном хосте включен, и вы можете установить подключение к удаленному рабочему столу с помощью клиента mstsc.
Заметка. По умолчанию только члены локальной группы администраторов могут подключаться через RDP удаленно. Чтобы разрешить подключения RDP для обычных пользователей, просто добавьте их в локальную группу «Пользователи удаленного рабочего стола».
Как включить удаленный рабочий стол через WMI?
Если вы хотите включить RDP на удаленном компьютере, на котором отключен WInRM (например, на обычном компьютере с Windows 10), вы можете использовать команду WMI PowerShell.
Чтобы проверить, включен ли доступ RDP на удаленном компьютере 192.168.1.90, выполните команду (см. Значение свойства AllowTSConnections):
Get-WmiObject -Class Win32_TerminalServiceSetting -Namespace rootCIMV2TerminalServices -Computer 192.168.1.90 -Authentication 6
Чтобы включить RDP и добавить правило исключений брандмауэра Windows, выполните следующую команду:
(Get-WmiObject -Class Win32_TerminalServiceSetting -Namespace rootCIMV2TerminalServices -Computer 192.168.1.90 -Authentication 6).SetAllowTSConnections(1,1)


