Продолжаем знакомиться с новыми возможностями ОС Windows Server 2012 R2. Ранее мы рассказывали о корпоративном аналоге DropBox в Windows Server 2012 R2 под названием Work Folders. Сегодня речь пойдет о еще одном новшестве новой серверной платформы – функции Web Application Proxy. Web Application Proxy – это новая функция роли Remote Access в Windows 2012 R2, позволяющая публиковать HTTP/ HTTPS приложения, расположенные в периметре корпоративной сети на клиентских устройствах (в первую очередь подразумеваются мобильные устройства) за ее периметром. Благодаря возможности интеграции c AD FS (служба может выступать в качестве ADFS-прокси), возможно обеспечить аутентификацию внешних пользователей, пытающихся получить доступ к опубликованным приложениям.
Web Application Proxy предоставляет такие же возможности публикации приложений, как и Forefront Unified Access Gateway (UAG), однако данная служба также позволяет взаимодействовать с другими серверами и сервисами, обеспечивая тем самым более гибкую и рациональную конфигурацию.
Web Application Proxy по сути выполняет функцию обратного прокси сервера (HTTP reverse proxy), организуя ретрансляцию запросов клиентов из внешней сети на внутренний сервер, и является межсетевым экраном на прикладном уровне.
Сервер со службой Web Application Proxy получает внешний HTTP/HTTPS трафик и терминирует его, после чего от своего имени инициирует новое подключение ко внутреннему приложению (веб-серверу). Т.е. внешние пользователи прямого доступа к внутреннему приложению реально не получают. Любой другой трафик, получаемый Web Application Proxy, отклоняется (в том числе отклоняются HTTP/HTTPS запросы, которые могут быть использованы при DoS, SSL и 0-day атаках).
Требования к организации Web Application Proxy и ключевые особенности:
- Систему можно развернуть на серверах с ОС Windows Server 2012 R2, включенных в домен Active Directory, с ролями AD FS и Web Application Proxy. Эти роли должны быть установлены на разных серверах.
- Необходимо обновить схему Active Directory до Windows Server 2012 R2 (обновлять контроллеры домена до Windows Server 2012 R2 не нужно)
- В качестве клиентских устройств поддерживаются устройства с ОС Windows, IOS (iPad и iPhone). Работы над клиентами для Android и Windows Phone пока еще не окончены
- Аутентификация клиентов осуществляется службой Active Directory Federation Services (ADFS), которая также выполняет функции ADFS – проксирования.
- Типовая схема размещения сервера с ролью Web Application Proxy представлена на рисунке. Данный сервер располагается в выделенной DMZ зоне и отделен от внешней (Интернет) и внутренней сети (Интранет) межсетевыми экранами. В этой конфигурации для работы Web Application Proxy требует наличия двух интерфейсов – внутреннего (Intranet) и внешнего (DMZ)

Установка роли ADFS в Windows Server 2012 R2
Для обеспечения дополнительной безопасности преаутентифкация внешних клиентов выполняется на сервере ADFS, в противном случае используется pass-through аутентификация на конечном сервере приложения (что менее секьюрно). Поэтому первый шаг при настройке Web Application Proxy – установка на отдельном сервере роли Active Directory Federation Services. 
При установке ADFS нужно выбрать SSL сертификат, который будет использоваться для шифрования, а также DNS имена, которые будут использоваться клиентами при подключении (соответствующие записи в DNS зоне придется создать самостоятельно).

Затем нужно указать сервисную учетную запись для службы ADFS. Необходимо учесть, что имя ADFS должно быть указано в атрибут Service Principal Name аккаунта. Сделать это можно командой:
setspn –F –S host/adfs.winitpro.ru adfssvc
 И, наконец, указать базу данных, в которой будет хранится информация: это может быть встроенная база на этом же сервере (WID — Windows Internal Database) или отдельная база на выделенном SQL-сервере.
Установка службы Web Application Proxy
Следующий этап, настройка самой службы Web Application Proxy. Напомним, что служба Web Application Proxy в Windows Server 2012 R2 является частью роли “Remote Access”. Установите службу Web Application Proxy и запустите мастер ее настройки.

На первом этапе мастер предложит Вам указать имя ADFS сервера и параметры учетной записи, имеющей доступ к данной службе.

Далее нужно указать сертификат (убедитесь, что в альтернативных именах сертификата содержится имя сервера ADFS).

Совет. Проверьте, что ваши DNSзоны настроены корректно: сервер с ролью WAP должен иметь возможность отрезолвить имя сервера ADFS, а он в свою очередь может разрешить имя прокси сервера. Сертификаты на обоих серверах должны включать имя службы федерации.
Публикация приложения через Web Application Proxy
После того, как установлены роли ADFS и Web Application Proxy (которая работает еще и как ADFS Proxy), можно перейти непосредственно к публикации наружу конкретного приложения. Сделать это можно с помощью консоли Remote Access Management Console.

Запустите мастер публикации и укажите, хотите ли вы использовать для преаутентификации службу ADFS (это именно наш вариант).

Затем нужно задать имя публикуемого приложения, используемый сертификат, внешний URL (имеенно его для подключения будут использовать внешние пользователи) и внутрений URL-адрес сервера, на который будут пересылаться запросы.
Совет. Если необходимо перенаправить внешнее приложение на альтернативный порт, необходимо задать его в URL, указаывающем на внутренний сервер. Например, если необходимо перенаправить внешние https запросы (443 порт) на 4443 порт, нужно указать:
Backend server URL: lync.winitpro.local:4443

Завершите работу мастера, и на этом публикация приложений окончена. Теперь, если попытаться с помощью браузера зайти на опубликованный внешний URL-адрес, то браузер сначала будет перенаправлен на службу аутентификации (ADFS Proxy), а после успешной аутентификации пользователь будет отправлен непосредственно на внутренний сайт (веб приложение).

Благодаря новой службе Web Application Proxy в Windows Server 2012 R2 возможно реализовать функционал обратного прокси сервера с целью публикации внутренних служб предприятия наружу без необходимости использования задействовать сторонние файерволы и продукты, в том числе такие, как Forefront и пр.
Client’s with a need to secure legacy servers behind a reverse proxy server have an option to use Microsoft IIS. While we typically recommend using a Linux server that has NGINX installed, we understand the need for such a use case and feel it’s important to demonstrate this basic technique.
We’ll be using a VM running Windows Server 2019 with IIS 10 installed. The IIS extension we’ll use is called URL Rewrite and has been around since IIS 7, so this technique should work well with older versions of IIS.
Assumptions
We won’t cover the basics of spinning up a VM running Windows Server on Microsoft Azure in this article. For more information on that topic, check out this great Microsoft Quickstart Tutorial on setting up a VM and installing IIS.
This article assumes you have the following items setup prior to starting this tutorial:
- Azure Portal — you will need a Microsoft Azure account.
- Azure Windows VM — we will be running Windows Server 2019 for this tutorial.
- IIS — we have installed IIS 10.
- Domain Name — you will need access to a domain or use a dynamic DNS service.
- DNS — we have setup azure-test.tevpro.com to point to the public IP of our VM.
Step 1: Install URL Rewrite
We have installed IIS 10 using a simple PowerShell command.
Doing so will setup and configure IIS using all the basic defaults that come with IIS.
Install-WindowsFeature -name Web-Server -IncludeManagementTools
The first thing we need to do is install an IIS extension called URL Rewrite. This will allow us to configure IIS to act as a reverse proxy server.
On the server you choose as your reverse proxy, download and install the URL Rewrite extension taking all the defaults when installing.
Step 2: Setup a Website
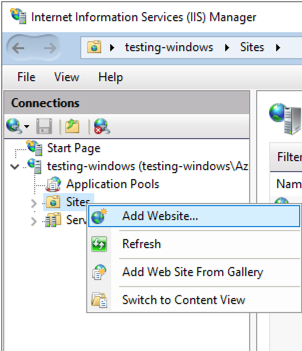
To begin, open up IIS manager and create a new website to use as your reverse proxy end-point. It should look like this:
Right click on Sites, then select Add Website.
Next, fill in some details about the website. For our example, we will create a new sub-domain for our Tevpro.com website.
Note: Even though we aren’t setting up an actual website, we still need to create a folder somewhere for our dummy site. Here, we created a test folder under our websites folder.
Once you have completed the form, click OK.

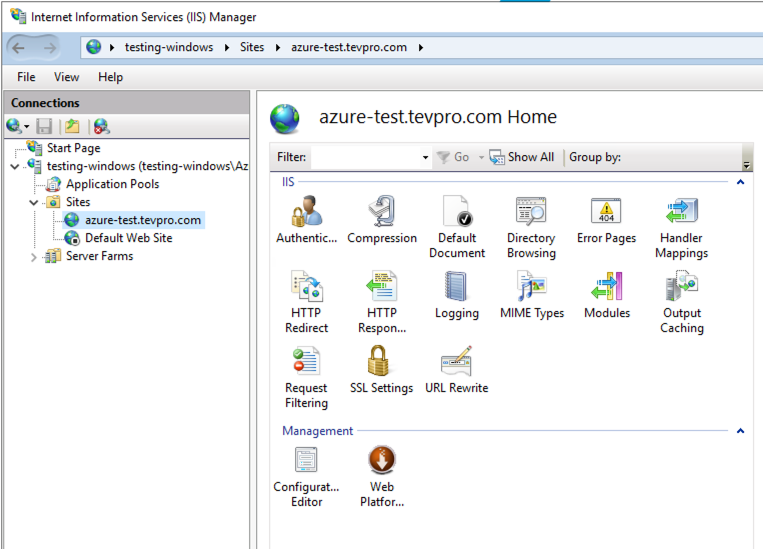
After clicking OK, we should see our website.
When selected, we should see the following options. Notice the URL Rewrite option that shows up after we successfully installed the extension. This is what we will use to configure our reverse proxy.
Step 3: Configure URL Rewrite
After we have setup our new website, that will act as our public end-point, we need to configure it as our reverse proxy.
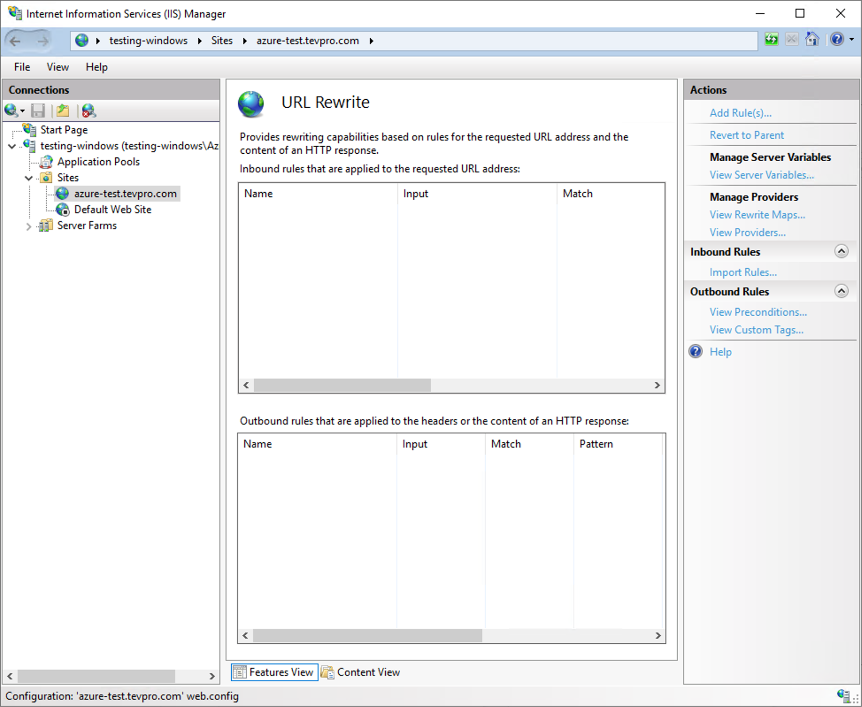
To do this, double click on the URL Rewrite option under our website (shown in Figure 3).
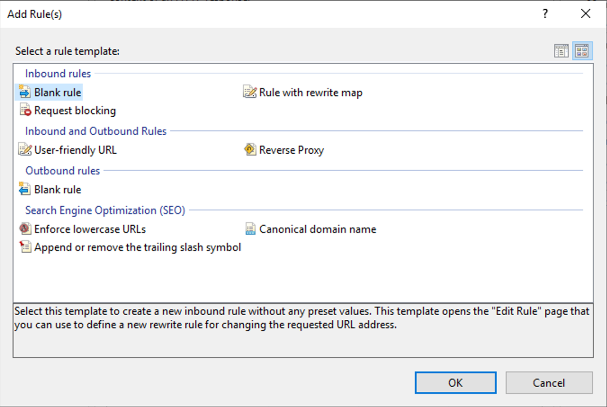
Next, click the Add Rule(s) item from the Actions section on the far right.
This will bring up the following dialog, under Inbound rules. Select Blank rule and click OK.
For our example, the configuration is pretty straightforward. It’s outside of the scope of this article, but know you can get more complex in the pattern matching and route handling.
First, we need to provide a name for our rule, add a pattern for how we want to match incoming request, and set the rewrite URL.
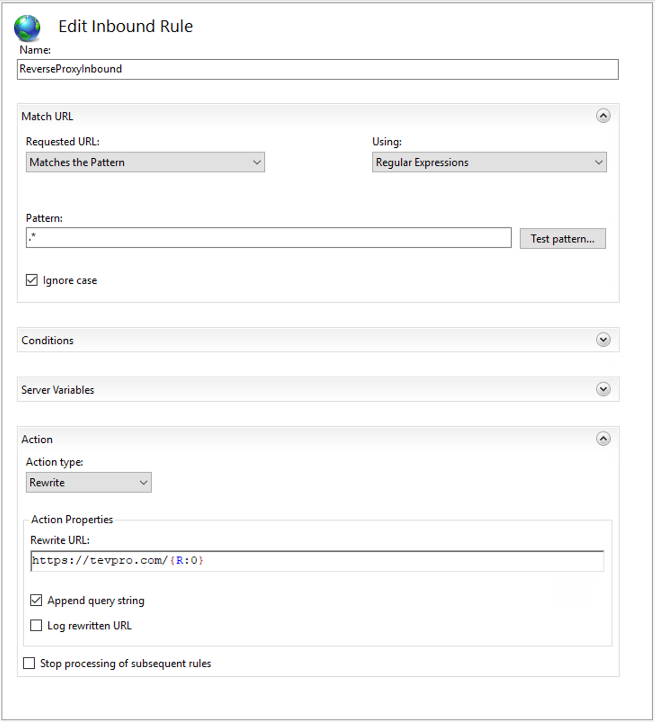
Breaking this step down a bit further, the pattern is how we want to handle capturing incoming request to the website we setup to act as our reverse proxy (azure-test.tevpro.com).
Since we want to be very broad and capture everything, our regex is quite simple. We want to match everything after the domain name, which is what «.*» will do for us.
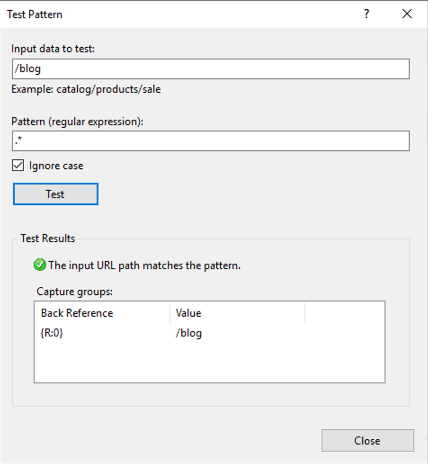
Click the Test pattern… button and a tool dialog pops up that allows us to test our pattern. We want to make sure that anytime someone visits azure-test.tevpro.com/blog, we capture anything after the domain name. This way we ensure when we rewrite the URL, we can point to the right location.
Take note of the capture group {R:0}. We will use this to configure our rewrite URL.
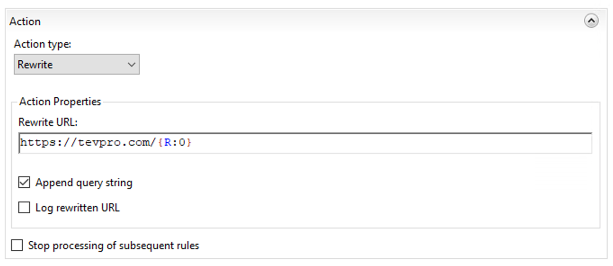
Taking a closer look at our action section, we see the Rewrite URL input field. This field indicates where we want our website to point. Since we want to route back to our website, we put in the URL and append the regex capture group {R:0} from the previous test pattern.
This will forward any request coming into our reverse proxy to the origin server tevpro.com keeping the URL fully intact.
Once you have finished setting up the new rule, click Apply.
And viola. We have configured our new website to act as a reverse proxy.
Note: Since we require SSL for our website, we configured SSL for our test server. That’s beyond the scope of this article, however we used Let’s Encrypt.
Step 4: Test the Reverse Proxy
Now that we have completed the reverse proxy configuration, we need to test our new website.
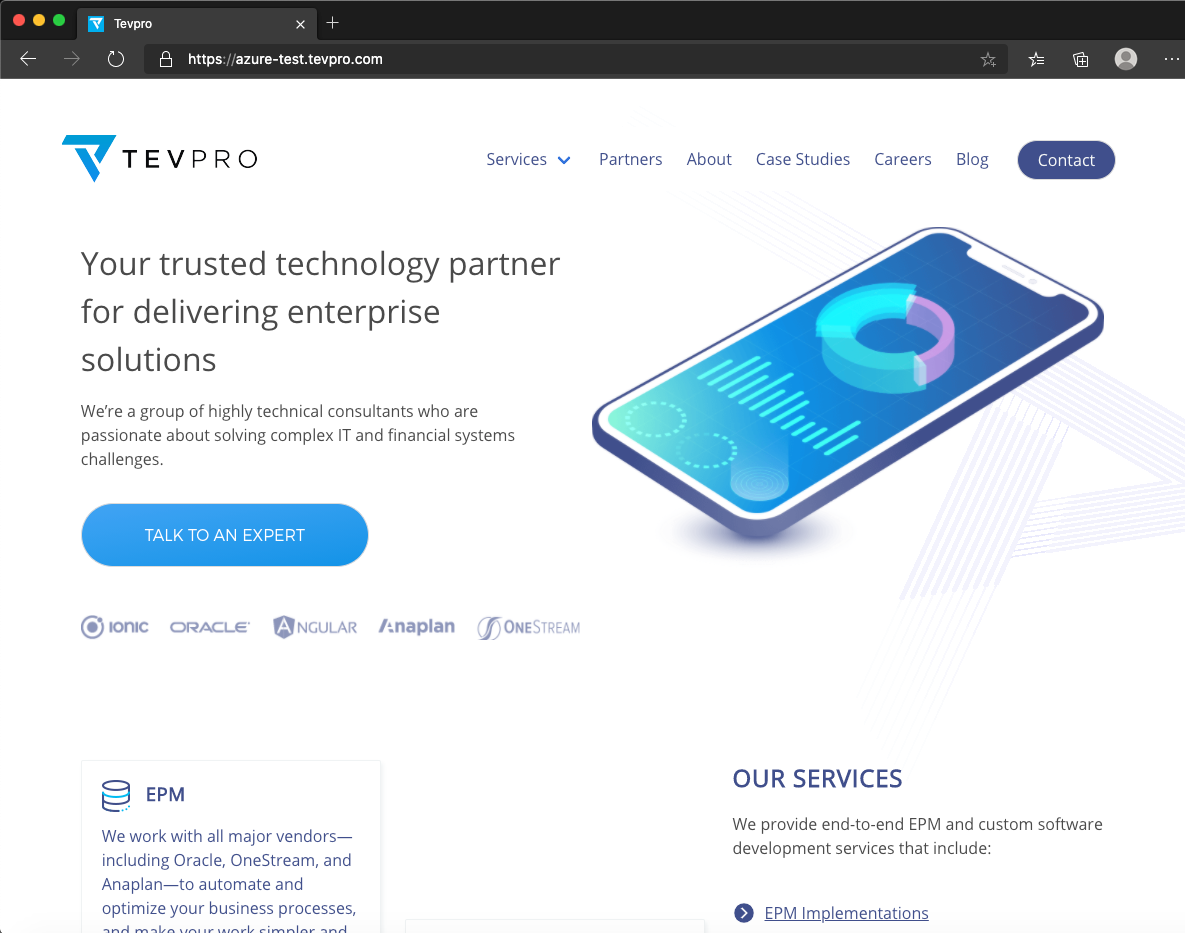
We expect that anytime a user visits the URL, azure-test.tevpro.com, we’ll automatically reroute the corresponding request to tevpro.com.
As you can see below, when we type the URL into our web browser, we see the Tevpro.com website. It is actually being masked behind our reverse proxy website. Pretty cool, right?
Conclusion
As you can see, it’s pretty simple technique to set up a reverse proxy server using IIS. The IIS extension does most of the heavy lifting and can be used for more complex routing when needed.
Whether you’re trying to protect a legacy system or add an extra layer in front of your existing website to make migrations easier, this approach has worked well over the years.
At Tevpro, we have helped countless clients improve their business with even the most basic techniques and technology solutions. We’re here to help clients discover their potential in a range of solutions, and weigh pros/cons, so that they are empowered to make the best decision for their business.
Feel free to reach out to us on Twitter or via email with any questions.
Photo by Science in HD

Below we may get step-by-step screenshots,
Step 1 — Verify and ensure appropriate IP addresses are assigned to all required fields.
Step 2 — Click on «Local Server«.
Step 3 — Click on «WORKGROUP«.
Step 4 — Click on «Change…«.
Step 5 — Click on «More…«.
Step 6 — Type the domain name and click on «OK«.
Step 10 — Click on «Close«.
Step 11 — Save rest of your background work, if any and click on «Restart Now«. If planning to restart after some time then click on «Restart Later«.
Step 12 — Click on «Add roles and features«.
Step 13 — Click on «Next«.
Step 14 — Keep selected «Role-based or feature-based installation» and click on «Next«.
Step 15 — Select/Verify the server name and IP address, then click on «Next«.
Step 16 — Locate «Remote Access» and click the check box.
Step 17 — Confirm the Tick mark and click on «Next«.
Step 18 — Click on «Next«.
Step 19 — Click on «Next«.
Step 20 — Locate «Web Application Proxy» and click the check box.
Step 21 — Click on «Add Features«.
Step 22 — Confirm the Tick mark and click on «Next«.
Step 23 — Click on «Install«.
Step 24 — Wait for some time until installation completes.
Step 25 — Click on «Open the Web Application Proxy Wizard«.
Step 26 — Click on «Next«.
Step 27 — Type «Federation Service Name«, «User name and Password» of a local administrator account on the federation servers.
Step 28 — Click on «Next«.
Step 29 — Select appropriate SSL Certificate from the drop down list and click on «Next«.
Step 30 — Review all selections and click on «Configure«.
Step 31 — Wait for some time until configuration completes.
Step 32 — Click on «Close«.
Step 33 — Click on «Publish«.
Step 34 — Click on «Next«.
Step 35 — Click on «Pass-through«.
Step 36 — Click on «Next«.
Step 37 — Type «Name«, «External URL» & «Backend server URL«, for example — «https://sso.dskoli.work/«, select appropriate «External certificate» from the drop down list.
Step 38 — Locate «Enable HTTP to HTTPS redirection«, click the check box, confirm the Tick mark and click on «Next«.
Step 39 — Review all selections and click on «Publish«.
Step 40 — Click on «Close«.
Step 41 — Published Web Application will be displayed in the list.
Step 42 — On the Public DNS Panel of domain, add «Host (A)» record for federation service name pointing to WAP server on Perimeter Network. For example, «sso.dskoli.work» pointing to Public IP.
“Thank You for being with me.”
IIS stands for Internet Information Services. It is a web server software package and has been designed for Windows Server. As a web administrator, you need IIS to create, configure, and publish sites on the web. Internet Information Services allows you to modify your website’s default pages, error pages, logging settings, and security settings. This article presents the Tutorial Install and Configure Reverse Proxy on IIS. Visiting Eldernode will fulfill your wishes to purchase your own Windows VPS Hosting.
IIS is mostly used to host ASP.NET web applications and static websites. Since IIS serves both standard HTML webpages and dynamic webpages, it is capable to send the HTML and associated images to the user’s browser. IIS is possible to run on Linux and Mac using Mono, but you are recommended to run IIS on Windows Server OS since it will be more versatile and stable.
While a forward proxy sits in front of a group of client machines, a reverse proxy is a server that sits in front of web servers and forwards client requests to those web servers. This guide will teach you how to install and configure Reverse Proxy with IIS on Windows Server.
How to Install Reverse Proxy on IIS
First, you need to learn to download and install the extension since IIS does not come with reverse proxy routing capability by default. Let’s go through the steps of this section and review the Routing Extension installation process.
Step 1:
Note: As you know, you must first enable IIS. Here are the Application Request Routing and URL Rewrite links that let you manually install certain extensions.
When you install the extensions, you will see the option URL Rewrite is adding to the IIS dashboard under Default Web Site. You must view something like below:
Step 2:
Now, you can add a reverse proxy rule. Click inside the URL Rewrite option and follow the below path to do this:
Right toolbar >> Select Actions >> Add Rule(s)… >> Inbound rules >> Blank rule or Reverse Proxy rule.
Then, you should see as below:
Let’s see what does the options of the above image means.
Pattern:
URL pattern in regex form to match for reverse proxy routing. It uses a regular expression format.
Conditions:
Extra conditions to complement Pattern. (Optional)
Server variables:
Add custom server variables if necessary. (Optional)
Action:
Action to perform if the URL is matching
Rewrite URL:
URL to route to if matched.
Pattern Note: In the field of pattern, you must check if the property of the URL for reverse routing matches or not. If yes, imply set pattern as (.*). Everything inside Pattern wrapped with parentheses can be referenced later in the Rewrite URL box in sequence ({R:1}, {R:2}, etc). {R:0} refers to the entire URL.
As you see in the above image, the request of http://api.myserver.com/myapi/auth/login is routing to http://localhost:8080 as http://localhost:8080/auth/login.
So, the {R:0} — myapi/api/login and {R:1} — auth/login variables will be created.
To apply the changes, click Apply after you modify the Pattern and Rewrite URL.
How to Configure Reverse Proxy on IIS
As you read earlier, IIS is not enabling by default. So, in this section, you will learn how to enable IIS proxy settings. Follow the below simple steps to proceed with the configuration of Reverse Proxy on IIS.
1- Open the IIS Manager and click on the server.
2- Double click on the Application Request Routing option.
3- At the right toolbar, select Server Proxy Settings…
4- Check Enable proxy.
5- Click Apply and proceed with the URL Rewriting configuration.
Note: Enable Forward Proxy to not get 404 Not Found. It will happen if you only apply the URL Rewrite rule.
That’s that! You just reviewed all the required steps to enabling reverse proxy routing in Windows IIS. The reverse proxy setup is now completing.
Conclusion
In this article, you learned How to Install And Configure Reverse Proxy on IIS. We do not expect you to encounter serious issues. IIS will be able to capture incoming traffic and forward it to the backend server and inspect responses from the backend server and rewrite URL links inside the responses to match the host headers that IIS uses to publish the site.

- Remove From My Forums
-
Question
-
Hi,
I have a web proxy server which can reach all internet addresses:
webproxy.myorg.org
What would be the best way to configure the proxy server for my ‘Windows 2016’ server?
I’m told that this would work:
netsh winhttp set proxy «webproxy.myorg.org:8080»
The server is part of an AD domain, so will this get removed by Group Policy.
Thanks for any help.
All replies
-
Please remember to mark the replies as answers if they help.
If you have feedback for TechNet Subscriber Support, contact
tnmff@microsoft.com. -
Good day!
As we haven’t heard from you for a few days, may I confirm with you on the latest status?
Much appreciated for your response in advance.Jolin
Please remember to mark the replies as answers if they help.
If you have feedback for TechNet Subscriber Support, contact
tnmff@microsoft.com. -
Believe you are doing well.
This is a kind follow up on this case. May I know the latest status?
Thanks and looking forward to your reply
Please remember to mark the replies as answers if they help.
If you have feedback for TechNet Subscriber Support, contact
tnmff@microsoft.com.