Deleted member 737638
Guest
-
#1
I set up my x470 Gaming Plus today, and was wondering what the difference between these two are? For the Universal driver, the website recommends it for Windows 10 RS3. Is the other driver for something else?

-
#2
for RS2 or earlier windows 10, you may use realtek high def driver. But note that if you wanna install nahimic 3, you need the universal driver and the software itself may be downloaded from microsoft store

-
#3
Hi, i have some questions about this topic, and i don’t think i should start new thread, so.
I have x470 gaming pro, and right now msi site offers me to download two different drivers on my choice
Realtek HD Universal Driver 6.0.1.8642
Code:
Must update Nahimic 3 in Microsoft store after updating Realtek HD Universal Driver.
Recommend installing this driver for Windows 10 RS3 or later versions.
and
Realtek High Definition Audio Driver 6.0.1.8619
As i understand, Nahimic 3 is software for artificial 3d sound / virtual surround, similar to Razer Surround, but free.
In Nahimic 3 description on MS Store it said — «Intel Processor» so i don’t sure if it even will works with AMD Ryzen.
So i have few questions.
— Will this Nahimic work for AMD?
— Why second driver (regular, not uad) still have Nahimic name in his archive? It some old version of Nahimic?
more important questions:
— It says, that UAD recommended for win10 RS3 or later — right now it’s RS5, why it so recommended?
— Being recommended it’s mean that using regular driver equal using outdated BAD driver? It will be not supported anymore by windows in some future or something?
— If it is recommended (and i can only use Nahimic 3 with UAD driver) how i suppose to do next things:
? Disable front panel jack detection
? Retask jacks (switch line-in with speakers or mic, etc)
— So using new recommended driver mean that i just CAN’T do anything that i was able to do with regular Realter HD Audio Manager? It suppose to be that way?
I googled it, and found almost nothing. It seems it’s possible to change some options (like disable front jack detection or remap inputs/outputs) but by editing registry it’s just… no way it’s future, and recommended.
I don’t get it.

-
#4
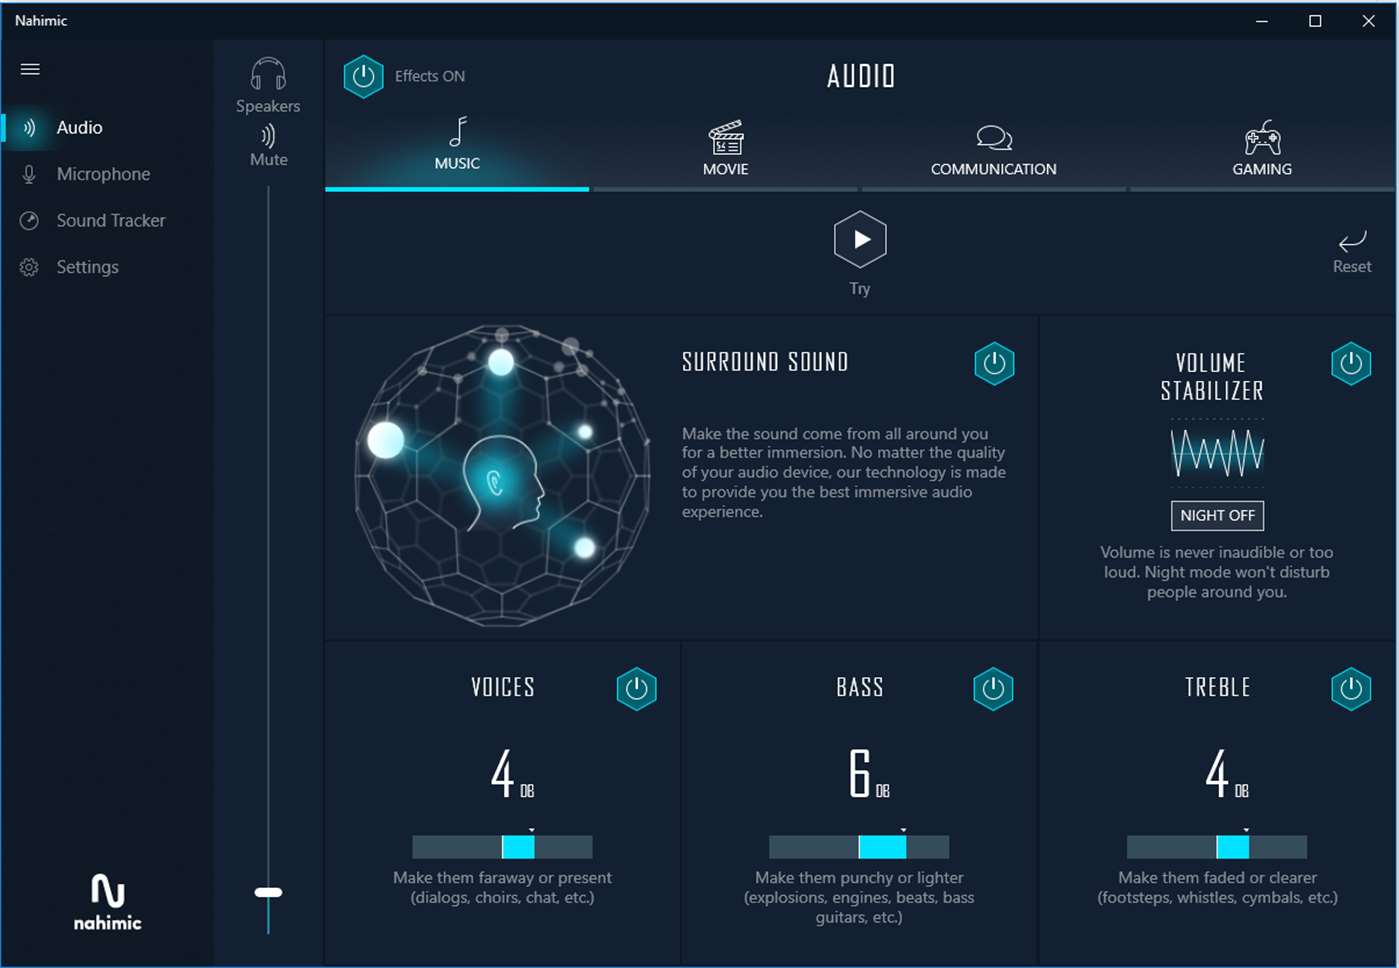
Nahimic 3 works with AMD processors, I have it running on a 2600X and X470 gaming pro
You need the small driver for nahimic 3, this software is very handy I think, it makes the gaming sound more lively and you can also change bass and stuff to your liking. I use it with my 5.1 suround sound system.
The drivers are both updated regularly, the only difference is that 1 works with nahimic and the other not.
You can still change audio inputs and stuff via a new realtek setup menu that has been created to work with nahimic 3.
Here is a screenshot of nahimic, sadly I can not make them myself because I had to send my MB back because of some USB problems.
-
#5
ProDoctoR1987 I’m gladly check out this Nahimic 3, but where i can get this new realtek menu? I saw that in autostart UAD driver adds some realtekuadservice but in system32 folder and doesn’t have GUI, it’s probably actually service and not just app, i wasn’t able to found any new GUI
-
#6
I tried install UAD driver once again and regardless of how hard i try to find any Realtek mention in Windows that will guide me to this menu, i can’t find anything.
New windows 10 UWP sound settings is joke, and also don’t have any links to this menu. And i can’t find any executable to start up.
I’m really lost…

-
#7
Hello,
Go >>Here<< and install:
[attachthumb=1]
Have a good day,

-

39.4 KB
Views: 5,481

-
#8
silentprayercg date=1556446022 said:
I tried install UAD driver once again and regardless of how hard i try to find any Realtek mention in Windows that will guide me to this menu, i can’t find anything.
New windows 10 UWP sound settings is joke, and also don’t have any links to this menu. And i can’t find any executable to start up.
I’m really lost…
Did you check the start menu ? There should also be a realtek folder when you have the driver + nahamic 3 installed. In that folder you can just start a realtek configuration menu.
Well that’s how it is with me, I have windows 10 x64.
-
#9
Hi rbleroy91, long time no see. You once again came to help me.
But omg that compression is bad, i barely see what it says. I’m actually didn’t expected it will be as link to store at MSI download page
And i tried to search it in store, but it show nothing. So i can get this app page only by link, that one hell of a a*s backwards system.
But i finally able to install it, and can check out this new driver and Nahimic. So thanks!
ProDoctoR1987 no i didn’t find any. There was some realtek related files in program files, but none of them start any configuration.
Only was able to get it as UWP app from magical link to ms store…
-
#10
silentprayercg date=1556457425 said:
Hi rbleroy91, long time no see. You once again came to help me.
Glad to see you again too! 
And i tried to search it in store, but it show nothing. So i can get this app page only by link, that one hell of a a*s backwards system.
But i finally able to install it, and can check out this new driver and Nahimic. So thanks!
Good news, happy for you! 
Friendly yours,
-
#11
silentprayercg date=1556457425 said:
Hi rbleroy91, long time no see. You once again came to help me.
But omg that compression is bad, i barely see what it says. I’m actually didn’t expected it will be as link to store at MSI download page
And i tried to search it in store, but it show nothing. So i can get this app page only by link, that one hell of a a*s backwards system.
But i finally able to install it, and can check out this new driver and Nahimic. So thanks!ProDoctoR1987 no i didn’t find any. There was some realtek related files in program files, but none of them start any configuration.
Only was able to get it as UWP app from magical link to ms store…
Got my MB back friday, here is a screenshot of the configuration folder I mentioned for realtek. I do use W10 X64.
-
379.4 KB
Views: 1,577

Содержание
- BIOS UPDATE HELP (MSI B450M PRO-VDH PLUS) NO BIOS FILE IN M-FLASH
- hicko129153202d2
- drhexukhere
- Available 50 files for MSI B450M PRO-VDH PLUS
- Select Files
- BUSINESS ELEGANCE
BIOS UPDATE HELP (MSI B450M PRO-VDH PLUS) NO BIOS FILE IN M-FLASH
hicko129153202d2
New member
I am trying to flash the bios of my motherboard to update it to version 7A38v9C2(Beta version) as it is currently outdated ( 9.30 18/03/2019 ) and I need it to support a Ryzen 5000 series CPU as I am upgrading to a Ryzen 7 5800X.
I have a 2GB USB pen, formatted it to FAT32 and extracted the ZIP file containing the updated BIOS version. I put the extracted folder into the root of the USB pen, and then attempted to launch the BIOS.
I navigated to the M-FLASH tab, and could see my USB drive there, but the only file it would show in the USB drive is the System Volume Information file, no BIOS file to click and update with.
I tried troubleshooting and following YouTube tutorials but have had no luck.
As a last resort I tried using Live Update 6 to scan for a BIOS update (despite reading forum posts advising against using Live Update 6 for BIOS update), however it just says ‘Your BIOS are the latest version. There is no need to upgrade’, despite the current BIOS version being released in 2019, and multiple newer versions being visible on the official MSI website. (https://www.msi.com/Motherboard/support/B450M-PRO-VDH-PLUS#down-bios)
Possible useful info:
PC was bought as a pre-built system from Cyberpower PC’s.
Motherboard:
MSI B450M PRO-VDH PLUS
Current bios version:
9.30 (Build Date 18/03/2019)
Version attempting to install:
7A38v9C2(Beta version) Released 2021-02-04
Please help me out, I want to flash my BIOS so that it updates to the latest version, making it compatible with my new 5000 series CPU. It shouldn’t be this hard, surely!
drhexukhere
Active member
I am trying to flash the bios of my motherboard to update it to version 7A38v9C2(Beta version) as it is currently outdated ( 9.30 18/03/2019 ) and I need it to support a Ryzen 5000 series CPU as I am upgrading to a Ryzen 7 5800X.
I have a 2GB USB pen, formatted it to FAT32 and extracted the ZIP file containing the updated BIOS version. I put the extracted folder into the root of the USB pen, and then attempted to launch the BIOS.
I navigated to the M-FLASH tab, and could see my USB drive there, but the only file it would show in the USB drive is the System Volume Information file, no BIOS file to click and update with.
I tried troubleshooting and following YouTube tutorials but have had no luck.
As a last resort I tried using Live Update 6 to scan for a BIOS update (despite reading forum posts advising against using Live Update 6 for BIOS update), however it just says ‘Your BIOS are the latest version. There is no need to upgrade’, despite the current BIOS version being released in 2019, and multiple newer versions being visible on the official MSI website. (https://www.msi.com/Motherboard/support/B450M-PRO-VDH-PLUS#down-bios)
Possible useful info:
PC was bought as a pre-built system from Cyberpower PC’s.
Motherboard:
MSI B450M PRO-VDH PLUS
Current bios version:
9.30 (Build Date 18/03/2019)
Version attempting to install:
7A38v9C2(Beta version) Released 2021-02-04
Please help me out, I want to flash my BIOS so that it updates to the latest version, making it compatible with my new 5000 series CPU. It shouldn’t be this hard, surely!
Источник
Available 50 files for MSI B450M PRO-VDH PLUS
Select Files
MSI B450M PRO-VDH PLUS
Improve memory compatibility.
MSI B450M PRO-VDH PLUS
Update to AMD ComboAm4v2PI 1.2.0.5.
MSI B450M PRO-VDH PLUS
Updated AMD AGESA ComboAm4PI 1.0.0.6
Fix HDMI audio lost issueWhen use AMD RX570 vga card.
MSI B450M PRO-VDH PLUS
Update AMD ComboPI1.0.0.3ab.b.a.
MSI B450M PRO-VDH PLUS
Support ComboPI 1.0.0.3ab.
Support OC Profile.
Improve memory compatibility.
MSI B450M PRO-VDH PLUS
Update AMD ComboPI1.0.0.3ab.
Support Ryzen 3000 series CPU. Ryzen 9 3900X/Ryzen 7 3800X/Ryzen 7 3700X/Ryzen 5 3600X/Ryzen 5 3600/Ryzen 5 3400G/Ryzen 3 3200.G.
ChangeBIOS UI to GSE
MSI B450M PRO-VDH PLUS
Support new upcoming AMD CPU.
MSI B450M PRO-VDH PLUS
Improve memory compatibility.
MSI B450M PRO-VDH PLUS
New BIOS Release.
MSI B450M PRO-VDH PLUS
Update AMD ComboPI1.0.0.4 Patch B (SMU v46.54).
Improved system boot up time.
Improved PCIE compatibility.
MSI B450M PRO-VDH PLUS
On-Board PIDE/SATA Drivers
AM4 RAID Driver
Windows 10 64-bits
MSI B450M PRO-VDH PLUS
System & Chipset Drivers
AMD Chipset Driver
Windows 10 64-bits
MSI B450M PRO-VDH PLUS
On-Board VGA Drivers
AMD Graphics Drivers
Windows 10 64-bits
MSI B450M PRO-VDH PLUS
On-Board Audio Drivers
Realtek HD Universal Driver
Windows 10 64-bits
Note
Recommend installing this driver for Windows 10 RS3 or later versions.
MSI B450M PRO-VDH PLUS
On-Board Audio Drivers
Realtek High Definition Audio Driver
Windows 10 64-bits
Note
Recommend installing this driver for Windows 10 RS2 or earlier versions.
MSI B450M PRO-VDH PLUS
Realtek PCI-E Ethernet Drivers
Windows 10 64-bits
MSI B450M PRO-VDH PLUS
CPU-Z MSI GAMING
Windows 10 64-bits
Z User Guide
This version support DDR4
5000 display and above.
MSI B450M PRO-VDH PLUS
Windows 10 64-bits
MSI B450M PRO-VDH PLUS
On-Board PIDE/SATA Drivers
AM4 RAID Driver
Windows 11 64-bits
MSI B450M PRO-VDH PLUS
System & Chipset Drivers
AMD Chipset Driver
Windows 11 64-bits
MSI B450M PRO-VDH PLUS
On-Board VGA Drivers
AMD Graphics Drivers
Windows 11 64-bits
MSI B450M PRO-VDH PLUS
On-Board Audio Drivers
Realtek HD Universal Driver
Windows 11 64-bits
Note
Recommend installing this driver for Windows 10 RS3 or later versions.
MSI B450M PRO-VDH PLUS
Realtek PCI-E Ethernet Drivers
Windows 11 64-bits
MSI B450M PRO-VDH PLUS
CPU-Z MSI GAMING
Windows 11 64-bits
Z User Guide
This version support DDR4
5000 display and above.
MSI B450M PRO-VDH PLUS
Windows 11 64-bits
MSI B450M PRO-VDH PLUS
On-Board Audio Drivers
Realtek High Definition Audio Driver
Windows 7 32-bits
Note
Recommend installing this driver for Windows 10 RS2 or earlier versions.
MSI B450M PRO-VDH PLUS
Realtek PCI-E Ethernet Drivers
Windows 7 32-bits
MSI B450M PRO-VDH PLUS
Windows 7 32-bits
MSI B450M PRO-VDH PLUS
Windows 7 32-bits
MSI B450M PRO-VDH PLUS
CPU-Z MSI GAMING
Windows 7 32-bits
Z User Guide
This version support DDR4
5000 display and above.
MSI B450M PRO-VDH PLUS
Windows 7 32-bits
MSI B450M PRO-VDH PLUS
Windows 7 32-bits
MSI B450M PRO-VDH PLUS
Windows 7 32-bits
Note
Fixed MCU RGB memory second generation firmware auto lock issue after loading customized profile.
MSI B450M PRO-VDH PLUS
Windows 7 32-bits
Description
The utility for msi products to charge Apple iPad/iPhone series.
Note
When connect iPad to USB port for charging, please remove other USB devices for stability.
MSI B450M PRO-VDH PLUS
Windows 7 32-bits
MSI B450M PRO-VDH PLUS
Windows 7 64-bits
MSI B450M PRO-VDH PLUS
Windows 7 64-bits
MSI B450M PRO-VDH PLUS
CPU-Z MSI GAMING
Windows 7 64-bits
Z User Guide
This version support DDR4
5000 display and above.
MSI B450M PRO-VDH PLUS
Windows 7 64-bits
MSI B450M PRO-VDH PLUS
Windows 7 64-bits
MSI B450M PRO-VDH PLUS
Windows 7 64-bits
Note
Fixed MCU RGB memory second generation firmware auto lock issue after loading customized profile.
MSI B450M PRO-VDH PLUS
Windows 7 64-bits
Description
The utility for msi products to charge Apple iPad/iPhone series.
Note
When connect iPad to USB port for charging, please remove other USB devices for stability.
MSI B450M PRO-VDH PLUS
Windows 7 64-bits
MSI B450M PRO-VDH PLUS
On-Board PIDE/SATA Drivers
AM4 RAID Driver
Windows 7 64-bits
MSI B450M PRO-VDH PLUS
System & Chipset Drivers
AMD Chipset Driver
Windows 7 64-bits
Note
Support Bristol Ridge CPU?Summit Ridge CPU?Pinnacle Ridge CPU.
Include AMD SMBus Driver?AMD Graphics Driver?AMD USB Controller Driver.
Microsoft Win7 Hotfix installation is required for AMD Chipset Driver to be installed successfully.
MSI B450M PRO-VDH PLUS
AMD USB3.1 Driver
Windows 7 64-bits
MSI B450M PRO-VDH PLUS
On-Board Audio Drivers
Realtek High Definition Audio Driver
Windows 7 64-bits
Note
Recommend installing this driver for Windows 10 RS2 or earlier versions.
MSI B450M PRO-VDH PLUS
Realtek PCI-E Ethernet Drivers
Windows 7 64-bits
MSI B450M PRO-VDH PLUS
MSI B450M PRO-VDH PLUS
Welcome to the HelpDrivers, driver for printers.
Original files: In HelpDrivers, all drivers, manuals, BIOS, etc. are those originally provided by the official manufacturers. Click here to learn more
You can download by either clicking the ‘Download’ button. From the File Download window, verify that «Save» is selected and click OK.
Do not rename the file you’re downloading, it may cause installation problems.
Источник
BUSINESS ELEGANCE

- PS/2 Port
- HDMI Port
- USB 3.1 Gen1 Ports
- LAN Port
- HD Audio Connectors
- Heavy plated heatsinks
Leading heatsinks design, for maximum cooling - DDR4 Boost
Optimized traces and isolated memory circuitry - PCI-E Steel Armor
Protecting VGA cards against bending and EMI - Turbo M.2
Delivering Speeds Up to 32Gb/s using PCI-Express Gen3 x4 - Audio Boost
Reward your ears with studio grade sound quality.

MSI motherboards feature tons of convenient and smart design, such as convenient pin-header keep out zone, friendly SATA & USB location and so on, so DIY users can pick and choose any gaming rig they want.

Every MSI motherboards are certified by strict mechanic that feature convenient pin-header keep out zone, friendly SATA & USB location for compatibility with the widest range of components and devices, so DIY user can pick and choose the components they want. More than that, we offer a dedicated Qualified Vendor List (QVL) for the most critical part — memory. Combining with MSI DDR4 Boost technology, we provide the maximum compatibility even over clocking, so you confirm and choose any gaming rig as you want.

Cooling your PC is essential for reliable performance. MSI motherboards feature excellent power design with solid and heavy heatsink. We’ve made sure to include enough fan headers with full control to allow you to cool your system any way you want.

MSI motherboards featured all the latest solution for enthusiast gamers and prosumers. CPU and memory enhancement and fast storage and USB transfer speed are ready to be on the battlefield.

MSI motherboards support all the latest storage standards, which allows users to connect any ultra-fast storage device. Start games faster, load levels faster and have a real advantage over your enemies.

High-quality power supply components and intelligent fans optimize CPU cooling performance, which is a key factor in ensuring stable and high-speed operation of the system.

MSI motherboards provide the most fascinating in-studio advantages, designed to satisfy any professional workflow. Elevate your listening pleasure and network connection with MSI Audio & LAN. Enjoy extreme sound quality and uninterrupted online experience.

Reward your ears with studio grade sound quality. MSI Audio Boost delivers the highest sound quality through the use of premium quality audio components. This lets you enjoy breathtaking, studio quality sound to create the most immersive sound experience.

Each MSI motherboard is built based on the specific topic in order to match different tastes and favors. Furthermore, MSI also adopts the modern style to design the heatsink through huge surface and sleek but simple cuts in order to make the heatsink and appearance looks ripped and powerful. Combined with neutral color, such as black, grey and silver, as the main background, MSI motherboard can perfect fit different RGB LED effects and strongly shows the gamers tunes.

PRO Series motherboards combine stable functionality and high quality assembly for clever business solutions. Designed to satisfy any professional workflow, PRO Series motherboards make life easier for businesses and office use.

With years of experience, MSI is no stranger to building high-performance motherboards. Our R&D and engineering teams have reviewed countless designs, evaluated a wide selection of high quality components, and developed products for reliability even under extreme conditions.

Using only the finest quality components and integrating the latest technological innovations delivers the best possible professional experience. Rigorous quality testing under the most extreme conditions ensures a super reliable, long-lasting and high performance motherboard.
Источник
Содержание
- Recommend installing this driver for windows 10 rs2 or earlier versions перевод на русский
- Откройте возможности нейронного машинного перевода PROMT
- install update
- См. также в других словарях:
- install update
- См. также в других словарях:
- Uninstall, Disable, Roll back, Update Device Drivers using Device Manager in Windows 11/10
- Device Manager in Windows 11/10
- Uninstall Drivers in Windows
- Update Drivers in Windows
- Roll back, Disable, Enable Drivers in Windows
- Ways to install Windows 11
- Before you begin
- Windows Update in Settings (recommended)
- Other ways to install Windows 11 (not recommended)
Recommend installing this driver for windows 10 rs2 or earlier versions перевод на русский


Откройте возможности нейронного машинного перевода PROMT
PROMT.One (www.translate.ru) – бесплатный онлайн-переводчик на основе нейронных сетей (NMT) для азербайджанского, английского, арабского, греческого, иврита, испанского, итальянского, казахского, китайского, корейского, немецкого, португальского, русского, татарского, турецкого, туркменского, узбекского, украинского, финского, французского, эстонского и японского языков.
Изучайте времена и формы глаголов в английском, немецком, испанском, французском и русском языках в разделе Спряжение и склонение. Учите употребление слов и выражений в разных Контекстах. Мы собрали для вас миллионы примеров перевода на разные языки, которые помогут вам в изучении иностранных языков и подготовке домашних заданий.
Переводите в любом месте и в любое время с помощью мобильного переводчика PROMT.One для iOS и Android. Попробуйте голосовой и фотоперевод, скачайте языковые пакеты для офлайн-перевода.
Поделиться переводом
Ваш текст переведен частично.
Вы можете переводить не более 999 символов за один раз.
Войдите или зарегистрируйтесь бесплатно на PROMT.One и переводите еще больше!

Добавить в избранное
Для добавления в Избранное необходимо авторизоваться
Источник
install update
1 de-update
2 update
s вчт. изменения свойств update вчт. дополнение
изменять в соответствии с новыми данными
by copy вчт. модификация с созданием новой версии
in situ вчт. модификация без создания новой версии
3 install
4 install
5 update
6 update
7 install
The new president was installed immediately after the election. — Новый президент был введен в должность сразу после избрания.
Cromwell was declared protector; and with great solemnity installed in that high office. — Кромвеля объявили протектором и с большой торжественностью официально ввели в эту высокую должность.
8 install
9 update
10 appraisal update
11 development safety update report (DSUR)
12 major update
13 minor update
14 install electricity
15 install user
Once logged in, the install user can assign the user name, level, and password for each of other users.
16 development safety update report
17 install
18 update
19 update
20 auto-update
См. также в других словарях:
update — <>I.<> noun 1 the most recent information ADJECTIVE ▪ daily, monthly, weekly, etc. ▪ frequent, periodic, regular ▪ … Collocations dictionary
install — verb ADVERB ▪ correctly, properly, safely (esp. BrE) ▪ Make sure the equipment is properly installed. ▪ She saw her guests safely installed in their rooms and then went downstairs. (BrE, figurative) … Collocations dictionary
Update Manager — Infobox Software name = Update Manager caption = developer = Canonical Ltd. latest release version = 0.45 latest release date = 11 October, 2006 latest preview version = latest preview date = operating system = Linux genre = Package Manager… … Wikipedia
Windows Update — A component of Microsoft Windows Windows Update running on Windows 7 … Wikipedia
Apple Software Update — Infobox Software name = Software Update caption = developer = Apple Inc. latest release version = 3.0.3 (180.2) latest release date = 2007 operating system = Mac OS X Windows genre = System Utility license = Proprietary website =… … Wikipedia
Zero Install — Infobox Software name = Zero Install caption = Zero Install ready to run a downloaded program developer = Thomas Leonard latest release version = 0.35 latest release date = release date|2008|08|16 latest preview version = latest preview date =… … Wikipedia
Windows Server Update Services — (WSUS) provides a software update service for Microsoft Windows operating systems and other Microsoft software. WSUS is a locally managed system that works with the public Microsoft Update website to give system administrators more control. By… … Wikipedia
Microsoft Update Catalog — URL Microsoft Update Catalog Type of site Downloads Owner … Wikipedia
Microsoft Office Update — is a free online service from Microsoft that allow users to detect and install updates for Microsoft Office products. It has been incorporated into Microsoft Update, the upgrade to Windows Update.This update service supports Office 2000, Office… … Wikipedia
KateOS — Infobox OS name = KateOS caption = KateOS III running Xfce developer = Damian Rakowski family = Linux source model = Open source working state = Current latest release version = 3.6 latest release date = release date|2007|09|17 kernel type =… … Wikipedia
Источник
install update
41 delta install
42 install
43 update
44 update rate
45 update
46 update
47 install
to install smb. as director — назначать кого-л. директором
No, he’s been installed in the chairmanship for too long to be dismissed now. — Нет, он слишком долго был председателем, чтобы его освободили от этих обязанностей теперь.
Cromwell was declared Lord-Protector and with great solemnity installed in that high office. — Кромвеля объявили лордом-протектором и с большой торжественностью официально ввели в эту должность.
to install oneself — устроиться, рассесться
Once I’ve installed myself in my favourite chair, I don’t like to get up. — Когда я устраиваюсь в своём любимом кресле, то не люблю вставать.
48 update
The new edition has been thoroughly revised and updated to reflect the events in the previous decade. — Новое издание было полностью переработано и дополнено с учётом событий, произошедших за последние десять лет.
They have just completed the job of updating the dictionary. — Они только что закончили работу по обновлению словаря.
An updated version is planned for the near future. — В ближайшем будущем планируется выпуск обновлённой версии.
Most antivirus software updates automatically when you connect to the web. — Антивирусное ПО в большинстве случаев обновляется автоматически, когда вы выходите в интернет.
49 update
50 install
51 update
52 update
Pre-tax profits are expected to exceed £50m, the company said in a trading update. — Как заявила компания в последней информации о торговле, ожидается, что прибыль до вычета налогов превысит 50 миллионов ф. ст.
53 install
54 update
55 install oneself
56 to install a machine
57 update
update a report — уточни́ть докла́д
update a plan — скорректи́ровать план
58 feature update
59 install
60 update
См. также в других словарях:
update — <>I.<> noun 1 the most recent information ADJECTIVE ▪ daily, monthly, weekly, etc. ▪ frequent, periodic, regular ▪ … Collocations dictionary
install — verb ADVERB ▪ correctly, properly, safely (esp. BrE) ▪ Make sure the equipment is properly installed. ▪ She saw her guests safely installed in their rooms and then went downstairs. (BrE, figurative) … Collocations dictionary
Update Manager — Infobox Software name = Update Manager caption = developer = Canonical Ltd. latest release version = 0.45 latest release date = 11 October, 2006 latest preview version = latest preview date = operating system = Linux genre = Package Manager… … Wikipedia
Windows Update — A component of Microsoft Windows Windows Update running on Windows 7 … Wikipedia
Apple Software Update — Infobox Software name = Software Update caption = developer = Apple Inc. latest release version = 3.0.3 (180.2) latest release date = 2007 operating system = Mac OS X Windows genre = System Utility license = Proprietary website =… … Wikipedia
Zero Install — Infobox Software name = Zero Install caption = Zero Install ready to run a downloaded program developer = Thomas Leonard latest release version = 0.35 latest release date = release date|2008|08|16 latest preview version = latest preview date =… … Wikipedia
Windows Server Update Services — (WSUS) provides a software update service for Microsoft Windows operating systems and other Microsoft software. WSUS is a locally managed system that works with the public Microsoft Update website to give system administrators more control. By… … Wikipedia
Microsoft Update Catalog — URL Microsoft Update Catalog Type of site Downloads Owner … Wikipedia
Microsoft Office Update — is a free online service from Microsoft that allow users to detect and install updates for Microsoft Office products. It has been incorporated into Microsoft Update, the upgrade to Windows Update.This update service supports Office 2000, Office… … Wikipedia
KateOS — Infobox OS name = KateOS caption = KateOS III running Xfce developer = Damian Rakowski family = Linux source model = Open source working state = Current latest release version = 3.6 latest release date = release date|2007|09|17 kernel type =… … Wikipedia
Источник
Uninstall, Disable, Roll back, Update Device Drivers using Device Manager in Windows 11/10
The Device Manager in Windows lets you view the hardware installed on your computer, along with its Properties. It lets you change hardware settings, identify device drivers for each device, view and change settings and properties, and install, uninstall, update, rollback, enable, disable the drivers.
While you can use a free Driver Updater software, this article will tell you how to Backup, Uninstall, Disable, Roll Back, Update Device Drivers using the Device Manager in Windows 11/10/8/7.
Device Manager in Windows 11/10
While on the Windows 11/10 desktop, open the WinX Menu and select Device Manager to open it.

Uninstall Drivers in Windows
If you wish to uninstall the driver, click on Uninstall.
Display Driver Uninstaller will help you completely uninstall AMD, INTEL, NVIDIA Drivers.
Update Drivers in Windows
NOTE: You can now run Windows Updates and see if any driver updates are available under Optional Updates. It’s a preferred, quicker, and easier way.
If you wish to check for updates and update the Driver, click on Update Driver Software. The wizard will open and offer you two options:
Select and click on the option you want, to proceed further.
Roll back, Disable, Enable Drivers in Windows
The right-click context menu will also let you open the Driver’s properties. Click on Properties to open the Properties box. Select the Driver tab.
Date: October 26, 2020 Tags: Drivers, Tips
Источник
Ways to install Windows 11
This article describes ways to install Windows 11.
Note: To upgrade to Windows 11, devices should meet the Windows 11 minimum system requirements. Some Windows 10 features aren’t available in Windows 11. System requirements to experience some Windows 11 features and apps will exceed the Windows 11 minimum system requirements. Find Windows 11 specs, features, and computer requirements
Before you begin
Make sure the device you want to install Windows 11 on meets the minimum system requirements. If your device is currently running Windows 10, we recommend you verify the minimum system requirements using the PC Health Check app. We do not recommend installing Windows 11 on a device that doesn’t meet requirements. For more info, see Installing Windows 11 on devices that don’t meet minimum system requirements.
Windows Update in Settings (recommended)
If you’re upgrading from Windows 10, we recommend you wait until you’re notified through Windows Update that the upgrade is ready for your device. To check if Windows 11 is ready for your device, select Start > Settings > Update & Security > Windows Update > Check for updates.
For known issues that might affect your device, you can also check the Windows release health hub.
Other ways to install Windows 11 (not recommended)
Use the Installation Assistant to upgrade
We recommend you wait until your device has been offered the upgrade to Windows 11 before you use the Installation Assistant. When you’re ready, you can find it on the Windows 11 software download page.
Create Windows 11 installation media
On the Windows 11 software download page, select Create tool now and follow the instructions to install Windows 11.
Microsoft recommends against installing Windows 11 on a device that does not meet the Windows 11 minimum system requirements. If you choose to install Windows 11 on a device that does not meet these requirements, and you acknowledge and understand the risks, you can create the following registry key values and bypass the check for TPM 2.0 (at least TPM 1.2 is required) and the CPU family and model.
Registry Key: HKEY_LOCAL_MACHINESYSTEMSetupMoSetup
Note: Serious problems might occur if you modify the registry incorrectly by using Registry Editor or by using another method. These problems might require that you reinstall the operating system. Microsoft cannot guarantee that these problems can be solved. Modify the registry at your own risk.
There are two installation paths available:
Upgrade by launching Setup on the media while running Windows 10. You will have the option to:
a. Perform a Full Upgrade, which keeps personal files (including drivers), apps, and Windows Settings. This is the default experience and is the one that Installation Assistant uses.
b. Keep Data Only will keep personal files (including drivers) only, not apps and not Windows Settings.
c. Clean Install will install Windows 11 and keep nothing from the Windows 10 installation. For more info, see Give your PC a Fresh Start.
Boot from media to launch Setup. This path is a clean install and will not retain previous files or settings. For more info, see Give your PC a Fresh Start.
Important: You should verify that your device meets minimum system requirements before you choose to boot from media, because it will allow you to install Windows 11 if you have at least TPM 1.2 (instead of the minimum system requirement of TPM 2.0), and it will not verify that your processor is on the approved CPU list based on family and model of processor.
Create an image install
Use DISM or 3rd party tools to directly apply an existing Windows 11 image to the disk.
Important: An image install of Windows 11 will not check for the following requirements: TPM 2.0 (at least TPM 1.2 is required) and CPU family and model.
Источник
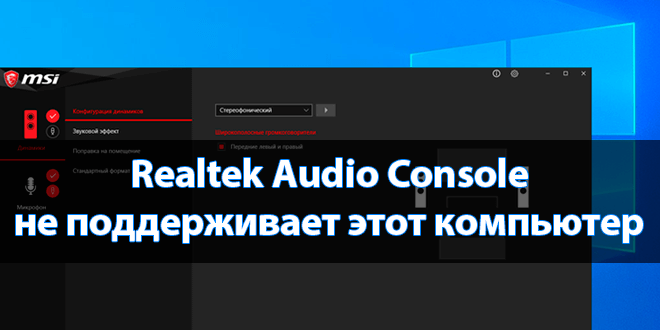
Программное обеспечение Realtek Audio Console может не поддерживать этот компьютер. С такой проблемой уже встречался. Недавно приобрёл себе материнку MSI B450 Gaming Plus Max под процессор AMD Ryzen 5 3600. С некоторыми драйверами мне пришлось ещё разбираться.
Эта статья расскажет, почему пишет: Realtek Audio Console не поддерживает этот компьютер под управлением Windows 10. На моей материнской плате используется кодек Realtek ALC892. Точно знаю, что он её поддерживает. Есть проблема в работе драйвера, нужно его переустановить.
Как переустановить драйвера Realtek
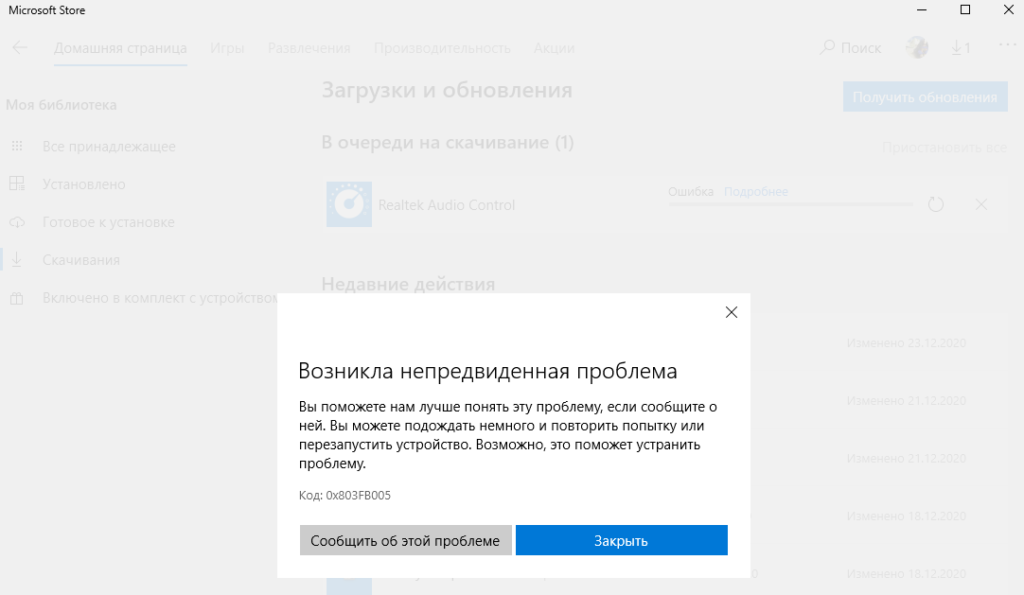
Небольшая предыстория. У меня был установлен Realtek High Definition Audio Driver с модифицированным диспетчером Realtek HD (фирменный стиль MSI). При попытке установить Realtek Audio Console с Microsoft Store возникла непредвиденная проблема с кодом: 0x803FB005.
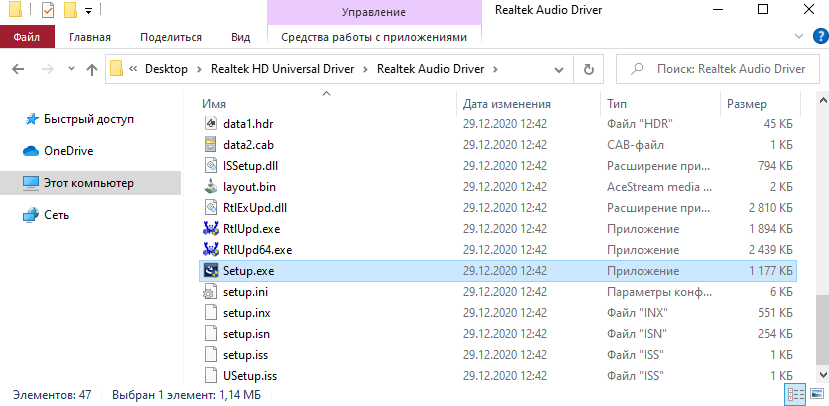
На сайте производителя материнской платы найдите свою модель. В моём случае нужно открыть страницу Поддержка > Драйверы и выбрать версию системы Windows. В разделе On-Board Audio Drivers загрузите именно Realtek HD Universal Driver (include Nahimic Driver).

В разделе имеется два разных драйвера Realtek. А именно классический Realtek High Definition Audio и универсальный Realtek HD Universal. Что касается драйверов HDA, пакет включает в себя все чипсеты Realtek. А драйверы UAD уже подходят не ко всем звуковым картам Realtek.
| Аудиодрайвер | Замечание & Описание |
| Realtek High Definition Audio Driver (HDA) | Этот драйвер рекомендуется для Windows 10 Redstone 2 или более ранних версий. Обеспечивает высококачественное звучание. Для управления звуковыми эффектами и настройки устройств используется Диспетчер Realtek HD. |
|
Версия 6.0.1.8619 |
Дата выпуска 2019-03-25 |
| Realtek HD Universal Driver (UAD) include Nahimic Driver |
Драйвер для Windows 10 RS3 или более поздних версий. Обеспечивает наилучшее качество звука с помощью аудиокодека Realtek. Вы можете настроить звуковые эффекты всех аудиоустройств прямо в приложении Realtek Audio Console. |
|
Версия 6.0.9071.1 |
Дата выпуска 2020-12-11 |
Распакуйте загруженный архив в удобное Вам место. И в разделе Realtek HD Universal Driver > Realtek Audio Driver запустите Setup.exe. Не будем останавливаться на процессе установки. Всё просто несколько раз Далее и отметив Да, перезагрузить сейчас жмите Готово.
А например, установка драйвера Realtek с помощью MSI Dragon Center приводит к ошибке: невозможно подключиться к службе RPC. Чтобы её исправить, нужно удалить Realtek Audio Driver и после перезагрузки заново установить, загрузив его на сайте производителя материнки.

Как установить Realtek Audio Console
Самостоятельно в Microsoft Store найдите Realtek Audio Console. Или воспользуйтесь ссылкой ниже (кнопка Скачать), у Вас откроется Магазин Windows 10. Напротив приложения нажмите Установить. Не знаю почему, но сейчас в поиске не получается найти Realtek Audio Console.
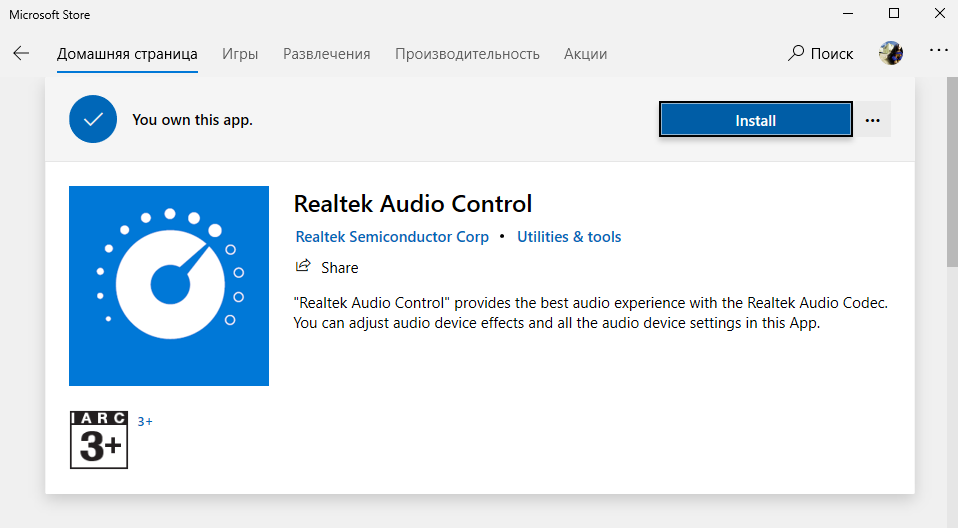
Ещё раз в двух словах разберёмся. Приложение Realtek Audio Console работает только с Realtek HD Universal Driver (include Nahimic Driver). Не все материнские платы его поддерживают. Если нужна функциональность Nahimic 3, тогда нужно установить именно универсальный драйвер.

Заключение
С программным обеспечением Realtek Audio Console бывают различные непонятные ситуации. Например, оно не поддерживает этот компьютер, невозможно подключиться к службе RPC или вовсе ошибка загрузки (код 0x803FB005). Интересно то, что способ исправления универсальный.
Вкратце на сайте производителя материнки загружаете Realtek HD Universal Driver. Удаляете установленную версию Realtek Driver и Audio Console. Перезагружаете компьютер и вручную их устанавливаете. В процессе написания MSI Dragon Center дважды некорректно ставил драйвер.


") (8 оценок, среднее: 2,50 из 5)
(8 оценок, среднее: 2,50 из 5)

Администратор и основатель проекта Windd.ru. Интересуюсь всеми новыми технологиями. Знаю толк в правильной сборке ПК. Участник программы предварительной оценки Windows Insider Preview. Могу с лёгкостью подобрать комплектующие с учётом соотношения цены — качества. Мой Компьютер: AMD Ryzen 5 3600 | MSI B450 Gaming Plus MAX | ASUS STRIX RX580 8GB GAMING | V-COLOR 16GB Skywalker PRISM RGB (2х8GB).
Содержание
- Realtek HD Universal Driver vs Realtek High Definition Audio Driver
- jbearden3
- plutomate
- silentprayercg
- Windows 10 Build 21343 (Dev): Новые иконки в «Проводнике Windows»
- Новое в Windows 10 build 21343
- Новые иконки в «Проводнике Windows»
- Новые иконки. До и после
- Улучшения в Windows Sandbox и Microsoft Defender Application Guard (MDAG)
- Изменения и улучшения
- Исправления
- Известные проблемы
- Установка через Центр обновления Windows
- Скачать Windows 10 build 21343 (Dev)
- Альтернативная загрузка
- Clean Installing Windows 10 RS2/Version 1703/Creator’s Update with UEFI and Secure Boot
- Prerequisites – Installation Media
- Data Loss Warning
- Booting from the Bootable USB in UEFI
- The Windows Setup: Part 1
- The Windows Setup: Part 2 The Product Key
- The Windows Setup: Part 3 Drive Options
- The Windows Setup: Part 4 Region, Keyboard and Network
- The Windows Setup: Part 5 User Accounts
- The Windows Setup: Part 6 End of Install
- Checking Product Activation
- Driver Installation
- 1. Intel Management Engine Interface
- 2. Intel Rapid Storage Technology Applications – Under SATA Drives and/or CPU
- 3. Laptop Touchpad
- 4. Dell Quickset/ControlPoint
Realtek HD Universal Driver vs Realtek High Definition Audio Driver
jbearden3
New member

plutomate
Well-known member

silentprayercg
New member
Hi, i have some questions about this topic, and i don’t think i should start new thread, so.
I have x470 gaming pro, and right now msi site offers me to download two different drivers on my choice
Realtek HD Universal Driver 6.0.1.8642
Realtek High Definition Audio Driver 6.0.1.8619
As i understand, Nahimic 3 is software for artificial 3d sound / virtual surround, similar to Razer Surround, but free.
In Nahimic 3 description on MS Store it said — «Intel Processor» so i don’t sure if it even will works with AMD Ryzen.
So i have few questions.
— Will this Nahimic work for AMD?
— Why second driver (regular, not uad) still have Nahimic name in his archive? It some old version of Nahimic?
more important questions:
— It says, that UAD recommended for win10 RS3 or later — right now it’s RS5, why it so recommended?
— Being recommended it’s mean that using regular driver equal using outdated BAD driver? It will be not supported anymore by windows in some future or something?
— If it is recommended (and i can only use Nahimic 3 with UAD driver) how i suppose to do next things:
? Disable front panel jack detection
? Retask jacks (switch line-in with speakers or mic, etc)
— So using new recommended driver mean that i just CAN’T do anything that i was able to do with regular Realter HD Audio Manager? It suppose to be that way?
I googled it, and found almost nothing. It seems it’s possible to change some options (like disable front jack detection or remap inputs/outputs) but by editing registry it’s just. no way it’s future, and recommended.
I don’t get it.
Windows 10 Build 21343 (Dev): Новые иконки в «Проводнике Windows»
Windows 10 Insider Preview build 21343.1000 – сборка, которая относится к ветви разработки RS_PRERELEASE, доступна участникам программы Windows Insider на Канале Dev.
Канал Dev предназначен для опытных, технически подкованных пользователей.
Инсайдеры на этом канале получают самые ранние сборки в цикле разработки (Active Development Branch). Данные сборки могут иметь проблемы стабильности, нарушения функциональности или требовать ручного исправления проблем.
Сборки на канале Dev не соответствуют определенной версии Windows 10. Новые функции и улучшения ОС на этом канале появятся в будущих выпусках Windows 10, когда они будут готовы.
Новое в Windows 10 build 21343
Новые иконки в «Проводнике Windows»
Microsoft запустила обновление иконок в Windows 10 в прошлом году, начиная со встроенных приложений. С тех пор разработчики продолжили обновление иконок в Windows 10, включая новый значок для «Безопасность Windows», значок «Экранного диктора» и новая иконка для «Экранного диктора». Теперь Microsoft делает следующий шаг, обновив многие системные иконки, используемые в «Проводнике Windows».
Обратите внимание: после обновления до этой сборки любые пользовательские папки, прикрепленные к Быстрому доступу, исчезнут. Вы можете либо записать их перед обновлением до этой сборки, либо приостановить обновление до тех пор, пока не будет доступно исправление.
Для большей согласованности в продуктах Microsoft, отображающих файлы, было внесено несколько изменений, таких как ориентация иконок папок и значков типа файлов по умолчанию. Примечательно, что пользовательские папки верхнего уровня, такие как «Рабочий стол», «Документы», «Загрузки» и «Изображения», имеют новый дизайн, который должен немного облегчить их разделение с первого взгляда. Иконка «Корзины» также была обновлена.
Новые иконки. До и после
Как вы можете себе представить, в Windows 10 есть много иконок, и еще больше иконок будут обновляться с течением времени.
Улучшения в Windows Sandbox и Microsoft Defender Application Guard (MDAG)
Как Windows Sandbox, так и Microsoft Defender Application Guard используют преимущества специальной контейнерной технологии, встроенной в Windows 10. Ранее время работы контейнера совпадало с временем работы хоста. Начиная со сборки 21343, Microsoft представляет новую среду выполнения, которая разработана и оптимизирована для сценариев работы с контейнерами. Она легкая и обеспечивает более быстрое время запуска как для Windows Sandbox, так и для Microsoft Defender Application Guard.
Разработчики ожидают, что это изменение не повлияет на совместимость приложений внутри Windows Sandbox. Однако, это значительное изменение, и пользователи могут столкнуться с некоторыми изменениями в поведении.
К тому же, Windows Sandbox теперь включает новый браузер Microsoft Edge на базе Chromium (начиная со сборки 21313). Посмотрите инструкцию по началу работы с Windows Sandbox.
Изменения и улучшения
- «Средства администрирования Windows» в меню «Пуск» переименованы в «Инструменты Windows».
- Новости и интересы доступны для инсайдеров из Китая.
- Начато развёртывание нового дизайна окна кандидатов в редакторе ввода с использованием упрощенных китайских редакторов ввода.
- Обновлена ссылка «Получить справку» на сенсорной клавиатуре — теперь она называется «Подробнее».
- Обновлен проводник при переименовании файлов, чтобы поддерживать использование CTRL + стрелка влево / вправо для перемещения курсора между словами в имени файла, а также CTRL + Delete и CTRL + Backspace для одновременного удаления слов, как и в других местах Windows.
- Внесены некоторые обновления в связанные с сетью окна в Windows, чтобы отображаемые символы использовали обновленные системные значки.
- На основании отзывов, если на странице «Общие впечатления» выявляется проблема с подключением к вашей учетной записи, теперь она будет отправлять уведомления непосредственно в Центр действий, а не повторять всплывающие уведомления, которые необходимо отклонять.
Исправления
- Исправлена проблема, из-за которой на устройствах с определенными дисками NVMe происходил сброс диска или проверка на ошибки с сообщением WHEA_UNCORRECTABLE_ERROR.
- Исправлена проблема, из-за которой некоторые устройства получали ошибки DPC_WATCHDOG_ERROR.
- Исправлена проблема, из-за которой на некоторых устройствах с сетевыми адаптерами Realtek и драйвером версии 1.0.0.4 периодически терялось подключение к сети.
- [Новости и интересы] Исправлена проблема, из-за которой в некоторых случаях текст кнопки новостей и интересов имел неправильный высококонтрастный цвет.
- [Новости и интересы] Исправлена ошибка, из-за которой новости и интересы могли быть недоступны при входе в Windows без доступа к интернету.
- [Новости и интересы] Внесено несколько исправлений, чтобы повысить производительность и надежность процесса explorer.exe.
- Исправлена проблема, приводившая к сбою процесса explorer.exe с кодом события 1002.
- Исправлена утечка памяти при взаимодействии с корзиной.
- Исправлен тупик в последних сборках Dev, связанный с индексатором, из-за которого не удавалось запускать меню «Пуск» или другие приложения при первой загрузке после обновления.
- Исправлена проблема, из-за которой на некоторых мониторах с высокой частотой обновления игры работали только с частотой 60 Гц. Эта проблема также могла привести к разрыву в сценариях монитора с переменной частотой обновления.
- Исправлена проблема, которая в последнее время приводила к сбою некоторых приложений во время установки и, возможно, другим действиям.
- Исправлена проблема, из-за которой в некоторых приложениях неожиданно отображалось сообщение: «Вы должны перезагрузить компьютер, чтобы новые настройки вступили в силу».
- Исправлена проблема, приводившая к размытому тексту на дополнительных мониторах в недавней сборке Dev, когда для монитора была установлена портретная ориентация.
- Исправлена проблема, влияющая на надежность WIN + Shift + Влево / Вправо в последних сборках.
- Исправлена проблема, из-за которой в диалоговом окне свойств проводника информация о размере, для дисков большой емкости, могла быть обрезана.
- Исправлена проблема, из-за которой на некоторых языках заголовок в верхней части окна приложения Параметры мог обрываться текст.
- Внесены исправления, чтобы решить проблему, из-за которой изображение профиля пользователя в заголовке приложения Параметры мерцало при изменении размера окна.
- Исправлена проблема, из-за которой после изменения конечных точек звука регуляторы громкости в настройках звука могли перестать работать.
- Исправлена проблема, из-за которой в последнее время на странице приложения состояния сети отсутствовали параметры «Свойства» и «Использование данных».
- Исправлена проблема, из-за которой, если вы искали «Расширенная конфигурация жестов сенсорной панели» и щелкали результат, он просто запускал приложение Параметры, а не конкретную страницу настроек.
- Исправлена проблема, приводившая к сбою приложения Параметры у некоторых инсайдеров после запуска двойным щелчком по значку «Обновления Windows» на панели задач.
- Исправлена проблема, из-за которой Azure Data Studio не могла обновиться до более новой версии на ARM64.
- Исправлены проблемы, из-за которых Ngen.exe не мог предварительно скомпилировать двоичные файлы .NET Framework на ARM64.
- Исправлена проблема, которая могла привести к отключению некоторых дочерних клавиш сенсорной клавиатуры.
- Исправлена проблема, из-за которой щелчок вверх в верхнем ряду сенсорной клавиатуры не вставлял соответствующий номер при использовании небольшой раскладки сенсорной клавиатуры, в отличие от других раскладок.
- Исправлена проблема, которая могла привести к проблемам с отображением окон кандидатов редактора ввода после переключения между светлой и темной темой.
- Исправлена проблема, из-за которой, после ввода очень длинной строки текста, японский редактор ввода мог отключаться.
- Исправлена проблема, из-за которой нельзя было использовать SHIFT + Пробел в приложении Excel при вводе японского текста.
- Исправлена проблема с японским вводом, из-за которой невозможно было ввести предложение, начинающееся с «?», при вводе в режиме ввода Кана.
Известные проблемы
- [Игры] В этой сборке есть проблема, из-за которой некоторые игры могут давать сбой, не синхронизируют данные сохранения, когда игра ведется на другом устройстве, или не сохраняются при установке новой игры.
- [Проводник] После установки этой сборки исчезнут все папки, прикрепленные к быстрому доступу в проводнике. Обязательно обратите внимание на то, что закреплено, перед обновлением, чтобы вы могли снова найти эти папки.
- [Проводник] Некоторые инсайдеры могут столкнуться с отсутствием всего раздела папок быстрого доступа. Если вы столкнулись с этим, удаление этой строки: вернет раздел, однако не вернет элементы, которые были откреплены.
- Изучаются отчеты о том, что процесс обновления зависает в течение длительного времени при попытке установить новую сборку.
- Ведется работа над исправлением проблемы, когда новые функции для закрепленных сайтов на панели задач не работает для некоторых веб-сайтов. В качестве решения, вы можете открепить сайт от панели задач, удалить его со страницы edge://apps , а затем снова закрепить сайт.
- [Новости и интересы] Ведется работа над исправлением проблемы, когда новости и интересы могут быть недоступны при входе в Windows без доступа к Интернету, но возвращаться при подключении к сети.
- [Новости и интересы] Иногда новости и интересы не могут быть закрыты ручкой-стилусом.
- Инсайдеры с устройствами ARM64, установившие предварительную версию графического драйвера Qualcomm Adreno на Surface Pro X, могут столкнуться с пониженной яркостью дисплея.
- Всплывающее меню сети на экране входа в систему в этой сборке не открывается, что не позволит вам подключиться к новой сети перед входом в систему. Если ваша учетная запись находится в состоянии, требующем подключения к Интернету, вы можете обойти проблему, попав в зону действия ранее настроенной сети Wi-Fi или сначала войдя в систему с любой другой доступной учетной записью.
- В этой сборке, панель рукописного ввода не будет работать с вводом при помощи пера на компьютерах с ARM64.
- В этой сборке присутствует проблема, которая может привести к сбою поиска при его запуске.
Полный список улучшений, изменений и известных ошибок доступен в официальном анонсе на сайте Microsoft.
Установка через Центр обновления Windows
Перейдите в меню Параметры > Обновление и безопасность и нажмите Проверить наличие обновлений . Для завершения установки потребуется перезагрузка компьютера.
Скачать Windows 10 build 21343 (Dev)
Альтернативная загрузка
Если вы хотите выполнить чистую установку Windows 10 Insider Preview build 21343, то, используя сервис WZT-UUP, можно скачать UUP файлы прямо с официальных серверов Microsoft и автоматически создать загрузочный ISO-образ, используя следующую инструкцию:
Clean Installing Windows 10 RS2/Version 1703/Creator’s Update with UEFI and Secure Boot
This guide is obsolete as a newer build of Windows 10 has been released. See Windows OEM Downloads and FAQs for the newer guide.
DellWindowsReinstallationGuide is written and maintained by Philip Yip. Scotland  , Great Britain (GB),
  , United Kingdom (UK)
  .
.
Thanks in advance for leaving any donations Philip.
You have created a Windows 10 Version 1709 Bootable USB. For more details see Creating a Windows 10 Bootable USB for a UEFI BIOS within Windows.
I will use a Windows 10 Version 1703 English (UK)/English (International) Bootable USB as an example. Installation is however identical for Windows 10 Version 1709.

Data Loss Warning
During the Windows Partition all Partitions will be Deleted and a Low Level Format Performed.
Back up any data from your old Windows Installation before proceeding i.e. copy all the files in the Desktop, Documents, Downloads, Music, Pictures and Videos folders to an external hard drive. If you cannot back up data because your old Windows Installation Cannot Boot then follow my guide Data Recovery Using Fedora. If you have large game installation files such as Steam or EA Origin see my guide Backing up and Restoring Steam Game Installation Files and Backing up and Restoring EA Game Installation Files.
Alternatively if you want to perform a proper Wipe so data is irrecoverable perform the Dell Data Wipe (UEFI BIOS) before proceeding. This is recommended if your old Windows Installation has been compromised by Malware or if you intend to sell your computer and want to keep any personal information from prying eyes.
Booting from the Bootable USB in UEFI
Power down your Dell and as you power it up press [F12].
For hardware manufactured by other OEMs you may have to press a different key. For example:
- For a Lenovo laptop you should also use [F12].
- For a HP laptop you should use [F9].
- For a Toshiba laptop you should use [F10]. Note you may need to Disable Fast Boot for the Bootable USB to display.

The first thing you want to check is that the Boot Mode is set to UEFI and Secure Boot is On. If they are press the [↓] key until you get your Bootable USB and press [Enter].


If the Boot Mode is Legacy or Secure Boot is Off you should amend your UEFI BIOS settings to Enable a UEFI Boot with Secure Boot. See my UEFI guide.
If there is no mention of Secure Boot but you have the mention of a UEFI Boot you have an early UEFI computer press the [↓] key until you get your Bootable USB and press [Enter].

If there is no mention of UEFI or Legacy you likely have an older system with a Legacy BIOS only. Press the [↓] arrow until you get to the USB Storage Device and press [Enter].

The Windows Setup: Part 1
The Windows setup will begin to load:
 Ensure you have selected your preferred Language, Time and Currency Format and Keyboard or Input method. Then select next:

The next screen will give you the options to Install Windows or Repair your Computer (which you can use to launch Diskpart for example). In most cases select Install:

The Windows Setup: Part 2 The Product Key
Despite what Microsoft marketing stated Windows 7 OEM and Windows 8.x OEM keys still work with Windows 10 RS2 installation media as Windows 10 OEM keys. For more details see Windows 7 OEM and Windows 8.x OEM Keys Still Activate Windows 10 OEM).
If your system came with a Windows 10 OEM or Windows 8.x OEM your product key is embedded in the systems UEFI BIOS (for more details see my guide Your OEM Product Key). Windows 10 RS2 Installation Media is Multi-Edition and will automatically input your Product Key during installation selecting the correct Edition of Windows 10 to install and taking you to the license agreement screen.

If you have a Windows 7 OEM key printed on the COA or a Retail Windows 7/8.x/10 key then Windows 10 RS2 media will search but won’t find a Product Key embedded in the UEFI BIOS. 
If you have the key to hand you can input it here and then the correct Edition of Windows 10 to install will be selected.
Alternatively to save time you can select «I don’t have a Product Key» and then select your Edition of Windows 10:

Note: Be careful here if you select the wrong Edition here you will need to start other and reinstall the correct Edition or alternatively purchase a new Product Key to activate the Edition you’ve installed.
If your OEM License was for Windows 7 Pro or Windows 7 Ultimate opt to install Windows 10 Pro.
If your OEM License was for Windows 7 Starter, Windows 7 Home Basic or Windows 7 Home Premium opt to install Windows 10 Home.

If your system has Windows 10 Pro/Home previously installed and activated then its system hardware profile (motherboard details) have been submitted to a Microsoft Product Activation server. Upon this Clean Reinstallation the system hardware profile will be resubmitted to the Microsoft Product Activation server and as your system is known as a Windows 10 Pro/Home Device the system will be given the green light for Product Reactivation. If alternatively your system has never had an activated version of Windows 10 installed you will be able to manually enter the Product Key post-installation for the initial activation.
Once you have selected your Edition of Windows 10 select Next
The Windows 10 Version 1703 .iso has 4 Editions:

The Windows 10 Version 1709 .iso has 9 Editions:

Accept the license agreement and select next:

The Windows Setup: Part 3 Drive Options
This step will result in data loss do not proceed unless you have all your data backed up onto an external hard drive.
If you are clean installing Windows due to a Boot Problem and cannot backup your data as Windows cannot boot the follow my guide Data Recovery using Fedora which uses a Bootable Fedora Live Linux USB which can access the HDD/SSD in many cases when Windows cannot.
This step will delete partitions and perform a low level format. With a mere format data is not wiped and can be recovered with third party utilities. If you want to perform a wipe due to a severe infection from malware/viruses or are wanting to sell your computer on then follow my guide Wiping your HDD or SSD.
Select custom install:

Select every partition on Drive 0 (or the desired Drive you wish to install Windows if you have a system with a multiple drive configuration) and systematically delete any partition.
Since Windows 10 has a proper digital distribution all previous OEM and recovery partitions are now obsolete and in any case won’t work after a clean install of Windows 10. They can safely be deleted.

Once all partitions are deleted, select Drive 0 Unallocated space and select next:

The following steps are automated. Windows will tell you its going to restart and give you a count down of 10 seconds. In these 10 seconds it is recommended to remove the Bootable USB. In some cases the Bootable USB gets put to the top of the Boot Menu and users end up in a loop restarting the clean install from scratch. After the restart Windows will spend some time getting ready:

The Windows Setup: Part 4 Region, Keyboard and Network
You will be asked to select your region, select it and select yes:
 Next you’ll be asked to select your keyboard layout, select it and select yes:
 You’ll then be asked if you wish to select another keyboard layout. Assuming you don’t want another keyboard layout select skip:

If you are already connected to a network via ethernet the Windows 10 setup will automatically search for some updates and then take you to the user accounts setup screen:

Otherwise you’ll need to connect to a network:

The Windows Setup: Part 5 User Accounts
You will then be asked to setup your account. Select setup for personal use then select next:

Microsoft recommend signing in with a Microsoft Account which makes it easier if you use many of their inbuilt Apps for example Mail or wish to purchase from the Microsoft Store. However they have made it relatively easy to sign in with an Offline Account unlike in previous builds where they hid the option in an obscure location.
Input your Microsoft Account Email and select next:

Input your Microsoft Account password and select next:

Windows will sign into your Microsoft Account:
 You’ll be asked whether you want to setup a pin for convenience. Select set a pin:
 Input your pin and confirm it then select ok:
 Windows will apply the pin to your Microsoft Account login:
  You’ll be asked whether or not you want to Enable Cortana:
 You’ll then be presented with the privacy settings. Take the time to read through these settings and apply or disable according to your own preferences. Then select Accept:
If you don’t want to sign in with a Microsoft Account instead select Offline Account:

The next screen will load:
Microsoft will advertise the use of a Microsoft Account, select no to continue with an Offline Account:

The Offline Account creation screen will load:

Enter your user name and then press next:
 Enter your password and then select next:

Confirm your password and then select next:

Confirm your password and then select next:


The Windows Setup: Part 6 End of Install
Now it is just a case of waiting for the Windows setup to complete. If your system is already a Windows 10 Edition Device and you have installed the matching Edition of Windows 10 at this stage the system should contact the Microsoft Product Activation server and reactivate in the background:

For computers that are over a year old, Microsoft likely has all the drivers inbuilt to Windows 10 or will obtain them via Windows Update. It is a good idea to leave your computer idle for 0-15 minutes immediately after installation to give Windows time to download the required drivers from Windows Update. This will be discussed in more detail below.
Checking Product Activation
Right click the start button and select settings:

If settings is normal then Windows is activated:

If on the other hand Windows is not Activate then settings will be watermarked:

If Windows isn’t Activated select Update & Security:
 Then go to Activation:
Then select Change Product Key:

In this case I will input the 25 digit Windows 7 OEM product key printed on systems COA and then select next. For laptops the Windows 7 COA may be found shielded in the battery compartment. This screen will also accept 25 digit product keys from Windows 7, 8.x and 10 Retail Licenses. Once you have input your 25 digit product key select next:

The installation media should then accept the Windows 7 OEM key:

Once the installation media accepts the OEM Product Key it should allow you to press Activate:

The Windows 7 OEM Product Key alongside your system’s hardware profile will be sent to the Microsoft Product Activation Server. Once the Server Accepts there you will get Windows has been Activated:

Driver Installation
Windows 10 will either have most system drivers inbuilt or obtain them from Windows Update automatically. The inbuilt driver support and the collection of drivers on Windows Update is one of the major improvements of Windows 10 over older Windows versions. In the vast majority of cases (unless your computer model is brand new and leading edge) every component of your computer will have a driver after leaving Windows 10 idle for 15 minutes after installation. This will give basic functionality and in some cases full functionality. There are a few common drivers which should be installed after Windows Installation for optimal performance, I list more details later:
- Intel Management Engine Interface
- Intel Storage Controllers
- Dell Touchpad Drivers
- Dell Quickset/Dell ControlPoint
- Dell Wireless Card
- Problem Devices
- UEFI/BIOS Updates
Here is a demonstration of Windows 10 Version 1607 installed offline and acquiring all the system drivers automatically when connected online. Version 1709 and Version 1703 will have even more native support.

1. Intel Management Engine Interface
Windows 10 Version 1709 has an updated Intel Management Engine Interface Driver (11.0.5.1189) which suffices in most cases.
Windows 10 (Version 1703 and earlier) installs an old driver version 11.0.0.1157 that is buggy and results in a black screen when coming out of sleep and an incorrect shutdown often draining the system battery. This effects almost every system that has Intel hardware and an SMBIOS version of 2.6 or later.
To check the version right click the start button and then left click Device Manager. Expand system Devices and right click Intel Management Engine Interface. Then select properties. In the dialogue box left click the driver tab. Check the version:

The latest version of Intel Management Engine Interface can be downloaded from Intel here.

First right click the download and then select extract:

You want to go to the ME_SW_MSI folder and then to the production subfolder. You then want to launch the .exe and install as normal:

You can then once again check the version installed in the Device Manager:

2. Intel Rapid Storage Technology Applications – Under SATA Drives and/or CPU
Another common issue with Windows 10 is the Intel Storage Controller driver that Windows 10 installs is a generic version and this may cause 100 % Disk Usage and sluggish overall performance.
If using an Intel system right click the start button and select Device Manager. Under IDE ATA/ATAPI Controllers look for an entry called Standard SATA AHCI Controller. Right click it select properties, then select Details and change the property to hardware IDs:

Hint press [Ctrl] and [ f ] on this page and search for your hardware ID e.g. 1E02 as the GIF shows meaning I should use driver version 13.1.0.1058.

Intel Rapid Storage Technology is available to download from Intel download the version that matches your hardware ID.
15.5.0.1051 (6-7th generation)
Intel® 200 Series Chipset Family SATA AHCI/RAID Controller (PCIVEN_8086&DEV_A282)
7th Generation Intel® Core™ Processor Family Platform I/O SATA AHCI/RAID Controller (PCIVEN_8086&DEV_A102)
Intel® 100 Series/C230 Series Chipset Family SATA AHCI/RAID Controller (PCIVEN_8086&DEV_A103)
6th Generation Intel® Core™ Processor Family Platform I/O SATA AHCI/RAID Controller (PCIVEN_8086&DEV_9D03)
14.8.14.1061 (4th-5th generation)
Intel(R) 9 Series Chipset Family SATA AHCI Controller (PCIVEN_8086&DEV_8D02)
Intel(R) 9 Series Chipset Family SATA AHCI Controller (PCIVEN_8086&DEV_9C83)
Intel(R) 9 Series Chipset Family SATA AHCI Controller (PCIVEN_8086&DEV_9C82)
Intel(R) 9 Series Chipset Family SATA AHCI Controller (PCIVEN_8086&DEV_8C83)
Intel(R) 9 Series Chipset Family SATA AHCI Controller (PCIVEN_8086&DEV_8C82)
Intel(R) 8 Series Chipset Family SATA AHCI Controller (PCIVEN_8086&DEV_9C03)
Intel(R) 8 Series/C220 Chipset Family SATA AHCI Controller (PCIVEN_8086&DEV_9C02)
Intel(R) 8 Series Chipset Family SATA AHCI Controller (PCIVEN_8086&DEV_8C03)
Intel(R) 8 Series/C220 Chipset Family SATA AHCI Controller (PCIVEN_8086&DEV_8C02)
13.1.0.1058 (3rd generation)
Intel(R) C600 Series Chipset SATA AHCI Controller (PCIVEN_8086&DEV_1D02)
Intel(R) 7 Series/C216 Chipset Family SATA AHCI Controller (PCIVEN_8086&DEV_1E02)
12.9.0.1001 (1st-3rd generation)
Intel(R) 7 Series Chipset Family SATA AHCI Controller (PCIVEN_8086&DEV_1E03)
Intel(R) Mobile Express Chipset SATA AHCI Controller (PCIVEN_8086&DEV_1C03)
Intel(R) Desktop/Workstation/Server Express Chipset SATA AHCI Controller (PCIVEN_8086&DEV_1C02)
Intel(R) 5 Series 4 Port SATA AHCI Controller (PCIVEN_8086&DEV_3B29)
Intel(R) 5 Series 6 Port SATA AHCI Controller (PCIVEN_8086&DEV_3B2F)
Intel(R) 5 Series/3400 Series SATA AHCI Controller (PCIVEN_8086&DEV_3B22)
11.7.0.1013 (1st-2nd Generation)
Intel(R) ICH10R SATA AHCI Controller (PCIVEN_8086&DEV_3A22)
Intel(R) ICH10D/DO SATA AHCI Controller (PCIVEN_8086&DEV_3A02)
Intel(R) ICH9M-E/M SATA AHCI Controller (PCIVEN_8086&DEV_2929)
Intel(R) C600 Series Chipset SATA AHCI Controller (PCIVEN_8086&DEV_1D02)
3. Laptop Touchpad
Older Dell Systems ( 2016 Hardware) there is a future push for Microsoft to natively support new Touchpads, so called “Precision Touchpads” which should alleviate any OEM driver issues.
4. Dell Quickset/ControlPoint
There may also be some applications such as Dell Quickset/Dell ControlPoint specific to your OEM which may help with regards to specific features such as the function keys. Note that most these applications are designed for Windows 7, 8 or 8.1 but work equally as well for Windows 10.
Как исправить Reset to device Device RaidPort0, была выдана ошибка в Windows 10
Ваш рабочий стол Windows временно зависает примерно на 30 секунд? Если это так, ваш журнал просмотра событий, вероятно, будет содержать ошибку « Сброс на устройство, DeviceRaidPort0, был выпущен ». Эта проблема возникает на серверных или клиентских ПК с различными платформами Windows. Системная ошибка сброса на устройство в основном относится к платам контроллера SATA и конфигурациям настроек питания Windows, и именно так вы можете это исправить.
Произошел сброс до deviceDeviceRaidPort1: исправьте эту ошибку в течение нескольких минут
- Запустите проверку системных файлов проверки
- Запустите проверку диска проверки
- Настройте параметры питания
- Настройте параметры схемы электропитания
- Обновите драйвер AHCI
- Отключите опцию быстрого запуска в Windows 10
1. Запустите проверку системных файлов.
Во-первых, возможно, стоит поискать поврежденные системные файлы. Проверка системных файлов – это встроенный инструмент Windows, который восстанавливает системные файлы, но у него нет графического интерфейса. Однако вы можете запустить сканирование SFC с помощью командной строки следующим образом.
- Нажмите кнопку меню Cortana или Start, чтобы открыть окно поиска Windows. Введите ключевое слово «cmd» в поле поиска.
- Нажмите правой кнопкой мыши командную строку и выберите Запуск от имени администратора .
- Введите «sfc/scannow» и нажмите клавишу «Return», чтобы начать сканирование.
- После завершения сканирования SFC перезапустите Windows, если она исправила какие-либо файлы.
- Если SFC не оказывает влияния, запустите сканирование DSIM (Обслуживание образов развертывания и управление ими), введя «DISM/Online/Cleanup-Image/RestoreHealth» в окне подсказки. Сканирование DSIM может восстановить образ Windows для утилиты SFC.
- Затем выполните сканирование с помощью инструмента SFC снова.
2. Запустите проверку диска
Check Disk, иначе chkdsk, является еще одной утилитой, которая может пригодиться для исправления ошибки сброса устройства. Этот инструмент восстанавливает сектора жесткого диска и исправляет поврежденные файловые системы. Вы также можете запустить Check Disk через командную строку следующим образом.
- Откройте командную строку как администратор.
- Введите «chkdsk/r» в окне подсказки и нажмите клавишу ввода.
- Командная строка попросит вас запланировать проверку тома при перезапуске Windows. Нажмите клавишу Y для подтверждения.
- Перезагрузите ваш рабочий стол или ноутбук. Проверка диска будет сканировать и восстанавливать тома во время перезапуска.
3. Настройте параметры питания
Корректировка пары настроек соединения ACHI может исправить ошибку «Сброс на устройство». Однако вам нужно изменить реестр, чтобы выбрать эти параметры в окне параметров электропитания. Вот как вы можете настроить параметры ACHI.
- Откройте Run, нажав сочетание клавиш Win + R.
- Введите «regedit» в текстовое поле «Выполнить» и нажмите ОК , чтобы открыть редактор реестра.
- Во-первых, вы можете сделать резервную копию реестра, нажав Файл >Сохранить и выбрав Все . Введите заголовок файла в текстовое поле и нажмите кнопку Сохранить .
- Теперь откройте ComputerHKEY_LOCAL_MACHINESYSTEMCurrentControlSetControlPowerPowerSettings012ee47-9041-4b5d-9b77-535fba8b1442b2d69d7-a2a1-449c-9680-f91c70521c60 в снимке реестра в снимке ниже.
- Щелкните правой кнопкой мыши Атрибуты в правой части окна и выберите Изменить , чтобы открыть окно Изменить DWORD.
- Введите “2” в поле “Значение” и нажмите кнопку ОК .
- Затем перейдите в это место редактора реестра: HKEY_LOCAL_MACHINESYSTEMCurrentControlSetControlPowerPowerSettings012ee47-9041-4b5d-9b77-535fba8b1442dab60367-53fe-4fbc-825e-521d069d45.
- Щелкните правой кнопкой мыши атрибут DWORD и выберите Изменить в его контекстном меню.
- Введите “2” в текстовое поле окна “Изменить DWORD” и нажмите кнопку ОК.
- Теперь вы можете закрыть редактор реестра.
- Введите «powercfg.cpl» в «Выполнить», чтобы открыть окно ниже.
- Нажмите Изменить настройки плана >Изменить дополнительные параметры питания , чтобы открыть окно параметров питания.
- Дважды нажмите Жесткий диск , чтобы расширить его параметры.
- Дважды нажмите Управление питанием AHCI Link – HIPM/DIPM и переключите оба параметра Питание от аккумулятора и Подключено к активному.
- Затем дважды нажмите AHCI Link Power Management – Adaptive и установите для параметров Батарея и Подключено значение 0.
- Дважды нажмите Отключить жесткий диск после и установите для параметров Питание от аккумулятора и Подключено значение «Никогда».
- Нажмите Применить >ОК , чтобы применить настройки и закрыть окно.
4. Настройте параметры схемы электропитания.
Переключение схемы управления питанием на высокую производительность также может решить проблему. Это отключит параметры соединения PCI Express для синхронизации PCI. Нажмите раскрывающееся меню в верхней части окна параметров электропитания, выберите Высокая производительность и нажмите кнопку ОК , чтобы настроить план. Затем параметры PCI Express, приведенные ниже, будут отключены, как показано на снимке ниже.

5. Обновите драйвер AHCI
Драйвер AHCI (Advanced Host Controller Interface) является важным драйвером для адаптеров шины SATA. Таким образом, обновление этого драйвера также может решить проблему с устройством. Вы можете обновить этот драйвер следующим образом.
- Нажмите горячую клавишу Win + X и выберите в меню Диспетчер устройств .
- Дважды нажмите Контроллеры IDE ATA/ATAPI в окне диспетчера устройств.
- Щелкните правой кнопкой мыши указанный драйвер AHCI и выберите Обновить драйвер в контекстном меню.
- Нажмите Поиск обновленного программного обеспечения драйвера , чтобы установить обновленный драйвер.
- Кроме того, вы можете вручную загрузить подходящий драйвер AHCI с веб-сайта производителя. Например, это обновленный драйвер Rapid Storage Technology (Intel® RST) для систем Intel.
- После загрузки драйвера выберите параметр Просмотреть мой компьютер для драйверапрограммное обеспечение в окне обновления драйверов непосредственно над. Затем нажмите кнопку Обзор , чтобы выбрать драйвер для установки.
6. Отключите опцию быстрого запуска в Windows 10
- Отключение быстрого запуска в Windows 10 исправило ошибку сброса устройства для некоторых пользователей. Вы можете отключить эту настройку, нажав клавишу Win + горячую клавишу X и выбрав в меню Параметры электропитания .
- Нажмите Дополнительные настройки мощности , чтобы открыть вкладку непосредственно под ней.
- Нажмите Выберите, что делают кнопки питания в левой части окна, чтобы открыть вкладку «Настройки системы» ниже.
- Выберите Изменить настройки, которые в данный момент недоступны , чтобы настроить параметр Включить быстрый запуск .
- Снимите флажок Включить быстрый запуск (рекомендуется) , если он установлен.
- Нажмите кнопку Сохранить изменения в нижней части вкладки.
- Затем перезапустите ОС Windows.
Это несколько способов устранения ошибки сброса устройства, чтобы Windows не зависала. Вы также можете попробовать изменить порт SATA-накопителя и заменить кабель SATA или ATA.
Примечание редактора . Этот пост был первоначально опубликован в октябре 2017 года и с тех пор был полностью переработан и обновлен для обеспечения свежести, точности и полноты.
Источник
Фризы системы после обновления на Windows10 AU
После обновления Windows 10 на Windows 10 AU начались подвисания системы на несколько секунд.
В журнале событий в это время сыплются ошибки «операция ввода-вывода по адресу логического блока выполнена повторно» и «был произведен возврат к устройству deviceraidport0», источник — storahci.
Ошибок на SSD не обнаружено, SMART — Ok, последняя прошивка, режим AHCI.
Нашел решение проблемы, для своего случая!
win10AU сразу же после чистой установки завалила меня такими сообщениями:
- Был произведен возврат к устройству DeviceRaidPort0.
- Операция ввода-вывода по адресу логического блока 0x1305a70 для диска 0 (имя PDO: Device000002b) выполнена повторно.
- taskhostw (4048) WebCacheLocal: Запрос на запись в файл «C:UsersuserAppDataLocalMicrosoftWindowsWebCacheWebCacheV01.jfm» со смещением 0 (0x0000000000000000) размером 8192 (0x00002000) байт выполнен, но его выполнение в ОС заняло слишком много времени (36 секунд). Кроме того, с тех пор как последнее сообщение об этой ошибке было возвращено 213 секунд назад, выполнение 0 других запросов ввода-вывода из этого файла также заняло слишком много времени. Вероятно, эта ошибка вызвана сбоем оборудования. Обратитесь к поставщику оборудования, чтобы установить причину ошибки.
Соответственно фризы системы (на 36 секунд! плюс/минус) чрезвычайно раздражали!
Отключение различных параметров энергосбережения не помогло.
Здесь выяснил, что причина может быть в драйверах SATA контроллера.
Производители чипсета и ноутбука не утруждают себя поддержкой драйверов для Intel(R) 5 Series 4 Port SATA AHCI Controller , официальные версии драйверов для win8, win8.1, win10 мной не обнаружены.
Благодаря такому ресурсу как devid.info удалось найти драйвера контроллера, совместимые с win10AU!
Используя поиск по ID контроллера (PCIVEN_8086&DEV_3B29)
| Версия пакета драйверов чипсета | Версия драйвера SATA контроллера | Дата разработки | Источник пакета или драйвера |
| 9.2.0.1030 | 7.0.0.1013 | 08.06.2010 | downloadcenter.intel.com |
| — | 12.8.20.1002 | 22.05.2015 | devid.info |
После обновления драйвера ни одного фриза системы и предупреждений в журнале win!
Очень рад, что SSD накопитель еще жив и здоров!
Кто занимается поддержкой контроллеров, если не производитель?
Источник
Был произведен возврат к устройству DeviceRaidPort0. Код события 129
Ответы (7)
Это помогло устранить вашу проблему?
К сожалению, это не помогло.
Великолепно! Спасибо, что пометили это как ответ.
Насколько Вы удовлетворены этим ответом?
Благодарим за отзыв, он поможет улучшить наш сайт.
Насколько Вы удовлетворены этим ответом?
Благодарим за отзыв.
Проверка Dism написала Восстановление выполнено успешно, операция завершена
Проверка sfc написала что обнаружила поврежденные файлы и восстановила их. Подробные сведения см. в файле CBS.log, который находится по следующему пути windirlogsCBSCBS.log.
Это помогло устранить вашу проблему?
К сожалению, это не помогло.
Великолепно! Спасибо, что пометили это как ответ.
Насколько Вы удовлетворены этим ответом?
Благодарим за отзыв, он поможет улучшить наш сайт.
Насколько Вы удовлетворены этим ответом?
Благодарим за отзыв.
Это помогло устранить вашу проблему?
К сожалению, это не помогло.
Великолепно! Спасибо, что пометили это как ответ.
Насколько Вы удовлетворены этим ответом?
Благодарим за отзыв, он поможет улучшить наш сайт.
Насколько Вы удовлетворены этим ответом?
Благодарим за отзыв.
Сайт ведет на сторонний ресурс, не принадлежащий Майкрософт. Будьте осторожны принимая соглашения, скачивая файлы или выполняя инструкции!
Это помогло устранить вашу проблему?
К сожалению, это не помогло.
Великолепно! Спасибо, что пометили это как ответ.
Насколько Вы удовлетворены этим ответом?
Благодарим за отзыв, он поможет улучшить наш сайт.
Насколько Вы удовлетворены этим ответом?
Благодарим за отзыв.
Укажите, пожалуйста, полное наименование используемого устройства.
Это помогло устранить вашу проблему?
К сожалению, это не помогло.
Великолепно! Спасибо, что пометили это как ответ.
Насколько Вы удовлетворены этим ответом?
Благодарим за отзыв, он поможет улучшить наш сайт.
Насколько Вы удовлетворены этим ответом?
Благодарим за отзыв.
Системная плата MSI 970A-G43 (MS-7693)
HDD Hitachi HDT721010SLA360
SSD KINGSTON SA400S37480G SATA Disk Device (на нем стоит винда)
Это помогло устранить вашу проблему?
К сожалению, это не помогло.
Великолепно! Спасибо, что пометили это как ответ.
Насколько Вы удовлетворены этим ответом?
Благодарим за отзыв, он поможет улучшить наш сайт.
Насколько Вы удовлетворены этим ответом?
Благодарим за отзыв.
Ошибка давно встречается на форумах и точного решения нет, т.к. она непосредственно идет от используемого драйвера материнской платы и версии биоса.
Для вашего устройства драйвера на биос и остальное староваты: https://www.msi.com/Motherboard/support/970A-G4.
Как предполагаю, вы сейчас на сборке 1803 или 1809, по крайней мере должны быть. Производитель последние драйвера обновил для звука с комментарием, что это для «Recommend installing this driver for Windows 10 RS2 or earlier versions.», т.е. послденее обновление было для версии 1703, которая была уже давно и более не поддерживается также.
Так что вам очень важно написать производителю и уточнить вопрос совместимости устройства с текущей версией ОС (именно сборкой, 10ка она как была, так и останется, а новые сборки по факту это новые ОС).
Дополнительно можете посмотреть данный раздел (английская ветка):
https://answers.microsoft.com/en-us/windows/for.
Здесь кстати много упоминаний от MSI и такой ошибке. Также имеются некоторые рекомендации, часть отмечена, как помогло, но не всем, так что надо смотреть и пробовать. Если будете вносить изменения в реестр, то обязательно предварительно создавайте резервные копии и копию самого реестра, чтобы в случае чего была возможность отката.
Источник