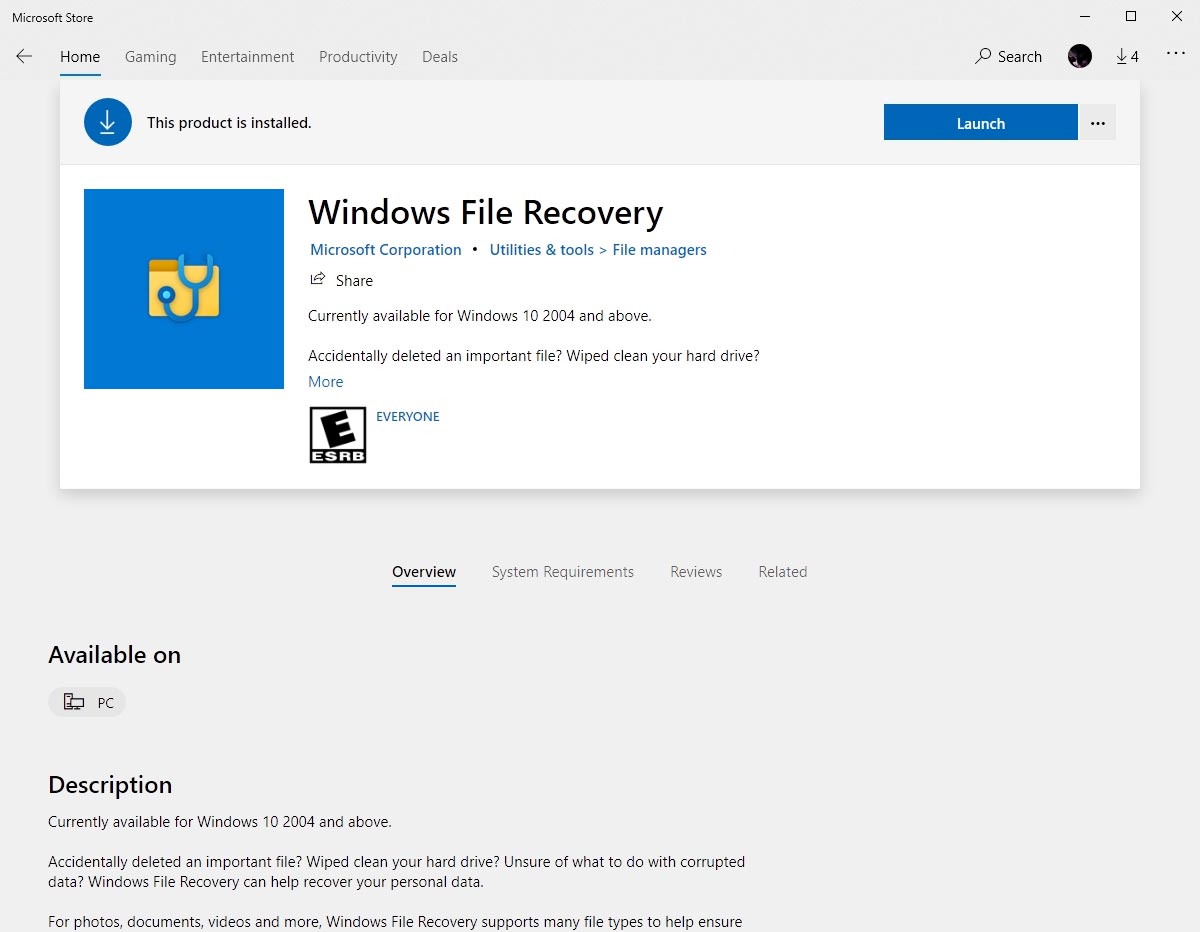
If you can’t locate a lost file from your backup, then you can use Windows File Recovery, which is a command line app available from the Microsoft Store. Use this app to try to recover lost files that have been deleted from your local storage device (including internal drives, external drives, and USB devices) and can’t be restored from the Recycle Bin. Recovery on cloud storage and network file shares is not supported.
Note This app requires Windows 10 build 19041 or later (See which version of Windows 10 you have).
Important: If you want to increase your chances of recovering a file, minimize or avoid using your computer. In the Windows file system, the space used by a deleted file is marked as free space, which means the file data can still exist and be recovered. But any use of your computer can create files, which may over-write this free space at any time.
Windows File Recovery — Winter 2020 release
-
If necessary, download and launch the app from Microsoft Store.
-
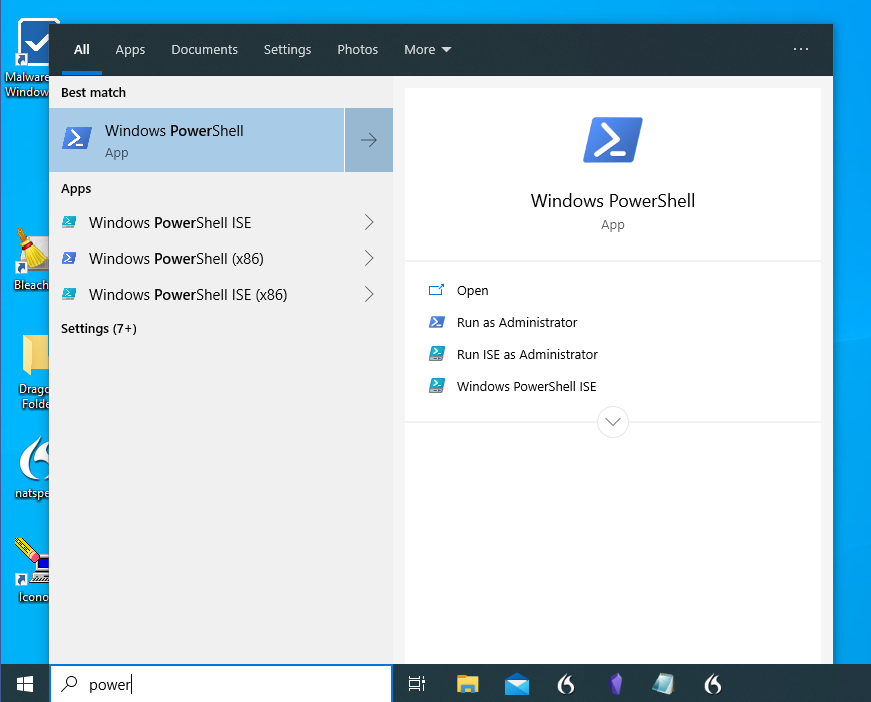
Press the Windows key, enter Windows File Recovery in the search box, and then select Windows File Recovery.
-
When you are prompted to allow the app to make changes to your device, select Yes.
-
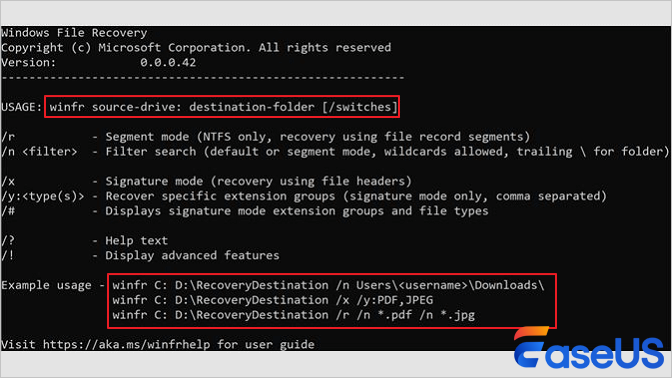
In the Command Prompt window, enter the command in the following format:
winfr source-drive: destination-drive: [/mode] [/switches]
-
There are 2 basic modes you can use to recover files: Regular and Extensive.
Regular mode examples
Recover your Documents folder from your C: drive to the recovery folder on an E: drive. Don’t forget the backslash () at the end of the folder.
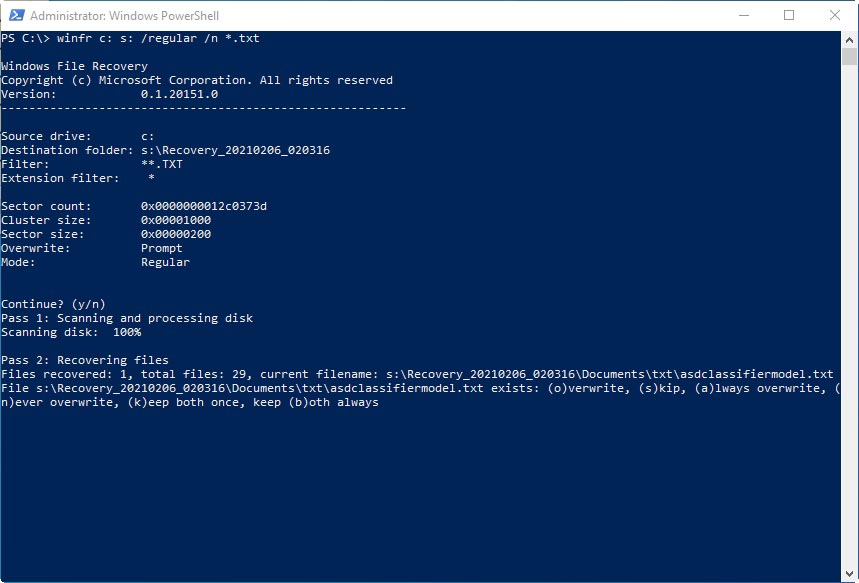
Winfr C: E: /regular /n Users<username>Documents
Recover PDF and Word files from your C: drive to the recovery folder on an E: drive.
Winfr C: E: /regular /n *.pdf /n *.docx
Extensive mode examples
Recover any file with the string «invoice» in the filename by using wildcard characters.
Winfr E: C: /extensive /n *invoice*
Recover jpeg and png photos from your Pictures folder to the recovery folder on an E: drive.
Winfr C: E: /extensive /n Users<username>Pictures*.JPEG /nUsers<username>Pictures*.PNG
The source and destination drives must be different. When recovering from the operating system drive (often C: ), use the /n <filter> switches to specify the user files or folder.
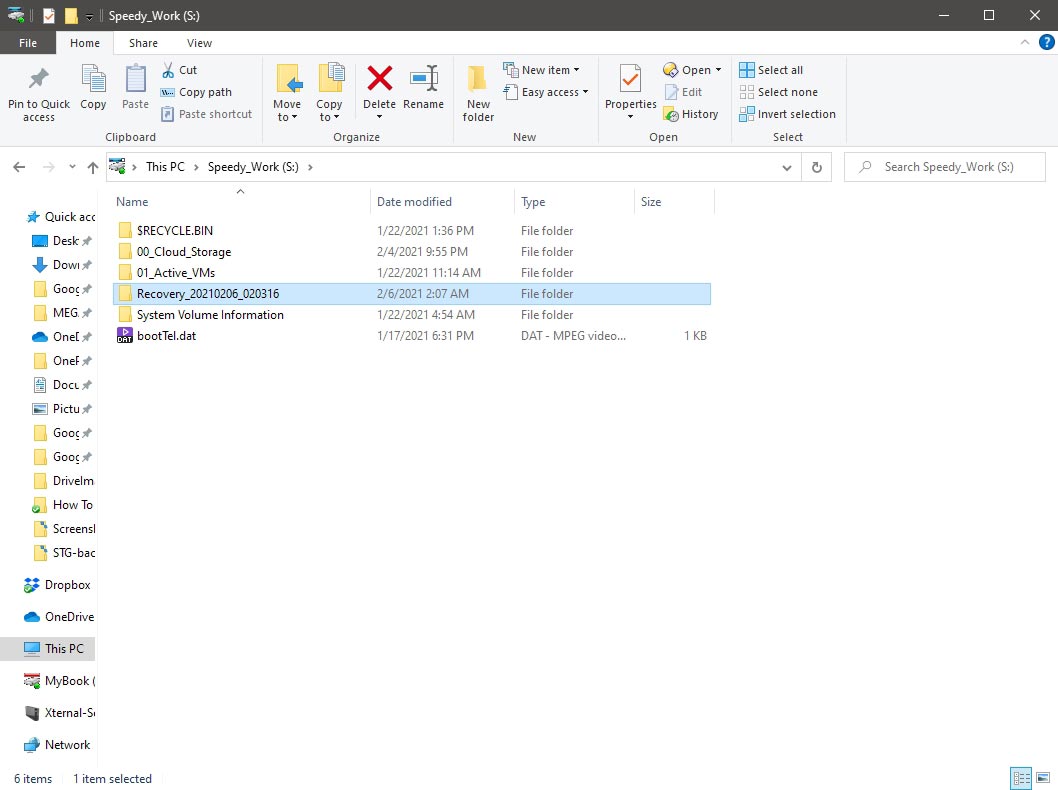
Microsoft automatically creates a recovery folder for you called, Recovery_<date and time> on the destination drive. -
When you are prompted for confirmation to continue, enter Y to start the recovery operation. Depending on the size of your source drive, this may take a while. To stop the recovery process, press Ctrl + C.
The following information can help you decide which file system you have and which mode to use.
File systems
|
File system |
Examples |
|---|---|
|
FAT and exFAT |
SD cards, flash or USB drives (< 4GB) |
|
NTFS |
Computers (HDD, SSD), external hard drives, flash or USB drives (> 4GB) |
There are several file systems supported by Windows that vary depending on the storage device or operating system. Recovering files from non-NTFS file systems is only supported by extensive mode. To see which file system you have, right click a drive in File Explorer and select Properties.
Deciding which mode to use
Use the following table to help you decide which mode to use. If you are not sure, start with Regular mode.
|
File system |
Circumstances |
Recommended mode |
|---|---|---|
|
NTFS |
Deleted recently |
Regular |
|
NTFS |
Deleted a while ago |
Extensive |
|
NTFS |
After formatting a disk |
Extensive |
|
NTFS |
A corrupted disk |
Extensive |
|
FAT and exFAT |
Any |
Extensive |
General syntax
The following table summarizes what each advanced switch is used for.
|
Parameter / switch |
Description |
Supported mode(s) |
|---|---|---|
|
Source-drive: |
Specifies the storage device where the files were lost. Must be different from the destination-drive. |
All |
|
Destination-drive: |
Specifies the storage device and folder on which to put the recovered files. Must be different from the source-drive. |
All |
|
/regular |
Regular mode, the standard recovery option for non-corrupted NTFS drives |
Regular |
|
/extensive |
Extensive mode, a thorough recovery option suitable for all file systems |
Extensive |
|
/n<filter> |
Scans for a specific file by using a file name, file path, file type, or wildcards. For example:
|
All |
|
/? |
Summary of syntax and switches for general users. |
All |
|
/! |
Summary of syntax and switches for advanced users. |
All |
Advanced syntax
The following table summarizes what each advanced switch is used for.
|
Switch |
Description |
Supported modes |
|---|---|---|
|
/ntfs |
NTFS mode, a fast recovery option for healthy NTFS drives using the master file table |
NTFS |
|
/segment |
Segment mode, recovery option for NTFS drives using file record segments |
Segment |
|
/signature |
Signature mode, recovery option for all file system types using file headers |
Signature |
|
/y:<type(s)> |
Recover specific extension groups, comma separated |
Signature |
|
/# |
Signature mode extension groups and supported file types. |
Signature |
|
/p:<folder> |
Saves a log file of the recovery operation in a different location than the default location on the recovery drive (for example, D:logfile). |
All |
|
/a |
Overrides user prompts, which is useful in a script file. |
All |
|
/u |
Recovers undeleted files, for example, from the Recycle Bin. |
NTFS |
|
/k |
Recovers system files. |
NTFS |
|
/o:<a|n|b> |
Specifies whether to always (a), never (n), orkeep both always(b) when choosing whether to overwrite a file. The default action is to prompt to overwrite. |
NTFS |
|
/g |
Recovers files without primary data streams. |
NTFS |
|
/e |
To keep your results manageable and focus on user files, some file types are filtered by default, but this switch removes that filter. For a complete list of these file types, see the information after this table. |
NTFS |
|
/e:<extension> |
Specifies which file types are filtered. For a complete list of these file types, see the information after this table. |
NTFS |
|
/s:<sectors> |
Specifies the number of sectors on the source device. To find sector information, use fsutil. |
Segment |
|
/b:<bytes> |
Specifies the cluster size (allocation unit) on the source device. |
Segment |
File extension filter list
The following file types are filtered from results by default. Use the /e switch to disable this filter or the /e:<extension> filter to specify file types not to filter.
_, adm, admx, appx, appx, ascx, asm, aspx, aux, ax, bin, browser, c, cab, cat cdf-ms, catalogItem, cdxm, cmake, cmd, coffee, config, cp, cpp, cs, cshtm, css, cur, dat, dll, et, evtx, exe, fon, gpd, h, hbakedcurve, htm, htm, ico, id, ildl, ilpdb, iltoc, iltocpdb, in, inf, inf_loc, ini, js, json, lib, lnk, log, man, manifest, map, metadata, mf, mof, msc, msi, mui, mui, mum, mun, nls, npmignore, nupkg, nuspec, obj, p7s, p7x, pak, pckdep, pdb, pf, pkgdef, plist, pnf, pp, pri, props, ps1, ps1xm, psd1, psm1, py, resjson, resw, resx, rl, rs, sha512, snippet, sq, sys, t4, targets, th, tlb, tmSnippet, toc, ts, tt, ttf, vb, vbhtm, vbs, vsdir, vsix, vsixlangpack, vsixmanifest, vstdir, vstemplate, vstman, winmd, xam, xbf, xm, xrm-ms, xs, xsd, ym
Can you give some tips to help me use the correct syntax?
-
Always use drive letters in the source and destination path, don’t forget the colon (:) after the drive letter, and make sure there is a space between the source and destination.
-
When you specify just a folder name, such as /n Myfolder, add a backslash () at the end of it.
-
If a file or folder name has spaces, surround it with quotes. For example:
winfr C: E: /regular /n «Users<username>DocumentsQuarterly Statement.docx»
What does <username> mean in the command examples?
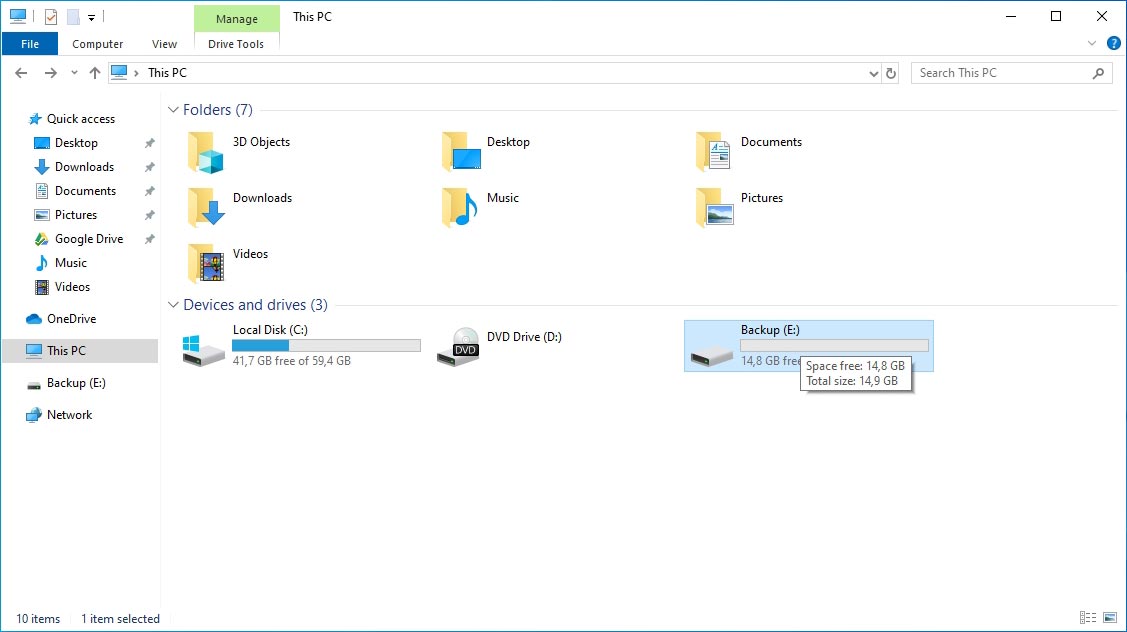
In the File Explorer address bar, enter C:users to see a list of potential users on your computer. There may be several users on your computer, including you, the administrator, and the default account. When you see <username> in a file path, it is a placeholder for the current username on your computer.
Why am I getting this message: «Source and Destination cannot refer to the same physical partition?»
The source and destination drive or partition path should not be the same. If you only have one drive, use a USB or external hard drive as your destination path. Don’t create a partition after losing data, because this reduces the chance of a successful recovery.
Why does the recovery operation take so long?
Depending on the size of the disk, it may take some time to recover the file, especially if you are using Extensive mode.
Why are additional files recovered from my operating system drive?
Behind the scenes, Windows is constantly creating and deleting files. By default, Windows File Recovery filters out these files, but some slip through. To prevent this, use the /n <filter> as per examples in this article.
What is the $Recycle.Bin folder?
For NTFS and segment modes, you may also see lost files recovered from the Recycle Bin (files either in the recycle bin or that were permanently deleted) with the name $files.xxx and stored in a folder called $RECYCLE.BIN.
What happens if the destination drive is full?
If you see the following message: »Destination disk is full, please free up space before resuming: (R)esume, (S)kip file, or (A)bort,» free up drive space on the destination drive, and then choose one of the options.
I was not able to recover the file, now what?
If you used Regular mode, try again in extensive mode if the file type is supported. It’s possible that the free space was overwritten, especially on a solid-state drive (SSD). If you need help, contact your administrator.
Windows File Recovery — Summer 2020 release
-
If necessary, download and launch the app from Microsoft Store.
-
Press the Windows key, enter Windows File Recovery in the search box, and then select Windows File Recovery.
-
When you are prompted to allow the app to make changes to your device, select Yes.
-
In the Command Prompt window, enter the command in the following format:
winfr source-drive: destination-drive: [/switches]
The source and destination drives must be different. When recovering from the operating system drive (often C: ), use the /n <filter> and /y:<type<(s)> switches to specify the user files or folder.
Microsoft automatically creates a recovery folder for you called Recovery_<date and time> on the destination drive.
There are three modes you can use to recover files: Default, Segment, and Signature.
Default mode examples
Recover a specific file from your C: drive to the recovery folder on an E: drive.
winfr C: E: /n Users<username>DocumentsQuarterlyStatement.docx
Recover jpeg and png photos from your Pictures folder to the recovery folder on an E: drive.winfr C: E: /n Users<username>Pictures*.JPEG /n Users<username>Pictures*.PNG
Recover your Documents folder from your C: drive to the recovery folder on an E: drive.winfr C: E: /n Users<username>Documents
Don’t forget the backslash () at the end of the folder.
Segment mode examples (/r)
Recover PDF and Word files from your C: drive to the recovery folder on an E: drive.
winfr C: E: /r /n *.pdf /n *.docx
Recover any file with the string «invoice» in the filename by using wildcard characters.winfr C: E: /r /n *invoice*
Signature mode examples (/x)
When using signature mode, it’s helpful to first see the supported extension groups and corresponding file types.
Recover JPEG (jpg, jpeg, jpe, jif, jfif, jfi) and PNG photos from your C: drive to the recovery folder on an E: drive.winfr C: E: /x /y:JPEG,PNG
Recover ZIP files (zip, docx, xlsx, ptpx, and so on) from your C: drive to the recovery folder on an E: drive.winfr C: E:RecoveryTest /x /y:ZIP
-
When you are prompted for confirmation to continue, enter Y to start the recovery operation.
Depending on the size of your source drive, this may take a while.
To stop the recovery process, press Ctrl+C.
The following information can help you decide which file system you have and which mode to use.
File systems
There are several file systems supported by Windows that vary depending on the storage device or operating system. Recovering files from non-NTFS file systems is only supported in signature mode. To see which file system you have, right click a drive in File Explorer and select Properties.
|
File system |
Examples |
|
FAT and exFAT |
SD cards, flash or USB drives (< 4GB) |
|
ReFS |
Windows Server and Windows Pro for Workstations |
|
NTFS |
Computers (HDD, SSD), external hard drives, flash or USB drives (> 4GB) |
Deciding which mode to use
Use the following table to help you decide which mode to use. If you’re not sure, start with the default mode.
|
File system |
Circumstances |
Recommended mode |
|
NTFS |
Deleted recently |
Default |
|
NTFS |
Deleted a while ago |
Segment, followed by Signature |
|
NTFS |
After formatting a disk |
Segment, followed by Signature |
|
NTFS |
A corrupted disk |
Segment, followed by Signature |
|
FAT, exFAT |
Recovery file type is supported (see following table) |
Signature |
Signature mode extension groups and file types
The following table summarizes the extension groups and the supported file types for each group when you use the /y:<type(s)> switch
|
Extension group |
File type |
|
ASF |
wma, wmv, asf |
|
JPEG |
jpg, jpeg, jpe, jif, jfif, jfi |
|
MP3 |
mp3 |
|
MPEG |
mpeg, mp4, mpg, m4a, m4v, m4b, m4r, mov, 3gp, qt |
|
|
|
|
PNG |
png |
|
ZIP |
zip, docx, xlsx, pptx, odt, ods, odp, odg, odi, odf, odc, odm, ott, otg, otp, ots, otc, oti, otf, oth |
General syntax
The following table summarizes what each basic command line parameter and switch is used for.
|
Parameter or switch |
Description |
Supported modes |
|
Source-drive: |
Specifies the storage device where the files were lost. Must be different from the destination-drive. |
All |
|
Destination-drive: |
Specifies the storage device and folder on which to put the recovered files. Must be different from the source-drive. |
All |
|
/r |
Uses segment mode, which examines File Record Segments (FRS). |
Segment |
|
/n <filter> |
Scans for a specific file by using a file name, file path, or wildcards. For example:
|
Default |
|
/x |
Uses signature mode, which examines file types and works on all file systems. |
Signature |
|
/y:<type(s)> |
Scans for files with specific file types. Separate multiple entries by using commas. For a list of extension groups and corresponding file types, see the table, «Signature mode extension groups and file types» in the section, «About modes and file systems». |
Signature |
|
/# |
Shows signature mode extension groups and corresponding file types in each group. |
All |
|
/? |
Shows a quick summary of syntax and switches for general users. |
All |
|
/! |
Shows a quick summary of syntax and switches for advanced users. |
All |
Advanced syntax
The following table summarizes what each advanced switch is used for.
|
Switch |
Description |
Supported modes |
|
/p:<folder> |
Saves a log file of the recovery operation in a different location than the default location on the recovery drive (for example, D:logfile). |
All |
|
/a |
Overrides user prompts, which is useful in a script file. |
All |
|
/u |
Recovers undeleted files, for example, from the Recycle Bin. |
Default |
|
/k |
Recovers system files. |
Default |
|
/o:<a|n|b> |
Specifies whether to always (a), never (n), orkeep both always(b) when choosing whether to overwrite a file. The default action is to prompt to overwrite. |
Default |
|
/g |
Recovers files without primary data streams. |
Default |
|
/e |
To keep your results manageable and focus on user files, some file types are filtered by default, but this switch removes that filter. For a complete list of these file types, see the information after this table. |
Default |
|
/e:<extension> |
Specifies which file types are filtered. For a complete list of these file types, see the information after this table. |
Default |
|
/s:<sectors> |
Specifies the number of sectors on the source device. To find sector information, use fsutil. |
Segment |
|
/b:<bytes> |
Specifies the cluster size (allocation unit) on the source device. |
Segment |
|
/f:>sector> |
First sector to scan on the source device. |
Segment |
Can you give some tips to help me use correct syntax?
Here are some suggestions:
-
Always use drive letters in the source and destination path, don’t forget the colon (:) after the drive letter, and make sure there is a space between the source and destination.
-
If a switch has a colon, such as /y:, don’t add a space between the colon and the rest of the value.
-
When you specify just a folder name, such as /n Myfolder, add a backslash () at the end of it.
-
If a file or folder name has spaces, surround it with quotes. For example:
winfr C: E: /n «Users<username>DocumentsQuarterly Statement.docx»
-
To stop the recovery process, press Ctrl+C.
What does <username> mean in the command examples?
In the File Explorer address bar, enter C:users to see a list of potential users on your computer. There may be several users on your computer, including you, the administrator, and the default account. When you see <username> in a file path, it is a placeholder for the current username on your computer.
Why am I getting this message: «Source and Destination cannot refer to the same physical partition?»
The source and destination drive or partition path should not be the same. If you only have one drive, use a USB or external hard drive as your destination path. Don’t create a partition after losing data, because this reduces the chance of a successful recovery.
Why does the recovery operation take so long?
Depending on the size of the disk, it may take some time to recover the file, especially if you are using signature mode.
Why are additional files recovered from my operating system drive?
Behind the scenes, Windows is constantly creating and deleting files. By default, Windows File Recovery filters out these files, but some slip through. To prevent this, use the /n <filter> switch in default and segment modes and the /y:<type(s)> switch in signature mode.
What is the $Recycle.Bin folder?
For default and segment modes, you may also see lost files recovered from the Recycle Bin (files either in the recycle bin or that were permanently deleted) with the name $files.xxx and stored in a folder called $RECYCLE.BIN.
What happens if the destination drive is full?
If you see the following message: «Destination disk is full, please free up space before resuming: (R)esume, (S)kip file, or (A)bort», Free up drive space on the destination drive, and then choose one of the options.
I was not able to recover the file, now what?
If you used default or segment mode, try again in signature mode if the file type is supported. It’s possible that the free space was over-written, especially on a solid state drive (SSD). If you need help, contact your administrator.
Looking to recover deleted files Windows 10? There are numerous methods you can use to get data back, including EaseUS file recovery software. Windows also has its own built-in file recovery tools. We’ll show you the best approach to take in different data loss situations.
It is, unfortunately, all too easy to accidentally delete files in Windows 10. Microsoft has included a safety net in the form of the Recycle Bin, but this does not always help – sometimes you can accidentally delete data permanently. Holding the Shift key while deleting a file, for instance, bypasses the Recycle Bin so data cannot be easily recovered, and the Recycle Bin is also limited in capacity. Not only can it hold a certain amount of data, but it will also house files up to a certain size. Try to delete files when the Bin is full, and data will simply be wiped out.
But all is not lost. There are things you can do to get back files you thought you would never see again. Join us as we show you how to restore permanently deleted files in Windows 10, using built-in tools and third-party options.
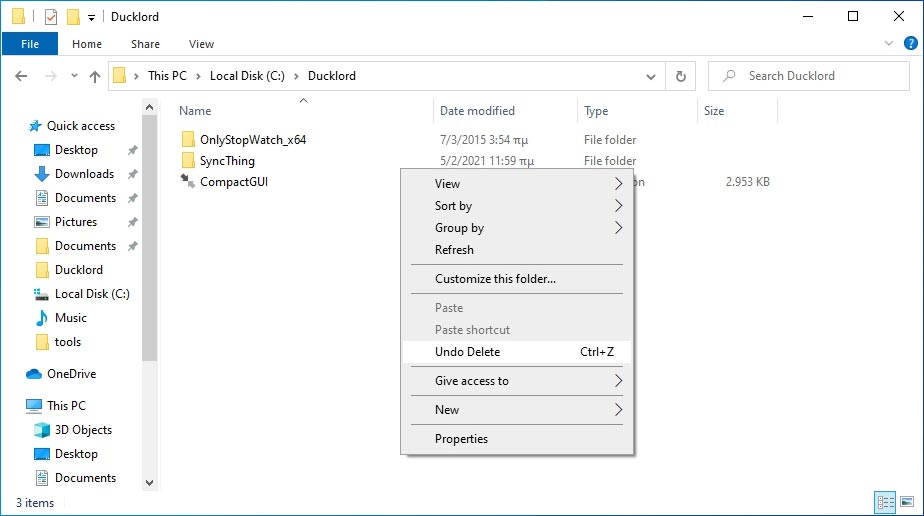
Recover Deleted Files Windows 10 Using Undo Delete
Many users know a quick way to restore recently deleted files, that is using Ctrl+Z deleted files recovery. Or, You can right-click the folder where it was located and clicking «Undo Delete».
Here are the steps to undelete files with Undo Delete feature:
Step 1. Right-click the folder where the file was lost.
Step 2. Click «Undo Delete» to restore the file to its original location.
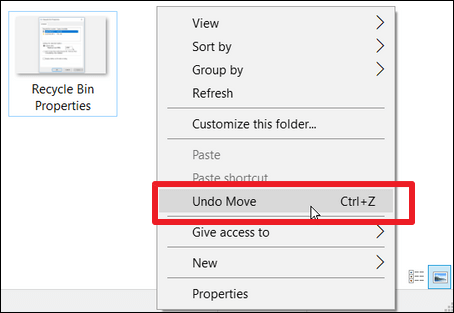
Step 3. Or, press «Ctrl+Z» directly to restore the lost files.
Keep in mind that ctrl+z or Undo Delete will only work if the file or folder was deleted recently. This method is not useful if you restart your computer after file loss, After a
Restore Deleted Files Windows 10 from Recycle Bin
If you delete a file by hitting the «Delete» button on your keyboard or simply drag it to the Recycle Bin, then the steps to undelete files in Windows 10 are easy.
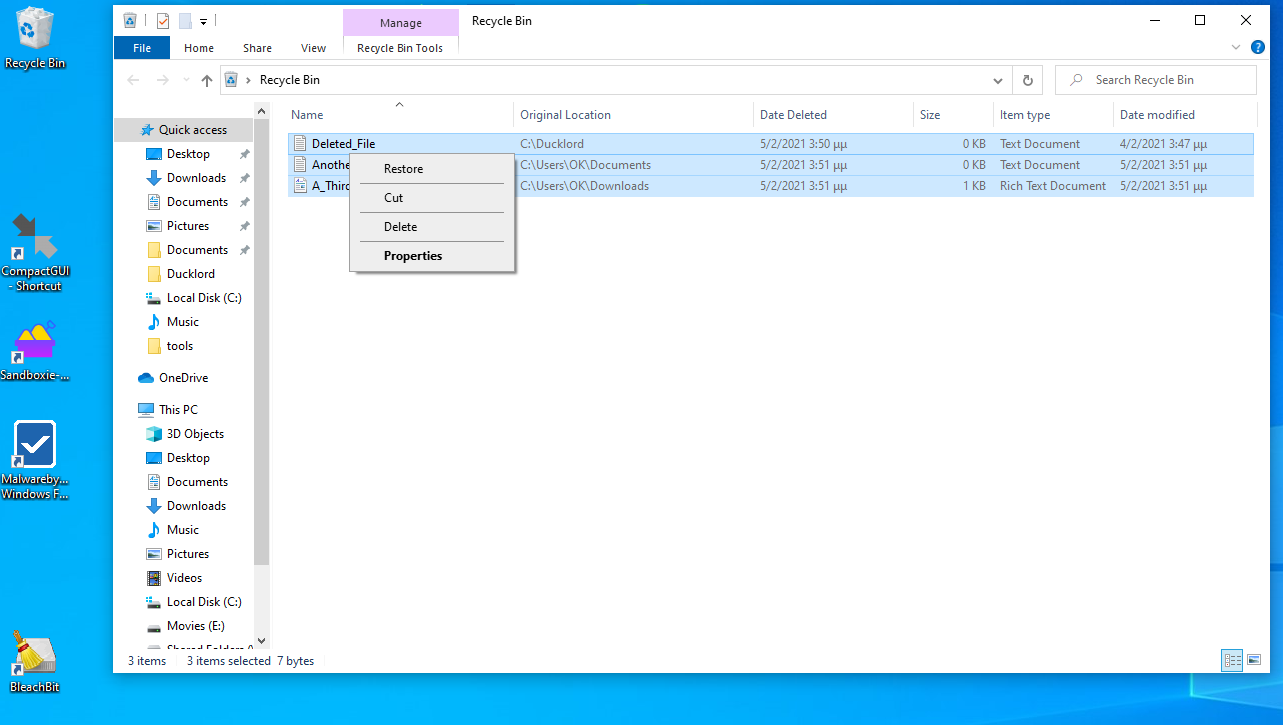
Step 1. Open the «Recycle Bin» from the desktop or Start menu and then locate the deleted files you are interested in.
Step 2. Browse through the content of the Recycle Bin to locate the files you need. You can also perform a search for a specific file, or use the column headings to identify files based on size, date of modification, and more.
Step 3. Select the file you would like to get back and then right-click them.
Step 4. Click «Restore» to recover the deleted files.
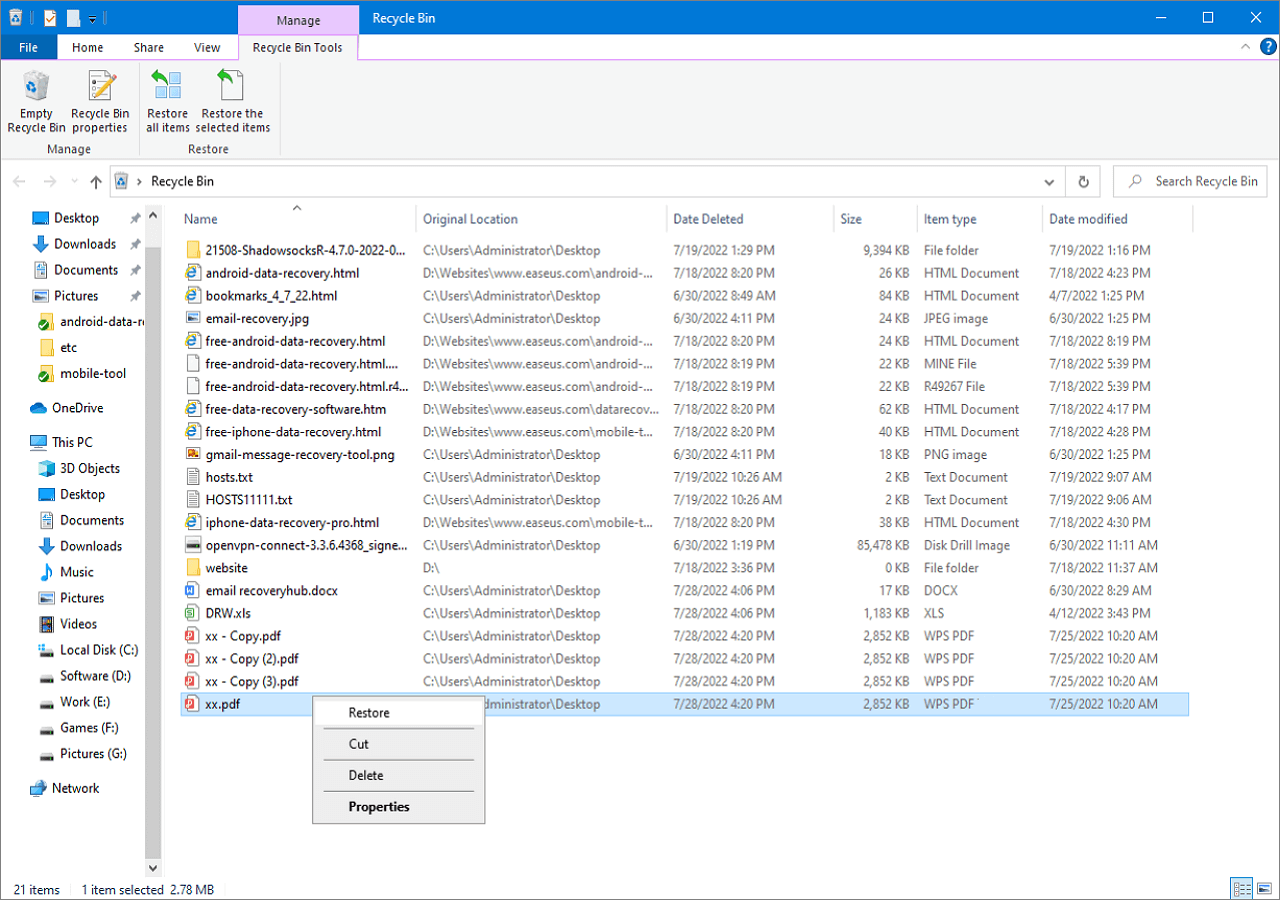
There are, however, limitations to this method. It will only work if you haven’t emptied the Recycle Bin, and if you have not bypassed the Bin by holding the Shift key while deleting data. If you can’t find what you are looking for in the Recycle Bin, it is possible that your files have been permanently deleted; you can try the following methods for Recycle Bin recovery.
How to Recover Permanently Deleted Files Windows 10 with Data Recovery Software
Perhaps the most reliable method of getting back deleted files is to use dedicated data recovery software. One such tool is for Windows 10 and macOS is EaseUS Data Recovery Wizard that has a high success rate and remains easy to use.
It does not matter if you have a backup available or not, the program will almost certainly be able to recover your deleted data for you.
EaseUS File Recovery Windows 10
- Recover lost or deleted files, documents, photos, videos, audio, music, and emails effectively
- Recover deleted files from hard drive, emptied recycle bin, memory card, flash drive, digital camera, and camcorders
- Support data recovery for accident deletion, formatting, inaccessible drives, virus attack, system crash under different situations
You can download the EaseUS files recovery software for free from the link above, and then use the following steps to recover your deleted files.
Note: To guarantee a high data recovery chance, install EaseUS data recovery software on another disk instead of the original disk where you lost files.
Step 1. Launch EaseUS Data Recovery Wizard on your Windows 11, Windows 10, Windows 8, or Windows 7 computer. Select the disk partition or storage location where you lost data and click «Scan».

Step 2. This recovery software will start scanning the disk to find all lost and deleted files. When the scan process completes, click «Filter» > «Type» to specify lost file types.

Step 3. Preview and restore lost Windows files. You can double-click to preview the scanned files. Then, select the target data and click the «Recover» button to save them to another safe spot in the PC or an external storage device.

What is essential to remember, however, is that time is of the essence when it comes to data recovery. The sooner you can start the process of locating and recovering data, the greater your chances of successful data recovery. Leave things for too long, and it is possible that recovery will be impossible due to data being overwritten, or a problem arising on the drive you are trying to recover data from.
Restore Deleted Files Windows 10 Using Windows File Recovery
As long as you have at least Windows 10 May 2020 Update (Windows 10 2004) installed, you have access to Windows File Recovery – although you will need to install it from the Microsoft Store. This is Microsoft’s own free data recovery tool, but it is very different from programs like EaseUS Data Recovery Wizard because it is a command-line tool. This means that rather than using a familiar system of icons and menus, it is text-based and therefore not something that everyone will be comfortable with.
Because of the potential for things to go wrong, Windows File Recovery is only really recommended for slightly more experienced computer users.
Before you get started with Windows File Recovery, there are two things you need to prepare: there are a couple of conditions you should know:
- You need a secondary drive to recover data – this can be a regular hard drive or an external USB drive.
- You need to know the exact location that your deleted files where originally stored in.
How to use Windows File Recovery to restore deleted files in Windows 10
Step 1. Open the «Microsoft Store» app and search for Window File Recovery. Now download and install the app by clicking the «Get» button.
Step 2. Open Windows File Recovery from the Start menu shortcut.
Solution source: https://www.microsoft.com/en-us/p/windows-file-recovery/9n26s50ln705?activetab=pivot:overviewtab from Microsoft official website
Step 3. Use the syntax indicated below to start the process of recovering deleted files. The basic command line is:
winfr source-drive: destination-drive: [/switches].
For example:
winfr C: D: /n UsersDocumentstest.docx
This particular command will recover a deleted Word document named test that had been stored on the C: drive, saving it to the D: drive.
Step 4. You can then follow the on-screen instructions to finishing restoring deleted files.
This method of data recovery is not going to be suitable for everyone because of the fact that different commands are needed for every single scenario. It’s also worth noting that it is not going to be able to help you out in every instance. For example, it will not be able to recover files following a virus attack or lost partition. In these cases, it is better to look to EaseUS Data Recovery Wizard as outlined above.
Recover Permanently Deleted Files Windows 10 from File Backup
This solution only work when you set up a backup or open the File History function before the data loss happens. If there is no backup available, you still need EaseUS Data Recovery Wizard to recover permanently deleted files on Windows 10.
Go to check your recent backups and follow steps to get deleted files back from a Windows backup:
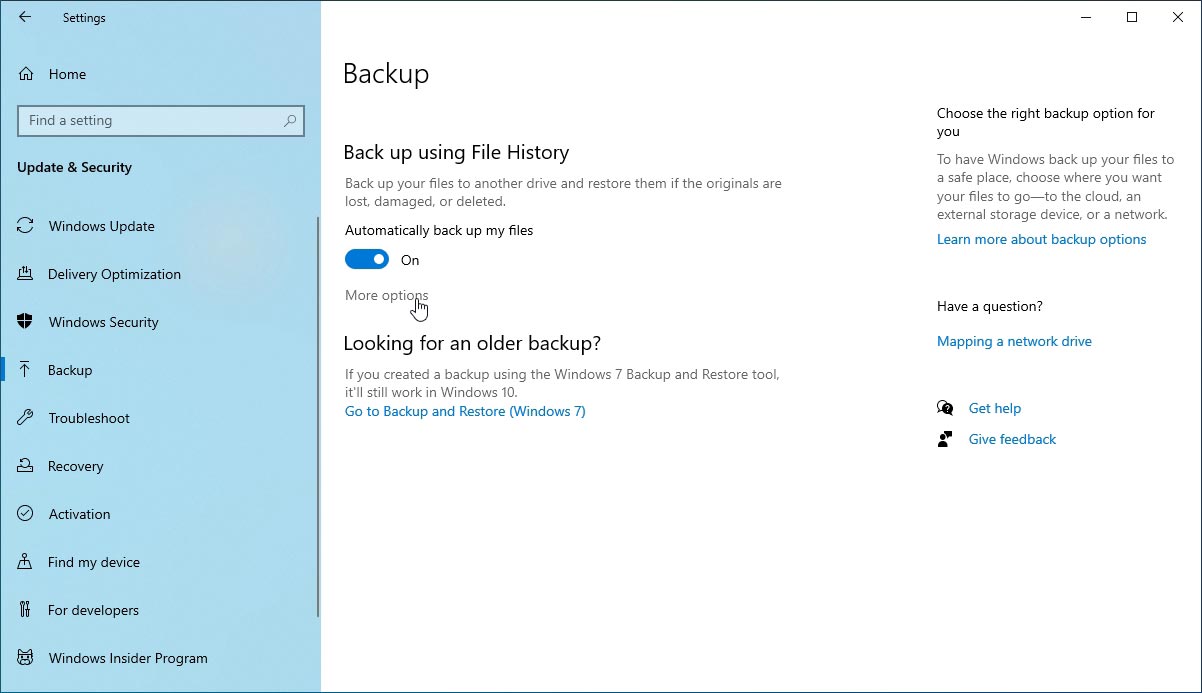
Step 1. Open «Settings» from the Start menu and head to «Update & Security». Click the «Backup» section to the left.
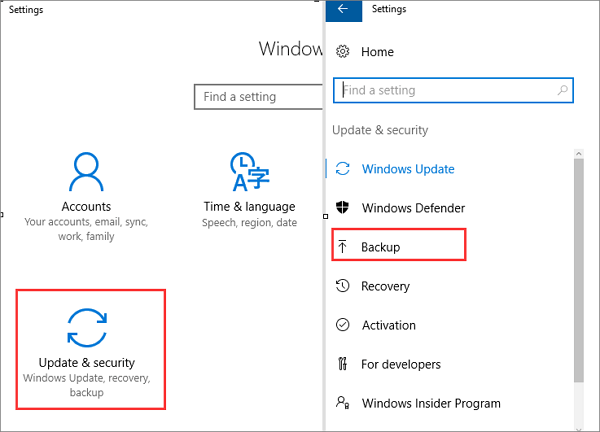
Step 2. Select «Backup and Restore (Windows 7)». Click «Restore my files» > «Browse for files» or «Browse for folders» to select the previously created backup.

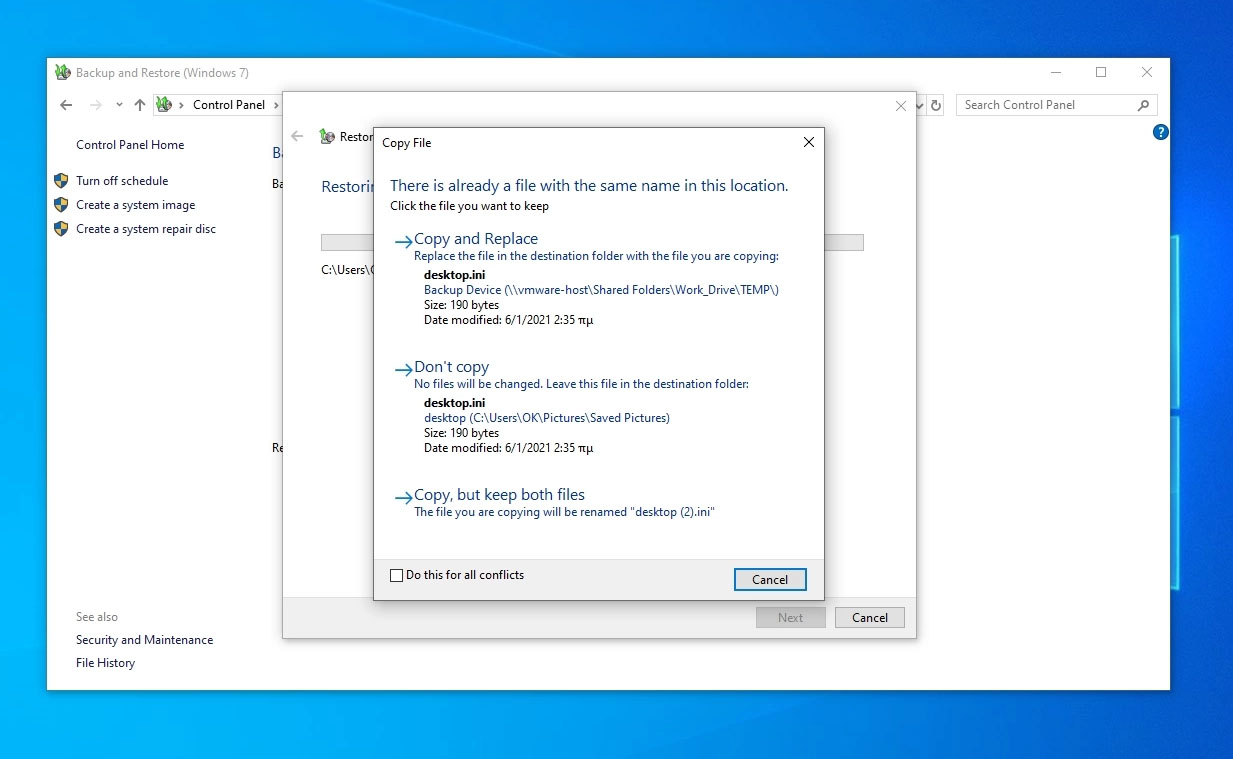
Step 3. Choose where to save your files. In the case of a naming conflict, Windows will warn you. Choose «Copy and Replace», «Don’t copy» or «Copy, but keep both files» according to your needs and then wait for the restoring process to complete.
Recover Deleted Files in Windows 10 from Previous Versions
You can also recover Windows 10 files by using the «previous versions» function – but you must already have enabled this feature in order for it to work. To ensure that this is an option that is available to you, you need to have set up File History to back up files automatically.
Assuming you have already configured this feature of Windows, you can use the following steps to restore permanently deleted files:
Step 1. Look for and right-click on the folder that contained the permanently deleted files.
Step 2. Click «Restore previous versions».
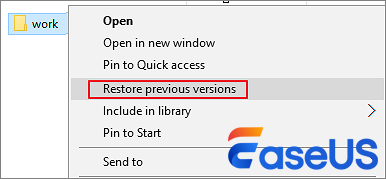
Step 3. Select the files you are interested in, and click «Restore».
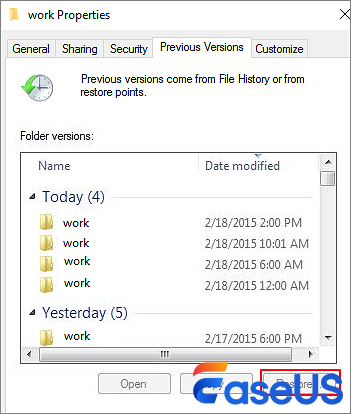
If Windows warns you that it already contains a file or folder with the same name, select «Replace the file in the destination» to overwrite it, or select a new file name.
What’s the Best Way to Recover Permanently Deleted Files in Windows 10
As you can see, there is more than one way to get back files you have deleted in Windows 10. The one that works best for you will very much depend on your circumstance and the way in which files were deleted.
The table below compares the various recovery methods available to you, helping you to weigh up the advantage and disadvantages of each.
| Comparison | Recycle Bin | Data Recovery Software | Windows File Recovery | File Backup & Previous Versions |
|---|---|---|---|---|
| Easy of use | Easy |
Easy |
Hard |
Medium |
| Deleted recovery | Yes | Yes | Yes | Yes |
| Permanently deleted recovery | No | Yes | No | Yes |
| Formatted recovery | No | Yes | No | Yes |
| Recycle Bin emptying recovery | No | Yes | No | Yes |
| Need backup | No | No | No | Yes |
| Platform | Windows | Windows + Mac | Windows | Windows |
| Recovery rate | Low | High | Low | Very low |
| Price | Free | free data recovery software or Paid | Free | Free |
All of the methods and techniques outlined in this article can be used to help get your data back. But it is the specialist recovery software EaseUS Data Recovery Wizard that gives you the greatest chance of success in the wide range of circumstances.
Read futher information on how to restore permanently deleted files in Windows 10.
1. Can I recover permanently deleted files from my computer?
In most cases, yes. However, there are a few factors that will affect your chances of success, such as the type of file that was deleted and how long ago it was deleted. If you have recently deleted a file and emptied it from your computer’s Recycle Bin, you may still be able to recover it using a deleted file recovery program.
2. How to recover permanently deleted files Windows 10 using CMD?
The Windows Command Prompt can be a powerful tool for disk and file management. You can use CMD to recover hidden files with the attrib command lines. But these commands can’t restore deleted files.
Step 1. Type cmd in the Search box. Right-click on Command Prompt and select Run as administrator.
Step 2. Type ATTRIB -H -R -S /S /D X:*.* and hit Enter. Replace «X» with the letter of your hard drive.
3. How to recover deleted files Windows free?
One option to restore deleted files for free is using a free deleted file recovery software — EaseUS Data Recovery Wizard Free, which will scan your hard drive and attempt to recover any deleted files. You can recover up to 2GB of data for free with this tool.
Step 1. Download and run EaseUS Data Recovery Wizard Free.
Step 2. Scan a disk for deleted files.
Step 3. Preview and recover lost files.
4. How can I recover deleted files in Windows 10 without software?
A few ways are available to recover deleted files without using any third-party software. One way is to check the Recycle Bin to see if the file you accidentally deleted is still there. If it is, simply right-click on the file and select Restore.
If the file is not in the Recycle Bin, then you can try restoring it from a previous version. To do this:
Step 1. Open File Explorer and navigate to the folder where the deleted file was located.
Step 2. Right-click on the folder and select Properties.
Step 3. Under the Previous Versions tab, select the most recent version of the folder that contains the deleted file and click Restore.
5. How to restore permanently deleted files from Recycle Bin?
You can use third-party file recovery software to recover permanently deleted a file from your Recycle Bin.
Step 1. Install and launch EaseUS Recycle Bin recovery software.
Step 2. Click Recycle Bin option under the Locations section and click Scan.
Step 3. Select the file you need, preview and restore it.
6. How can I recover permanently deleted files in Windows 10 without backup?
If you have accidentally deleted a file and do not have a backup, then you will need to use dedicated Windows 10 data recovery software to recover it. There are a number of different file recovery programs available, and EasedUS data recovery software is a popular one.
Once you have chosen and installed a file recovery program, simply run it and follow the prompts in order to attempt to recover your permanently deleted files.
![]()
Download Article
![]()
Download Article
Did you accidentally delete an irreplaceable file from your Windows 10 PC? It happens to the best of us! Fortunately, there are many safeguards in place that make it easy to recover your files before they are gone forever. This wikiHow article will show you how to undelete files using free tools built into Windows and two other easy data recovery tools.
-

1
Open the Recycle Bin on your PC. Before you panic or try another method, double-check your Recycle Bin to make sure the file isn’t still in there. You’ll usually see the Recycle Bin icon on your desktop, but if you don’t, you can also fine it by pressing the Windows key, typing recycle, and clicking Recycle Bin.
-
2
Browse or search for a file. If your Recycle Bin has a lot of files, it may be helpful to use the search bar at the top-right corner. You can also simply scroll through the files to look for the one you need.
Advertisement
-
3
Right-click a file and choose Restore. This will return the deleted file to the folder from which you deleted it.
- To restore multiple files at once, hold down the Control key as you click each file, then right-click anywhere in the highlighted area and choose Restore.
- You can also restore all deleted files from the Recycle Bin at once by clicking Restore all items at the top of the window.


Advertisement
-
1
Know when to use this method. If you aren’t able to restore a file from the Recycle Bin or find it in your backup, this method can help you regain access to lost files.[1]
- You have to restore the missing files to a drive that is not the same drive the file was deleted from—this means that if you only have one hard drive, you’ll need to connect a USB flash or other external drive to your PC to restore the lost files. If you don’t have another drive to use, you won’t be able to use this method.
- It’s not possible to restore files to or from a cloud storage or networked drive with this method.
-
2
Install Windows File Recovery by Microsoft. This utility might already be installed on some systems, but not all.
- Open the Microsoft Store app from the Windows Start menu.
- Search for Windows File Recovery.
- If you see the option to do so, click Get and follow the on-screen instructions to install.
- If the app is already installed, you’ll see Open instead.
-
3
Open Windows File Recovery. It’s easy—just type windows file recovery into the Windows Search field (press Windows key + S if you don’t see it), and then click Windows File Recovery in the search results. This will open a command prompt window.
- If prompted, give the app permission to make changes to your computer.
-
4
Determine the mode you want to use. There are two different modes for restoring files:
- Regular mode: Use this mode if the file you deleted was from a drive formatted with NTFS and the drive is not corrupted.
-
Extensive mode: Use this mode if the file you deleted was on a drive formatted as FAT or exFAT, which is common for flash cards and other removable media, or the drive is corrupted. This mode will take a little longer.
- If you’re not sure which mode to use, start with Regular mode, and then try Extensive if that doesn’t work.
-
5
Use the winfr command to restore your files. The command will look like this winfr source-drive: destination-drive: /mode /switches file-or-folder. The /n switch lets you specify files and folders to recover. Here are some examples you can use in both regular and extensive modes:
- If you want to recover all files ending with .JPEG from your pictures directory on the C drive to a recovery folder on your F drive, you’d use winfr C: F: /regular /n *UsersyourusernamePictures*.JPEG.
- You can also use /n multiple times to recover files that meet multiple criteria. For example, to recover both JPEG and PNG files from your Pictures folder, you could use winfr C: F: /regular /n UsersyourusernamePictures*.JPEG /n UsersyourusernamePictures*.PNG.
- To recover all files ending with .docx from any location on the original drive, you could use winfr C: F: /regular /n *.docx.
- To recover your entire Documents folder from the C: drive to the F: drive, you’d use winfr C: F: /regular UsersyourusernameDocuments.
- Note the trailing backslash at the end of the folder name—this is necessary when recovering an entire folder.
-
6
Press Y to confirm. Windows File Recovery will now attempt to recover the file(s). If the recover is successful, the files will be saved to the destination drive in a new folder called «Recovery_(date and time).
- If you’re unable to recover the files in regular mode, run the same command again replacing /regular with /extensive.
- Some file types are hidden from results by default, including .log, .vbs, .c, .cab, .py, and .lnk. If you are unable to find the type of file you’re looking for, run the recovery again, this time adding the /e switch to disable extended filtering.


Advertisement
-
1
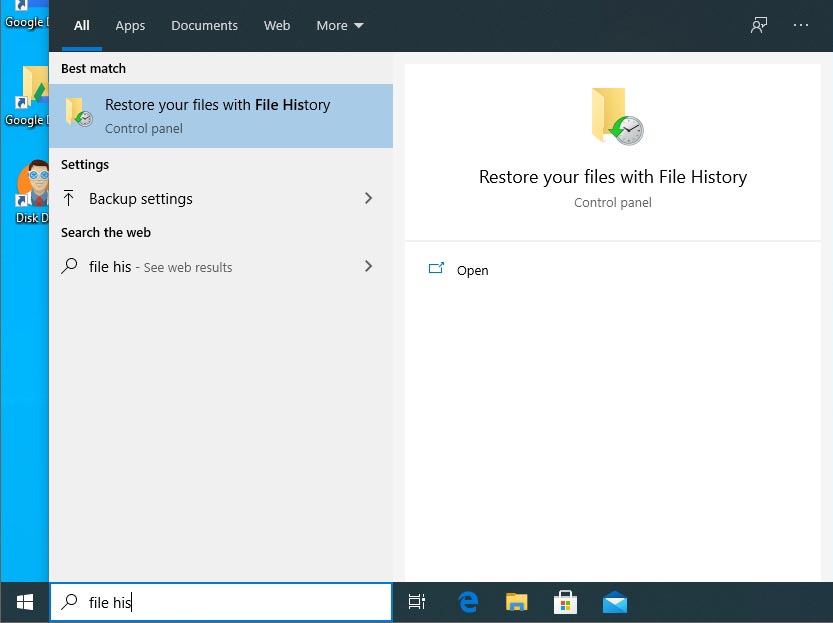
Open the File History tool. If you want to recover a file or folder you’ve accidentally overwritten or replaced with a newer version in your Documents, Music, Pictures, Videos, or Desktop folder, this method will help you get your original file(s) back. To open the tool, press the Windows key on your keyboard, type restore your files, and then click Restore your files with File History.[2]
- This method requires that you’ve enabled File History in your settings. File History works with a network or external drive, so if you don’t have one of those, you don’t have File History enabled.[3]
- If the file you want to recover no longer exists at all, you can restore its containing folder to a previous version that existed before you deleted the file.
- This method requires that you’ve enabled File History in your settings. File History works with a network or external drive, so if you don’t have one of those, you don’t have File History enabled.[3]
-
2
Locate the file or folder you need in the File History tool. All of the files that have earlier versions saved will be visible here. Once you find the file, you’ll be able to browse the dates of previously saved versions.
-
3
Use the arrows to select the version to restore. Be sure to choose a version of the file or folder that existed before you made the change.
-
4
Select a version and click Restore. A confirmation message will appear.
- If you’d rather restore the file or folder to a different location, right-click Restore, choose Restore to, and then click another location.
-
5
Click Restore to confirm. This saves the original version of the file or folder to its original location.


Advertisement
-
1
Install Recuva. Recuva is a free app that will undelete files you accidentally removed from your computer.[4]
You can get the tool from https://www.ccleaner.com/recuva.- The free version of the tool should be enough for recovering most deleted files.
-
2
Open Recuva once installed. You’ll find it in your Windows menu. If prompted, allow the app to make changes to your PC.
- The first time you open Recuva, you may see a warning message about the app being blocked. Click the warning message, select the first option in the list, select the Actions menu, and then click Allow on device to continue.
-
3
Click Next on the wizard. Now you’ll be able to use this quick-start feature to recover deleted files.
-
4
Select a file type and click Next. If you’re not sure the type of file you’re looking for, choose All Files.
-
5
Select the location the file was deleted from. For example, if you deleted the file from Recycle Bin, choose In the Recycle Bin.
- To enter a specific folder, choose In a specific location, click Browse…, and then select the folder.
-
6
Click Next. Recuva will now attempt to find deleted files.
- You’ll see that there’s a Deep Scan option here. Try the regular scan first. If you are unable to recover your file normally, you can close and re-open Recuva and check the box next to «Enable Deep Scan.» This option will take a long time, and it might not be necessary.
-
7
Click Start. Recuva will now search for shadow copies of deleted files from the selected location. Once the scan is complete, a list of files will appear.
-
8
Select the file(s) you want to recover and click Recover…. This restores the selected file(s) and/or folder(s) to the original location.


Advertisement
-
1
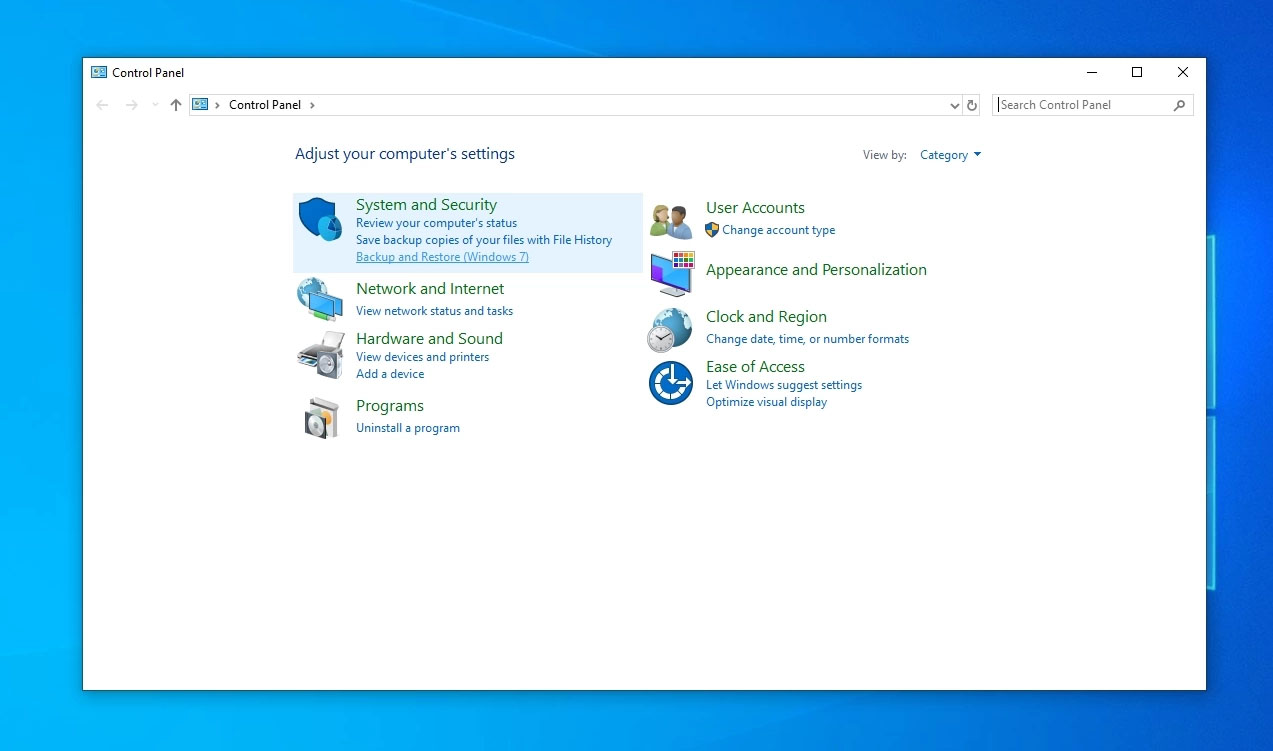
Open the Control Panel. If you back up your PC to another drive, including a networked drive, or another version of Windows that was installed on your PC, you can restore files at any time from earlier backups. To get started, press the Windows key and type control panel, then click Control Panel in the search results.[5]
-
2
Open the Backup and Restore tool. If you don’t see it, click System and Security first.
-
3
Choose which files to restore. If you want to restore one of your own files, select Restore my files. To restore files for another user (or all users), choose Restore all users’ files.
- If you want to restore files from a different backup than the one selected by default, click Select another backup to restore files from, and then locate the backup.
-
4
Select Browse for files or Browse for folders. Choose the option that applies to you based on whether you want to restore individual files or entire folders.
-
5
Search for the file or folder you want to restore. You can type any part of the file or folder name to locate the file or folder, and then click Search.
- You can use wildcards, such as *.jpg, to find all files that match a certain string of text.
-
6
Select the file(s) or folder(s) and click Next.
-
7
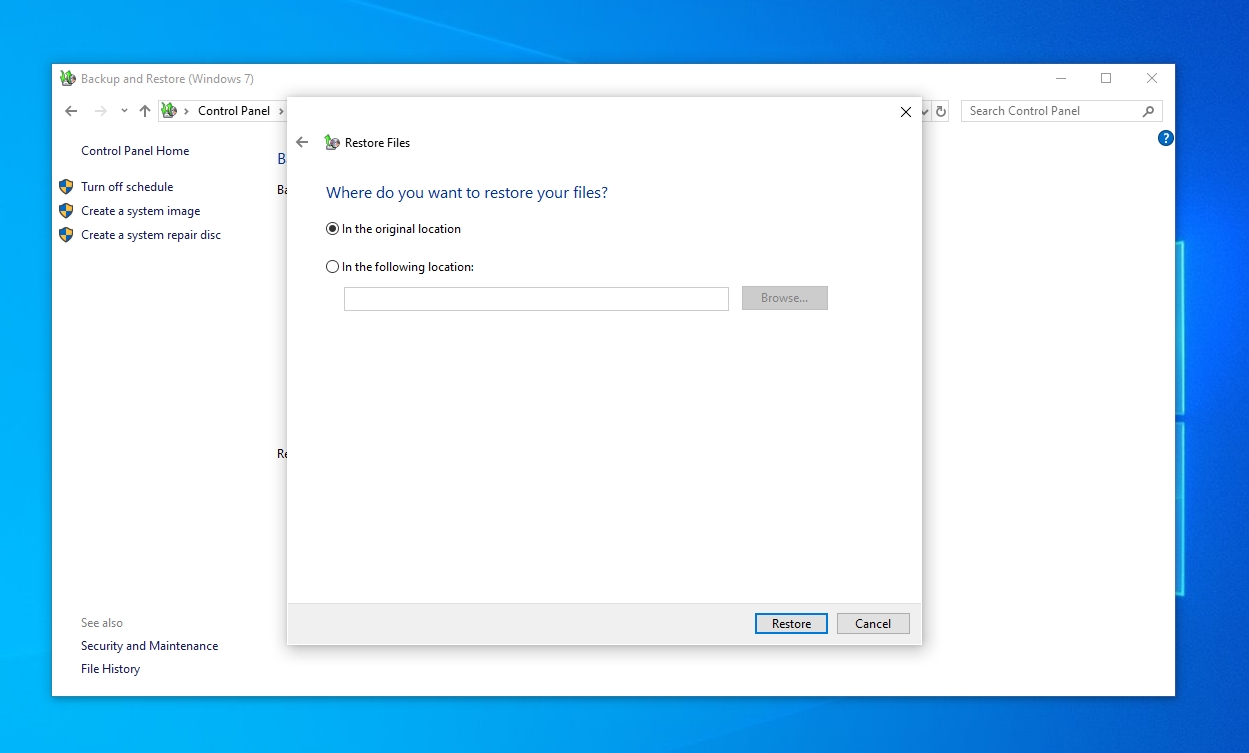
Choose where you want to restore the files. To bring them back to their original location, leave the default option selected. Otherwise, you can select In the following location and click Browse to select another folder.
-
8
Click Restore. The selected file(s) and/or folder(s) will be recovered to the chosen directory.


Advertisement
-
1
Install Stellar Data Recovery on your Windows PC. This file recovery app does have a fee, but you can do a free scan before paying to see if the app is capable of restoring the files you need. Search the web for «Stellar Data Recovery» and install the free downloadable version.
-
2
Open Stellar Data Recovery. You’ll find it in your Windows menu after installing.
-
3
Choose what you want to recover and click Next. You can select as many of the different file types as you’d like.
-
4
Select the location from which you deleted the file. You can choose one of the common locations at the top, such as Desktop or Documents, or select Choose Location to select a folder manually.
- If the file was saved to an external drive that’s connected to your computer right now, select that drive.
- If the file was saved to a partition that is no longer accessible, select Can’t Find Drive.
-
5
Click Scan to search for deleted files. Once the scan is complete, you’ll see a list of files and/or folders you can restore.
- If nothing is found, click the link next to «Deep Scan» to try a more in-depth scan.
-
6
Select the file(s) and/or folder(s) and click Recover. If you’re willing to pay for Stellar, you will be asked to do so now. Once you make your payment, you’ll receive a product key via email that you can enter into the provided field. Once validated, you’ll be able to recover the selected file(s), as well as any you need to recover in the future.


Advertisement
Add New Question
-
Question
How can I recover a file that was accidentally overwritten?

Stan Kats is the COO and Chief Technologist for The STG IT Consulting Group in West Hollywood, California. Stan provides comprehensive technology & cybersecurity solutions to businesses through managed IT services, and for individuals through his consumer service business, Stan’s Tech Garage. Stan has over 7 years of cybersecurity experience, holding senior positions in information security at General Motors, AIG, and Aramark over his career. Stan received a BA in International Relations from The University of Southern California.
Cybersecurity Expert
Expert Answer
If you hadn’t turned on file versions in your operating system, and you overwrote a file with the exact same name, then unfortunately it will have been lost irrevocably. Check to see if you made backup copies.

Ask a Question
200 characters left
Include your email address to get a message when this question is answered.
Submit
Advertisement
References
About This Article
Article SummaryX
1. Check the Recycle Bin first.
2. Use Windows File Recovery if you have another drive, including a flash drive.
3. Restore from File History if you make backups.
4. Use the free Recuva tool to find deleted files.
5. Restore from an older backup using Backup and Restore.
6. Try Stellar Data Recovery’s free option to see if files are recoverable.
Did this summary help you?
Thanks to all authors for creating a page that has been read 12,951 times.
Is this article up to date?
This article details eight tried-and-tested methods to recover deleted files on Windows 10. It’s almost guaranteed that at least one of those methods will help you get your data back. See the Quick Navigation section below for an overview of common data loss situations and applicable recovery methods.
Jump to:
- Undelete Files on Windows 10 Using Third-party Data Recovery Software
- Pull Windows 10 Lost Data Out Of (File) History
Losing your precious data is easy. One absent-minded click and your files will be gone quicker than a coin in a magic trick. Thankfully, there are several ways to restore deleted files on Windows 10. It’s almost guaranteed that at least one of those methods will help you get your data back.
⚠️
If you deleted your files and don’t have backups available, you should avoid actively using your computer. Your files’ recovery should be your immediate next move to minimize the chances of newer data overwriting them.
Quick Navigation
| Problem | Solution |
|---|---|
|
I just deleted a file accidentally. Can I undo my action? |
Look in the Bin Quick Auto-Rescue from the Bin with CTRL+Z |
|
I’ve permanently deleted a file – manually removed it from the Recycle Bin. Can I still get it back? |
Software to the Rescue There’s an App for That – Windows File Recovery Backup and Restore — In Windows 10 |
|
I clicked something in Explorer, and my files disappeared. How do I get them back? |
Look in the Bin Hidden Files, Garbled Filesystems Software to the Rescue |
|
My computer is slow and my files disappeared/are inaccessible |
Hidden Files, Garbled Filesystems |
|
I made changes to a file and saved it. Can I somehow undo them? |
There’s an App for That – Windows File Recovery History Trip Backup and Restore — In Windows 10 |
|
A secondary storage device with all my work files disappeared! |
Hidden Files, Garbled Filesystems There’s an App for That – Windows File Recovery Software to the Rescue Backup and Restore — In Windows 10 System Image File Extraction |
|
My computer won’t boot. The OS and files are inaccessible. |
Backup and Restore — In Windows 10 System Image File Extraction |
|
I formatted an HDD but forgot to backup my files! What now? |
Software to the Rescue Backup and Restore — In Windows 10 System Image File Extraction |
Here’s a super-quick method to recover deleted files on Windows 10:
- Download & install Disk Drill on your Windows 10 PC.
- Open Disk Drill & select the device you want to scan.
- Click “Search for Lost Data” to start the scan.
- Preview & select the lost files and click “Recover”.
- Choose a safe recovery destination and confirm.
Read the detailed guide below.
🗨️
There are many ways to recover permanently deleted files on Windows 10, and a lot of them rely on various types of backups. In this guide, we will see how you can set them up and recover your deleted files from Windows 10 with and without them.
Method 1: Restore Deleted Files From the Windows 10 Recycle Bin
Most users delete files by selecting them and then either right-clicking and choosing Delete or hitting Delete on the keyboard. On modern operating systems like Windows 10, this doesn’t erase a file. It moves it to the Recycle Bin. If you act immediately, undoing that mistake can be easy.
- Open the recycle bin. You can do it by either right-clicking on its icon and choosing that option (open) or double-clicking on it.

- Locate the file you want to save from its impending deletion.
- Right-click on it and choose Restore from the pop-up menu that appears.

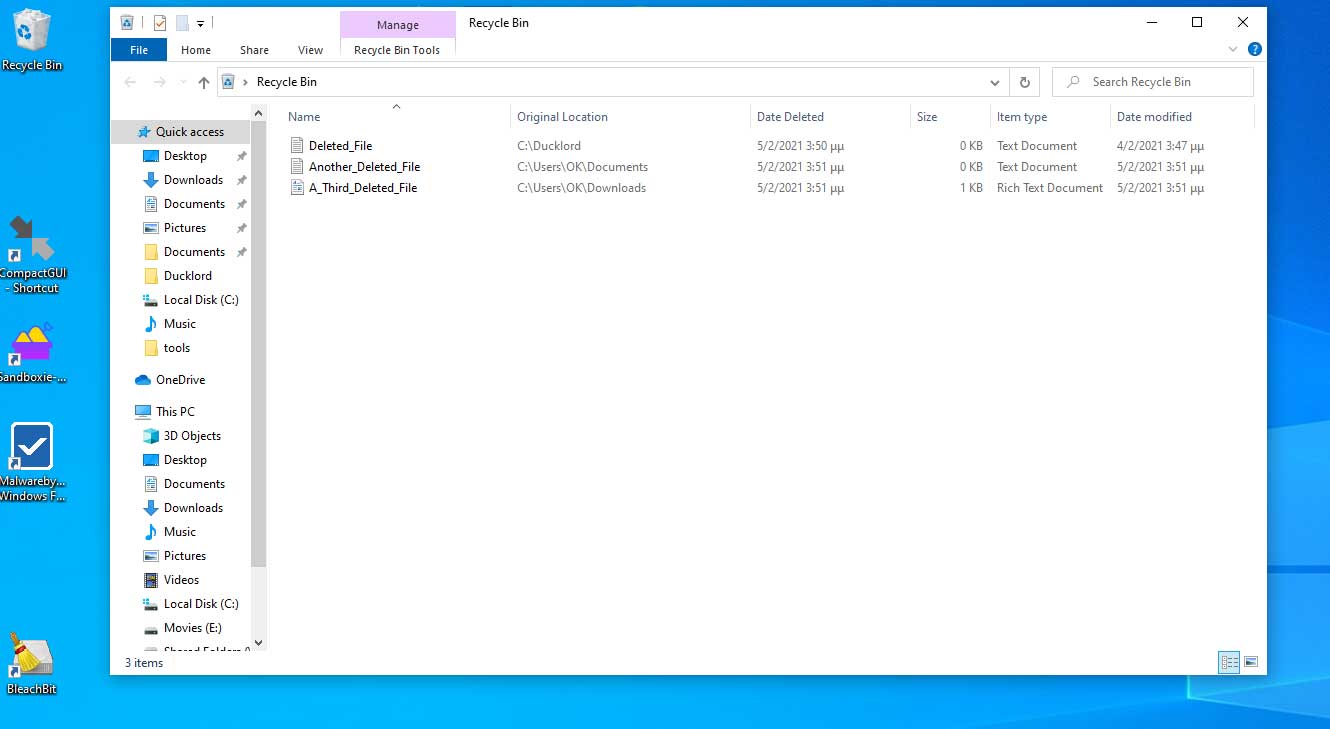
👀
To restore multiple files, keep CTRL or Shift pressed on your keyboard while clicking on them.
After that, your files will move from the Recycle Bin back to their original location.
Method 2: Quickly Auto-Recover Deleted Files From Windows 10’s Recycle Bin With CTRL+Z
There’s an even easier way to get your files back from the Recycle Bin than the process above. However, you should only use it right after deleting a file, and only if:
- You are still in the Windows Explorer window from where you deleted the file.
- You are absolutely sure it was moved to the recycle bin.
To get your file back, press CTRL + Z, and hey presto, it will be back where it originally was. At least, theoretically.
Practically, this isn’t some magical shortcut that brings files back from the dead, but a command to undo your last action. In Windows from Build 19041/Version 2004 onward, Microsoft decided to present it as a file-saving solution. If you right-click on a blank spot of the Windows Explorer window from where you deleted a file, you’ll see the option to Undo Delete on the menu that pops up.
👀
To check out how much data your Recycle Bin can hold, right-click on its icon on your desktop and choose Properties. You can also increase your Recycle Bin’s size from that spot.
Method 3: Bring Back Hidden Files and Fix Garbled Filesystems on Windows 10
Sometimes you may not lose your files because of a deletion, but instead, lose access to them. A virus infection, a filesystem corruption, or some other problem can render them invisible or inaccessible. Depending on the type of problem, two command-line tools might help you regain access to your files: chkdsk and attrib.
⬛ chkdsk
Did a power failure or an unexpected restart corrupt your filesystem? Chkdsk can help restore it to its former glory.
- Press Windows Key + X to access a quick menu of Windows tools. From there, choose Windows PowerShell (Admin). Alternatively, you can press the Windows key or click on the start button. Then, type “cmd” or “PowerShell“, right-click on the one you prefer, and choose “Run as administrator“.

- To check the active disk’s file system for errors and, if found, fix them, type “chkdsk /f” (without the quotation marks).
To scan a different storage device with chkdsk, state its letter after the command itself, as “chkdsk D: /f” to check the drive with the letter D, “chkdsk Q: /f” for the drive with the letter Q, and so on. - Chkdsk needs to lock the device it’s checking to do its thing. You won’t be able to access any files on this device while the process is running. It’s also impossible to check and fix the storage device where Windows 10 is installed while actively using the OS. If you need to check that disk, chkdsk will suggest scheduling the scan for the next reboot.
- Are you suspecting that the file system corruption source is a failing storage device? Then, replace the “/f” parameter with “/r“. This would make the command look like “chkdsk D: /r” for the drive with the letter D and “chkdsk Q: /r” for the drive with the letter Q. The “/r” parameter works the same as “/f” but also checks for physical disk errors, locates bad sectors, and can recover readable information from them.
⬛ attrib
Unlike what others may claim, attrib isn’t a file recovery tool. Instead, it provides access to almost the same options you’d see if you’d right-clicked on a file and chose Properties. With it, you can change a file’s flags to set it as hidden, read-only, archive, or as a system file.
Still, after a serious bout of filesystem corruption, or some other problem, your files might end up with the wrong flags. To fix them, run command prompt (CMD) or PowerShell as an administrator, as we saw above. When there, use the attrib command as follows:
- To mark a file as hidden (+h), read-only (+r), archive (+a), or system-related (+s), type:
attrib +h +r +a +s FILENAME
- When dealing with “lost” files, you’d probably want to do the opposite. To mark them as not hidden/read-only/archives, and surely not system-related. Thus, you should replace the pluses with minuses to instead remove those flags. In that case, the command would turn to:
attrib -h -r -a -s FILENAME

- Do you want to remove those flags from many files at once? You can run attrib with the “/s” and “/d” parameters. The first one (“/s”) instructs attrib to apply your setting to all files in the active directory, recursively. The second one (“/d”) tells attrib to also “touch” directories.

⚠️
Note that you shouldn’t randomly change the settings of files about which you know nothing. Nor should you ever run a batch command at the root of the storage device with your active operating system. Those could lead to further problems, the solutions to which would demand a wholly different guide.
Thanks to those two nifty tools that come with Windows, regaining access to your lost files might be a single command away. However, if your files were really deleted, you’ll have to look into one of the solutions that follow instead.
Method 4: Windows File Recovery: Microsoft’s Official Windows 10 File Recovery Solution
If you are on one of the latest versions of Windows (Version 2004 or newer), you can use Windows File Recovery. It’s another command-line tool, which you will have to use through Powershell or the command prompt. Still, it’s a pretty straightforward affair.
- Press the Windows key and start typing “Store”. Then, choose the Microsoft Store entry that appears. When there, perform a search for “Windows File Recovery“. Click the “Install” button to get the application.

- Open either PowerShell or the Command Prompt with administrative privileges, as we saw before.
- If you’re trying to restore files from a non-corrupted NTFS drive, type:
winfr SOURCE_DRIVE DESTINATION_DRIVE /regular
An actual version of the command to recover files from the system drive “C” to a backup drive “J” would be:
winfr C: J: /regular
👀
If that command doesn’t lead to the results you wanted, or you are dealing with a corrupted disk, swap the operating mode from “/regular” to “/extensive”.
- Do you want to recover only files of a specific file type? Add “/n *.FILE_EXTENSION” at the end of the command above. For example, to undelete your lost TXT, Doc, and PDF files from drive “D” to drive “Q”, you could type:
winfr D: Q: /extensive /n *.txt /n *.doc /n *.pdf

- The above commands automatically create a recovery directory. You’ll find it in the specified target drive, with the time and date in its name. You can specify the recovery directory’s name by stating a full target path instead of only a drive letter. This would look like:
winfr C: E:RecoverDir
In this particular example, “RecoverDir” is the name of a folder in the “E” drive.

- Winfr also offers two more advanced modes for recovering files: segment and signature mode. You can choose the first one by adding an “/r” switch and the second with “/x“. Unlike the default mode, they don’t rely on the hard drive’s Master Boot Record (MBR) and can recover more files. However, signature mode can only recover a small group of filetypes, like images stored as JPG or PNG files. To check out the supported filetypes, use the command “winfr /#” (without quotation marks).
Still, Windows File Recovery is a somewhat restricted tool and sometimes manages to restore everything but the files you wanted. That’s when it’s worth trying a third-party solution.
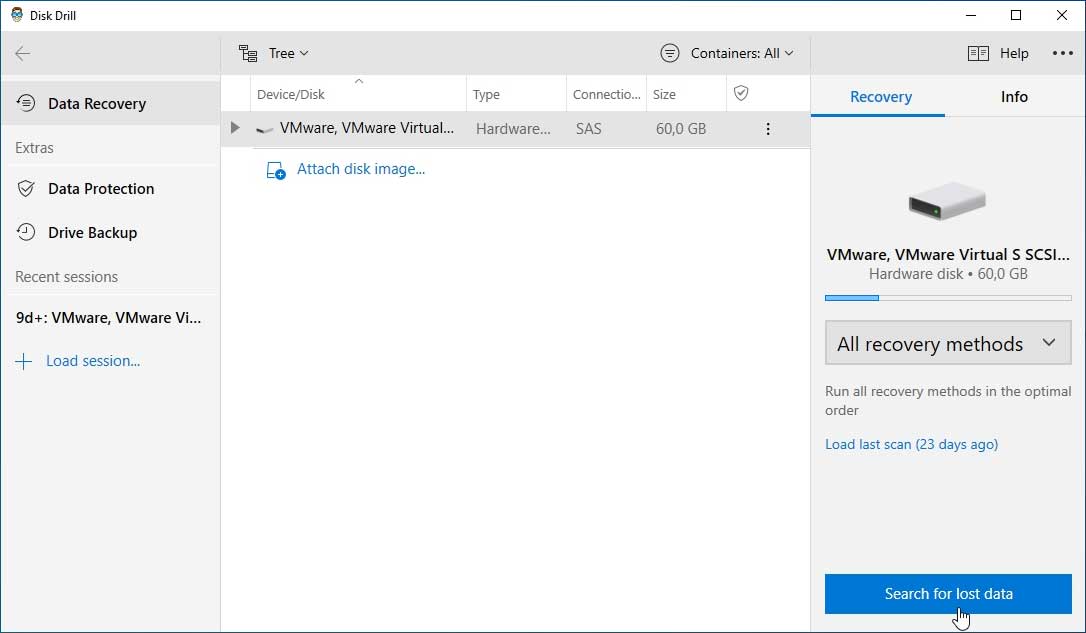
Method 5: Undelete Files on Windows 10 Using Third-party Data Recovery Software
Didn’t Microsoft’s Windows File Recovery bring back the files you wanted? That’s when it’s time to try a more established solution. We usually go for Disk Drill, which combines powerful recovery algorithms with outstanding ease-of-use.
👀
Disk Drill is also available for Macs, and can scan Android phones and iOS devices when connected to your computer. For this guide, though, we’ll be using it on Windows 10, to recover files lost on a PC.
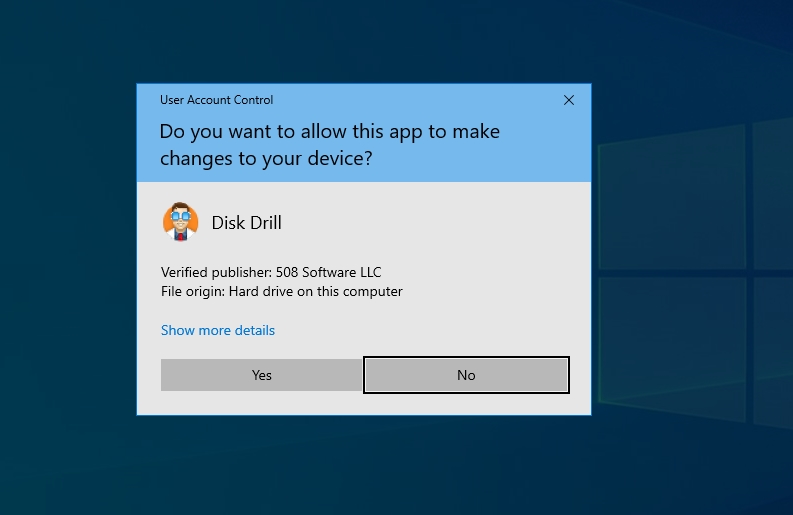
- Visit Disk Drill’s official site. From there, download and install the application. Then, run it, and answer positively when asked if you want to allow it to make changes to your device.

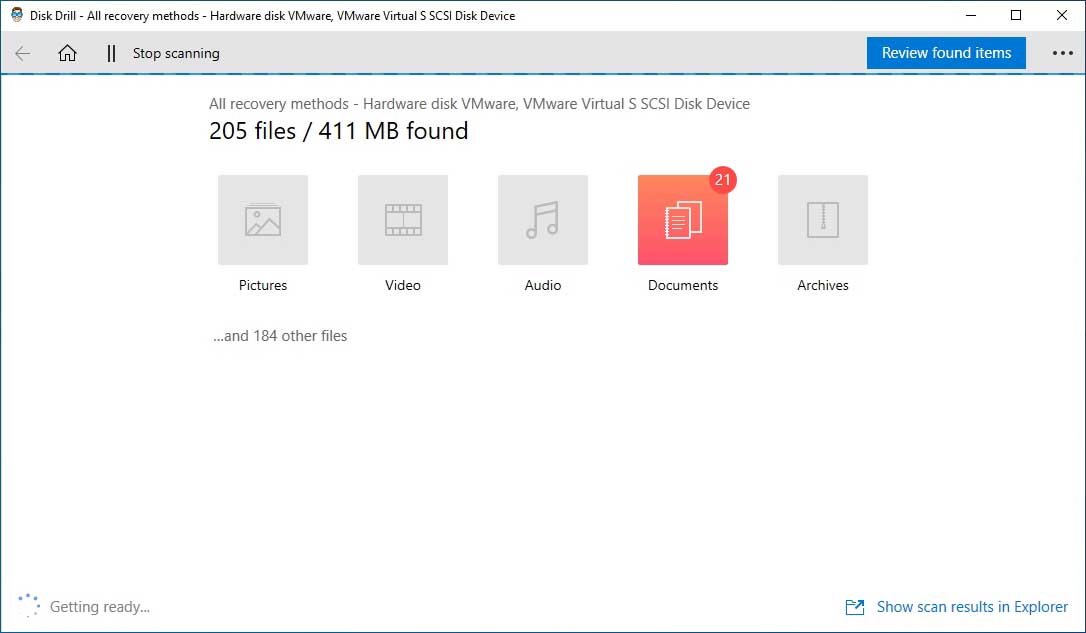
- Choose the storage device you want to scan for lost files from the main list at the center of Disk Drill’s window. You might have more than one on your computer. Then, click on “Search for lost data” at the bottom right.

- Disk Drill will immediately start scanning your storage device. It will also present a summary of the lost files it’s located and can recover, updated in realtime. You can check them out while the process is still underway by clicking on “Review found items” at the top right.
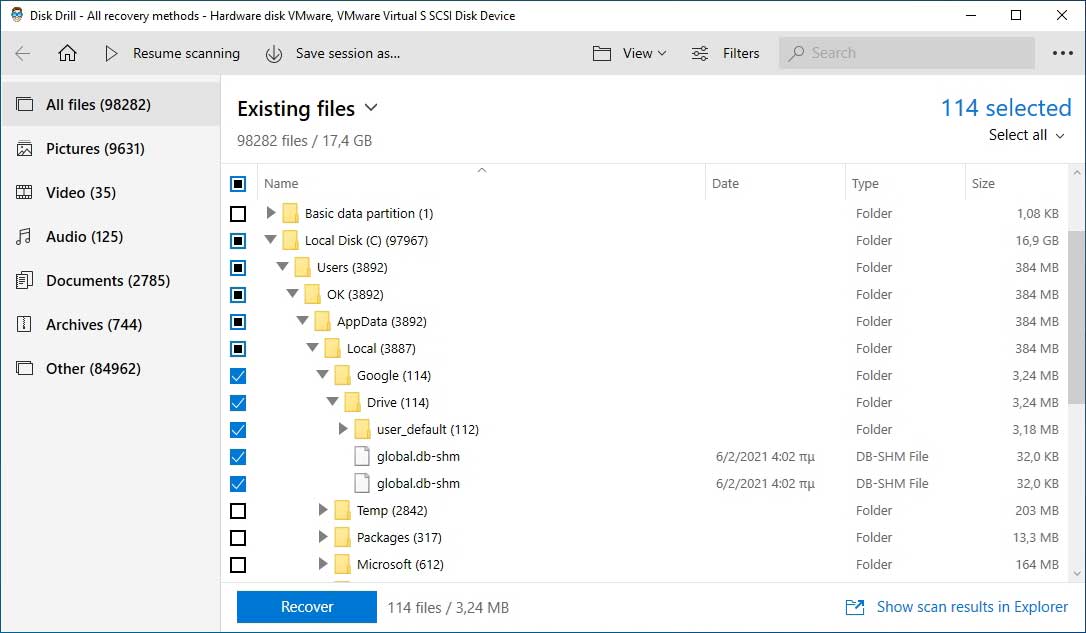
- Did Disk Drill find the files you want to recover before the scanning process completed? You can stop the scanning process by clicking on “Stop scanning” on the top left of the window. Then, proceed with their recovery. Look at the list of found files and “tick” on the left of the ones you want recovered. If they’re not among the results, give Disk Drill’s scanning some more time. Note that you can resume the scanning process if you’ve stopped it.

- Stop the scanning process and choose the files you want to recover. A blue “Recover” button will be enabled on the bottom left of Disk Drill’s window. Click on it to move to the next step.
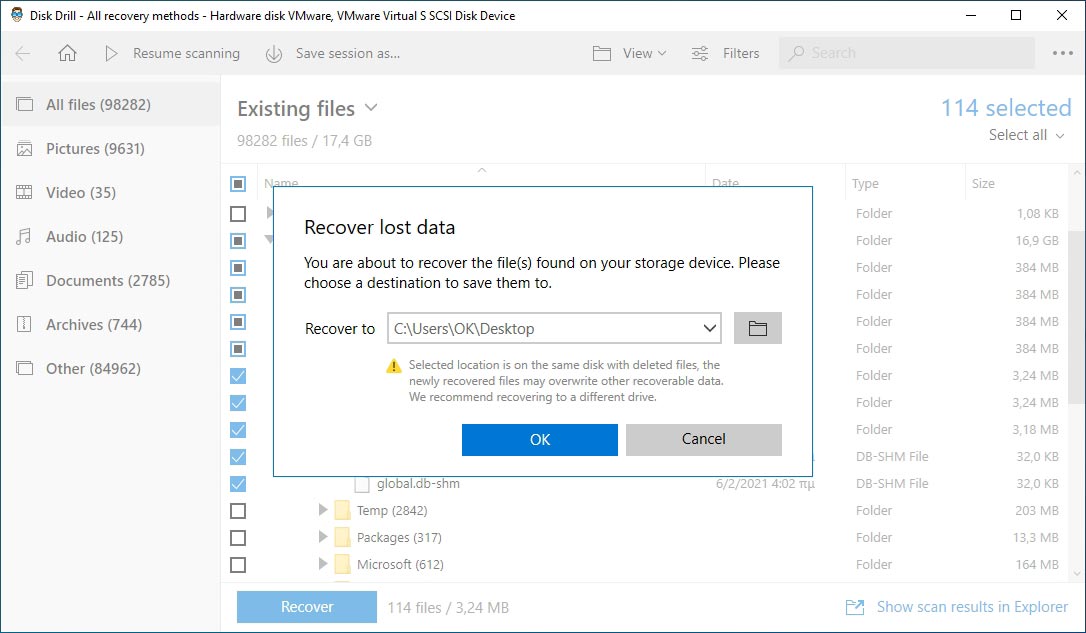
- Disk Drill will ask you where you want to save your files. It’s better to choose a different device than the one from which you’re trying to recover your lost data.
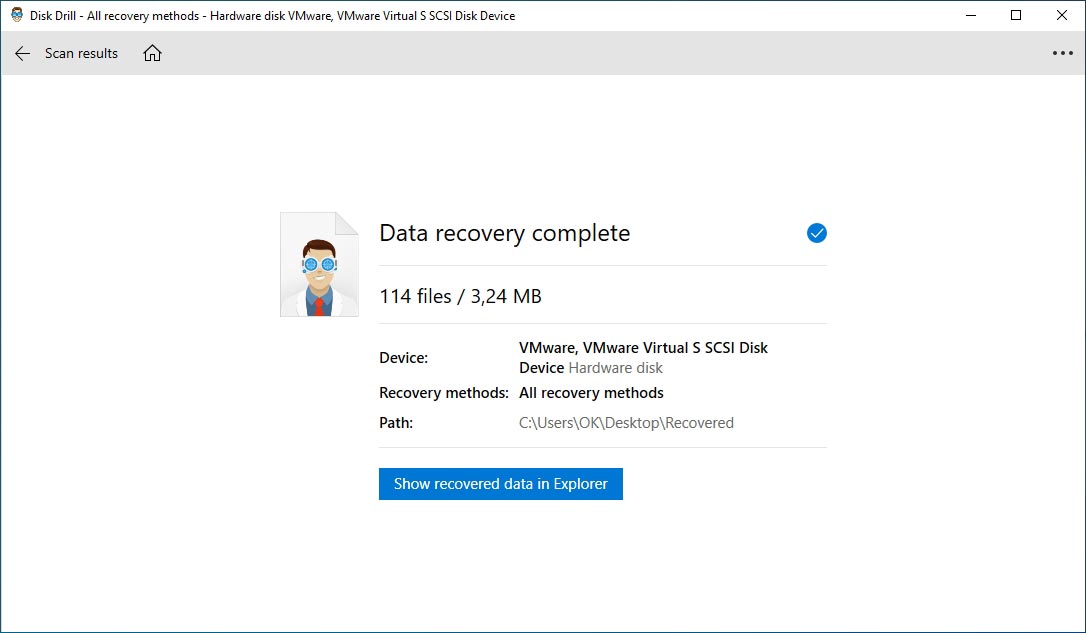
- Soon after, Disk Drill will inform you that the recovery process is complete. It will offer the option to check out the recovered files in Windows Explorer.
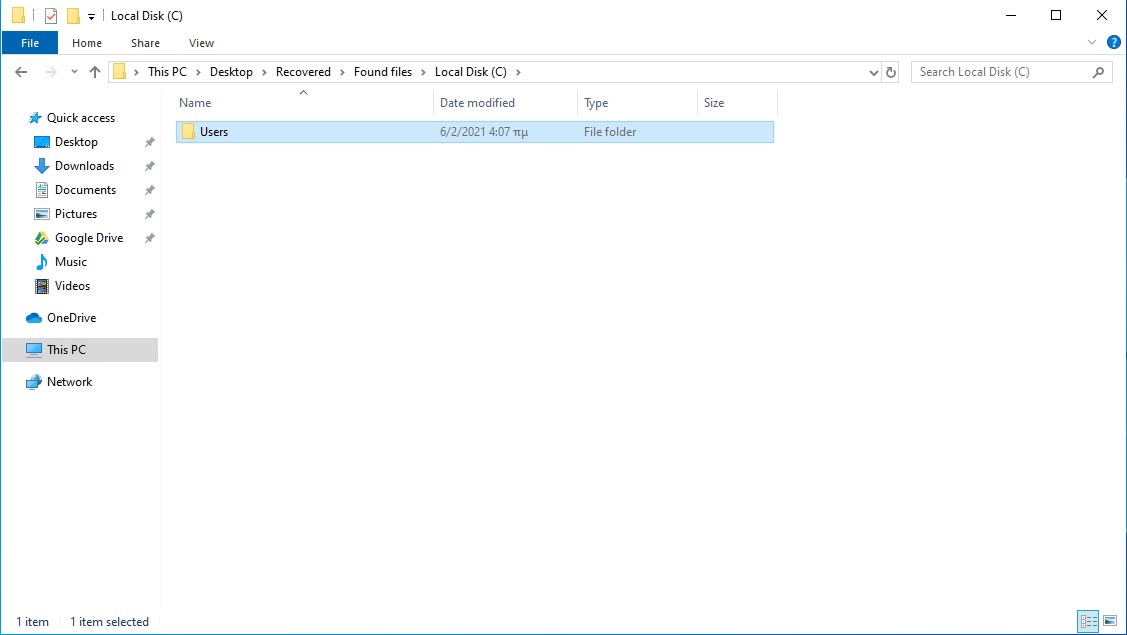
- Disk Drill will have also kept your recovered files’ folder structure. Thus, you might have to look into the results folder’s subfolders to find them.


Despite Disk Drill’s impressive results, it’s better to be prepared. Another way to put this would be “it’s better to keep backups”. Thankfully, Microsoft equipped their latest OS with many backup solutions, through which you can recover deleted files on Windows 10.
Method 6: Pull Windows 10 Lost Data Out Of (File) History
Out of all the backup solutions included with Windows 10, File History is the one specializing in securing your personal files. However, as with all backup solutions, to recover your lost data on Windows 10 using it, you must have first set it up.
👀
File History is best used with an external storage device, like a USB flash drive or an external hard disk drive. We suggest you use one with ample space to hold multiple versions of your personal files.
- File History relies on a secondary storage device. Thus, the first step is connecting said device and ensuring it’s accessible and writable. For this guide, we’ll use a 16 GB USB flash drive.

- Locate the File History options. To do that, either click on the start menu button, or press the Windows key on your keyboard, and start typing “file history“. When “Restore your files with File History” shows up, click on it.

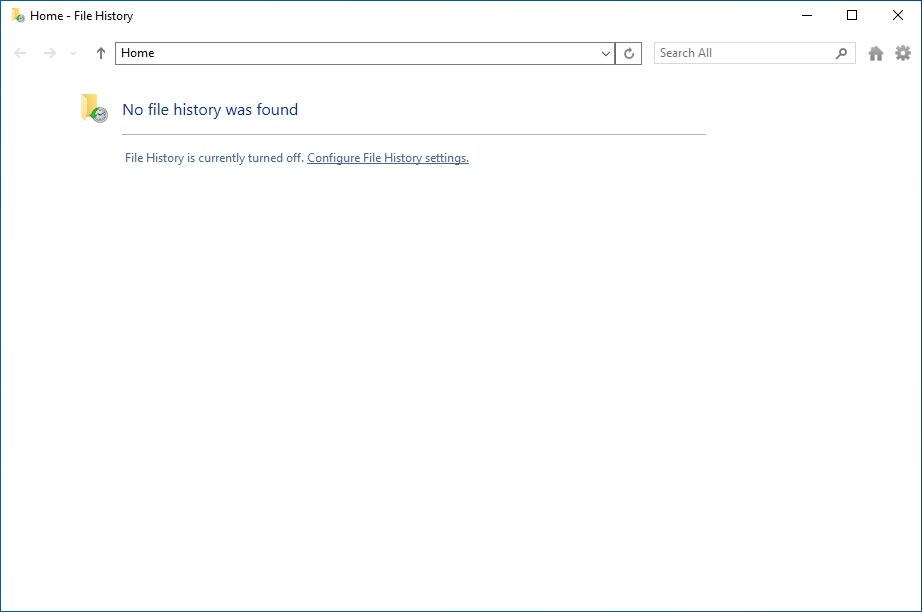
- File History will greet you with a blank page since it’s not enabled yet. Click on the underlined “Configure File History settings“.

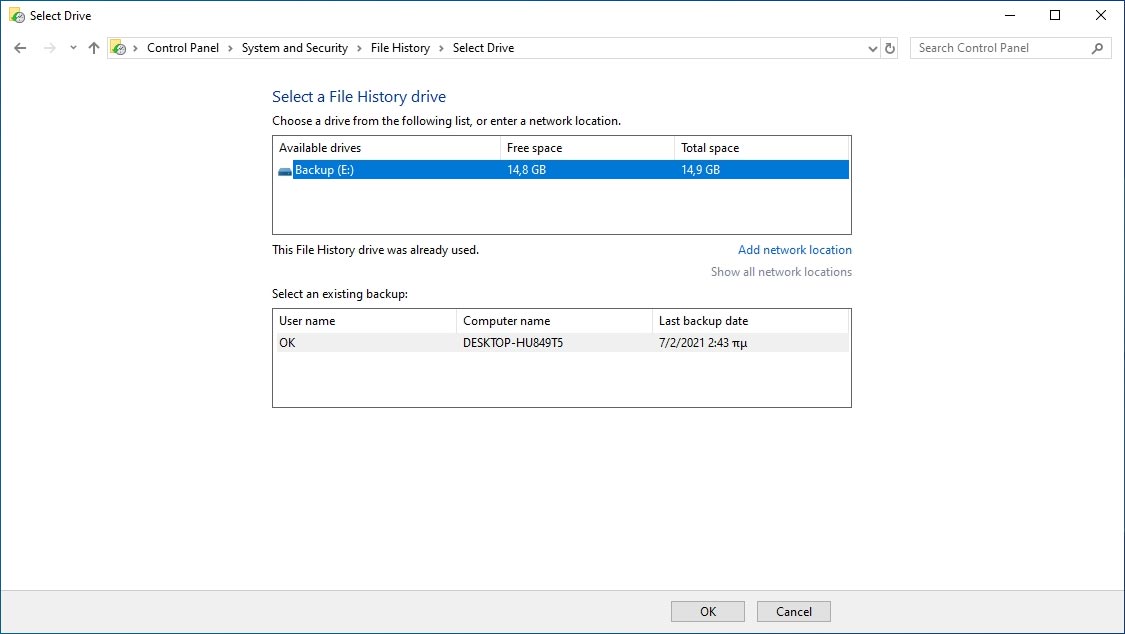
- File History will ask you to select a drive where it will store its backups. You can choose a drive from its list or select a network location – like a shared folder on another PC or a network drive. If you go for a network-accessible target, you should make sure that it’s always available for File History to save its backups. Avoid choosing something like another family member’s laptop that randomly turns on and off throughout the day.

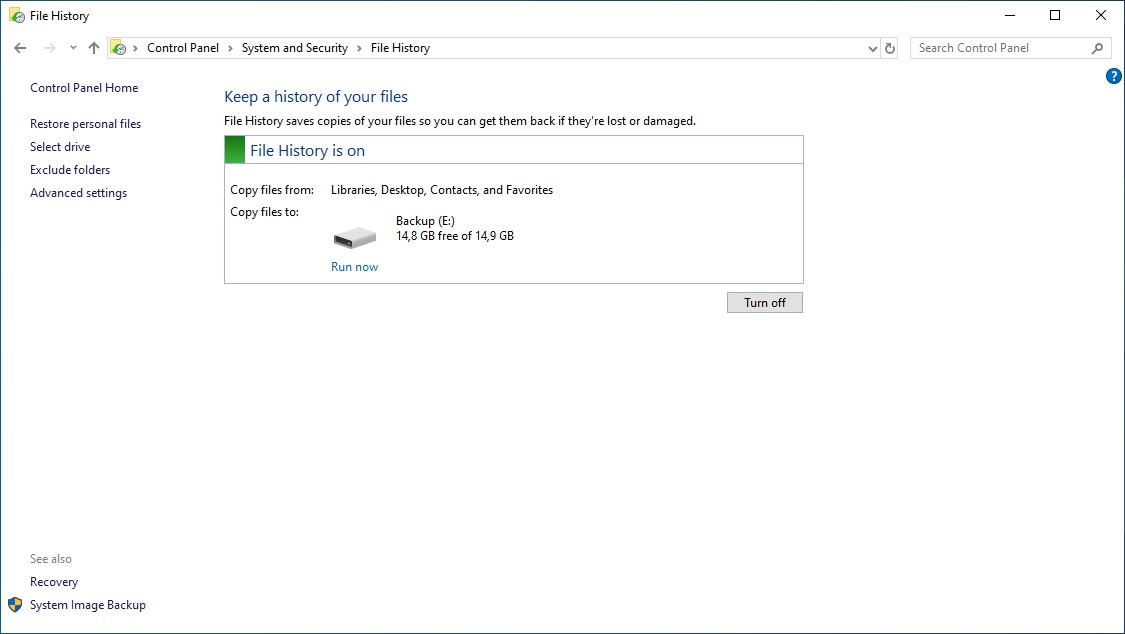
- File History will report that it’s turned on and using the target drive you selected. However, your files won’t be safe yet. File History will currently contain zero backups and won’t create one until it detects changes to your files. Thus, it’s better to create the first backup manually. Do that by clicking on the small blue “Run now” under your drive’s icon.
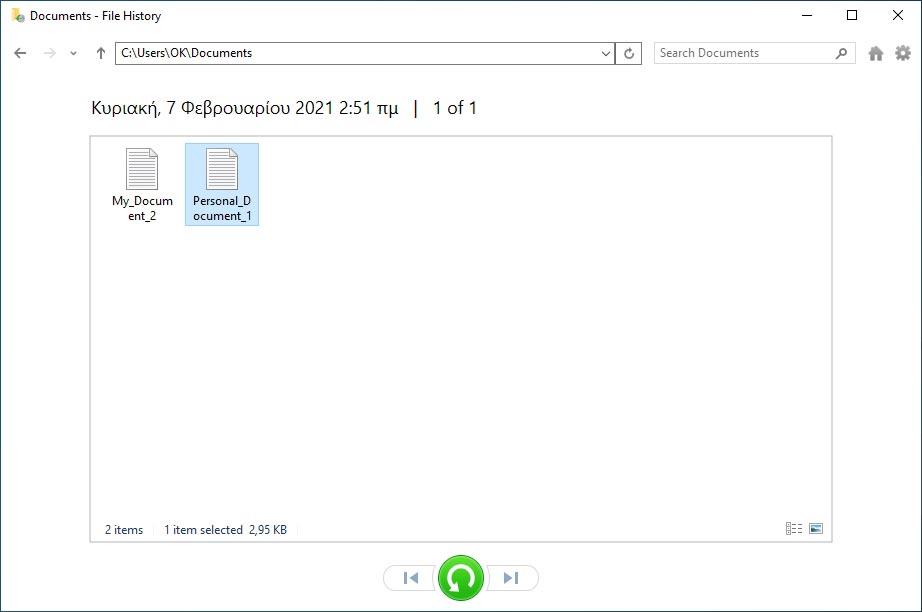
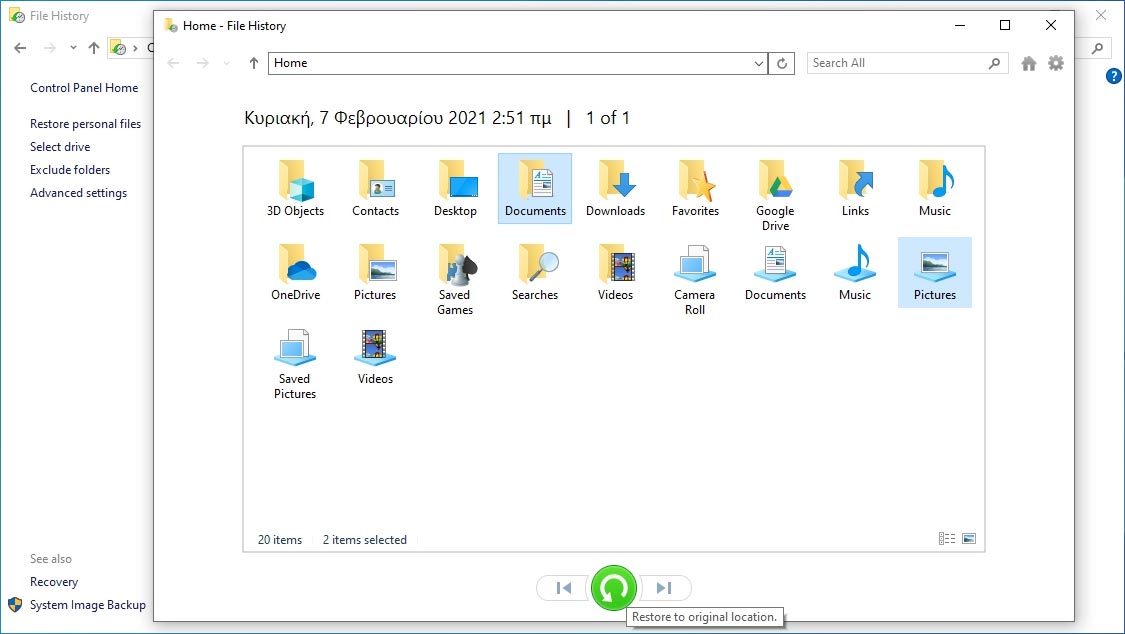
- With backups available, restoring your files from File History is easy. Return to File History’s main page and click on “Restore personal files” from the menu on the left. File History will show you the contents of its latest snapshot. At the bottom of the window, two buttons for back and forward allow you to move between snapshots, offering access to different versions of your files.
- You don’t have to recover everything from a snapshot. You can selectively choose files and folders by keeping the CTRL key pressed while clicking on them. Then, click on that big, friendly, green button at the bottom of the window to initiate the recovery process. When it completes, you will find your files back at their original location.
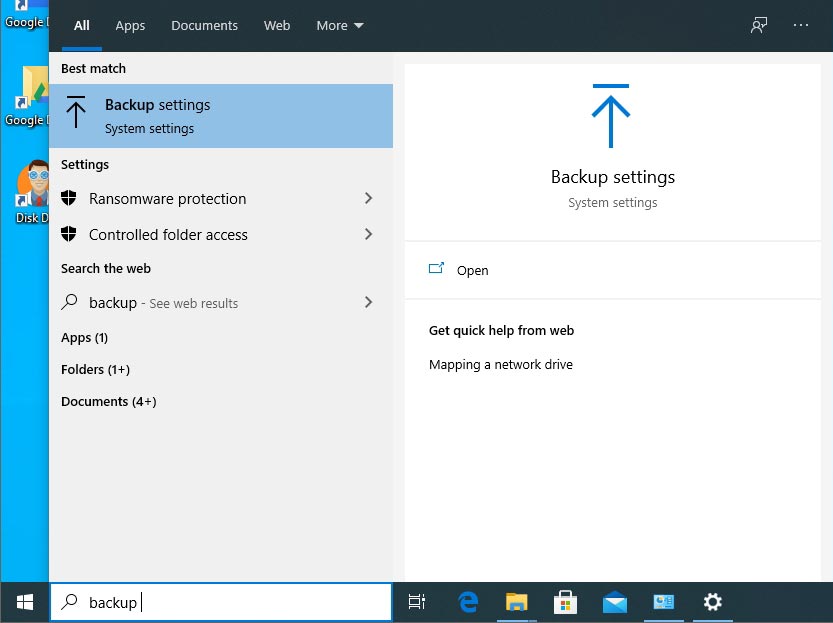
- You can add more folders to File History apart from the default ones. However, keeping up with Microsoft’s tradition of unnecessarily complicating things, that’s done from a wholly different menu. Click on the start button or press the Windows key and start typing “Backup settings“. Choose that entry when it shows up.
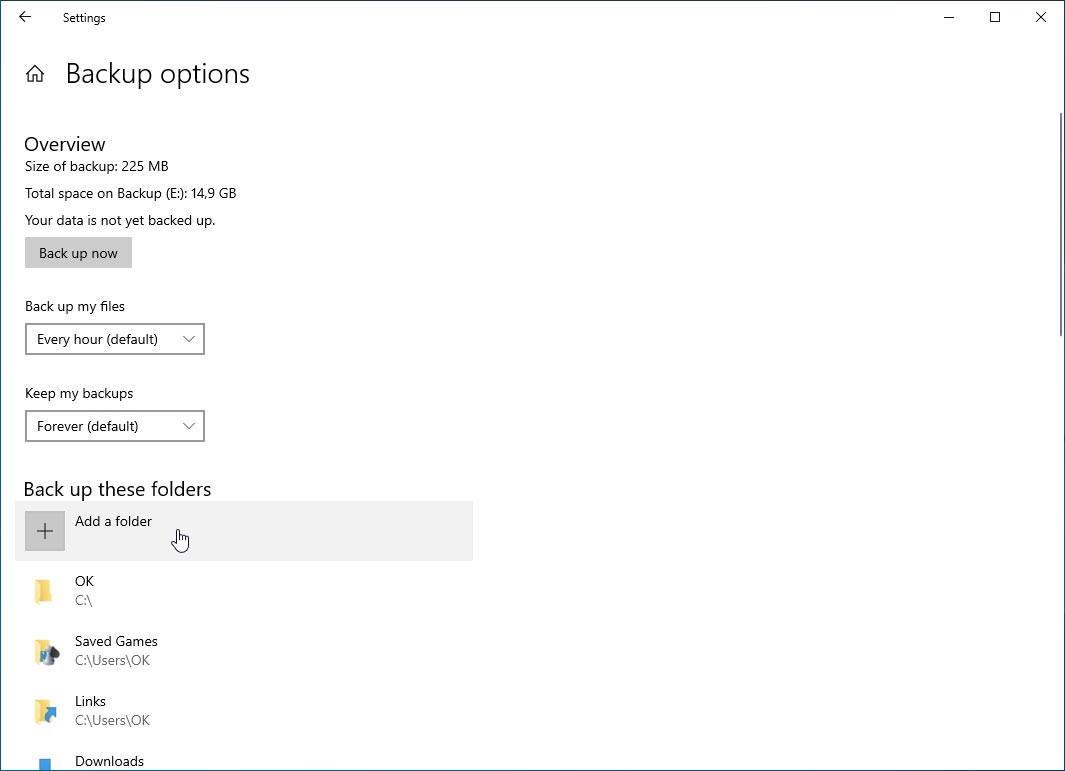
- Enable “Automatically backup my files” if it’s not already set to On. Then click on “More options” directly underneath.

- Click on “Back up now” if you are informed that “Your data is not yet backed up” to create the first backup manually. You can also tweak the backup schedule from the drop-down menu underneath “Back up my files“. Under “Keep my backups“, a second drop-down menu allows you to indirectly define how much storage your backups will take by limiting their number. To include more folders in the backups, click on the “Add a folder” option, with a plus icon next to it, under “Back up these folders“.

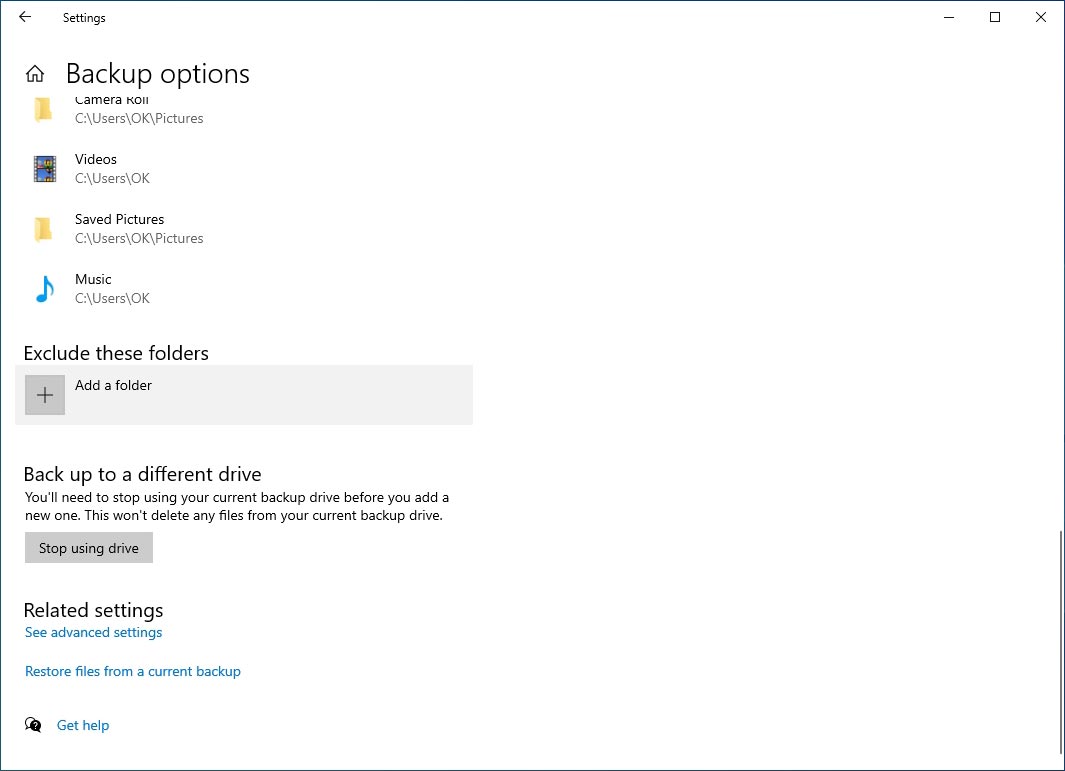
- If you scroll down below the folders list, you will find the option to exclude some folders from your backups. This is useful when you want a folder backed up, but not some of its subfolders. Right below is the option to “Stop using drive“, which will also stop File History from taking backups of your files in the future.
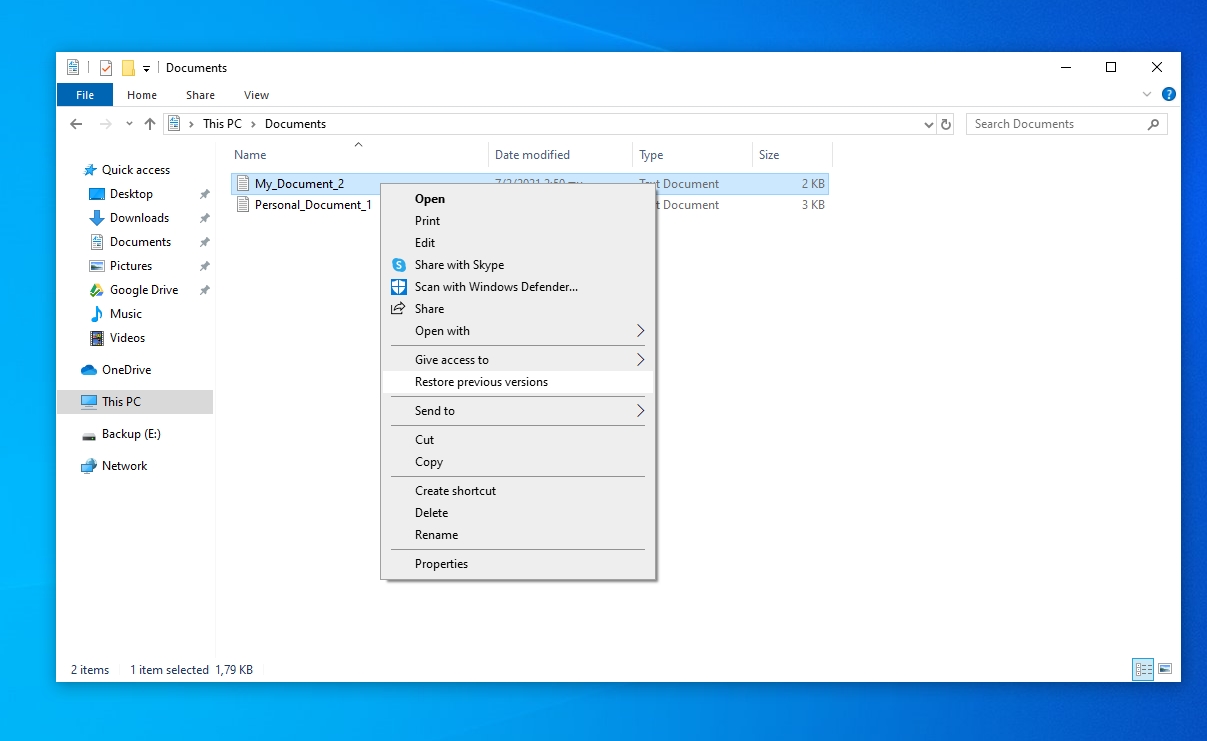
- You can also access the contents of your File History backups directly from Windows Explorer. If you right-click on a folder or file that’s backed up, you’ll see an option to “Restore previous versions“. That’s a shortcut to the same window you’d get if you right-clicked a file or folder, chose Properties, and then moved to the “Previous Versions” tab.

- From there, you can choose the version of the file or folder that you wish to restore. Then, click on the “Restore” button on the bottom right to get it back. If you don’t want to overwrite your current data, click on the down arrow on that button’s right and choose “Restore to…” instead. Then, select where you want your files recovered. You can also directly open a previous version of a file using the “Open” button instead.


⚠️
File History is the new way of keeping your personal files secure with Windows 10. If you were used to how Windows 7 did this or also want to keep backups of your whole operating system, that’s still an option, as we’ll see right next.
Method 7: Recover Lost Files on Windows 10 With Backup and Restore (Windows 7)
This title makes more sense when you realize we are not talking about Windows 7 itself. Instead, “Backup and Restore” is the name of another backup solution included in Windows 10, kept from the previous version of Microsoft’s operating system.
Unlike File History, Backup and Restore can also keep backups of the operating system. It’s also closer to a classic backup solution: it doesn’t present its backups as a snapshot sequence, and you have to choose from where to restore your data manually.
As its name hints, to restore your files with Backup and Restore, you first need to have them backed up.
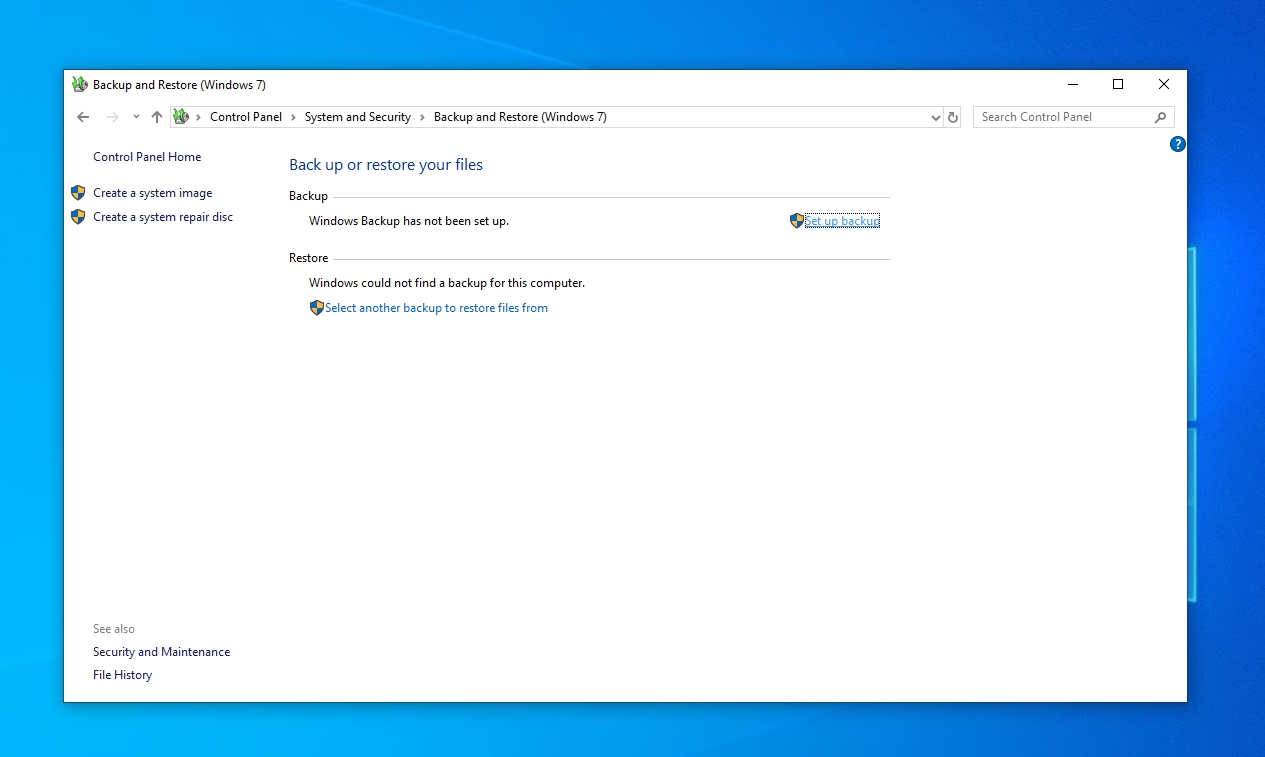
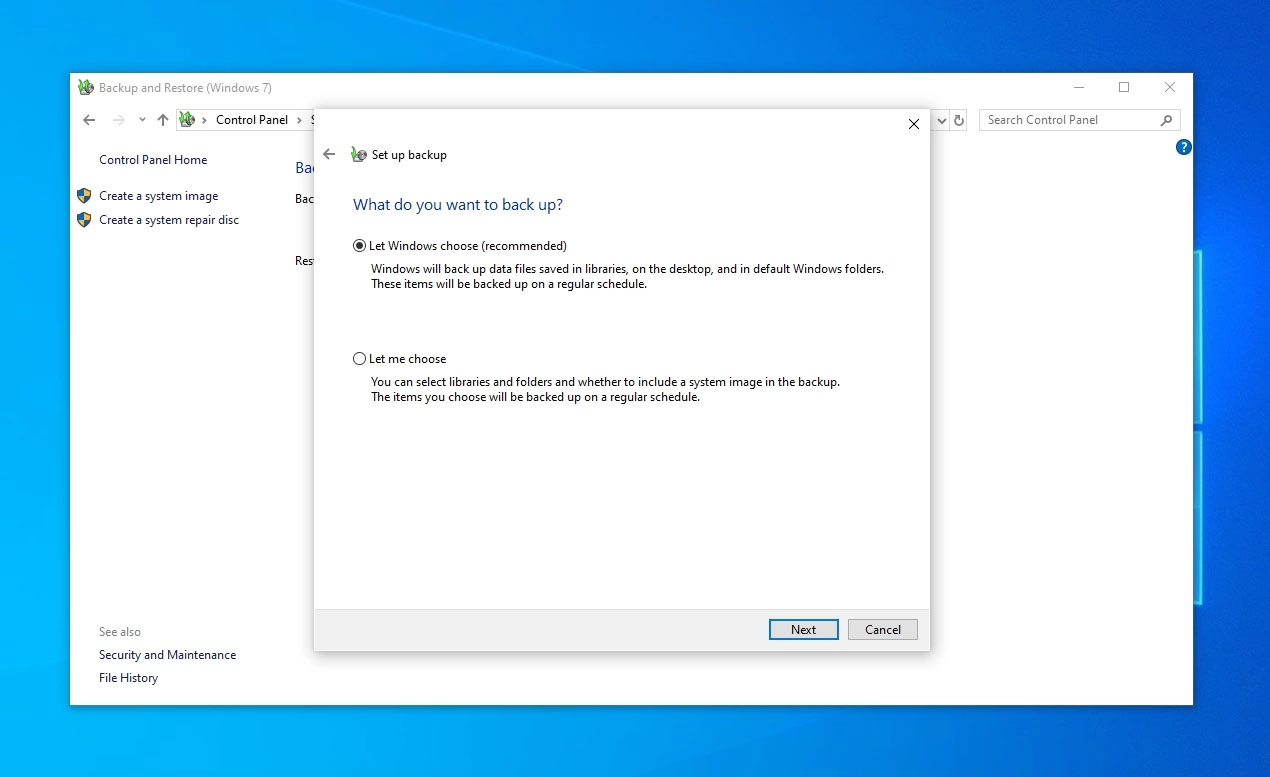
- Visit Windows 10’s Control Panel. For a quick jump there, either press the start button or press the Windows key on your keyboard and start typing its name. Then, choose it when it shows up. From there, click on “Backup and Restore” under System and Security.

- Windows will inform you that “Windows Backup has not been set up”. Click on the “Set up backup” on the right.

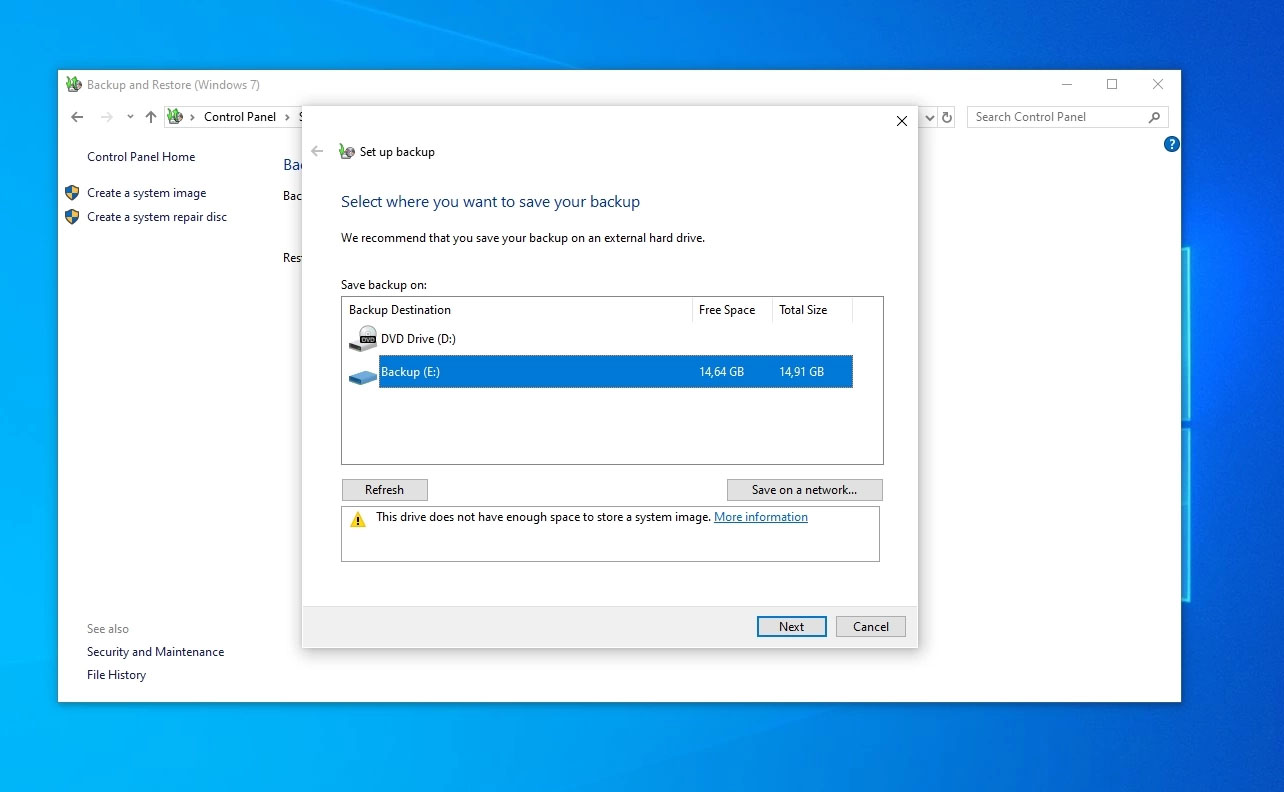
- Choose the drive where you want to save your backup. Like before, you should choose a secondary drive with enough space or a network location. Keep in mind that backing up your whole operating system can take up as much space as its partition, or even more. Then, click on Next.

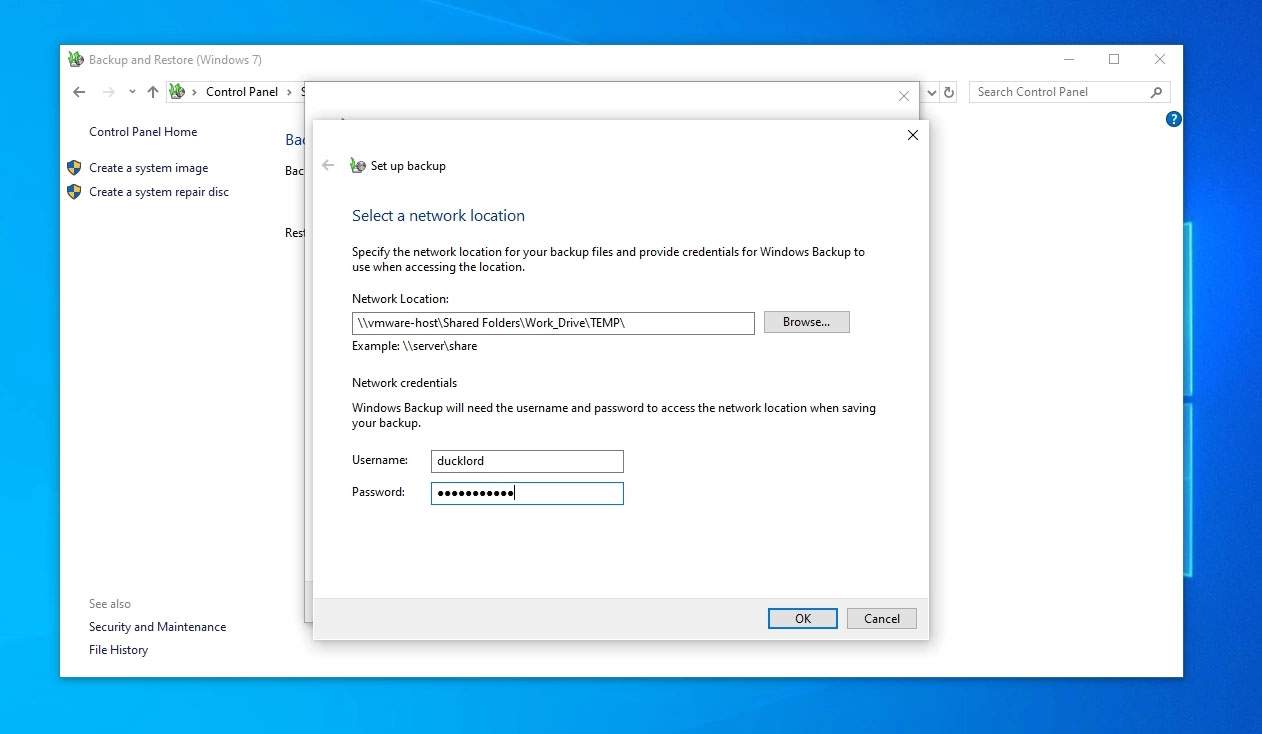
- There’s a caveat with network locations: Windows might inform you that it can’t save a system image there, forcing you to select a local drive. You can choose what to back up. Your user account’s library folders will be preselected, to which you can manually add folders from your computer’s storage devices.

- Depending on what you’ve decided to backup, the process can take a while. Even more so if you chose to keep a system image, which means backing up everything in the operating system’s partition.

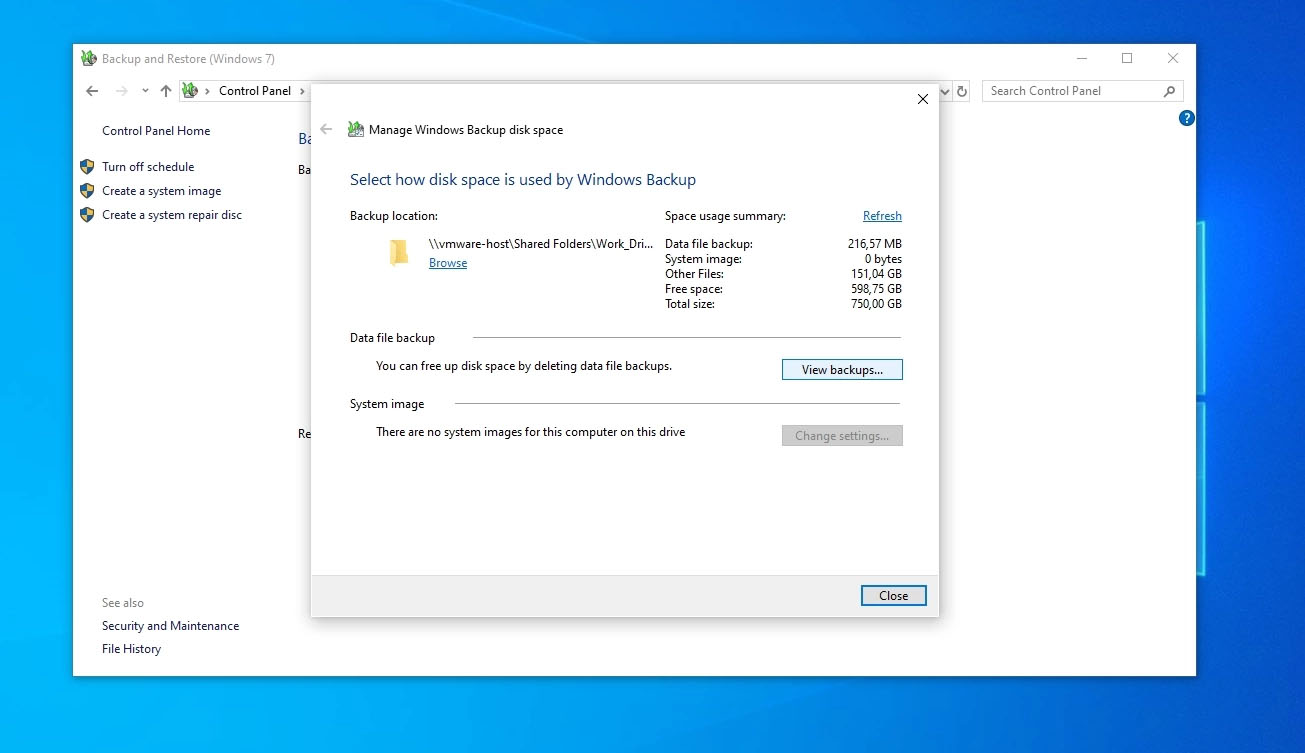
- Are you running out of storage space? By clicking on “Manage space” and then clicking on the “View backups…” button, on the right of the new window that will pop up, you can check out the available backups and the space each of them eats up from your storage. You can remove some of them to get back some storage space by selecting them and then clicking on the “Delete” button on the right of their list.

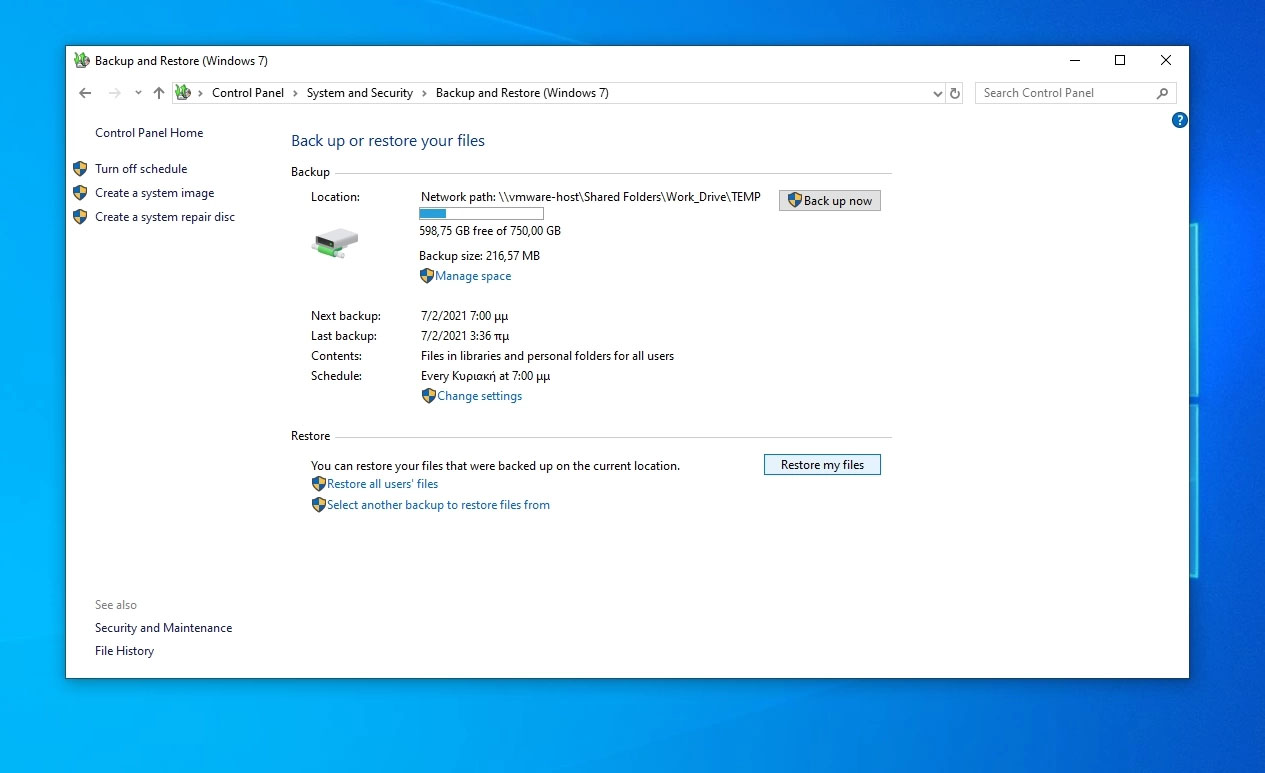
- Ready to restore your files from those backups? Return to the “Backup and Restore” main page. Then, click on “Restore my files” on the bottom right.

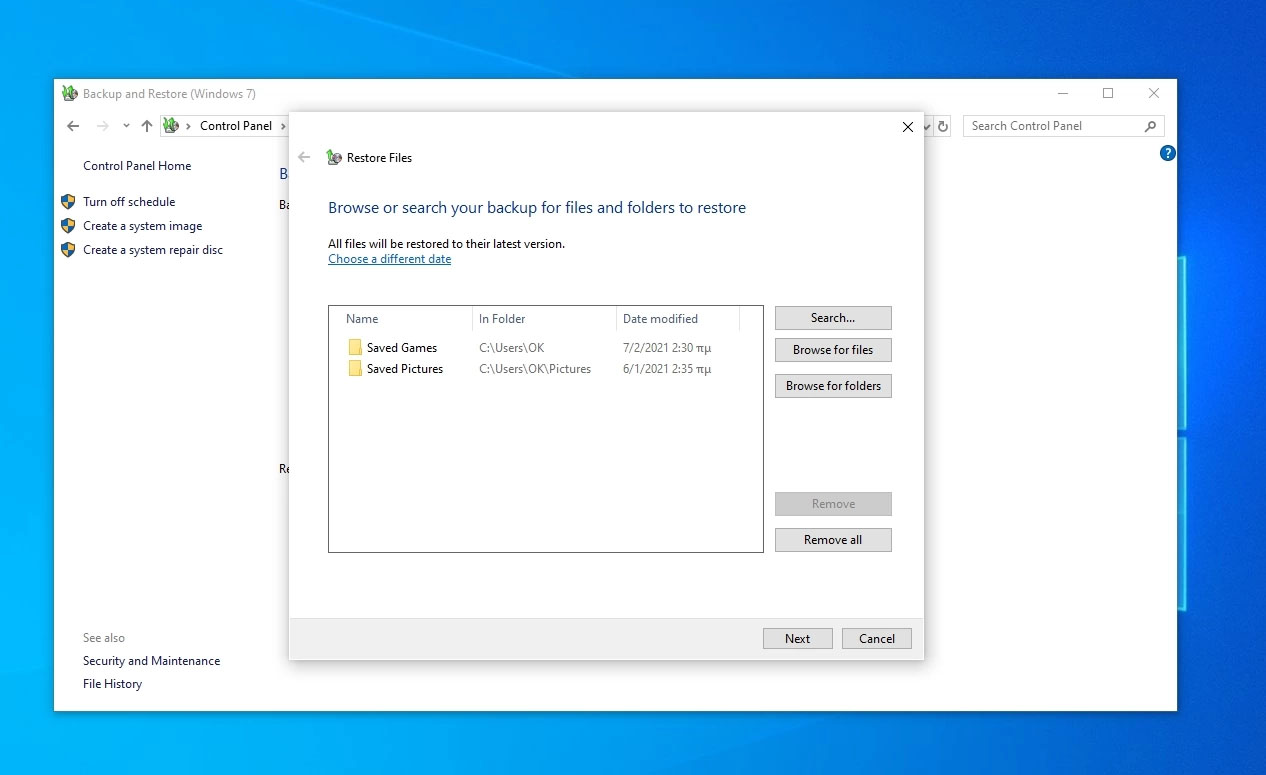
- You can choose from which backup you want to restore your files by clicking on “Choose a different date”. You can also select the files and folders you want to recover using the “Search…“, “Browse for files“, and “Browse for folders” options on the right. You can add multiple entries to the Restore Files list.

- The next step is choosing where you want to restore your files. You can have them return to their original location or choose a different folder. One final click on the “Restore” button on the bottom right of the window, and soon you will have your files back.

- If you chose to recover your files to their original location, you will probably meet some conflicts. “Conflicts” as in files being recovered with the same name and to the same spot as existing ones. You can have your recovered files replace the current versions (“Copy and Replace”), skip their recovery (“Don’t copy”), or have them automatically renamed and keep both instances (“Copy, but keep both files”).

As we will see right next, if you take full system image backups frequently, you don’t also have to back up your personal files individually. As long as a system image backup includes those files, even if the process is somewhat convoluted, you can extract them manually.
Method 8: Extract Lost Files on Windows 10 From a System Image Backup
All the solutions we saw up to now deal with individual files and folders, but what happens if you only have a full system image available? In such a scenario, you can “pull out” individual files and folders from it as follows:
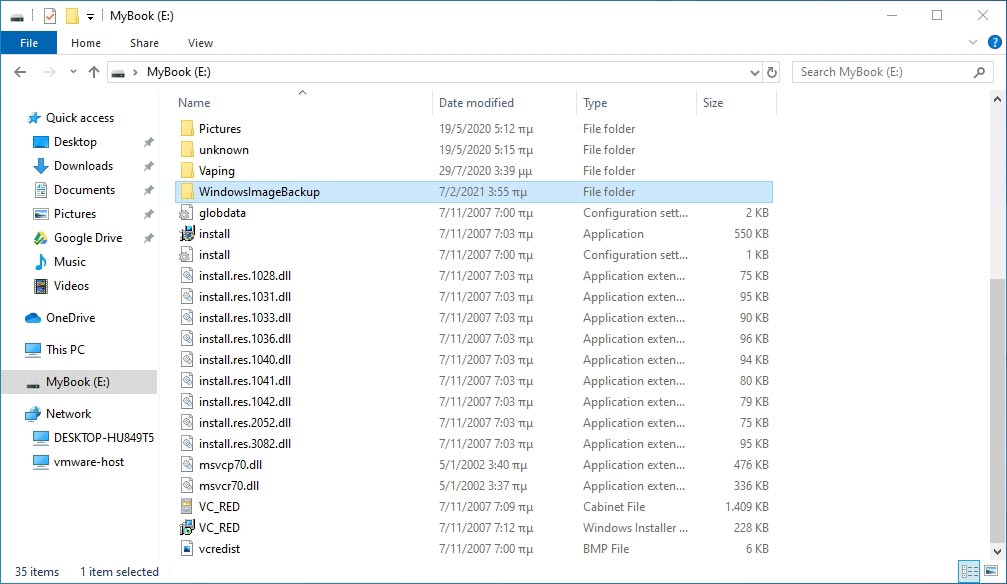
- Fire up your favorite file manager. For most people, this means Windows Explorer. Then, point it to the location where your system image backups are stored. Enter the folder “WindowsImageBackup” that you will find there.

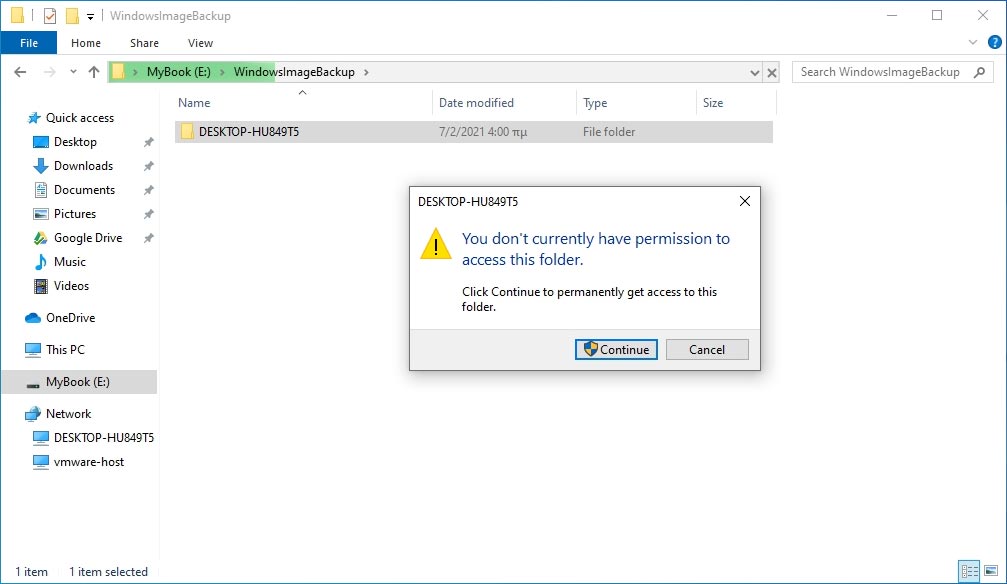
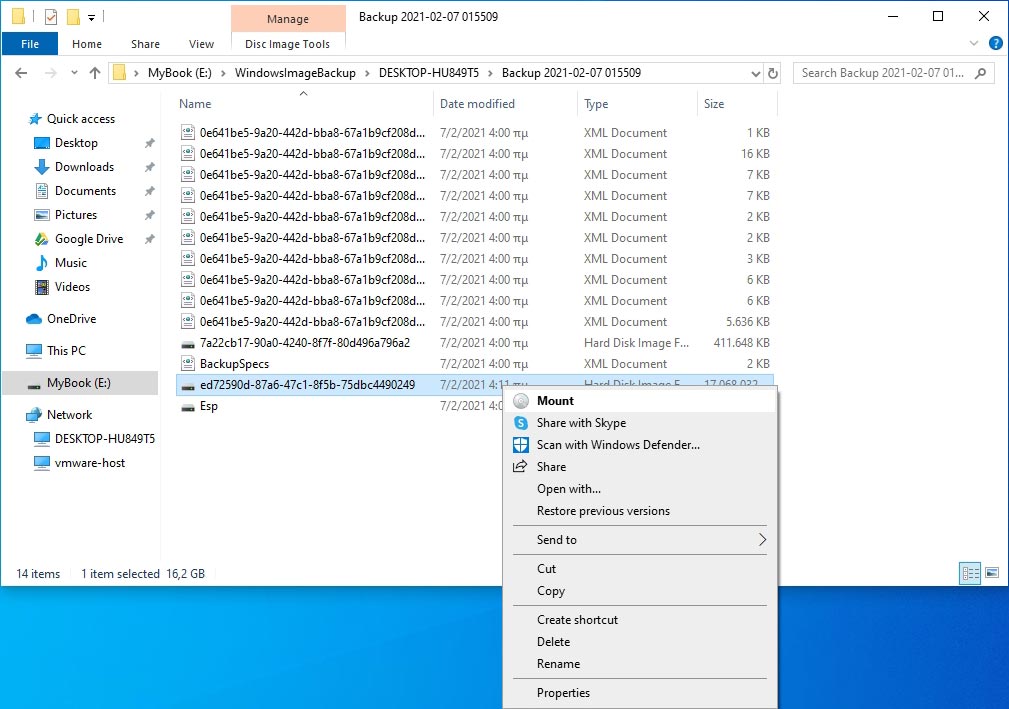
- Windows will bug you that you don’t have permission to access this folder. However, you can simply click on “Continue” to proceed. Note that you will have to repeat this step for every subfolder that you are trying to access.
- Each system image backup will be stored in a folder with its time and date. Inside those, you will find multiple other files. Turn your attention towards the larger one, with a size close to that of your full operating system’s partition. Right-click on it and choose “Mount” from the menu that shows up. This backup’s contents should now be accessible from a new drive letter, from Windows Explorer, like any other drive. If they’re not, move to the next step.

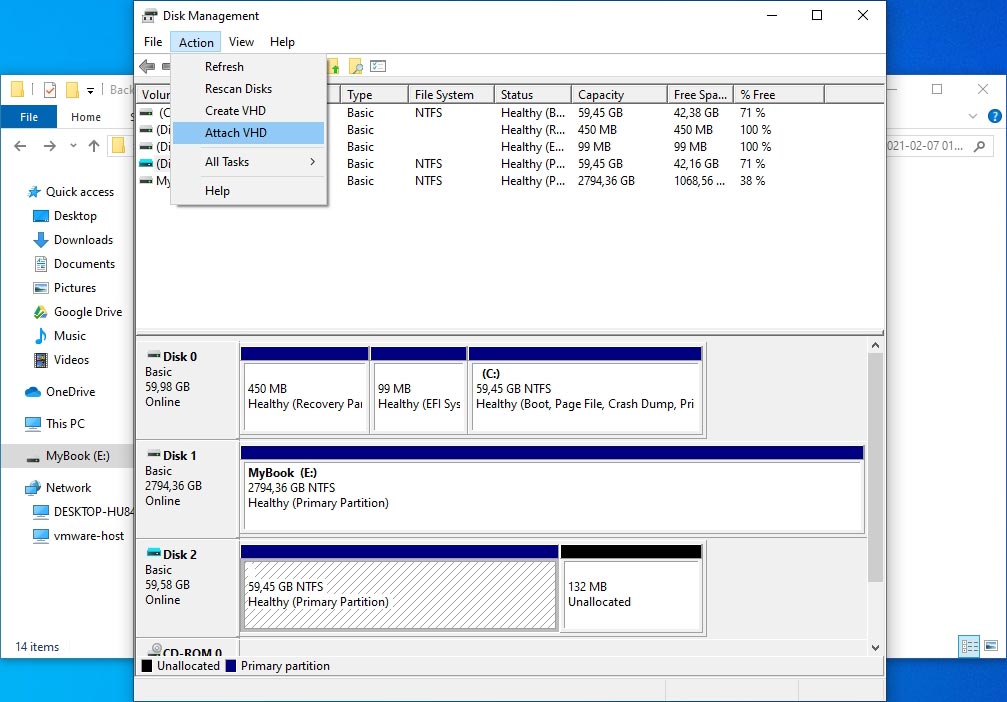
- Didn’t the previous step give you access to the contents of your system image backup through Windows Explorer? Try a different approach for mounting the backup image. Click on the start button or press the Windows key on your keyboard and start typing “Disk Management“. Choose that entry when it shows up. From there, click on the second menu, “Action“, and choose “Attach VHD“, then your backup image.

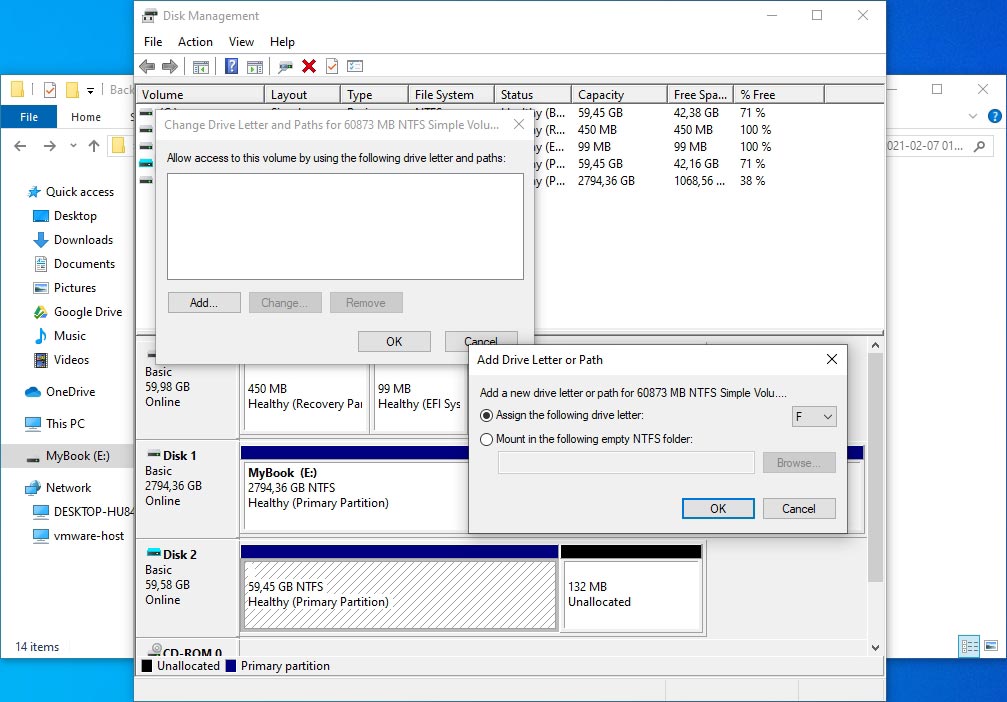
- The image file you selected will show up as another disk in Disk Management’s lists. Right-click on it and choose “Change Drive Letter and Paths…“, then select a drive letter that you’d like to (temporarily) assign to that image file, from where you will have access to its contents.
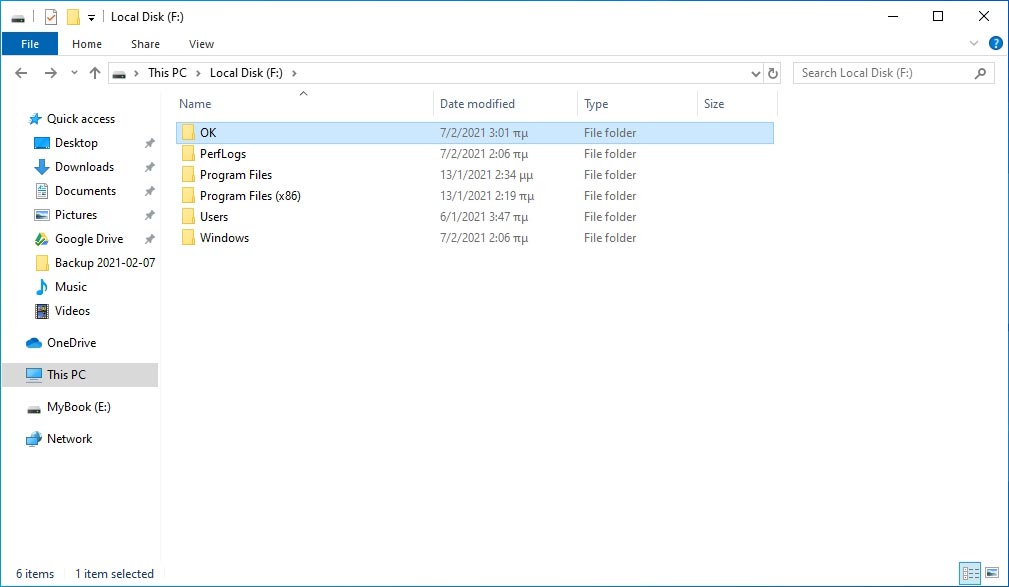
- Open your favorite file manager and visit the drive letter assigned to your image file. Inside you’ll find a clone of everything in your operating system’s partition from when the backup was created. You can navigate into its subfolders, locate the files you’d like to recover, and copy them anywhere you wish.

Although other approaches are more straightforward for backing-up and recovering your personal files, if you’ve never set one up, being able to pull your files out of a system image backup can be a lifesaver.
FAQ
The solutions we covered are the best zero-cost solutions for recovering your files. There are alternatives, but most of them more or less work in the same ways and achieve the same results.
Two of the software tools we saw, Disk Drill and Windows File Recovery, can also check a storage device that appears empty after a format, and recover files that seemed all but lost. Point them towards the media from where you want to recover files, choose their thoroughest options, and give them enough time to locate previous filesystem structures from where they might manage to fish out your files.
Proper recovery tools need direct access to your storage. That isn’t possible through online apps for both technical and security reasons. The “technical” bit is that this would demand the exchange of insanely huge amounts of data between your computer and a remote server. The process would be slow, resource-intensive, and economically unfeasible. More importantly, though, you’d be sending your whole storage device’s contents to a third party. Would you trust them with data ranging from notes and family photos to your browsing history and stored passwords? That’s why if someone offers you a magical online solution for recovering your lost data with a single click, you should run the other way.
Be Prepared: The Best Way to Deal With Lost Files on Windows 10 (and Any Other OS)
Unfortunately, the web is filled with misinformation on how to recover deleted files on Windows 10. Misinformation which can even lead to further data loss. Thankfully, the solutions we saw can help you recover all your lost files on Windows 10. They’re tried, tested, and guaranteed to work.
However, we’ll repeat that the best solution for such disasters is being prepared. When you eventually get your files back and have your operating system in order, make sure to set up a backup solution if you hadn’t already. And keep a recovery tool like Disk Drill, or Windows File Recovery installed and ready. You never know when it will come in handy.
Odysseas Kourafalos started playing with technology over thirty years ago, with a Commodore 128. Instead of gaming with it, he ended up trying to learn what made games — and tech, in general — tick. Since then, he’s used thousands of applications, from music trackers to video editing suites, on multiple platforms, and lived to write about them.
Andrey Vasilyev is an Editorial Advisor for Handy Recovery. Andrey is a software engineer expert with extensive expertise in data recovery, computer forensics, and data litigation. Andrey brings over 12 years of experience in software development, database administration, and hardware repair to the team.
We’ve all done it, and most of us will do it again at some point in the future. We’re talking, of course, about accidentally deleting important files using the Shift + Delete shortcut in Windows 10, which removes the possibility to simply recover them from the Recycle Bin.
The good news is that not all hope is lost when you select wrong files and accidentally delete them because there are many ways how to recover permanently deleted files on Windows 10 users should know about, and we describe them all in this article.
How to Recover Deleted Files from a Recycle Bin in Windows 10
As you may know, when you normally select a file in Windows 10 and hit Delete on your keyboard, the file moves to the Recycle Bin, where it sits until you manually empty the Recycle Bin, giving you time to change your mind and easily rescue the deleted file.
To recover deleted files from the Recycle Bin on Windows 10:
- Open the Recycle Bin by right-clicking its icon.
- Select Open from the menu to view deleted files.
- Check the box to the left of the filename you want to restore.
- Right-click on a selected file and choose ‘Restore’ to recover the file to its original location on Windows 10.
The problem with this way of deleting files is that it doesn’t immediately free up any storage space, which is why most people delete files in the first place. Only when you manually empty the Recycle Bin does Windows mark the disk space occupied by the deleted files as empty.
If you want to delete a file that you’re 100% positive won’t be needed in the future, you can skip the Recycle Bin and use the Shift + Delete shortcut to delete it permanently right away. When you delete a file using the Shift + Delete shortcut, you immediately free up storage space, but you deprive yourself of the possibility to simply recover it from the Recycle Bin.
However, just because you can’t recover permanently deleted files from Recycle Bin doesn’t mean you can’t recover them at all. Just keep in mind that you need to act quickly and recover your permanently deleted files before they get overwritten.
![]() We start with the least user-friendly method, which involves the Command Prompt and a series of very specific commands. If you can successfully use this method, we’re convinced that you won’t have a problem with any other method described in this article.
We start with the least user-friendly method, which involves the Command Prompt and a series of very specific commands. If you can successfully use this method, we’re convinced that you won’t have a problem with any other method described in this article.
The recovery process may take a while to finish, so be patient and don’t interrupt it. If possible, don’t do anything at all on your computer while the recovery process is running because you could overwrite the deleted files and make recovery impossible.
Recover Permanently Deleted Files from an Older Backup
 Windows Vista introduced a new data recovery component called Backup and Restore, which allowed users to create backups and restore from backups created earlier.
Even though Backup and Restore was completely removed from the Windows operating system in Windows 8.1 in favor of File History (more about File History in the next chapter of this article), it’s still possible to recover data on Windows 10 computers from backups created using the Backup and Restore tool.
Recover Deleted Files Using Data Recovery Software ✅
![]() Disk Drill is a professional data recovery software that’s so easy to use that it’s suitable even for complete beginners. With Disk Drill, you can recover several hundred file formats with just a few simple clicks without spending any money at all.
Disk Drill is a professional data recovery software that’s so easy to use that it’s suitable even for complete beginners. With Disk Drill, you can recover several hundred file formats with just a few simple clicks without spending any money at all.
To Recover Deleted Files in Windows 10 follow these steps:
- Download Disk Drill by clicking on the Free Download button.

Data recovery for free
Your Companion for Deleted Files RecoveryFree Download
- Install Disk Drill just like you would any other Windows 10 application.
- Launch Disk Drill and click the
"Search for lost data"
button next to the hard drive from which you want to recover permanently deleted files. - Select which files you want to recover, from the list of results
- Click the
"Recover"
button to begin the recovery process.

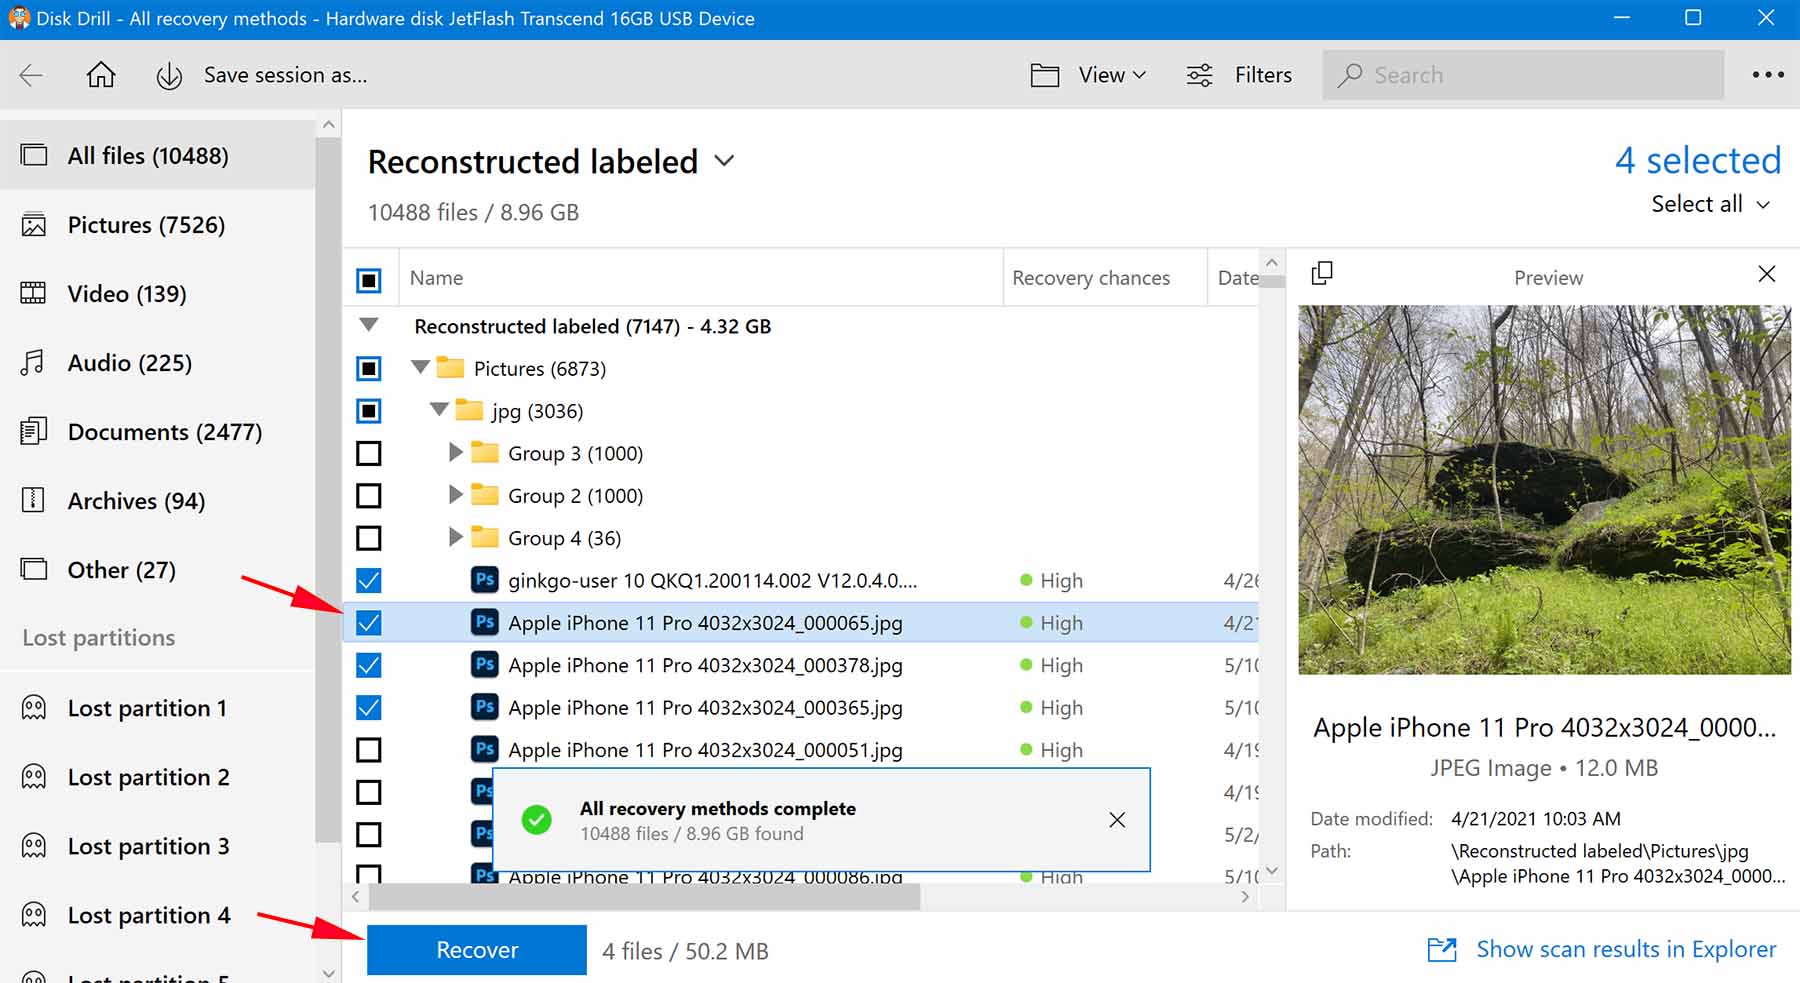
Disk Drill allows you to recover up to 500MB of data without paying, and it comes with a tool to protect your files against data loss.
Use the Windows File Recovery Tool
![]() Microsoft has released its own data recovery tool, called Windows File Recovery, and you can use it to recover some deleted files even if they are no longer present in the Recycle Bin.
Microsoft has released its own data recovery tool, called Windows File Recovery, and you can use it to recover some deleted files even if they are no longer present in the Recycle Bin.
Unfortunately, Windows File Recovery is a command-line tool, so it’s not nearly as intuitive as Disk Drill and other graphical data recovery tools. At least you can download it for free directly from the Microsoft Store—at least if you have Windows 10 build 19041 or later.
Use the following syntax to recover lost data with the Windows File Recovery tool:
- Winter 2020 release: winfr source-drive: destination-drive: [/mode] [/switches]
- Summer 2020 release: winfr source-drive: destination-drive: [/switches]
You can find more information about the available recovery modes and switches on the official support page. Here’s an example of how the latest version of the Windows File Recovery tool can be used to recover PDF files from C: drive to E: drive:
- Launch Windows Terminal.
- Enter the following command: Winfr C: E: /regular /n *.pdf /n *.docx

- Enter Y to start the recovery operation.
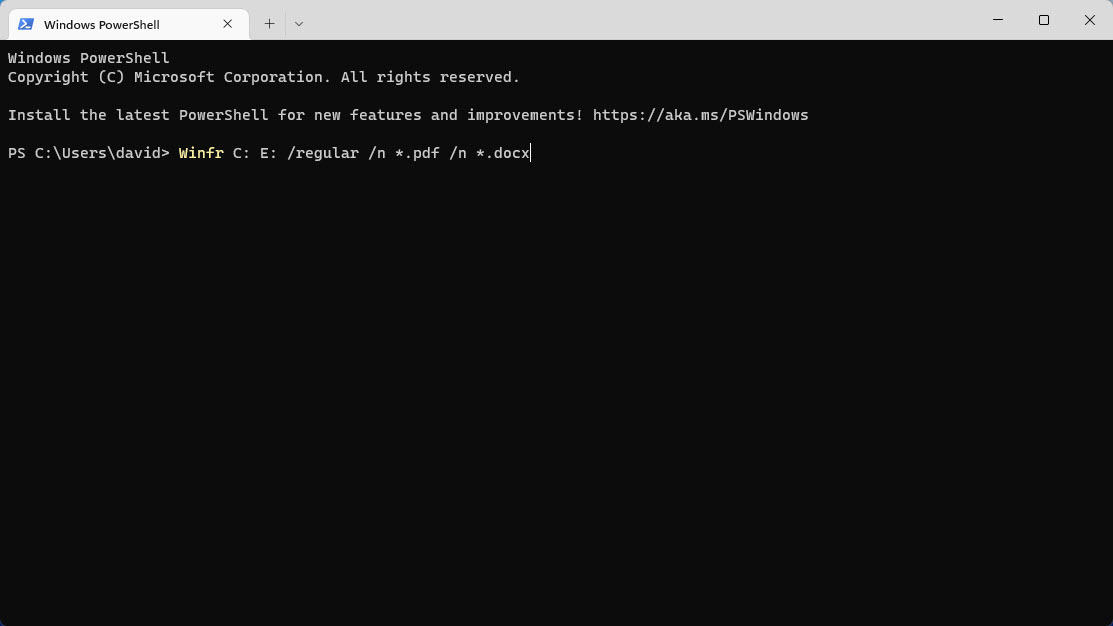
The tool will automatically create a recovery folder on the destination drive and copy all recoverable files there.
Restore Permanently Deleted Files in Windows 10 for Free from a File History Backup
 File History is a replacement for the Backup and Restore feature that was present in older version of the Windows operating system, allowing for simply
 ![]() Recycle Bin recovery
Recycle Bin recovery ![]() Windows 10 as well as for the recovery of permanently deleted files.
Windows 10 as well as for the recovery of permanently deleted files.
To Recover Deleted Files on Windows 10 for free:
- Open the Start menu.
- Type “restore files” and hit Enter on your keyboard.
- Look for the folder where you deleted files were stored.
- Select the “Restore” button in the middle to undelete Windows 10 files to their original location.

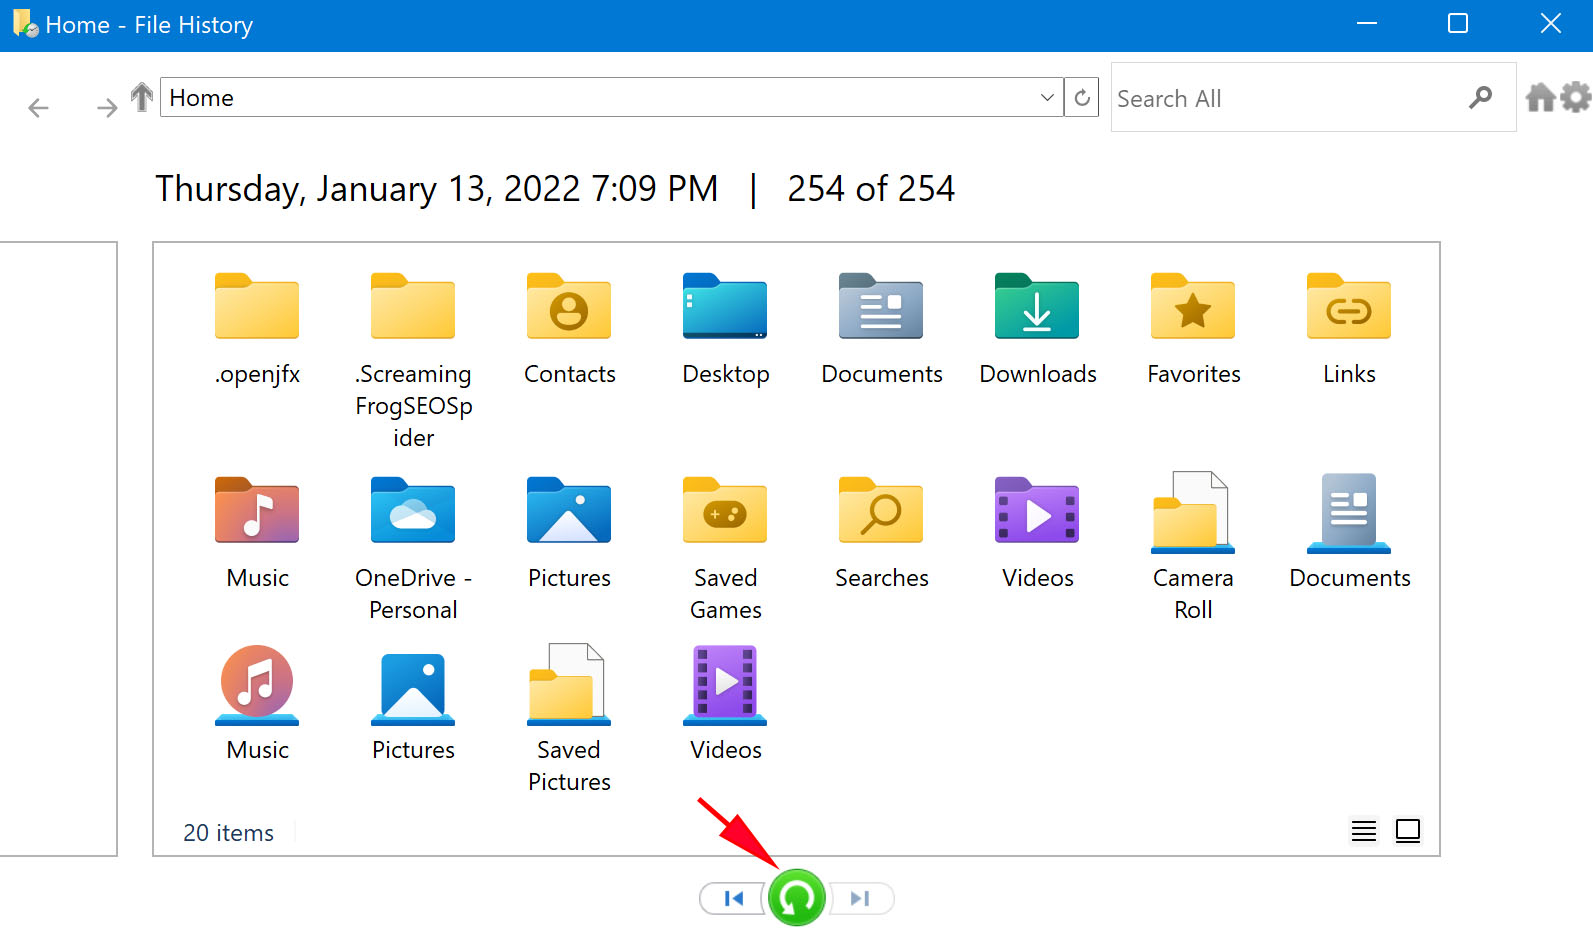
If you cannot see any folders, that’s probably because File History is turned off. In that case, you should see an option to turn it on.
Use the Restore Previous Versions Feature
![]()
![]() Windows 10 comes with an extremely useful data recovery feature, called “Restore previous versions”, which allows you to restore previous versions of all files and folders on your computer — provided you’ve activated it. To do that:
Windows 10 comes with an extremely useful data recovery feature, called “Restore previous versions”, which allows you to restore previous versions of all files and folders on your computer — provided you’ve activated it. To do that:
- Open the Start menu.
- Type "system protection" and hit Enter on your keyboard.
- Choose a hard drive under “Protection Settings” and click
"Configure"
. - Select
"Turn on system protection"
and click “OK”. -
You can now use the “Restore previous versions” feature to restore a file or folder to its previous state.
Simply right-click on any file or folder, go to the “Previous Versions” tab and select which version you would like to restore.

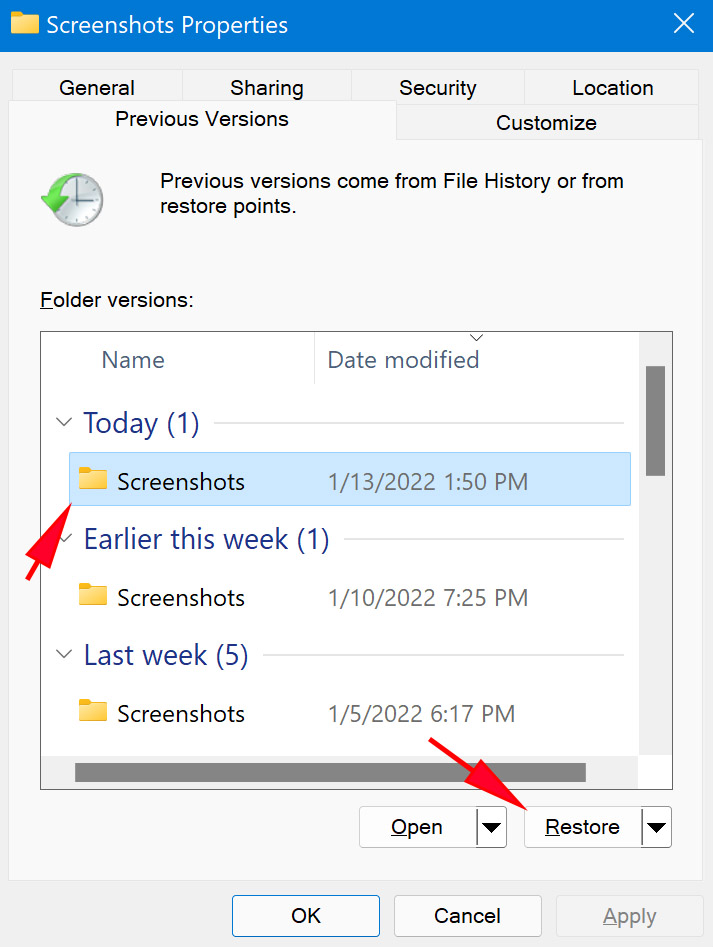
How to Recover Permanently Deleted Files from Google Drive
![]() If you use
If you use ![]() Google’s cloud file storage and synchronization service, Google Drive, to store files on their servers and synchronize them across devices, you can use the 5 above-described methods to recover permanently deleted files from Google Drive.
Google’s cloud file storage and synchronization service, Google Drive, to store files on their servers and synchronize them across devices, you can use the 5 above-described methods to recover permanently deleted files from Google Drive.
How? Simply perform data recovery on the drive where you store the Google Drive folder to recover files that are no longer recoverable using the
"Restore from Trash"
option in Google Drive.
Conclusion
As you can see, even files deleted with the Shift + Delete keyboard shortcut in Windows 10 aren’t actually permanently deleted as long as you know what to do and act quickly enough. The next time someone asks you, “How do I recover permanently deleted files from my PC?” you can just point the person to this article or, better yet, recommend Disk Drill, the only data recovery solution you need.
FAQ
Follow these steps to recover lost files on Windows 10:
- Press the Windows key, enter and select Windows File Recovery.
- In the Command Prompt window, enter the command in the following format:
winfr source-drive: destination-drive: [/mode] [/switches] - There are 2 basic modes you can use to recover files: Regular and Extensive. You can read more about them here.
- Once you’ve selected the drive and entered the prompt, ensure that the source and destination drives are different.
- Now, click Y to start the recovery operation.
You can recover deleted files in Windows 10 without third-party software by restoring them from the Recycle Bin:
- Double-click the Recycle Bin icon on your desktop.
- Select the deleted files you want to recover.
- Drag them from the Recycle Bin to any folder you want.
That depends on how you define permanently deleted files. If you mean files that have recently been deleted from the Recycle Bin, then we have good news for you: such files can usually be recovered. But if you mean files that you deleted a long time ago, then you most likely won’t be able to recover them.
Yes, there are several free data recovery software solutions for Windows 10 that you can download for free:
- Disk Drill (user-friendly UI, great performance)
- TestDisk (command-line interface, average performance)
- Windows File Recovery (command-line interface, average performance)
- PhotoRec (command-line interface, average performance)
- Recuva (graphical user interface, low performance)
That depends on two things: your luck and whether you’re backing up your data. If you’re lucky, the deleted file is still present on your hard drive, which means that you can recover it with data recovery software. Of course, backups, such as those created with File History, can be used to recover any file regardless of how long it has been deleted.
When you either empty the Recycle Bin with deleted files or use the Shift + Delete shortcut to delete files, Windows marks the files as deleted and removes all pointers to them, which is why such files become invisible for the user.
Moreover, the space that was used by the deleted files becomes marked as free space. So technically, the deleted files will still be physically present on your computer until Windows overwrites them with new data.
If you have the File History feature set up on your computer, you can use it to recover deleted files. Follow these steps to recover a permanently deleted file in Windows 10 via File History:
- Launch File Explorer and choose the folder where the deleted files used to be stored.
- On the ribbon, click the History button.
- Look through the backup history of the chosen folder by using the controls below.
- When ready, click the arrow on the top to recover the whole folder or click the needed file to choose it. Click the green button to complete the recovery.
- The file will get restored to its original location.

Robert Agar
Robert is a freelance writer who graduated from Pace University in New York with a Computer Science degree in 1992. Former computer specialist at IBM. Over the course of a long IT career, he has worked for a number of lar…
Read full bio
Robert is a freelance writer who graduated from Pace University in New York with a Computer Science degree in 1992. Former computer specialist at IBM. Over the course of a long IT career, he has worked for a number of lar…
Read full bio

Approved by
Brett Johnson
This article has been approved by Brett Johnson, Data Recovery Engineer at ACE Data Recovery. Brett has a Bachelor’s Degree in Computer Systems and Network, 12 years of experience.
This article has been approved by Brett Johnson, Data Recovery Engineer at ACE Data Recovery. Brett has a Bachelor’s Degree in Computer Systems and Network, 12 years of experience.
File History is a backup feature introduced in Windows 10 as a replacement for the Backup and Restore component of Windows Vista, Windows 7, and Windows 8. When enabled, it automatically creates copies of files in selected folders.
By default, File History backs up files in the Documents, Music, Pictures, Videos, and Desktop folders, but you can easily add any folder you want.
To restore permanently deleted files using File History:
- Open Windows Explorer and navigate to the folder where the deleted files were located.
- Right-click anywhere inside the folder and select Restore previous versions.
- Pick the most appropriate File History backup and click Open to preview its content.
- Select the files you want to recover and click the green Recover button to recover them.

Logically deleted files can remain resident on their hard drive for an extended period of time, based on your computer usage. Windows logically deletes files and marks their previous storage as available for reuse. The file is still physically available until the time that Windows actually overwrites it with new data, even though you can no longer access it through Windows Explorer. This makes it possible to recover permanently deleted files on Windows 10 computers.
When faced with a data loss scenario, there are several methods that can be used in an attempt to undelete or retrieve the lost information.
Your first action when a data loss is discovered should be to stop using the affected storage device as soon as possible. This will minimize the chance that Windows will overwrite the files before recovery can be performed.
Method 1: Check the Recycle Bin
This method should be the first one you employ when you need to recover deleted files on Windows 10 computers. If the file in question was deleted recently, it may be in the Recycle Bin where it is easily retrieved.
To restore deleted files follow these steps:
- Double-click on the Recycle Bin to open it.
- Find and see the files to be recovered. You can use the Ctrl and Shift keys to choose multiple items at once.
- Right-click on the selection and choose Restore. This will restore the file to its original location. You can also drag the file out of the Recycle Bin and drop it on a new location where it will be stored.
- Verify the files have indeed been restored to their original or new location.

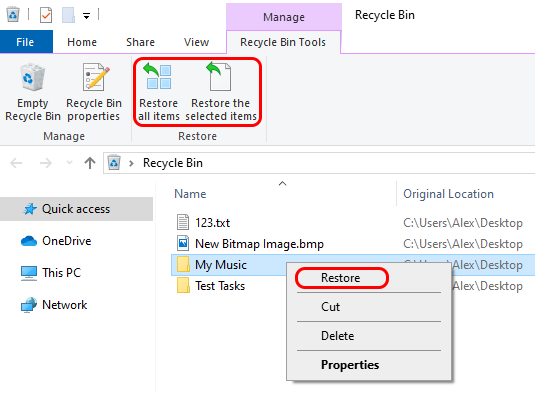
Files that exceed the capacity of the Bin will be permanently deleted instead of stored for potential recovery. You will not find these files in the Recycle Bin. You can adjust the size of the Recycle Bin and how long it retains files by modifying its settings. If your lost files are not in the Recycle Bin, you will need to use another method for recovery. Read on to see what other options you have to recover lost or deleted files.
Method 2: Use Data Recovery Software
Using file recovery software may be necessary in order to undo the effects of a data loss event. We recommend CleverFiles’ Disk Drill for Windows as your data recovery tool of choice. It is a comprehensive data recovery application which makes use of advanced algorithms to scan any storage media for deleted files that can be recovered. Its deep scanning mode will scavenge your disk for fragments of files that can be reconstructed long after they have been deleted from the storage device.
Disk Drill can be downloaded for free and can be used to recover up to 500MB of data and view all files that are available for recovery without any financial investment. Larger restores will necessitate the purchase of the Pro version of the tool.
Here are the steps to recover lost data with Disk Drill.
- Download and install Disk Drill. It is strongly recommended that you do not use the disk that will be used for the recovery. Installing on that disk can lead to corruption or overwritten files before you get the chance to recover them.
- Launch the application.
- Select the disk or partition where the files were located from the list presented in the application’s window.
- Click the Search for lost data button to initiate Disk Drill’s scanning algorithms. As it processes, you will be presented with a list of the files that can be recovered.
- Select the files you wish to restore and a new location where you will store them. Don’t use files original location as this can lead to file corruption during the restore.
- Click Recover to perform the data recovery.

- Navigate to the new location and verify that the files are fully recovered and usable by your applications.
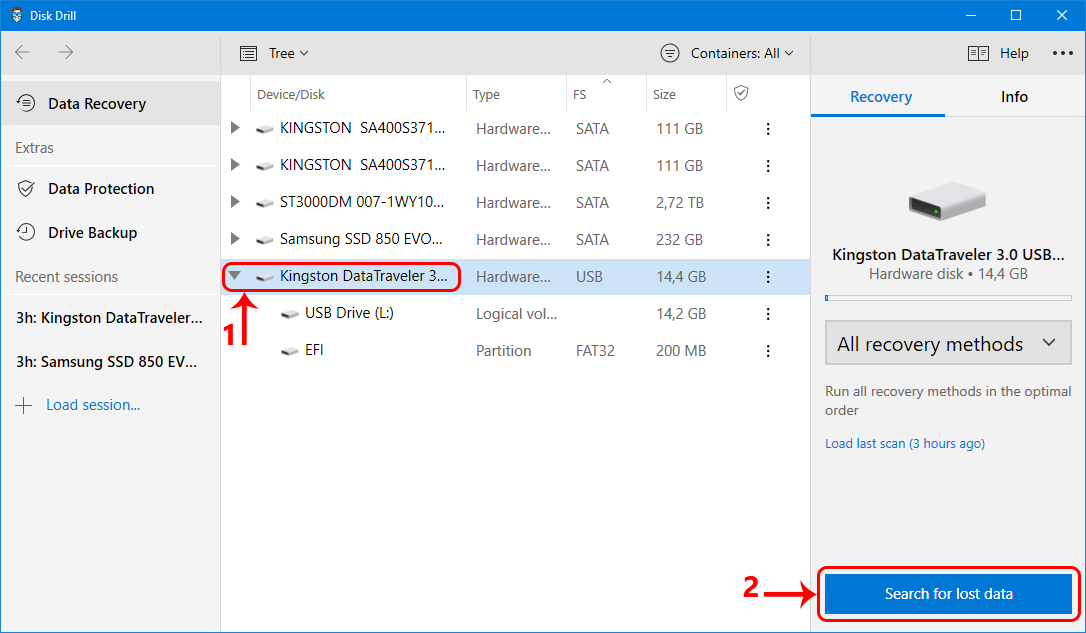
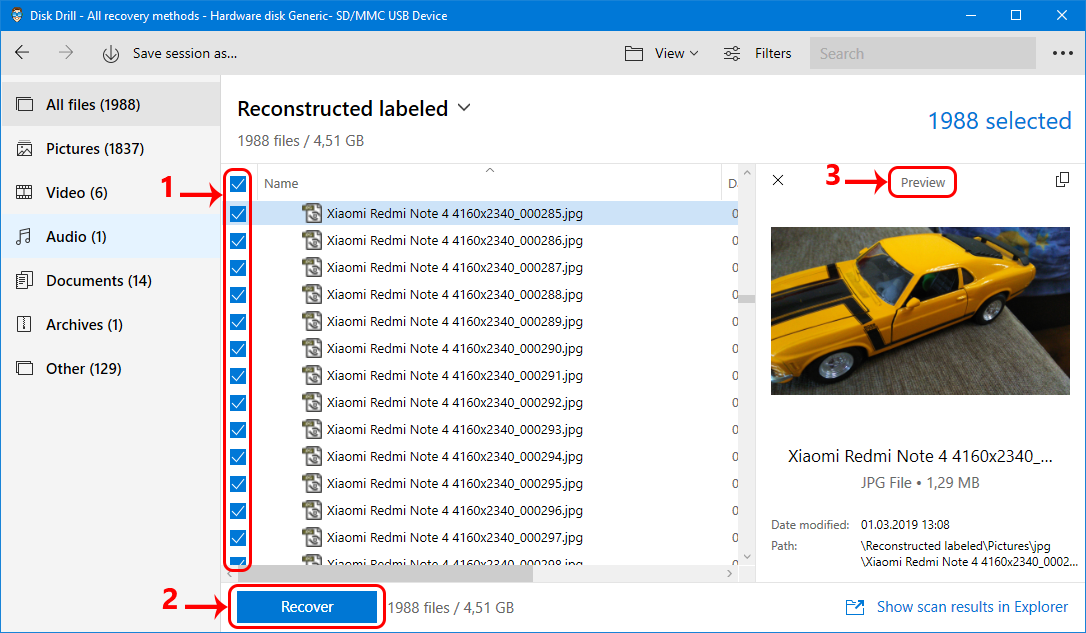
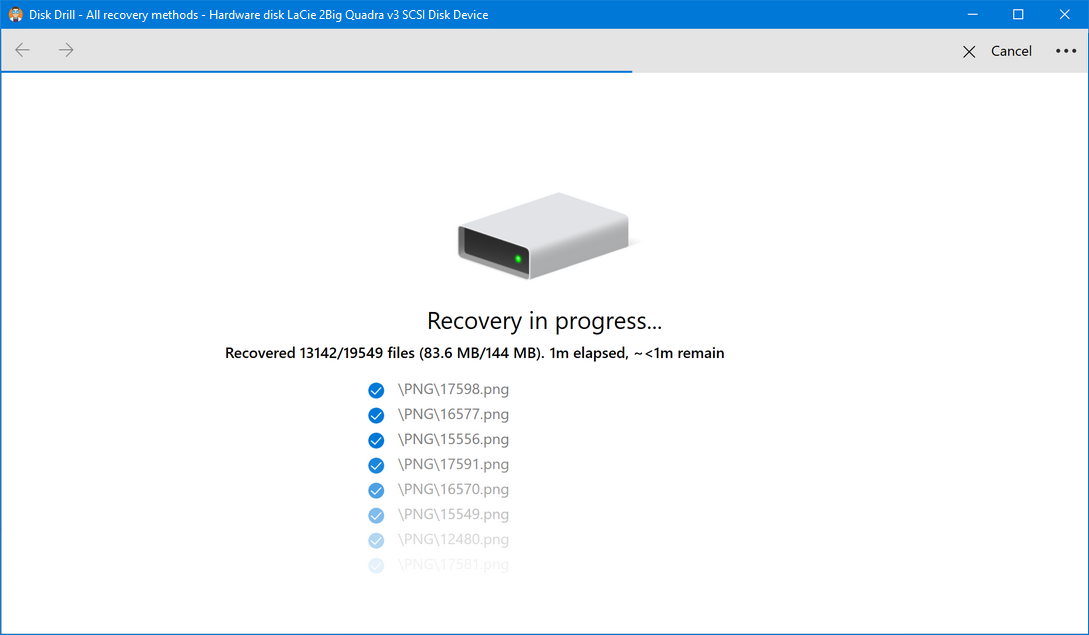

Operating systems:
Windows 11
Windows 10
Windows 8
Windows 7
Windows Vista
Method 3: Restore From a File History Backup
One of the most important tasks for all computer users is the protection of the data that reside on the machine. The best way to accomplish this is to perform a regular system backup using the backup tool of your choice. Windows 10 offers a built-in backup and recovery tool called File History that can be instrumental in allowing you to restore deleted items. Windows users should take the time to set it up to protect the data on their laptop or PC.
Here are the steps to recover deleted files from a File History Backup.
- Click on the File Explorer icon and open the folder that contained the items that you want to recover.
- Click the Home tab and then the History button.
- Select the files or folder that you wish to restore.
- Navigate through time with the arrows to search for the version you want to recover.
- Click the Restore button to restore the file to its original location.
- Address any naming conflicts by replacing the original file with the restored version, skipping the file, or keeping both for your review.

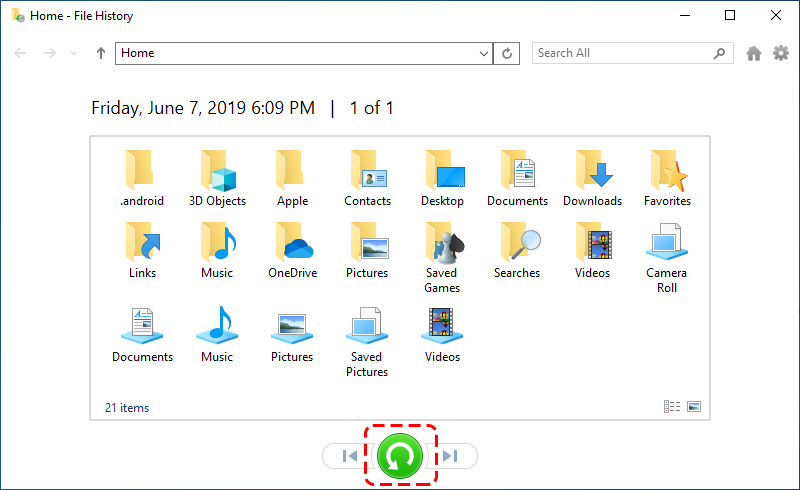
Method 4: Restore Previous Versions of Files on Window 10
The Restore Previous Versions feature of the operating system can be very helpful if you accidentally delete a file with which you have been working. Using this feature enables you to revert to a previously saved version quickly and easily. These versions are saved when Windows creates restore points. You can access this feature by using the following steps.
- Open File Explorer and navigate to the folder that contained the lost files before they were sent to the Recycle Bin.
- Right-click on the item you would like to recover and select Restore previous versions.
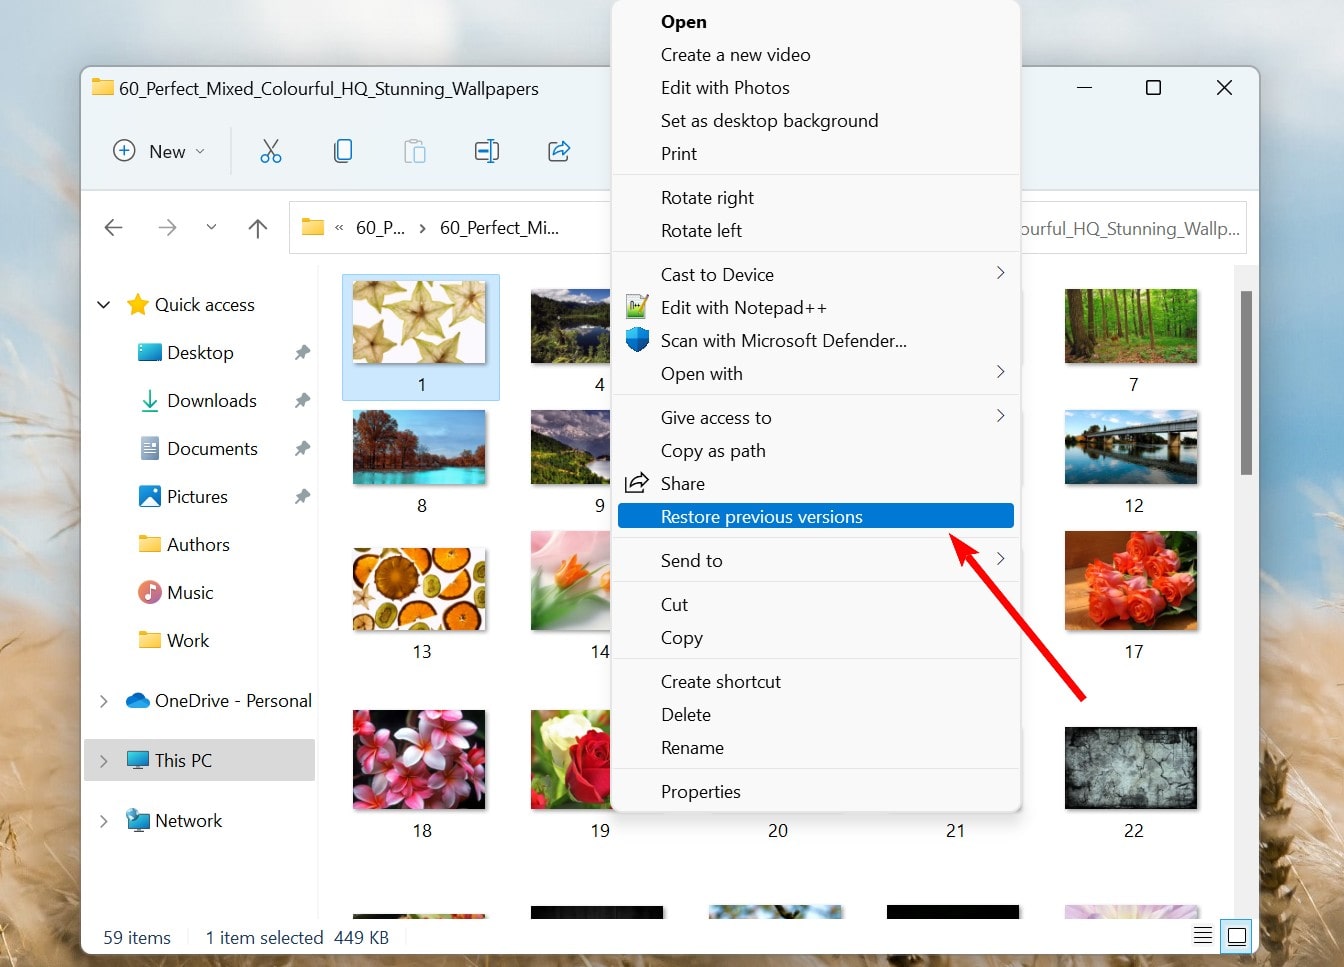
Choose the version of the file you would like to recover and click the Restore button.
Method 5: Recover Lost Files with the Windows File Recovery App
The Windows File Recovery app is a command-line tool available for free from the Microsoft app store. It enables you to recover multiple types of files that have been accidentally deleted from your Windows 10 computer.
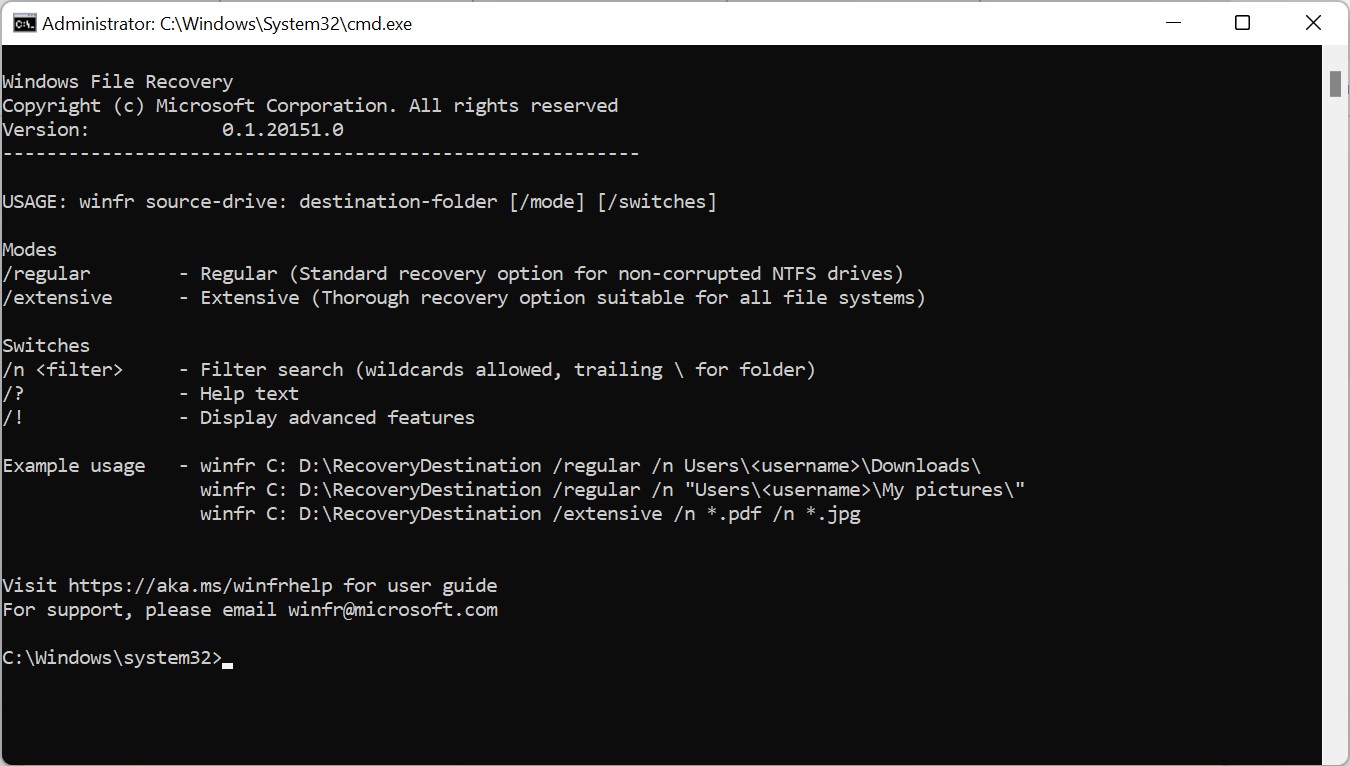
This tool allows you to recover photos, documents, videos, and other items. It can be used to recover data from your main hard drive or external devices such as an SD card. You might want to try this tool before looking at third-party recovery options. More details on the tool are available at this site.
Method 6: Use the Command Prompt
The Command Prompt can be used to recover lost data with the following procedure:
- Open a Command Prompt on your Windows machine.
- Type chkdsk ‘drive letter’ /f and press Enter.
- Press Y until the command line reappears.
- Type the drive letter and hit Enter.
- Enter this command: drive letter: attrib –h –r –s /s /d *.*.
These commands display hidden folders that may contain your lost data. Filenames will be displayed in generic form and it may be hard to verify that you have restored the desired data.
Method 7: Restore Using Backup and Restore
Backup and Restore is a backup feature that was introduced with Windows Vista and Windows 7. It has survived through multiple releases of Windows for its reliability, as many still rely on it as a primary backup solution to restore permanently deleted files in Windows 10. In addition to the ability to retrieve permanently deleted files, you can create system image backups in the event that your operating system doesn’t boot.
The only condition is that you need to have set it up before your files were lost. If it wasn’t, there will be no record of the files to restore from. If you configured Backup and Restore prior to your data becoming lost, you can restore it directly from a backup by following these steps:
- Press Windows Key + S and search Backup settings. Select the first option.

- Click Go to Backup and Restore (Windows 7).

- Click Restore my files.

- Click Browse for files. Find your files and mark them for restoration.

- Click Next.
- Choose whether you want to restore the files to their original location or a new one. When ready, click Restore.

- Click Finish.
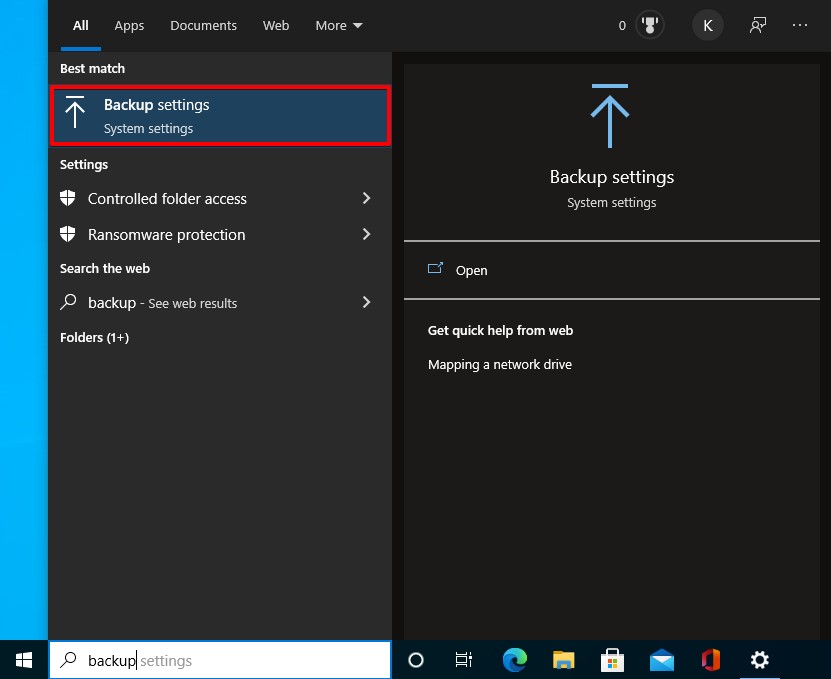
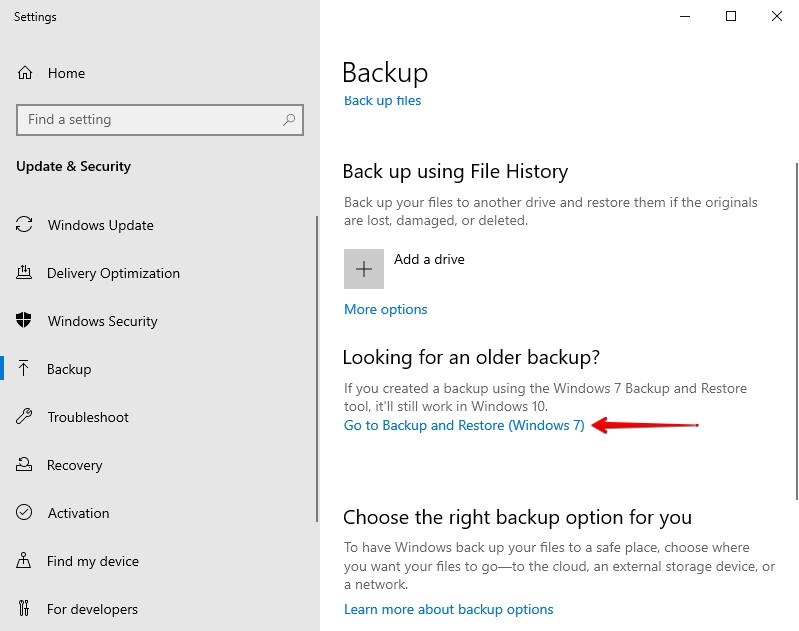
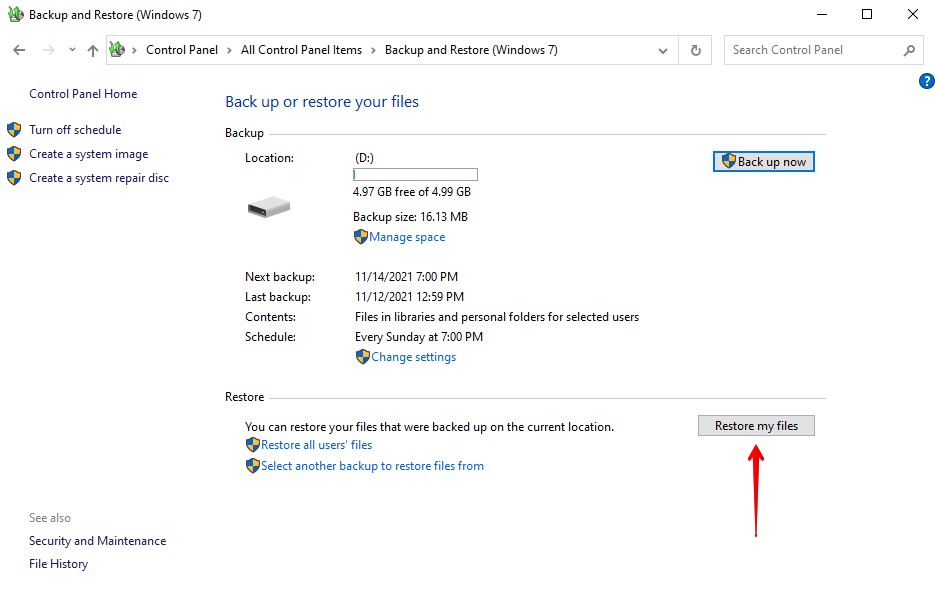
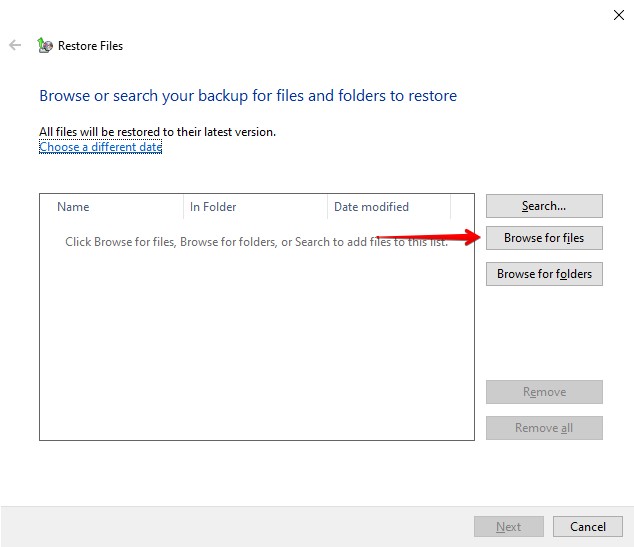
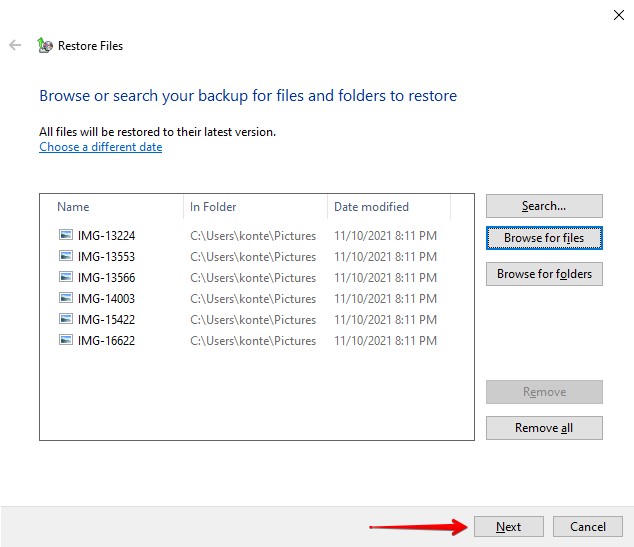
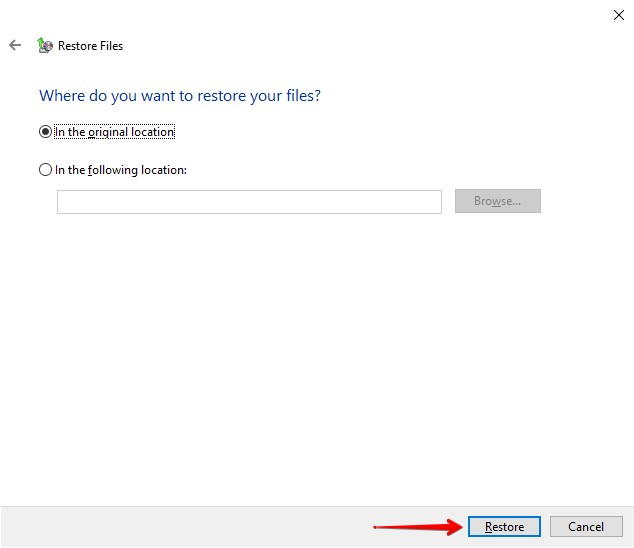
Once you click Restore, the files will either be returned to their original location or a new one, depending on which option you chose.
Method 8: Check Cloud Backup
Cloud-based storage applications like OneDrive and Google Drive include bin systems similar to the Recycle Bin found in Windows. When a file is deleted, there’s a chance the file is sent to the bin instead of being deleted for good. This acts as a safeguard against accidental deletion.
Something to consider is Google Drive will automatically delete files in the Trash after 30 days. Other cloud-based solutions have similar policies. Of course, this will depend on the type of plan you have. Until the data is deleted from the bin, it acts as a reliable method to recover permanently deleted files from a PC easily and safely.
In this method, I’ll demonstrate what recovering a file from the Trash in Google Drive is like:
- Go to your Google Drive storage and log in using your credentials.

- In the left panel, click Trash.

- Right-click the file you want to restore and click Restore.


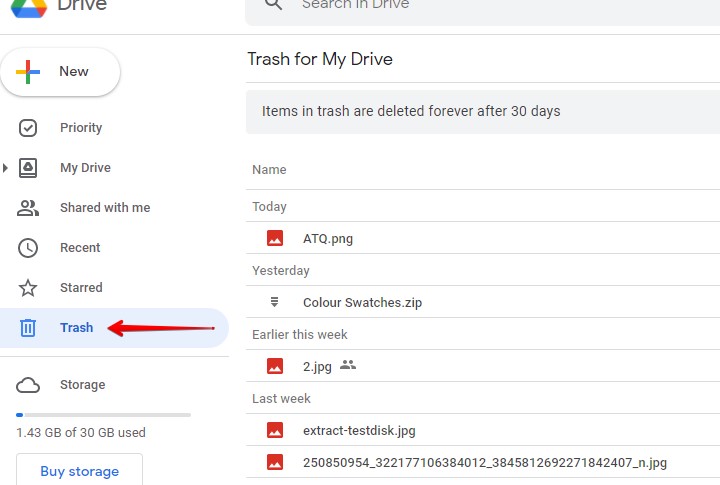
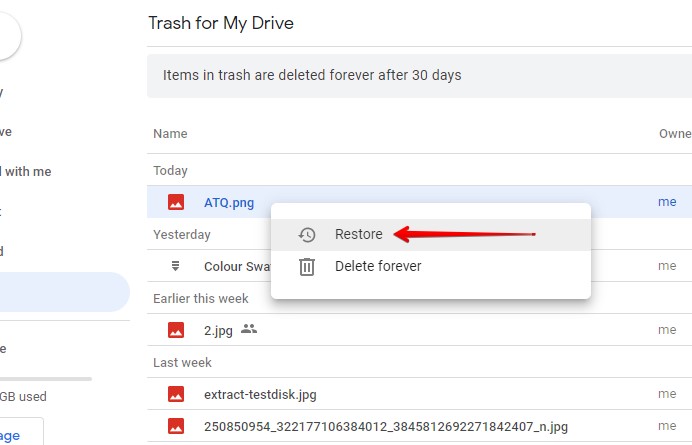
When you restore the files, they will be restored to their original location in your cloud storage. This may be different if you’re using a different cloud solution. Once restored, consider keeping a local backup of the files if they’re important to circumvent the 30 day limitation of the Trash folder.
Recovering Permanently Deleted Files in Windows 11
Windows 11 was released on the 5th of October, 2021. With its release, many are wondering what the recovery process will look like on the brand new operating system from Microsoft. In truth, it’s not that different (if not the same) as Windows 10! Many of the same features you use now will be available to you, some with a new design.
For those who have already updated their operating system from Windows 10 to Windows 11, you should check out our guide on recovering deleted files in Windows 11 to get specific instructions for navigating the new user interface.
How to Prevent Accidentally Deleting Data on Windows 10
Preventing the accidental deletion of data from your computer is certainly preferred over spending time recovering from data loss events. Here are some tips that may help you protect your valuable information and enable you to access it at any time.
| Tip | Description |
| 🧍♂️ Minimize human interaction | Human error is the primary cause of data loss. Controlling access to a computer and its data can go a long way in protecting it from unexpected data loss. Training in correct procedures can help minimize mistakes, but as long as people are interacting with computers the chance of an accident that wipes out some data will continue to exist. |
| 💾 Take regular backups | Backing up your computer is critically important if you value the data that it contains. At a minimum, you should be using the internal File History method of backing up a Windows 10 machine to an external storage device. You should also consider cloud backups to maintain copies of important data in an alternate location to protect against physical disasters such as fire or flooding. |
| 💻 Keep system software up to date | Installing the latest system updates can help prevent data loss. These updates often address bugs and security flaws that could increase your chances of losing data. |
It is impossible to totally guard against data loss. Most experienced Windows users have had to recover lost files and folders at one time or another. Using the methods outlined above will give you a great chance of recovering all of your lost data. Remember to get those backups set up, and good luck with your recovery efforts.
FAQ
There are several methods of recovering deleted files on a Windows 10 machine for free. Using native operating system features such as the Recycle Bin, command prompt, or restoring previous versions may get your lost data back at no cost. If these measures fail, you can download the Windows File Recovery tool from the Microsoft Store to try and retrieve your data. Disk Drill for Windows is another option and offers users the opportunity to use a professional data recovery tool to restore up to 500 MB of data for free.
Yes. Here are the methods that enable a complete folder to be recovered easily.
- You can choose to restore a folder that resides in the Recycle Bin. Just right-click on the folder and select Restore to retrieve the item.
- Recovering from a backup enables you to restore complete folders. When choosing the items to recover in your backup/recovery tool, select the full folder.
- Data recovery software can be used to recover full folders and their contents. When making your selections for recovery, be sure to indicate the folder and its contents should be restored.
Yes, through the use of backups or data recovery software.
If you’re trying to recover deleted files from a laptop that’s running Windows 10, you should first check your Recycle Bin. When files are deleted, they go there first. Failing that, search any available backups you have for previous versions of the files you’re looking for, namely File History and Backup and Restore. If you don’t have any backups, consider using data recovery software to search for and restore your deleted files. Solutions like Disk Drill, Windows File Recovery, and PhotoRec are powerful and effective at scanning your drive and recovering any data that’s found.
To restore permanently deleted files in Windows 10, namely photos, you should first stop using the drive. Continued use puts the data at risk of being overwritten. If you don’t have a backup to restore from, you can either use a data recovery tool to recover the photos or rely on the services of a data recovery professional to do it for you.
When a file is permanently deleted from the Recycle Bin, it still resides on the hard drive until it’s overwritten with new data. Therefore, a data recovery tool can be used to restore some or all of the data. In order to restore permanently deleted files from the Recycle Bin, you will need a backup copy of the files to restore from. If you don’t, you will need to use an effective data recovery solution or have the data professionally recovered using a data recovery service.
by Jenefey Aaron Updated on 2021-09-09 / Update for Data Recovery
Did you permanently delete your important files or folders in your Windows 10 computers but later you realize you need to get it back? If you did, don’t worry, you also can recover deleted or lost documents, photos, videos, audios, etc. on Windows 10 with 4DDiG for Windows Data Recovery. It is a safe and effective solution for recovering files from computer’s hard drive, USB flash drive and even mobile phone.


What May Cause Data Loss on Your Windows 10:
- Empty the Recycle Bin after file is deleted accidently
- Press shift + Delete on the keyboard mistakenly
- Virus attack after installing new application
- Update system to new version
How to Restore Deleted or Lost Files from Windows 10 without Backup?
4DDiG for Windows Data Recovery is a safe and effective Windows 10 data recovery tool for recovering all files on your computer. Go to get trail version and recover your important files.
Step1. Run the program on your computer then select the partition where your lost files located and click «Scan» to find lost files. The location could be decided by yourself such as Desktop, My Document or any one of your hard drives.

Step2. After scanning, You can preview the recoverable files such as videos, documents, photos and other by path, file type or the created time
Step3. Finally, check the files and press «Recover»buttoon to save the recovered data. Please do not save to the same partition where you lost them in case of disk overwritten and permanent data loss.
More Tips You Need to Know about Recovering Deleted or Lost Files from Windows 10:
-
Try to recover files from Recycle Bin if it was not emptied
Actually files still cover the partition space and remains in the Recycle Bin after it is deleted from partition. Only it is deleted from Recycle Bin can release the space on the partition. Therefore you can try to restore your lost files directly from Recycle Bin if it is not erased.
-
Stop writing files to the partition where files were deleted
If it is unlikely to be recovered from Recycle Bin, the only way to recover file is to ask for help from third-party recovery data software. Thus you have to stop writing new data to the partition where files were deleted from being rewritten.
Tell us what we can do to improve the article in the comment section.