Содержание
- Восстановление ноутбука, Использование раздела восстановления – Инструкция по эксплуатации Asus N53J
- Страница 14
- Recover windows to first partition only
- Recover windows to first partition only
- Capture and apply Windows, system, and recovery partitions
- Capture the customized partitions
- Step 1: Determine which partitions to capture
- Step 2: Prepare to capture partitions
- Step 3: Capture images for each customized partition.
- Step 4: Save images to the network or another safe location.
- Apply the images
- Step 1: Prepare to apply partitions
- Step 2: Apply the partitions
- Step 3: Verify that it worked
- Recovery options in Windows
- Before you start to refresh or reset your PC
- Refresh, reset, or restore
- To refresh your PC
- To reset your PC
- To restore your PC to an earlier point in time
Восстановление ноутбука, Использование раздела восстановления – Инструкция по эксплуатации Asus N53J
Страница 14

Руководство пользователя ноутбука
Использование раздела восстановления
Раздел восстановления предоставляет возможность быстрого
восстановления программного обеспечения на ноутбуке в его
оригинальное рабочее состояние. Перед использованием раздела
восстановления, скопируйте Ваши данные на USB устройство
или сетевой диск и запишите параметры конфигурации (например
О разделе восстановления
на Вашем жестком диске, используемое для восстановления
операционной системы, драйверов и утилит, установленных на
Ваш ноутбук на заводе.
р а з д е л с н а з в а н и е м
восстановления создан на
заводе и при удалении не
может быть восстановлен
пользователем. Если у Вас есть проблемы с процессом
восстановления, обратитесь в сервис-центр ASUS.
Использование раздела восстановления:
1. Во время загрузки нажмите (требуется раздел
4. Прочитайте ASUS Preload Wizard и нажмите Далее.
5. Выберите раздел и нажмите Далее. Опции раздела:
Recover Windows to first partition only.
Эта опция удалит только первый раздел, позволив Вам сохранить
другие разделы и создаст новый системный раздел как диск “C”.
Recover Windows to entire HD.
Эта опция удалит все разделы на Вашем жестком диске и создаст
Источник
Recover windows to first partition only

Взял новую модельку от ASUS Zenbook U500VZ.
Готов ответить на все вопросы.
На выставке IFA компания ASUS представила инновационные мобильные компьютеры ZENBOOK U500VZ.
ASUS ZENBOOK U500VZ. ASUS ZENBOOK U500VZ является реальным свидетельством того, что ультракомпактный ноутбук может быть высокопроизводительным без каких-либо компромиссов с точки зрения форм-фактора. Обладая тонким (не более 19,7 мм) алюминиевым корпусом с отличительным дизайном, ZENBOOK U500VZ может похвастаться такими мощными компонентами как четырехъядерный процессор Intel Core i7 третьего поколения и видеокарта NVIDIA GeForce GT650M. Дисковая подсистема ASUS ZENBOOK U500VZ может быть представлена как гибридным решением (500Гб HDD + 128Гб SSD), так и RAID 0 массивом из двух твердотельных накопителей общим объёмом 512Гб. За оптимальный же расход заряда аккумулятора отвечает технология ASUS Super Hybrid Engine II.
15-дюймовый дисплей этого ультра компактного ноутбука прекрасно подходит и для работы, и для развлечений, причем IPS-панель обеспечивает великолепные углы обзора, а антибликовое покрытие способствует комфорту для глаз. Полноразмерная клавиатура снабжена подсветкой, яркость которой изменяется в зависимости от внешнего освещения.
Как ожидается, ноутбук ASUS ZENBOOK U500VZ появится на российском рынке в конце сентября и будет продаваться по цене от 77 000 рублей
Производитель ASUS
Ссылка на производителя www.asus.ru.
Установленная ОС Win 8
Тип ноутбук
Гарантия производителя 2 года
Код производителя 90NWOG212W11C35853AY
Цвет Серый
Ultrabook Да
Процессор Intel Core i7
Частота процессора, МГц 2100 MHz
Код процессора 3612QM
Количество ядер процессора 4
Объем кэша L2 6 Мб
Размер экрана, дюйм 15.6 »
Разрешение экрана 1920×1080
Широкоформатный экран Да
Тип экрана матовый
Светодиодная подсветка экрана Да
IPS матрица Да
Оперативная память, Мб 8192 Mb
Тип памяти DDR3
Частота памяти 1600 МГц
Тип видеокарты дискретный и встроенный
Производитель видеокарты NVIDIA
Чипсет графического контроллера NVIDIA GeForce GT 650M
Два видеоадаптера Да
Размер видеопамяти, Мб 2048
Тип видеопамяти GDDR5
Размер жесткого диска, Гб 512 Гб
Твердотельный диск (SSD) Да
Оптический привод DVD нет
Устройство для чтения флэш-карт Да
Wi-Fi Да
Bluetooth Да
Версия Bluetooth 4.0
Встроенная сетевая карта Да
Количество интерфейсов USB 2.0 1
Количество интерфейсов USB 3.0 1
Выход mini VGA Да
Выход micro HDMI Да
Вход микрофонный Да
Выход аудио/наушники Да
Комплект поставки Клавиатура с подсветкой, чехол
Устройства позиционирования Touchpad
Веб-камера Да
Количество пикселов веб-камеры 1.3 млн пикс.
Слот блокировки Да
Время работы, ч 8 ч
Емкость аккумулятора 6840 мА/ч
Количество ячеек батареи 4 шт
Тип аккумулятора Li-Ion
Длина 223 мм
Ширина 325 мм
Толщина 17 мм
Вес 1300 г


1. Есть два варианта, WinFlash от Asus под Windows или F2 при включении компьютера, далее в БИОСе выбираем Easy Flash, предварительно вставляем флешку с файликом в разъем. Я пользуюсь прошивальщиком через БИОС, не доверяю Window’ым, хотя файлик прикладываю.
Спасибо пользователю eldreamer
2. После включения и прогрузки:
а) Проверить равномерность «вставки» матрици экрана относительно рамки (по крайним рядам пикселей). Видел перекошенную.
б) тест на битые (не горящие) или постоянно светящиеся пиксели на всех цветах заливки на максимальной яркости. (По умолчанию, даже если нажимать на fn+F6 и ползунок будет «на потолке», яркость будет всего
Сегодня впервые попробовал установить на наш ноутбук программу NoteBook FanControl (NBFC).
Это просто чудо а не программа! С ней в комплекте сразу идет набор готовых конфигурационных файлов под разные ноуты, в том числе и под наш UX51VZA. В каждом конфигурационном файле уже сделаны наиболее оптимальные настройки политики работы вентиляторов под каждую конкретную модель ноутбука. Программу можно установить в автозагрузку и забыть о ней, а заодно и о шуме вентиляторов. До 50С вентиляторы вообще стоят, и можно серфить в инете или работать в Exel и других офисных программах при полной тишине. Я никогда не думал, что все так просто и классно.
https://skydrive.live.com/?cid=6c34bd33ac55. APNc-4e4i7-KxOw
Качать последнюю версию 0.14.4.60 beta. Конфигурационный файл под наш UX51VZA идет в комплекте. Программа умная, и при установке сразу сама выберет его. Настраивать ничего не нужно, просто после установки поместить ярлык программы в автозагрузку.
Спасибо Klem66
Небольшой FAQ по настройке программы NoteBook Fan Control
Немножко подробнее о NoteBook Fan Control.
При желании таблицу можно подкорректировать. Для этого выбираем в таблице нужный пункт, задаем верхнее и нижнее пороговые значения температур,
задаем обороты вентиляторов в процентах от максимальных ползунком вверху и жмем кнопку «обновить» (над таблицей справа).
Если нужно добавить строку в таблицу, сначала задаем все параметры, потом жмем кнопку «+».
При включении программы появляется значок в трее (отображающий температуру процессора). Нажав на него правой кнопкой, проверьте отмечен ли флажком пункт «Start with Windows» (автозагрузка).
По умолчанию (с заводской термальной таблицей) скорость вентиляторов ниже 25% не опускалась, а это довольно шумно.
Благодаря использованию этой программы в режиме простоя (и при небольшой нагрузке) ноут успешно охлаждается пассивным образом.
Источник
Recover windows to first partition only
Сообщения: 189
Откуда: Находка
Репутация:
Всем привет тут такое дело угробил я виндовс виста на ноутбуке ASUS F3Tc,
но в комплекте к нему шол диск, Recovery DVD ASUSTeK Computer Inc. и так установил я этот диск в дисковод и перезагрузилса, после этого в низу экрана поевилась полоска загрузки с надписью windows is loading files, как при установке windows, после загрузки поевилось меню.
ASUS Preload
ASUS Preload Wizard
This Recovery Wizard has been programmed to operate only with your ASUS Notebook
Series. IT WILL NOT WORK WITH ANY OTHER COMPUTER SYSTEM.
Please be aware that all software on the Recovery CD is subject to the terms of the
Software license agreements that come with your ASUS Notebook Series. Your use of
This CD means that you agree to all of those license agreement terms.
All your files on the hard disk’s partition(s) will be lost while using the Recovery CD.
ASUSTeK Computer Inc. shall not be liable for any incidental or consequential damages.
и три кнопки BACK NEXT и CANCEL нажал NEXT дальше поевилось меню
ASUS Preload
ASUS Preload Wizard
Select the appropriate option below:
( ) Recover Windows to first partition only.
( ) Recover Windows to entire HD.
( ) Recover Windows to entire HD with 2 partition.
и тагже три кнопки BACK NEXT и CANCEL, незнаю что выбрать плохо знаю английский пожалуйста помогите.
Репутация:
Сообщения: 189
Откуда: Находка
Репутация:
Сообщения: 19308
Откуда: Пермь
Репутация: 126
Сообщения: 5169
Откуда: Москва
Репутация: 10
Сообщения: 19308
Откуда: Пермь
Репутация: 126
Сообщения: 5169
Откуда: Москва
Репутация: 10
U-Nick
Ну, если есть куда выложить 180Мб, могу дать свой конструктор — BartPE с любимыми прогами.
Подключение и правка реестра другой копии ОС:
- Открыть редактор реестра regedit.exe.
Встать на ветку HKEY_LOCAL_MACHINE или HKEY_USERS.
Файл —> Загрузить куст.
Выбрать файл реестра в папке WindowsSystem32Config (System и/или Software).
Дать ему произвольное название для подключения.
Найти и исправить ключ.
Выгрузить куст.
Сообщения: 19308
Откуда: Пермь
Репутация: 126
Сообщения: 5169
Откуда: Москва
Репутация: 10
Цитата: А вот списочек любимых пр0г — эт интересно.
Легко 
7Tools Partition Manager 2005
Acronis Disk Director
AkelPad
AusLogics DiskDefrag
AVZ
Beyond Compare
CureIt
Easy Recovery
ERDCommander 2005
Everest
FAR
Firefox
Foxit Reader
FreeCommander
Irfan View
LoadHive
Monitor Tests
NikFileTree
Office Viewers
PhotoFiltre
RegShot
ResHacker
Salamander
SnM
Socrat
The Bee
Total Commander
WinHex
WinRAR
Xplorer2
Сообщения: 19308
Откуда: Пермь
Репутация: 126
Сообщения: 5169
Откуда: Москва
Репутация: 10
Сообщения: 19308
Откуда: Пермь
Репутация: 126
Сообщения: 5169
Откуда: Москва
Репутация: 10
Цитата: Ссылочку на LockSmith подкинь.
Сообщения: 19308
Откуда: Пермь
Репутация: 126
Репутация:
Sergey-MRS писал(а): Всем привет тут такое дело угробил я виндовс виста на ноутбуке ASUS F3Tc,
но в комплекте к нему шол диск, Recovery DVD ASUSTeK Computer Inc. и так установил я этот диск в дисковод и перезагрузилса, после этого в низу экрана поевилась полоска загрузки с надписью windows is loading files, как при установке windows, после загрузки поевилось меню.
ASUS Preload
ASUS Preload Wizard
This Recovery Wizard has been programmed to operate only with your ASUS Notebook
Series. IT WILL NOT WORK WITH ANY OTHER COMPUTER SYSTEM.
Please be aware that all software on the Recovery CD is subject to the terms of the
Software license agreements that come with your ASUS Notebook Series. Your use of
This CD means that you agree to all of those license agreement terms.
All your files on the hard disk’s partition(s) will be lost while using the Recovery CD.
ASUSTeK Computer Inc. shall not be liable for any incidental or consequential damages.
и три кнопки BACK NEXT и CANCEL нажал NEXT дальше поевилось меню
ASUS Preload
ASUS Preload Wizard
Select the appropriate option below:
( ) Recover Windows to first partition only.
( ) Recover Windows to entire HD.
( ) Recover Windows to entire HD with 2 partition.
и тагже три кнопки BACK NEXT и CANCEL, незнаю что выбрать плохо знаю английский пожалуйста помогите.
Источник
Capture and apply Windows, system, and recovery partitions
When you’re deploying Windows using the WIM format, and using customized partitions, a customized system partition or an additional utility partition, learn how to capture the right partitions to apply to new PCs.
Notes:
If you don’t need custom partitions, you usually can just capture the Windows partition, and then use files from that image to set up the rest of the partitions on the drive. See Capture and Apply Windows using a single WIM file.
FFU captures the full contents of a drive, so you don’t need to worry about capturing and configuring individual partitions.
Capture the customized partitions
Step 1: Determine which partitions to capture
This table shows the types of partitions that you must capture and those that are managed automatically.
If you’re deploying both UEFI and BIOS systems, you can reuse your primary and logical partitions across UEFI-based and BIOS-based devices, but not the other partition types.
| Partition type | Should you capture this partition? | Can you reuse the same WIM on UEFI and BIOS firmware? |
|---|---|---|
| System partition (EFI System Partition or BIOS system partition) | Optional. If only a simple set of partition files is required, you don’t have to capture this partition. | No |
| Microsoft Reserved partition (MSR) | No | No |
| Primary partitions (Windows partitions, data / utility partitions that you’ve added) | Yes | Yes |
| Recovery partition | Optional. If you haven’t customized this partition, you don’t have to capture it. | No |
| Extended partition | No | No |
| Logical partitions (Windows partitions, data / utility partitions that you’ve added) | Yes | Yes |
Step 2: Prepare to capture partitions
If you’ve booted the Windows image, generalize it so that it can be deployed to other devices. For more information, see Sysprep (Generalize) a Windows installation.
Start your reference device by using WindowsВ PE.
At the WindowsВ PE command prompt, type diskpart to open the DiskPart tool.
Check to see if the partitions that you want to capture have drive letters assigned.
If any of the partitions you want to capture don’t already have a drive letter assigned, continue:
List the disks in your PC:
Select the primary hard disk:
View the partitions:
Select a partition that needs a drive letter:
Assign a letter to the partition with the assign letter command. For example,
Type exit to return to the WindowsВ PE command prompt.
For more information, see the DiskPart Help from the command line, or Diskpart Command line syntax.
Step 3: Capture images for each customized partition.
At the WindowsВ PE command prompt, capture each customized partition, for example:
For more information about using the DISM tool to capture an image, see DISM Image Management Command-Line Options.
Step 4: Save images to the network or another safe location.
Connect an external drive, or connect to a network location where you can safely save your image, for example:
If prompted, provide your network credentials.
Copy the partitions to your network share. For example,
Apply the images
Step 1: Prepare to apply partitions
Start your destination device by using WindowsВ PE.
Connect an external drive, or connect to a safe network location, for example:
If prompted, provide your network credentials.
Wipe the hard drive and create new partitions.
To apply to multiple devices, save the Diskpart commands into a script and run them on each new device. For examples, see Configure UEFI/GPT-Based Hard Drive Partitions or Configure BIOS/MBR-Based Hard Drive Partitions. Example:
Where D: is a USB flash drive or other file storage location.
In these DiskPart examples, the partitions are assigned the letters: System=S, Windows=W, and Recovery=R because these are the letters assigned by CreatePartitions-UEFI.txt and CreatePartitios-BIOS.txt.
If you’re using different scripts, change the Windows drive letter to a letter that’s near the end of the alphabet, such as W, to avoid drive letter conflicts. Don’t use X for a drive letter, because this drive letter is reserved for Windows PE. After the device reboots, the Windows partition is assigned the letter C, and the other partitions won’t be assigned drive letters.
If you reboot, WindowsВ PE reassigns disk letters alphabetically, starting with the letter C, without regard to the configuration in Windows Setup. This configuration can change based on the presence of different drives, such as USB flash drives.
Step 2: Apply the partitions
Windows and data partitions: Apply the image(s), example:
where W: is the Windows partition.
System partition: You can either:
Configure the system partition by using the BCDBoot tool. This tool copies and configures system partition files by using files from the Windows partition. For example:
Apply a custom image
Where S: is the system partition
Recovery partition:
Copy the Windows Recovery Environment (RE) tools into the recovery tools partition.
Where R: is the recovery partition
Apply a custom image
b. Register the location of the recovery tools, and hide the recovery partition using Diskpart. You can use our sample script or perform the steps manually:
Diskpart steps for UEFI:
Diskpart steps for BIOS:
Step 3: Verify that it worked
Reboot the device ( exit ). Windows should boot.
If the device doesn’t boot, (for example, if you receive the error message: Bootmgr not found. Press CTRL+ALT+DEL) check the steps for setting up the system partition:
Complete the out of box experience (OOBE) as a new user, and check the recovery partition:
Check that in File Explorer that the Recovery partition is not visible.
View the partitions exist, either by right-clicking Start and selecting Disk Management, or by using diskpart (Open a command prompt as an administrator > diskpart > select disk 0 > list partition > exit ).
Источник
Recovery options in Windows
If you’re having problems with your PC, the following table can help you decide which recovery option to use.
Your PC isn’t working well and you recently installed an update.
Your PC isn’t working well and it’s been a while since you installed an app, driver, or update.
Your PC won’t start or is still loading
Your PC won’t start, you haven’t created a recovery drive, and resetting your PC didn’t work.
Your PC won’t start and you haven’t created a recovery drive.
Your PC won’t start and you’ve created a recovery drive.
You want to reinstall your previous operating system.
Your PC isn’t working well and you recently installed an app.
Click one of the recovery options below and follow the steps to try to get things working again.
If you’ve recently installed a Windows update, uninstall the update to try to resolve the issue.
Select Start > Settings > Windows Update > Update history > Uninstall updates.
View update history
On the list that appears, select update you want to remove, and then select Uninstall.
Important: If you’ve encrypted your device, you’ll need your BitLocker key to reset your PC If you don’t know your BitLocker key, see Find my BitLocker recovery key.
Resetting reinstalls Windows 11, but lets you choose whether to keep your files or remove them, and then reinstalls Windows. You can reset your PC from Settings, the sign-in screen, or by using a recovery drive or installation media.
Reset your PC from Settings
Next to Reset this PC, select Reset PC. Then choose from the options and/or settings in the table below.
Keep my files > Change settings > Preinstalled apps On
Reinstalls Windows 11 and keeps your personal files.
Removes apps and drivers you installed.
Removes changes you made to settings.
Restores any apps your PC manufacturer installed if your PC came with Windows 11.
Keep my files > Change settings > Preinstalled apps Off
Reinstalls Windows 11 and keeps your personal files.
Removes apps and drivers you installed.
Removes changes you made to settings.
Removes any apps your PC manufacturer installed.
Reinstalls Windows 11 and removes your personal files.
Removes apps and drivers you installed.
Removes changes you made to settings.
Removes any apps your PC manufacturer installed. (If your PC came with Windows 11, apps from your PC manufacturer will be reinstalled.)
Note: Remove everything > Change settings gives you two options.
Data erasure On removes files and cleans the drive. If you’re planning to donate, recycle, or sell your PC, use this option. This might take an hour or two, but it makes it harder for other people to recover files you’ve removed.
Data erasure Off just removes files. It takes less time, but is less secure.
Reset your PC from the sign-in screen
If you can’t open Settings, you can reset your PC from the sign-in screen. Here’s how:
Press Windows logo key + L to get to the sign-in screen. Then restart your PC by pressing the Shift key while you select the Power button > Restart.
Your PC will restart in the Windows Recovery Environment (WinRE) environment.
On the Choose an option screen, select Troubleshoot > Reset this PC, and then choose one of the options in the previous table.

Startup Repair helps you fix common problems that can prevent Windows from starting up.
Note: If you’ve encrypted your device, you’ll need your BitLocker key to start in safe mode.
First, you need to enter the Windows Recovery Environment (winRE). To do this, you will repeatedly turn your device off, then on:
Hold down the power button for 10 seconds to turn off your device.
Press the power button again to turn on your device.
On the first sign that Windows has started (for example, some devices show the manufacturer’s logo when restarting) hold down the power button for 10 seconds to turn off your device.
Press the power button again to turn on your device.
When Windows starts again, hold down the power button for 10 seconds to turn off your device.
Press the power button again to turn on your device.
This time, allow your device to fully start up.
Select Advanced options.
Now that you’re in winRE, on the Choose an option screen, select Troubleshoot > Advanced options > Startup Repair > Restart.


Connect the installation media you created to your PC and reinstall Windows 11.
Open File Explorer and select the drive with the installation media.
From the root directory of the drive, double-click setup.exe, and then select Yes when asked if you’d like to allow the app to make changes to your device.
Select Change what to keep.
Select one of the following options, and then select Next:
Keep personal files and apps – This will preserve your personal data, apps, and settings.
Keep personal files only – This will preserve your personal data and settings, but all your apps will be removed.
Keep nothing – This will remove all personal data, settings, and apps.
Warning: You cannot undo a reinstallation of Windows 10. Be sure to back up your files first if you choose the Keep nothing option.
To finish, select Install to start reinstalling Windows 11 on your PC.
Your PC will restart several times during the reinstallation.
Important: If you’ve encrypted your device, you’ll need your BitLocker key to use a recovery drive to restore or reset your PC If you don’t know your BitLocker key, see Find my BitLocker recovery key.
If your PC won’t start and you haven’t created a recovery drive, download installation media and use it to restore from a system restore point or reset your PC.
Download the Windows 11 media creation tool and then run it.
Select Create installation media for another PC.
Choose a language, edition, and architecture (64-bit or 32-bit).
Follow the steps to create installation media, and then select Finish.
Connect the installation media you created to your nonfunctional PC, and then turn it on.
On the initial setup screen, enter your language and other preferences, and then select Next. If you don’t see the setup screen, your PC might not be set up to boot from a drive. Check your PC manufacturer’s website for info on how to change your PC’s boot order, and then try again.
Select Repair your computer.
On the Choose an option screen, select Troubleshoot. From there, you can:
Restore from a system restore point by selecting Advanced options > System Restore. This will remove recently installed apps, drivers, and updates that might be causing your PC problems. Restoring from a restore point won’t affect your personal files.
Important: If you’ve encrypted your device, you’ll need your BitLocker key to use a recovery drive to restore or reset your PC If you don’t know your BitLocker key, see Find my BitLocker recovery key.
If your PC won’t start, you can use a recovery drive to restore from a system restore point or recover your PC. For info on how to create a recovery drive on a working PC, see Create a recovery drive.
Note: If you are using a Surface, see Creating and using a USB recovery drive for Surface to download and create a USB recovery image specifically for your Surface device.
To restore or recover using the recovery drive:
Connect the recovery drive and turn on your PC.
Press Windows logo key + L to get to the sign-in screen, and then restart your PC by pressing the Shift key while you select the Power button > Restart.
Your PC will restart in the Windows Recovery Environment (WinRE) environment.
On the Choose an option screen, select Troubleshoot, and then select one of the following two options. (If you don’t see the Choose your option screen, your PC might not be set up to boot from a drive. Check your PC manufacturer’s website for info on how to change your PC’s boot order.)
To restore from a system restore point, select Advanced Options > System Restore. This won’t affect your personal files, but it will remove recently installed apps, drivers, and updates that might be causing your PC problems.
To reinstall Windows 11, select Advanced Options > Recover from a drive. This will remove your personal files, apps and drivers you installed, and changes you made to settings.
To go back, you’ll need to:
bt folders after the upgrade.
Remove any user accounts you added after the upgrade.
Have the USB drive you used to upgrade to Windows 11 (if you used one).
Note: The option in Settings to go back to your previous version of Windows is only available for a limited time after upgrading.
Info for Windows Insiders
If you’re an Insider and the current preview build isn’t working for you, select Start > Settings > System > Recovery. Next to Go back, select Go back. This won’t remove your personal files, but it’ll remove recently installed apps and drivers, and change settings back to their defaults.
Going back to an earlier build won’t remove you from the Insider Program. When the next preview build is ready, it’ll be installed on your PC.
This option takes your PC back to an earlier point in time, called a system restore point. Restore points are generated when you install a new app or driver, and when you create a restore point manually. Restoring won’t affect your personal files, but it will remove apps, drivers, and updates installed after the restore point was made.
In the search box on the taskbar, type control panel, and then choose it from the list of results
In the Control Panel search box, type recovery.
Select Recovery > Open System Restore.
In the Restore system files and setting box, select Next.
Select the restore point that you want to use in the list of results, and then select Scan for affected programs.
If you don’t see the restore point that you want to use, select the Show more restore points check box to see more restore points.
If you’re not seeing any restore points, it might be because system protection isn’t turned on. Here’s how to check:
In the search box on the taskbar, type control panel, and then choose it from the list of results.
In the Control Panel search box, type recovery.
Select Recovery > Configure System Restore > Configure and see if the Turn on system protection option is selected.
If the Turn on system protection option is not selected, system protection isn’t turned on and there aren’t any restore points. In this scenario, you won’t be able to recovery your PC using a system restore point and will need to use one of the other recovery options listed on this page.
If the Turn on system protection option is selected, continue with step 6.
You’ll see a list of items that will be deleted if you remove this restore point. If you’re OK with the deletions, select Close > Next > Finish.
If you’re having problems with your PC, the following table can help you decide which recovery option to use.
Your PC isn’t working well and you recently installed an update.
Your PC isn’t working well and it’s been a while since you installed an app, driver, or update.
Your PC won’t start or is still loading
Your PC won’t start, you haven’t created a recovery drive, and resetting your PC didn’t work.
Your PC won’t start and you haven’t created a recovery drive.
Your PC won’t start and you’ve created a recovery drive.
You want to reinstall your previous operating system.
Your PC isn’t working well and you recently installed an app.
Click one of the recovery options below and follow the steps to try to get things working again.
If you’ve recently installed a Windows update, uninstall the update to try to resolve the issue.
Select the Start button, then select Settings > Update & Security > Windows Update > View your update history > Uninstall updates.
View update history settings
Right-click the update you want to remove, and then select Uninstall.
Important: If you’ve encrypted your device, you’ll need your BitLocker key to reset your PC If you don’t know your BitLocker key, see Find my BitLocker recovery key.
Resetting reinstalls Windows 10, but lets you choose whether to keep your files or remove them, and then reinstalls Windows. You can reset your PC from Settings, the sign-in screen, or by using a recovery drive or installation media.
Reset your PC from Settings
Under Reset this PC, select Get started and then choose from the options and/or settings in the table below.
Keep my files > Change settings > Preinstalled apps On
Reinstalls Windows 10 and keeps your personal files.
Removes apps and drivers you installed.
Removes changes you made to settings.
Restores any apps your PC manufacturer installed if your PC came with Windows 10.
Keep my files > Change settings > Preinstalled apps Off
Reinstalls Windows 10 and keeps your personal files.
Removes apps and drivers you installed.
Removes changes you made to settings.
Removes any apps your PC manufacturer installed.
Reinstalls Windows 10 and removes your personal files.
Removes apps and drivers you installed.
Removes changes you made to settings.
Removes any apps your PC manufacturer installed. (If your PC came with Windows 10, apps from your PC manufacturer will be reinstalled.)
Note: Remove everything > Change settings gives you two options.
Data erasure On removes files and cleans the drive. If you’re planning to donate, recycle, or sell your PC, use this option. This might take an hour or two, but it makes it harder for other people to recover files you’ve removed.
Data erasure Off just removes files. It takes less time, but is less secure.
Reset your PC from the sign-in screen
If you can’t open Settings, you can reset your PC from the sign-in screen. Here’s how:
Press Windows logo key + L to get to the sign-in screen, and then restart your PC by pressing the Shift key while you select the Power button > Restart in the lower-right corner of the screen.
Your PC will restart in the Windows Recovery Environment (WinRE) environment.
On the Choose an option screen, select Troubleshoot > Reset this PC, and then choose one of the options in the previous table.
Startup Repair helps you fix common problems that can prevent Windows from starting up.
Note: If you’ve encrypted your device, you’ll need your BitLocker key to start in safe mode.
First, you need to enter the Windows Recovery Environment (winRE). To do this, you will repeatedly turn your device off, then on:
Hold down the power button for 10 seconds to turn off your device.
Press the power button again to turn on your device.
On the first sign that Windows has started (for example, some devices show the manufacturer’s logo when restarting) hold down the power button for 10 seconds to turn off your device.
Press the power button again to turn on your device.
When Windows starts again, hold down the power button for 10 seconds to turn off your device.
Press the power button again to turn on your device.
This time, allow your device to fully start up.
Select Advanced options.
Now that you’re in winRE, on the Choose an option screen, select Troubleshoot > Advanced options > Startup Repair > Restart.
Connect the installation media you created to your PC and reinstall Windows 10.
Open File Explorer and select the drive with the installation media.
From the root directory of the drive, double-click setup.exe, and then select Yes when asked if you’d like to allow the app to make changes to your device.
Select Change what to keep.
Select one of the following options, and then select Next:
Keep personal files and apps – This will preserve your personal data, apps, and settings.
Keep personal files only – This will preserve your personal data and settings, but all your apps will be removed.
Keep nothing – This will remove all personal data, settings, and apps.
Warning: You cannot undo a reinstallation of Windows 10. Be sure to back up your files first if you choose the Keep nothing option.
To finish, select Install to start reinstalling Windows 10 on your PC.
Your PC will restart several times during the reinstallation.
Important: If you’ve encrypted your device, you’ll need your BitLocker key to use a recovery drive to restore or reset your PC If you don’t know your BitLocker key, see Find my BitLocker recovery key.
If your PC won’t start and you haven’t created a recovery drive, download installation media and use it to restore from a system restore point or reset your PC.
Download the Windows 10 media creation tool and then run it.
Select Create installation media for another PC.
Choose a language, edition, and architecture (64-bit or 32-bit).
Follow the steps to create installation media, and then select Finish.
Connect the installation media you created to your nonfunctional PC, and then turn it on.
On the initial setup screen, enter your language and other preferences, and then select Next. If you don’t see the setup screen, your PC might not be set up to boot from a drive. Check your PC manufacturer’s website for info on how to change your PC’s boot order, and then try again.
Select Repair your computer.
On the Choose an option screen, select Troubleshoot. From there, you can:
Restore from a system restore point by selecting Advanced options > System Restore. This will remove recently installed apps, drivers, and updates that might be causing your PC problems. Restoring from a restore point won’t affect your personal files.
Important: If you’ve encrypted your device, you’ll need your BitLocker key to use a recovery drive to restore or reset your PC If you don’t know your BitLocker key, see Find my BitLocker recovery key.
If your PC won’t start, you can use a recovery drive to restore from a system restore point or recover your PC. For info on how to create a recovery drive on a working PC, see Create a recovery drive.
Note: If you are using a Surface, see Creating and using a USB recovery drive for Surface to download and create a USB recovery image specifically for your Surface device.
To restore or recover using the recovery drive:
Connect the recovery drive and turn on your PC.
Press Windows logo key + L to get to the sign-in screen, and then restart your PC by pressing the Shift key while you select the Power button> Restart in the lower-right corner of the screen.
Your PC will restart in the Windows Recovery Environment (WinRE) environment.
On the Choose an option screen, select Troubleshoot, and then select one of the following two options. (If you don’t see the Choose your option screen, your PC might not be set up to boot from a drive. Check your PC manufacturer’s website for info on how to change your PC’s boot order.)
To restore from a system restore point, select Advanced Options > System Restore. This won’t affect your personal files, but it will remove recently installed apps, drivers, and updates that might be causing your PC problems.
To reinstall Windows 10, select Advanced Options > Recover from a drive. This will remove your personal files, apps and drivers you installed, and changes you made to settings.
For a limited time after upgrading to Windows 10, you’ll be able to go back to your previous version of Windows by selecting the Start button, then select Settings > Update & Security > Recovery and then selecting Get started under Go back to the previous version of Windows 10. This will keep your personal files, but it’ll remove apps and drivers installed after the upgrade, as well as any changes you made to settings. In most cases, you’ll have 10 days to go back.
Open Recovery settings
To go back, you’ll need to:
bt folders after the upgrade.
Remove any user accounts you added after the upgrade.
Know the password you used to sign in to Windows 7 or Windows 8.1 (if you used one).
Have the USB drive you used to upgrade to Windows 10 (if you used one).
Note: If you go back to Windows 8.1, some apps that came with Windows, like Mail and People, might not work anymore. To fix the apps, reinstall them from the Microsoft Store.
Note: The option in Settings to go back to your previous version of Windows is only available for a limited time after upgrading.
Info for Windows Insiders
Going back to an earlier build won’t remove you from the Insider Program. When the next preview build is ready, it’ll be installed on your PC.
This option takes your PC back to an earlier point in time, called a system restore point. Restore points are generated when you install a new app or driver, and when you create a restore point manually. Restoring won’t affect your personal files, but it will remove apps, drivers, and updates installed after the restore point was made.
In the search box on the taskbar, type control panel, and then choose it from the list of results
In the Control Panel search box, type recovery.
Select Recovery > Open System Restore.
In the Restore system files and setting box, select Next.
Select the restore point that you want to use in the list of results, and then select Scan for affected programs.
If you don’t see the restore point that you want to use, select the Show more restore points check box to see more restore points.
If you’re not seeing any restore points, it might be because system protection isn’t turned on. Here’s how to check:
In the search box on the taskbar, type control panel, and then choose it from the list of results.
In the Control Panel search box, type recovery.
Select Recovery > Configure System Restore > Configure and see if the Turn on system protection option is selected.
If the Turn on system protection option is not selected, system protection isn’t turned on and there aren’t any restore points. In this scenario, you won’t be able to recovery your PC using a system restore point and will need to use one of the other recovery options listed on this page.
If the Turn on system protection option is selected, continue with step 6.
You’ll see a list of items that will be deleted if you remove this restore point. If you’re OK with the deletions, select Close > Next > Finish.
If you’re having problems with your PC, you can:
Refresh your PC to reinstall Windows and keep your personal files and settings. Refresh also keeps the apps that came with your PC and the apps you installed from the Microsoft Store.
Reset your PC to reinstall Windows but delete your files, settings, and apps—except for the apps that came with your PC.
Restore your PC to undo recent system changes you’ve made.
If you’re having trouble starting (booting) your PC, see Windows Startup Settings (including safe mode), and go to the “Get to Windows Startup Settings in the Windows Recovery Environment” section. You can refresh, reset, or restore your PC from the Windows Recovery Environment.
If you want to back up and restore your personal files using File History, see Set up a drive for File History.
Before you start to refresh or reset your PC
In most cases, once you start to refresh or reset your PC, it’ll finish on its own. However, if Windows needs missing files, you’ll be asked to insert recovery media, which is typically on a DVD disc or thumb drive. If that happens, what you’ll need depends on your PC.
If your PC came with Windows 8.1 or Windows RT 8.1, you’ll need the discs or thumb drive that came with your PC. Check the info that came with your PC to see if your PC manufacturer provided these discs or media. In some cases, you might have created them when you first set up your PC.
If you don’t have either of those, you can make them if you have a USB thumb drive of 16 GB or larger. Having a recovery drive can help you troubleshoot and fix problems with your PC, even if it won’t start. For more info, see Create a USB recovery drive.
If you upgraded your PC to Windows 8.1 or Windows RT 8.1 with a DVD, use that disc. If you don’t have Windows 8.1 or Windows RT 8.1 media, contact Microsoft Support.
Refresh, reset, or restore
Select any of the following for more detailed info.
If your PC isn’t performing as well as it once did, and you don’t know why, you can refresh your PC without deleting any of your personal files or changing your settings.
Note: If you upgraded your PC from Windows 8 to Windows 8.1 and your PC has a Windows 8 recovery partition, refreshing your PC will restore Windows 8. You’ll need to upgrade to Windows 8.1 after the refresh has finished.
Warning: Apps you installed from websites and DVDs will be removed. Apps that came with your PC and apps you installed from Microsoft Store will be reinstalled. Windows puts a list of removed apps on your desktop after refreshing your PC.
To refresh your PC
Swipe in from the right edge of the screen, tap Settings, and then tap Change PC settings.
(If you’re using a mouse, point to the upper-right corner of the screen, move the mouse pointer down, select Settings, and then select Change PC settings.)
Tap or select Update and recovery, and then tap or select Recovery.
Under Refresh your PC without affecting your files, tap or select Get started.
Follow the instructions on the screen.
If you want to recycle your PC, give it away, or start over with it, you can reset it completely. This removes everything and reinstalls Windows.
Note: If you upgraded your PC from Windows 8 to Windows 8.1 and your PC has a Windows 8 recovery partition, resetting your PC will restore Windows 8. You’ll need to upgrade to Windows 8.1 after the reset has finished.
Warning: All of your personal files will be deleted and your settings will be reset. All apps that you installed will be removed. Only apps that came with your PC will be reinstalled.
To reset your PC
Swipe in from the right edge of the screen, tap Settings, and then tap Change PC settings.
(If you’re using a mouse, point to the upper-right corner of the screen, move the mouse pointer down, select Settings, and then select Change PC settings.)
Tap or select Update and recovery, and then tap or select Recovery.
Under Remove everything and reinstall Windows, tap or select Get started.
Follow the instructions on the screen.
Note: You’ll be asked to choose whether you want to erase data quickly or thoroughly. If you choose to erase data quickly, some data might be recoverable using special software. If you choose to erase data thoroughly, this will take longer but it makes recovering data less likely.
If you think an app or driver that you recently installed caused problems with your PC, you can restore Windows back to an earlier point in time, called a restore point. System Restore doesn’t change your personal files, but it might remove recently installed apps and drivers.
System Restore isn’t available for Windows RT 8.1.
Windows automatically creates a restore point when you install desktop apps and new Windows updates, if the last restore point is older than 7 days. You can also create a restore point manually at any time.
To restore your PC to an earlier point in time
Swipe in from the right edge of the screen, and then tap Search.
(If you’re using a mouse, point to the upper-right corner of the screen, move the mouse pointer down, and then select Search.)
Enter Control Panel in the search box, and tap or select Control Panel.
Enter Recovery in the Control Panel search box, and then tap or select Recovery.
Tap or select Open System Restore and then follow the instructions.
If you need additional help refreshing, resetting, or restoring your PC, check out the Repair and Recovery community pages in the Windows forum for solutions that other people have found for problems they’ve experienced.
Источник
14
Руководство пользователя ноутбука
Восстановление ноутбука
Использование раздела восстановления
Раздел восстановления предоставляет возможность быстрого
восстановления программного обеспечения на ноутбуке в его
оригинальное рабочее состояние. Перед использованием раздела
восстановления, скопируйте Ваши данные на USB устройство
или сетевой диск и запишите параметры конфигурации (например
сетевые параметры).
О разделе восстановления
Раздел восстановления — пространство, зарезервированное
на Вашем жестком диске, используемое для восстановления
операционной системы, драйверов и утилит, установленных на
Ваш ноутбук на заводе.
В А Ж Н О ! Н е у д а л я й т е
р а з д е л с н а з в а н и е м
R E C O V E R Y . Р а з д е л
восстановления создан на
заводе и при удалении не
может быть восстановлен
пользователем. Если у Вас есть проблемы с процессом
восстановления, обратитесь в сервис-центр ASUS.
Использование раздела восстановления:
1. Во время загрузки нажмите<F9> (требуется раздел
восстановления).
2. Нажмите <Enter> для выбора Windows Setup <EMS Enabled>.
3. Выберите язык, используемый при восстановлении и нажмите
Далее.
4. Прочитайте ASUS Preload Wizard и нажмите Далее.
5. Выберите раздел и нажмите Далее. Опции раздела:
Recover Windows to first partition only.
Эта опция удалит только первый раздел, позволив Вам сохранить
другие разделы и создаст новый системный раздел как диск “C”.
Recover Windows to entire HD.
Эта опция удалит все разделы на Вашем жестком диске и создаст
новый системный раздел как диск “C”.
ASUS Восстановление ОС используя «скрытый раздел» (F9)
Скрытый раздел, он же раздел восстановления, позволяет восстановить операционную систему, драйверы и утилиты, установленные производителем.
Важно! Рекомендуем предварительно сделать резервную копию личных данных на съёмный носитель, что бы исключить их возможную потерю.
Для того чтобы восстановить ОС необходимо:
1. Включив ноутбук нажать и удерживать кнопку F9;
2. В появившемся меню выбрать пункт Windows Setup [EMS Enabled] и нажать кнопку Enter;
3. Выбрав соответствующий язык (русский) в выпадающем меню нажать Next;
4. Прочитав условия использования данной процедуры нажимаем Далее;
5. Выбрав требуемую опцию восстановления нажимаем Далее (как правило, более оптимально использовать восстановление только на первый раздел);
Код:
     *опции восстановления:
 Recover Windows to first partition only.
Удаление только первого раздела, сохранить при этом другие разделы, и создание нового системного раздела как диск "C".
Recover Windows to entire HD.
Удаление всех разделов на Вашем жестком диске и последующее создание нового системного раздела как диск "C" используя всё пространство HDD.
Recover Windows to entire HD with 2 partition.
Удаление всех разделов на Вашем жестком диске и создание два новых раздела "C" (60%) и "D" (40%).
6. Ещё несколько предупредительных сообщений, нажав Далее и Готово запускаем процесс восстановления;
7. По окончании восстановления появиться соответствующее сообщение где необходимо нажать кнопку ОК;
8. Вновь включаем ноутбук и производим первоначальную настройку системы как при первом включении ноутбука при покупке.
Всем привет тут такое дело угробил я виндовс виста на ноутбуке ASUS F3Tc,
но в комплекте к нему шол диск, Recovery DVD ASUSTeK Computer Inc. и так установил я этот диск в дисковод и перезагрузилса, после этого в низу экрана поевилась полоска загрузки с надписью windows is loading files, как при установке windows, после загрузки поевилось меню.
ASUS Preload
ASUS Preload Wizard
This Recovery Wizard has been programmed to operate only with your ASUS Notebook
Series. IT WILL NOT WORK WITH ANY OTHER COMPUTER SYSTEM.
Please be aware that all software on the Recovery CD is subject to the terms of the
Software license agreements that come with your ASUS Notebook Series. Your use of
This CD means that you agree to all of those license agreement terms.
All your files on the hard disk’s partition(s) will be lost while using the Recovery CD.
ASUSTeK Computer Inc. shall not be liable for any incidental or consequential damages.
и три кнопки BACK NEXT и CANCEL нажал NEXT дальше поевилось меню
ASUS Preload
ASUS Preload Wizard
Select the appropriate option below:
( ) Recover Windows to first partition only.
( ) Recover Windows to entire HD.
( ) Recover Windows to entire HD with 2 partition.
и тагже три кнопки BACK NEXT и CANCEL, незнаю что выбрать плохо знаю английский пожалуйста помогите.
Содержание
- Восстановление ноутбука, Использование раздела восстановления – Инструкция по эксплуатации Asus N53J
- Страница 14
- Что это recover windows to first partition only перевод
- Что это recover windows to first partition only перевод
Восстановление ноутбука, Использование раздела восстановления – Инструкция по эксплуатации Asus N53J
Страница 14
Руководство пользователя ноутбука
Использование раздела восстановления
Раздел восстановления предоставляет возможность быстрого
восстановления программного обеспечения на ноутбуке в его
оригинальное рабочее состояние. Перед использованием раздела
восстановления, скопируйте Ваши данные на USB устройство
или сетевой диск и запишите параметры конфигурации (например
О разделе восстановления
Раздел восстановления — пространство, зарезервированное
на Вашем жестком диске, используемое для восстановления
операционной системы, драйверов и утилит, установленных на
Ваш ноутбук на заводе.
В А Ж Н О ! Н е у д а л я й т е
р а з д е л с н а з в а н и е м
R E C O V E R Y . Р а з д е л
восстановления создан на
заводе и при удалении не
может быть восстановлен
пользователем. Если у Вас есть проблемы с процессом
восстановления, обратитесь в сервис-центр ASUS.
Использование раздела восстановления:
1. Во время загрузки нажмите (требуется раздел
2. Нажмите для выбора Windows Setup .
3. Выберите язык, используемый при восстановлении и нажмите
4. Прочитайте ASUS Preload Wizard и нажмите Далее.
5. Выберите раздел и нажмите Далее. Опции раздела:
Recover Windows to first partition only.
Эта опция удалит только первый раздел, позволив Вам сохранить
другие разделы и создаст новый системный раздел как диск “C”.
Recover Windows to entire HD.
Эта опция удалит все разделы на Вашем жестком диске и создаст
Что это recover windows to first partition only перевод
Сообщения: 189
Откуда: Находка
Репутация:
Всем привет тут такое дело угробил я виндовс виста на ноутбуке ASUS F3Tc,
но в комплекте к нему шол диск, Recovery DVD ASUSTeK Computer Inc. и так установил я этот диск в дисковод и перезагрузилса, после этого в низу экрана поевилась полоска загрузки с надписью windows is loading files, как при установке windows, после загрузки поевилось меню.
ASUS Preload
ASUS Preload Wizard
This Recovery Wizard has been programmed to operate only with your ASUS Notebook
Series. IT WILL NOT WORK WITH ANY OTHER COMPUTER SYSTEM.
Please be aware that all software on the Recovery CD is subject to the terms of the
Software license agreements that come with your ASUS Notebook Series. Your use of
This CD means that you agree to all of those license agreement terms.
All your files on the hard disk’s partition(s) will be lost while using the Recovery CD.
ASUSTeK Computer Inc. shall not be liable for any incidental or consequential damages.
и три кнопки BACK NEXT и CANCEL нажал NEXT дальше поевилось меню
ASUS Preload
ASUS Preload Wizard
Select the appropriate option below:
( ) Recover Windows to first partition only.
( ) Recover Windows to entire HD.
( ) Recover Windows to entire HD with 2 partition.
и тагже три кнопки BACK NEXT и CANCEL, незнаю что выбрать плохо знаю английский пожалуйста помогите.
Репутация:
Сообщения: 189
Откуда: Находка
Репутация:
Сообщения: 19287
Откуда: Пермь
Репутация: 123
Сообщения: 5169
Откуда: Москва
Репутация: 10
Сообщения: 19287
Откуда: Пермь
Репутация: 123
Сообщения: 5169
Откуда: Москва
Репутация: 10
U-Nick
Ну, если есть куда выложить 180Мб, могу дать свой конструктор — BartPE с любимыми прогами.
Подключение и правка реестра другой копии ОС:
- Открыть редактор реестра regedit.exe.
Встать на ветку HKEY_LOCAL_MACHINE или HKEY_USERS.
Файл —> Загрузить куст.
Выбрать файл реестра в папке WindowsSystem32Config (System и/или Software).
Дать ему произвольное название для подключения.
Найти и исправить ключ.
Выгрузить куст.
Сообщения: 19287
Откуда: Пермь
Репутация: 123
Сообщения: 5169
Откуда: Москва
Репутация: 10
Цитата: А вот списочек любимых пр0г — эт интересно.
Легко
7Tools Partition Manager 2005
Acronis Disk Director
AkelPad
AusLogics DiskDefrag
AVZ
Beyond Compare
CureIt
Easy Recovery
ERDCommander 2005
Everest
FAR
Firefox
Foxit Reader
FreeCommander
Irfan View
LoadHive
Monitor Tests
NikFileTree
Office Viewers
PhotoFiltre
RegShot
ResHacker
Salamander
SnM
Socrat
The Bee
Total Commander
WinHex
WinRAR
Xplorer2
Сообщения: 19287
Откуда: Пермь
Репутация: 123
Сообщения: 5169
Откуда: Москва
Репутация: 10
Сообщения: 19287
Откуда: Пермь
Репутация: 123
Сообщения: 5169
Откуда: Москва
Репутация: 10
Цитата: Ссылочку на LockSmith подкинь.
Сообщения: 19287
Откуда: Пермь
Репутация: 123
Репутация:
Sergey-MRS писал(а): Всем привет тут такое дело угробил я виндовс виста на ноутбуке ASUS F3Tc,
но в комплекте к нему шол диск, Recovery DVD ASUSTeK Computer Inc. и так установил я этот диск в дисковод и перезагрузилса, после этого в низу экрана поевилась полоска загрузки с надписью windows is loading files, как при установке windows, после загрузки поевилось меню.
ASUS Preload
ASUS Preload Wizard
This Recovery Wizard has been programmed to operate only with your ASUS Notebook
Series. IT WILL NOT WORK WITH ANY OTHER COMPUTER SYSTEM.
Please be aware that all software on the Recovery CD is subject to the terms of the
Software license agreements that come with your ASUS Notebook Series. Your use of
This CD means that you agree to all of those license agreement terms.
All your files on the hard disk’s partition(s) will be lost while using the Recovery CD.
ASUSTeK Computer Inc. shall not be liable for any incidental or consequential damages.
и три кнопки BACK NEXT и CANCEL нажал NEXT дальше поевилось меню
ASUS Preload
ASUS Preload Wizard
Select the appropriate option below:
( ) Recover Windows to first partition only.
( ) Recover Windows to entire HD.
( ) Recover Windows to entire HD with 2 partition.
и тагже три кнопки BACK NEXT и CANCEL, незнаю что выбрать плохо знаю английский пожалуйста помогите.
Использование раздела восстановления: (как восстановить систему на ноутбуке asus; asus recovery; asus recovery раздел)
1. Во время загрузки нажмите (требуется раздел восстановления).
2. Нажмите для выбора Windows Setup .
3. Прочитайте ASUS Preload Wizard и нажмите Next.
4. Выберите раздел и нажмите Next. Опции раздела:
Recover Windows to first partition only.
Эта опция удалит только первый раздел, позволив Вам сохранить другие разделы и создаст новый системный раздел как диск «C».
Recover Windows to entire HD.
Эта опция удалит все разделы на Вашем жестком диске и создаст новый системный раздел как диск «C».
Recover Windows to entire HD with 2 partition.
Эта опция удалит все разделы на Вашем жестком диске и создаст два новых раздела «C» (60%) и «D» (40%).
5. Следуйте инструкциям на экране для завершения процесса.
Что это recover windows to first partition only перевод

Взял новую модельку от ASUS Zenbook U500VZ.
Готов ответить на все вопросы.
На выставке IFA компания ASUS представила инновационные мобильные компьютеры ZENBOOK U500VZ.
ASUS ZENBOOK U500VZ. ASUS ZENBOOK U500VZ является реальным свидетельством того, что ультракомпактный ноутбук может быть высокопроизводительным без каких-либо компромиссов с точки зрения форм-фактора. Обладая тонким (не более 19,7 мм) алюминиевым корпусом с отличительным дизайном, ZENBOOK U500VZ может похвастаться такими мощными компонентами как четырехъядерный процессор Intel Core i7 третьего поколения и видеокарта NVIDIA GeForce GT650M. Дисковая подсистема ASUS ZENBOOK U500VZ может быть представлена как гибридным решением (500Гб HDD + 128Гб SSD), так и RAID 0 массивом из двух твердотельных накопителей общим объёмом 512Гб. За оптимальный же расход заряда аккумулятора отвечает технология ASUS Super Hybrid Engine II.
15-дюймовый дисплей этого ультра компактного ноутбука прекрасно подходит и для работы, и для развлечений, причем IPS-панель обеспечивает великолепные углы обзора, а антибликовое покрытие способствует комфорту для глаз. Полноразмерная клавиатура снабжена подсветкой, яркость которой изменяется в зависимости от внешнего освещения.
Как ожидается, ноутбук ASUS ZENBOOK U500VZ появится на российском рынке в конце сентября и будет продаваться по цене от 77 000 рублей
Ссылка на официальный сайт ASUS Zenbook — [url=»http://zenbook.asus.com/zenbook/»]http://zenbook.asus.com/zenbook/[/url
Производитель ASUS
Ссылка на производителя www.asus.ru.
Установленная ОС Win 8
Тип ноутбук
Гарантия производителя 2 года
Код производителя 90NWOG212W11C35853AY
Цвет Серый
Ultrabook Да
Процессор Intel Core i7
Частота процессора, МГц 2100 MHz
Код процессора 3612QM
Количество ядер процессора 4
Объем кэша L2 6 Мб
Размер экрана, дюйм 15.6 »
Разрешение экрана 1920×1080
Широкоформатный экран Да
Тип экрана матовый
Светодиодная подсветка экрана Да
IPS матрица Да
Оперативная память, Мб 8192 Mb
Тип памяти DDR3
Частота памяти 1600 МГц
Тип видеокарты дискретный и встроенный
Производитель видеокарты NVIDIA
Чипсет графического контроллера NVIDIA GeForce GT 650M
Два видеоадаптера Да
Размер видеопамяти, Мб 2048
Тип видеопамяти GDDR5
Размер жесткого диска, Гб 512 Гб
Твердотельный диск (SSD) Да
Оптический привод DVD нет
Устройство для чтения флэш-карт Да
Wi-Fi Да
Bluetooth Да
Версия Bluetooth 4.0
Встроенная сетевая карта Да
Количество интерфейсов USB 2.0 1
Количество интерфейсов USB 3.0 1
Выход mini VGA Да
Выход micro HDMI Да
Вход микрофонный Да
Выход аудио/наушники Да
Комплект поставки Клавиатура с подсветкой, чехол
Устройства позиционирования Touchpad
Веб-камера Да
Количество пикселов веб-камеры 1.3 млн пикс.
Слот блокировки Да
Время работы, ч 8 ч
Емкость аккумулятора 6840 мА/ч
Количество ячеек батареи 4 шт
Тип аккумулятора Li-Ion
Длина 223 мм
Ширина 325 мм
Толщина 17 мм
Вес 1300 г

[attachment=»2206560:6e726dee. f250e
33f.jpg»]


1. Есть два варианта, WinFlash от Asus под Windows или F2 при включении компьютера, далее в БИОСе выбираем Easy Flash, предварительно вставляем флешку с файликом в разъем. Я пользуюсь прошивальщиком через БИОС, не доверяю Window’ым, хотя файлик прикладываю.
 WinFlash_Win8_64_Z2411.zip ( 364,59 КБ )
Спасибо пользователю eldreamer
1. Строго перед включением:
Внешний осмотр «пациента»:
а) На черной коробке должна быть не вскрытая пленка (вскрытый брать за такие $$$ не рекомендую,- можно напороться на возврат).
б) Если магазин небольшой и он там один, и продавец божится, что новый:
— убедится в отсутствии множественных отпечатков пальцев (новый, по определению не должен быть «заляпан»)
— убедится в том, что аппарат не прогружен (при Вас делается первая загрузка системы).
в) Проверить равномерность щелей по периметру в закрытом и открытом состоянии (в районе петель тоже).
г) Проверить работу петель
д) Проверить отсутствие слишком больших щелей между экраном и окантовывающей его рамкой (иногда отходит от матрицы).
е) тачпад должен быть чуть ниже общего уровня. Левый нижний угол может слегка быть выше (см. мои посты в теме),- в этом случае нажатия на левую и правую кнопку тачпада должны вызывать одинаковые тактильные ощущения. (На самом деле она там одна и расположена по центру внизу, но нажимать надо именно по краям).
ж) понажимать на все клавиши.
з) отсутствие сколов и царапин (иначе в случае чего не вернете никогда).
2. После включения и прогрузки:
а) Проверить равномерность «вставки» матрици экрана относительно рамки (по крайним рядам пикселей). Видел перекошенную.
б) тест на битые (не горящие) или постоянно светящиеся пиксели на всех цветах заливки на максимальной яркости. (По умолчанию, даже если нажимать на fn+F6 и ползунок будет «на потолке», яркость будет всего
40%. Как сделать 100% уже писал в этой теме). Программа для проверки — tfttest. По картинке в jpeg — не советую.
в) равномерность заливки (она же равномерность подсветки, лучше на белом или сером). Теоретически можете проверить засветы по краям и углам экрана на черной заливке при максимальной яркости. Практически в магазине это сделать не удастся, т.к. там обычно очень яркий свет.
г) отсутствие хрипов динамиков с обеих сторон (звук у сабжа не плох).
д) подсветку клавы
е) соответствие объема SSD, типа Windows 8 (обычная или Pro), объема памяти заявленным (если был распечатан).
ж) в конце перезагрузка и еще раз на пиксели (это не прихоть, в большинстве случаев, если экран долго работал и битых нет,- то их и не будет).
з) если продавец «еще жив», можете еще что-нибудь проверить на свое усмотрение. Например коплектацию, работу саббуфера и прочее.
3. Если что-то не устроило — НЕ БРАТЬ!
Спасибо пользователю Sparta
Цитата(Agent69 @ 18.01.2013, 18:36) *
Был сейчас в магазе Асус, смотрел сабж в живую.
Мне тупо не хватает яркости, выкрутил все на максимум, толку ноль.
Продавцы — ЛОХИ.
Когда мне его включили продавец-консультант (откуда только таких на работу берут!) тоже долго не мог понять, почему яркость на максимуме, а экран тусклый (даже фонариком в датчик освещенности светить стал). 😀
Пока я его не отодвинул и не настроил в одном «волшебном» месте всё сам, а именно:
По умолчанию включена «адаптивная регулировка яркости», ее надо отключить и экран тут же станет ярким, как полуденное солнце!
Где?- Здесь:
Настройки —> Управление электропитанием —> в том месте, где стоит галочка: Настройка схемы электропитания —> Изменить дополнительные параметры питания —> Экран —> Включить адаптивную регулировку яркости —> От батареи (а заодно и От сети) —> Выкл.
Всё. И делов-то. :rolleyes:
Так что возвращайтесь в магазин, и заклеймите «позором и нехорошими словами» консультанта, который не прошел прошлый раз тест на проф-пригодность. >-)
На этой странице уже писал: Яркость у меня — 348 cd/m2. Куда больше-то.
У ретины и то меньше!
Сегодня впервые попробовал установить на наш ноутбук программу NoteBook FanControl (NBFC).
Это просто чудо а не программа! С ней в комплекте сразу идет набор готовых конфигурационных файлов под разные ноуты, в том числе и под наш UX51VZA. В каждом конфигурационном файле уже сделаны наиболее оптимальные настройки политики работы вентиляторов под каждую конкретную модель ноутбука. Программу можно установить в автозагрузку и забыть о ней, а заодно и о шуме вентиляторов. До 50С вентиляторы вообще стоят, и можно серфить в инете или работать в Exel и других офисных программах при полной тишине. Я никогда не думал, что все так просто и классно.
https://skydrive.live.com/?cid=6c34bd33ac55. APNc-4e4i7-KxOw
Качать последнюю версию 0.14.4.60 beta. Конфигурационный файл под наш UX51VZA идет в комплекте. Программа умная, и при установке сразу сама выберет его. Настраивать ничего не нужно, просто после установки поместить ярлык программы в автозагрузку.
Спасибо Klem66
Небольшой FAQ по настройке программы NoteBook Fan Control
Немножко подробнее о NoteBook Fan Control.
После запуска и выбора профиля UX51VZA в открывшемся окне ставим AutoFan Control — Enabled.
Видим термальную таблицу, заданную по умолчанию для нашего ноута автором программы.
Программа контролирует температуру процессора. Судя по опыту, северный мост слегка горячее, дискретная видеокарта — холоднее (даже в играх).
При желании таблицу можно подкорректировать. Для этого выбираем в таблице нужный пункт, задаем верхнее и нижнее пороговые значения температур,
задаем обороты вентиляторов в процентах от максимальных ползунком вверху и жмем кнопку «обновить» (над таблицей справа).
Если нужно добавить строку в таблицу, сначала задаем все параметры, потом жмем кнопку «+».
Я поставил 50-0 — 0%; 55-50 — 14,3%; 60-55 — 28,6%; 65-60 — 42,9%, далее по усмотрению БИОС (устанавливается ползунком оборотов вентиляторов, перемещенным в крайнее положение).
Что означают цифры в таблице? Скажем, 55-50 — 14,3% — имеется в виду, что начиная с 55 градусов вентиляторы работают на оборотах 14,3% от максимальных,
а при достижении 50 градусов переходит на меньший уровень (50-0; в данном случае — отключается). Если 60-55 — начиная с 60 градусов обороты — 28,6%, при охлаждении до 55 осуществляется
переход на меньший уровень (55-50; 14,3%). С остальными режимами аналогично.
При включении программы появляется значок в трее (отображающий температуру процессора). Нажав на него правой кнопкой, проверьте отмечен ли флажком пункт «Start with Windows» (автозагрузка).
По умолчанию (с заводской термальной таблицей) скорость вентиляторов ниже 25% не опускалась, а это довольно шумно.
Благодаря использованию этой программы в режиме простоя (и при небольшой нагрузке) ноут успешно охлаждается пассивным образом.
Сообщение отредактировал stp101 — 24.05.18, 17:03
Adblock
detector
Поскольку ПК приобретается раз в несколько лет, а его комплектующие периодически заменяются, программные и аппаратные компоненты порой плохо соответствуют друг другу. Сам ПК может быть достаточно старым, но вы укомплектовали его современным SSD. Уже не первый год доступна Windows 10, а вы до сих пор отдаете предпочтение привычной «семерке».
Помимо таких заметных каждому вещей, как производительность процессора и интерфейс ПО, есть значимые характеристики, которые начинают представлять интерес только в тех случаях, когда становятся причиной сбоев.
К ним относится и формат таблиц разделов HDD или SSD. Вы могли и не слышать о существовании характеристики накопителя, которая неожиданно огорчила, препятствуя установке Windows 7, 10 или 8.
ПК «говорит», что установка Windows невозможна. Причина: таблица разделов диска — GPT или MBR. Увы, технологии прошлого не всегда «дружат» с современными. К счастью, это легко исправимо.

Не получается поставить ОС на GPT-диск. Решения, которые помогут
Содержание
- Не получается поставить ОС на GPT-диск. Решения, которые помогут
- Настоящее (UEFI и GPT) и прошлое (BIOS и MBR)
- Выбор метода
- Помните:
- BIOS или UEFI
- Чаще всего не получается установить Windows 7
- Преобразование GPT в MBR
- Невозможно поставить ОС на диск с MBR-разделами
- Преобразование MBR в GPT. Вся информация будет удалена
- Как не потерять данные при преобразовании
- Как обойтись без преобразования
Существуют две возможности:
- Установка ОС на диск GPT.
- Преобразование в MBR.
Настоящее (UEFI и GPT) и прошлое (BIOS и MBR)
Раньше материнская плата ПК оснащалась ПО BIOS. Оно осуществляло диагностику и анализ железа, а затем загружало ОС, опираясь на загрузочную запись раздела MBR.

В более современных моделях роль BIOS выполняет UEFI. Загружается быстрее и поддерживает:
- Безопасную загрузку.
- HDD, зашифрованные на аппаратном уровне.
- Драйвера UEFI.
- GPT-диски.

GPT превосходит MBR по важным параметрам:
- Работает с HDD большего объема.
- Большее число разделов на HDD.
Выбор метода
Пытаться все же установить систему на «несовместимый HDD» или преобразовать его в MBR и тем самым сделать так, что ошибка больше появляться не будет. В каждом случае решение зависит от ряда факторов:
- Для старого ПК со старомодным BIOS и 32-битным процессором оптимальным решением будет преобразование GPT в MBR.
- Обладателям ПК с 64-битным процессором и UEFI предпочтительно установить систему на GPT-диск.
Помните:
- Предельный объем MBR-диска — 2 терабайта.
- Возможность создания на MBR-диске более четырех разделов затруднено.
BIOS или UEFI
Когда вы заходите в BIOS и видите старомодный синий экран — перед вами традиционный BIOS. Если интерфейс с современной графикой и поддержкой мыши — это UEFI.
Чаще всего не получается установить Windows 7
Сложности с установкой системы на GPT-диск с большей вероятностью возникают у пользователей, которые предпочитают Windows 7.
Для установки Windows на диск со стилем разделов GPT необходимо соблюсти два условия:
- 64-битная ОС.
- Загрузка в режиме EFI.
Исхожу из того, что вы устанавливаете 64-битную версию Windows. Это означает, что сообщение об ошибке появляется по причине несоответствия второму требованию.
Не исключено, что будет достаточно поменять настройки BIOS. Зайдите в него, нажав предусмотренную для этого клавишу. Вы увидите, какую клавишу нажимать в процессе загрузки компьютера. В ноутбуках чаще всего применяется F2, в настольных моделях — Delete.
Поменяйте загрузку CSM (Compatibility Support Mode) на UEFI.
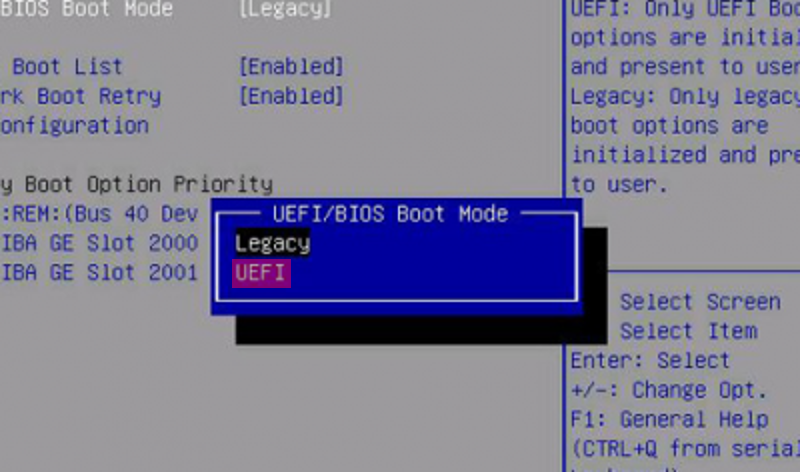
Ищите в разделах «BIOS Setup», «BIOS Features» или подобных по смыслу. В SATA определите режим AHCI, а не IDE.

Для седьмой (и еще более древних) версий Windows нужно также выключить Secure Boot.

BIOS вашей модели компьютера может выглядеть иначе. Названия пунктов меню также могут быть другими. Но смысл всегда сохраняется.
После изменения и сохранения вами новых параметров BIOS у вас появится возможность установки системы на GPT-диск. Если вы устанавливаете ОС с DVD, то сообщение об ошибке при повторной попытке установки, скорее всего, не появится.
В случае установки с USB-накопителя сообщение может отобразиться опять. В этой ситуации необходимо пересоздать установочную флешку таким образом, чтобы она поддерживала загрузку UEFI.
Не забудьте подписаться на наш Дзен
Если накопителем поддерживаются два метода загрузки, удалите файл «bootmgr» в корневой директории флешки. Тем самым вы предотвратите возможность загрузки в режиме BIOS. Если нужна загрузка в режиме BIOS, удалите каталог «efi». Не делайте этого в тех случаях, когда есть хоть малейшие сомнения. Можно повредить дистрибутив.
Преобразование GPT в MBR
Если вы располагаете ПК с классическим BIOS и собираетесь поставить Windows 7, этот вариант будет лучшим (и, возможно, единственным). В процессе преобразования вся информация с накопителя будет удалена.
Во время работы мастера установки ОС нажмите F10 и Shift. В некоторых моделях ноутбуков — F10, Fn и Shift. В открывшейся командной строке последовательно введите такие команды:
— diskpart
— list disk (запишите номер подлежащего преобразованию диска)
— select disk N (вместо N — записанный номер)
— clean (команда очистит диск)
— convert mbr
— create partition primary
— active
— format fs=ntfs quick (быстрое форматирование в файловой системе NTFS)
— assign
— exit

Невозможно поставить ОС на диск с MBR-разделами
Вероятна обратная ситуация. Появляется ошибка:
«Установка Windows на данный диск невозможна. На выбранном диске находится таблица MBR-разделов. В системах EFI Windows можно установить только на GPT-диск»
Она означает, что вы пытаетесь установить систему с DVD или USB-накопителя в режиме EFI. Таблица разделов HDD или SSD старая — MBR. В этом случае вы можете:
- Преобразовать SSD или HDD в GPT.
- В UEFI или BIOS поменять установленный способ загрузки с Legacy на EFI.
Первый вариант предпочтительнее, поскольку проще и быстрее. Помните, что информация со всех разделов накопителя будет полностью потеряна.
Преобразование MBR в GPT. Вся информация будет удалена
В установщике системы запустите командную строку:
- F10 и Shift (на настольных ПК).
- F10, Fn и Shift (на некоторых ноутбуках).
В открывшемся окне:
- Последовательно вводите показанные команды.
- Нажимайте Enter после ввода каждой из них.
Последовательность команд:
— diskpart
— list disk (запишите номер подлежащего преобразованию диска)
— select disk N (вместо N — записанный номер)
— clean (команда очистит диск)
— convert gpt
— exit

Когда команды применены:
- Закройте окно командной строки.
- Нажмите «Обновить» в окне выбора разделов.
- Нажмите «Создать» для формирования нескольких разделов на HDD или SSD.
- Выберите свободное пространство и запустите установку ОС.

Более простой способ преобразования с потерей информации на накопителе:
- Удалите все разделы на HDD или SSD.
- Выберите свободное пространство.
- Нажмите «Далее».
Результатом ваших действий станет автоматическое преобразование в GPT. Следующим шагом стартует установка ОС.
Как не потерять данные при преобразовании
Используйте стороннюю утилиту Minitool Partition Wizard Bootable. Скачайте ISO-образ и запишите его на флешку, отформатированную в FAT32. Необходимые условия:
- Используется загрузка EFI.
- В BIOS выключена функция «Secure Boot».
Загрузите ПК с созданного вами накопителя. В окне программного инструмента:
- Выберите HDD или SSD таблицу разделов которого нужно преобразовать.
- В левой части окна программы выберите пункт «Convert MBR Disk to GPT Disk».
- Примените изменения нажатием кнопки «Apply».
- Дайте положительный ответ на предупреждение утилиты.
- Ждите завершения преобразования. Время, которое потребуется, зависит от объема накопителя и занятого пространства на нем.

Если диск системный, может появиться сообщение о том, что его преобразование невозможно. Чтобы все же преобразовать его:
- Выберите раздел загрузчика ОС, который располагается в самом начале.
- Удалите его, нажав «Delete» и подтвердив действие кнопкой «Apply». Вместо него вы можете тут же создать новый раздел загрузчика, но уже в файловой системе FAT32.
- Повторите действия для преобразования таблицы разделов.
Как обойтись без преобразования
Зайдите в BIOS и установите режим загрузки CSM (Compatibility Support Mode) или Legacy, отключив EFI. Отключите «Secure Boot».
Ранее я подробно рассмотрел процессы чистой установки Windows 10 и Windows 7.
Какие другие затруднения возникали у вас при установке Windows?