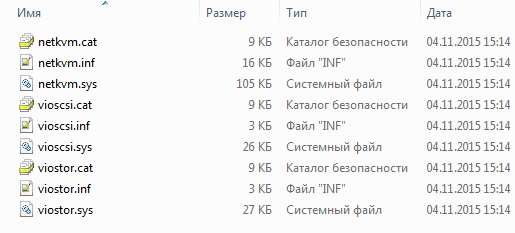
To use Microsoft Windows as the guest operating system in your virtual machines (VMs) on a RHEL 9 host, Red Hat recommends taking extra steps to ensure these VMs run correctly.
For this purpose, the following sections provide information on installing and optimizing Windows VMs on the host, as well as installing and configuring drivers in these VMs.
20.1. Installing Windows virtual machines
You can create a fully-virtualized Windows machine on a RHEL 9 host, launch the graphical Windows installer inside the virtual machine (VM), and optimize the installed Windows guest operating system (OS).
To create the VM and to install the Windows guest OS, use the virt-install command or the RHEL 9 web console.
Prerequisites
-
A Windows OS installation source, which can be one of the following, and be available locally or on a network:
- An ISO image of an installation medium
- A disk image of an existing VM installation
-
A storage medium with the KVM
virtiodrivers.To create this medium, see Preparing virtio driver installation media on a host machine.
-
If you are installing Windows 11, the
edk2-ovmf,swtpmandlibtpmspackages must be installed on the host.
Procedure
-
Create the VM. For instructions, see Creating virtual machines, but keep in mind the following specifics.
-
If using the
virt-installutility to create the VM, add the following options to the command:-
The storage medium with the KVM
virtiodrivers. For example:--disk path=/usr/share/virtio-win/virtio-win.iso,device=cdrom -
The Windows version you will install. For example, for Windows 10 and 11:
--os-variant win10For a list of available Windows versions and the appropriate option, use the following command:
# osinfo-query os -
If you are installing Windows 11, enable Unified Extensible Firmware Interface (UEFI) and virtual Trusted Platform Module (vTPM):
--boot uefi
-
-
If using the web console to create the VM, specify your version of Windows in the Operating system field of the Create new virtual machine window.
- If you are installing Windows versions prior to Windows 11 and Windows Server 2022, start the installation by clicking Create and run.
-
If you are installing Windows 11, or you want to use additional Windows Server 2022 features, confirm by clicking Create and edit and enable UEFI and vTPM using the CLI:
-
Open the VM’s XML configuration:
# virsh edit windows-vm -
Add the
firmware='efi'option to theoselement:<os firmware='efi'> <type arch='x86_64' machine='pc-q35-6.2'>hvm</type> <boot dev='hd'/> </os> -
Add the
tpmdevice inside thedeviceselement:<devices> <tpm model='tpm-crb'> <backend type='emulator' version='2.0'/> </tpm> </devices>
- Start the Windows installation by clicking Install in the Virtual machines table.
-
-
-
Install the Windows OS in the VM.
For information on how to install a Windows operating system, refer to the relevant Microsoft installation documentation.
- If using the web console to create the VM, attach the storage medium with virtio drivers to the VM using the Disks interface. For instructions, see Attaching existing disks to virtual machines using the web console.
-
Configure KVM
virtiodrivers in the Windows guest OS. For details, see Installing KVM paravirtualized drivers for Windows virtual machines.
Additional resources
- Optimizing Windows virtual machines
- Enabling standard hardware security on Windows virtual machines
- Enabling enhanced hardware security on Windows virtual machines
- Sample virtual machine XML configuration
20.2. Optimizing Windows virtual machines
When using Microsoft Windows as a guest operating system in a virtual machine (VM) hosted in RHEL 9, the performance of the guest may be negatively impacted.
Therefore, Red Hat recommends optimizing your Windows VMs by doing any combination of the following:
- Using paravirtualized drivers. For more information, see Installing KVM paravirtualized drivers for Windows virtual machines.
- Enabling Hyper-V enlightenments. For more information, see Enabling Hyper-V enlightenments.
- Configuring NetKVM driver parameters. For more information, see Configuring NetKVM driver parameters.
- Optimizing or disabling Windows background processes. For more information, see Optimizing background processes on Windows virtual machines.
20.2.1. Installing KVM paravirtualized drivers for Windows virtual machines
The primary method of improving the performance of your Windows virtual machines (VMs) is to install KVM paravirtualized (virtio) drivers for Windows on the guest operating system (OS).
To do so:
- Prepare the install media on the host machine. For more information, see Preparing virtio driver installation media on a host machine.
- Attach the install media to an existing Windows VM, or attach it when creating a new Windows VM.
-
Install the
virtiodrivers on the Windows guest OS. For more information, see Installing virtio drivers on a Windows guest.
20.2.1.1. How Windows virtio drivers work
Paravirtualized drivers enhance the performance of virtual machines (VMs) by decreasing I/O latency and increasing throughput to almost bare-metal levels. Red Hat recommends that you use paravirtualized drivers for VMs that run I/O-heavy tasks and applications.
virtio drivers are KVM’s paravirtualized device drivers, available for Windows VMs running on KVM hosts. These drivers are provided by the virtio-win package, which includes drivers for:
- Block (storage) devices
- Network interface controllers
- Video controllers
- Memory ballooning device
- Paravirtual serial port device
- Entropy source device
- Paravirtual panic device
- Input devices, such as mice, keyboards, or tablets
- A small set of emulated devices
Using KVM virtio drivers, the following Microsoft Windows versions are expected to run similarly to physical systems:
- Windows Server versions: See Certified guest operating systems for Red Hat Enterprise Linux with KVM in the Red Hat Knowledgebase.
-
Windows Desktop (non-server) versions:
- Windows 10 (32-bit and 64-bit versions)
- Windows 11 (64-bit)
20.2.1.2. Preparing virtio driver installation media on a host machine
To install or update KVM virtio drivers on a Windows virtual machine (VM), you must first prepare the virtio driver installation media on the host machine. To do so, attach the .iso file, provided by the virtio-win package, as a storage device to the Windows VM.
Prerequisites
- Ensure that virtualization is enabled in your RHEL 9 host system. For more information, see Enabling virtualization.
- Ensure that you have root access privileges to the VM.
Procedure
-
Refresh your subscription data:
# subscription-manager refresh All local data refreshed -
Get the latest version of the
virtio-winpackage.-
If
virtio-winis not installed:# dnf install -y virtio-win -
If
virtio-winis installed:# dnf upgrade -y virtio-win
If the installation succeeds, the
virtio-windriver files are available in the/usr/share/virtio-win/directory. These includeISOfiles and adriversdirectory with the driver files in directories, one for each architecture and supported Windows version.# ls /usr/share/virtio-win/ drivers/ guest-agent/ virtio-win-1.9.9.iso virtio-win.iso -
-
Attach the
virtio-win.isofile as a storage device to the Windows VM.-
When creating a new Windows VM, attach the file using the
virt-installcommand options. -
When installing the drivers on an existing Windows VM, attach the file as a CD-ROM using the
virt-xmlutility:# virt-xml WindowsVM --add-device --disk virtio-win.iso,device=cdrom Domain 'WindowsVM' defined successfully.
-
When creating a new Windows VM, attach the file using the
20.2.1.3. Installing virtio drivers on a Windows guest
To install KVM virtio drivers on a Windows guest operating system (OS), you must add a storage device that contains the drivers — either when creating the virtual machine (VM) or afterwards — and install the drivers in the Windows guest OS.
This example shows how to install the drivers using the graphical interface. You can also use the Microsoft Windows Installer (MSI) command line interface.
Prerequisites
-
An installation medium with the KVM
virtiodrivers must be attached to the VM. For instructions on preparing the medium, see Preparing virtio driver installation media on a host machine.
Procedure
-
In the Windows guest OS, open the
File Explorerapplication. -
Click
This PC. -
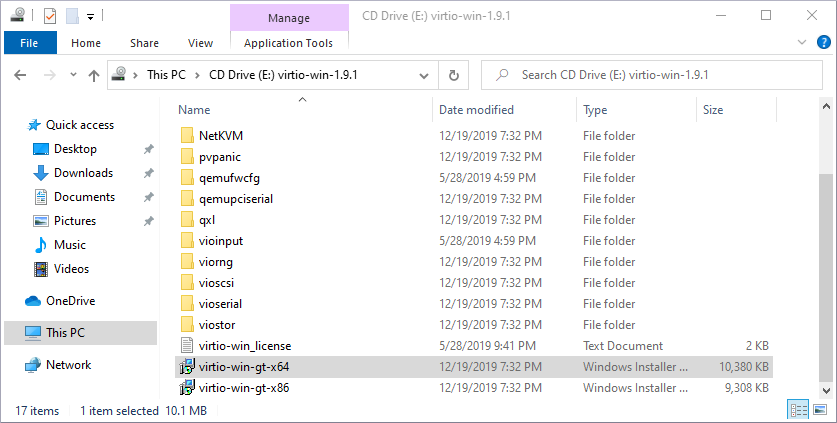
In the
Devices and drivespane, open thevirtio-winmedium. -
Based on the architecture of the VM’s vCPU, run one of the installers on the medium.
-
If using a 32-bit vCPU, run the
virtio-win-gt-x86installer. -
If using a 64-bit vCPU, run the
virtio-win-gt-x64installer.
-
If using a 32-bit vCPU, run the
-
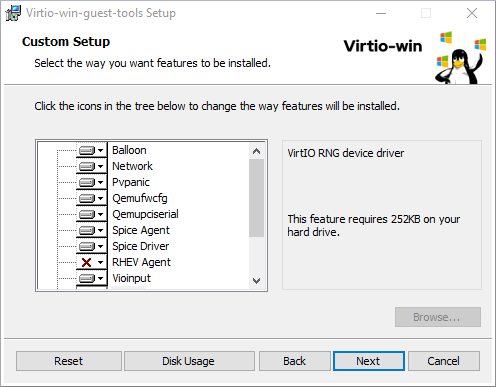
In the
Virtio-win-guest-toolssetup wizard that opens, follow the displayed instructions until you reach theCustom Setupstep. - In the Custom Setup window, select the device drivers you want to install. The recommended driver set is selected automatically, and the descriptions of the drivers are displayed on the right of the list.
- Click next, then click Install.
- After the installation completes, click Finish.
- Reboot the VM to complete the driver installation.
Verification
-
In
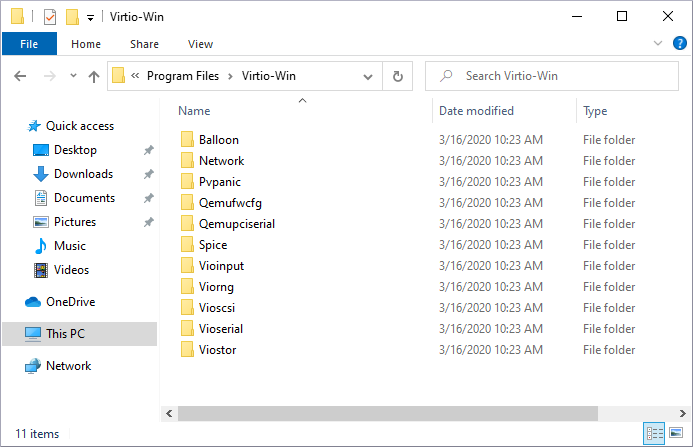
This PC, open the system disk. This is typically(C:). -
In the
Program Filesdirectory, open theVirtio-Windirectory.If the
Virtio-Windirectory is present and contains a sub-directory for each of the selected drivers, the installation was successful.
Next steps
- If you install the NetKVM driver, you may also need to configure the Windows guest’s networking parameters.
20.2.1.4. Updating virtio drivers on a Windows guest
To update KVM virtio drivers on a Windows guest operating system (OS), you can use the Windows Update service, if the Windows OS version supports it. If it does not, reinstall the drivers from virtio driver installation media attached to the Windows virtual machine (VM).
Prerequisites
- A Windows guest OS with virtio drivers installed.
-
If not using
Windows Update, an installation medium with up-to-date KVMvirtiodrivers must be attached to the Windows VM. For instructions on preparing the medium, see Preparing virtio driver installation media on a host machine.
Procedure 1: Updating the drivers using Windows Update
On Windows 10, Windows Server 2016 and later operating systems, check if the driver updates are available using the Windows Update graphical interface:
- Start the Windows VM and log in to its guest OS.
-
Navigate to the Optional updates page:
Settings → Windows Update → Advanced options → Optional updates
- Install all updates from Red Hat, Inc.
Procedure 2: Updating the drivers by reinstalling them
On operating systems prior to Windows 10 and Windows Server 2016, or if the OS does not have access to Windows Update, reinstall the drivers. This restores the Windows guest OS network configuration to default (DHCP). If you want to preserve a customized network configuration, you also need to create a backup and restore it using the netsh utility:
- Start the Windows VM and log in to its guest OS.
-
Open the Windows Command Prompt:
- Use the Super+R keyboard shortcut.
-
In the window that appears, type
cmdand press Ctrl+Shift+Enter to run as administrator.
-
Back up the OS network configuration using the Windows Command Prompt:
C:WINDOWSsystem32netsh dump > backup.txt -
Reinstall KVM
virtiodrivers from the attached installation media. Do one of the following:-
Reinstall the drivers using the Windows Command Prompt, where X is the installation media drive letter. The following commands install all
virtiodrivers.-
If using a 64-bit vCPU:
C:WINDOWSsystem32msiexec.exe /i X:virtio-win-gt-x64.msi /passive /norestart -
If using a 32-bit vCPU:
C:WINDOWSsystem32msiexec.exe /i X:virtio-win-gt-x86.msi /passive /norestart
-
- Reinstall the drivers using the graphical interface without rebooting the VM.
-
-
Restore the OS network configuration using the Windows Command Prompt:
C:WINDOWSsystem32netsh -f backup.txt - Reboot the VM to complete the driver installation.
20.2.2. Enabling Hyper-V enlightenments
Hyper-V enlightenments provide a method for KVM to emulate the Microsoft Hyper-V hypervisor. This improves the performance of Windows virtual machines.
The following sections provide information about the supported Hyper-V enlightenments and how to enable them.
20.2.2.1. Enabling Hyper-V enlightenments on a Windows virtual machine
Hyper-V enlightenments provide better performance in a Windows virtual machine (VM) running in a RHEL 9 host. For instructions on how to enable them, see the following.
Procedure
-
Use the
virsh editcommand to open the XML configuration of the VM. For example:# virsh edit windows-vm -
Add the following
<hyperv>sub-section to the<features>section of the XML:<features> [...] <hyperv> <relaxed state='on'/> <vapic state='on'/> <spinlocks state='on' retries='8191'/> <vpindex state='on'/> <runtime state='on' /> <synic state='on'/> <stimer state='on'> <direct state='on'/> </stimer> <frequencies state='on'/> <reset state='on'/> <relaxed state='on'/> <time state='on'/> <tlbflush state='on'/> <reenlightenment state='on'/> <stimer_direct state='on'/> <ipi state='on'/> <crash state='on'/> <evmcs state='on'/> </hyperv> [...] </features>If the XML already contains a
<hyperv>sub-section, modify it as shown above. -
Change the
clocksection of the configuration as follows:<clock offset='localtime'> ... <timer name='hypervclock' present='yes'/> </clock>
- Save and exit the XML configuration.
- If the VM is running, restart it.
Verification
-
Use the
virsh dumpxmlcommand to display the XML configuration of the running VM. If it includes the following segments, the Hyper-V enlightenments are enabled on the VM.<hyperv> <relaxed state='on'/> <vapic state='on'/> <spinlocks state='on' retries='8191'/> <vpindex state='on'/> <runtime state='on' /> <synic state='on'/> <stimer state='on'/> <frequencies state='on'/> <reset state='on'/> <relaxed state='on'/> <time state='on'/> <tlbflush state='on'/> <reenlightenment state='on'/> <stimer state='on'> <direct state='on'/> </stimer> <ipi state='on'/> <crash state='on'/> <evmcs state='on'/> </hyperv> <clock offset='localtime'> ... <timer name='hypervclock' present='yes'/> </clock>
20.2.2.2. Configurable Hyper-V enlightenments
You can configure certain Hyper-V features to optimize Windows VMs. The following table provides information about these configurable Hyper-V features and their values.
Table 20.1. Configurable Hyper-V features
| Enlightenment | Description | Values |
|---|---|---|
|
crash |
Provides MSRs to the VMs that can be used to store information and logs if a VM crashes. The information in available in the QEMU log. If hv_crash is enabled, Windows crash dumps are not created. |
on, off |
|
evmcs |
Implements paravirtualized protocol between L0 (KVM) and L1 (Hyper-V) hypervisors, which enables faster L2 exits to the hypervisor. This feature is exclusive to Intel processors. |
on, off |
|
frequencies |
Enables Hyper-V frequency Machine Specific Registers (MSRs). |
on, off |
|
ipi |
Enables paravirtualized inter processor interrupts (IPI) support. |
on, off |
|
no-nonarch-coresharing |
Notifies the guest OS that virtual processors will never share a physical core unless they are reported as sibling SMT threads. This information is required by Windows and Hyper-V guests to properly mitigate simultaneous multithreading (SMT) related CPU vulnerabilities. |
on, off, auto |
|
reenlightenment |
Notifies when there is a time stamp counter (TSC) frequency change which only occurs during migration. It also allows the guest to keep using the old frequency until it is ready to switch to the new one. |
on, off |
|
relaxed |
Disables a Windows sanity check that commonly results in a BSOD when the VM is running on a heavily loaded host. This is similar to the Linux kernel option no_timer_check, which is automatically enabled when Linux is running on KVM. |
on, off |
|
runtime |
Sets processor time spent on running the guest code, and on behalf of the guest code. |
on, off |
|
spinlocks |
|
on, off |
|
stimer |
Enables synthetic timers for virtual processors. Note that certain Windows versions revert to using HPET (or even RTC when HPET is unavailable) when this enlightenment is not provided, which can lead to significant CPU consumption, even when the virtual CPU is idle. |
on, off |
|
stimer-direct |
Enables synthetic timers when an expiration event is delivered via a normal interrupt. |
on, off. |
|
synic |
Together with stimer, activates the synthetic timer. Windows 8 uses this feature in periodic mode. |
on, off |
|
time |
Enables the following Hyper-V-specific clock sources available to the VM,
|
on, off |
|
tlbflush |
Flushes the TLB of the virtual processors. |
on, off |
|
vapic |
Enables virtual APIC, which provides accelerated MSR access to the high-usage, memory-mapped Advanced Programmable Interrupt Controller (APIC) registers. |
on, off |
|
vendor_id |
Sets the Hyper-V vendor id. |
|
|
vpindex |
Enables virtual processor index. |
on, off |
20.2.3. Configuring NetKVM driver parameters
After the NetKVM driver is installed, you can configure it to better suit your environment. The parameters listed in this section can be configured using the Windows Device Manager (devmgmt.msc).
Modifying the driver’s parameters causes Windows to reload that driver. This interrupts existing network activity.
Prerequisites
-
The NetKVM driver is installed on the virtual machine.
For more information, see Installing KVM paravirtualized drivers for Windows virtual machines.
Procedure
-
Open Windows Device Manager.
For information on opening Device Manager, refer to the Windows documentation.
-
Locate the Red Hat VirtIO Ethernet Adapter.
- In the Device Manager window, click + next to Network adapters.
-
Under the list of network adapters, double-click Red Hat VirtIO Ethernet Adapter.
The Properties window for the device opens.
-
View the device parameters.
In the Properties window, click the Advanced tab.
-
Modify the device parameters.
-
Click the parameter you want to modify.
Options for that parameter are displayed.
-
Modify the options as needed.
For information on the NetKVM parameter options, refer to NetKVM driver parameters.
- Click OK to save the changes.
-
20.2.4. NetKVM driver parameters
The following table provides information on the configurable NetKVM driver logging parameters.
Table 20.2. Logging parameters
| Parameter | Description 2 |
|---|---|
|
Logging.Enable |
A Boolean value that determines whether logging is enabled. The default value is Enabled. |
|
Logging.Level |
An integer that defines the logging level. As the integer increases, so does the verbosity of the log.
High logging levels will slow down your virtual machine. |
The following table provides information on the configurable NetKVM driver initial parameters.
Table 20.3. Initial parameters
| Parameter | Description |
|---|---|
|
Assign MAC |
A string that defines the locally-administered MAC address for the paravirtualized NIC. This is not set by default. |
|
Init.ConnectionRate(Mb) |
An integer that represents the connection rate in megabits per second. The default value for Windows 2008 and later is 10G (10,000 megabits per second). |
|
Init.Do802.1PQ |
A Boolean value that enables Priority/VLAN tag population and removal support. The default value is Enabled. |
|
Init.MTUSize |
An integer that defines the maximum transmission unit (MTU). The default value is 1500. Any value from 500 to 65500 is acceptable. |
|
Init.MaxTxBuffers |
An integer that represents the number of TX ring descriptors that will be allocated. The default value is 1024. Valid values are: 16, 32, 64, 128, 256, 512, and 1024. |
|
Init.MaxRxBuffers |
An integer that represents the number of RX ring descriptors that will be allocated. The default value is 256. Valid values are: 16, 32, 64, 128, 256, 512, and 1024. |
|
Offload.Tx.Checksum |
Specifies the TX checksum offloading mode. In Red Hat Enterprise Linux 9, the valid values for this parameter are: * All (the default) which enables IP, TCP, and UDP checksum offloading for both IPv4 and IPv6 * TCP/UDP(v4,v6) which enables TCP and UDP checksum offloading for both IPv4 and IPv6 * TCP/UDP(v4) which enables TCP and UDP checksum offloading for IPv4 only * TCP(v4) which enables only TCP checksum offloading for IPv4 only |
20.2.5. Optimizing background processes on Windows virtual machines
To optimize the performance of a virtual machine (VM) running a Windows OS, you can configure or disable a variety of Windows processes.
Certain processes might not work as expected if you change their configuration.
Procedure
You can optimize your Windows VMs by performing any combination of the following:
- Remove unused devices, such as USBs or CD-ROMs, and disable the ports.
- Disable background services, such as SuperFetch and Windows Search. For more information about stopping services, see Disabling system services or Stop-Service.
-
Disable
useplatformclock. To do so, run the following command,# bcdedit /set useplatformclock No - Review and disable unnecessary scheduled tasks, such as scheduled disk defragmentation. For more information on how to do so, see Disable Scheduled Tasks.
- Make sure the disks are not encrypted.
- Reduce periodic activity of server applications. You can do so by editing the respective timers. For more information, see Multimedia Timers.
- Close the Server Manager application on the VM.
- Disable the antivirus software. Note that disabling the antivirus might compromise the security of the VM.
- Disable the screen saver.
- Keep the Windows OS on the sign-in screen when not in use.
20.3. Enabling standard hardware security on Windows virtual machines
To secure Windows virtual machines (VMs), you can enable basic level security using the standard hardware capabilities of the Windows device.
Prerequisites
- Make sure you have installed the latest WHQL certified VirtIO drivers.
- Make sure the VM’s firmware supports UEFI boot.
-
Install the
edk2-OVMFpackage on your host machine.# dnf install edk2-ovmf -
Install the
vTPMpackages on your host machine.# dnf install swtpm libtpms - Make sure the VM is using the Q35 machine architecture.
- Make sure you have the Windows installation media.
Procedure
-
Enable TPM 2.0 by adding the following parameters to the
<devices>section in the VM’s XML configuration.<devices> [...] <tpm model='tpm-crb'> <backend type='emulator' version='2.0'/> </tpm> [...] </devices> - Install Windows in UEFI mode. For more information on how to do so, see Creating a SecureBoot virtual machine.
- Install the VirtIO drivers on the Windows VM. For more information on how to do so, see Installing virtio drivers on a Windows guest.
- In UEFI, enable Secure Boot. For more information on how to do so, see Secure Boot.
Verification
-
Ensure that the Device Security page on your Windows machine displays the following message:
Settings > Update & Security > Windows Security > Device Security
Your device meets the requirements for standard hardware security.
20.4. Enabling enhanced hardware security on Windows virtual machines
To further secure Windows virtual machines (VMs), you can enable virtualization-based protection of code integrity, also known as Hypervisor-Protected Code Integrity (HVCI).
Prerequisites
- Ensure that standard hardware security is enabled. For more information, see Enabling standard hardware security on Windows virtual machines.
- Ensure you have enabled Hyper-V enlightenments. For more information, see Enabling Hyper-V enlightenments.
Procedure
-
Open the XML configuration of the Windows VM. The following example opens the configuration of the Example-L1 VM:
# virsh edit Example-L1 -
Under the
<cpu>section, specify the CPU mode and add the policy flag.-
For Intel CPUs, enable the
vmxpolicy flag. -
For AMD CPUs, enable the
svmpolicy flag. -
If you do not wish to specify a custom CPU, you can set the
<cpu mode>ashost-passthrough.
<cpu mode='custom' match='exact' check='partial'> <model fallback='allow'>Skylake-Client-IBRS</model> <topology sockets='1' dies='1' cores='4' threads='1'/> <feature policy='require' name='vmx'/> </cpu> -
For Intel CPUs, enable the
- Save the XML configuration and reboot the VM.
-
On the VMs operating system, navigate to the Core isolation details page:
Settings > Update & Security > Windows Security > Device Security > Core isolation details
- Toggle the switch to enable Memory Integrity.
- Reboot the VM.
For other methods of enabling HVCI, see the relevant Microsoft documentation.
Verification
-
Ensure that the Device Security page on your Windows VM displays the following message:
Settings > Update & Security > Windows Security > Device Security
Your device meets the requirements for enhanced hardware security. -
Alternatively, check System Information on the Windows VM:
-
Run
msinfo32.exein a command prompt. - Check if Credential Guard, Hypervisor enforced Code Integrity is listed under Virtualization-based security Services Running.
-
Run
20.5. Next steps
-
To use utilities for accessing, editing, and creating virtual machine disks or other disk images for a Windows VM, install the
libguestfs-toolsandlibguestfs-winsupportpackages on the host machine:$ sudo dnf install libguestfs-tools libguestfs-winsupport -
To use utilities for accessing, editing, and creating virtual machine disks or other disk images for a Windows VM, install the
guestfs-toolsandguestfs-winsupportpackages on the host machine:$ sudo dnf install guestfs-tools guestfs-winsupport - To share files between your RHEL 9 host and its Windows VMs, you can use virtiofs or NFS.
В данной статье мы проиллюстрируем пошаговую установку драйверов VirtIO на примере операционной системы Microsoft Windows Server.
Для начала авторизуйтесь в панели управления Cloud2 для присоединения ISO-образа диска с драйверами VirtIO к существующей виртуальной машине:
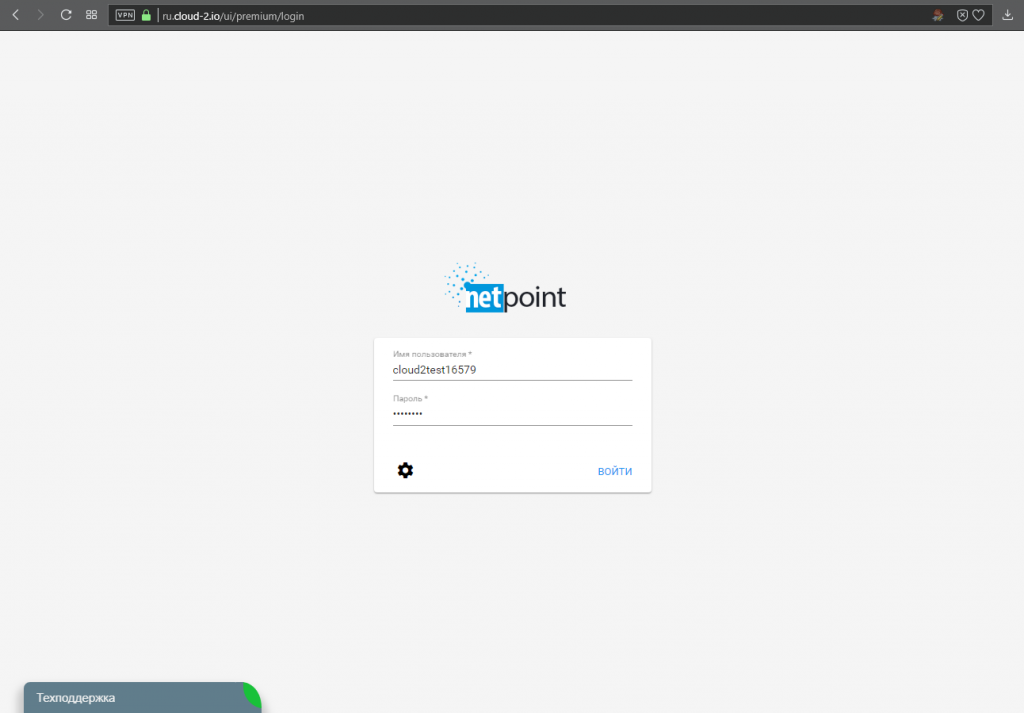
1. Авторизуемся в панели управления по адресу: https://ru.cloud-2.io/ui/premium/
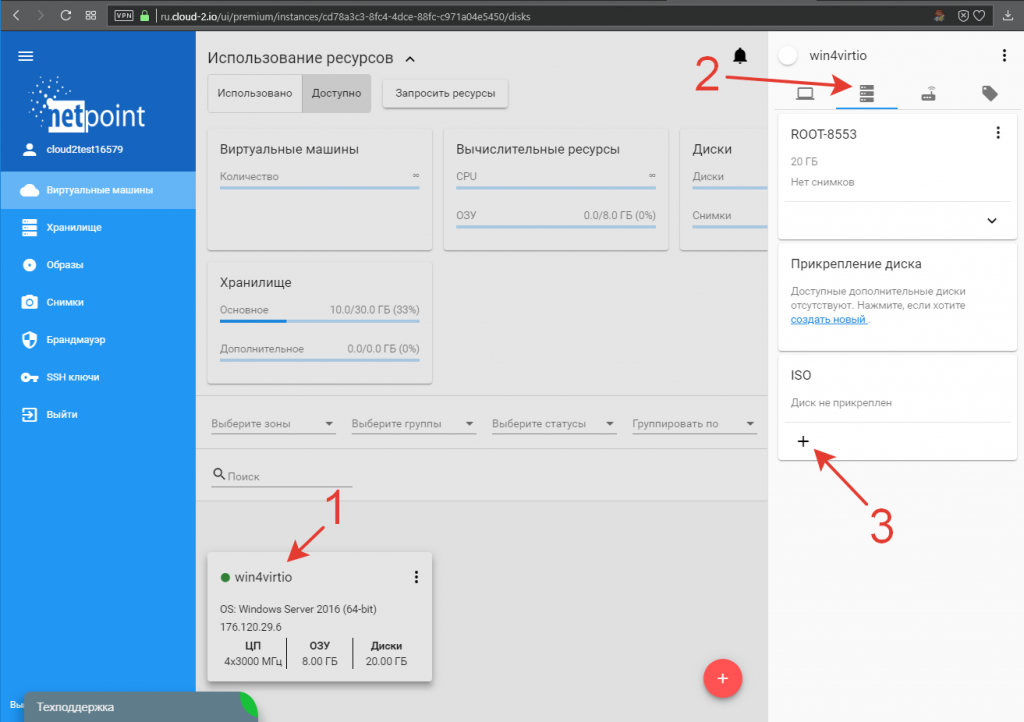
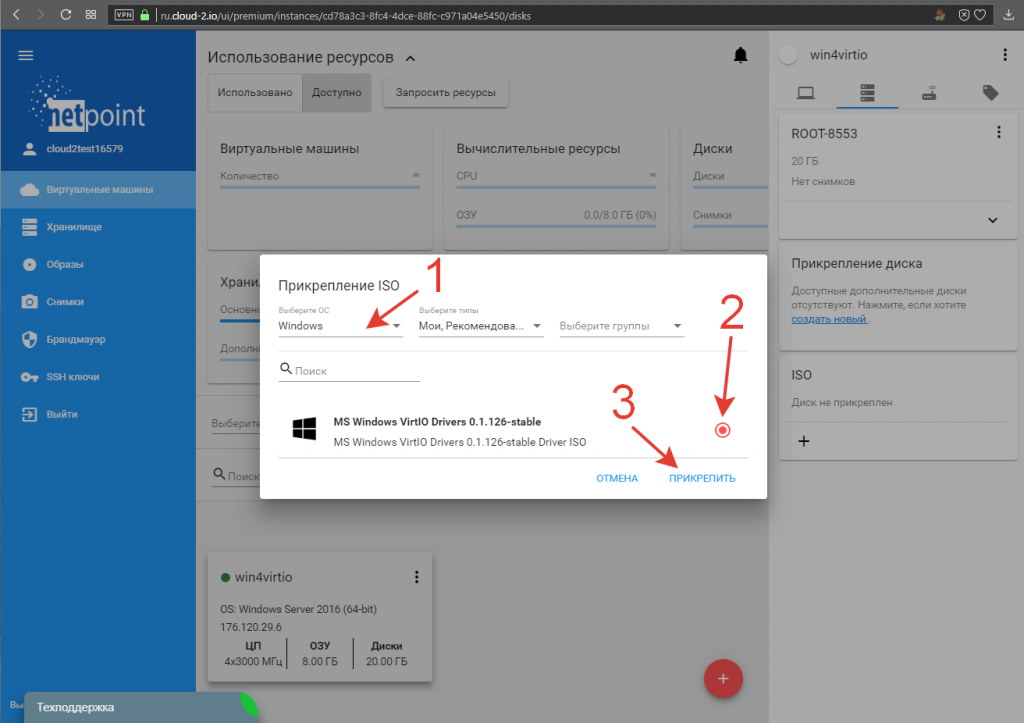
2. Выбираем нужную виртуальную машину кликая по её названию (1). В открывшейся панели управления переходим во вкладку устройств (2) и нажимаем стилизованную под плюс кнопку подключения ISO-образа (3):
3. В открывшемся окне прикрепления ISO-образа указываем тип операционной системы Windows (1), отмечаем образ диска с драйверами VirtIO (2) и подключаем его к нашей машине (3):
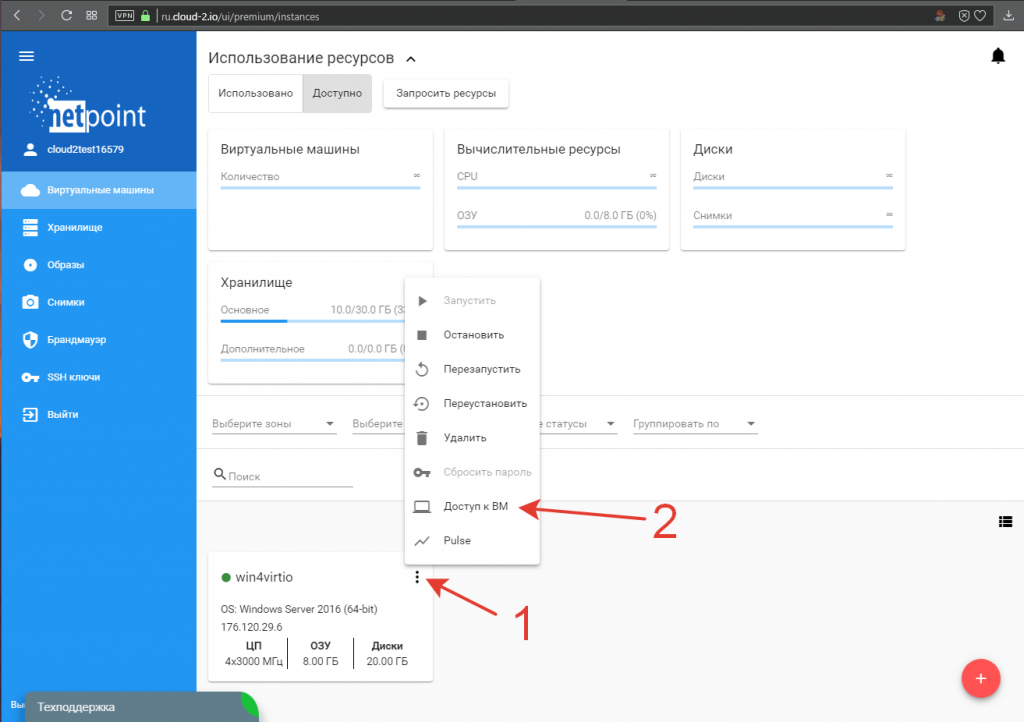
4. Переходим в операционную систему. Для этого подключаемся к машине по RDP или используем встроенную консоль панели управления. Для этого кликаем по стилизованной под три точки кнопке меню виртуальной машины (1) и выбираем пункт «Доступ к ВМ» (2):
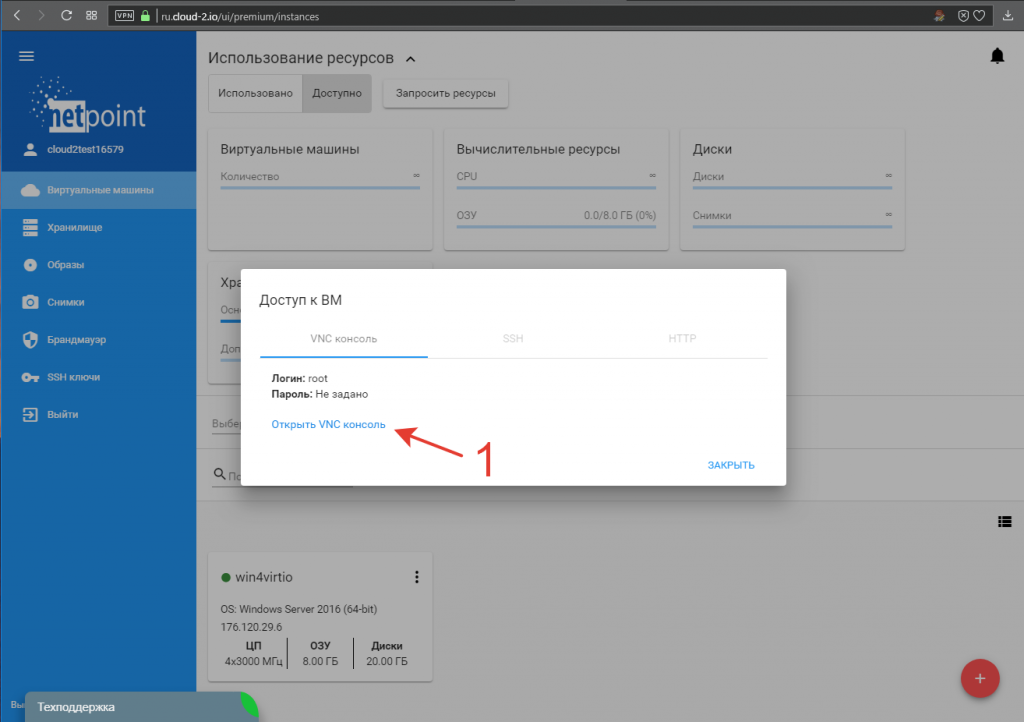
В открывшемся окне нажимаем ссылку «Открыть VNC консоль» (1):
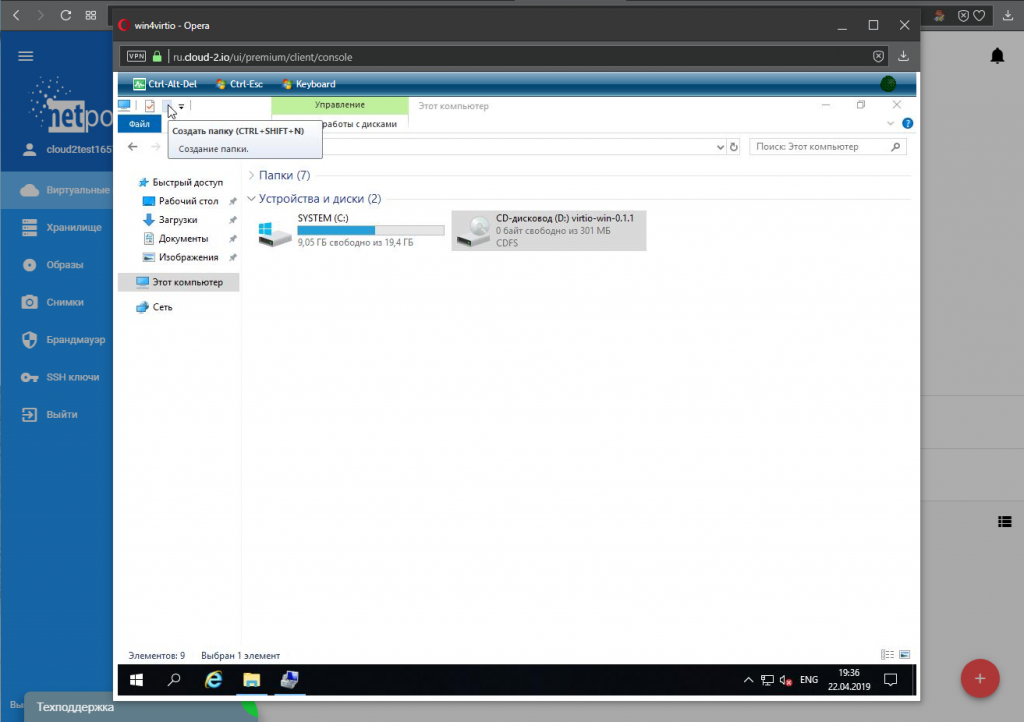
5. В операционной системе с помощью проводника Windows проверяем наличие присоединённого нужного образа с драйверами:
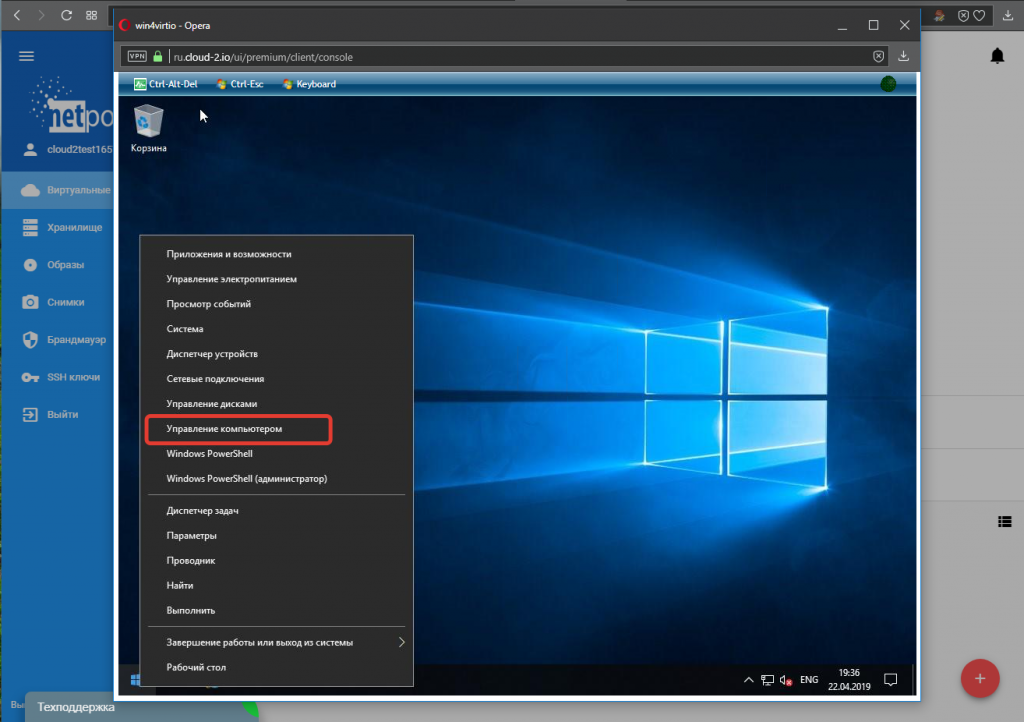
В контекстном меню (правая кнопка мыши) кнопки «Пуск» выбираем пункт «Управление компьютером»:
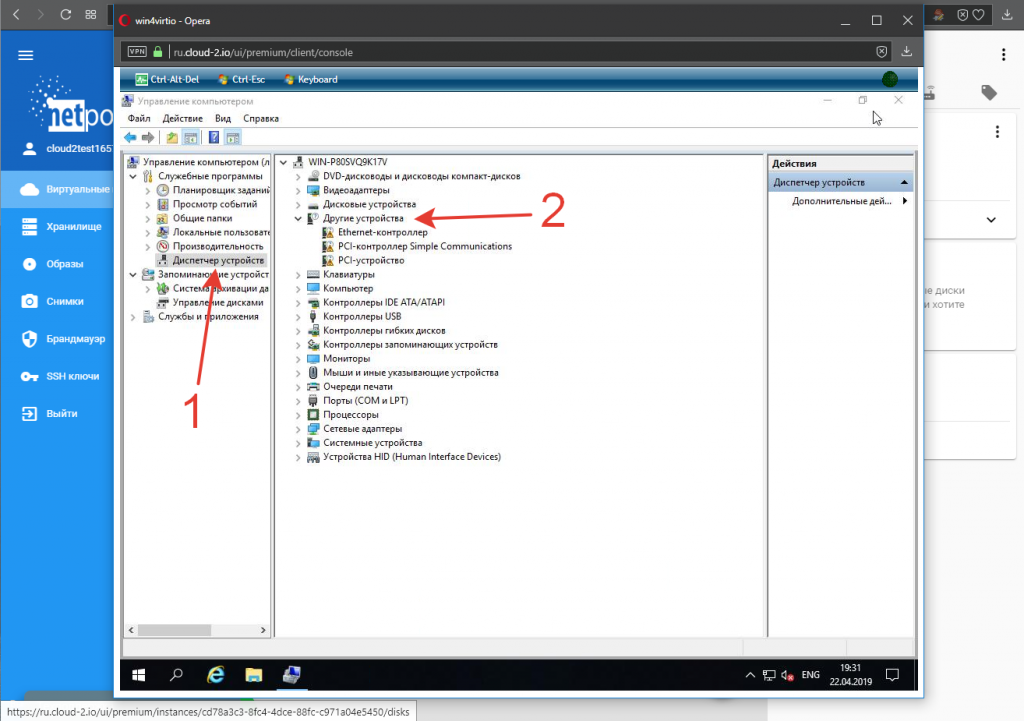
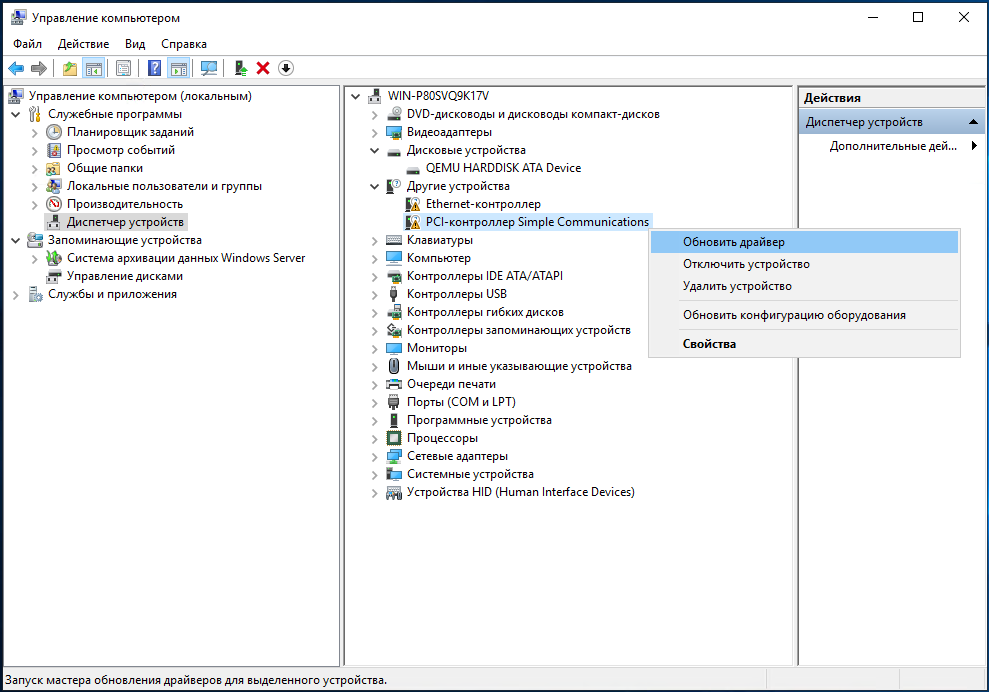
6. В открывшейся панели переходим в Диспетчер устройств (1), где наблюдаем ряд неизвестных нашей системе девайсов (2), которые нам предстоит инициализировать:
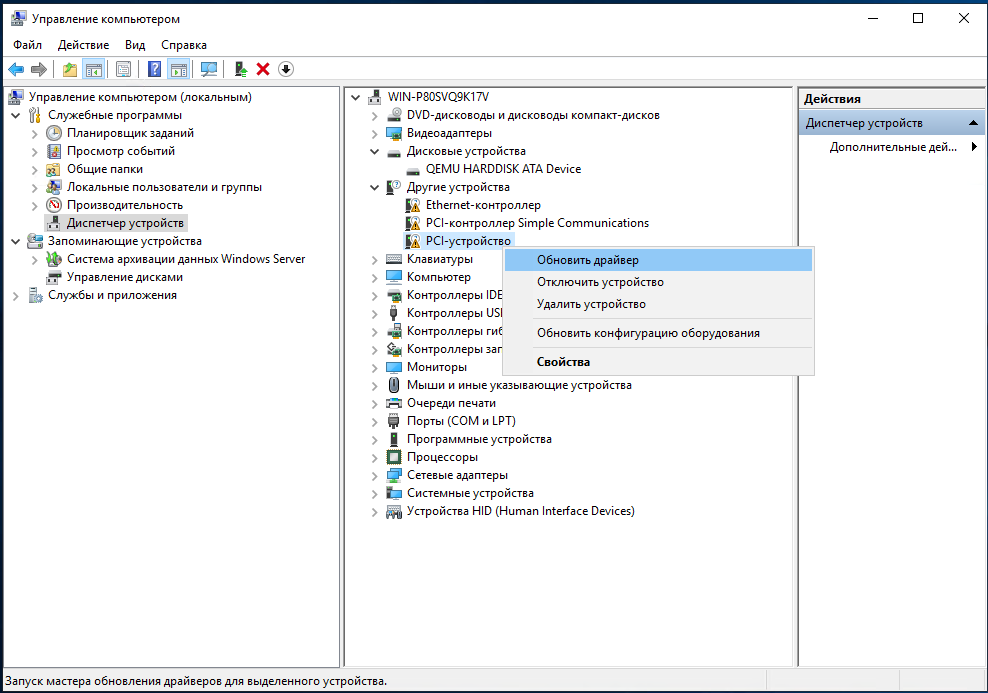
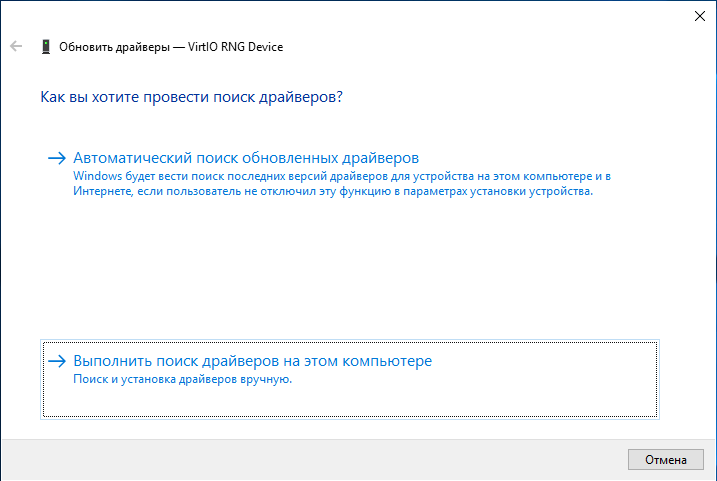
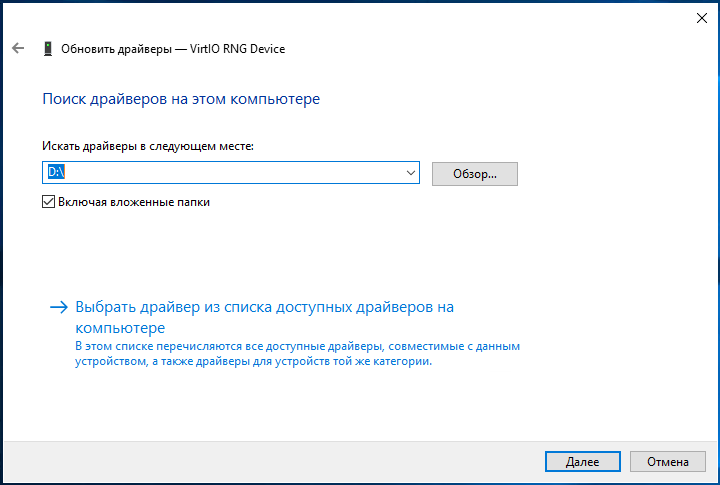
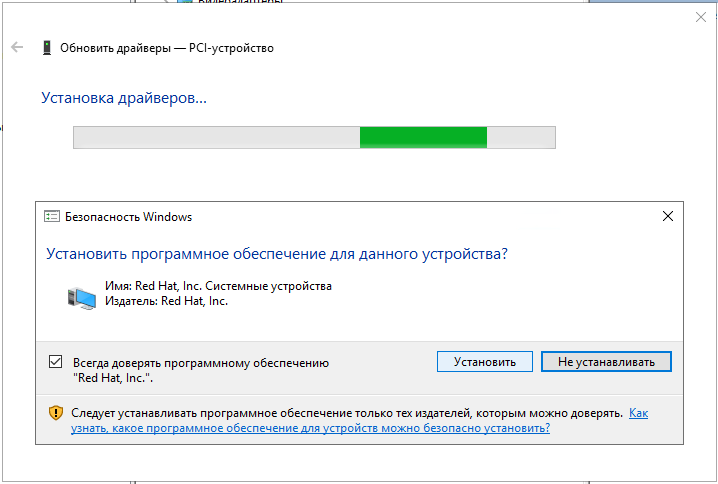
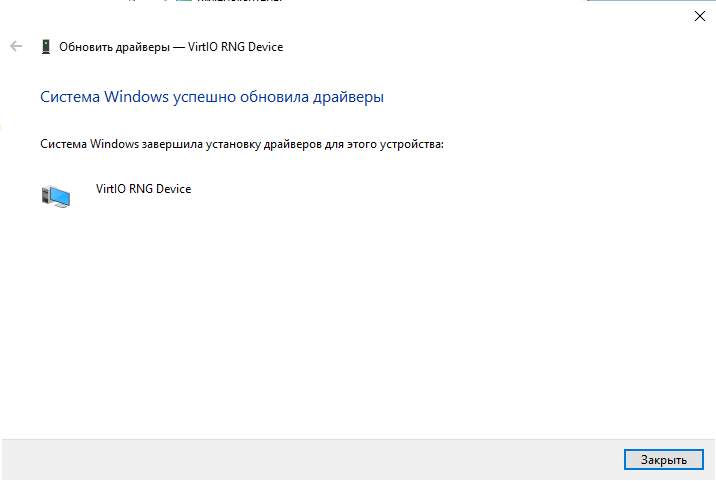
7. Поочерёдно устанавливаем драйвера на каждое устройство с подключенного диска. Устанавливаем драйвер устройства Virtio RNG Device:
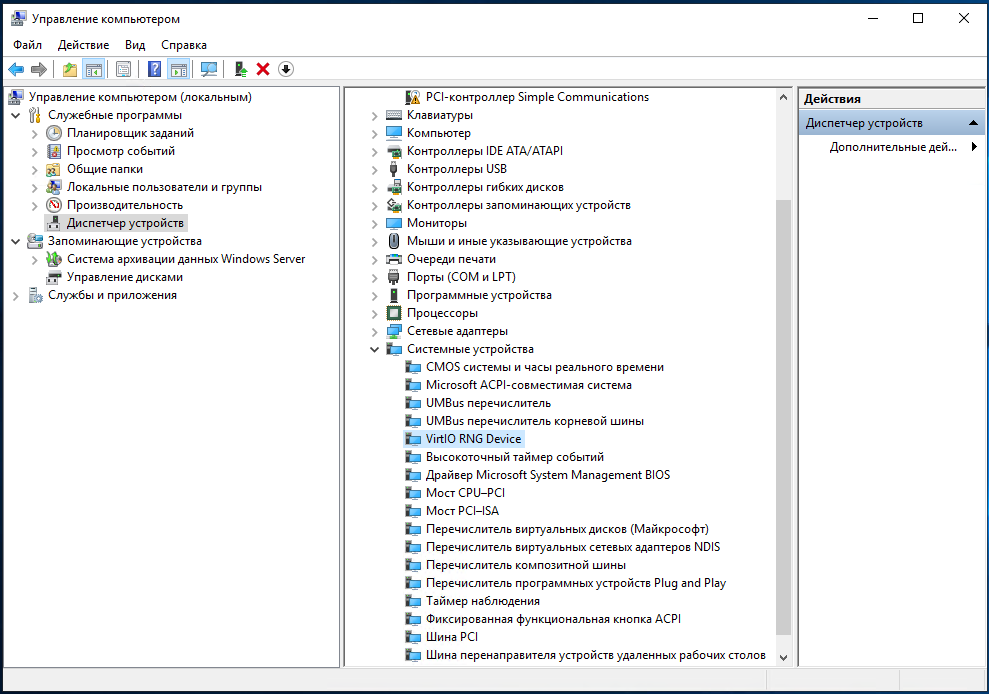
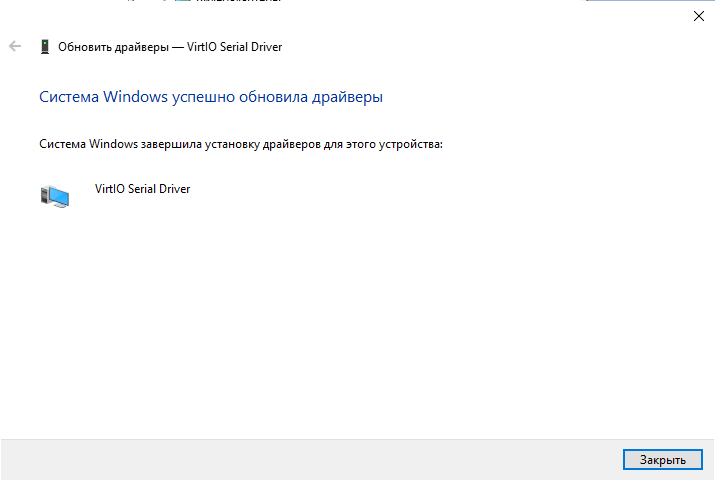
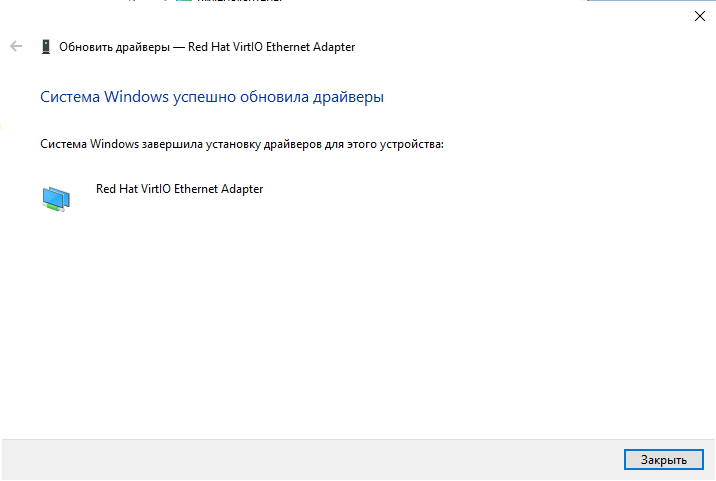
Аналогично устанавливаем последующие драйвера устройств VirtIO Serial Driver и Red Hat VirtIO Ethernet Adapter:
В результате проделанных манипуляций мы получаем полностью установленные VirtIO устройства в нашей системе. Не забудьте отключить ISO в самой системе или в панели управления виртуальной машиной по окончании работ.
Поиск по ID
Red Hat VirtIO Ethernet Adapter Driver v.61.70.104.8100 Windows XP / Vista / 7 / 8 32-64 bits
Подробнее о пакете драйверов:Тип: драйвер |
Драйвер версии 61.70.104.8100 для VirtIO Ethernet Adapter от компании Red Hat. Предназначен для ручной установки на Windows XP, Windows Vista, Windows 7, Windows 8.
Внимание! Перед установкой драйвера Red Hat VirtIO Ethernet Adapter Driver рекомендутся удалить её старую версию. Удаление драйвера особенно необходимо — при замене оборудования или перед установкой новых версий драйверов для видеокарт. Узнать об этом подробнее можно в разделе FAQ.
Скриншот файлов архива
Файлы для скачивания (информация)
Поддерживаемые устройства (ID оборудований):
Другие драйверы от Прочие
Сайт не содержит материалов, защищенных авторскими правами. Все файлы взяты из открытых источников.
© 2012-2023 DriversLab | Каталог драйверов, новые драйвера для ПК, скачать бесплатно для Windows
kamtizis@mail.ru
Страница сгенерирована за 0.038000 секунд
После установки гостевой Windows в виртуальную машину на хосте KVM, нужно добавить корректные драйвера (kvm virtio driver). Без этих драйверов гостевая Windows не сможет определить виртуальные сетевые адаптеры и ряд другого оборудования.
Скачайте актуальную версию ISO образа с драйверами KVM для Windows (около 500 Мб):
$ wget https://fedorapeople.org/groups/virt/virtio-win/direct-downloads/stable-virtio/virtio-win.iso -P /vm/kvm/iso/
Создайте конфигурационной файл для монтирования iso образа в виртуальную машину:
$ vi /etc/libvirt/qemu/guest-virtio-drivers.xml
Добавьте в него следующую конфигурацию:
<disk type='file' device='cdrom'>
 <driver name='qemu' type='raw'/>
 <source file='/vm/kvm/iso/virtio-win.iso'/>
 <target dev='hdb' bus='ide'/>
 <readonly/>
 <address type='drive' controller='0' bus='0' target='0' unit='1'/>
</disk>
Чтобы смонтировать ISO образ в виртуальную машину KVM, выполните:
$ virsh update-device test-win1 /etc/libvirt/qemu/guest-virtio-drivers.xml
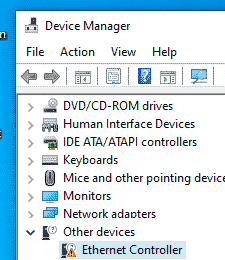
Подключитесь к консоли виртуальной машины Windows, запустите диспетчер устройств и найдите оборудование Ethernet Controller в секции Other Device. Как вы видите, Windows не нашла драйвер для сетевой карты.
Щелкните по контроллеру правой клавишей и выберите: Update Driver -> Browse my computer for driver software, укажите путь к виртуальному CD диску, в который смонтирован ISO образ.
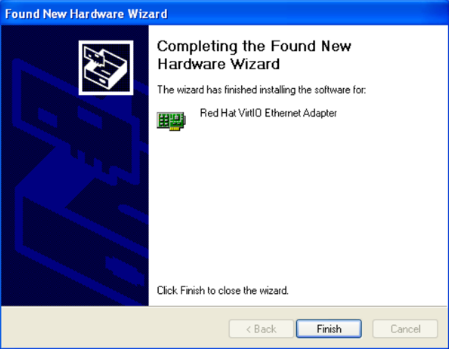
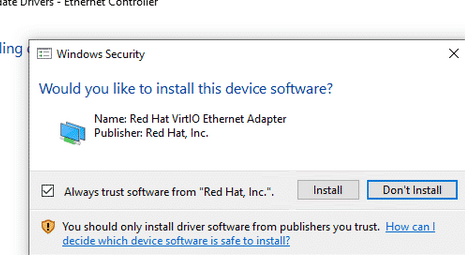
Подтвердите установку драйвера Red Hat VirtIO Ethernet Adapter.
Аналогичным образом установите все остальные драйвера, для оборудования, которое Windows не смогла обнаружить.
-
Red Hat VirtIO Ethernet Adapter
Версия:
100.92.104.22900
(14 ноя 2022)
Файл *.inf:
netkvm.inf -
Red Hat VirtIO Ethernet Adapter
Версия:
3.17.1.7365
(17 авг 2017)
Файл *.inf:
netkvm.inf
Windows 7 x86, 8 x86, 8.1 x86, 10 x86
-
Red Hat VirtIO Ethernet Adapter
Версия:
15.32.0.62
(02 авг 2017)
Файл *.inf:
netkvm.inf
Windows Vista x64, 7 x64, 8 x64, 8.1 x64, 10 x64
-
Red Hat VirtIO Ethernet Adapter
Версия:
15.1.5.47309
(26 сен 2020)
Файл *.inf:
prl_eth5.inf
Windows Vista, 7, 8, 8.1, 10
В каталоге нет драйверов для Red Hat VirtIO Ethernet Adapter под Windows.
Скачайте DriverHub для автоматического подбора драйвера.
Драйверы для Red Hat VirtIO Ethernet Adapter собраны с официальных сайтов компаний-производителей и других проверенных источников.
Официальные пакеты драйверов помогут исправить ошибки и неполадки в работе Red Hat VirtIO Ethernet Adapter (сетевые устройства).
Скачать последние версии драйверов на Red Hat VirtIO Ethernet Adapter для компьютеров и ноутбуков на Windows.
Building the Windows ISO (Server versions only)
-
Get the latest binary VirtIO drivers for Windows, packaged as an ISO file, from https://fedorapeople.org/groups/virt/virtio-win/direct-downloads/stable-virtio/virtio-win.iso
-
Make a folder:
c:custom. -
Extract your Windows Server ISO to:
c:customwinserverwith a compression tool such as 7zip http://www.7-zip.org/. -
Extract the VirtIO ISO to
c:customwinservervirtio. -
Use an ISO mastering tool to create your custom slipstream ISO. In general, the following mastering options are needed:
-
Filesystem: UDF, Include Hidden Files, Include System Files
-
Make image bootable.
-
Emulation Type: none
-
Boot Image:
C:customwinserverbootetfsboot.com -
Platform ID: 80×86
-
Developer ID: Microsoft Corporation
-
Sectors to load: 8
You now have a Windows ISO with built-in VirtIO drivers ready for use as a custom Vultr ISO.
Installing
After deploying your custom ISO, open the Vultr Web Console.
At first, no drive is present. This is normal. Click «Load Driver».
-
For Server 2012 and 2012 R2, use WIN8.
-
For Server 2016, use 2k16.
For example, using 2012 on a 64 bit VPS:
Browse to one of the following folders (varies based on your ISO image):
-
virtio > WIN8 > AMD64
-
Virtio > Virtstor > Win2012 > AMD
Select «Red Hat VirtIO SCSI» driver.
Now the drive is visible.
Additional Steps
Configuring Network Connectivity
-
After you log in for the first time on your Windows VPS via View Console, you will be greeted by the Server Manager. On the upper right part of the menu, click on
Toolsthen chooseComputer Management. A new window will open. -
On the left pane of that new window (will be named
Computer Management), selectDevice Manager. -
You should notice 3 devices that are marked with yellow «!» signs (4 if you chose to enable
Private Networking).Right-click on
Ethernet Controllerand chooseUpdate Driver Software... -
Two choices will appear, choose the one below, which is
Browse my computer for driver software. -
Click
Browse...and navigate toD:virtioNetKVMWIN8AMD64, then clickNext. -
You will see a pop-up confirmation to verify that you want to install
Red Hat VirtIO Ethernet Adapter, just clickInstall. -
Your VPS will now have internet connectivity! Perform steps 3-6 again for any more
Unrecognized Deviceson your system.
Getting Windows RDP to Work (optional)
By default, Windows Server will allow two concurrent RDP sessions. Make sure the Windows firewall allows Remote Desktop on the Public network.
-
Navigate to Control Panel > Windows Firewall > Allowed Apps.
-
Verify Public is checked for Remote Desktop.
If you need more than two concurrent RDP sessions, install the Remote Desktop Session Host. This requires additional licensing.
-
Click on
Manage, then chooseAdd Roles and Features. -
It is safe to keep clicking
Nextuntil you get toServer Rolessection of it. -
Scroll down a bit, and find
Remote Desktop Services, click the check-box beside it to select. Then clickNext. -
You can skip the
Featurespart for now, so just clickNextagain. -
Now on
Role Services, click the check-box besideRemote Desktop Session Host. -
A pop-up will appear, just click
Add Features, then clickNextone last time. -
Confirm your installation by clicking
Install. Your VPS will now be installingWindows RDP. -
Once the installation finishes, you can reboot your VPS to apply the changes. And you’re done! You will now be able to connect to your VPS via
Windows RDP, using yourIP Address,User name(default is Administrator) andPassword.
Windows Licensing
Due to licensing requirements, we cannot provide support for custom Windows installations. If you intend to install Windows at Vultr, make sure you have a valid Windows license before proceeding. The majority of Windows licenses are not valid for cloud server deployment.
Want to contribute?
Для создания нового образа виртуальной машины (ВМ) и установки в него
гостевой ОС Windows 10 [1] необходимо использовать утилиту менеджера
виртуализации – virt-manager. Утилита должна быть установлена
на АРМ администратора (Linux).
Должно быть настроено подключение к гипервизору KVM выделенной платформы
виртуализации, который предоставляет графическую консоль с помощью протокола
VNC (Virtual Network Computing). Также может использоваться протокол SPICE,
настраиваемый менеджером виртуализации (для новых ВМ).
| [1] | https://www.easycoding.org/2019/12/19/zapuskaem-windows-v-kvm-na-fedora.html |
6.2.1. Подготовка рабочего окружения
Установите графический интерфейс virt-manager,
который содержит встроенные терминальные клиенты (VNC/SPICE).
Терминальный клиент позволяет просматривать виртуальный дисплей и
взаимодействовать с графической консолью при помощи клавиатуры и мыши.
Внимание.
Клиент может быть вызван отдельно от менеджера виртуализации, с помощью
утилитыvirt-viewer. Этот способ удобен тем, что позволяет пробрасывать
USB-устройства, присоединенные к АРМ, в гостевые ОС, обслуживаемые
гипервизором, с которым установлена связь (настроено подключение).
Используя SSH, запустите virt-manager с помощью протокола доступа
к графическому интерфейсу (X11), с правами суперпользователя (root):
ssh -XYC root@server virt-manager
Запуск возможен как локально, так и удаленно.
Если учетная запись (user) не принадлежит суперпользователю, то выполните
следующие команды:
ssh -XYC user@server
sudo virt-manager
Примечание.
Флаг -X, передаваемый в
sshчерез аргумент командной строки,
позволит «пробросить графику» из удаленного сервера (server) в АРМ.
На стороне сервера данный проброс (X11-forwarding) должен быть разрешен
путем настройки конфигурации.
В качестве сервера может выступать вычислительный узел облачной инфраструктуры
(Compute-нода), временно выведенный из эксплуатации. Однако, рекомендуется
выполнять промежуточные операции по подготовке образов на инфраструктурном
узле или на контроллере OpenStack (УУ).
6.2.2. Запуск виртуальной сети
Перед запуском ВМ необходимо убедиться, что виртуальная сеть libvirt активна
и ВМ, загружаемая из образа, имеет возможность подключиться к сети.
Проверка подключения к сети гипервизора (libvirt) выполняется с помощью
команды:
# virsh net-list

Name                 State      Autostart
-----------------------------------------
default              active     yes
Если сеть неактивна (в графе статуса не отображается состояние active),
то потребуется выполнить команду её запуска:
# virsh net-start default
Также сеть может быть активирована из менеджера виртуализации.
6.2.3. Подготовка образа CD, содержащего драйверы VirtIO
Для настройки VirtIO-поддержки созданной ВМ потребуются драйверы паравиртуализации
для гостевых ОС Windows – VirtIO Win. Эти драйверы могут быть скачаны
в виде единого носителя (в формате ISO) по ссылке:
Для скачивания стабильной версии следует перейти по ссылке:
В составе единого носителя доступны блочный драйвер, дисковый драйвер,
драйвер балунинга (контроллера памяти), драйвер последовательного порта,
сетевой драйвер (для NIC-устройства), имеющие собственные названия:
- VirtIO-SCSI – блочный драйвер для KVM;
- Viostor – дисковый драйвер VirtIO;
- Balloon – драйвер балунинга (PCI standard RAM Controller);
- Vioserial – драйвер последовательного порта (PCI Simple Communication Controller);
- NetKVM – сетевой драйвер VirtIO.
Установка каждого из вышеперечисленных драйверов выполняется в гостевой ОС,
из Диспетчера устройств (Windows Device Manager).
Обычно требуется указание пути к папке с драйвером, либо полного пути к inf-файлу.
Однако, большинство современных настольных ОС Windows позволяют отыскать
подходящие файлы автоматически.
6.2.4. Создание и настройка ВМ
После запуска менеджера виртуализации откроется окно с заголовком
«Менеджер виртуальных машин» (Рис. 6.1).
Рис. 6.1 Интерфейс менеджера виртуальных машин
Нажатие на кнопку создания новой виртуальной машины (в левом верхнем углу –
иконка с изображением дисплея) приведет к открытию многошагового диалога
(мастера установки ВМ).
Выполните по шагам все действия, с соблюдением рекомендаций, изложенных ниже.
6.2.4.1. Выбор метода установки ОС
Откроется окно «Создание виртуальной машины» (Рис. 6.2).
Рис. 6.2 Создание виртуальной машины (Шаг 1)
В открывшемся окне выбрать опцию – выбора метода установки операционной
системы (локальный ISO или CDROM). Нажать на кнопку «Вперед».
6.2.4.2. Выбор установочного носителя
На следующем шаге создания виртуальной машины выбрать диск c дистрибутивом
windows.iso, для этого кликнуть кнопку «Обзор…».
В открывшемся окне – «Создание виртуальной машины» (Рис. 6.3) –
выбрать диск c дистрибутивом (файл образа – windows.iso).
Примечание. В данном примере используется установочный образ
/.../ru-en_windows_10_1709_x86-x64_20in1_KMS-activation.iso.
Рис. 6.3 Выбор средства установки (Шаг 2)
Убрать галочку флага «Автоматическое определение источника установки».
В поисковой строке набрать название ОС, в выпадающем списке выбрать
необходимую ОС (Рис. 6.4).
Нажать на кнопку «Вперед».
Примечания.
Выбирается не фактический диск установки Windows, так как добавление
будет происходить позже, и ошибка в virt-manager заставляет его настроить
новые ВМ для загрузки с диска, добавленного в последний раз.Если вышеупомянутой особенности нет в будущих версиях, то сразу
указывается диск Windows, а диск драйвера – позже.
Рис. 6.4 Выбор типа гостевой ОС (Windows 10)
6.2.4.3. Задание размера памяти и количества процессоров
В открывшемся окне «Создание виртуальной машины» (Рис. 6.5),
задать соответствующее количество памяти и количество ядер.
Нажать на кнопку «Вперед».
Рис. 6.5 Задание размера памяти и количества процессоров (Шаг 3)
6.2.4.4. Настройка дополнительного пространства данных
В открывшемся окне «Создание виртуальной машины» выбрать том (Рис. 6.6).
Примечание. В данном примере выделяется новый том.
Рис. 6.6 Настройка дополнительного пространства данных (Шаг 4)
Нажать на кнопку «Настроить». Откроется окно «Выбор тома хранилища»,
в котором рядом с надписью «Список томов» потребуется нажать на кнопку «+».
Откроется окно «Создание тома хранилища» (Рис. 6.7),
в котором потребуется ввести название тома и выбрать формат qcow2.
Рис. 6.7 Создание тома хранилища
Рекомендуется задать объем диска, позволяющего сохранить все обновления: 60 ГБ
(не менее 50 Гб из доступного пространства).
Нажать на кнопку «Готово». Появится диалог, отображающий степень готовности.
Создание тома займет некоторое время. Необходимо дождаться завершения операции.
6.2.4.5. Проверка конфигурации ВМ
В открывшемся финальном окне Мастера создания виртуальной машины
(Рис. 6.8) выбрать сеть (сетевой мост).
Нажать на кнопку «Готово» для запуска ВМ в заданной конфигурации.
Рис. 6.8 Проверка конфигурации ВМ (Шаг 5)
6.2.4.6. Дополнительные настройки конфигурации ВМ
Для добавления оборудования к текущей конфигурации ВМ выполнить следующие
действия:
- Нажать на пиктограмму «лампочка» – «Показать виртуальное оборудование».
- В параметрах загрузки посмотреть, что ВМ работает и параметры соответствуют заданным.
- В верхней панели экрана (Рис. 6.9) нажать на знак раскрывающегося
списка и выбрать опцию «принудительное выключение машины».
Рис. 6.9 Параметры загрузки ВМ
- После выключения ВМ перейти к строке конфигурации «SATA Диск1».
Нажать на знак раскрывающегося списка и выбрать опцию «SCSI» (Рис. 6.10).
Рис. 6.10 Выбор шины диска
Нажать на кнопку «Применить». В левой панели появится диск «SCSI Диск1»
и «Controller Virtio SCSI 0».
- Нажать на строку конфигурации контроллера и выбрать модель – «Virtio SCSI» (Рис. 6.11).
Рис. 6.11 Настройка контроллера (VirtIO/SCSI)
Нажать на кнопку «Применить».
- Добавить дополнительный CD-ROM диск с драйверами VirtIO для Windows.
ISO-образ (для подключения к CD-ROM) может быть загружен по ссылке:
- Нажать на кнопку «Добавить оборудование», в нижней части появившегося нового раздела.
Откроется мастер добавления нового устройства. Выберите тип устройства
(если это необходимо, зависит от версии), которое нужно добавить.Выполните следующие действия:
а. Нажать на кнопку «Вперед» (Forward).
б. Выбрать файл ISO.
в. Убедиться, что включен флаг опции выбора управляемого хранилища, и просмотреть файл изображения драйвера Virtio.
г. Изменить тип устройства на IDE cdrom и нажать на кнопку «Вперед» (Forward).
д. Нажать на кнопку «Закончить», чтобы закончить добавление виртуального оборудования.
Закройте окно мастера.
6.2.5. Установка и настройка гостевой ОС
Внимание. Предварительно загрузите драйверы VirtIO-поддержки, доступные
по ссылке:ВАЖНО! Рекомендуется удалить или отключить сетевой интерфейс (NAT),
чтобы гостевая ОС (Windows) не производила автоматическое обновление
системы до окончания установки VirtIO-драйверов.
Установите гостевую ОС, выполнив следующие действия.
- Запустить ВМ.
После включения ВМ должен начаться процесс установки Windows
(с подключенного к CD/DVD ISO-образа).В процессе установки ОС Windows на этапе выбора диска поступит
диагностическое сообщение, что диски не найдены (Рис. 6.12).
Рис. 6.12 Сообщение об отсутствии драйверов при установке ОС (Windows7)
- Загрузить драйвер жесткого диска virtio-scsi.
Загрузите драйвер с дополнительного диска
virtio-win-drivers(Рис. 6.13).
Рис. 6.13 Пример выбора папки с драйвером VirtIO
- Нажать Load Driver и перейти в каталог AMD64 для соответствующей версии Windows.
- Подтвердить выбор (
E:WIN7AMD64) и нажать кнопку «Next». - Выбрать драйвер контроллера Red Hat VirtIO SCSI. Отобразится диск.
Далее выполните первичные действия по настройке VirtIO-поддержки в гостевой
системе, как описано ниже.
6.2.5.1. Настройка VirtIO-поддержки
Для каждого варианта/комбинации ОС и архитектуры предусмотрен отдельный
драйвер, описываемый inf-файлом. Драйверы расположены иерархически,
в зависимости от типа драйвера, операционной системы и архитектуры, на
которой они будут установлены.
INF-файлы содержат необходимую информацию о системных файлах драйверов
устройств, соответственно версии гостевой ОС (Windows 8/8.1/10).
Перечень INF-файлов, содержащих сведения об установке драйверов:
- Virtio-SCSI: <virtio-win-version>vioscsi<WinVer><arch>vioscsi.inf;
- Viostor: <virtio-win-version>viostor<WinVer><arch>viostor.inf;
- Balloon: <virtio-win-version>Balloon<WinVer><arch>balloon.inf;
- Vioserial: <virtio-win-version>vioser<WinVer><arch>vioser.inf;
- NetKVM: <virtio-win-version>NetKVM<WinVer><arch>netkvm.inf.
Условные обозначения:
<virtio-win-version> – полный путь к директории с драйверами поддержки устройства,
содержащий логическое имя диска с подключенным ISO-носителем (D:);
<arch> – процессорная архитектура, в которой может выполняться машинный код драйвера
(x86 = 32-bit Intel, amd64 = 64-bit Intel; некоторые имеют ARM64-исполнение);
<WinVer> – версия операционной системы (w10 = Windows 10 и т.п.).
Рекомендуется использование стандартного механизма поиска (Update driver)
с указанием логического диска, содержащего драйверы VirtIO.
Примечания.
Для версий ОС Windows7 и ниже в качестве драйвера устройства хранения
(storage-контроллера) следует указать Virtio, а внутри гостевой ОС –
установить драйвер viostor.Если к ВМ уже подключен сетевой интерфейс (NIC), то для него следует
указать модель устройства VirtIO.Рекомендуется выполнение установки VirtIO-драйвера сетевого адаптера
(Ethernet) в последнюю очередь.ВАЖНО. После настройки VirtIO-драйверов следует завершить работу ВМ,
добавить сетевой интерфейсный адаптер (NIC), подключенный к шине VirtIO,
и повторить запуск гостевой ОС, а также обновить драйвер сетевого
интерфейсного адаптера (через Диспетчер устройств).
6.2.5.1.1. Проверка загрузки гостевой ОС
Включить созданную ВМ и убедиться, что гостевая ОС (Windows) успешно запускается.
Штатным способом (Windows) открыть Диспетчер устройств и установить
VirtIO-драйверы для неизвестных устройств, определенных как Other devices
(Другие устройства):
- На рабочем столе (Windows) щелкнуть по значку «Пуск» в левом нижнем
углу экрана для открытия меню. - На знаке «Проводник» щелкнуть правой кнопкой мыши, далее на знаке «Этот компьютер»,
в выпадающем меню выбрать «Свойства» и нажать на «Диспетчер устройств» (Device Manager).
Убедиться, что для устройств хранения применены паравиртуализованные
драйверы (VirtIO-Win), т.е. в Диспетчере устройств присутствуют следующие
устройства: Disk Drivers, Storage Controllers (Рис. 6.14).
Рис. 6.14 Диспетчер устройств (Контроллеры хранилищ)
Виртуальный накопитель CD-ROM следует отключить и удалить, если далее
в гостевой ОС не будет устанавливаться дополнительное ПО
(необходимое для работы VDI-машины, пользователя Рабочего стола).
6.2.5.1.2. Установка драйвера и службы балунинга (Ballon Driver/Service)
Для установки драйвера системного устройства Balloon (контроллера
оперативной памяти) в гостевой ОС (Windows) выполнить следующие действия.
- Из среды Рабочего стола виртуальной машины (гостевой ОС) открыть Диспетчер устройств.
- Выбрать для обновления системное устройство PCI standars RAM Controller.
- Определить местонахождение драйвера с помощью Мастера обновления (Рис. 6.15).
Рис. 6.15 Мастер обновления драйвера (Update Driver Software)
Чтобы выбрать драйвер для установки, откройте файловый браузер и нажмите
на кнопку «Browse» (Просмотр).Примечание. Для операционной системы Windows 10 с архитектурой x64
драйвер (VirtIO Balloon Driver) находится в каталоге:
driver_type/os/arch/Balloon/w10/x64
- Выбрать размещение ПО драйвера и нажать «OK».
- Нажать на кнопку «Next» (Далее).
В окне с заголовком «Update Driver Software — …» отобразится строка
процесса установки драйвера (Installing driver software).
- Дождаться нормального завершения установки драйвера.
По окончании процесса установки отобразится окно с диагностическим
сообщением об успешной установке (Рис. 6.16).
Рис. 6.16 Завершение установки драйвера (VirtIO Balloon)
- Нажатием на кнопку «Close» (Закрыть) следует закрыть окно мастера
установки/обновления (драйвера).
По завершении установки (обновления) драйвера в Диспетчере устройств
должно отображаться устройство VirtIO Balloon Driver.
Примечание. Рассмотрен драйвер для 64-разрядной Windows:
D:Balloonw10amd64.
Установка службы балунинга осуществляется сразу после установки драйвера.
Потребуется выполнить следующие действия:
- Перейти в раздел «Управление компьютером»/подраздел «Службы».
Необходимо проверить наличие сервиса balloon (не установлена ли служба).
-
Перейдите в каталог:
Balloon<os version><architectrure>. -
Скопировать файлы, относящиеся к сервису balloon и поместить их в выбранную папку.
-
Переименовать папку amd64 balloon и переместить ее с системную папку Windows.
-
Открыть консоль и от имени администратора в командной строке выполнить команду:
C: Windowsballoon>.blnsrv.exe -i
Листинг выполнения команды изображен на Рис. 6.17.
Рис. 6.17 Установка службы Balloon (управление памятью). Листинг
6.2.5.1.3. Установка драйвера последовательного устройства (VirtIO/Serial)
Драйвер устройства последовательного ввода-вывода необходим для получения
гипервизором обратной связи от гостевой ОС.
Данный драйвер устанавливается аналогично установке драйвера балунинга.
По завершении установки (обновления) драйвера в Диспетчере устройств
рядом с драйвером Baloon должно отображаться VirtIO Serial Driver:
Рис. 6.18 Драйвер ввода-вывода (VirtIO Serial Driver)
6.2.5.1.4. Установка драйвера сетевого адаптера (VirtIO/Ethernet)
Если ранее сетевой адаптер (NIC) удалялся из настроек ВМ, то необходимо
в настройках ВМ добавить виртуальную сеть (default) и выбрать модель
устройства virtio (Рис. 6.19).
Рис. 6.19 Настройка сетевого интерфейсного адаптера (NIC с MAC-адресом)
Для применения настроек ВМ потребуется её выключение (перезагрузка гостевой ОС).
После перезагрузки гостевой ОС необходимо выполнить следующие действия:
- В Диспетчере устройств Windows отыскать драйвер (неопознанного) сетевого устройства.
- Навести курсор на устройство и щелкнуть правой кнопкой мыши.
- В выпадающем меню выбрать опцию «Обновить драйвер».
Откроется окно диалога «Поиск драйверов на этом компьютере» (Рис. 6.20).
Рис. 6.20 Окно «Поиск драйверов на этом компьютере» (NetKVM)
В строке диалога выбрать нужный драйвер и нажать на кнопку «Далее».
- Дождаться сообщения об успешном обновлении драйвера адаптера сети и
нажать на кнопку «Закрыть».
В ОС Windows 10 по завершении поиска и установки драйвера VirtIO Ethernet
будет открыто информационное окно с заголовком «Update Drivers Red Hat
VirtIO Ethernet Adapter» и надписью:
Windows has successfully updated your drivers
Расположение сетевого адаптера в иерархии Диспетчера устройств (Рис. 6.21):
Сетевые адаптеры.
Название устройства (после установки драйвера): Red Hat VirtIO Ethernet Adapter.
Рис. 6.21 Расположение сетевого адаптера VirtIO (в диспетчере устройств)
6.2.5.2. Установка ПО гостевого агента
В гостевой ОС Windows запуск пакета установщика осуществляется с подключенного
к ВМ CD-дисковода (логического диска D:), кликом мыши на файле qemu-ga-x86_64
(см. (Рис. 6.22)).
Рис. 6.22 Установка ПО гостевого агента (QEMU Guest Agent)
Далее следовать инструкциям Мастера установки ПО.
После установки ПО гостевого агента следует убедиться, что сервис
QEMU/Guest Agent (Рис. 6.23) установлен.
Рис. 6.23 Список служб сервис QEMU/Guest Agent
6.2.5.3. Установка драйвера поддержки видео (QXL)
Для того, чтобы виртуальная машина впоследствии (после переноса образа
в облачную платформу) обладала нормальной производительностью видеоподсистемы,
а также позволяла менять разрешение (масштабировать) экран в консоли «Тионикс»,
используемой для VDI-доступа.
В таком случае потребуется в гостевой ОС заменить используемый по умолчанию
драйвер базового дисплея Microsoft Basic Display Adapter (Рис. 6.24).
Рис. 6.24 Обновление драйвера базового дисплея
Драйвер QXL находится на CD-носителе (virtio-win). Местоположение системного
файла драйвера определено в INF-файле (qxldod.inf).
Системный файл драйвера копируется в системную папку гостевой ОС:
WindowsSystem32DRIVERSqxldod.sys
После обновления драйвера в системе вместо прежнего (дисплейного) адаптера
появится новое устройство QXL controller. Данное устройство обслуживается
ядром гостевой ОС.
Драйвер (контроллер видео QXL) связывается с видео-устройством KVM
(устройству «Видео QXL» в свойствах виртуальной машины) и начинает
немедленно функционировать.
Перезагрузка гостевой ОС не требуется.
Если потребуется установка определенной или наиболее крайней версии
драйвера (для архитектуры x86-64), то его следует скачать из сетевого
ресурса, доступного по ссылке:
Для скачивания может быть использован штатный веб-браузер гостевой ОС (Windows IE).
Примечания.
При скачивании в гостевой ОС должен быть активен сетевой интерфейсный адаптер (Ethernet).
В случае недоступности виртуальной сети для обмена может быть подключен и использован USB-носитель.
После скачивания архива двойным кликом на ссылке (в области Downloads)
открыть zip-архив (сжатую папку) и распаковать в произвольную (временную)
папку его содержимое.
Папка содержит файлы установщика (spice-qxl-wddm-dod-*.msi) для
32-/64-разрядных процессорных архитектур.
После запуска (двойным кликом) на выбранном msi-пакете cистема защиты
Windows 10 (UAC) потребует подтверждения установки ПО, подписанного
публичным сертификатом (Red Hat, Inc).
Дополнительных действий не потребуется, установщик отработает и завершит
работу автоматически.
Рекомендуется убедиться (через Диспетчер устройств), что стандартный
драйвер (VGA-дисплея) сменился на драйвер Red Hat QXL Controller.
Также рекомендуется поменять разрешение экрана и проверить текущие настройки
(из Панели управления Windows Settings):
Рис. 6.25 Изменение разрешения экрана (виртуального дисплея QXL)
6.2.6. Установка ПО инициализации инстанса
Примечание. Пример для подготовки систем на основе Windows Server.
Для успешного осуществления инициализации гостевой ОС при создании
в OpenStack экземпляра виртуальной машины (инстанса), необходимо
ознакомиться с дополнительными инструкциями, выполняемыми при подготовке
образа диска для ВМ с гостевой ОС (Windows):
Полное руководство по подготовке образа диска виртуальной машины
(Image requirements), интегрируемой в инфраструктуру, управляемую
с помощью OpenStack, можно скачать по ссылке:
Согласно описания, на последнем этапе подготовки требуется установка ПО
инициализации Cloudbase-Init,
которому посвящен отдельный веб-ресурс, содержащий сведения о поддерживаемых
гостевых ОС (Supported Windows Versions).
ПО инициализации виртуальных машин (OpenStack Cloud-init), предназначенных
для эксплуатации в виртуальной среде облачной инфраструктуры (OpenStack),
может также упоминаться с сокращением cloud-init. Подробное описание
публично доступно в сети Интернет:
Для скачивания ПО следует перейти по ссылке:
Скачивание и установка данного ПО могут быть произведены непосредственно
на этапе завершения подготовки виртуальной машины в среде гипервизора (KVM),
после установки драйверов паравиртуализации (VirtIO).
Примечания.
При первом посещении указанного (для скачивания) веб-ресурса может потребоваться регистрация.
Скачивание (без регистрации) возможно по ссылке: https://github.com/cloudbase/cloudbase-init.
Внимание.
После выбора стабильной версии (Stable) для процессорной архитектуры,
соответствующей процессорной архитектуре гостевой ОС, в штатном
веб-браузере (IE) потребуется подтверждение.
Выполните установку CloudBase-init, как указано в INT_CloudInit-and-SysPrep.
6.2.7. Сохранение снимка ВМ
По окончании процесса установки Cloudbase-Init рекомендуется сделать
снимок/снапшот ВМ, средствами virt-manager или qemu-img [2].
Из командной строки выполните:
qemu-img create -f qcow2 -b <имя_образа>.img <имя_снэпшота>.img
| [2] |
https://wiki.qemu.org/Documentation/CreateSnapshot Примечания. Созданный снапшот фиксирует состояние образа и позволяет позднее, Необходимо проверить успешность создания образа, для этого запустить ВМ со снапшота. |
6.2.8. Выполнение SYSPREP
Sysprep – средство отсоединения («отвязки») операционной системы от
драйверов/комплектующих конкретного компьютера и отдельных профильных данных.
Такое отсоединение предусматривается для эталонного (золотого) образа
Windows – шаблона с предустановленным состоянием гостевой ОС, содержащего
настройки оптимизации и дополнительно установленное ПО – служебное или
прикладное.
В дальнейшем шаблон гостевой ОС используется для развёртывания однотипных
виртуализованных рабочих столов или виртуальных серверных узлов
(масштабирование инфраструктуры).
Более подробно вопросы выполнения Sysprep (практические инструкции,
содержание файла ответов и т.д.) освещены отдельно (Sysprep).

