При необходимости иметь AD, службы DNS и DHCP проще использовать стандартные в поставке Windows Server. Практически не нуждается в настройке, разве что авторизацию DHCP в DNS включить. А автоматическая регистрация хостов работает «из коробки».
Однако Linux машины обслуживаемые тем же DHCP, что и Windows машины, автоматически не регистрируются в DNS. Да и в DHCP имя хоста пустое.

В случае с Debian, решение проблемы не сложное, скорее всего в других дистрибутивах действия будут аналогичными.
Настройка Dibian
В /etc/dhcp/dhclient.conf добавить строку:
send host-name "hostname";
где hostname — имя Linux хоста
Или автоматически получить имя хоста:
send host-name = gethostname();
Согласно man’у имя может как содержать имя домена, так и не содержать его, с рекомендацией указывать только имя машины, без домена.
option host-name string;
This option specifies the name of the client. The name may or may not be qualified with the local domain name (it is preferable to use the domain-name option to specify the domain name). See RFC 1035 for character set restrictions. This option is only honored by dhclient-script(8) if the hostname for the client machine is not set.
Этим мы заставим DHCP Client при запросе IP адреса передавать имя хоста. Этого более чем достаточно, чтобы в оснастке DHCP сервера появилось полное доменное имя хоста. Мне лишь не понятно, почему указание имени машины при DHCP запросах не является настройкой по-умолчанию, ну да ладно.
Примените изменения любым удобным вам образом, хоть перезагрузкой.
Настройка Windows Server
В оснастке DHCP сервера уже видно полное доменное имя хоста, который мы настраиваем.

Но в DNS новых записей не появилось, хотя DHCP настроен на обновление DNS (я надеюсь, что вы выполнили эту настройку еще когда поднимали AD, впрочем это не сложно сделать и в любое другое время).
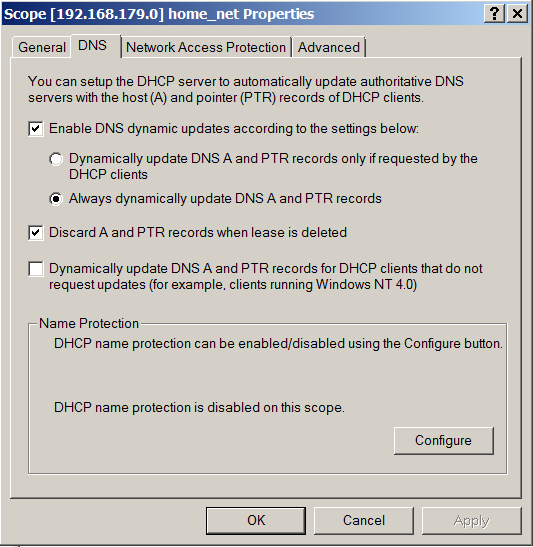
Тут есть два пути. Либо разрешить Nonsecure Dynamic Updates для доменной зоны, либо попросить DHCP сервер обновить DNS. Второй вариант мне кажется более безопасным, а для его настройки нужно поставить аж одну галочку.
В свойствах DHCP сервера, или более локально, в свойствах Scope, на закладке DNS включите:
Dynamically update DNS A and PTR records for DHCP clients that do not request updates (for example, clients running Windows NT 4.0).

На этом всё. При следующем запросе IP адреса у DHCP произойдет регистрация в Windows DNS.
В этой статье будет описан процесс добавления Linux-машины (Ubuntu 20.04) в домен Windows AD.
Шаг 1. Установка пакетов и подготовка
sudo apt updatesudo apt upgrade
После этого установите требуемые пакеты.
sudo apt -y install realmd sssd sssd-tools libnss-sss libpam-sss adcli samba-common-bin oddjob oddjob-mkhomedir packagekit
Далее мы настроим все инструменты. Вам требуется знать:
- Домен: office.local
- IP DNS-сервера: 192.168.0.1
- IP второго DNS-сервера: 192.168.0.2
Шаг 2. Настройка DNS
Откройте конфигурационный файл netplan:
sudo nano /etc/netplan/*.yaml
Если вы видите там «dhcp4: true», то есть ваш DHCP-сервер настроен корректно, переходите к следующему шагу. Если вы настраиваете параметры сетевого подключения вручную, ознакомьтесь с примером настройки:
network:ethernets:enp0s3:addresses:- 192.168.0.15/24gateway4: 192.168.0.10nameservers:addresses: [192.168.0.1, 192.168.0.2]search:- office.localoptional: trueversion: 2
- addresses — это IP, назначаемый сетевой карте;
- gateway4 — IP роутера;
- nameservers — DNS-сервера;
- search — целевой домен.
sudo netplan apply
Шаг 3. Обнаружение домена, присоединение к нему и проверка результата.
В первую очередь требуется обнаружить домен:
realm discover office.local
Вы увидите что-то подобное. Это означает, что настройки сети верны и машина получила ответ от домена. Если нет, вам необходимо проверить настройки сети, домен и работоспособность DNS.
office.localtype: kerberosrealm-name: OFFICE.LOCALdomain-name: office.localconfigured: no...
Затем присоединитесь к домену AD. Замените admin1 на имя администратора и укажите пароль.
realm join -U admin1 office.localPassword for admin1:
Проверьте, возможен ли прием информации о пользователе AD. Замените user1 на имя пользователя вашего домена.
id user1@office.localuid=687821651(user1@office.local) gid=687800512(user1@office.local) groups=687800512(domain users@office.local)
Шаг 4. Последние настройки и авторизация.
Необходимо произвести настройку, чтобы в будущем каждый раз не добавлять имя домена к имени пользователя.
sudo nano /etc/sssd/sssd.conf
Измените значение use_fully_qualified_names на False. Перезагрузите и проверьте:
sudo systemctl restart sssdid useruid=687821651(user1@office.local) gid=687800512(user1@office.local) groups=687800512(domain users@office.local)
Теперь нужно настроить создание домашних каталогов для пользователей AD при входе в систему.
sudo nano /etc/pam.d/common-session#add this line in the end of filesession optional pam_mkhomedir.so skel=/etc/skel umask=077
Войдите в систему как пользователь AD.
su – userPassword:Creating directory '/home/user1@office.local'.user1@ubuntu-server:~$
Это означает, что вы успешно вошли в систему как пользователь AD.
Также вы можете разрешить авторизацию для некоторых пользователей и групп AD или же ограничить других. В приведенном ниже примере настроен запрет для всех пользователей, кроме user0, user1 и группы Main Admins.
sudo realm deny –allsudo realm permit user0@office.local user1@office.localsudo realm permit -g 'Main Admins'
Настройка пользователей AD для получения root-прав такая же, как и для локальных, но выполняется в другом файле.
sudo nano /etc/sudoers.d/admins
Добавьте к нему нужные строки. Например:
user ALL=(ALL) ALL%Domain\ Admins ALL=(ALL) ALL
191028
Санкт-Петербург
Литейный пр., д. 26, Лит. А
+7 (812) 403-06-99
![]()
700
300
ООО «ИТГЛОБАЛКОМ ЛАБС»
191028
Санкт-Петербург
Литейный пр., д. 26, Лит. А
+7 (812) 403-06-99
![]()
700
300
ООО «ИТГЛОБАЛКОМ ЛАБС»
I have several Ubuntu machines (mostly 8.04) that I would like to register their hostnames (or desired hostnames) with my main DNS server running on Windows 2000 so that I can access these machines from any other machine using that DNS server by hostname. Windows clients can do this automatically with the MS client or manually with ipconfig /registerdns. How do I do the equivalent in Linux? I don’t necessarily want to register them with the domain using Likewise Open, unless that is the only way to send DNS entries to the Windows server.
These are static IP’s. I realize I could add the DNS entries on the Windows side manually as well, but I’m not actually in charge of that Windows DNS server.
![]()
jldugger
14.2k19 gold badges73 silver badges129 bronze badges
asked Jun 4, 2009 at 20:50
![]()
Sorry, I forgot to put in the question
that these are static IP’s. I realize
I could add the DNS entries on the
Windows side manually as well, but I’m
not actually in charge of that Windows
DNS server.
If you don’t have control of the DNS server, and if the DNS isn’t set up to allow non-secure updates, and it isn’t set up to update based on DHCP assignments, and you have a static address, then you are probably out of luck.
Since this system has a static address, is there some reason you can’t just contact the person who runs the DNS server and ask them to add a record for your system?
![]()
TRiG
1,1672 gold badges13 silver badges30 bronze badges
answered Jun 4, 2009 at 21:43
![]()
ZoredacheZoredache
130k40 gold badges271 silver badges414 bronze badges
1
If you want the Linux machines to update DNS themselves, then the DNS zone(s) must be configured for nonsecure dynamic updates. Then if you have the Samba client installed, you can update the record manually like this:
net ads dns register -P
I’m not sure if this command requires you to be on the domain though.
answered Jun 4, 2009 at 21:02
![]()
Mike ConigliaroMike Conigliaro
3,1452 gold badges24 silver badges24 bronze badges
3
Have you considered configuring your Windows DHCP server to update DNS entries from the DHCP leases? This could achieve the desired result without any changes on the DNS server or Linux side of things.
answered Jun 4, 2009 at 20:54
![]()
Kevin KuphalKevin Kuphal
9,0941 gold badge34 silver badges41 bronze badges
2
This was resolved here using the standard Linux utility nsupdate and initial collaboration from your DNS server administrator.
![]()
answered Jun 15, 2016 at 12:02
![]()
fcmfcm
4181 gold badge3 silver badges13 bronze badges
1
While Linux has proliferated extensively in the server arena in the recent past, client networks are still dominated by Windows devices. This means, things that we take for granted in a client environment such as DDNS are not as matured as they are in Windows environment. One may ask whether the recent surge in Linux based clients such as IoT devices has changed this equation. But the nature of these devices is different from Windows based clients that they mostly rely on outbound connection to internet. Since they seldom require other hosts to initiate connection to them, their operation doesn’t rely much on Dynamic DNS.
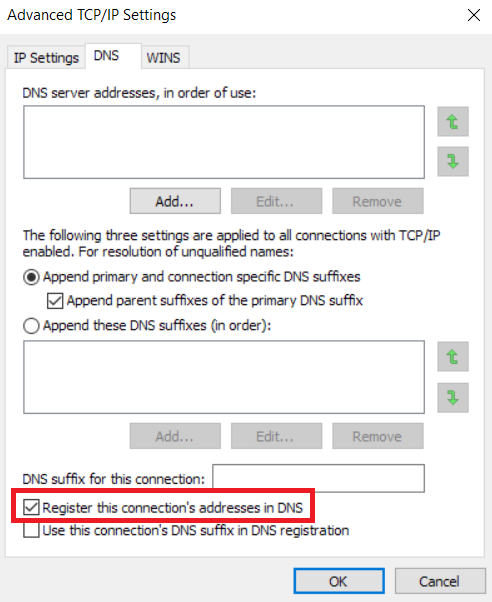
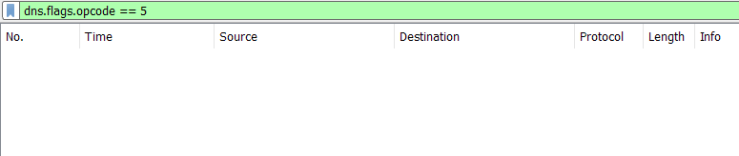
So, what does it take to make a Linux client register dynamically in a Windows environment? At its basic, the entire process relies on Dynamic DNS as explained in RFC2136. In a traditional windows environment with AD, this process is taken care by client OS. Every time a Windows PC gets an IP address from DHCP server, it would send a DNS Update (Opcode = 5) request to its registered DNS server. Performed manually, this is same as typing “ipconfig /registerdns” at an elevated command prompt. This behaviour can be modified by accessing DNS section of Advanced TCP/IP settings of a network adapter.
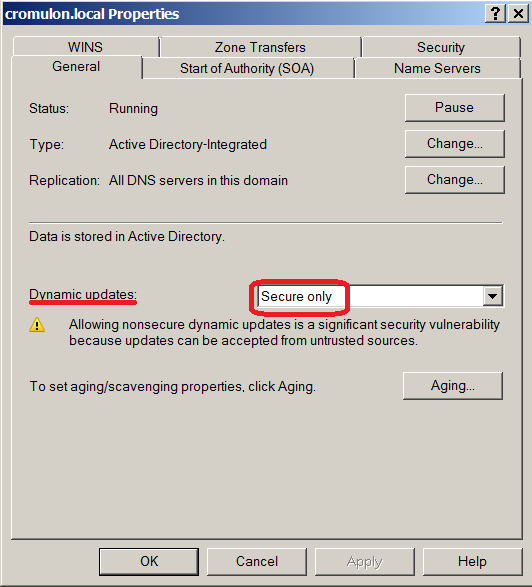
When we ask a Linux client to do the same (later I will explain how it can be configured to ask), it won’t work unless the DNS server is configured to accept “Insecure updates” (Which is a major security risk if you need to ask).
Take a look at the capture of Linux client performing DNS update, you can see that the server comes back with a UPDATE REFUSED response.

This is because our DNS server is enabled with secure updates which means only authenticated clients can send update.
The client is expected to send a transaction signature along with the update request. There are different types of signatures such as a TSIG resource or the SIG(0) or GSS-TSIG signatures. In Windows world however, only GSS-TSIG signatures as described in RFC3645 are understood and accepted.
Looking at a capture from a Windows PC joined to domain, one can see the Windows Device sending Update request with GSS-TSIG resource.

Given this background, let us explore some of the options available to setup DDNS for Linux based clients. In this series of posts, I will explore 3 options:
- Configure DHCP server to perform DNS registration on behalf of the clients
- Join the Linux devices to AD domain and configure them to dynamically update
- Setup a new sub-domain running a dedicated Linux BIND server and configure DNS forwarding on Microsoft DNS server.
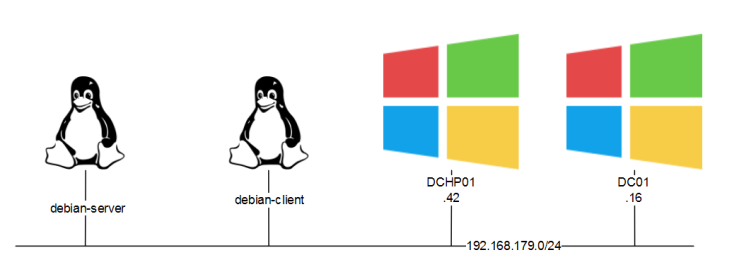
Our environment has the following setup:
- Microsoft Active Directory environment with DNS server installed in Domain controller and a DHCP server running separately on a different host. All are running on Windows Server 2008 R2.
- DNS is configured to accept only Secure updates.
- Two Linux devices running Debian Stretch operating system. One of them will act as DNS server in one of the scenarios.
The solutions we discuss should meet the following objectives:
- Update DNS when the device gets an IP address
- Perform periodic update to DNS server to protect against expiry
- Fully automated with very little or no hand-coding on client devices, assume no automation tools like Puppet or Chef
- Scalable to hundreds or thousands of devices
Point 3 is important to me since I had to work out a solution at work where we are using hundreds of Raspberry Pi’s, all booting the same image cloned on to flash disks. So, editing config files on each of them is not an option (we will come to this later).
Configuring DHCP server to perform DNS registration on behalf of the clients
This is the simplest and most reliable solution of the available options. This method makes use of DHCP option 81 as defined in RFC4702, which is used to convey a client’s FQDN to a DHCP server as part of DHCP process.
An aside: RFC doesn’t mandate whether a DHCP server should register client’s DNS or not. It is left to site-specific policies, which may differ per the security context of the site.
The default setting in a Microsoft DHCP server scope is as follows (Right click on scope name -> Properties to reach here):
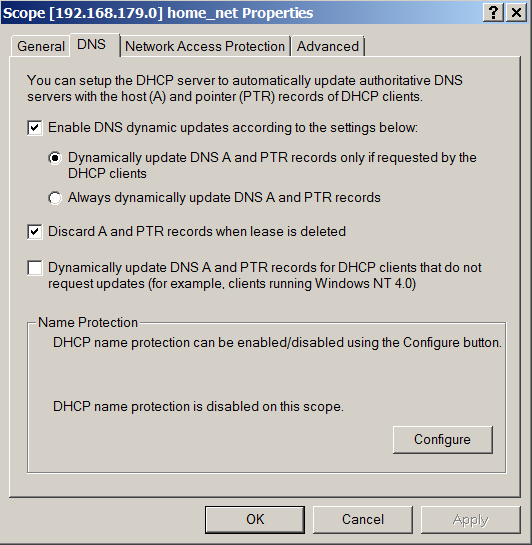
Understandably, this only updates to DNS server if requested by the client. What happens if we select the option to “Always dynamically update DNS A and PTR records”? Is that what we want?
If you trigger a DHCP request from the client, you will notice that this doesn’t work.
This setting merely controls whether a DHCP server should update ‘A’ record or not. The label “Always dynamically update DNS A and PTR records” is misleading since it applies only for the clients that request a DNS update. By default, a client is responsible for updating the A record and DHCP server is responsible for updating the PTR record. Selecting the second option forces DHCP server to update A record as well. But the prerequisite is that the client should request for DNS update.
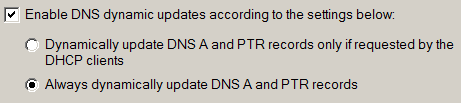
The two options above correspond to the two cases discussed in RFC4702

For our Linux clients, the option we need is the last check box. Let us turn this on and trigger a DHCP request from our client.

When we check the DNS server, we can see that the A record successfully is created.

On the capture, we can see secure DNS update message being sent from the DHCP server (Note that the DNS clients always tries insecure updates first and gets rejected by the server).

For a home environment, this is almost enough. But for production environments, with multiple DHCP servers, this is not enough. The problem is that, in such setup the DHCP server becomes the owner of the A and PTR records (see below). It is fine as long as the DHCP server is alive to create and remove records. But when it goes down, its peer DHCP server won’t be able to do anything about those records.
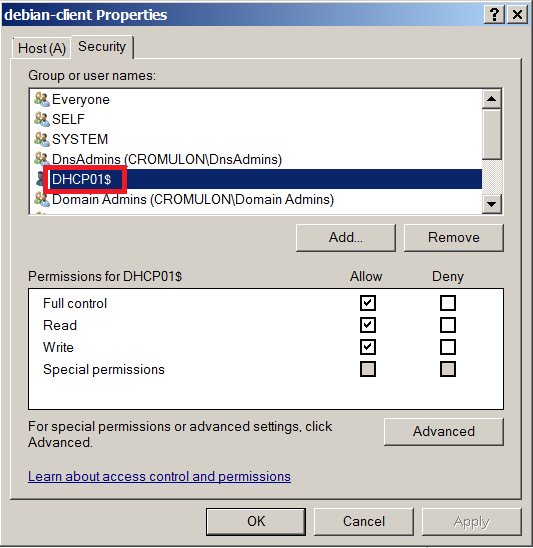
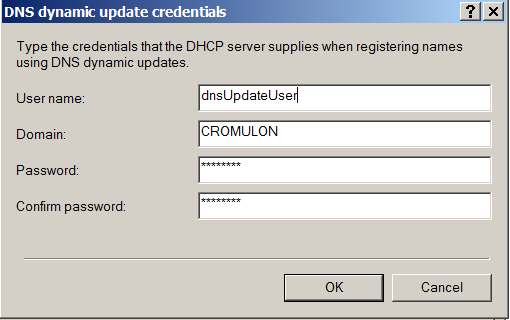
This link explains the issue in more detail. Let us follow the advice, create a dedicated user account for updating DNS and delete the old record with DHCP server as owner. Do not grant any extra privilege to this account. Just adding to DNSUpdateProxy group should be sufficient (Right click on IPv4 -> Properties -> Advanced).
As usual, let us go ahead to trigger an update.
As expected, new A and PTR record gets created.

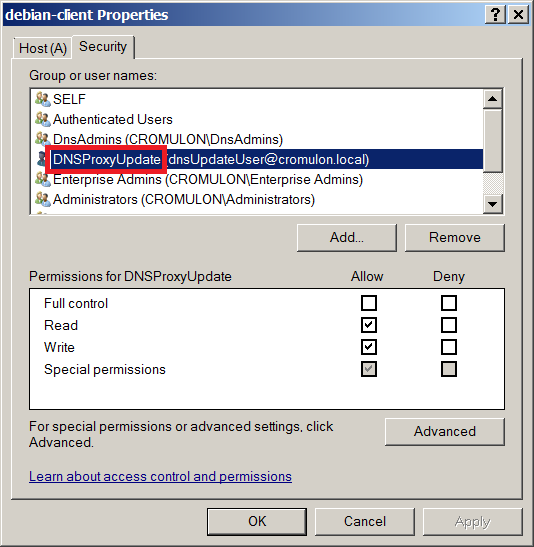
If we check the ownership, we can find that the record is owned by DNSProxyUpdate group.
Finally, let us discuss the option called “Name Protection” at the bottom of the dialog box.
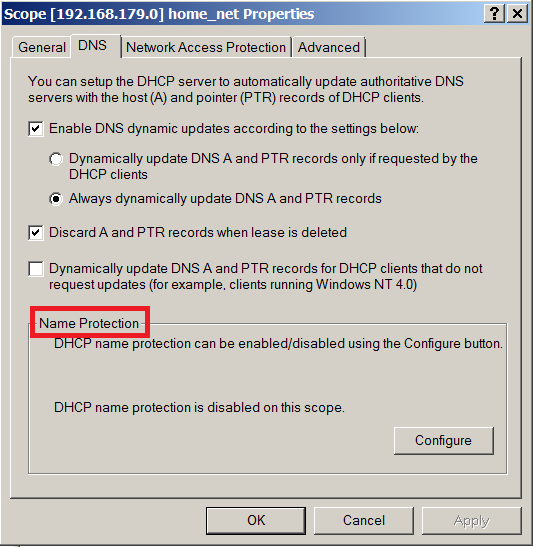
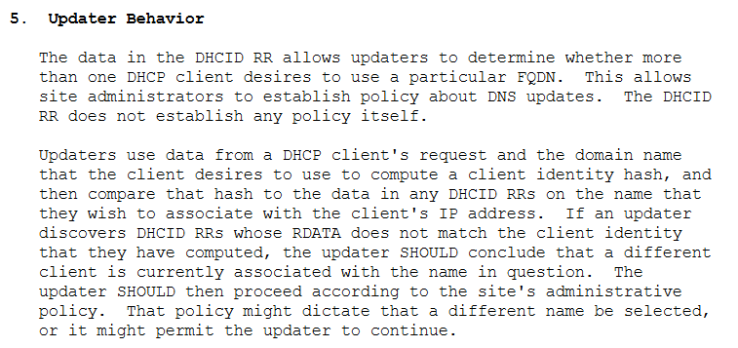
This forces DHCP server to manage the entire lifecycle of your client’s A and PTR records. If you are going to let your DHCP server manage client’s A record, I don’t see any reason to keep this disabled. It will also protect you from “Name Squatting” by offline clients. RFC4701 describes the problem as:

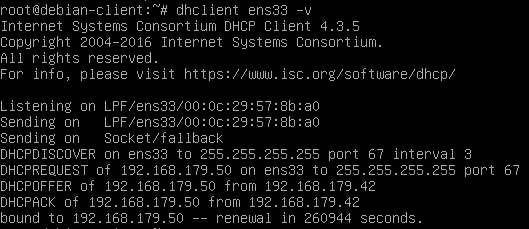
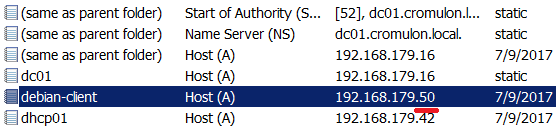
Let us see what it means to turn on this option. First, we keep it disabled and bring two clients online with same hostname, one after other. All is well when the first client comes online and gets an IP address 192.168.179.50.

DNS also gets updated accordingly.
Let us bring another Linux client online and change the hostname to same as this host. Then perform a DHCP request from this host.

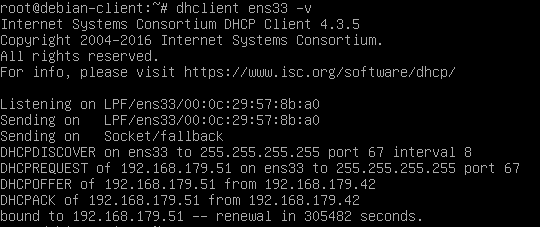
DHCP server assigns IP address 192.168.179.51 and sends an update to DNS server. Note that the DHCP server makes no fuss about two hosts sharing the same hostname. For all it knows, it could be the same host with multiple interfaces.

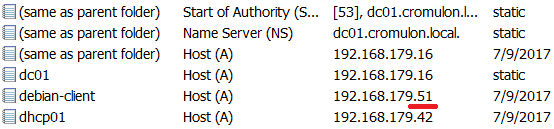
On the DNS sever side, we see that it accepts this update without any hesitation. The only problem is that this overwrites the existing record, while the client is still online. So, anyone trying to talk the first node ends up talking to the second node.
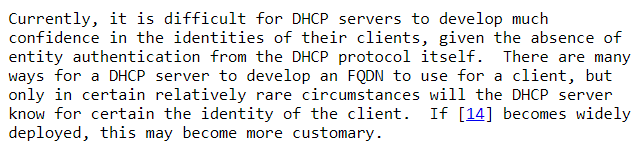
Clearly, DHCP server is not a reliable source of identity. RFC4703 briefly mentions the inability of DHCP server to provide any sort of assurance.
Let us see what happens when we enable “Name Protection”.
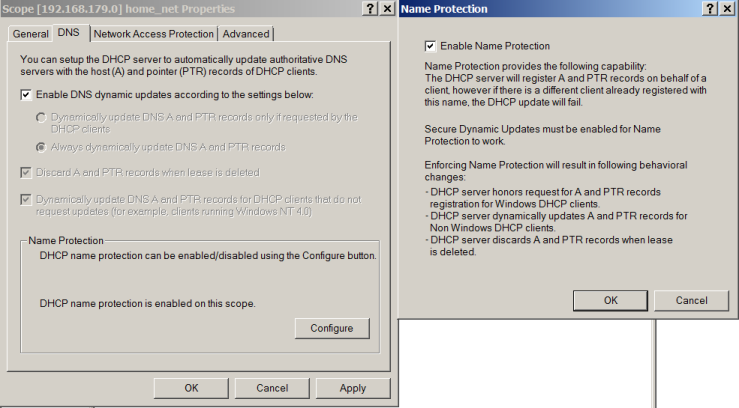
As soon as we enable this option, first thing we notice is that all other options are greyed out. This is because, with Name Protection enabled, it is always the responsibility of DHCP server to perform both A record and PTR record updates.
Let us wipe the slate clean, by releasing IP address from both the clients and deleting the existing DNS & DHCP records.
Now when you bring the first Linux client online, you can see that the DHCP server performs a new type of record registration called DHCID.

A new record type DHCID appears in the DNS server.

Let us bring up the impostor and request DHCP address. It gets an IP address of 192.168.179.51.
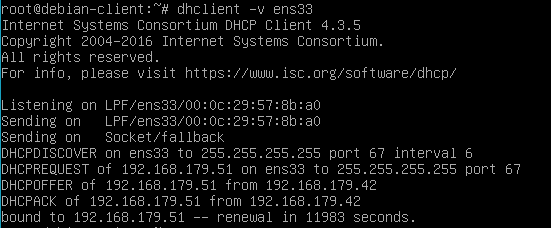
As usual, DHCP server is very generous about having two hosts sharing the same hostname.

But no new DNS entry is created.

Looking at the capture, we can see that the DNS registration fails with a response that RRset does not exist.

This message means that DHCID value calculated from the new update packet doesn’t match with any DHCID RR’s stored in the server. This behaviour is described in RFC4701.
This is as much as we need to know about configuring a Microsoft DHCP server to perform Dynamic DNS for Linux clients. In the upcoming posts, let us explore the other two options.
Содержание
Введение
Зачастую возникает необходимость ввести Linux-машину в существующий домен Windows. Например, чтобы сделать файловый сервер с помощью Samba. Сделать это очень просто, для этого вам понадобятся клиент Kerberos, Samba и Winbind.
Перед установкой желательно обновиться:
sudo aptitude update
sudo aptitude upgrade
Установить всё это добро можно командой:
sudo aptitude install krb5-user samba winbind
Также может понадобиться установить следующие библиотеки:
sudo aptitude install libpam-krb5 libpam-winbind libnss-winbind
Либо, если вы используете Ubuntu Desktop, те же пакеты можно поставить через менеджер пакетов Synaptic.
Далее вам потребуется настроить все вышеперечисленные инструменты для работы с вашим доменом. Допустим, вы хотите войти в домен DOMAIN.COM, доменконтроллером которого является сервер dc.domain.com с IP адресом 192.168.0.1. Этот же сервер является и первичным DNS сервером домена. Кроме того допустим у вас есть второй доменконтроллер1), он же DNS — dc2.domain.com с IP 192.168.0.2. Ваш же компьютер будет называться smbsrv01.
Настройка DNS
Для начала необходимо изменить настройки DNS на вашей машине, прописав в качестве DNS сервера доменконтроллер2) и в качестве домена поиска — нужный домен.
Если у вас статический IP-адрес, то в Ubuntu Desktop это можно сделать через Network Manager, в Ubuntu Server необходимо изменить содержимое файла /etc/resolv.conf на примерно такое:
domain domain.com
search domain.com
nameserver 192.168.0.1
nameserver 192.168.0.2
В современных дистрибутивах файл resolv.conf создается автоматически и править вручную его не нужно.
Для получение нужного результата нужно добавить необходимые изменения в файл: /etc/resolvconf/resolv.conf.d/head
Данные которые будут добавлены в него, будут автоматически вставлены в файл /etc/resolv.conf
Если IP-адрес динамический и присваивается DHCP сервером то после перезагрузки resolv.conf может формироваться «неправильный» resolv.conf’ , например присутствует только один nameserver 192.168.0.1 и не указаны domain и search. Нужно отредактировать /etc/dhcp/dhclient.conf. Чтобы появились записи domain и search нужно убрать комментарий перед строкой supersede domain-name, и вписать свой домен:
supersede domain-name "domain.com";
Чтобы добавить еще один nameserver нужно убрать комментарий перед prepend domain-name-servers и указать ip сервера:
prepend domain-name-servers 192.168.0.2;
Для применения изменений остается перезапустить службу:
/etc/init.d/networking restart
Теперь убедитесь, что вы задали нужное имя компьютера в файле /etc/hostname:
smbsrv01
Кроме того необходимо отредактировать файл /etc/hosts так, чтобы в нём была запись с полным доменным именем компьютера и обязательно коротким именем хоста, ссылающаяся на один из внутренних IP:
# Имена этого компьютера
127.0.0.1	localhost
127.0.1.1	smbsrv01.domain.com	smbsrv01
Сразу нужно проверить что нормально пингуется наш контроллер домена, по короткому и полному имени, чтобы в будушем не получать ошибки что контроллер домена не найден:
ping dc
ping dc.domain.com
Не обязательно, но если вы что-то поменяете — перезагрузите компьютер для применения изменений.
Настройка синхронизации времени
Далее необходимо настроить синхронизацию времени с доменконтроллером. Если разница будет более 5 минут мы не сможем получить лист от Kerberos.
Для единовременной синхронизации можно воспользоваться командой:
sudo net time set dc
Если в сети существует сервер точного времени, то можно воспользоваться им или любым публичным:
ntpdate ntp.mobatime.ru
Автоматическая же синхронизация настраивается с помощью ntpd, это демон будет периодически выполнять синхронизацию. Для начала его необходимо установить:
sudo aptitude install ntp
Теперь исправьте файл /etc/ntp.conf, добавив в него информацию о вашем сервере времени:
# You do need to talk to an NTP server or two (or three).
server dc.domain.com
После чего перезапустите демон ntpd:
sudo /etc/init.d/ntp restart
Теперь пора настраивать непосредственно взаимодействие с доменом.
Настройка авторизации через Kerberos
Начнём с настройки авторизации в домене через протокол Kerberos. Вам потребуется изменить файл /etc/krb5.conf. В общем случае он выглядит так:
[libdefaults]
	default_realm = DOMAIN.COM
	kdc_timesync = 1
	ccache_type = 4
	forwardable = true
	proxiable = true
	v4_instance_resolve = false
	v4_name_convert = {
		host = {
			rcmd = host
			ftp = ftp
		}
		plain = {
			something = something-else
		}
	}
	fcc-mit-ticketflags = true

[realms]
	DOMAIN.COM = {
		kdc = dc
		kdc = dc2
		admin_server = dc
		default_domain = DOMAIN.COM
	}

[domain_realm]
	.domain.com = DOMAIN.COM
	domain.com = DOMAIN.COM
[login]
	krb4_convert = false
	krb4_get_tickets = false
Вам, конечно, нужно изменить domain.com на ваш домен и dc и dc2 на ваши доменконтроллеры. Кстати, возможно вам понадобится написать полные имена доменконтроллеров dc.domain.com и dc2.domain.com. Поскольку у меня прописан домен поиска в DNS, то мне это делать не нужно.
Обратите особое внимание на регистр написания имени домена — везде, где домен написан в верхнем регистре, его обязательно нужно писать именно в верхнем регистре. Иначе волшебным образом ничего может не заработать.
Это не все возможные опции настройки Kerberos, только основные. Однако их обычно достаточно.
Теперь настало время проверить, что мы можем авторизоваться в домене. Для этого выполните команду
kinit username@DOMAIN.COM
Вместо username естественно стоит вписать имя существующего пользователя домена.
Имя домена необходимо писать заглавными буквами!
Если вы не получили никаких ошибок — значит вы настроили всё верно и домен отдаёт вам билет Kerberos. Кстати, некоторые распространённые ошибки перечислены чуть ниже.
Убедиться в том, что билет получен, можно выполнив команду
klist
Удалить все билеты (они вам вообще говоря не нужны) можно командой
kdestroy
Итак, будем считать, что авторизацию вы настроили, пора настроить непосредственно вход в домен, об этом после списка распространённых ошибок kinit.
Распространённые ошибки kinit
kinit(v5): Clock skew too great while getting initial credentials
Это значит, что у вашего компьютера не синхронизировано время с доменконтроллером (см. выше).
kinit(v5): Preauthentication failed while getting initial credentials
Вы ввели неверный пароль.
kinit(v5): KDC reply did not match expectations while getting initial credentials
Самая странная ошибка. Убедитесь, что имя realm в krb5.conf, а так же домен в команде kinit введены большими буквами:
DOMAIN.COM = {
# ...
kinit username@DOMAIN.COM
kinit(v5): Client not found in Kerberos database while getting initial credentials
Указанного пользователя не существует в домене.
Настройка Samba и вход в домен
Для того, чтобы войти в домен, необходимо прописать правильные настройки в файле /etc/samba/smb.conf. На данном этапе вас должны интересовать только некоторые опции из секции [global]. Ниже — пример части файла конфигурации Samba с комментариями по поводу значения важных параметров:
[global]
   # Эти две опции нужно писать именно в заглавном регистре, причём workgroup без
   # последней секции после точки, а realm - полное имя домена
   workgroup = DOMAIN
   realm = DOMAIN.COM

   # Эти две опции отвечают как раз за авторизацию через AD
   security = ADS
   encrypt passwords = true
   # Просто важные
   dns proxy = no
   socket options = TCP_NODELAY

   # Если вы не хотите, чтобы самба пыталась при случае вылезти в лидеры в домене или рабочей группе,
   # или даже стать доменконтроллером, то всегда прописывайте эти пять опций именно в таком виде
   domain master = no
   local master = no
   preferred master = no
   os level = 0
   domain logons = no

   # Отключить поддержку принтеров
   load printers = no
   show add printer wizard = no
   printcap name = /dev/null
   disable spoolss = yes
После того, как вы отредактируете smb.conf выполните команду
testparm
Она проверит вашу конфигурацию на ошибки и выдаст суммарную сводку о нём:
# testparm
Load smb config files from /etc/samba/smb.conf
Loaded services file OK.
Server role: ROLE_DOMAIN_MEMBER
Press enter to see a dump of your service definitions
Как видно мы задали правильные параметры для того, чтобы наш компьютер стал членом домена. Теперь пора попытаться непосредственно войти в домен. Для этого введите команду:
net ads join -U username -D DOMAIN
И в случае успеха вы увидите что-то похожее на:
# net ads join -U username -D DOMAIN
Enter username's password:
Using short domain name -- DOMAIN
Joined 'SMBSRV01' to realm 'domain.com'
Используемые параметры команды net
-U username%password: Обязательный параметр, вместо username необходимо подставить имя пользователя с правами администратора домена, и указать пароль.
-D DOMAIN: DOMAIN — собственно сам домен, домен можно и не указывать, но лучше всё же это всегда делать — хуже не будет.
-S win_domain_controller: win_domain_controller, можно не указывать, но бывают случаи когда автоматически сервер не находит контроллер домена.
createcomputer=«OU/OU/…» : В AD часто используется OU (Organizational Unit), есть в корне домена OU = Office, в нем OU = Cabinet, чтобы сразу добавить в нужный можно указать так: sudo net ads join -U username createcomputer=«Office/Cabinet».
Если больше никаких сообщений нет — значит всё хорошо. Попробуйте попинговать свой компьютер по имени с другого члена домена, чтобы убедиться, что в домене всё прописалось так, как надо.
Так же можно набрать команду:
net ads testjoin
Если все хорошо, можно увидеть:
#net ads testjoin
Join is OK
Но иногда после сообщения о присоединении к домену выдаётся ошибка наподобие3):
DNS update failed!
Это не очень хорошо, и в этом случае рекомендуется ещё раз прочитать раздел про настройку DNS чуть выше и понять, что же вы сделали не так. После этого нужно удалить компьютер из домена и попытаться ввести его заново. Если вы твердо уверены, что всё настроили верно, а DNS всё равно не обновляется, то можно внести вручную запись для вашего компьютера на ваш DNS сервер и всё будет работать. Конечно, если нет никаких других ошибок, и вы успешно вошли в домен. Однако лучше всё же разберитесь, почему DNS не обновляется автоматически. Это может быть связано не только с вашим компьютером, но и с некорректной настройкой AD.
Прежде чем выяснять, почему же не обновляется DNS, не забудьте перезагрузить компьютер после введения в домен! Вполне возможно, что это решит проблему.
Если всё прошло без ошибок, то поздравляем, вы успешно вошли в домен! Можете заглянуть в AD и убедиться в этом. Кроме того хорошо бы проверить, что вы можете видеть ресурсы в домене. Для этого установите smbclient:
sudo aptitude install smbclient
Теперь можно просматривать ресурсы компьютеров домена. Но для этого нужно иметь билет kerberos, т.е. если мы их удалили, то получаем опять через kinit (см. выше). Посмотрим какие ресурсы предоставлены в сеть компьютером workstation:
smbclient -k -L workstation
Вы должны увидеть список общих ресурсов на этом компьютере.
Настройка Winbind
Если вам необходимо как-либо работать с пользователями домена, например, настраивать SMB-шары с разграничением доступа, то вам понадобится кроме самой Samba ещё и Winbind — специальный демон, служащий для связи локальной системы управления пользователями и группами Linux с сервером Active Directory. Проще говоря Winbind нужен, если вы хотите видеть пользователей домена на своём компьютере с Ubuntu.
Winbind позволяет спроецировать всех пользователей и все группы AD в вашу Linux систему, присвоив им ID из заданного диапазона. Таким образом вы сможете назначать пользователей домена владельцами папок и файлов на вашем компьютере и выполнять любые другие операции, завязанные на пользователей и группы.
Для настройки Winbind используется всё тот же файл /etc/samba/smb.conf. Добавьте в секцию [global] следующие строки:
   # Опции сопоставления доменных пользователей и виртуальных пользователей в системе через Winbind.
   # Диапазоны идентификаторов для виртуальных пользователей и групп.
   idmap uid = 10000 - 40000
   idmap gid = 10000 - 40000
   # Эти опции не стоит выключать.
   winbind enum groups = yes
   winbind enum users = yes
   # Использовать домен по умолчанию для имён пользователей. Без этой опции имена пользователей и групп
   # будут использоваться с доменом, т.е. вместо username - DOMAINusername.
   # Возможно именно это вам и нужно, однако обычно проще этот параметр включить.
   winbind use default domain = yes
   # Если вы хотите разрещить использовать командную строку для пользователей домена, то
   # добавьте следующую строку, иначе в качестве shell'а будет вызываться /bin/false
   template shell = /bin/bash
   # Для автоматического обновления билета Kerberos модулем pam_winbind.so нужно добавить строчку
   winbind refresh tickets = yes
Параметры :
idmap uid = 10000 — 40000
idmap gid = 10000 — 40000
в новых версиях Samba уже устарели и при проверке конфига самбы с помощью testparm
будет выдваться предупреждение:
WARNING: The «idmap uid» option is deprecated
WARNING: The «idmap gid» option is deprecated
Чтобы убрать предупреждения нужно заменить эти строки на новые:
idmap config * : range = 10000-20000
idmap config * : backend = tdb
Теперь перезапустите демон Winbind и Samba в следующем порядке:
sudo /etc/init.d/winbind stop
sudo smbd restart
sudo /etc/init.d/winbind start
Запускаем
sudo testparm
Смотрим есть ли ошибки или предупреждения, если появится:
«rlimit_max: rlimit_max (1024) below minimum Windows limit (16384)»
Без перезагрузки можно устранить так:
ulimit -n 16384
Для сохранения после перезагрузки отредактировать файл /etc/security/limits.conf
# Добавить в конец файла строки:
*               -    nofile            16384
root            -    nofile            16384
После перезапуска проверьте, что Winbind установил доверительные отношения с AD командой:
# wbinfo -t
checking the trust secret for domain DCN via RPC calls succeeded
А так же, что Winbind увидел пользователей и группы из AD командами4):
wbinfo -u
wbinfo -g
Эти две команды должны выдать список пользователей и групп из домена соответственно. Либо с префиксом DOMAIN, либо без него — в зависимости от того, какое значение вы указали параметру «winbind use default domain» в smb.conf.
Итак, Winbind работает, однако в систему он ещё не интегрирован.
Добавление Winbind в качестве источника пользователей и групп
Для того, чтобы ваша Ubuntu прозрачно работала с пользователями домена, в частности, чтобы вы могли назначать пользователей домена владельцами папок и файлов, необходимо указать Ubuntu использовать Winbind как дополнительный источник информации о пользователях и группах.
Для этого измените две строчки в файле /etc/nsswitch.conf:
passwd:         compat
group:          compat
добавив к ним в конец winbind:
passwd:         compat winbind
group:          compat winbind
также рекомендую привести строку files в файле /etc/nsswitch.conf к виду:
files: dns mdns4_minimal[NotFoud=return] mdns4
ubuntu server 14.04, файл /etc/nsswitch.conf не содержал строку
«files: dns mdns4_minimal[NotFoud=return] mdns4»
вместо неё было:
«hosts: files mdns4_minimal [NOTFOUND=return] dns wins»
Которую я преобразовал в:
«hosts: dns mdns4_minimal[NotFoud=return] mdns4 files»
после чего всё заработало
Теперь проверьте, что Ubuntu запрашивает у Winbind информацию о пользователях и группах, выполнив
getent passwd
getent group
Первая команда должна вам вернуть всё содержимое вашего файла /etc/passwd, то есть ваших локальных пользователей, плюс пользователей домена с ID из заданного вами в smb.conf диапазона. Вторая должна сделать тоже самое для групп.
Теперь вы можете взять любого пользователя домена и сделать его, например, владельцем какого-нибудь файла.
Авторизация в Ubuntu через пользователей домена
Несмотря на то, что все пользователи домена фактически стали полноценными пользователями системы (в чём можно убедиться, выполнив последние две команды из предыдущего раздела), зайти ни под кем из них в систему всё ещё нельзя. Для включения возможности авторизации пользователей домена на компьютере с Ubuntu необходимо настроить PAM на работу с Winbind.
Он-лайн авторизация
Для Ubuntu 10.04 и выше добавьте всего одну строку в файле /etc/pam.d/common-session, т.к. PAM и так неплохо справляется с авторизацией:
session optional pam_mkhomedir.so skel=/etc/skel/ umask=0077
Для Ubuntu 13.10 чтобы появилось поле ручного ввода логина необходимо в любой файл из папки /etc/lightdm/lightdm.conf/ снизу добавить строку:
greeter-show-manual-login=true
Для Ubuntu 9.10 и ниже придется редактировать несколько файлов (но никто не запрещает использовать этот способ и в 10.04 — он тоже работает):
Последовательность строк в файлах имеет значение!
/etc/pam.d/common-auth
auth        required      pam_env.so
auth        sufficient    pam_unix.so likeauth nullok try_first_pass
auth        sufficient    pam_winbind.so use_first_pass krb5_auth krb5_ccache_type=FILE
auth        required      pam_deny.so
/etc/pam.d/common-account
account     sufficient    pam_winbind.so
account     required      pam_unix.so
/etc/pam.d/common-session
session     optional      pam_mkhomedir.so skel=/etc/skel/ umask=0077
session     optional      pam_ck_connector.so nox11
session     required      pam_limits.so
session     required      pam_env.so
session     required      pam_unix.so
/etc/pam.d/common-password
password    sufficient    pam_unix.so try_first_pass use_authtok nullok sha512 shadow
password    sufficient    pam_winbind.so
password    required      pam_deny.so
И, наконец, необходимо перенести запуск Winbind при загрузке системы после всех остальных служб (по умолчанию он запускается с индексом 20). Для этого в терминале выполните следующую команду:
sudo bash -c "for i in 2 3 4 5; do mv /etc/rc$i.d/S20winbind /etc/rc$i.d/S99winbind; done"
Что эквивалентно запуску для каждого уровня (в примере — 4) команды:
mv /etc/rc4.d/S20winbind /etc/rc4.d/S99winbind
В некоторых случаях winbind может иметь иной уровень запуска (например, S02winbind). Поэтому сначала проверьте имена файлов, вполнив команду «ls /etc/rc{2,3,4,5}.d/ | grep winbind» (без кавычек).
Готово, все настройки завершены. Перезагружайтесь и пытайтесь войти с учетной записью пользователя домена.
Офф-лайн авторизация
Часто возникает ситуация, когда домен-контроллер недоступен по различным причинам — профилактика, отключение света или вы принесли ноутбук домой и хотите поработать. В этом случае для Winbind можно настроить кэширование учетных записей пользователей домена. Для этого необходимо сделать следующее.
Добавьте в секцию [global] файла /etc/samba/smb.conf следующие строки:
[global]
   # Возможность оффлайн-авторизации при недоступности доменконтроллера
   winbind offline logon = yes
   # Период кэширования учетных записей, по умолчанию равен 300 секунд
   winbind cache time = 300
   # Необязательная настройка, но избавляет от нудных пауз, указываем контроллер домена dc,
   # можно указать и ip, но это является плохим тоном
   password server = dc
Обычно этого достаточно. Если же возникают ошибки, то необходимо создать файл /etc/security/pam_winbind.conf со следующим содержанием5):
Внимание! При использовании советов ниже может возникать совершенно случайная ошибка «Сбой аутентификации»! Поэтому все что Вы делаете, Вы делаете на свой страх и риск!
#
# pam_winbind configuration file
#
# /etc/security/pam_winbind.conf
#
[global]
  # turn on debugging
  debug = no
  # request a cached login if possible
  # (needs "winbind offline logon = yes" in smb.conf)
  cached_login = yes
  # authenticate using kerberos
  krb5_auth = yes
  # when using kerberos, request a "FILE" krb5 credential cache type
  # (leave empty to just do krb5 authentication but not have a ticket
  # afterwards)
  krb5_ccache_type = FILE
  # make successful authentication dependend on membership of one SID
  # (can also take a name)
  ;require_membership_of =
  silent = yes
Файл /etc/pam.d/gnome-screensaver в таком случае принимает вид:
auth    sufficient      pam_unix.so nullok_secure
auth    sufficient      pam_winbind.so use_first_pass
auth    required        pam_deny.so
А также изменяется файл /etc/pam.d/common-auth:
auth    optional        pam_group.so
auth    sufficient      pam_unix.so nullok_secure  use_first_pass
auth    sufficient      pam_winbind.so use_first_pass
auth    required        pam_deny.so
Ссылки
Для того, чтобы linux машина регистрировала себя в Windows DNS после получения IP адреса по DHCP нужно сделать следующее.
На linux машине
Centos/RedHat:
в /etc/sysconfig/network-scripts/ifcfg-eth0 добавить
DHCP_HOSTNAME=manager-pc
Лучше использовать только имя хоста, без домена.
Перезапустить сеть:
systemctl restart network
Говорят, что добавление DHCP_HOSTNAME в /etc/sysconfig/network тоже работает.
Ubuntu:
$ sudo vi /etc/dhcp/dhclient.conf
добавить:
send host-name "manager-pc"; или send host-name = gethostname();
Лучше использовать только имя хоста, без домена.
Сохранить, обновить адрес:
$ sudo dhclient eth0

$ sudo dhclient interface-name
Таким образом мы заставим DHCP Client при запросе IP адреса передавать имя хоста.
На DNS сервере:
На Windows сервере нужно поставить галочку “Dynamically update DNS A and PTR records for DHCP client that do not request updates (for example, clients running Windows NT 4.0)” в свойствах сервера или домена Start > Admin Tools > DHCP > [server] > IPv4 > Scope > Properties > DNS.
ъЕсли при этом нужно поменять имя хоста:
hostname manager-pc
в /etc/hostname
manager-pc
в /etc/hosts добавить
127.0.0.1 localhost localhost.localdomain localhost4 localhost4.localdomain4 manager-pc manager-pc.domain.ru
::1 localhost localhost.localdomain localhost6 localhost6.localdomain6
Linux (Unix-like) servers are very popular choice in the tech world. A majority of web and file servers are hosted on Unix and Unix-like operating systems. At the same time Microsoft Windows Servers are utilized by all major organization for its easy-to-use features such as Active Directory Domain Services, also simply known as, domains. If you have a mixed environment with both Linux and Windows servers or Linux desktops (end devices) and Windows servers, you need to be able to Windows domain join Linux machines. This is a step-by-step guide on how to domain join a CentOS, which is similar to RHEL (Red Hat Enterprise Linux) to an existing Windows Domain.
You may watch the video instead of using this article.
Preparation
You should have a Windows Server (in this example Windows Server 2019) with the server promoted to an Active Directory Domain Services (AD-DS) domain.
A Linux machine with OS and packages updates done so the system and the repository are up-to-date. In this demonstration, we will be using CentOS 8. The command for update is yum update. If you are using other versions of Linux other than CentOS or RHEL, please use the appropriate commands (for example, Ubuntu, it would be apt-get update and apt-get upgrade).

Step-by-step Guide
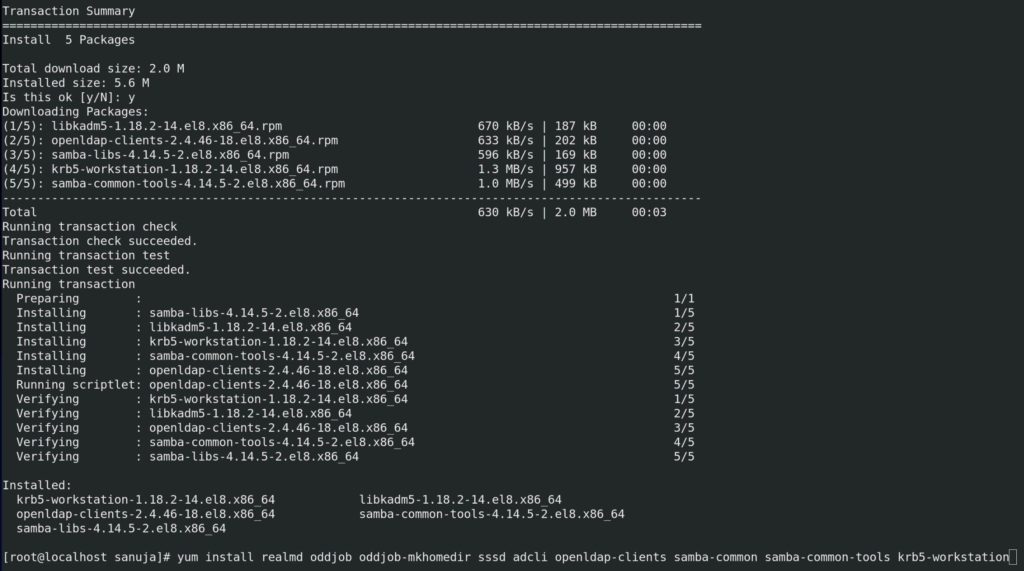
Step 1: On the Linux machine, install the following packages needed for the domain join process that includes Kerberos, Samba, Realmd and few others.
realmd
oddjob
oddjob-mkhomedir
sssd
adcli
openldap-clients
samba-common
samba-common-tools
krb5-workstation
You may copy and paste the following combined command in CentOS 8:
yum install realmd oddjob oddjob-mkhomedir sssd adcli openldap-clients samba-common samba-common-tools krb5-workstation
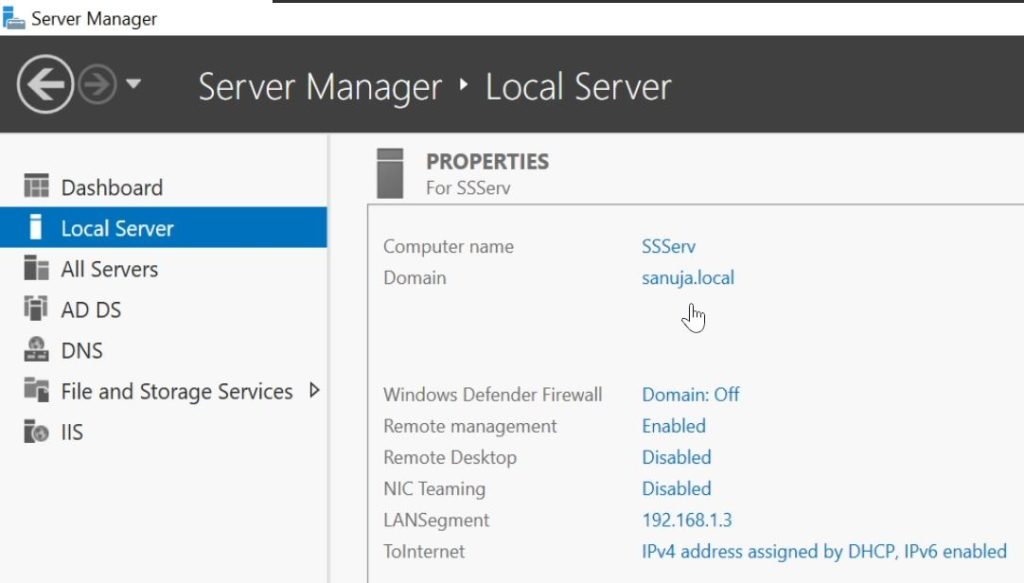
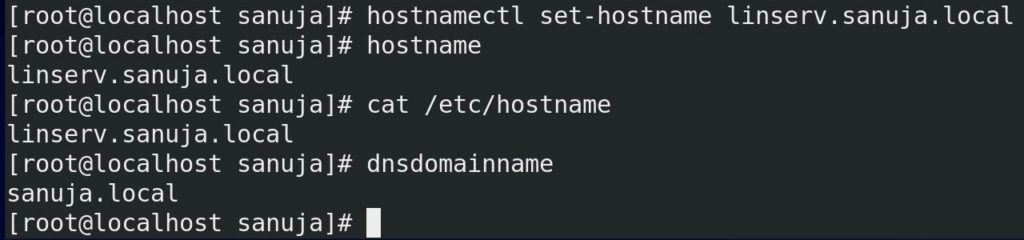
Step 2: Set an appropriate hostname for the Linux machine. The hostname should also include your Windows domain ending. For example, if your domain is sanuja.local, your Linux hostname should be hostname.sanuja.local where “hostname” is a term of your choice. To change the hostname in CentOS 8, use the following command:
hostnamectl set-hostname hostname.sanuja.local
You should check your hostname change with the following commands:
hostname
cat /etc/hostname
Both above commands should return full hostname including the domain ending.
dnsdomainname
The DNS domain name command above should return only the domain name at the end of your hostname.
Step 3: Confirm the Linux and the Windows Server are on the same network. To join the domain, both machines must be on the same network and in the same subnet. I would recommend that you have a static IP address on the Windows Server with the Domain Controller installed. The Linux machine may use either a DHCP IP from a pool or use static IP.
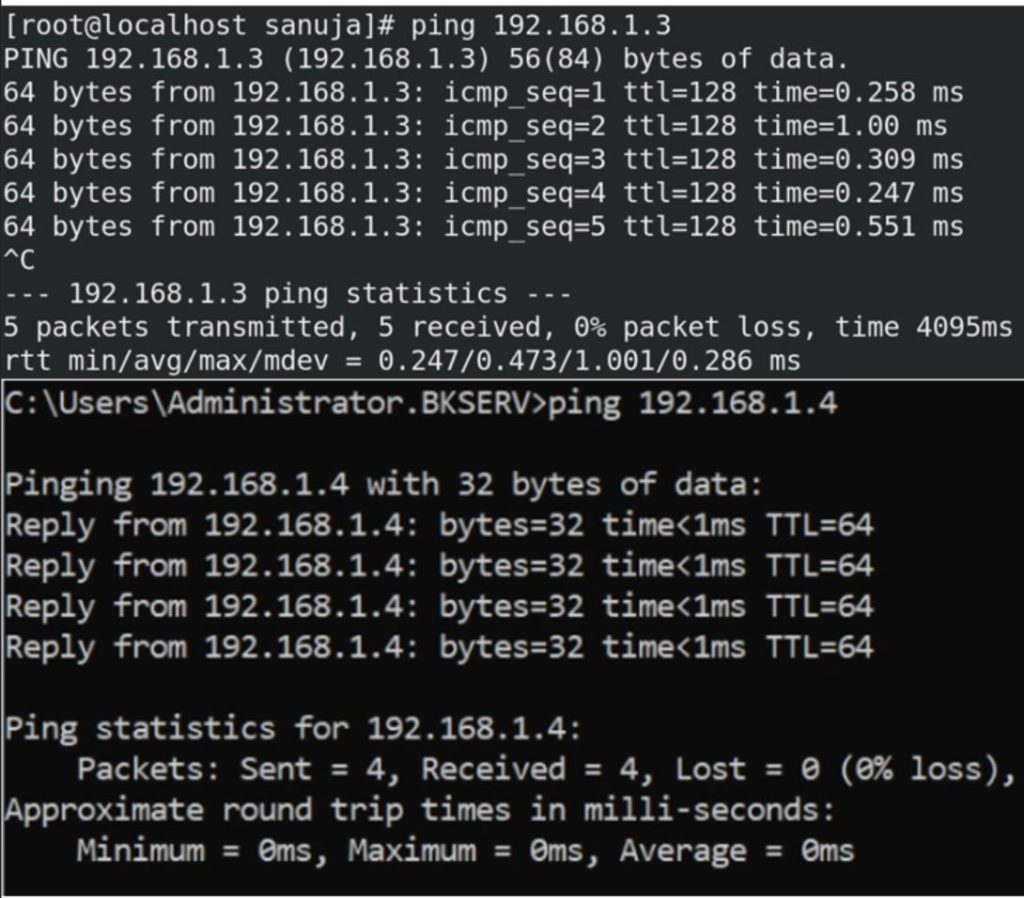
Step 4: Confirm Linux Server (or computer) and Windows Server can ping each other. From the Linux machine, ping the Windows Server IP and from the Windows Server machine, ping the Linux IP. This proves the connectivity between the two machines.
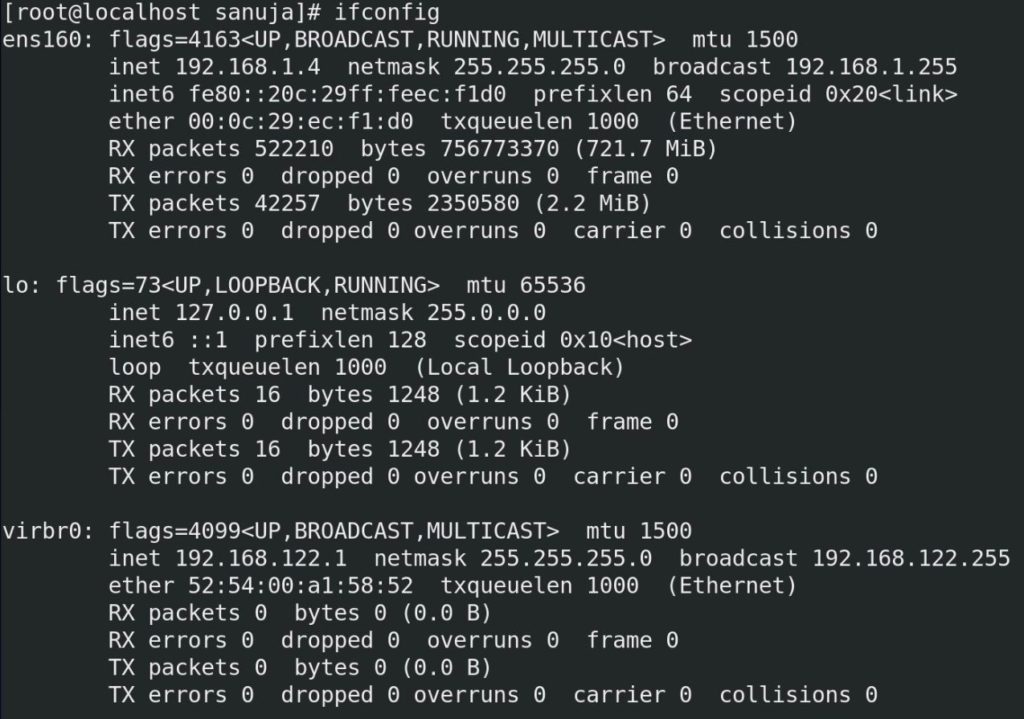
Step 5: Now, we need to setup the Linux hosts file. First you need to know your IP address of the Linux. If you have used a DHCP to obtain an IP for the Linux, you can use ifconifg command to check the IP (you may also use it for static IP checks as well).
Change the configuration within the hosts file. To open the hosts file, use the following command. I am using nano but you may use vim or gedit as well.
nano /etc/hosts
In the hosts file, you will see two line already entered by the system. The first line is for the IPv4 loopback (127.0.0.1) and the second line is for the IPv6 loopback (::1). We may either leave both these line as it is or we can replace the IPv6 loopback line. In this demonstration, I am replacing the IPv6 line with the edits I want to make.

Add the IP address of the Linux machine along with hostname and the complete hostname with the domain name at the end. For example, 192.168.1.4 linserv {space} linserver.sanuja.local.

Step 6: Confirm the hosts file change with pinging the Linux machine using its own terminal. Use the hostname and full hostname to test it.
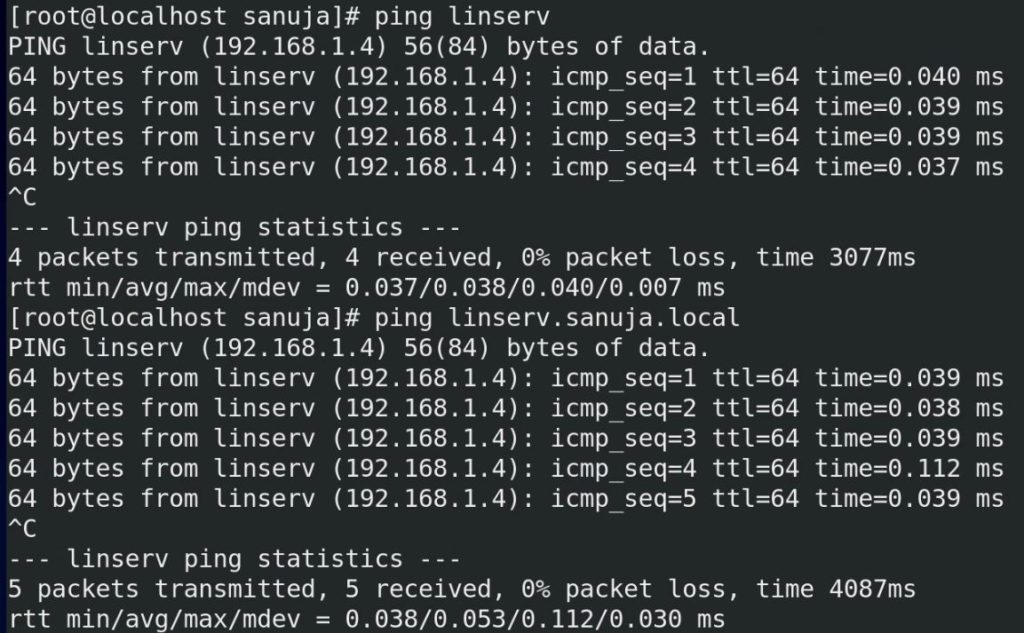
Step 7: On the Windows Server, add a record in the Forward Lookup Zones within the DNS Manager with the details of the Linux machine. Open Server Manager > Tools > DNS Manager.
Expand the Forward Lookup Zones from the left-hand pane and select your domain. In this demonstration it would be sanuja.local. Then right click on a blank space on the right-hand pane and open New Host (A or AAAA)… record.
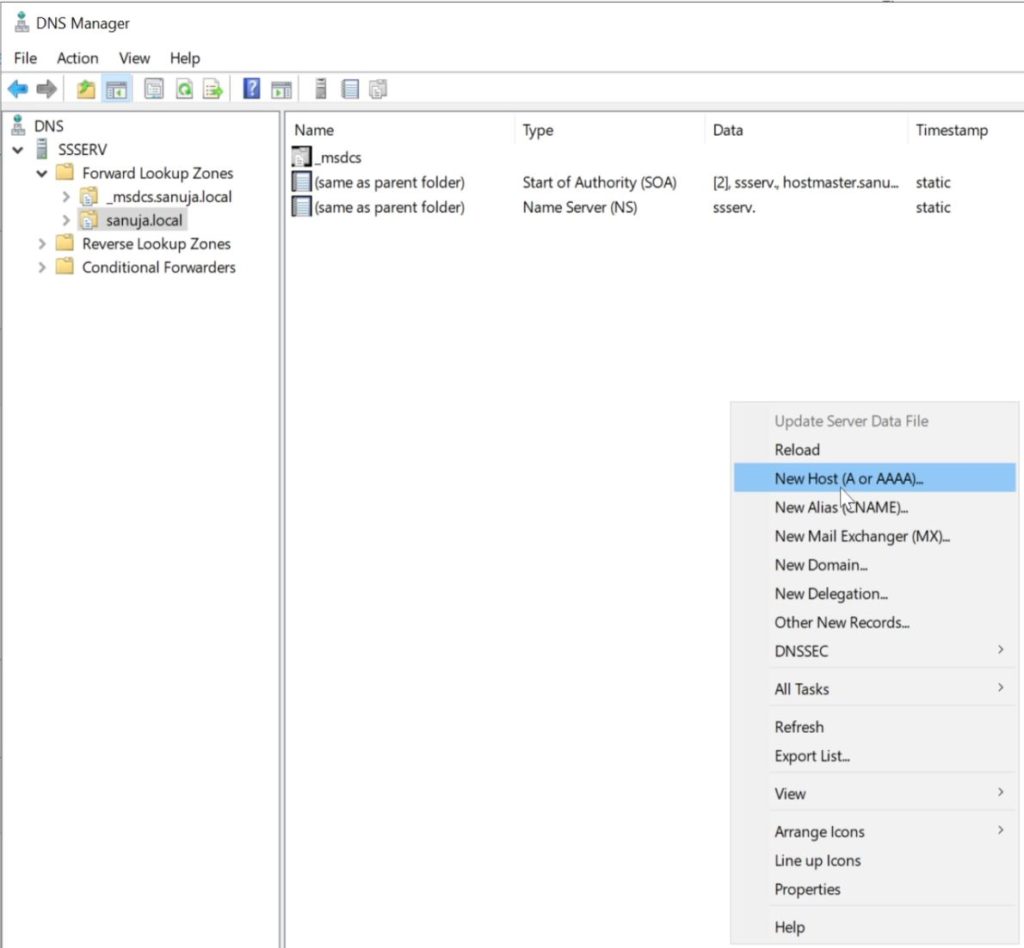
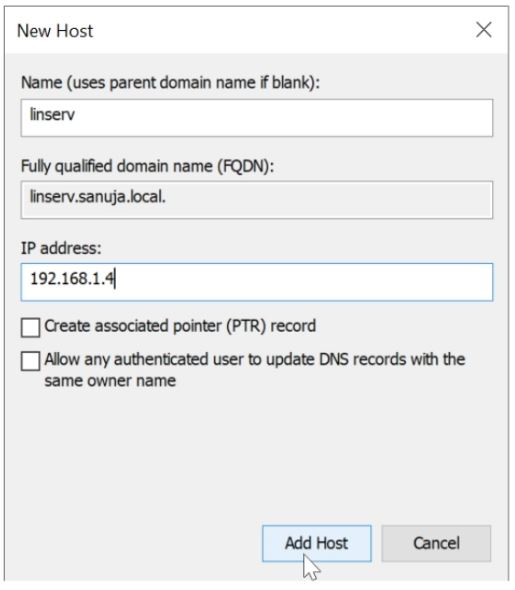
Fill in the New Host record information with the Linux data. For the name, use the Linux hostname without the domain ending. The FQDN should populate with the full hostname with the domain ending (which is the FQDN). Enter the IP address of your Linux machine.
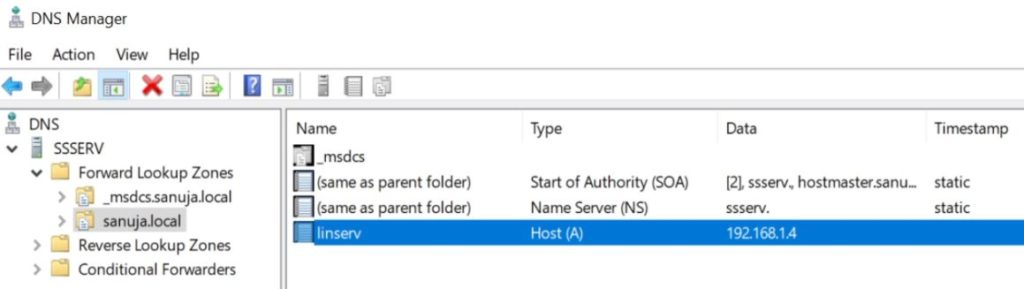
Linux DNS record should now be in the Forward Lookup Zones.
Step 8: Now ping again to Linux machine from the Windows server. This time, ping using the Linux hostnames. For example, linserv and linserv.sanuja.local (as per above DNS record). You should be able to get ICMP ping replies back from the Linux machine.
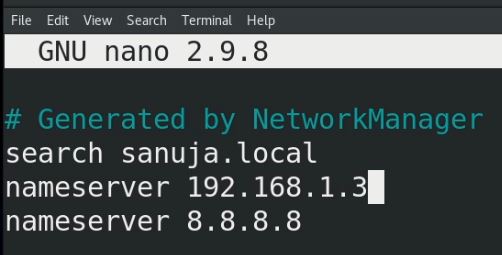
Step 9: On the Linux machine, edit the resolv.conf file so it can be used by the Linux to see the DNS server on the Windows machine. Use the following command to open the reslov.conf file.
nano /etc/resolv.conf
Note, this file is created by the NetworkManager. This means that this file may be overwritten by the system each time you reboot your Linux machine. I will explain how to stop this in a different article/video. But for now, add a new namesever line to resolv.conf. You should already have an entry for your domain name on the first line. You may also have a DNS entry added because of the Network Manager having a DNS. This DNS record is coming from your Linux Network Card configuration. We should change the configuration to point the DNS record to the Windows Server with our domain.
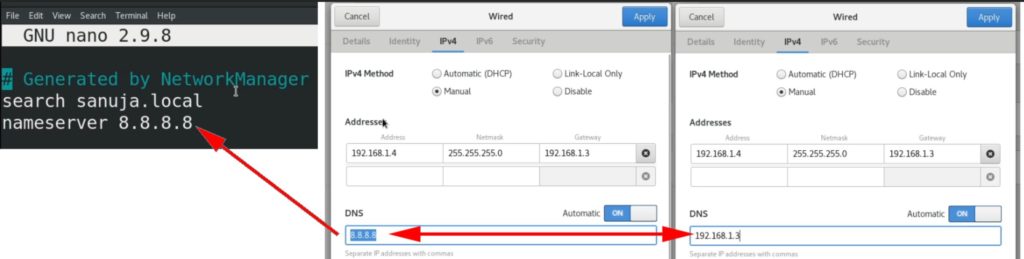
No need to delete the DNS entry already in the file. Instead, just add a new nameserver entry just above it. The Linux will take the first nameserver available when looking for DNS information. Enter your Windows Server IP address with the nameserver entry.
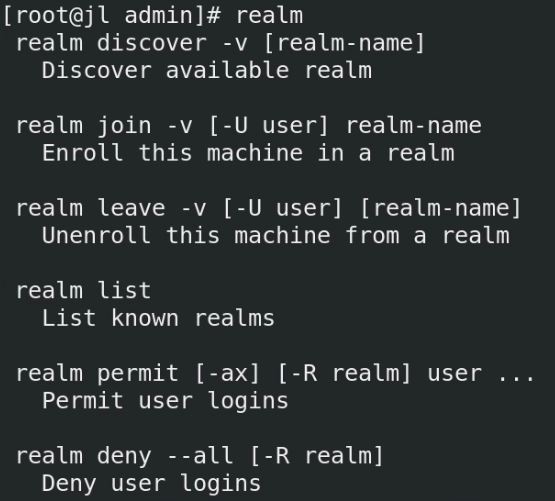
Step 10: Check if the Linux is already on a domain by using the relam list command. Then if there are no record (there should not be), check if your Linux can see the Windows domain by using the command realm discover sanuja.local (your domain instead of sanuja.local). You can check all the commands for joining a domain using realm by typing realm [Enter].
Note: Use the “administrator” user and the password for your Windows Domain during the joining process on the Linux side.
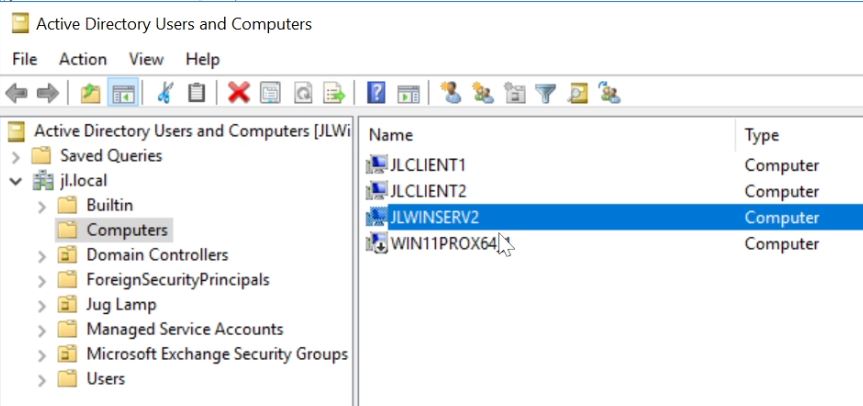
Once you have joined the Windows Domain, your Linux machine should appear under Server Manager > Tools > Active Directory Users and Computers in the Windows Server.
Windows server licenses aren’t cheap so why not pair your AD domain controller with a Linux BIND9 secondary instead? Find out how!
Having a backup for your Windows Active Directory DNS services is always a good idea. Larger organizations would probably have a backup domain controller providing secondary DNS duties, but this may not be feasible for small shops or home labs. Windows server licenses aren’t cheap so why not pair your AD domain controller with a Linux BIND9 secondary instead?
I ran a home lab with a single DNS server for years, but I got into a few situations where it became problematic. To conserve power, I shut down the majority of my home lab, including the hosts that run my Active Directory VM. I wanted to maintain DNS functionality for the limited number of VMs that stay powered up 24/7. Having a functional secondary was the answer.
What is a DNS Secondary?
A DNS secondary is a DNS server containing read-only copies of DNS zones received from a DNS primary. All of your “A”, “MX” and other records are configured in the zones of the primary and then are sent to the secondary using “zone transfers”. In practice, the secondary zones should always be identical to that of the primary. If the primary goes down, clients will still be able to resolve DNS queries via the secondary. Obviously, in order for this to work, all of your client devices and VMs will need to have both DNS servers defined in their TCP/IP configuration.
Configuring Your Windows DNS Server
Before you can do zone transfers to your new secondary, some configuration will be required on your Active Directory DNS server. I’m using Windows Sever 2018, but this should be the same for 2012/2016 and even 2008 if I’m not mistaken.
Before changing any configuration, you’ll need to create a standard “A” record for your secondary DNS server in your forward lookup zone. In my case, it is ns2.vswit.ch with an IP of 172.16.10.11:
Next, from the DNS snap-in, right click on your DNS server and go to Properties and click the Advanced tab.

Check “Enable BIND secondaries”. Click Apply.
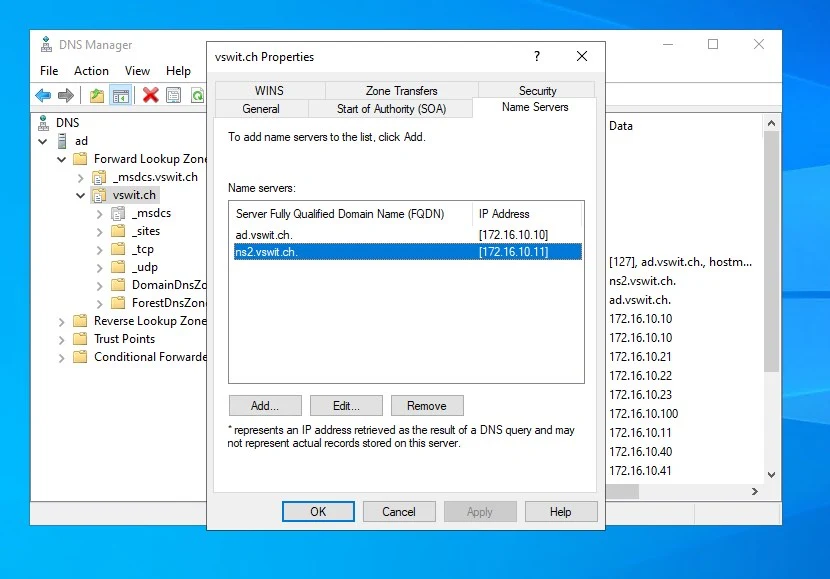
Next, right click on your first forward lookup zone and click properties. In my case it is vswit.ch. Go to the Name Servers tab. Here, you’ll want to add your secondary. Don’t worry if the validation process fails at this point. As long as you see the DNS secondary in the list, you are good.
Next, click the “Zone Transfers” tab.
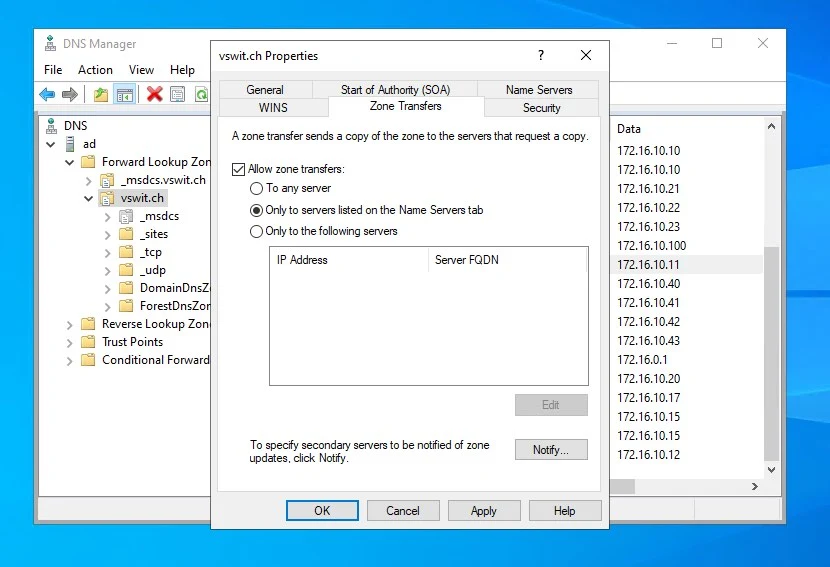
Here, you want to check “Allow zone transfers” and select the “Only to servers listed on the Name Servers tab”. Next, click Notify.
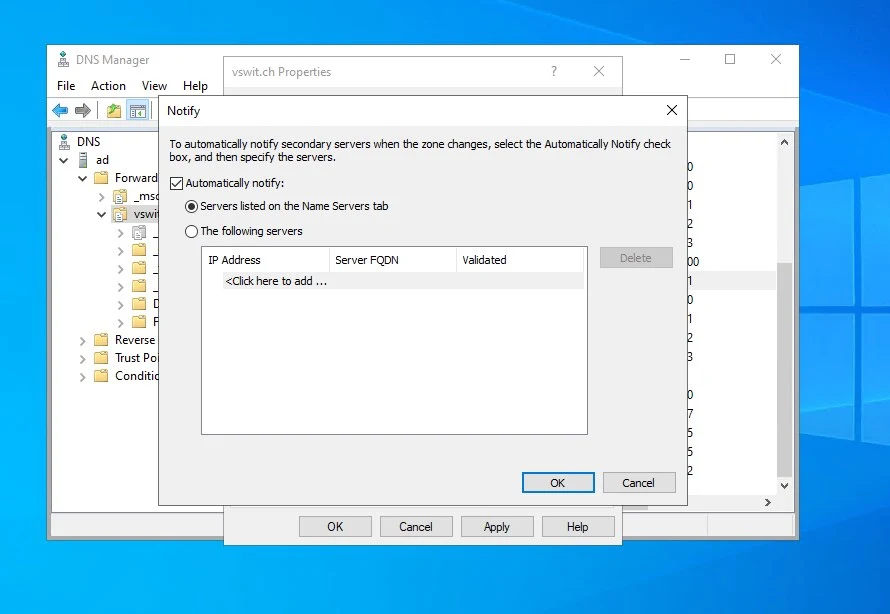
In the Notify dialog, you want to check “Automatically notify” and again, select “Servers listed on the Name Servers tab”. Click OK, and OK again.
You’ll then want to repeat the same above steps for all other zones you have (both forward and reverse lookup zones). I don’t think it’s necessary, but I did the default _msdcs forward lookup zone created by active directory as well just for good measure. Be sure to get a list of your zone names with exact spelling and case sensitivity as you’ll need them when configuring your secondary.
Installing BIND9
For this deployment, I’ll be using a very small Debian 10 VM with only 512MB of RAM and no UI. Unless you have a large environment, this is plenty. Before you begin, be sure to give your machine a static IP address. This is out of the scope of this post, so please refer to your distribution’s documentation if necessary.
Note: If you are logged in as root, you can just remove sudo from the beginning of each command.
First, let’s install the required BIND9 packages:
sudo apt-get update
sudo apt-get install bind9 bind9utils bind9-doc dnsutils -y
The dnsutils package is optional, but it includes useful tools for troubleshooting including nslookup and dig.
Next, let’s backup all of the default BIND9 configuration files, which is good practice in case something goes wrong, and you need to revert.
sudo cp /etc/bind/named.conf.local /etc/bind/named.conf.local.old
sudo cp /etc/bind/named.conf.options /etc/bind/named.conf.options.old
sudo cp /etc/bind/named.conf /etc/bind/named.conf.old
All of your zone configuration will go into the /etc/bind/named.conf.local configuration file. There are really only four lines per zone required. Below is a sample:
zone "<domain-name>" IN {
     type slave;
     file "/var/cache/bind/<filename>";
     masters { <master-server-ip>; };
};
The zone’s domain name would be either a forward-lookup zone FQDN or a reverse lookup zone name. You should make them match exactly with your zone names in your Windows DNS server. You can optionally include the default _msdcs forward lookup zone that Active Directory creates. I don’t believe it is necessary but I did it anyway.
Since this is a Secondary DNS server, the the zone type should always be "type slave" for each of your zones in this configuration.
For file, this is the location of the zone cache and DB files. Be sure to pick a filename that seems logical and describes the zone. Although you can get creative with the filename, don’t just pick any arbitrary directory. The file should be stored in the directory specified for cache in the named.conf.options file. In my Debian machine, this is /var/cache/bind. If you don’t, you may run into permissions issues. Double check by using this command:
cat /etc/bind/named.conf.options |grep directory
        directory "/var/cache/bind";
Lastly, you need to specify the IP address of the primary DNS server. This automatically implies it will receive zone transfers from that DNS server for the zone in question.
Here are my four zones for reference. Simply add them to the bottom of /etc/bind/named.conf.local:
zone "vswit.ch" IN {
     type slave;
     file "/var/cache/bind/forward.vswit.ch.db";
     masters { 172.16.10.10; };
};
zone "_msdcs.vswit.ch" IN {
     type slave;
     file "/var/cache/bind/forward._msdcs.vswit.ch.db";
     masters { 172.16.10.10; };
};
zone "0.16.172.in-addr.arpa" IN {
     type slave;
     file "/var/cache/bind/reverse.vswit.ch.0.16.172.db";
     masters { 172.16.10.10; };
};
zone "10.16.172.in-addr.arpa" IN {
     type slave;
     file "/var/cache/bind/reverse.vswit.ch.10.16.172.db";
     masters { 172.16.10.10; };
};
DNS Forwarding
By default, bind will always use root hints to resolve external DNS names that don’t exist within the configured zones. This makes things simple as you don’t need an upstream DNS server setup for forwarding but may not be ideal in some situations. For example, you may want to use a specific upstream DNS server for security reasons (OpenDNS for instance). In this case, you should add the desired forwarders into the /etc/bind/named.conf.options file similar to the following:
forwarders {
                208.67.222.222;
        };
If you want your secondary DNS server to resolve only internal names and avoid the use of root hints, you’ll need to disable recursion. It is enabled by default if not specified in the configuration options. This can be done by adding the following line to the /etc/bind/named.conf.options file:
recursion no;
Testing Name Resolution
Before you begin, you’ll want to check /var/log/syslog to ensure your DNS zones were loaded and transferred successfully.
You’ll see where bind starts after this line:
Feb 24 11:04:48 ns2 named[615]: starting BIND 9.11.5-P4-5.1+deb10u3-Debian (Extended Support Version) <id:998753c>q
You should see successful zone transfer messages for each of your configured domains similar to this:
Feb 24 10:51:53 ns2 named[752]: transfer of '0.16.172.in-addr.arpa/IN' from 172.16.10.10#53: connected using 172.16.10.11#44163
Feb 24 10:51:53 ns2 named[752]: transfer of '0.16.172.in-addr.arpa/IN' from 172.16.10.10#53: Transfer status: success
Feb 24 10:51:53 ns2 named[752]: transfer of '0.16.172.in-addr.arpa/IN' from 172.16.10.10#53: Transfer completed: 6 messages, 6 records, 477 bytes, 0.001 secs (477000 bytes/sec)
Feb 24 10:51:54 ns2 named[752]: transfer of '10.16.172.in-addr.arpa/IN' from 172.16.10.10#53: connected using 172.16.10.11#49573
Feb 24 10:51:54 ns2 named[752]: transfer of 'vswit.ch/IN' from 172.16.10.10#53: connected using 172.16.10.11#57609
Feb 24 10:51:54 ns2 named[752]: transfer of '10.16.172.in-addr.arpa/IN' from 172.16.10.10#53: Transfer status: success
Feb 24 10:51:54 ns2 named[752]: transfer of '10.16.172.in-addr.arpa/IN' from 172.16.10.10#53: Transfer completed: 19 messages, 19 records, 1405 bytes, 0.002 secs (702500 bytes/sec)
Feb 24 10:51:54 ns2 named[752]: transfer of '_msdcs.vswit.ch/IN' from 172.16.10.10#53: connected using 172.16.10.11#40635
Feb 24 10:51:54 ns2 named[752]: transfer of 'vswit.ch/IN' from 172.16.10.10#53: Transfer status: success
Feb 24 10:51:54 ns2 named[752]: transfer of 'vswit.ch/IN' from 172.16.10.10#53: Transfer completed: 36 messages, 36 records, 2279 bytes, 0.004 secs (569750 bytes/sec)
Feb 24 10:51:54 ns2 named[752]: transfer of '_msdcs.vswit.ch/IN' from 172.16.10.10#53: Transfer status: success
Feb 24 10:51:54 ns2 named[752]: transfer of '_msdcs.vswit.ch/IN' from 172.16.10.10#53: Transfer completed: 15 messages, 15 records, 1291 bytes, 0.004 secs (322750 bytes/sec)
(END) Feb 24 10:51:54 ns2 named[752]: transfer of '_msdcs.vswit.ch/IN' from 172.16.10.10#53: Transfer status: success
Once we know the zone transfers worked, we can test resolution. This can most easily be done by specifying the local host address 127.0.0.1 when using nslookup. Try both an internal and external FQDN:
root@ns2:~# nslookup ad.vswit.ch 127.0.0.1
Server:         127.0.0.1
Address:        127.0.0.1#53
Name:   ad.vswit.ch
Address: 172.16.10.10root@ns2:~# nslookup google.com 127.0.0.1
Server:         127.0.0.1
Address:        127.0.0.1#53
Non-authoritative answer:
Name:   google.com
Address: 172.217.165.14
Name:   google.com
Address: 2607:f8b0:400b:802::200e
Viewing Your DNS Records
Your DNS records received from the primary server are stored in so-called “masterfile” database files. In newer versions of bind, the DB files are in a raw binary format. This is done for performance reasons, not security as it is still mostly viewable if you open it in a text editor. Unless you have a really massive DNS database and performance is important to you, you can add the following to your /etc/bind/named.conf.options file:
masterfile-format text;
Once added, restart bind:
systemctl restart bind
Now your DB files are plain text and you can see all of your “A” and other records:
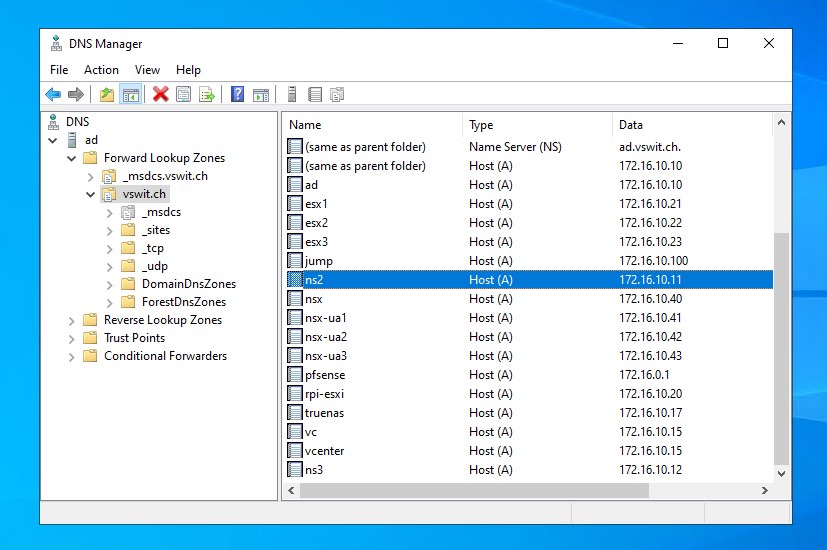
root@ns2:~# cat /var/cache/bind/forward.vswit.ch.db |grep A
                        A       172.16.10.10
ad                      A       172.16.10.10
DomainDnsZones          A       172.16.10.10
esx1                    A       172.16.10.21
esx2                    A       172.16.10.22
esx3                    A       172.16.10.23
ForestDnsZones          A       172.16.10.10
jump                    A       172.16.10.100
ns2                     A       172.16.10.11
nsx                     A       172.16.10.40
nsx-ua1                 A       172.16.10.41
nsx-ua2                 A       172.16.10.42
nsx-ua3                 A       172.16.10.43
pfsense                 A       172.16.0.1
rpi-esxi                A       172.16.10.20
truenas                 A       172.16.10.17
vc                      A       172.16.10.15
vcenter                 A       172.16.10.15
BIND Caching
BIND will operate as a DNS cache by default without any special configuration. It will cache all DNS query responses for a period of time so that it can respond to clients more quickly. If you’d like to view this cache, you can use the rndc utility. You first dump the cache to a file and then can open it in a text editor:
rndc dumpdb -cache
cat /var/cache/bind/named_dump.db
In my case the file created is /var/cache/bind/named_dump.db by default. In some distributions or BIND versions it may be /var/named/data/cache_dump.db. If you can’t find yours, you can always force BIND to use a specific file location in /etc/bind/named.conf.options:
dump-file "/tmp/named_dump.db";
Don’t forget to restart BIND after doing this.
If your DNS secondary has cached a problematic record – i.e. an IP changed recently – you can flush the cache. This is done with:
rndc flush
For good measure, restart BIND afterward:
systemctl restart bind9
Conclusion
Bind9 is an extremely powerful DNS service and I’ve only scratched the surface of what is possible. With just a small amount of config, you can have a functional DNS secondary paired with your Active Directory domain controller in no time. I hope you found this helpful.
20 Replies
-

I think you have to add the hosts manually unless you have the Linux machines setup as LDAP servers.
0 of 1 found this helpful
thumb_up
thumb_down
-
Just add them manually.
Windows dynamic dns only works with Windows. May be a way to make linux work with it, don’t know, I always just added them myself.
0 of 1 found this helpful
thumb_up
thumb_down
-
Yup, I’ve always added them manually as well
0 of 1 found this helpful
thumb_up
thumb_down
-
Antal Daavid wrote:
I think you have to add the hosts manually unless you have the Linux machines setup as LDAP servers.
Yup, same with all non-AD member devices. DNS isn’t automatically updated by any system outside of AD. In the grand scheme of enterprise DNS, it’s pure manual.
0 of 1 found this helpful
thumb_up
thumb_down
-
At least up through the Windows DHCP/DNS server i n Server 2003 you could configure the DHCP server to do the update to DNS for clients that are unable to do it themselves (NT, and Windows 98 for instance couldn’t do this), this also I believe worked with Linux clients as well.
1 found this helpful
thumb_up
thumb_down
-
I was thinking somewhere in a past course you can set up DNS to allow basically any thing to update DNS, but this is a major security hole. I know it wasn’t recommended. Good luck. I know I am about to have to deal with this too. Gotta change out some Igels and looks like I am going to use Ubuntu. I hope it isn’t hard.
Was this post helpful?
thumb_up
thumb_down
-
Doesn’t look difficult from the link I posted, just need to create an account to allow Linux machines to update the DNS.
Was this post helpful?
thumb_up
thumb_down
-
Good to know.
I figured their has to be a way since Windows requires authentication for its Dynamic DNS to work.
Was this post helpful?
thumb_up
thumb_down
-
Alex3031 wrote:
Here is one way option http:/ Opens a new window/newartisans.com/2009/01/linux-dhcp-and-windows-dns Opens a new window
This option seems to require the use of not only DHCP on the Linux machine but also DHCP on the Windows server. If he’s doing static addresses, it doesn’t matter much.
Was this post helpful?
thumb_up
thumb_down
-
Yes, but if you are using Static addressing that normally won’t update DNS records you’ll need to manually enter them anyways.
Was this post helpful?
thumb_up
thumb_down
-
im cant remember the command or if there even is one in linux to push its refresh like ipconfig /registerdns is in windows. if there is one you could set up a cron job to run or just run it manually.
im really out of practice on linux.
Was this post helpful?
thumb_up
thumb_down
-
That doesn’t exist in Linux
Was this post helpful?
thumb_up
thumb_down
-
25 May 05 12:43
A script might be something like this:
#!/bin/sh
ADDR=`/sbin/ifconfig eth0 | grep ‘inet addr’ | awk ‘{print $2}’ | sed -e s/.*://`
HOST=`hostname -f`
echo «update delete $HOST A» > /var/nsupdate.txt
echo «update add $HOST 86400 A $ADDR» >> /var/nsupdate.txt
nsupdate /var/nsupdate.txt
I haven’t used nsupdate myself, so try ‘man nsupdate’ to see if you can get it to do what you want.
Was this post helpful?
thumb_up
thumb_down
-
The issue here is that the Linux machine isn’t trusted and therefore can’t make updates to DNS like a domain machine can. Unless you turn off that security feature and let anything and everything update the DNS then a simple script doesn’t work unfortunately.
Was this post helpful?
thumb_up
thumb_down
-
Alex3031 wrote:
The issue here is that the Linux machine isn’t trusted and therefore can’t make updates to DNS like a domain machine can. Unless you turn off that security feature and let anything and everything update the DNS then a simple script doesn’t work unfortunately.
Yeah and definitely don’t do that.
Was this post helpful?
thumb_up
thumb_down
-
Hi,
If you really want your Linux into your DNS namespace you’ll have to :
1 — On your DHCP server (if it’s a Windows) :
Go on scope properties / DNS / enable : Dynamically update DNS A and PTR records for DHCP clients that do not request update
2 — On your DNS : Right click on your zone / Properties / General / set Dynamic update to : Nonsecure and SecureHope this will help,
julien
Was this post helpful?
thumb_up
thumb_down
-
Alternatively, add the A and PTR records manually once, then adjust the Everyone permissions in the DACL and add Write. You can then use `nsupdate` as Phil6196 suggested above. Windows Server 2003/2008/2012 all support DNS record updates via the standard RFC2136, which `nsupdate` conforms to. The script is perfect, minus the PTR records… see updated: https:/ Opens a new window/gist.github.com/mbrownnycnyc/5644413 Opens a new window
Was this post helpful?
thumb_up
thumb_down
-
The easiest way is to install samba server on your linux box. By doing this you will be able to ping your linux box using the hostname from any OS.
To install samba:
sudo apt-get -y install samba
Your comment are welcome. Thank you.
k!T4R0
1 found this helpful
thumb_up
thumb_down
-
Linux can dynamically update on windows AD.
https://blogs.technet.microsoft.com/jeffbutte/2016/12/18/265/ Opens a new window
I tried and it works on AD based on a 2008 Server and Debian.
Was this post helpful?
thumb_up
thumb_down


Read these next…
User has over 300 «open» shared folders in computer management
Windows
I was looking in computer management > Open Files this morning to see who had a particular file open and I saw that one user had over 300 folders «open». I confirmed with the user that they didn’t have some extensive search or anything running that may c…
What Mobile OS are you using
Mobile Computing
Just for my own curiosity, and since it’s been a while since I have seen anyone post about it, what Mobile OS are you currently using?I use iOS myself. I used to be a Windows and Android guy, but I have moved everything over to the Cult of Mac, I like how…
Spark! Pro Series — 7 February 2023
Spiceworks Originals
Today in History: 7 February
1817 – Baltimore becomes
the 1st American city lit by gas street lamps with the first turned
on at Market and Lemon Streets (currently Baltimore and Holliday Streets)1845 – The Port…
2FA solutions for Windows RDS
Windows
Everywhere I turn I see Duo mentioned as an easy 2FA solution for Windows RDS / Terminal server. My issue is that last month I left about a dozen messages for them with my contact information. They never answer the phone, you’re dumped into a voicemail s…
Copy Function Limitation In Windows?
Windows
I am having difficulty copying (Ctl+C) files from one folder to another on an exterrnal HDD. I am using Windows 10 Pro x64. The folder has 1000’s of files in it and it takes 10 minutes before it gives any response (copying…..). I have a Dell Optiplex 7…


