Introduction
Hello guys, in this article we will create a login and registration form with a database in a C# Windows Form application. This application has three forms, login, registration, and home. Users first register themselves, then log in to their account and see the welcome message on the home page.
Step 1
Open your visual studio, here I will use Visual Studio 2019.
Step 2
The clock on file menu on top of the visual studio, hover mouse on new, and click on Project.
Step 3
Search for Windows Form App (.NET framework) and click on next.
Step 4
In this step, you have to enter some details of your application and then click on the Create button. You have to enter the following details:
- Project Name: Name of your project
- Location: Location where you want to store your app on your local computer.
- Solution Name: This name is displayed in solution explorer in visual studio.
- Framework: Select the appropriate framework as per your application requirements.
Step 5
Now your project is created. Open Solution Explorer. If you don’t see solution explorer, you can open it from the View menu on top, or you can try the short cut key “Ctrl+W,S”. We need to create some pages for our application. Right-click on the solution name then Hover the mouse on Add and click on Add New Item, or you can user short cut key “Ctrl+Shift+A”.
Step 6
Now you see a dialog where we add our forms. Select Windows Form, give it a proper name and click on Add. Add a Login, Registration, and Home page in the same way.
Step 7
Now we need to add a database in our project. Right-click on the solution name, then Hover mouse on Add and click on Add New Item, or you can user short cut key “Ctrl+Shift+A”. Select data filter from the left sidebar to see the item which is associated with the database. Select service-based database, give it a name and click on add.
Step 8
Now we create a table that we user in login and registration. Double click on the database file from solution explorer. It will open a database file in the server explorer.
Expand your database and right-click on the table, then click on Add New Table.
Step 9
Create a table field that you want. Here, I added only three fields, ID, Username, and password, where ID is auto incremented by 1. You can set it by right clicking on the field name, click on property, and find the Id Identity Specification. Expand it and make it true (Is Identity) field and give an increment number which increments Id by adding this number in the last Id.
q
CREATE TABLE [dbo].[LoginTable]
(
    [Id] INT NOT NULL PRIMARY KEY IDENTITY,
    [username] NVARCHAR(50) NULL,
    [password] NVARCHAR(50) NULL
)
Step 10
Now we create a Registration form. Create a design for your form as you need. In the below image, you see how I design a form.
Step 11
Now click anywhere on the form. It will generate a Form_Load event where you can enter the following code. This code creates a database connection and opens it. In the next step, you will learn how you get that connection string which are added in SQLConnection Constructor.
private void Registration_Load(object sender, EventArgs e)
{
    cn = new SqlConnection(@"Data Source=(LocalDB)MSSQLLocalDB;AttachDbFilename=H:WebsiteRegistrationAndLoginDatabase.mdf;Integrated Security=True");
    cn.Open();
}
Step 12
Go to Server Explorer, right-click on the database, then click on Modify Connection.
Step 13
Now you see a windows dialog popup click on the advance button. This will open another dialog. Before that, click on the test button and check that your database is working properly.
Step 14
Copy the path which shows below on this dialog and close both dialogs. Then paste this path in the form load event. Add @ sign before this path so there’s no need to change the slash.
Step 15
We need to open the login page when the user clicks on the login button, so enter the following code in the Login Button click event.
private void Button1_Click(object sender, EventArgs e)
{
    this.Hide();
    Login login = new Login();
    login.ShowDialog();
}
Code Explanation
- First, we hide the current form which is registration .
- Then we create an object of login page and show login form using that object.
Step 16
Now add the following code in the registration button click event:
private void BtnRegister_Click(object sender, EventArgs e)
{
    if (txtconfirmpassword.Text != string.Empty || txtpassword.Text != string.Empty || txtusername.Text != string.Empty)
    {
        if (txtpassword.Text == txtconfirmpassword.Text)
        {
            cmd = new SqlCommand("select * from LoginTable where username='" + txtusername.Text + "'", cn);
            dr = cmd.ExecuteReader();
            if (dr.Read())
            {
                dr.Close();
                MessageBox.Show("Username Already exist please try another ", "Error", MessageBoxButtons.OK, MessageBoxIcon.Error);
            }
            else
            {
                dr.Close();
                cmd = new SqlCommand("insert into LoginTable values(@username,@password)", cn);
                cmd.Parameters.AddWithValue("username", txtusername.Text);
                cmd.Parameters.AddWithValue("password", txtpassword.Text);
                cmd.ExecuteNonQuery();
                MessageBox.Show("Your Account is created . Please login now.", "Done", MessageBoxButtons.OK, MessageBoxIcon.Information);
            }
        }
        else
        {
            MessageBox.Show("Please enter both password same ", "Error", MessageBoxButtons.OK, MessageBoxIcon.Error);
        }
    }
    else
    {
        MessageBox.Show("Please enter value in all field.", "Error", MessageBoxButtons.OK, MessageBoxIcon.Error);
    }
}
Code Explanation
- First of all, we check that the user entered a value in all fields. If yes, then continue, otherwise, show a message using the message box.
- Then we check if the password and confirm password both are the same.
- Then we check if any record/user is already registered with that username if not then continue further otherwise show an error message.
- In last we insert data in the table using the SQLCommand object.
Step 17
Now we create a login page. Here, I added two text boxes for username and password and two buttons for a login and open registration form.
Step 18
Click on anywhere in a form which generates a Form_Load event add connection code, as shown below.
private void Login_Load(object sender, EventArgs e)
{
    cn = new SqlConnection(@"Data Source=(LocalDB)MSSQLLocalDB;AttachDbFilename=H:WebsiteRegistrationAndLoginDatabase.mdf;Integrated Security=True");
    cn.Open();
}
Step 19
On a Registration button click, add the following code which opens the registration form.
private void Btnregister_Click(object sender, EventArgs e)
{
    this.Hide();
    Registration registration = new Registration();
    registration.ShowDialog();
}
Step 20
Add the below code in the login button click for redirecting users to the home page form if the user exists.
private void BtnLogin_Click(object sender, EventArgs e)
{
    if (txtpassword.Text != string.Empty || txtusername.Text != string.Empty)
    {

        cmd = new SqlCommand("select * from LoginTable where username='" + txtusername.Text + "' and password='"+txtpassword.Text+"'", cn);
        dr = cmd.ExecuteReader();
        if (dr.Read())
        {
            dr.Close();
            this.Hide();
            Home home = new Home();
            home.ShowDialog();
        }
        else
        {
            dr.Close();
            MessageBox.Show("No Account avilable with this username and password ", "Error", MessageBoxButtons.OK, MessageBoxIcon.Error);
        }

    }
    else
    {
        MessageBox.Show("Please enter value in all field.", "Error", MessageBoxButtons.OK, MessageBoxIcon.Error);
    }
}
Code Explanation
- Here, first of all, we check if the user enters a value in both fields. If yes, then continue, otherwise, show an error message.
- Then we check if the user exists in our database with that username and password. If the user exists, then open the home page which we generated at the start.
Step 21
Change the start page as login in Program.cs File.
static void Main()
{
    Application.EnableVisualStyles();
    Application.SetCompatibleTextRenderingDefault(false);
    Application.Run(new Login());
}
Step 22
Now run your application.
Login.cs
using System;
using System.Collections.Generic;
using System.ComponentModel;
using System.Data;
using System.Data.SqlClient;
using System.Drawing;
using System.Linq;
using System.Text;
using System.Threading.Tasks;
using System.Windows.Forms;

namespace RegistrationAndLogin
{
    public partial class Login : Form
    {
        SqlCommand cmd;
        SqlConnection cn;
        SqlDataReader dr;

        public Login()
        {
            InitializeComponent();
        }

        private void Login_Load(object sender, EventArgs e)
        {
            cn = new SqlConnection(@"Data Source=(LocalDB)MSSQLLocalDB;AttachDbFilename=D:ArticlesCodeRegistrationAndLoginDatabase.mdf;Integrated Security=True");
            cn.Open();
        }

        private void Btnregister_Click(object sender, EventArgs e)
        {
            this.Hide();
            Registration registration = new Registration();
            registration.ShowDialog();
        }

        private void BtnLogin_Click(object sender, EventArgs e)
        {
            if (txtpassword.Text != string.Empty || txtusername.Text != string.Empty)
            {

                cmd = new SqlCommand("select * from LoginTable where username='" + txtusername.Text + "' and password='"+txtpassword.Text+"'", cn);
                dr = cmd.ExecuteReader();
                if (dr.Read())
                {
                    dr.Close();
                    this.Hide();
                    Home home = new Home();
                    home.ShowDialog();
                }
                else
                {
                    dr.Close();
                    MessageBox.Show("No Account avilable with this username and password ", "Error", MessageBoxButtons.OK, MessageBoxIcon.Error);
                }

            }
            else
            {
                MessageBox.Show("Please enter value in all field.", "Error", MessageBoxButtons.OK, MessageBoxIcon.Error);
            }
        }

    }
}
Registration.cs
using System;
using System.Collections.Generic;
using System.ComponentModel;
using System.Data;
using System.Data.Common;
using System.Data.SqlClient;
using System.Drawing;
using System.Linq;
using System.Text;
using System.Threading.Tasks;
using System.Windows.Forms;

namespace RegistrationAndLogin
{
    public partial class Registration : Form
    {

        SqlCommand cmd;
        SqlConnection cn;
        SqlDataReader dr;

        public Registration()
        {
            InitializeComponent();
        }

        private void Registration_Load(object sender, EventArgs e)
        {
            cn = new SqlConnection(@"Data Source=(LocalDB)MSSQLLocalDB;AttachDbFilename=D:ArticlesCodeRegistrationAndLoginDatabase.mdf;Integrated Security=True");
            cn.Open();
        }

        private void BtnRegister_Click(object sender, EventArgs e)
        {
            if (txtconfirmpassword.Text != string.Empty || txtpassword.Text != string.Empty || txtusername.Text != string.Empty)
            {
                if (txtpassword.Text == txtconfirmpassword.Text)
                {
                    cmd = new SqlCommand("select * from LoginTable where username='" + txtusername.Text + "'", cn);
                    dr = cmd.ExecuteReader();
                    if (dr.Read())
                    {
                        dr.Close();
                        MessageBox.Show("Username Already exist please try another ", "Error", MessageBoxButtons.OK, MessageBoxIcon.Error);
                    }
                    else
                    {
                        dr.Close();
                        cmd = new SqlCommand("insert into LoginTable values(@username,@password)", cn);
                        cmd.Parameters.AddWithValue("username", txtusername.Text);
                        cmd.Parameters.AddWithValue("password", txtpassword.Text);
                        cmd.ExecuteNonQuery();
                        MessageBox.Show("Your Account is created . Please login now.", "Done", MessageBoxButtons.OK, MessageBoxIcon.Information);
                    }
                }
                else
                {
                    MessageBox.Show("Please enter both password same ", "Error", MessageBoxButtons.OK, MessageBoxIcon.Error);
                }
            }
            else
            {
                MessageBox.Show("Please enter value in all field.", "Error", MessageBoxButtons.OK, MessageBoxIcon.Error);
            }
        }

        private void Button1_Click(object sender, EventArgs e)
        {
            this.Hide();
            Login login = new Login();
            login.ShowDialog();
        }
    }
}
Home.cs
using System;
using System.Collections.Generic;
using System.ComponentModel;
using System.Data;
using System.Drawing;
using System.Linq;
using System.Text;
using System.Threading.Tasks;
using System.Windows.Forms;

namespace RegistrationAndLogin
{
    public partial class Home : Form
    {
        public Home()
        {
            InitializeComponent();
        }
    }
}
Program.cs
using System;
using System.Collections.Generic;
using System.Linq;
using System.Threading.Tasks;
using System.Windows.Forms;

namespace RegistrationAndLogin
{
    static class Program
    {
        /// <summary>
        /// The main entry point for the application.
        /// </summary>
        [STAThread]
        static void Main()
        {
            Application.EnableVisualStyles();
            Application.SetCompatibleTextRenderingDefault(false);
            Application.Run(new Login());
        }
    }
}
Conclusion
So here, we created a simple login and registration page in a Windows Form application. I hope you liked this article, share it with your friends.

В уроке мы научимся регистрировать пользователя в базе данных через приложение. Приложение будет получать значения, соединятся с базой данных и регистрировать нового пользователя только в том случае, если такого пользователя еще нет.
Видеоурок
Регистрация пользователя
Регистрацию пользователя можно разбить на несколько этапов:
- отслеживание нажатия на кнопку;
- получение данных от пользователя;
- проверка данных на их корректность;
- подключение к БД и добавление новой записи в таблицу со всеми пользователями.
Для проверки данных можно использовать множество условных операторов, хотя мы в ходе урока обошлись лишь несколькими. Вам стоит добавить проверку на поля логин и пароль, а также вы можете добавить проверку для отслеживания количества введенных символов.
// Проверка на количество символов
if (userNameField.Text.Length < 5)
	return;
// Если у нас менее 5 символов в строке, то будет выдана ошибка пользователю
Материалы для курса
Чтобы скачивать материалы к видеокурсам необходимо оформить подписку на сайт
Исходный код
Весь код будет доступен после подписки на проект!Задание к уроку
Необходимо оформить подписку на проект, чтобы получить доступ ко всем домашним заданиям
Большое задание по курсу
Вам необходимо оформить подписку на сайте, чтобы иметь доступ ко всем большим заданиям. В задание входит методика решения, а также готовый проект с ответом к заданию.
PS: подобные задания доступны при подписке от 1 месяца
Также стоит посмотреть
Уроки Unity C# для начинающих
11 уроков
Изучение языка C# для начинающих
26 уроков
Xamarin Forms / Мобильные приложения на C#
3 урока
Изучение ASP.NET Core MVC. Создание сайтов на C#
10 уроков
Изучение C# и создание Windows программ
Изучение C# WPF на практике. Создание программ на C#
10 уроков
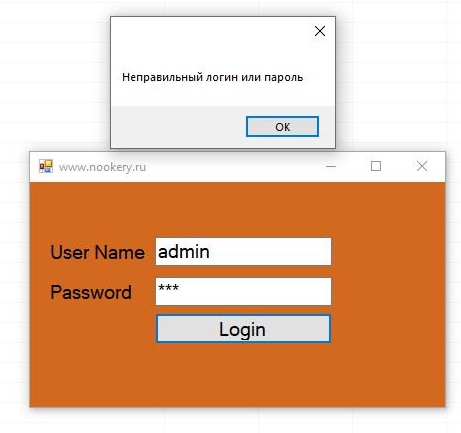
В этой статье рассматривается, как создать приложение Windows Form в C# в качестве страницы входа, которая в основном содержит все приложения в качестве начальной страницы, где пользователи будут проверены на их пароли.
Шаг 1:
Создайте проект Windows Form и разместите на нем компоненты как показано на скрине ниже.
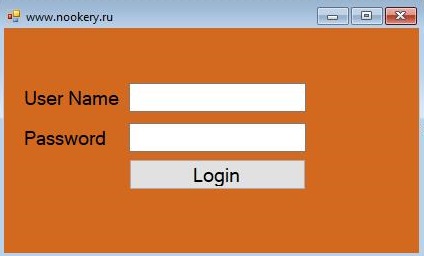
Шаг 2:
Обычный способ любой формы входа будет содержать пароль, отображаемый специальным символом, который используется в целях безопасности. Чтобы ввести это понятие в форму входа в систему, выберите параметр свойства текстового поля, в котором вы можете найти параметр PasswordChar, где вы можете дать желаемый специальный символ (в моем случае я использовал * звездочку). После внесения этого изменения, если вы запустите приложение, оно будет отображать только специальный символ при вводе пароля.
![]()
Шаг 3:
Теперь настало время для создания репозитория для вашей формы входа.Для этого перейдите в меню Пуск и найдите MS Access, а затем нажмите один раз, чтобы открыть. Создайте БД с именем dbUsers.accdb

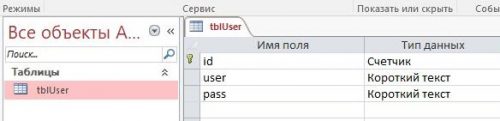
Шаг 4:
Создадим таблицу с именем tblUser и поля id, user, pass. А так же внесем значения в БД.

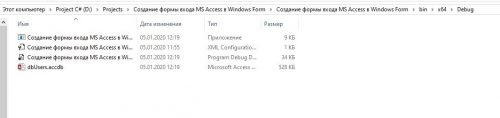
Шаг 5:
Скопируем нашу БД в каталог программы изменив при это целевую платформу на x64
Шаг 6:
исходный код:
|
1 2 3 4 5 6 7 8 9 10 11 12 13 14 15 16 17 18 19 20 21 22 23 24 25 26 27 28 29 30 31 32 33 34 35 36 37 38 39 40 41 42 43 44 45 46 47 48 49 50 51 52 |
using System; using System.Collections.Generic; using System.ComponentModel; using System.Data; using System.Data.OleDb; using System.Data.SqlClient; using System.Drawing; using System.Linq; using System.Text; using System.Threading.Tasks; using System.Windows.Forms; namespace Создание_формы_входа_MS_Access_в_Windows_Form { public partial class Form1 : Form //nookery.ru { OleDbConnection con; OleDbCommand cmd; OleDbDataReader dr; public Form1() { InitializeComponent(); } private void btnLogin_Click(object sender, EventArgs e) { string usr = txtUser.Text; string psw = txtPass.Text; con = new OleDbConnection(@»Provider=Microsoft.ACE.Oledb.12.0;Data Source=D:ProjectsСоздание формы входа MS Access в Windows FormСоздание формы входа MS Access в Windows Formbinx64DebugdbUsers.accdb»); cmd = new OleDbCommand(); con.Open(); cmd.Connection = con; string str = «SELECT * FROM tblUser where user='» + txtUser.Text + «‘ AND pass='» + txtPass.Text + «‘»; cmd.CommandText = str; dr = cmd.ExecuteReader(); if (dr.Read()) { MessageBox.Show(«Добро пожаловать « + txtUser.Text); } else { MessageBox.Show(«Неправильный логин или пароль»); } con.Close(); } } } |
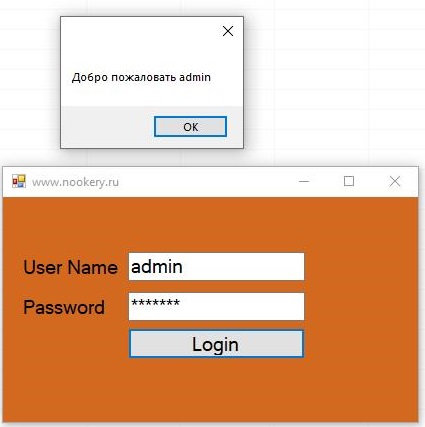
Внимание если у вас возникает ошибка:System.InvalidOperationException: «Поставщик «Microsoft.ACE.OLEDB.12.0″ не зарегистрирован на локальном компьютере.»
Вам надо изменить целевую сборку проекта на x64, если вы не знаете как это сделать, прочитайте тут.
Create Login and Registration Form in C# Windows Form With Database
Introduction
Hello guys, in this article we will create a login and registration form with database in c# windows form application .In this article we create a windows form app with login page, registration page for create new account and home page which show message that you login successfully .I hope you will like this article .So let’s start step by step.
 and Registration (Sign Up) Form in C# Windows Form With Database")
Step: 1:- Open your visual studio, here I will use visual studio 2019.
Step: 2:- Clock on file menu on top of the visual studio, hover mouse on new and click on project.
 and Registration (Sign Up) Form in C# Windows Form With Database")
Step: 3:- Search for windows form App.(.Net framework) and click on next.
 and Registration (Sign Up) Form in C# Windows Form With Database")
Step: 4:- In this step you have to enter some details of your application and then click on Create button. Following details you have to enter.
 and Registration (Sign Up) Form in C# Windows Form With Database")
1. Project Name: Name of your project
2. Location: Location where you want to store your app in your local computer.
3. Solution Name: This name is display in solution explore in visual studio.
4. Framework: Select appropriate framework as your application require.
Step: 5:- Now your project is created. Open Solution Explorer .If you don’t see solution explore you can open from View menu on top or you can try short cut key “Ctrl+W,S”. We need to create some pages for our application. Right click on solution name then Hover mouse on Add and click on Add New Item or you can user short cut key “Ctrl+Shift+A”.
 and Registration (Sign Up) Form in C# Windows Form With Database")
Step: 6:- Now you see a dialog where we add our forms. Select Windows Form, give proper name and click on Add. Add Login, Registration and Home page in same way.
 and Registration (Sign Up) Form in C# Windows Form With Database")
Step: 7:- Now we need to add database in our project. Right click on solution name then Hover mouse on Add and click on Add New Item or you can user short cut key “Ctrl+Shift+A”. Select data filter from left side bar for see item which associate with database. Select service based database, give name and click on add.
 and Registration (Sign Up) Form in C# Windows Form With Database")
Step: 8:- Now we create a table which we user in login and registration. Double click on database file from solution explorer. It will open database file in server explore. Expand your database and right click on table then click on Add New Table.
 and Registration (Sign Up) Form in C# Windows Form With Database")
Step: 9:-Create table field which you want, here I added only three field Id, UserName and password where id is auto increment by 1. You can set it by right click on field name , click on property and find Id Identity Specification expand it make true (Is Identity) field and give increment number which increment id by adding this number in last id.
 and Registration (Sign Up) Form in C# Windows Form With Database")
CREATE TABLE [dbo].[LoginTable]
(
    [Id] INT NOT NULL PRIMARY KEY IDENTITY,
    [username] NVARCHAR(50) NULL,
    [password] NVARCHAR(50) NULL
)
Step:-10:- Now first of all we create Registration form. So create design of your form as you need. In below image you see how I design form.
 and Registration (Sign Up) Form in C# Windows Form With Database")
Step: 11:- Now click anywhere on form it will generate Form_Load event where enter following code. This code create database connection and open it. In next step you will learn how you get that connection string which added in SQLConnection Constructor.
private void Registration_Load(object sender, EventArgs e)
{
            cn = new SqlConnection(@"Data Source=(LocalDB)MSSQLLocalDB;AttachDbFilename=H:WebsiteRegistrationAndLoginDatabase.mdf;Integrated Security=True");
            cn.Open();
}
Step: 12:- Go to server Explorer right click on database, click on Modify Connection.
 and Registration (Sign Up) Form in C# Windows Form With Database")
Step: 13:- Now you see a windows dialog popup click on advance button. This will open another dialog. But Before that click on test button and check you database working properly.
 and Registration (Sign Up) Form in C# Windows Form With Database")
Step: 14:- Copy path which show below on this dialog and close both dialog. Then past this path in form load event. Add @ sign before this path so you no need to change slash.
 and Registration (Sign Up) Form in C# Windows Form With Database")
Step: 15:- We need to open login page when user click on login button so enter following code in Login Button click event.
private void Button1_Click(object sender, EventArgs e)
{
            this.Hide();
            Login login = new Login();
            login.ShowDialog();
}
Code Explanation:
1. Here first we hide the current form which is registration .
2. Then we create an object of login page and show login form using that object.
Step: 16:- Now add following code in registration button click event
private void BtnRegister_Click(object sender, EventArgs e)
        {
            if (txtconfirmpassword.Text != string.Empty || txtpassword.Text != string.Empty || txtusername.Text != string.Empty)
            {
                if (txtpassword.Text == txtconfirmpassword.Text)
                {
                    cmd = new SqlCommand("select * from LoginTable where username='" + txtusername.Text + "'", cn);
                    dr = cmd.ExecuteReader();
                    if (dr.Read())
                    {
                        dr.Close();
                        MessageBox.Show("Username Already exist please try another ", "Error", MessageBoxButtons.OK, MessageBoxIcon.Error);
                    }
                    else
                    {
                        dr.Close();
                        cmd = new SqlCommand("insert into LoginTable values(@username,@password)", cn);
                        cmd.Parameters.AddWithValue("username", txtusername.Text);
                        cmd.Parameters.AddWithValue("password", txtpassword.Text);
                        cmd.ExecuteNonQuery();
                        MessageBox.Show("Your Account is created . Please login now.", "Done", MessageBoxButtons.OK, MessageBoxIcon.Information);
                    }
                }
                else
                {
                    MessageBox.Show("Please enter both password same ", "Error", MessageBoxButtons.OK, MessageBoxIcon.Error);
                }
            }
            else
            {
                MessageBox.Show("Please enter value in all field.", "Error", MessageBoxButtons.OK, MessageBoxIcon.Error);
            }
        }
Code Explanation:
1. First of all we check that user enter value in all field if yes that continue otherwise show message using message box.
2. Then we check if password and confirm password both are same.
3. Then we check if any record/user is already register with that username if not then continue further otherwise show error message.
4. In last we insert data in table using SQLCommand object.
Step: 17:- Now we create a login page here I add two textbox for username and password and two button for login and open registration form.
 and Registration (Sign Up) Form in C# Windows Form With Database")
Step: 18:- Click on anywhere in form which generate Form_Load event add connection code that as show below.
private void Login_Load(object sender, EventArgs e)
{
            cn = new SqlConnection(@"Data Source=(LocalDB)MSSQLLocalDB;AttachDbFilename=H:WebsiteRegistrationAndLoginDatabase.mdf;Integrated Security=True");
            cn.Open();
}
Step: 19:- On Registration button click add following code which open registration form.
private void Btnregister_Click(object sender, EventArgs e)
{
            this.Hide();
            Registration registration = new Registration();
            registration.ShowDialog();
}
Step: 20:- Add below code in login button click for redirect user to home page form if user exist.
private void BtnLogin_Click(object sender, EventArgs e)
        {
            if (txtpassword.Text != string.Empty || txtusername.Text != string.Empty)
            {

                cmd = new SqlCommand("select * from LoginTable where username='" + txtusername.Text + "' and password='"+txtpassword.Text+"'", cn);
                dr = cmd.ExecuteReader();
                if (dr.Read())
                {
                    dr.Close();
                    this.Hide();
                    Home home = new Home();
                    home.ShowDialog();
                }
                else
                {
                    dr.Close();
                    MessageBox.Show("No Account avilable with this username and password ", "Error", MessageBoxButtons.OK, MessageBoxIcon.Error);
                }

            }
            else
            {
                MessageBox.Show("Please enter value in all field.", "Error", MessageBoxButtons.OK, MessageBoxIcon.Error);
            }
        }
Code Explanation
1. Here first of all we check if user enter value in both field if yes then continue otherwise show error message.
2. Then we check if user exist in our database with that username and password. If user exist then open home page which we generate in start.
Step: 21:-Change start page as login in Program.cs File.
static void Main()
{
            Application.EnableVisualStyles();
            Application.SetCompatibleTextRenderingDefault(false);
            Application.Run(new Login());
}
Step: 22:-Now run your application.
 and Registration (Sign Up) Form in C# Windows Form With Database")
 and Registration (Sign Up) Form in C# Windows Form With Database")
 and Registration (Sign Up) Form in C# Windows Form With Database")
Conclusion
So, here we create a simple login and registration page in windows form application. I hope you like this article, share with your friends.
Source : My Website (YogeshHadiya.In) -> Create Login(Sign In) and Registration (Sign Up) Form in C# Windows Form With Database
In My C# Corner Blog
|
0 / 0 / 1 Регистрация: 31.01.2016 Сообщений: 77 |
|
|
1 |
|
|
MySQL Форма регистрации нового пользователя21.05.2017, 17:26. Показов 9167. Ответов 20
Здравствуйте, подскажите пожалуйста код для регистрации. Что бы при например при вводе логина и пароля в textbox’ы и нажатия кнопки, данные сохранялись в БД MySQL.
__________________
0 |

|
Programming Эксперт 94731 / 64177 / 26122 Регистрация: 12.04.2006 Сообщений: 116,782 |
21.05.2017, 17:26 |
|
20 |
|
OwenGlendower Администратор
15246 / 12285 / 4904 Регистрация: 17.03.2014 Сообщений: 24,882 Записей в блоге: 1 |
||||
|
22.05.2017, 00:02 |
2 |
|||
|
ArtesiaMaster, например так:
Прим.
0 |
|
0 / 0 / 1 Регистрация: 31.01.2016 Сообщений: 77 |
|
|
22.05.2017, 02:05 [ТС] |
3 |
|
А как сделать что бы одинаковые имена нельзя было регистрировать?
0 |
|
Администратор
15246 / 12285 / 4904 Регистрация: 17.03.2014 Сообщений: 24,882 Записей в блоге: 1 |
|
|
22.05.2017, 02:20 |
4 |
|
ArtesiaMaster, поставь UNIQUE CONSTRAINT на колонку Login и лови исключение при вызове ExecuteNonQuery. У этой ошибки должен быть свой код.
0 |
|
0 / 0 / 1 Регистрация: 31.01.2016 Сообщений: 77 |
|
|
22.05.2017, 15:40 [ТС] |
5 |
|
Извините, я просто не очень опытен не в MySQL, не в C# что значит ловит исключение, и как это сделать?
0 |
|
OwenGlendower Администратор
15246 / 12285 / 4904 Регистрация: 17.03.2014 Сообщений: 24,882 Записей в блоге: 1 |
||||
|
22.05.2017, 16:23 |
6 |
|||
|
ArtesiaMaster, это делается путем заключения вызова addUserCmd.ExecuteNonQuery() в блок try/catch
0 |
|
ArtesiaMaster 0 / 0 / 1 Регистрация: 31.01.2016 Сообщений: 77 |
||||
|
22.05.2017, 17:20 [ТС] |
7 |
|||
|
Обработка исключения что туда писать? Добавлено через 36 минут
0 |
|
OwenGlendower Администратор
15246 / 12285 / 4904 Регистрация: 17.03.2014 Сообщений: 24,882 Записей в блоге: 1 |
||||
|
22.05.2017, 18:09 |
8 |
|||
|
Обработка исключения что туда писать? Проверка номера ошибки (свойство Number) и если там код 1169 (это только мое предположение, не забудь проверить на практике), то значит такой пользователь уже существует и значит нужно выдать соответствующее сообщение. В противном случае можно вывести общее сообщение что при добавлении пользователя произошла ошибка.
И после чего вставлять try/catch? В данном коде никуда потому что это не код регистрации о котором мы говорим. Переделать тем не менее его нужно хотя бы потому что в запросах следует использовать параметры. Также, если ты будешь использовать вариант с PBKDF2 хешем как я предложил выше, то проверку пароля нужно делать по другому. Исправленный вариант
0 |

|
0 / 0 / 1 Регистрация: 31.01.2016 Сообщений: 77 |
|
|
22.05.2017, 20:26 [ТС] |
9 |
|
А куда вставлять код PBKDF2HashHelper
0 |
|
0 / 0 / 1 Регистрация: 31.01.2016 Сообщений: 77 |
|
|
22.05.2017, 20:57 [ТС] |
10 |
|
Почему-то так, я вставил класс
0 |

|
Администратор
15246 / 12285 / 4904 Регистрация: 17.03.2014 Сообщений: 24,882 Записей в блоге: 1 |
|
|
22.05.2017, 20:57 |
11 |
|
ArtesiaMaster, добавь в проект новый класс (он создается в новом файле) с именем PBKDF2HashHelper и в замени его объявление на код из ссылки.
0 |
|
0 / 0 / 1 Регистрация: 31.01.2016 Сообщений: 77 |
|
|
22.05.2017, 21:02 [ТС] |
12 |
|
Все равно ошибки такие же
0 |
|
0 / 0 / 1 Регистрация: 31.01.2016 Сообщений: 77 |
|
|
22.05.2017, 21:59 [ТС] |
13 |
|
Вот что осталось
0 |
|
ArtesiaMaster 0 / 0 / 1 Регистрация: 31.01.2016 Сообщений: 77 |
||||||||
|
22.05.2017, 22:20 [ТС] |
14 |
|||||||
|
Опять извиняюсь, исправил Добавлено через 17 минут
0 |
|
Администратор
15246 / 12285 / 4904 Регистрация: 17.03.2014 Сообщений: 24,882 Записей в блоге: 1 |
|
|
22.05.2017, 22:55 |
15 |
|
но я просто запутался Да уж заметно. Выложи архив проекта на форум я его исправлю как надо.
0 |
|
0 / 0 / 1 Регистрация: 31.01.2016 Сообщений: 77 |
|
|
22.05.2017, 23:06 [ТС] |
16 |
|
Да уж заметно. Выложи архив проекта на форум я его исправлю как надо. В общем вообще все сломалось, сделайте пожалуйста, буду признателен!
0 |
|
Администратор
15246 / 12285 / 4904 Регистрация: 17.03.2014 Сообщений: 24,882 Записей в блоге: 1 |
|
|
23.05.2017, 01:38 |
17 |
|
ArtesiaMaster, лови
0 |
|
0 / 0 / 1 Регистрация: 31.01.2016 Сообщений: 77 |
|
|
23.05.2017, 03:24 [ТС] |
18 |
|
лови Спасибо, но все равно ошибка какая-то
0 |
|
0 / 0 / 1 Регистрация: 31.01.2016 Сообщений: 77 |
|
|
23.05.2017, 03:26 [ТС] |
19 |
|
И при регистрации, какой бы я пароль не ввел, он все равно 0
0 |
|
0 / 0 / 1 Регистрация: 31.01.2016 Сообщений: 77 |
|
|
23.05.2017, 21:52 [ТС] |
20 |
|
лови Так что есть время помочь, а то мне побыстрее нужно с этим разобраться, что бы дальше продолжить делать программу
0 |
In This C# Tutorial We Will See How To Design a Login & Signup Form and Connect Those Two Forms With MySQL Database To Allow The Users To Create Their Account or To Access The Application Using C# Windows Form and Visual Studio Editor .
What We Are Gonna Use In This Project:
— Cshap Programming Language.
— Visual Studio Editor.
— xampp server.
— MySQL Database.
— PhpMyAdmin.
— Canva.com( to create the images )
What We Will Do In This Project:
— Design Two Forms For The Login and Register Using Panels, TextBoxes and Labels.
— Create Label To Close The Application On Click.
— Create a Class For The Connection With MySQL Database.
— Connect C# To MySQL Database, To Add The Created User Data In The Signup Form.
— Check If The User Leave Some Fields Empty or Filled With The PlaceHolder Data.
— Check if The Username Already Exists.
— Check If The User Enter a Wrong Password In The Confirmation Field.
WATCH THIS C# TUTORIAL
Project Source Code:
// —— First We Need To Create a Class To Connect Our Application With The MySQL Database
using System;
using System.Collections.Generic;
using System.Linq;
using System.Text;
using System.Threading.Tasks;
using MySql.Data.MySqlClient;
namespace Csharp_Login_And_Register
{
/*
* we need to download the mysql connector
* add the connector to our project
* ( watch the video to see how )
* create a connection now with mysql
* open xampp and start mysql & apache
* go to phpmyadmin and create the users database
*/
class DB
{
// the connection
private MySqlConnection connection = new MySqlConnection(«server=localhost;port=3306;username=root;password=;database=csharp_users_db»);
// create a function to open the connection
public void openConnection()
{
if(connection.State == System.Data.ConnectionState.Closed)
{
connection.Open();
}
}
// create a function to close the connection
public void closeConnection()
{
if (connection.State == System.Data.ConnectionState.Open)
{
connection.Close();
}
}
// create a function to return the connection
public MySqlConnection getConnection()
{
return connection;
}
}
}
// —— After Creating The Connection Class, Now We Need To Build a Register Form To Allow Users To Create Their Account
using System;
using System.Collections.Generic;
using System.ComponentModel;
using System.Data;
using System.Drawing;
using System.Linq;
using System.Text;
using System.Threading.Tasks;
using System.Windows.Forms;
using MySql.Data.MySqlClient;
namespace Csharp_Login_And_Register
{
public partial class RegisterForm : Form
{
public RegisterForm()
{
InitializeComponent();
}
private void RegisterForm_Load(object sender, EventArgs e)
{
// remove the focus from the textboxes by making a label the active control
this.ActiveControl = label1;
}
// textbox first name ENTER
private void textBoxFirstname_Enter(object sender, EventArgs e)
{
String fname = textBoxFirstname.Text;
if(fname.ToLower().Trim().Equals(«first name»))
{
textBoxFirstname.Text = «»;
textBoxFirstname.ForeColor = Color.Black;
}
}
// textbox first name LEAVE
private void textBoxFirstname_Leave(object sender, EventArgs e)
{
String fname = textBoxFirstname.Text;
if (fname.ToLower().Trim().Equals(«first name») || fname.Trim().Equals(«»))
{
textBoxFirstname.Text = «first name»;
textBoxFirstname.ForeColor = Color.Gray;
}
}
// textbox last name ENTER
private void textBoxLastname_Enter(object sender, EventArgs e)
{
String lname = textBoxLastname.Text;
if (lname.ToLower().Trim().Equals(«last name»))
{
textBoxLastname.Text = «»;
textBoxLastname.ForeColor = Color.Black;
}
}
// textbox last name LEAVE
private void textBoxLastname_Leave(object sender, EventArgs e)
{
String lname = textBoxLastname.Text;
if (lname.ToLower().Trim().Equals(«last name») || lname.Trim().Equals(«»))
{
textBoxLastname.Text = «last name»;
textBoxLastname.ForeColor = Color.Gray;
}
}
// textbox email ENTER
private void textBoxEmail_Enter(object sender, EventArgs e)
{
String email = textBoxEmail.Text;
if (email.ToLower().Trim().Equals(«email address»))
{
textBoxEmail.Text = «»;
textBoxEmail.ForeColor = Color.Black;
}
}
// textbox email LEAVE
private void textBoxEmail_Leave(object sender, EventArgs e)
{
String email = textBoxEmail.Text;
if (email.ToLower().Trim().Equals(«email address») || email.Trim().Equals(«»))
{
textBoxEmail.Text = «email address»;
textBoxEmail.ForeColor = Color.Gray;
}
}
// textbox username ENTER
private void textBoxUsername_Enter(object sender, EventArgs e)
{
String username = textBoxUsername.Text;
if (username.ToLower().Trim().Equals(«username»))
{
textBoxUsername.Text = «»;
textBoxUsername.ForeColor = Color.Black;
}
}
// textbox username LEAVE
private void textBoxUsername_Leave(object sender, EventArgs e)
{
String username = textBoxUsername.Text;
if (username.ToLower().Trim().Equals(«username») || username.Trim().Equals(«»))
{
textBoxUsername.Text = «username»;
textBoxUsername.ForeColor = Color.Gray;
}
}
// textbox password ENTER
private void textBoxPassword_Enter(object sender, EventArgs e)
{
String password = textBoxPassword.Text;
if (password.ToLower().Trim().Equals(«password»))
{
textBoxPassword.Text = «»;
textBoxPassword.UseSystemPasswordChar = true;
textBoxPassword.ForeColor = Color.Black;
}
}
// textbox password LEAVE
private void textBoxPassword_Leave(object sender, EventArgs e)
{
String password = textBoxPassword.Text;
if (password.ToLower().Trim().Equals(«password») || password.Trim().Equals(«»))
{
textBoxPassword.Text = «password»;
textBoxPassword.UseSystemPasswordChar = false;
textBoxPassword.ForeColor = Color.Gray;
}
}
// textbox confirm password ENTER
private void textBoxPasswordConfirm_Enter(object sender, EventArgs e)
{
String cpassword = textBoxPasswordConfirm.Text;
if (cpassword.ToLower().Trim().Equals(«confirm password»))
{
textBoxPasswordConfirm.Text = «»;
textBoxPasswordConfirm.UseSystemPasswordChar = true;
textBoxPasswordConfirm.ForeColor = Color.Black;
}
}
// textbox confirm password LEAVE
private void textBoxPasswordConfirm_Leave(object sender, EventArgs e)
{
String cpassword = textBoxPasswordConfirm.Text;
if (cpassword.ToLower().Trim().Equals(«confirm password») ||
cpassword.ToLower().Trim().Equals(«password») ||
cpassword.Trim().Equals(«»))
{
textBoxPasswordConfirm.Text = «confirm password»;
textBoxPasswordConfirm.UseSystemPasswordChar = false;
textBoxPasswordConfirm.ForeColor = Color.Gray;
}
}
// label close CLICK
private void labelClose_Click(object sender, EventArgs e)
{
//this.Close();
Application.Exit();
}
// label close MOUSE ENTER
private void labelClose_MouseEnter(object sender, EventArgs e)
{
labelClose.ForeColor = Color.Black;
}
// label close MOUSE LEAVE
private void labelClose_MouseLeave(object sender, EventArgs e)
{
labelClose.ForeColor = Color.White;
}
// button signup
private void buttonCreateAccount_Click(object sender, EventArgs e)
{
// add a new user
DB db = new DB();
MySqlCommand command = new MySqlCommand(«INSERT INTO `users`(`firstname`, `lastname`, `emailaddress`, `username`, `password`) VALUES (@fn, @ln, @email, @usn, @pass)», db.getConnection());
command.Parameters.Add(«@fn», MySqlDbType.VarChar).Value = textBoxFirstname.Text;
command.Parameters.Add(«@ln», MySqlDbType.VarChar).Value = textBoxLastname.Text;
command.Parameters.Add(«@email», MySqlDbType.VarChar).Value = textBoxEmail.Text;
command.Parameters.Add(«@usn», MySqlDbType.VarChar).Value = textBoxUsername.Text;
command.Parameters.Add(«@pass», MySqlDbType.VarChar).Value = textBoxPassword.Text;
// open the connection
db.openConnection();
// check if the textboxes contains the default values
if (!checkTextBoxesValues())
{
// check if the password equal the confirm password
if(textBoxPassword.Text.Equals(textBoxPasswordConfirm.Text))
{
// check if this username already exists
if (checkUsername())
{
MessageBox.Show(«This Username Already Exists, Select A Different One»,»Duplicate Username»,MessageBoxButtons.OKCancel,MessageBoxIcon.Error);
}
else
{
// execute the query
if (command.ExecuteNonQuery() == 1)
{
MessageBox.Show(«Your Account Has Been Created»,»Account Created»,MessageBoxButtons.OK,MessageBoxIcon.Information);
}
else
{
MessageBox.Show(«ERROR»);
}
}
}
else
{
MessageBox.Show(«Wrong Confirmation Password»,»Password Error»,MessageBoxButtons.OKCancel,MessageBoxIcon.Error);
}
}
else
{
MessageBox.Show(«Enter Your Informations First»,»Empty Data»,MessageBoxButtons.OKCancel,MessageBoxIcon.Error);
}
// close the connection
db.closeConnection();
}
// check if the username already exists
public Boolean checkUsername()
{
DB db = new DB();
String username = textBoxUsername.Text;
DataTable table = new DataTable();
MySqlDataAdapter adapter = new MySqlDataAdapter();
MySqlCommand command = new MySqlCommand(«SELECT * FROM `users` WHERE `username` = @usn», db.getConnection());
command.Parameters.Add(«@usn», MySqlDbType.VarChar).Value = username;
adapter.SelectCommand = command;
adapter.Fill(table);
// check if this username already exists in the database
if (table.Rows.Count > 0)
{
return true;
}
else
{
return false;
}
}
// check if the textboxes contains the default values
public Boolean checkTextBoxesValues()
{
String fname = textBoxFirstname.Text;
String lname = textBoxLastname.Text;
String email = textBoxEmail.Text;
String uname = textBoxUsername.Text;
String pass = textBoxPassword.Text;
if(fname.Equals(«first name») || lname.Equals(«last name») ||
email.Equals(«email address») || uname.Equals(«username»)
|| pass.Equals(«password»))
{
return true;
}
else
{
return false;
}
}
// label go to the login form MOUSE ENTER
private void labelGoToLogin_MouseEnter(object sender, EventArgs e)
{
labelGoToLogin.ForeColor = Color.Yellow;
}
// label go to the login form MOUSE LEAVE
private void labelGoToLogin_MouseLeave(object sender, EventArgs e)
{
labelGoToLogin.ForeColor = Color.White;
}
// label go to the login form CLICK
private void labelGoToLogin_Click(object sender, EventArgs e)
{
this.Hide();
LoginForm loginform = new LoginForm();
loginform.Show();
}
}
}
// —— After The User Have Created His Acoount, He Need To Login To The Application, So Let’s Create The Login Form.
using MySql.Data.MySqlClient;
using System;
using System.Collections.Generic;
using System.ComponentModel;
using System.Data;
using System.Drawing;
using System.Linq;
using System.Text;
using System.Threading.Tasks;
using System.Windows.Forms;
namespace Csharp_Login_And_Register
{
public partial class LoginForm : Form
{
public LoginForm()
{
InitializeComponent();
// set the autosize for the password to false
this.textBoxPassword.AutoSize = false;
// set the the height of the password to 50
this.textBoxPassword.Size = new Size(this.textBoxPassword.Size.Width, 50);
}
// label close MOUSE ENTER
private void labelClose_MouseEnter(object sender, EventArgs e)
{
labelClose.ForeColor = Color.Black;
}
// label close MOUSE LEAVE
private void labelClose_MouseLeave(object sender, EventArgs e)
{
labelClose.ForeColor = Color.White;
}
// label close CLICK
private void labelClose_Click(object sender, EventArgs e)
{
//this.Close();
Application.Exit();
}
// button login
private void buttonLogin_Click(object sender, EventArgs e)
{
DB db = new DB();
String username = textBoxUsername.Text;
String password = textBoxPassword.Text;
DataTable table = new DataTable();
MySqlDataAdapter adapter = new MySqlDataAdapter();
MySqlCommand command = new MySqlCommand(«SELECT * FROM `users` WHERE `username` = @usn and `password` = @pass», db.getConnection());
command.Parameters.Add(«@usn», MySqlDbType.VarChar).Value = username;
command.Parameters.Add(«@pass», MySqlDbType.VarChar).Value = password;
adapter.SelectCommand = command;
adapter.Fill(table);
// check if the user exists or not
if (table.Rows.Count > 0)
{
this.Hide();
MainForm mainform = new MainForm();
mainform.Show();
}
else
{
// check if the username field is empty
if(username.Trim().Equals(«»))
{
MessageBox.Show(«Enter Your Username To Login»,»Empty Username»,MessageBoxButtons.OK,MessageBoxIcon.Error);
}
// check if the password field is empty
else if (password.Trim().Equals(«»))
{
MessageBox.Show(«Enter Your Password To Login», «Empty Password», MessageBoxButtons.OK, MessageBoxIcon.Error);
}
// check if the username or the password don’t exist
else
{
MessageBox.Show(«Wrong Username Or Password», «Wrong Data», MessageBoxButtons.OK, MessageBoxIcon.Error);
}
}
}
// label go to signup CLICK
private void labelGoToSignUp_Click(object sender, EventArgs e)
{
this.Hide();
RegisterForm registerform = new RegisterForm();
registerform.Show();
}
// label go to signup MOUSE ENTER
private void labelGoToSignUp_MouseEnter(object sender, EventArgs e)
{
labelGoToSignUp.ForeColor = Color.Yellow;
}
// label go to signup MOUSE LEAVE
private void labelGoToSignUp_MouseLeave(object sender, EventArgs e)
{
labelGoToSignUp.ForeColor = Color.White;
}
}
}
OUTPUT:
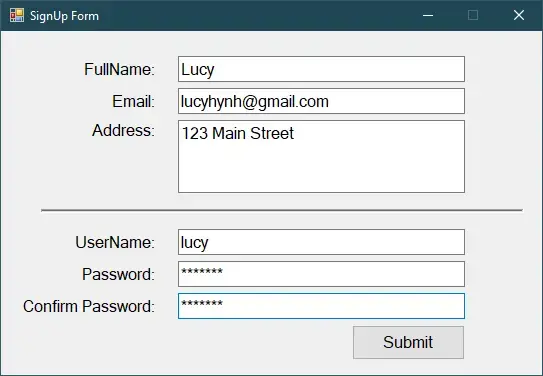
This post shows you How to Create User Registration Or Sign Up Form With SQL Server using Dapper ORM in C# .NET Windows Forms Application.
Creating a new windows forms application project, then design a simple signup form as shown below.
Right click on your project, then add a new item->service based database
Next, You need to connect to the local database from your visual studio, then create a simple user table.
After creating the user table, you need to add a datasource to the local database. This helps you automatically create database connection strings in the app.config file.
<?xml version="1.0" encoding="utf-8" ?>
<configuration>
    <configSections>
    </configSections>
    <connectionStrings>
        <add name="SignUpApp.Properties.Settings.cn" connectionString="Data Source=(LocalDB)MSSQLLocalDB;AttachDbFilename=|DataDirectory|Database.mdf;Integrated Security=True"
            providerName="System.Data.SqlClient" />
    </connectionStrings>
    <startup>
        <supportedRuntime version="v4.0" sku=".NETFramework,Version=v4.6.1" />
    </startup>
</configuration>
Create the AppHelper class allows you to get connection string from the app.config file. You can easily change your connection string in the app.config file.
public static class AppHelper
{
    public static string ConnectionString => ConfigurationManager.ConnectionStrings["SignUpApp.Properties.Settings.cn"].ConnectionString;
}
Creating a User class allows you to map data between User object and User table in your database.
public class User
{
    public string UserName { get; set; }
    public string Password { get; set; }
    public string Email { get; set; }
    public string FullName { get; set; }
    public string Address { get; set; }
}
Defining an IUserRepository interface allows you to eaily modify your code
public interface IUserRepository
{
    Task<bool> Insert(User user);
}
Creating the UserRepository class inherit from the IUserRepository interface, and don’t forget to implement methods in the interface.
public class UserRepository : IUserRepository
{
    public async Task<bool> Insert(User user)
    {
        using (IDbConnection db = new SqlConnection(AppHelper.ConnectionString))
        {
            var result = await db.ExecuteAsync(SignUpApp.Properties.Resources.InsertUser, new { UserName = user.UserName, FullName = user.FullName, Email = user.Email, Address = user.Address, Password = user.Password });
            return result > 0;
        }
    }
}
We will use the UserRepository class to access to your sql database using Dapper ORM in c#. So, you need to search and install the Dapper from the Manage Nuget Packages to your project.
As you know, Dapper ORM is a high performance Micro-ORM supporting SQL Server, MySQL, Sqlite, SqlCE, Firebird etc..
private async void btnSignUp_Click(object sender, EventArgs e)
{
    if (string.IsNullOrEmpty(txtUserName.Text))
    {
        MessageBox.Show("Please enter your username !", "Message", MessageBoxButtons.OK, MessageBoxIcon.Warning);
        txtUserName.Focus();
        return;
    }
    if (txtPassword.Text != txtConfirmPassword.Text)
    {
        MessageBox.Show("Password and Confirm password don't match !", "Message", MessageBoxButtons.OK, MessageBoxIcon.Warning);
        return;
    }
    IUserRepository repository = new UserRepository();
    bool result = await repository.Insert(new User() { UserName = txtUserName.Text, Password = txtPassword.Text, Email = txtEmail.Text, FullName = txtFullName.Text, Address = txtAddress.Text });
    if (result)
        MessageBox.Show("You have successfully signed up !", "Message", MessageBoxButtons.OK, MessageBoxIcon.Information);
    else
        MessageBox.Show("Error !", "Message", MessageBoxButtons.OK, MessageBoxIcon.Information);
}
Open your resource section, then create an InsertUser resource name as show below.
if not exists(select username from users where [email protected])
begin
	insert into users(username,password,email,fullname,address)
	values(@UserName,@Password,@Email,@FullName,@Address)
end
VIDEO TUTORIAL
Post Views: 5,389
In this post we will see how we can create C# Windows form Login page with MS SQL Database. I’m using Visual studio 2012 and MS SQL 2014 for developing this login form.
C# Windows Form Creating Login form with SQL Database – DOWNLOAD SOURCE CODE
Step 1:
Create a new Windows form application in Visual studio 2012 with name “WindowsLogin”.
Step 2:
In the project you will have a default form created with name “Form1”, in this form take two Windows form Labels in a row and name it (change their IDs) as “lblWelcome” and “lblInfo” respectively. And change the Windows name to “Dashboard”. This window form will serve as Dashboard or Homepage for our windows form application after user successfully logins into our c# application with valid Login userid and password. 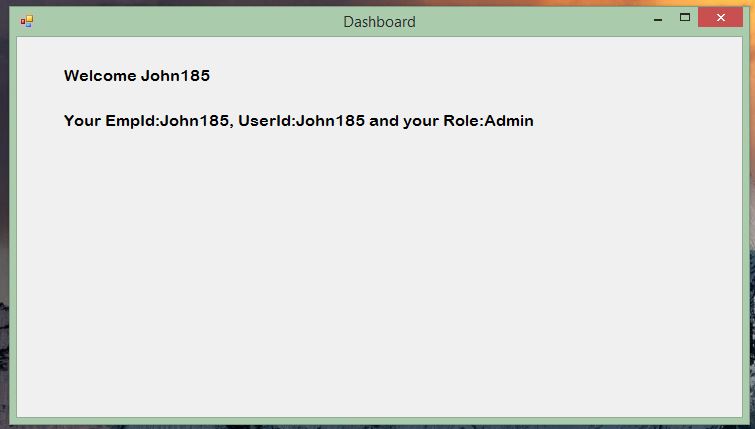
Open the code file and edit as below:
Form1.cs:
using System;
using System.Collections.Generic;
using System.ComponentModel;
using System.Data;
using System.Drawing;
using System.Linq;
using System.Text;
using System.Threading.Tasks;
using System.Windows.Forms;

namespace WindowsLogin
{
public partial class Form1 : Form
{
public Form1()
{
InitializeComponent();
}

private void Form1_Load(object sender, EventArgs e)
{
lblWelcome.Text = "Welcome " + UserInfo.userid;
lblInfo.Text = "Your EmpId:" + UserInfo.userid + ", UserId:" + UserInfo.userid + " and your Role:" + UserInfo.role;
}
}
}
Step 3:
Create a new class with name UserInfo.cs in our Windows form application and edit as below:
UserInfo.cs:
using System;
using System.Collections.Generic;
using System.Linq;
using System.Text;
using System.Threading.Tasks;

namespace WindowsLogin
{
public class UserInfo
{
public static string userid = "";
public static string empid = "";
public static string role = "";

}
}
This class will be used for setting or providing the logged in User details in our application to all other forms.
Step 4:
In Program.cs add a static Boolean variable “openDashboard” and edit it as below
Program.cs:
using System;
using System.Collections.Generic;
using System.Linq;
using System.Threading.Tasks;
using System.Windows.Forms;

namespace WindowsLogin
{
static class Program
{
/// <summary>
/// The main entry point for the application.
/// </summary>
///
public static Boolean openDashboard { get; set; }
[STAThread]
static void Main()
{
Application.EnableVisualStyles();
Application.SetCompatibleTextRenderingDefault(false);
Application.Run(new Login());

if (openDashboard)
{
Application.Run(new Form1());
}
}
}
}
We will use this variable to open another form after successful login process.
Step 5:
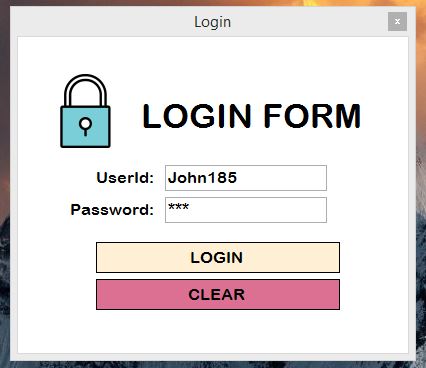
Create a new Window Form with name “Login” and make its design as below:
Login window:
Login Lock Image:

In this form :
Two Windows form Textboxes with id : txtUserId and txtPassword
Two Windows form Buttons with id : btnLogin and btnClear
A Windows form PictureBox for displaying Login Lock Image and three windows form labels, one for LOGIN FORM and other two for UserId and Password.
Double click on btnLogin and btnClear button to generate their Click methods.
Login form cs code:
Login.cs:
using System;
using System.Collections.Generic;
using System.ComponentModel;
using System.Data;
using System.Drawing;
using System.Linq;
using System.Text;
using System.Threading.Tasks;
using System.Windows.Forms;
using System.Data.SqlClient;

namespace WindowsLogin
{
public partial class Login : Form
{
SqlConnection con;
SqlCommand cmd;
SqlDataReader reader;
public Login()
{
InitializeComponent();
}

private void btnLogin_Click(object sender, EventArgs e)
{
String result = "";
try
{
con = new SqlConnection(@"Data Source=192.168.0.192;Initial Catalog=Parallelcodes;User ID=sa;Password=789;Integrated Security=True");
cmd = new SqlCommand("select * from tblLogininfo where UserId=@uid and Password=@password", con);
con.Open();
cmd.Parameters.AddWithValue("@uid", txtUserId.Text.ToString());
cmd.Parameters.AddWithValue("@password", txtPassword.Text.ToString());
reader = cmd.ExecuteReader();
if (reader.Read())
{
if (reader["Password"].ToString().Equals(txtPassword.Text.ToString(), StringComparison.InvariantCulture))
{
UserInfo.empid = reader["EmpId"].ToString();
UserInfo.userid = reader["UserId"].ToString();
UserInfo.role = reader["UserRole"].ToString();
result = "1";
}
else
result = "Invalid credentials";
}
else
result = "Connection failed";

reader.Close();
cmd.Dispose();
con.Close();

}
catch (Exception ex)
{
result = ex.Message.ToString();
}

if (result == "1")
{
Program.openDashboard = true;
this.Close();
}
else
MessageBox.Show(result);
}

private void btnClear_Click(object sender, EventArgs e)
{
txtPassword.Text = "";
txtUserId.Text = "";
}
}
}
MS SQL Database script :
Create database ParallelCodes

USE [ParallelCodes]
GO

/****** Object: Table [dbo].[tblLoginInfo] Script Date: 1/12/2019 6:35:11 PM ******/
SET ANSI_NULLS ON
GO

SET QUOTED_IDENTIFIER ON
GO

CREATE TABLE [dbo].[tblLoginInfo](
[Id] [int] IDENTITY(1,1) NOT NULL,
[EmpId] [int] NOT NULL,
[UserId] [nvarchar](50) NOT NULL,
[Password] [nvarchar](50) NOT NULL,
[UserRole] [nvarchar](10) NOT NULL,
[OnDate] [datetime] NULL DEFAULT (getdate())
) ON [PRIMARY]

GO
DOWNLOAD SOURCE CODE
Also see :
WPF Login form with MS SQL Database
ASP.NET Login form using Cookies
ASP.NET Login form using Sessions