I had to this challenge when working on a Java Project with MySQL server as the database.
Here’s how I did it:
First, confirm that your MySQL server configuration to allow for remote connections. Use your preferred text editor to open the MySQL server configuration file:
sudo nano /etc/mysql/mysql.conf.d/mysqld.cnf
Scroll down to the bind-address line and ensure that is either commented out or replaced with 0.0.0.0 (to allow all remote connections) or replaced with Ip-Addresses that you want remote connections from.
Once you make the necessary changes, save and exit the configuration file. Apply the changes made to the MySQL config file by restarting the MySQL service:
sudo systemctl restart mysql
Next, log into the MySQL server console on the server it was installed:
mysql -u root -p
Enter your mysql user password
Check the hosts that the user you want has access to already. In my case the user is root:
SELECT host FROM mysql.user WHERE user = "root";
This gave me this output:
+-----------+
| host      |
+-----------+
| localhost |
+-----------+
Next, I ran the command below to grant the root user remote access to the database named my_database:
USE my_database;
GRANT ALL PRIVILEGES ON *.* TO 'root'@'%' IDENTIFIED BY 'my-password';
Note: % grants a user remote access from all hosts on a network. You can specify the Ip-Address of the individual hosts that you want to grant the user access from using the command — GRANT ALL PRIVILEGES ON *.* TO 'root'@'Ip-Address' IDENTIFIED BY 'my-password';
Afterwhich I checked the hosts that the user now has access to. In my case the user is root:
SELECT host FROM mysql.user WHERE user = "root";
This gave me this output:
+-----------+
| host      |
+-----------+
| %         |
| localhost |
+-----------+
Finally, you can try connecting to the MySQL server from another server using the command:
mysql -u username -h mysql-server-ip-address -p
Where u represents user, h represents mysql-server-ip-address and p represents password. So in my case it was:
mysql -u root -h 34.69.261.158 -p
Enter your mysql user password
You should get this output depending on your MySQL server version:
Welcome to the MySQL monitor.  Commands end with ; or g.
Your MySQL connection id is 4
Server version: 5.7.31 MySQL Community Server (GPL)

Copyright (c) 2000, 2020, Oracle and/or its affiliates. All rights reserved.

Oracle is a registered trademark of Oracle Corporation and/or its
affiliates. Other names may be trademarks of their respective
owners.

Type 'help;' or 'h' for help. Type 'c' to clear the current input statement.

mysql>
Resources: How to Allow Remote Connections to MySQL
That’s all.
I hope this helps
Introduction
It is not uncommon to host databases and web servers on the same local machine. However, many organizations are now moving to a more distributed environment.
A separate database server can improve security, hardware performance, and enable you to scale resources quickly. In such use cases, learning how to manage remote resources effectively is a priority.
This tutorial shows you how to enable remote connections to a MySQL database.
Prerequisites
- Access to a terminal window/command line
- Remote MySQL server
- Sudo or root privileges on local and remote machines
Note: If you do not have direct access to your MySQL server, you need to establish a secure SSH connection. In case you need assistance, we have prepared a comprehensive tutorial on how to use SSH to connect to a remote server. This article a must-read for anyone new to the process.
MySQL Server Remote Connection
Allowing connections to a remote MySQL server is set up in 3 steps:
1. Edit MySQL config file.
2. Configure firewall.
3. Connect to remote MySQL server.
Step 1: Edit MySQL Config File
1.1 Access mysqld.cnf File
Use your preferred text editor to open the mysqld.cnf file. This example uses the nano text editor in Ubuntu 18.04. Enter the following command in your command-line interface to access the MySQL server configuration file:
sudo nano /etc/mysql/mysql.conf.d/mysqld.cnfThe location of the file may vary based on the distribution and version in use. If the MySQL configuration file is not it its default location try using the Linux find command to detect it.
1.2 Change Bind-Address IP
You now have access to the MySQL server configuration file. Scroll down to the bind-address line and change the IP address. The current default IP is set to 127.0.0.1. This IP limits MySQL connections to the local machine.
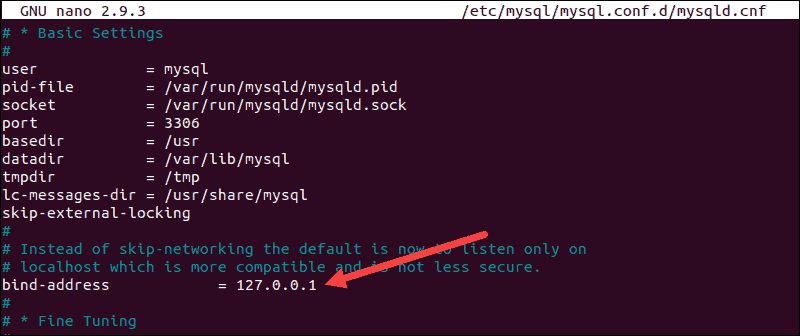
The new IP should match the address of the machine that needs to access the MySQL server remotely. For example, if you bind MySQL to 0.0.0.0, then any machine that reaches the MySQL server can also connect with it.
Once you make the necessary changes, save and exit the configuration file.
Note: Remote access is additionally verified by using the correct credentials and user parameters you have defined for your MySQL users.
1.3 Restart MySQL Service
Apply the changes made to the MySQL config file by restarting the MySQL service:
sudo systemctl restart mysqlNext, your current firewall settings need to be adjusted to allow traffic to the default MySQL port.
Step 2: Set up Firewall to Allow Remote MySQL Connection
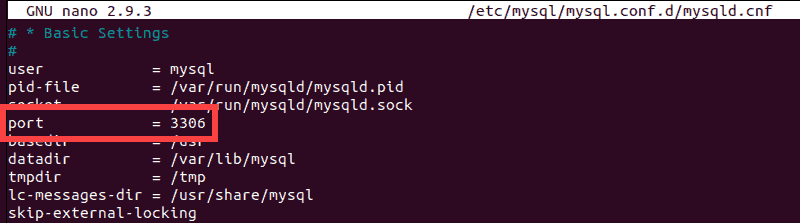
While editing the configuration file, you probably observed that the default MySQL port is 3306.
If you have already configured a firewall on your MySQL server, you need to open traffic for this specific port. Follow the instructions below that correspond to your firewall service in use.
Option 1: UFW (Uncomplicated Firewall)
UFW is the default firewall tool in Ubuntu. In a terminal window, type the following command to allow traffic and match the IP and port:
sudo ufw allow from remote_ip_address to any port 3306The system confirms that the rules were successfully updated.
Option 2: FirewallD
The firewalld management tool in CentOS uses zones to dictate what traffic is to be allowed.
Create a new zone to set the rules for the MySQL server traffic. The name of the zone in our example is mysqlrule, and we used the IP address from our previous example 133.155.44.103:
sudo firewall-cmd --new-zone=mysqlrule --permanent
sudo firewall-cmd --reload
sudo firewall-cmd --permanent --zone=mysqlrule --add-source=133.155.44.103
sudo firewall-cmd --permanent --zone=mysqlrule --add-port=3306/tcp
sudo firewall-cmd --reload
You have successfully opened port 3306 on your firewall.
Option 3: Open Port 3306 with iptables
The iptables utility is available on most Linux distributions by default. Type the following command to open MySQL port 3306 to unrestricted traffic:
sudo iptables -A INPUT -p tcp --dport 3306 -j ACCEPTTo limit access to a specific IP address, use the following command instead:
sudo iptables -A INPUT -p tcp -s 133.155.44.103 --dport 3306 -j ACCEPTThis command grants access to 133.155.44.103. You would need to substitute it with the IP for your remote connection.
It is necessary to save the changes made to the iptables rules. In an Ubuntu-based distribution type the following commands:
sudo netfilter-persistent save
sudo netfilter-persistent reload
Note: If the previous commands do not work, try installing the program with:
sudo apt-get install iptables-persistent
Type the ensuing command to save the new iptables rules in CentOS:
service iptables saveStep 3: Connect to Remote MySQL Server
Your remote server is now ready to accept connections. Use the following command to establish a connection with your remote MySQL server:
mysql -u username -h mysql_server_ip -pThe -u username in the command represents your MySQL username. The -h mysql_server_ip is the IP or the hostname of your MySQL server. The -p option prompts you to enter the password for the MySQL username.
You should see an output similar to the one below:
Connection to mysql_server_ip 3306 port [tcp/mysql] succeeded!How to Grant Remote Access to New MySQL Database?
If you do not have any databases yet, you can easily create a database by typing the following command in your MySQL shell:
CREATE DATABASE 'yourDB';To grant remote user access to a specific database:
GRANT ALL PRIVILEGES ON yourDB.* TO [email protected]'133.155.44.103' IDENTIFIED BY 'password1';The name of the database, the username, remote IP, and password need to match the information you want to use for the remote connection.
How to Grant Remote Access to Existing MySQL Database
Granting remote access to a user for an existing database requires a set of two commands:
update db set Host='133.155.44.103' where Db='yourDB';
update user set Host='133.155.44.103' where user='user1';
User1 is now able to access yourDB from a remote location identified by the IP 133.155.44.103.
Conclusion
In this article, you have gained valuable insight into the general principles of a remote MySQL connection.
With the appropriate credentials, a user originating from the specified IP address can now access your MySQL server from a remote machine.
This article describes how to use a local computer to connect to your MySQL databases stored remotely on A2 Hosting servers.
- Choose a remote MySQL connection method
- Method #1: Set up an SSH tunnel
- Microsoft Windows
- Mac OS X and Linux
- Method #2: Set up a direct connection
- Example ODBC connection
- Troubleshooting
- More Information
Choose a remote MySQL connection method
You can use either of the following methods to access your MySQL databases remotely:
- SSH tunnel: This is the more secure method. You set up an SSH tunnel that forwards a port on your local computer to the remote MySQL server. The MySQL traffic is encrypted by the SSH tunnel.
- Direct connection: You can set up a direct connection between your local computer and the remote MySQL server. Although it is easier to configure, it is not as secure.
After you have set up a remote MySQL connection, you can use a MySQL client application to manage your databases. For more information, please see this article.
Method #1: Set up an SSH tunnel
The procedure you follow to set up an SSH tunnel between your local computer and the A2 Hosting server depends on the local computer’s operating system.
Microsoft Windows
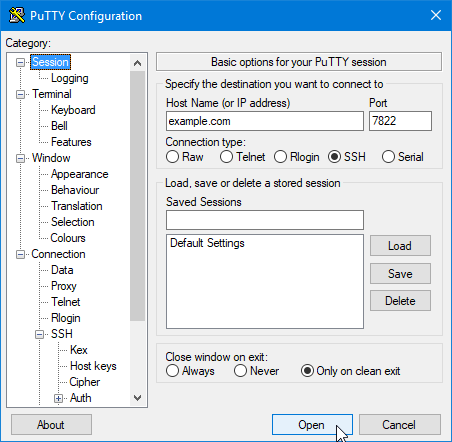
In order to use an SSH tunnel on a computer running Microsoft Windows, you need an SSH client program. A2 Hosting recommends using PuTTY, which you can download here. After you have downloaded the PuTTY executable to your local computer, you can set up an SSH tunnel.
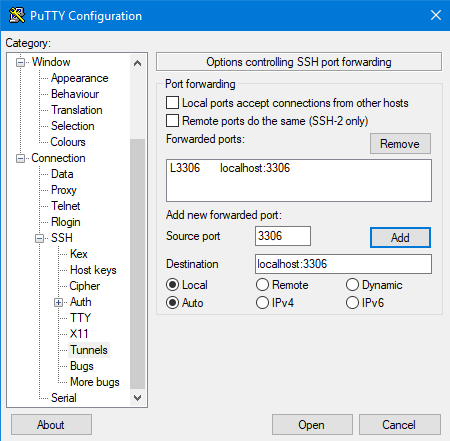
To set up an SSH tunnel on a computer running Microsoft Windows:
- Start PuTTY.
- In the Category pane, expand Connection, expand SSH, and then click Tunnels.
- In the Source port text box of the Port Forwarding section, type 3306. This is the local port to forward.In the Destination text box, type localhost:3306.
- Confirm that the Local and Auto radio buttons are selected.
- Click Add:

- In the Category pane, click Session.
- In the Host Name (or IP address) text box, type your web site’s domain name or IP address.
- In the Port text box, type 7822.
- Confirm that the Connection type radio button is set to SSH.
-
Click Open:
- If a PuTTY security alert about the server’s host key appears, click Yes.
- When the login as prompt appears, type your A2 Hosting username, and then type your password.
-
When the remote server’s command line prompt appears, the SSH tunnel is established and you can use your MySQL client applications on the local computer.
To verify that PuTTY is forwarding ports correctly, you can click the icon in the top-left corner of the PuTTY session window, and then click Event Log. If port forwarding is working correctly, you see a line similar to:
Local port 3306 forwarding to localhost:3306
Mac OS X and Linux
To establish an SSH tunnel on a computer running Mac OS X or Linux:
- Open a terminal window and type the following command at the command line. Replace username with your A2 Hosting username, and replace example.com with your site’s domain name:
ssh -p 7822 username@example.com -L 3306:localhost:3306
- Type your password, and then press Enter. When the remote server’s command line prompt appears, the SSH tunnel is established and you can use your MySQL client applications on the local computer.
Method #2: Set up a direct connection
To set up a direct connection between your local computer and the MySQL server, you must enable remote MySQL access in cPanel. For information about how to do this, please see this article.
Example ODBC connection
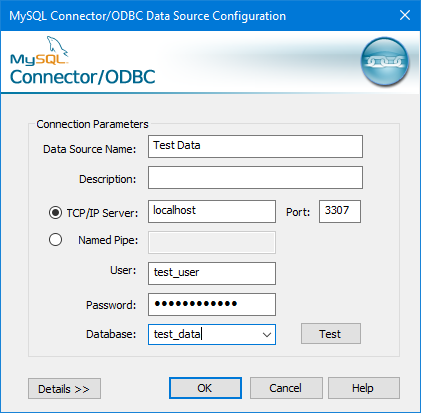
The following procedure demonstrates how to configure a remote ODBC connection:
- Launch the ODBC Data Source Administrator.
- Click Add to add a new data source.
- In the Create New Data Source dialog box, click the MySQL ODBC driver.
- Click Finish to start the MySQL Connector/ODBC Data Source Configuration.
- On the MySQL Connector/ODBC Data Source Configuration dialog box, in the Data Source Name text box, type a descriptive name for the data source.
- Confirm that TCP/IP Server is selected.
- Do one of the following:
- If you are using an SSH tunnel, in the TCP/IP Server text box, type localhost.
- If you are using a direct connection, in the TCP/IP Server text box, type the domain or IP address of the remote server.
- In the Port text box, type 3306.
- In the User text box, type a database username that can connect to the remote database.
- In the Password text box, type the password for the username.
-
To test the connection, click Test:
- Optionally, you can use the Database list box to select an initial database for the connection.
- To complete the configuration, click OK.

Troubleshooting
If you are doing development work on the local computer, a local copy of MySQL may already be running on port 3306. In this case, the following connection error appears:
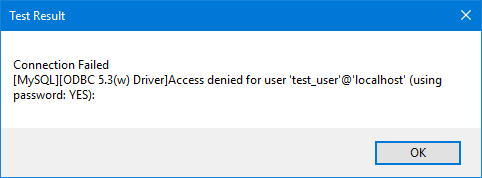
To work around this issue, create a tunnel with an alternate local port, and then connect to the remote MySQL server on that port.
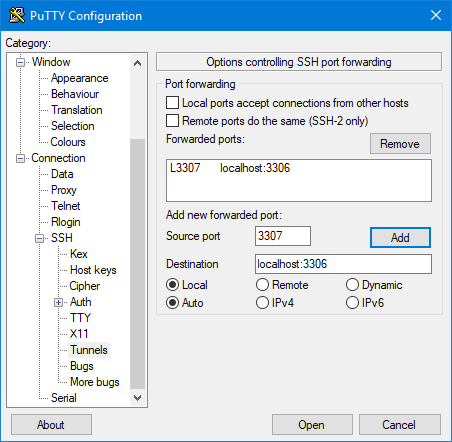
- If you use Putty to create the tunnel, use an alternate Source port on the Tunnels configuration page. In this example, port 3307 is being used:
The session configuration does not change.
-
For Mac OS X or Linux, use the following SSH command to create the tunnel with a local port of 3307. Replace username with your A2 Hosting username, and replace example.com with your site’s domain name:
ssh -p 7822 username@example.com -L 3307:localhost:3306
-
Create the ODBC connection as previously described, but type 3307 in the Port text box (instead of 3306).
- You should now be able to connect.
More Information
To view the online documentation for PuTTY, please visit http://the.earth.li/~sgtatham/putty/0.60/htmldoc/index.html.
5 years late to the party, but the only answer appearing here while accurate left me feeling unsatisfied.
The reason is that the OP in a comment asked » if i have to specify a single ip address to connect from, whats the point in creating a user with wildcard «%»? Am i not restricting the server to allow connections from a specified host against to the given privilege of user that he can connect virtually from anywhere?»
There seems to be some confusion regarding several issues including the purpose of the bind address and the difference between connecting FROM vs connecting TO.
From the docs… «The MySQL server listens on a single network socket for TCP/IP connections. This socket is bound to a single address, but it is possible for an address to map onto multiple network interfaces.»
Simply put, the server binds to one and only one address. The client can only connect where the server is listening for a connection attempt. The client connects TO the server. The server receives connection attempts FROM clients. If the client is connecting FROM client.com, then the server must allow that host — client.com — in the grant tables if the connection is to succeed.
That is why Derek Downey stated:
Look in your mysql.user table on the Linux MySQL server for a user
entry with the user/host combination of your windows machine:SELECT User, Host FROM mysql.user WHERE User=’my_user’ AND
Host=’windows_ip’;If that doesn’t return a result, you’ll need to add that user.
So «lo» is an interface and it’s the interface associated with localhost/127.0.0.1. localhost is mapped to 127.0.0.1 in /etc/hosts — though some distributions add some new constructs which I won’t go into here. eth0 was an ethernet interface at one time, now it’s something like enp5s0 (at least on ubuntu). That interface is associated with your other address such as 192.168.0.2 or 101.25.45.107 and is generally associated with your physical Network Interface Card (NIC).
When a client wants to connect, it specifies where it wants to connect TO — what address and port. The server is listening on the bind address and the configured port (3306 by default). Since it is possible for an address to map onto multiple network interfaces, the server can listen on multiple IP addresses that are associated with said interfaces.
Next, there’s the grant tables. The grant tables specify which clients are allowed to connect — and that’s where you add your client. If only user@localhost is allowed, then remote connections will fail. The OP stated he tried user@% as a test, so that indicates the OP’s issue is somewhere else. I’m not a security expert, but I think that’s probably safe (secure as the user’s password) as long as you don’t use root or another privileged user as your «user». Otherwise, someone can beat on your account remotely. Best to specify specific hosts to allow if you’re security conscious.
I would guess that you have an anonymous user in your table and your client matches that first. Solution: Delete that user. Use «SELECT User, Host FROM mysql.user» to see what users are in the table. You might be surprised at what you see. Make sure you understand why each row is in the table.
This post is far too long at this point, so look elsewhere to secure your installation. Here’s a good starting point though now that it’s 5 years later, it is of course a later version than the OP was using: https://dev.mysql.com/doc/refman/5.7/en/default-privileges.html
It provides more details on the mentioned anonymous user.
Below copied from https://dev.mysql.com/doc/refman/5.7/en/server-options.html
The MySQL server listens on a single network socket for TCP/IP
connections. This socket is bound to a single address, but it is
possible for an address to map onto multiple network interfaces. To
specify an address, use the —bind-address=addr option at server
startup, where addr is an IPv4 or IPv6 address or a host name. If addr
is a host name, the server resolves the name to an IP address and
binds to that address.The server treats different types of addresses as follows:
If the address is *, the server accepts TCP/IP connections on all server host IPv6 and IPv4 interfaces if the server host supports IPv6,or accepts TCP/IP connections on all IPv4 addresses otherwise. Use
this address to permit both IPv4 and IPv6 connections on all server
interfaces. This value is the default.If the address is 0.0.0.0, the server accepts TCP/IP connections on all server host IPv4 interfaces. If the address is ::, the server accepts TCP/IP connections on all server host IPv4 and IPv6 interfaces. If the address is an IPv4-mapped address, the server accepts TCP/IP connections for that address, in either IPv4 or IPv6 format.For example, if the server is bound to ::ffff:127.0.0.1, clients can
connect using —host=127.0.0.1 or —host=::ffff:127.0.0.1.If the address is a “regular” IPv4 or IPv6 address (such as 127.0.0.1 or ::1), the server accepts TCP/IP connections only for that IPv4 or IPv6 address.If you intend to bind the server to a specific address, be sure that
the mysql.user grant table contains an account with administrative
privileges that you can use to connect to that address. Otherwise, you
will not be able to shut down the server. For example, if you bind the
server to *, you can connect to it using all existing accounts. But if
you bind the server to ::1, it accepts connections only on that
address. In that case, first make sure that the ‘root’@’::1′ account
is present in the mysql.user table so you can still connect to the
server to shut it down.
Usually remote access to MySQL database server is disabled for security reasons. However, some time you need to provide remote access to MySQL database server from home or a web server. You can follow these steps to enable it.
Step 1 : Log in using SSH (if server is outside your environment or intranet)
First, login over ssh to remote MySQL database server from windows using PuTTy or from Linux using SSH
Step 2 : Edit the my.cnf file
Once connected you need to edit the MySQL server configuration file my.cnf using a text editor such as vi:
- On Debian Linux file is located at /etc/mysql/my.cnf location.
- On Red Hat Linux/Fedora/Centos Linux file is located at /etc/my.cnflocation.
To edit /etc/my.cnf, run:
# vi /etc/my.cnf
- On Windows, my.ini file is located at C:Program FilesMySQLMySQL Server X.Y (X.Y is version number of MySQL server)
For windows, open my.ini file in notepad
Step 3: Once file is opened, locate line that reads as follows
[mysqld]
Make sure line skip-networking is commented (or remove line) and add following line
bind-address=YOUR-SERVER-IP
For example, if your MySQL server IP is 173.234.21.12 then entire block will look like as follows:
[mysqld]
user            = mysql
pid-file        = /var/run/mysqld/mysqld.pid
socket          = /var/run/mysqld/mysqld.sock
port            = 3306
basedir         = /usr
datadir         = /var/lib/mysql
tmpdir          = /tmp
language        = /usr/share/mysql/English
bind-address    = 173.234.21.12
# skip-networking
....
Where,
- bind-address: IP address to bind to.
- skip-networking : Don’t listen for TCP/IP connections at all. All interaction with mysqld must be made via Unix sockets. This option is highly recommended for systems where only local requests are allowed. Since you need to allow remote connection this line should be removed from my.cnf or commented.
Step 4: Save and Close the file
On Debian / Ubuntu Linux, type the following command to restart the mysql server:
# /etc/init.d/mysql restart
On RHEL / CentOS / Fedora / Scientific Linux, type the following command to restart the mysql server:
# /etc/init.d/mysqld restart
On Windows, open command prompt as Administrator and type
net stop MySQL
net start MySQL
Step 5: Grant access to remote IP address
Grant access to a new database
If you want to add a new database called foo for user bar and remote IP 162.72.20.23 then you need to type the following commands at mysql prompt:
mysql> CREATE DATABASE foo;
mysql> GRANT ALL ON foo.* TO bar@'162.72.20.23' IDENTIFIED BY 'PASSWORD';
Grant Access To An Existing Database
Let us assume that you are always making connection from remote IP called 162.72.20.23 to database called webdb for user webadmin. To grant access to this IP address for existing database type the following command at mysql prompt:
mysql> update db set Host='162.72.20.23' where Db='webdb';
mysql> update user set Host='162.72.20.23' where user='webadmin';
Step 6: Logout of MySQL
Type exit command to logout of mysql:
mysql> exit
Step 7: Open port 3306
A sample iptables rule to open Linux iptables firewall
/sbin/iptables -A INPUT -i eth0 -p tcp --destination-port 3306 -j ACCEPT
OR only allow remote connection from your web server located at 162.72.20.23:
/sbin/iptables -A INPUT -i eth0 -s 162.72.20.23 -p tcp --destination-port 3306 -j ACCEPT
OR only allow remote connection from your lan subnet 192.168.1.0/24:
/sbin/iptables -A INPUT -i eth0 -s 192.168.1.0/24 -p tcp --destination-port 3306 -j ACCEPT
Finally save all rules (RHEL / CentOS specific command):# service iptables save
On windows, go to Control Panel > Windows Firewall > Add inbound rule for port 3306
Step 8: Test remote access to MySQL database
From your remote system or your desktop type the following command:
$ mysql -u webadmin –h 173.234.21.12 –p
On windows, run the MySQL command-line program, and log in as an administrator by typing the following command from the MySQL root folder (e.g Program FilesMySQLMySQL Server 5.5bin):
C:Program FilesMySQLMySQL Server 5.5bin>mysql -u webadmin –h 173.234.21.12 –p
Where,
- -u webadmin: webadmin is MySQL username
- -h IP or hostname: 173.234.21.12 is MySQL server IP address or hostname (FQDN)
- -p : Prompt for password
Related posts:
- About Author
![]()