Содержание
- Remote Display
- Contents
- Remote Display V2 Over ActiveSync
- Remote Display V2 Over Ethernet
- Remote Display V3 Over Ethernet
- Installation Instructions (Manual Start)
- Installation Instructions (Automatic Start)
- Часто задаваемые вопросы для ОС Windows CE
- Использование удаленного рабочего стола
- Как использовать средства Remote Tools, входящие в состав Visual Studio
- Как сделать автозапуск программы при загрузке ОС
- Remote display
- Overview
- Setup
- Compatibility and scope
- Troubleshooting
- When I try to connect, the client app goes to a white screen.
- Remote display control for windows ce
Remote Display
Contents
The Remote Display allows to operate the target device’s Win CE desktop from a Windows PC. It requires a USB ActiveSync or Ethernet connection.
There are two Versions of RemoteDisplay Available.
Remote Display V2 Over ActiveSync
After each Colibri Restart, you need to wait for an ActiveSync connection and restart CeRHost.exe.
Remote Display V2 Over Ethernet
To use Remote Display V2 through Ethernet:
cerdisp2.exe can be found in the same zip file as CERHost.exe.
To start the program automatically you can put a Shortcut into any AutoRun folder.
Remote Display V3 Over Ethernet
If you are evaluating on WEC2013, please use CerDisp.exe and shortcut which is inside the WinCE2013 folder.
If you are evaluating on WCE5 or WCE6 or WEC7, please use CerDisp.exe and shortcut which is inside the WinCE folder.
Installation Instructions (Manual Start)
Copy CerDisp.exe to any folder on the Colibri.
Execute it and click the «Start» button.
Installation Instructions (Automatic Start)
Copy the folders AutoRun and AutoCopy either
Whenever you boot the Colibri, or insert the pen drive or SD/MMC card, the cerdisp.exe tool is automatically run on the Colibri.
We noticed that the Remote Display V3 (over Ethernet) loses connection as soon as the software keyboard (SIP) appears or disappears from the screen. This issue has been fixed in release 3.1 of the tool.
Источник
Часто задаваемые вопросы для ОС Windows CE
Использование удаленного рабочего стола
Утилита позволяет подключаться удаленно (через ethernet) к системе с WinCE, видеть на экране ПК рабочий стол удаленной системы, управлять ей мышью и клавиатурой ПК.
Утилита включает 2 части:
По умолчанию в реестре записан адрес 10.42.42.77. Тоесть для соединения необходимо на ПК установить данный ip-адрес, либо изменить значение в реестре на нужное.
Для использования Remote Tools (удаленный редактор реестра, удаленный проводник, удаленный диспетчер процессов и прочие) необходимо запустить нужную утилиту (меню Target→Remote Tools→…), далее в меню Connection→Configure Windows CE Platform Manager добавить новое устройство (Add Device). Настроить данное устройство следующим образом (пункт Properties):
Затем выбрать пункт Connection→Add Conection главного меню утилиты, в списке выбрать созданное устройство и нажать ОК. В появившемся окне содержится список файлов, которые необходимо скопировать в папку Windows одноплатного компьютера. Данные файлы можно найти в папке C:Program FilesCommon FilesMicrosoft SharedWindows CE ToolsPlatmantargetwce600armV4i.После этого необходимо запустить на Тионе команду, указанную в нижней строке. Затем нажать кнопку ОК утилиты на ПК.
Как сделать автозапуск программы при загрузке ОС
Существую 2 основных способа:
1. Добавить ярлык программы, которую нужно запустить, в папку автозапуска.
Папка автозапуска задается в реестре, ключ
Обычно это папка «NandFlashStartUp».
Источник
Remote display
View and control your Windows 10 IoT Core UWP applications remotely, from a Windows 10 desktop PC, tablet, or phone
Windows IoT Remote Client is a developer only feature. It is not intended or supported for production devices.
The Windows IoT Remote client does not work for Raspberry Pi. Use a board with accelerated graphics such as Minnowboard Max or Dragonboard or attach a monitor for local display.
Overview
The remote display experience is a developer tool used to remotely control UWP applications running on a Windows 10 IoT Core device.
Setup
Ensure that your IoT Core device and development computer are on the same network and n a secure environment.
One method is to connect your device directly to your laptop using a USB Ethernet adapter, which supports automatic crossover.
Turn on the remote display functionality on your Windows 10 IoT Core device.
Connect your device to the Internet and connect to Windows Device Portal.
Choose the page «Remote» from the options on the left, and mark the check box labeled «Enable Window IoT Remote Server». Your device is now enabled for remote display experience. 
Install the Windows IoT Remote Client on your companion Windows 10 device.
To enable a Windows 10 device to connect to your Windows 10 IoT Core device, you need to install our Store application. The Windows IoT Remote Client app is currently available by link only and can be found here.

Connect to your Windows 10 IoT Core device through the installed application.
Run the Windows IoT Remote Client application on your Windows 10 companion device. At the Connect screen, enter the IP address of your device. The two devices should connect, remoting the UI experience of the Windows 10 IoT Core device to the companion device.
You’re now connected! From this point forward, touch and click input on the companion Windows 10 device can be used to control the Windows 10 IoT Core UWP application. 
Compatibility and scope
In order to use the IoT Remote Client, you must be running the latest build of Windows 10 IoT Core on the target device and the latest client application from the store.
Troubleshooting
When I try to connect, the client app goes to a white screen.
Failed connections can be caused by a number of issues, but we’ve run into a couple more common problems:
Источник
Remote display control for windows ce
Внимание! Все вопросы по программам, отсутствующим в этом разделе, задавайте в теме Скорая помощь новичкам.
В ЭТОМ РАЗДЕЛЕ ТОЛЬКО КАТАЛОГ ПРОГРАММ! СОЗДАНИЕ ТЕМ С ВОПРОСАМИ ЗАПРЕЩЕНО! ПОИСК ПРОГРАММ.
Новые темы необходимо создавать только в корневом разделе! В дальнейшем они будут обработаны модераторами.
Remote Display Control
Версия 2.03
Последнее обновление программы в шапке: 15.02.07

Описание: Программа для управления КПК с настольного компьютера.
Принцип работы: одна часть программы устанавливается на ББ, вторая на кпк, после чего запускается на обоих и на экране настольного в окошке появляется полная копия экрана подключенного КПК. Привычная мышь полностью заменяет стилус, клавиатура ПК может использоваться при вводе текста. Русская кодировка не поддерживается.
Совместимость: WM5, WM6 и выше.
Скачать:
Версия 1.00 EXE:  RemoteDSP.rar ( 633.49 КБ )
Версия 2.03 EXE: remote_display_control_for_pocket_pc_v_2_03.rar ( 633.48 КБ )
Источник


-
fs-support_ZU -
Mar 26th 2019
-
- Mar 26th 2019
- #1
You can use CERHost to connect to your Windows Embedded Compact terminal over Ethernet and display its screens in a window. You can also use the mouse and keyboard on the desktop to remote control the device the same way as if you were using the UI on the device.
In general device side component is already available on the device. Just launch is by enter «start CERDisp -c». Now launch cerhost on your desktop and select the device you want to conncet.
HOW-TO: USE REMOTE DISPLAY APPLICATION
To access the Compact 7 target device’s desktop, with the Remote Display application launched from the previous steps, you need to use the Platform Builder CE Remote Display Host application, CERHOST.EXE, from the development station.
The CERHOST.EXE application is included as part of the Platform Builder software, installed to the following directory: $(_WINCEROOT)PUBLICCOMMONOAKBINi386.
Work through the following steps to remotely access the Compact 7 target device’s desktop from the development station:
1. From the development station, launch the CERHOST.EXE executable to bring up the Remote Display Control for Windows CE screen, as shown in Figure 12-5.
2. From the Remote Display Control for Windows CE File menu, click Connect to bring up the Connect screen, as shown in Figure 12-6.
3. After a few seconds, as the messages broadcasted by the Remote Display application from the Compact 7 target device are detected, the device ID, VDX, is listed on the Active target devices list.
4. Click the device ID to select the device. As you click the device ID, the target device’s IP address is shown on the Connect screen.
5. Click OK to close the Connect screen, and launch the target device’s Compact 7 desktop, as shown …
As handheld devices take their place in the corporate world, there is an increased need to train users and offer technical support. One of the tools used for such purposes is Remote Display Control. This application can display actions on a Pocket PC, including user input, remotely on the display of a desktop or laptop personal computer. This is a great tool for demonstrating the power of the Pocket PC to a large audience. It also allows developers to test their applications for the Pocket PC on a larger screen. Remote Display Control uses TCP/IP, and it can work with ActiveSync® connections via Ethernet or dial-up. I’ll explain how this PowerToy can come in handy for PC support professionals and walk you through some setup scenarios so you can get started using Remote Display Control.
Who can benefit
Software developers, tech support staff, sales and marketing representatives, and training providers would all benefit from this technology. As a developer, I find it much easier to use the mouse and keyboard when I test Pocket PC applications. There are plenty of emulators available for programmers, but it’s much nicer to test the applications on the real thing.
Help desk and/or tech support staff who have the capability to control desktops remotely using systems management server (SMS), virtual network computing (VNC), or XP’s Remote Desktop may also assist users further by troubleshooting their handheld devices using Remote Display Control.
People in sales, marketing, or technical training can remotely connect to the Pocket PC device using Remote Display Control and combine that with projectors to run demos, presentations, and training sessions. Recently, a sales person showed up at my company for a presentation having only his Pocket PC. He connected via USB cable to the presentation computer and activated Remote Desktop. He then copied his PowerPoint file from the device and started the slideshow side-by-side. He went back and forth between PowerPoint and the remote display to produce an interactive presentation.
Before we start
Let’s have a quick look at the system requirements and setup procedures. Remote Display Control works on any platform running Windows CE version 2.11 or later. To get the version of your Windows CE device, go to Start | Settings | About. You can update your device only through system updates obtained from your Pocket PC vendor. The Microsoft Active Sync software must be version 3.1 or higher. To find your current version, go to Start | Programs and click Active Sync. Next go to Help | About. I just updated mine and it reads version 3.6 (Build 2148). To update Active Sync go to the Pocket PC Web site and then get the latest version from the download section. For TCP/IP, you will need to have a configured Ethernet network card (wired or wireless).
Getting the setup file
The Remote Display Control application (Cerdisp by the code name) can be downloaded separately from the Pocket PC Web site and is part of the Pocket PC PowerToys collection. To get the file, follow the PowerToys Link under the Microsoft Downloads section. You may need to scroll down the page to get to the Remote Display Control for Pocket PC section. Click Download and save the “remoteDSP.exe” file on your desktop.
Installing Remote Display Control
Turn your device on and place it in the cradle. Wait for the Active Sync icon to become green, then wait for any synchronization to complete. Now start the installation by double-clicking the file you just saved on your desktop named “remoteDSP.exe.” Click Next at the welcoming screen and then accept the default installation directory. Click the Finish button to exit the installation.
Understanding the connection process
It’s important to understand the three-step process required to achieve basic connectivity between the desktop and your handheld device. You begin by loading the remote display application on the desktop, continue by initiating the connection from your Pocket PC, and then take over from the desktop. This process is valid for all types of connectivity, whether it is direct cable or network adapter.
There are two main methods to connect your device. One method is Active Sync via USB or serial cables, which will enable a connection between the device and desktop. The other method is TCP/IP via Ethernet, which will connect the device to a LAN. Traditionally, Active Sync means connecting via USB or serial cables to a desktop. However, with the introduction of Active Sync 3.5, synchronization via Ethernet is becoming popular.
Running the remote display application
Finally, you get to the fun part. The following are step-by-step instructions for the Active Sync connection. To begin, simply launch the application on the desktop. From the Start menu go to Programs | Remote Display Control and click on Remote Display Control Host. Now you need to switch to the Pocket PC main desktop, as shown in Figure A.
| Figure A |
 |
Use the stylus on the device to tap on Start | Programs | Cerdisp (see Figure B).
| Figure B |
 |
Click OK to clear the welcome screen. The next screen provides you with a number of options. At this point, just click Connect and leave Hostname as PPP_PEER and tap OK. Now you should be able to see the device’s screen on the desktop. Take a test drive by using your mouse and navigating through the menus. In applications that require input, such as Microsoft Pocket Word, you may use the desktop’s keyboard to type.
Remote Display connectivity in detail
Next, I’ll explore how to connect using the TCP connection before looking at the various options available to Remote Display on the handheld, as well as on the desktop.
Connecting via Ethernet to your LAN using TCP/IP
This method may sound intimidating at first, but if you have a good TCP connection, then enabling Remote Display Control is just as easy as through USB or serial cables. You begin by ensuring you have installed the Remote Display Control host on the desktop. Then launch the desktop host by clicking Start | Programs | Remote Display Control | Remote Display Control Host. Switch to the device and with the stylus tap on Start | Programs | Cerdisp. Choose OK to clear the About screen. At this point, you need to type the name of the intended desktop, which is the TCP network host name.
Tip
For those who don’t know the computer name, here’s how to get it. If you have Windows 2000 or XP, go to Start | Settings | Control Panel and click System. Click the Computer Name tab. Write down the part of the computer name before the first dot in the name if the domain is displayed. For example, the computer name is john if the displayed name is john.techrepublic.net. If you have Windows 9x, you’d instead go to Start | Settings | Control Panel | Network Neighborhood. Click the Computer Identification tab and read the computer name from there.
Remote Display Control options on the Pocket PC
On the connect screen there will be a number of buttons, as shown in Figure C.
| Figure C |
 |
The Hide button will place a Cerdisp icon on the taskbar and keep it resident in memory. Clicking the icon will bring the startup form in view. You may experience a bit of disappointment after clicking the Settings button because you’ll only find one option to change the refresh rate for sending display updates. The default of 100 ms is intended to produce 10 frames per second. However, in my experience I noticed that the real refresh rate is somewhat less than five frames per second, with many frames being dropped. Nevertheless, I rarely need to lower or accelerate the refresh rate. Running a processor-intensive application on the device may benefit from a lower refresh rate, however, since Cerdisp uses a great deal of processor resources.
Remote Display Control options on the desktop
For the desktop options, the most useful preference is the Zoom. For those of you using resolutions higher than 800 by 600, you will appreciate the Zoom 2X. The shortcut key is [Alt]Z, followed by the number two. The 3X zoom is quite a stretch, and I hardly see anyone needing it. Intermediate zoom options might have been more suitable. For those making presentations, consider Zoom 2X.
The other option on the desktop version of the Remote Display is Send All Mouse Move, which can be found under the Tools menu. By default, the Remote Display application sends only keyboard input and mouse clicks to the receiving handheld. If you are running on your device applications that also require mouse moves, you must toggle this option as shown in Figure D.
| Figure D |
 |
As a side note, I tried running the Cubicle Chaos game on the desktop. It was obvious that the Remote Display Control was not built for such an exercise, and I felt bound to use the Pocket PC directly until I could repair my damaged average score.
Tip
For those involved in troubleshooting devices that make frequent use of Cerdisp, keep in mind that the desktop version number must match the client version number. Make sure to compare the version number from Help | About on your desktop to the welcome screen of the Cerdisp on the device.
Guide to wireless LAN connections
If you’re considering connecting your Pocket PC to your LAN using Ethernet, I’d recommend choosing wireless technology. To do so, you’ll need a wireless access point and a compatible network card. The network card, most likely compact flash style, will be inserted into the expansion pack for your Pocket PC. Installing the network drivers is done via the Active Sync.
Use the network card’s utility to verify that you obtained an IP address and that you can ping the desktop computer, which will run the Remote Display Control host. Figure E is a screenshot of the utility provided with the SMC compact flash network card used for this article.
| Figure E |
 |
End notes
Finally, for those using Bluetooth technology to synchronize, keep in mind that the methods to connect the two devices are similar to USB connections. I am not aware at this time of any incompatibilities or conflicts with other uses of Bluetooth technology, such as remote printing or remote headphones. If you are using Pocket PC 2000, it is recommended to download and install Service Pack 1. Users of Compaq iPaqs are encouraged to an update from Compaq’s Web site for a customized version.
The «Remote Display Application» or CERDisp is a Windows CE functionality that gives you the possibility to see remotely the content of the Frame Buffer of your device, and to interact with it through the mouse and keyboard. This tool is composed of two part, a client and a server.
The server :
CERHost is the host part of this tool, and must be launched on your computer before the client. This tools will wait for client connections.
The application can be found in the following folder :
C:WINCE600PUBLICCOMMONOAKBINI386

The Client :
CERDisp is the Windows CE client and must be integrated inside your Windows CE binary image, by selecting the «Remote Display Application» component in your OSDesign. The client will connect to a dedicated server, for which the settings are stored in the registry. Add the following registry settings to your Project.reg file to setup CERDisp.
[HKEY_LOCAL_MACHINESOFTWARECERDISP]
«Hostname»=»nameoftheserver«
The Hostname is the name or the IP address of the server. Use ppp_peer the as Hostname if you want ot use CERDisp throught an ActiveSync connection.
Tip to use this tool :
As you have to launch CERDisp on your device, you need an access to your device through a command prompt. That’s why in that case I suggest you to enable a Telnet server to have a network access to your device and be able to launch the client.
[HKEY_LOCAL_MACHINECOMMTELNETD]
«IsEnabled «=dword:1
«UseAuthentication»=dword:0
The above settings are enabling the telnet server and removing the authentication. So you may have network security risk to use those settings AS IS on your device.
Launch CERDisp :
Before launching CERDisp, you have to launch CERHost on your computer. To launch CERDisp you have to use the following command line :
Cerdisp –c
The -c parameter is used to specify that the application have to connect.
Note : Do not store any registry settings about the host if you do not have a specific dedicated host. You may be able to select your device in a list under CERHost (File -> Connect).
— Nicolas
Перевод статьи из блога Джейсона Гина «Разорви на части»
TL;DR: да, на осциллографе Keysight 1000 X-Series реально можно запустить Doom! Однако это непросто сделать.

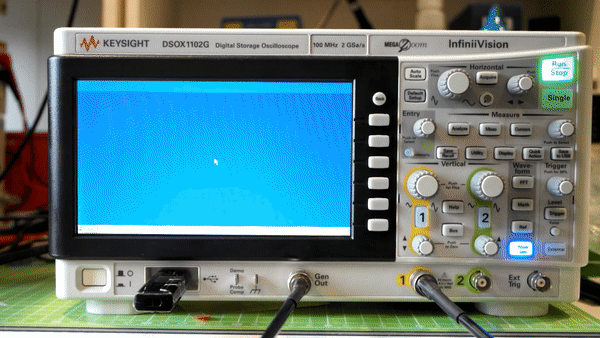
Keysight DSOX1102G
Осциллограф должен иметь в своём арсенале любой уважающий себя энтузиаст-электронщик. Осциллографы, кратко говоря, позволяют вам изучать волны электрических сигналов в контуре, а цифровые осциллографы (digital storage oscilloscope, DSO) незаменимы тем, что могут найти редкие ошибки в сигнале, которые не распознает аналоговый осциллограф или мультиметр.
Тема моей статьи — DSOX1102G от компании Keysight Technologies (бывш. Agilent), из их недорогой линейки осциллографов, отличающихся неплохим соотношением цены к качеству по сравнению с продукцией конкурентов. Как и большинство их осциллографов, на этой модели работает встроенная ОС Windows Embedded CE 6.0 (также известная, как Windows CE или WinCE), но, как и в большинстве случаев применения WinCE, её интерфейс вы практически никогда не видите – он спрятан за специально сделанным интерфейсом для пользователя.
Этап 1: пробуждение
Когда в начале 2017 была запущена серия Keysight 1000-X, один из обзорщиков с Hackaday заметил, что способ сохранения данных на этих осциллографах иногда приводил к их падению и перезагрузке, и отметил, что перед загрузкой на экране на несколько секунд можно было увидеть указатель мыши. В его посте была гифка, где он сохраняет файл, вызывающий падение, и я заметил нечто странное на одном из кадров анимации – там можно было различить панель задач Windows сразу перед чёрным экраном с ошибкой. Интересненько!..
Выиграв свой осциллограф благодаря конкурсу Scope Month от Keysight, пару месяцев я не думал об этом, пока не наткнулся на экран с отказом самостоятельно. В моём случае я обнаружил, что заголовок Windows CE был виден поверх обработчика отказов осциллографа; перетаскивание заголовка оставляло за собой след, и в итоге подвешивало WinCE. Такое случалось очень редко, поэтому, наткнувшись на отказы впоследствии, я просто позволил обработчику просканировать файловую систему и перезагрузить ОС.
Однако меня это заинтриговало, и я хотел узнать большое о том, что происходит с лежащей в основе системы WinCE. Я обнаружил, что USB-порт осциллографа довольно чувствителен к ошибкам, и простое шатание флэшки в порту может привести к аварийному сбою. Однако этого было недостаточно для сбора нужного количества информации, поскольку это был ненадёжный метод.
Так начались мои поиски доступа к рабочему столу WinCE.
Сначала я попробовал чисто программное решение, пытаясь создать файл обновления прошивки .ksx (на самом деле это просто архив .cab), который бы смог завершить работу программы осциллографа и открыть Проводник Windows – не получилось. ПО осциллографа выдавало сообщение об ошибке, жалуясь на невозможность открыть файл. Оказывается, такое решение не сработало бы, даже если бы я заставил его загрузить файл обновления, поскольку ПО осциллографа не выходит на рабочий стол во время обновления. Встретив это первое серьёзное препятствие, я на время отставил в сторону любопытство и пользовался осциллографом по прямому назначению.
Этап 2: заглянем поглубже
Из-за своего любопытства однажды я решил посмотреть, сможет ли осциллограф считывать и записывать дискеты на 3,5″ (или, как говорит молодёжь, распечатанную иконку сохранения) через USB-порт – и он смог! Однако я заметил одну странную проблему; осциллограф аварийно завершал работу, если я оставлял дисковод в USB-порту при включении. Эврика! Я нашёл способ надёжно вызывать аварийный отказ.
Тут, к несчастью, меня поджидало второе серьёзное препятствие. Этот отказ при загрузке происходил, только если в USB-порт было включено единственное устройство — дисковод. Отказа не было, если я использовал USB-хаб, в который включал дисковод. Это означало, что мне придётся очень быстро переключаться между дисководом и USB мышью с клавиатурой. Спешка с целью как можно быстрее вынуть дисковод и воткнуть комбинацию из клавиатуры и тачпада в USB в процессе загрузки была утомительной и раздражающей. Мне нужно было решение получше – железячное решение.
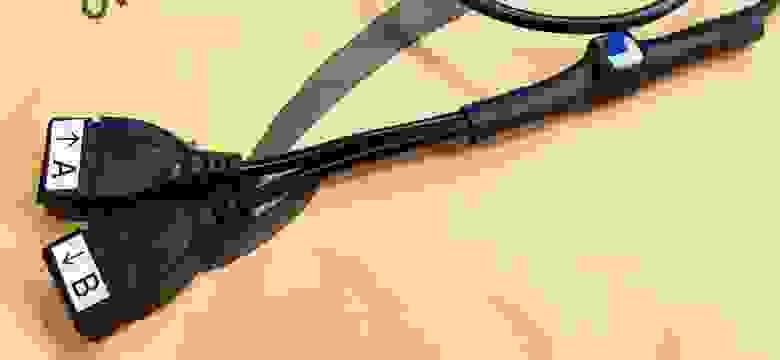
Специальный переключатель A/B для USB, сделанный мною для быстрой замены устройств
Использовав старый USB-кабель, дохлый USB-хаб и DPDT-переключатель, я создал переключатель USB A/B, чтобы упростить и ускорить процесс переключения между устройствами. При помощи этого метода мне удалось попытаться установить контакт с ОС WinCE на долю секунды, пока панель задач была видимой на экране, и до тех пор, пока обработчик отказов не сломал мне всю малину. При помощи магии, заключённой в замедленной съёмке моего Samsung Galaxy S9, я смог определить, что могу отправлять последовательности нажатий клавиш в WinCE и она их обрабатывает – даже на заставке системы! Я смог получить информацию о системе, вслепую нажимая клавиши, и потом изучая отклик при аварийном отказе ПО осциллографа. Тут я столкнулся со вторым препятствием.
Возможность очень краткого взаимодействия с WinCE – это хорошо, но она была бесполезной, поскольку я не мог взять над ней управление до тех пор, пока обработчик отказов перезагрузит систему. Обработчик крепко держался за ОС, и никакая долбёжка по клавиатуре и Ctrl+Alt+Delete не пускали меня обратно в WinCE.
Этап 3: ищем точку опоры
И снова моё периодически играющее любопытство пригодилось, когда я решил использовать свой старый Sony Clie PEG-NX73V (наладонник на PalmOS от 2003 года) в качестве USB-привода. У него была функция импорта данных, позволявшая перетаскивать файлы на карту памяти точно так же, как на съёмный диск.
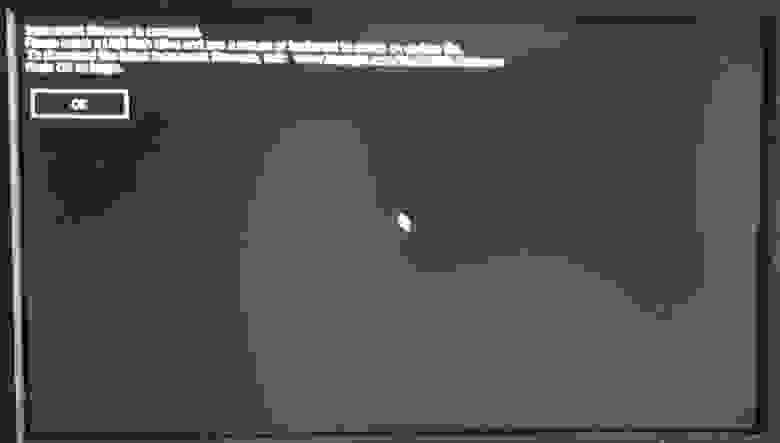
Точно так же, как и в случае с USB-дисководом, произошёл отказ системы, когда я включил осциллограф, не вытащив PDA. Однако на этот раз обработчик отказов решил, что файловая система PDA – это повреждённый раздел прошивки, и предложил загрузить обновление прошивки с внешней USB-флэшки.
Это поведение не было регулярным, иногда ПО осциллографа всё равно загружалось, и появлялось очень странное окно из WinCE с ярко-голубым указателем мыши, оставлявшим следы на экране. Однако в этом странном состоянии мне удалось оттащить окно ПО осциллографа InfiniiVision в сторону, и я попытался потыкаться с ОС. Но ПО осциллографа вело себя очень агрессивно и возвращало себе фокус каждый раз после клика вне окна. После некоторой возни со странно раскрашенной ОС я смог обойти её. Я не мог просмотреть файловую систему, поскольку не получалось надолго забирать управление от окна ПО осциллографа, но я смог вызвать диалоговое окно свойств системы, где было написано, что осциллограф основан на Windows CE 6.00, и у него есть 100 Мб RAM.

Затем я решил порыться на форумах EEVblog, где люди активно пытаются хакнуть осциллограф, чтобы открыть дополнительные возможности. Там я обнаружил, что ПО ищет файл infiniiVisionStartupOverride.txt в корне USB-флэшки, и если находит, то пытается загрузить с неё ПО осциллографа. И хотя, судя по всему, на самом деле прошивка не загружала ПО с флэшки, этот процесс прервал запуск ПО осциллографа, и тогда уже никто не забирал у меня управление ОС. С этого момента всё стало интереснее – обработчик отказов открывал окно Проводника, и введя в поле для имени файла «*.*», я смог начать рыться в файловой системе осциллографа и USB-флэшки! Именно это мне и было нужно для получения контроля над WinCE. Однако, я встретил очередное препятствие: осциллограф перезагружался через 60 секунд, из-за чего у меня не было много времени на рытьё в операционной системе.
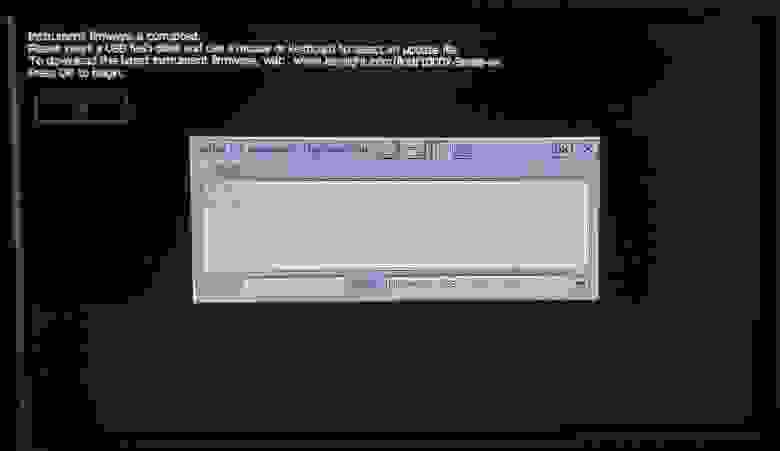
Запрос на обновление прошивки DSOX1102G с диалогом выбора файла с флэшки
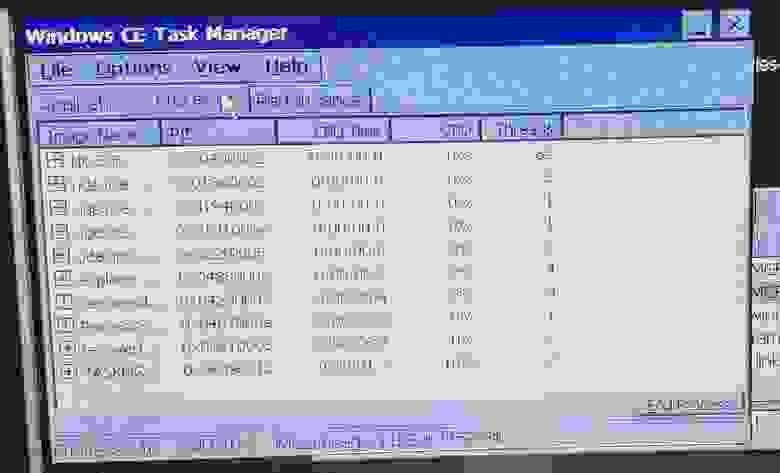
Менеджер задач Windows CE показывает запущенные процессы на экране восстановления прошивки
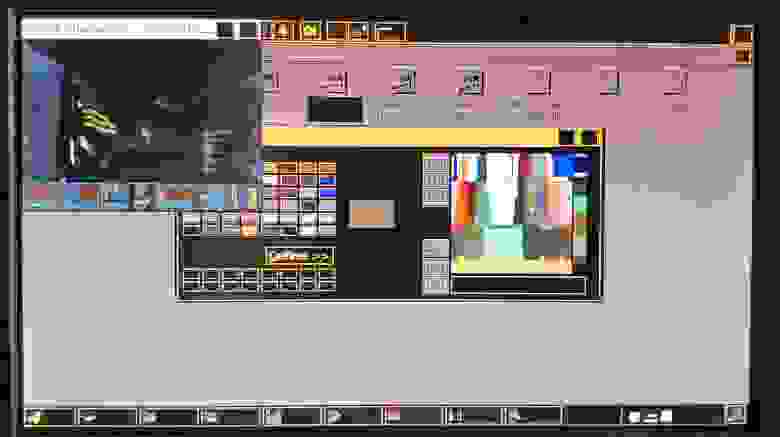
Скопировав несколько инструментов Windows CE, например, Windows CE Task Manager, я заметил два интересных процесса, которые были запущены, когда обработчик отказов ещё был виден — recoverInfiniiVision.exe и processStartupFolder.exe; судя по всему, первый был обработчиком отказов, не дававший мне доступ к WinCE после аварийного отказа ПО осциллографа. Прибив второй процесс при помощи iTaskMgr (бесплатная версия менеджера задач WinCE не даёт убивать процессы) я смог удержать осциллограф от перезагрузок, а прибив первый, я увидел чистый рабочий стол WinCE – и вот я внутри! К несчастью, мне не удалось восстановить панель задач, из-за чего ориентироваться в ОС было довольно неудобно.
Я создал на рабочем столе новую папку, чтобы открыть Проводник, и, наконец, смог заняться изучением файловой системы осциллографа. Этому очень помогла программа Total Commander/CE, имеющая встроенный текстовый редактор, которого не было в данной версии WinCE.
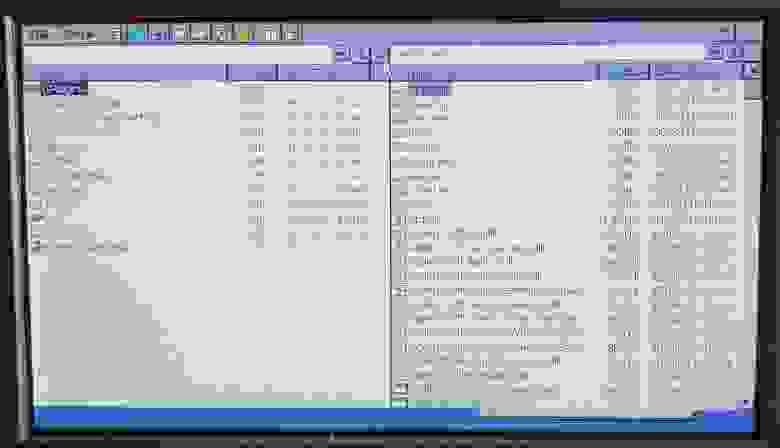
Копаясь в файловой системе при помощи Total Commander/CE (пока никакой панели задач)
Этап 4: полный контроль
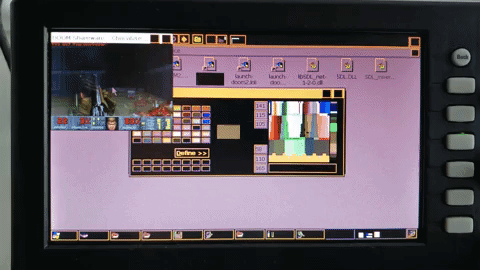
Теперь, сумев добраться до небесно-голубого рабочего стола, для полноценного ощущения WinCE я должен был восстановить панель задач. Погуглив, полазав по Stack Overflow, я накидал небольшую программу для этого. Открыв её из Проводника, я получил полную версию рабочего стола WinCE! Наконец у меня был полный контроль над базовой ОС!
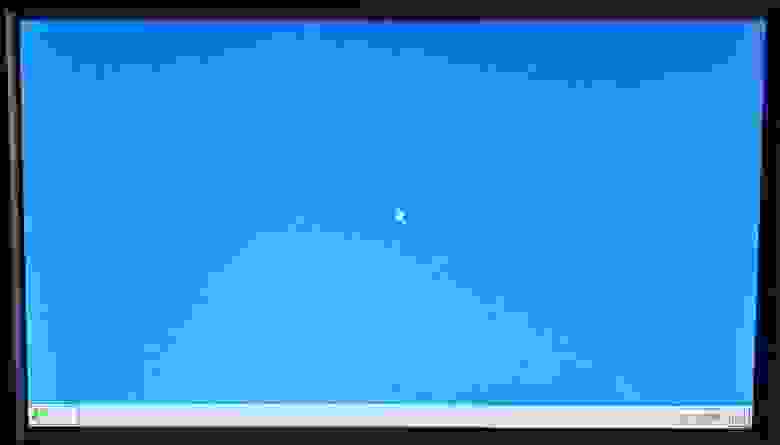
Свобода – полноценный рабочий стол WinCE на осциллографе!
С этого момента я начал рыться в файловой системе и смотреть, какие интересные инструменты там можно найти. Интерпретатор командной строки не хотел запускаться, однако я покопался в реестре и нашёл ключ HKEY_LOCAL_MACHINEDriversConsoleOutputTo, значение которого было 0xFFFFFFFF. Поменяв его на 0, я сумел сделать Command Prompt видимым на рабочем столе, поэтому я сделал ещё одну небольшую программу, которая занималась именно этим.
Всё шло хорошо, я сделал командный файл со всеми командами, необходимыми для того, чтобы убивать ПО осциллографа, обработчик стартовой папки, обработчик отказов, восстанавливать панель задач и разрешать запуск Command Prompt. Однако для открытия меню обработчика отказов требовался мой PDA, а это означало, что другие не смогут воспроизвести такой эффект.
Покопавшись дальше, я обнаружил, что как только появлялась заставка и начинали мигать светодиоды на панели, WinCE начинала обрабатывать нажатия клавиш даже без устройства, ронявшего ПО. Нажатие win+U подвешивало осциллограф, поскольку этим я открывал меню Пуск и выбирал опцию Suspend (и у ОС не было возможности вернуть после этого контроль, поскольку у осциллографа была только кнопка выключения питания). Помня это, я переименовал свой файл в a.bat, чтобы его имя было проще набирать, и попытался запускать его при загрузке через win+R, команду usba.bat и нажатия Enter. Но осциллограф в результате просто показывал заставку на экране, хотя в фоне WinCE была жива, и я просто не мог видеть, что там происходит. Оказывается, что обработчик отказов был необходимым компонентом для демонстрации рабочего стола ОС, и мне нужно было просто добавить в командный файл несколько строчек для запуска и последующей остановки обработчика отказов. Добавив эти последние штрихи, я смог (полуавтоматически) загружать осциллограф прямо до появления рабочего стола, используя только USB-флэшку, мышь и клавиатуру!
Этап 4: Да, на нём запускается DOOM!
Получив доступ к WinCE, я смог, наконец, ответить на вопрос: «Запускается ли на нём Doom?» И, как оказалось, реально запускается! После запуска осциллографа на это ушло полтора года, но до этой вехи я, наконец, дошёл.
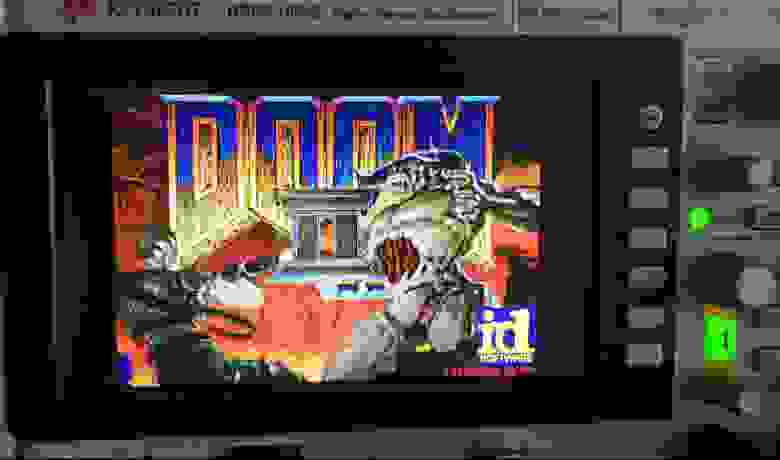
Это не обман: на осциллографе Keysight 1000 X можно запустить Doom!
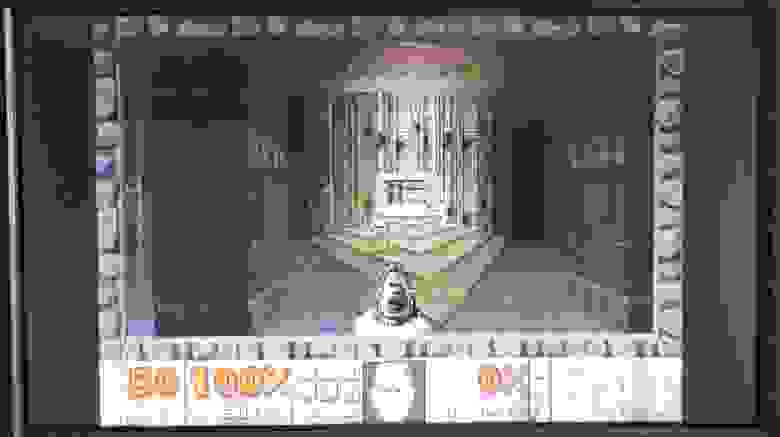
Doom II работает на моём осциллографе DSOX1102G! (3 кадра в секунду)
Запуск Doom в окошке размером 320×240 позволило выжать достаточно кадров в секунду для игры. Посмотрите, какая палитра цветов!
В следующей статье я ещё немного поиграюсь с этой легендарной видеоигрой на железяке, которая никогда не предназначалась для игр.
Doom в действии в разрешении 320×240, 256 цветов! На осциллографе!
Файлы для скачивания
Я выложил файлы, которые могут вам понадобиться для того, чтобы попробовать то же самое на своём осциллографе – но учтите, я не отвечаю за его превращение в кирпич или что-то ещё неприятное! Я проверял всё это только на своём DSOX1102G, но подозреваю, что другие модели серии 1000 X и другие осциллографы от Keysight, обладающие функцией восстановления прошивки, тоже могут сработать. Прошивка осциллографа сделана так, что вся WinCE запускается в оперативной памяти и не сохраняется после перезагрузки, поэтому все изменения в ОС, ломающие систему, не превратят осциллограф в кирпич (файлы с прошивкой лежат в директориях NAND-флэшки, которые нельзя открыть через Проводник, а можно лишь набрать по имени).
Флэшку необходимо будет отформатировать в FAT или FAT32, и распаковать в её корень zip-архив Scope Liberator. Инструкции содержатся в readme.txt.
Если вам интересен исходный код вспомогательных программ, которые возвращают панель задач и интерпретатор командной строки, я их тоже выложил.
image/svg+xml
VERY GOOD
User Rating
The Remote Display Control application is a way to remote the display and keyboard/mouse/touch screen of a windows CE device to a desktop. The application itself uses TCP/IP and can work over ActiveSync connections (to the Host Desktop, no routing off of the host), via Ethernet (to any reachable Desktop, does not include any support for proxy servers etc) or dialup.
Remote Display control works on any platform running Windows CE version 2.11 or later.
Обзор
Remote Display Control это программное обеспечение Freeware в категории (2), разработанная Microsoft.
Последняя версия Remote Display Control- 2.03, выпущенный на 19.09.2008. Первоначально он был добавлен в нашу базу данных на 30.10.2007.
Remote Display Control работает на следующих операционных системах: Windows.
Пользователи Remote Display Control дал ему Рейтинг 4 из 5 звезд.