моя ОС-Windows 7, и у меня есть удаленный хост Windows 8.1, который я могу использовать RDP для перенаправления локального usb-устройства на windows 8.1. Но перенаправление USB не работает в Хосте windows 10. Как включить его в windows 10?
4 ответов
у меня тоже были проблемы с помощью RemoteFX USB Redirection на клиенте Windows 7 на удаленный хост в Azure под управлением Windows 10, в то время как та же конфигурация компьютера успешно перенаправляет USB на Windows 8.1 Azure VM.
чтобы быть ясным, у меня не было проблем с перенаправлением USB для общих устройств (флэш-накопители, принтеры и т.д.), которые поддерживаются с настройкой vanilla удаленного рабочего стола. Этот тип перенаправления USB, например, позволяет мне видеть флэш-накопитель, который я подключаю к своему Клиент Windows 7 отлично работает для меня, как я вижу в Проводнике в Azure VM.
сравнение стандартного перенаправления RDP и перенаправления RemoteFX подробно описано в этом блог запись.
моя конкретная проблема перенаправления USB относится к классам устройств, не обрабатываемых базовым перенаправлением высокого уровня RDP, и для этого я включил перенаправление USB RemoteFX в предыдущих выпусках Windows. Когда это работает правильно, я получаю значок компьютера ( )появится в строке заголовка удаленного рабочего стола, позволяя мне выбрать, какое устройство должно быть перенаправлено на виртуальную машину.

заголовок, когда RemoteFX USB перенаправление работает
следуя инструкциям на многочисленных веб-ресурсах для включения перенаправления RemoteFX USB работал для меня для более ранних версий ОС (например, Windows 8.1 на Azure VM), но не будет работать для любой Windows 10 VM я создал. Заголовок упорно оставался без функции перенаправления RemoteFX USB.

заголовок В Windows 10, когда функция перенаправления USB не работает
я, наконец, наткнулся на этот нить что решило мою проблему.
кажется, что на хосте Windows 10 требуется еще один шаг по сравнению с предыдущими версиями ОС и что есть:
-
Run
gpedit.mscна целевой виртуальной машине (целевой виртуальной машине windows 10), чтобы запуститьGroup Policy Editor.gpedit.mscможно ввести из диалога запуска (используйтеWinKey+R) если у вас есть доступ администратора, или запустить с повышенными правамиCMD.EXEи типаgpedit.mscиз командной строки. -
выберите пункт
Computer Configuration Administrative Templates Windows Components Remote Desktop Services Remote Desktop Session Host Device and Resource Redirection Do not allow supported Plug and Play device redirectionиз treeviewGroup Policy Editor. -
странно установите этот пункт в
Disabled -
Run
gpupdate /forceв командной строке -
по крайней мере, отключите сеанс RDP и снова подключитесь, если это не работает перезагрузите целевую виртуальную машину.
теперь вам нужно обновить политику машины, используя
gpupdate / force из командной строки. Затем перезагрузите компьютер, чтобы изменения вступили в силу, и включите опцию перенаправления RemoteFX USB в клиенте подключения к удаленному рабочему столу.
Как только он включен, перейдите на вкладку локальные ресурсы, нажмите Еще в разделе локальные устройства и ресурсы, и вы увидите новую настройку USB-устройств RemoteFX. Этот параметр можно использовать для сопоставления многих типов USB-устройств, которые невозможно с перенаправлением USB RDP ванили.
Do как на физической машине Windows, так и на удаленном хосте
все изменения находятся под следующим:
Computer Configuration Administrative Templates Windows Components Remote Desktop Services >>
GPEdits:
- Я также изменился с «администраторы»на» администраторы + пользователи»
Remote Desktop Connection Client  RemoteFX USB Device Redirection  All RDP Redirection (Enable)

Remote Desktop Session Host  Remote Session Environment  RemoteFX for Windows Server 2008 R2  Configure RemoteFX (Enable)

Remote Desktop Session Host  Connections  Allow users to connect remotely using Remote Desktop Services (Enable)

Remote Desktop Session Host  Device and Resource Redirection Do not allow supported Plug and Play device redirection (Disable)

gpupdate /force in elevated CMD Prompt and reboot
3
автор: FreeSoftwareServers
USB RemoteFX Passthrough не работает на некоторых ПК
У меня было несколько ПК, которые соответствовали спецификациям оборудования, но отсутствовали опции Remotefx в RDP.
решение было такое:
в программах и функциях удалите»Intel(R) USB 3.0 eXtensible Host Controller Driver»
этот драйвер не совместим с RemoteFX passthrough.
How to enable RemoteFX USB redirection for Windows 10
Start with configuring your server:
Step 1: Open your system’s Server Manager and click Add roles and features to invoke the pop-up window titled Add Roles and Features Wizard.

Step 2: Click Next to see the Select installation type page. You won’t have to make any adjustments here for the default configuration is just right.
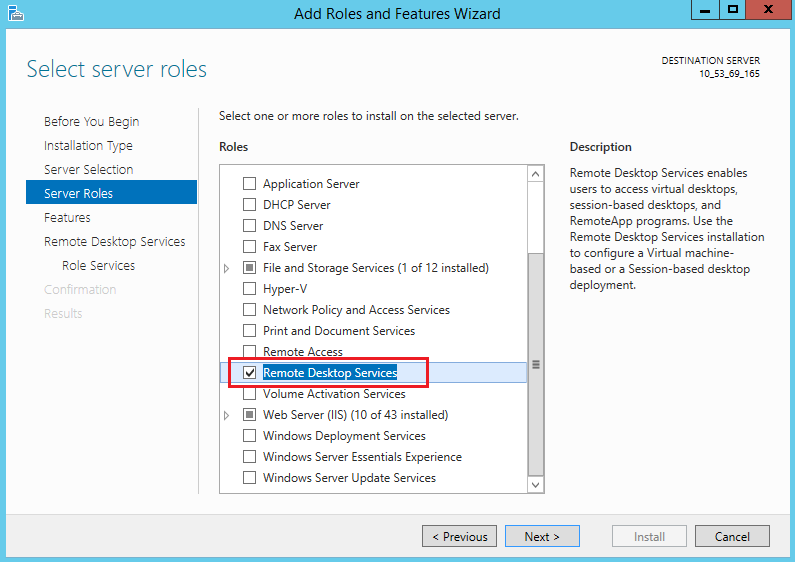
Step 3: Click Next again to get to the Select server roles page and pick Remote Desktop Services on the Roles list.
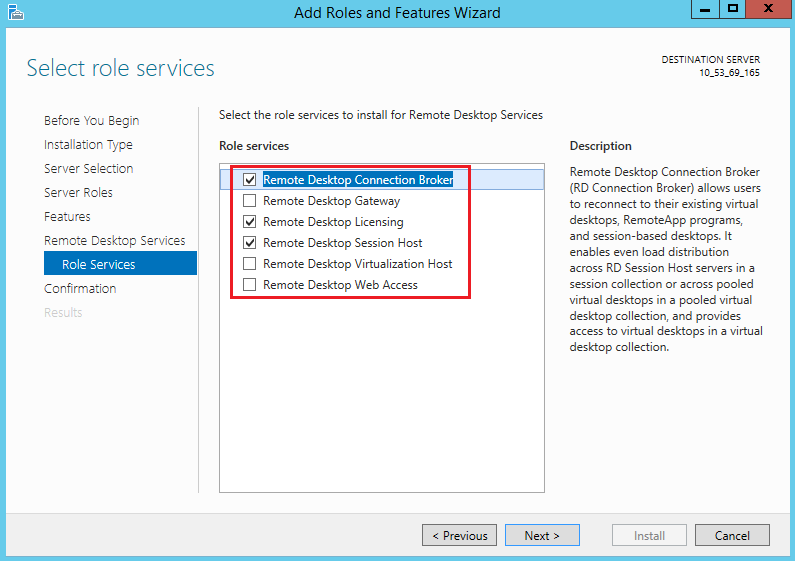
Step 4: Keep clicking Next until you see the Role services list. Here you need to tick Remote Desktop Connection Broker, Remote Desktop Licensing, and Remote Desktop Session Host.

Step 5: Click Next one more time, then click the Install button.
Step 6: Wait until the installation is successfully completed, restart your CVM. Then use Windows search to find gpedit.msc. Press Enter to invoke the window titled Local Group Policy Editor.
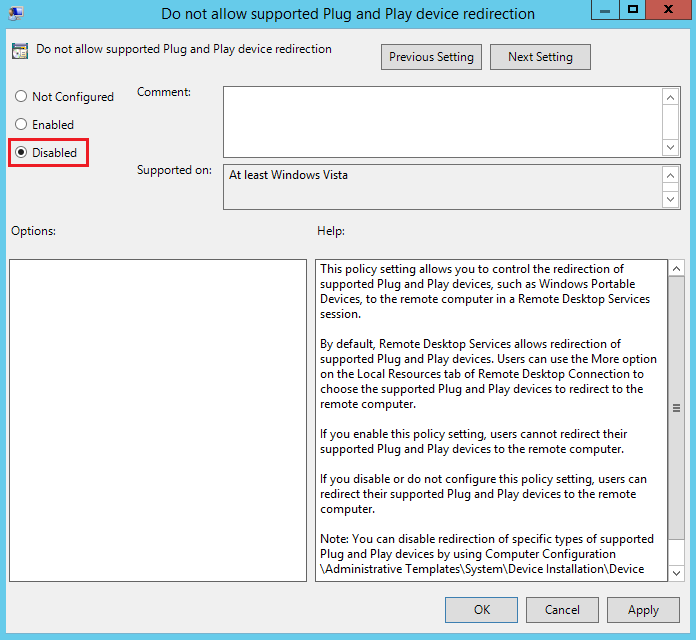
Step 7: Go to Computer Configuration → Administrative Templates → Windows Components → Remote Desktop Services → Remote Desktop Session Host → Device and Resource Redirection and double-click Do not allow supported Plug and Play device redirection to invoke a pop-up window.
Step 8: On the Do not allow supported Plug and Play device redirection window, select Disabled and click OK.
Step 9: Restart the CVM once more.
Now configure your client:
Step 1: Enter gpedit.msc to Run dialog box and click OK.
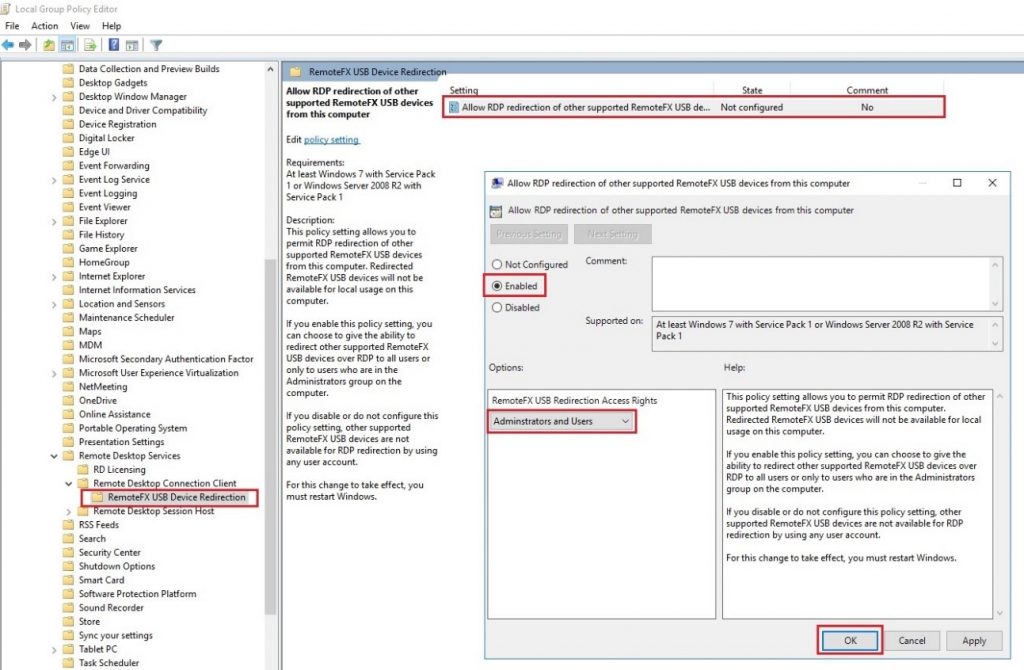
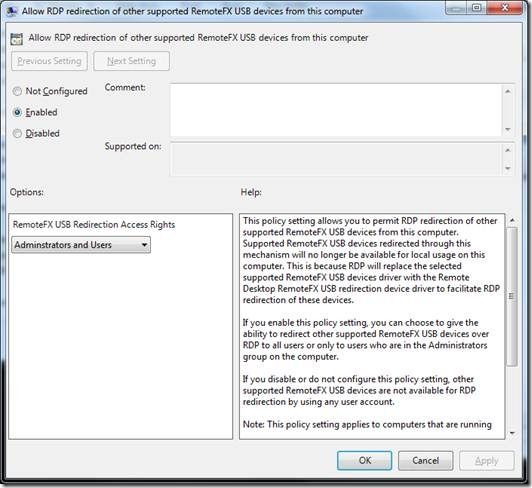
Step 2: In the invoked Local Group Policy Editor window, click RemoteFx USB Redirection on the menu (it’s in Computer Configuration → Administrative Templates → Windows Components → Remote Desktop Services → Remote Desktop Connection Client → RemoteFx USB Redirection), then double-click Allow RDP redirection of other supported RemoteFx USB devices.

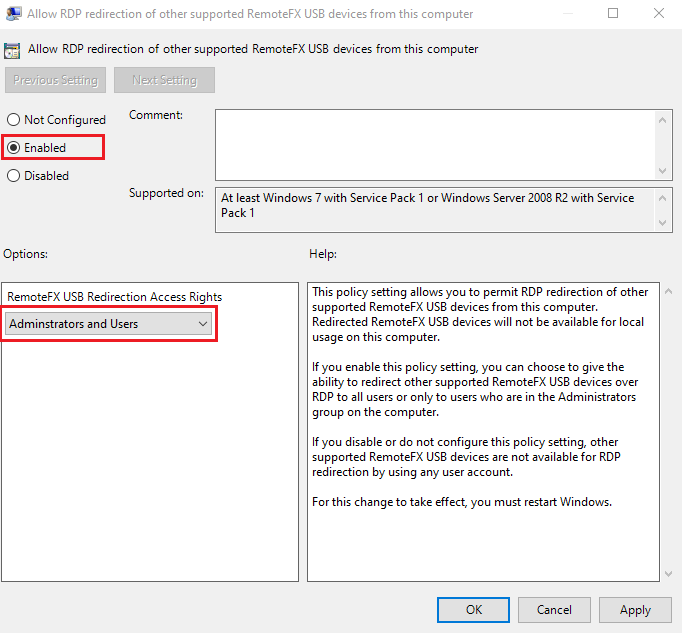
Step 3: In the popped-up window, select Enabled, then go down to the RemoteFX USB Redirection Access Rights menu and select the Administrators and Users option.

Step 4: Click OK and restart your computer.


June 26, 2020
Last updated on August 3, 2022
RemoteFX USB redirection complements the native Remote Desktop Protocol (RDP) device redirection features in order to provide users with a complete experience when managing different types of devices in a remote session.
Key Features of RemoteFX
The following are some of RemoteFX for WAN’s important features:
- Automatic network detection that may change to accommodate initial and evolving network circumstances
- A UDP transport with best-effort delivery for multimedia content and the ability to use forward error correction (FEC) to recover from losses without re-transmission is designed for networks with packet loss.
- When UDP is not accessible, fallback to TCP transport
- Industry-standard standards for congestion control and security
Advantages of RemoteFX USB Redirection
One of the main advantages of this feature is that no driver installation is required for USB devices on the client computers and all of them will work through a universal interface. This solution supports a large set of devices, including all-in-one printers, human interface devices, scanners or webcams.
This feature is disabled by default and can be enabled by performing these steps:
- To configure it locally in a client PC, run gpedit.msc
For a centralized configuration through Active Directory Group Policies, open the Group Policy Management Console, create a new policy and once you have configured it as shown below, link it to the Organizational Unit where target machines are located.
- Navigate to Computer ConfigurationAdministrative TemplatesWindows ComponentsRemote Desktop ServicesRemote Desktop Connection ClientRemoteFX USB Redirection
- Set “Allow RDP redirection of other supported RemoteFX USB devices from this computer” option to Enabled
- Set who should have RemoteFX USB redirection rights and click OK, then close the policy editor
- Update the machine’s policy by running gpupdate /force
Requirements for RemoteFX USB Redirection
The complicated configuration that RemoteFX necessitates is likely to be your biggest challenge. Additionally, you must ensure that:
- Your RDS session host is running Windows Server 2012, 2012 R2, or 2016;
- You utilize a VDI desktop and run Windows 7 SP1 (with Remote Desktop Connection 8.1), Windows 8.1, or Windows 10;
- On your client PC, you’re using Windows Workspot client 2.x.x. (You should have Remote Desktop Connection 8.1 or later and a client that supports RemoteFX));
As you can see, there are a lot of conditions that must be satisfied in order to activate the RemoteFX USB redirection feature.
RDP USB Redirection with Parallels RAS
Parallels Remote Application Server (RAS) provides a seamless experience using RDP USB redirection to local devices, such as printing and audio, with server-based desktops or virtual published applications:
- Universal Printing Redirection
- Universal Scanning
- RemoteFX RDP USB Redirection
- Local Drive Redirection
- Audio Bidirectional
- URL and Email
The full list of capabilities can be found here.
Give Parallels RAS a try now with a 30-day free trial!
Download the Trial
Scenario
RemoteFx is an upgraded version of Windows Remote Desktop Protocol (RDP). From RDP 8.0, RemoteFx can be used to redirect local USB devices to a remote desktop through the RDP data channel, ensuring that the CVM can use these USB devices.
This document uses the following environment versions as examples to describe how to enable the RemoteFx USB redirection feature of RDP to redirect USB devices to a CVM.
- Client: Windows 10
- Server: Windows Server 2016
Use Limits
Because RDP 8.0 and later versions support the RemoteFx USB redirection feature, Windows 8, Windows 10, Windows Server 2016, and Windows Server 2019 all support this feature. If the operating system of your local PC has one of these versions, you do not need to install the RDP 8.0 update patch. If your local PC has Windows 7 or Windows Vista, please go to Microsoft official website to get and install the RDP 8.0 update patch.
Directions
Configuring the server
- Logging in to a Windows instance using the RDP file (recommended).
- On the desktop, click
 and select Server Manager to open Server Manager.
 - In the «Server Manager» window, click Add roles and features, as shown in the following figure:
- In the pop-up «Add Roles and Features Wizard» window, click Next to go to the «Select installation type» page.
- On the «Select installation type» page, select Role-based or feature-based installation and click Next.
- On the «Select destination server» page, keep the default configurations and click Next.
- On the «Select server roles» page, select Remote Desktop Services and click Next, as shown in the following figure:
- Keep the default configurations and click Next for 2 times.
- On the «Select role services» page, select Remote Desktop Session Host, Remote Desktop Connection Broker, and Remote Desktop Licensing. In the pop-up window, click Add Features, as shown in the following figure:
- Click Next.
- Click Install.
- After the installation is completed, restart the CVM.
- On the desktop, click , enter gpedit.msc, and press Enter to open «Local Group Policy Editor».
- In the leftside navigation tree, choose Computer Configuration > Administrative Templates > Windows Components > Remote Desktop Services > Remote Desktop Session Host > Device and Resource Redirection, and double-click Do not allow supported Plug and Play device redirection, as shown in the following figure:
- In the pop-up window, select Disabled and click OK, as shown in the following figure:
- Restart the CVM.
 and select Server Manager to open Server Manager.
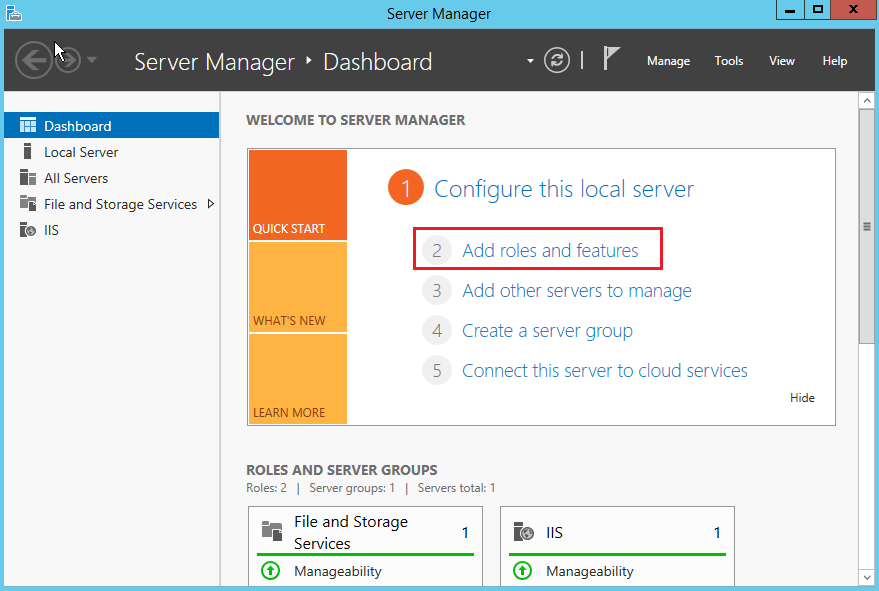
 , enter gpedit.msc, and press Enter to open «Local Group Policy Editor».
Configuring the client
- On the local PC, right-click and choose Run to open the «Run» dialog box, as shown in the following figure:
- In the «Run» dialog box, enter gpedit.msc and click OK to open «Local Group Policy Editor».
- In the leftside navigation tree, choose Computer Configuration > Administrative Templates > Windows Components > Remote Desktop Services > Remote Desktop Connection Client > RemoteFx USB Redirection and double-click Allow RDP redirection of other supported RemoteFx USB devices, as shown in the following figure:
- In the pop-up window, select Enabled and set the RemoteFx USB redirection access permission to Administrators and Users, as shown in the following figure:
- Click OK.
- Restart the local PC.
 and choose Run to open the «Run» dialog box, as shown in the following figure:
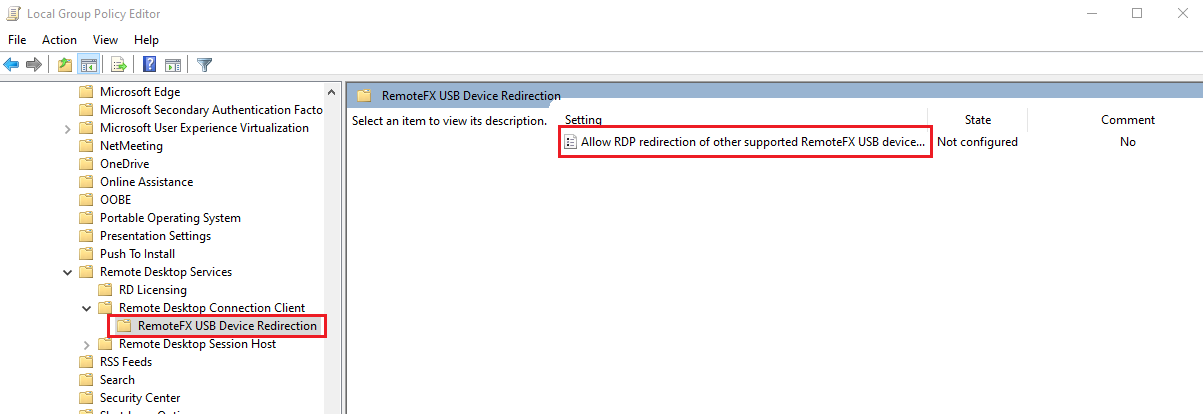
Verifying the configuration result
- On your local PC, insert a USB device, right-click and choose Run to open the «Run» dialog box.
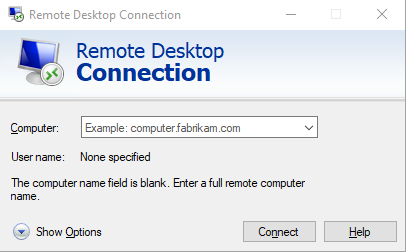
- In the «Run» dialog box, enter mstsc and press Enter to open the remote desktop connection dialog box, as shown in the following figure:
- Enter the Windows server’s public IP address in Computer, and then click Options.
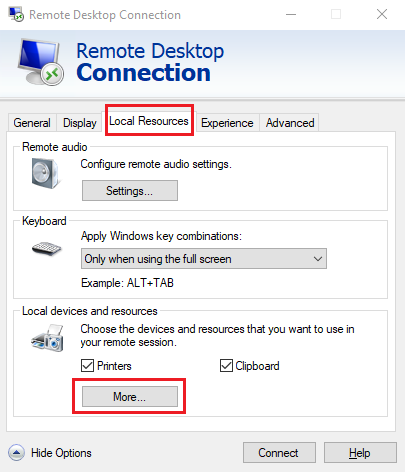
- On the Local Resources tab page, click More under «Local devices and resources», as shown in the following figure:
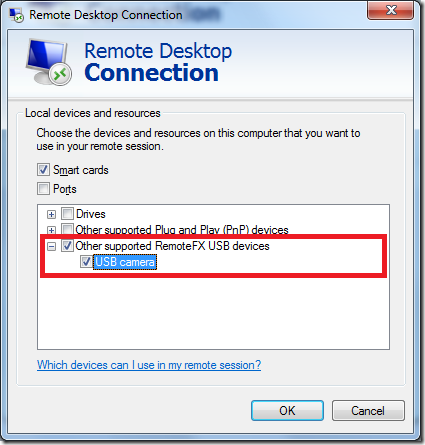
- In the pop-up window, expand Other supported RemoteFx USB devices, select the inserted USB device, and click OK.
- Click Connect.
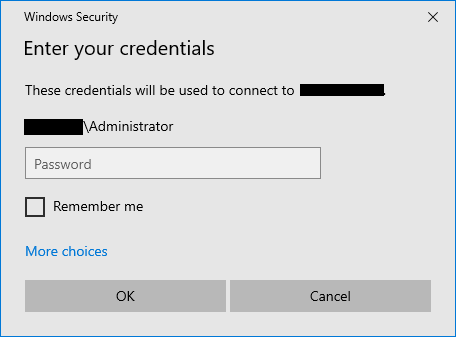
- In the pop-up Windows Security window, enter the instance’s admin account and password, as shown in the following figure:
- Click OK to log in to the Windows instance.
If appears on the Windows instance operation page, the configuration was successful.
 appears on the Windows instance operation page, the configuration was successful.
Relevant Operations
Windows RDP provides optimized connection for standard USB devices. Devices such as drivers and cameras can be mapped directly without enabling the RemoteFx feature. The RemoteFX USB redirection feature is required for less commonly used USB devices. The following table lists the redirection methods for these USB devices.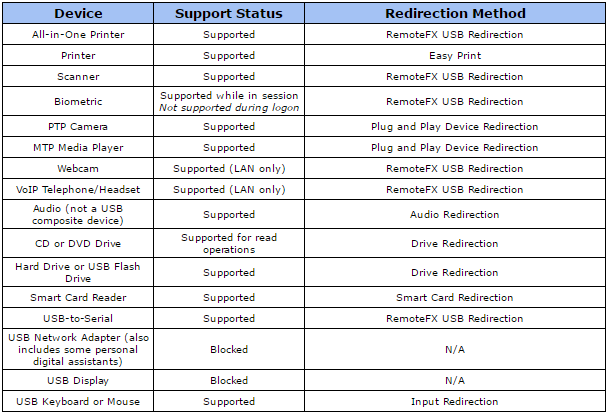
I too have had problems using RemoteFX USB Redirection on a Windows 7 Client to a remote host on Azure running Windows 10, while the same machine configuration would successfully redirect USB to a Windows 8.1 Azure VM.
To be clear I’ve not had issues with the USB redirection for common devices (Flash drives, Printers, etc) that are supported with the vanilla setup of Remote Desktop. This type of USB redirection, for example, allowing me to see a Flash drive that I plug in to my Windows 7 client is working perfectly for me as I can see it in Explorer in the Azure VM.
A comparison of standard RDP redirection and RemoteFX redirection is detailed in this blog entry.
My particular USB redirection problem relates to the classes of devices not handled by the basic RDP high-level redirection, and for that I’ve enabled RemoteFX USB redirection on previous releases of Windows. When this is functioning correctly the computer icon ( ) appears in the Remote Desktop title bar allowing me to select which device should be redirected to the VM.

Titlebar when RemoteFX USB Redirection is working
Following the instructions on numerous web resources for enabling RemoteFX USB redirection worked for me for earlier OS versions (i.e. Windows 8.1 on a Azure VM), but would not work for any Windows 10 VM I created. The titlebar stubbornly remained without the RemoteFX USB redirection feature.

Titlebar when RemoteFX USB Redirection was not working
I finally stumbled across this thread which solved my problem.
It seems there is one more step needed on a Windows 10 host compared to previous OS versions and that is:
-
Run
gpedit.mscon the target VM (the target windows 10 Virtual Machine) to start theGroup Policy Editor.gpedit.msccan be typed in from a run dialog (use WinKey+R) if you have administrator access, or start an elevatedCMD.EXEand typegpedit.mscfrom the command line. -
Locate the item
Computer Configuration Administrative Templates Windows Components Remote Desktop Services Remote Desktop Session Host Device and Resource Redirection Do not allow supported Plug and Play device redirectionfrom the treeview of theGroup Policy Editor. -
Bizarrely set this item to
Disabled. -
Run
gpupdate /forcefrom an elevated command prompt. -
At least disconnect RDP session and connect again, if this does not work reboot target VM.
- Remove From My Forums
-
Question
-
here is the situation I have.. I have a windows 8.1 enterprise machine.. with a windows 7 pro machine as a client. the windows 7 machines RDPs into the the 8.1 enterprise and has remotefx usb redirection working fine I need to pull the
local scanner etc over to the remote machine. I now have a copy of windows 10 enterprise and I cannot get the usb redirection to work from the same client computer. and I have tried with a windows 10 pro machine also the usb redirection over
RDP does not show devices on the enterprise 10 machines… is there something I need to enable on the 10 enterprise to make usb redirection to work… I am trying to move from the 8.1 enterprise to 10 enterprise but I cannot do this unless I get the
RDP usb redirection to work. and I checked the settings between the 8.1 and 10 they are identical as far as I can tell.
First published on CloudBlogs on Jun, 10 2010
In April, Max Herrmann posted
a blog article
announcing our newest device redirection feature for Remote Desktop Virtualization Host: RemoteFX USB redirection. In this three-part series, we’ll take a closer look at the feature and how it helps close the gap between the user experience of a local user sitting at their physical desktop and that of a remote user connected to a virtual desktop. The first part of the series gives an overview of the feature and what it can do, and how to set up a basic deployment of the feature.
Feature Overview
The goal of RemoteFX USB redirection is simple: the user should be able to use
any
device they want, and have it
just work
. RDP has numerous high-level redirections that allow specific types of devices to be used effectively in a remote session, such as:
- Easy Print, which allows users to print to local printers in remote sessions
- Drive Redirection, which allows users to access the file system on any local drive in a remote session, including USB drives
- Smart Card Redirection, which allows users to authenticate to and in a remote session by using smart cards/e-tokens
- Plug-and-Play Device Redirection, which allows users to access PTP digital cameras, MTP music players, and POS for .NET devices in a remote session, among others
- Input Redirection, which allows the use of keyboards/mice in remote sessions
- Audio Redirection, which allows recording and playback of audio in remote sessions
- Port Redirection, which allows the use of serial and parallel ports in remote sessions
However, there are many devices which are not covered by these redirections, such as scanners, multifunction printers, webcams, and more. RemoteFX USB redirection acts as a catch-all mechanism that redirects these USB devices! Unlike high-level redirections such as drive redirection, RemoteFX USB redirection happens at the port protocol (USB request block or URB) level, and is similar to how one can redirect serial or parallel ports via RDP. This provides some unique advantages, as you’ll see below. However, RemoteFX USB redirection is meant to supplement high-level redirections, not to supplant them. By combining RemoteFX USB redirection with RDP high-level device redirections, you can have the best of both worlds. Here is a table that compares and contrasts the two forms of redirection.
|
|
|
|
Does not require drivers on the client |
Requires drivers for the device to be installed on the client |
|
Requires the device driver to be installed on the server |
Generally does not require drivers on the server |
|
Uses one redirection method for many types of devices |
Uses a specific, unique method for each type of device being redirected |
|
Forwards URBs to and from the device over the RDP connection |
Exposes high-level device functionality in the remote session by using an optimized protocol for the device type |
|
Enables only one session to use a device at a given time; the local client cannot use the device while an RDP session is using it |
Enables any number of sessions to access the device simultaneously, including the local client |
|
Is optimized for the LAN, like the rest of RemoteFX |
Works with both LAN and WAN |
Setting up a Basic Deployment
Now that you’ve seen what RemoteFX USB redirection can do, let’s take a look at how to set up the feature.
Prerequisites
You will need the following:
- A RemoteFX-capable client (Remote Desktop Connection 7.1 or later)
- A virtual machine hosted on a RemoteFX host (Windows 7 SP1 or later)
Enabling RemoteFX USB redirection on the clients
-
In order to redirect USB devices from a given machine, the RemoteFX USB redirection feature must be enabled. In Group Policy, navigate to Computer ConfigurationAdministrative TemplatesWindows ComponentsRemote Desktop ServicesRemote Desktop Connection ClientRemoteFX USB Device Redirection, and edit “Allow RDP redirection of other supported RemoteFX USB devices from this computer.” Enable the policy, and specify whether you wish to allow all users or only admins to redirect devices.
-
On the client machines, run “gpupdate /force” (without quotes) from an Administrator command prompt to enable/disable the feature, and then restart the computer for the changes to take effect.
The feature will not work until you restart.
Using the feature
-
On the client, open Remote Desktop Connection. If the tabs are not listed, click
Options
to expand the dialog box. -
On the
Local Resources
tab, click
More
to display the
Local devices and resources
dialog box. If at least one supported RemoteFX USB device is connected, it should be listed in the device tree under
Other supported RemoteFX USB devices
.
Note: The heading “Other supported RemoteFX USB devices” will only appear if the RemoteFX USB redirection feature is enabled on the client (apply the Group Policy setting, run gpupdate, and then restart) and at least one supported RemoteFX USB device is connected and available for redirection.
-
After you are connected, the devices that you have selected should appear in the remote virtual desktop.


I hope you’ve enjoyed this first part in our series of blogs about RemoteFX USB redirection. In Part 2, we’re going to talk about some deployment-related topics, including setting up publishing and RD Web Access for rich and thin clients, and server device security. If you have any questions or comments, please post them to the blog, or send us an e-mail at
rfxusb@microsoft.com
. We look forward to hearing from you.
Функция перенаправления USB в RemoteFX
После обсуждения богатых графических возможностей, предоставляемых функцией RemoteFX в Windows Server 2008 R2 SP1 в предыдущей статье, в этой статье будет рассказано о перенаправлении USB в RemoteFX.
В исходном сценарии VDI, поскольку клиент использует виртуальную машину на сервере, виртуальная машина не поддерживает двустороннее аудио и USB-устройства. Она поддерживает только воспроизведение звука, а некоторые U-диски или мобильные жесткие диски USB распознаются как диски. устройство. После выпуска Windows 7 встроенный RDP 7.0 в Windows 7 поддерживает двустороннее аудио, что позволяет воспроизводить и записывать аудио. Однако он поддерживает только очень небольшое количество устройств, таких как U-диски или мобильные жесткие диски USB. Использование USB-камер, USB-сканеров и других устройств невозможно. Но с функцией RemoteFX и RDP 7.1 в Windows 7 SP1 (включая Windows Server 2008 R2 SP1). В виртуальных машинах в VDI стало реальностью использование USB-камер, USB-сканеров и других устройств. Далее мы реализуем перенаправление USB-устройств.
Здесь мы по-прежнему используем экспериментальную среду из предыдущего документа.
Сначала откройте физическую машину с установленным пакетом обновления 1 (SP1) для Windows 7, которая будет использоваться для подключения к виртуальной машине, и включите параметр, разрешающий перенаправление USB в групповой политике.
1. Нажмите Пуск, введите gpedit.msc, затем нажмите Enter, чтобы открыть редактор групповой политики, а затем найдите параметр, разрешающий RemoteFX, перенаправление USB.

2. Затем разрешите администраторам и пользователям выполнять перенаправление USB.

3. Затем обновите групповую политику.

4. Перезагрузите компьютер.
5. После запуска системы подключите USB-устройство к этой физической машине. Я подключил здесь 3 устройства, а именно: USB-камеру, пульт дистанционного управления Media Center и свой мобильный телефон.

6. Откройте подключение к удаленному рабочему столу, введите IP-адрес виртуальной машины, к которой вы хотите подключиться, затем откройте вкладку «Локальные ресурсы» и нажмите кнопку «Дополнительно» в разделе «Локальные устройства и ресурсы».

7. Вы можете видеть, что была добавлена опция для USB-устройства RemoteFX, включая три подключенных мной устройства.

8. Затем подключитесь к виртуальной машине, откройте диспетчер устройств удаленного рабочего стола, вы увидите, что три устройства были подключены к виртуальной машине.

9. Затем мы используем QQ2010 для проверки функции устройства, сначала для проверки двустороннего звука, его можно использовать в обычном режиме.

10. Затем проверьте работу USB-камеры, вы увидите, что USB-камеру также можно использовать в обычном режиме.

С помощью описанных выше шагов тест перенаправления USB-устройств RemoteFX был завершен, и все перенаправленные устройства можно использовать в обычном режиме, чтобы виртуальный рабочий стол мог выполнять больше задач, а VDI можно было применять к большему количеству сценариев.

What is RemoteFX?
Users of the Windows operating system can take advantage of the platform’s built-in Remote Desktop feature. It allows remote access to applications but has limited capabilities for graphic-intensive tasks like playing games or viewing videos. Another potential drawback to the RDP protocol is its lack of support for accessing locally connected USB peripherals.
An alternative that addresses these issues is RemoteFX technology developed by Calista Technologies. It is a set of protocols that enables users to access virtual desktop sessions over a LAN. The protocol provides RemoteFX USB redirection enabling Windows users to access devices attached to a local host from within guest virtual sessions.
Contents
- What is RemoteFX USB redirection
- How to access any USB devices over RDP
- Comparison of RemoteFX USB Redirection and
dedicated USB sharing software - USB redirection software: access USB devices in RDP session
Beginning with Windows Server 2012, RemoteFX has enabled users to redirect USB traffic to RDP sessions. It offers this extended functionality:
- The ability to dynamically redirect USB transmission to remote sessions means that USB devices can be connected to previously established sessions. The connection does not have to be made before the session starts.
- Any virtual machine can enjoy USB redirection without the need for a dedicated GPU.
- Multiple clients can establish remote desktop USB redirection to a single virtual session. This enables flexible RDP USB redirection with devices from different clients attached and accessible from a virtual Windows 8 Enterprise guest session. The devices are isolated and only available to specifically shared VMs.
Remote Desktop USB Redirection: access any USB devices over RDP
Using the native capabilities of the RDP protocol limits USB redirection to specific types of devices. Printers and flash drives are no problem, but many other kinds of devices are not supported.
USB Redirector eliminates those concerns and lets you redirect any USB peripheral device.
Remote Desktop USB redirection lets you share physical USB ports with virtual sessions. Devices connected to a shared port are immediately available and accessible over RDP. Connections are made dynamically with new devices inserted into the port automatically redirected to the remote desktop.
Watch how easy it works!
Comparison of RemoteFX USB Redirection and dedicated USB sharing software
Two potential issues with using RemoteFX are its complex configuration requirements and the prerequisites it demands from your system. Here is what needs to be enabled on your Windows machine to make use of RemoteFX.
- The Desktop Experience feature is installed.
- Windows Server 2012, 2012 R2, or 2016 needs to be running on the RDP session host.
- Windows 7 SP1 (with Remote Desktop Connection 8.1), Windows 8.1 or Windows 10 needs to be run on the VDI desktop.
- Windows Workspot client 2.x.x needs to be installed on your client system. A RemoteFX-capable client such as Remote Desktop Connection 8.1 or later is also required.

So it is obvious that there are several requirements that must be met if you intend to use RemoteFX USB redirection. Fortunately, there is a solution that offers a simpler path to USB redirection over RDP enabling your virtual sessions to access locally attached devices.
USB Redirector by Electronic Team, Inc. is a software solution that lets remotely attached RDP sessions access local USB equipment. There are no complex configuration steps to negotiate and with just a few clicks, remote sessions can have the same level of functionality as if they were directly connected to the USB device.
Here’s how to use this dedicated software solution.
The first step is to install RDP USB Redirector on the computer that will share the USB port and the machine that will access the shared device.
- The USB Redirector server is the term used for the computer that will share the device over RDP. The machine must be running the client for Microsoft RDP protocol. This is where the USB peripheral device is physically attached.
- The remote desktop that will access the shared device is known as the USB over RDP Client. The server component of the Microsoft RDP protocol needs to be active on this system.