How to Deploy Graphics Devices Using RemoteFX vGPU
Hardware virtualization allows you to share hardware resources between virtual machines to achieve flexible and rational usage of resources. If one VM is idle, another VM running heavy applications can consume more CPU and memory resources. Sometimes you may need to run applications that require hardware video acceleration and a graphics card. While installing a video card on a physical computer is not a problem, it’s not as straightforward on a virtual machine. Virtual machines use only basic video functionality to display data by default. However, you can configure a virtual machine to use a video card and 3D acceleration. Hyper-V RemoteFX is a feature that helps you with this task. This blog post covers Hyper-V RemoteFX and explains how to configure RemoteFX on Windows machines.
What Is RemoteFX
RemoteFX is a feature that allows Hyper-V virtual machines to share a physical GPU (graphics processing unit). The resources of a video card are shared among multiple VMs. This is the optimal scenario for high-burst workloads when the dedicated resources of a video card are not required at all times. Hyper-V RemoteFX can be used to deploy a VDI (virtual desktop infrastructure). A RemoteFX GPU is a virtual device attached to a virtual machine that shares the resources of a physical video card installed on a Hyper-V host (shares the GPU and video memory).
RemoteFX was introduced in Windows 7 and has been available in Windows 8, Windows 10, Windows Server 2008 R2 SP1, Windows Server 2012, and Windows Server 2016. This feature is not present in Hyper-V Manager in the latest version of Windows Server 2019 – you cannot enable Hyper-V RemoteFX in the graphical user interface (GUI). Using RemoteFX decreases CPU (central processing unit) load and increases scalability in a virtual environment. You don’t need to attach a dedicated GPU for each VM when using Hyper-V RemoteFX because virtual machines can dynamically share the GPU for the workload.
Video rendering, processing heavy images, working with CAD applications, and 3D modeling are some of the cases when you may need 3D acceleration and a RemoteFX GPU in a VM. A modern GPU is better adapted for parallel processing than the CPU, handles more threats simultaneously, and has more processing cores. The number of monitors and used resolutions depends on the video memory and the GPU performance of a video card. Use Remote Desktop, not VMConnect (Virtual Machine Connection), to connect to VMs using RemoteFX.
The advantage of RemoteFX is that it can be used on desktop and server Windows versions. While buying a supported video card that is compatible with server hardware may not be easy, most desktop computers that usually run client Windows operating systems have PCI Express graphics adapters installed.
End of Support
There is a vulnerability (CVE-2020-1036) that can be used by cybercriminals for remote code execution. Hackers can execute remote code on a host machine by using specially crafted applications on a VM with RemoteFX GPU to attack video drivers on a Hyper-V host. A host server cannot properly validate input from an authenticated user on a guest OS in this case. Microsoft doesn’t provide a patch to fix this vulnerability and says that this is an architectural issue. Due to these security concerns, Microsoft decided to disable and remove RemoteFX from all Windows versions using automatic updates:
- RemoteFX vGPU was disabled on July 14, 2020, for all Windows versions.
- RemoteFX vGPU was removed on April 13, 2021.
RemoteFX works on Windows 10 version 1803 and earlier Windows versions (can be configured in a few clicks in the GUI of Hyper-V Manager). After the KB4571756 update (a cumulative update released in September 2020), this feature is disabled in the GUI. As a result, Windows 10 RemoteFX configuration is not available in the GUI of the Hyper-V Manager in Windows 10, version 1809, because the feature was disabled. Until the updates in April 2021, RemoteFX GPU had to be enabled in PowerShell with special commands.
RemoteFX Requirements
- A supported Windows version on a Hyper-V host (Windows 7 Ultimate/Enterprise, Windows 8 Ultimate/Enterprise, Windows 10; Windows Server 2008 R2 SP1, Windows Server 2012, Windows Server 2016, Windows Server 2019). Updates removing Hyper-V RemoteFX must not be installed.
- A GPU must be compatible with DirectX 11 on a host machine (DirectX 10 can be used on Windows Server 2008 and Windows 7 installed on a physical machine). If multiple video cards are installed on the Hyper-V host, they must be identical. DirectX 11 is available on Windows 8.1 and newer Windows versions on guest VMs.
- A CPU must support SLAT (Second Level Address Translation). The name of this feature is Extended Page Tables (EPT) for Intel processors and Nested Page Tables (NPT) for AMD processors.
- Supported guest operating systems are Windows 7 SP1, Windows 8 and 8.1, Windows 10 1703 or later, Windows Server 2008 R2, Windows Server 2012, Windows Server 2016 (in a single-session deployment only).
Prepare the physical machine that is the Hyper-V host. Make sure that you have installed graphics drivers for a graphics adapter on the Hyper-V host. It is recommended that you install the latest stable version of drivers provided by your GPU vendor (for example, NVIDIA or AMD).
Prepare a virtual machine that is running a supported version of Windows to use Hyper-V RemoteFX. In my example, the name of the VM is Windows-VM, and the name of the Hyper-V host is Hyper-V-prim.
Installing the needed features
Install the Remote Desktop Virtualization Host service on the Hyper-V host.
Open Server Manager, and click Manage > Add Roles and Features.
The Add Roles and Features Wizard opens.
Installation Type. Select Role-based or feature-based installation. Hit Next at each step of the wizard to continue.
Server Selection. Select a server from the server pool. Make sure that your Hyper-V host is selected.
Server Roles. Select Remote Desktop Services in the list of roles. If the Hyper-V role is not installed, select and install the Hyper-V role.
Features. Skip this step.
Remote Desktop Services. Read the explanation, and go to the next step.
Role Services. Select Remote Desktop Virtualization Host. You can read the description in the right pane.
Reboot the Hyper-V host when the installation of the role is finished.
Configuring Hyper-V Settings
Open Hyper-V Manager by running virtmgmt in the command line or using the Windows GUI. Then open Hyper-V Settings.
In the navigation pane of the Hyper-V Settings window, click Physical GPUs. In the drop-down menu, select your video card, and then select the Use this GPU with RemoteFX checkbox.
If you cannot select this checkbox, then your video adapter cannot be used for RemoteFX, or RemoteFX is disabled.
Stop the virtual machine.
Open Hyper-V Manager, select your VM, right-click the VM, and open VM Settings.
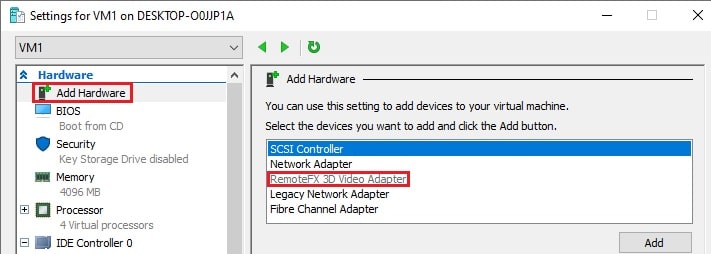
In the VM Settings window, click Add Hardware in the left pane (the navigation pane). In the right pane, you see a list of devices that you can add to a virtual machine. The workflow is similar for Generation 1 and Generation 2 VMs.
If a RemoteFX 3D Video Adapter is active (a black font is used), select this adapter and click Add. This option is active in Windows versions until July 14, 2020, updates are installed.
If your Windows was updated, the RemoteFX 3D Video Adapter option is inactive (a grey font is used), and you cannot add this adapter in the GUI of Hyper-V Manager. At the same time, the Physical GPUs option is no longer displayed in Hyper-V Settings.
You can fix this in PowerShell.
Run the command in PowerShell on the Hyper-V host to add a RemoteFX 3D video adapter to a VM:
Add-VMRemoteFx3dVideoAdapter -VMName your_VM_name
If the command is executed successfully, a warning message is displayed.
WARNING: We no longer support the RemoteFX 3D video adapter. If you are still using this adapter, you may become vulnerable to security risks.
If you see the error: Add-VMRemoteFx3dVideoAdapter: To enable this device, use Server Manager to install the Remote Desktop Virtualization Host role service
The Remote Desktop Virtualization service is not installed on the Hyper-V host. See Installing the needed features earlier in this post.
Enabling Windows 10 RemoteFX after installing updates
As I mentioned earlier, if the Windows updates of July 14, 2020, are installed, Microsoft RemoteFX is disabled. If you have VMs configured to use RemoteFX, they won’t start. The following Windows 10 RemoteFX error for Windows 10 with the July 14, 2020, update is displayed when trying to start a VM:
An error occurred while attempting to start the selected virtual machine(s):
‘VM-name’ failed to start.
Synthetic 3D Display Controller (Instance ID xxxxxxxx-xxxx-xxxx-xxxx-xxxxxxxxxxxx): Failed to Power on with Error ‘Insufficient system resources exist to complete the requested service.’.
The virtual machine cannot be started because all the RemoteFX-capable GPUs are disabled in Hyper-V Manager. You must enable at least one GPU.
Another variant of the error:
The virtual machine cannot be started because the server has insufficient GPU resources.
You can fix this in PowerShell. This method is applicable for Windows 10 and the appropriate Windows Server versions. Use commands in PowerShell to fix this error and enable RemoteFX. Run this command to check information about the video adapter on the Hyper-V host:
Get-VMRemoteFXPhysicalVideoAdapter
Find this string:
Enabled: False
It means that RemoteFX is disabled. Change this value to True.
Copy the name of the video card (in my example, NVIDIA GeForce GTX 1060).
Run the command:
Enable-VMRemoteFXPhysicalVideoAdapter -Name «video_card_name»
Enter your graphic card name.
Try to start your VM using RemoteFX again. The VM should start now.
Note also these PowerShell cmdlets to manage a RemoteFX 3D video adapter:
Set-VMRemoteFx3dVideoAdapter
Get-VMRemoteFXPhysicalVideoAdapter
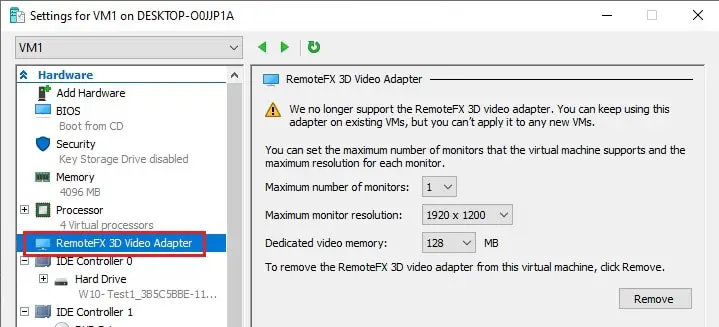
After adding a RemoteFX 3D video adapter to a VM, this adapter should be visible in the list of VM hardware with options to set resolution, the number of monitors, and dedicated video memory.
If you don’t see these options in the GUI of Hyper-V Manager, use additional parameters when adding a RemoteFX video adapter to a VM in PowerShell, for example:
Set-VMRemoteFx3dVideoAdapter -VMName Windows-VM -MaximumResolution 1024×768 -VRAMSizeBytes 536870912
If Microsoft RemoteFX was configured successfully, in the guest Windows that is running on the VM, you see a Microsoft RemoteFX Graphics Device – WDDM device in the Display Adapters section of Device Manager. This RemoteFX 3D video adapter is a virtual device that shares the resources of the physical video card installed on the physical Hyper-V host by using RemoteFX.
Troubleshooting
Sometimes additional errors may occur. Let me explain a common error when a user cannot connect to a running VM using Remote desktop RemoteFX.
Symptoms:
- Video remoting was disconnected and the appropriate message is displayed.
- RDP failed to connect: Your Remote Desktop session has been ended, possibly for one of the following reasons.
If this error occurred on your VM, edit a group policy in the guest Windows on the VM.
Click Start > Run > gpedit.msc to open the Group Policy Editor for a local machine.
In the left pane of the Group Policy Editor window, navigate to
Computer Configuration > Administrative Templates > Windows Components > Remote Desktop Services > Remote Desktop Session Host > Remote Session Environment > RemoteFX for Windows Server. Double-click Configure RemoteFX in the right pane of the window.
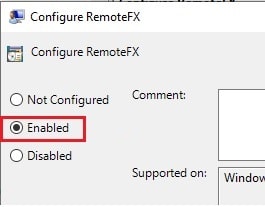
A window with Configure RemoteFX properties opens. Select Enabled, and hit OK to save settings.
Double-click Use WDDM graphics display driver for Remote Desktop Connections (available for Windows 10 version 1903 and newer Windows versions).
In the window that opens, select Disabled, and hit OK.
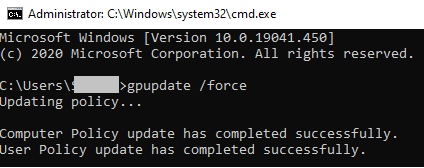
Update configuration of group policies to apply new settings with the command:
gpupdate /force
Reboot your virtual machine. Try to connect to your VM using the Enhanced Session Mode.
How to Prevent Disabling RemoteFX on a Hyper-V host
After the Windows update released in April 2021 is installed, VMs using a RemoteFX 3D video adapter fail to start. You can disable automatic updates on Windows computers at your own risk to continue using RemoteFX. Note that security patches are not installed automatically on Windows machines if Windows updates are disabled. Unpatched vulnerabilities are a threat for your computers, which are then at risk of getting infected with ransomware, viruses, and other malware. You can download Windows updates (patches) manually from the Microsoft site and install them. Learn which Window updates are intended to remove RemoteFX and don’t install them. Consider deploying WSUS (Windows Server Update Services) in your organization and deselect the updates that you don’t need.
Don’t forget to back up your Windows servers and Hyper-V virtual machines. In case of a disaster or ransomware attack, having a backup allows you to recover your data, restore workloads, and resume operations in a short time. Use NAKIVO Backup & Replication to back up your physical and virtual machines.
Alternatives to Hyper-V RemoteFX
Microsoft recommends that customers use DDA instead of using RemoteFX after April 2021.
DDA (Discrete Device Assignment) is a feature that allows you to attach a device (in my case, a PCI Express device) directly to a VM. In the case of a graphics card, the card should be disconnected from the host machine and connected to a VM. Only one VM can use a video card with DDA at any given time.
A video driver for a GPU must be installed on the guest OS of a VM, not on a host machine. In this case, features such as DirectX 12 and CUDA (Compute Unified Device Architecture) are available on a VM (CUDA is not available on a VM when using RemoteFX). When using Direct Device Assignment, VM migration between Hyper-V hosts is not possible.
Consider using VMware alternatives for servers and desktops running VMs. Use Virtual Shared Graphics Acceleration (vSGA) and Virtual Shared Pass-Through Graphics Acceleration in VMware vSphere to share GPU with multiple VMs. Use compatible video cards that support GPU virtualization and have the appropriate hardware features:
- nVidia GRID vGPU
- AMD Multiuser GPU
You can enable accelerated 3D graphics for a VM in VMware Workstation if you use a desktop machine rather than a server.
Conclusion
Hyper-V RemoteFX is a useful feature that allows VMs to share hardware resources of a physical video adapter installed on a Hyper-V host and use 3D acceleration for applications on virtual machines. To configure RemoteFX on a virtual machine, install the Remote Desktop Virtualization Host service on the Hyper-V host, edit general Hyper-V settings to select the GPU that must be used for video acceleration, and add a RemoteFX 3D video adapter in the virtual hardware options of the VM. Unfortunately, Hyper-V RemoteFX is deprecated by Microsoft, and using RemoteFX is possible only until you install Windows updates of April 2021.
A useful feature that was introduced not too long ago for Windows 10 has now been disabled. The RemoteFX vGPU feature lets the users of Virtual Machines (VMs) running Windows Server 2008 R2, Server 2012, Server 2016, and Windows 10 running on Hyper-V use the physical Graphics Processing Unit (GPU) of the host machine to render its graphic output.
As of the most recent update by Microsoft for Windows 10, KB4571757, Microsoft has decided to discontinue this feature due to a critical vulnerability discovered in Remote Code Execution.
Let’s look into the details of the feature, why it was discontinued, and whether or not we can find a way for it to still work.
Table of contents
- What is RemoteFX vGPU?
- Why did Microsoft remove RemoteFX vGPU feature?
- How to enable RemoteFX vGPU on Hyper-V running on Windows 10
- Alternative for RemoteFX vGPU
- Configure the VM for DDA
- Dismount the GPU from the host computer
- Assign the GPU to the VM
- Closing words
What is RemoteFX vGPU?
The VMs running on Hyper-V can use the physical GPU on the host computer to run their tasks concerning video rendering and image processing, using the RemoteFX vGPU feature. This allows users to take the load off of their CPU and run heavy image processing on their VMs using the shared GPU.
With this feature, a dedicated GPU for each VM is not required and simultaneously provides enhanced scalability and usability of the GPU, as well as the VMs. Head on to Microsoft’s web page to learn more about the feature.
Why did Microsoft remove RemoteFX vGPU feature?
Although the RemoteFX vGPU feature is old as it was introduced in Windows 7, it is now being exploited by hackers to execute remote commands on the host machine. This feature is not capable of authenticating the input of a valid user on the VM. A hacker can exploit this vulnerability to run modified applications on the VM to exploit the drivers of the host GPU and gain access. Once they have access to the host machine, they are able to execute remote commands and scripts.
Although Microsoft addresses such vulnerabilities through their regular updates, they were unable to do so as the flaw is architectural.
Microsoft started removing this feature for different versions of the OS back in July 2020. However, the Windows 10 cumulative update for September 2020 disabled the feature in all editions of Windows 10 version 2004.
Microsoft states that users will still be able to re-enable the feature until February 2021 through special commands, but should start working on alternative methods which will be discussed further down the article. Here is a notification by Microsoft on disabling RemoteFX vGPU.
How to enable RemoteFX vGPU on Hyper-V running on Windows 10
Although Microsoft has greyed out the feature to enable RemoteFX vGPU through Hyper-V on Windows 10, it can still be enabled through a command using PowerShell. Moreover, the Group Policy Settings are still there within the guest Operating Systems (VMs) which can be used to enable the feature on the VM just as before.
- First, turn on the VM you wish to configure this feature on and open the Group Policy Editor by typing in gpedit.msc in Run.
- In the Group Policy Editor, navigate to the following from the left pane:
- Computer Configuration -> Administrative Templates -> Windows Components -> Remote Desktop Services -> Remote Desktop Session Host -> Remote Session Environment -> RemoteFX for Windows Server
- In the right pane, double-click on Configure RemoteFX.
- In the Configure RemoteFX properties window, select Enabled, and then click Apply and Ok.
- Now open the Command Prompt and type in gpupdate /force to update the Group Policies.
- Download and install the recommended GPU driver according to your physical GPU. Here is a detailed review of GPUs and how to manage them.
- Now shut down the VM and navigate back to the hosting computer running Hyper-V.
- Since the RemoteFX 3D Video Adapter option is greyed out in the settings of the VM, we shall enable it through PowerShell. Run PowerShell with Administrative Rights. Here is a complete guide on how to always run PowerShell in Administrative Mode.
- Enter the following command while replacing (name) with the name of your virtual machine:
Add-VMRemoteFX3dVideoAdapter -VMName (name) - Now open the VM Settings through the Hyper-V control panel and you will find the RemoteFX ED Video Adapter under the Processor tab. Click on it and then make the configurations according to your needs.
You can now start and connect to the virtual machine and it will now use the host machine’s GPU to process its workload. You may also configure multiple VMs to run on a shared physical GPU.
Alternative for RemoteFX vGPU
Microsoft is permanently planning on removing the feature by February 2021. However, they have not left their users stranded. Microsoft has also proposed an alternative solution to directly mount the physical GPU on the PCIe port to a VM through the Discrete Device Assignment (DDA).
This method has three phases which need to be completed in order to provide a VM with a dedicated GPU:
- Configure the VM for DDA
- Dismount the GPU from the host computer
- Assign the GPU to the VM
Configure the VM for DDA
On the host computer, run the following commands one after the other to configure its settings. Replace (name) with the name of the VM:
Set-VM -Name (name) -AutomaticStopAction TurnOffSet-VM -GuestControlledCacheTypes $true -VMName (name)Set-VM -LowMemoryMappedIoSpace 3Gb -VMName (name)Set-VM -HighMemoryMappedIoSpace 33280Mb -VMName (name)
Dismount the GPU from the host computer
Firstly, you need to disable the GPU on the PCIe port, and then dismount it. But before that, you are going to need the port’s physical address. This can be determined by performing the following:
- Head to the Device Manager by typing in devmgmt.msc in Run.
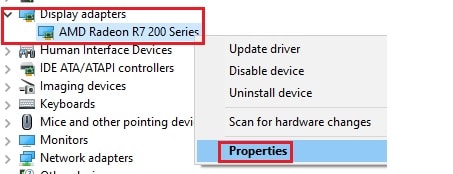
- Now expand Display Adapters and right-click on the GPU. Select Properties from the Context Menu.
- Go to the Details tab and select Location Paths from the drop-down menu under Property.
- Note that the entry starts with “PCIROOT” as this will be required when dismounting the GPU from the host device.
Now perform the following to dismount the device:
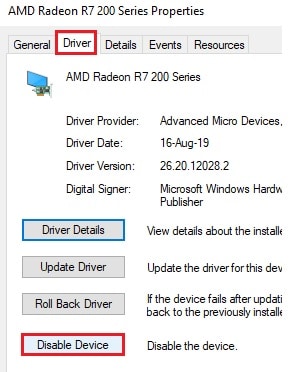
- Head to the Properties window of the GPU from the Device Manager.
- Go to the Driver tab and then click on Disable device.
Now that the device has been disabled, you need to dismount it.
Enter the following command in Command Prompt:Dismount-VMHostAssignableDevice -force -LocationPath $(LocationPath)
Replace (LocationPath) with the PCIe path you had noted earlier.
Once done, you may proceed to the next phase.
Assign the GPU to the VM
Now all you need to do is program Hyper-V to let the specified VM use the physical GPU. This can be done by running the command below in Command Prompt:Add-VMAssignableDevice -LocationPath $locationPath -VMName (name)
Replace (name) with the name of the VM.
You may now start the guest operating system and see that the video adapter it is now using will be the physical one on your host computer.
If at any time you wish to return the GPU back to the host device, simply run the following two commands in the same order, one after the other, in the Command Prompt while replacing (name) with the name of the VM:Remove-VMAssignableDevice -LocationPath $locationPath -VMName VMName<br>Mount-VMHostAssignableDevice -LocationPath $locationPath
Closing words
The RemoteFX vGPU hasn’t been around much for the version 2004. However, people liked the idea of it. Seeing it go might not be as troublesome as anticipated unless you put in the cost factor.
Although Microsoft has given an alternative for using designated GPUs for each virtual machine, it would not be ideal to place as many GPUs on the motherboard of the host computer as the virtual machines. The costs would be too high, and power consumption would not be ideal.
Microsoft needs to find a workaround for the issue as the solution provided is not feasible for most users.
Also see:
Subhan Zafar is an established IT professional with interests in Windows and Server infrastructure testing and research, and is currently working with Itechtics as a research consultant. He has studied Electrical Engineering and is also certified by Huawei (HCNA & HCNP Routing and Switching).
- Remove From My Forums
-
Question
-
I am running Server 2016 Technical Preview (v3) and I’m having trouble getting RemoteFX working in a Server 2016 Preview (v3) guest VM. My understanding from the various blogs I’ve read is that OpenGL and OpenCL support are currently only available
when running both the Server and Client w/t Server 2016 (the case I’m trying to test).I have Server 2016 Preview (v3) with a Windows 10 Enterprise Guest VM working properly with RemoteFX, but there is no OpenCL or OpenGL support and I understand that is as expected.
On the same host I created both a Server 2016 Preview (v3) Gen 1 and Gen 2 VM with RemoteFX enabled. In both instances the display adapter in the device manager comes up as unknown on the guest VM. I saw this same behavior when trying other OS’s
that were not compatible with this build of Server 2016. I’ve tried connecting both the server itself and the guest VM’s to the internet to pull the latest updates, however that has not resolved any issues. I’ve uninstalled and reinstalled the
RemoteFX adapter several times, also not working. I’m confident in the server hardware and configuration because it works properly with my Win10 Enterprise, but I wanted to specifically test the OpenGL and OpenCL capabilities which is only supported
with a Server 2016 Guest.I have attempted this on three separate servers with the same results each time, ensuring each time I follow the step-by-step guide found at:
http://social.technet.microsoft.com/wiki/contents/articles/31771.experience-guide-for-enabling-opengl-support-for-vgpu-in-server-2016.aspx
Any suggestions would be greatly appreciated at this point.
Dan
Answers
-
Hello,
I’m Chris Huybregts, the program manager who wrote the referenced article. First, thank you for raising the issue. The team is actively looking at the problem and I’ll update this thread when we have a solution.
Chris
-
Marked as answer by
Monday, August 31, 2015 2:54 PM
-
Marked as answer by
Корпорация Майкрософт выпустила обновление безопасности — KB4571756, которое отключит RemoteFX vGPU функция из-за уязвимости системы безопасности. Это применимо к Windows 10 версии 2004 и всем выпускам Windows Server версии 2004.
Опубликуйте это обновление, любая виртуальная машина, на которой включен RemoteFX vGPU, выйдет из строя со следующими сообщениями об ошибках:
- Невозможно запустить виртуальную машину, поскольку все графические процессоры с поддержкой RemoteFX отключены в диспетчере Hyper-V.
- Невозможно запустить виртуальную машину, поскольку на сервере недостаточно ресурсов графического процессора.
Даже если конечный пользователь попытается повторно включить RemoteFX vGPU, виртуальная машина отобразит сообщение об ошибке:
Мы больше не поддерживаем видеоадаптер RemoteFX 3D. Если вы все еще используете этот адаптер, вы можете подвергнуться риску безопасности.
Что такое функция vGPU RemoteFX?
При запуске виртуальных машин функция RemoteFX vGPU позволяет вам совместно использовать физический графический процессор. Эта функция хорошо подходит, когда физический графический процессор является слишком большим ресурсом, но вместо этого все виртуальные машины могут динамически совместно использовать графический процессор для своей рабочей нагрузки. Преимущество, конечно же, в удешевлении GPU и уменьшении нагрузки на CPU. Если вы хотите представить, это похоже на одновременное выполнение нескольких приложений DirectX на одном физическом графическом процессоре. Таким образом, вместо покупки 4 графических процессоров, может помочь один графический процессор, в зависимости от рабочей нагрузки. Также были предусмотрены контрмеры, ограничивавшие чрезмерное использование физического графического процессора.
В чем заключается уязвимость системы безопасности RemoteFX vGPU?
RemoteFX vGPU устарел. Он был представлен в Windows 7 и теперь сталкивается с уязвимостью удаленного выполнения кода. Уязвимость удаленного выполнения кода существует, когда Hyper-V RemoteFX vGPU на хост-сервере не может должным образом проверить ввод от аутентифицированного пользователя в гостевой операционной системе. Это происходит, когда vGPU Hyper-V RemoteFX на хост-сервере не может должным образом проверить ввод от аутентифицированного пользователя в гостевой операционной системе, когда злоумышленник запускает созданное приложение в гостевой ОС, которое атакует отдельные сторонние видеодрайверы, работающие на Hyper. -V хозяин.
Как только злоумышленник получит доступ, он может запустить любой код в ОС хоста. Поскольку это архитектурная проблема, исправить ее невозможно.
Альтернативные варианты для RemoteFX vGPU
Единственный вариант — использовать альтернативный vGPU, который может быть из сторонних приложений или Microsoft предлагает использовать Discrete Device Assignment (DDA). Это позволяет объединить все устройство PCIe в виртуальную машину. Вы можете не только разрешить доступ к графическим автомобилям, но и совместно использовать хранилище NVMe.
Самым большим преимуществом DDA, помимо того, что он безопасен, нет необходимости устанавливать драйверы на хосте до того, как устройство будет подключено к виртуальной машине. Пока виртуальная машина может определить местоположение устройства PCIe, можно определить путь, по которому виртуальная машина смонтирует его. Короче говоря, DDA, передающий графический процессор в виртуальную машину, позволяет использовать собственный драйвер графического процессора в виртуальной машине и все возможности. Это включает DirectX 12, CUDA и т. Д., Что было невозможно с RemoteFX vGPU.
Microsoft четко предупреждает, что вам не следует использовать RemoteFX vGPU, но если вам нужно, есть способ снова включить его на свой страх и риск.
Предполагая, что вы уже настроили 3D-адаптер RemoteFX vGPU, вот подробности, которые будут работать только в Windows 10 версии 1803 и более ранних версиях.
Настройте RemoteFX vGPU с помощью Hyper-V Manager
Чтобы настроить RemoteFX vGPU 3D с помощью диспетчера Hyper-V, выполните следующие действия:
- Остановить виртуальную машину
- Откройте диспетчер Hyper-V и перейдите к параметрам виртуальной машины.
- Щелкните Добавить оборудование.
- Выберите адаптер 3D-графики RemoteFX, а затем нажмите «Добавить».
Настройте RemoteFX vGPU с помощью командлетов PowerShell
- Enable-VMRemoteFXPhysicalVideoAdapter
- Добавить VMRemoteFx3dVideoAdapter
- Get-VMRemoteFx3dVideoAdapter
- Set-VMRemoteFx3dVideoAdapter
- Get-VMRemoteFXPhysicalVideoAdapter
Вы можете прочитать больше об этом здесь, в Microsoft.


