This article explains how you can disable Check for Updates using Group Policy. To prevent users from manually downloading updates from Microsoft, you can disable the check for updates button.
Most organizations today use Configuration Manager to deploy software updates to computers. Why? Because SCCM makes it easy to deploy and manage the updates.
With Configuration Manager deploying the software updates, you ensure the client computers are patched with the latest updates.
 1")
The software update point (SUP) interacts with the WSUS services to configure the software update settings and to request synchronization of software updates metadata.
If you have set up a standalone WSUS server to deploy Windows Updates to your computers, you ensure only the approved updates are deployed to all computers.
When you are using ConfigMgr/WSUS to manage updates, you basically have a complete control over the updates that you deploy. You don’t want users to manually check updates from Microsoft update and install it.
If you are allowing users to check for updates from Microsoft update, any user can download the updates and install. You don’t want users to download unwanted updates and cause issues with the laptop.
And when WSUS or SCCM attempts to deploy the latest updates, it would detect the client computer already has the updates installed.
Why should you disable Check for Updates?
Here are some reasons why you should prevent domain users from using Check for Updates option in Windows.
- A user can manually go to Start > Settings > Windows Update and run check for updates. This option should be disabled on domain computers because a user can manually download unapproved updates. Since these updates aren’t tested by admins, it may affect the stability of the computer.
- When a user manually downloads and installs the updates from Microsoft update, an operating system upgrade could occur. This has been the case in several organizations where an OS upgrade occurred just because the user wanted newer version of operating system. After the upgrade, some applications may not work properly and some settings may change. Overall, it’s a big challenge for system admins to roll back the operating system. To prevent such things, you can restrict users checking updates from Microsoft.
- Allowing users to manually check for updates from Microsoft update defeats the purpose of having WSUS, Configuration Manager in the setup. When you have invested money in a tool that deploys updates to your domain computers, it’s of no use when users download the updates directly from Microsoft update.
The below screenshot is from a computer that is just joined to the AD domain and managed by Configuration Manager.
Notice that check for updates button is active and enabled. In addition, there is a cumulative update available for installation.
If the user clicks download and install, the quality update will download from Microsoft update and install on the computer.
The user may think that the computer requires that optional update whereas it clearly states that it’s an optional quality update.
Now, do you see a reason why you must disable check for updates on domain computers?
 2")
Therefore, in most organizations, a group policy is deployed to the client computers to disable check online for updates from Microsoft update site.
Thankfully, with “Remove access to use all Windows Update features” GPO setting, administrators can disable the “Check for updates” option for users.
The group policy setting essentially blocks the access to Windows update. If you enable this policy setting, user access to Windows Update scan, download and install is removed.
Any background update scans, downloads and installations will continue to work as configured.
The best way to disable check for updates on computers is by using group policy (GPO). Group Policy can be used to apply security settings to users and computers.
The Group Policy allows administrators to define security policies for users and for computers. The GPO is a vast topic, and you can start learning about Group Policy from Microsoft Documentation.
When you create a group policy, you either deploy it to the entire AD domain or select Organizational Units. Whenever you create a new GPO, ensure you test it on pilot computers and then deploy it to wider set of computers.
Let’s create a new group policy disable check for updates from Microsoft Update. Launch the Server Manager and click Tools > Group Policy Management console.
In the Group Policy Management console, expand the domain and right-click Group Policy Objects and select New.
 3")
Specify the GPO name as “Disable Check for Updates from Microsoft Update” or something similar. Click OK.
 4")
After you create the GPO, right click the GPO and select Edit. Edit the GPO and specify the settings to disable check for updates.
 5")
In the Group Policy Object Editor, expand Computer Configuration > Administrative Templates > Windows Components > Windows Update.
In the right pane, from the list of settings, right click the setting Remove access to use all Windows Update features and select Edit.
 6")
The GPO setting Remove access to use all Windows Update features removes access to scan for Windows Updates. The check for updates from Microsoft update button will be disabled.
 7")
Group Policy Result – Check for Updates Disabled
After you apply the above group policy, run the command gpupdate /force on the client machines.
Read: How to Modify Group Policy Refresh Interval for Windows computers.
On the Windows 10 computer, click Start > Settings > Windows Update. Notice that Check for updates button is now disabled. The option to check online for updates from Microsoft update is also gone.
Instead, you see This option is managed by your organization.
 8")
Let’s check if the check for updates button is disabled for Windows 11 computer. On the Windows 11 computer, click Start > Settings > Windows Update. Yes, the check for updates button is disabled. The option to check online for updates from Microsoft update is not available.
 9")

Prajwal Desai is a Microsoft MVP in Enterprise Mobility. He writes articles on SCCM, Intune, Configuration Manager, Microsoft Intune, Azure, Windows Server, Windows 11, WordPress and other topics, with the goal of providing people with useful information.
Содержание
- При отключении системным администратором службы Центра обновления Windows или Центра обновления Майкрософт появляется одно или несколько сообщений об ошибках
- Проблема
- Для компьютеров с системами Microsoft Windows 98, Microsoft Windows Millennium Edition, Microsoft Windows 2000, Microsoft Windows XP или Microsoft Windows Server 2003
- Для компьютеров с Windows 2000, Windows XP или Windows Server 2003
- Причина
- Решение
- Для корпоративных пользователей, компьютеры которых подключены к корпоративной сети
- Для пользователей домашних компьютеров, не подключенных к корпоративной сети
- Для пользователей системы Windows 2000, Windows XP или Windows Server 2003
- Для пользователей систем Windows 98 или Windows Millennium Edition
- Дополнительная информация
- Как отключить автообновление Windows 10 навсегда
- Содержание:
- Как отключить службу обновления Windows 10
- Настройка ручной установки обновлений Windows 10
- Отключение через Центр обновлений
- Отключение Центра обновлений через реестр
- Запрет доступа обновлениям через редактор политики групп
- Ограничение обновлений с помощью лимита трафика
- Отключение обновлений для отдельного приложения
- Сторонние утилиты для отключения обновлений
- Отложить обновление Windows на неопределённое время
- Содержание:
- ↑ Как отключить автоматическое обновление Windows 11
- ↑ С помощью редактора групповой политики
- ↑ Отключение автообновления через реестр
- ↑ Настройка лимитных подключений в Windows 11
- ↑ Отключение службы Windows Update
- Disable windows update access
- Answered by:
- Question
- Answers
- All replies
При отключении системным администратором службы Центра обновления Windows или Центра обновления Майкрософт появляется одно или несколько сообщений об ошибках
Важно. Эта статья содержит сведения об изменении реестра. Перед изменением реестра необходимо сделать его резервную копию. Убедитесь в том, что знаете, как восстановить реестр в случае возникновения проблемы. Дополнительные сведения о создании резервной копии, восстановлении и изменении реестра см. в следующей статье базы знаний Майкрософт:
256986 Описание реестра Microsoft Windows
Проблема
Для компьютеров с системами Microsoft Windows 98, Microsoft Windows Millennium Edition, Microsoft Windows 2000, Microsoft Windows XP или Microsoft Windows Server 2003
Могут появляться следующие признаки:
При доступе к веб-узлам Центра обновления Windows или Центра обновления Майкрософт появляется сообщение об ошибке, подобное следующему:
Отказано в доступе
Настройки сетевой политики запрещают использовать Центр обновлений Windows на этом компьютере. Если вы считаете, что это сообщение не должно было появляться, обратитесь к системному администратору.
При выборе пункта Windows Update или Microsoft Update в меню Пуск появляется сообщение об ошибке, подобное следующему:
Служба Windows Update отключена системным администратором.
Для компьютеров с Windows 2000, Windows XP или Windows Server 2003
Могут появляться следующие признаки:
Отсутствует ярлык Windows Update или ярлык Microsoft Update в меню Пуск.
Отсутствует ярлык Windows Update или ярлык Microsoft Update в меню Сервис обозревателя Microsoft Internet Explorer.
Отсутствует вкладка Автоматическое обновление в диалоговом окне Свойства системы.
После настройки автоматического обновления не приходят уведомления о критических обновлениях. Кроме того, критические обновления не загружаются с веб-узлов Центра обновления Windows или Центра обновления Майкрософт.
Диспетчер устройств не устанавливает автоматически обновления драйверов с веб-узлов Windows Update или Microsoft Update.
При выборе средства Автоматическое обновление на панели управления недоступны настройки автоматического обновления. Появится сообщение следующего вида:
Служба Windows Update в данный момент недоступна.
Причина
Это происходит, если служба Центра обновления Windows выключена с помощью одного из следующих средств.
Решение
Для корпоративных пользователей, компьютеры которых подключены к корпоративной сети
Чтобы решить эту проблему, свяжитесь с системным администратором, чтобы узнать, отключен ли доступ к Центру обновлений Windows с помощью параметров групповой политики.
Для пользователей домашних компьютеров, не подключенных к корпоративной сети
Для пользователей системы Windows 2000, Windows XP или Windows Server 2003
Чтобы восстановить отсутствующий ярлык Windows Update или Microsoft Update на компьютере с Windows 2000, выполните следующие действия:
Войдите в систему с учетной записью администратора.
Выберите в меню Пуск пункт Выполнить, введите команду gpedit.msc и нажмите кнопку OК.
На левой панели разверните пункт Конфигурация пользователя, а затем Административные шаблоны, после чего щелкните Start Menu and Taskbar.
На правой панели щелкните правой кнопкой мыши элемент Disable and remove links to Windows Update и выберите пункт Свойства.
Выберите параметр Отключен, а затем последовательно нажмите кнопки Применить и ОК.
Чтобы восстановить отсутствующий ярлык Windows Update или Microsoft Update на компьютере с Windows XP или Windows Server 2003, выполните следующие действия:
Войдите в систему с учетной записью администратора.
Выберите в меню Пуск пункт Выполнить, введите команду gpedit.msc и нажмите кнопку OК.
На левой панели разверните пункт Конфигурация пользователя, а затем Административные шаблоны, после чего щелкните пункт Start Menu and Taskbar.
На правой панели щелкните правой кнопкой мыши элемент Disable and remove links to Windows Update и выберите пункт Свойства.
Выберите параметр Отключен, а затем последовательно нажмите кнопки Применить и ОК.
Чтобы разрешить доступ к веб-узлу Центра обновления Windows Update, выполните следующие действия:
Войдите в систему с учетной записью администратора.
Выберите в меню Пуск пункт Выполнить, введите команду gpedit.msc и нажмите кнопку OК.
На левой панели разверните пункт Конфигурация пользователя, а затем Административные шаблоны.
Разверните пункт Windows Components, а затем выберите Windows Update.
На правой панели щелкните правой кнопкой мыши элемент Remove access to use all Windows Update Features и выберите пункт Свойства.
Выберите параметр Отключен, а затем последовательно нажмите кнопки Применить и ОК.
Для пользователей систем Windows 98 или Windows Millennium Edition
Предупреждение. При неправильном изменении реестра с помощью редактора реестра или иным способом могут возникнуть серьезные проблемы. Эти проблемы могут привести к необходимости переустановки операционной системы. Корпорация Майкрософт не гарантирует разрешения этих проблем. Ответственность за изменение реестра несет пользователь.
Выберите в меню Пуск пункт Выполнить, введите в поле Открыть команду regedit и нажмите кнопку ОК.
Разверните последовательно разделы HKEY_CURRENT_USER, Software, Microsoft, Windows, CurrentVersion, а затем Policies.
Если раздел Windows Update существует, щелкните раздел Windows Update.
На правой панели, если существует значение DWORD DisableWindowsUpdateAccess, щелкните правой кнопкой мыши значение DisableWindowsUpdateAccess и выберите пункт Удалить.
Разверните последовательно разделы HKEY_CURRENT_USER, Software, Microsoft, Windows, CurrentVersion, а затем Policies.
Если раздел Explorer существует, щелкните раздел Explorer.
На правой панели, если существует значение DWORD DisableWindowsUpdateAccess, щелкните значение DisableWindowsUpdateAccess правой кнопкой мыши и выберите пункт Удалить.
На правой панели, если существует значение DWORD NoWindowsUpdate, щелкните правой кнопкой мыши значение NoWindowsUpdate и выберите пункт Удалить.
Раскройте последовательно разделы HKEY_LOCAL_MACHINE, Software, Microsoft, Windows, CurrentVersion, а затем Policies.
Если раздел Explorer существует, щелкните раздел Explorer.
На правой панели, если существует значение DWORD DisableWindowsUpdateAccess, щелкните значение DisableWindowsUpdateAccess правой кнопкой мыши и выберите пункт Удалить.
На правой панели, если существует значение DWORD NoWindowsUpdate, щелкните правой кнопкой мыши значение NoWindowsUpdate и выберите пункт Удалить.
Закройте редактор реестра и перезагрузите компьютер.
Дополнительная информация
Windows 2000 поддерживает параметр групповой политики Disable and remove links to Windows Update. Windows XP Professional и Windows Server 2003 поддерживают параметр групповой политики Remove links and access to Windows Update. Для других версий операционной системы Windows можно использовать системные политики или вносить изменения в реестр.
Администратор может использовать эти политики, чтобы запретить доступ к Центру обновления Windows и Центру обновления Майкрософт для отдельных пользователей, пользователей домена или объектов Active Directory.
Дополнительные сведения об устранении неисправностей Центра обновления Windows и Центра обновления Майкрософт, см. в следующей статье базы знаний Майкрософт:
316524 При обращении на веб-узел Windows Update появляется сообщение об ошибке, разрешающее работу с узлом только администраторам
Источник
Как отключить автообновление Windows 10 навсегда
Цель автоматического обновления программ — улучшение работы операционной системы и приложений за счёт апгрейда разработчиками старой версии. Но на практике такие обновления далеко не всегда несут благо. Часто из-за бесконтрольных обновлений падает производительность компьютера или ноутбука, возникают конфликты с установленными сторонними программами. Поэтому многие пользователи предпочитают отключить обновление Windows 10. При этом в предыдущих версиях операционной системы можно было как-то влиять на автообновления, выбирая из них те, что нужны. В версии Windows 10 Pro, Home такая возможность полностью отсутствует, в Pro позволено только отложить его на несколько часов. Рассмотрим способы обхода запрета на автообновление.
Содержание:
Как отключить службу обновления Windows 10
Пользователи компьютеров очень не любят, когда их ограничивают в чём-то, поэтому сейчас разработано несколько способов, как отключить обновления на Windows 10:
В случае, когда ни один из пунктов не срабатывает, пользователи придумали ещё один способ, который не отключает полностью автообновление, но откладывают их на срок от нескольких месяцев до года.
Настройка ручной установки обновлений Windows 10
С каждым новым обновлением операционной системы, разработчики усложняют процесс обхода отключения автообновлений. Но всё-таки возможность вручную отключать и включать их есть, если деактивировать службу, которая постоянно сканирует систему и совершает поиск обновлений. Приложение, отвечающая за это — Schedule Scan. Чтобы ПО перестало выполнять свои функции нужно поставить запрет на поиск и обновление. Делается это с помощью запрета работы программы UsoClient.exe. Чтобы выполнить это, необходимо войти в систему под правами администратора и сделать следующие шаги:


Теперь обновление Windows 10 отключено, но такое отключение даёт возможность пользователю вручную включать его, когда это необходимо и совершать обновление также вручную. Для этого нужно воспользоваться центром обновлений, зайдя в него через “Параметры”, а далее “Обновление и безопасность”.
Также есть возможность вернуть автообновление, заново запустив файл UsoClient.exe. Для этого также необходимо будет вызвать командную строку через Пуск, запустив через права администратора, нажав правой кнопкой мыши на командную строку. В появившемся окне введите команду: icacls c:windowssystem32usoclient.exe/reset. Так вы только запустите работу приложения по поиску обновлений. Для полного включения автообновления нужно повторить пункты 3-6, описанные выше.
Отключение через Центр обновлений
Такой вариант отключения обновлений возможен для всех версий Windows 10: профессиональной, корпоративной, домашней. К сожалению не всегда манипуляции с Центром обновления отключают их навсегда. Пользователи отмечают, что со временем, служба обновлений включается самостоятельно. Ниже будет описана пошаговая инструкция, как установить запрет на автообновление:


Раньше этого было достаточно, чтобы отключить обновление Windows, но сейчас, как писалось выше, Центр обновлений со временем включается самостоятельно. Поэтому предлагаем вам продолжение “операции”, чтобы автообновление не включилось, начнём с 8 пункта:


Теперь обновление для Виндовс отключено окончательно, без возможности самостоятельного включения. Для пользователя всё также остаётся возможность вернуть автообновление. Для этого необходимо все пункты выполнить в обратном порядке, выбрав пользователя, от имени которого запускался поиск и обновление приложений и системных файлов.
Отключение Центра обновлений через реестр
Отключить обновление Виндовс 10 можно, закрыв доступ к Центру обновлений через реестр. Для этого необходимо выполнить следующее:


После этих действий нужно закрыть редактор реестра, а компьютерное устройство перезагрузить. Теперь обновления Windows не будут иметь доступа к вашему ноутбуку или компьютеру.
Запрет доступа обновлениям через редактор политики групп
Отключение обновления Винды через редактор политики для групп возможен только для версий Windows 10 Pro и корпоративных, для домашней версии такая возможность отсутствует. В целом, рекомендуется именно так отключать автообновления, воспользовавшись инструментом администрирования. Инструкция, как отключить обновление Windows 10:


Теперь редактор можно закрыть. Чтобы изменения вступили в силу, зайдите в параметры системы и вручную совершите поиск обновлений.
Ограничение обновлений с помощью лимита трафика
Такой способ отключения обновлений Виндовс 10 подходит для всех версий. Хитрость в том, что Виндовс по умолчанию даже не пытается загружать обновления при включенном лимите на интернет. Сделать это можно, указав, что подключенный Wi-Fi лимитированные, даже если это не так. Как установить ограничение на трафик интернета:

После этого операционной системе будет дана команда, что подключенный интернет платный и имеет ограниченный трафик. К сожалению в обновленной версии Виндовс 10 от апреля 2017 года, некоторые приложения могут обновляться несмотря на установленный лимит трафика.
Отключение обновлений для отдельного приложения
Часто пользователи сталкиваются, что отдельное приложение или программное обеспечение конфликтует с другими программами. Чтобы этого избежать, выход один — выключить автоматическое обновление конфликтующего ПО. Для этого можно воспользоваться родной утилитой от компании Майкрософт — Show or Hide Updates. Найти приложение можно, скачав его с официального источника. Следующие шаги по настройкам обновлений Windows для отдельного приложения:

В случае, когда появится необходимость обновить эти программы, тогда нужно открыть утилиту Show or Hide Updates и выбрать пункт “Show hidden updates”. Снова появится список обновляемых файлов системой, вам просто нужно убрать ограничительные галочки.
Сторонние утилиты для отключения обновлений
Есть программное обеспечение, которое создано с целью отключать автообновление Windows 10. Рассмотрим три из них, самые популярные:

Программа не влияет на работу компьютера и ноутбука, к тому же полностью бесплатная.
Отложить обновление Windows на неопределённое время
Если никакие ухищрения по ограничению или запрету обновлений Виндовс не сработали, то всегда есть вариант отложить это обновление на какое-то время. Как можно это сделать:

Источник

Содержание:
Инсайдерские сборки Windows могут быть и часто являются нестабильными, поэтому, если вы не разработчик, то лучше просто перейти на другой канал инсайдерской программы и получать только отлаженные сборки, но можно поступить и по другому. Установив тестовую версию системы, убедившись в её относительной стабильности и решив пользоваться ею на постоянной основе, во избежание связанных с установкой накопительных обновлений последние будет лучше всего отключить. Не навсегда, конечно, а до того момента, пока не выйдет стабильная сборка системы. В новой Windows 11 отключить автоматическое обновление можно несколькими способами, к рассмотрению которых мы сейчас перейдём.
↑ Как отключить автоматическое обновление Windows 11
↑ С помощью редактора групповой политики
Если у вас установлена Windows 11 редакции Pro или выше, остановить получение обновлений можно с помощью редактора групповых политик. Откройте его командой gpedit.msc и перейдите в левой колонке по цепочке Конфигурация компьютера → Административные шаблоны → Компоненты Windows → Центр обновления Windows → Управление интерфейсом пользователя.

В правой части окна оснастки у вас будет политика «Настройка автоматического обновления», кликните по ней дважды и активируйте в открывшемся окне настроек радиокнопку «Отключено». Сохраните настройки и перезагрузите компьютер. В результате автоматическое обновление Windows 11 будет отключено, однако ручное обновление вам по-прежнему будет доступно.

↑ Отключение автообновления через реестр
Альтернативный способ отключения автоматического обновления Windows 11, им вы можете воспользоваться, если в вашей системе, например, в редакции Home, отсутствует редактор локальных групповых политик. В этом случае используем редактор реестра. Откройте последний командой regedit и разверните ветку HKLMSOFTWAREPoliciesMicrosoftWindows.

Через контекстное меню создайте в последнем подразделе еще один подраздел с именем WindowsUpdate, а в нём в свою очередь создайте подраздел AU, чтобы получилось так, как на скриншоте.

В разделе AU создайте параметр типа DWORD с именем NoAutoUpdate и установите в качестве его значения 1. Чтобы настройки вступили в силу, перезагружаем компьютер. Результат применения твика будет аналогичным результату отключения политики «Настройка автоматического обновления».


↑ Настройка лимитных подключений в Windows 11
Для предотвращения автоматического скачивания и установки обновлений можно воспользоваться предназначенной для экономии трафика функцией лимитированного подключения к интернету. Откройте приложение Параметры и перейдите в раздел Центр обновления Windows → Дополнительные параметры и убедитесь, что рычажок «Скачивать обновления через лимитные подключения» установлен в положение «Отключено».


Затем в приложении Параметры зайдите в раздел «Сеть и интернет», откройте свойства вашего текущего подключения и в подразделе «Лимитное подключение» установите переключатель в положение «Включено».


↑ Отключение службы Windows Update
Этот способ защититься от принудительного обновления вряд ли можно считать особо надёжным, так как теоретически система может восстановить исходные настройки. Откройте командой services.msc оснастку управления службами и отыщите в списке службу «Центр обновления Windows» (она находится внизу списка).

Двойным по ней кликом откройте её свойства и остановите, если запущена. Затем в выпадающем меню «Тип запуска» выберите опцию «Отключена», сохраните настройки и перезагрузитесь.


Это всё, отныне Windows 11 не станет устанавливать обновления самостоятельно, по крайней мере, вероятность автоматической установки будет снижена.
Источник
Disable windows update access
This forum has migrated to Microsoft Q&A. Visit Microsoft Q&A to post new questions.
Answered by:

Question
I have a WSUS server and use GPO to make settings for automatic update (au) on clients.
I wish to use Disable access to Windows Update for clients. This should be done in Computer ConfigurationAdministrative TemplatesSystem Internet Communication Management Internet Communication settingsTurn off access to all Windows Update features: enabled.
With this setting the registry is changed on the clients, but they can still use the links in Start menu and Internet Explorer. At first I thought this setting would try to disable au itself and so is in conflict with my other settings about au. However the manual of WSUS really says this setting can be enabled, clients can then still get updates only through WSUS.
Does anyone know why this setting doesn’t work?
My actual goal is to disable any notifications about updates and restarts, or else this will raise questions with the users. On this moment they get a notification about a restart if needed. When they say ‘later’, the message doesn’t come back and a yellow exclamation mark is shown right below. I wish to don’t show any notification at all. I think this can be arranged by using the setting mentioned above.
A second question: if I move away the ‘Install updates and shut down’ option in shutdown windows dialog box (through gpo), will the updates still be installed if they shutdown?
Answers
I wish to use Disable access to Windows Update for clients. This should be done in Computer ConfigurationAdministrative TemplatesSystemInternet Communication ManagementInternet Communication settingsTurn off access to all Windows Update features: enabled.
With this setting the registry is changed on the clients, but they can still use the links in Start menu and Internet Explorer.
However the manual of WSUS really says this setting can be enabled, clients can then still get updates only through WSUS.
Does anyone know why this setting doesn’t work?
My actual goal is to disable any notifications about updates and restarts
A second question: if I move away the ‘Install updates and shut down’ option in shutdown windows dialog box (through gpo), will the updates still be installed if they shutdown?
No. That option, when Not Configured or Disabled, permits the presentation of that option at Shutdown, however it does not force the user to use that option. If you Enable the policy, the option will be hidden from the user and updates can never be installed at shutdown.
In addition to the Deployment Guide, which it appears you have already reviewed, you may find some additional benefit from a webcast I did earlier this year: Group Policy and WSUS Best Practices, where among other topics, I discussed the use of these policy settings to control access.
So I got now one question left about a restart-update. To complete the installation of this update, will it use the first restart the computer gets and is it independent from the user’s interaction?
If I turn off all notifications (Remove all access to Windows Update features, in GPO user configuration and choose don’t show any notifications), the user can’t give interaction and restart the machine when an update initiates this through a notification, which could mean the installation of this restart-update won’t be completed. which would be too absurd and rediculous if I think about it.
Actually, if you block the user’s ability to interact with the WUAgent or the WUApp, then the WUAgent will FORCE the installation upon the logged in user. The user will get a five-minute countdown warning, and the system will be restarted. The logged on user has no choice in the matter.
. and a restart is the same as power-down + start-up with a night (or some other period) between them?
I wish to use Disable access to Windows Update for clients. This should be done in Computer ConfigurationAdministrative TemplatesSystemInternet Communication ManagementInternet Communication settingsTurn off access to all Windows Update features: enabled.
With this setting the registry is changed on the clients, but they can still use the links in Start menu and Internet Explorer.
However the manual of WSUS really says this setting can be enabled, clients can then still get updates only through WSUS.
Does anyone know why this setting doesn’t work?
My actual goal is to disable any notifications about updates and restarts
A second question: if I move away the ‘Install updates and shut down’ option in shutdown windows dialog box (through gpo), will the updates still be installed if they shutdown?
No. That option, when Not Configured or Disabled, permits the presentation of that option at Shutdown, however it does not force the user to use that option. If you Enable the policy, the option will be hidden from the user and updates can never be installed at shutdown.
In addition to the Deployment Guide, which it appears you have already reviewed, you may find some additional benefit from a webcast I did earlier this year: Group Policy and WSUS Best Practices, where among other topics, I discussed the use of these policy settings to control access.
You’re totally right! I was expecting the wrong results! Before you post your message I already came to this conclusion by reading the explanation again about the gpo-setting. I red wrong. Also the WSUS-guide is confusing about this to me, because about ‘disable access to Windows update’ it says » This setting overrides the user settings Remove links and access to Windows Update and Remove access to use all Windows Update features «. It made me think those two settings would also be set by the first setting. Thanks for the confirmation!
Also thanks for the answer to my second question, now I know I shouldn’t move away the option in shutdown-menu.
Thanks for the support!
To: Lawrence Garvin,
I hope you still notice this thread. I have seen your webcast. I still have a question.
If there are updates that must be installed upon shutdown, can this be forced to do so? I still don’t want to show notifications to users. I wish there was an option that forces the user to take the option ‘install updates and shutdown’ in shutdown menu, but I think there isn’t.
What happens when the updates aren’t installed upon shutdown? Will they be installed upon next startup? In that case, there won’t be any problem.
If there are updates that must be installed upon shutdown, can this be forced to do so?
What happens when the updates aren’t installed upon shutdown?
Will they be installed upon next startup?
Depends. If the client is:
Lawrence: Thank your for your reply. But Im afraid I still don’t understand the outcome in my situation:
The AU option is 4, so there is a scheduled download and installation day and time. This is overday during working hours. Let’s say there’s an update that can only be installed during shutdown. But the user chooses not to do so in the shutdown-menu at the end of the day (because he or she is rebellious). I don’t have a policy disabled that permits installation at power-on. Will the update be installed during next power-on?
Or did I understand it correctly from your reply that that will only happen if the scheduled day and time is ‘between the shutdown and poweron times’ or, as an exception, ‘the machine was powered off during the scheduled installation time’?
Let’s say there’s an update that can only be installed during shutdown. But the user chooses not to do so in the shutdown-menu at the end of the day (because he or she is rebellious). I don’t have a policy disabled that permits installation at power-on. Will the update be installed during next power-on?
MAYBE! (which is my point in the previous message).
If the update is downloaded the machine prior to shutdown, and thus that update is part of the scheduled installation event, AND the machine is powered off during that scheduled installation event, then the update will be installed at power-on the next day.
However, since your scheduled installation event is during the workday, only one of two scenarios seem possible to me:
[a] The update is downloaded prior to the scheduled installation event (during the morning) and it IS installed at the scheduled event (making installation at shutdown a non-issue). or
Fundamentally, as long as you have a during-working-hours scheduled installation event, the Install at Shutdown and Install at Power-On options are rarely going to be relevant.
Sorry for my lack of understanding, because I still don’t.
«If the update is downloaded the machine prior to shutdown, and thus that update is part of the scheduled installation event, AND the machine is powered off during that scheduled installation event, then the update will be installed at power-on the next day.»
I guess this is only true for updates that don’t need restart? I have enabled this policy-setting.
You mention two scenario’s for my situation. Again, scenario A will only occur for updates that don’t need restart, I guess.
I hope you can provide more info on this to me.
The status of the restart flag for the update is irrelevant to the question of WHEN the update will be installed.
Let me try this from a different perspective. Let’s discuss how the process actually works, and perhaps that will help you to understand what will, or will not, occur under different scenarios.
Источник
17 Dec, 22
by Oliver K
5 min Read
List of content you will read in this article:
- 1. What is Group policy?
- 2. Disable Windows Update From Group Policy [GPO Windows Update Setting]
- 3. How to Limit Windows Updates from Group Policy
- 4. Conclusion
As we all know, Windows update is an essential feature of Microsoft to ensure that Windows services stay up to date. Windows update generally includes files to update drivers, services, security, feature improvements, and other upgrades. We don’t recommend you disable these updates because they help maintain your system according to the latest upgrades. This article will explain windows update group policy settings and how to disable windows update group policy.
What is Group policy?
Group policy management is one more feature of Windows that offers the convenience of controlling multiple accounts in Windows and changing the advanced settings which are not accessible through the Windows Settings app. If you are annoyed with regular updates and want a permanent solution, you can use a group policy to disable the Windows update feature. So in this particular guide, we will give you brief details on disabling the Windows update from group policy.
Disable Windows Update From Group Policy [GPO Windows Update Setting]
The feature of the group policy editor in Windows 10 Pro offers multiple options to disable automatic updates permanently. Users can also change different Windows Update policies to decide when all updates should be installed on the system.
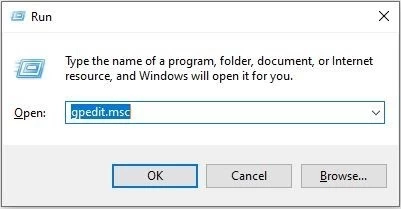
- First, open the start menu, search for gpedit.msc and open the Local Group Policy Editor or press Windows and R keys to open the Run utility.
- In the Run utility, type gpedit.msc and press Enter button to open Local Group Policy Editor.
- In the new window, go to the following:
Computer Configuration > Administrative Templates > Windows Components > Windows Update

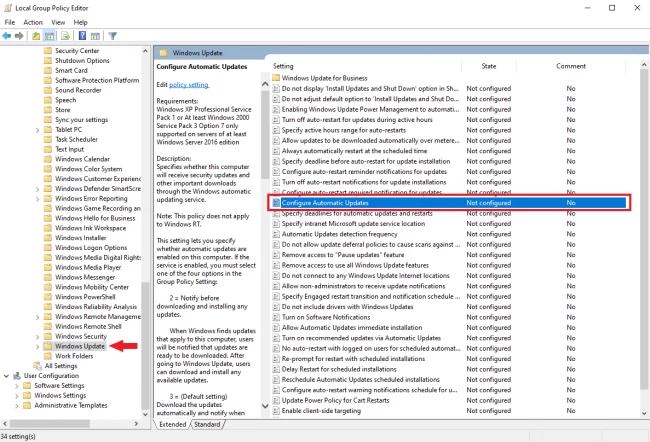
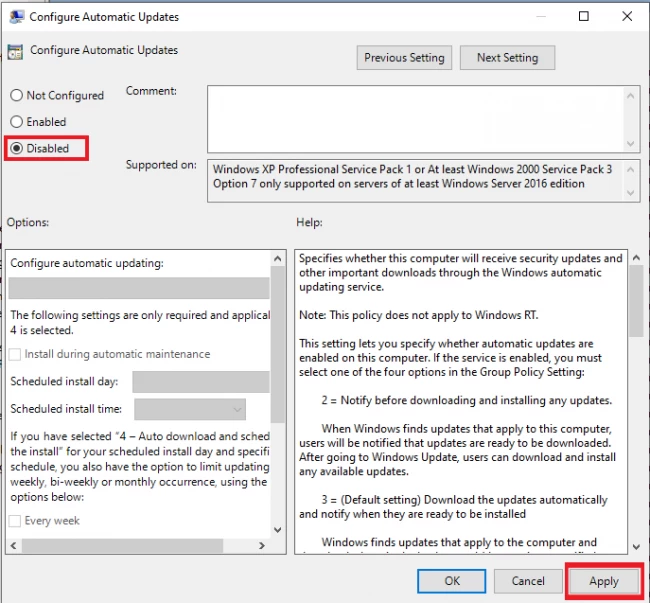
- Double-click the Configure Automatic Updates policy and turn on the disable option to disable the automatic update feature permanently.
- After that, click on the Apply and OK button to save changes.
- Once you save these changes, your system will not download the updates automatically, but you can manually check for updates from Settings.
- If you want to manually check the updates, open the Settings app and go to the Update & Security option, then Windows Update.
In the Windows Update option, click on the check for an update for downloading the latest update.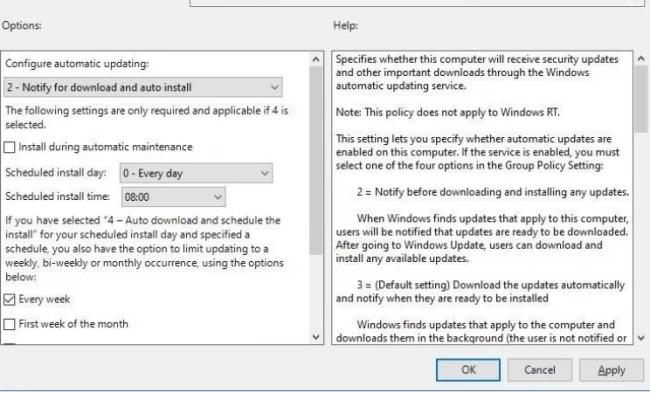
How to Limit Windows Updates from Group Policy
If you don’t want to permanently disable the Windows Update from the system, then you can limit the update. In other words, you can easily customize the policy to download the updates according to your requirements.
- To do it, open the Group Policy Editor again by searching it in the Start Menu or Run utility.
- Once you open it, go to the following file:
Computer Configuration > Administrative Templates > Windows Components > Windows Update
- Double-click on the Configure Automatic Updates policy and click on Enable to start the policy again.
- You will see a «Options» section in this window, so you can change these settings to download the update according to your requirements.
2 — Notify for download and auto-install
It will notify you about the latest update whenever it is available for the system.
3 — Auto download and notify for install
The system auto downloads and notify you about the installation
4 — Auto download and schedule the installation.
The system auto downloads and schedule the installation
5 — Allow the local admin to choose the setting.
It will allow a local admin to select the settings for Windows update
7 — Auto-Download, Notify to install, Notify to Restart.
The system will automatically download and notify you about installing and restarting the computer/laptop.
After successfully changing the settings, click the Apply then OK button to save changes.
After saving the changes, the Windows update will not download automatically. Still, you can install the new updates once your system receives any new patch, but you need to download it manually from the Windows update settings.
Conclusion
That’s it, and now you can easily change the Windows update setting from the Group policy and set it according to the requirements. We hope that our information will help you as we have divided the procedures into simple steps for easy understanding. Remember you need to follow all of the steps to get desired results otherwise, you will face errors while installing the updates for the system. If you are using windows 10, you can also disable automatic updates on windows 10. All these configurations can be done on Windows VPS Server & Dedicated Server.
People are also reading:
- How to Disable Automatic Updates in Windows 10
- Managing Windows services with PowerShell
- How to Repair Windows with DISM command?
- Configure Windows 10 Update Through Registry
This setting allows you to remove access to Windows Update.If you enable this setting all Windows Update features are removed. This includes blocking access to the Windows Update Web site at http://windowsupdate.microsoft.com from the Windows Update hyperlink on the Start menu and also on the Tools menu in Internet Explorer. Windows automatic updating is also disabled; you will neither be notified about nor will you receive critical updates from Windows Update. This setting also prevents Device Manager from automatically installing driver updates from the Windows Update Web site.If enabled you can configure one of the following notification options:0 = Do not show any notificationsThis setting will remove all access to Windows Update features and no notifications will be shown.1 = Show restart required notificationsThis setting will show notifications about restarts that are required to complete an installation.On Windows 8 and Windows RT if this policy is Enabled then only notifications related to restarts and the inability to detect updates will be shown. The notification options are not supported. Notifications on the login screen will always show up.
Policy path:
Windows ComponentsWindows Update
Scope:
Supported on:
Windows XP Professional Service Pack 1 or At least Windows 2000 Service Pack 3
Registry settings:
HKCUSoftwareMicrosoftWindowsCurrentVersionPoliciesWindowsUpdate!DisableWindowsUpdateAccess; HKCUSoftwareMicrosoftWindowsCurrentVersionPoliciesWindowsUpdate!DisableWindowsUpdateAccessMode