Может случиться так, что после установки Windows Update, Quality Update или Feature Update ваш компьютер с Windows 10 не загружается. В этом случае вам, возможно, придется удалить обновление. В этом посте мы покажем вам, как удалить последнее качественное обновление или обновление функций, когда ваш компьютер с Windows 10 не загружается, введя дополнительные параметры.
Чтобы удалить последнее качественное обновление или обновление функций, сделайте следующее:
- Загрузитесь в экран дополнительных параметров запуска
- Выберите Устранение неполадок
- Выберите Дополнительные параметры
- Нажмите Удалить обновления.
- Выберите, чтобы удалить «Обновление качества» или «Обновление компонентов».
- Следуйте инструкциям на экране.
Загрузитесь в экран дополнительных параметров запуска
Поскольку ваша система не загружается нормально, у вас есть три следующих варианта перехода на экран дополнительных параметров:
- Используйте установочный носитель: на первом экране найдите ссылку «Восстановить компьютер». Нажмите здесь. Это загрузит ваш компьютер на экране дополнительных параметров.
- Нажмите F2 или F8: когда ваш компьютер с Windows 10 загрузится, нажмите F2, чтобы получить доступ к настройкам BIOS, или нажмите F8, чтобы получить доступ к меню загрузки или запуска. Это может варьироваться от OEM к OEM. Когда вы получаете доступ к меню загрузки, вам, возможно, придется нажать F11, чтобы открыть экран «Выберите параметр». Отсюда вы должны нажать «Устранение неполадок», а затем «Дополнительные параметры».
- Трижды выключите компьютер: резко выключите компьютер, когда вы его включили. Сделайте это несколько раз. После 3 раз это может заставить Windows подумать, что с вашим ПК возникла какая-то проблема, и заставит нажать экран автоматического восстановления. Отсюда вы можете получить доступ к расширенным параметрам запуска.
Выберите Устранение неполадок
Достигнув среды восстановления, нажмите «Устранение неполадок».
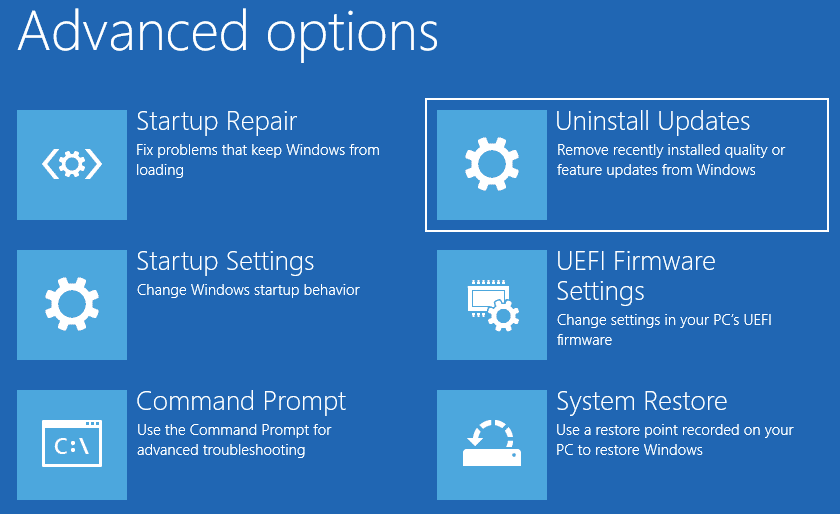
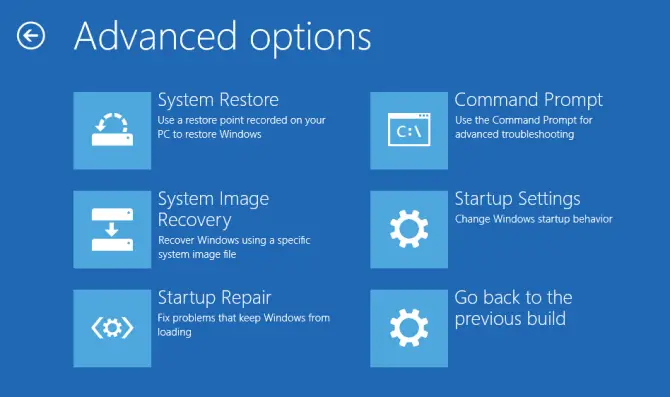
Выберите Дополнительные параметры
Далее вам будут предложены два варианта. Выберите Дополнительные параметры.
Нажмите Удалить обновления.
На следующем экране выберите Удалить обновления.
Выберите, чтобы удалить качественное обновление или обновление функций
В зависимости от ваших требований вы можете выбрать:
- Удалите последнее качественное обновление
- Удалить последнее обновление функции
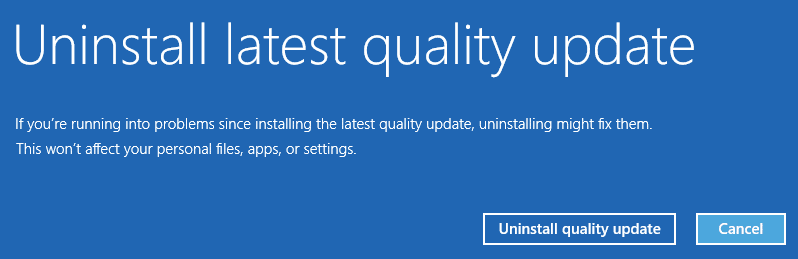
Следуйте инструкциям на экране
После того, как вы сделаете свой выбор, вам будет предложен экран для выбора конкретного обновления.
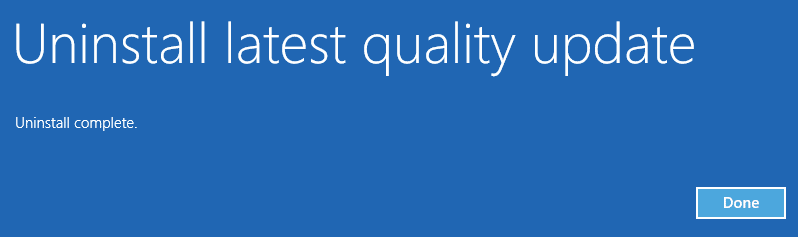
Щелкните по нему, следуйте инструкциям на экране и дождитесь, пока Windows удалит проблемное обновление.
После этого ваша система должна нормально перезагрузиться.
Связано: Windows 10 зависает на экране входа в систему после обновления.
.
Содержание
- How to Remove Installed Updates in Windows 10 and Windows Server?
- How to Uninstall Windows Updates Using the Control Panel?
- How to Prevent (Block) a Specific Update from Installing in Windows 10?
- WUSA.exe: Removing Windows Updates via the Command Line
- How to Uninstall a Windows Update using WSUS?
- Removing Windows Update Using the GPO
- How To Uninstall Windows Updates When Computer Is Not Booting?
- How to uninstall latest Quality Update or Feature Update in Windows 10
- Uninstall Quality Update or Feature Update in Windows 10
- Boot into Advanced Startup Options screen
- Select Troubleshoot
- Select Advanced Options
- Press Uninstall Updates
- Choose to uninstall Quality Update or Feature Update
- Follow on-screen instructions
- How to uninstall Windows Updates in Windows 10
- Uninstall Windows Updates in Windows 10
- Remove Windows Updates using the command line
How to Remove Installed Updates in Windows 10 and Windows Server?
Sometimes it happens that the security updates for Microsoft products (released under MS Patch Tuesday) cause problems with the OS or third-party software. The issues caused by the updates can be either mass and occur in a large number of devices or private that occur in some combinations of the Windows OS version and some apps.
If the Windows (or Office) patch causes a problem on the computers of many users, and this is confirmed by Microsoft experts, the update is pulled by the company and after a while is replaced by a new one with the bugs fixed. But if necessary, in Windows there is a way to uninstall any security update or patch.
In this article we’ll show how to properly uninstall updates in Windows OS (the article covers Windows 10, 8.1, 7 and Windows Server 2016, 2012/R2, 2008/R2). These ways of removing updates can be used if you installed the update manually from a CAB or MSU file, your device automatically received it from the Windows Update servers or your WSUS server.
There are several ways to uninstall updates in Windows (Windows Server):
How to Uninstall Windows Updates Using the Control Panel?
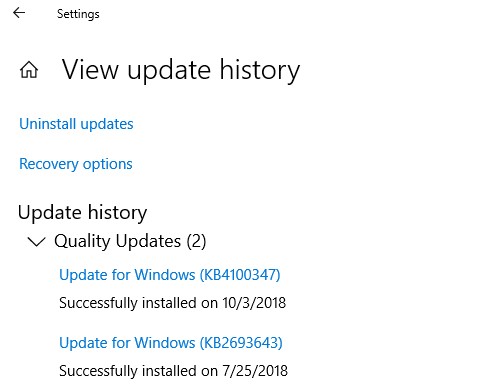
Let’s look on how to uninstall updates in Windows 10. Open the menu Settings app and go to the Update & Security -> Windows update -> View Update History -> Uninstall updates.
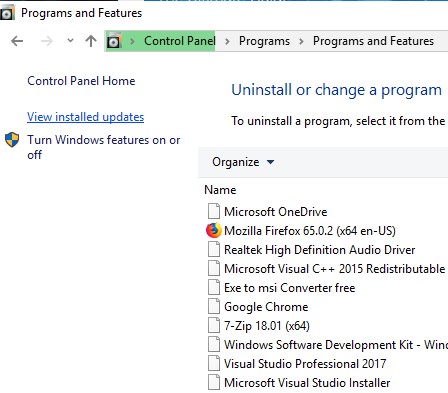
You can also go to the “Uninstall an update” panel using the classic Control Panel (Control PanelProgramsPrograms and Features) and press the button “View installed updates”.
A list of all Windows and Office updates installed on your device will appear. Find the necessary update in the list (or, to be more precise, unnecessary :)), select it, click the Uninstall button. The uninstall update wizard starts.
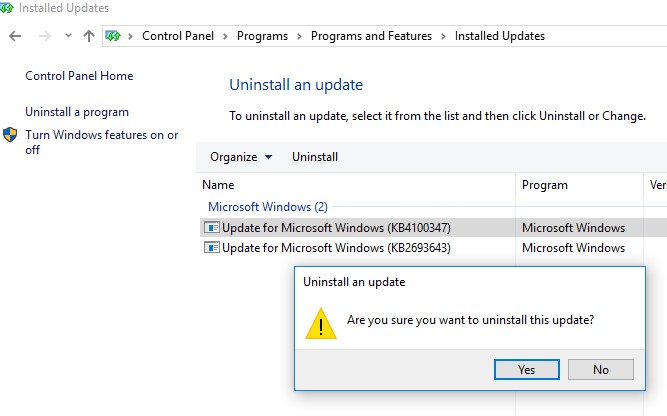
Click Yes when prompted if you want to uninstall this update.
And wait till it is uninstalled. After the update is removed, Windows may request a system restart.
How to Prevent (Block) a Specific Update from Installing in Windows 10?
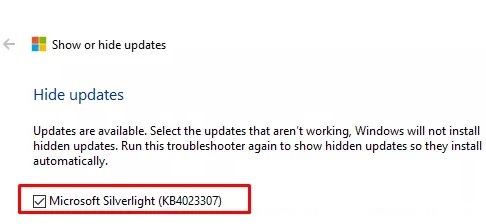
If your computer is configured to automatically receive Windows updates through Windows Update or WSUS, this update will most likely be installed on your computer again. But you can prevent the installation of a specific update by hiding (blocking) it. To do this, use the official tool Microsoft Show or Hide Updates https://support.microsoft.com/en-us/help/3073930/how-to-temporarily-prevent-a-driver-update-from-reinstalling-in-window
- Download and run the wushowhide.diagcab;
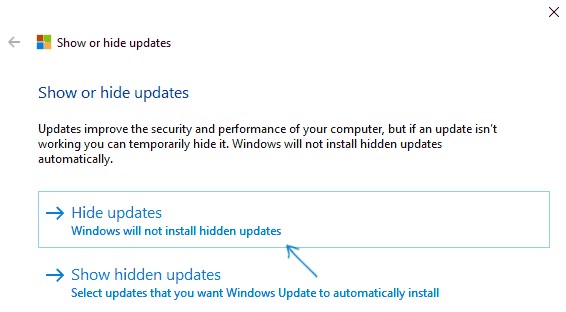
- Select the option Hide Updates;

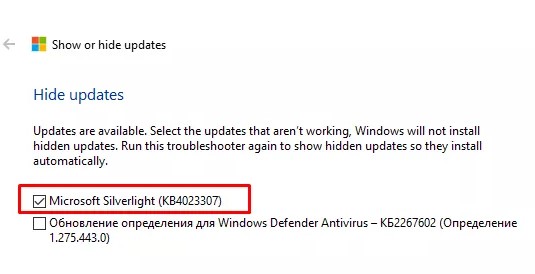
- Select the update you want to hide and click Next;
- After that, this update won’t be installed in Windows automatically via Windows Update. You can remove the hidden update by selecting it in the Show hidden updates.

WUSA.exe: Removing Windows Updates via the Command Line
Windows updates can also be uninstalled from the command prompt. To do it, there is a built-in CLI tool wusa.exe (Windows Update Standalone Installer).
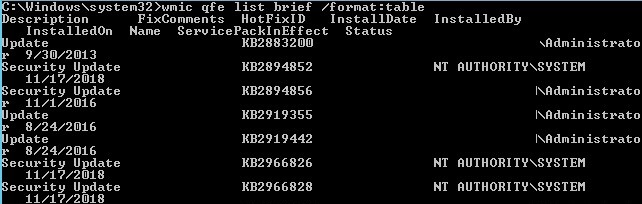
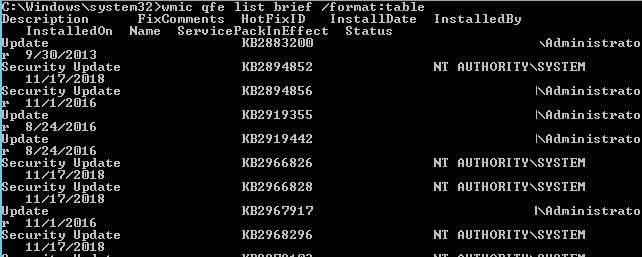
You can list all updates installed on a computer with the command:
wmic qfe list brief /format:table
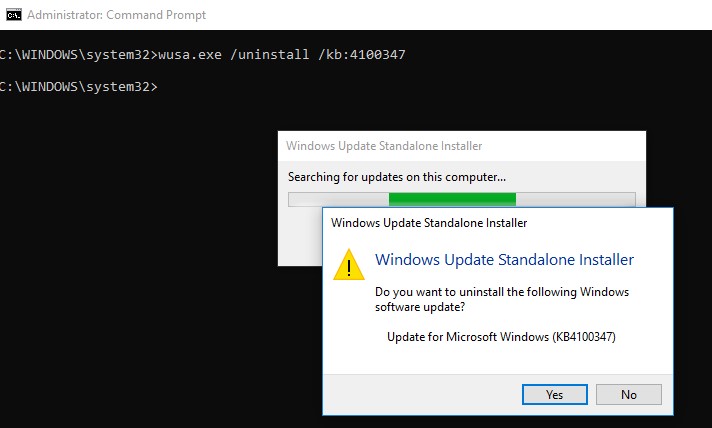
Using the following command, running as administrator, you can remove the specific update (KB 4100347):
wusa.exe /uninstall /kb:4100347
A user must confirm the removing of the update.
If the update has to be uninstalled in a quiet mode without a user request and notifying about of the subsequent system reboot, the command will look like that:
wusa.exe /quiet /uninstall /kb:4100347 /promptrestart
If you need to suppress the reboot request, use the command:
wusa.exe /quiet /uninstall /kb:4100347 /norestart
You can also remove the update from PowerShell using the PSWindowsUpdate module. The Remove-WindowsUpdate cmdlet is used:
Remove-WindowsUpdate -KBArticleID KB4100347 -NoRestart
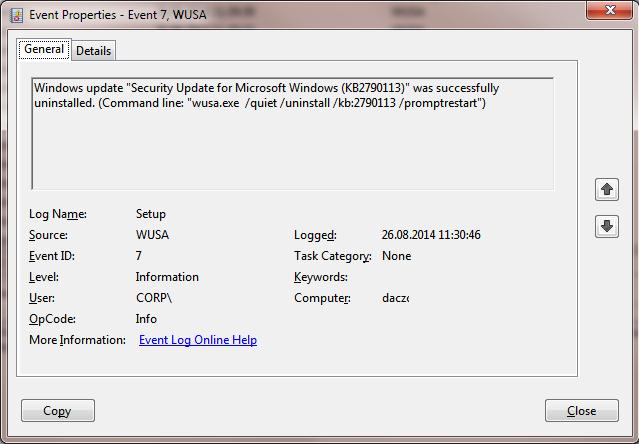
The Windows update uninstall event is recorded to the Setup log with the EventID 7 from the WUSA source:
Using PsExec you can uninstall an update on a remote computer, the command is as follows:
psexec.exe \RemotePCName C:WindowsSystem32wusa.exe /quiet /uninstall /kb:4100347 /warnrestart:600
How to Uninstall a Windows Update using WSUS?
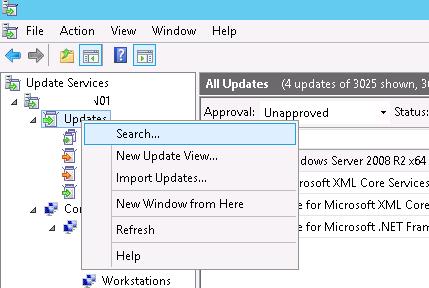
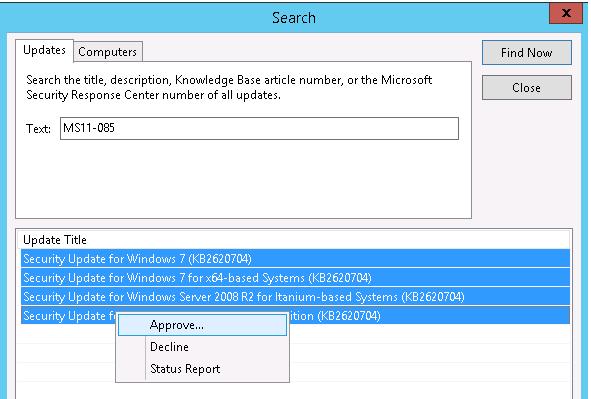
If a corporate WSUS server is used in your company to install updates on a domain computers and servers, you can remove the update approved for install using the Update Services management console. To do it, right-click the Updates branch and then click Search in the menu.
Specify the KB number or a security bulletin you need to find and click Find now. In the list containing the updates that have been found for different Windows versions, select the updates to be uninstalled and click Approve in the menu.
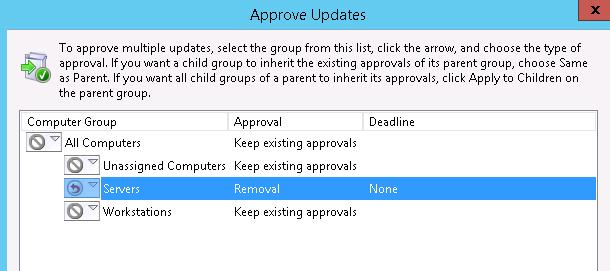
Then select the WSUS Target group you need and choose Approved for Removal in the drop-down list.
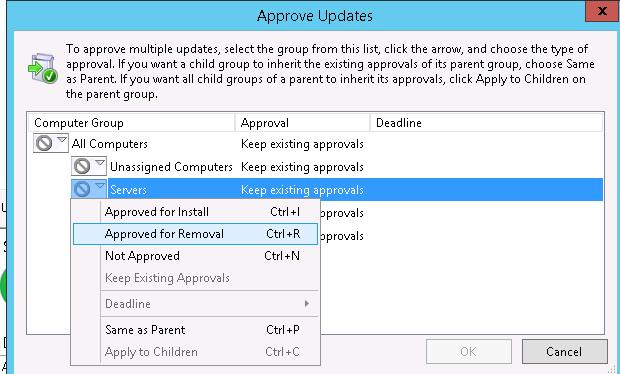
In our example, we want to uninstall update on a group of computers named Servers (more about WSUS GPO targeting).
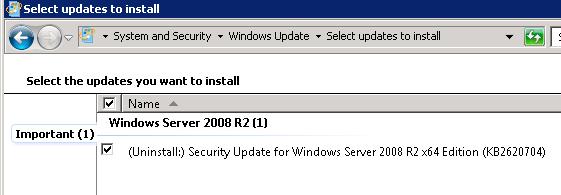
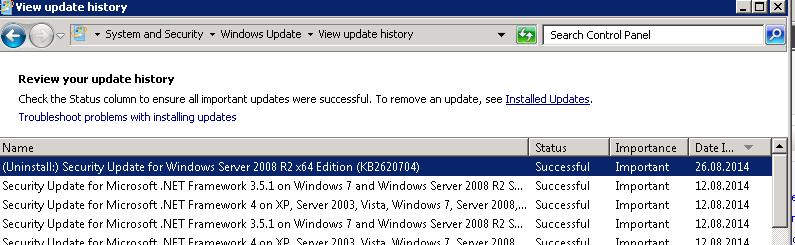
After updating data on the side of WSUS clients (which occurs on a schedule in accordance with the WSUS policy and the synchronization frequency, which is set by the Automatic Update detection frequency, or can be done manually by running wuauclt /detectnow ) , the corresponding update appears with the prefix (Uninstall:) in its name in the Windows Update panel.
After the update has been uninstalled, this event is displayed in Windows Update History.
Removing Windows Update Using the GPO
If you want to remove a specific update on multiple computers of Active Directory domain that doesn’t use WSUS, you can use Startup/Shutdown GPO scripts.
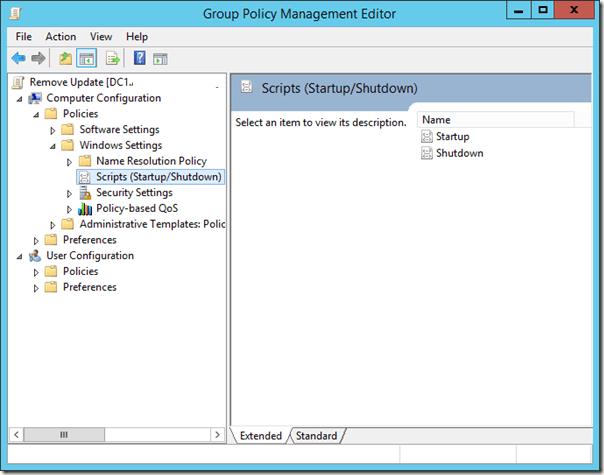
To do it, create a new GPO object linked to the necessary OU, AD site or computer group. Then create a new startup script with the wusa.exe command in the section Computer Configuration -> Policies -> Windows Settings -> Scripts (Startup/Shutdown).
You can also use PowerShell startup scripts to remove installed updates.
How To Uninstall Windows Updates When Computer Is Not Booting?
Sometimes it happens that you cannot remove an update directly from the Windows, since the OS simply not booting after installing the problematic update. In this case, you may have to boot the computer from the rescue or install boot disk and delete the updates via DISM (see the article “Computer Won’t Start After Windows Update”) or using the “Hotfix uninstall” utility from the MSDaRT.
So, we have covered common scenarios of how to uninstall updates on Windows computers.
How to uninstall latest Quality Update or Feature Update in Windows 10
It may happen that after installing a Windows Update, Quality Update, or Feature Update, your Windows 10 computer does not boot. In this case, you may have to uninstall the update. In this post, we will show you how to uninstall the latest Quality Update or Feature Update, when your Windows 10 computer will not boot, by entering Advanced Options.
Uninstall Quality Update or Feature Update in Windows 10
To uninstall the latest Quality Update or Feature Update, do the following:
- Boot into Advanced Startup Options screen
- Select Troubleshoot
- Select Advanced Options
- Press Uninstall Updates
- Choose to uninstall the Quality Update or Feature Update.
- Follow on-screen instructions.
Boot into Advanced Startup Options screen
Since your system does not boot normally, you have the following three options to get to the Advanced Options screen:
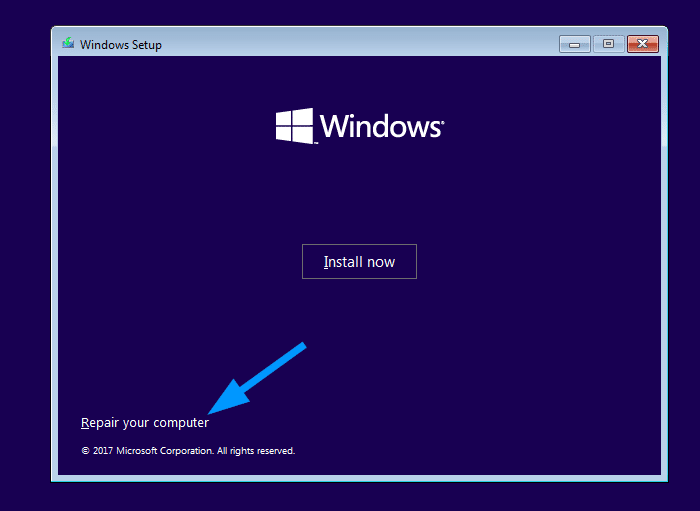
- Use Installation Media: On the first screen, look for a link “Repair your computer.” Click on it. It will boot your computer into the Advanced Options screen.
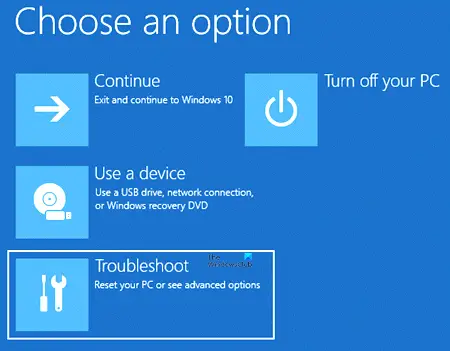
- Press F2 or F8: When your Windows 10 PC boots up, press F2 to access your BIOS settings or press F8 to access the boot or startup menu. This can vary from OEM to OEM. When you access the boot menu, you may have to press F11 to open the Choose an option screen. From here you have to press Troubleshoot and then Advanced Options.
- Power-down PC thrice: Abruptly power down the PC when you have powered it up. Do it multiple times. After 3 times this may force Windows to think that there is some problem with your PC, and it will force push the Automatic Repair screen. From here, you can get access to the Advanced Startup Options.
Select Troubleshoot
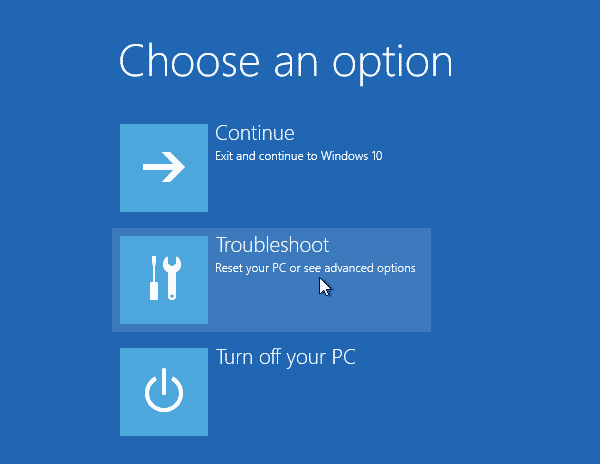
Once you have reached the Recovery environment, click on Troubleshoot.
Select Advanced Options
You will next be offered two options. Select Advanced options.
Press Uninstall Updates
On the next screen select Uninstall Updates.
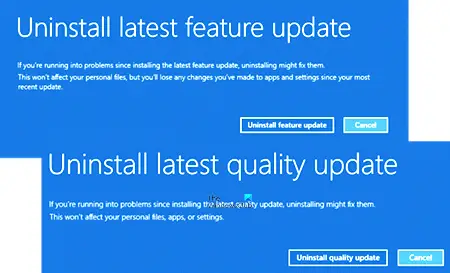
Choose to uninstall Quality Update or Feature Update
Depending on what your requirement is, you may opt to:
- Uninstall latest quality update
- Uninstall latest feature update
Follow on-screen instructions
Once you have made your choice, you will be offered a screen to select the particular Update.
Click on it, follow the on-screen instructions and wait for Windows to uninstall the problematic update.
Once done, your system should reboot normally.
Date: March 24, 2021 Tags: Boot, Troubleshoot
How to uninstall Windows Updates in Windows 10
We all prefer to keep our Windows operating system updated. But sometimes some Windows Updates may make your PC go crazy. Maybe your Windows computer has gone in an endless loop! In this post, we will see how to remove or uninstall Windows Updates and troubleshoot & fix problems caused due to them in Windows 10/8/7.
If you find yourself in one of these situations while dealing with Windows Updates, then try some of the solutions provided here. These are some of the most common solutions to the most common problems. In some cases, you may have to enter the Safe Mode to be able to carry out the suggestions.
Uninstall Windows Updates in Windows 10
To remove a particular update do the following:
Updates are meant to enhance the security of your computer; it’s best not to remove an update unless you’re certain that it is causing a problem. Take these steps to be certain you want to remove an update:
In Windows 7, click Start and then click All Programs and select Windows Update from the list of programs. In Windows 8, open the WinX menu and click open Control Panel. Now open the Windows Update applet.
From the View update history, select the update that you want to remove, and note down its KB number. I suggest you go here first as it offers some description too.
Now open the Program and Features applet of the Control Panel, and from the left side click on View Installed Updates. Right-click on the Update you wish to uninstall and click on Uninstall. The update will get installed. You may be required to reboot your computer.
In Windows 10, open Settings > Update and Security > Windows Update > View update history and then click on Uninstall Updates.
This will open a window that will show the list of all the installed updates on your computer. Then you can select the update you want to uninstall and click on the Uninstall button on the lower right corner of the window.
It is important to mention that if you have used the Disk Cleanup Tool to delete the Windows Update Cleanup option, then you might not be able to uninstall the Update.
Remove Windows Updates using the command line
To uninstall Windows Updates using the command line, open an elevated command prompt window, type the following, and hit Enter:
Here 1234567 should be the number of the Update you wish to uninstall. Here we are using the built-in WUSA or Windows Update Standalone Installer tool.
TROUBLESHOOTING SCENARIOS AND TIPS
1. A recently installed update is causing the problem: If you are sure enough that a recently installed update is causing the problem then only try these steps or before uninstalling it try to find information about any problems that have occurred on the computer by checking for a solution. If no solutions are available, check the Windows Update history to learn more about recently installed updates.
- Click Start and then click All Programs and select Windows Update from the list of programs.
- In the left pane, click View update history.
- To view more information about an update, double-click it.
2. You are not able to remove an update: You may face this error because you might be connected to a network where updates are managed by Group Policy. These network-wide settings can prevent you from removing an update. In other cases, you might not be able to remove an update because it applies to a security-related area of the operating system. If you think an update that you can’t remove is causing problems, contact the system administrator of your organization.
3. A removed update is getting reinstalled automatically: Your computer is probably connected to a network where Group Policy settings determine which updates must be installed on each computer. These network-wide settings can reinstall any required updates that you’ve removed.
You might also have Windows set to automatically install updates, which is the recommended setting for your computer. If you don’t want Windows to install an update, you need to hide it.
- Click Start and then click All Programs and select Windows Update from the list of programs.
- In the left pane, click Check for updates.
- When Windows finds updates for your computer, do one of the following:
- Click on important updates links if you have important updates to hide.
- Click on optional updates links if you have optional updates to hide.
- Right-click the update you don’t want to install, and then click Hide update. The next time you check for updates, the update won’t be automatically selected or installed.
The same steps are also applied if you want to stops Windows Updates from offering an update that you don’t want to install like Language packs.
4. Your Device or Hardware is not working after updating its device drivers from Windows Update: You might need to revert to a previous version of the driver for that device. Check the manufacturer’s website for a more recent version of the driver, or remove the driver and restart your computer.
Date: January 31, 2020 Tags: Windows Updates
If a recently installed cumulative update or feature update has rendered your Windows 10/11 computer unbootable, you can use the Windows Recovery Options to uninstall the newly installed update.
You can uninstall a recent update using two methods, and this article explains both ways.
Choose one of the following methods (GUI vs. command-line) to uninstall a recent Windows 10 Update via Windows Recovery Options. Method 1 is the easiest option, but it exists only in the latest versions of Windows 10. The instructions apply to Windows 10 and 11.
Method 1: Uninstall Updates via Windows RE Advanced Options
Boot the system using your Windows installation media or Recovery drive and access the Windows Recovery Options. See the section Access the Windows Recovery Environment in this article for details.
In the Windows Recovery Options menu, click Troubleshoot, and then click Advanced Options.
.png)
Click Uninstall Updates. This option removes recently installed quality or feature updates.
(If you booted from a USB setup disk, you’d be asked to choose the target Operating System on the next screen.)
You’re asked to choose the type of update you want to uninstall. Quality updates are monthly cumulative updates or roll-up patches mostly containing security fixes and are released every month. Feature updates are massive updates that are version upgrades released twice a year (e.g., referenced by their versions 2004, 21H2, 22H2, etc.)
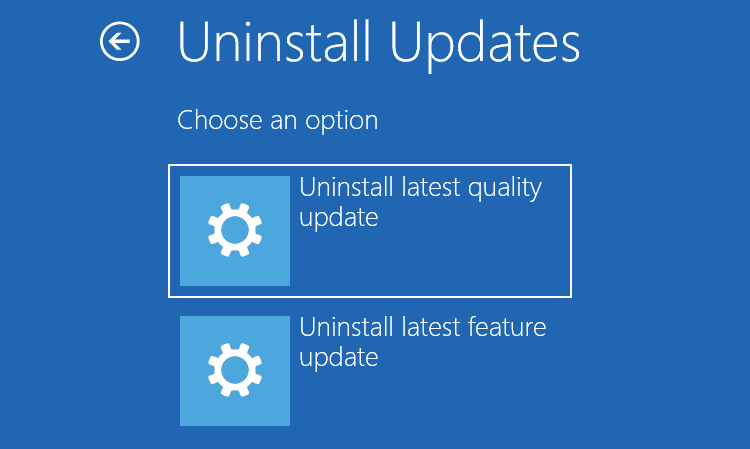
Click on Uninstall latest quality update, and then click Uninstall quality update on the next screen.
Method 2: Using DISM to Uninstall an Update
To uninstall an update offline using the DISM command-line tool, in Windows RE’s Advanced Options window, click Command Prompt.
Find out the drive letter of your Windows installation by typing bcdedit
If Windows was installed on C: drive, it might be assigned D:, E: or something else (depending upon the disk/partitions layout), when you’re in Windows RE. The output of the bcdedit command shows the Windows drive letter as seen from Windows RE.
.png)
Once you get the drive letter of your Windows installation, next, run the following command to get the list of update packages installed.
dism /Image:D: /get-packages /format:list
(Assuming D: is the Windows drive letter)
Deployment Image Servicing and Management tool
Version: 10.0.18362.1

Image Version: 10.0.18362.175

Package Identity : Microsoft-Windows-Client-LanguagePack-Package~31bf3856ad364e35~amd64~en-US~10.0.18362.175
State : Installed
Release Type : Language Pack
Install Time : 6/12/2019 3:46 PM

Package Identity : Microsoft-Windows-FodMetadata-Package~31bf3856ad364e35~amd64~~10.0.18362.1
State : Installed
Release Type : Feature Pack
Install Time : 3/19/2019 6:21 AM

Package Identity : Package_for_KB4498523~31bf3856ad364e35~amd64~~18362.144.1.1
State : Installed
Release Type : Security Update
Install Time : 5/30/2019 12:25 PM

Package Identity : Package_for_KB4500109~31bf3856ad364e35~amd64~~18362.110.1.1
State : Installed
Release Type : Security Update
Install Time : 5/22/2019 3:45 AM

Package Identity : Package_for_KB4503308~31bf3856ad364e35~amd64~~10.0.1.1
State : Installed
Release Type : Security Update
Install Time : 6/12/2019 3:01 PM

Package Identity : Package_for_RollupFix~31bf3856ad364e35~amd64~~18362.175.1.6
State : Installed
Release Type : Update
Install Time : 6/12/2019 3:46 PM

The operation completed successfully.
Copy the Package Identity of the update you want to uninstall. The update’s installation date and the build number in the Package Id give you a hint on which update is what.
For example, 18362.175.1.6 is the build number of the latest Cumulative Update installed on the computer. To get more details about the update, run this command:
dism /Image:D: /get-packageinfo /PackageName:Package_for_RollupFix~31bf3856ad364e35~amd64~~18362.175.1.6
It gives you more information about the update, as below:
Deployment Image Servicing and Management tool
Version: 10.0.18362.1

Image Version: 10.0.18362.175

Package information:

Package Identity : Package_for_RollupFix~31bf3856ad364e35~amd64~~18362.175.1.6
Applicable : Yes
Copyright : Microsoft Corporation
Company : Microsoft Corporation
Creation Time :
Description : Fix for KB4503293
Install Client : UpdateAgentLCU
Install Package Name : Package_for_RollupFix~31bf3856ad364e35~amd64~~18362.175.1.6.mum
Install Time : 6/12/2019 3:46 PM
Last Update Time :
Name : default
Product Name : Package_for_RollupFix
Product Version :
Release Type : Update
Restart Required : Possible
Support Information : http://support.microsoft.com/?kbid=4503293
State : Installed
Completely offline capable : Undetermined
Self servicing package : No
Capability Identity :

Custom Properties:

Version : 10.0.18362.175
PackageFormat : PSFX

Features listing for package : Package_for_RollupFix~31bf3856ad364e35~amd64~~18362.175.1.6

(No features found for this package)

The operation completed successfully.
While the above info is self-explanatory, for additional confirmation, you may visit the Support Information URL from another computer or mobile device. The support link tells you that the build 18362.175.1.6 corresponds to the June 11, 2019—KB4503293 (OS Build 18362.175) Cumulative Update.
To uninstall the recently installed Cumulative Update 18362.175.1.6, run this command:
dism /Image:D: /Remove-Package /PackageName:Package_for_RollupFix~31bf3856ad364e35~amd64~~18362.175.1.6
Exit the Windows Recovery Options and continue to Windows.
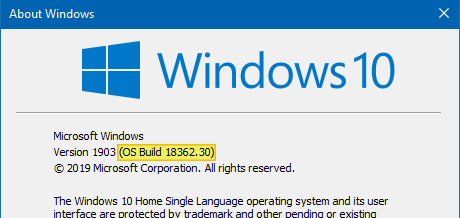
That’s it! You’ve downgraded the build from 18362.175.1.6 to 18362.30 (which is the base build of v1903)
Running winver.exe shows you the current version & build the system is running.
I hope one of the above methods helped you fix a non-bootable (due to a recent update) Windows 10/11 computer and get it back working.
Did you know that Windows RE also lets you perform a System Restore rollback offline?
One small request: If you liked this post, please share this?
One «tiny» share from you would seriously help a lot with the growth of this blog.
Some great suggestions:
- Pin it!
- Share it to your favorite blog + Facebook, Reddit
- Tweet it!
So thank you so much for your support. It won’t take more than 10 seconds of your time. The share buttons are right below. 
На моей практике уже не раз случалось, что свежие обновления безопасности для продуктов Microsoft, выпускаемые в рамках MS Patch Tuesday, вызывают проблемы в работе операционной системы Windows или стороннего ПО. Проблемы, вызываемые обновлениями, бывают как массовыми, встречающимися у большого количества пользователей, так и частными – встречающимися в редких сочетания определённой версии Windows ОС и некоторых приложений (яркий такой пример проблемы описан здесь).
Если обновление Windows (или Office) вызывает проблему на компьютерах многих пользователей, и это подтверждается специалистами Microsoft, обновление отзывается компанией и через некоторое время заменяется новым, в котором исправляются найденные ошибки. Если обновление Windows вызывает проблемы, пользователь или администратора может самостоятельно удалить уже установленные обновления безопасности.
В этой статье мы рассмотрим, как правильно удалить обновления в ОС Windows (статья относится к Windows 10, 8.1, 7 и Windows Server 2016, 2012/R2, 2008/R2). Данные способы удаления обновлений можно использовать, если вы установили обновление вручную из CAB или MSU файла, автоматически получили его из Интернета с серверов Windows Update или своего сервера WSUS.
Вы можете удалить обновления в Windows (Windows Server) несколькими способами:
Содержание:
- Удаляем обновление Windows вручную через Панель управления
- Как заблокировать (скрыть) конкретное обновление в Windows 10?
- WUSA.exe: Удаление обновлений Windows из командной строки
- Удаление обновлений на всех компьютерах домена через WSUS
- Удаление обновлений на компьютерах домена с помощью политик GPO
- Как удалить обновление, если Windows не грузится?
Внимание. Возможность удаления обновлений – это, в первую очередь, временное решение, к которому можно прибегнуть, чтобы, во-первых, быстро восстановить работоспособность системы или ПО, а во-вторых подтвердить факт, что проблема вызвана именно установкой нового обновления безопасности. О найденной проблеме рекомендуется сообщить в техподдержку Microsoft и дождаться появления новой версии обновлений. Ни в коем случае нельзя отключать автоматическое обновление системы, удалять обновления из соображений улучшения работы системы или освобождения места на диске (тем более в новых версиях Windows появился мастер очистки устаревших обновлений, позволяющий удалить старые версии обновленных файлов). В противном случае вы подвергаете серьезному риску безопасность своего компьютера!
Удаляем обновление Windows вручную через Панель управления
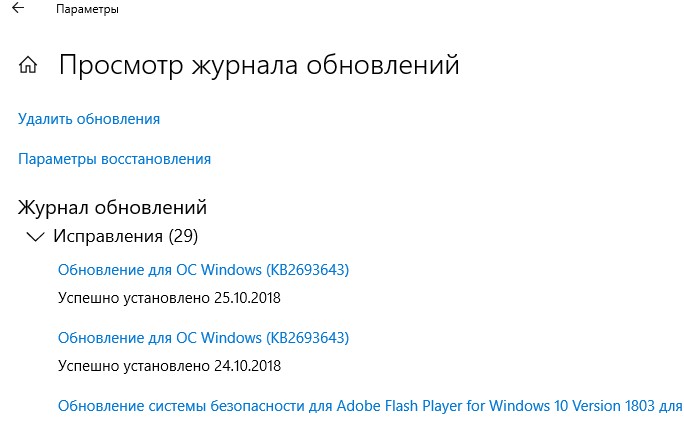
Рассмотрим, как удаляются обновления на примере Windows 10. Откройте меню Параметры (Settings) и перейдите в раздел Обновления и Безопасность (Update & Security) -> Центр обновления Windows (Windows update)-> Просмотр журнала обновлений (View Update History) -> Удалить обновления (Uninstall updates).
Также вы можете перейди в окно удаления обновлений через классическую Панель управления: Панель управления -> Программы -> Удаление программ (Control PanelProgramsPrograms and Features) и нажмите на кнопку “Просмотр установленных обновлений” (View installed updates).
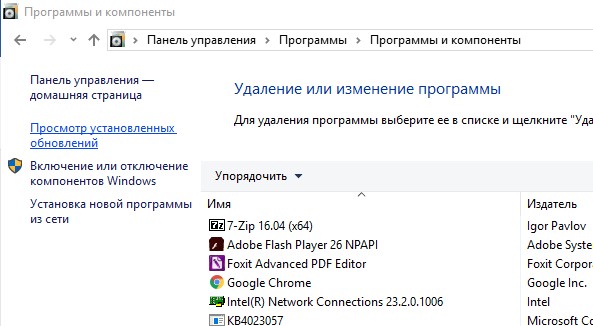
В открывшемся окне появится список всех обновлений Windows и Office, установленных в системе. Найдите в списке нужное обновление (а если быть более точным, ненужное 🙂 ), выделите его, нажмите кнопку Удалить (Uninstall). Запуститься мастер удаления обновления.
шт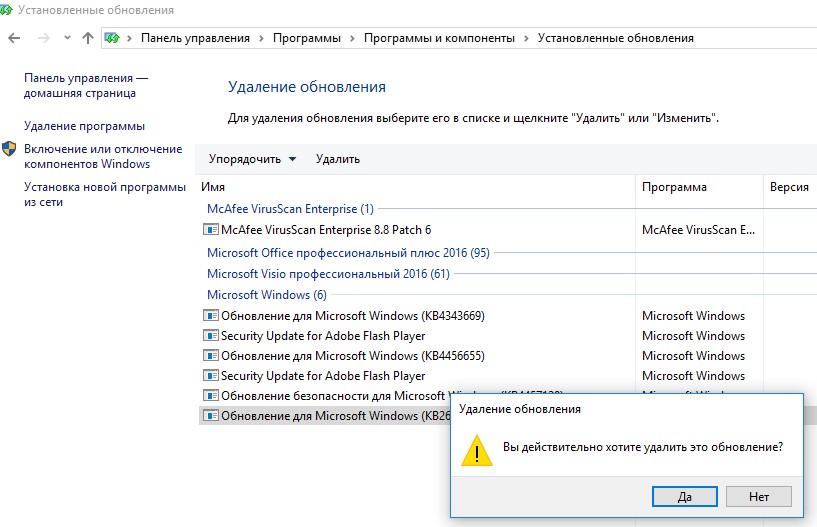
На вопрос: “вы действительно хотите удалить это обновление?” ответьте Да..
Дождитесь окончания удаления обновления. После завершения сценария удаления обновления, Windows может запросить перезагрузку системы.
Как заблокировать (скрыть) конкретное обновление в Windows 10?
Если ваш компьютер настроены на автоматическое обновление Windows через Windows Update или WSUS это обновление скорее всего опять установится на вашем компьютере. Но вы можете отключить установку конкретного обновления, скрыв его (заблокировав). Для этого нужно использовать официальную утилиту Microsoft Show or Hide Updates (Показывать или скрывать обновления) https://support.microsoft.com/ru-ru/help/3073930/how-to-temporarily-prevent-a-driver-update-from-reinstalling-in-window
- Запустите wushowhide.diagcab;
- В мастере выберите пункт Hide Updates (скрыть обновления);

- Выберите обнволение, которое вы хотите скрыть и нажмите Далее;

- После этого данное обновление не будет устанавливаться в Windows через систему автоматических обновлений. Вы можете убрать обновление из скрытых, выбрав его в пункте Show hidden updates (показать скрытые обновления).
WUSA.exe: Удаление обновлений Windows из командной строки
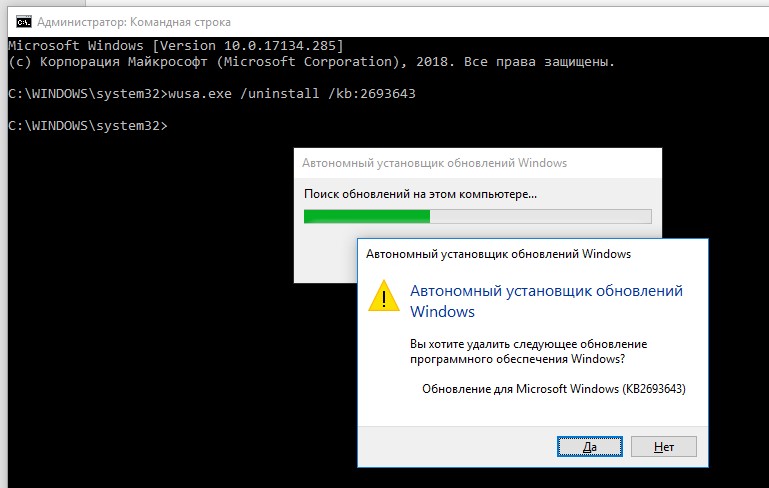
Обновления Windows можно удалить также и из командной строки. Для этих целей в системе предусмотрена утилита wusa.exe (Windows Update Standalone Installer – автономный установщик обновлений Windows).
Вы можете вывести список всех обновлений, установленных на компьютере, командой:
wmic qfe list brief /format:table
С помощью следующей команды, запущенной с правами администратора, мы удалим обновление KB2790655:
wusa.exe /uninstall /kb:2693643
Пользователь должен подтвердить удаление обновления.
Если обновление нужно удалить в «тихом» режиме без запроса пользователя и предупредить его о последующей перезагрузке системы, команда будет выглядеть так:
wusa.exe /quiet /uninstall /kb:2693643 /promptrestart
Если нужно подавить запрос на перезагрузку, используйте команду:
wusa.exe /quiet /uninstall /kb:2693643 /norestart
Также вы можете удалить обновление из PowerShell с помощью модуля PSWindowsUpdate. Используется командлет Remove-WindowsUpdate формат команды:
Remove-WindowsUpdate -KBArticleID KB2693643 -NoRestart
Событие удаление обновления Windows фиксируется в системном журнале Setup EventID 7 и источником WUSA:
Windows update «Security Update for Microsoft Windows (KB2693643)» was successfully uninstalled. (Command line: «wusa.exe /quiet /uninstall /kb:2693643 /promptrestart»).

Вы можете удалить обновление на удаленном компьютере с помощью PsExec, используется такой формат команды:
psexec.exe \remotePK C:WindowsSystem32wusa.exe /quiet /uninstall /kb:2693643/warnrestart:600
Удаление обновлений на всех компьютерах домена через WSUS
Если в вашей комании для установки обновлений на компьютеры домена используется корпоративный сервер WSUS, вы моежет удалить установленные одобренные обновления из консоли управления службы обновлений Update Services. Для этого щелкните ПКМ по ветке Updates и в меню выберите Search. 
Укажите номер KB или бюллетеня безопасности, который требуется найти и нажмите Find Now. В списке, содержащем найденные обновления для разных версий Windows, выделите обновления, которые требуется удалить и выберите в меню пункт Approve.

Затем выберите группу компьютеров, которая вас интересует и в выпадающем списке выберите пункт Approved for Removal.

В нашем примере мы хотим удалить обновления на группе компьютеров, с именем Servers. 
После процедуры обновления Windows на стороне клиентов WSUS (которая происходит по расписанию в соответствии с политикам WSUS и частотой синхронизации, которая задается параметром Automatic Update detection frequency, либо вы можете запустить цикл синхронизации вручную, набрав wuauclt /detectnow) в панели Windows Update соответствующее обновление появится с префиксом (Uninstall🙂 в названии.

После удаления обновления в журнале Windows Update History появится запись об этом событии.

Удаление обновлений на компьютерах домена с помощью политик GPO
Если вам нужно удалить определенное обновление на множестве компьютеров в домене Active Directory, в котором не используется WSUS, можно воспользоваться функционалом Startup/Shutdown скриптом групповых политик (GPO).
Для этого создайте новый объект GPO, нацеленный на нужную OU / сайт (пример таргетирования групповых политик на сайты AD описан здесь)/ или группу компьютеров. А затем в разделе Computer Configuration -> Policies -> Windows Settings -> Scripts (Startup/Shutdown) создайте новый скрипт с командой wusa из предыдущего раздела.
")
Также вы можете использовать PowerShell логон скрипты для удаления обновлений.
Как удалить обновление, если Windows не грузится?
Иногда случается, что не удается удалить обновление непосредственно из системы, т.к. Windows просто перестала загружаться после установки проблемного обновления. В этом случае, вероятно, вам придется загрузиться компьютер с загрузочного диска и удалять обновления через DISM (см статью https://winitpro.ru/index.php/2018/01/24/ne-zagruzhaetsya-windows-posle-ustanovki-obnovlenij/), или с помощью утилиты Hotfix uninstall из комплекта MSDaRT.
Итак, мы рассмотрели самые распространенные сценарии удаления обновлений на компьютерах под управлением Windows.
Обратите внимание, что нельзя удалить установленные обновления, если произведена очистка образа системы от старых версий компонентов с помощью мастера очистки диска (Cleanup Manager) или очистки хранилища компонентов (WinSxS ) командой:
Dism.exe /Online /Cleanup-Image /StartComponentCleanup /ResetBase
Is it OK to uninstall old Windows updates?
Windows Update Cleanup: When you install updates from Windows Update, Windows keeps older versions of the system files around. This allows you to uninstall the updates later. … This is safe to delete as long as your computer is working properly and you don’t plan on uninstalling any updates.
Should I uninstall Windows 10 update?
And “uninstalling the update doesn’t off cleanly and still gets lockups on initial boot.” If you haven’t installed this update yet, it’s a good idea to avoid doing so in case you also suffer the same problems. These aren’t the only troublesome Windows 10 updates recently.
What is uninstall latest quality update?
The “Uninstall latest quality update” option will uninstall the last normal Windows Update you installed, while “Uninstall latest feature update” will uninstall the previous major once-every-six-month update like the May 2019 Update or October 2018 Update.
What does uninstall updates mean Windows 10?
If a recent update is wreaking havoc on your computer, Windows 10 may automatically uninstall it, according to Microsoft support. … You can install updates manually if you think Windows shouldn’t have removed them, but your system may still nix them if they stop your computer from starting up properly.
Is it safe to uninstall updates?
No, you should not uninstall older Windows Updates, since they are critical to keep your system safe and secure from attacks and vulnerabilities.
How do I uninstall a Windows update that won’t uninstall?
Open the Start menu and click the gear-shaped Settings icon. Go to Update & security > View Update History > Uninstall updates. Use the search box to find “Windows 10 update KB4535996.” Highlight the update then click the “Uninstall” button at the top of the list.
How do I turn off automatic updates for Windows 10?
To disable Windows 10 Automatic Updates:
- Go to Control Panel – Administrative Tools – Services.
- Scroll down to Windows Update in the resulting list.
- Double click the Windows Update Entry.
- In the resulting dialog, if the service is started, click ‘Stop’
- Set Startup Type to Disabled.
What Windows Update is causing problems?
Windows 10 update disaster — Microsoft confirms app crashes and blue screens of death. Another day, another Windows 10 update that’s causing problems. Well, technically it’s two updates this time, and Microsoft has confirmed (via BetaNews) that they’re causing issues for users.
Can’t uninstall an update Windows 10?
The quickest way to do this is via the Settings app that comes bundled with Windows 10. Click the Start button, then click the Settings cog. Once the Settings app opens, click Update & Security. From the list in the centre of the window, click “View update history,” then “Uninstall updates” in the top-left corner.
How do I remove quality updates?
Only this time, head to Troubleshoot > Advanced Options and choose Uninstall Updates. This will present you with the option of uninstalling the latest Quality Update or the latest Feature Update, which will hopefully allow you to boot back into Windows safely again.
How long does it take to uninstall a quality update?
Windows 10 only gives you ten days to uninstall big updates like the October 2020 Update. It does this by keeping the operating system files from the previous version of Windows 10 around. When you uninstall the update, Windows 10 will go back to whatever your previous system was running.
How do I uninstall a system update?
How to Remove Software Update on Samsung
- Step 1: Enter the settings option- First, you need to go to your phone’s settings. …
- Step 2: Tap on the apps- …
- Step 3: Click on software update – …
- Step 4: Click on battery option- …
- Step 5: Tap on the storage – …
- Step 6: Click on the notification- …
- Step 7: Click on 2nd software update- …
- Step 9: Go on the General option-
How do I uninstall the latest Android update 2020?
How To Uninstall Android 10 Update
- First thing first is that you go to your phone’s settings application.
- Now select the applications under the device category.
- Click or tap on the application that is the android 10 update to be uninstalled.
- You now choose force stop in order to be on the safer side.
How do I uninstall all Windows 10 updates?
Click the Start button, then click the Settings cog. Once the Settings app opens, click Update & Security. From the list in the centre of the window, click “View update history,” then “Uninstall updates” in the top-left corner.
Is Windows 10 safe to update now?
No, absolutely not. In fact, Microsoft explicitly states this update is intended to act as a patch for bugs and glitches and is not a security fix. This means installing it is ultimately less important than installing a security patch.
Download PC Repair Tool to quickly find & fix Windows errors automatically
It may happen that after installing a Windows Update, Quality Update, or Feature Update, your Windows 10 computer does not boot. In this case, you may have to uninstall the update. In this post, we will show you how to uninstall the latest Quality Update or Feature Update, when your Windows 11/10 computer will not boot, by entering Advanced Options.
To uninstall the latest Quality Update or Feature Update, do the following:
- Boot into Advanced Startup Options screen
- Select Troubleshoot
- Select Advanced Options
- Press Uninstall Updates
- Choose to uninstall the Quality Update or Feature Update.
- Follow on-screen instructions.
1] Boot into Advanced Startup Options screen
Since your system does not boot normally, you have the following three options to get to the Advanced Options screen:
- Use Installation Media: On the first screen, look for a link “Repair your computer.” Click on it. It will boot your computer into the Advanced Options screen.
- Press F2 or F8: When your Windows 10 PC boots up, press F2 to access your BIOS settings or press F8 to access the boot or startup menu. This can vary from OEM to OEM. When you access the boot menu, you may have to press F11 to open the Choose an option screen. From here you have to press Troubleshoot and then Advanced Options.
- Power-down PC thrice: Abruptly power down the PC when you have powered it up. Do it multiple times. After 3 times this may force Windows to think that there is some problem with your PC, and it will force push the Automatic Repair screen. From here, you can get access to the Advanced Startup Options.
2] Select Troubleshoot
Once you have reached the Recovery environment, click on Troubleshoot.
3] Select Advanced Options
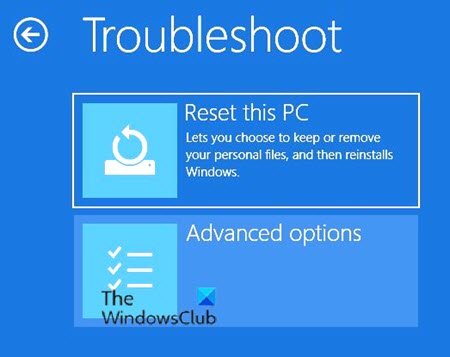
You will next be offered two options. Select Advanced options.
4] Press Uninstall Updates
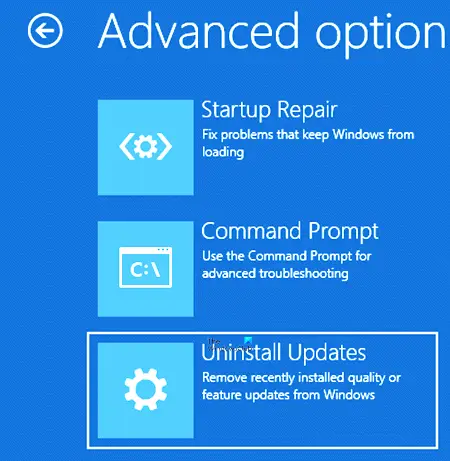
On the next screen select Uninstall Updates.
5] Choose to uninstall Quality Update or Feature Update

Depending on what your requirement is, you may opt to:
- Uninstall latest quality update
- Uninstall latest feature update
6] Follow on-screen instructions
Once you have made your choice, you will be offered a screen to select the particular Update.
Click on it, follow the on-screen instructions and wait for Windows to uninstall the problematic update.
Once done, your system should reboot normally.
Related: Windows 11/10 stuck at the log-in screen after upgrade.

Anand Khanse is the Admin of TheWindowsClub.com, a 10-year Microsoft MVP (2006-16) & a Windows Insider MVP (2016-2022). Please read the entire post & the comments first, create a System Restore Point before making any changes to your system & be careful about any 3rd-party offers while installing freeware.
On Windows 10, Microsoft introduced a servicing model known as «Windows as a Service» (WaaS), which means that instead of getting a new version every three years, you now receive incremental updates to speed up the integration of new features and simplify the process of keeping devices secure and supported.
As a result of this new servicing model, we now have two main types of updates for Windows 10 (and Windows 11): «feature updates» and «quality updates.» Both are equally important, but each one delivers a different set of improvements at different times.
This guide will highlight the difference between a feature and quality updates to understand better the updates you install on your computer.
What are feature updates for Windows?
On Windows 10 and Windows 11, feature updates are technically new operating system versions, which are available once a year during the fall and are supported for 18 months. After the support cycle ends, you must upgrade to one of the available supported versions to continue getting security and non-security patches.
As part of the development process, Microsoft uses telemetry data and feedback from internal testing and participants of the Windows Insider Program to prepare the new version. Once the update passes the testing phases and proves to be reliable, the rollout begins through Windows Update as an optional update, which users have to install manually. However, devices with an installation nearing the end of service will (eventually) receive the feature update automatically to maintain the system’s security and support.
These updates typically include new features, visual improvements, and significant enhancements to improve the overall experience and security. However, unlike the previous servicing model (such as the one for Windows Vista and Windows 7), feature updates include a smaller list of changes, which help reduce compatibility issues and minimize the user learning curve.
Also, feature updates are bigger than quality updates. The download size can be close to 3GB for the 64-bit or 2GB for the 32-bit version when using Windows Update. Or close to 4.9GB for the 64-bit version or 3.5GB for the 32-bit version when using an installation media like the Media Creation Tool or Update Assistant. (This information is specific for Windows 10 since Windows 11 is only available on the 64-bit platform.)
If you use Windows Update, the system will download only the files necessary for the upgrade depending on your current configuration, making the download package up to 35% smaller.
When installing a feature update, you’re technically installing a new version. Therefore a complete reinstallation of Windows 10 (or Windows 11) is required. This also means it’ll take longer to apply, and you’re more likely to run into problems than when installing a quality update.
The only exception is when Microsoft releases minor incremental feature updates that roll out as cumulative updates that don’t require complete reinstallation.
It’s important to note that since the launch of Windows 11 in 2021, the company has slowed down the development of Windows 10 almost completely as the focus is on developing the newer operating system. Windows 10 is expected to continue receiving feature updates, but only in small packages to maintain the system until the end of support, which is on Oct. 14, 2025.
What are quality updates for Windows?
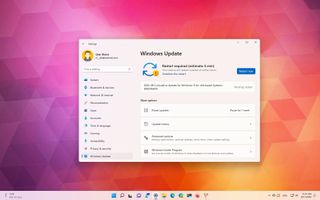
Quality updates (also are referred to as «cumulative updates» or «cumulative quality updates») are the mandatory updates that your computer downloads and installs automatically every month through Windows Update. Usually, every second Tuesday of every month («Patch Tuesday»).

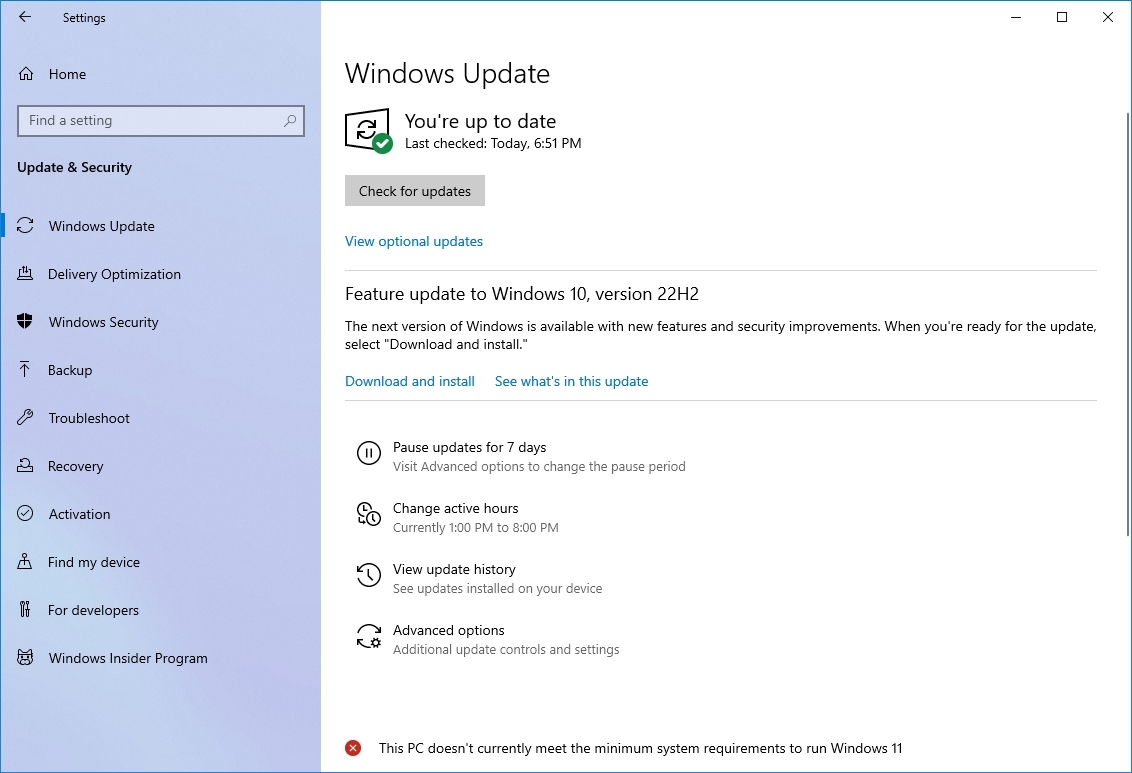
A quality update can also appear as a «Cumulative update,» «Security update,» or «Update for Windows 10.» You can always view the updates installed on your device by going to Settings > Update & Security > Windows Update and clicking the View update history option. (On Windows 11, you will need to go to Settings > Windows Update > Update history.)
Unlike feature updates, these updates usually do not include new features, visual changes, or significant improvements. Instead, they are maintenance updates meant to fix bugs and errors, patch security vulnerabilities, and improve reliability with the current version of Windows 10.
However, starting on Windows 11, quality updates may include new features, visual changes, and other minor enhancements, but they are not as significant as those you would receive through feature updates.
On Windows 10 and Windows 11, there are four types of quality updates, including «B,» «C,» «D,» and «out-of-band.»
The «B» rollout happens every second Tuesday of the month (also known as Patch Tuesday), containing the most important fixes and improvements devices may need during a specific month. Also, this is Microsoft’s only regular release to ship fixes to patch security vulnerabilities.
The «C» release happens in the third week of the month, and the «D» release comes out during the fourth week of the month. Unlike the «B» rollout, the «C» and «D» updates contain a preview of the maintenance bits that the company plans to ship the following month during Patch Tuesday, and they don’t include security updates.
Then there are the «out-of-band» updates, which can include one or multiple vulnerability fixes that can’t wait until the next officially monthly release schedule.
Usually, quality updates increase in size each month, as their nature of being cumulative means that each update includes the changes available in the previous updates. As a result, this cumulative approach reduces the number of problems and updates required to download on your device.
Quality updates download and install faster than feature updates because they’re smaller packages, and they don’t require a complete reinstallation, which also means that it’s not necessary to create a backup before installing them. However, it’s always a good idea to have a current backup of your files as errors and hardware failure can happen at any time.
Whether running Windows 10 Pro or Windows 10 Home, you can delay quality updates for up to seven days. The only caveat is that you can only pause these updates once, and when updates resume, your computer must install the latest quality update before you can use the option again.
Wrapping things up
Using the «Windows as a Service» model with feature and quality updates is the Microsoft approach to ensure that devices stay secure and current with the latest features and security updates while maintaining consistency and reliability.
At least, that’s true in theory, as we have already seen the software company struggling to keep up with code quality control almost regularly.
If you want to learn more technical details about updates, you can check out this Microsoft support article (opens in new tab).
While we cover the difference between feature updates and quality updates for both versions of Windows, Microsoft has plans to go back to releasing a new version of Windows every three years with feature drops (known as moments) up to four times per year.
All of this means that Windows 11 version 22H2 is expected to be the last yearly feature update, then the company will start rolling out new features as soon as they are ready through its new moment’s rollouts. Then the next version of Windows is expected to launch sometime in 2024 (three years after the release of Windows 11).
More resources
For more helpful articles, coverage, and answers to common questions about Windows 10 and Windows 11, visit the following resources:
- Windows 11 on Windows Central — All you need to know
- Windows 10 on Windows Central — All you need to know
Get the best of Windows Central in in your inbox, every day!
Mauro Huculak is technical writer for WindowsCentral.com. His primary focus is to write comprehensive how-tos to help users get the most out of Windows 10 and its many related technologies. He has an IT background with professional certifications from Microsoft, Cisco, and CompTIA, and he’s a recognized member of the Microsoft MVP community.