You can choose whether the search box shows on your taskbar. If you don’t see a search box on your taskbar, it’s hidden and you can make it visible again.
Show the search box on the taskbar
-
Press and hold (or right-click) the taskbar and select Taskbar settings.
-
Select Taskbar items to expand the section, then toggle the Search switch to On.
Hide the search box on the taskbar
-
Press and hold (or right-click) the taskbar and select Taskbar settings.
-
Select Taskbar items to expand the section, then toggle the Search switch to Off.
You can choose whether the search box shows on your taskbar. If you don’t see a search box on your taskbar, it’s hidden and you can make it visible again.
Show the search box on the taskbar
-
Press and hold (or right-click) the taskbar and select Search.
-
Select Show search box.
If you still don’t see the search box, try opening taskbar settings. Select Start > Settings > Personalization > Taskbar.
Make sure the toggle for Use small taskbar buttons is set to Off. Make sure the Taskbar location on screen list is set to Bottom.
Hide the search box on the taskbar
-
Press and hold (or right-click) the taskbar and select Search.
-
Select Hidden.
Многие пользователи сталкиваются с необходимостью убрать строку поиска Windows 10, особенно после установки или обновления операционной системы. По умолчанию, Microsoft устанавливает строку поиска в развернутом виде на Панели задач.
Поиск в Windows 10 — полезный системный инструмент для быстрого поиска файлов, папок, настроек и приложений на компьютере. Поиск быстро ищет нужные данные на ПК, предлагая результаты в специальном окне.
Содержание:
- Как убрать поле поиска Windows 10
- Как выключить поиск в Windows 10
- Как отключить процесс поиск в Windows 10
- Как отключить поиск в Интернете
- Выводы статьи
- Как убрать строку поиска Windows 10 (видео)
Поиск Windows 10 расположен на Панели задач, сразу после меню «Пуск». С отображением строки поиска в Windows 10 есть некоторые проблемы.
Дело в том, что по умолчанию строка поиска находится в развернутом виде и занимает значительное место на Панели задач. На Панели задач может находиться большое количество значков, а в процессе работы на ПК появятся еще дополнительные значки запущенных программ.
Из-за этого, станет не очень удобно работать на компьютере. Поэтому возникают вопросы, как убрать панель поиска в Windows 10.

Поисковая строка находится на Панели задач не всегда. В меню параметров Панели задач не отображается пункт «Показать поле поиска» при следующих обстоятельствах:
- при разрешении экрана менее 1024 х 768;
- при размещении панели задач сверху, слева или справа.
В этом руководстве вы найдете инструкции о том, как убрать поиск в Windows 10 и как отключить поиск в Windows 10. Хотя все применяемые настройки можно вернуть назад (это касается отключения поиска), перед проведением изменений на компьютере создайте точку восстановления Windows.
Как убрать поле поиска Windows 10
Сначала мы разберемся, как отключить строку поиска в Windows 10. Это безопасная операция, которую может выполнить пользователь с любым уровнем подготовки.
Для того, чтобы убрать поиск из Панели задач Windows 10, выполните следующие действия:
- Щелкните правой кнопкой мыши по Панели задач.
- В контекстном меню выберите пункт «Поиск».

- В следующем меню предложено три варианта настроек:
- Скрыто.
- Показать значок поиска.
- Показать поле поиска.
- Выберите подходящий вариант для отображения поиска или вообще скройте его из Панели задач.

На своем компьютере я выбираю показ значка поиска, по моему мнению, это наиболее оптимальный вариант.

После того, как мы разобрались, как отключить панель поиска в Windows 10 визуальным способом на Рабочем столе, далее мы посмотрим, как отключить поиск Windows в настройках системы. Встроенный поиск Windows может заменить бесплатная программа Everything — мощное средство для поиска данных на компьютере.
Как выключить поиск в Windows 10
Сейчас мы рассмотрим, как отключить службу поиска Windows 10 с помощью средства операционной системы. Этот способ работает и в предыдущих версиях Windows.
Пройдите последовательные шаги:
- Щелкните правой кнопкой мыши по меню «Пуск».
- В контекстном меню выберите «Управление компьютером».
- В окне «Управление компьютером», в левой области «Управление компьютером (локальным)» нажмите галку около пункта «Службы и приложения».
- Кликните левой кнопкой мыши по пункту «Службы».
- В списке служб найдите службу «Windows Search».
- Щелкните по службе правой кнопкой мыши, в контекстном меню выберите «Свойства».

Служба «Windows Search» настроена на автоматический запуск после старта Windows. Служба отвечает за индексирование контента, кэширование свойств и результатов поиска для файлов, электронной почты и другого контента.
- В окне «Свойства: Windows Search (Локальный компьютер)», во вкладке «Общие» перейдите к параметру «Тип запуска:».
- Выберите опцию «Отключена».

- Нажмите на кнопку «Остановить».

- После того, как в опции «Состояние:» появится надпись «Остановлена» нажмите на кнопку «ОК».

В Windows 10 отключено индексирование поиска.
Если вам понадобиться отменить сделанные изменения, снова запустите службу «Windows Search» для работы в автоматическом режиме.
Как отключить процесс поиск в Windows 10
Помимо остановки системной службы, в системе остаются работающие компоненты поисковой службы Windows, связанные с поиском и голосовым помощником. На ПК запущен процесс «SearchUI.exe», который необходимо отключить.
В деле отключения этого процесса нам поможет сторонняя бесплатная программа Unlocker, обладающая возможностями для внесения изменений в файлы операционной системы. Послу установки на компьютер, программа Unlocker встраивается в контекстное меню Проводника.
Выполните последовательные действия:
- Щелкните правой кнопкой мыши по меню «Пуск».
- В открывшемся контекстном меню выберите «Диспетчер задач».
- В окне «Диспетчер задач» откройте вкладку «Подробности».
- Найдите файл «SearchUI.exe», щелкните по файлу правой кнопкой мыши.
- В контекстном меню выберите «Открыть расположение файла».

- Кликните по файлу «SearchUI.exe» правой кнопкой мыши, а в контекстном меню Проводника нажмите на «Unlocker».

- В окне программы Unlocker, в поле выбора действий выберите вариант «Переименовать».

- В окне «Выберите новое имя для объекта» добавьте к имени файла букву или знак, нажмите на кнопку «ОК».

- Перезагрузите компьютер.
Для отмены этого изменения, войдите в расположение файла, а затем с помощью Unlocker переименуйте имя файла снова в «SearchUI.exe».
Как отключить поиск в Интернете
Поисковая система Windows 10 интегрирована с поиском Bing. Нам нужно отключить возможность взаимодействия встроенного поиска с поиском в интернете.
Сделать это можно с помощью Редактора локальной групповой политики, который работает в старших версиях операционной системы Windows: Windows 10 Pro (Профессиональная) и Windows 10 Enterprise (Корпоративная).
Потребуется выполнить следующие настройки:
- Нажмите на клавиатуре на «Win» + «R».
- В диалоговом окне «Выполнить», в поле «Открыть:» введите команду «gpedit.msc» (без кавычек), а затем нажмите на кнопку «ОК».
- Пройдите по пути:
Конфигурация компьютера → Административные шаблоны → Компоненты Windows
- Щелкните по папке «Найти».
- В области «Состояние» найдите «Запретить поиск в Интернете».

- Щелкните два раза левой кнопкой мыши по «Запретить поиск в Интернете».
- В окне «Запретить поиск в Интернете» активируйте параметр «Включено», нажмите на кнопку «ОК».

- Проделайте подобные действия с двумя другими настройками: «Не выполнять поиск в Интернете и не отображать результаты из Интернета в поиске» и «Не выполнять поиск в Интернете и не отображать результаты из Интернета в поиске при использовании лимитных подключений».
- Выполните перезагрузку компьютера.
Отключение этих параметров проводится следующим образом: необходимо в настройках Редактора локальной групповой политики указать параметр «Не задано» в каждой измененной опции.
Выводы статьи
Довольно большое число пользователей сталкиваются с необходимостью убрать строку поиска Windows с Панели задач на Рабочем столе. Другим пользователям нужно отключить встроенный поиск Windows 10. В операционной системе Windows имеются настройки для выполнения перечисленных действий с системным поиском.
Как убрать строку поиска Windows 10 (видео)
Похожие публикации:
- Очистка Windows 10: автоматическое и ручное удаление ненужных файлов
- Как убрать или отключить живые плитки Windows 10
- Запись видео с экрана Windows 10 — 3 способа
- Как удалить последнее обновление Windows 10 — 3 способа
- Установка Windows 10 второй системой с Windows 7
You are here:
Home » Windows 10 » How To Remove Search Box From Taskbar In Windows 10
Tip: You don’t need the taskbar search box to search your Windows 10 PC or web. Even after hiding the search box, open the Start menu (use the Windows logo key) and start typing to search your PC/web.
The new taskbar search box is one of the first things you notice as soon as you start using Windows 10. The search box appears right next to the Start button, where we usually pin our favorite folders, programs, and drives, and the search box is capable of searching the web as well as your PC.
The other problem with the search box is that it takes a considerable amount of space on the taskbar, which isn’t an issue for large screen users, though. Those of you who want to get rid of the search box to regain some space on the taskbar or users who open the Start menu to begin the search can configure Windows 10 to show a small search icon on the taskbar instead of the default search box (check method 3 and 4 for instructions) or completely remove the search box from the taskbar.
To remove the search box from Windows 10 taskbar, please follow the given below instructions.
Note that the search box will continue to appear as a taskbar search box whenever you click the Start button or press the Windows logo key on the taskbar.
Method 1 of 3
Step 1: Right-click on an empty spot on the Taskbar, click Search and then click the Hidden option to remove the search box from Windows 10 taskbar.
Method 2 of 3
Disable the search box on the Windows 10 taskbar
This method is useful for those users who want to free up some space on the taskbar by placing a search icon instead of a massive search box.
Step 1: Right-click click on the taskbar, click Search, and then click the Show search icon option to show the search icon instead of the search box.
Method 3 of 3
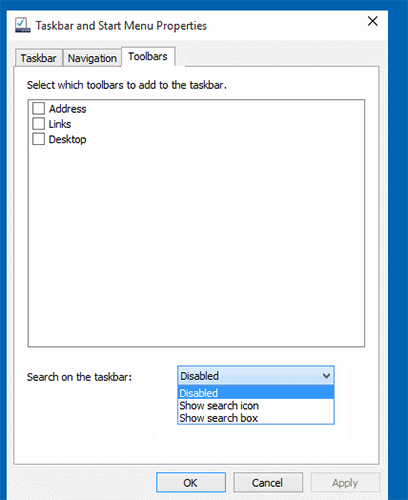
Disable Windows 10 taskbar search box
UPDATE: This method no longer works as Microsoft has dropped the Taskbar and Start Menu Properties dialog.
Step 1: Right-click on the empty space of the taskbar and then click Properties to open the Taskbar and Navigation Properties dialog.
Step 2: Here, under the Toolbars tab, in the box right next to Search on the taskbar option, select the Disabled option.
Click the Apply button.

The Search box on the Windows 10 taskbar takes up a lot of real estate. If you want to create more room on the taskbar you can reduce its size or remove it entirely.
One of the features that came to Windows 10 starting a few builds ago is a Windows Search box where Cortana used to live. And it takes up a good chunk of space on the taskbar. If you would rather have more room on the taskbar for icons, you can get rid of it. Here’s how.
If you’re new to Windows 10 or have been using it for a while now, you will like this trick. It makes more room for other items you might want on the taskbar.
The Windows Search box lives next to the Start button. But it takes up a lot of room on the taskbar.
When you search for an app, file, or other items, a search results box will pop up with the best matches. It also includes features at the top that allow for more in-depth and specific searches if you need them.
Hide the Windows 10 Search Box
To remove the search box you have a couple of options. Right-click in the box or an empty area next to it on the taskbar. From the menu go to Search and you can choose to just Show search icon or select Hidden.
![]()
First, here’s a look at showing only the search icon – it looks like a magnifying glass and is just a button. You can still click on it to do a search, but it frees up a good chunk of space on the taskbar.
![]()
In the following example, I completely disabled it — all gone. This gives you a nice and clean look to the taskbar and easy access to the Start button.
![]()
If you want to make even more room, you can get rid of the Cortana and Task View buttons, too. Right-click the taskbar and uncheck them from the menu.

Here is how it looks with Search, Cortana, and Task View buttons removed. Only the Start button remains and you can move right over to your apps on the taskbar.

So, How Do I Search Windows 10?
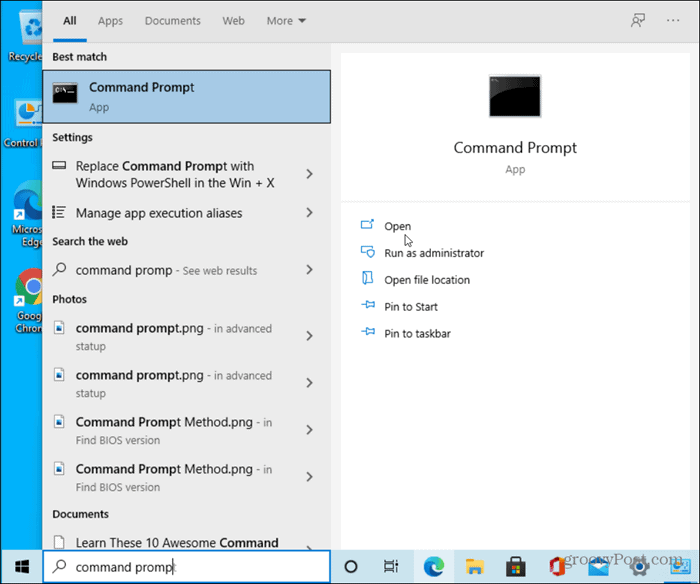
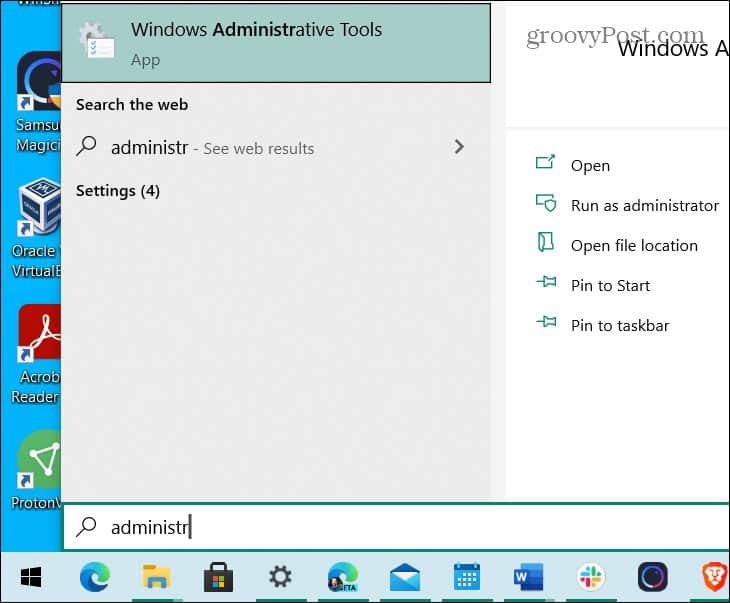
So now you might be wondering how to search Windows 10 with the search box and button removed? It’s simple. Hit the Windows Key on your keyboard and start typing in your query. When you start typing the Windows Search Box will come up. For example, here I just hit the Windows key and started typing my search for Windows Administrative Tools.
That’s all there is to it. Whether or not you want to remove the Search button entirely, let alone the Task View and/or Cortana buttons, just getting rid of the full box saves plenty of space for other items.
It’s worth noting that the Task View button will bring up the Windows Timeline feature. If you don’t use that feature it’s fine to go ahead and remove the button. And I don’t know of many people who use Cortana on their PCs anyway — so removing that button just gives you more room on the taskbar.
![]()
If you are searching for answers on how to remove search bar Windows 10, then you are not alone. Due to the behavior of the search bar in Windows 10, many users have decided to just get rid of it and place something more useful there. There are several reasons as to why the users want to do it. Some don’t like Bing being the default search engine and unfortunately there’s no way you can change it. Others don’t like the bar taking a huge section of the screen real estate that could otherwise be used for folder shortcuts.
So, if you’re one of those users who dislike the search bar, here’s how to disable Windows search Windows 10 using various methods.
- Method 1. Hide Windows 10 Search Bar from Taskbar and Start Menu Properties
- Method 2. Remove Windows 10 Search Bar Using Taskbar Context Menu
- Method 3. Disable Windows 10 Search Box Using Registry Editor
- Additional Tip: How to Disable Web Results in Windows 10 Search
Method 1. Hide Windows 10 Search Bar from Taskbar and Start Menu Properties
This is one of the easiest methods to hide the search bar from Taskbar on your Windows 10 based PC. All this requires you to do is change an option in a dialog box and you are good to go.
The following is how you can use this method to remove the search bar from your PC:
1. Right-click anywhere empty in your Taskbar and you will find a menu appearing on your screen. From the menu, choose the option that says Properties to open the Taskbar properties dialog box.

2. When the properties dialog box opens, you will need to click on the tab that says Toolbars at the top. It’s the third and the last tab in the tab menu.
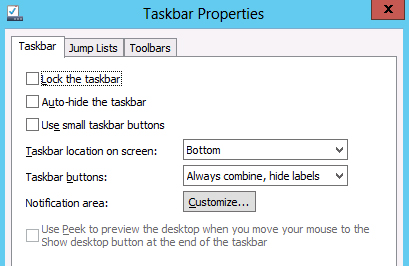
3. When the Toolbars tab opens, you will see a drop-down menu in the bottom that says Search on the taskbar. From the available options, choose the option that says Disabled and click on Apply.
What the above procedure will do is it will turn off Windows search Windows 10 on your PC. Soon as you press the apply button, you will find that the search bar’s gone from your Windows Taskbar. Your mission is accomplished.
Method 2. Remove Windows 10 Search Bar Using Taskbar Context Menu
If you are not very keen on using the above method to remove the search bar for some reason, you have another method available for you. This method uses even lesser steps to help you disable the search bar and the following is how you can use this method on your PC.

Right-click anywhere empty on your Taskbar and you will see a menu. Choose Search and you will see a submenu with three options. If you want to completely remove the search bar, choose Disabled from the submenu. However, if you wish to keep the search icon, then choose Show search icon and it will remove the search bar but will keep the search icon in your Taskbar.
Depending on what option you have selected, you will find that the search bar is completely removed from your Taskbar or you only have the search icon in your Taskbar. If you ever wish to modify this setting again, just head to the same menu and you should be able to change your options.
Method 3. Disable Windows 10 Search Box Using Registry Editor
The Registry Editor utility on your Windows 10 PC also allows you to enable and disable the search bar on your PC. There are just a few basic things that you need to modify in the registry and it will either remove or keep the search bar in your Taskbar.
Here’s how to use the Registry Editor to manage the search bar on your PC:
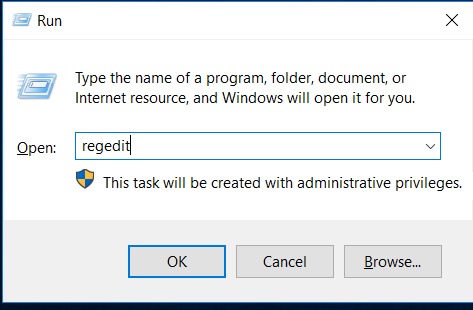
1. Press the Windows + R key on your keyboard to open the Run dialog box. When it opens, type regedit into it and press the Enter key to open Registry Editor.
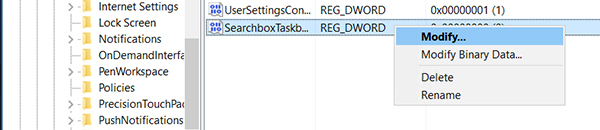
2. When the Registry Editor opens, head to the following path, find the entry named SearchboxTaskbarMode and right-click on it and select Modify.
ComputerHKEY_CURRENT_USERSOFTWAREMicrosoftWindows
CurrentVersionSearch
3. On the following screen, you should be able to change the value of the entry. It will be 1 by default but you need to enter 0 in the Value data field and click on OK. There are two others values that you can use and those are:
1 = this will show the search icon
2 = this will show the search bar
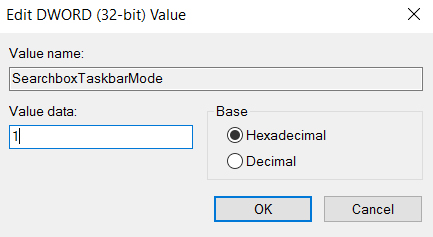
There you go. Reboot your PC and you will find that the Registry Editor has removed the huge search bar from your Taskbar making more space available for other apps to be pinned there.
Additional Tip: How to Disable Web Results in Windows 10 Search
One of the key reasons said by many users to remove the search bar is because they don’t want it to show web results. If that’s the case with you, you have an option to disable web results in your Windows 10 search.
Here’s how to remove search the web bar Windows 10 on your PC:
Click on the search bar in your Taskbar and select the Notebook icon followed by the Settings option.
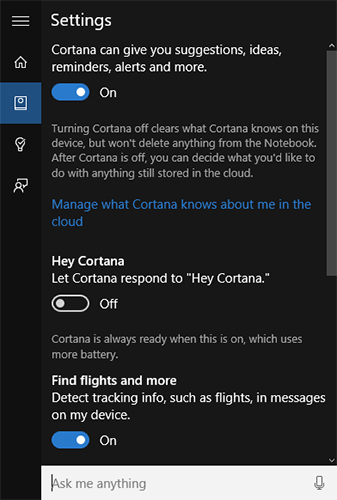
On the following screen, turn off the option that says Cortana can give you suggestions, ideas, reminders, alerts and more. Also turn off another option that says Search online and include web results.
You have successfully disabled the web results feature in your Windows search bar and you will now only see search results from your own PC and not from the web.
Many users complain that Windows lacks the feature to reset forgotten user passwords and the users often get stuck when they can’t recall the password for their user account. If you ever run into such issues, Windows Password Key should help you out. It’s a utility built specifically to help you reset the passwords for your user accounts on Windows PCs.
We hope our Windows 10 remove search bar guide above helps you remove the unwanted Windows search bar from the Taskbar on your PC. Also, if you forget the user password for your account, we suggest using the 4WinKey tool to reset the password.
Recommended Product
![]()
- Reset/Remove Windows admin and other user password for local/domain account.
- Create a new local/domain admin account to unlock your computer.
- Change your Microsoft account password offline.
- Fully support Windows 10/8.1/8/7/Vista/XP, Windows Server 2012 (R2)/2008 (R2)/2003 (R2).
Free Download
- Related Articles
- 2 Ways to Change Account Type of Users in Windows 10
- Windows 10 Keeps Asking for Login User Password, How to Fix It
- Windows 10 Password is Incorrect, How to Fix it
comments powered by
 Несмотря на то, что на мой взгляд поиск в Windows 10 — одна из самых нужных и полезных функций, многие пользователи с этим не согласны и хотят отключить строку или иконку поиска Windows 10.
В этой простой инструкции для начинающих пользователей о том, как убрать поиск из панели задач Windows 10, а также о некоторых дополнительных настройках, которые могут быть полезны, если вы его не используете. Также может быть полезным: Что делать, если не работает поиск Windows 10.
- Как отключить панель поиска Windows 10 в панели задач
- Видео инструкция
Отключаем отображение строки поиска в панели задач
Чтобы убрать поиск Windows 10 из панели задач достаточно двух кликов мышью:
- Нажмите правой кнопкой мыши по полю поиска или в пустом месте панели задач.
- В разделе «Поиск» выберите пункт «Скрыто».


Сразу после этого панель поиска перестанет отображаться — готово.
Если вам потребуется убрать что-то еще из системных значков, сделать это можно также в контекстном меню панели задач (например, отключить пункт «Показать кнопку Представления задач»), а значки в области уведомлений справа можно отключить в разделе «Область уведомлений» в параметрах панели задач (нижний пункт этого же меню).
Если вы не планируете использовать поиск Windows 10 в дальнейшем, может иметь смысл отключить индексирование, для этого:
- Зайдите в панель управления (с отключенным поиском это можно сделать так: нажимаем клавиши Win+R, вводим control и нажимаем Enter). В поле «Просмотр» справа вверху панели управления установите смените «Категории» на «Значки».
- Откройте пункт «Параметры индексирования».
- Нажмите «Изменить» и отключите все расположения, включенные в индексирование.

- Также в проводнике вы можете открыть свойства локальных дисков и снять отметки «Разрешить индексировать содержимое файлов на этом диске в дополнение к свойствам файла».


Более подробно на тему: Как отключить индексирование в Windows 10.
Видео инструкция
Надеюсь, всё было понятно и цель достигнута. Однако, еще раз: я рекомендую использовать поиск Windows 10 — это удобно и избавляет от необходимости искать, где находится тот или иной системный элемент, что часто оказывается полезным для начинающих пользователей.