System recovery options can help you repair Windows if a serious error occurs. To use system recovery options, you’ll need a Windows installation disc or access to the recovery options provided by your computer manufacturer. If you don’t have either of those choices, you can create a system repair disc to access system recovery options.
-
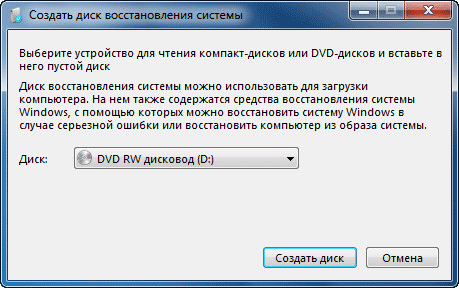
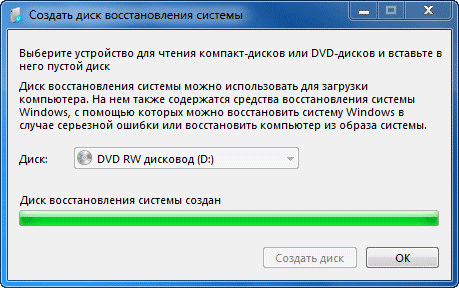
Open Backup and Restore by clicking the Start button, clicking Control Panel, clicking System and Maintenance, and then clicking Backup and Restore.
-
In the left pane, click Create a system repair disc, and then follow the steps.
 If you’re prompted for an administrator password or confirmation, type the password or provide confirmation.
 If you’re prompted for an administrator password or confirmation, type the password or provide confirmation.
Note: If you’re prompted to insert a Windows installation disc, it means that the files needed to create the system repair disc can’t be found on your computer. Insert a Windows 7 installation disc.
-
Insert the system repair disc into your CD or DVD drive.
-
Restart your computer using the computer’s power button.
-
If prompted, press any key to start the computer from the system repair disc.
-
If your computer isn’t configured to start from a CD or DVD, check the information that came with your computer. You might need to change your computer’s BIOS settings.
-
-
Choose your language settings, and then click Next.
-
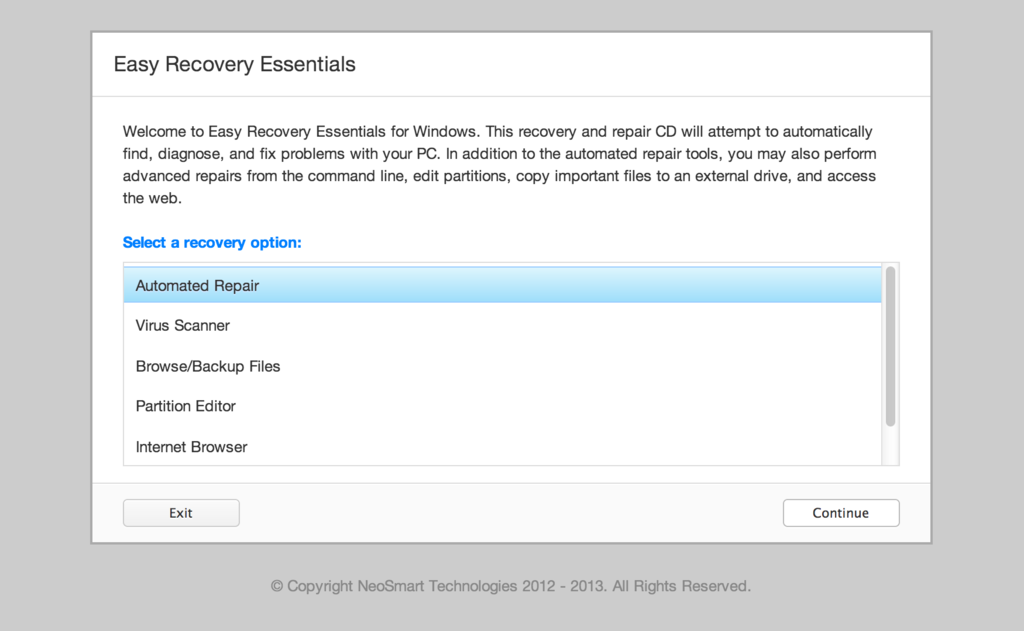
Select a recovery option, and then click Next.
Tip: Print these instructions and keep them in a safe location with your system repair disc.
Start your computer from a Windows 7 installation disc or USB flash drive
You might need to start, or boot, your computer using the Windows 7 installation disc or a USB flash drive if you want to:
-
Install or reinstall Windows 7.
-
Recover Windows 7 from a serious error. If your computer won’t start Windows at all, you can access Startup Repair and other tools in the System Recovery Options menu from the Windows 7 installation disc or USB flash drive. These tools can help you get Windows 7 running again.
Note: If you use a Tablet PC or other computer with a touchscreen, you might need to attach a keyboard and mouse in order to use Startup Repair and other tools in the System Recovery Options menu.
-
Turn on your computer, insert the Windows 7 installation disc or USB flash drive, and then turn off your computer.
-
Restart your computer.
-
Press any key when prompted to do so, and then follow any instructions that appear.
-
When the Install Windows page appears, click Install now to begin the installation process or click Repair your computer to access system recovery options.
-
Follow the instructions.
If the Install Windows page doesn’t appear, and you aren’t asked to press any key, you might have to specify that your computer uses its DVD drive or a USB flash drive as the first startup device. To do this, you need to change settings in the computer’s basic input/output system (BIOS).
Note: Most newer computers can start from a USB device, but some older computers might not have this capability. For more information, check the documentation that came with your computer or go to the manufacturer’s website.
Before you change BIOS settings, check the information that came with your computer or go to the computer manufacturer’s website. Specific procedures for accessing the BIOS and changing settings can differ depending on your computer’s manufacturer, or you might be able to choose which startup device your computer uses without changing BIOS settings.
Warning: Be careful when changing BIOS settings. The BIOS interface is designed for advanced users, and it’s possible to change a setting that could prevent your computer from starting correctly.
-
Turn on your computer, insert the Windows 7 installation disc or USB flash drive, and then restart your computer.
-
Newer computers often display a startup (or boot) menu. On the startup menu, choose «BIOS setup,» or «BIOS settings,» or something similar.
Procedures vary depending on the BIOS manufacturer. Usually, you must press a key (such as F2, F12, Delete, Esc) or a key combination immediately after you turn on your computer but before Windows starts. If the Windows logo appears, you need to try again by waiting until the Windows logon prompt appears, and then shutting down and restarting your computer again.
-
The BIOS setup screen appears. On the BIOS setup screen, choose the option called «Boot order,» or something similar. Boot order settings might also be listed under «Advanced settings» or something similar.
-
Select your DVD drive or USB flash drive as the first startup device. (The USB flash drive might be listed under «Removable devices» or something similar.)
-
Save the setting changes, and then exit the BIOS.
-
Restart your computer, and then start Windows 7 from the installation disc or USB flash drive as previously described.
Need more help?
Download our recovery and repair disk for Microsoft Windows 7 (also available for Windows 8, Vista, XP or Server editions) that can be used to access system restore tools.
It comes with our Automated Repair feature, option to access System Restore, tools to backup and recover your most important files, a built-in antivirus scanner and a command-line for advanced recovery options.
Download recovery disk for Windows 7
Looking for recovery disks for other Windows versions?
- Download Windows Vista recovery disk
- Download Windows 8 (and 8.1) recovery disk
- Download Windows XP recovery disk
Contents
- What is a recovery and repair disk
- Download recovery disk for Windows 7
- Burn to CD, DVD or USB
- Compatible with PC manufacturers
- Dell, HP
- Asus, Acer
- Lenovo, Toshiba, Samsung
- IBM, Compaq, Gateway, eMachines
- Disk for Windows 8, Vista, XP or Server editions
- Support
Our recovery disk supports x86 and x64 platforms and all Microsoft Windows 7 editions, including 32-bit and 64-bit editions: Ultimate, Enterprise, Professional, Home Premium, Home Basic and Starter.
Easy Recovery Essentials (or EasyRE), is a 55 to 135 MiB ISO image ready to be downloaded.
You can burn this ISO image to any CDs, DVDs or USB drives and boot from it to recover or repair your broken computer. We provided instructions on how to do this below, see Burn to CD, DVD or USB.
With the Easy Recovery Essentials you can (see list of features here):
- Automatically find and fix errors using Automated Repair
- Recover your PC from infections using its built-in antivirus
- Restore your PC to a working state
- Access and backup your most important data (like documents, pictures, music, videos and so on)
Easy Recovery Essentials comes with powerful tools that computer technicians or IT experts can use straight away:
- Fully-featured visual partition editor
- Scriptable command line
- Advanced recovery options
- Web browser
You can read more about EasyRE for computer repair professionals here.
What is a recovery and repair disk
 Major PC manufacturers no longer give customers a real Windows 7 installation DVD along with their purchase of a computer.
A Windows 7 installation DVD can be used to recover your PC, not just install a Windows 7 copy. The DVD has a “recovery center” that gives you options to Automated Recovery (attempts to fix automatically any errors found), System Restore (restores your computer to the last working state) or you can access a command-line for advanced recovery options.
Instead, customers are expected to create a recovery media themselves – on a CD, DVD or USB drive.
Your computer’s hard drive might have a recovery partition added by the manufacturer, but what happens when your PC or Windows isn’t working or you’ve lost the disks you had?
If you can’t boot into Windows or your PC isn’t working, only a bootable recovery and repair CD/DVD/USB can save you.
Easy Recovery Essentials, our recovery and repair disk, uses a non-destructive repair process that can recover your PC without formatting your hard drive or reinstalling Windows.
It comes with our powerful Automated Repair feature, an antivirus scanner built-in, the ability to access System Restore, tools to browse the Internet (a web browser) and back-up your most important files (documents, videos, pictures, music and so on), memory diagnostics and a command-line tools for advanced options.
Some of its features include (see list of features here):
- One-click Windows repair
- System Restore
- Web browser
- File backup
- Antivirus scanner
- Partition editor
Update: Please note that this disk is no longer free, due to licensing restrictions imposed upon us.
Download Easy Recovery Essentials for Windows 7
Our recovery disk supports x86 and x64 platforms and all Microsoft Windows 7 editions:
- Windows 7 Ultimate (32-bit and 64-bit editions)
- Windows 7 Enterprise (32-bit and 64-bit editions)
- Windows 7 Professional (32-bit and 64-bit editions)
- Windows 7 Home Premium (32-bit and 64-bit editions)
- Windows 7 Home Basic (32-bit and 64-bit editions)
- Windows 7 Starter (32-bit edition) (Starter is available only in 32-bit)
It works with any Windows 7 that has Service Packs installed:
- Windows 7 Service Pack 1 (SP1)
The disk is in ISO image format that you can burn to any CDs, DVDs or USB sticks and then use it as a bootable recovery CD/DVD/USB. We provided step-by-step instructions how to burn the ISO image below.
It’s a 120 MiB download file.
You cannot use a recovery or repair disk to install or reinstall Windows 7.
Burn to CD, DVD or USB
NeoSmart Technologies has published a guide on how to burn an ISO image to CD or DVD. This ISO image can be burnt to any CDs or DVDs and even USB drives.
You can burn the ISO with your favorite burning program. We published step-by-step instructions and guides on how to do this:
- Burn with ActiveISO
- Burn with ImgBurn
- Burn with Alcohol 120%
If you prefer to have a recovery USB instead, follow our guide on how to make a EasyRE recovery USB drive here.
Compatible with PC manufacturers
Our recovery and repair disk works with any desktop computers, workstations, laptops, notebooks, ultrabooks, netbooks or servers computers from all major PC manufacturers, Dell, Asus, IBM and more.
It works with older or no longer on the market PC brands, such as Gateway Computers or eMachines PCs.
Dell, HP
Dell recovery disk
This disk is compatible with Dell PCs and its manufactured series:
- Adamo
- Inspiron
- Studio
- Vostro
- XPS
- Latitude
Do you have a Dell computer running Windows 7? Read our recovery and restore guide for Dell.
HP recovery disk
Easy Recovery Essentials works with your HP computer, including any of these series and models:
- ENVY
- EliteBook
- Essential Home
- Pavilion
- x2 models
Do you have a HP computer running Windows 7? Read our recovery and restore guide for HP.
Asus, Acer
Asus recovery disk
It works with any Asus computer model that runs any of the following Windows versions:
- Windows 8
- Windows 7
- Windows Vista
- Windows XP
- Windows Server 2003, Server 2008 and Server 2012
Do you have an Asus computer running Windows 7? Read our recovery and restore guide for Asus.
Acer recovery disk
Acer users can download our disk. It’s compatible with all Acer models:
- Desktops models: Aspire M and T, Aspire X and Predator G
- Notebooks models: Aspire R, Aspire V3 and Aspire E
- Netbooks and ultra-thin computer models: Aspire S7, Aspire S5, Aspire S3, Aspire P, Aspire M, Aspire V7, Aspire V5
- Netbooks models: Aspire One
Do you have an Acer computer running Windows 7? Read our recovery and restore guide for Acer.
Lenovo, Toshiba, Samsung
Lenovo
Lenovo computers are supported by our disk, including any of the following series:
- Laptops models: ThinkPad and IdeaPad
- Desktops models: Thinkcentre and Ideacentre
Essentials series for laptops and desktop PCs are also supported.
Do you have a Lenovo computer running Windows 7? Read our recovery and restore guide for Lenovo.
Toshiba
The disk is compatible with any Toshiba computer model: Satellite, Qosmio, Portege, Tecra, Kira family series and All-in-One desktop series.
Do you have a Toshiba computer running Windows 7? Read our recovery and restore guide for Toshiba.
Samsung
Samsung users can download our disk. It is compatible with any Samsung laptops or desktops:
- ATIV Book, Gaming and Business PC series for laptops
- ATIV One for All-in-One desktops
IBM, Compaq, Gateway, eMachines
IBM
Lenovo acquired IBM’s personal computer division in 2005. You can download Easy Recovery Essentials if you own a IBM computer.
It is compatible with IBM desktops and laptops models, like the ThinkPad series.
Compaq
The Compaq company was acquired by HP in 2002.
It is compatible with Compaq notebooks and desktops, including the Compaq Presario series.
Gateway and eMachines
Gateway Computers was acquired by Acer in 2007. If you happen to have a Gateway computer, you can download our disk. It is compatible with its manufactured series:
- Series SX, DX and One ZX for desktop systems
- NE and NV series for notebooks
- LT series for netbooks
Do you have a Gateway computer running Windows 7? Read our recovery and restore guide for Gateway.
eMachines computers were available on sale until 2004 when Gateway Computers (above) brought the company. Gateway was acquired in 2007, but the eMachines brand was used until 2012.
If you own a computer from eMachines, you can download our disk as it is compatible with eMachines PCs.
Disk for Windows 8, Vista, XP or Server editions
Easy Recovery Essentials is compatible with other Windows versions, not just 7.
Windows 8
Read more about our recovery disk for Windows 8. It supports Windows 8 and its update, Windows 8.1.
Download for Windows 8.
Windows Vista
Read more about our recovery disk for Windows Vista. Easy Recovery Essentials supports all Windows Vista editions, from Vista Starter to Vista Ultimate, and the 32-bit and 64-bit versions.
Download for Windows Vista.
Windows XP and Server 2003, 2008 and 2012
Windows XP is supported by Easy Recovery Essentials. This includes Service Packs of XP too: SP1, SP2, SP3.
Easy Recovery Essentials supports all Windows Server editions, such as Server 2003, Server 2008 and Server 2012 and the updated versions: Server 2003 R2, Server 2008 R2, Server 2012 R2.
Support
Easy Recovery Essentials supports all Service Packs (SP) of your Windows:
- Windows XP SP1, XP SP2, XP SP3
- Windows Vista SP1, Vista SP2
- Windows 7 SP1, 7 SP2
- Windows 8, 8.1
- Windows Server 2003 R2, Server 2008 R2, Server 2012 R2
Download Easy Recovery Essentials from here.
Please don’t ask for help below, it’ll get real cluttered real soon!
Open a support thread at https://neosmart.net/forums/ and we’ll help you resolve your problem ASAP.
Due to a planned power outage on Friday, 1/14, between 8am-1pm PST, some services may be impacted.
- About
- Blog
- Projects
- Help
-
Donate
Donate icon
An illustration of a heart shape - Contact
- Jobs
- Volunteer
- People
Item Preview
There Is No Preview Available For This Item
This item does not appear to have any files that can be experienced on Archive.org.
Please download files in this item to interact with them on your computer.
Show all files
software
Windows 7 Repair Disc (x64)
- by
- Microsoft
This is the repair disc iso for a Windows 7 x64 machine. This disc does not include the full Windows 7 operating system, just the recovery only.
- Addeddate
- 2020-12-26 20:24:06
- Identifier
- windows-7-64-bit-repair-disc
- Scanner
- Internet Archive HTML5 Uploader 1.6.4
comment
Reviews
There are no reviews yet. Be the first one to
write a review.
4,310
Views
2
Favorites
DOWNLOAD OPTIONS
Uploaded by
VEE_H
on December 26, 2020
SIMILAR ITEMS (based on metadata)
by Jenefey Aaron Updated on 2019-07-25 / Update for Fix Windows
If your Windows 7 won’t start or start with significant problems, you may need to use the System Repair Disc to fix problems with Windows 7. When computer came with a Windows 7 DVD, you can use that DVD to repair your system. But what if you don’t have one? It is necessary to create a System Repair Disk at once. Spend a few minutes to read this passage, which tells 2 ways to create Windows 7 64/32 bit repair disc and how to use it to repair your computer.
2 Methods to Create a System Repair Disk for Windows 7 64/32 Bit
Situation 1: When Your Windows 7 PC is Unable to Start Normally
If your computer has failed to boot normally, you can take use of a professional Windows 7 repair disk creator, also known as Windows Boot Genius. To start with, you should prepare a workable computer and a blank disk, such as CD/DVD/USB flash drive. And then you can follow the instructions below.
- 1) Download and install Windows Boot Genius on the workable computer you have prepared.
- 2). Insert the CD/DVD or USB into the computer and launch the program. Then, just click «Burn» to start creating a Windows 7 system repair disk.
- 3). Then you can insert the newly burnt disk into the PC which has run into a problem, and start to fix your computer. You just do the following:
Reboot the computer and set its BIOS settings to let the PC boot from the disk.
After entering the Windows system, launch Windows Boot Genius again. Choose «Windows Rescue» on the top tab. It shows «Crash before Loading Bar» by default. Choose the right error type, and try the provided solutions to fix the problem your computer has run into.

Situation 2: When Your Windows 7 Computer can Boot up Normally
If your computer can work properly, and you want to create a Windows 7 repair disk for further use, then you can try this way. Please do as the following:
- 1) Open the Start menu and type Backup. Choose «Backup and Restore». Click «Create a system repair disc».
- 2) Click the Create a System Repair Disc link.
- 3) Insert a blank DVD into your DVD drive. Click the Create Disc button, and Windows will copy over the appropriate files. Once it’s finished, the autorun window will appear, showing that the disc is named «Repair Disc Windows 7 64-bit» (or «32-bit», if you are using that version of the OS).
Take disc out and put it in some place where you will be able to find in an emergency.
You can choose either of the 2 ways to create a system repair disk for Windows 7, according to your own situation. You can also take use of the same methods to create repair disk for Windows 8, Windows 10 and etc.

Диск восстановления Windows 7 необходим при возникновении серьезных неполадок в операционной системе. Если Windows загружается, то пользователь может войти в среду восстановления Windows RE непосредственно из операционной системы, для устранения неполадок на компьютере.
В среде восстановления пользователь выполняет нужные действия по приведению компьютера в штатное рабочее состояние, в зависимости от характера неисправностей и сбоев, возникших в операционной системе.
Содержание:
- Как создать диск восстановления системы Windows 7
- Как создать диск восстановления Windows 7 на флешке
- Запуск восстановления системы с диска восстановления Windows 7
- Восстановление Windows 7 с установочного диска
- Выводы статьи
- Создание диска восстановления Windows 7 на флешке (видео)
Что делать в ситуации, когда система вообще отказывается загружаться? В этом случае, решить проблему (разумеется, если она решаема) поможет диск восстановления Windows 7.
После включения компьютера, необходимо войти в BIOS для того, чтобы выставить приоритет загрузки с оптического привода (CD/DVD) или с загрузочной флешки (USB флэш накопителя). Другой вариант: войдите в загрузочное меню (Boot Menu) для выбора диска, с которого следует загрузиться. Загрузившись, пользователю нужно провести восстановление Виндовс 7 с диска, выполнив те, или иные действия.
Для восстановления параметров системы, в случае невозможности запуска Windows 7, есть два варианта для загрузки среды восстановления:
- Использование диска восстановления Windows (CD/DVD диска или загрузочной флешки).
- Использование установочного диска Windows (DVD диск или загрузочная флешка с операционной системой).
В первом случае, пользователь заранее создает диск восстановления системы, с которого, после загрузки данного диска, запускается среда восстановления.
Во втором случае, используется установочный DVD диск или загрузочная флешка с дистрибутивом операционной системы (необходимо наличие диска или флешки с Windows 7).
В обоих случаях, пользователь может выполнить необходимые действия по восстановлению системы:
- Восстановить запуск системы — автоматическое решение проблем, связанных с загрузчиком Windows.
- Провести восстановление Windows с помощью контрольных точек восстановления — восстановление состояния Виндовс на дату создания точки восстановления.
- Запустить восстановление образа системы — восстановление системы из образа системы, созданного ранее с помощью функции резервного копирования.
- Произвести некоторые другие технологические операции для решения проблем с компьютером — диагностика памяти, запуск командной строки.
В случае повреждения загрузчика Windows, система его восстанавливает, сделав возможным запуск операционной системы.
Достаточно простой способ решения проблем с системой: выполнение восстановления системы с помощью ранее созданных точек восстановления Windows 7, при условии, что на компьютере не была отключена функция для создания точек восстановления.
Восстановление образа системы подразумевает восстановление образа всего системного диска с ОС Windows, с установленными программами, данными пользователя, из заранее сделанной резервной копии образа диска, созданного при помощи средства архивирования и резервного копирования Windows 7.
При необходимости, можно запустить диагностику памяти на наличие ошибок, или открыть окно командной строки для выполнения необходимых команд.
Установочный диск Виндовс можно создать самостоятельно. Образ операционной системы Windows 7 нужно записать на DVD диск при помощи программы для записи дисков, или создать загрузочную флешку.
При создании диска восстановления в Windows 7 штатным средством системы, выявляется один нюанс: по умолчанию, диск восстановления можно записать только на CD/DVD диск.
Что делать тем, у кого на компьютерах (особенно, на ноутбуках) нет дисковода? Это ограничение можно обойти, и создать диск восстановления Windows 7 на флешке.
Далее в статье рассмотрим: создание диска восстановления Windows 7 на CD/DVD диске, на флешке, запуск среды восстановления с диска восстановления, запуск среды восстановления с установочного диска.
Как создать диск восстановления системы Windows 7
Процесс создания диска восстановления на CD или DVD диске проходит в несколько последовательных этапов:
- Войдите в меню «Пуск».
- Пройдите по пути: «Все программы» => «Обслуживание» => «Создать диск восстановления системы».
- В окне «Создать диск восстановления системы» выберите устройство для чтения CD/DVD дисков.
- Вставьте в оптический привод пустой лазерный диск.
- Нажмите на кнопку «Создать диск».
- Далее начинается процесс создания диска.
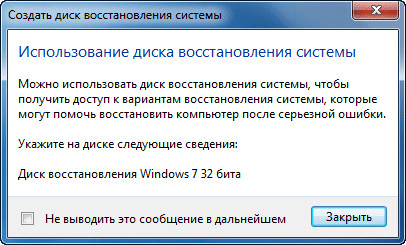
- По завершении записи диска, средство проинформирует о том, что диск восстановления системы создан.
- В открывшемся окне приводится информация о названии диска восстановления.
- Нажмите на кнопку «Закрыть».
- В окне «Создать диск восстановления» нажмите на кнопку «ОК».
Диск восстановления Windows 7 готов для дальнейшего использования.
Как создать диск восстановления Windows 7 на флешке
Создать диск восстановления Windows 7 на флешке штатным средством не представляется возможным, потому что там изначально не предусмотрена поддержка USB диска. Но, обладатели ноутбуков, не имеющие дисковода, могут обойти это ограничение.
Обращаю ваше внимание, что в интернете есть статьи, описывающие создание диска восстановления Виндовс 7 на флешке, в которых сначала образ создают на физическом оптическом диске, а затем переносят его на флешку. Но у меня возникает один вопрос: «Каким образом пользователь может сначала записать диск восстановления на CD или DVD диск, если на компьютере отсутствует дисковод?». Выходит, что подобные статьи оторваны от практики.
Нам понадобится программа — эмулятор для создания виртуальных пишущих приводов. Это обязательное условие. Меня заинтересовала возможность создания диска восстановления Виндовс 7 на флешке, поэтому в процессе написания этой статьи, я потратил несколько часов для тестирования подобных программ, пока не нашел работоспособное приложение для данного метода.
Программа Phantom Drive (в сети можно найти программу с русификатором) успешно правилась с поставленной задачей.
Для создания диска восстановления Windows 7 на флешке, необходимо выполнить следующие действия:
- В эмуляторе пишущего дисковода создается диск восстановления системы.
- Затем создается загрузочная флешка для диска восстановления.
- Из эмулятора оптического диска на загрузочную флешку копируется содержимое диска восстановления.
Первый этап: сначала нужно записать диск восстановления на виртуальный дисковод Phantom Drive:
- Запустите программу Phantom Drive.
- В стартовом окне программы выберите задачу: «Создать. Создать новый чистый диск».
- В окне «Phantom Drive – Создание», в настройке «Создать как», выберите тип диска (я выбрал DVD-RW), нажмите на кнопку «Создать».
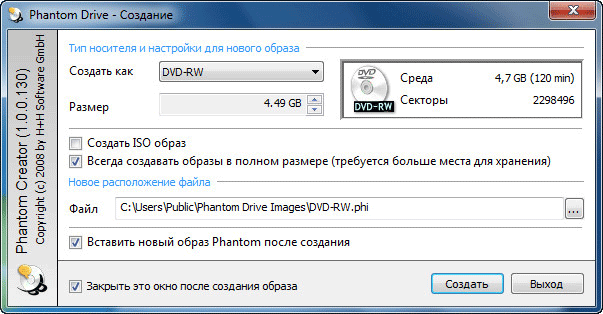
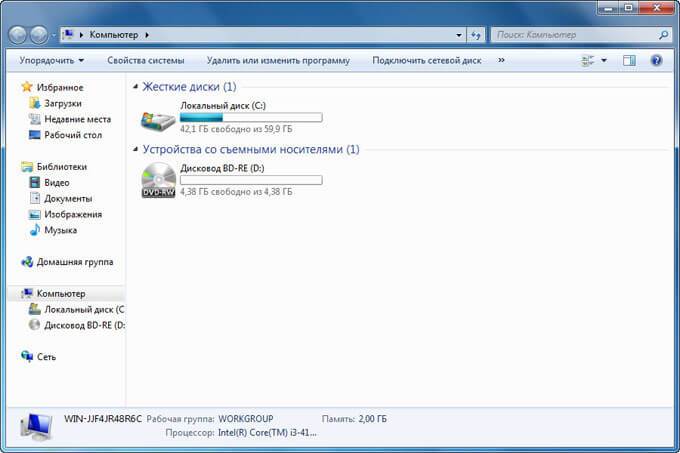
- После этого, в окне Проводника, в виртуальном дисководе отобразится вставленный виртуальный оптический диск.
- Пройдите по пути: меню «Пуск» => «Обслуживание» => «Создать диск восстановления системы».
- В окне «Создать диск восстановления системы» выберите виртуальный дисковод, нажмите на кнопку «Создать диск».
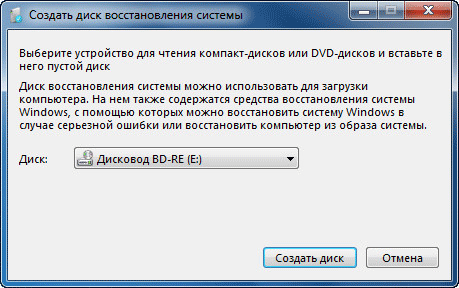
- Далее проходит процесс создания диска восстановления, по его завершении, закройте окна средства системы.
Второй этап: создание загрузочной флешки с помощью командной строки.
- Вставьте флешку в USB разъем компьютера.
- Войдите в меню «Пуск» => «Стандартные» «Командная строка».
- Запустите командную строку от имени администратора, введите последовательно следующие команды (после ввода команды, необходимо нажать на клавишу «Enter» для выполнения команды):
Diskpart list disk
- В окне интерпретатора командной строки отобразятся все подключенные к компьютеру диски. Определите среди дисков компьютера флешку, ориентируясь по размеру USB флеш накопителя. По этому изображению понятно, что флешка имеет название «Диск 1» (у вас может быть другая цифра диска, в зависимости от количества подключенных дисков).
- Выберите диск, в данном случае «Диск 1».
select disk 1
- Далее необходимо ввести следующие команды, в результате выполнения которых, произойдет очистка флешки от данных, создание разделов, выбор раздела, пометка раздела, форматирование раздела в FAT32, присвоение буквы диска, завершение работы утилиты DiskPart.
- В интерпретаторе командной строки выполните последовательно команды:
clean

create partition primary

select partition 1

active

format fs=FAT32 QUICK

assign

exit
- После завершения работы DiskPart, закройте командную строку. Загрузочная флешка создана.
Откройте окно Проводника, присвойте загрузочной флешке какое-нибудь понятное имя.
Далее начинается третий, завершающий этап.
- Откройте стартовое окно программы Phantom Drive, выберите задачу «Образ. Вставить существующий образ».
- Кликните правой кнопкой мыши по дисководу с диском восстановления, в контекстном меню выберите «Открыть».
- В окне Проводника отобразятся все имеющиеся на диске файлы.
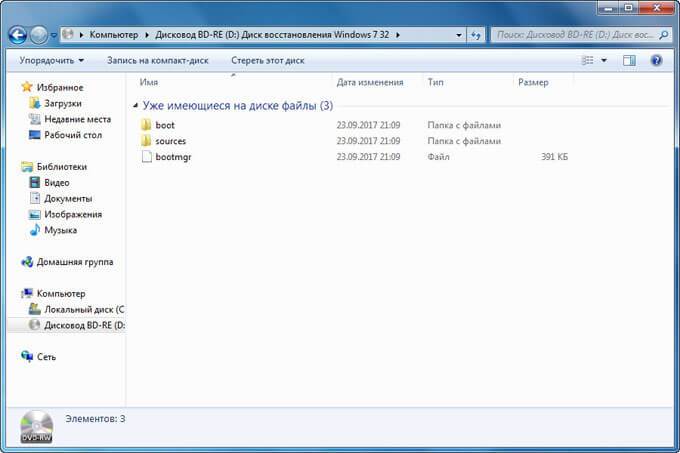
- Скопируйте содержимое диска из окна Проводника на загрузочную флешку.
Все, теперь, в случае возникновения нештатной ситуации, можно загрузиться с диска восстановления системы Windows 7, при помощи загрузочной USB флешки.
Если вы не желаете связываться с командной строкой, воспользуйтесь программой UltraISO. Порядок действий следующий:
- После записи диска с помощью виртуального дисковода, откройте образ в Phantom Drive.
- Вставьте флешку в USB порт компьютера.
- Запустите программу UltraISO.
- Войдите в меню «Файл», выберите «Открыть CD/DVD…».
- Выберите образ, монтированный в виртуальном приводе.
- Далее войдите в меню «Самозагрузка», выберите «Записать образ Жесткого диска…».
- Создайте по этой статье загрузочную флешку с диском восстановления системы.
Запуск восстановления системы с диска восстановления Windows 7
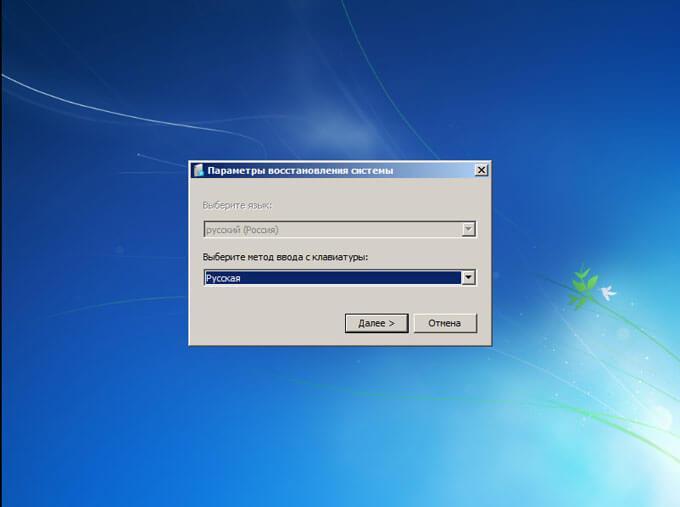
Загрузитесь на компьютере с помощью диска восстановления Windows 7. Далее выполните следующие действия:
- Сразу после загрузки с диска восстановления, в окне «Параметры восстановления системы» выберите язык ввода с клавиатуры, а затем нажмите на кнопку «Далее».
- Далее средство восстановления выполнит поиск установленных систем Windows.
- В окне «Параметры восстановления» выберите операционную систему (если их несколько). По умолчанию используются штатные средства восстановления.
- Если необходимо запустить восстановление с помощью резервного образа системы, активируйте пункт «Восстановление компьютера с помощью ранее созданного образа системы».
- Нажмите на кнопку «Далее».

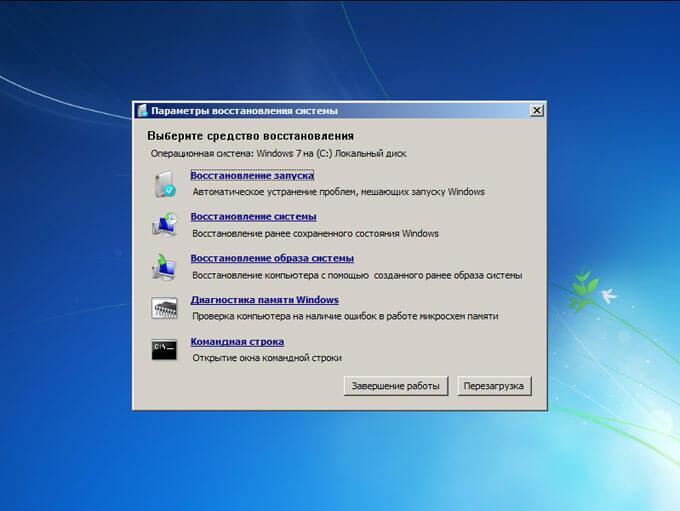
- Затем выберите один из предложенных инструментов среды восстановления:
- Восстановление запуска.
- Восстановление системы.
- Восстановление образа системы.
- Диагностика памяти Windows.
- Командная строка.
- В зависимости от выбранного средства, выполните необходимые действия по восстановлению работоспособного состояния операционной системы.
Восстановление Windows 7 с установочного диска
Восстановление Windows 7 с установочного диска — самый оптимальный вариант для восстановления системы. Плюсом является то, что с установочного диска или флешки, кроме восстановления, можно установить операционную систему на компьютер.
Для запуска средства восстановления Windows 7, необходимо загрузить компьютер с загрузочной флешки или DVD диска с операционной системой.
После загрузки запускается установка Windows 7.
В окне «Установка Windows» согласитесь нас выбором русского языка, нажмите на кнопку «Далее».

В следующем окне, в левом нижнем углу нажмите на «Восстановление системы».
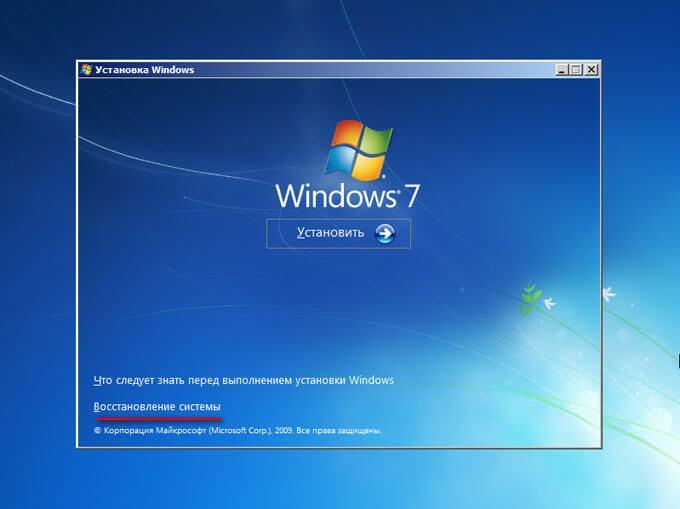
Далее запуститься среда восстановления системы (смотрите выше в статье), в которой нужно выбрать подходящие средства для восстановления компьютера.
Выводы статьи
Пользователь может записать диск восстановления Windows 7 на CD/DVD диск или флешку, для использования, в случае возникновения неполадок в работе системы. Другим способом среда восстановления запускается непосредственно с загрузочной флешки или установочного диска с Windows 7, предварительно загрузившись со съемного носителя.
Создание диска восстановления Windows 7 на флешке (видео)
Похожие публикации:
- Диск восстановления Windows 10
- Диск восстановления Windows 8.1 (Windows
- Как отключить обновления в Windows 7 — 3 способа
- Игровой режим в Windows 10
- Windows 7 AIO [Все в одном] в Win Toolkit
