dbname-
Specifies the name of the database to be dumped. If this is not specified, the environment variable
PGDATABASEis used. If that is not set, the user name specified for the connection is used. -a--data-only-
Dump only the data, not the schema (data definitions). Table data, large objects, and sequence values are dumped.
This option is similar to, but for historical reasons not identical to, specifying
--section=data. -b--blobs-
Include large objects in the dump. This is the default behavior except when
--schema,--table, or--schema-onlyis specified. The-bswitch is therefore only useful to add large objects to dumps where a specific schema or table has been requested. Note that blobs are considered data and therefore will be included when--data-onlyis used, but not when--schema-onlyis. -B--no-blobs-
Exclude large objects in the dump.
When both
-band-Bare given, the behavior is to output large objects, when data is being dumped, see the-bdocumentation. -c--clean-
Output commands to clean (drop) database objects prior to outputting the commands for creating them. (Unless
--if-existsis also specified, restore might generate some harmless error messages, if any objects were not present in the destination database.)This option is ignored when emitting an archive (non-text) output file. For the archive formats, you can specify the option when you call
pg_restore. -C--create-
Begin the output with a command to create the database itself and reconnect to the created database. (With a script of this form, it doesn’t matter which database in the destination installation you connect to before running the script.) If
--cleanis also specified, the script drops and recreates the target database before reconnecting to it.With
--create, the output also includes the database’s comment if any, and any configuration variable settings that are specific to this database, that is, anyALTER DATABASE ... SET ...andALTER ROLE ... IN DATABASE ... SET ...commands that mention this database. Access privileges for the database itself are also dumped, unless--no-aclis specified.This option is ignored when emitting an archive (non-text) output file. For the archive formats, you can specify the option when you call
pg_restore. -epattern--extension=pattern-
Dump only extensions matching
pattern. When this option is not specified, all non-system extensions in the target database will be dumped. Multiple extensions can be selected by writing multiple-eswitches. Thepatternparameter is interpreted as a pattern according to the same rules used by psql‘sdcommands (see Patterns), so multiple extensions can also be selected by writing wildcard characters in the pattern. When using wildcards, be careful to quote the pattern if needed to prevent the shell from expanding the wildcards.Any configuration relation registered by
pg_extension_config_dumpis included in the dump if its extension is specified by--extension.Note
When
-eis specified, pg_dump makes no attempt to dump any other database objects that the selected extension(s) might depend upon. Therefore, there is no guarantee that the results of a specific-extension dump can be successfully restored by themselves into a clean database. -Eencoding--encoding=encoding-
Create the dump in the specified character set encoding. By default, the dump is created in the database encoding. (Another way to get the same result is to set the
PGCLIENTENCODINGenvironment variable to the desired dump encoding.) The supported encodings are described in Section 24.3.1. -ffile--file=file-
Send output to the specified file. This parameter can be omitted for file based output formats, in which case the standard output is used. It must be given for the directory output format however, where it specifies the target directory instead of a file. In this case the directory is created by
pg_dumpand must not exist before. -Fformat--format=format-
Selects the format of the output.
formatcan be one of the following:pplain-
Output a plain-text SQL script file (the default).
ccustom-
Output a custom-format archive suitable for input into pg_restore. Together with the directory output format, this is the most flexible output format in that it allows manual selection and reordering of archived items during restore. This format is also compressed by default.
ddirectory-
Output a directory-format archive suitable for input into pg_restore. This will create a directory with one file for each table and blob being dumped, plus a so-called Table of Contents file describing the dumped objects in a machine-readable format that pg_restore can read. A directory format archive can be manipulated with standard Unix tools; for example, files in an uncompressed archive can be compressed with the gzip tool. This format is compressed by default and also supports parallel dumps.
ttar-
Output a
tar-format archive suitable for input into pg_restore. The tar format is compatible with the directory format: extracting a tar-format archive produces a valid directory-format archive. However, the tar format does not support compression. Also, when using tar format the relative order of table data items cannot be changed during restore.
-jnjobs--jobs=njobs-
Run the dump in parallel by dumping
njobstables simultaneously. This option may reduce the time needed to perform the dump but it also increases the load on the database server. You can only use this option with the directory output format because this is the only output format where multiple processes can write their data at the same time.pg_dump will open
njobs+ 1 connections to the database, so make sure your max_connections setting is high enough to accommodate all connections.Requesting exclusive locks on database objects while running a parallel dump could cause the dump to fail. The reason is that the pg_dump leader process requests shared locks (ACCESS SHARE) on the objects that the worker processes are going to dump later in order to make sure that nobody deletes them and makes them go away while the dump is running. If another client then requests an exclusive lock on a table, that lock will not be granted but will be queued waiting for the shared lock of the leader process to be released. Consequently any other access to the table will not be granted either and will queue after the exclusive lock request. This includes the worker process trying to dump the table. Without any precautions this would be a classic deadlock situation. To detect this conflict, the pg_dump worker process requests another shared lock using the
NOWAIToption. If the worker process is not granted this shared lock, somebody else must have requested an exclusive lock in the meantime and there is no way to continue with the dump, so pg_dump has no choice but to abort the dump.To perform a parallel dump, the database server needs to support synchronized snapshots, a feature that was introduced in PostgreSQL 9.2 for primary servers and 10 for standbys. With this feature, database clients can ensure they see the same data set even though they use different connections.
pg_dump -juses multiple database connections; it connects to the database once with the leader process and once again for each worker job. Without the synchronized snapshot feature, the different worker jobs wouldn’t be guaranteed to see the same data in each connection, which could lead to an inconsistent backup. -npattern--schema=pattern-
Dump only schemas matching
pattern; this selects both the schema itself, and all its contained objects. When this option is not specified, all non-system schemas in the target database will be dumped. Multiple schemas can be selected by writing multiple-nswitches. Thepatternparameter is interpreted as a pattern according to the same rules used by psql‘sdcommands (see Patterns below), so multiple schemas can also be selected by writing wildcard characters in the pattern. When using wildcards, be careful to quote the pattern if needed to prevent the shell from expanding the wildcards; see Examples below.Note
When
-nis specified, pg_dump makes no attempt to dump any other database objects that the selected schema(s) might depend upon. Therefore, there is no guarantee that the results of a specific-schema dump can be successfully restored by themselves into a clean database.Note
Non-schema objects such as blobs are not dumped when
-nis specified. You can add blobs back to the dump with the--blobsswitch. -Npattern--exclude-schema=pattern-
Do not dump any schemas matching
pattern. The pattern is interpreted according to the same rules as for-n.-Ncan be given more than once to exclude schemas matching any of several patterns.When both
-nand-Nare given, the behavior is to dump just the schemas that match at least one-nswitch but no-Nswitches. If-Nappears without-n, then schemas matching-Nare excluded from what is otherwise a normal dump. -O--no-owner-
Do not output commands to set ownership of objects to match the original database. By default, pg_dump issues
ALTER OWNERorSET SESSION AUTHORIZATIONstatements to set ownership of created database objects. These statements will fail when the script is run unless it is started by a superuser (or the same user that owns all of the objects in the script). To make a script that can be restored by any user, but will give that user ownership of all the objects, specify-O.This option is ignored when emitting an archive (non-text) output file. For the archive formats, you can specify the option when you call
pg_restore. -R--no-reconnect-
This option is obsolete but still accepted for backwards compatibility.
-s--schema-only-
Dump only the object definitions (schema), not data.
This option is the inverse of
--data-only. It is similar to, but for historical reasons not identical to, specifying--section=pre-data --section=post-data.(Do not confuse this with the
--schemaoption, which uses the word “schema” in a different meaning.)To exclude table data for only a subset of tables in the database, see
--exclude-table-data. -Susername--superuser=username-
Specify the superuser user name to use when disabling triggers. This is relevant only if
--disable-triggersis used. (Usually, it’s better to leave this out, and instead start the resulting script as superuser.) -tpattern--table=pattern-
Dump only tables with names matching
pattern. Multiple tables can be selected by writing multiple-tswitches. Thepatternparameter is interpreted as a pattern according to the same rules used by psql‘sdcommands (see Patterns below), so multiple tables can also be selected by writing wildcard characters in the pattern. When using wildcards, be careful to quote the pattern if needed to prevent the shell from expanding the wildcards; see Examples below.As well as tables, this option can be used to dump the definition of matching views, materialized views, foreign tables, and sequences. It will not dump the contents of views or materialized views, and the contents of foreign tables will only be dumped if the corresponding foreign server is specified with
--include-foreign-data.The
-nand-Nswitches have no effect when-tis used, because tables selected by-twill be dumped regardless of those switches, and non-table objects will not be dumped.Note
When
-tis specified, pg_dump makes no attempt to dump any other database objects that the selected table(s) might depend upon. Therefore, there is no guarantee that the results of a specific-table dump can be successfully restored by themselves into a clean database. -Tpattern--exclude-table=pattern-
Do not dump any tables matching
pattern. The pattern is interpreted according to the same rules as for-t.-Tcan be given more than once to exclude tables matching any of several patterns.When both
-tand-Tare given, the behavior is to dump just the tables that match at least one-tswitch but no-Tswitches. If-Tappears without-t, then tables matching-Tare excluded from what is otherwise a normal dump. -v--verbose-
Specifies verbose mode. This will cause pg_dump to output detailed object comments and start/stop times to the dump file, and progress messages to standard error. Repeating the option causes additional debug-level messages to appear on standard error.
-V--version-
Print the pg_dump version and exit.
-x--no-privileges--no-acl-
Prevent dumping of access privileges (grant/revoke commands).
-Z0..9--compress=0..9-
Specify the compression level to use. Zero means no compression. For the custom and directory archive formats, this specifies compression of individual table-data segments, and the default is to compress at a moderate level. For plain text output, setting a nonzero compression level causes the entire output file to be compressed, as though it had been fed through gzip; but the default is not to compress. The tar archive format currently does not support compression at all.
--binary-upgrade-
This option is for use by in-place upgrade utilities. Its use for other purposes is not recommended or supported. The behavior of the option may change in future releases without notice.
--column-inserts--attribute-inserts-
Dump data as
INSERTcommands with explicit column names (INSERT INTO). This will make restoration very slow; it is mainly useful for making dumps that can be loaded into non-PostgreSQL databases. Any error during restoring will cause only rows that are part of the problematictable(column, ...) VALUES ...INSERTto be lost, rather than the entire table contents. --disable-dollar-quoting-
This option disables the use of dollar quoting for function bodies, and forces them to be quoted using SQL standard string syntax.
--disable-triggers-
This option is relevant only when creating a data-only dump. It instructs pg_dump to include commands to temporarily disable triggers on the target tables while the data is restored. Use this if you have referential integrity checks or other triggers on the tables that you do not want to invoke during data restore.
Presently, the commands emitted for
--disable-triggersmust be done as superuser. So, you should also specify a superuser name with-S, or preferably be careful to start the resulting script as a superuser.This option is ignored when emitting an archive (non-text) output file. For the archive formats, you can specify the option when you call
pg_restore. --enable-row-security-
This option is relevant only when dumping the contents of a table which has row security. By default, pg_dump will set row_security to off, to ensure that all data is dumped from the table. If the user does not have sufficient privileges to bypass row security, then an error is thrown. This parameter instructs pg_dump to set row_security to on instead, allowing the user to dump the parts of the contents of the table that they have access to.
Note that if you use this option currently, you probably also want the dump be in
INSERTformat, as theCOPY FROMduring restore does not support row security. --exclude-table-data=pattern-
Do not dump data for any tables matching
pattern. The pattern is interpreted according to the same rules as for-t.--exclude-table-datacan be given more than once to exclude tables matching any of several patterns. This option is useful when you need the definition of a particular table even though you do not need the data in it.To exclude data for all tables in the database, see
--schema-only. --extra-float-digits=ndigits-
Use the specified value of
extra_float_digitswhen dumping floating-point data, instead of the maximum available precision. Routine dumps made for backup purposes should not use this option. --if-exists-
Use conditional commands (i.e., add an
IF EXISTSclause) when cleaning database objects. This option is not valid unless--cleanis also specified. --include-foreign-data=foreignserver-
Dump the data for any foreign table with a foreign server matching
foreignserverpattern. Multiple foreign servers can be selected by writing multiple--include-foreign-dataswitches. Also, theforeignserverparameter is interpreted as a pattern according to the same rules used by psql‘sdcommands (see Patterns below), so multiple foreign servers can also be selected by writing wildcard characters in the pattern. When using wildcards, be careful to quote the pattern if needed to prevent the shell from expanding the wildcards; see Examples below. The only exception is that an empty pattern is disallowed.Note
When
--include-foreign-datais specified, pg_dump does not check that the foreign table is writable. Therefore, there is no guarantee that the results of a foreign table dump can be successfully restored. --inserts-
Dump data as
INSERTcommands (rather thanCOPY). This will make restoration very slow; it is mainly useful for making dumps that can be loaded into non-PostgreSQL databases. Any error during restoring will cause only rows that are part of the problematicINSERTto be lost, rather than the entire table contents. Note that the restore might fail altogether if you have rearranged column order. The--column-insertsoption is safe against column order changes, though even slower. --load-via-partition-root-
When dumping data for a table partition, make the
COPYorINSERTstatements target the root of the partitioning hierarchy that contains it, rather than the partition itself. This causes the appropriate partition to be re-determined for each row when the data is loaded. This may be useful when restoring data on a server where rows do not always fall into the same partitions as they did on the original server. That could happen, for example, if the partitioning column is of type text and the two systems have different definitions of the collation used to sort the partitioning column.It is best not to use parallelism when restoring from an archive made with this option, because pg_restore will not know exactly which partition(s) a given archive data item will load data into. This could result in inefficiency due to lock conflicts between parallel jobs, or perhaps even restore failures due to foreign key constraints being set up before all the relevant data is loaded.
--lock-wait-timeout=timeout-
Do not wait forever to acquire shared table locks at the beginning of the dump. Instead fail if unable to lock a table within the specified
timeout. The timeout may be specified in any of the formats accepted bySET statement_timeout. (Allowed formats vary depending on the server version you are dumping from, but an integer number of milliseconds is accepted by all versions.) --no-comments-
Do not dump comments.
--no-publications-
Do not dump publications.
--no-security-labels-
Do not dump security labels.
--no-subscriptions-
Do not dump subscriptions.
--no-sync-
By default,
pg_dumpwill wait for all files to be written safely to disk. This option causespg_dumpto return without waiting, which is faster, but means that a subsequent operating system crash can leave the dump corrupt. Generally, this option is useful for testing but should not be used when dumping data from production installation. --no-table-access-method-
Do not output commands to select table access methods. With this option, all objects will be created with whichever table access method is the default during restore.
This option is ignored when emitting an archive (non-text) output file. For the archive formats, you can specify the option when you call
pg_restore. --no-tablespaces-
Do not output commands to select tablespaces. With this option, all objects will be created in whichever tablespace is the default during restore.
This option is ignored when emitting an archive (non-text) output file. For the archive formats, you can specify the option when you call
pg_restore. --no-toast-compression-
Do not output commands to set TOAST compression methods. With this option, all columns will be restored with the default compression setting.
--no-unlogged-table-data-
Do not dump the contents of unlogged tables and sequences. This option has no effect on whether or not the table and sequence definitions (schema) are dumped; it only suppresses dumping the table and sequence data. Data in unlogged tables and sequences is always excluded when dumping from a standby server.
--on-conflict-do-nothing-
Add
ON CONFLICT DO NOTHINGtoINSERTcommands. This option is not valid unless--inserts,--column-insertsor--rows-per-insertis also specified. --quote-all-identifiers-
Force quoting of all identifiers. This option is recommended when dumping a database from a server whose PostgreSQL major version is different from pg_dump‘s, or when the output is intended to be loaded into a server of a different major version. By default, pg_dump quotes only identifiers that are reserved words in its own major version. This sometimes results in compatibility issues when dealing with servers of other versions that may have slightly different sets of reserved words. Using
--quote-all-identifiersprevents such issues, at the price of a harder-to-read dump script. --rows-per-insert=nrows-
Dump data as
INSERTcommands (rather thanCOPY). Controls the maximum number of rows perINSERTcommand. The value specified must be a number greater than zero. Any error during restoring will cause only rows that are part of the problematicINSERTto be lost, rather than the entire table contents. --section=sectionname-
Only dump the named section. The section name can be
pre-data,data, orpost-data. This option can be specified more than once to select multiple sections. The default is to dump all sections.The data section contains actual table data, large-object contents, and sequence values. Post-data items include definitions of indexes, triggers, rules, and constraints other than validated check constraints. Pre-data items include all other data definition items.
--serializable-deferrable-
Use a
serializabletransaction for the dump, to ensure that the snapshot used is consistent with later database states; but do this by waiting for a point in the transaction stream at which no anomalies can be present, so that there isn’t a risk of the dump failing or causing other transactions to roll back with aserialization_failure. See Chapter 13 for more information about transaction isolation and concurrency control.This option is not beneficial for a dump which is intended only for disaster recovery. It could be useful for a dump used to load a copy of the database for reporting or other read-only load sharing while the original database continues to be updated. Without it the dump may reflect a state which is not consistent with any serial execution of the transactions eventually committed. For example, if batch processing techniques are used, a batch may show as closed in the dump without all of the items which are in the batch appearing.
This option will make no difference if there are no read-write transactions active when pg_dump is started. If read-write transactions are active, the start of the dump may be delayed for an indeterminate length of time. Once running, performance with or without the switch is the same.
--snapshot=snapshotname-
Use the specified synchronized snapshot when making a dump of the database (see Table 9.92 for more details).
This option is useful when needing to synchronize the dump with a logical replication slot (see Chapter 49) or with a concurrent session.
In the case of a parallel dump, the snapshot name defined by this option is used rather than taking a new snapshot.
--strict-names-
Require that each extension (
-e/--extension), schema (-n/--schema) and table (-t/--table) qualifier match at least one extension/schema/table in the database to be dumped. Note that if none of the extension/schema/table qualifiers find matches, pg_dump will generate an error even without--strict-names.This option has no effect on
-N/--exclude-schema,-T/--exclude-table, or--exclude-table-data. An exclude pattern failing to match any objects is not considered an error. --use-set-session-authorization-
Output SQL-standard
SET SESSION AUTHORIZATIONcommands instead ofALTER OWNERcommands to determine object ownership. This makes the dump more standards-compatible, but depending on the history of the objects in the dump, might not restore properly. Also, a dump usingSET SESSION AUTHORIZATIONwill certainly require superuser privileges to restore correctly, whereasALTER OWNERrequires lesser privileges. -?--help-
Show help about pg_dump command line arguments, and exit.
The following command-line options control the database connection parameters.
-ddbname--dbname=dbname-
Specifies the name of the database to connect to. This is equivalent to specifying
dbnameas the first non-option argument on the command line. Thedbnamecan be a connection string. If so, connection string parameters will override any conflicting command line options. -hhost--host=host-
Specifies the host name of the machine on which the server is running. If the value begins with a slash, it is used as the directory for the Unix domain socket. The default is taken from the
PGHOSTenvironment variable, if set, else a Unix domain socket connection is attempted. -pport--port=port-
Specifies the TCP port or local Unix domain socket file extension on which the server is listening for connections. Defaults to the
PGPORTenvironment variable, if set, or a compiled-in default. -Uusername--username=username-
User name to connect as.
-w--no-password-
Never issue a password prompt. If the server requires password authentication and a password is not available by other means such as a
.pgpassfile, the connection attempt will fail. This option can be useful in batch jobs and scripts where no user is present to enter a password. -W--password-
Force pg_dump to prompt for a password before connecting to a database.
This option is never essential, since pg_dump will automatically prompt for a password if the server demands password authentication. However, pg_dump will waste a connection attempt finding out that the server wants a password. In some cases it is worth typing
-Wto avoid the extra connection attempt. --role=rolename-
Specifies a role name to be used to create the dump. This option causes pg_dump to issue a
SET ROLErolenamecommand after connecting to the database. It is useful when the authenticated user (specified by-U) lacks privileges needed by pg_dump, but can switch to a role with the required rights. Some installations have a policy against logging in directly as a superuser, and use of this option allows dumps to be made without violating the policy.
Время прочтения
5 мин
Просмотры 227K
Многие разговоры про бэкапы начинаются с присказки что люди делятся на две категории… так вот я отношусь к тем людям которые делают бэкапы. Правильно настроенное резервное копирование и проверка резервных копий укрепляет сон. А наличие заранее написаных и проигранных инструкций по восстановлению вообще укрепляет пищеварение и иммунитет. Так вот, за время работы с PostgreSQL мне довелось часто настраивать резервное копирование, при этом условия и требования были самые разные. Однако при этом набор инструментов за редким исключением оставался неизменным. В этой статье поделюсь своим опытом в деле, как можно брать резервные копии PostgreSQL.

Если рассматривать резервное копирование как вполне конкретный процесс, то возникает два простых вопроса:
1. откуда запускать резервное копирование?
2. какие инструменты следует использовать для резервного копирования?
На первый вопрос есть два варианта ответа: можно запускать задачу резервного копирования с выделенного backup сервера, на мой взгляд это наиболее подходящий вариант. Либо запускать задачу непосредственно с сервера БД, это в случае если нет выделенного сервера бэкапов.
С инструментами все гораздо интереснее. Здесь я выделяю две группы, основные инструменты и вспомогательные. Основные это те, которые собственно и выполняют резервное копирование. Вспомогательные это те которые добавляют что-то особенное к процессу резервного копирования, например архивирование, шифрование, управление нагрузкой и т.д.
В комплекте PostgreSQL есть 2 утилиты которые позволяют делать резервные копии, это pg_dump/pg_dumpall и pg_basebackup. Кроме того есть возможность использовать утилиты файлового копирования, такие как rsync, tar, cp и т.п.
Итак, каким инструментом запускать бэкап?
pg_dump — подходит для случаев когда нужно сделать резервную копию таблицы, базы, схемы или данных.
pg_basebackup — подходит для случаев когда нужно сделать резервную копию целиком всего кластера БД или настроить hot standby реплику.
rsync/tar/cp — также используются для случаев копирования всего кластера.
Когда только случился релиз PostgreSQL 9.0 резервное копирование выполнялось с помощью rsync, однако уже в 9.1 появился pg_basebackup, который имеет некоторыми преимуществами перед rsync:
- pg_basebackup не требует ssh доступа, но требует доступа к базе указанного в pg_hba.conf;
- pg_basebackup богаче по функциональности (копирование WAL, создание recovery.conf, встроенное сжатие gzip и пр.);
- pg_basebackup не требует отдельного вызова функций pg_start_backup/pg_stop_backup как это требуется при использовании rsync/tar/cp;
- pg_basebackup выполняет копирование быстрее чем rsync за счет использования протокола потоковой репликации.
но есть и некоторые недостатки:
- pg_basebackup идет out-of-the-box, и соответственно требует установленного postgres;
- pg_basebackup не имеет встроенных функций для ограничения скорости копирования (обещают только в 9.4);
- pg_basebackup требует включенных опций wal_level = hot_standby, max_wal_senders в postgresql.conf.
Здесь я буду рассматривать pg_basebackup, хотя и pg_dump тоже может использоваться в нижеперечисленных способах.
1. Простое и без изысков резервное копирование с backup сервера в каталог /backup (каталог должен быть предварительно создан):
backup@backup ~ $ pg_basebackup -x -h db01.example.com -U backup -D /backup
2. Копирование с пониженным приоритетом IO операций с помощью ionice, для случаев когда нужно уменьшить нагрузку на дисковый ввод-вывод от резервного копирования:
postgres@db01 ~ $ ionice -c 3 pg_basebackup -x -h db01.example.com -U backup -D /backup
3. Копирование с сжатием в bzip2, для случаев когда нужно использовать нестандартный для pg_basebackup алгоритм сжатия (gzip). Здесь мы передаем данные через стандартный вывод (stdout) на стандартный ввод (stdin) программе bzip2.
backup@backup ~ $ pg_basebackup -x --format=tar -h db01.example.com -U backup -D - |bzip2 -9 > /backup/db01/backup-$(date +%Y-%m-%d).tar.bz2
4. Копирование с сжатием в несколько потоков (используем lbzip2 и задействуем 6 ядер). При таком раскладе можно задействовать простаивающие ядра и ускорить процесс сжатия.
backup@backup ~ $ pg_basebackup -x --format=tar -h db01.example.com -U backup -D - |lbzip2 -n 6 -9 > /backup/db01/backup-$(date +%Y-%m-%d).tar.bz2
5. Здесь копирование запускается на сервере БД. Формируемая резервная копия отправляется на удаленный сервер по ssh.
postgres@db01 ~ $ pg_basebackup -x --format=tar -h 127.0.0.1 -U backup -D - |ssh backup@backup.example.com "tar xf - -C /backup/"
6. Здесь копирование также запускается на сервере БД и выполняется отправка на удаленный сервер, но уже с архивированием в 6 потоков с помощью lbzip2.
backup@backup ~ $ pg_basebackup -x --format=tar -h 127.0.0.1 -U backup -D - |ssh backup@backup.example.com "lbzip2 -n 6 -9 > /backup/db01/backup-$(date +%Y-%m-%d).tar.bz2"
7. Копирование на удаленный сервер с ограничением пропускной полосы до 10Мб с помощью pv и последующее архивирование на удаленной стороне. Этот вариант для случаев когда нужно передать не нагружая сеть.
backup@backup ~ $ pg_basebackup -x --format=tar -h 127.0.0.1 -U backup -D - |pv -r -b -L 10M |ssh backup@backup.example.com "bzip2 -9 > /backup/db01/backup-$(date +%Y-%m-%d).tar.bz2"
Тут стоит отметить что c 9.4 в pg_basebackup уже есть возможность ограничения скорости передачи (-r, —max-rate).
8. Копирование запускается на backup сервере, а далее происходит раздваивание потока на две части. Один поток сжимается с bzip2 (сам бэкап) и второй поток через tar копируется во временный каталог для последующей валидации. Способ редкоиспользуемый, но тут интересна сама реализация.
backup@backup ~ $ pg_basebackup -x --format=tar -h db01.example.com -U backup -D - |tee >(bzip2 -9 -c > /backup/db01/backup-$(date +%d-%b-%Y).tar.bz2) |tar xf - -C /backup/validation/
9. Копирование с задействование lbzip2 на обоих узлах, для случаев когда у сети маленькая пропускная способность, сначала поток сжимается, затем передается по сети и затем расжимается на удаленной стороне. Здесь используется tar и требуется выполнение pg_start_backup(‘label_name’) на стороне postgres.
postgres@master # cd /var/lib/pgsql/9.3/data
postgres@master # tar cfO - ./ |lbzip2 -n 2 -5 |ssh postgres@standby "lbunzip2 -c -n 2 |tar xf - -C /var/lib/pgsql/9.3/data"
10. бэкапирование с шифрованием через GPG, для случаев когда нужно зашифровать резервную копию. Предварительно следует создать ключи через gpg —gen-key (в моем случае ключи созданы с именем backup)
backup@backup ~ $ pg_basebackup -x --format=tar -h db01.example.com -U backup -D - |gpg -r backup -e |bzip2 -9 > /backup/db01/backup-$(date +%d-%b-%Y).tar.bz2
Для расшифровки резервной копии следует выполнить такую команду
backup@backup ~ $ bzcat /backup/backup-09-May-2014.tar.bz2 |gpg -r backup -d |tar xf - -C /example/dir/
На этом все, подведем итоги по инструментам:
- pg_basebackup — утилита для создания резервных копий postgres;
- lbzip2 — bzip2 сжатие с использованием несокльких ядер — если нужно запаковать быстрее (аналоги: pbzip2, pigz);
- ionice — регулировка класса и приоритета для планировщика ввода-вывода (также можно использовать nice для регулировки приоритета процессов для CPU планировщика);
- pv — контролируем объем передаваемых данных через pipe и т.о. используем для ограничения объема передаваемых данных в единицу времени (аналог — throttle);
- tar — утилита архивирования, нужна для вспомогательных целей когда неиспользуется сжатие bzip2/gzip;
- tee — чтение с stdin c записью в stdout и другие файлы (является частью coreutils);
- gpg — решает задачи по шифрованию.
Всем спасибо за внимание!
Задача резервного копирования — одна из основных при сопровождении и поддержке PostgreSQL. Для резервного копирования логической схемы и данных можно использовать как встроенные инструменты СУБД, так и внешние. В этой статье мы разберем оба варианта.
Для начала подготовим сервер. Для демо-стенда закажем виртуальный сервер в Облачной платформе. Для этого откроем панель управления my.selectel.ru, перейдем в меню Облачная платформа и нажмем на кнопку Создать сервер.
В статье будем использовать виртуальный сервер с конфигурацией 2 vCPU, 4 ГБ RAM и 10 ГБ HDD с операционной системой CentOS 8 64-bit.
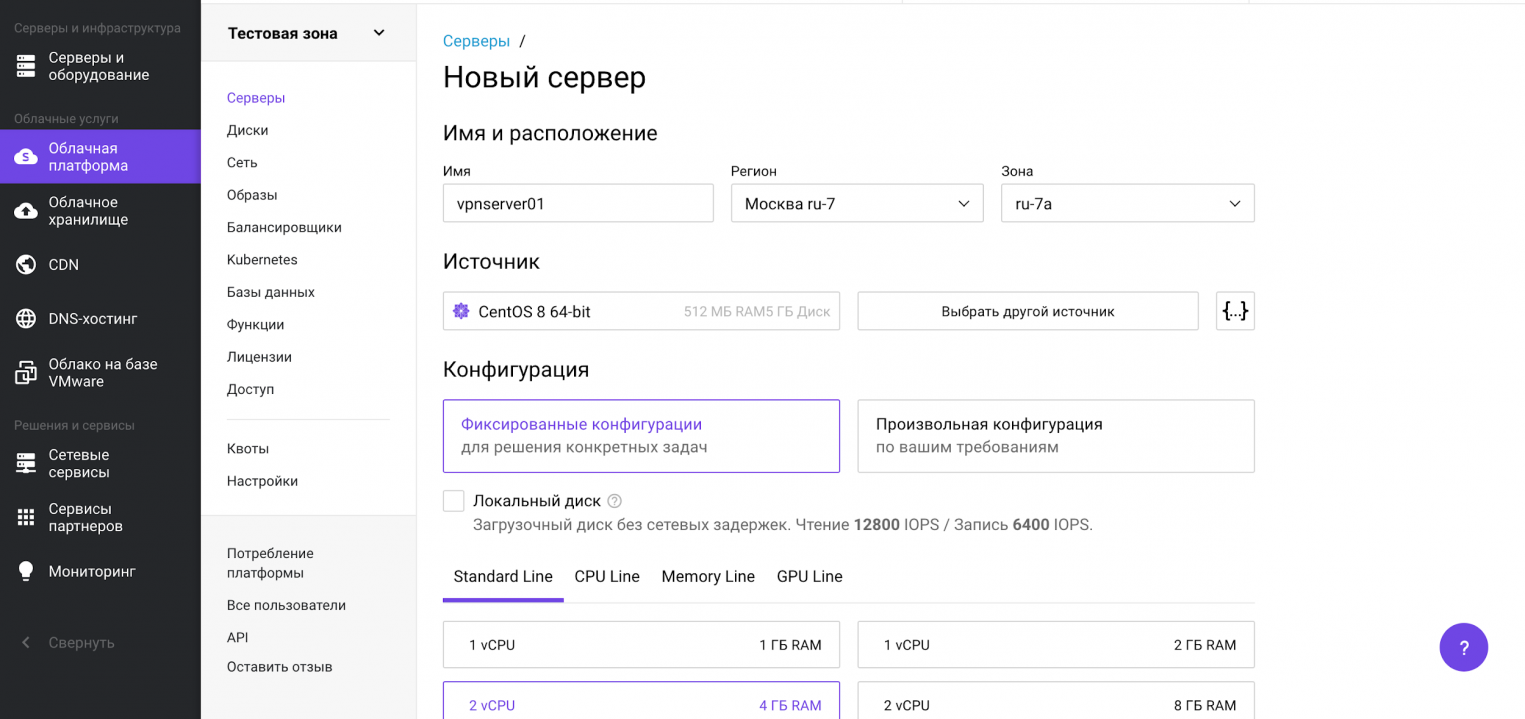
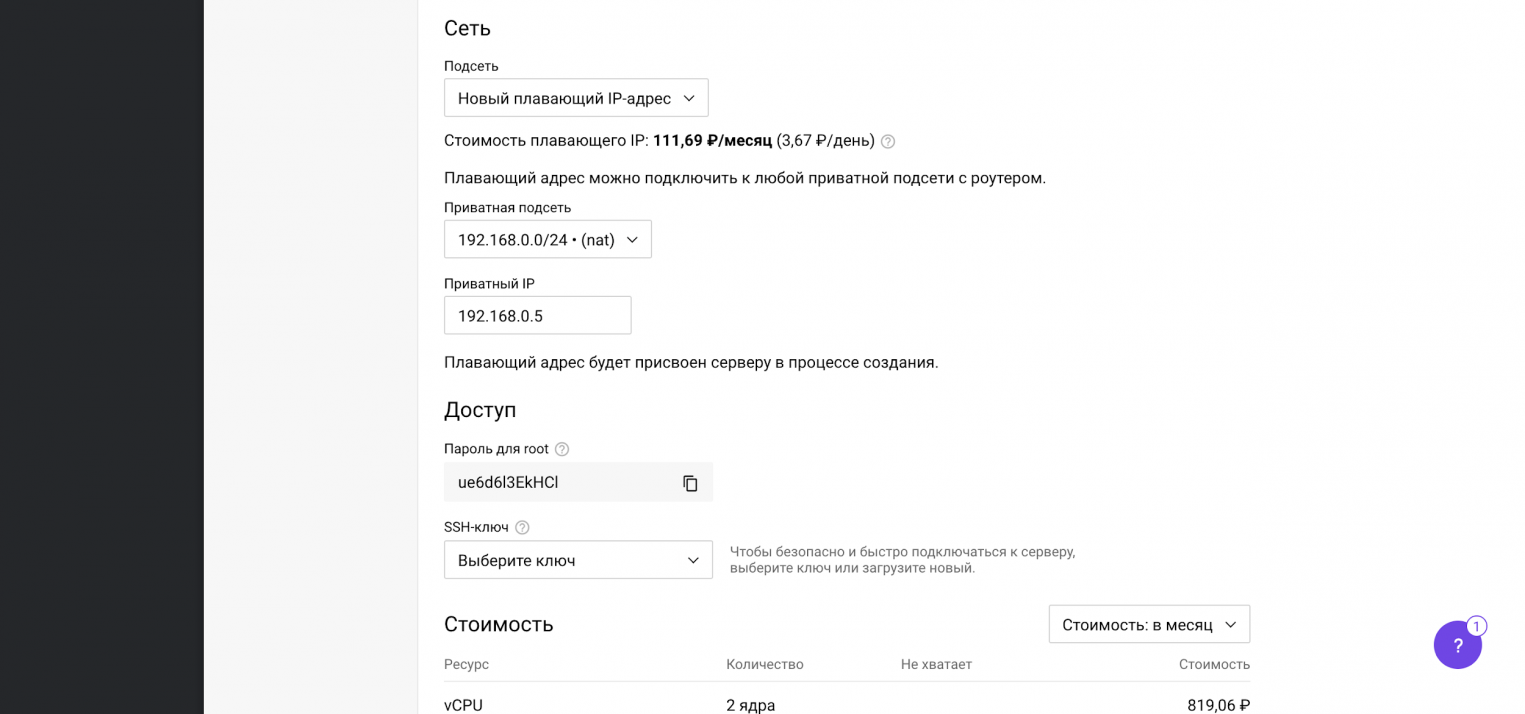
Теперь прокрутим представление ниже, где находятся настройки сети. Важно, чтобы у сервера был внешний плавающий IP-адрес для доступа извне.
После выбора операционной системы, конфигурации сервера и выполнения сетевых настроек переходим к завершению заказа и нажимаем на кнопку Создать. Через несколько минут сервер будет готов.
Перед началом демонстрации возможностей резервного копирования, мы подготовили PostgreSQL. Для целей наполнения базы данных и создания непрерывного потока записи, развернули там Zabbix (некоторое время назад публиковали о нем статью).
Создание резервных копий и восстановление из командной строки
В этом разделе мы расскажем как сделать дамп базы данных PostgreSQL в консоли при подключении по SSH, разберем синтаксис и покажем примеры использования утилит pg_dump, pg_dumpall, pg_restore, pg_basebackup и wal-g.
Утилита pg_dump
В PostgreSQL есть встроенный инструмент для создания резервных копий — утилита pg_dump. Утилита имеет простой синтаксис:
# pg_dump <параметры> <имя базы> > <файл для сохранения копии> В простейшем случае достаточно указать имя базы данных, которую в дальнейшем нужно будет восстановить. Резервная копия создается следующей командой:
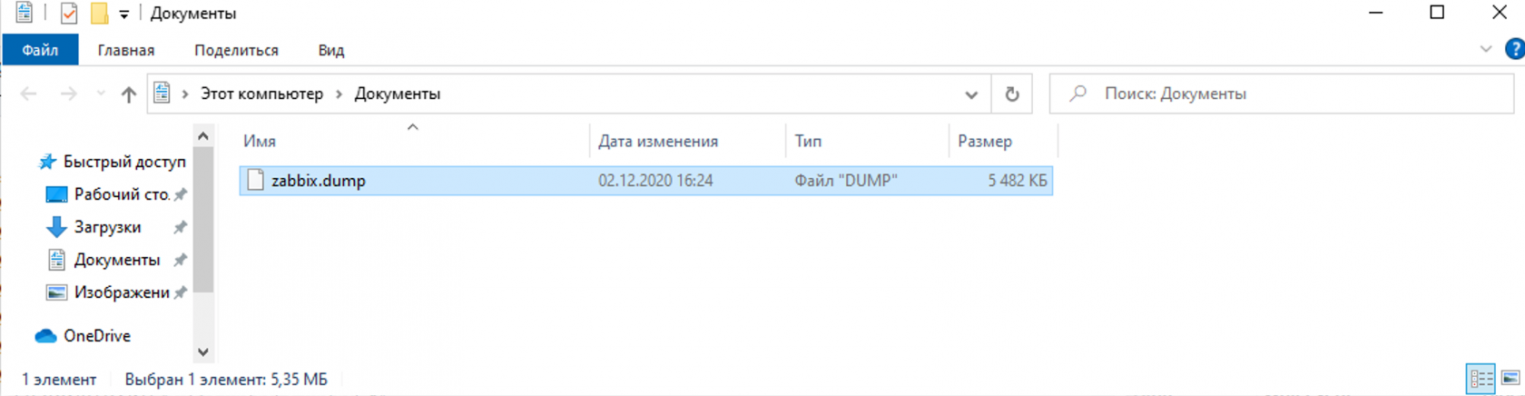
# pg_dump zabbix > /tmp/zabbix.dumpЕсли требуется авторизация под определенным пользователем, можно воспользоваться ключом -U:
# pg_dump -U zabbix -W zabbix > /tmp/zabbix.dump # pg dump u postgresКлюч -U определяет пользователя, а -W обязывает ввести пароль.
Чтобы сэкономить место на диске, можно сразу же сжимать дамп:
# pg_dump -U zabbix -W zabbix | gzip > /tmp/zabbix.gzРезервное копирование обычно выполняется по расписанию, например, ежедневно в 3 часа ночи. Нижеприведенный пример скрипта не только выполняет бэкап, но и удаляет все файлы старше 61 дня (за исключением 15-го числа месяца).
#!/bin/sh

PATH=/etc:/bin:/sbin:/usr/bin:/usr/sbin:/usr/local/bin:/usr/local/sbin

PGPASSWORD=some_password
export PGPASSWORD
pathB=/mnt/backup
dbUser=dbadmin
database=zabbix


find $pathB ( -name "*-1[^5].*" -o -name "*-[023]?.*" ) -ctime +61 -delete
pg_dump -U $dbUser $database | gzip > $pathB/pgsql_$(date "+%Y-%m-%d").sql.gz


unset PGPASSWORD
Чтобы настроить регулярное выполнение, выполним следующую команду в планировщике crontab:
# crontab -e
3 0 * * * /etc/scripts/pgsql_dump.sh # postgres pg dump
Чтобы выполнить аналогичную команду на удаленном сервере, достаточно добавить ключ -h:
# pg_dump -h 192.168.56.101 zabbix > /tmp/zabbix.dumpКлюч -t задает таблицу, для которой нужно создать резервную копию:
# pg_dump -t history zabbix > /tmp/zabbix.dump # postgres dump tableПри помощи специальных ключей можно создавать резервные копии структуры данных или непосредственно данных:
# pg_dump --schema-only zabbix > /tmp/zabbix.dump
# pg_dump --data-only zabbix > /tmp/zabbix.dump
У утилиты pg_dump также есть ключи для сохранения дампа в другие форматы. Чтобы сохранить копию в виде бинарного файла используются ключи -Fc:
# pg_dump -Fc zabbix > /tmp/zabbix.bakЧтобы создать архив — -Ft:
# pg_dump -Ft zabbix > /tmp/zabbix.tarЧтобы сохранить в directory-формате — -Fd:
# pg_dump -Fd zabbix > /tmp/zabbix.dirРезервное копирование в виде каталогов позволяет выполнять процесс в многопоточном режиме.
Ниже мы перечислим возможные параметры утилиты pg_dump.
-d <имя_бд>, —dbname=имя_бд — база данных, к которой выполняется подключение.
-h <сервер>, —host=сервер — имя сервера.
-p <порт>, —port=порт — порт для подключения.
-U <пользователь>, —username=пользователь) — учетная запись, используемое для подключения.
-w, —no-password — деактивация требования ввода пароля.
-W, —password — активация требования ввода пароля.
—role=имя роли — роль, от имени которой генерируется резервная копия.
-a, —data-only — вывод только данных, вместо схемы объектов (DDL).
-b, —blobs — параметр добавляет в выгрузку большие объекты.
-c, —clean — добавление команд DROP перед командами CREATE в файл резервной копии.
-C, —create — генерация реквизитов для подключения к базе данных в файле резервной копии.
-E <кодировка>, —encoding=кодировка — определение кодировки резервной копии.
-f <файл>, —file=файл — задает имя файла, в который будет сохраняться вывод утилиты.
-F <формат>, —format=формат — параметр определяет формат резервной копии. Доступные форматы:
- p, plain) — формирует текстовый SQL-скрипт;
- c, custom) — формирует резервную копию в архивном формате;
- d, directory) — формирует копию в directory-формате;
- t, tar) — формирует копию в формате tar.
-j <число_заданий>, —jobs=число_заданий — параметр активирует параллельную выгрузку для одновременной обработки нескольких таблиц (равной числу заданий). Работает только при выгрузке копии в формате directory.
-n <схема>, —schema=схема — выгрузка в файл копии только определенной схемы.
-N <схема>, —exclude-schema=схема — исключение из выгрузки определенных схем.
-o, —oids — добавляет в выгрузку идентификаторы объектов (OIDs) вместе с данными таблиц.
-O, —no-owner — деактивация создания команд, определяющих владельцев объектов в базе данных.
-s, —schema-only —добавление в выгрузку только схемы данных, без самих данных.
-S <пользователь>, —superuser=пользователь — учетная запись привилегированного пользователя, которая должна использоваться для отключения триггеров.
-t <таблица>, —table=таблица — активация выгрузки определенной таблицы.
-T <таблица>, —exclude-table=таблица —исключение из выгрузки определенной таблицы.
-v, —verbose — режим подробного логирования.
-V, —version — вывод версии pg_dump.
-Z 0..9, —compress=0..9 — установка уровня сжатия данных. 0 — сжатие выключено.
Утилита pg_dumpall
Утилита pg_dumpall реализует резервное копирование всего экземпляра (кластера или инстанса) базы данных без указания конкретной базы данных на инстансе. По принципу схожа с pg_dump. Добавим, что только утилиты pg_dump и pg_dumpall предоставляют возможность создания логической копии данных, остальные утилиты, рассматриваемые в этой статье, позволяют создавать только бинарные копии.
# pg_dumpall > /tmp/instance.bakЧтобы сразу сжать резервную копию экземпляра базы данных, нужно передать вывод на архиватор gzip:
# pg_dumpall | gzip > /tmp/instance.tar.gzНиже приведены параметры, с которыми может вызываться утилита pg_dumpall.
-d <имя_бд>, —dbname=имя_бд — имя базы данных.
-h <сервер>, —host=сервер — имя сервера.
-p <порт>, —port=порт — TCP-порт, на который принимаются подключения.
-U <пользователь>, —username=пользователь — имя пользователя для подключения.
-w, —no-password — деактивация требования ввода пароля.
-W, —password — активация требования ввода пароля.
—role=<имя роли> — роль, от имени которой генерируется резервная копия.
-a, —data-only — создание резервной копии без схемы данных.
-c, —clean — добавление операторов DROP перед операторами CREATE.
-f <имя_файла>, —file=имя_файла — активация направления вывода в указанный файл.
-g, —globals-only — выгрузка глобальных объектов без баз данных.
-o, —oids — выгрузка идентификаторов объектов (OIDs) вместе с данными таблиц.
-O, —no-owner — деактивация генерации команд, устанавливающих принадлежность объектов, как в исходной базе данных.
-r, —roles-only — выгрузка только ролей без баз данных и табличных пространств.
-s, —schema-only — выгрузка только схемы без самих данных.
-S <имя_пользователя>, —superuser=имя_пользователя — привилегированный пользователь, используемый для отключения триггеров.
-t, —tablespaces-only — выгрузка табличных пространства без баз данных и ролей.
-v, —verbose — режим подробного логирования.
-V (—version — вывод версии утилиты pg_dumpall.
Утилита pg_restore
Утилита позволяет восстанавливать данные из резервных копий. Например, чтобы восстановить только определенную БД (в нашем примере zabbix), нужно запустить эту утилиту с параметром -d:
# pg_restore -d zabbix /tmp/zabbix.bakЧтобы этой же утилитой восстановить определенную таблицу, нужно использовать ее с параметром -t:
# pg_restore -a -t history /tmp/zabbix.bakТакже утилитой pg_restore можно восстановить данные из бинарного или архивного файла. Соответственно:
# pg_restore -Fc zabbix.bak
# pg_restore -Ft zabbix.tar
При восстановлении можно одновременно создать новую базу:
# pg_restore -Ft -С zabbix.tarВосстановить данные из дампа также возможно при помощи psql:
# psql zabbix < /tmp/zabbix.dumpЕсли для подключения нужно авторизоваться, вводим следующую команду:
# psql -U zabbix -W zabbix < /tmp/zabbix.dumpНиже приведен синтаксис утилиты pg_restore.
-h <сервер>, —host=сервер — имя сервера, на котором работает база данных.
-p <порт>, —port=порт — TCP-порт, через база данных принимает подключения.
-U <пользователь>, —username=пользователь — имя пользователя для подключения..
-w, —no-password — деактивация требования ввода пароля.
-W, —password — активация требования ввода пароля.
—role=имя роли — роль, от имени которой выполняется восстановление резервная копия.
<имя_файла> — расположение восстанавливаемых данных.
-a, —data-only — восстановление данных без схемы.
-c, —clean — добавление операторов DROP перед операторами CREATE.
-C, —create — создание базы данных перед запуском процесса восстановления.
-d <имя_бд>, —dbname=имя_бд — имя целевой базы данных.
-e, —exit-on-error — завершение работы в случае возникновения ошибки при выполнении SQL-команд.
-f <имя_файла>, —file=имя_файла — файл для вывода сгенерированного скрипта.
-F <формат>, —format=формат — формат резервной копии. Допустимые форматы:
- p, plain — формирует текстовый SQL-скрипт;
- c, custom — формирует резервную копию в архивном формате;
- d, directory — формирует копию в directory-формате;
- t, tar — формирует копию в формате tar.
-I <индекс>, —index=индекс — восстановление только заданного индекса.
-j <число-заданий>, —jobs=число-заданий — запуск самых длительных операций в нескольких параллельных потоках.
-l, —list) — активация вывода содержимого архива.
-L <файл-список>, —use-list=файл-список — восстановление из архива элементов, перечисленных в файле-списке в соответствующем порядке.
-n <пространство_имен>, —schema=схема — восстановление объектов в указанной схеме.
-O, —no-owner — деактивация генерации команд, устанавливающих владение объектами по образцу исходной базы данных.
-P <имя-функции(тип-аргумента[, …])>, —function=имя-функции(тип-аргумента[, …]) — восстановление только указанной функции.
-s, —schema-only — восстановление только схемы без самих данных.
-S <пользователь>, —superuser=пользователь — учетная запись привилегированного пользователя, используемая для отключения триггеров.
-t <таблица>, —table=таблица — восстановление определенной таблицы.
-T <триггер>, —trigger=триггер — восстановление конкретного триггера.
-v, —verbose — режим подробного логирования.
-V, —version — вывод версии утилиты pg_restore.
Утилита pg_basebackup
Утилитой pg_basebackup можно выполнять резервное копирования работающего кластера баз данных PostgreSQL. Результирующий бинарный файл можно использовать для репликации или восстановления на определенный момент в прошлом. Утилита создает резервную копию всего экземпляра базы данных и не дает возможности создавать слепки данных отдельных сущностей. Подключение pg_basebackup к PostgreSQL выполняется при помощи протокола репликации с полномочиями суперпользователя или с правом REPLICATION.
Для выполнения резервного копирования локальной базы данных достаточно передать утилите pg_basebackup параметр -D, обозначающий директорию, в которой будет сохранена резервная копия:
# pg_basebackup -D /tmpЧтобы создать сжатые файлы из табличных пространств, добавим параметры -Ft и -z:
# pg_basebackup -D /tmp -Ft -z То же самое, но со сжатием bzip2 и для экземпляра базы с общим табличным пространством:
# pg_basebackup -D /tmp -Ft | bzip2 > backup.tar.bz2Ниже приведен синтаксис утилиты pg_basebackup.
-d <строка_подключения>, —dbname=строка_подключения — определение базы данных в виде строки для подключения.
-h <сервер>, —host=сервер — имя сервера с базой данных.
-p <порт>, —port=порт — TCP-порт, через база данных принимает подключения.
-s <интервал>, —status-interval=интервал — количество секунд между отправками статусных пакетов.
-U <пользователь>, —username=пользователь — установка имени пользователя для подключения.
-w, —no-password — отключение запроса на ввод пароля.
-W, —password — принудительный запрос пароля.
-V, —version — вывод версии утилиты pg_basebackup.
-?, —help — вывод справки по утилите pg_basebackup.
-D каталог, —pgdata=каталог — директория записи данных.
-F <формат>, —format=формат — формат вывода. Допустимые варианты:
- p, plain — значение для записи выводимых данных в текстовые файлы;
- t, tar — значение, указывающее на необходимость записи в целевую директорию в формате tar.
-r <скорость_передачи>, —max-rate=скорость_передачи — предельная скорость передачи данных в Кб/с.
-R, —write-recovery-conf — записать минимальный файл recovery.conf в директорию вывода.
-S <имя_слота>, —slot=имя_слота — задание слота репликации при использовании WAL в режиме потоковой передачи.
-T <каталог_1=каталог_2>, —tablespace-mapping=каталог_1=каталог_2 — активация миграции табличного пространства из одного каталога в другой каталог при копировании.
—xlogdir=каталог_xlog — директория хранения журналов транзакций.
-X <метод>, —xlog-method=метод — активация вывода файлов журналов транзакций WAL в резервную копию на основе следующих методов:
- f, fetch — включение режима сбора файлов журналов транзакций при окончании процесса копирования;
- s, stream — включение передачи журнала транзакций в процессе создания резервной копии.
-z, —gzip — активация gzip-сжатия результирующего tar-файла.
-Z <уровень>, —compress=уровень — определение уровня сжатия механизмом gzip.
-c , —checkpoint=fast|spread — активация режима реперных точек.
-l <метка>, —label=метка — установка метки резервной копии.
-P, —progress — активация в вывод отчета о прогрессе.
-v, —verbose — режим подробного логирования.
Утилита wal-g
Wal-g — утилита для резервного копирования и восстановления базы данных PostgreSQL. При помощи wal-g можно выполнять сохранение резервных копий на хранилищах S3 или просто на файловой системе. Ниже мы разберем установку, настройку и работу с утилитой. Покажем как выполнить резервное копирование в Облачное хранилище S3 от Selectel.
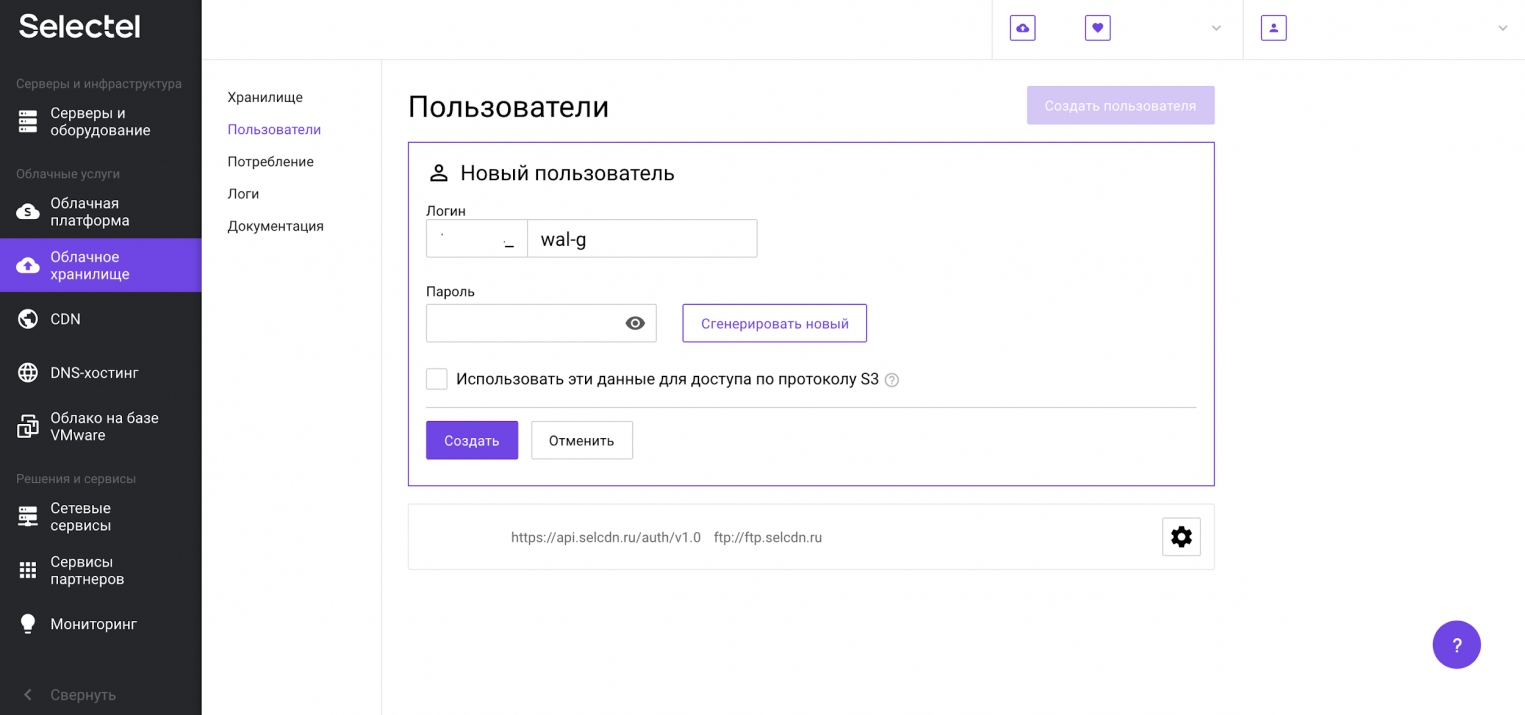
Создадим пользователя для облачного хранилища, учетные данные которого будем потом использовать для сохранения резервной копии. Перейдем в меню Пользователи и нажмем кнопку Создать пользователя:
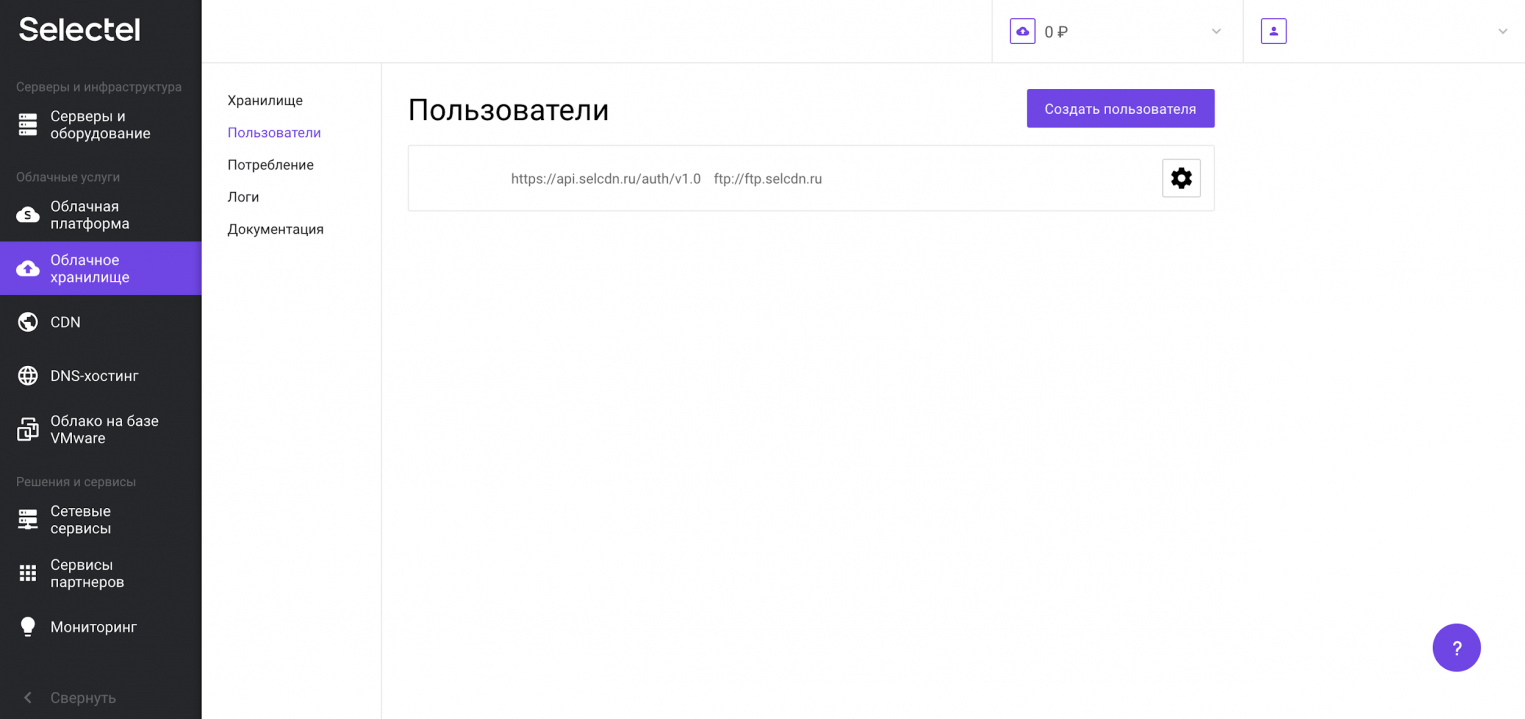
Дополнительную информацию можно получить в нашей Базе знаний. Первую часть логина изменить нельзя — это идентификатор пользователя в панели управления. Вторая часть логина задается произвольно. Например, 123456_wal-g:
Теперь перейдем к установке wal-g. Скачаем готовый установочный пакет из репозитория на github.com, распакуем и скопируем папку содержающую исполняемые файлы:
# cd /tmp
# curl -L "https://github.com/wal-g/wal-g/releases/download/v0.2.19/wal-g.linux-amd64.tar.gz" -o "wal-g.linux-amd64.tar.gz
# tar -xzf wal-g.linux-amd64.tar.gz
# mv wal-g /usr/local/bin/
Заполним конфигурационный файл wal-g и изменим его владельца на учетную запись postgres:
# cat > /var/lib/pgsql/.walg.json << EOF
 {
     "WALG_S3_PREFIX": "s3://container",
     "AWS_ENDPOINT": "https://s3.selcdn.ru"
     "AWS_ACCESS_KEY_ID": "123456_wal-g",
     "AWS_SECRET_ACCESS_KEY": "password",
     "WALG_COMPRESSION_METHOD": "brotli",
     "WALG_DELTA_MAX_STEPS": "5",
     "PGDATA": "/var/lib/pgsql/data",
     "PGHOST": "/var/run/postgresql/.s.PGSQL.5432"
 }
 EOF
# chown postgres: /var/lib/pgsql/.walg.json
Далее настроим автоматизированное создание резервных копий в PostgreSQL и перезагрузим процессы базы данных:
# echo "wal_level=replica" >> /var/lib/pgsql/data/postgresql.conf
# echo "archive_mode=on" >> /var/lib/pgsql/data/postgresql.conf
# echo "archive_command='/usr/local/bin/wal-g wal-push "%p" >> /var/log/postgresql/archive_command.log 2>&1' " >> /var/lib/pgsql/data/postgresql.conf
# echo “archive_timeout=60” >> /var/lib/pgsql/data/postgresql.conf
# echo "restore_command='/usr/local/bin/wal-g wal-fetch "%f" "%p" >> /var/log/postgresql/restore_command.log 2>&1' " >> /var/lib/pgsql/data/postgresql.conf
# killall -s HUP postgres
Теперь проверим корректность проведения настроек и загрузим резервную копию в хранилище:
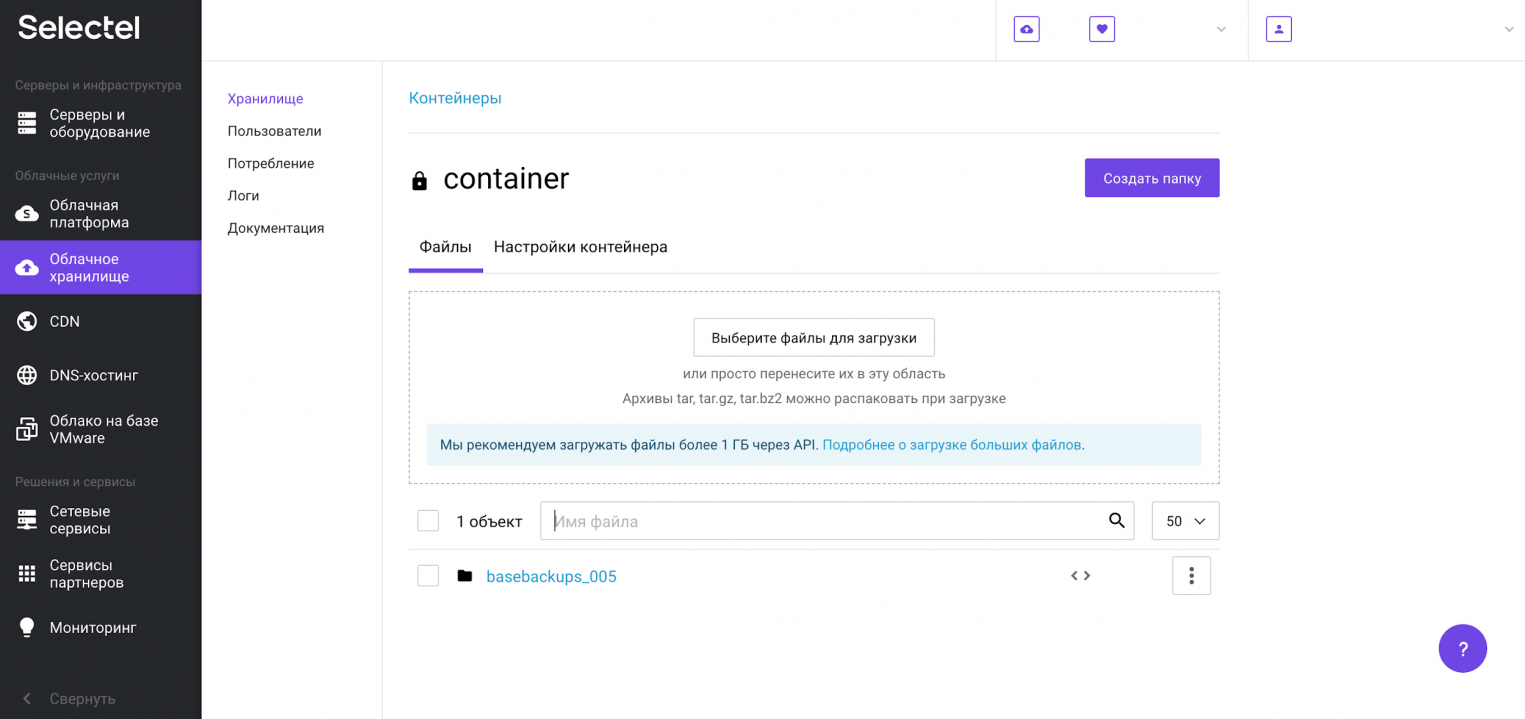
# su - postgres -c '/usr/local/bin/wal-g backup-push /var/lib/pgsql/data'После выполнения процесса резервного копирования, в созданном контейнере появится директория с резервными копиями баз данных:
Такой процесс в продакшене может выполняться при помощи планировщика заданий на регулярной основе.
Утилита pgAdmin
Управлять созданием резервных копий возможно также и в графическом интерфейсе. Для этого мы будем использовать утилиту pgAdmin. Актуальную версию для Windows или другой поддерживаемой ОС можно свободно скачать с официального сайта.
После скачивания утилиту нужно установить и запустить. Она работает в виде веб-приложения через браузер.
После добавления сервера с базой данных, в интерфейсе появляется возможность создания резервной копии. Аналогичным образом здесь же можно выполнить восстановление из резервной копии.
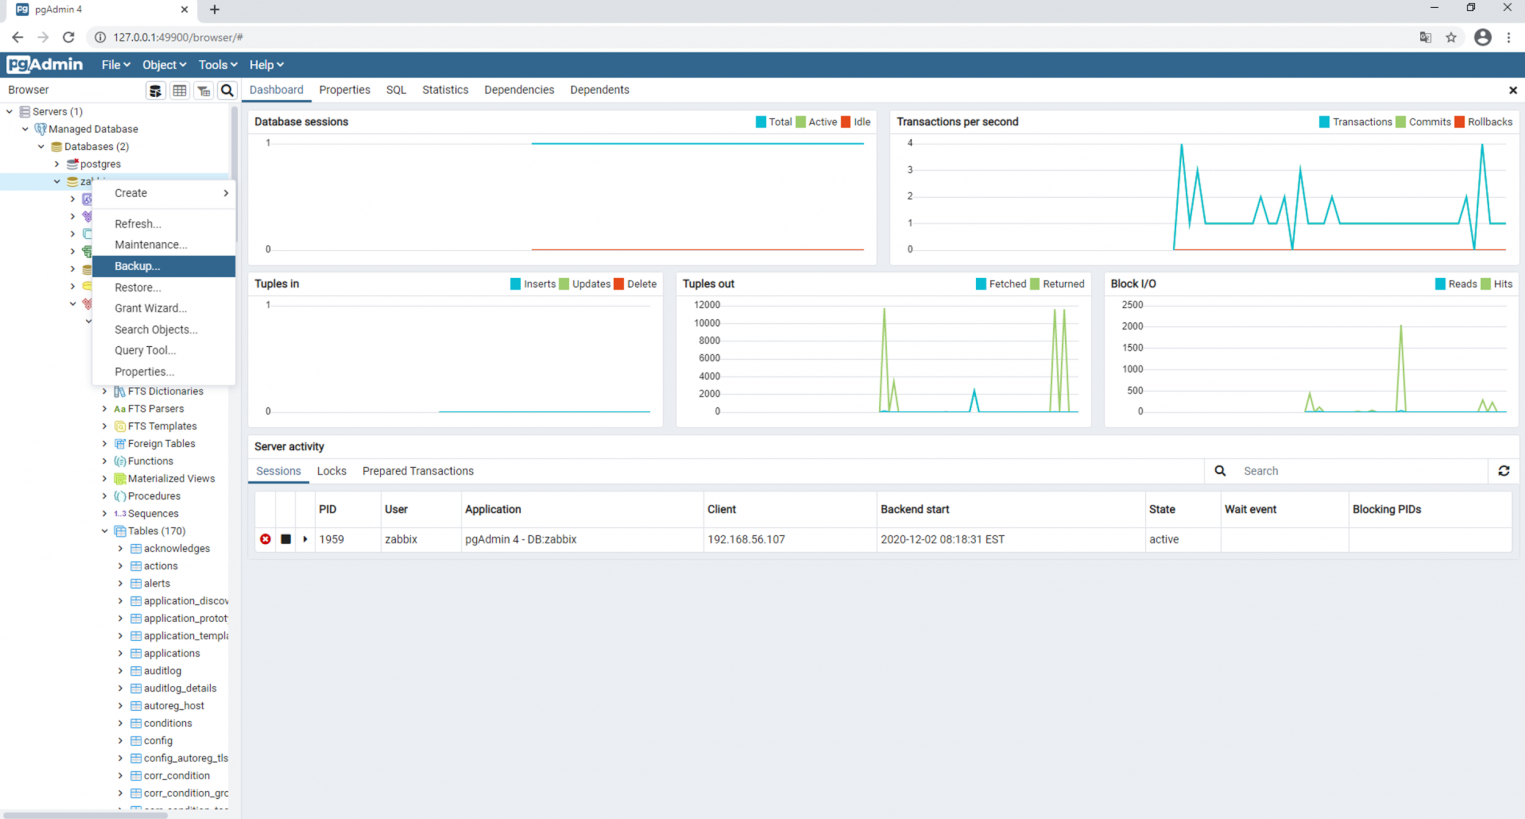
После выполнения команды Backup резервная копия сохраняется в заранее определенную директорию.
Работа с облачной базой данных в панели управления Selectel
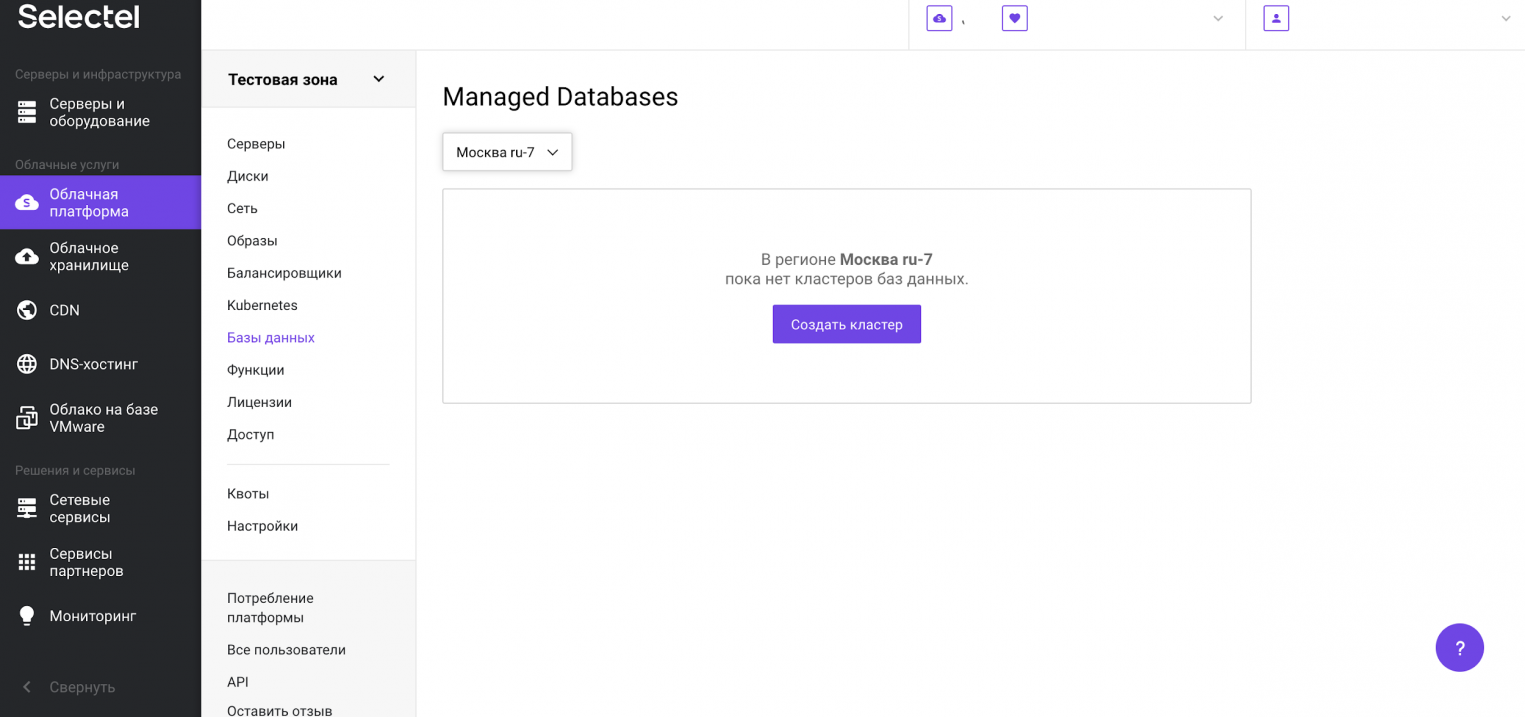
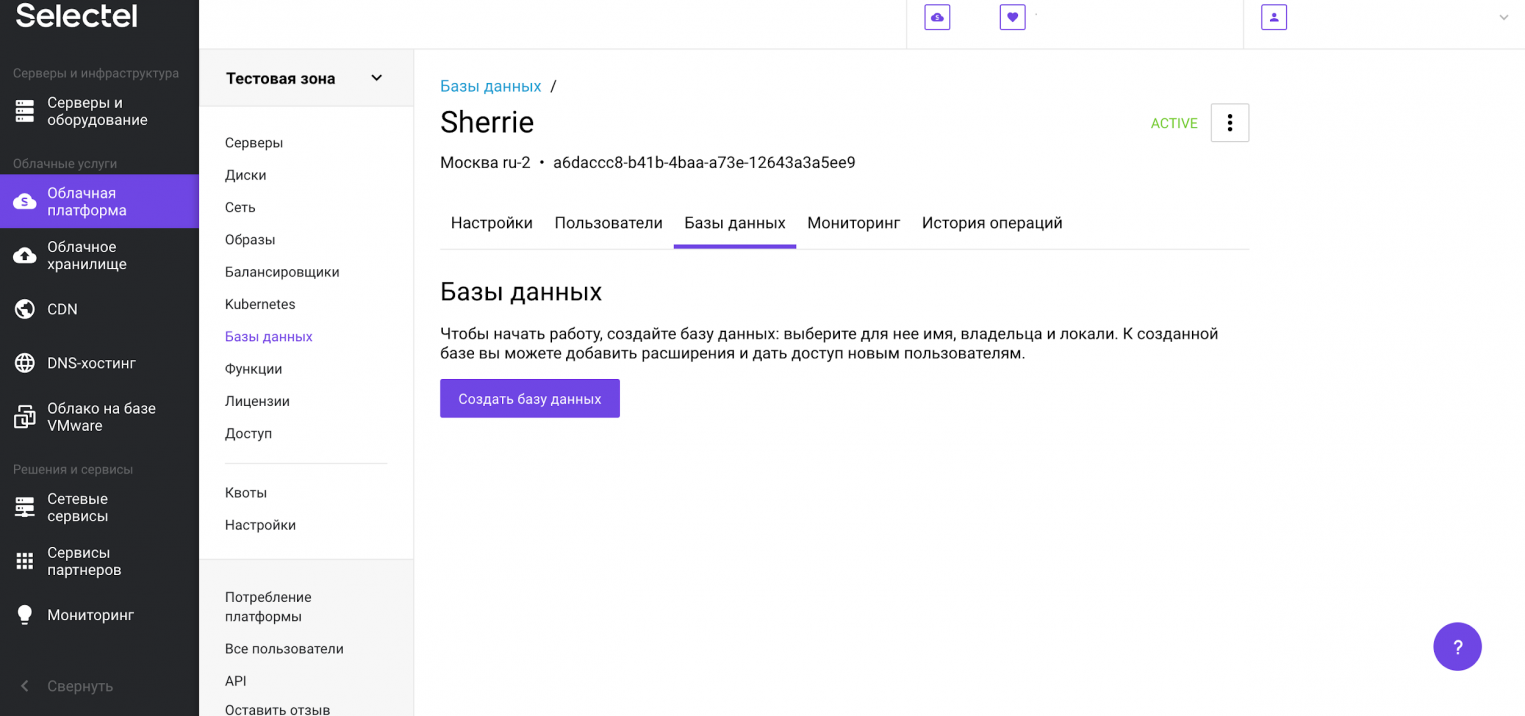
В Облачной платформе Selectel есть возможность создавать управляемые базы данных (Managed Databases). Такие БД разворачиваются в несколько кликов мыши, однако, их основные преимущества — автоматическое резервное копирование, отказоустойчивость, быстрое масштабирование и управление различными характеристиками из графического интерфейса. Ниже мы создадим экземпляр управляемой базы данных, создадим резервную копию базы данных на виртуальном сервере и восстановим ее в управляемую базу данных.
Чтобы создать управляемую базу данных, перейдем в меню Базы данных и нажмем кнопку Создать кластер:
Появится форма создания кластера. Здесь можно выбрать версию PostgreSQL, конфигурацию кластера, настройки сети, режим пулинга и размер пула.
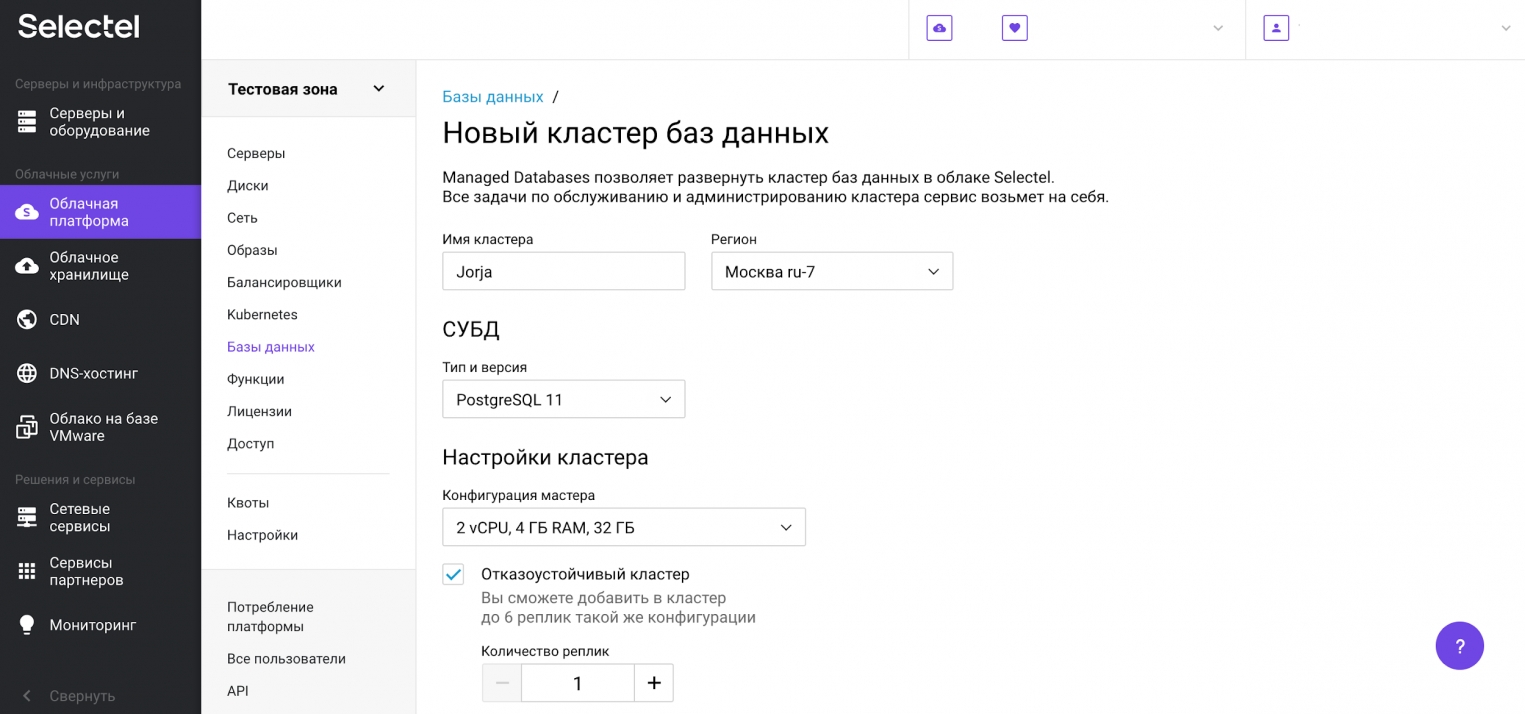
Обращаем внимание на блок Резервные копии, в котором указаны частота резервного копирования, время и срок хранения выгрузок. «Под капотом» используется механизм wal-g, о котором мы писали выше.
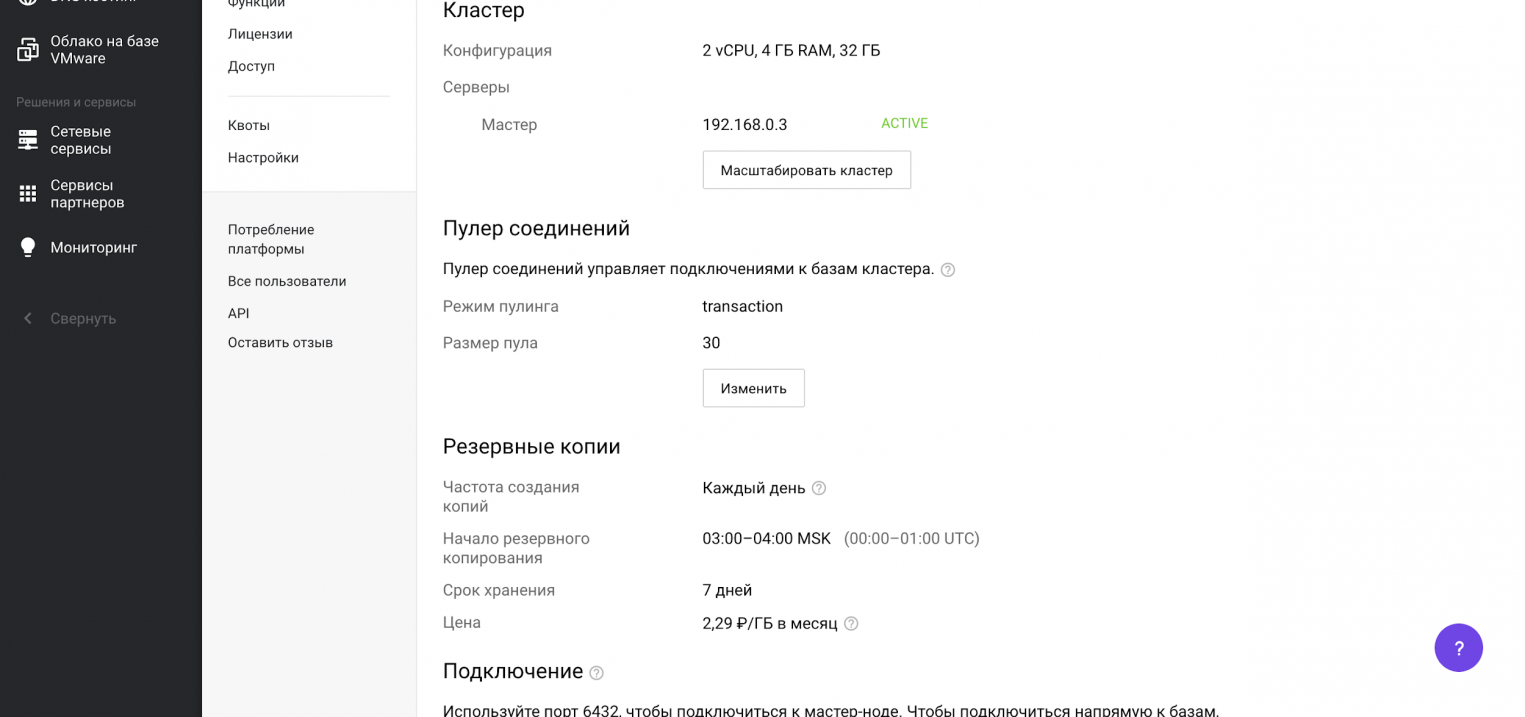
Автоматическое создание резервных копий отключить нельзя.
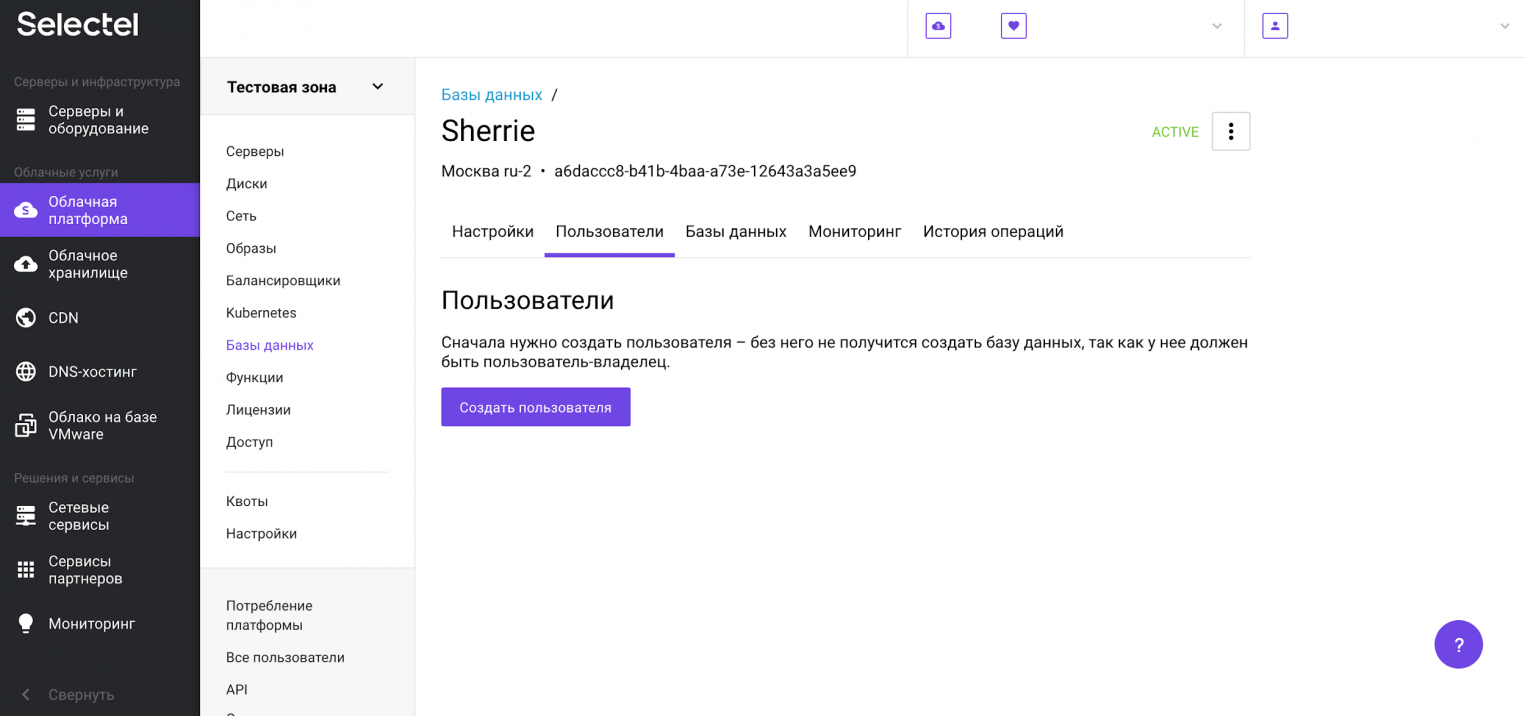
Следующий шаг — создание пользователя, от имени которого мы позже будем обращаться к базе данных. Для этого перейдем на вкладку Пользователи и нажмем на кнопку Создать пользователя.
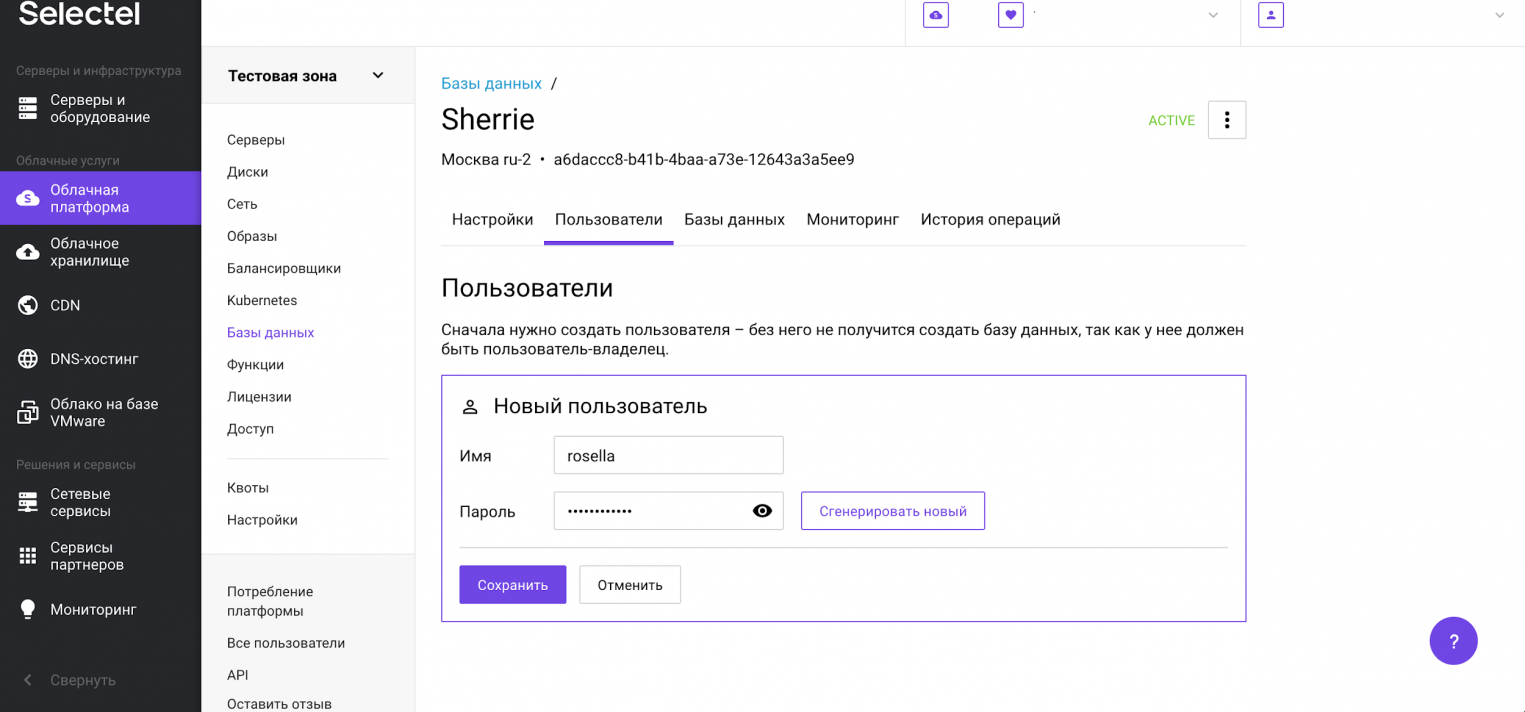
После этого появится приглашение ввести имя пользователя и пароль. После ввода этих данных нажимаем Сохранить.
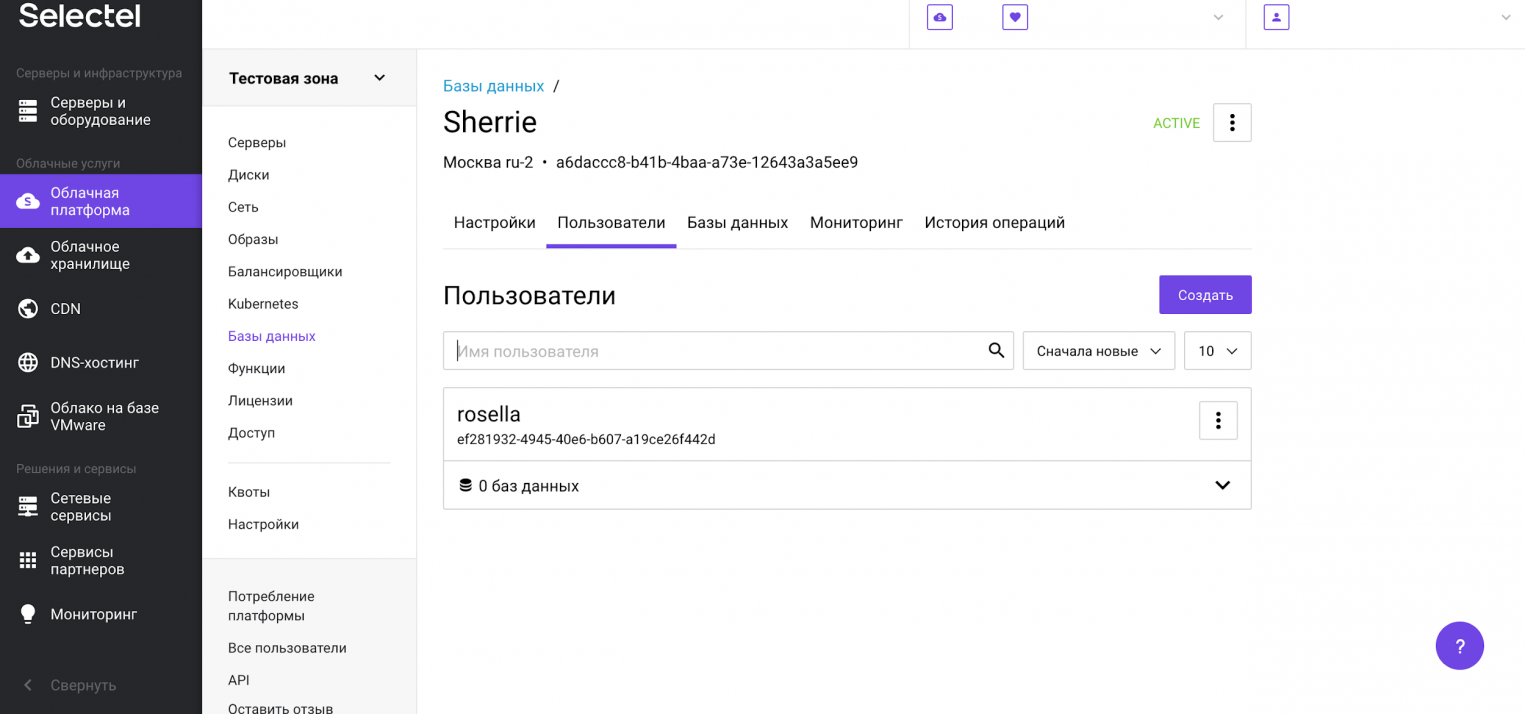
Пользователь создан и отображается в списке пользователей.
Теперь создадим базу данных. Для этого перейдем на вкладку Базы данных и нажмем на кнопку Создать базу данных.
Заполняем необходимые поля и нажимаем кнопку Сохранить.
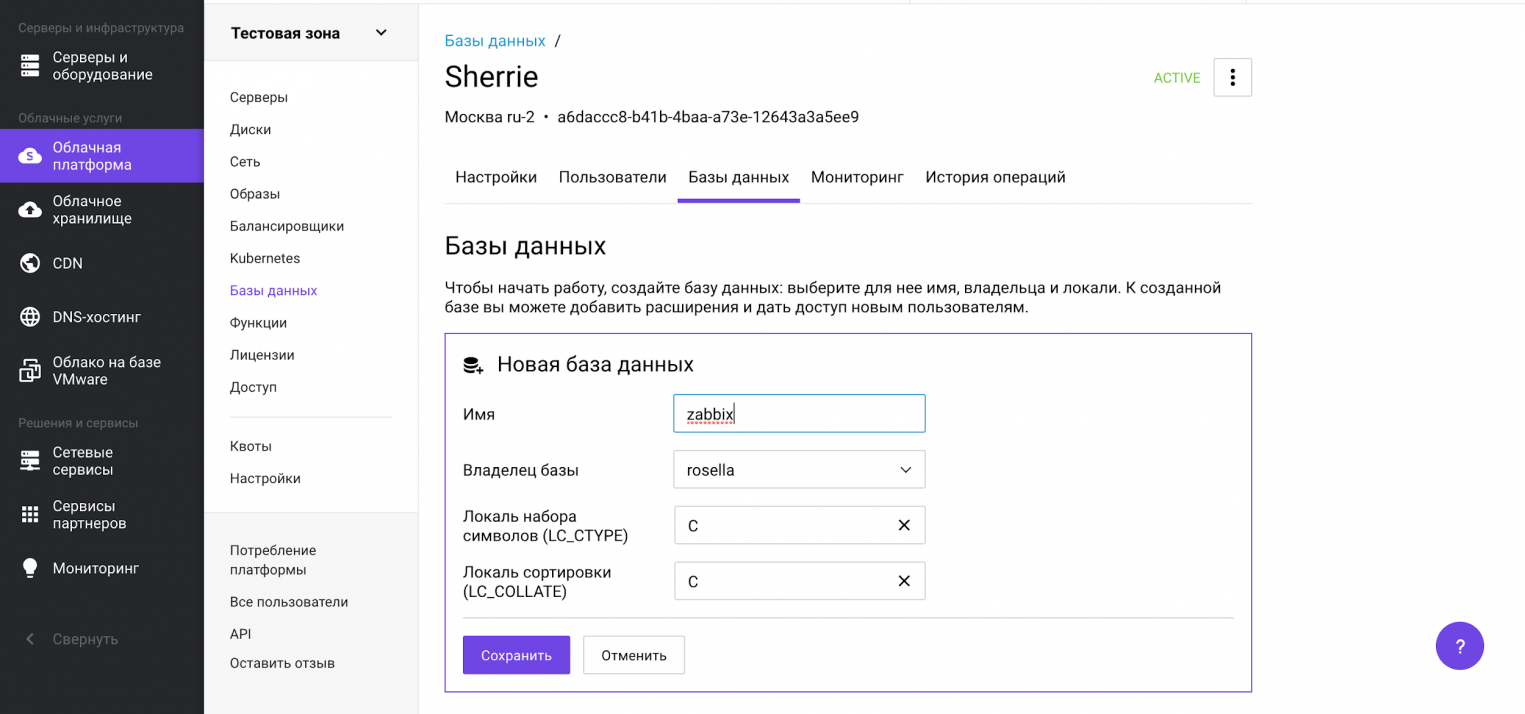
База данных создана и отображается в списке баз данных.

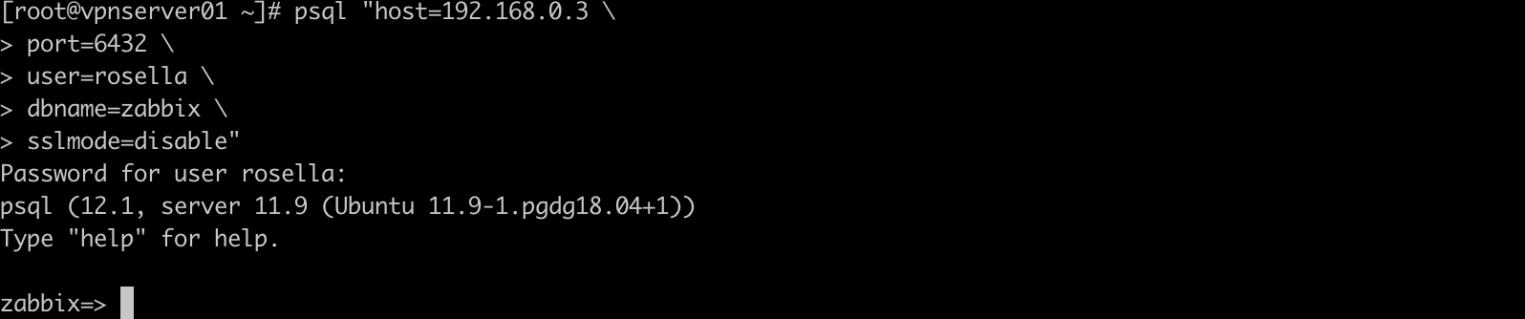
Теперь проверим возможность подключения. Для этого откроем консоль и вводим реквизиты:
# psql "host=192.168.0.3
port=6432
user=rosella
dbname=zabbix
sslmode=disable"
В консоли должно появиться приглашение к вводу SQL-запроса или других управляющих команд.
Выполним резервное копирование при помощи команды pg_dump:
# pg_dump zabbix > /tmp/zabbix.dumpИ следом резервное восстановление в созданную управляемую базу данных:
# psql -h 192.168.0.3 -U rosella -d zabbix < /tmp/zabbix.dumpВ результате выполнения команды выше мы восстановили резервную копию в управляемую базу данных.
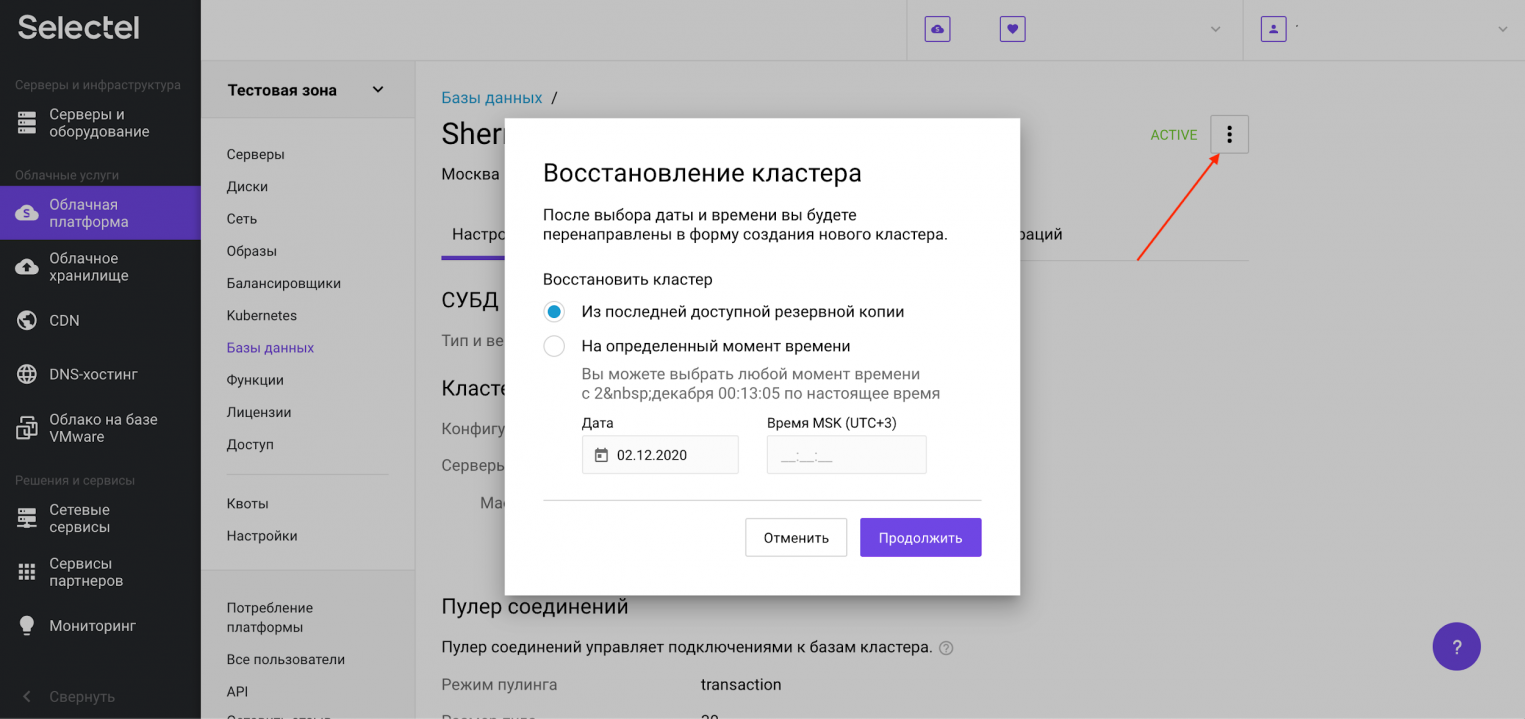
Чтобы воспользоваться восстановлением из резервной копии, которая автоматически создается на платформе Selectel, необходимо нажать на символ с тремя точками. В открывшемся меню нужно нажать на опцию Восстановить. После этого появится модальное окно, в котором можно выбрать резервную копию, а также дату и время, на которое нужно восстановить базу данных. Это так называемый Point-in-Time Recovery из WAL-файлов.
Услуга «Управляемые базы данных в облаке» позволяет перенести существующий кластер PostgreSQL на сервис управляемых баз данных бесшовно и без простоя, обратившись в техническую поддержку. Инженеры Selectel готовы помочь с переносом, а также проконсультировать по всем связанным с этим процессом вопросам.
Заключение
Мы рассмотрели возможности выполнения резервного копирования и показали отличия утилит pg_dump, pg_dumpall, pg_restore, pg_basebackup и wal-g. Вы увидели как можно создать управляемую базу данных, чтобы переложить часть административных задач на облачного провайдера.
Узнать подробнее об управляемых базах данных можно в документации Selectel.
 Обновлено: 30.05.2022
Опубликовано: 25.09.2017
Тематические термины: PostgreSQL, SQL
В данной инструкции рассмотрены варианты и примеры создания резервных копий и восстановления баз СУБД PostgreSQL.
Создание копий
Базовая команда
Пользователь и пароль
Сжатие данных
Скрипт
На удаленном сервере
Дамп определенной таблицы
Каждая таблица в свой файл
Для определенной схемы
Только схемы
Только данные
pgAdmin
Не текстовые форматы
pg_basebackup
pg_dumpall (все базы данных)
Восстановление
Базовая команда
С авторизацией
Из файла gz
Определенную базу
Определенную таблицу
С помощью pgAdmin
pg_restore (бинарные бэкапы)
Работа с CSV
Возможные проблемы
Input file appears to be a text format dump. please use psql
No matching tables were found
Too many command-line arguments
Aborting because of server version mismatch
No password supplied
Неверная команда
Все команды, которые приводятся ниже, должны выполняться из командной строки. В Linux — это окно терминала, в Windows — командная строка (cmd.exe) с переходом в папку установки PostgreSQL.
Создание резервных копий
Базовая команда
Синтаксис:
pg_dump <параметры> <имя базы> > <файл, куда сохранить дамп>
Пример:
pg_dump users > /tmp/users.dump
Пользователь и пароль
Если резервная копия выполняется не от учетной записи postgres, необходимо добавить опцию -U с указанием пользователя:
pg_dump -U dmosk -W users > /tmp/users.dump
* где dmosk — имя учетной записи; опция W потребует ввода пароля.
Сжатие данных
Для экономии дискового пространства или более быстрой передачи по сети можно сжать наш архив:
pg_dump users | gzip > users.dump.gz
Скрипт для автоматического резервного копирования
Рассмотрим 2 варианта написания скрипта для резервирования баз PostgreSQL. Первый вариант — запуск скрипта от пользователя root для резервирования одной базы. Второй — запуск от пользователя postgres для резервирования всех баз, созданных в СУБД.
Для начала, создадим каталог, в котором разместим скрипт, например:
mkdir /scripts
И сам скрипт:
vi /scripts/postgresql_dump.sh
Вариант 1. Запуск от пользователя root; одна база.
#!/bin/sh
PATH=/etc:/bin:/sbin:/usr/bin:/usr/sbin:/usr/local/bin:/usr/local/sbin
PGPASSWORD=password
export PGPASSWORD
pathB=/backup
dbUser=dbuser
database=db
find $pathB ( -name «*-1[^5].*» -o -name «*-[023]?.*» ) -ctime +61 -delete
pg_dump -U $dbUser $database | gzip > $pathB/pgsql_$(date «+%Y-%m-%d»).sql.gz
unset PGPASSWORD
* где password — пароль для подключения к postgresql; /backup — каталог, в котором будут храниться резервные копии; dbuser — имя учетной записи для подключения к БУБД; pathB — путь до каталога, где будут храниться резервные копии.
* данный скрипт сначала удалит все резервные копии, старше 61 дня, но оставит от 15-о числа как длительный архив. После при помощи утилиты pg_dump будет выполнено подключение и резервирование базы db. Пароль экспортируется в системную переменную на момент выполнения задачи.
Для запуска резервного копирования по расписанию, сохраняем скрипт в файл, например, /scripts/postgresql_dump.sh и создаем задание в планировщике:
crontab -e
3 0 * * * /scripts/postgresql_dump.sh
* наш скрипт будет запускаться каждый день в 03:00.
Вариант 2. Запуск от пользователя postgres; все базы.
#!/bin/bash
PATH=/etc:/bin:/sbin:/usr/bin:/usr/sbin:/usr/local/bin:/usr/local/sbin
pathB=/backup/postgres
find $pathB ( -name «*-1[^5].*» -o -name «*-[023]?.*» ) -ctime +61 -delete
for dbname in `echo «SELECT datname FROM pg_database;» | psql | tail -n +3 | head -n -2 | egrep -v ‘template0|template1|postgres’`; do
pg_dump $dbname | gzip > $pathB/$dbname-$(date «+%Y-%m-%d»).sql.gz
done;
* где /backup — каталог, в котором будут храниться резервные копии; pathB — путь до каталога, где будут храниться резервные копии.
* данный скрипт сначала удалит все резервные копии, старше 61 дня, но оставит от 15-о числа как длительный архив. После найдет все созданные в СУБД базы, кроме служебных и при помощи утилиты pg_dump будет выполнено резервирование каждой найденной базы. Пароль нам не нужен, так как по умолчанию, пользователь postgres имеет возможность подключаться к базе без пароля.
Необходимо убедиться, что у пользователя postgre будет разрешение на запись в каталог назначения, в нашем примере, /backup/postgres.
Зададим в качестве владельца файла, пользователя postgres:
chown postgres:postgres /scripts/postgresql_dump.sh
Для запуска резервного копирования по расписанию, сохраняем скрипт в файл, например, /scripts/postgresql_dump.sh и создаем задание в планировщике:
crontab -e -u postgres
* мы откроем на редактирование cron для пользователя postgres.
3 0 * * * /scripts/postgresql_dump.sh
* наш скрипт будет запускаться каждый день в 03:00.
Права и запуск
Разрешаем запуск скрипта, как исполняемого файла:
chmod +x /scripts/postgresql_dump.sh
Единоразово можно запустить задание на выполнение резервной копии:
/scripts/postgresql_dump.sh
… или от пользователя postgres:
su — postgres -c «/scripts/postgresql_dump.sh»
На удаленном сервере
Если сервер баз данных находится на другом сервере, просто добавляем опцию -h:
pg_dump -h 192.168.0.15 users > /tmp/users.dump
* необходимо убедиться, что сама СУБД разрешает удаленное подключение. Подробнее читайте инструкцию Как настроить удаленное подключение к PostgreSQL.
Дамп определенной таблицы
Запускается с опцией -t <table> или —table=<table>:
pg_dump -t students users > /tmp/students.dump
* где students — таблица; users — база данных.
Если наша таблица находится в определенной схеме, то она указывается вместе с ней, например:
pg_dump -t public.students users > /tmp/students.dump
* где public — схема; students — таблица; users — база данных.
Размещение каждой таблицы в отдельный файл
Также называется резервированием в каталог. Данный способ удобен при больших размерах базы или необходимости восстанавливать отдельные таблицы. Выполняется с ипользованием ключа -d:
pg_dump -d customers > /tmp/folder
* где /tmp/folder — путь до каталога, в котором разместяться файлы дампа для каждой таблицы.
Для определенной схемы
В нашей базе может быть несколько схем. Если мы хотим сделать дамп только для определенной схемы, то используем опцию -n, например:
pg_dump -n public peoples > /tmp/peoples.public.sql
* в данном примере мы заархивируем схему public базы данных peoples.
Только схемы (структуры)
Для резервного копирования без данных (только таблицы и их структуры):
pg_dump —schema-only users > /tmp/users.schema.dump
Также, внутри каждой базы могут быть свои схемы с данными. Если нам нужно сделать дамп именно той схемы, которая внутри базы, используем ключ -n:
pg_dump —schema-only users -n production > /tmp/users.schema_production.dump
* в данном примере мы создадим дамп структуры базы данных users только для схемы production.
Или полный дамп с данными для схемы внутри базы данных:
pg_dump users -n production > /tmp/users.production.dump
Только данные
pg_dump —data-only users > /tmp/users.data.dump
Использование pgAdmin
Данный метод хорошо подойдет для компьютеров с Windows и для быстрого создания резервных копий из графического интерфейса.
Запускаем pgAdmin — подключаемся к серверу — кликаем правой кнопкой мыши по базе, для которой хотим сделать дамп — выбираем Резервная копия:

В открывшемся окне выбираем путь для сохранения данных и настраиваемый формат:

При желании, можно изучить дополнительные параметры для резервного копирования:

После нажимаем Резервная копия — ждем окончания процесса и кликаем по Завершено.
Не текстовые форматы дампа
Другие форматы позволяют делать частичное восстановление, работать в несколько потоков и сжимать данные.
Бинарный с компрессией:
pg_dump -Fc users > users.bak
Тарбол:
pg_dump -Ft users > users.tar
Directory-формат:
pg_dump -Fd users > users.dir
Использование pg_basebackup
pg_basebackup позволяет создать резервную копию для кластера PostgreSQL.
pg_basebackup -h node1 -D /backup
* в данном примере создается резервная копия для сервера node1 с сохранением в каталог /backup.
pg_dumpall
Данная утилита делает выгрузку всех баз данных, в том числе системных. На выходе получаем файл для восстановления в формате скрипта.
pg_dumpall > cluster.bak
Утилиту удобно использовать с ключом -g (—globals-only) — выгрузка только глобальных объектов (ролей и табличных пространств).
Для создание резервного копирования со сжатием:
pg_dumpall | gzip > cluster.tar.gz
Восстановление
Может понадобиться создать базу данных. Это можно сделать SQL-запросом:
=# CREATE DATABASE users WITH ENCODING=’UTF-8′;
* где users — имя базы; UTF-8 — используемая кодировка.
Если мы получим ошибку:
ERROR: encoding «UTF8» does not match locale «en_US»
DETAIL: The chosen LC_CTYPE setting requires encoding «LATIN1».
Указываем больше параметров при создании базы:
CREATE DATABASE users WITH OWNER ‘postgres’ ENCODING ‘UTF8’ LC_COLLATE = ‘ru_RU.UTF-8’ LC_CTYPE = ‘ru_RU.UTF-8’ TEMPLATE = template0;
Базовая команда
Синтаксис:
psql <имя базы> < <файл с дампом>
Пример:
psql users < /tmp/users.dump
С авторизацией
При необходимости авторизоваться при подключении к базе вводим:
psql -U dmosk -W users < /tmp/users.dump
* где dmosk — имя учетной записи; опция W потребует ввода пароля.
Из файла gz
Сначала распаковываем файл, затем запускаем восстановление:
gunzip users.dump.gz
psql users < users.dump
Или одной командой:
zcat users.dump.gz | psql users
Определенную базу
Если резервная копия делалась для определенной базы, запускаем восстановление:
psql users < /tmp/database.dump
Если делался полный дамп (всех баз), восстановить определенную можно при помощи утилиты pg_restore с параметром -d:
pg_restore -d users cluster.bak
Определенную таблицу
Если резервная копия делалась для определенной таблицы, можно просто запустить восстановление:
psql users < /tmp/students.dump
Если делался полный дамп, восстановить определенную таблицу можно при помощи утилиты pg_restore с параметром -t:
pg_restore -a -t students users.dump
С помощью pgAdmin
Запускаем pgAdmin — подключаемся к серверу — кликаем правой кнопкой мыши по базе, для которой хотим восстановить данные — выбираем Восстановить:

Выбираем наш файл с дампом:

И кликаем по Восстановить:

Использование pg_restore
Данная утилита предназначена для восстановления данных не текстового формата (в одном из примеров создания копий мы тоже делали резервную копию не текстового формата).
Из бинарника:
pg_restore -Fc users.bak
Из тарбола:
pg_restore -Ft users.tar
С созданием новой базы:
pg_restore -Ft -C users.tar
Мы можем использовать опцию d для указания подключения к конкретному серверу и базе, например:
pg_restore -d «postgresql://dmosk_user:dmosk_pass@localhost/dmosk_base» -Fc users.bak
* в данном примере мы подключимся к локальной базе (localhost) с названием dmosk_base от пользователя dmosk_user с паролем dmosk_pass.
Работа с CSV
Мы можем переносить данные с использованием файлов csv. Это нельзя назвать напрямую резервным копированием, но в рамках данной инструкции материал будет интересен.
Создание файла CSV (экспорт)
Пример запроса (выполняется в командной оболочке SQL):
> COPY (SELECT * FROM public.users WHERE name LIKE ‘А%’) TO ‘/tmp/users.csv’ WITH CSV DELIMITER ‘;’ HEADER;
* в данном примере мы выгрузим все данные для таблицы users в схеме public, где значение поля name начинается с буквы А. Результат будет сохранен в файл /tmp/users.csv. Также мы указываем, что в качестве разделителя данных нужно использовать точку с запятой и первой строкой сделать заголовок.
Также мы можем сделать выгрузку, но сделать вывод в оболочку и перенаправить его в файл:
psql -d «postgresql://pg_user:pg_pass@localhost:5432/pg_databasename» -c «COPY (SELECT * FROM public.users WHERE name LIKE ‘А%’) TO STDIN WITH CSV DELIMITER ‘;’ HEADER;» > /tmp/users.csv
Импорт данных из файла CSV
Также можно выполнить запрос в оболочке SQL:
> COPY public.users FROM ‘/tmp/test.csv’ DELIMITER ‘;’ CSV HEADER;
Или перенаправить запрос через STDOUT из файла:
psql -d «postgresql://pg_user:pg_pass@localhost:5432/pg_databasename» -c «COPY public.users FROM STDOUT DELIMITER ‘;’ CSV HEADER;» < /tmp/users.csv
* в нашем примере мы выполним импорт данных из ранее созданного файла /tmp/users.csv в таблицу users.
Возможные ошибки
Рассмотрим некоторые проблемы, с которыми можно столкнуться при работе с дампами PostgreSQL.
Input file appears to be a text format dump. please use psql.
Причина: дамп сделан в текстовом формате, поэтому нельзя использовать утилиту pg_restore.
Решение: восстановить данные можно командой psql <имя базы> < <файл с дампом> или выполнив SQL, открыв файл, скопировав его содержимое и вставив в SQL-редактор.
No matching tables were found
Причина: Таблица, для которой создается дамп не существует. Утилита pg_dump чувствительна к лишним пробелам, порядку ключей и регистру.
Решение: проверьте, что правильно написано название таблицы и нет лишних пробелов.
Too many command-line arguments
Причина: Утилита pg_dump чувствительна к лишним пробелам.
Решение: проверьте, что нет лишних пробелов.
Aborting because of server version mismatch
Причина: несовместимая версия сервера и утилиты pg_dump. Может возникнуть после обновления или при выполнении резервного копирования с удаленной консоли.
Решение: нужная версия утилиты хранится в каталоге /usr/lib/postgresql/<version>/bin/. Необходимо найти нужный каталог, если их несколько и запускать нужную версию. При отсутствии последней, установить.
No password supplied
Причина: нет системной переменной PGPASSWORD или она пустая.
Решение: либо настройте сервер для предоставление доступа без пароля в файле pg_hba.conf либо экспортируйте переменную PGPASSWORD (export PGPASSWORD или set PGPASSWORD).
Неверная команда
Причина: при выполнении восстановления возникла ошибка, которую СУБД не показывает при стандартных параметрах восстановления.
Решение: запускаем восстановление с опцией -v ON_ERROR_STOP=1, например:
psql -v ON_ERROR_STOP=1 users < /tmp/users.dump
Теперь, когда возникнет ошибка, система прекратит выполнять операцию и выведет сообщение на экран.
-
Главная
-
Инструкции
-
PostgreSQL
-
Дампы в PostgreSQL: резервное копирование и восстановление

Важным моментом в администрировании любой базы данных является вопрос сохранности данных от воздействия внешних и внутренних факторов: физическая неисправность сервера, взлом БД или ошибка пользователя. Резервное копирование занимает особое место в вопросе сохранности информации. В postgresql это реализуется встроенными и сторонними инструментами, о которых сегодня и пойдет речь.
Создание резервных копий
pg_dump
В postgresql резервное копирование одной конкретной базы данных можно осуществить с помощью pg_dump. Во работы этой утилиты пользователь может обращаться к БД: записывать или читать данные.
Формат дампа пользователь определяет сам. Это может быть архив или скрипт. Скрипт — это текстовый файл с перечнем SQL команд. Восстановление БД с помощью скрипта реализуется несколькими путями:
- выполнение скрипта в консольном клиенте PostgreSQL;
- выполнение такой psql-команды:
psql [имя БД] < [SQL скрипт postgresql dump database]Восстановления БД с помощью архива реализуется утилитой pg_restore.
Что выбрать: скрипт или архив? Зависит от вашей БД и цели резервного копирования. Если вы хотите перенести БД на другую машину в PostgreSQL, то подойдет скрипт. Архивы же устроены таким образом, что их можно переносить на другие платформы. Помимо прочего, восстановление с помощью pg_restore предоставит вам возможность настраивать сам процесс за счет параметров утилиты.
Важно не забывать: pg_dump создает дамп только одного экземпляра БД. При наличии глобальных объектов PostgreSQL необходимо использовать утилиту pg_dumpall, речь о которой пойдет дальше.
Синтаксис
pg_dump [параметры для подключения] [параметры дампа] [имя БД*] > [каталог, куда необходимо сохранить backup postgres database]* Если не задать имя БД, то вместо него будет использоваться значение переменной окружения PGDATABASE. А если PGDATABASE не присвоено какое-либо значение, то pg_dump воспользуется именем пользователя, инициирующего утилиту.
Параметры для подключения
- -d [name] или —dbname=[name]: имя БД. Равнозначно [имя базы данных].
- -h [name] или —host=[name]: имя сервера. По умолчанию host = PGHOST.
- -p [port] или —port=[port]: порт. По умолчанию port = PGPORT.
- -U [name] или —username=[name]: имя пользователя.
Параметры создания резервной копии
- -a или —data-only: сохраняем только данные. Например, при использовании этого параметра связи между таблицами не сохраняются.
- -b или —blobs: добавляем в дамп большие объекты. Этот параметр используется по умолчанию.
- -B или —no-blobs: не сохраняем большие объекты.
- -c или —clean: добавляем в скрипт команды DROP. Может понадобится при наличии объектов с одинаковыми именами. Применим только к SQL скриптам.
- -C или —create: добавляем в скрипт команды для создания БД и подключения к ней. Применимо только к SQL скриптам.
- -E кодировка или —encoding=кодировка: устанавливаем определенную кодировку дампа.
- -f [catalog] или —file=[catalog]: каталог, куда сохраняем дамп. Параметр равнозначен указанному в синтаксисе [каталог, куда необходимо сохранить дамп БД]
- -F [format] или —format=[format]: формат дампа. В postgresql format может принимать следующие значения:
- p или plain: SQL скрипт. Значение по умолчанию.
- c или custom: архив.
- d или directory: каталог.
- t или tar: формат .tar
- -j [count] или —jobs=[count]: выполняем утилиту в многопоточном формате (количество потоков = [count]).
- -n [schema] или —schema=[schema]: сохраняем схемы, удовлетворяющие шаблону.
- -N [schema] или —exclude-schema=[schema]: не сохраняем схемы, удовлетворяющие шаблону.
- -o или —oids: сохраняем OID.
- -O или —no-owner: не добавляем в скрипт команды, связанные с установкой владельцев.
- -s или —schema-only: сохраняем только схемы.
- -t [schema] или —table=[schema]: сохранить таблицы, удовлетворяющие шаблону.
- -T [schema] или —exclude-table=[schema]: не сохраняем таблицы, удовлетворяющие шаблону.
- -x или —no-privileges или —no-acl: не сохраняем права доступа.
- -Z [0..9] или —compress=[0..9]: выбираем уровня сжатия (0 — не сжимать, 9 — максимальный).
pg_dumpall
Pg_dumpall создает бэкап целого кластера или инстанса. Результат работы утилиты — SQL скрипт. Во многих аспектах эта утилита похожа на pg_dump.
Синтаксис
pg_dumpall [параметры для подключения] [параметры дампа] > [каталог, куда необходимо сохранить дамп]Параметры для подключения
- -d [connection string] или —dbname=[connection string]: задаем строку подключения.
- -h [name] или —host=[name]: имя сервера. По умолчанию host = PGHOST.
- -p [port] или —port=[port]: порт. По умолчанию port = PGPORT.
- -U [name] или —username=[name]: имя пользователя.
- -l [name] или —database=[name]: выбираем БД, через которую загрузим глобальные объекты.
Параметры создания резервной копии
- -a или —data-only: сохраняем только данные. Например, при использовании этого параметра связи между таблицами не сохраняются.
- -c или —clean: добавляем в дамп команды DROP перед CREATE. Может понадобится при наличии объектов с одинаковыми именами.
- -f [catalog] или —file=[catalog]: каталог, куда сохраняем дамп. Параметр равнозначен указанному в синтаксисе [каталог, куда необходимо сохранить дамп]
- -g или —globals-only: сохраняем только глобальные объекты.
- -o или —oids: сохранять OID.
- -O или —no-owner: не добавляем в скрипт команды, связанные с установкой владельцев.
- -r или —roles-only: сохраняем только роли.
- -s или —schema-only: сохраняем только схемы.
- -t или —tablespaces-only: сохраняем только табличные пространства.
- -x или —no-privileges или —no-acl: не сохраняем права доступа.
pg_basebackup
Pg_basebackup — это утилита для создания бэкапа всего инстанса или кластера. Результат работы — дамп в бинарном формате. Сам процесс нельзя настроить: вы сохраняете кластер (инстанс) целиком. В postgresql список пользователей, обладающих правом создания дампа с помощью pg_basebackup, ограничен. Для этого необходимо быть суперпользователем или обладать правом REPLICATION.
Синтаксис
pg_basebackup [параметры для подключения] [параметры создания резервной копии]Параметры для подключения
- -d [connection string] или —dbname=[connection string]: задаем строку подключения.
- -h [name] или —host=[name]: имя сервера. По умолчанию host = PGHOST.
- -p [port] или —port=[port]: порт. По умолчанию port = PGPORT.
- -U [name] или —username=[name]: имя пользователя.
Параметры создания резервной копии
- -D [catalog] или —pgdata=[catalog]: каталог, каталог, куда сохраняем дамп.
- -F [format] или —format=[format]: формат дампа. Может иметь следующие значения:
- p или plain: обычные файлы;
- t или tar: формат .tar;
- -r [speed]или —max-rate=[speed]: задаем максимальную скорость передачи данных в Кб/с
- -Z [0..9] или —compress=[0..9]: выбираем уровня сжатия (0 — не сжимать, 9 — максимальный).
pg_restore
Pg_restore работает в связке с pg_dump. На вход поступает дамп в архивном формате, созданный с помощью pg_dump. При восстановлении вы можете настраивать различные параметры процесса.
Синтаксис
pg_restore [параметры для подключения] [параметры восстановления] [дамп базы данных]Параметры для подключения
- -h [name] или —host=[name]: имя сервера. По умолчанию host = PGHOST.
- -p [port] или —port=[port]: порт. По умолчанию port = PGPORT.
- -U [name] или —username=[name]: имя пользователя.
- -w или —no-password: отключаем запрос пароля.
- -W или —password: принудительно включаем запрос пароля.
- —role=[name]: задаем имя роли.
Параметры восстановления
- -a или —data-only: восстанавливаем только данные.
- -c или —clean: удаляем одноименные объекты перед восстановлением.
- -C или —create: создаем БД перед восстановлением.
- -d [name] или —dbname=[name]: подключаемся к [name] БД и восстанавливаем данные в неё.
- -e или —exit-on-error: завершаем восстановление в случае ошибки.
- -j [count] или —jobs=[count]: осуществляем восстановление в многопоточном режиме ([count]=количество потоков)
- -n [schema] или —schema=[schema]: восстанавливаем объекты только этой схемы.
- -N [schema] или —exclude-schema=[schema]: не восстанавливаем объекты этой схемы.
- -O или —no-owner: не восстанавливаем права на владение объектами.
- -s или —schema-only: восстанавливаем только схему
- -t таблица или —table=таблица: восстанавливаем только указанную таблицу.
- -x или —no-privileges или —no-acl: не восстанавливаем права доступа.
wal-g
Wal-g — это сторонняя утилита для выгрузки дампов в хранилища и восстановления БД. Её действие распространяется не только на PostgreSQL, но и на другие СУБД. Wal-g поддерживает работу с несколькими типами хранилищ. Мы сосредоточимся на работе с S3.
Загрузка и установка
Wal-g работает в linux-системах, для работы на Win 10 необходимо использовать сервисы наподобие WSL. Работа с wal-g начинается с github, где расположены файлы утилиты. На вкладке releases размещены версии для различных систем и СУБД. Для установки последней версии wal-g на Ubuntu 20.04 выполняем эти команды:
wget https://github.com/wal-g/wal-g/releases/download/v1.1/wal-g-pg-ubuntu-20.04-amd64.tar.gz
tar -zxvf wal-g-pg-ubuntu-20.04-amd64.tar.gz -C /usr/local/bin/wal-g
Настройка
Для настройки wal-g можно воспользоваться как переменными окружения, так и конфигурационным файлом. Мы создадим конфигурационный файл для хранилища S3 по такому шаблону bash:
cat > /var/lib/postgresql/.walg.json << EOF
{
    "WALG_S3_PREFIX": "Путь к вашему бакету",
    "AWS_ACCESS_KEY_ID": "Ключ доступа к хранилищу",
    "AWS_SECRET_ACCESS_KEY": "Секретный ключ",
    "WALG_COMPRESSION_METHOD": "Алгоритм сжатия:brotli, LZ4 или LZMA.",
    "WALG_DELTA_MAX_STEPS": "количество дельт*",
    "PGDATA": "путь к данным БД",
    "PGHOST": "имя хоста"
}
EOFchown postgres: /var/lib/postgresql/.walg.json #меняем имя владельца скрипта на postgres
*Дельта-бэкап — это бэкап разницы между текущим состоянием системы и последним полным бэкапом. Такой подход позволяет экономить пространство в хранилище. Количество дельт — это количество таких бэкапов.
Использование
За создание бэкапов в wal-g отвечает функция backup_push. Её можно использовать прямо в консоли следующим образом:
su postgres -c ’/usr/local/bin/wal-g/wal-g backup_push *путь к данным БД или PGDATA*’pgAdmin
pgAdmin — это утилита с графическим интерфейсом для создания дампов. Для начала работы переходим на сайт pgAdmin и загружаем подходящую версию программы:
После загрузки и установки необходимо подключиться к серверу:
В PostgreSQL есть утилита, которая создает дамп базы данных и называется она pg_dump. Для того чтобы автоматизировать процесс создания бэкапов баз PostgreSQL нужно будет создать bat-файл, который будет вызывать утилиту pg_dump и вызывать его с помощью планировщика заданий. Результатом выполнения такого сценария будет ежедневное копирование базы данных PostgreSQL, ведение журнала с информацией о датах и результатах выполнения, сохранение подробных сведений о ходе выполнения каждой резервной копии в отдельный текстовый файл и в случае неудачи отображение диалогового окна с сообщением.Содержимое bat-файла следующее:
REM ПРИМЕР СОЗДАНИЯ РЕЗЕРВНОЙ КОПИИ БАЗЫ ДАННЫХ POSTGRESQL
CLS
ECHO OFF
CHCP 1251
REM Установка переменных окружения
SET PGBIN=c:Program FilesPostgreSQL9.2.4-1.1Cbin
SET PGDATABASE=ut
SET PGHOST=localhost
SET PGPORT=5432
SET PGUSER=postgres
SET PGPASSWORD=123456
REM Смена диска и переход в папку из которой запущен bat-файл
%~d0
CD %~dp0
REM Формирование имени файла резервной копии и файла-отчета
SET DATETIME=%DATE:~6,4%-%DATE:~3,2%-%DATE:~0,2% %TIME:~0,2%-%TIME:~3,2%-%TIME:~6,2%
SET DUMPFILE=%PGDATABASE% %DATETIME%.backup
SET LOGFILE=%PGDATABASE% %DATETIME%.log
SET DUMPPATH="Backup%DUMPFILE%"
SET LOGPATH="Backup%LOGFILE%"
REM Создание резервной копии
IF NOT EXIST Backup MD Backup
CALL "%PGBIN%pg_dump.exe" --format=custom --verbose --file=%DUMPPATH% 2>%LOGPATH%
REM Анализ кода завершения
IF NOT %ERRORLEVEL%==0 GOTO Error
GOTO Successfull
REM В случае ошибки удаляется поврежденная резервная копия и делается соответствующая запись в журнале
:Error
DEL %DUMPPATH%
MSG * "Ошибка при создании резервной копии базы данных. Смотрите backup.log."
ECHO %DATETIME% Ошибки при создании резервной копии базы данных %DUMPFILE%. Смотрите отчет %LOGFILE%. >> backup.log
GOTO End
REM В случае удачного резервного копирования просто делается запись в журнал
:Successfull
ECHO %DATETIME% Успешное создание резервной копии %DUMPFILE% >> backup.log
GOTO End
:End
Справочную информацию о командах, испульзуемых в этом файле можно получить из командной строки набрав следующую команду: «[Имя команды] /?»
Многие использованные здесь команды достаточно распространены и известны, поэтому хочется акцентировать внимание на нескольких менее известных.
Строки 15, 16 выполняют переход в папку в которой находится файл «backup.bat». «%0» возвращает имя bat-файла; «%~d0» и «%~dp0» возвращают соответственно диск и путь к bat-файлу. Подробные сведения о работе с параметрами файла можно посмотреть по этой ссылке.
В строке 19 формируется строковое представление даты и времени в нужном формате. При формировании происходит обращение к переменным окружения DATE и TIME, которые хранят текстовое представление даты и времени соответственно. После имени переменной указывается строка вида «:~m,n», где m — позиция в строке, n — количество символов.
В строке 27 вызывается утилита резервного копирования pg_dump.exe. Вызов выполняется с применением команды CALL, это позволяет дождаться завершения утилиты и проанализировать результат выполнения. Вызов утилиты завершается строкой «2>%LOGPATH%». Эта строка означает что поток ошибок STDERR, номер которого 2, приложения pg_dump.exe перенаправляется в файл, имя которого сохранено в переменной окружения LOGPATH. Так как приложение pg_dump.exe выводит все сообщения в стандартный поток ошибок, то в файле LOGPATH будет сохранен подробный отчет о выполнении резервного копирования.
В строках 37 и 42 выполняется перенаправление вывода в файл backup.log. Перенаправление осуществляется оператором «>>». Различие между операторами «>» и «>>» в том, что первый каждый раз создает новый файл, затирая ранее записанные данные, а второй — дописывает данные в существующий файл. Таким образом можно вести журнал с подробными сведениями о результатах резервного копирования.
Проверяем как работает bat-файл. Если дампы базы создаются, то можно приступать к созданию задачи для планировщика заданий Windows.
Создаем задание, которое будет запускать bat-файл каждый день в ночное время.
Ежедневные бэкапы со временям породят проблему свободного пространства на жестком диске. Можно чистить ручками, но лучше уж автоматизацию сделать полной. Решается этот вопрос также созданием bat-файла и задачи в планировщике заданий Windows.
Содержимое bat-файла такое:
forfiles /p "E:BACKUPBackup" /S /D -5 /C "cmd /c del /f /a /q @file"
Здесь указана команда при выполнении которой будут удаляться файлы старше 5 дней.
В планировщике заданий можно создать задачу на исполнения этого bat-файла раз в неделю.
Postgres provides three fundamentally different approaches for backing up its data:
- SQL dump (or Logical)
- File system-level backup (or Physical)
- Continuous archiving (or Point In Time Recovery)
![]() This article describes how to backup PostgreSQL databases in Windows. If you need to backup PostgreSQL databases in Linux, then we recommend that you have a look at this article: How to Automate PostgreSQL Database Backups in Linux.
This article describes how to backup PostgreSQL databases in Windows. If you need to backup PostgreSQL databases in Linux, then we recommend that you have a look at this article: How to Automate PostgreSQL Database Backups in Linux.
Now let’s discuss these three methods one by one but if you prefer GUI tools you can use our free application to create database backups, which is, in essence, a powerful wrapper for pg_dump that creates SQL dumps.
How to create PostgreSQL dump file
In Postgres, to extract a database into a script file or other archive file, a utility called “pg_dump” is used. A crucial advantage of this utility is that you can restore its dumps on newer versions of PostgreSQL or on machines with different architectures. Other backup methods, like file-level backups and continuous archiving, are bound to a particular server version and architecture.
The simplest usage of this command is:
pg_dump database_name > database.sql
or:
pg_dump database_name -f database.sql
This command creates an SQL file containing commands necessary for recreating the database in the same state it was at the time of the backup.
If you got “pg_dump” is not recognized as an internal or external command” error add the path to PostgreSQL’s bin directory to the PATH environment variable (in my case it is “C:Program FilesPostgreSQL11bin”). The option for changing the environment variable is running the command with the full path, for example:
“C:Program FilesPostgreSQL11binpg_dump” database_name > database.sql
The command must be run by a user with privileges to read all of the database information. If your Windows user doesn’t have enough rights to your database then you can run this command from Postgres user:
pg_dump -U postgres database_name > database.sql
Running pg_dump in batch (unattended)
If you plan to back up a database automatically, then you might need to get rid of a password prompt. It will be useful if you run a backup in a batch or scripts where no user is present to enter a password. You can do it by assigning a password to the PGPASSWORD variable:
SET PGPASSWORD=my_password
pg_dump -U postgres database_name > database.sql
As an alternative, when you don’t want to keep the password in a batch file, you can put the credentials to %APPDATA%postgresqlpgpass.conf in the following format:
hostname:port:database:username:password
Asterisks can replace the hostname and database.
The following commands will create a directory and add the record into the file in one batch:
cd %appdata%
mkdir postgresql
cd postgresql
echo localhost:5432:my_database:postgres:my_password >> pgpass.conf
Backing up a remote server
If you need to back up a remote server add -h and -p options:
pg_dump -h host_name -p port_number database_name > database.sql
If your database schema contains OIDs (like foreign keys), you must make pg_dump dumping the OIDs as well using the -o option. If your application does not reference the OID columns in any way, this option should not be used.
Backing up a single table
To dump a single table, use the -t option:
pg_dump -t table_name database_name > table.sql
In this case, pg_dump will not dump any other database objects linked to the selected table. It means that there is no guarantee that you will be able to restore this dump on a clean database without errors.
In old (before 8.2) PostgreSQL versions, -t table_name would dump all tables with the specified name. Modern Postgres engines dump everything visible in your default search path. If you want to go back to the old behavior, you can write -t “*.table_name”.
Also, you must write something like -t schema_name.table_name to choose a table of a particular schema instead of the old options like -n schema_name -t table_name.
Compressing the backup script
If you need to compress the output file, you must use the -Z option:
pg_dump -Z6 database_name > database.gz
This command causes the entire output file to be compressed as though it had been fed through gzip with a compression level equal to 6 (it can vary from 0 to 6).
Another option to get a smaller backup file is by using the custom file format on backup.
How to restore the PostgreSQL dump file
Since the text files generated by pg_dump contain a set of SQL commands, they can be fed to the psql utility. The database itself will not be created by psql, so you must create it yourself from template0 first. So, the general command form to restore a dump is:
createdb -T template0 database_name
psql database_name < database.sql
Before starting to restore an SQL dump and the recreation of the objects with the original ownership and/or permissions, it is crucial to make sure that all users who have been granted permissions on objects, or who own objects in the uploaded database, already exist. Otherwise, the restoration process will fail.
Restoring a remote database
If you need to restore a database on a remote server, you can connect psql to it using -h and -p options:
psql -h host_name -p port_number database_name < database.sql
It is possible to dump a database directly from one server to another due to the ability of pg_dump and psql to write to or read from pipes, for example:
pg_dump -h source_host database_name | psql -h destination_host database_name
This command will duplicate a database:
createdb -T template0 new_database
pg_dump existing_database | psql new_database
Error handling
If an SQL error occurs, the psql script continues to be executed; this is by default. Such behavior can be changed by running psql with the ON_ERROR_STOP variable, and if an SQL error is encountered, psql exit with an exit status of 3.
psql --set ON_ERROR_STOP=on database_name < database.sql
If an error happens, you receive a partially restored database. To avoid this and complete the restoration, either fully successful or fully rolled back, set to restore a whole dump as a single transaction. To do it, use -1 option to psql:
psql --set ON_ERROR_STOP=on -1 database_name < database.sql
How to backup several PostgreSQL databases at once
Pg_dump can dump only one database at a time, and information about tablespaces or roles will not be included in that dump. It happens because those aren’t per-database but cluster-wide. There is a pg_dumpall program that supports convenient dumping of the entire contents of a database cluster. It preserves role and tablespace definitions (cluster-wide data) and performs backups of each database in a given cluster. pg_dumpall works in the following way: it emits commands to re-create tablespaces, empty databases, and roles and then invokes pg_dump for each database. Although each database will be internally consistent, snapshots of different databases may not be fully synchronized.
The basic usage of this command is as follows:
pg_dumpall > all_databases.sql
Psql and option -f can be used to restore the resulting dump:
psql -f all_databases.sql postgres
No matter which database you are connecting to, the script file created via pg_dumpall will contain all necessary commands for creation and connection to the saved databases.
How to backup PostgreSQL to a custom-format archive file
While the plain text format produced by pg_dump is natural and simple, at the same time, it is not very flexible because it can create huge output files. Alternatively, PostgreSQL has a nice little feature that allows users to export the so-called “custom format”, a format that is archived by default (without additional steps) and provides significant flexibility, especially when re-importing.
To produce a backup file in custom dump format, you need to add the -Fc option:
pg_dump -Fc database_name > database.dump
This file format must be used with pg_restore to rebuild the database. That allows pg_restore to be selective about what is being restored, or even to reorder items before restoration. Archived file formats are intended for transfer between architectures.
To restore the custom file format, use the following command:
pg_restore -d database_name database.dump
Using the -j option, you can dramatically reduce the time to restore a large database to a server running on a multiprocessor machine. This is achieved by running the most time-consuming parts of pg_restore, namely, those that load data, create constraints, or create indices using multiple simultaneous tasks. Each job represents one thread or one process; it uses a separate connection to the server and depends on the operating system. For example, this command will restore a database in four concurrent jobs:
pg_restore -j 4 -d database_name database.dump
Use the following to drop the database and recreate it from the dump:
dropdb database_name
pg_restore -C -d database_name database.dump
With the -C option, data is always restored to the database name that appears in the dump file.
Run the following to reload the dump into a new database:
createdb -T template0 database_name
pg_restore -d database_name database.dump
Other PostgreSQL backup formats
The pg_dump provides two other output file formats: directory and tar. Both of them are restored with pg_restore utility.
To create a directory-format archive, you need to use the -Fd option:
pg_dump -Fd database_name -f database.dump
A directory with one file for each table and dumped blob will be created, as well as a so-called Table of Contents file that describes the dumped objects in a machine-readable format that pg_restore can read. Standard Unix tools can be used to manage a directory format archive; for example, the gzip tool can be used to compress files in an uncompressed archive. That format supports parallel dumps, compressed by default.
The tar format is compatible with the directory format: a valid archive in directory format is produced when a tar-format archive is extracting. However, the tar format does not support compression. In addition, when using the tar format, the relative order of the table data elements cannot be changed during the restoration process.
To create a tar file, use the -Ft option:
pg_dump -Ft database_name -f database.tar
How to backup database object definitions
From time to time, there is a need to backup only the database object definitions, which allows you to restore the schema only. It can be useful in the test phase, in which you do not want to keep the old test data populated.
Use the following command to backup all objects in all databases, including roles, databases, tablespaces, tables, schemas, indexes, functions, triggers, constraints, privileges, views, and ownerships:
pg_dumpall --schema-only > definitions.sql
Use the following command to backup the role definition only:
pg_dumpall --roles-only > roles.sql
Use the following command to backup the tablespaces definition:
pg_dumpall --tablespaces-only > tablespaces.sql
File System Level backup
An alternative backup strategy is to directly copy the files that PostgreSQL uses to store the data in the database. Any method for file system backups can be used, for example:
xcopy “C:Program FilesPostgreSQL11data” “D:backup” /E
Then, you will be able to start a new server instance with the same release name on this folder (note that you have to run this command at the administrator level):
pg_ctl start -D “D:backup”
This method gives you the following advantages:
- Faster than logical backups (SQL dump), as fast as simple file copying
- Entire instance (cluster) backed up
- Does not cause lock contention and does not depend on other connections releasing their locks
- Almost instant recovery process — no need to execute SQL statements to get data back
and at the same time, it implies some limitations:
- Requires the database to be shut down
- Can be restored only on the same major version of PostgreSQL
- Single databases or single tables cannot be restored: one has to restore all or nothing
- Produces very large backups as it includes all the indices and bloat and may, therefore, be much, much larger than SQL dumps
Continuous archiving
The continuous archiving method combines a file-system-level backup with a backup of the WAL files (that stores each change made to the data files of the database). This way is more difficult to administer than any of the previous approaches, but it has some significant advantages:
- There is no need to have a perfectly consistent file system backup as a starting point. A log replay will correct any internal discrepancy in the backup (this does not have a crucial difference from what happens during failure recovery). Thus, you do not need to create a snapshot of the file system, just tar or a similar archiving tool.
- Continuous backups can be achieved by simply continuing to archive the WAL files. This is especially valuable for large databases, where it is not always convenient to perform a full backup.
- There is no need to replay the WAL entries all the way to the end. You could stop the replay at any point and have a consistent snapshot of the existing database. Thus, this technique supports the so-called “point-in-time recovery”: the database can be restored to its state at any time since the database backup was made.
- If you continuously feed the series of WAL files to another machine that has been loaded with the same base backup file, you will have a warm standby system: the second machine can be brought up anytime, with the nearly-current copy of the database.
As with a simple file-system-backup method, this technique can only support restoring an entire database cluster, but not a subset. In addition, this requires large archive storage: a basic backup can be bulky, and a busy system will generate many megabytes of WAL traffic that needs to be archived. However, this is the preferred backup method in many situations where high reliability is required.
We will not cover all the processes of setting up continuous archiving, as it’s exhaustively described in the documentation.
How to backup PostgreSQL database using SQLBackupAndFTP
If you prefer the GUI interface for managing your backups then you can try our free utility called SQLBackupAndFTP. Using pg_dump internally it adds more usability and a bunch of other useful features like:
- running backup to a schedule
- notifying you if something went wrong
- sending your backup to one of the famous cloud storage services (like Dropbox, Google Drive, Amazon S3, etc.)
- archive encryption
- file backup
- support of SQL Server, My SQL, and Azure databases
It’s quite easy to start with SQLBackupAndFTP. After downloading and installation, connect it to your PostgreSQL database by pressing the “Gear” button at the “Connect to Database Server” section. In the popup that appears, choose PostgreSQL (TCP/IP) as a server type, then specify the login/password. After that, click “Test Connection” to check if everything is ok and press “Save & Close” to apply all the settings:

Then you need to select databases that you want to backup, by clicking a gear under “Select Databases” section:
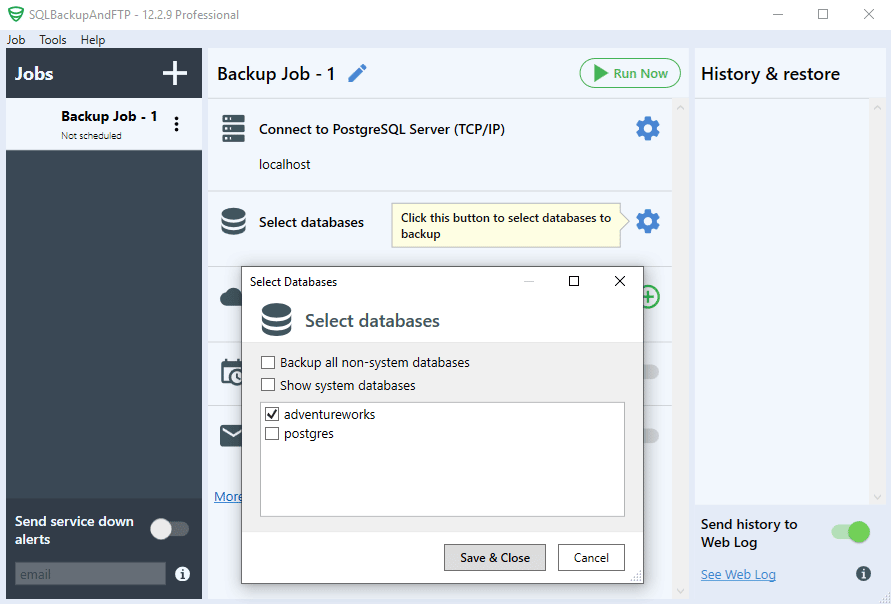
After that, choose a destination where PostgreSQL database backups will be sent to by clicking the “plus” icon in the “Store backups in selected destinations” section.
You can send the backup to the following cloud storage services: Local or Network folder, FTP Server, Amazon S3, Dropbox, Google Drive, OneDrive, Box, Azure Storage, OneDrive, for Business, Backblaze B2, Yandex Disk: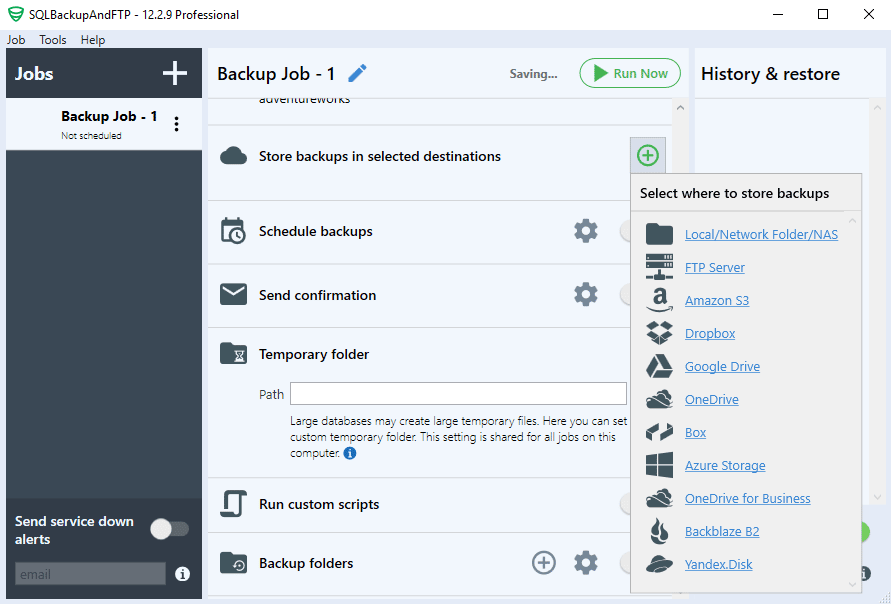
If you want to run the backup to a schedule you need to set up a backup plan. You can get it done in the following way: turn on the switch next to “Schedule backups” title and click on the “Gear” button to access the advanced backup schedule settings:
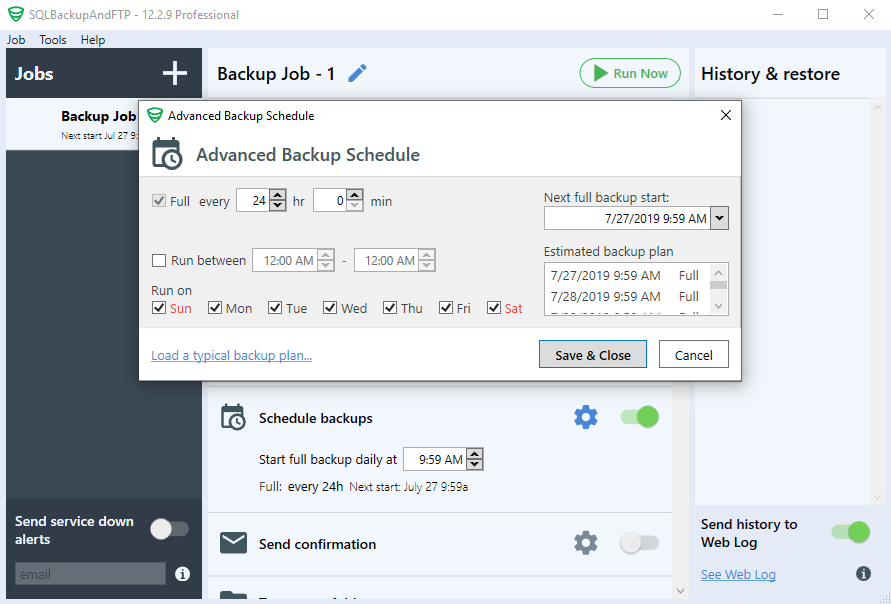
This is all. If you need to create the backup right away click “Run Now”:
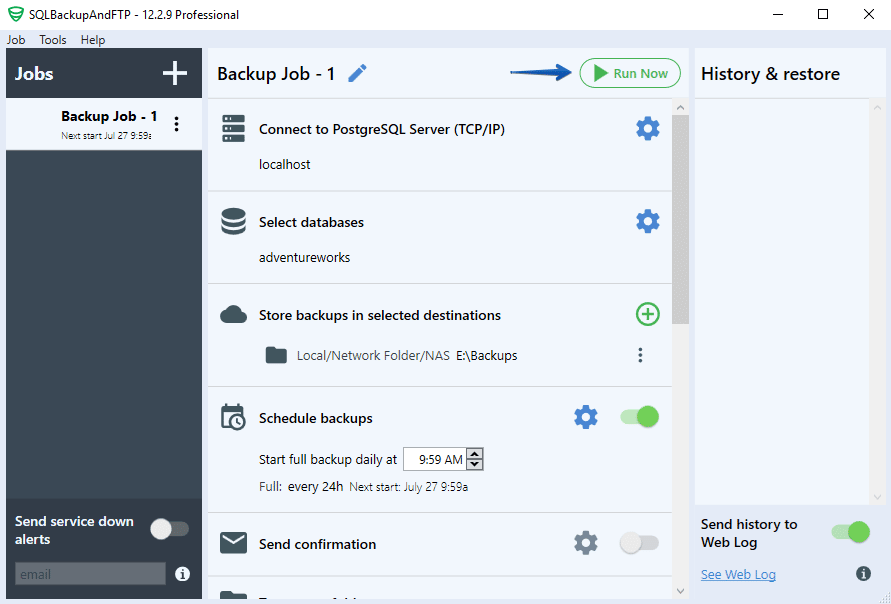
Optionally, if you need to apply some pg_dump options, you can scroll down, click “More settings…” and then “More settings…” again in the “Backup options” section. This will give you the following window with several quick options and the ability to add your own: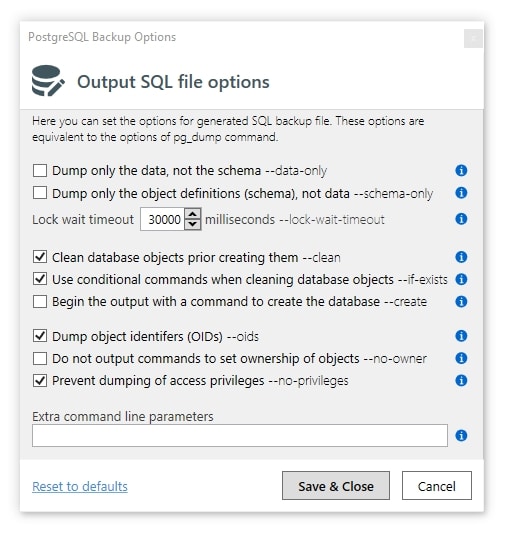
How to restore the PostgreSQL database using SQLBackupAndFTP
There are two ways to restore previously created backup using SQLBackupAndFTP:
- From the “History & restore” pane if the backup was created by means of SQLBackupAndFTP
- Using a “Restore Job” if the backup was created by other means, most probably by pg_dump utility directly
In the first case, you need to find the backup you want to restore in the “History & restore” section of the main window, click the three dots icon and select “Restore from backup”: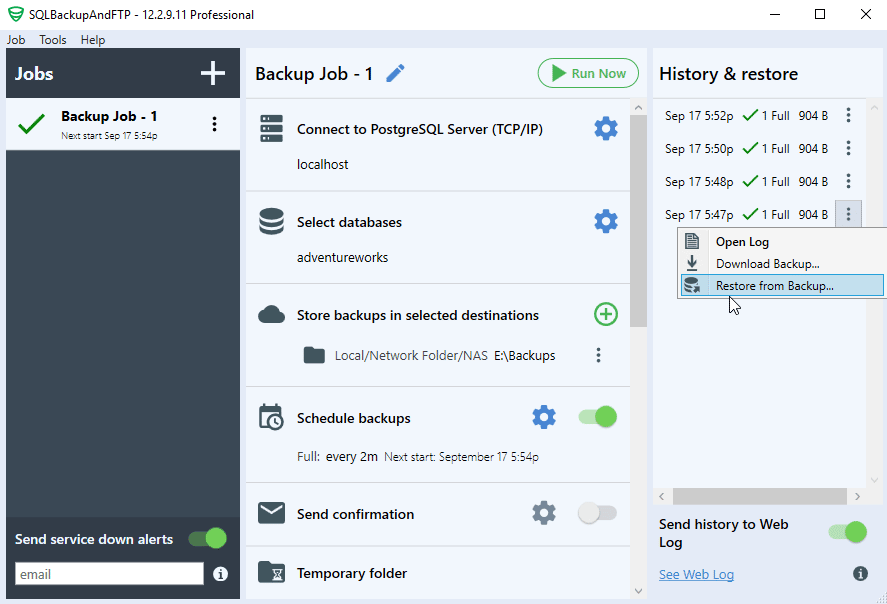 You will see a popup where you need to choose what database from what destination you want to restore, the following screenshot has only one option:
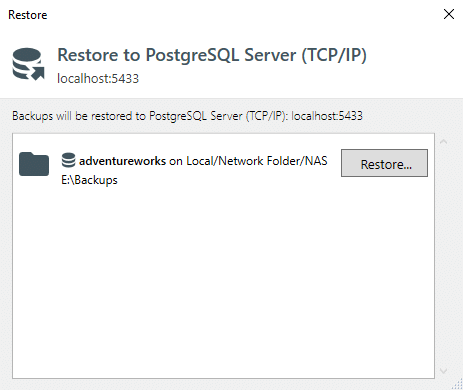 On the last step, you will have a possibility to change database name (if you don’t want to overwrite the existing database) and specify the archive password (if you set one up when created the archive):
How to restore an arbitrary SQL dump using SQLBackupAndFTP
If you’ve got an arbitrary PostgreSQL dump of database backup that you want to restore on this machine then you can take advantage of “Restore Job” available in SQLBackupAndFTP. This job takes SQL dump from the cloud storage and restores it on the selected database. The procedure of setting such job up is similar to creating backups.
Create a “Restore job” by clicking “Job” > “Add New Restore Job”:
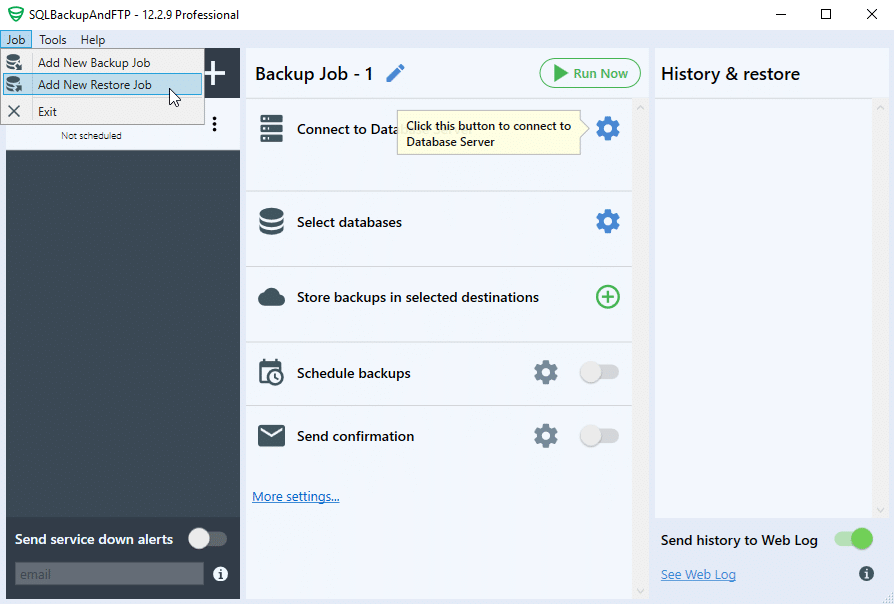
Choose a place where your backup is located:

In the “Store databases to restore” section choose a backup that should be restored:
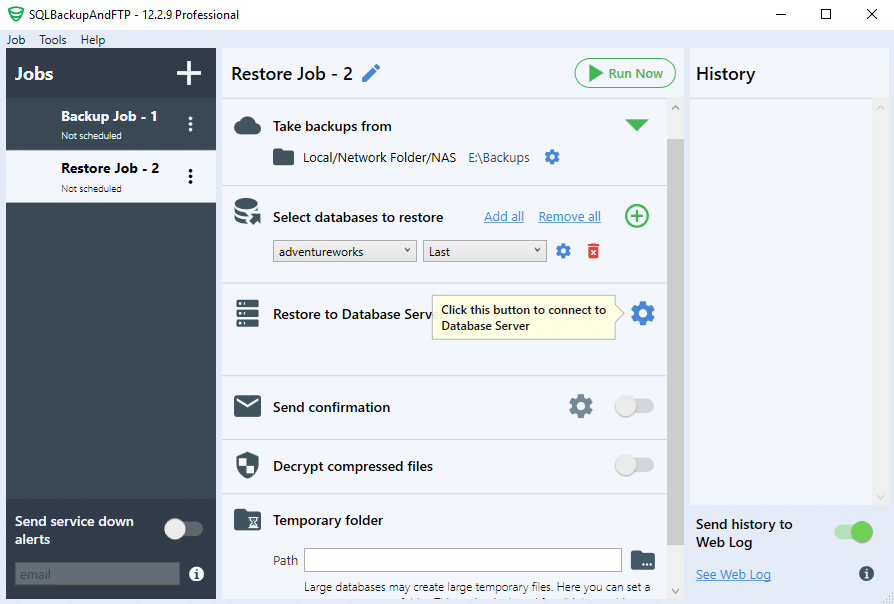
Connect to your PostgreSQL server in the “Restore to Database Server” section:
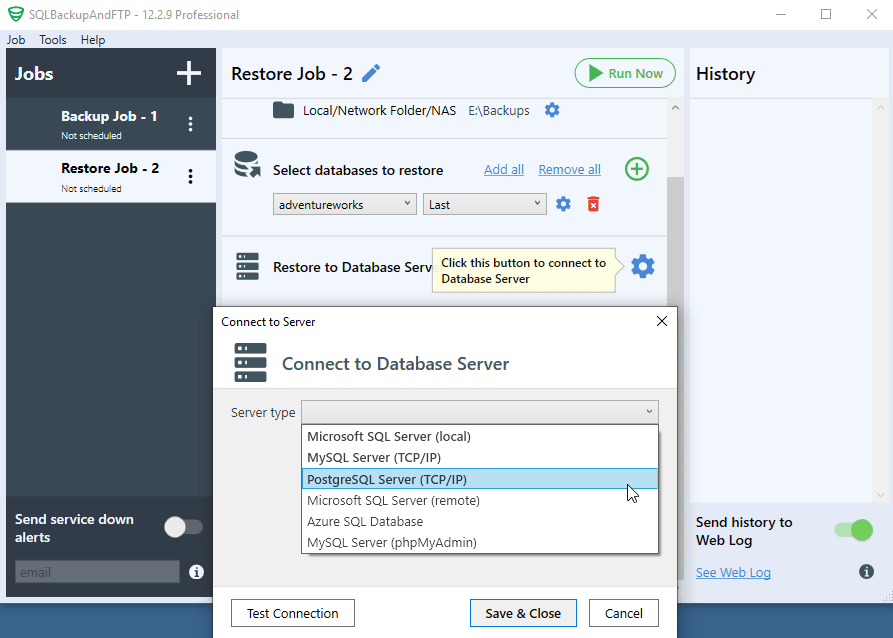
Now as all the preparation is done, restore your backup by clicking the “Run Now” button:
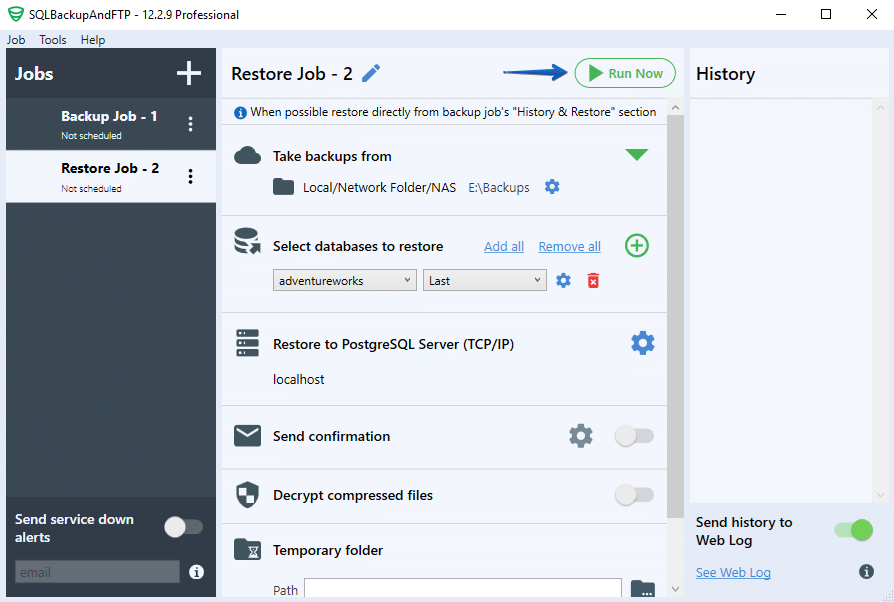
Рассмотрим резервирование объектов, баз или целых кластеров PostgreSQL. Посмотрим на физическое и логическое резервирование а также на протокол репликации.
Существует логическое и физическое резервирование PostgreSQL. Первый тип сохраняет SQL команды выполнив которые можно восстановить объекты, например создать базу данных, наполнить её таблицами, заполнить таблицы данными и тому подобное. А второй тип резервирует сами данные, то есть сохраняет каталог PGDATA.
Недостаток логического копирования – невысокая скорость. При этом логическую копию можно загрузить в более новую версию сервера postgres. Или выгрузить базу с сервера на Windows и загрузить её на Linux. Также логическое резервное копирование позволяет сохранять не только базы, но и отдельно таблички или весь кластер.
Есть 3 инструмента для логического копирования:
- COPY – команда SQL для копирования данных из таблицы в файл или наоборот из файла в таблицу. То есть мы можем сохранить сами данные в файл с помощью COPY. А затем используя скрипт создать таблицу (CREATE) и скопировать (COPY) данные из файла в эту таблицу.
- pg_dump – утилита postgresql для копирования всей базы данных. Она использует команду COPY для выгрузки самих данных. По умолчанию pg_dump выгружает в текстовом формате, тогда восстанавливаем с помощью psql. Можно создать дамп в другом формате, тогда при загрузке нужно использовать утилиту pg_restore. Перед восстановлением должна быть создана сама база данных из шаблона template0 (если вы не меняли template1, то можно и из него). Еще заранее нужно подготовить роли и табличные пространства, если они использовались. После восстановления имеет смысл выполнить сбор статистики так как pg_dump статистику не выгружает.
- pg_dumpall – утилита postgresql для копирования всего кластера. Выгружает только в текстовом формате. С помощью дополнительных опций можно выгрузить только глобальные объекты: роли, табличные пространства и подобное. Восстанавливать такой дамп нужно с помощью утилиты psql.
Физическое резервирование PostgreSQL
Физическое резервирование сохраняет файлы данных и журналы предварительной записи. Из плюсов такого копирования выделяют:
- скорость восстановления;
- возможность восстановить кластер на определённый момент времени.
Минусы тоже есть:
- нельзя восстановить отдельную БД, только весь кластер целиком;
- восстановление возможно только на той же версии и архитектуре.
Физическое резервное копирование разделяется на:
- Холодное резервирование (при выключенном сервере) – после корректного выключения можно перенести данные на другой сервер. Если был сбой или некорректное выключение, то вместе с данными нужно перенести журналы предварительной записи с момента последней контрольной точки.
- Горячее резервирование (при включенном сервере) -делается специальными средствами, при этом требуются все файлы предварительной записи с момента начала копирования и до его окончания.
Для горячего резервирования используется утилита pg_basebackup, которая выполняет следующие действия:
- подключается к серверу по протоколу репликации;
- выполняет контрольную точку;
- переключается на следующий сегмент WAL;
- копирует файловую систему в указанный каталог;
- переключается на следующий сегмент WAL;
- копирует все сегменты WAL, сгенерированные за время копирования.
При восстановлении подменяем каталог PGDATA у кластера сохраненной резервной копией и запускаем сервер.
Протокол репликации
Протокол репликации – специальный протокол, который позволяет:
- получать поток журнальных записей. То есть не ждать пока очередной wal файл заполнится а получать записи на лету;
- выполнять команды управления резервным копированием и репликацией.
Когда мы подключаемся по протоколу репликации нас начинает обслуживать процесс wal_sender.
Чтобы мы могли работать по протоколу репликации нужно выставить параметр сервера: wal_level=replica.
Слот репликации – механизм для резервирования wal файлов. Подключившись по протоколу репликации мы создаём слот репликации и через этот слот передаются wal файлы. Когда сервер захочет удалить wal файл, он проверит, был ли этот файл уже прочитан через этот слот и если не был, то wal файл не удаляется. Нужно следить за подключенными репликами, так как если отвалится реплика, которая создала слот репликации, начинают копиться wal файлы, что может привести к заполнению диска и выходу сервера из строя.
Подробнее про репликацию можете почитать ещё тут.
Архив журналов
Можно создавать архив wal файлов. Такой архив может быть файловым или потоковым.
Файловый архив:
- сегменты WAL копируются в архив по мере заполнения;
- механизм работает под управлением сервера;
- неизбежны задержки попадания данных в архив.
Потоковый архив:
- в архив постоянно записывается поток журнальных записей;
- требуются внешние средства;
- задержки минимальны.
Чтобы запустить файловый архив нужно запустить процесс archiver. Для этого нужно настроить 3 параметра:
- archive_mode = on;
- archive_command – команда shell для копирования сегмента WAL в отдельное хранилище (или скрипт);
- archive_timeout – максимальное время для переключения на новый сегмент WAL (если по окончанию этого времени сегмент wal не заполнится, то переключение всё равно произойдет на новый файл). Даже если wal файл до конца не заполнился он все равно будет весить 16 МБ, поэтому слишком маленьким таймаут лучше не делать.
При заполнении сегмента WAL вызывается команда archive_command если команда завершается со статусом 0, сегмент удаляется если команда возвращает не 0 (в частности, если команда не задана), сегмент остается до тех пор, пока попытка не будет успешной.
При настроенном архивировании, на резервном сервере мы можем восстановиться на любой момент времени.
Для потокового архива используется утилита pg_receivewal. Она подключается по протоколу репликации и может использовать слот репликации. Затем она направляет поток записей WAL в файлы-сегменты. Стартовая позиция – начало текущего сегмента. В отличии от файлового архивирования записи wal передаются постоянно.
При восстановлении базы данных, когда есть данные на определённый момент времени и архив wal файлов. Нужно создать файл $PGDATA/recovery.conf в котором указать, откуда брать wal файлы, и включить сервер.
Практика
Создадим базу данных и подключимся к ней. Создадим таблицу и вставим туда 3 строки:
postgres@s-pg13:~$ psql
Timing is on.
psql (13.3)
Type "help" for help.

postgres@postgres=# CREATE DATABASE backup_overview;
CREATE DATABASE
Time: 98,451 ms

postgres@postgres=# c backup_overview
You are now connected to database "backup_overview" as user "postgres".

postgres@backup_overview=# CREATE TABLE t(id numeric, s text);
CREATE TABLE
Time: 3,508 ms

postgres@backup_overview=# INSERT INTO t VALUES (1, 'Привет!'), (2, ''), (3, NULL);
INSERT 0 3
Time: 0,812 ms
Получилась такая табличка:
postgres@backup_overview=# SELECT * FROM t;
 id |    s
----+---------
  1 | Привет!
  2 |
  3 |
(3 rows)
Time: 0,274 ms
Вот так выглядит таблица в выводе команды COPY:
postgres@backup_overview=# COPY t TO stdout;
1       Привет!
2
3       N
Time: 1,544 ms
Обратите внимание на то, что пустая строка и NULL – разные значения, хотя, выполняя запрос SELECT это не заметно.
Затрем табличку t и с помощью COPY из стандартного ввода введём данные. Переход к другому столбцу осуществляется табуляцией:
postgres@backup_overview=# TRUNCATE TABLE t;
TRUNCATE TABLE
Time: 1,348 ms

postgres@backup_overview=# COPY t FROM STDIN;
Enter data to be copied followed by a newline.
End with a backslash and a period on a line by itself, or an EOF signal.
>> 1    Hi there!
>> 2
>> 3    N
>> .
COPY 3
Time: 25427,695 ms (00:25,428)
Проверим:
postgres@backup_overview=# SELECT * FROM t;
 id |     s
----+-----------
  1 | Hi there!
  2 |
  3 |
(3 rows)

Time: 0,234 ms
postgres@backup_overview=# COPY t TO stdout;
1       Hi there!
2
3       N
Time: 0,183 ms
Отключимся от СУБД и выполним pg_dump. Опция –create добавляет команды для последующего создания базы данных при загрузки из дампа. Без этой опции вначале пришлось бы создать базу а потом в неё загружать дамп.
postgres@backup_overview=# q

postgres@s-pg13:~$ pg_dump -d backup_overview --create
--
-- PostgreSQL database dump
--

-- Dumped from database version 13.3
-- Dumped by pg_dump version 13.3

SET statement_timeout = 0;
SET lock_timeout = 0;
SET idle_in_transaction_session_timeout = 0;
SET client_encoding = 'UTF8';
SET standard_conforming_strings = on;
SELECT pg_catalog.set_config('search_path', '', false);
SET check_function_bodies = false;
SET xmloption = content;
SET client_min_messages = warning;
SET row_security = off;

CREATE DATABASE backup_overview WITH TEMPLATE = template0 ENCODING = 'UTF8' LOCALE = 'ru_RU.UTF-8';

***(сократил вывод)***

CREATE TABLE public.t (
    id numeric,
    s text
);

***(сократил вывод)***

COPY public.t (id, s) FROM stdin;
1       Hi there!
2
3       N
.

--
-- PostgreSQL database dump complete
--
В выводе у нас логическая копия базы данных, которая выводится на стандартный поток, то есть в терминал. Можно было бы перенаправить поток в файл для создания файла логической архивной копии.
Теперь из одной базы сделаем другую, при этом передавать будем только таблицу “t“:
postgres@s-pg13:~$ psql
Timing is on.
psql (13.3)
Type "help" for help.

postgres@postgres=# CREATE DATABASE backup_overview2;
CREATE DATABASE
Time: 62,386 ms

postgres@postgres=# q

postgres@s-pg13:~$ pg_dump -d backup_overview --table=t | psql -d backup_overview2
Timing is on.
SET
Time: 0,133 ms
SET
Time: 0,094 ms
SET
Time: 0,064 ms
SET
Time: 0,050 ms
SET
Time: 0,046 ms
 set_config
------------

(1 row)

Time: 0,416 ms
SET
Time: 0,045 ms
SET
Time: 0,046 ms
SET
Time: 0,038 ms
SET
Time: 0,038 ms
SET
Time: 0,038 ms
SET
Time: 0,062 ms
CREATE TABLE
Time: 2,933 ms
ALTER TABLE
Time: 0,248 ms
COPY 3
Time: 0,293 ms

postgres@s-pg13:~$ psql -d backup_overview2
Timing is on.
psql (13.3)
Type "help" for help.

postgres@backup_overview2=# SELECT * FROM t;
 id |     s
----+-----------
  1 | Hi there!
  2 |
  3 |
(3 rows)

Time: 0,569 ms
Теперь поработаем с pg_basebackup и протоколом репликации. Убедимся что wal_level=replica и max_wal_senders больше нуля:
postgres@backup_overview2=# SELECT name, setting FROM pg_settings WHERE name IN ('wal_level','max_wal_senders');
      name       | setting
-----------------+---------
 max_wal_senders | 10
 wal_level       | replica
(2 rows)

Time: 1,571 ms
Убедимся что в pg_hba.conf есть разрешение подключаться по протоколу репликации:
postgres@backup_overview2=# SELECT type, database, user_name, address, auth_method FROM pg_hba_file_rules WHERE database = '{replication}';
 type  |   database    | user_name |  address  | auth_method
-------+---------------+-----------+-----------+-------------
 local | {replication} | {all}     |           | trust
 host  | {replication} | {all}     | 127.0.0.1 | trust
 host  | {replication} | {all}     | ::1       | trust
(3 rows)

Time: 1,078 ms
Отключимся от СУБД, очистим созданный на первом уроке каталог data2. После чего сделаем бекап с помощью pg_basebackup:
postgres@backup_overview2=# q

postgres@s-pg13:~$ rm -rf /usr/local/pgsql/data2/*

postgres@s-pg13:~$ pg_basebackup --pgdata=/usr/local/pgsql/data2/
Посмотрим что у нас скопировалось:
postgres@s-pg13:~$ ls -l /usr/local/pgsql/data2
итого 525
-rw-------  1 postgres postgres    224 июн 30 10:42 backup_label
-rw-------  1 postgres postgres 440132 июн 30 10:42 backup_manifest
drwx------ 12 postgres postgres     12 июн 30 10:42 base
drwx------  2 postgres postgres     59 июн 30 10:42 global
drwx------  2 postgres postgres      2 июн 30 10:42 pg_commit_ts
drwx------  2 postgres postgres      2 июн 30 10:42 pg_dynshmem
-rw-------  1 postgres postgres   4760 июн 30 10:42 pg_hba.conf
-rw-------  1 postgres postgres   1636 июн 30 10:42 pg_ident.conf
drwx------  4 postgres postgres      5 июн 30 10:42 pg_logical
drwx------  4 postgres postgres      4 июн 30 10:42 pg_multixact
drwx------  2 postgres postgres      2 июн 30 10:42 pg_notify
drwx------  2 postgres postgres      2 июн 30 10:42 pg_replslot
drwx------  2 postgres postgres      2 июн 30 10:42 pg_serial
drwx------  2 postgres postgres      2 июн 30 10:42 pg_snapshots
drwx------  2 postgres postgres      2 июн 30 10:42 pg_stat
drwx------  2 postgres postgres      2 июн 30 10:42 pg_stat_tmp
drwx------  2 postgres postgres      2 июн 30 10:42 pg_subtrans
drwx------  2 postgres postgres      2 июн 30 10:42 pg_tblspc
drwx------  2 postgres postgres      2 июн 30 10:42 pg_twophase
-rw-------  1 postgres postgres      3 июн 30 10:42 PG_VERSION
drwx------  3 postgres postgres      4 июн 30 10:42 pg_wal
drwx------  2 postgres postgres      3 июн 30 10:42 pg_xact
-rw-r--r--  1 postgres postgres     15 июн 30 10:42 postgres.conf
-rw-------  1 postgres postgres    216 июн 30 10:42 postgresql.auto.conf
-rw-------  1 postgres postgres  28037 июн 30 10:42 postgresql.conf
Перенастроим порт для второго кластера и запустим его. Подключимся к СУБД и проверим нашу базу данных “backup_overview2” с табличкой “t”:
postgres@s-pg13:~$ echo port=5433 >> /usr/local/pgsql/data2/postgresql.auto.conf

postgres@s-pg13:~$ pg_ctl -w -l /home/postgres/logfile2 -D /usr/local/pgsql/data2 start
waiting for server to start.... done
server started

postgres@s-pg13:~$ psql -p 5433 -d backup_overview2
Timing is on.
psql (13.3)
Type "help" for help.

postgres@backup_overview2=# SELECT * FROM t;
 id |     s
----+-----------
  1 | Hi there!
  2 |
  3 |
(3 rows)

Time: 0,913 ms
Отключимся от СУБД и остановим второй кластер:
postgres@backup_overview2=# q

postgres@s-pg13:~$ pg_ctl -D /usr/local/pgsql/data2 stop
waiting for server to shut down.... done
server stopped
Можно было бы утилитой pg_basebackup подключиться к удалённому серверу и сделать бекап всего кластера себе на компьютер, а затем восстановить на каком-нибудь другом сервере подменив каталог PGDATA.
Сводка
Имя статьи
Резервирование PostgreSQL
Описание
Рассмотрим резервирование объектов, баз или целых кластеров PostgreSQL. Посмотрим на физическое и логическое резервирование а также на протокол репликации