Задача, которая стояла передо мной:
Есть сервер с mysql под управлением windows server 2008 R2, на котором, в числе прочего, крутится mysql с несколькими десятками баз данных, число и состав которых периодически меняется. Нужно организовать ежедневный бекап этих баз без остановки mysql сервера, причем таким образом, чтобы каждая база попадала в отдельных архив. Эта, на первый взгляд простейшая задача (возможно, так оно и есть) для меня оказалась достаточно сложной.
Что нам говорит гугл?
О том, что есть mysqlhotcopy и mysqldump. Первый работает прямо с файлами баз данных, второй — делает дампы с помощью запросов.
Заставить работать mysqlhotcopy даже с простейшими параметрами я не смог, и погуглив, пришел к выводу (поправьте меня если ошибаюсь) что для windows данный скрипт не приспособлен.
Начинал я именно с mysqlhotcopy, потому что работать непосредственно с файлами в моем случае проще — просто подсунул файлы мускулю и работай. Дамп же, хоть и весит меньше за счет отсутствия индексов, еще нужно импортировать. Но, раз другого способа без остановки mysql я не нашел, будем делать дампы.
Здесь я нашел отличное руководство по ключам скрипта. Итак, он может сделать общий дамп всех баз в один файл (крайне неудобно), или сделать дампы перечисленных баз. Так как число и имена баз у нас меняются, то писать список не вариант — каждый раз править его замучаемся. Значит нужен скрипт, который будет подставлять в mysqldump каждую базу поочередно.
Реализовал я это так — батник смотрит какие папки лежат в директории данных mysql и в цикле подставляет имя каждой из них (которое и является именем базы данных) в строку параметров mysqldump.
SET SOURCEDIR=E:xamppmysqldata

set hour=%TIME:~0,2%
set minute=%TIME:~3,2%
set second=%TIME:~6,2%
set HHMMSS=%hour%-%minute%

for /d %%i in (%SOURCEDIR%*) do "E:xamppmysqlbinmysqldump.exe" -uusername -hlocalhost -ppassword -c -n %%~ni | "c:Program Files7-Zip7z.exe" a -tgzip -si"%%~ni_%DATE%_%HHMMSS%.sql" "D:backupsdata%DATE%_%HHMMSS%%%~ni.sql.gzip"

eachfile.exe -purge -r -w -e -d 13 -l 0 -dir D:backupsdata

exit
Полученный дамп сразу же архивируется при помощи 7-zip в формат gzip (чтобы полученный файл можно было без распаковки скормить мускулю). Ну а утилитка eachfile удалит устаревшие бекапы.
В процессе гугления также наткнулся на программу MySQL Backup Tool тестировать которую, однако, не решился.
Is there a way to back up MySQL database automatically at certain times of the day for designated servers or send an email with an attachment.. Which ever do you think is the best and safest way to achieve this?
![]()
Philipp
2,7902 gold badges26 silver badges27 bronze badges
asked Feb 2, 2013 at 21:41
![]()
1
Best way to do this would be
mysqldump.exe --user=YourUserName --password=YourPassword --host=localhost --port=3306 --result-file="Pathdump.sql" --databases "DatabaseName1" "Database2"


mysqldump.exe --user=root --password=root  --host=localhost --port=3306 --result-file="c:wwwdbbackup.%date:~10,4%%date:~7,2%%date:~4,2%.sql" --default-character-set=utf8 --single-transaction=TRUE --databases "dbtest1" "dbtest2"
The pattern backup.%date:~10,4%%date:~7,2%%date:~4,2%.sql will create a unique name (backup20131010.sql) each time it will run
Now you just need to call this command in your task scheduler. That’s it. 
![]()
leonbloy
71.7k20 gold badges139 silver badges189 bronze badges
answered Jul 7, 2014 at 10:36
![]()
Tarun GuptaTarun Gupta
6,2152 gold badges41 silver badges39 bronze badges
4
I would use Windows Task Scehduler/cron (depending on your system) and mysqldump. Scroll down in the link, it includes some insights how to achieve what you want.
answered Feb 2, 2013 at 22:15
![]()
martinmartin
2,49224 silver badges28 bronze badges
2
You can add one of these commands to Windows task scheduler:
mysqldump –-user [username] –-password=[password] [database name] > [dump file]
or in a compact way:
mysqldump –u[username] –p[password] [database name] > [dump file]
or:
mysqldump -u[user] -p[password] --result-file="c:<path>backup.%DATE:~0,3%.sql" [database]
answered Feb 7, 2014 at 9:33
![]()
Jess StoneJess Stone
6778 silver badges20 bronze badges
databaseW.2016,06,29-22,31,48-15.sql
@echo off
rem Backup Database (Daily,via Task Scheduler)
rem databaseW
set filename="c:xamppdbkdatabaseW.%date:~6,4%,%date:~0,2%,%date:~3,2%-%time:~0,2%,%time:~3,2%,%time:~6,2%-%time:~9,2%.sql"
c:xamppmysqlbinmysqldump.exe --user=root --password=dell@root --host=localhost --port=3306 --result-file=%filename% --default-character-set=utf8 --single-transaction=TRUE --databases "databaseW"
To create file whose name is based on the date and time, use %date% and %time%.
Note that the 2 variables are based on locale and cmd shell version
- open the cmd windows
- input
echo %time%andecho %date%
mine is22:11:16.80,06/29/2016 Wed - substr the variable through
%variable:~startpos,length%
I want the time delimited by comma, so the cmd goes
echo %time:~0,2%,%time:~3,2%,%time:~6,2%,%time:~9,2% - to get a filename like
databaseW.2016,06,29-22,31,48-15.sql
useset filename="databaseW.%date:~6,4%,%date:~0,2%,%date:~3,2%-%time:~0,2%,%time:~3,2%,%time:~6,2%-%time:~9,2%.sql" - check the
dateandtimein advance - use the
--result-fileoption instead of>; According to the Mysql Manuel, the charset of file saved using «>» isUTF-16, while the--result-filefollows the--default-character-set - save to file
BackpDay-databaseW.cmd - add it to a new task
Actionand set a trigger (Windows Task Scheduler)
answered Jun 29, 2016 at 15:01
![]()
MitoxysMitoxys
2773 silver badges8 bronze badges
I did the work, similar to what other people explained through… but with little difference and extra work:
1) I made a batch file
2) Ran that batch file through windows scheduler
3) Made appropriate schedule for that task
4) Inside the batch file these steps are executed:
- 4-1) Prepared a file name based on current date
- 4-2) Got a backup by mysqldump.exe in the corresponding directory & file name
- 4-3) Made a compress file through 7-Zip app(install it) & then delete the uncompressed backup
- 4-4) Put a copy on our network File-Server
Here is a script(.bat) sample:
@echo off
set current=%date:~10,4%%date:~4,2%%date:~7,2%
set filename="E:MySQL BackupsDBName-%current%.sql"
set filename2="E:MySQL BackupsDBName-%current%.zip"
echo %filename%
cd "E:MySQL Backups"
C:"Program Files"MySQL"MySQL Server 5.5"binmysqldump.exe db_name --user=root --password=rootpass --host="127.0.0.1" --port=instancePort --result-file=%filename% --default-character-set=utf8 --single-transaction=TRUE
echo backup-finished

if exist %filename% (
    "C:Program Files7-Zip7z.exe" a %filename2% %filename%
    echo zip-finished
    del %filename%
)
if exist %filename2% (
    copy %filename2% "\192.168.x.xMySQL Backups"
    echo copy-finished
)
answered Jul 2, 2019 at 12:41
![]()
Is there a way to back up MySQL database automatically at certain times of the day for designated servers or send an email with an attachment.. Which ever do you think is the best and safest way to achieve this?
![]()
Philipp
2,7902 gold badges26 silver badges27 bronze badges
asked Feb 2, 2013 at 21:41
![]()
1
Best way to do this would be
mysqldump.exe --user=YourUserName --password=YourPassword --host=localhost --port=3306 --result-file="Pathdump.sql" --databases "DatabaseName1" "Database2"


mysqldump.exe --user=root --password=root  --host=localhost --port=3306 --result-file="c:wwwdbbackup.%date:~10,4%%date:~7,2%%date:~4,2%.sql" --default-character-set=utf8 --single-transaction=TRUE --databases "dbtest1" "dbtest2"
The pattern backup.%date:~10,4%%date:~7,2%%date:~4,2%.sql will create a unique name (backup20131010.sql) each time it will run
Now you just need to call this command in your task scheduler. That’s it.
![]()
leonbloy
71.7k20 gold badges139 silver badges189 bronze badges
answered Jul 7, 2014 at 10:36
![]()
Tarun GuptaTarun Gupta
6,2152 gold badges41 silver badges39 bronze badges
4
I would use Windows Task Scehduler/cron (depending on your system) and mysqldump. Scroll down in the link, it includes some insights how to achieve what you want.
answered Feb 2, 2013 at 22:15
![]()
martinmartin
2,49224 silver badges28 bronze badges
2
You can add one of these commands to Windows task scheduler:
mysqldump –-user [username] –-password=[password] [database name] > [dump file]
or in a compact way:
mysqldump –u[username] –p[password] [database name] > [dump file]
or:
mysqldump -u[user] -p[password] --result-file="c:<path>backup.%DATE:~0,3%.sql" [database]
answered Feb 7, 2014 at 9:33
![]()
Jess StoneJess Stone
6778 silver badges20 bronze badges
databaseW.2016,06,29-22,31,48-15.sql
@echo off
rem Backup Database (Daily,via Task Scheduler)
rem databaseW
set filename="c:xamppdbkdatabaseW.%date:~6,4%,%date:~0,2%,%date:~3,2%-%time:~0,2%,%time:~3,2%,%time:~6,2%-%time:~9,2%.sql"
c:xamppmysqlbinmysqldump.exe --user=root --password=dell@root --host=localhost --port=3306 --result-file=%filename% --default-character-set=utf8 --single-transaction=TRUE --databases "databaseW"
To create file whose name is based on the date and time, use %date% and %time%.
Note that the 2 variables are based on locale and cmd shell version
- open the cmd windows
- input
echo %time%andecho %date%
mine is22:11:16.80,06/29/2016 Wed - substr the variable through
%variable:~startpos,length%
I want the time delimited by comma, so the cmd goes
echo %time:~0,2%,%time:~3,2%,%time:~6,2%,%time:~9,2% - to get a filename like
databaseW.2016,06,29-22,31,48-15.sql
useset filename="databaseW.%date:~6,4%,%date:~0,2%,%date:~3,2%-%time:~0,2%,%time:~3,2%,%time:~6,2%-%time:~9,2%.sql" - check the
dateandtimein advance - use the
--result-fileoption instead of>; According to the Mysql Manuel, the charset of file saved using «>» isUTF-16, while the--result-filefollows the--default-character-set - save to file
BackpDay-databaseW.cmd - add it to a new task
Actionand set a trigger (Windows Task Scheduler)
answered Jun 29, 2016 at 15:01
![]()
MitoxysMitoxys
2773 silver badges8 bronze badges
I did the work, similar to what other people explained through… but with little difference and extra work:
1) I made a batch file
2) Ran that batch file through windows scheduler
3) Made appropriate schedule for that task
4) Inside the batch file these steps are executed:
- 4-1) Prepared a file name based on current date
- 4-2) Got a backup by mysqldump.exe in the corresponding directory & file name
- 4-3) Made a compress file through 7-Zip app(install it) & then delete the uncompressed backup
- 4-4) Put a copy on our network File-Server
Here is a script(.bat) sample:
@echo off
set current=%date:~10,4%%date:~4,2%%date:~7,2%
set filename="E:MySQL BackupsDBName-%current%.sql"
set filename2="E:MySQL BackupsDBName-%current%.zip"
echo %filename%
cd "E:MySQL Backups"
C:"Program Files"MySQL"MySQL Server 5.5"binmysqldump.exe db_name --user=root --password=rootpass --host="127.0.0.1" --port=instancePort --result-file=%filename% --default-character-set=utf8 --single-transaction=TRUE
echo backup-finished

if exist %filename% (
    "C:Program Files7-Zip7z.exe" a %filename2% %filename%
    echo zip-finished
    del %filename%
)
if exist %filename2% (
    copy %filename2% "\192.168.x.xMySQL Backups"
    echo copy-finished
)
answered Jul 2, 2019 at 12:41
![]()
Apr
21
Unlike on Linux, when MySQL is running on Windows, most of sys-admins including myself  found that backup MySQL Databases on Windows is little bit hard. When trying to automate it, then it would definitely become challenge . However there are lots of free and commercial tools are available to automate MySQL backup process on windows. Here we are going to discus how to achieve same using simple windows batch script. Later we discuss automate the batch script using Windows task scheduler
01) Create batch file
Open notepad and save following script as batch file (.bat) and make sure to change all SET parameters as you need. If you install XAMPP then mysqldump.exe location would be similar as below otherwise you need to change it.
|
@echo off For /f «tokens=2-4 delims=/ « %%a in (‘date /t’) do (set mydate=%%c-%%a-%%b) For /f «tokens=1-2 delims=/:» %%a in («%TIME%») do (set mytime=%%a%%b) SET backupdir=C:xampphtdocsbackup SET mysqluername=root SET mysqlpassword=somepassword SET database=dbname C:xamppmysqlbinmysqldump.exe —uroot —pPASSWORD %database% > %backupdir%%database%_%mydate%_%mytime%_.sql |
02) Automate the MySQL Backup process
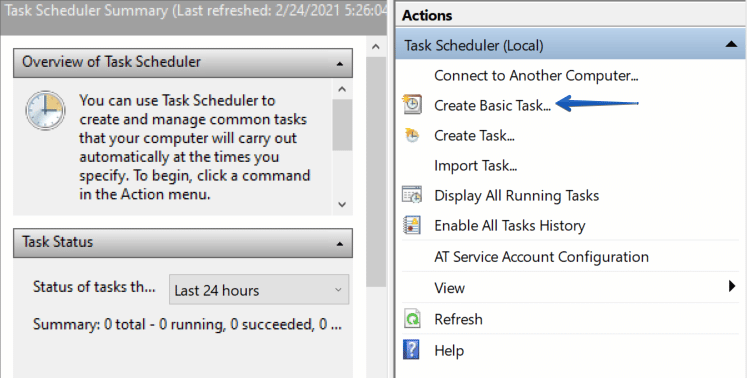
i) Open task scheduler
Open a command prompt. To open a command prompt, click Start , click All Programs , click Accessories , and then click Command Prompt .
At the command prompt, type Taskschd.msc .
For alternative options refer this :- https://technet.microsoft.com/en-us/library/cc721931.aspx
ii) Create New Task

Click on “Create Task…” from right hand side. it will open up “create task” sub windows
please make sure to select “Run whether user is logged on or not” and tick “Run with highest privileges“. You may can change user but
recommend to select user with admin privileges , later you may need to provide credentials of that user.
iii) Schedule the time
From “Triggers” tab select how often back process should happen and it’s time
iv) Set backup process script
From the “Actions” tab select previously saved bat file.
v) Click “OK” and save the task
That’s it, feel to comment here if you any doubts.
February 21, 2018
How to automate MySQL backups with a .bat file on a Windows server FREE. Typically we have used the backup facility built into MySQL administrator, which unfortunately has now reached end of life. While it worked well it had some major shortcomings. For example once you created a scheduled backup it would only include the databases you told it to at the time of creation. Well, if you are like us and you constantly add new databases the new ones simply wouldn’t be backed up, Annoying. What replaced MySQL administrator? Enter the new MySQL Workbench. Great tool save one missing feature, they decided to no longer support scheduled MySQL backups.
Obviously there are lots of scripts out there and easier solutions for linux based systems. The only windows solutions seemed to use php which seemed overly complex, relied on unnecessary systems that could fail, and introduced security concerns when you could use a simple batch file with a few lines of code to accomplish the same task. I had little luck Googling solutions on how to backup all the databases individually, zip them into one file, and delete the older archives so I sat down and wrote my own batch file. It was so useful to us that I feel compelled to share it with others. It should work on any version of windows x86 or x64 and any version of MySQL.
Updated 10/14/2019
Platforms Tested:
- Windows 2008 R2 x64 En with MySQL 5.5.x,
- Windows 2012 Server with MySQL 5.6.x,
- Windows 2012R2 with MySQL 5.7.x (x64)
- Windows Server 2016 with MySQL 5.7.x and newer (x64)
- Windows Server 2019 with MySQL 5.7.x AND MySQL 8.0.x (x64)
Features:
- No cost DIY solution
- Backup all MySQl databases, including all newly created ones automatically
- Create an individual .sql file for each database (God send when restoring)
- ZIP all the .sql files into one zip file and date/timestamp the file name to save space
- Automatically delete MySQL backups older than n days (set to however many days you like)
- FTP your backup zip to a remote location
- Highly suggest you also setup a scheduled task to backup your MySQL directory and your new backup folder to an off site location
Setup Instructions:
- Right click and edit mysqlbackup.bat file in notepad
- Set the backupdate format, whatever your preference, mine is yyyy-mm-dd-m-s ( I have not tested other variants)
- Set the root u/p (or user with adequate permissions)
- Set the MySQL data directory to match your install
- Set the path to your mysqldump.exe to match your install path
- Set the destination of the backups should go, make sure there are write permissions obviously
- Set the path to your zip application with it’s flags/commands to zip an item, I am using the command line version of 7zip which is free.
- Update the path where your backups will be saved and then deleted once zipped
- Set the number of days to keep backups, using the win program “Forfiles” for this, mine is set to 30 days “-30”
- Test your batch file on a dummy directory. You’ll see the backup directory fill up with .sql files, then a timestamped zip file is made, and the directory is cleared. Put some files older than 30 days in there and they will be wiped at the end.
- Finally create a scheduled task in windows to run the batch file on a schedule, remember to choose “Run whether user is logged on or not” otherwise it will fail.
Basic Troubleshooting tips:
- IMPORTANT NOTE: updated 3.14.2013 if you get an error in the command prompt stating “mysqldump: unkown option ‘–no-beep’ this is due to your my.ini file having an invalid option under [client]. Open your my.ini file find the [client] section and comment out #no-beep with a hash, re-run the bat file and it will work. This error has nothing to do with this script, you’d get the same error if you ran mysqldump.exe directly. I believe that MySQL Admin adds that line to the ini file when installed, thanks Oracle.
- 80% of the “Didn’t work for me” issues tend to be resolved by triple checking that your directory paths exist and are correct.
To save you some time I zipped up all the necessary files including the 7zip.exe app with the folder structure to match the batch file. Simply unzip and update your specific paths in the .bat file and you’re done.
DOWNLOAD MySQL-BACKUP-WIN-v1.5
Here is a quick look at the .bat file:
:: Auto MySQL Backup For Windows Servers By Matt Moeller  v.1.5
:: RED OLIVE INC.  - www.redolive.com

:: Follow us on twitter for updates to this script  twitter.com/redolivedesign
:: coming soon:  email admin a synopsis of the backup with total file size(s) and time it took to execute

:: FILE HISTORY ----------------------------------------------
:: UPDATE 11.7.2012  Added setup all folder paths into variables at the top of the script to ease deployment
:: UPDATE 7.16.2012  Added --routines, fix for dashes in filename, and fix for regional time settings
:: UPDATE 3.30.2012  Added error logging to help troubleshoot databases backup errors.   --log-error="c:MySQLBackupsbackupfilesdumperrors.txt"
:: UPDATE 12.29.2011 Added time bug fix and remote FTP options - Thanks to Kamil Tomas
:: UPDATE 5.09.2011  v 1.0


:: If the time is less than two digits insert a zero so there is no space to break the filename

:: If you have any regional date/time issues call this include: getdate.cmd  credit: Simon Sheppard for this cmd - untested
:: call getdate.cmd

set year=%DATE:~10,4%
set day=%DATE:~7,2%
set mnt=%DATE:~4,2%
set hr=%TIME:~0,2%
set min=%TIME:~3,2%

IF %day% LSS 10 SET day=0%day:~1,1%
IF %mnt% LSS 10 SET mnt=0%mnt:~1,1%
IF %hr% LSS 10 SET hr=0%hr:~1,1%
IF %min% LSS 10 SET min=0%min:~1,1%

set backuptime=%year%-%day%-%mnt%-%hr%-%min%
echo %backuptime%


:: SETTINGS AND PATHS
:: Note: Do not put spaces before the equal signs or variables will fail

:: Name of the database user with rights to all tables
set dbuser=root

:: Password for the database user
set dbpass=youradminpassword

:: Error log path - Important in debugging your issues
set errorLogPath="c:MySQLBackupsbackupfilesdumperrors.txt"

:: MySQL EXE Path
set mysqldumpexe="C:Program FilesMySQLMySQL Server 5.5binmysqldump.exe"

:: Error log path
set backupfldr=c:MySQLBackupsbackupfiles

:: Path to data folder which may differ from install dir
set datafldr="C:ProgramDataMySQLMySQL Server 5.5data"

:: Path to zip executable
set zipper="c:MySQLBackupszip7za.exe"

:: Number of days to retain .zip backup files
set retaindays=5

:: DONE WITH SETTINGS


:: GO FORTH AND BACKUP EVERYTHING!

:: Switch to the data directory to enumerate the folders
pushd %datafldr%

echo "Pass each name to mysqldump.exe and output an individual .sql file for each"

:: Thanks to Radek Dolezel for adding the support for dashes in the db name
:: Added --routines thanks for the suggestion Angel

:: turn on if you are debugging
@echo off

FOR /D %%F IN (*) DO (

IF NOT [%%F]==[performance_schema] (
SET %%F=!%%F:@002d=-!
%mysqldumpexe% --user=%dbuser% --password=%dbpass% --databases --routines --log-error=%errorLogPath% %%F > "%backupfldr%%%F.%backuptime%.sql"
) ELSE (
echo Skipping DB backup for performance_schema
)
)

echo "Zipping all files ending in .sql in the folder"


:: .zip option clean but not as compressed
%zipper% a -tzip "%backupfldr%FullBackup.%backuptime%.zip" "%backupfldr%*.sql"


echo "Deleting all the files ending in .sql only"

del "%backupfldr%*.sql"

echo "Deleting zip files older than 30 days now"
Forfiles -p %backupfldr% -s -m *.* -d -%retaindays% -c "cmd /c del /q @path"


::FOR THOSE WHO WISH TO FTP YOUR FILE UNCOMMENT THESE LINES AND UPDATE - Thanks Kamil for this addition!

::cd[path to directory where your file is saved]
::@echo off
::echo user [here comes your ftp username]>ftpup.dat
::echo [here comes ftp password]>>ftpup.dat
::echo [optional line; you can put "cd" command to navigate through the folders on the ftp server; eg. cdfolder1folder2]>>ftpup.dat
::echo binary>>ftpup.dat
::echo put [file name comes here; eg. FullBackup.%backuptime%.zip]>>ftpup.dat
::echo quit>>ftpup.dat
::ftp -n -s:ftpup.dat [insert ftp server here; eg. myserver.com]
::del ftpup.dat

echo "done"

::return to the main script dir on end
popd
This script is free to use and update as needed. Enjoy
Preservation of data is an essential part of any business. Losing a database, such as a customer list, could effectively be the end of a company. The primary way to protect your data is to regularly back it up.
In this article, we will explain how to automate regular backups for MySQL on Windows. If you use Linux, check out this article: How to Automate MySQL Database Backups in Linux.
What a Backup Process Should Include
Data protection is not only about creating a backup file. After the backup is created, it must be compressed to save storage space. It is also recommended for additional protection to encrypt the backup file with symmetric encryption (but be sure not to misplace the key). You will then need to transfer the compressed and encrypted backup to storage on another server or, preferably, to the cloud. It is also necessary to ensure that old backups are removed from the storage. Otherwise, the storage will overflow over time.
This process needs to be configured, but if something goes wrong you need to have ways of knowing about it. Therefore, you must have a notification process in place.
Thus, the backup process should include the following steps:
- Backup creation
- Compression
- Encryption
- Transfer to storage on another server or the cloud (AWS S3, Azure, OneDrive, etc.)
- Removal of old backups
- Notifications about backup results
How to Create a .bat Script
A script is the basic automation tool in any operating system. And although Windows is primarily interface-oriented, it is possible to create a .bat file that can follow almost all the steps described above.
Preparing to Create a Script
We will need two utilities to cook up a script:
-
Backup creation utility
When installing SQL Server on Windows, the go-to utility for creating backups is installed too – mysqldump. The utility is located in the same directory as MySQL Server.
To make your experience with MySQL Server more pleasurable, add the directory with mysql utilities to Windows environment variables. Click here to find out how to do it.
mysqldump is a straightforward utility. To back up an entire server, run this command:
mysqldump --user root --password --all-databases > all-databases.sql
-
Compression and encryption utility
By default, Windows does not have a command-line utility for compressing and encrypting files, so you need to download and install it yourself. Most suitable for this task is 7z.
This utility is very easy to use. To compress and encrypt a file, you need to run the command (replace %password% with your password):
“C:Program Files7-Zip7z” a -p%password% archive.zip backup.sql
Simple Script for Creating, Encrypting and Transferring Backups to a Network Folder
Below is a simple script for creating a backup of all databases on MySQL Server, compressing it and copying it to a network folder. The result of executing this script is written to the Windows Event Log.
The data necessary for authorization to MySQL Server and the network folder are indicated at the script’s beginning. You also need to specify the path to mysqldump and to 7z.
rem credentials to connect to mysql server
set mysql_user=root
set mysql_password=***********
rem archive password
set encryption_password=***********
rem Credentials to connect to network folder
set network_folder=\192.168.1.1Elements
set network_user=192.168.1.1kevin
set network_password=***********
rem backup storage period (in days)
set max_keep_days=1
rem path to backup compression utility
set seven_zip_path=C:Program Files7-Zip
rem backup file name generation
set backup_name=all-databases-%DATE:~-4%-%DATE:~4,2%-%DATE:~7,2%-%time::=.%
rem backup creation
mysqldump --user=%mysql_user% --password=%mysql_password% --all-databases >> %backup_name%.sql
if %ERRORLEVEL% neq 0 eventcreate /ID 1 /L APPLICATION /T ERROR /SO mysql-backup-script /D "Backup failed: error during dump creation" && exit

rem backup compression
"%seven_zip_path%7z" a -p%encryption_password% %backup_name%.zip %backup_name%.sql
if %ERRORLEVEL% neq 0 eventcreate /ID 1 /L APPLICATION /T ERROR /SO mysql-backup-script /D " Backup failed: error during archive creation" && exit

rem delete temporary .sql file
del %backup_name%.sql

rem create temporary network drive for file transfer
net use N: %network_folder% /u:%network_user% %network_password%
rem copy backup to sorage
robocopy %backup_name%.zip "N:" /e /maxage:3
if %ERRORLEVEL% neq 0 eventcreate /ID 1 /L APPLICATION /T ERROR /SO mysql-backup-script /D "Backup failed: error during file transfer to storage" && exit
rem obsolete files from storage
ForFiles /p "N:" /s /d -04 /c "cmd /c del @path & echo Deleted old: @path"
rem disconnect network drive

net use N: /delete
rem local backup copy

del %backup_name%.zip
eventcreate /ID 1 /L APPLICATION /T INFORMATION /SO mysql-backup-script /D "Backup successful"
Running the Script Regularly
After the script for the backup is created, it should be scheduled for regular execution.
The main way to schedule any process to run regularly in Windows is the Windows scheduler. Below are the instructions on how to schedule a regular run of the backup script:
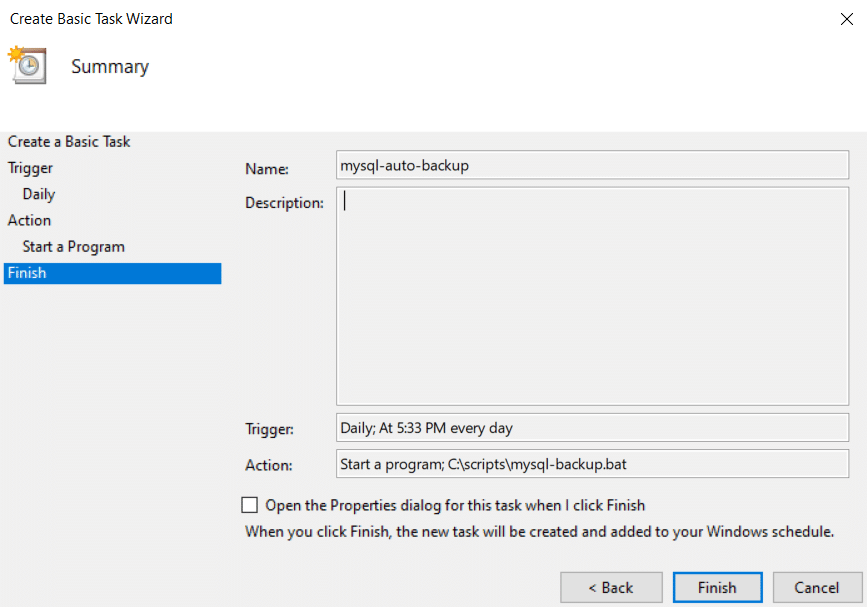
- Press win+r and enter taskschd.msc.

- Select Create Basic Task on the right panel.

- Follow the steps in the wizard. On the Action tab, select “Start a Program” and specify the path to the backup script.

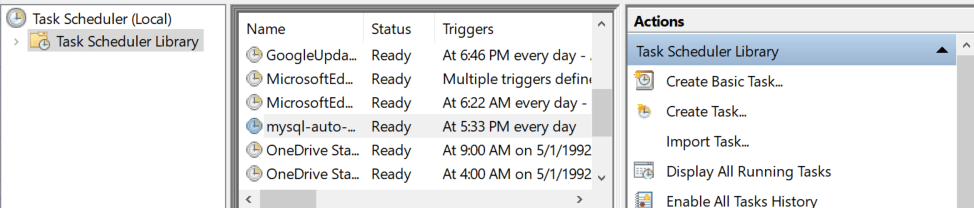
- After clicking the “Finish” button, a task will be created that will be regularly launched at the specified interval.


Backup Restoration
You can restore data using the mysql utility. It is located in the same directory as mysqldump
mysql --user root --password mysql < all-databases.sql
Summary
Creating a .bat script to run regular backups is a simple solution that covers the bare minimum in the process of good backup creation. However, Windows is an operating system that focuses on customizing processes through a user interface. As a result, shell scripts for Windows are underdeveloped, and it is usually difficult to implement a good and reliable solution based only on scripts.
Using GUI Solutions
Unlike Unix systems – Windows is focused on user interaction through a graphical user interface.
Below we will consider utilities with a graphical interface that allows you to perform all the steps necessary to create a good backup of MySQL databases on Windows.
SQLBackupAndFTP
SQLBackupAndFTP is a popular backup solution for an SQL Server. However, this program allows you to automate backups for MySQL Server too.
This utility has a straightforward interface, but also boasts many useful features such as backup encryption, email notifications and automated scripts before and after creating a backup. It also allows automated data recovery.
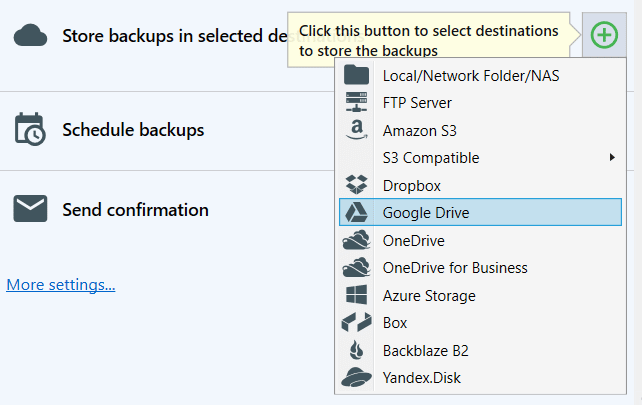
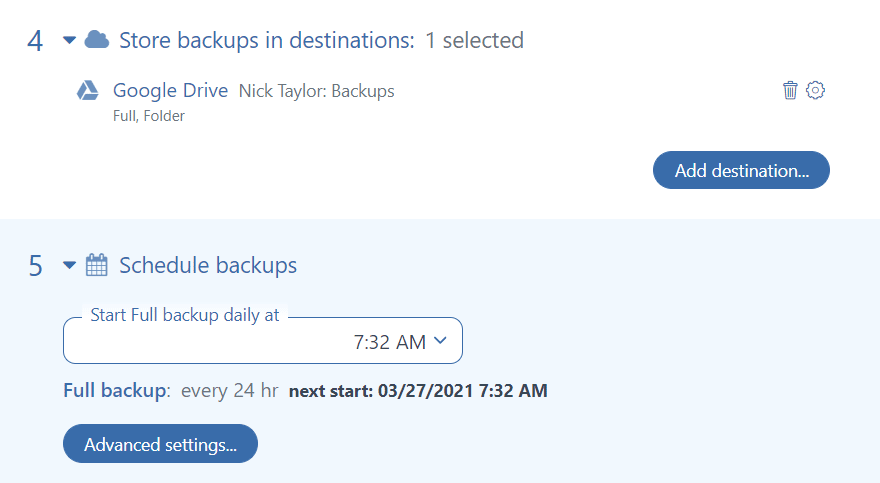
Most importantly, this program allows you to send a backup to a folder, FTP server or cloud storage. The complete list of supported destinations is: local/network folder/NAS, FTP server, Amazon S3, S3 Compatible (custom, Google Cloud, Wasabi, Aruba), Dropbox, Google Drive, OneDrive, OneDrive for Business, Azure Storage, Box, Backblaze B2, and Yandex.Disk.
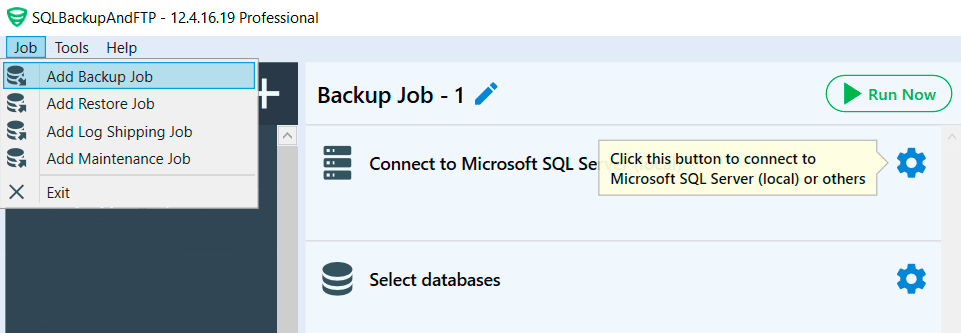
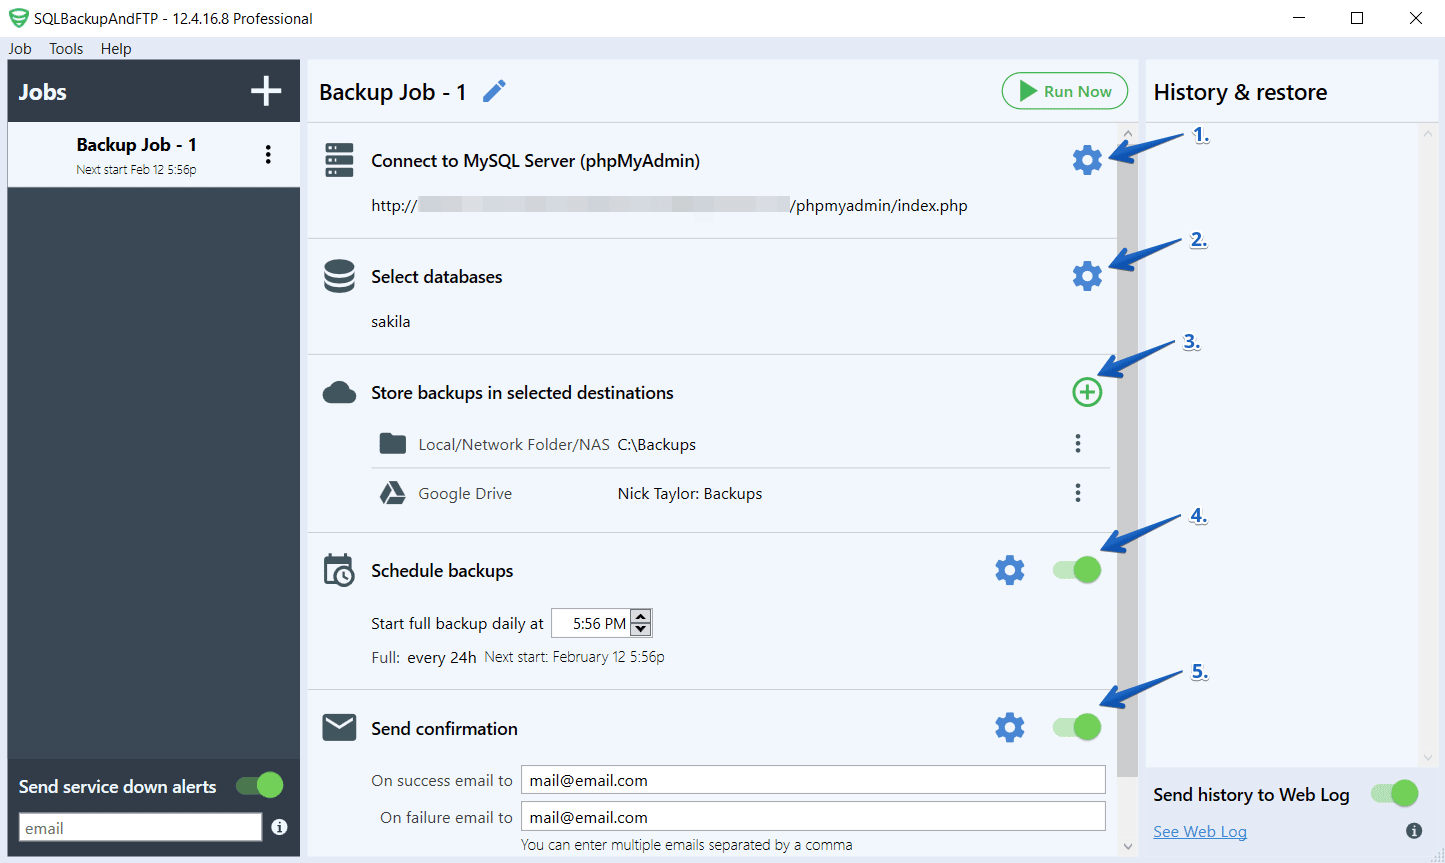
To create a backup job in SQLBackupAndFTP follow the steps below:
- Create a backup job by clicking Jobs > Add Backup Job

- Establish a connection with your MySQL Server.

- Select the databases you want to back up.

- Specify the location where the backups will be stored. In this case, it’s Google Drive. Select Google Drive from the list provided and establish a connection.

- Create a backup schedule.

- Enter your email to receive fail/success notifications.


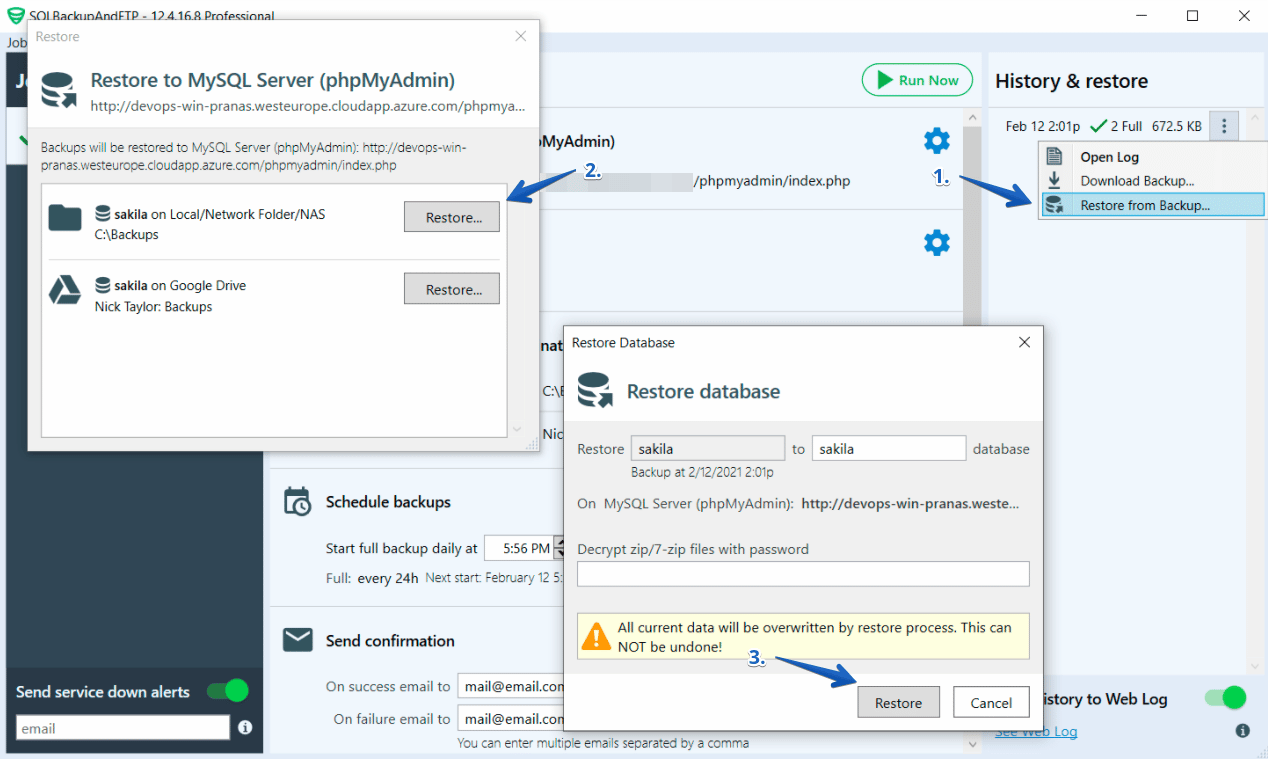
To recover data, follow these steps:
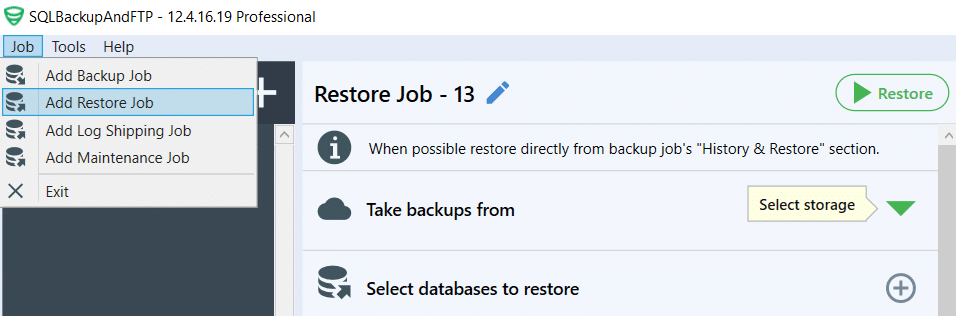
- Create a Restore Job by clicking Jobs > Add New Restore Job

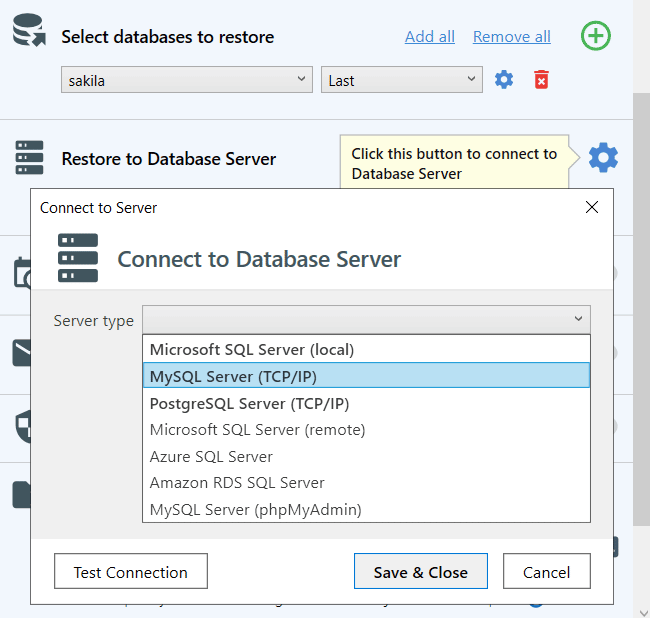
- Specify the location where the backups will be stored (for example, Google Drive) and establish a connection.

- Choose a backup that should be restored.

- Connect to your MySQL Server.

- If necessary, set up email notifications.


Click “Run Now” to start.
Also, you can restore your backups in just several clicks. Choose the backup you need from the “History & Restore” section, click the three dots and press “Restore from Backup…”, and then follow the steps.

Summary
SQLBackupAndFTP was developed over 15 years ago and has since been installed over a million times. It is a reliable data protection solution. A simple interface and an extensive list of supported cloud storage save database administrators a lot of time.
SqlBak
If you need to have regular MySQL database backups for several servers, then a solution that needs to be configured on the server itself may not be very convenient.
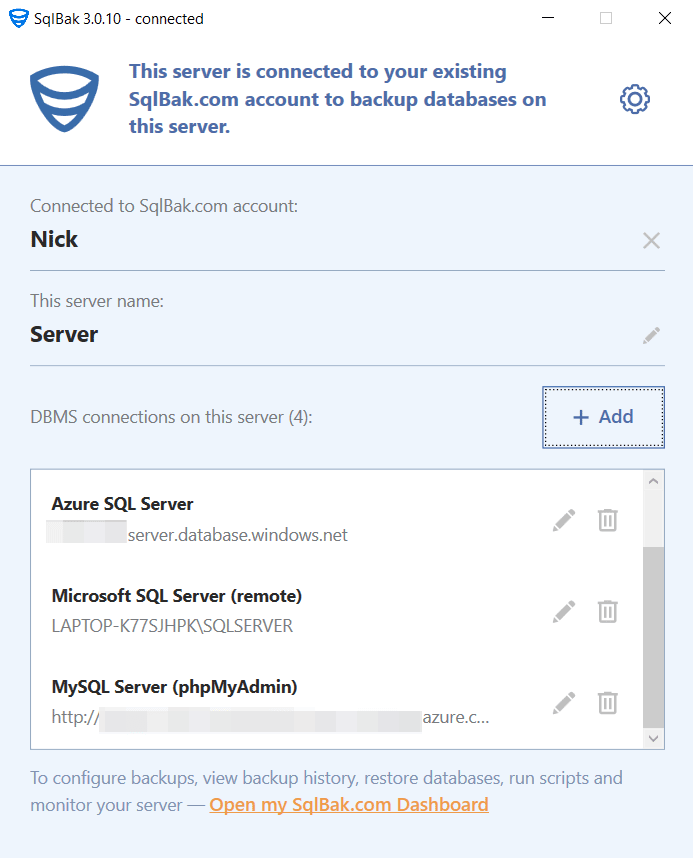
Another tool that covers all the steps required to create a good backup is SqlBak. You only need to install a small application in which you will need to specify credentials to connect to the MySQL database. All other settings, logs, and reports are located on the site, which is very convenient if you need to administer several servers simultaneously.
SqlBak can save backup in the following locations: local/network folder/NAS, FTP server, Amazon S3, S3 Compatible (custom, Google Cloud, Wasabi, Aruba), Dropbox, Google Drive, OneDrive, OneDrive for Business, Azure Storage, Box, Backblaze B2, and Yandex.Disk.
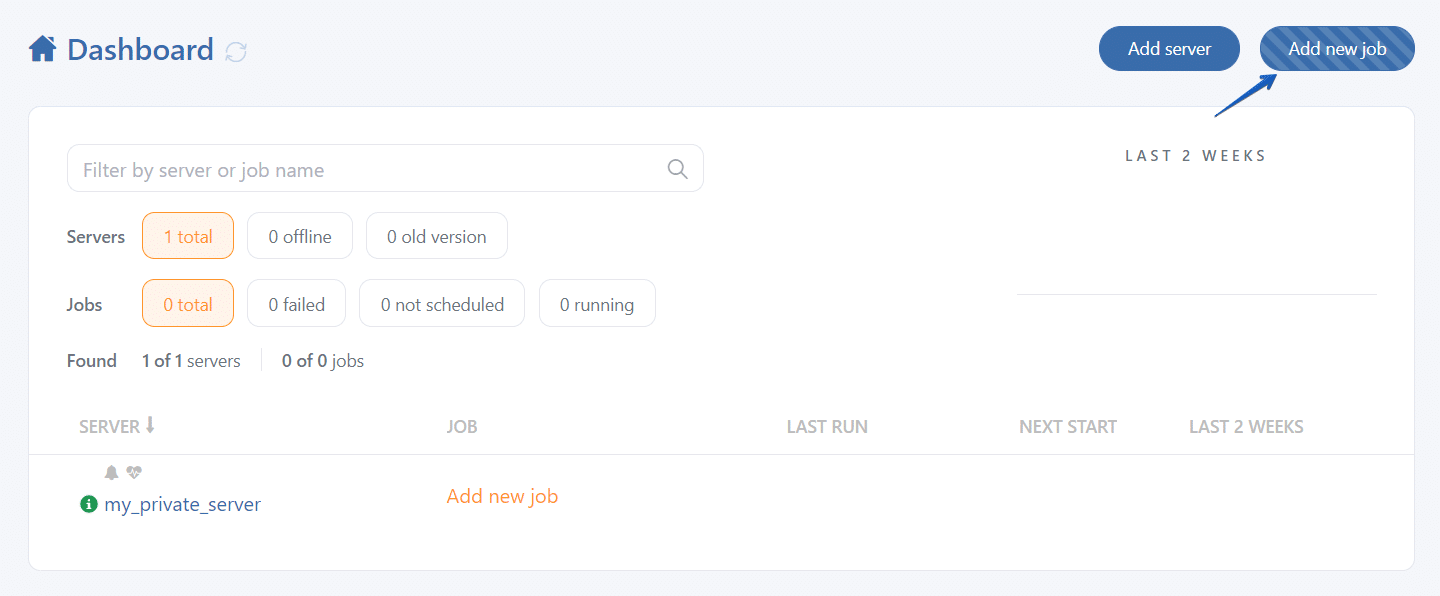
To set up an automated MySQL Server backup on Windows using SqlBak, follow the steps below:
- First of all, you need to install SqlBak on your computer and establish a connection to the MySQL Server. You can find more information on the Download page.

- Go to the Dashboard page, click the “Add new job” button, check the settings and click “Create Job.”

- Select the databases you want to back up.

- Set up a location where your backups will be stored, for example, Google Drive.

- Set up a backup schedule.

- Enter your email for backup fail/success notifications.


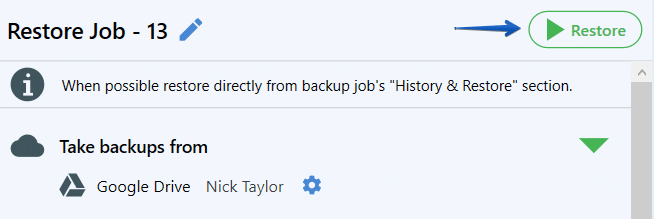
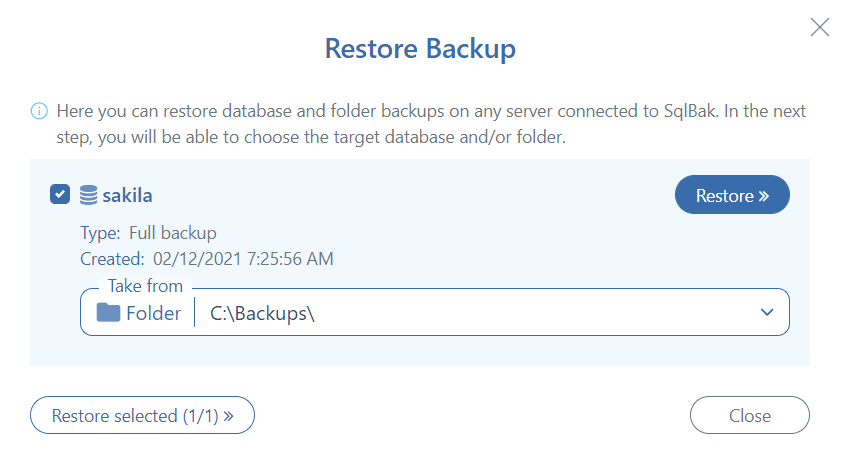
You can restore your data in just three clicks. Select the backup you need from the backup history section, click the “Restore” button, and follow the steps.

Summary
SqlBak can run on both Windows and Linux. The advantages of SqlBak are revealed when connecting multiple MySQL Servers. The service simplifies the administration of multiple MySQL computers and can restore a backup to another linked server. That makes it very easy to transfer databases between servers and set up automated recovery on the development server.
Bottom Line
Even though the MySQL Server does not have built-in backup automation mechanisms, this task can be solved in many other ways: from writing a shell script to using utilities with a graphical interface such as SqlBak or SQLBackupAndFTP.
The main purpose of a backup is that you can use it to restore your data. Never store your backup on the server where you keep your database, keep your encryption key safe and be sure to test restoration on another server from time to time.


Накидал маленький BAT скрипт для резервного копирование MySQL баз. Внесите свои данные и через scheduler настройте расписание резервного копирования.
Ссылки
Customizing the PATH for MySQL Tools
Установка MySQL 8 на Windows Server 2016
Mysql 8 — mysqldump в командной строке
7-Zip — бесплатный архиватор
BAT скрипт для резервного копирования MySQL в Облако Mail.Ru
Функции
- С помощью mysqldump делает резервные копии всех баз данных mysql на сервере.
- Каждый бэкап сохраняется в отдельную подпапку вида DD.MM.YYYY_hhmmmss.
- С помощью 7-Zip архивирует резервные копии.
- Удаляет старые резервные копии.
Код
@echo off
SetLocal EnableDelayedExpansion

rem =============================
rem ====== admin variables ======
rem =============================

set user=root
set pass=your_password_is_here
set prot=tcp
set port=3306
set host=localhost
set BackupDir=D:MySQL
set NumFolders=10

rem =============================
rem ======== 7-Zip path =========
rem =============================

set a7z=%ProgramFiles%7-Zip7z.exe

rem =============================
rem == create backup directory ==
rem ==== DD.MM.YYYY_hhmmmss =====
rem =============================

set h=%time:~0,2%
set h=%h: =0%
set FullBackupDir=%BackupDir%%date%_%h%%time:~3,2%%time:~6,2%
md %FullBackupDir%

rem =============================
rem === backup all databases ====
rem =============================

for /F "delims=|" %%a in ('mysql -u%user% -P%port% -h%host% -p%pass% -s --execute="show databases;"') do (
	rem === backup database ====
	mysqldump.exe ^
		--user=%user% ^
		--host=%host% ^
		--protocol=%prot% ^
		--port=%port% ^
		--password=%pass% ^
		--default-character-set=utf8 ^
		--single-transaction=TRUE ^
		--routines ^
		--events ^
		--add-drop-table ^
		--add-locks ^
		--extended-insert ^
		--lock-tables ^
		--dump-date ^
		--disable-keys ^
		--tz-utc ^
		"%%a" > %FullBackupDir%%%a.sql 2>nul
	rem === zip ====
	"%a7z%" a -tzip -bb0 -bd -sdel "%FullBackupDir%%%a.zip" "%FullBackupDir%%%a.sql" 2>nul >nul
 )

rem =============================
rem ==== remove old folders =====
rem =============================

for /f "tokens=* delims=" %%D in ('dir %BackupDir% /ad /b /o-d') do (
	if not %%D=="" (
		if not !NumFolders!==0 (
			set /a NumFolders-=1
		) else (
			rd /s /q %BackupDir%%%D 2>nul >nul
		)
	)
)
- user — логин в MySQL
- pass — пароль
- prot — протокол
- port — порт
- host — сервер
- BackupDir — папка куда бэкапить
- NumFolders — сколько подпапок с бэкапами хранить
- a7z — путь к 7z.exe
Пример настройки расписания
В Task Scheduler настраиваем новое задание.
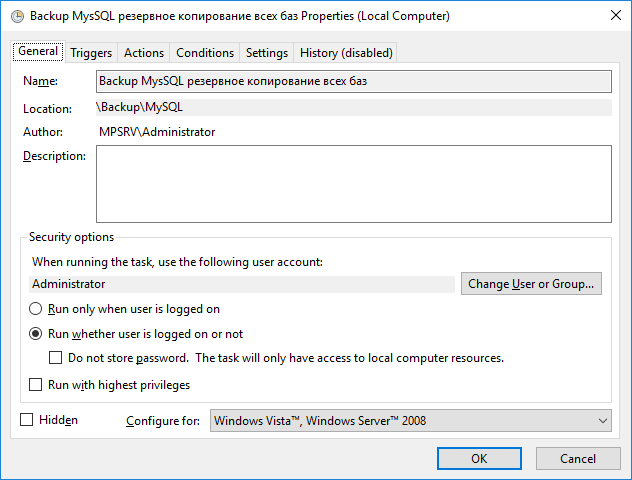
Выбираем пользователя, от имени которого будет выполняться резервное копирование. После сохранения задания нас спросят пароль от него. Ставим галку Run whether user is logged or not — запускать даже если юзер не залогинен.
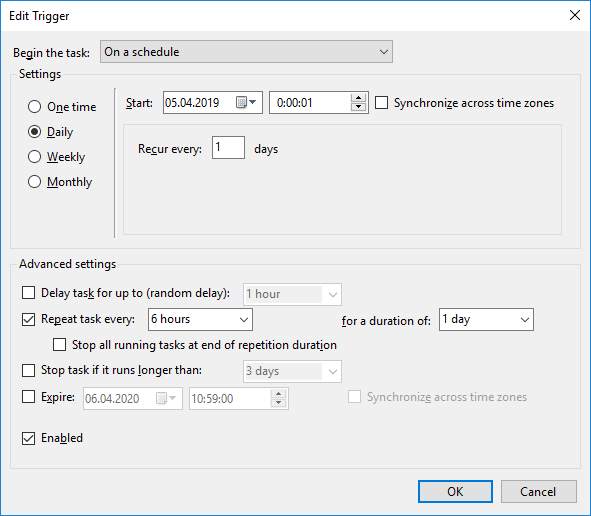
В триггерах настраиваем расписание. У меня резервное копирование происходит каждые 6 часов.
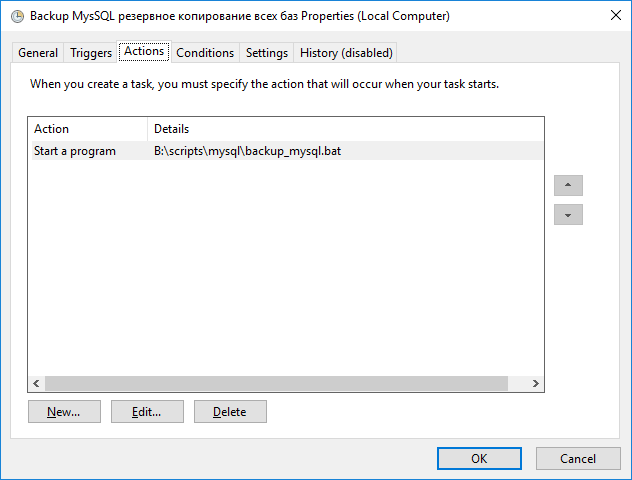
Указываем ссылку на наш BAT файл.
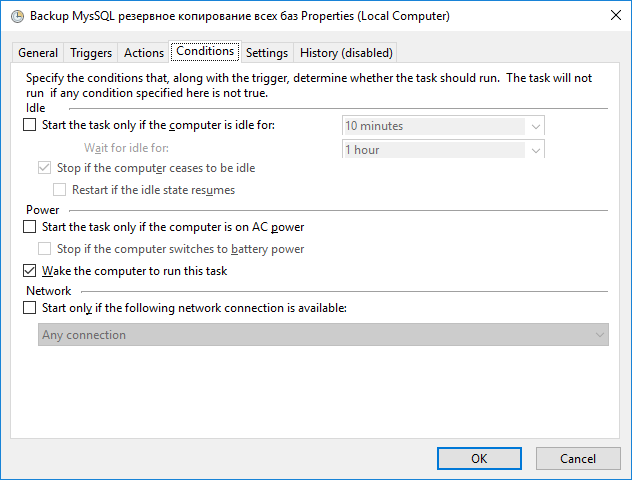
Настраиваем условия.

Проверяем настройки. OK.
Теперь все наши MySQL базы будут резервироваться каждые 6 часов — это 4 раза в день. С настройкой NumFolders=10 в BAT файле мы будем хранить данные за последние 2,5 дня. Если вы хотите с таким расписанием хранить резервные копии баз данных 10 дней, то измените: NumFolders=40.
Если хотите хранить ежедневные и ежемесячные резервные копии — сделайте два BAT файла и два расписания резервного копирования в разные папки.
Because there are several ways to backup MySQL database on Windows, this article will review all the different options so that you can select the method that works for you. This article is limited to MySQL database backups for a Microsoft Windows Server only. If you are using a Linux-based OS, see How to Automate MySQL Database Backups in Linux.
Note that most of the methods described in this article are fully compatible with MariaDB, with the exception of hot physical backups.
MySQL Backup types
MySQL database supports the following types of backups:
- Logical – the result of a logical backup is a .sql script for database recreation. This script is created using the mysqldump utility. The main advantage of this backup is that it has no third-party dependencies and can be restored on any MySQL Server.
- Physical – this backup is created by copying the database files. Creating and restoring such a backup is faster than a logical backup. We recommend using it for large databases.
- Hot – if a MySQL Server is running on an InnoDB subsystem, then you can create transactional-consistent backups without stopping writing to a MySQL Server
- Partial – the backup is not created for the entire DBMS, but for specific databases or tables. This is useful when different backup strategies are applied to different data.
How to create a logical MySQL backup
Simple backup of MySQL database using mysqldump
When installing a MySQL server, the main backup utility is automatically installed – mysqldump. This command-line utility creates a backup file with a set of commands to recreate the database.
It is easy to restore a MySQL database from a file created by mysqldump. A small database can be restored by copying the contents of the file into the SQL editor of a graphic IDE (for example, in MySQL Workbench) and running it from there. However, it is preferable to restore a large database using the mysql command utility.
Typically, mysqldump is located in the MySQL Server installation directory. For example, for MySQL 8.0, the path to the directory is C:Program FilesMySQLMySQL Server 8.0bin. It is advisable to add this directory to the global PATH variable.
To create a backup of all MySQL server databases, run the following command:
mysqldump --user root --password --all-databases > all-databases.sql
To recover data, use the following command:
mysql --user root --password mysql < all-databases.sql
Often you need to backup not the entire server, but a specific database. To dump a specific database, use the name of the database instead of the –all-database parameter.
mysql --user root --password [db_name] < [db_name].sql
The fact that the backup is created in an open format has two important advantages:
- You can restore a dump on a server with a different version. Thus, switching to another version of MySQL can be done without worrying about backups.
- You can manually edit the .sql file if you need to change something before restoring.
For more information, see mysqldump documentation.
Backup using MySQL Workbench
MySQL Workbench is a tool for visual design and it works with a MySQL database. This application also allows you to create logical backups of a MySQL database.
To create a backup using MySQL Workbench follow these steps:
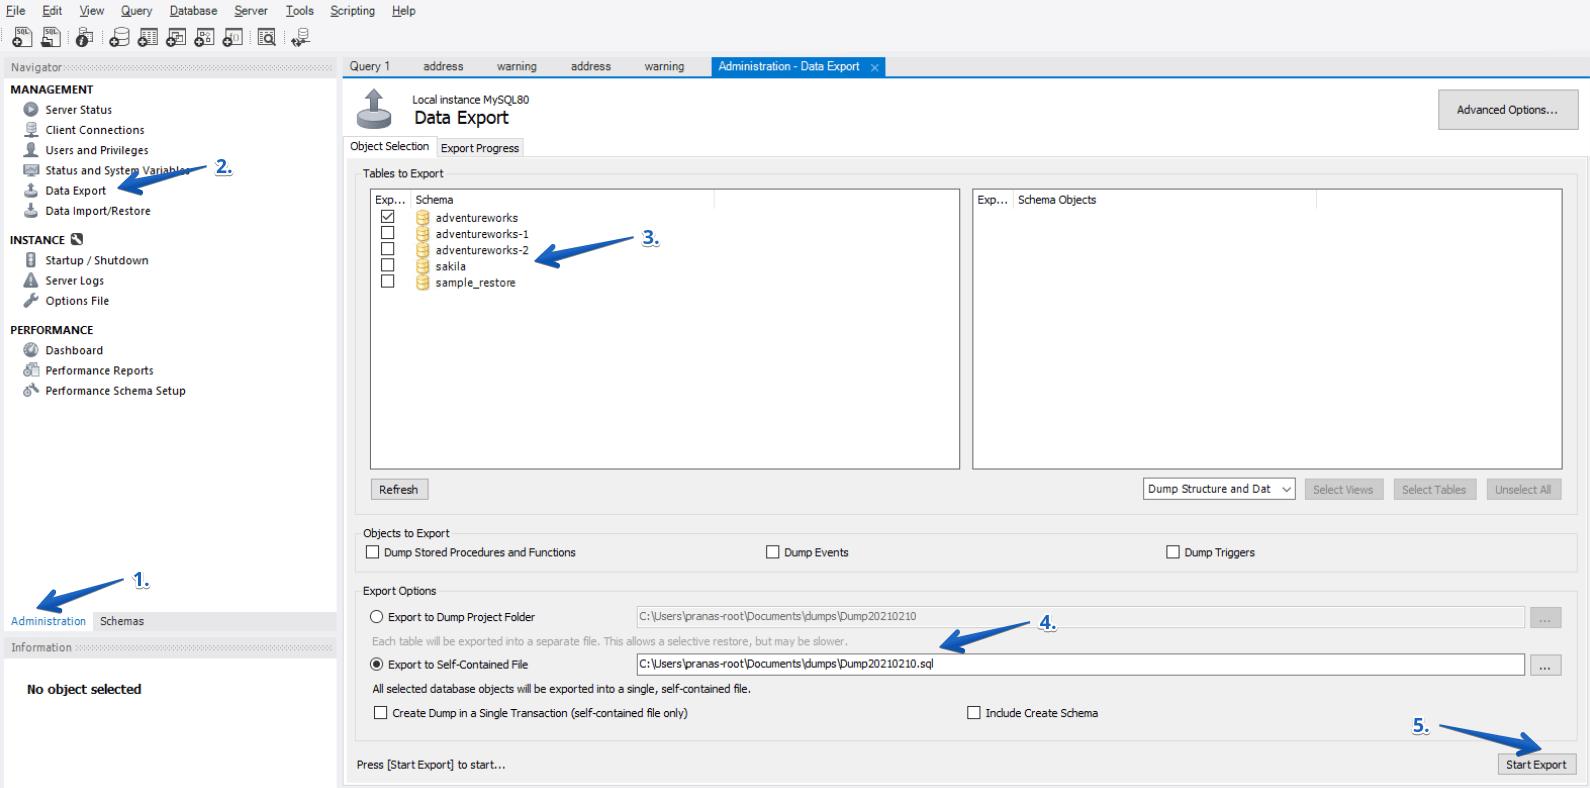
- Go to the Administration tab, on the Navigation panel (on the left by default)
- Select Data Export
- From the Data Export tab in the Tables To Export section, select the databases and tables that will be added to the backup file
- From the Export Option section, select the format for the exported data. Either each table will be exported to a separate .sql file, or one common .sql file will be created.
Exporting each table to a separate file can be useful if you need to restore not the entire database, but some specific tables. But, as a rule, this is not necessary, and it is easier to work with one backup file.
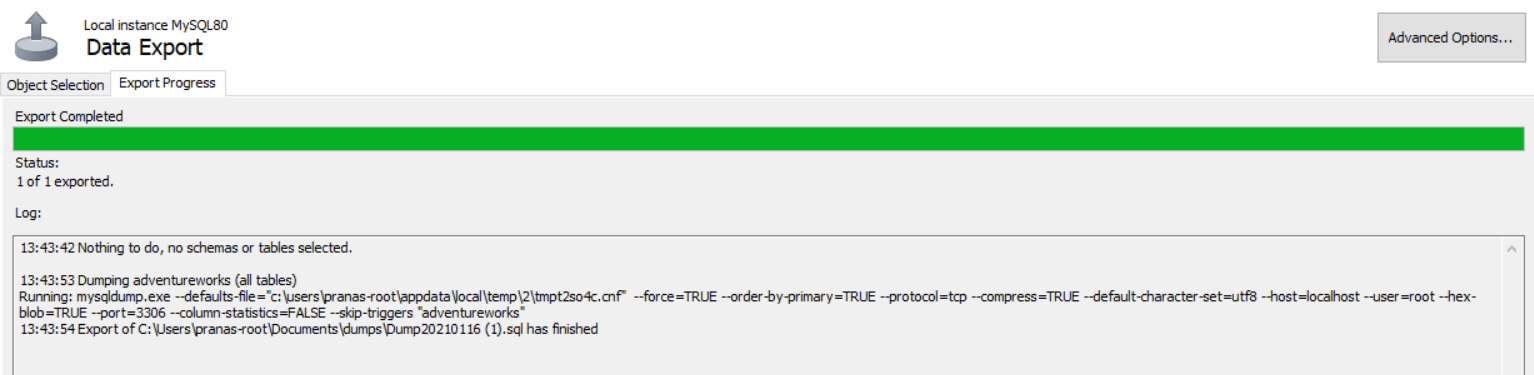
- Press the Export button to create a backup file.
The export section is essentially a graphic interface to the mysqldump utility. Although you cannot automate the creation process using MySQL Workbench, this tool is convenient for manually creating a backup and for migrating data.
Also, you can use MySQL Workbench as a parameter constructor for mysqldumpmysqldump
Dump recovery using MySQL Workbench
To restore the created backup, follow these steps:
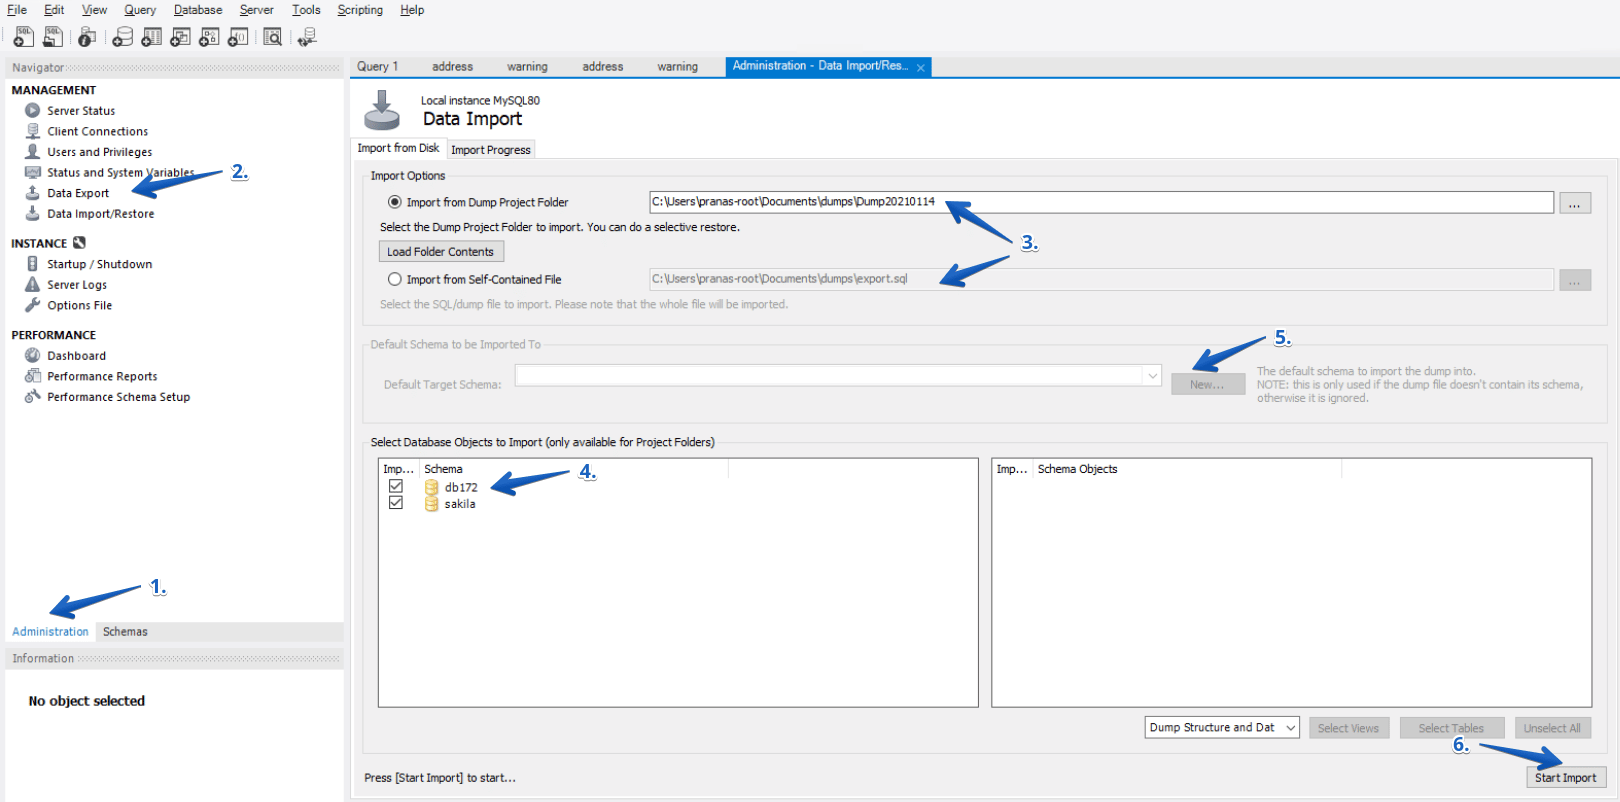
- Go to the Administration tab, on the Navigation panel (on the left by default)
- Select Data ImportRestore
- Select the source of the recovery Dump Project Folder or Self-Contained File, depending on what you selected at the backup stage
- If you used a Dump Project Folder, then you can select the databases and tables that need to be restored.
- If you use a Self-Contained File, then before restoring, you must select the schema into which you want to restore the dump. If you restore a dump to a server where the required schema does not exist, you can create it by clicking the New button.
- Press the Start Import button.
Backup using SQLBackupAndFTP
SQLBackupAndFTP is a popular utility for backing up and restoring MySQL, SQL Server, and PostgreSQL. This specialized utility is designed for the automated creation of backups and sending them to storage.
This utility not only simplifies backups but also allows you to perform a one-click restore, as well as automate the restore, which can be very useful for synchronizing data or creating a test server.
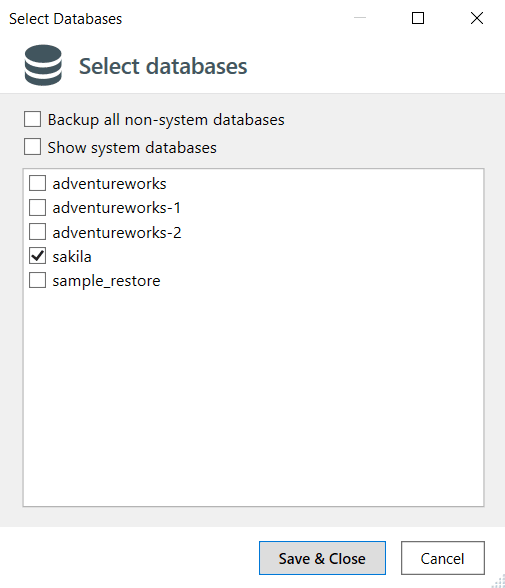
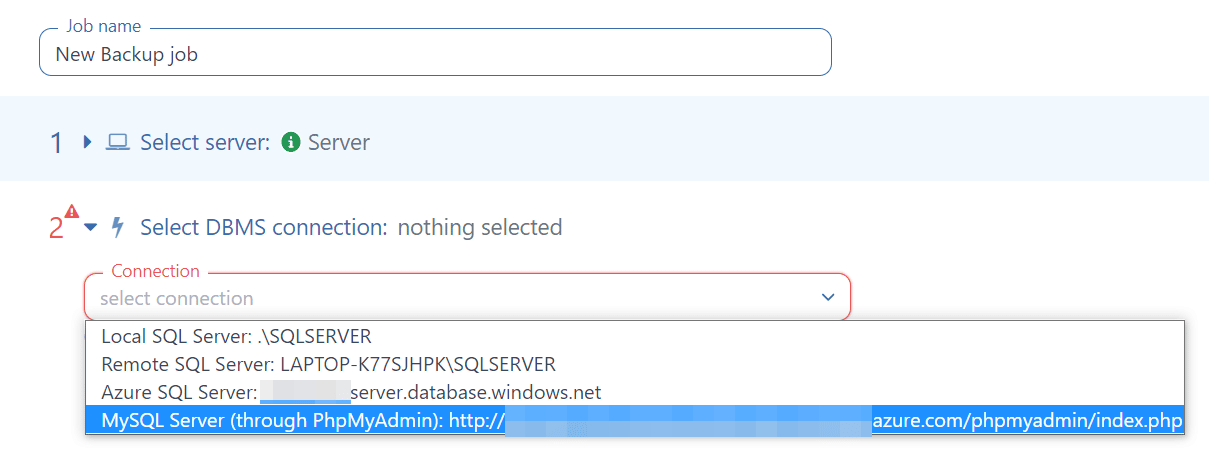
To create a MySQL database backup using SQLBackupAndFTP, follow these steps:
- Connect to your MySQL Server by selecting the connection type MySQL Server (TCP/IP) or MySQL Server (phpMyAdmin)
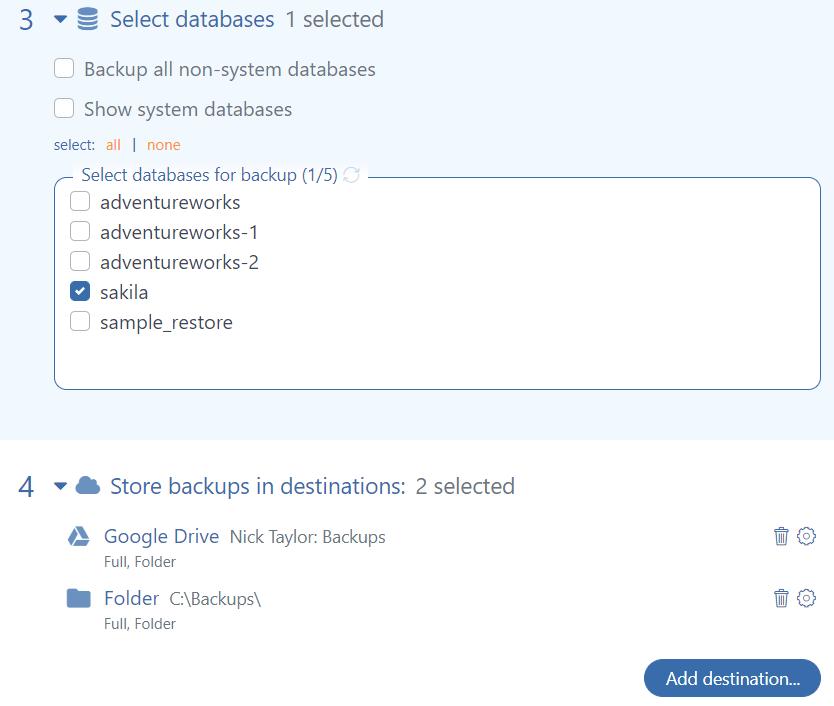
- Next, from the Select Databases section, select the databases you want to back up
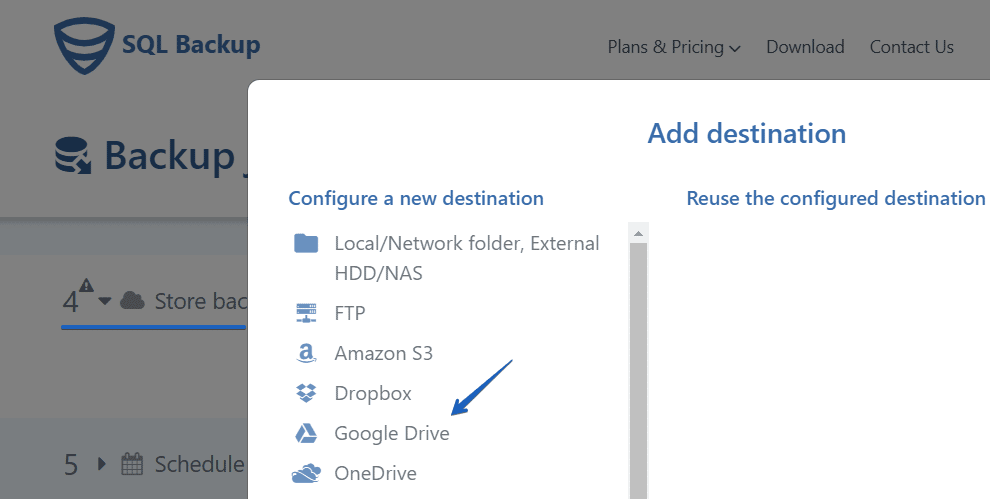
- The next step is to choose where to store your backups. It can be a local or network folder, FTP, or popular cloud storage services such as Dropbox, Google Drive, Amazon S3, Azure, and others. Please note, you can specify several places where backups will be sent.
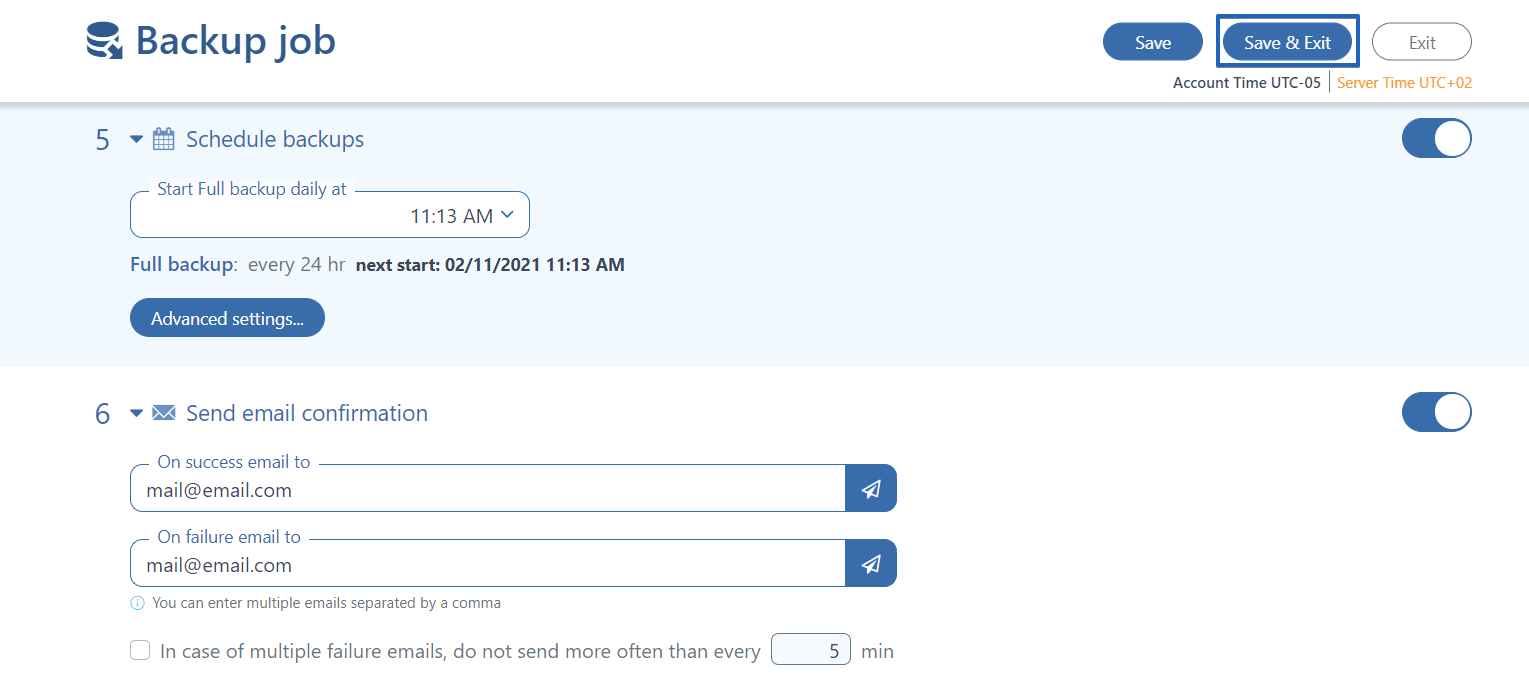
- In the Schedule Backups section, create a backup schedule
- To receive email notifications about completed backups, set the Send Confirmation option
These are the basic settings, but you can also adjust the compression level of your backups, set a password for them (using the encryption option), specify a temporary folder to do the work, set up scripts to run, and much more.
To restore the MySQL database created by SQLBackupAndFTP, just follow these steps:
- Find the backup you want to restore in the History & Restore section on the right side of the application
- Click on three dots and select “Restore from backup…”
- Make sure the correct backup is selected and click the Restore button
- Specify the name of the database where you want to restore the backup and password, if necessary, then click Restore and confirm the launch
The main feature of SQLBackupAndFTP is that this utility not only provides a good interface for creating a backup file, but also allows you to configure all the accompanying steps: compression, encryption, cloud storage, and fail notifications.
Backup using SqlBak
Typically, a DBA has to maintain more than one database. A good solution for creating and maintaining backups on multiple servers is SqlBak.
This is an agent-based application for creating backups, compressing them, and then sending them to storage. All necessary settings are done in the browser.
To create a backup using SqlBak use the following instructions:
- Run SqlBak App and connect to your MySQL Server using the server type MySQL Server (TCP/IP) or MySQL Server (phpMyAdmin)

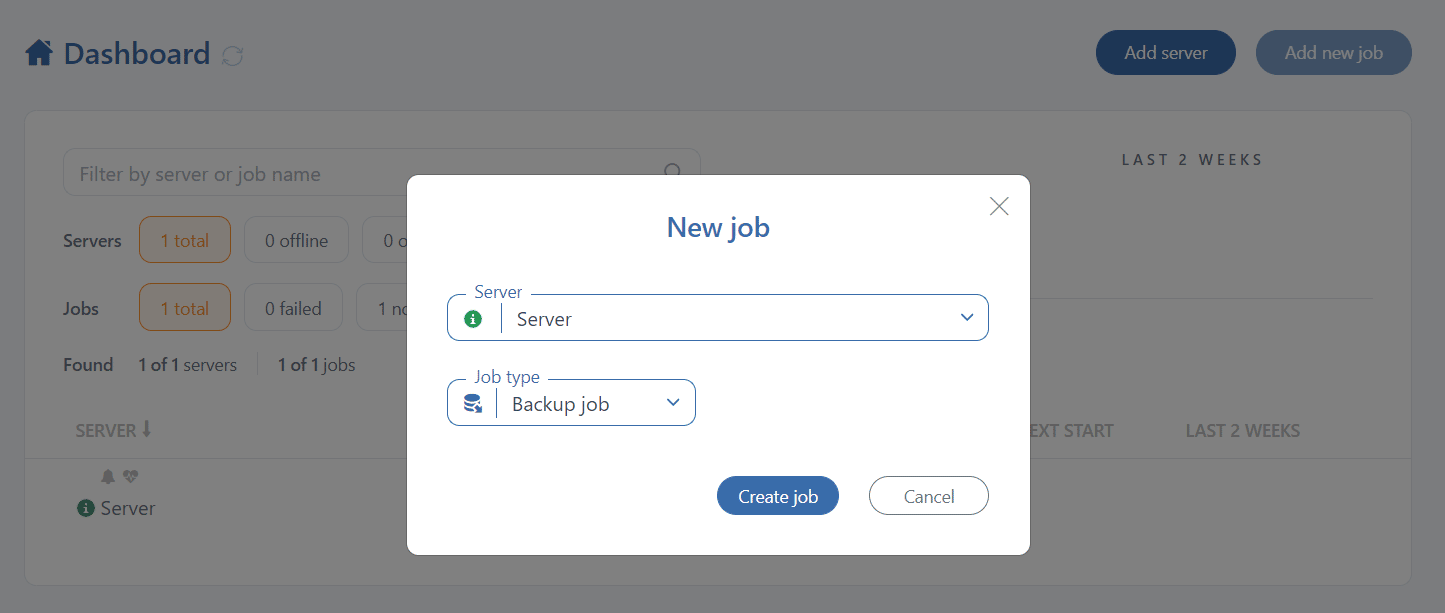
- Go to the Dashboard page and click the Add New Job button
- In the window that opens, select the server you need, set the Backup Job in the Job Type field and click Create Job

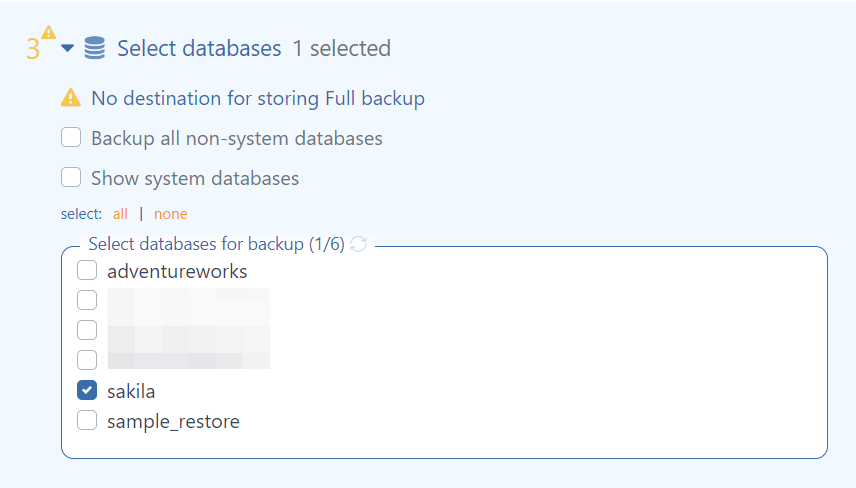
- In the Select DBMS connection section, select the connection to your MySQL Server. If you have only one connection on the server, it will be selected automatically.

- In the Select databases section, mark all databases that you want to back up
- Now you need to configure the locations where your backups will be stored. These can be local or network folders, FTP, or cloud storage like OneDrive, Amazon S3, S3 Compatible (like Google Cloud, Wasabi), etc.

- Create a schedule to start the job
- Specify your email address for job success/fail notifications
- Click the Save & Exit button to save the settings and start the job

These are the essential settings, but you can also configure the encryption of your backups, compression, running scripts, and much more.
To restore the database from a backup created by SqlBak, you need to do the following:
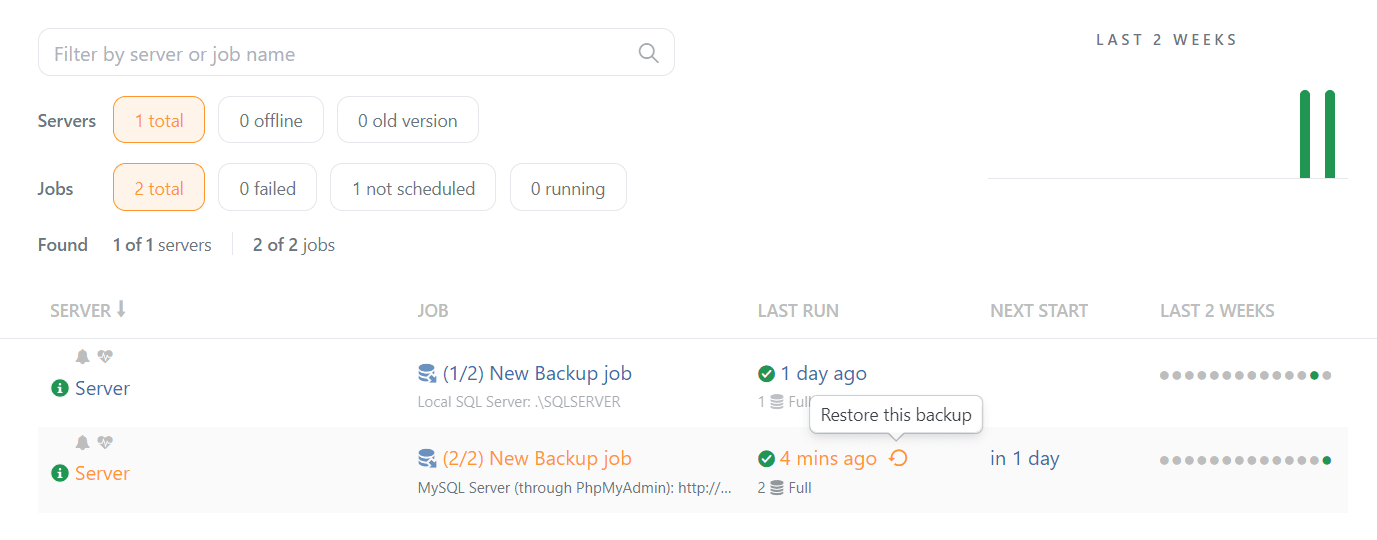
- Go to the Dashboard page and click on the Restore icon in the LAST RUN column to restore the last backup. Alternatively, go to the backup job setup page, find the backup you need in the Backup history section and click the Restore icon in the Actions column

- Select the backup you need and click the Restore button
- Check the settings and start the restore

Backup using PhpMyAdmin
PhpMyAdmin is an open-source tool for administering MySQL databases through a browser. It may be an overkill to install PhpMyAdmin solely for creating backups, but if you already use this tool, you can create a backup in only five clicks.
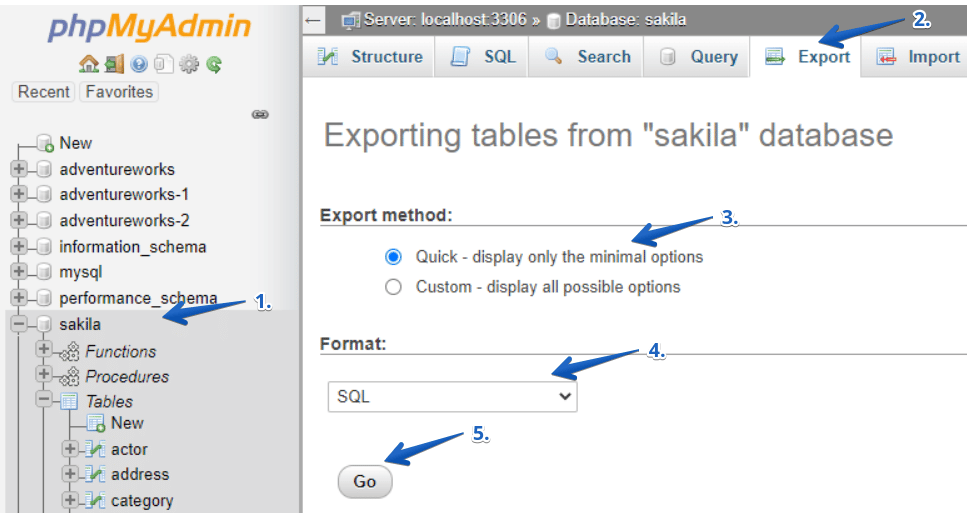
- Select the database in the left panel
- Go to the Export tab
- To back up the entire server, select Quick. If you want to backup specific databases, then you must select Custom to see additional settings.
- Select SQL format, which is the best for backup.
- Click GO.
Quite often, hosting providers do not provide direct access to a MySQL database, but instead, they provide access through PhpMyAdmin. However, as in the case of MySQL Workbench, PhpMyAdmin is a tool for working with a database, and it does not support built-in mechanisms to automate the creation of regular backups. In this case, SqlBak or SQLBackupAndFTP can help by connecting to a MySQL database over PhpMyAdmin.
How to create a physical MySQL database backup
Ultimately, any database is stored in a file or set of files. If you save these files to another location, you can later use them to restore the data from a particular time period.
Unlike logical backups, physical backups are created much faster, because it is only a matter of copying files. The restoration is also fast, for the same reason.
However, physical backups have two important disadvantages:
- Backups are portable only to other machines that have identical or similar hardware characteristics.
- The solution for creating hot backups can be too expensive for small businesses, as the only Windows tool that allows you to create a physical backup without stopping the server is MySQL Enterprise Backup.
Manual creation of a MySQL Server backup by copying data files
The easiest way to create a backup is to simply copy the contents of a MySQL data directory.
To manually create a MySQL Server backup based on files, follow the steps below:
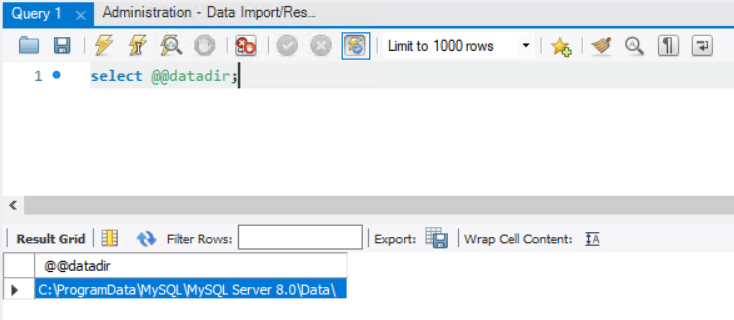
- Find MySQL Server data directory. To do this, run the following command:
select @@datadir;
The easiest way to do this is through MySQL Workbench.
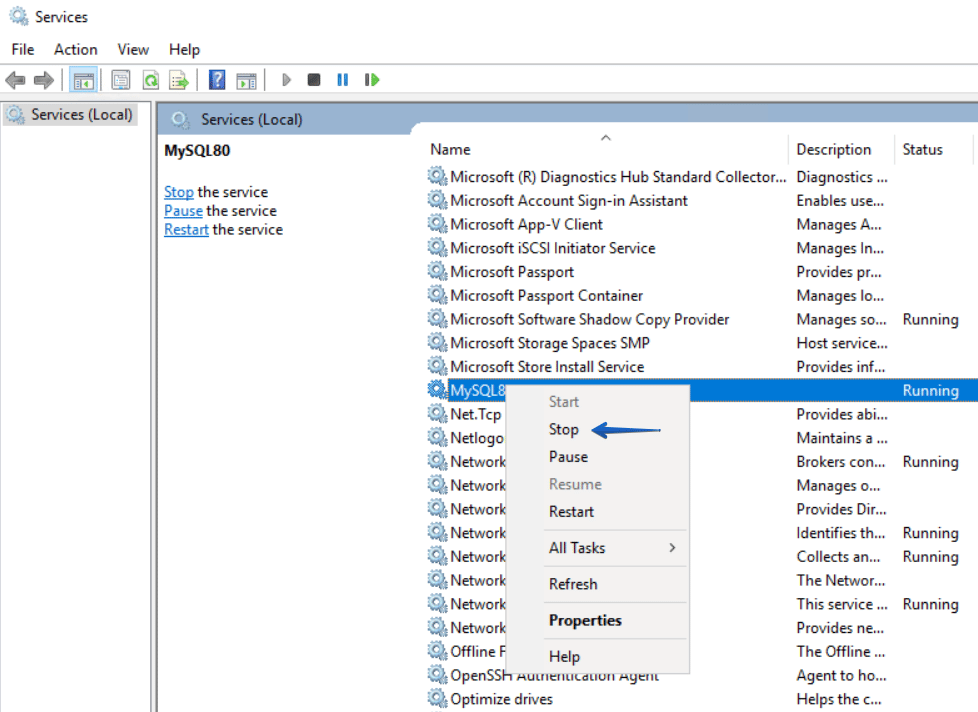
- Find and stop the MySQL Server service
- Press win+R
- Enter services.msc
- Find the MySQL Server service in the list of services
- Right-click on it and select Stop

- Copy or pack the contents of a MySQL Server data directory to another location
- Start MySQL Server by clicking Start in the context menu of the service.
Creating a MySQL Server backup by copying data files using a batch script
All actions described in the previous section can be performed using one batch script.
First, set values for the variable values mysql_data_dir,backup_dir, mysql_service_nameand then run the script. It will stop the service, copy the contents of the data folder to a new subdirectory, and then start the MySQL Service.
set mysql_data_dir=C:ProgramDataMySQLMySQL Server 8.0Data
set backup_dir=D:Temp
set mysql_service_name=MySQL80

NET STOP %mysql_service_name%
set mysql_backup_folder=%backup_dir%mysql-backup-%DATE:~-4%-%DATE:~4,2%-%DATE:~7,2%-%time::=.%
mkdir %mysql_backup_folder%
xcopy /e /k /h /i "%mysql_data_dir%" "%mysql_backup_folder%"
NET START %mysql_service_name%
Database restoration from files
Follow the steps below to restore your data:
- Stop MySQL Service
- Empty MySQL Server data directory completely
- Copy the saved data to the data directory
- Start the service
Using mysqlbackup utility
The main disadvantage of the previous method is the need to stop MySQL Server. And although copying itself should take little time, even a short shutdown of the server may be unacceptable.
For a windows server, Oracle Corporation has developed a MySQL Enterprise backup product that allows you to create hot physical backups.
This solution includes a console utility – mysqlbackup, which allows creating physical backups. It is as easy to use as mysqldump.
The following command creates a backup file in the directory d:TempEnterpriseBackup.
mysqlbackup --user=root --password --backup-image=backup.mbi --backup-dir=D:TempEnterpriseBackup backup-to-image
–backup-image – Backup file name
–backup-dir – Directory in which backup will be created
To restore data from backups, you will need to perform preparatory steps, namely to stop the MySQL Service and clear the MySQL Server data directory. Then you need to use the same utility to restore data but with different parameters.
mysqlbackup --datadir=C:ProgramDataMySQLMySQL Server 8.0Data --backup-image=backup.mbi --backup-dir=D:TempEnterpriseBackup copy-back-and-apply-log
–datadir – MySQL Server data directory
–backup-image – Backup file name
–backup-dir – The directory containing the backup file.
The mysqlbackup utility supports on-the-fly compression, a partial backup, incremental backup, and many other features. Details are available here.
The main drawback of this solution is the need to purchase MySQL Enterprise, which can be expensive for small and medium-sized businesses.
Bottom line
Remember that protecting your data isn’t just about creating a backup file. It will be necessary to ensure the transfer of the backup file to storage and to regularly delete old backups in order to prevent the storage from overflowing.
Whether you create a batch script for an automated MySQL Server backup using mysqldump / mysqlbackup , or use SqlBakSQLBackupAndFTP, the main thing is not to forget that you are creating a backup so that you can restore it later. So test your restore scripts from time to time.
Hopefully, these instructions will help you find the right backup procedures that work the best for your needs.
Как говорится, админы делятся на тех, кто не делает бэкапов и тех, кто уже делает. Уж сколько раз убеждались, что делать бэкапы нужно, и чем чаще, тем лучше, но не перевелась еще армия админов, надеющихся на авось.
Недавно поднял на очередном компьютере веб-сервер Xampp и запустил несложную, но важную программку с веб-интерфейсом для внутрисетевого использования и озадачился вопросом — как сделать, чтобы база данных сама бэкапилась каждый день.
В принципе, задача имеет множества вариантов решения, но мне больше всего понравился такой вариант — создать .bat-файл и забить его в штатный планировщик Windows. После активного поиска в интернете был найден такой код:
SET SOURCEDIR=D:xamppmysqldata

set hour=%TIME:~0,2%

set minute=%TIME:~3,2%

set second=%TIME:~6,2%

set HHMMSS=%hour%-%minute%

for /d %%i in (%SOURCEDIR%*) do "D:xamppmysqlbinmysqldump.exe" -uusername -hlocalhost -ppassword -c -n %%~ni | "c:Program Files7-Zip7z.exe" a -tgzip -si"%%~ni_%DATE%_%HHMMSS%.sql" "D:backupsdata%DATE%_%HHMMSS%%%~ni.sql.gzip"

eachfile.exe -purge -r -w -e -d 13 -l 0 -dir D:backupsdata

exit
Принцип работы следующий:
- в первой строке задаем путь к каталогу, в котором хранятся файлы базы данных MySQL
- дальше идут строки (set …), в которых формируется имя архива — оно состоит из даты и времени создания архива
- цикл for перебирает все файлы в каталоге и для каждого из них запускает процедуру создания дампа базы данных. Для этого нужно ввести данные -uusername, -hlocalhost, -ppassword. Именно так, без пробелов. Дампы упаковываются архиватором 7-zip (должен быть установлен на ПК). Каждый дамп пишется в отдельный архив.
- eachfile.exe — это бесплатная программа, позволяющая удалять устаревшие файлы в каталоге. В предпоследней строчке выполнение программы настроено таким образом, что она удаляет файлы старже 13 дней.
После этого заходим в планировщик заданий и настраиваем выполнение этого скрипта каждый день в удобное для нас время.
- Подробности
- Категория: Полезные скрипты
-
Опубликовано: 21 августа 2017
-
Просмотров: 5662