Do you want to have a backup of the Windows Server 2016? Various situations may lead to data loss. For instance, you can encounter an issue with the operating system. Ultimately, you need to take the necessary steps to have a backup.
There are two distinct ways you can back up Windows Server 2016. One is with the Windows Server Backup, and the other is via reliable and effective data recovery software. This article will dive into the process you need to follow to back up Windows Server 2016.
Why Do You Back Up Windows Server 2016?
Are you wondering why you need to back up Windows Server 2016? Well, the answer is relatively simple. Data security is one of the most vital aspects for users. And when it comes to enterprises, data loss can lead to devastating consequences. Various causes can lead to data loss.
- For instance, you can face a power failure or device breakdown.
- Apart from that, you can also lose data due to software upgrades or malfunctions.
- In some cases, human errors can lead to that massive data loss.
- Irrespective of the data loss, you need to have a solution beforehand.
- Otherwise, you can expect anxiety and stress levels to shoot up. That solution you can seek is a backup.
There is nothing to worry about when you use Server backup software. It is one of the most secure methods one can use to protect crucial data. Windows server is specifically used in enterprise environments and, as such, need such protection even more. Now, you could also go through the data recovery pathway. But that requires a significant amount of investment with no particular guarantee.
Back Up Windows Server 2016 with Windows Server Backup Feature
One of the best ways to back up Windows Server 2016 is via the Windows Server Backup. WSB is an essential backup software for Servers. However, before we proceed, it is vital to know more about this feature.
What Is Windows Server Backup
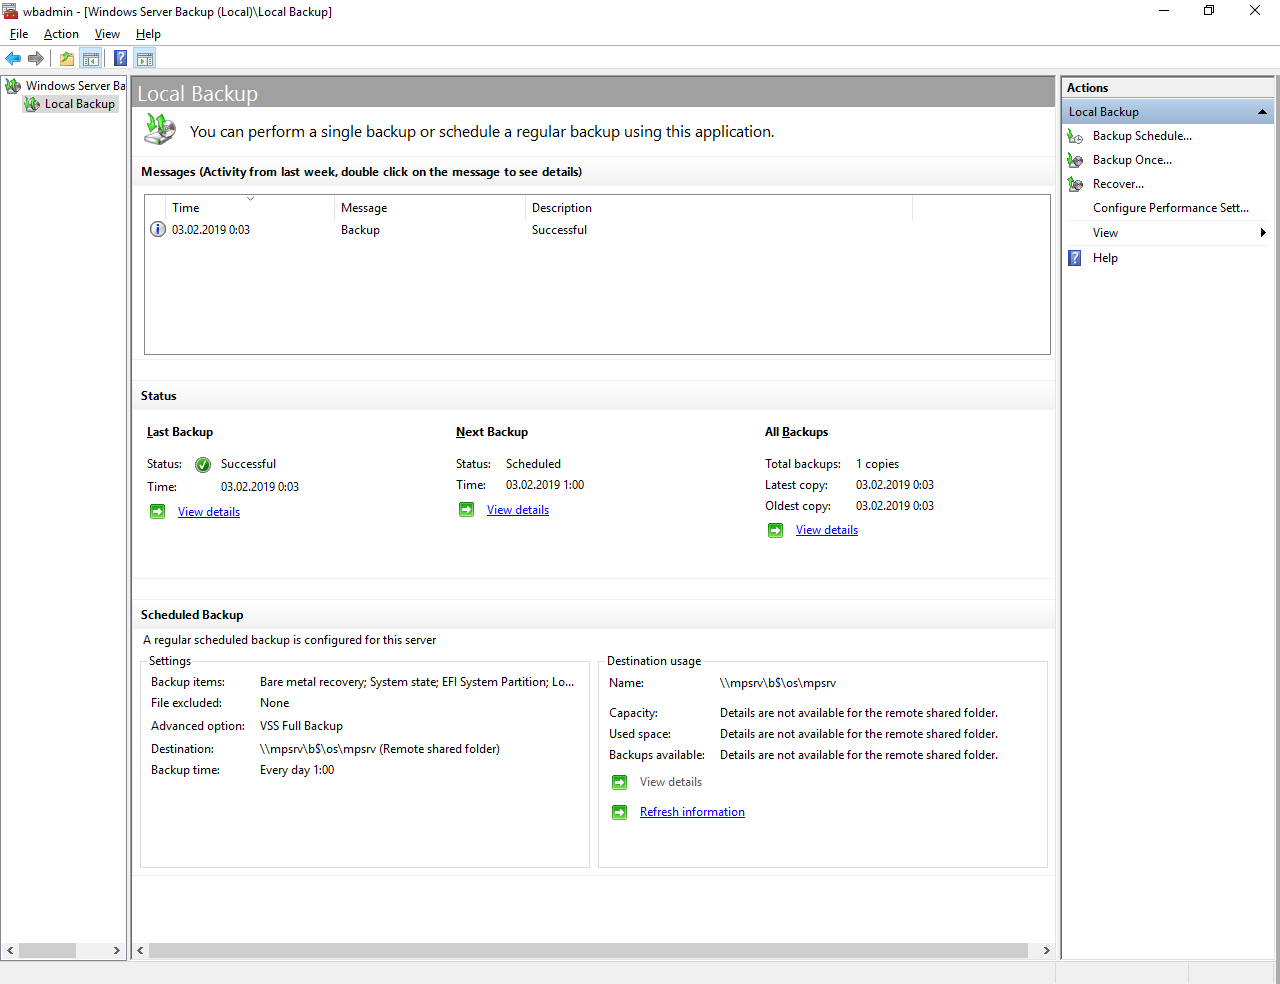
Windows Server Backup or WSB is a critical feature of Windows that offers recovery and backup options to users using Windows Server. However, to use this feature, you must first install it on the Windows Server. With the Windows Server Backup, you can back up specific files, folders, system states, particular volumes, and an entire server.
The Windows Server Backup also makes it easy for users to recover the data. You can recover files, folders, system states, particular applications, and volumes without hassle. In the event of failure of the hard disks, you can opt for the bare metal recovery.
The feature also allows you to manage backups for both remote and local computers. Microsoft introduced this feature intending to help anyone needing a Windows Server backup.
Here, we will discuss how to use Windows Server Backup to back up Windows Server 2016 in detail. Take a look:
How to Install Windows Server Backup
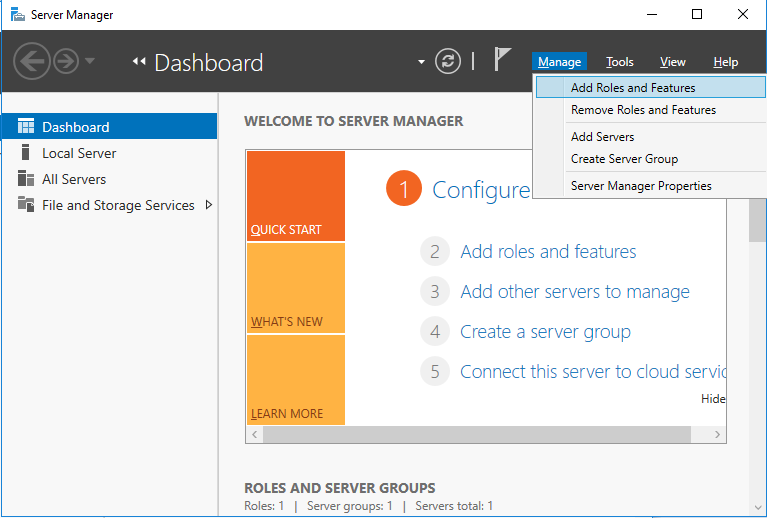
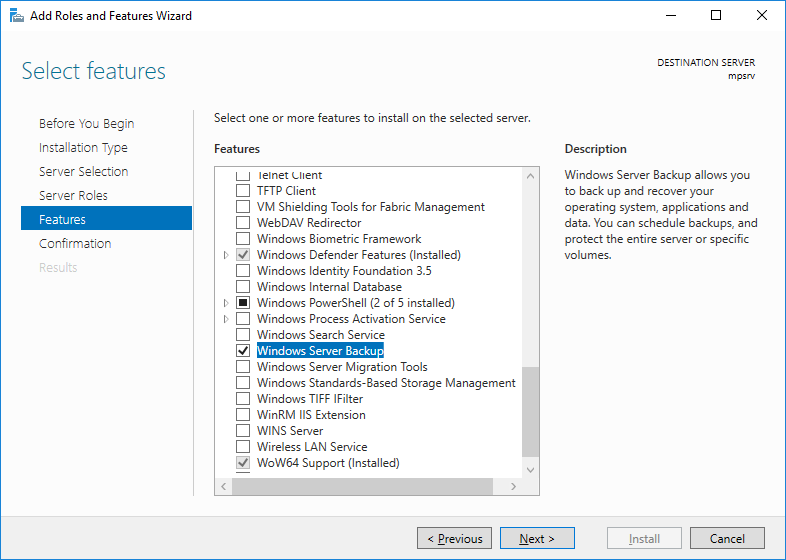
Step 1. Go to Server Manager. Press the Manage option. Tap on Add roles and features.
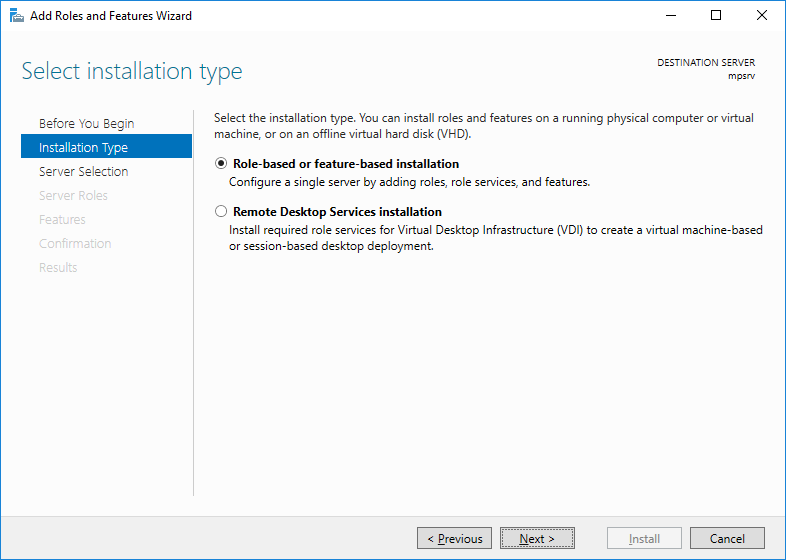
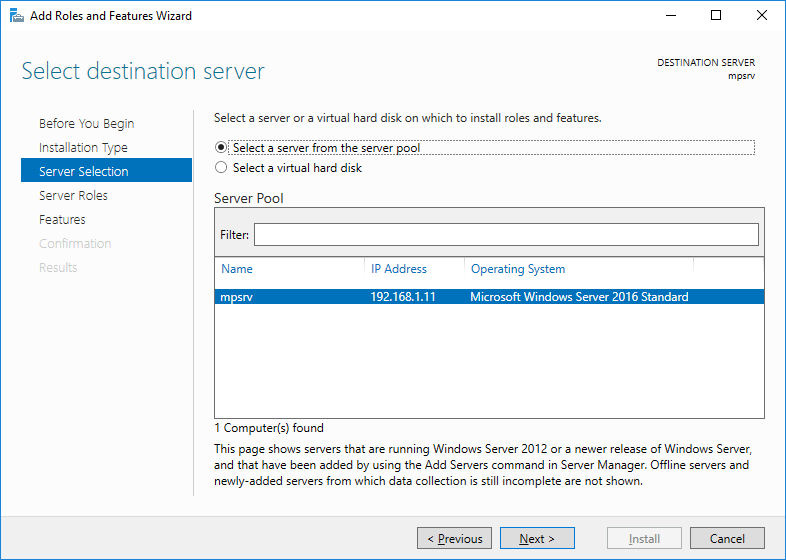
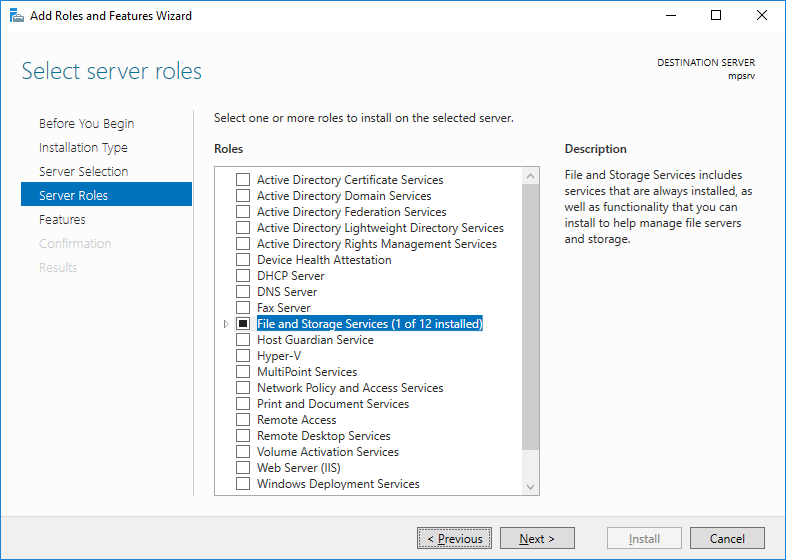
Step 2. Keep on hitting Next till you reach the Features page. You need to scroll down under the Features section on the Select Feature page. There, you will see the Windows Server Backup option.
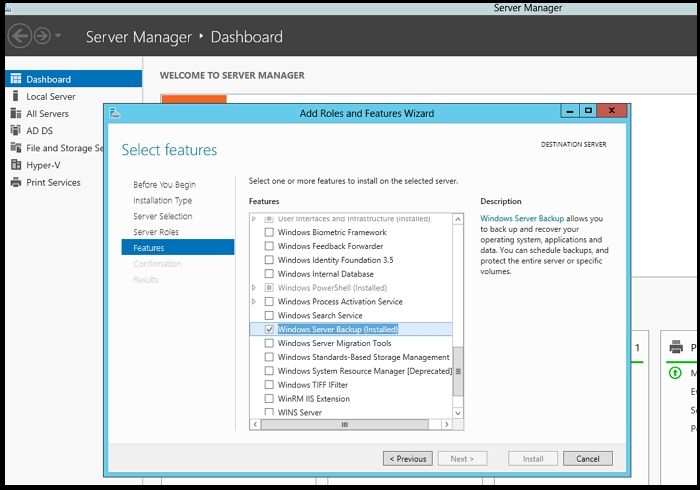
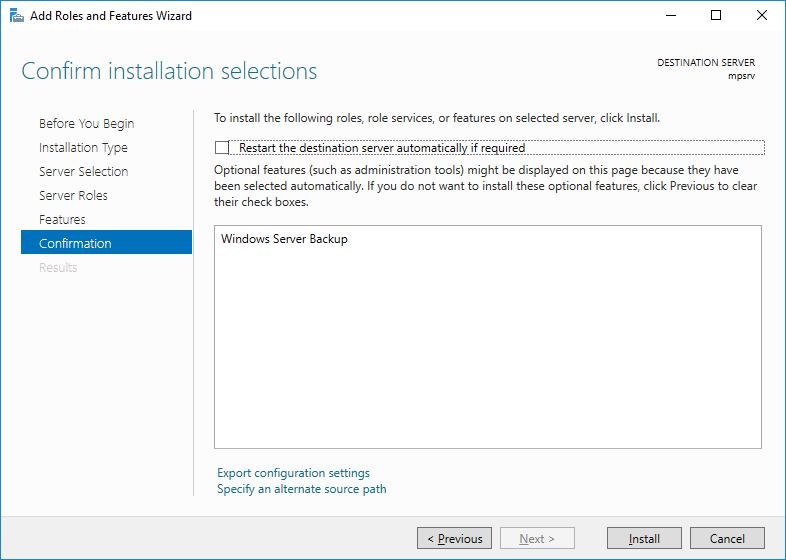
Step 3. Tick-mark the option and press the Next button. It will lead to the Confirm Installation Selections page.
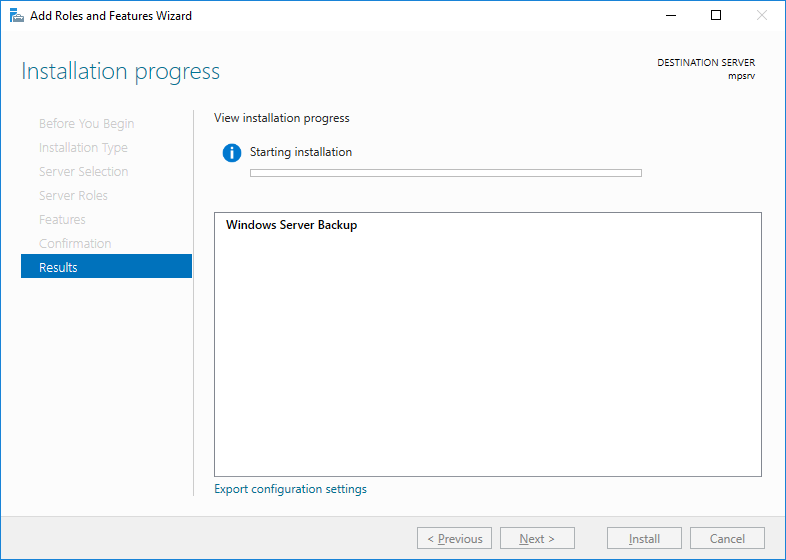
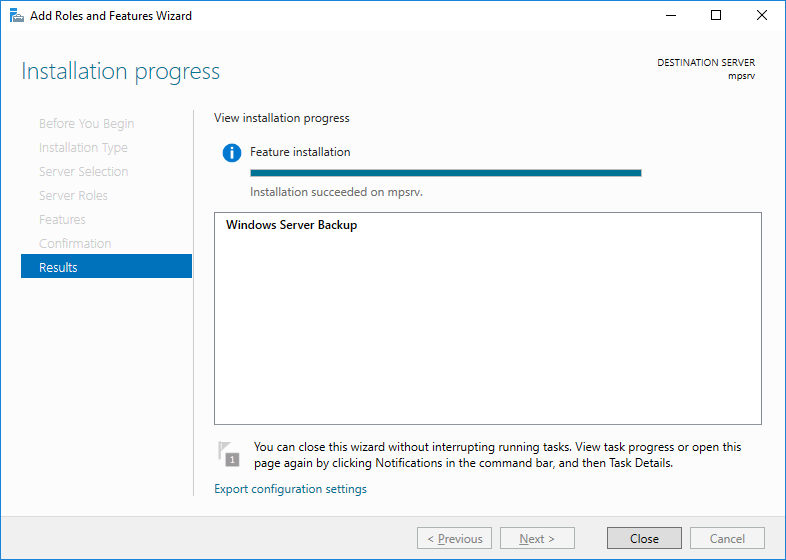
Step 4. There click on the Install button. Wait for some time for the installation to finish.
- Notice:
- Keep in mind that there is no need to reboot or restart Windows Server to install the feature.
After the installation, you need to develop a backup plan. There are different backup plans you can select from. These include the whole server, files and folders, critical volume, individual volumes, and system state. It is crucial to choose a particular backup plan and then move forward.
Steps to Back Up Windows Server 2016
Here are the steps you need to follow for the backup (For this article, we are opting for the Backup once option.)
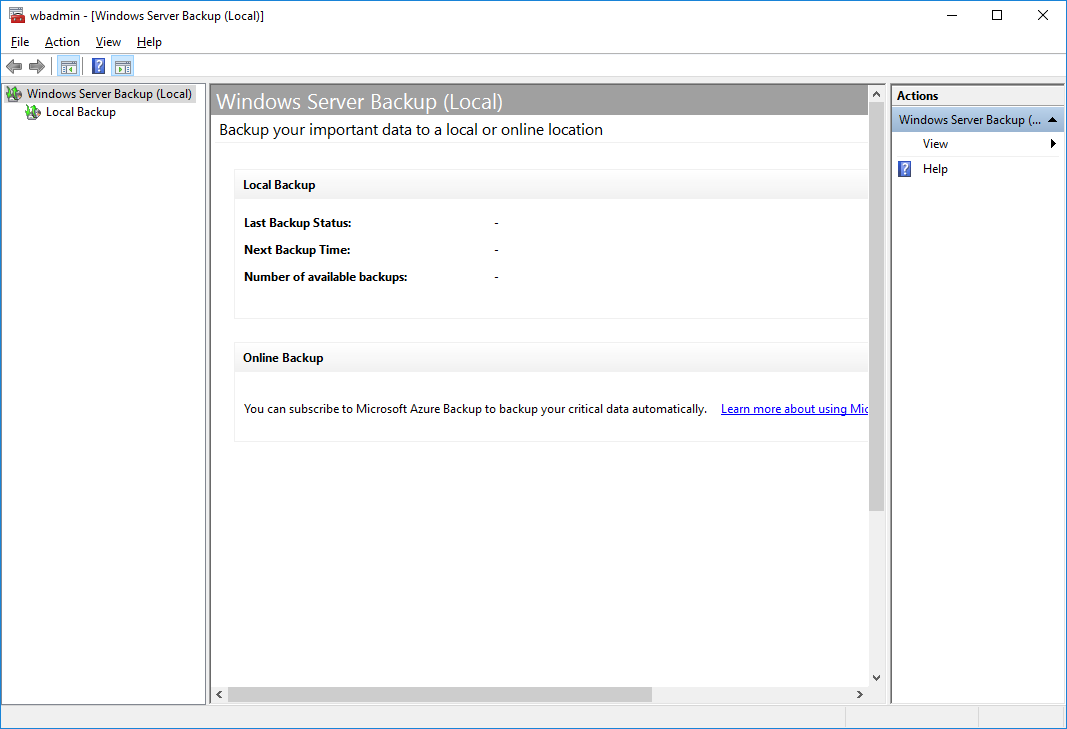
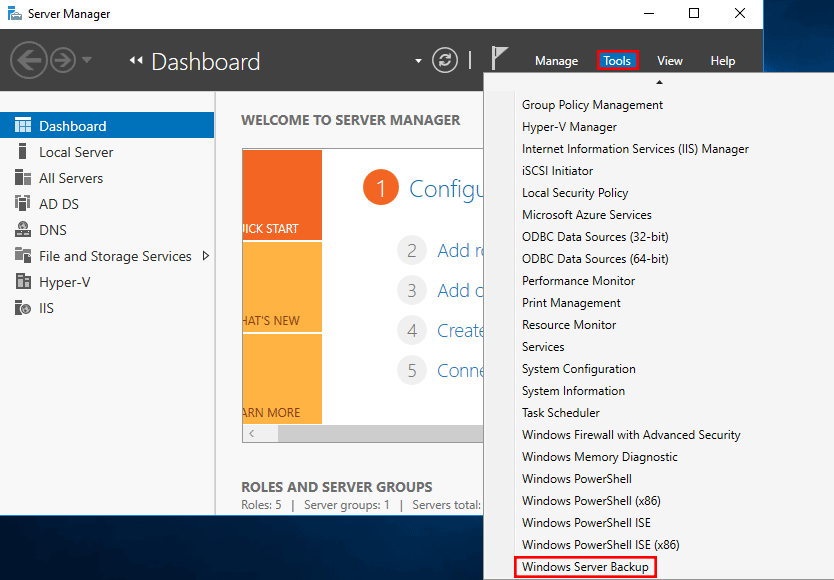
Step 1. Launch Server Manager. Press «Tools», and then select «Windows Server Backup» from the drop-down list. Wait for the Windows Server Backup to open.
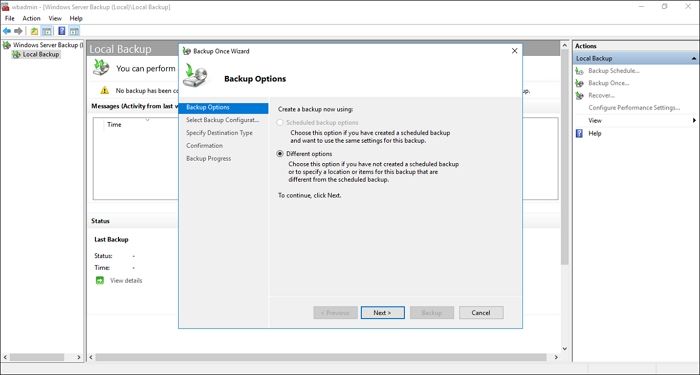
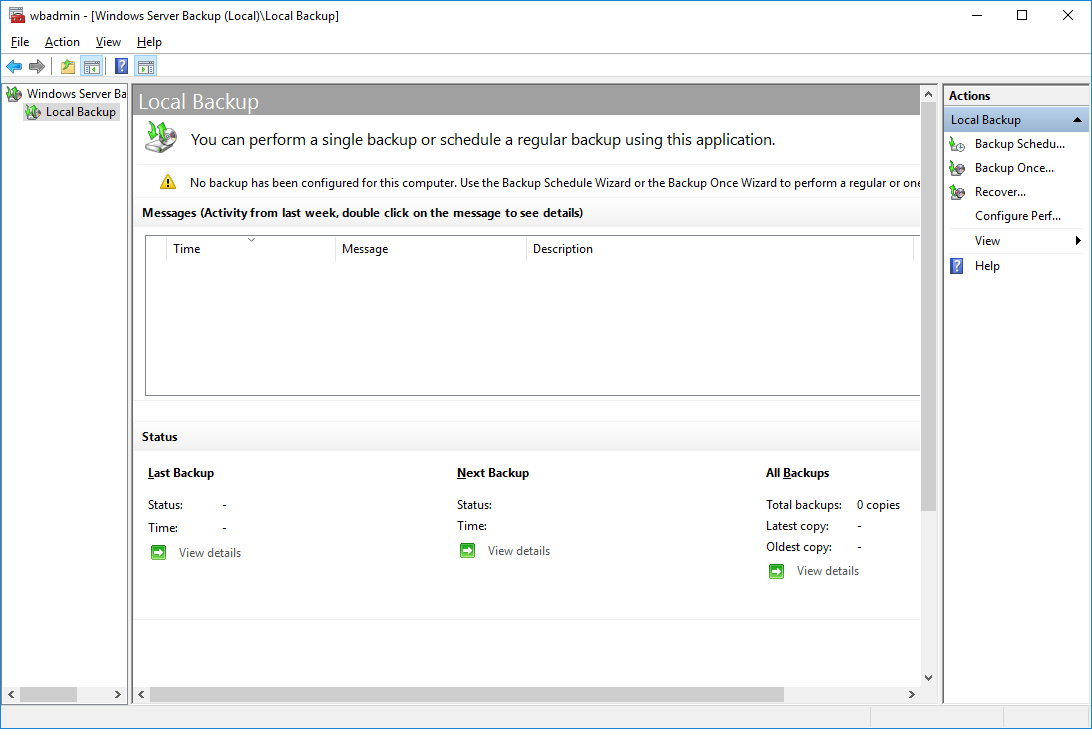
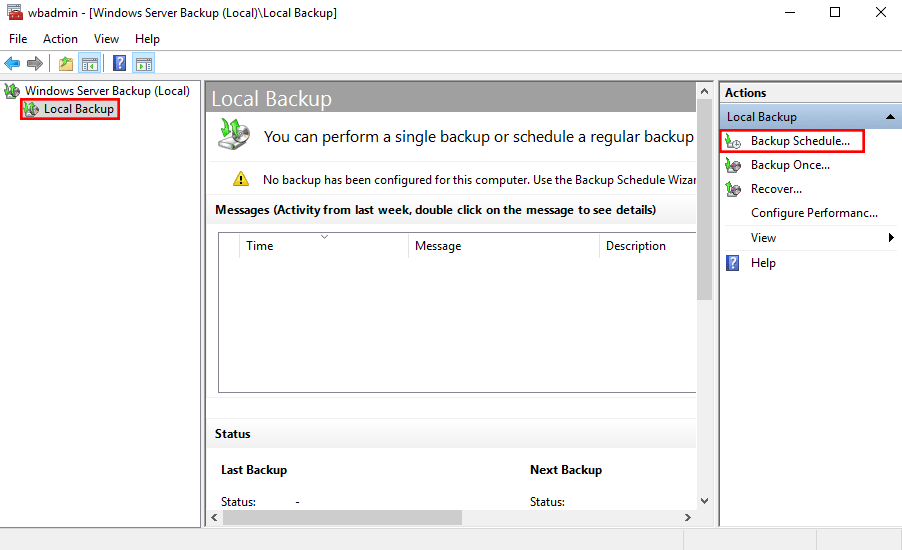
Step 2. You will see the Action menu on the right side. There are three options- backup schedule, backup once, and recover and schedule backup. Choose the option you want.
Step 3. It will lead to the Backup Options page. Here, you will come across two options – Scheduled backup options and Different options. Select the «Different options» and press the «Next button».
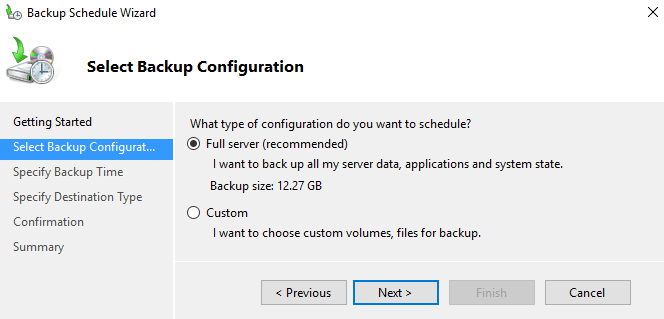
Step 4. The next page is the Select «Backup Configuration page». You will get two options – Full server and custom.
Step 5. If you choose the full server, the entire server will have a backup. On the other hand, custom allows users to select the files or folders they want to back up.
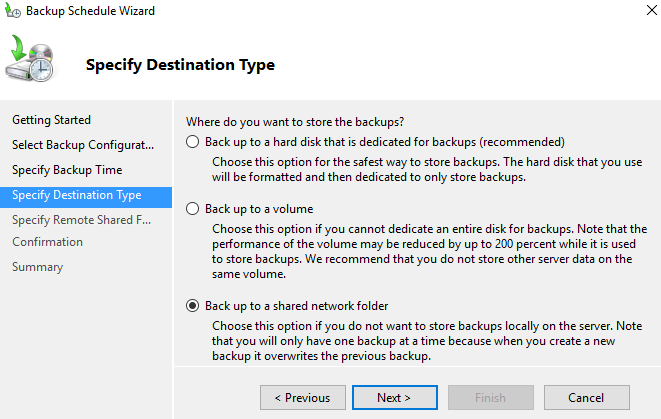
Step 6. Here, the full Server option is selected. Press the «Next button». The next page is the Specify Destination Type page. You need to choose between Local drives and the Remote shared folder.
Step 7. In this case, the Local drives option is selected. Tap the «Next button».
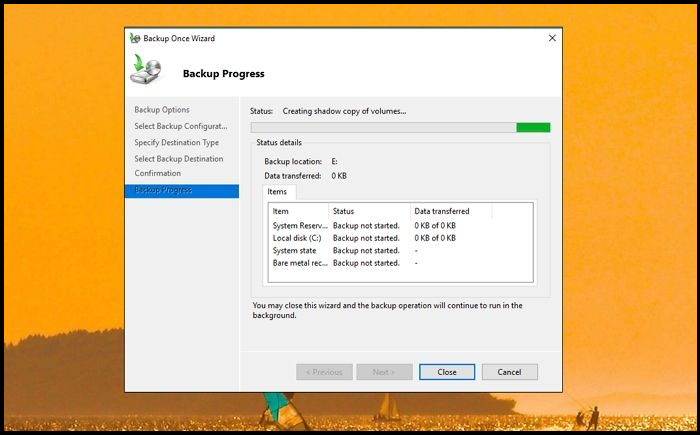
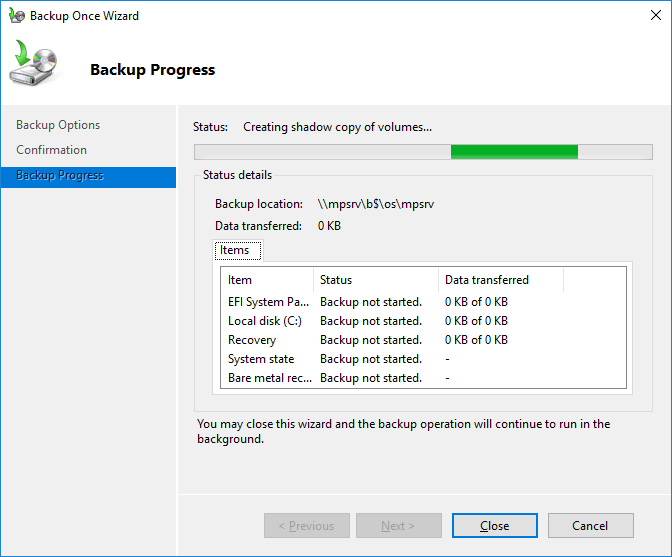
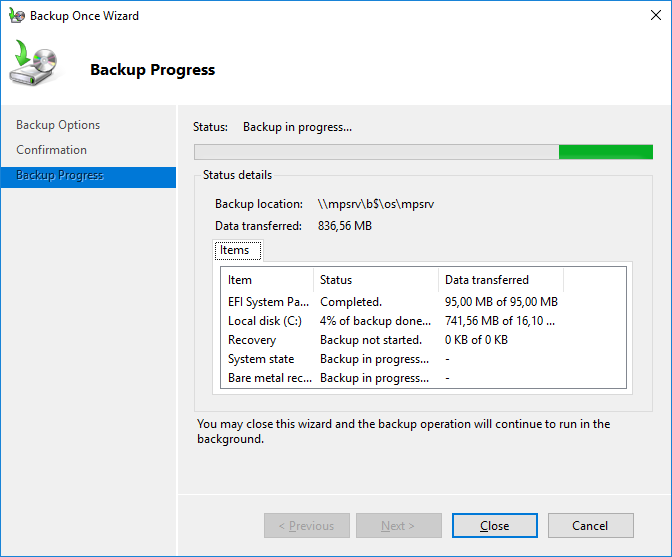
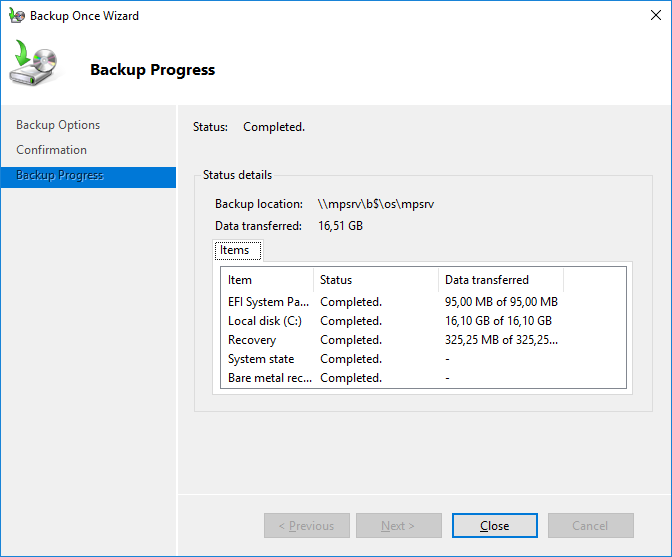
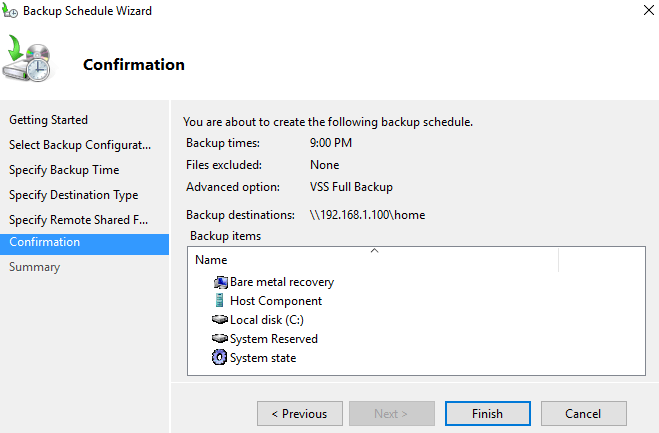
Step 8. On the next page – the Select Backup Destination page, you need to choose the drive where you want the backup. Press the «Next button». On the Confirmation page, select the «Backup option».
Now, you need to wait for the backup to complete. It may take some time, depending on the volume of the backup.
There is a video below to tell you how to install and use Windows Server Backup on Server 2016, if you have interest in it, you can watch it:
Timeline:
- 0:00 Start
- 0:36 Features – Windows Server Backup
- 0:51 Windows Server Backup installation done
- 0:58 Tools — Windows Server Backup
Perform Windows Server Backup 2016 with Software
Another way to back up Windows Server 2016 is to opt for a professional software — EaseUS Todo Backup Enterprise. You can use this excellent software to back up Windows Server 2016 seamlessly.
It is an easy-to-use software offering a wide range of features. There are several packages available where users can opt for the one that suits their needs. These include – Workstation, Server, Advanced Server, and Technician: the prices and features available vary.
Main features:
- Safeguards different business environments and sizes
- Comes with different cost-effective packages
- Reliable SQL Server backup software and Exchange Backup tool
- Business-level protection against various disasters
- Free trial with access to round-the-clock tech support
How to Back Up Windows Server 2016 via Software
Do you want to back up Windows Server 2016 with the EaseUS backup and recovery software? Are you wondering how to do that? Don’t worry! We are here to help.
Though the software is easy to use, you can still face problems. In that case, take a look at the steps listed below:
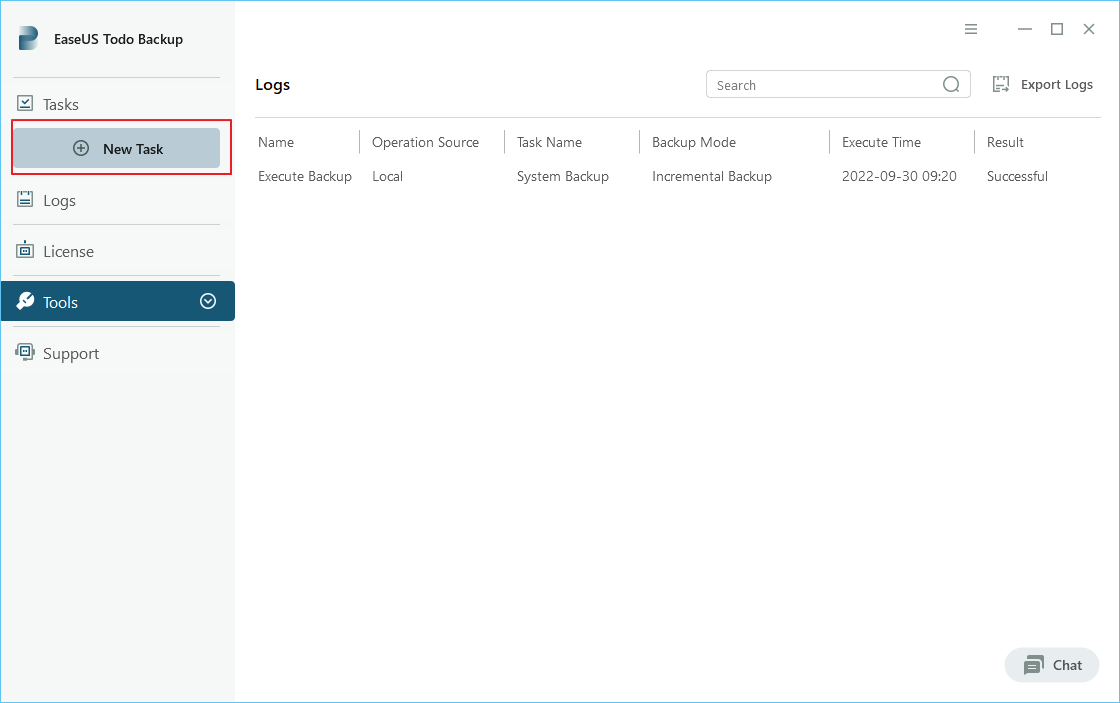
Step 1. Open EaseUS Todo Backup Enterprise. Then click «New Task» to set a new backup.
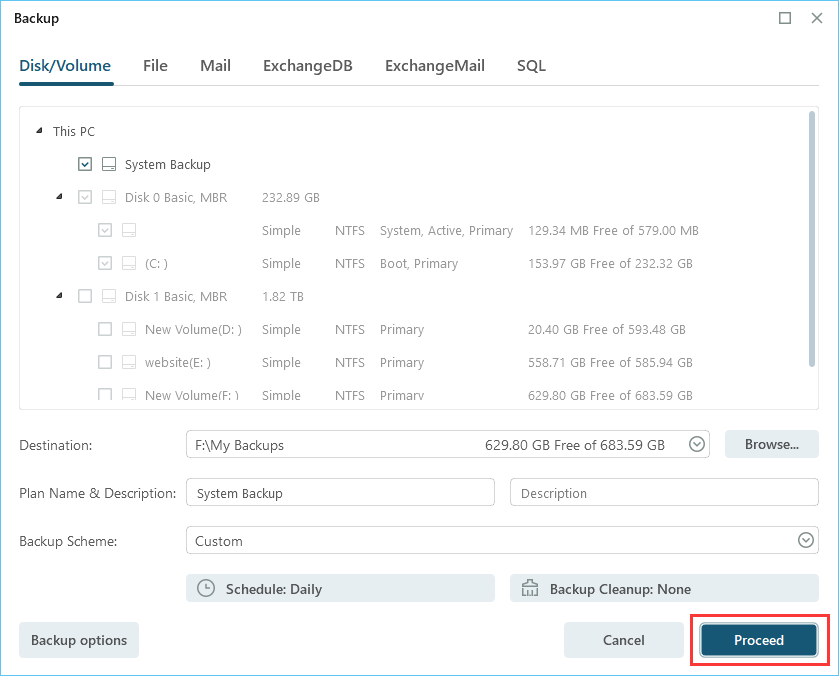
Step 2. Choose «Disk/Volume» as the target among the options at the top. Then select the system to back up.
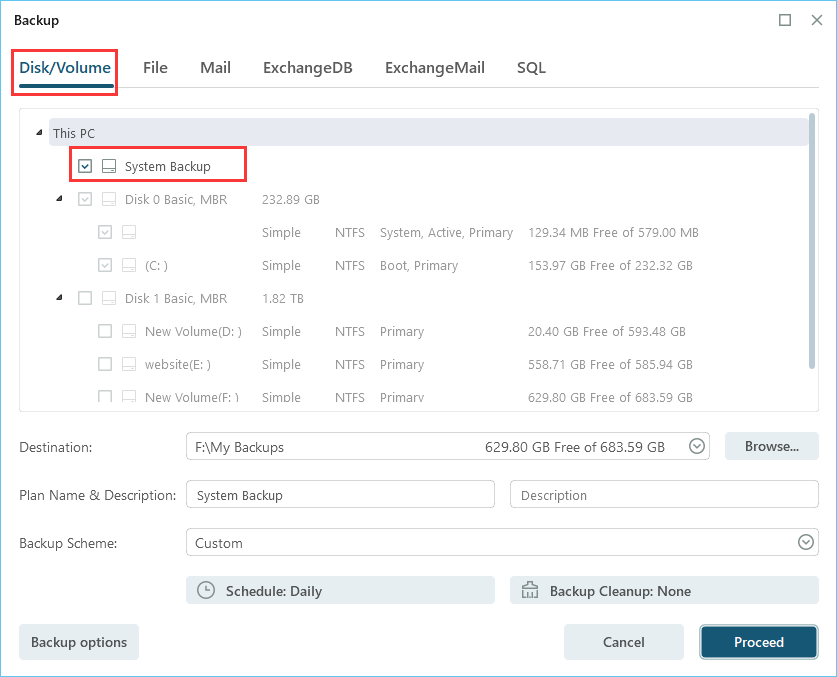
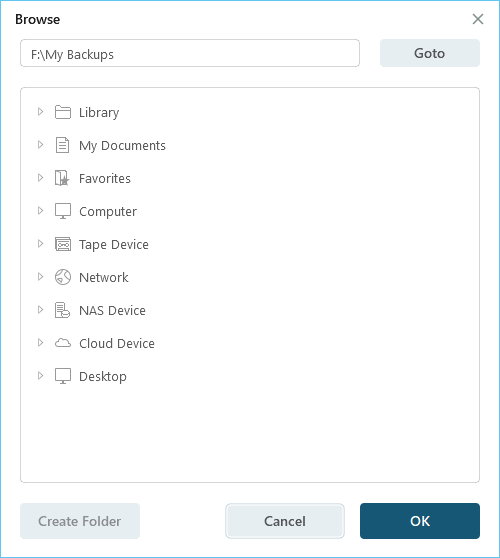
Step 3. Then click «Browser» to choose the destination where you want to put the backup.
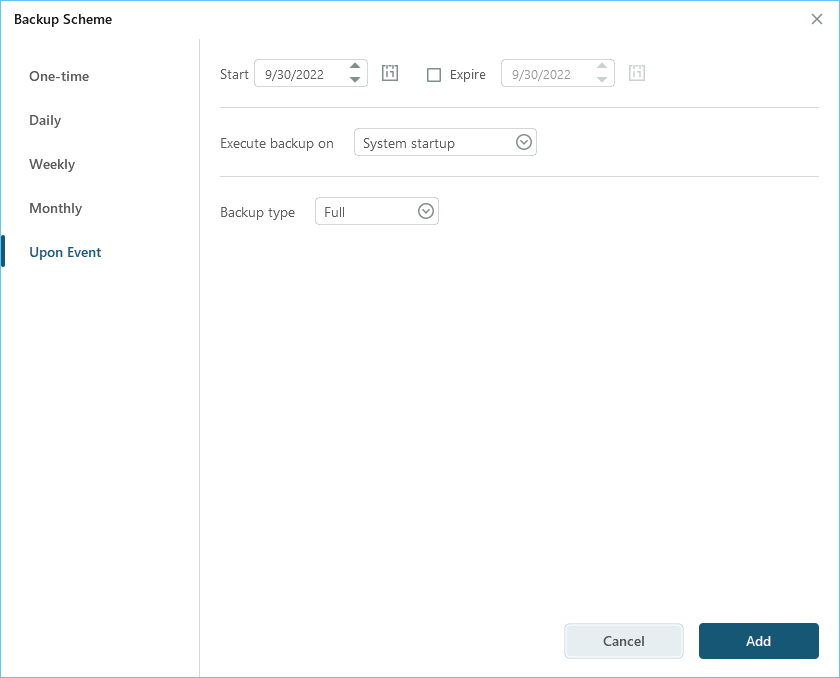
Step 4. You can customize your backup scheme by clicking «Schedule: Off«. Here you can see «Schedule«, «Backup cleanup» and «Adcanced Settings«. Click «New» under the «Schedule» catalog.
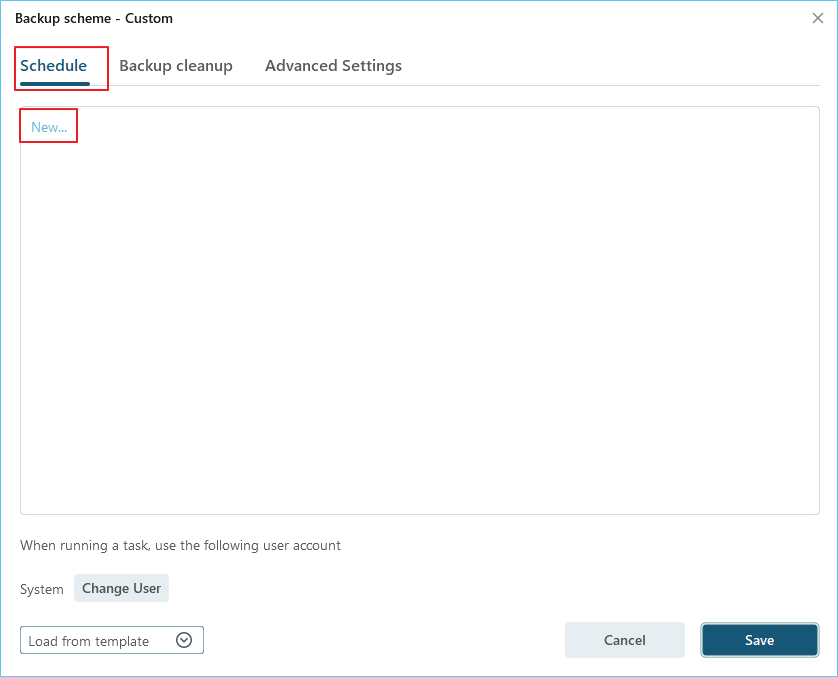
Then set the backup frequency based on your needs.
Step 5. Click «Backup options» on the bottom-left corner of the interface.
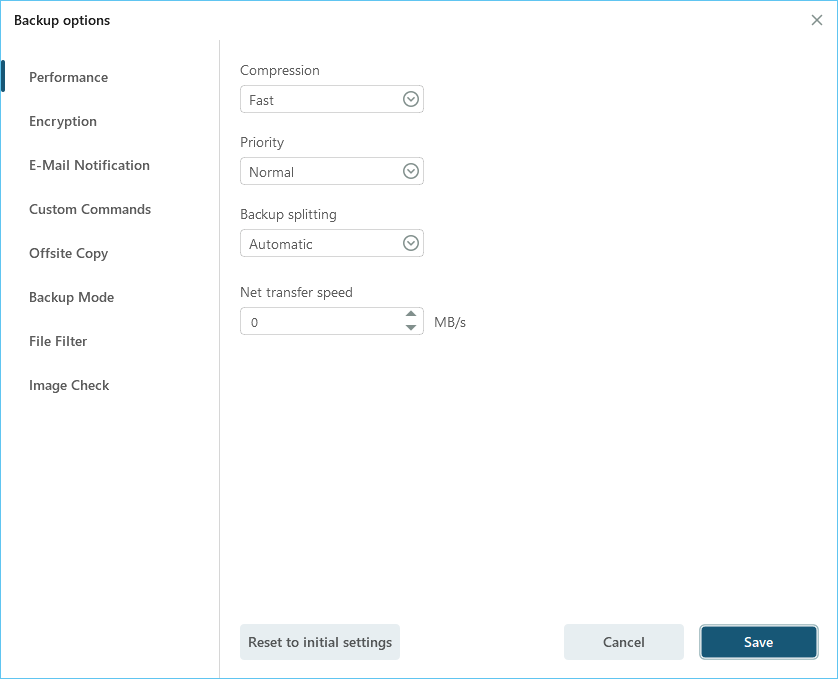
You can change the performance, encryption, e-mail notification, and other options here according to your preferences. When finish, click «Save» to return to the main interface.
Step 6. When you finish all settings, click «Proceed» to start backing up system.
Conclusion
Windows Server 2016 is primarily used for enterprise environments; thus, backing up the server becomes critical. You don’t want to lose data, leading to chaos and other consequences. There are two different ways to move forward.
Firstly, you can choose the Windows Server Backup, an excellent backup solution. Alternatively, you can also opt for professional software. You can select EaseUS Todo Backup Business if you are looking for reliable data backup software.
It is one of the best backup software solutions in the market. The software is easy to use and comes with a wide array of features. You can even opt for the free trial and choose the package that suits your needs. So, what are you waiting for? Get EaseUS Todo Backup Business today!
Windows Server Backup 2016 FAQs
The article details the different ways you can back up Windows Server 2016. However, you can always enhance your knowledge by learning more information. Take a look at the below-mentioned questions and answers to gather more knowledge.
1. How can I check my Windows Server 2016 backup?
- You must go to the Control Panel to check the Windows Server 2016 backup status.
- It would be best if you chose the server from the server box and then to the Backup and archiving section.
- Press the Backup and Restore Manager options, and then look at the server status.
2. How does Windows Server Backup work?
It works like any Windows Backup. Windows Server Backup takes a backup of all the files or the one selected during the setup. It will also look for incremental or full backup and works accordingly.
3. Can I back up Windows Server 2019?
Yes. You can back up Windows Server 2019 using the Windows Server Backup 2019. But, there is a difference between the 2016 and 2019 versions. In the 2019 version, you must opt for the backing up of the complete volume. It doesn’t allow users to back up individual folders.
4. What does it mean to back up a Server?
Backing up the server means enabling the backup of files, databases, data, applications, or the complete server on another server or external storage.
Do you want to have a backup of the Windows Server 2016? Various situations may lead to data loss. For instance, you can encounter an issue with the operating system. Ultimately, you need to take the necessary steps to have a backup.
There are two distinct ways you can back up Windows Server 2016. One is with the Windows Server Backup, and the other is via reliable and effective data recovery software. This article will dive into the process you need to follow to back up Windows Server 2016.
Why Do You Back Up Windows Server 2016?
Are you wondering why you need to back up Windows Server 2016? Well, the answer is relatively simple. Data security is one of the most vital aspects for users. And when it comes to enterprises, data loss can lead to devastating consequences. Various causes can lead to data loss.
- For instance, you can face a power failure or device breakdown.
- Apart from that, you can also lose data due to software upgrades or malfunctions.
- In some cases, human errors can lead to that massive data loss.
- Irrespective of the data loss, you need to have a solution beforehand.
- Otherwise, you can expect anxiety and stress levels to shoot up. That solution you can seek is a backup.
There is nothing to worry about when you use Server backup software. It is one of the most secure methods one can use to protect crucial data. Windows server is specifically used in enterprise environments and, as such, need such protection even more. Now, you could also go through the data recovery pathway. But that requires a significant amount of investment with no particular guarantee.
Back Up Windows Server 2016 with Windows Server Backup Feature
One of the best ways to back up Windows Server 2016 is via the Windows Server Backup. WSB is an essential backup software for Servers. However, before we proceed, it is vital to know more about this feature.
What Is Windows Server Backup
Windows Server Backup or WSB is a critical feature of Windows that offers recovery and backup options to users using Windows Server. However, to use this feature, you must first install it on the Windows Server. With the Windows Server Backup, you can back up specific files, folders, system states, particular volumes, and an entire server.
The Windows Server Backup also makes it easy for users to recover the data. You can recover files, folders, system states, particular applications, and volumes without hassle. In the event of failure of the hard disks, you can opt for the bare metal recovery.
The feature also allows you to manage backups for both remote and local computers. Microsoft introduced this feature intending to help anyone needing a Windows Server backup.
Here, we will discuss how to use Windows Server Backup to back up Windows Server 2016 in detail. Take a look:
How to Install Windows Server Backup
Step 1. Go to Server Manager. Press the Manage option. Tap on Add roles and features.
Step 2. Keep on hitting Next till you reach the Features page. You need to scroll down under the Features section on the Select Feature page. There, you will see the Windows Server Backup option.
Step 3. Tick-mark the option and press the Next button. It will lead to the Confirm Installation Selections page.
Step 4. There click on the Install button. Wait for some time for the installation to finish.
- Notice:
- Keep in mind that there is no need to reboot or restart Windows Server to install the feature.
After the installation, you need to develop a backup plan. There are different backup plans you can select from. These include the whole server, files and folders, critical volume, individual volumes, and system state. It is crucial to choose a particular backup plan and then move forward.
Steps to Back Up Windows Server 2016
Here are the steps you need to follow for the backup (For this article, we are opting for the Backup once option.)
Step 1. Launch Server Manager. Press «Tools», and then select «Windows Server Backup» from the drop-down list. Wait for the Windows Server Backup to open.
Step 2. You will see the Action menu on the right side. There are three options- backup schedule, backup once, and recover and schedule backup. Choose the option you want.
Step 3. It will lead to the Backup Options page. Here, you will come across two options – Scheduled backup options and Different options. Select the «Different options» and press the «Next button».
Step 4. The next page is the Select «Backup Configuration page». You will get two options – Full server and custom.
Step 5. If you choose the full server, the entire server will have a backup. On the other hand, custom allows users to select the files or folders they want to back up.
Step 6. Here, the full Server option is selected. Press the «Next button». The next page is the Specify Destination Type page. You need to choose between Local drives and the Remote shared folder.
Step 7. In this case, the Local drives option is selected. Tap the «Next button».
Step 8. On the next page – the Select Backup Destination page, you need to choose the drive where you want the backup. Press the «Next button». On the Confirmation page, select the «Backup option».
Now, you need to wait for the backup to complete. It may take some time, depending on the volume of the backup.
There is a video below to tell you how to install and use Windows Server Backup on Server 2016, if you have interest in it, you can watch it:
Timeline:
- 0:00 Start
- 0:36 Features – Windows Server Backup
- 0:51 Windows Server Backup installation done
- 0:58 Tools — Windows Server Backup
Perform Windows Server Backup 2016 with Software
Another way to back up Windows Server 2016 is to opt for a professional software — EaseUS Todo Backup Enterprise. You can use this excellent software to back up Windows Server 2016 seamlessly.
It is an easy-to-use software offering a wide range of features. There are several packages available where users can opt for the one that suits their needs. These include – Workstation, Server, Advanced Server, and Technician: the prices and features available vary.
Main features:
- Safeguards different business environments and sizes
- Comes with different cost-effective packages
- Reliable SQL Server backup software and Exchange Backup tool
- Business-level protection against various disasters
- Free trial with access to round-the-clock tech support
How to Back Up Windows Server 2016 via Software
Do you want to back up Windows Server 2016 with the EaseUS backup and recovery software? Are you wondering how to do that? Don’t worry! We are here to help.
Though the software is easy to use, you can still face problems. In that case, take a look at the steps listed below:
Step 1. Open EaseUS Todo Backup Enterprise. Then click «New Task» to set a new backup.
Step 2. Choose «Disk/Volume» as the target among the options at the top. Then select the system to back up.
Step 3. Then click «Browser» to choose the destination where you want to put the backup.
Step 4. You can customize your backup scheme by clicking «Schedule: Off«. Here you can see «Schedule«, «Backup cleanup» and «Adcanced Settings«. Click «New» under the «Schedule» catalog.
Then set the backup frequency based on your needs.
Step 5. Click «Backup options» on the bottom-left corner of the interface.
You can change the performance, encryption, e-mail notification, and other options here according to your preferences. When finish, click «Save» to return to the main interface.
Step 6. When you finish all settings, click «Proceed» to start backing up system.
Conclusion
Windows Server 2016 is primarily used for enterprise environments; thus, backing up the server becomes critical. You don’t want to lose data, leading to chaos and other consequences. There are two different ways to move forward.
Firstly, you can choose the Windows Server Backup, an excellent backup solution. Alternatively, you can also opt for professional software. You can select EaseUS Todo Backup Business if you are looking for reliable data backup software.
It is one of the best backup software solutions in the market. The software is easy to use and comes with a wide array of features. You can even opt for the free trial and choose the package that suits your needs. So, what are you waiting for? Get EaseUS Todo Backup Business today!
Windows Server Backup 2016 FAQs
The article details the different ways you can back up Windows Server 2016. However, you can always enhance your knowledge by learning more information. Take a look at the below-mentioned questions and answers to gather more knowledge.
1. How can I check my Windows Server 2016 backup?
- You must go to the Control Panel to check the Windows Server 2016 backup status.
- It would be best if you chose the server from the server box and then to the Backup and archiving section.
- Press the Backup and Restore Manager options, and then look at the server status.
2. How does Windows Server Backup work?
It works like any Windows Backup. Windows Server Backup takes a backup of all the files or the one selected during the setup. It will also look for incremental or full backup and works accordingly.
3. Can I back up Windows Server 2019?
Yes. You can back up Windows Server 2019 using the Windows Server Backup 2019. But, there is a difference between the 2016 and 2019 versions. In the 2019 version, you must opt for the backing up of the complete volume. It doesn’t allow users to back up individual folders.
4. What does it mean to back up a Server?
Backing up the server means enabling the backup of files, databases, data, applications, or the complete server on another server or external storage.
| title | description | ms.date | ms.topic | ms.assetid | author | ms.author | manager |
|---|---|---|---|---|---|---|---|
|
Manage Server Backup in Windows Server Essentials |
Learn about common backup tasks that you can accomplish by using the Windows Server Essentials Dashboard. |
10/03/2016 |
article |
0302d070-c58a-40f2-b56d-7e7842813d02 |
nnamuhcs |
wscontent |
mtillman |
Manage Server Backup in Windows Server Essentials
Applies To: Windows Server 2016 Essentials, Windows Server 2012 R2 Essentials, Windows Server 2012 Essentials
The following topics include information about common backup tasks that you can accomplish by using the Windows Server Essentials Dashboard:
-
Which backup should I choose?
-
Set up or customize server backup
-
Stop server backup in progress
-
Remotely manage your backups
-
Disable server backup
-
Learn more about setting up server backup
-
Repartition a hard drive on the server
-
Restore files and folders from a server backup
Which backup should I choose?
Choosing a backup can be straightforward if you have a very recent successful backup and you know that the backup contains all of your critical data. If you are trying to restore to the server or a computer from an older backup, choosing a good backup to restore to may require some investigation and, possibly, some compromise.
To choose a backup
-
Check with the owner of the files or folders, and note the dates and times when they added or edited them. Use these dates and times as a starting point.
-
On the Choose a restore option page in the Restore Files and Folders Wizard, click Restore from a backup that I select (advanced).
-
Depending on whether you want to restore an older or newer version of the files or folders, select the backup that best fits the dates and times noted in step 1.
-
As a best practice, you can restore files and folders to an alternate location, and then let the owner of the files and folders move the ones that they need to the original location. When they finish, the files and folders that remain in the alternate location can be deleted.
Set up or customize server backup
Server backup is not automatically configured during installation. You should protect your server and its data automatically by scheduling daily backups. It is recommended that you maintain a daily backup plan because most organizations cannot afford to lose the data that has been created over several days. For more information, see Set up or customize server backup.
Stop server backup in progress
Whether a server backup starts at a regularly scheduled time or you start a server backup manually, you can stop the backup in progress.
To stop a backup in progress
-
Open the Dashboard.
-
In the navigation bar, click Devices.
-
In the list of computers, click the server, and then click Stop backup for the server in the Tasks pane.
-
Click Yes to confirm your action.
Remotely manage your backups
When you are away from the office, you can use Windows Server Essentials Remote Web Access to access the Windows Server Essentials Dashboard to manage your server.
To use Remote Web Access to manage your server
-
Open a web browser.
-
In the address box, type the name of the Windows Server Essentials domain.
-
When prompted, enter your user name and password.
-
When you click the name of the server in Remote Web Access, the logon page for the Dashboard is displayed.
-
Log on to the Dashboard as an administrator, and then click Devices.
For more information about Remote Web Access, see Remote Web Access overview.
Disable server backup
You should protect your server and its data automatically by scheduling daily backups. It is recommended that you maintain a daily backup plan because most organizations cannot afford to lose the data that has been created over several days.
If you already have server backup configured, and later want to use a third-party application to back up the server, you can disable Windows Server Essentials server backup.
To disable server backup
-
Log on to the Windows Server Essentials Dashboard using an administrator account and password.
-
Click the Devices tab, and then click the name of the server.
-
In the Tasks pane, click Customize Backup for the server.
[!NOTE]
The Customize Backup for the server task is displayed after you have configured server backup using the Set Up Server Backup Wizard. For more information about setting up server backup, see Set up or customize server backup. -
The Customize Server Backup Wizard appears.
-
On the Configuration Options page, click Disable Server Backup. Follow the instructions in the wizard.
Learn more about setting up server backup
Server backup is not enabled during server setup.
[!NOTE]
When you configure server backup, you should connect at least one external hard drive to the server to use as the backup destination hard drive.
Backup destination drive
You can use multiple external storage drives for backups, and you can rotate the drives between onsite and offsite storage locations. This can improve your disaster preparedness planning by helping you recover your data if physical damage occurs to the hardware onsite.
When choosing a storage drive for your server backup, consider the following:
-
Choose a drive that contains sufficient space to store your data. Your storage drives should contain at least 2.5 times the storage capacity of the data that you want to back up. The drives should also be large enough to accommodate the future growth of your server data.
-
If the backup destination drive contains offline drives, the backup configuration will not succeed. To complete the configuration, when selecting the backup destination, clear the check box to exclude drives that are offline.
-
If you choose a drive that contains previous backups as the backup destination, the wizard allows you choose if you want to keep the previous backups. If you keep the backups, the wizard does not format the drive.
-
When reusing an external storage drive, make sure that the drive is empty or contains only data that you do not need.
-
You should visit the website for your external storage drive manufacturer to ensure that your backup drive is supported on computers running Windows Server Essentials.
[!CAUTION]
The Set Up Server Backup Wizard formats the storage drives when it configures them for backup.
Server backup schedule
You should protect your server and its data automatically by scheduling daily backups. It is recommended that you maintain a daily backup plan because most organizations cannot afford to lose the data that has been created over several days.
When you use the Windows Server Essentials Set Up Server Backup Wizard, you can choose to back up server data at multiple times during the day. Because the wizard schedules differential-based backups, Backup runs quickly, and server performance is not significantly impacted. By default, Set Up Server Backup schedules a backup to run daily at 12:00 PM and 11:00 PM. However, you can adjust the backup schedule according to the needs of your organization. You should occasionally evaluate the effectiveness of your backup plan, and change the plan as necessary.
[!NOTE]
In the default installation of Windows Server Essentials, the server is configured to automatically perform a defragmentation once each week. This can result in larger than normal backups if you use non-Microsoft imaging software. If it is not necessary to defragment the server on a regular basis, you can follow these steps to turn off the defragmentation schedule:
- Press the Windows key + W to open Search.
2. In the Search text box, type Defragment.
3. In the results section, click Defragment and Optimize Drives.
4. In the Optimize Drives page, select a drive, and then click Change settings.
5. In the Optimization schedule window, clear the Run on a schedule (recommended) check box, and then click OK to save the change.
Items to be backed up
By default, all operating system files and folders are selected for backup. You can choose to back up all the hard disks, files, and folders on the server, or select only individual hard disks, files, or folders to backup. To add or remove items for the backup, do one of the following:
-
To include a data drive in the server backup, select the adjacent check box.
-
To exclude a data drive from the server backup, clear the adjacent check box.
[!NOTE]
If you want to exclude the Operating System item from the backup, you must first clear the System Backup (recommended) check box.
To minimize the amount of backup hard disk space that your server backups use, you may want to exclude any folders that contain files that you don’t consider valuable or particularly important.
For example, you may have a folder that contains recorded television programs that uses a lot of hard drive space. You may choose not to back up these files because you normally delete them after viewing them anyway. Alternatively, you may have a folder that contains temporary files that you do not intend to keep.
Repartition a hard drive on the server
When an unformatted internal hard disk drive is detected on the Windows Server Essentials server, a health alert is raised that contains a link to the Add a New Hard Drive Wizard. The Add a New Hard Drive Wizard walks you through the various options for formatting the hard drive. When the wizard is finished, one or more, depending on the size of the drive, logical hard drives formatted will be created on the hard drive and formatted as NTFS.
If it becomes necessary to repartition a hard disk drive, follow these instructions:
To repartition a hard disk drive
-
On the Start screen, click Administrative Tools, and then double-click Computer Management.
-
In Computer Management, click Storage, and then double-click Disk Management.
-
Right-click the drive that you want to repartition, click Delete Volume, and then click Yes.
[!NOTE]
Repeat this step for each partition on the hard disk drive. -
Right-click the Unallocated hard disk drive, and then click New Simple Volume.
-
In the New Simple Volume Wizard, create and format a volume that is 16 TB (16,000,000 MB) or less.
[!NOTE]
Repeat this step until all unallocated space on the hard disk drive is used.
Restore files and folders from a server backup
You can browse and restore individual files and folders from a server backup.
To restore files and folders from a server backup
-
Open the Dashboard, and then click the Devices tab.
-
Click the name of the server, and then click Restore files or folders for the server in the Tasks pane.
-
The Restore Files or Folders Wizard opens. Follow the instructions in the wizard to restore the files or folders.
Additional References
-
Manage Backup and Restore
-
Manage Windows Server Essentials
-
Use Windows Server Essentials
У операционной системы Windows Server имеется собственное средство резервного копирования, помогающее сэкономить на приобретении сторонних программ. Мы разберем по пунктам все необходимые шаги.
Содержание
-
Сетевая папка.
- Установка средства резервного копирования.
- Настройка утилиты WBADMIN.
- Добовление необходимого пользователя.
- Возможные ошибки.
- Восстановление.
Сетевая папка
Во избежании различного рода проблем для начало подключим удалённую сетевую папку к Вашему серверу.
Установка средства резервного копирования
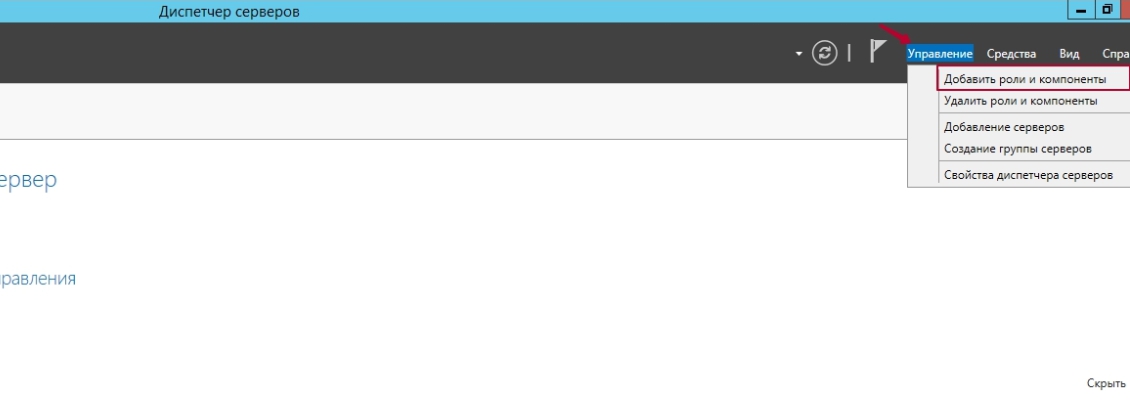
Откройте «Диспетчер серверов». В меню «Управления» нажмите на «Добавить роли и компоненты».
Откроется установочное окно, где перед началом работ нажмите кнопку «Далее».

Выберите «Установка ролей и компонентов» и нажмите «Далее».
Выберите Ваш сервер из пула серверов и нажмите «Далее».

На вкладке «Выбор ролей сервера» нажмите «Далее».
После этого подтвердите нажав кнопку «Установить».

Начнется процесс установки компонента и по завершению закройте программу.

Настойка утилиты WBADMIN
Чтобы открыть систему архивации данных Windows, зайдите в Диспетчер серверов и в правом верхнем углу выберите Средства. Из перечисленного списка выберите «Система архивации данных Windows Server».
В открывшемся окне в меню слева нажмите «Локальная архивация». В горизонтальном меню справа можно настроить: расписание резервного копирования, одноразовое создание копии или восстановление.

Для настройки по расписанию выберите данный пункт в меню. Далее у Вас откроется меню параметров. Нажмите кнопку «Далее».
Вы можете настроить резервную копию операционной системы целиком или выбрать отдельно тома и архивы, которые требуются для бэкапа. Рекомендуем выбирать сервер целиком.
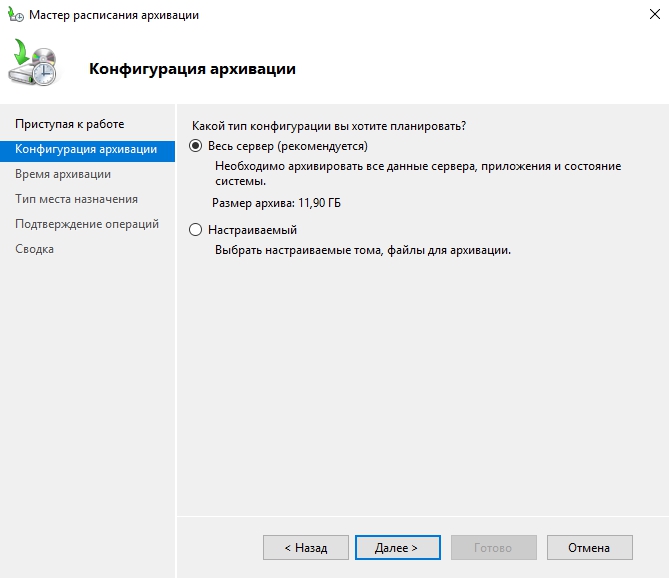
На следующем шаге требуется задать частоту создания резервной копии и её время. Вы можете выбрать определённое время или несколько вариантов в день. Однако помните, что при создании копий на удалённую сетевую папку — хранится только одна последняя копия бэкапа.

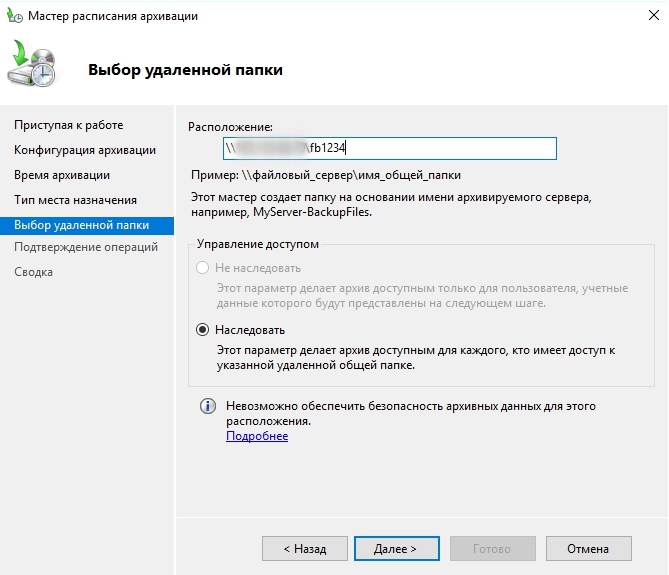
При выборе удалённой папки укажите месторасположения её целиком — IP-сервераназвание папки

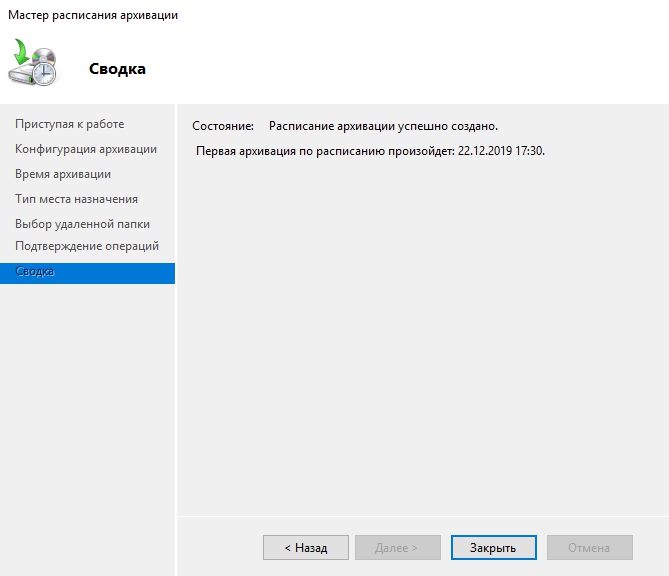
По окончанию требуется проверить все настраиваемые параметры сверху и нажать «Готово».

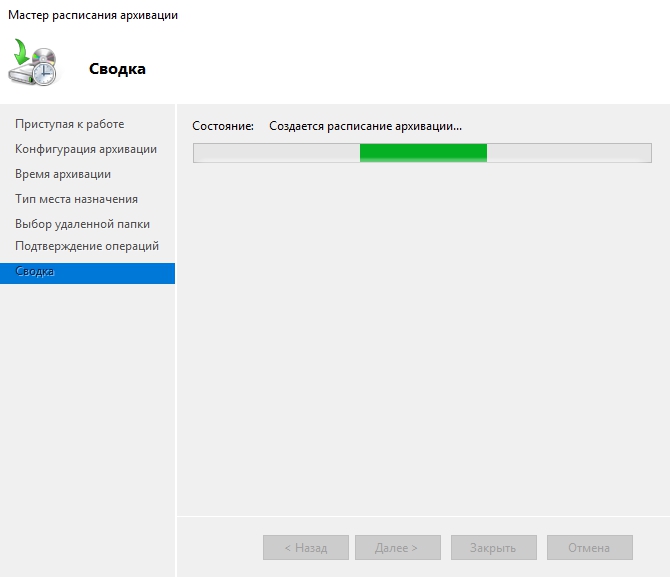
Начнется создание расписания архивации.
По завершении нажмите кнопку «Закрыть».
Добавление необходимого пользователя
Данная процедура необходима для корректной работы системы резервного копирования Windows. При подключении к удалённой сетевой папки система будет запрашивать данные доступа (Имя пользователя и пароль). Для синхронизации программы с месторасположения директории бэкапа, Windows требуется создать пользователя с такими же данными, как у пользователя с удалённой сетевой папкой.
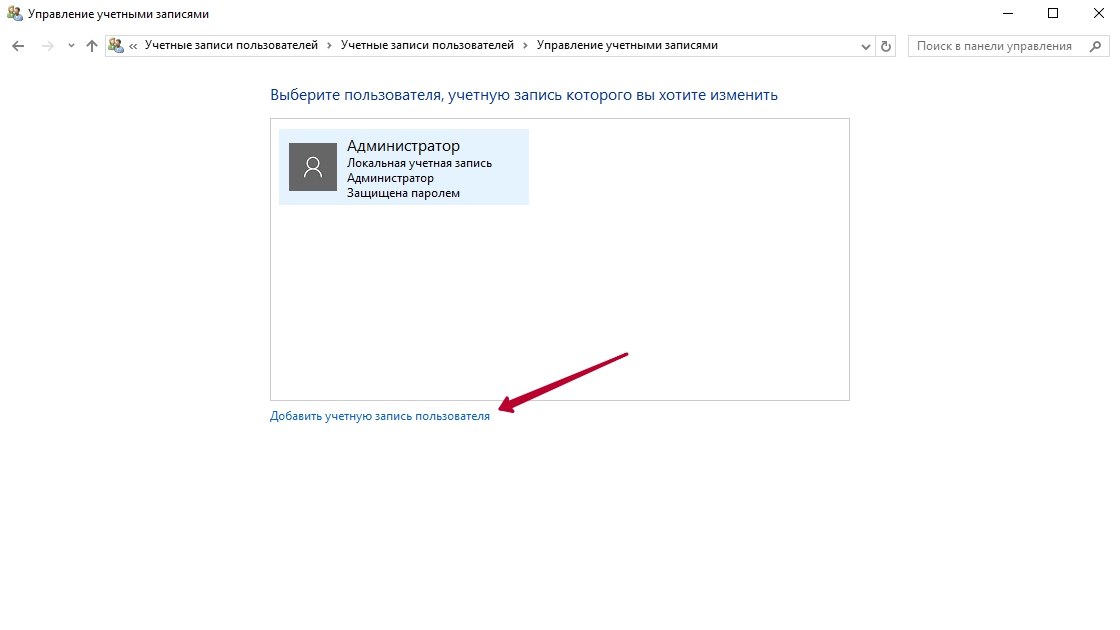
Для начало требуется зайти «Пуск» — «Панель управления».
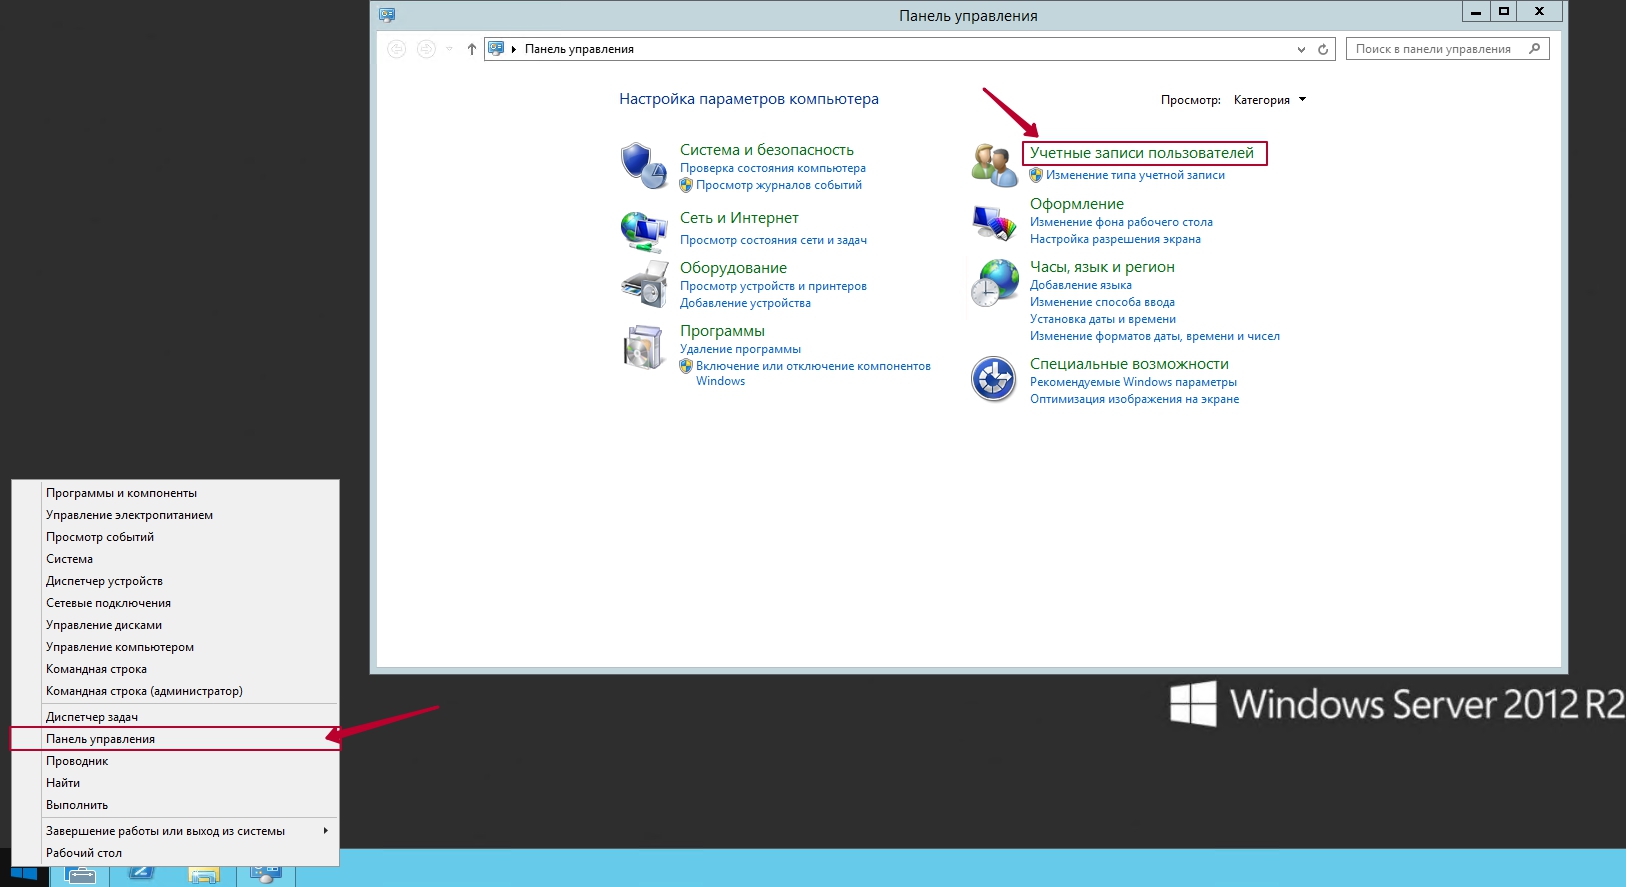
Далее выбираем «Учетные записи пользователей».
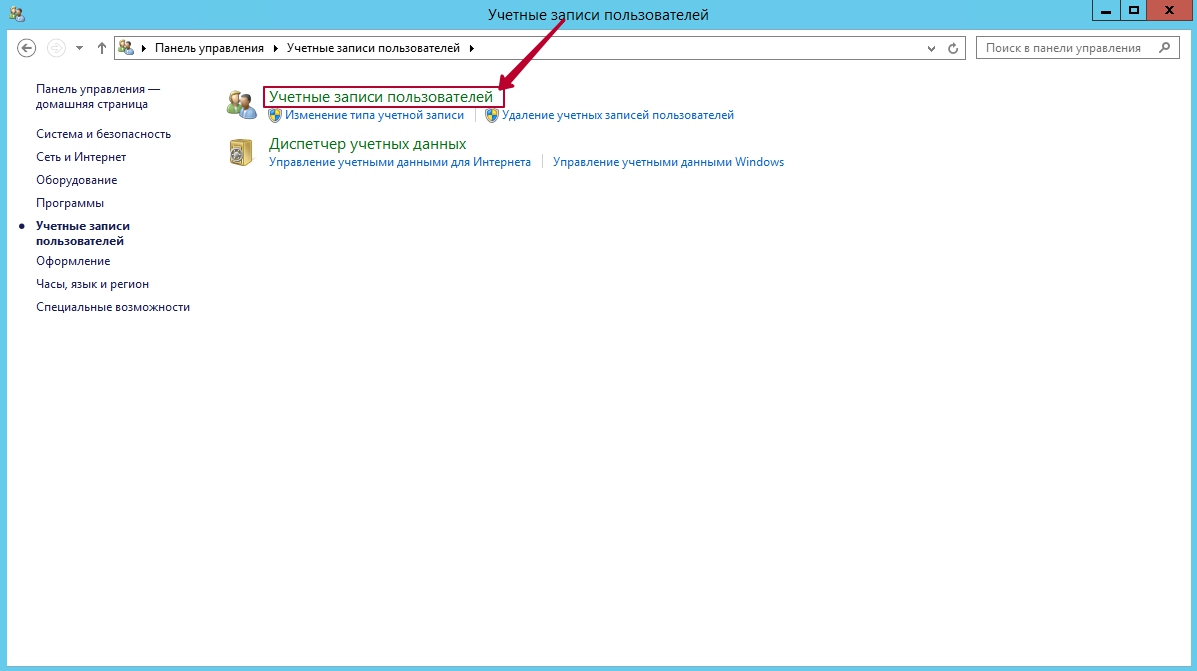
После этого выберите «Управление другой учетной записью».
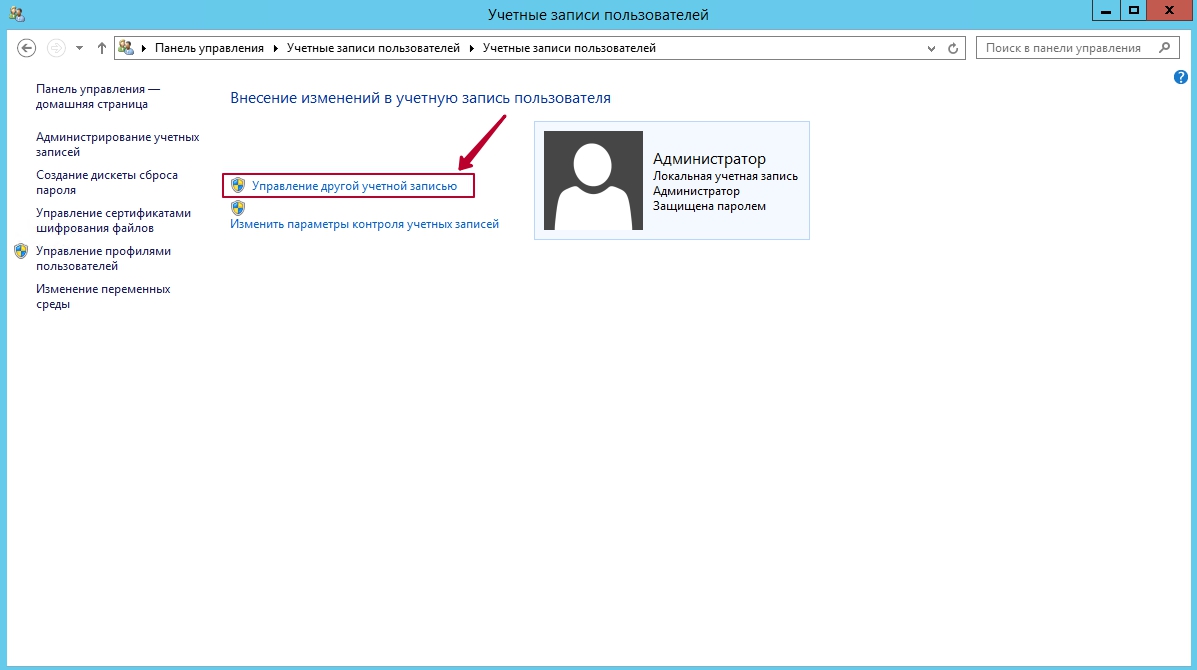
Добавьте новую учетную запись пользователя.
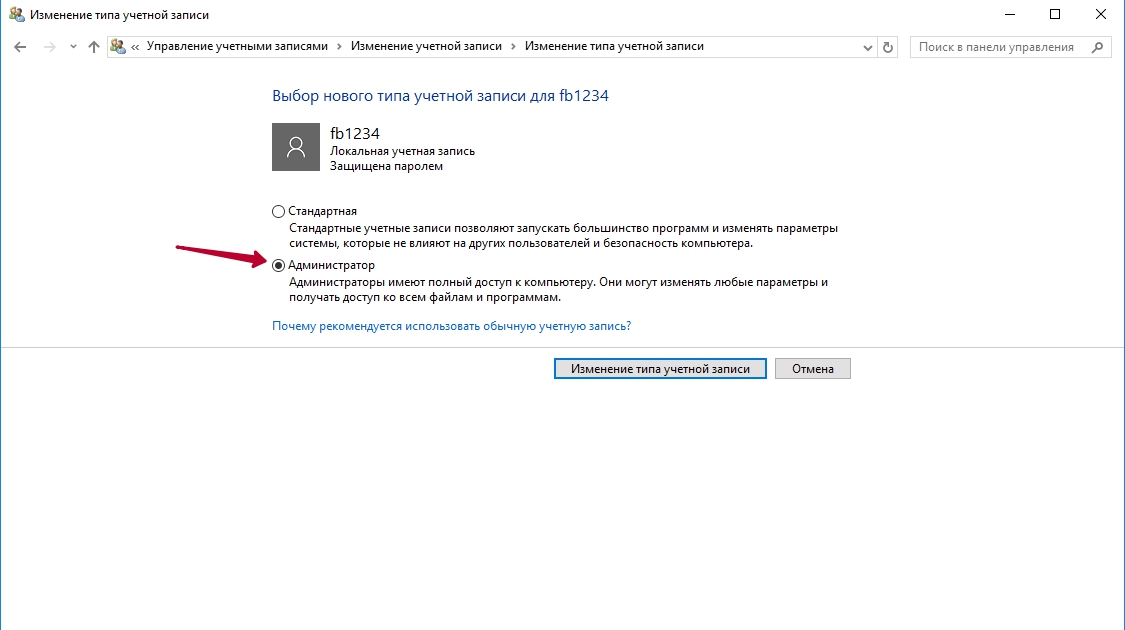
Внимание! Вносим имя пользователя и пароль от услуги Fairy Disk!
Статья «Где найти данные доступа к услуге Fairy Disk» — https://my.fairyhosting.com/knowledgebase.php?action=displayarticle&id=379

После создания учетной записи обязательно смените тип учетной записи на «Администратор».

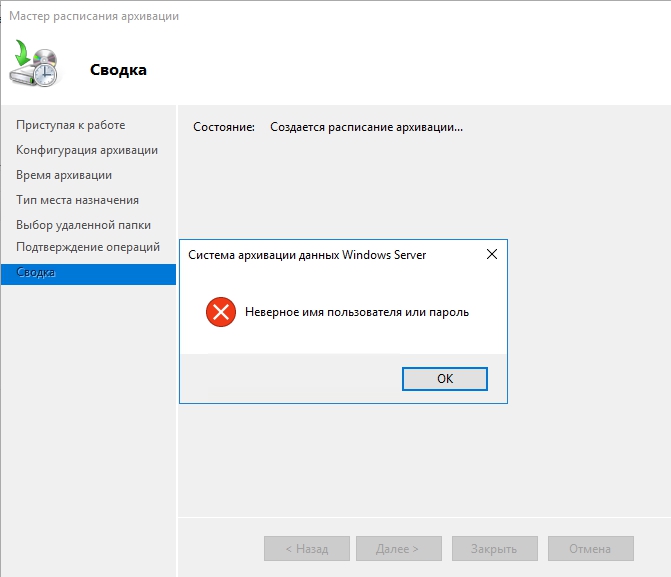
Возможные Ошибки
Ошибка 1. Если у Вас ошибка — «Неверное имя пользователя или пароль»
Решение: Неправильно введенные данные доступа. Пожалуйста проверьте язык ввода и выключен ли у Вас (Caps Lock).
Ошибка 2. Если у Вас ошибка — «Архивации данных не удалось запланировать выполнение архивации, поскольку пользователь, учетные данные которого были указаны, не входит в группу локальных администраторов или операторов архива».
Решение: Неправильно создан пользователь. Смотрите главу «Добавление необходимого пользователя» выше

Восстановление
Выберите в оснастке «Восстановление», чтобы открыть Мастера по восстановлению системы.

Выберите источник резервной копии «Архив находится в другом расположении».

Тип размещения будет «Удаленная общая папка».
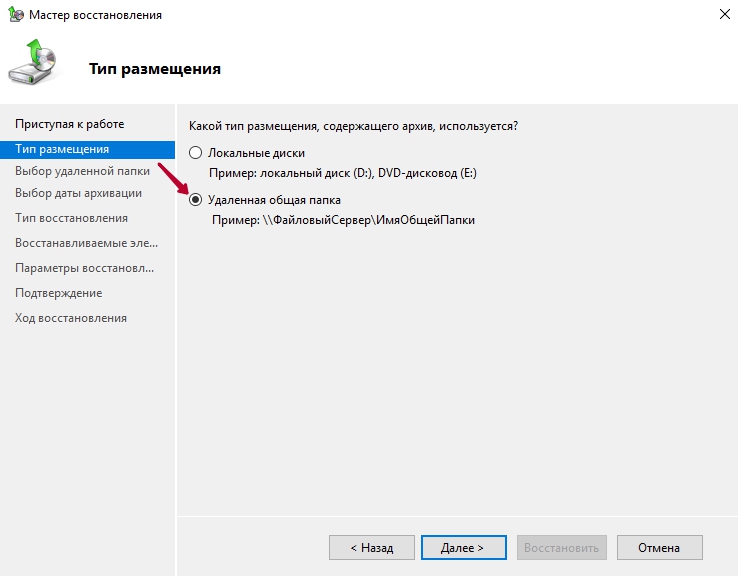
Введите путь до сетевой папки.

На следующем шаге выберите нужную точку для восстановления — дату и время. Помните, что на удалённой сетевой папке хранится только одна последняя копия резервной копии.
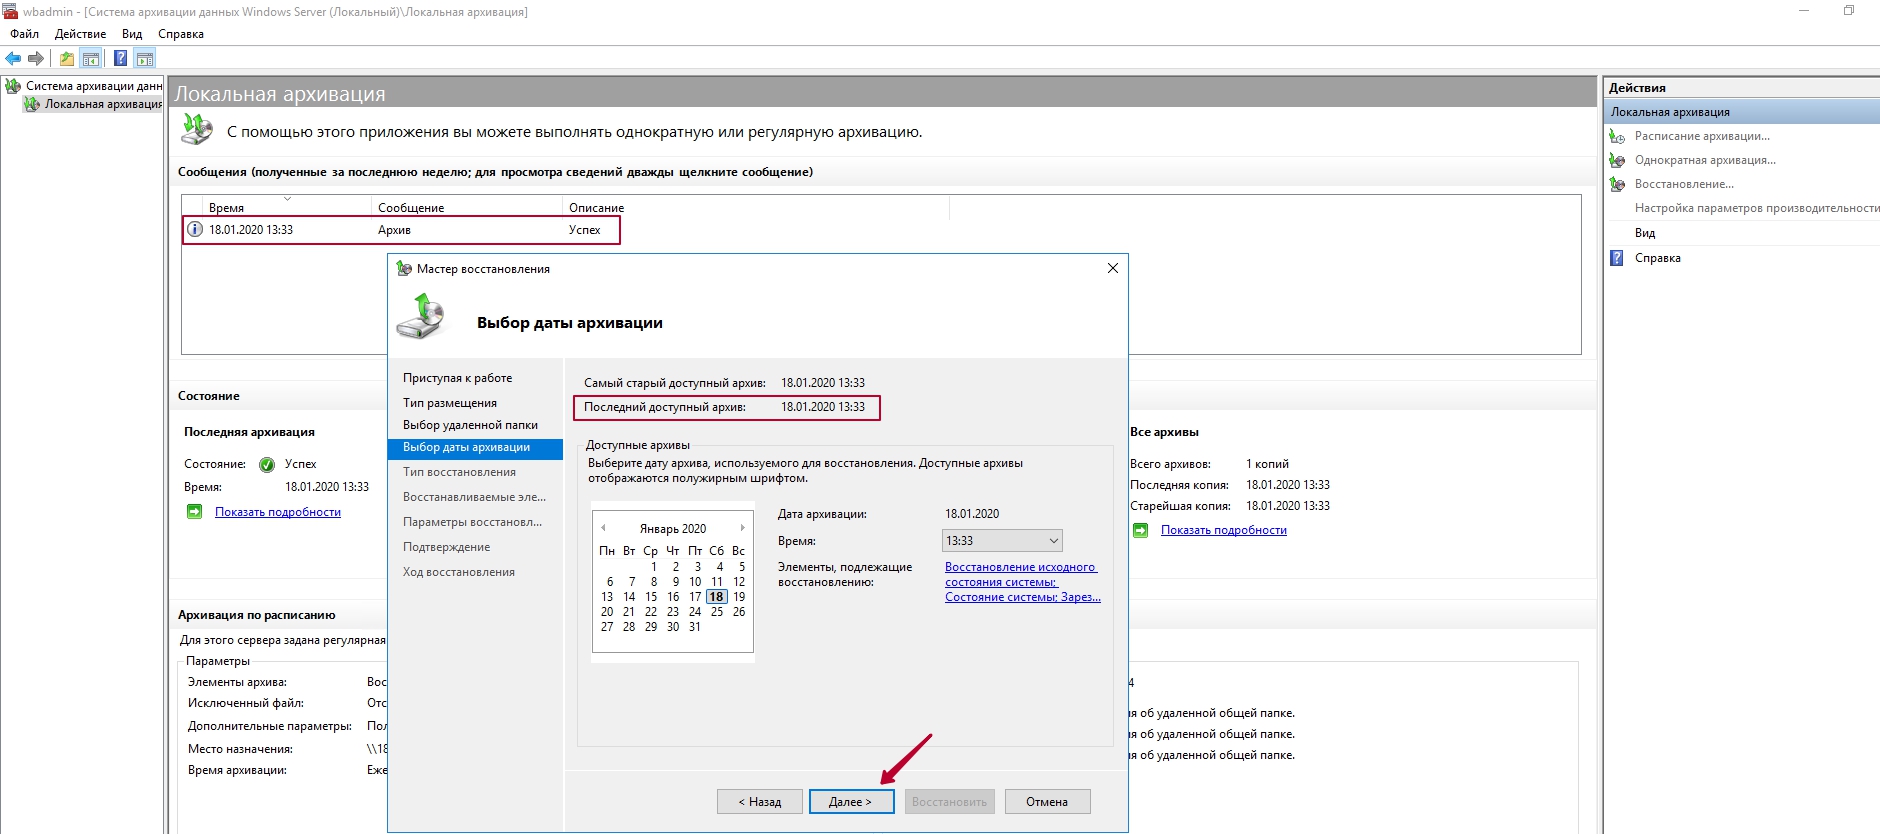
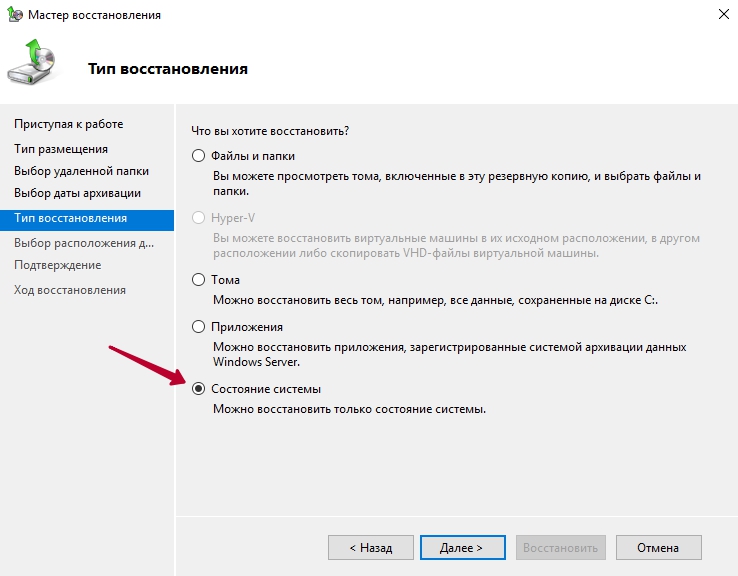
Далее укажите, что именно требуется восстановить. На выбор: файлы и каталоги, тома файловой системы, приложения или состояние системы. В нашем случае, мы восстановим систему полностью, выбрав «Состояние системы».
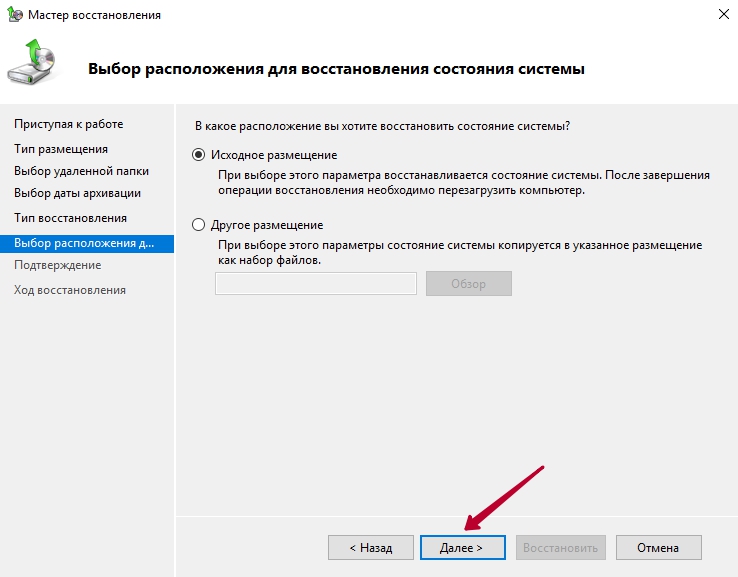
Оставляем «Исходное размещение».
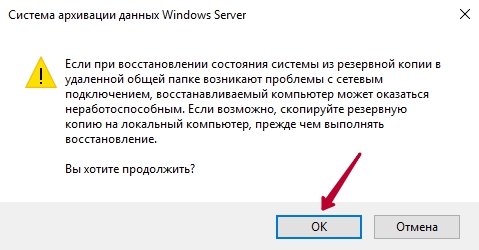
Далее Вас оповещают, что система восстановления может быть восстановлена некорректно, если возникнут проблемы с сетью. Нажмите «ОК».
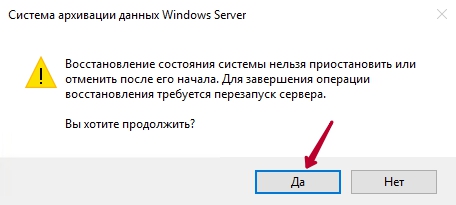
Подтвердите, что хотите восстановить состояние системы полностью. Нажмите «Восстановить».
Обратите внимание, что систему восстановления после начало работы нельзя будет приостановить!

После этого начнется процесс восстановления системы.
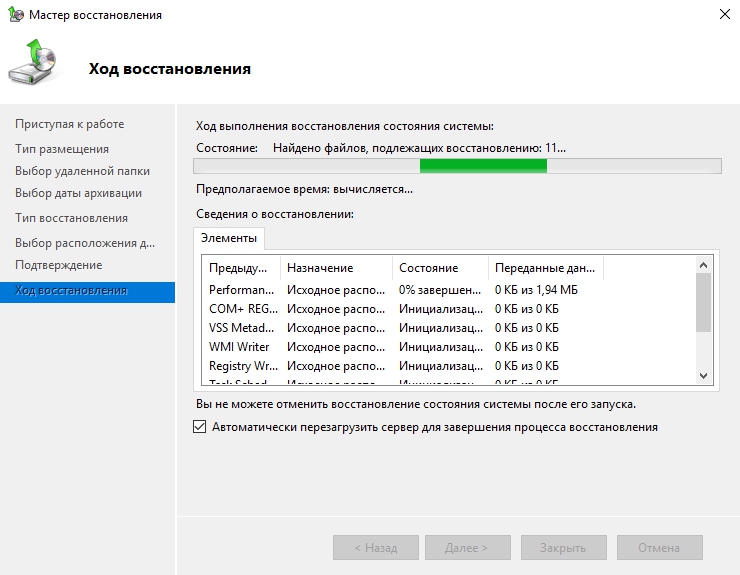
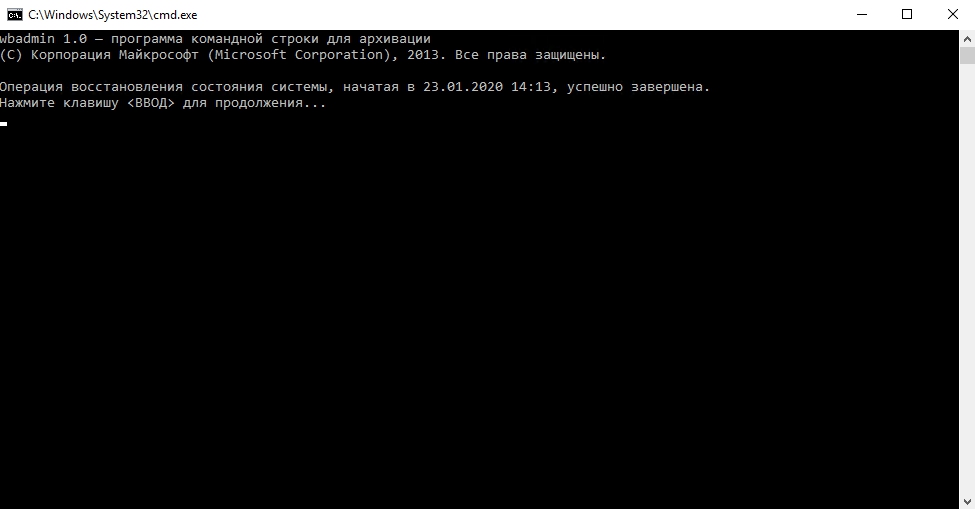
После завершения потребуется перезагрузить сервер и по завершению откроется терминатьное окно, об успешносм восстановлении системы.
Готово.

![]()
Настроим с нуля Windows Server Backup на сервере с операционной системой Windows Server 2016. Я хочу, чтобы сервер сам себя бэкапил. К ОС подключен диск «B», будем бэкапиться на него. Поехали.
Запускаем оснастку Server Manager.
Manage > Add Roles and Features.
Запускается мастер настройки ролей сервера.

Бла-бла-бла, непонятно зачем нужна эта страница, хорошо, что можно поставить галку Skip this page by default. Next. Открывается вкладка Installation Type.
Оставляем Role-based or feature-based installation. Next. Открывается вкладка Server Selection.
У меня один сервер, выбираю его, Next. Открывается вкладка Server Roles.
Next. Открывается вкладка Features.
Находим в списке фич Windows Server Backup, ставим галку. Next. Открывается вкладка Confirmation.
Install. Начинается установка.
Установка успешно завершена.
Закрываем мастер. Запускаем Windows Server Backup.
Выбираем Local Backup.
Видим предупреждение:
No backup has been configured for this computer. Use the Backup Schedule Wizard or the Backup Once Wizard to perform a regular or one-time backup.
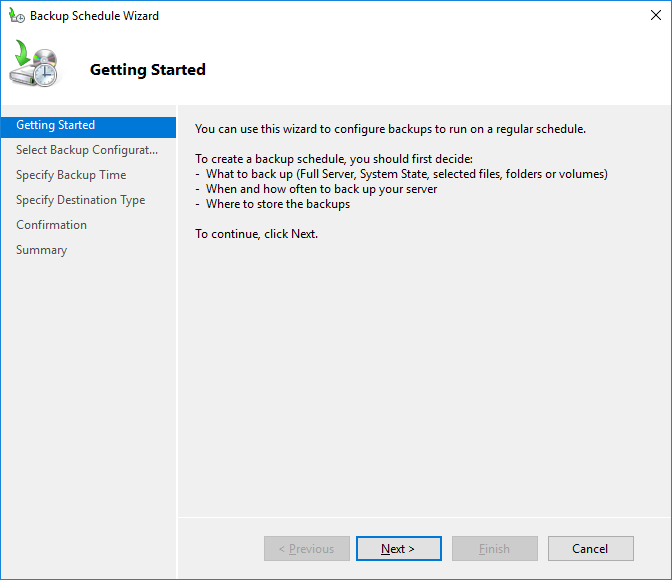
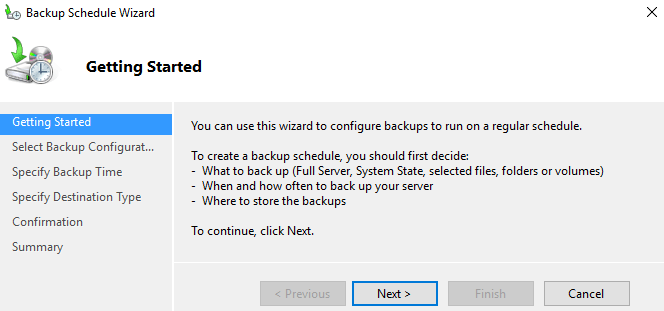
Это нормально, мы ничего пока не настраивали. Нажимаем справа Backup Schedule Wizard. Открывается мастер настройки расписания бэкапа. Открывается раздел Getting Started.
Next. Открывается раздел Select Backup Configuration.
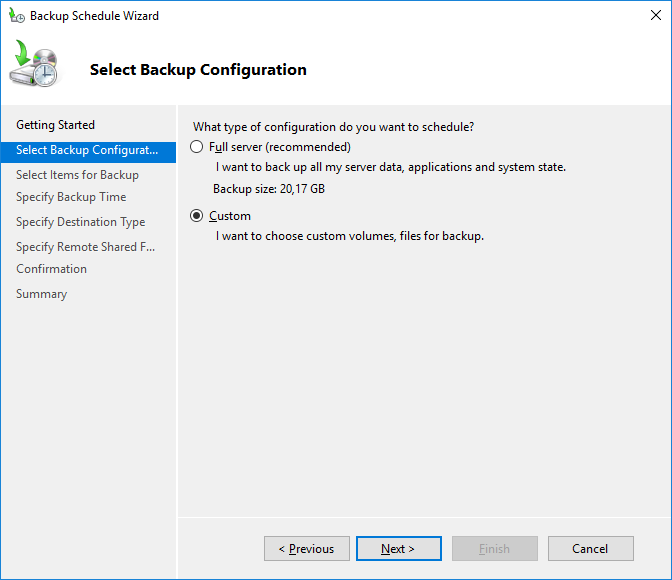
Нам предлагают бэкапить весь сервер или выбрать настройки. Ставлю Custom. Next. Открывается раздел Select Items for Baackup.

Нажимаем Add Items.
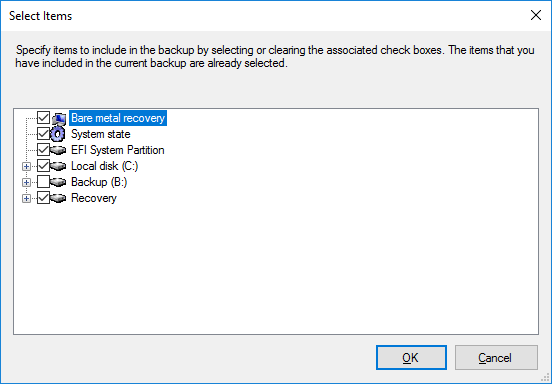
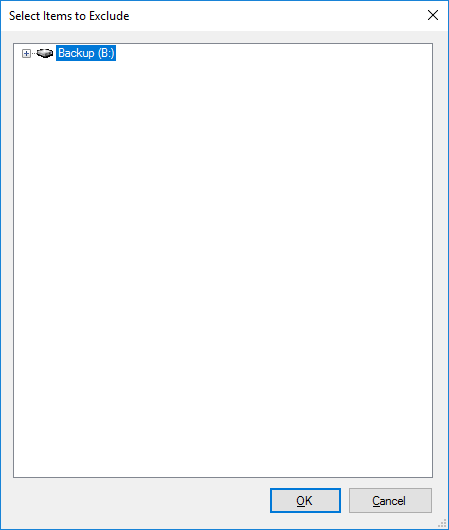
Выбираю всё кроме диска B. На диск B будет делаться бэкап. Ok. Нажимаем Advanced Settings.
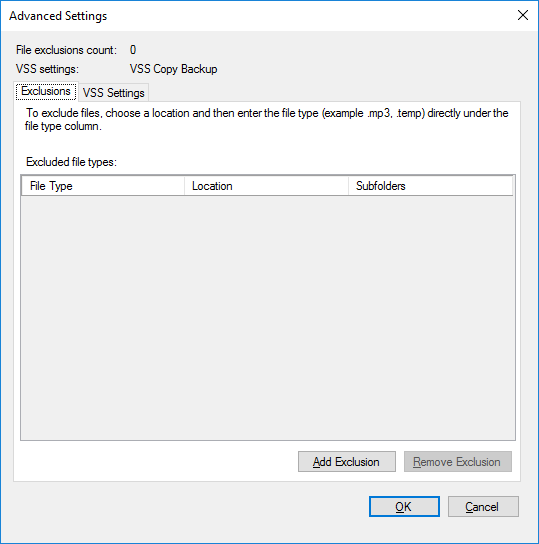
Нажимаем Add Exclusion. Добавляем в исключения диск B. Ok.
Переходим во вкладку VSS Settings.
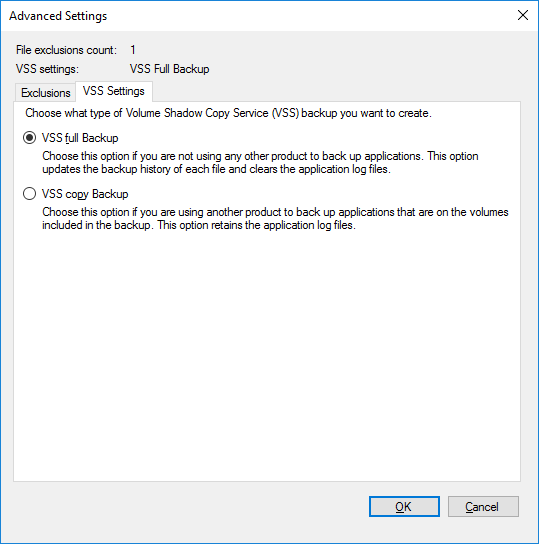
Выбираю VSS full Backup. На сервере будет крутиться какая-нибудь база данных, пусть будет полный бэкап. OK. Открывается раздел Specify Backup Time.
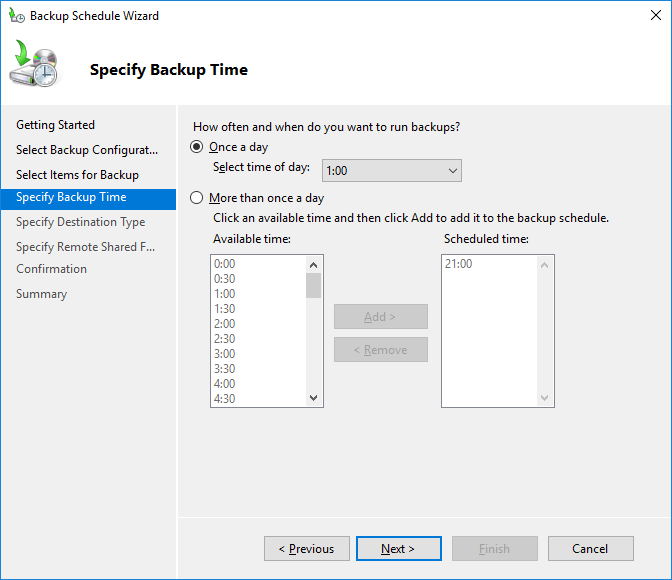
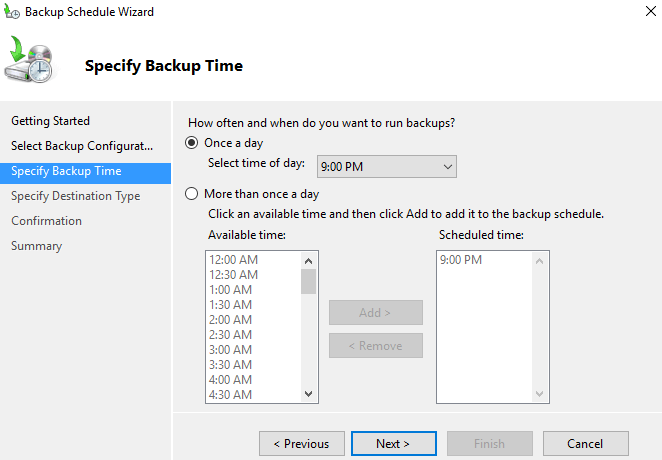
Вот тут меня поджидал первый привет от индусских разработчиков. Почему-то бэкапить нужно минимум раз в день. Раз в месяц нельзя. Лишний бэкап, конечно, лишним не бывает, однако я бы хотел бэкапить раз в неделю. Ладно, решим эту проблему позже. Делаем пока бэкап раз в день, в час ночи. Next. Открывается раздел Specify Destination Type.
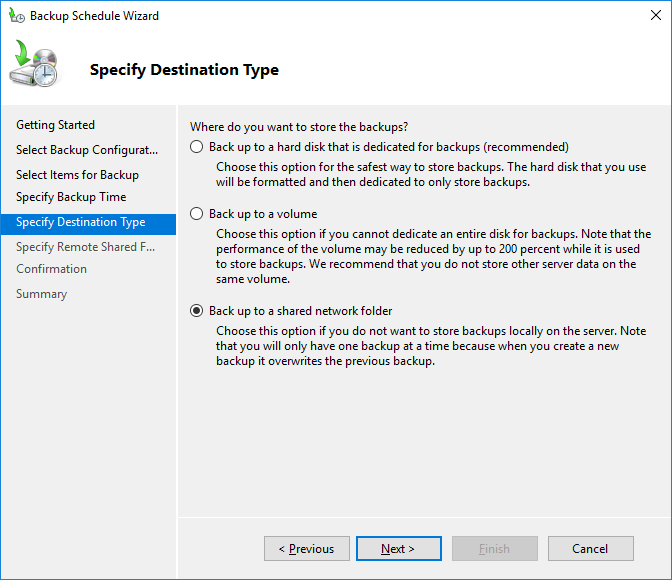
Нам предлагают три варианта бэкапа.
- На диск.
- На том.
- В сетевую папку.
Выделять целый диск или том под бэкап слишком жирно. Однако, это единственный вариант, когда нужно иметь несколько бэкапов. А вот бэкап в шару интересен, но есть минус — можно хранить только последний бэкап. Могли бы и пару бэкапов делать, странные какие-то разрабы — это второй привет от них. Ладно, при необходимости эта проблема тоже решается. Интересно, что будет с сервером,если ОС сдохнет в момент бэкапа… Выбираю Back up to a shared network folder. Next.
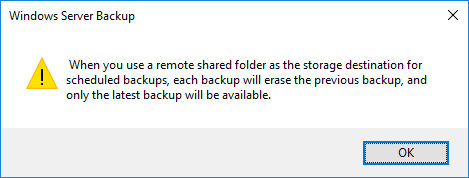
Вот как раз предупреждение о том, что храниться будет только последний бэкап. OK. Открывается раздел Specify Remote Shared Folder.
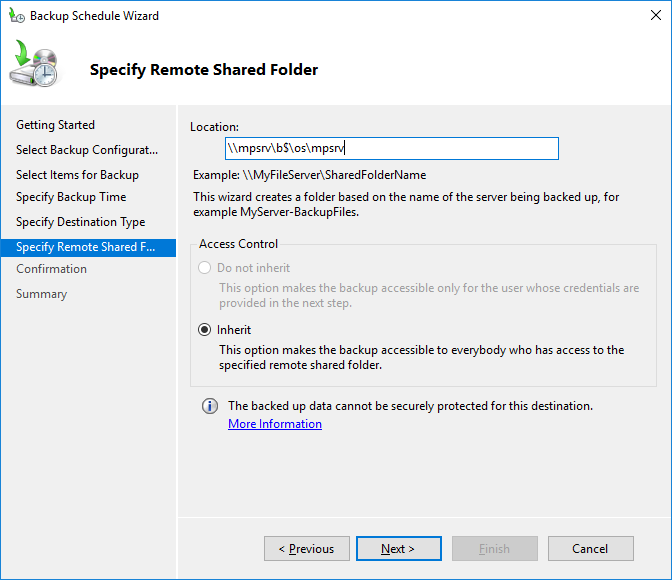
Нас просят указать шару, куда будем лить бэкап. Я хотел вообще-то на диск B, поэтому пишем путь на шару к диску B. Next.
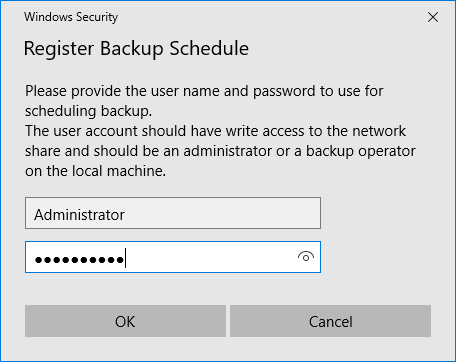
Указываем логин-пароль пользователя, от имени которого будет проводиться резервное копирование. OK. Открывается раздел Confirmation.

Finish. Открывается раздел Summary.
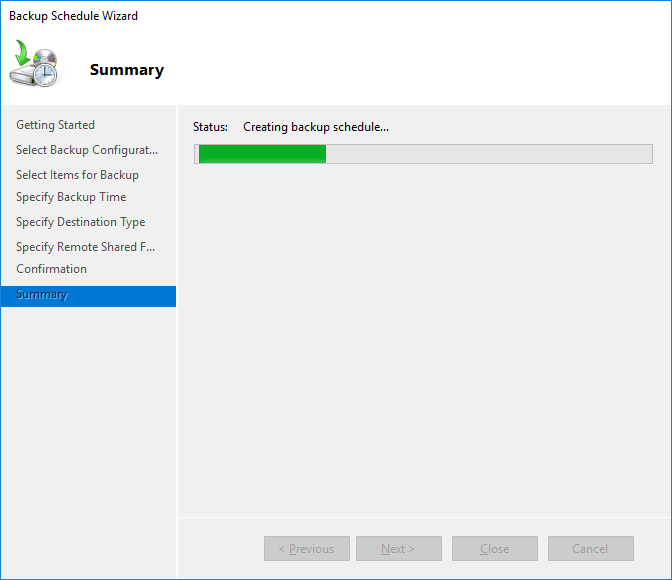
Запускается создание расписания для резервного копирования сервера.
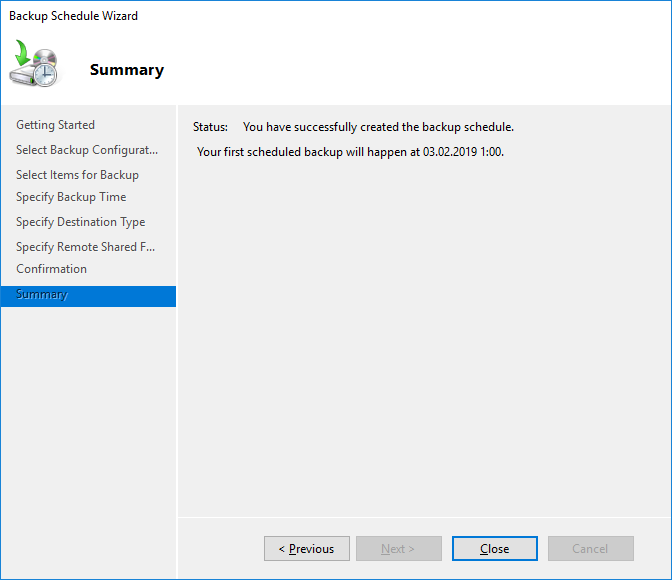
Расписание создано. Close.
Теперь нужно проверить, всё ли работает. Сделаем один бэкап. Запускаем мастер Backup Once Wizard.

Выбираем Scheduled backup options. Next. Открывается раздел Confirmation.
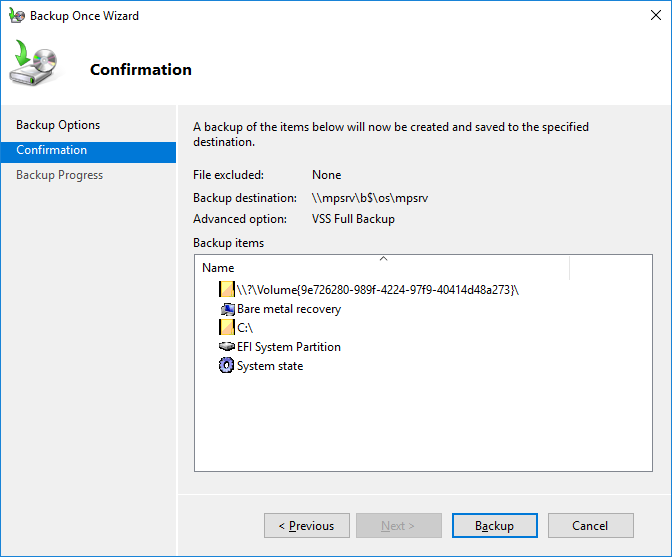
Backup.
Ждём.
Запускается резервное копирование.
Побежали процентики, всё заработало.
Completed.
Теперь сервер будет бэкапиться каждую ночь.
Теперь изменим частоту резервного копирования как и планировали — раз в неделю:
Windows Server Backup — меняем расписание через Task Scheduler
Here we’ll show you how to install the Windows Server Backup feature in Windows Server 2016 with PowerShell and then configure basic server backups.
We’ll also take a quick look at how the backup files are stored and see if they are at all encrypted or not.
In order to perform simple backup and restores out of the box, Windows Server 2016 provides the Windows Server Backup feature. While this does work it is fairly basic and lacks many useful features, if you have many critical servers to backup I highly recommend that you look at something else such as Microsoft’s Data Protection Manager (DPM) or a third party backup solution from some other vendor.
An example of this is that when you backup over the network to an external share with Windows Server Backup you can only store one restore point at a time, any further backups will overwrite existing ones which isn’t very useful if you actually need some sort of retention. The backups are also managed on a per server basis which makes them difficult to maintain and manage.
Install Windows Server Backup Feature
Before we can actually configure the backups, we must first install the Windows Server Backup feature. This can be done through the graphical user interface, however it’s just faster to simply use PowerShell.
First we’ll use the Get-WindowsFeature cmdlet to search for available features that contain the string ‘*Backup*’ in the Name field.
PS C:> Get-WindowsFeature -Name *Backup*

As we can see Windows-Server-Backup is available for install but not currently installed.
Next we use the Install-WindowsFeature cmdlet to install the Windows-Server-Backup feature, as shown below.
PS C:> Install-WindowsFeature -Name Windows-Server-Backup

Once complete we should see that the installation has completed successfully, no reboot is required for this feature, we can begin using it straight away.
Configure Backups
Now that we have installed the Windows Server Backup feature, we can begin to configure our server backups. To begin we’re going to open the Windows Server Backup console from the Tools menu in Server Manager as shown below.
From the wbadmin window that opens up, select “Local Backup” from the menu on the left. We will see that there is a warning noting that no backup has been configured for this computer, which is currently expected. We can either configure a backup schedule which will perform the backup as we define, or we can perform a once off backup. Here we’ll setup a backup schedule, by clicking “Backup Schedule” on the right.
This will open up a Getting Started window advising that we can use this wizard to configure a regular backup schedule for the full server, system state, selected files, folders or entire volumes – click Next to proceed.
On the next Select Backup Configuration window we can select if we want to perform a full server backup which is the recommended and default action, or we can optionally select custom to pick specific volumes or files that we want to backup rather than the full server. In this example we will be configuring a full server backup, however you can change this to suit your requirements.
The next window allows us to specify the time the backup should run. We can set the backup to run once daily at a specified time, or we can optionally have it run multiple times per day by selecting the more than once a day option and adding the times the backup should run to the right side.
Next we will be asked to specify the destination of our backup data. The recommended option is to store the data on a separate disk that is attached to the server, however we can also change this to backup to another volume, or a network share. In this example I’ll be using a network share as I have one available, however note that there is a limitation of this, we will only be able to store one backup point at a time as new backups will overwrite the existing one. This limitation does not exist when you backup to another disk or volume.
We will now specify the network location, here I pick a file share that is available on the local network and click Next to continue. If you selected a disk or volume destination rather than network, you would instead be asked to pick that disk or volume here.
Finally we are presented with a confirmation screen which will summarize our options, click the Finish button to complete the process and accept this, or otherwise go back and make any changes as needed. The summary notes that as we are performing a full backup, we will be able to perform bare metal recovery of the entire system which is fairly powerful.
That’s it, the backup should automatically start at the time specified. We can manually initiate it by going back to the Windows Server Backup window and selecting “Backup Once”. From here we are given the option to create a once off backup based off of our scheduled backup, so all of the same settings will be used but we will be running the backup now rather than at the scheduled time.
Are Windows Server Backups Encrypted?
This is a common question that I’ve seen asked a few times, so I thought I’d take the opportunity to answer it here. No, by default backups in Windows Server 2016 (and previous versions for that matter) are not encrypted. We can confirm this by simply browsing to the location that we have specified to backup the data to and look through it. Primarily a .vhdx file is created for the C: drive of the server, which we can easily mount through disk manager, assign a drive letter to and then browse through the files and folders.
To encrypt the backup files we could setup Bitlocker on the disks where the backups are being stored, however note that this only protects the data at rest. If the data can be accessed while the drive is available for the backup to work, it could also be read by any potential attacker during this time.
Summary
We have shown you how to install the Windows Server Backup feature in Windows Server 2016 using PowerShell, and then configure a basic backup schedule to a network share.
We also then confirmed that the backup files are not encrypted, so additional steps should be taken to protect them.
Видовое разнообразие внешних и внутренних факторов, которые могут поспособствовать краху ОС и привести к нежелательной утрате пользовательских данных, велико. Однако возможности современных ОС позволяют обезопасить важную информацию. Можно выполнить ряд простых предварительных операций и при необходимости вернуть пропавшую информацию.
Как ранее известно, процесс стирания файлов не подразумевает их мгновенное затирание. Ответственная служба ОС Windows Server просто помечает занятое удаленными файлами пространство дискового носителя соответствующей меткой и отображает данный объем накопителя в виде пустого незанятого места. А потом, при выполнении последующих операций записи новых файлов, система производит посекторное затирание отмеченной области и сохраняет новые данные поверх старых. Поэтому, удаленные данные не пропадают. Они все еще находятся на диске. Их можно восстановить независимо от причины, послужившей их пропаже. Также можно вернуть и функциональность всей ОС, если произошел критический сбой или участились системные ошибки.
Ответственный инструмент системной архивации, встроенный в функционал ОС Windows Server
Инструмент «Система архивации данных» в ОС Windows Server является вложенной функцией. Однако, несмотря на ее важность для полноценного и безопасного хранения данных (рассчитана на восстановление информации пользователей, управление хранилищем и возврат работоспособности системы), она не установлена сразу изначально. Пользователям предстоит самостоятельно выполнить ряд простых последовательных шагов и произвести установку инструмента, ответственного за резервное копирование, вручную. Алгоритм установки предполагает следующие действия.
Произведите запуск приложения «Диспетчер серверов», для чего в меню управления системными приложениями «Пуск» найдите и кликните одноименный раздел (в боковом списке программ или закрепленном поле плиток).
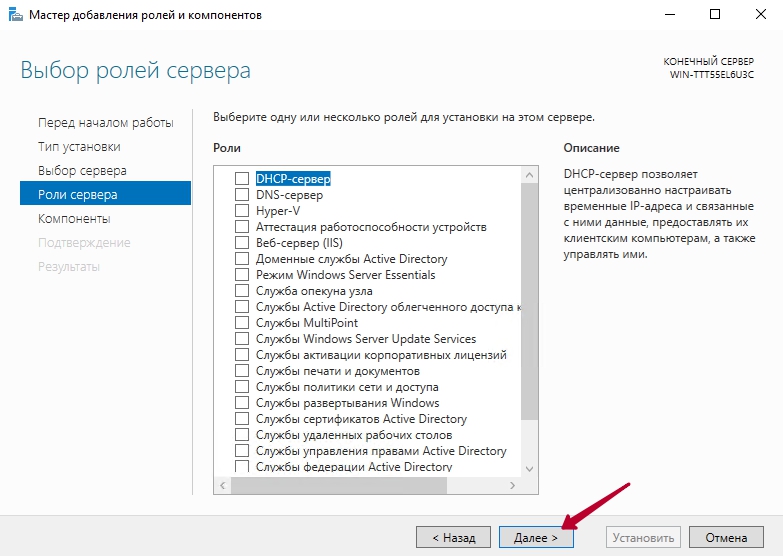
Выберите в окне приложения в левой панели управления раздел «Панель мониторинга». Затем в основной панели настроек локального сервера щелкните раздел «Добавить роли и компоненты», запускающий ответственного помощника.
В новом окне встроенного системного помощника в левой панели будут представлены разделы для пошагового заполнения. В разделе «Перед началом работы» ознакомьтесь с важными условиями для продолжения. Проверьте соответствия будущих настроек установленным потребностям, подтвердите, что система обладает последней версией пакета безопасности, а также защищены приоритетные системы контроля и управления. Кликните по кнопке «Далее» и выполните переход к следующей странице.
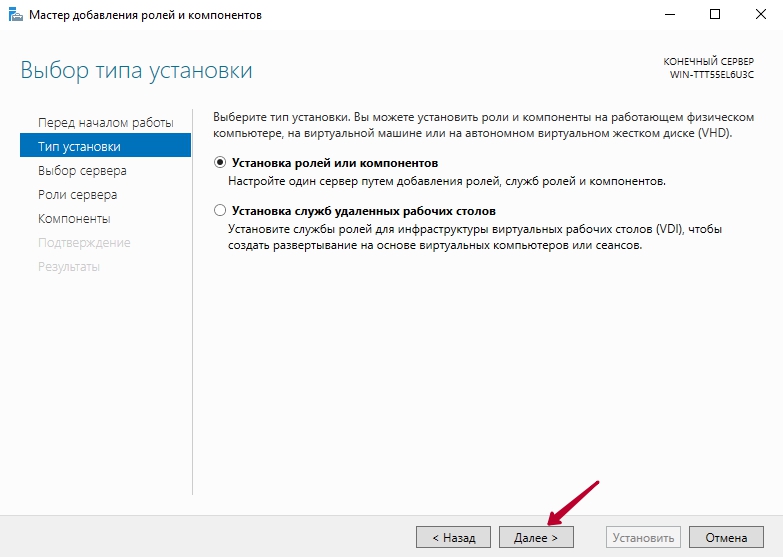
В разделе основной панели управления «Тип установки» определитесь с приемлемым вариантом будущих характеристик. Изначально помощник предлагает верный раздел. Поэтому, ничего не меняйте, оставьте в качестве своего выбора параметр «Установка ролей и компонентов» и жмите «Далее».
В следующем разделе боковой панели «Выбор сервера», аналогично предыдущему шагу, тоже нет необходимости изменять предложенный помощником выбор. Ничего не меняя нажмите на кнопку продолжения «Далее».
Следующий раздел «Компоненты» боковой панели управления позволяет задать нужный компонент сервера. В одноименном поле, содержащем список всех доступных к использованию компонентов, отыщите выделенный вариант «Система архивации данных Windows Server» и выберите его, отметив соответствующим образом. Потом задействуйте стандартную кнопку перехода к следующему разделу («Далее»).
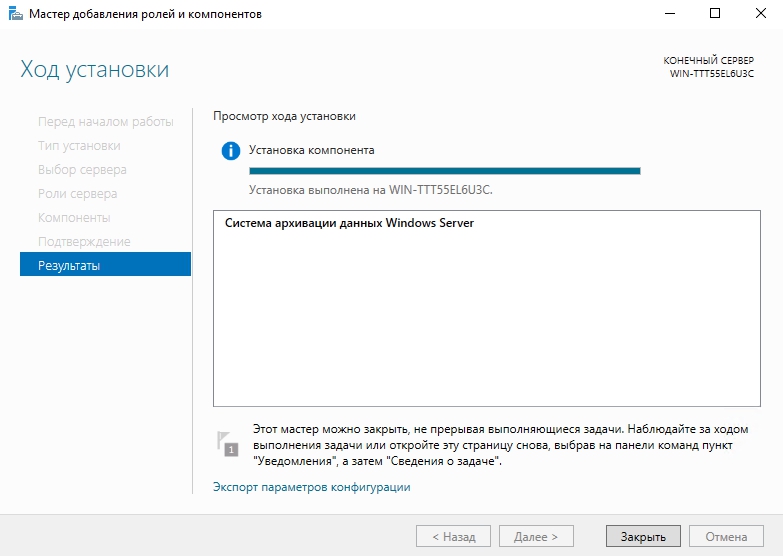
Ознакомьтесь с представленными характеристиками, отредактируйте их при необходимости, а потом запустите процесс установки путем нажатия на соответствующую кнопку действия.
В финальном разделе боковой панели «Результаты» можно отслеживать весь процесс. По его исполнению, закройте окно ответственной кнопкой «Закрыть».
Искомый инструмент для резервной архивации в операционной системе Windows Server теперь готов к дальнейшему использованию.
Порядок действий для воссоздания архивной копии данных посредством установленного инструмента в ОС Windows Server?
Теперь пользователи могут непосредственно приступить к созданию собственного архива данных, а также к организации автоматической функции резервирования информации в соответствии с персональным распорядком. Алгоритм действий следующий.
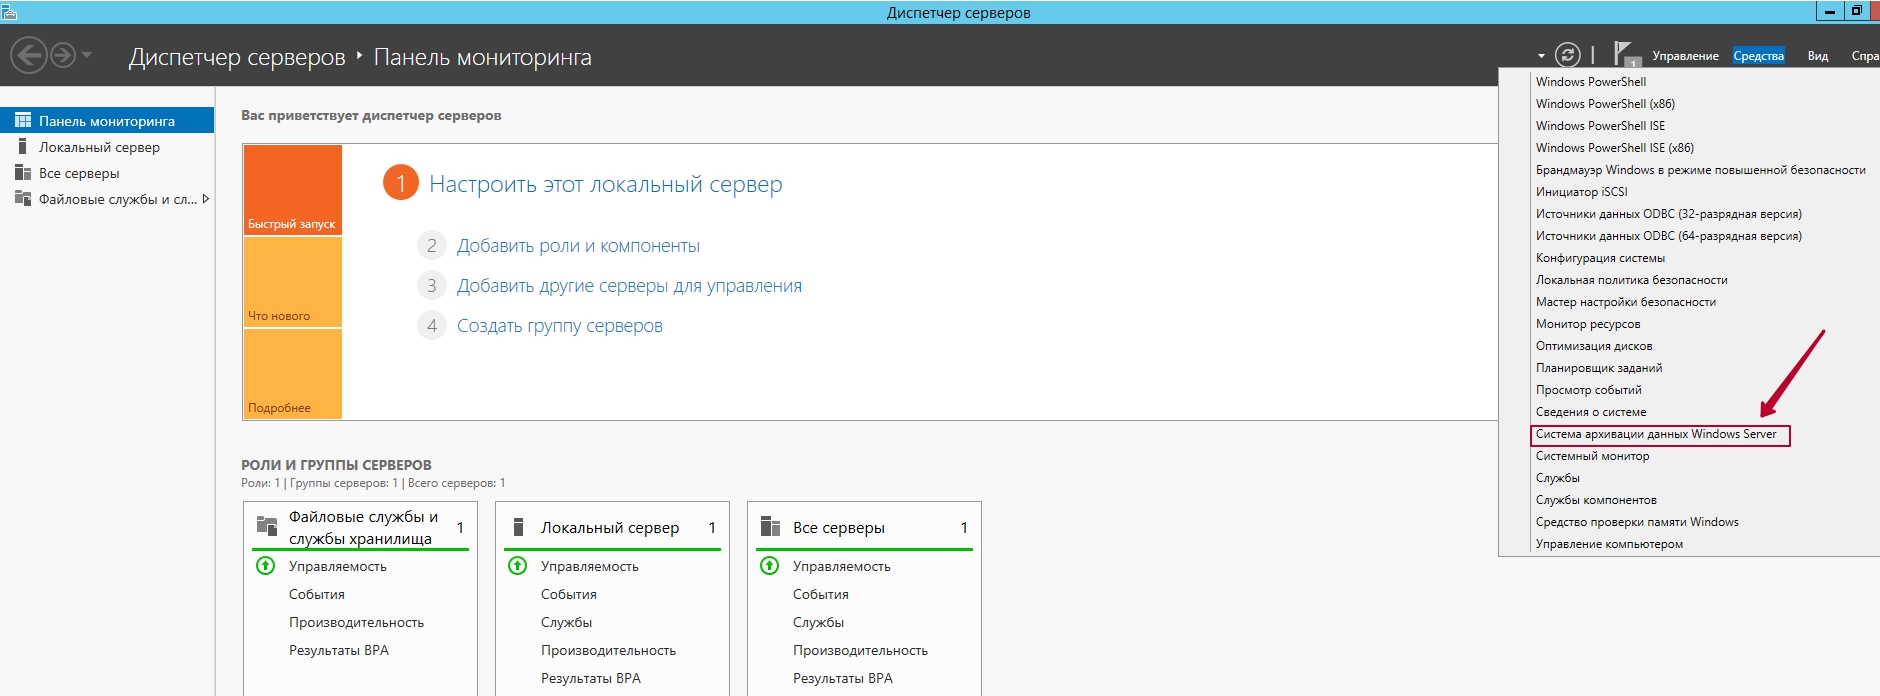
Известным способом через меню «Пуск» запустите приложение «Диспетчер серверов». На ленте меню «Панели мониторинга» отыщите и нажмите на кнопку «Средства». В открывшемся выпадающем меню выберите параметр «Система архивации данных Windows Server».
Примечание. Открыть инструмент архивации также можно сразу напрямую, если воспользоваться службой поиска. Наберите запрос «wbadmin.msc» и в разделе «Лучшее соответствие» поисковой панели будет представлен требуемый результат.
В разделе, ответственном за локальную архивацию, пользователи могут воспользоваться любым вариантом, из представленных, по выбору, и настроить параметры резервного копирования (единичные или постоянные) или произвести восстановление данных.
Установка режима резервирования данных согласно собственного распорядка
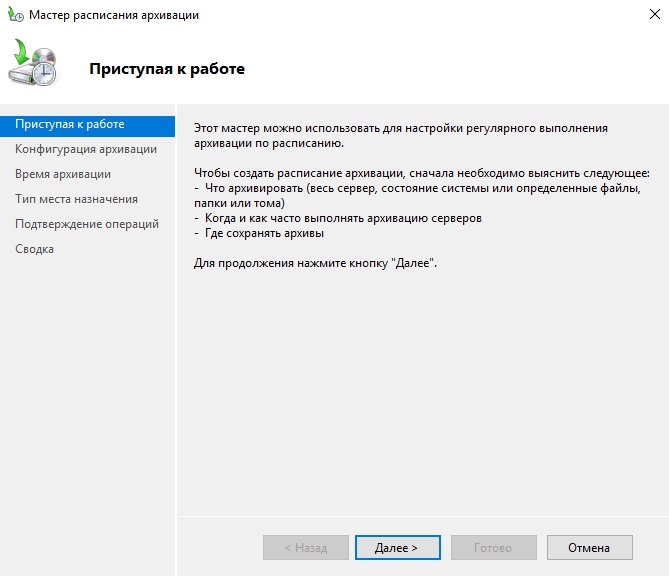
Чтобы задать параметры периодического цикличного режима архивации согласно персонального распорядка пользователи должны выполнить следующие действия. В консоли инструмента архивации щелкните ответственный параметр «Расписание архивации», представленный в крайней правой панели допустимых действий.
Будет запущен встроенный помощник настройки расписания. Укажите требуемый тип конфигурации, установив напротив нужного параметра индикатор выделения («точку»). В зависимости от задач пользователи могут настроить автоматический режим архивации как для всего сервера, так и для отдельных его элементов.
Установите распорядок, который включает периодичность архивации и приемлемый временной интервал ее исполнения. Используйте потом кнопку «Далее» для перехода к следующим характеристикам.
На следующей странице параметров «Тип места назначения» выберите способ хранения будущих копий, поместив индикатор выделения («точку») рядом с подходящим решением.
Если пользователи предпочтут третий вариант, который представлен способом «Архивация в общую сетевую папку», то система выдаст служебное уведомление, объясняющее последствия такого выбора. Как ясно из всплывающего сообщения, данный способ позволит располагать на хранение только последнюю версию готового архива. Предшествующие версии будут недоступны.
Задайте предпочитаемое месторасположение (заполните поле «Расположение») для удаленной папки на странице соответствующей характеристики и перейдите к следующим настройкам.
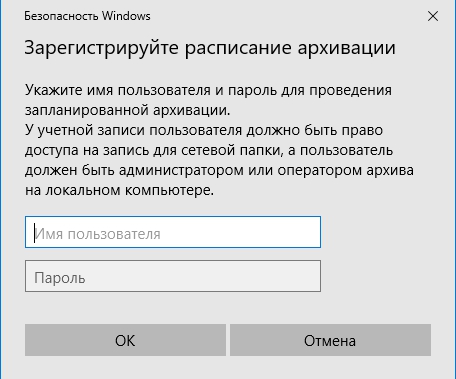
Зарегистрируйте расписание архивации во всплывающем одноименном окне, подтвердив наличие прав администратора путем ввода данных соответствующей учетной записи.
Проверьте заданные на предыдущих этапах характеристики и сохраните настройки расписания. Нажмите на кнопку окончания «Готово» и завершите процедуру.
При необходимости подготовить архив в одном экземпляре, то выберите режим однократного резервирования. В панели действий инструмента архивации Windows Server отметьте соответствующий раздел («Однократная архивация»).
Задайте тип конфигурации «Настраиваемый» (установите индикатор выделения «точку»).
Выберите элементы, для которых будет выполнена операция резервного копирования, закрепив их в подготовленном поле.
Определитесь с типом места назначения, в котором будет располагаться архивная копия (используйте стандартный способ выбора параметра посредством индикатора выделения «точки»).
Проверьте соответствие примененных параметров. Щелкните на кнопку «Архивировать», когда все характеристики будут представлены верно.
Восстановите операционную систему из подготовленного архива
Резервная копия позволяет быстро и без дополнительных инструментов восстановить работоспособность операционной системы в случае ее непредвиденного сбоя или поломки.
Откройте инструмент «Система архивации данных Windows Server» любым способом. Например, введите в поисковой строке запрос «wbadmin.msc» для прямого мгновенного перехода к требуемому приложению.
В крайней боковой панели допустимых в инструменте действий найдите среди предложенных вариантов и щелкните левой кнопкой мыши раздел «Восстановление», ответственный за требуемую операцию.
В окне помощника восстановления на начальном этапе (в разделе «Приступая к работе») укажите адресное месторасположение ранее сохраненной архивной копии. Отметьте индикатором выделения верный параметр и продолжите, нажав на кнопку «Далее».
Отметьте используемый тип размещения и задайте расположение архива в следующих одноименных разделах.
В разделе «Выбор сервера» укажите источник восстановления, который содержит резервную копию, и продолжите, нажав на стандартную кнопку перехода к следующему шагу «Далее».
Раздел «Выбор даты архивации» содержит варианты архивов. Упорядоченные по дате их создания. Отметьте из представленных образцов требуемый.
Определите в разделе «Тип восстановления» виды объектов, подлежащие восстановлению.
В следующем разделе «Восстанавливаемые элементы» поместите в одноименное поле нужные для возврата элементы.
Раздел «Параметры восстановления» позволит указать директорию для вывода восстановленных объектов, отмеченных на предыдущем этапе.
Просмотрите примененные настройки и убедитесь в их корректности. Потом щелкните кнопку начала процесса «Восстановить». Система приступит к выполнению операции.
По окончанию процесса закройте окно исполнения.
Восстановите ОС после масштабного краха
Когда операционная система неработоспособна, но в наличии присутствует диск восстановления, пользователи могут задействовать его возможности и вернуть систему к рабочему состоянию. Алгоритм подразумевает следующие действия.
Установочный носитель необходимо подключить к проблемному ПК, а потом выполнить загрузку системы с него при соответствующем приглашении.
В предложенном системой меню управления выберите инструмент «Восстановление системы» в нижнем левом углу окна приветствия.
Потом пошагово выберите перечисленные пункты меню, последовательно нажимая каждый один за другим: «Поиск и устранение неисправностей» — «Восстановление образа системы» — «Windows Server».
Система отобразит отдельное окно для выбора архивного образа системы, в котором следует указать рабочий вариант готовой исправной копии.
На странице дополнительных параметров оставьте настройки в графе, ответственной за форматирование, без изменений (индикатор выбора «галочку» не убирайте), для приведения структуры диска в соответствие с архивной копией.
Если настройки установлены верно, но запустите операцию восстановления (кликните кнопку «Готово»).
Подтвердите системе свое разрешение процесса восстановления, нажав на кнопку «Да».
Инструмент восстановления вернет ОС к состоянию из резервного образа.
Современные версии операционных систем оснащены встроенным инструментом восстановления работоспособности ОС и возврата утраченных данных. Необходимо только своевременно выполнить его установку и настройку. При таком подходе, пользователи всегда смогут вернуться к рабочей версии системы или восстановить нужные файлы.
Полную версию статьи со всеми дополнительными видео уроками смотрите в источнике.
ОС Windows Server обладает самостоятельной компонентой резервного копирования, позволяющим не приобретать сторонние программы. Серверный Windows, в отличие от пользовательских версий, не имеет механизмов защиты. Архитектура операционный среды серверов подразумевает минимализм, необходимый, чтобы снизить нагрузку. Системные администраторы используют для резервного копирования разное ПО. Несмотря на то, что Windows Server «вшит» в систему и обладает неплохими техническими характеристиками, решение используется на практике далеко не всегда.
Компания Microsoft рекомендует организовывать хранение резервных копий на отдельных дисках. Они размечаются системой архивирования, сжимая файлы для экономии памяти без потерь качества. Спрятанный от пользователей отформатированный диск обеспечивает дополнительную защиту от разрушительных внешних воздействий, в т.ч. «троянов». Размеченные разделы, отдельные сетевые папки и iSCSI диски также могут выступать в качестве хранилищ.
В момент настройки резервного копирования Windows Server сетевые диски подключаются по iSCSI протоколу, работая с ними аналогично физическим. Также создаются тома, остается возможность форматирования и т.д. Операционная система «видит» их как физические диски. Чтобы сделать бэкап, достаточно подключить iSCSI диск к проблемному серверу. Скорость восстановления данных позволит избежать серьезных перебоев работоспособности.
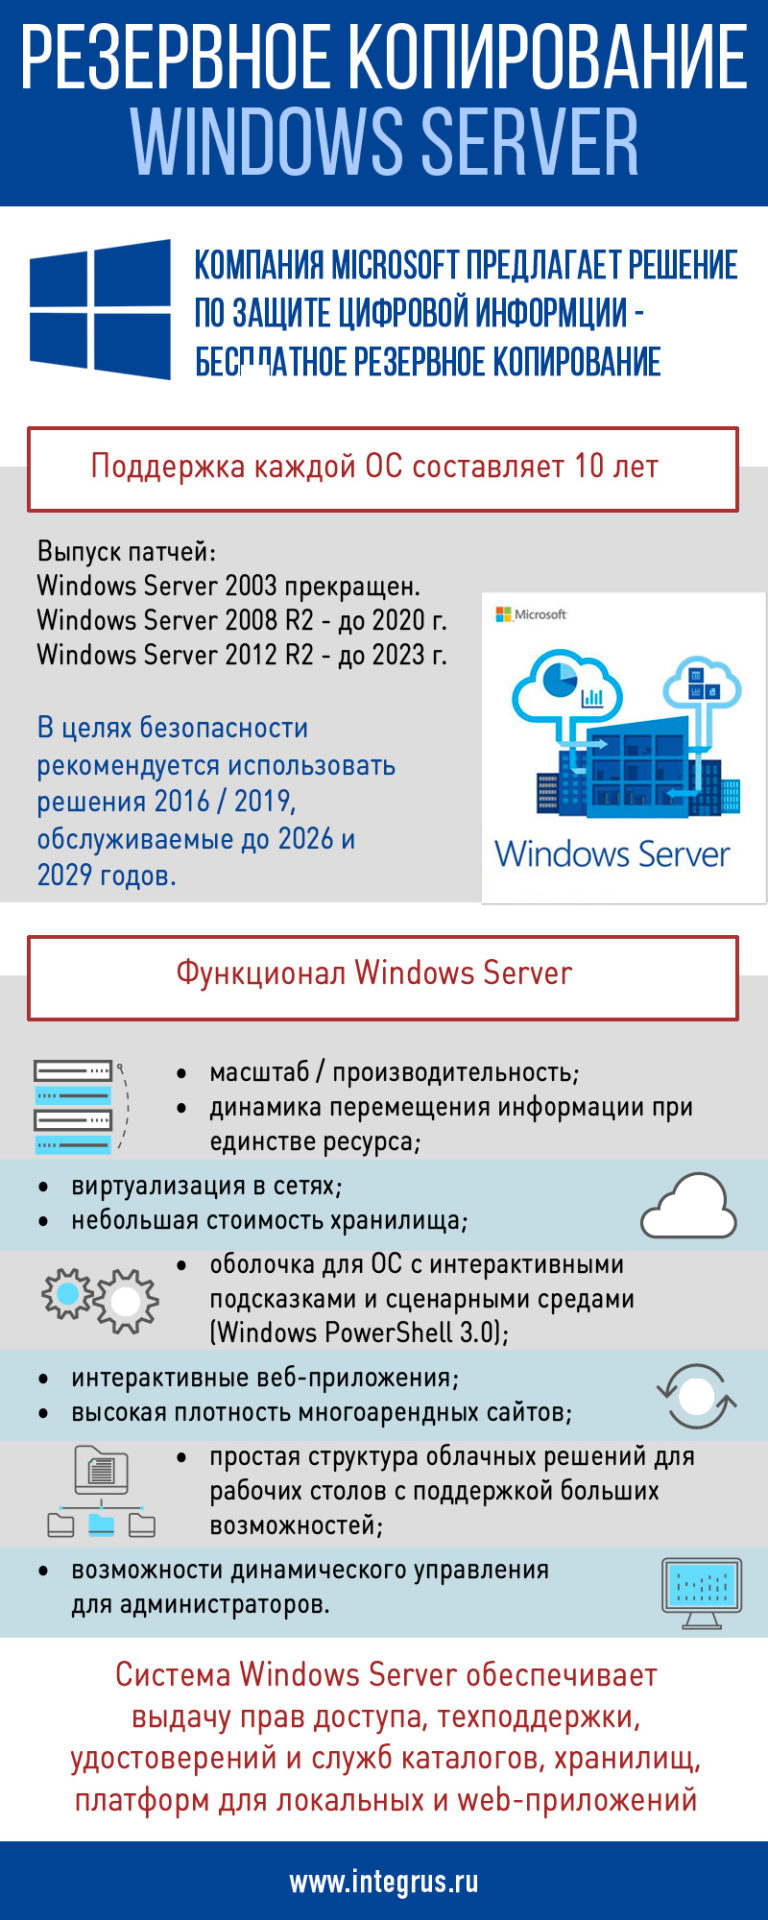
В настоящее время используются несколько версий Windows Server в разных редакциях. Начиная с XXI века ОС маркируется годом запуска. Выбор поколения основывается на предоставляемом функционале. Каждая последующая версия увеличивает возможности.
Поддержка операционной системы составляет 10 лет. Поэтому выпуск патчей для версии 2003 года закончен пять лет назад, а техподдержка 2008 R2 завершается. До 2023 года поддерживается Windows Server 2012 R2, а решения 2016 и 2019 годов прослужат соответственно до 2026 и 2029 годов. По соображениям безопасности рекомендуется использовать последние версии системы.
Для тех, кто недостаточно хорошо разбирается в IT, существует комплексное решение — Acronis Backup Windows Server. Новое ПО быстро резервирует данные и восстанавливает сервера, созданные на платформе Windows. Образы дисков всего сервера создаются на уровне блоков несколькими кликами. Восстановление занимает несколько минут, касаясь как отдельных файлов, папок, дисков, так и всего сервера. Данные минут восстанавливаться на исходном месте либо переноситься на другое оборудование, в т.ч. виртуальное.
Windows Server имеет функционал, полноценно доступный в последних версиях и крайне урезанный в старых.
- сочетание масштаба / производительность;
- динамика перемещения информации при единстве ресурса;
- виртуализация в сетях;
- небольшая стоимость хранилища;
- оболочка для ОС с интерактивными подсказками и сценарными средами (Windows PowerShell 3.0);
- интерактивные веб-приложения;
- высокая плотность многоарендных сайтов;
- простая структура облачных решений для рабочих столов с поддержкой больших возможностей;
- возможности динамического управления для администраторов.
Система Windows Server обеспечивает выдачу прав доступа и необходимой техподдержки для нормальной работы удостоверений и различных служб каталогов, хранилищ, платформ для локальных и web-приложений. Также происходит оптимизация возможностей сетевой работы, автоматизируется управление процессами.
При создании расписания необходимо учитывать пики нагрузок, приводящие к снижению производительности системы. После завершения процесса копирования необходимо проверить корректность восстановленной работы структуры. При создании копий не обязательно использовать дорогостоящие SSD диски, в целях экономии пригодны носители SAS и SATA.
Стоимость Windows Server 2012 R2 / 2016 / 2019 не меняется для стандартной лицензии и Datacenter 2016. Различие, начиная с 2016 года, заключается в изменении стоимости лицензирования для серверов, имеющих высокую плотность ядер. По новым правилам лицензии выдаются для не для процессора, а поядерно.
Резервное копирование Windows Server 2003
Для создания резервной копии Windows Server 2003 используется компонента NTBackup. Запись производится даже на ленточные устройства. Допускается резервное копирование информации вручную или при помощи мастера, полное, частичное для групп файлов и данных о конфигурации.
Возможности весьма ограниченные, исходя из 64 логических процессоров поддерживаемой системы и 1 Тб ОЗУ. Каждый сертификат SSL привязан только к единственному IP-адресу. Необходимо для передачи данных между разными модулями использовать соединения типа «точка–точка».
Резервное копирование Windows Server 2008
Привычная архивация оказалась полностью переработана. Новая «научилась» самостоятельно создавать как основную, так и промежуточные копии, контролируя сроки хранения информации. На диске учитывается глубина копирования, а при заполнении выделенного объема запись ведется поверх устаревшей информации.
При этом версия утратила значительную долю полезных функций, например, пропали средства архивирования, а образы перестали разворачиваться, утратив обратную совместимость. Необходимый, но «исчезнувший» функционал из NTBackup вернули только спустя год, под эгидой Windows Server 2008 R2, сделав создание копий вновь удобным и легким.
Транспортный протокол iSCSI используется для хранения архивов и систем, с правом распоряжения дисковым пространством. Решение задействует теневое копирование (VSS), позволяющее непрерывно вести запись без простоев в работе пользователей и замедления системы.
Если сравнивать со старой версией 2003 года:
- расширилась ОЗУ (2 ТБ), увеличилось число логических процессоров (256 LP), появилась поддержка гостевых операционных систем и кластеризации;
- поддержка коснулась предыдущих версий VDI, персонализируя и дополнительно защищая рабочую среду;
- упростилось логика восстановления информации и ОС;
- ускорился процесс создания копий.
Резервное копирование Windows Server 2012
Начиная с данной версии возможна создание архивов работающих на хостинге облачных машин, с последующим поочередным восстановлением состояния. Доступно беспроблемное VSS-копирование продукции Exchange и MS CQL Server. Из минусов – появился конфликт с продуктами других компаний.
Мастер восстановления, созданный для приложения Microsoft, умеет выполнять «откат» до нужного состояния ОС без вмешательства в пользовательские данные. Альтернативно на уровне томов данные восстанавливаются с уничтожением совокупности информации и необходимой загрузкой выбранного состояния на конкретную дату. Подобный подход практикуется и в решениях Windows Server 2012 R2 Acronis.
Windows Server 2012 Backup – инструмент, предусматривающий полноценное восстановление системы на всех уровнях, снимающий с администраторов рутинные обязанности по созданию копий. Существующие ограничения при выполнении бэкапа позволяют пользоваться сторонними утилитами или программами.
Стремление повысить отказоустойчивость и виртуализацию систем привели к изменению политики лицензирования, включающей четыре редакции.
- Foundation. Операционная система для серверов с низкими техническими характеристиками, используется в небольших офисах численностью до 15 человек.
- Удачное решение, имеющее ограничения по количеству устройств (50) и численности пользователей (25). Имеет заранее установленные файловые службы, настроенный удаленный рабочий стол и предварительно настроенные роли.
- Standart. Не ограничивает количество пользователей, предлагая различные клиентские лицензии. Система акцентирована на виртуализацию среды.
- Datacenter. Лучшая редакция, отличающаяся от Standart возможностью запуска неограниченного числа с сервера гостевых ОС.
Изменения коснулись сочетания масштабности и производительности. Для серверов резервного копирования доступны 4 Тб оперативки, 640 логических процессоров, поддержка до 1024 облачных машин, увеличилось число сторонних ОС, имеющих доступ к процессорам и т.п. Простое соединение сменилось миграцией виртуальных машин через Ethernet.
Резервное копирование Windows Server 2016
Настройка производится посредством встроенного компонента Windows Server Backup. Архивация сервера устанавливается админами самостоятельно, рекомендуемый режим – ежедневный.
Возможно использовать несколько дисков для записи резервной копии, как на предприятии, так и вовне. Создать дубликаты можно для всех данных, определенных дисков, фалов или каталогов. Можно минимизировать место на диске, отменив резервное копирование для тех малоценных папок.
Доступно четыре редакции.
- Hyper-V. Предназначена для бесплатного запуска гипервизора виртуальной среды.
- Essentials. Обладает базовым функционалом.
- Standard. Предлагает расширенный функционал без интенсивной виртуализации.
- Datacenter. Имеет высокую степень виртуализации без каких-либо ограничений количества облачных машин.
Защита серверной среды от Acronis Backup Windows Server 2016 максимально упрощает операции по созданию и восстановлению копий. Полноценное решение не имеет несовместимостей оборудования, создавая образ сервера за один этап и восстанавливая файлы, приложения и целые системы несколькими кликами.
Резервное копирование Windows Server 2019
Обновленные Standard и Datacenter имеют разные способны установки, влияющие на требуемый функционал. В первую очередь изменения касаются набора сервисов и полноты графического интерфейса.
- Desktop Experience. Популярная система с большим функционалом, но и значительным количеством перегрузок, требуемых обновлений, открытых портов.
- Небольшой объем серверного ядра – это меньшая кодовая база, и, соответственно, меньшая зависимость от внешних атак. Версия без лишних наворотов и специальных возможностей.
- Установка, начиная с этой версии, доступна лишь в виде контейнеризированного образа ОС. Используется для создания различных приложений серверных ОС.
Версия Windows Server 2019 поставляется без функции архивации, которую надо устанавливать дополнительно.
Резервное копирование представляет собой обязательное условие ежедневного серверного управления, позволяя восстанавливать данные при возникновении нештатных ситуаций.