See how you can draw shapes, use colors, and render images in a WinForms app.

Windows Forms is a framework that lets you build desktop applications. You can click and drag components like buttons onto a visual user interface. It also helps you manually create various shapes within your code.
This article will show you how to add lines, shapes, and images to your application. This tutorial uses the Visual Studio 2019 Community Edition to show examples.
What Are the Built-In Classes Used for Drawing Graphics?
Windows Forms uses the C# programming language. Its built-in classes and methods allow you to draw various shapes onto a Windows Form canvas. These include the Graphics, Pen, Color, and Brush classes.
|
Class |
Description |
|---|---|
|
Graphics |
The Graphics class allows you to draw shapes and lines onto the canvas. It includes methods such as:
|
|
Pen |
The Pen class allows you to specify the properties of a ‘pen’ tip which you can use to draw your shapes. You can specify properties such as color, thickness, or dash style. Methods include:
|
|
Color |
A color object made up of R (red), G (green), and B (blue) values. You will need a color object for many of the built-in methods that create shapes. |
|
SolidBrush, HatchBrush, TextureBrush |
These brush classes derive from the «Brush» interface. These classes allow you to color in blank spaces on the canvas. You can also choose to fill the spaces using different patterns or textures. You can specify properties such as the color. |
|
Rectangle, Line, Polygon, Ellipse |
You can create objects based on these shapes, and use them when calling methods such as DrawRectangle(). Instead of passing the x, y, width, and height as arguments, you can choose to pass an existing Rectangle object instead. |
To view the source code for a running example of the above tutorial, visit the GitHub repository. You can try out the following examples once you’ve created a Winforms application.
How to Add a Paint on Form Load Event Handler
First, add an event handler to draw shapes when the canvas loads.
- Add a Paint function for the form.
 private void Form1_Paint(object sender, PaintEventArgs e)
{
    // Code goes here
} - Go into the Design View Tab.
- In the Properties window, select the lightning icon to open the «Events» tab.
- In «Paint», under «Appearance», select the Form1_Paint function. This will execute the function when you run the application.

How to Draw Lines Onto a Windows Form Canvas
You can use a Color, Pen, and the DrawLine() method to draw lines on a canvas.
- Inside the Form1_Paint() function, create a Color object with the color you want the line to be. Then, create a Pen object to draw the line with.
 Color black = Color.FromArgb(255, 0, 0, 0);
Pen blackPen = new Pen(black); - The DrawLine() method from the Graphics class will draw a line using the pen. This will start drawing a line from an x, y position to another x, y position.
e.Graphics.DrawLine(blackPen, 300, 200, 800, 200); - You can modify the properties for the pen object to change its width, dash style, and start or end cap.
 blackPen.Width = 20;
blackPen.DashStyle = System.Drawing.Drawing2D.DashStyle.Dash;
blackPen.StartCap = System.Drawing.Drawing2D.LineCap.ArrowAnchor;
e.Graphics.DrawLine(blackPen, 300, 200, 800, 200); - Press the green play button at the top of Visual Studio to see the changes.


How to Draw Shapes Such as Rectangles and Circles
You can use the shapes classes for different shapes, or draw shapes manually onto the canvas.
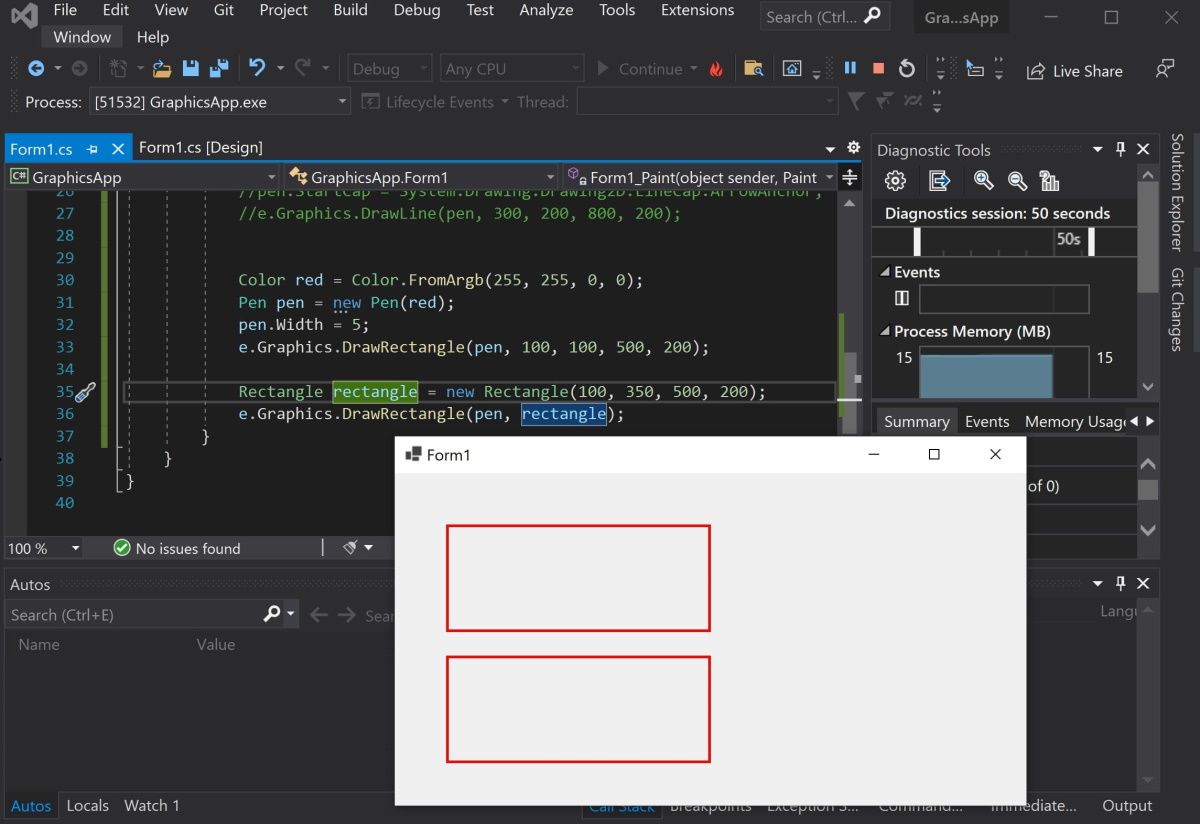
- Create a Color and Pen object as shown in the previous steps. Then, use the DrawRectangle() method to create the rectangle. The arguments are the x and y coordinates for the top-left of the rectangle, along with its width and height.
 Color red = Color.FromArgb(255, 255, 0, 0);
Pen redPen = new Pen(red);
redPen.Width = 5;
e.Graphics.DrawRectangle(redPen, 100, 100, 500, 200); - You can also create a rectangle using the Rectangle Class. First, create a Rectangle object. The arguments are also the x and y coordinates for the top-left corner, width, and height.
Rectangle rectangle = new Rectangle(100, 350, 500, 200); - Use the DrawRectangle() function to draw the rectangle. Instead of passing the x, y, width, and height like before, you can use the Rectangle object instead.
e.Graphics.DrawRectangle(redPen, rectangle); - Press the green play button at the top of Visual Studio to see the changes.

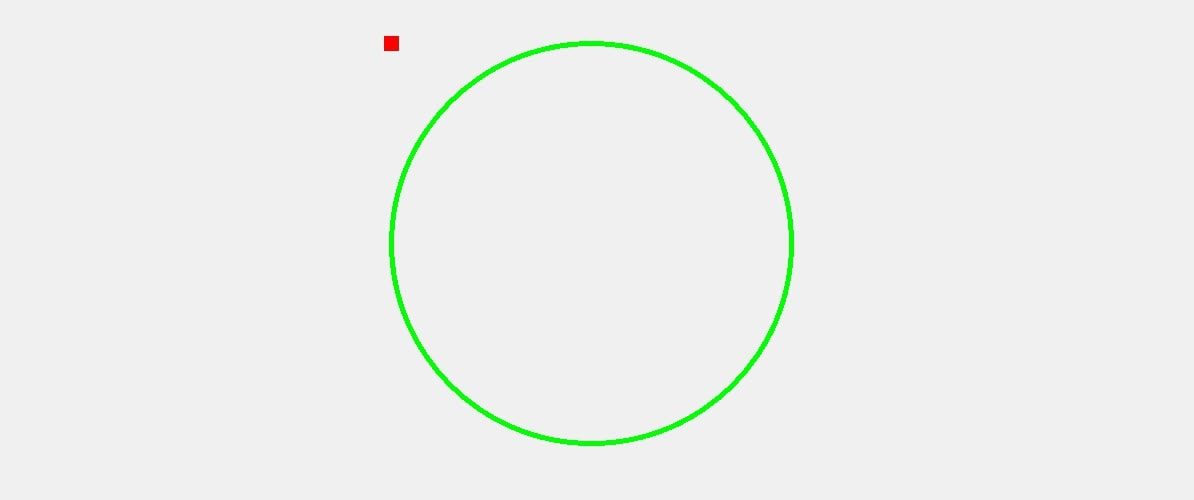
- Go back to the code to draw other shapes. Use the DrawEllipse() function to draw a circle.
 Color green = Color.FromArgb(255, 0, 255, 0);
Pen greenPen = new Pen(green);
greenPen.Width = 5;
e.Graphics.DrawEllipse(greenPen, 400, 150, 400, 400);
When you draw a circle, the x and y coordinates (x=400, y=150) refer to the top-left corner of the circle, not the center of the circle.

- To draw other shapes such as triangles or hexagons, use the DrawPolygon() method. Here you can specify a list of coordinates to represent the points of the shape.
 Color blue = Color.FromArgb(255, 0, 0, 255);
Pen bluePen = new Pen(blue);
bluePen.Width = 5;PointF[] coordinatesForTriangle = new PointF[] {
    new PointF(400, 150),
    new PointF(300, 300),
    new PointF(500, 300)
};e.Graphics.DrawPolygon(bluePen, coordinatesForTriangle);
The DrawPolygon() method will draw lines between the points specified.


How to Use the Brush Class to Fill In Shapes With Color
You can use the FillRectangle(), FillEllipses() or FillTriangle() methods to create shapes with a solid color.
- First, create a brush object.
 Color purple = Color.FromArgb(255, 128, 0, 0);
SolidBrush solidBrush = new SolidBrush(purple); - Use the FillRectangle(), FillEllipses() or FillTriangle() methods. They work the same way as the draw functions above, except instead of a Pen, they use a Brush object.
 e.Graphics.FillRectangle(solidBrush, 50, 50, 200, 250);
e.Graphics.FillEllipse(solidBrush, 300, 50, 200, 200);
e.Graphics.FillPolygon(solidBrush, new PointF[] { new PointF(700, 150), new PointF(600, 300), new PointF(800, 300) });
- You can also input a shape object directly instead of providing coordinates.
 Rectangle rectangle = new Rectangle(100, 350, 500, 200);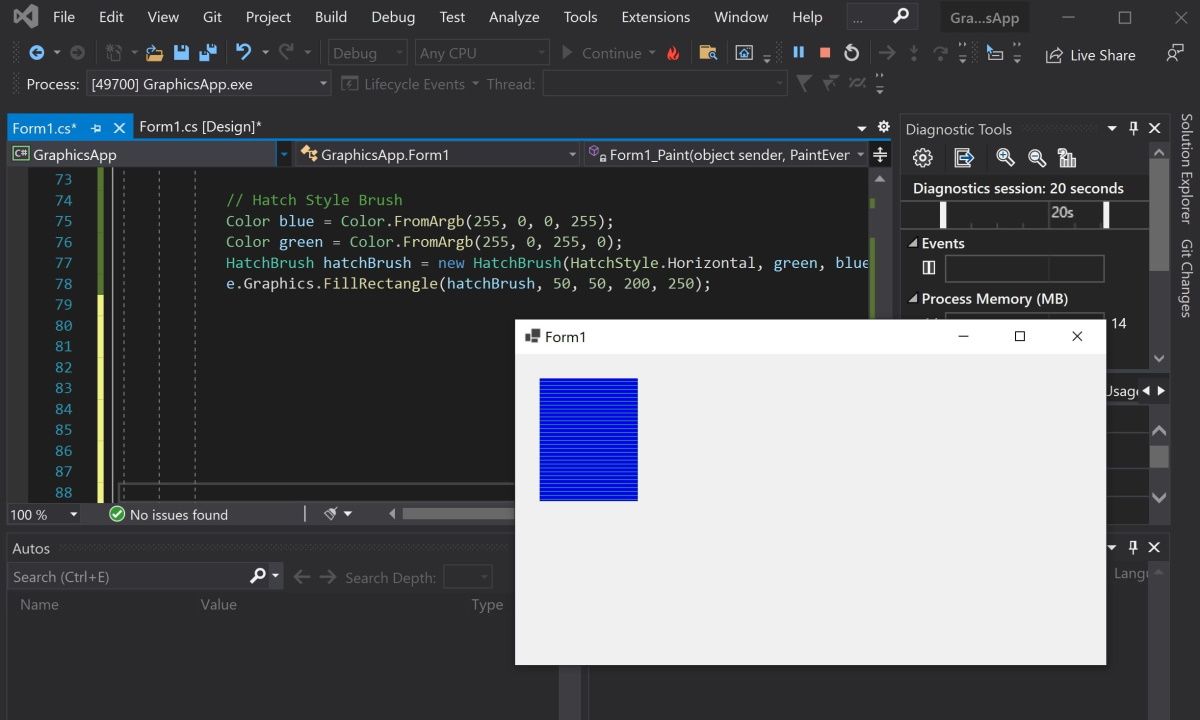
e.Graphics.FillRectangle(solidBrush, rectangle); - Use the HatchBrush to fill the shape using a different fill style, such as a horizontal or vertical pattern.
 Color blue = Color.FromArgb(255, 0, 0, 255);
Color green = Color.FromArgb(255, 0, 255, 0);
HatchBrush hatchBrush = new HatchBrush(HatchStyle.Horizontal, green, blue);
e.Graphics.FillRectangle(hatchBrush, 50, 50, 200, 250);
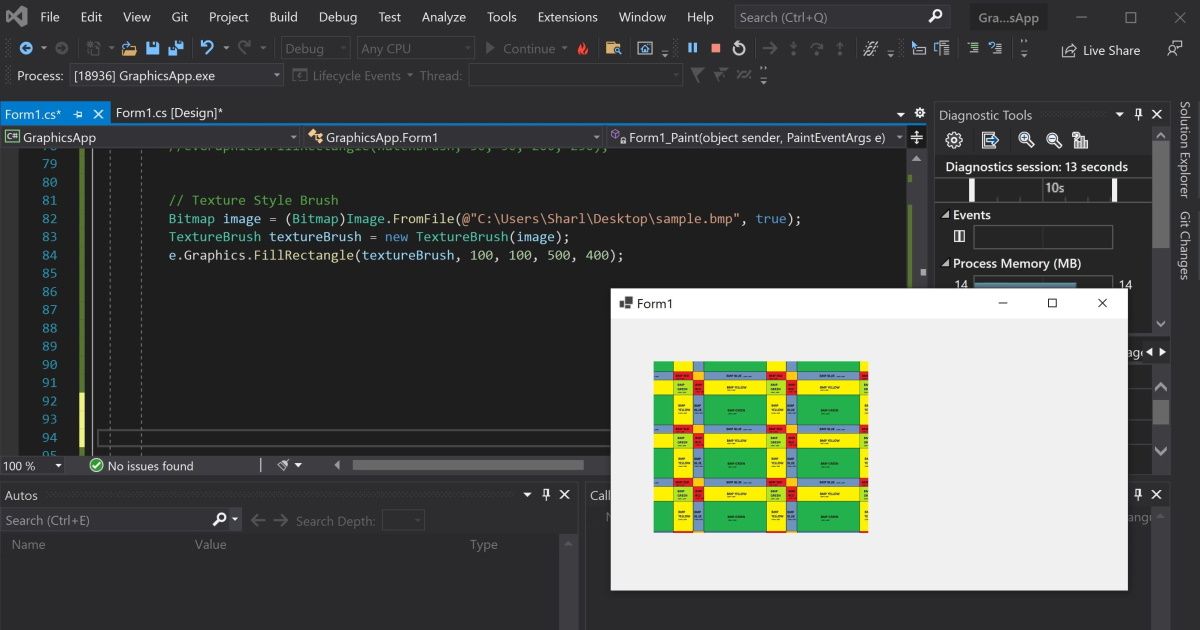
- You can use the TextureBrush to fill a shape using an image. Here, create a bitmap by pointing to an image file. Instead of creating a brush using a color, create it using the image.
 Bitmap image = (Bitmap)Image.FromFile(@"C:UsersSharlDesktopflag.bmp", true);
TextureBrush textureBrush = new TextureBrush(image);
e.Graphics.FillRectangle(textureBrush, 100, 100, 500, 400);

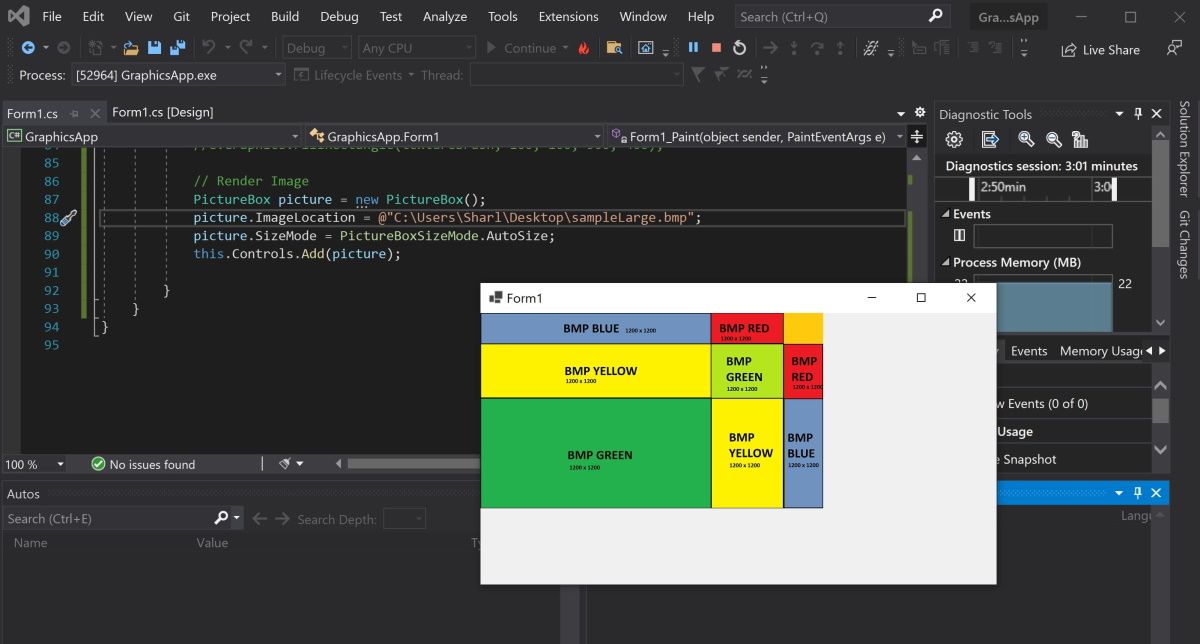
How to Render Images Onto the Form
To render an image, create a PictureBox control object and add it to the form.
- Create a PictureBox control object using an image file.
 PictureBox picture = new PictureBox();
picture.ImageLocation = @"C:UsersSharlDesktopflagLarge.bmp"; - Set the size of the image and add it onto the form so it renders.
 picture.SizeMode = PictureBoxSizeMode.AutoSize;
this.Controls.Add(picture); - Press the green start button at the top to view the image.

Adding More Shapes to Your Windows Form
You should now understand how to add lines, shapes, and images to your Windows form. You can combine shapes to create new shapes. You can also play around with the built-in functions to create more complex shapes.
See how you can draw shapes, use colors, and render images in a WinForms app.
Windows Forms is a framework that lets you build desktop applications. You can click and drag components like buttons onto a visual user interface. It also helps you manually create various shapes within your code.
This article will show you how to add lines, shapes, and images to your application. This tutorial uses the Visual Studio 2019 Community Edition to show examples.
What Are the Built-In Classes Used for Drawing Graphics?
Windows Forms uses the C# programming language. Its built-in classes and methods allow you to draw various shapes onto a Windows Form canvas. These include the Graphics, Pen, Color, and Brush classes.
|
Class |
Description |
|---|---|
|
Graphics |
The Graphics class allows you to draw shapes and lines onto the canvas. It includes methods such as:
|
|
Pen |
The Pen class allows you to specify the properties of a ‘pen’ tip which you can use to draw your shapes. You can specify properties such as color, thickness, or dash style. Methods include:
|
|
Color |
A color object made up of R (red), G (green), and B (blue) values. You will need a color object for many of the built-in methods that create shapes. |
|
SolidBrush, HatchBrush, TextureBrush |
These brush classes derive from the «Brush» interface. These classes allow you to color in blank spaces on the canvas. You can also choose to fill the spaces using different patterns or textures. You can specify properties such as the color. |
|
Rectangle, Line, Polygon, Ellipse |
You can create objects based on these shapes, and use them when calling methods such as DrawRectangle(). Instead of passing the x, y, width, and height as arguments, you can choose to pass an existing Rectangle object instead. |
To view the source code for a running example of the above tutorial, visit the GitHub repository. You can try out the following examples once you’ve created a Winforms application.
How to Add a Paint on Form Load Event Handler
First, add an event handler to draw shapes when the canvas loads.
- Add a Paint function for the form.
 private void Form1_Paint(object sender, PaintEventArgs e)
{
    // Code goes here
} - Go into the Design View Tab.
- In the Properties window, select the lightning icon to open the «Events» tab.
- In «Paint», under «Appearance», select the Form1_Paint function. This will execute the function when you run the application.
How to Draw Lines Onto a Windows Form Canvas
You can use a Color, Pen, and the DrawLine() method to draw lines on a canvas.
- Inside the Form1_Paint() function, create a Color object with the color you want the line to be. Then, create a Pen object to draw the line with.
 Color black = Color.FromArgb(255, 0, 0, 0);
Pen blackPen = new Pen(black); - The DrawLine() method from the Graphics class will draw a line using the pen. This will start drawing a line from an x, y position to another x, y position.
e.Graphics.DrawLine(blackPen, 300, 200, 800, 200); - You can modify the properties for the pen object to change its width, dash style, and start or end cap.
 blackPen.Width = 20;
blackPen.DashStyle = System.Drawing.Drawing2D.DashStyle.Dash;
blackPen.StartCap = System.Drawing.Drawing2D.LineCap.ArrowAnchor;
e.Graphics.DrawLine(blackPen, 300, 200, 800, 200); - Press the green play button at the top of Visual Studio to see the changes.
How to Draw Shapes Such as Rectangles and Circles
You can use the shapes classes for different shapes, or draw shapes manually onto the canvas.
- Create a Color and Pen object as shown in the previous steps. Then, use the DrawRectangle() method to create the rectangle. The arguments are the x and y coordinates for the top-left of the rectangle, along with its width and height.
 Color red = Color.FromArgb(255, 255, 0, 0);
Pen redPen = new Pen(red);
redPen.Width = 5;
e.Graphics.DrawRectangle(redPen, 100, 100, 500, 200); - You can also create a rectangle using the Rectangle Class. First, create a Rectangle object. The arguments are also the x and y coordinates for the top-left corner, width, and height.
Rectangle rectangle = new Rectangle(100, 350, 500, 200); - Use the DrawRectangle() function to draw the rectangle. Instead of passing the x, y, width, and height like before, you can use the Rectangle object instead.
e.Graphics.DrawRectangle(redPen, rectangle); - Press the green play button at the top of Visual Studio to see the changes.
- Go back to the code to draw other shapes. Use the DrawEllipse() function to draw a circle.
 Color green = Color.FromArgb(255, 0, 255, 0);
Pen greenPen = new Pen(green);
greenPen.Width = 5;
e.Graphics.DrawEllipse(greenPen, 400, 150, 400, 400);
When you draw a circle, the x and y coordinates (x=400, y=150) refer to the top-left corner of the circle, not the center of the circle.
- To draw other shapes such as triangles or hexagons, use the DrawPolygon() method. Here you can specify a list of coordinates to represent the points of the shape.
 Color blue = Color.FromArgb(255, 0, 0, 255);
Pen bluePen = new Pen(blue);
bluePen.Width = 5;PointF[] coordinatesForTriangle = new PointF[] {
    new PointF(400, 150),
    new PointF(300, 300),
    new PointF(500, 300)
};e.Graphics.DrawPolygon(bluePen, coordinatesForTriangle);
The DrawPolygon() method will draw lines between the points specified.
How to Use the Brush Class to Fill In Shapes With Color
You can use the FillRectangle(), FillEllipses() or FillTriangle() methods to create shapes with a solid color.
- First, create a brush object.
 Color purple = Color.FromArgb(255, 128, 0, 0);
SolidBrush solidBrush = new SolidBrush(purple); - Use the FillRectangle(), FillEllipses() or FillTriangle() methods. They work the same way as the draw functions above, except instead of a Pen, they use a Brush object.
 e.Graphics.FillRectangle(solidBrush, 50, 50, 200, 250);
e.Graphics.FillEllipse(solidBrush, 300, 50, 200, 200);
e.Graphics.FillPolygon(solidBrush, new PointF[] { new PointF(700, 150), new PointF(600, 300), new PointF(800, 300) }); - You can also input a shape object directly instead of providing coordinates.
 Rectangle rectangle = new Rectangle(100, 350, 500, 200);
e.Graphics.FillRectangle(solidBrush, rectangle); - Use the HatchBrush to fill the shape using a different fill style, such as a horizontal or vertical pattern.
 Color blue = Color.FromArgb(255, 0, 0, 255);
Color green = Color.FromArgb(255, 0, 255, 0);
HatchBrush hatchBrush = new HatchBrush(HatchStyle.Horizontal, green, blue);
e.Graphics.FillRectangle(hatchBrush, 50, 50, 200, 250); - You can use the TextureBrush to fill a shape using an image. Here, create a bitmap by pointing to an image file. Instead of creating a brush using a color, create it using the image.
 Bitmap image = (Bitmap)Image.FromFile(@"C:UsersSharlDesktopflag.bmp", true);
TextureBrush textureBrush = new TextureBrush(image);
e.Graphics.FillRectangle(textureBrush, 100, 100, 500, 400);
How to Render Images Onto the Form
To render an image, create a PictureBox control object and add it to the form.
- Create a PictureBox control object using an image file.
 PictureBox picture = new PictureBox();
picture.ImageLocation = @"C:UsersSharlDesktopflagLarge.bmp"; - Set the size of the image and add it onto the form so it renders.
 picture.SizeMode = PictureBoxSizeMode.AutoSize;
this.Controls.Add(picture); - Press the green start button at the top to view the image.
Adding More Shapes to Your Windows Form
You should now understand how to add lines, shapes, and images to your Windows form. You can combine shapes to create new shapes. You can also play around with the built-in functions to create more complex shapes.
In the previous lesson, Birthday Reminder — Storing Data and Conclusion, we finished creating the birthday
reminder. We tried the basic form controls on it, as well as bindings and error
handling. We are already able to create quite sophisticated applications. In
today’s C# .NET tutorial we’re going to take a look at drawing.
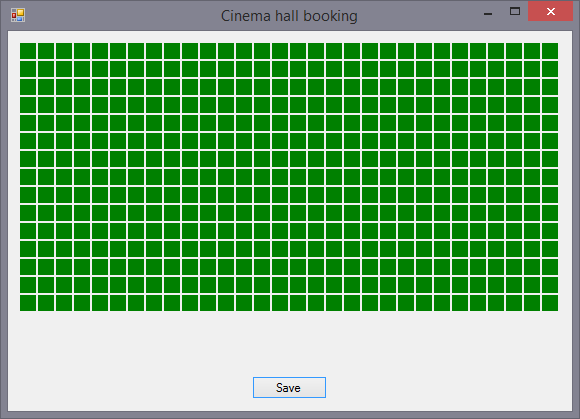
Drawing on Graphics
We’ll create an application that takes care of selling cinema tickets. As we
know, there are many seats in the cinema hall, and the cinema worker should be
able to see in the application which seats are already occupied. You might think
of clicking a PictureBox for each seat. However, if the cinema had
15 rows with 30 seats each, we’d have 450 PictureBox. You probably
guess there should be a better way than to start typing
PictureBox1, PictureBox2, … And how those would be
handled then? In case we need to render something more complex than just one or
two pictures, we use Graphics. The principle is we place a
single PictureBox on the form and draw what we need on its
canvas.
We’ll simplify the application considerably, it doesn’t need to be
complicated. It’ll be able to display a single hall only, which will be
initially empty. The user will click the seats to make them occupied using the
mouse, and then they will press the Save button, which will create a simple text
file at the selected location. The file will contain information about the
occupancy of the hall. The reason of saving the data is to learn how to work
with dialogues.
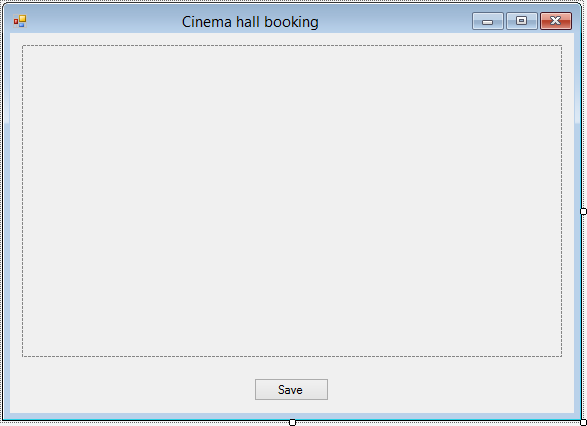
Form Design
Create a new Windows Forms Application, rename the form to
CinemaForm, the title could be Cinema hall booking.
Add a PictureBox to cover most of the form and name it as
cinemaPictureBox. Below the PictureBox, place a
Button with the saveButton name and the
Save text. Finally, we’ll drag SaveFileDialog onto the
form. This control won’t be placed directly on the form, but in a bar below it,
because it’s not an actual form control, but merely a helper component. We’ll
rename it to cinemaSaveFileDialog. You can play with the anchors as
you want. Your form should look like this:
Logic Layer
You’re probably not surprised that we’ll add a Cinema class.
It’ll have a single private field, a two-dimensional
array of seats. If you haven’t worked with a 2D array yet, you can think of
it as a table. A one-dimensional (classic) array is just a single row. With the
2D array we work exactly the same as with the one-dimensional array, except that
we have to specify two coordinates (X and Y). In many languages, 2D arrays are
created as array of arrays, but C# allows us to declare 2D arrays directly as
follows:
class Cinema
{
    private bool[,] seats = new bool[30, 15];

}
The seats are of the bool type, because we only care whether
it’s vacant or occupied. 30 is the width of the array,
15 is the height.
We’ll also add 2 private constants to the class, one defining the size of
rendered seats in pixels, and the other one defining the space between the seats
in pixels. Get used to constants, because when you’ll want to resize the seats,
you’ll just change the value of a constant without having to mess with the
rendering code.
private const int size = 16;
private const int space = 2;
We can now move to methods.
Rendering
The cinema hall should be able to render itself. We’ve already mentioned that
we’ll draw on a canvas. This canvas is of the Graphics type, and
we’ll request it as a Draw() method parameter. You need to add
using System.Drawing for the Graphics type to use, but
it certainly didn’t surprise you. We draw on the canvas using its methods. For
now, we’ll be interested only in the FillRectangle() method, which
draws a rectangle filled with a specific color. There are a lot of methods for
different geometric shapes, both filled or unfilled. You can check them out,
we’ll try some of them in following lessons.
In Graphics, there are two types of color — the fill color
(Brush) and the outline color (Pen). For the filled
rectangle we have to specify a Brush. Already created instances set
to certain colors can be found in the static Brushes class (or
Pens for outlines, respectively), you can choose. Brushes can also
draw patterns or pictures, but that isn’t important to us right now.
Using two nested loops, we’ll go through all the seats in the array and draw
either a green or a red square on the canvas. We’ll go through the rows using
the outer loop, and through the columns in the current row using the inner loop.
We’ll determine the color (the brush, more precisely) by whether the seat at the
given coordinates is true or false. The method code
will be as follows:
public void Draw(Graphics g)
{
    Brush brush;
    for (int j = 0; j < seats.GetLength(1); j++)
    {
        for (int i = 0; i < seats.GetLength(0); i++)
        {
            if (seats[i, j])
                brush = Brushes.Red;
            else
                brush = Brushes.Green;
            g.FillRectangle(brush, i * (size + space), j * (size + space), size, size);
        }
    }
}
Notice that we didn’t hard-code the values 30 and
15 in the loops, but we use the GetLength() method
instead with parameters 0 and 1. This method is used
to get the size of a two-dimensional array. 0 is the width,
1 is the height (of course, it depends on us which dimension we
choose to represent the height and which dimension the width). Of course, we
don’t specify a fixed size because in the future we may increase/decrease the
array size, and we don’t want to have to look in the entire code to find where
we use the values 30 and 15. It’s always better to
avoid these problems and work with the array length.
It’s worth mentioning the rendering of the rectangle itself. The first
parameter of the FillRectangle() method is the Brush,
which determines the filling color. The other two parameters are the coordinates
of the upper left corner of the rectangle. The last two parameters determine its
height and width. Since each seat is 16 pixels wide + 2 pixels spaced from each
other, we need to multiply its coordinate by that value. For example, if the
i value is 2 (i.e. drawing the third column), we’re
drawing at the X coordinate of 36, instead of 2  The same applies for the Y
coordinate.
Later, you may try replacing the FillRectangle() method with
FillOval(). It works exactly the same, but draws an ellipse. Be
sure to try drawing other shapes after we finish the app.
Wiring the Form and Logic
The base of the logic is done, let’s wire it with the form. Let’s go to the
form code and create a private instance of the cinema hall:
private Cinema cinema = new Cinema();
Now we’ll click the PictureBox and add it the Paint
event handler. You have to do this via the flash icon in the Properties window.
The event is called by the system when the window is to be redrawn. This is, of
course, when we start the application, but also after maximizing the window,
when we move another window over the window of our application, and so on.
In the event handler, we’ll call the Draw() method of the cinema
instance. The canvas is passed as a property of the event parameter. We’ll just
pass it to the logic method that will draw on it.
private void cinemaPictureBox_Paint(object sender, PaintEventArgs e)
{
    cinema.Draw(e.Graphics);
}
We certainly don’t have to be ashamed of the result:
In the next lesson, Handling Clicks at Coordinates in C# .NET, we’ll show how to change the status of a seat by
clicking on it, and we’ll also implement saving. As always, you can download the
project in the attachment below, in case something went wrong.
Did you have a problem with anything? Download the sample application below and compare it with your project, you will find the error easily.
I looked for sample code that was both simple and worked and did not find anything. You do not need offscreen bitmaps or CreateGraphics for this, but you will need to handle tracking the mouse position, drawing to the screen, and adding drawn shapes to a list of shapes as Eric suggests. To handle interactive drawing you need to store the mouse state, initial click position, and current rectangle in your form handler:
bool mouseDown;
Point clickPos;
Rectangle rect;
Then when the user clicks, remember the initial position:
private void MouseDown(object sender, MouseEventArgs e)
{
    mouseDown = true;
    clickPos = e.Location;
    rect = new Rectangle(clickPos, new Size(0, 0));
}
While the user drags with the mouse down, create a rectangle encompassing the start and current location:
private void MouseMove(object sender, MouseEventArgs e)
{
    if (mouseDown)
    {
        this.Invalidate(rect);
        if (e.Location.X > clickPos.X && e.Location.Y > clickPos.Y)
        {
            rect = new Rectangle(clickPos.X, clickPos.Y, e.Location.X - clickPos.X, e.Location.Y - clickPos.Y);
        }
        else if (e.Location.X > clickPos.X && e.Location.Y < clickPos.Y)
        {
            rect = new Rectangle(clickPos.X, e.Location.Y, e.Location.X - clickPos.X, clickPos.Y - e.Location.Y);
        }
        else if (e.Location.X < clickPos.X && e.Location.Y < clickPos.Y)
        {
            rect = new Rectangle(e.Location.X, e.Location.Y, clickPos.X - e.Location.X, clickPos.Y - e.Location.Y);
        }
        else if (e.Location.X < clickPos.X && e.Location.Y > clickPos.Y)
        {
            rect = new Rectangle(e.Location.X, clickPos.Y, clickPos.X - e.Location.X, e.Location.Y - clickPos.Y);
        }

        this.Invalidate(rect);
    }
}
When the user releases the mouse, stop drawing:
private void MouseUp(object sender, MouseEventArgs e)
{
    mouseDown = false;
}
The #1 most important rule in Windows Forms is: only draw to the screen in the Paint event. Never never draw in the MouseMoved event:
private void Paint(object sender, PaintEventArgs e)
{
    e.Graphics.FillRectangle(Brushes.DarkGray, rect);
}
Once you get this working, create a form List<Rectangle> and add the current rectangle in the MouseUp event and draw all rectangles in the Paint event. You might also want to clip your drawing to the panel or window you are drawing in. You can also do some optimizations in MouseMoved to only invalidate the changed screen region, not both the old and new rectangles.
The System.Drawing and GDI + package
The System.Drawing package provides access to GDI + Windows features:
- Drawing surfaces
- Working with graphics and graphical transformations
- Drawing geometric shapes
- Working with images
- Working with text and fonts
- Printing on printer
It consists of several spaces:
- System.Drawing — provides basic classes such as surfaces, pencils, brushes, classes for text painting.
- System.Drawing.Imaging — Provides classes for working with images, pictures and icons, classes for converting to different file formats and for resizing images.
- System.Drawing.Drawing2D — Provides classes for graphical transformations — blends, matrixes, and more.
- System.Drawing.Text — Provides classes for accessing the graphical environment fonts.
- System.Drawing.Printeing — Provides printer printing classes and system dialog boxes for printing.
Class Graphics
The System.Drawing.Graphics class provides an abstract drawing surface. Such a surface may be part of the screen control as well as part of a printer page or other device.
The most common drawing is done in the Paint event handler. If necessary, the graphical appearance of the control is redefined. The provided PaintEventArgs parameter contains the Graphics Object. A graphic object can be created using Control.CreateGraphics(). It must necessarily be released through the finally block or using construction because it is a valuable resource.

Coordinate system
The value for x is the location of the point along the x-axis, if x = 0 this means that the point is at the extreme left of the coordinate system.
The value for y is the location of the point on the y-axis, if y = 0 this means that the point is at the top of the coordinate system.
Example:
A starting point and an end point must be available to draw a line. The starting point is set by the values x1 and y1. The endpoint is set by the values of x2 and y2. In this case x1 = y1 = 75 pixels and x2 = y2 = 275 pixels.
To draw figures in C #, a starting point, an end point, and a Pen control must be available.
Pen control in C# Windows Forms
The most important properties of this control are:
- DashStyle — sets the type of line.
- Color — sets the color of the line.
- Width — sets the line width (in pixels).
- Alignment — sets where to position Pen control over the theoretical line.
C# has the ability to draw text as well. The Font and SolidBrush controls are required to draw text.
The main parameters of the Font Class are:
- FontFamily — Sets the font, for example: «Courier New».
- Font size — sets the font size.
- FontStyle — sets the font style, for example: bold.
The main parameters of the SolidBrush class is:
- Color — sets the color of the brush.
Sample tasks
1) Crete application that draws: circle, square, arch, pie, smiley man, figure by set values and text. Draw in two variants: the first one only with Pen controls and the second one with Pen and Brush controls (where possible). The field should be scaled to 6 parts. Click on the form to generate random colors and numbers and plot the shape.
Solution:
Create new windows Forms Application project and design the form as shown:

Name the controls as follows:
- Radio button „Use only the PEN tool“ – rbPen.
- Radio button „Use both the PEN & BRUSH tools” – rbPenBrush.
- Button „Circle“ – bCircle.
- Button „Rectangle“ – bRectangle.
- Button „Arc and Pie“ – bArcPie.
- Button „Smiley Face“ – bSmilyFace.
- Button „Array of Points“ – bArrayOfPoints.
- Button „Strings“ – bStrings.
- Panel – pDrawingArea.
The shapes will be drawn in the panel. The panel will be divided into 6 equal squares by drawing lines at the beginning of the program. There will be two radio button that will allow the user to choose whether to draw figures with or without fill. On button click it will be checked which of the radio buttons is selected. The bool variables CirclePen, RectanglePen, ArcPiePen, SmileyFacePen, ArrayOfPointsPen, StringsPen, will be set to true if radio button “Use only the PEN tool” is selected, and to false if radio button “Use both the PEN & BRUSH tools” is selected. For every button there is bool variable that will be set to true if the button is clicked. At the end the Refresh() property of the panel will be called. On panel refresh there will be check which button is clicked and the corresponding shapes will be drawn.
Declare all necessary variables as global.
This variables are necessary for setting the style and type of the lines and the fill of the brushes:
Pen myPen = new Pen(Color.Cyan, 3);
Pen myPen2 = new Pen(Color.Cyan, 2);

SolidBrush myBrush = new SolidBrush(Color.Black);

Font drawFont = new Font("Courier New", 10, FontStyle.Bold);
SolidBrush myBrushDrawText = new SolidBrush(Color.Cyan);
string drawString = "";

Graphics graphic;
Rectangle rectangle = new Rectangle();
PaintEventArgs pea;
Positioning variables. They will have two common variables xOrgin and yOrgin. This two variables will serve for general positioning of the shapes.
int xOrgin = 0;
int yOrgin = 0;
int x1 = 0;
int x2 = 0;
int y1 = 0;
int y2 = 0;
int width = 0;
int height = 0;
int startAngle = 0;
int sweepAngle = 0;
int[] polyArrayX;
int[] polyArrayY;
int num = 0;
int xMCoords = 0;
int yMCoords = 0;
The boolean variables that will serve for checking witch button is clicked and whish type of drawing is selected.
bool bCircleClicked = false;
bool bRectangleClicked = false;
bool bArcPieClicked = false;
bool bSmilyFaceClicked = false;
bool bArrayOfPointsClicked = false;
bool bStringsClicked = false;

bool CirclePen = false;
bool RectanglePen = false;
bool ArcPiePen = false;
bool SmilyFacePen = false;
bool ArrayOfPointsPen = false;
bool StringsPen = false;
In the Form1_Load event are initialized the main drawing components and the default selected radio button.
private void Form1_Load(object sender, EventArgs e)
{
   myPen2.Alignment = PenAlignment.Outset;
   graphic = this.CreateGraphics();
   pea = new PaintEventArgs(graphic, rectangle);

   this.Refresh();

   rbPen.Checked = true;
   rbPenBrush.Checked = false;
}
Separate universal function is created for polygon drawing.
private void DrawPolygon(int[] polyArrayX, int[] polyArrayY,
              int polyPointsNum, Pen pen, PaintEventArgs e)
{
   Point[] pts = new Point[polyPointsNum];

   for (int b = 0; b < polyPointsNum; b++)
   {
      pts[b] = new Point(polyArrayX[b], polyArrayY[b]);
   }

   e.Graphics.DrawPolygon(pen, pts);
}
In the Paint event of the panel contains the grid and the checks for that which button is clicked.
private void pDrawingArea_Paint(object sender, PaintEventArgs e)
{
   e.Graphics.SmoothingMode = SmoothingMode.AntiAlias;

   xOrgin = 0;
   yOrgin = 0;

   // Drawing Grid
   x1 = xOrgin + 200;
   y1 = yOrgin + 0;
   x2 = xOrgin + 200;
   y2 = yOrgin + 400;
   e.Graphics.DrawLine(myPen, x1, y1, x2, y2);

   x1 = xOrgin + 400;
   y1 = yOrgin + 0;
   x2 = xOrgin + 400;
   y2 = yOrgin + 400;
   e.Graphics.DrawLine(myPen, x1, y1, x2, y2);

   x1 = xOrgin + 0;
   y1 = yOrgin + 200;
   x2 = xOrgin + 600;
   y2 = yOrgin + 200;
   e.Graphics.DrawLine(myPen, x1, y1, x2, y2);

   if (bCircleClicked)
      DrawingCircle(e);

   if (bRectangleClicked)
      DrawingRectangle(e);

   if (bArcPieClicked)
      DrawingArcPie(e);

   if (bSmilyFaceClicked)
      DrawingSmilyFace(e);

   if (bArrayOfPointsClicked)
      DrawingPolygon(e);

   if (bStringsClicked)
      DrawingStrings(e);
}
The functions for drawing the different shapes:
Circle
To draw a circle initial point must be set, by the variables x1 and y1, width and height for size of the circle, and a Pen control.
private void DrawingCircle(PaintEventArgs e)
{
    xOrgin = 0;
    yOrgin = 0;
    x1 = xOrgin + 40;
    y1 = yOrgin + 40;
    width = 80;
    height = 80;

    if (CirclePen == true)
        e.Graphics.DrawEllipse(myPen2, x1, y1, width, height);
    else
    {
        e.Graphics.DrawEllipse(myPen2, x1, y1, width, height);
        e.Graphics.FillEllipse(myBrush, x1, y1, width, height);
    }
}
Square
To draw a square initial point must be set, by the variables x1 and y1, width and height for size of the circle, and a Pen control.
private void DrawingRectangle(PaintEventArgs e)
{
    xOrgin = 200;
    yOrgin = 0;
    x1 = xOrgin + 40;
    y1 = yOrgin + 40;
    width = 80;
    height = 80;

    if (RectanglePen == true)
        e.Graphics.DrawRectangle(myPen2, x1, y1, width, height);
    else
    {
        e.Graphics.DrawRectangle(myPen2, x1, y1, width, height);
        e.Graphics.FillRectangle(myBrush, x1, y1, width, height);
    }
}
Arc and Pie
To draw this shapes initial point must be set, width and height, start and end angles and a Pen control are necessary.
private void DrawingArcPie(PaintEventArgs e)
{
    xOrgin = 400;
    yOrgin = 0;
    x1 = xOrgin + 40;
    y1 = yOrgin + 40;
    width = 60;
    height = 60;
    x2 = x1 + width + 20;
    y2 = y1;
    startAngle = 0;
    sweepAngle = 90;

    if (ArcPiePen == true)
    {
        e.Graphics.DrawArc(myPen2, x1, y1, width, height, startAngle, sweepAngle);
        e.Graphics.DrawPie(myPen2, x2, y2, width, height, startAngle, sweepAngle);
    }
    else
    {
        e.Graphics.DrawArc(myPen2, x1, y1, width, height, startAngle, sweepAngle);
        e.Graphics.DrawPie(myPen2, x2, y2, width, height, startAngle, sweepAngle);
        e.Graphics.FillPie(myBrush, x2, y2, width, height, startAngle, sweepAngle);
    }
}
Smiley Face
It drawn with the help of above shapes.
private void DrawingSmilyFace(PaintEventArgs e)
{
    xOrgin = 0;
    yOrgin = 200;
    x1 = xOrgin + 40;
    y1 = yOrgin + 40;
    width = 40;
    height = 40;

    if (SmilyFacePen == true)
    {
        e.Graphics.DrawEllipse(myPen2, x1, y1, width, height);

        x2 = x1 + 8;
        y2 = y1 + 15;
        width = 24;
        height = 20;
        startAngle = 0;
        sweepAngle = 180;

        e.Graphics.DrawArc(myPen2, x2, y2, width, height, startAngle, sweepAngle);

        x1 = x1 + 8;
        y1 = y1 + 10;
        width = 8;
        height = 8;

        e.Graphics.DrawEllipse(myPen2, x1, y1, width, height);

        x1 = x1 + 16;

        e.Graphics.DrawEllipse(myPen2, x1, y1, width, height);
    }
    else
    {
        Pen pen = new Pen(Color.Red, 2);
        SolidBrush solidBrush = new SolidBrush(Color.Yellow);

        e.Graphics.DrawEllipse(myPen2, x1, y1, width, height);
        e.Graphics.FillEllipse(solidBrush, x1, y1, width, height);

        x2 = x1 + 8;
        y2 = y1 + 15;
        width = 24;
        height = 20;
        startAngle = 0;
        sweepAngle = 180;

        e.Graphics.DrawArc(pen, x2, y2, width, height, startAngle, sweepAngle);

        x1 = x1 + 8;
        y1 = y1 + 10;
        width = 8;
        height = 8;

        e.Graphics.DrawEllipse(myPen2, x1, y1, width, height);
        solidBrush.Color = Color.Blue;
        e.Graphics.FillEllipse(solidBrush, x1, y1, width, height);

        x1 = x1 + 16;

        e.Graphics.DrawEllipse(myPen2, x1, y1, width, height);
        e.Graphics.FillEllipse(solidBrush, x1, y1, width, height);
    }
}
Shapes drawn by predefined points
To draw polygon a Pen and array of points must be set.
To draw bezier curves a Pen and a sequence of 4 points must be set.
private void DrawingPolygon(PaintEventArgs e)
{
    int px1, px2, px3;
    int py1, py2, py3;

    Point pt1, pt2, pt3, pt4;
    int x, y;

    xOrgin = 200;
    yOrgin = 200;

    px1 = xOrgin + 40;
    py1 = yOrgin + 40;
    px2 = px1 + 80;
    py2 = py1;
    px3 = px1 + 40;
    py3 = py1 + 45;

    const int pPointsNum = 3;
    polyArrayX = new int[pPointsNum] { px1, px2, px3 };
    polyArrayY = new int[pPointsNum] { py1, py2, py3 };

    x = 300;
    y = 350;
    pt1 = new Point(x - 30, y - 30);
    pt2 = new Point(x - 130, y + 130);
    pt3 = new Point(x + 130, y - 130);
    pt4 = new Point(x + 30, y + 30);

    if (ArrayOfPointsPen == true)
    {
        DrawPolygon(polyArrayX, polyArrayY, pPointsNum, myPen2, e);
        e.Graphics.DrawBezier(myPen2, pt1, pt2, pt3, pt4);
    }
    else
    {
        x1 = xOrgin + 40;
        y1 = yOrgin + 40;

        drawString = "No, no, no ntBambino ntt:(((";
        e.Graphics.DrawString(drawString, drawFont, myBrushDrawText, x1, y1);
    }
}
Text
To draw text the following must be set: the desired text, font, solid brush and start point.
private void DrawingStrings(PaintEventArgs e)
{
    xOrgin = 400;
    yOrgin = 200;
    x1 = xOrgin + 40;
    y1 = yOrgin + 40;
    width = 50;
    height = 50;
    drawString = "Hello ntWorld ntt:)))";

    if (StringsPen == true)
        e.Graphics.DrawString(drawString, drawFont, myBrushDrawText, x1, y1);
    else
    {
        drawString = "Bye Bye ntWorld ntt:(((";
        e.Graphics.DrawString(drawString, drawFont, myBrushDrawText, x1, y1);
    }
}
Here are the click events for the buttons:
private void bCircle_Click(object sender, EventArgs e)
{
    if (rbPenBrush.Checked == true) CirclePen = false;
    else CirclePen = true;

    bCircleClicked = true;
    pDrawingArea.Refresh();
}

private void bRectangle_Click(object sender, EventArgs e)
{
    if (rbPenBrush.Checked == true) RectanglePen = false;
    else RectanglePen = true;

    bRectangleClicked = true;
    pDrawingArea.Refresh();
}

private void bArcPie_Click(object sender, EventArgs e)
{
    if (rbPenBrush.Checked == true) ArcPiePen = false;
    else ArcPiePen = true;

    bArcPieClicked = true;
    pDrawingArea.Refresh();
}

private void bSmilyFace_Click(object sender, EventArgs e)
{
    if (rbPenBrush.Checked == true) SmilyFacePen = false;
    else SmilyFacePen = true;

    bSmilyFaceClicked = true;
    pDrawingArea.Refresh();
}

private void bArrayOfPoints_Click(object sender, EventArgs e)
{
    if (rbPenBrush.Checked == true) ArrayOfPointsPen = false;
    else ArrayOfPointsPen = true;

    bArrayOfPointsClicked = true;
    pDrawingArea.Refresh();
}

private void bStrings_Click(object sender, EventArgs e)
{
    if (rbPenBrush.Checked == true) StringsPen = false;
    else StringsPen = true;

    bStringsClicked = true;
    pDrawingArea.Refresh();
}
Generating color circles with random numbers will be separate function. The function will generate random numbers for each color component (R, G, B). There will be two brushes. One for the color of the circle and one for the contrast color of the text in the circle.
private void DrawingNumDotsRndColor(int xCoords, int yCoords, PaintEventArgs e)
{
    int red, green, blue;

    Random rnd = new Random();
    red = rnd.Next(256);
    green = rnd.Next(256);
    blue = rnd.Next(256);

    SolidBrush myBrushNumDot = new SolidBrush(Color.FromArgb(255, red, green, blue));
    SolidBrush myBrushNumDot2 = new SolidBrush(Color.FromArgb(255, 255 - red, 255 - green, 255 - blue));

    num++;

    x1 = xMCoords;
    y1 = yMCoords;
    width = 20;
    height = 20;
    e.Graphics.FillEllipse(myBrushNumDot, x1, y1, width, height);
    e.Graphics.DrawString(num.ToString(), drawFont, myBrushNumDot2, x1, y1);
}
In the Form1_MouseDown event on mouse click the cursor coordinates will be taken and a random color circle with number will be generated by calling the above function.
private void Form1_MouseDown(object sender, MouseEventArgs e)
{
    xMCoords = e.X;
    yMCoords = e.Y;

    DrawingNumDotsRndColor(xMCoords, yMCoords, pea);
}
Self-assignments
1) Draw grid of nine equal squares with size 60×60. Draw the following shapes:
- Line – start point (10,10), end point (40,40);
- Circle – start point (10,70), width: 40, height: 40;
- Rectangle – start point (15, 130), width: 40, height: 30;
- Trapeze – start point (70,20), bases 20 and 40, height: 40;
- Sliced pizza – use the Pie, start point (90, 90);
- Diamond – start point (70, 150), width: 40, height, 40;
- Right-angled triangle – start point (130,10), catheters 40;
- Sinusoid – start point (150, 70)

2) Draw coordinate axis and graphic by the following points:
- 0,0
- 90,20
- 160,35
- 240,50
- 320,80
- 360,120
- 375,160,
- 390,250
- 400,480
|
gorbunov-anton 2 / 2 / 1 Регистрация: 28.03.2014 Сообщений: 56 |
||||
|
1 |
||||
|
29.10.2014, 21:15. Показов 53482. Ответов 32 Метки нет (Все метки)
Нужно нарисовать в Form геометрическую фигуру. Я думаю что рисовать нужно на каком-то объекте я взял PictureBox и попытался рисовать на нем, но вышли ошибки, может я что-то не так сделал и есть другие объекты для рисования на них? И еще после того как я нарисовал пробную линию она через несколько секунд исчезла, как сделать чтобы нарисованный объект не исчезал. Вот мой код:
__________________
0 |

|
zna926 546 / 477 / 315 Регистрация: 24.09.2013 Сообщений: 3,345 Записей в блоге: 1 |
||||
|
29.10.2014, 23:55 |
3 |
|||
|
Привожу код построения, например, эллипса. Аналогично можно строить прямоугольники, многоугольники и пр.
0 |
|
1087 / 830 / 490 Регистрация: 09.04.2014 Сообщений: 1,966 |
|
|
30.10.2014, 00:02 |
4 |
|
я нарисовал пробную линию она через несколько секунд исчезла, как сделать чтобы нарисованный объект не исчезал.
Аналогично можно строить прямоугольники, многоугольники и пр. Аналогично исчезнут Слушайте ViterAlex, он дело говорит
0 |

|
gorbunov-anton 2 / 2 / 1 Регистрация: 28.03.2014 Сообщений: 56 |
||||
|
30.10.2014, 16:14 [ТС] |
5 |
|||
|
Я не могу так свободно читать код без объяснения поэтому по этим ссылкам я мало что усвоил для себя. Я вот сам попытался загрузить изображение в PictureBox при загрузке Form. Но у меня не получилось скажите что я сделал не так ?
0 |
|
zna926 546 / 477 / 315 Регистрация: 24.09.2013 Сообщений: 3,345 Записей в блоге: 1 |
||||
|
30.10.2014, 17:40 |
6 |
|||
|
Ошибка в твоем коде, что не указана толщина линии.
0 |
|
2 / 2 / 1 Регистрация: 28.03.2014 Сообщений: 56 |
|
|
30.10.2014, 20:07 [ТС] |
7 |
|
Да не исчезает. Теперь понятно. Но мне нужно рисовать на белом фоне. А для этого я думаю надо использовать PictureBox с Bitmap.
0 |
|
546 / 477 / 315 Регистрация: 24.09.2013 Сообщений: 3,345 Записей в блоге: 1 |
|
|
30.10.2014, 21:08 |
8 |
|
Непонятно, зачем так сложно.
0 |
|
ViterAlex 8924 / 4836 / 1885 Регистрация: 11.02.2013 Сообщений: 10,246 |
||||
|
30.10.2014, 21:40 |
9 |
|||
|
Чувствую, что пора написать FAQ по рисованию на форме. Ну пока так:
На форме только PictureBox и кнопка Добавлено через 1 минуту
у меня не получилось скажите что я сделал не так ? Изображение ты назначил в pictureBox, а рисуешь на форме
1 |
|
2 / 2 / 1 Регистрация: 28.03.2014 Сообщений: 56 |
|
|
30.10.2014, 21:51 [ТС] |
10 |
|
Да у меня курсовая а там кнопки на сером фоне и белый экранчик на котором происходит рисование. Конечно можно в свойствах PictureBox задать белый цвет, но хотел все по умному сделать, правильно, чтобы кодом а не настройками цвет устанавливался. Добавлено через 3 минуты
0 |
|
8924 / 4836 / 1885 Регистрация: 11.02.2013 Сообщений: 10,246 |
|
|
30.10.2014, 22:42 |
11 |
|
Я понимаю что рисую на форме, но для начала я хотел просто изображение загрузить и не получилось. Почему? Не загрузилось? Ошибку выдало? Компьютер сгорел?
0 |
|
gorbunov-anton 2 / 2 / 1 Регистрация: 28.03.2014 Сообщений: 56 |
||||
|
30.10.2014, 23:29 [ТС] |
12 |
|||
|
Ну вот например я пытаюсь просто загрузить изображение на PictureBox
и он пишет:
0 |
|
8924 / 4836 / 1885 Регистрация: 11.02.2013 Сообщений: 10,246 |
|
|
30.10.2014, 23:35 |
13 |
|
Правильно пишет. Потому что ты пытаешься загрузить картинку из файла и сразу указать её размер. Почему ты решил, что это возможно? Такого конструктора Bitmap не имеет. Есть отдельный конструктор по имени файла и отдельный по размеру.
0 |
|
2 / 2 / 1 Регистрация: 28.03.2014 Сообщений: 56 |
|
|
31.10.2014, 09:40 [ТС] |
14 |
|
А эта конструкция что значит ? Миниатюры
0 |

|
2 / 2 / 1 Регистрация: 28.03.2014 Сообщений: 56 |
|
|
03.11.2014, 22:15 [ТС] |
15 |
|
Я вот еще подумал, а что не могу я нарисовать изображение прямо на форме зачем для этого нужен picturebox ?
0 |
|
546 / 477 / 315 Регистрация: 24.09.2013 Сообщений: 3,345 Записей в блоге: 1 |
|
|
03.11.2014, 22:45 |
16 |
|
Используя рикчербокс, можно перемещать изображение на форме.
0 |
|
gorbunov-anton 2 / 2 / 1 Регистрация: 28.03.2014 Сообщений: 56 |
||||
|
03.11.2014, 22:58 [ТС] |
17 |
|||
|
Движение можно создать и на форме заливая одну картинку поверх другой. Почему этот код не работает?
0 |
|
546 / 477 / 315 Регистрация: 24.09.2013 Сообщений: 3,345 Записей в блоге: 1 |
|
|
04.11.2014, 17:27 |
18 |
|
Очень сложно. Нужно менять координаты рикчербокса
0 |
|
2 / 2 / 1 Регистрация: 28.03.2014 Сообщений: 56 |
|
|
04.11.2014, 19:46 [ТС] |
19 |
|
Кое-что у меня получилось. Оказывается причина была еще в том что я неправильно событие назвал. Надо было писать не Form1_Load а Form1_Load_1
0 |
|
zna926 546 / 477 / 315 Регистрация: 24.09.2013 Сообщений: 3,345 Записей в блоге: 1 |
||||
|
04.11.2014, 22:57 |
20 |
|||
|
Думаю, что события тут вообще не нужны. Используется, например, просто форма1, а код движения записывается в
0 |
Нарисуем корабль, например, такой:

Ваши действия:
1) Создайте приложение Windows Forms, namespace = «Кораблик».
2) Размер формы задайте 900х500, на ней разместите визуальный объект для рисования pictureBox1, измените его свойство Dock = Fill; (он займет все пространство формы).
3) Кликнув на компоненте, вы создадите событие pictureBox1.Click и форму для метода обработки этого события pictureBox1_Click ();
4) Не забудьте добавить библиотеку System.Drawing. Ненужные библиотеки можно удалить (нужны всего три: System, System.Windows.Forms и System.Drawing).
5) В окне кода файла Form1.cs получите следующий текст:
using System;
using System.Drawing;
using System.Windows.Forms;
namespace Кораблик
{
public partial class Form1 : Form
{
public Form1()
{
InitializeComponent();
}
private void pictureBox1_Click(object sender, EventArgs e)
{
...
}
}
}
Теперь нам осталось только написать обработчик события, добавленный нами метод pictureBox1_Click ( ), для чего вставим следующие операторы с комментариями:
// Объявляем объект "g" класса Graphics и предоставляем // ему возможность рисования на pictureBox1: Graphics g = pictureBox1.CreateGraphics(); g.Clear(Color.Turquoise); // Создаем объекты-кисти для закрашивания фигур SolidBrush myCorp = new SolidBrush(Color.DarkMagenta); SolidBrush myTrum = new SolidBrush(Color.DarkOrchid); SolidBrush myTrub = new SolidBrush(Color.DeepPink); SolidBrush mySeа = new SolidBrush(Color.Blue); //Выбираем перо myPen желтого цвета толщиной в 2 пикселя: Pen myWind = new Pen(Color.Yellow, 2); // Закрашиваем фигуры g.FillRectangle(myTrub,300,125,75,75); // 1 труба (прямоугольник) g.FillRectangle(myTrub,480,125,75,75); // 2 труба (прямоугольник) g.FillPolygon(myCorp, new Point[] // корпус (трапеция) { new Point(100,300),new Point(700,300), new Point(700,300),new Point(600,400), new Point(600,400),new Point(200,400), new Point(200,400),new Point(100,300) } ); g.FillRectangle(myTrum, 250, 200, 350, 100); // палуба (прямоугольник) // Море - 12 секторов-полуокружностей int x = 50; int Radius = 50; while (x <= pictureBox1.Width - Radius) { g.FillPie(mySeа, 0 + x, 375, 50, 50, 0, -180); x += 50; } // Иллюминаторы for (int y = 300; y <= 550; y += 50) { g.DrawEllipse(myWind, y, 240, 20, 20); // 6 окружностей }
В этом примере мы использовали методы класса Graphics: FillRectangle(), FillPolygon(), FillPie() и DrawEllipse(). Найдите их в таблице предыдущей статьи. Кроме того мы используем структуры Point; oбъекты-кисти класса SolidBrush; объект-перо класса Pen. Для рисования волн моря использовался цикл while, для иллюминаторов — цикл for. Полигон задается массивом точек для соединения их сплошной ломаной.
И все, программу можно проверять. Кликнув в окне, сможем увидеть наш кораблик:

Перейдем к следующему примеру «Рисование контура и закраска произвольной области, ограниченной ломаной прямой».
NEW: Наш Чат, в котором вы можете обсудить любые вопросы, идеи, поделиться опытом или связаться с администраторами.
Помощь проекту:
Introduction
GDI+ consists of the set of .NET base classes that are available to control custom drawing on the screen. These classes arrange for the appropriate instructions to be sent to the graphics device drivers to ensure the correct output is placed on the screen. GDI provides a level of abstraction, hiding the differences between different video cards. You simply call on the Windows API function to do the specific task, and internally the GDI figures out how to get the client’s particular video card to do whatever it is you want when they run your particular piece of code.
Not only this, but the client has several display devices — for example — monitors and printers — GDI achieves the task of making the printer look the same onscreen as far as the application is concerned. If the client wants to print something instead of displaying it, your application will simply inform the system that the output device is the printer and then call the same API functions in exactly the same way. As you can see, the device-context (DC) object is a very powerful mechanism. Having said that, we can also use this layer of abstraction to draw onto a Windows Form. This paper will therefore begin with an example of a basic Windows Forms development in order to demonstrate how to draw graphics onto a Windows Form, or a control on that form. The focus of this article will be on graphics.
The Form object is used to represent any Window in your application. When creating a main window, you must follow two mandatory steps:
- Derive a new custom class from System.Windows.Forms.Form
- Configure the application’s Main() method to call System.Windows.Forms.Application.Run(), passing an instance of your new Form derived as a class argument.
Here is an example:
C# File: MyForm.cs
using System;
using System.Windows.Forms;
public class MyForm : System.Windows.Forms.Form
{
public MyForm()
{
Text = "No Graphics";
}
public static void Main()
{
Application.Run(new MyForm());
}
}To compile:
C:WindowsMicrosoft.NETFrameworkv2.050727>csc /target:winexe MyForm.cs
So now we have a blank form. So what do we do to learn how to use graphics? If you use Visual Studio 2005 you probably know that the .NET Framework 2.0 supports partial classes. With Visual Studio 2005, a Windows Form is completely defined with a single C# source file. The code generated by the IDE was separated from your code by using regions, therefore taking advantage of partial classes.
By default, each form named Form111 corresponds to two files; Form111.cs which contains your code and Form111.Designer.cs, which contains the code generated by the IDE. The code, however, is usually generated by dragging and dropping controls. One of the simplest uses for the System.Drawing namespace is specifying the location of the controls in a Windows Forms application. More to the point, user-defined types are often referred to as structures.
To draw lines and shapes you must follow these steps:
-
Create a Graphics object by calling System.Windows.Forms.Control.CreateGraphics method. The Graphics object contains the Windows DC you need to draw with. The device control created is associated with the display device, and also with the Window.
-
Create a Pen object
-
Call a member of the Graphics class to draw on the control using the Pen
Here is an example of a Form with a line drawn at a 60 degree angle from the upper-most left hand corner:
//File: DrawLine.cs
using System;
using System.Drawing;
using System.Drawing.Drawing2D;
using System.Collections;
using System.ComponentModel;
using System.Windows.Forms;
using System.Data;
public class MainForm : System.Windows.Forms.Form
{
private System.ComponentModel.Container components;
public MainForm()
{
InitializeComponent();
CenterToScreen();
SetStyle(ControlStyles.ResizeRedraw, true);
}
// Clean up any resources being used.
protected override void Dispose(bool disposing)
{
if (disposing)
{
if (components != null)
{
components.Dispose();
}
}
base.Dispose(disposing);
}
#region Windows Form Designer generated code
private void InitializeComponent()
{
this.AutoScaleBaseSize = new System.Drawing.Size(5, 13);
this.ClientSize = new System.Drawing.Size(292, 273);
this.Text = "Fun with graphics";
this.Resize += new System.EventHandler(this.Form1_Resize);
this.Paint += new System.Windows.Forms.PaintEventHandler(this.MainForm_Paint);
}
#endregion
[STAThread]
static void Main()
{
Application.Run(new MainForm());
}
private void MainForm_Paint(object sender, System.Windows.Forms.PaintEventArgs e)
{
//create a graphics object from the form
Graphics g = this.CreateGraphics();
// create a pen object with which to draw
Pen p = new Pen(Color.Red, 7); // draw the line
// call a member of the graphics class
g.DrawLine(p, 1, 1, 100, 100);
}
private void Form1_Resize(object sender, System.EventArgs e)
{
// Invalidate(); See ctor!
}
}TO COMPILE:
csc.exe /target:winexe DrawLine.cs
Typically, you specify the Pen class color and width in pixels with the constructor. The code above draws a 7-pixel wide red line from the upper-left corner (1,1,) to a point near the middle of the form (100, 100). Note the following code that draws a pie shape:
//File: DrawPie.cs
using System;
using System.Drawing;
using System.Drawing.Drawing2D;
using System.Collections;
using System.ComponentModel;
using System.Windows.Forms;
using System.Data;
public class MainForm : System.Windows.Forms.Form
{
private System.ComponentModel.Container components;
public MainForm()
{
InitializeComponent();
CenterToScreen();
SetStyle(ControlStyles.ResizeRedraw, true);
}
protected override void Dispose(bool disposing)
{
if (disposing)
{
if (components != null)
{
components.Dispose();
}
}
base.Dispose(disposing);
}
#region Windows Form Designer generated code
//
private void InitializeComponent()
{
this.AutoScaleBaseSize = new System.Drawing.Size(5, 13);
this.ClientSize = new System.Drawing.Size(292, 273);
this.Text = "Fun with graphics";
this.Resize += new System.EventHandler(this.Form1_Resize);
this.Paint += new System.Windows.Forms.PaintEventHandler(this.MainForm_Paint);
}
#endregion
[STAThread]
static void Main()
{
Application.Run(new MainForm());
}
private void MainForm_Paint(object sender, System.Windows.Forms.PaintEventArgs e)
{
//create a graphics object from the form
Graphics g = this.CreateGraphics();
Pen p = new Pen(Color.Blue, 3);
g.DrawPie(p, 1, 1, 100, 100, -30, 60);
}
private void Form1_Resize(object sender, System.EventArgs e)
{
}
}To compile:
csc.exe /target:winexe DrawPie.cs
A structure, or «struct», is a cut-down class that does almost everything a class does, except support inheritance and finalizers. A structure is a composite of other types that make easier to work with related data. The simplest example is System.Drawing.Point, which contain X and Y integer properties that define the horizontal and vertical coordinates of a point.
The Point structure simplifies working with coordinates by providing constructors and members as follows:
// Requires reference to System.Drawing
// Create point
System.Drawing.Point p = new System.Drawing.Point(20, 20);
// move point diagonally
p.Offset(-1, -1)
Console.WriteLine("Point X {0}, Y {1}", p.X, p.Y.);So as the coordinates of a point define its location, this process also specifies a control’s location. Just create a new Point structure by specifying the coordinates relative to the upper-left corner of the form, and use the Point to set the control’s Location property.
Graphics.DrawLines, Graphics.DrawPolygons, and Graphics.DrawRectangles accept arrays as parameters to help you draw more complex shapes:
Here is an example of a polygon, but with its contents filled. Notice the code responsible for filling the shape:
DrawPolygonAndFill.cs
using System;
using System.Drawing;
using System.Drawing.Drawing2D;
using System.Collections;
using System.ComponentModel;
using System.Windows.Forms;
using System.Data;
public class MainForm : System.Windows.Forms.Form
{
private System.ComponentModel.Container components;
public MainForm()
{
InitializeComponent();
CenterToScreen();
SetStyle(ControlStyles.ResizeRedraw, true);
}
protected override void Dispose(bool disposing)
{
if (disposing)
{
if (components != null)
{
components.Dispose();
}
}
base.Dispose(disposing);
}
#region Windows Form Designer generated code
private void InitializeComponent()
{
this.AutoScaleBaseSize = new System.Drawing.Size(5, 13);
this.ClientSize = new System.Drawing.Size(292, 273);
this.Text = "Fun with graphics";
this.Resize += new System.EventHandler(this.Form1_Resize);
this.Paint += new System.Windows.Forms.PaintEventHandler(this.MainForm_Paint);
}
#endregion
[STAThread]
static void Main()
{
Application.Run(new MainForm());
}
private void MainForm_Paint(object sender, System.Windows.Forms.PaintEventArgs e)
{
//create a graphics object from the form
Graphics g = this.CreateGraphics();
Brush b = new SolidBrush(Color.Maroon);
Point[] points = new Point[]
{
new Point(10, 10),
new Point(10, 100),
new Point(50, 65),
new Point(100, 100),
new Point(85, 40)}; // Notice the braces, as used in structures
g.FillPolygon(b, points);
}
}
private void Form1_Resize(object sender, System.EventArgs e)
{
}
}Customizing Pens
The color and size of a pen is specified in the Pen constructor, so you can manipulate the pattern and the endcaps. The endcaps are the end of the line, and you can use them to create arrows and other special effects. While pens by default draw straight lines, their properties can be set to one of these values: DashStyle.Dash, DashStyle.DashDot, DashStyle.DashDotDot, DashStyle.Dot, or DashStyle.Solid. Consider this final example:
UsePen.cs
using System;
using System.Drawing;
using System.Drawing.Drawing2D;
using System.Collections;
using System.ComponentModel;
using System.Windows.Forms;
using System.Data;
public class MainForm : System.Windows.Forms.Form
{
private System.ComponentModel.Container components;
public MainForm()
{
InitializeComponent();
CenterToScreen();
SetStyle(ControlStyles.ResizeRedraw, true);
}
// Clean up any resources being used.
protected override void Dispose(bool disposing)
{
if (disposing)
{
if (components != null)
{
components.Dispose();
}
}
base.Dispose(disposing);
}
#region Windows Form Designer generated code
private void InitializeComponent()
{
this.AutoScaleBaseSize = new System.Drawing.Size(5, 13);
this.ClientSize = new System.Drawing.Size(292, 273);
this.Text = "Learning graphics";
this.Resize += new System.EventHandler(this.Form1_Resize);
this.Paint += new System.Windows.Forms.PaintEventHandler(this.MainForm_Paint);
}
#endregion
[STAThread]
static void Main()
{
Application.Run(new MainForm());
}
private void MainForm_Paint(object sender, System.Windows.Forms.PaintEventArgs e)
{
//create a graphics object from the form
Graphics g = this.CreateGraphics();
// create a Pen object
Pen p = new Pen(Color.Red, 10);
p.StartCap = LineCap.ArrowAnchor;
p.EndCap = LineCap.DiamondAnchor;
g.DrawLine(p, 50, 25, 400, 25);
p.StartCap = LineCap.SquareAnchor;
p.EndCap = LineCap.Triangle;
g.DrawLine(p, 50, 50, 400, 50);
p.StartCap = LineCap.Flat;
p.EndCap = LineCap.Round;
g.DrawLine(p, 50, 75, 400, 75);
p.StartCap = LineCap.RoundAnchor;
p.EndCap = LineCap.Square;
g.DrawLine(p, 50, 100, 400, 100);
}
private void Form1_Resize(object sender, System.EventArgs e)
{
// Invalidate(); See ctor!
}
}The basics underlying principles in this paper indicate the location and size of points so that they for a line or a shape. This should the new developer to understand that these principles can be expanded upon to specify the size and location of controls that are dragged and dropped onto a Windows Form. For instance, if we were to start Visual Studio 2005 and begin a Forms application, we could set that Form background color to white. The designer file and the source file that comprise the application would both reflect that property: the setting of the property would cause the IDE to generate the code in the Form.Designer.cs file. Well, that all for now.
DrawLine.cs
using System;
using System.Drawing;
using System.Drawing.Drawing2D;
using System.Collections;
using System.ComponentModel;
using System.Windows.Forms;
using System.Data;
public class MainForm : System.Windows.Forms.Form
{
private System.ComponentModel.Container components;
public MainForm()
{
InitializeComponent();
CenterToScreen();
SetStyle(ControlStyles.ResizeRedraw, true);
}
// Clean up any resources being used.
protected override void Dispose(bool disposing)
{
if (disposing)
{
if (components != null)
{
components.Dispose();
}
}
base.Dispose(disposing);
}
#region Windows Form Designer generated code
private void InitializeComponent()
{
this.AutoScaleBaseSize = new System.Drawing.Size(5, 13);
this.ClientSize = new System.Drawing.Size(292, 273);
this.Text = "Learning graphics";
this.Resize += new System.EventHandler(this.Form1_Resize);
this.Paint += new System.Windows.Forms.PaintEventHandler(this.MainForm_Paint);
}
#endregion
[STAThread]
static void Main()
{
Application.Run(new MainForm());
}
private void MainForm_Paint(object sender, System.Windows.Forms.PaintEventArgs e)
{
//create a graphics object from the form
Graphics g = this.CreateGraphics();
// create a pen object with which to draw
Pen p = new Pen(Color.Red, 7);
// draw the line
g.DrawLine(p, 1, 1, 100, 100);
}
private void Form1_Resize(object sender, System.EventArgs e)
{
// Invalidate(); See ctor!
}
}Приветствую всех, ниже я продемонстрирую вариант того как можно реализовать простенькую программу для рисования на C#
Шаг 1:
Создаем проект Windows Form приложения.
Шаг 2:
Мы будем использовать события формы, MouseMove, MouseDown и MouseUp.
Шаг 3:
Исходный код программы:
|
1 2 3 4 5 6 7 8 9 10 11 12 13 14 15 16 17 18 19 20 21 22 23 24 25 26 27 28 29 30 31 32 33 34 35 36 37 38 39 40 41 42 43 44 45 46 47 48 49 50 51 52 53 54 |
using System; using System.Collections.Generic; using System.ComponentModel; using System.Data; using System.Drawing; using System.Linq; using System.Text; using System.Threading.Tasks; using System.Windows.Forms; namespace Приложения_для_рисования { public partial class Form1 : Form //www.nookery.ru { public Form1() { InitializeComponent(); } bool drw; int beginX, beginY; private void Form1_MouseUp(object sender, MouseEventArgs e) { drw = false; } private void Form1_MouseDown(object sender, MouseEventArgs e) { drw = true; beginX = e.X; beginY = e.Y; } private void Form1_MouseMove(object sender, MouseEventArgs e) { Graphics g = this.CreateGraphics(); Pen p = new Pen(Color.White, 4); Point point1 = new Point(beginX, beginY); Point point2 = new Point(e.X, e.Y); if (drw == true) { g.DrawLine(p, point1, point2); beginX = e.X; beginY = e.Y; } } private void Form1_Load(object sender, EventArgs e) { this.Text = «www.nookery.ru»; this.BackColor = Color.Black; } } } |