
Studio
Roblox Studio is available on Windows and Mac
Make Anything You Can Imagine
With our FREE and immersive creation engine
Make Anything
Roblox Studio lets you create anything and release with one click to smartphones, tablets, desktops, consoles, and virtual reality devices

Reach Millions of Players
Connect with a massive audience by tapping into an incredibly enthusiastic and international community of over 50 million daily players
What Our Creators Are Saying


I enjoy creating games on Roblox because it’s social. It takes the socialization of platforms like Facebook to a new level with the games and creativity of the community.
— Jackson Munsell

Roblox was so easy to get into. You can have a whole career on it because it’s such a hot platform and the team there is always providing great resources for developers.
— Alex Balfanz

Documentation
The documentation is your one-stop shop for learning how to make anything you can imagine on Roblox. Use a wide set of tutorials and browse our API references.
Continue to Documentation
Содержание
- Studio
- Make Anything
- Reach Millions of Players
- What Our Creators Are Saying
- Developer Hub
- Roblox Studio is FREE! Try it out today!
- Thanks for visiting Roblox
- Studio
- Make Anything
- Reach Millions of Players
- What Our Creators Are Saying
- Developer Hub
- Roblox Studio is FREE! Try it out today!
- Thanks for visiting Roblox
- Программа для создания карт Роблокс Студио
- Технические характеристики
- Минимальные требования:
- Описание программы
- Вводный урок
- Roblox Studio Overview
- Studio Interface
- Menu Bar
- Ribbon Bar
- Game Editor Window
- Explorer Window
- Properties Window
- Asset Manager
- Toolbox
- Quick Open
- Moving the Camera
- Saving and Publishing
- Playtesting
- Customizing Studio
- Studio Theme
- Moving Windows
- Quick Access Toolbar
- Studio Shortcuts
- Explorer Window
- Properties Window
- Saving and Publishing
- Games vs. Places
- Publishing to Roblox
- Local Saves
- Customizing Studio
- Dark Theme
- Moving Windows
- Quick Access Toolbar
- Studio Shortcuts
- How this site use cookies
- Roblox Studio for Windows
- Softonic review
- Free game development program
- Is Roblox Studio free?
- Manage the virtual workspace
- What script does Roblox use?
- How do you make your own game in Roblox?
- Alternative game building tools
- Personalize content for profit
Studio
With our FREE and immersive creation engine

Make Anything
Roblox Studio lets you create anything and release with one click to smartphones, tablets, desktops, consoles, and virtual reality devices
Reach Millions of Players
Connect with a massive audience by tapping into an incredibly enthusiastic and international community of over 50 million monthly players
What Our Creators Are Saying
I enjoy creating games on Roblox because it’s social. It takes the socialization of platforms like Facebook to a new level with the games and creativity of the community.
Roblox was so easy to get into. You can have a whole career on it because it’s such a hot platform and the team there is always providing great resources for developers.
Developer Hub
The Developer Hub is your one-stop shop for publishing on Roblox. Learn from a wide set of tutorials, connect with other developers, get platform updates, browse our API references, and much more.
Roblox Studio is FREE! Try it out today!

Check Remember my choice and click  in the dialog box above to join experiences faster in the future!
Thanks for visiting Roblox
Click RobloxPlayer.exe to run the Roblox installer, which just downloaded via your web browser.

Click Run when prompted by your computer to begin the installation process.

Click Ok once you’ve successfully installed Roblox.

After installation, click Join below to join the action!
Источник
Studio
With our FREE and immersive creation engine
Make Anything
Roblox Studio lets you create anything and release with one click to smartphones, tablets, desktops, consoles, and virtual reality devices
Reach Millions of Players
Connect with a massive audience by tapping into an incredibly enthusiastic and international community of over 50 million monthly players
What Our Creators Are Saying
I enjoy creating games on Roblox because it’s social. It takes the socialization of platforms like Facebook to a new level with the games and creativity of the community.
Roblox was so easy to get into. You can have a whole career on it because it’s such a hot platform and the team there is always providing great resources for developers.
Developer Hub
The Developer Hub is your one-stop shop for publishing on Roblox. Learn from a wide set of tutorials, connect with other developers, get platform updates, browse our API references, and much more.
Roblox Studio is FREE! Try it out today!
Check Remember my choice and click in the dialog box above to join experiences faster in the future!
Thanks for visiting Roblox
Click RobloxPlayer.exe to run the Roblox installer, which just downloaded via your web browser.
Click Run when prompted by your computer to begin the installation process.
Click Ok once you’ve successfully installed Roblox.
After installation, click Join below to join the action!
Источник
Программа для создания карт Роблокс Студио
Роблокс Студия – это дополнительное программное обеспечение, необходимое для создания собственных карт в игре. Обладает широким функционалом и уже готовыми возможностями.
Чтобы создавать собственные плейсы или редактировать какие-либо объекты, пользователь должен обладать базовыми знаниями в программировании на C++ или увлекаться разработкой 3D-моделями.
Название
Операционная система Разрядность Версия
Скачать
Технические характеристики
Требования для Студио такие же, как у самой игры. Приложение требует поддержки 3D-проработки графики, ровно также, как и сам Роблокс.
Минимальные требования:
Максимальные характеристики включают в себя увеличенное количество оперативной памяти от 1 Гб, что подходит для разработки и создания моделей.
Содержание:
Описание программы
Приложение имеет собственную программную строку и 3D-площадку для создания различных локаций. Пользователь может самостоятельно настроить объекты, соорудить здания и придать им различные свойства. Привязка к определенному объекту выполняется при помощи программного кода или иначе «диалога». Благодаря такой возможности, можно самостоятельно настроить различные предметы и позволить игрокам взаимодействовать вместе с ними.
ПО идет как дополнение к основной игре, поэтому при установке игры – вы сразу же получаете Студию для разработки. На официальном сайте будущий разработчик может ознакомиться с функционалом приложения, а также с мануалами, которые выполнены в видеоформате. Программа обладает панелью быстрого доступа, функциональными клавишами и широкими возможностями для тех, кто планирует самостоятельно создавать игровые площадки.
Пользователь может создать множество карт, но только одна из них будет активна.
Доступ к бесчисленному количеству плейсов есть у тех игроков, которые приобрели для себя статус VIP. Чаще всего, разработкой занимаются целый студии, которые предоставляют Роблоксу права на использование своего продукта. Создание карт приносит относительно серьезный доход, особенно, если настроить на карте систему микротранзакций или платного входа.
Вводный урок
Чтобы начать действительно создавать свои площадки, нужно разобраться с основными параметрами и инструментами. Пользователь может сразу же воспользоваться уже готовыми картами и реализовать их в игру. Представлены такие типы:
Самая первая и представляющая собой обычную площадку для редактирования – Baseplate.
Переходя в нее, игроку будут доступны самые популярные предметы, которые на данный момент используются многими разработчиками. В боковой панели также можно найти дополнительные объекты, при помощи которых можно украсить свою карту.
Начать редактирование и вводный курс, можно с настройки обычного кубика. В Роблоксе все предметы привязаны к определенному месту и состоят из отдельных компонентов. Это квадрат, который достаточно сложно изменить. Чтобы создать максимально плоский объект, например, спрайт (картинка), нужно перейти в настройки панели «Модель» — верхняя часть управления «1 Stat» или же «1/5 Stat», «Offs».
При запуске редактора, по умолчанию стоит «1stat», что обозначает возможность редактировать предмета размером в один кубик. Для создания более тонких деталей, нужно выбрать либо «Offs», либо «1/5 Stat». После этого – настройте объект так, как вам необходимо: растяните или увеличьте в высоту.
Объект можно разукрасить или добавить на него уже готовую картинку. Она расположена в боковой панели инструментов, в разделе «Decals». Выбрав нужное изображение, выделите свой объект и разместите на нем картинку. Изображение будет размещено по всей поверхности с одной стороны, вы также можете разместить картинку и на другой. Вы можете созданный объект «Вырезать», «Копировать» и ставить в абсолютно любых местах.
Достаточно обладать минимальными знаниями английского языка, чтобы полностью разобраться в программе.
Источник
Roblox Studio Overview
Studio Interface
The Studio interface is divided into several sections:
At the very top of the Studio window is a menu bar with the following items:


Ribbon Bar
Below the menu bar is the ribbon bar. The tools displayed in the ribbon change when you click on the Home, Model, Test, View, and Plugins tabs.

Game Editor Window
This is where most of your game design happens. Here you can build, playtest, and move the virtual camera around your Roblox world.

Explorer Window
The Explorer window shows a hierarchical list of every object inside a place. It can be toggled from the View tab. See the Explorer reference for more details on this window.

Properties Window
The Properties window, also toggled from the View tab, shows every detail about how an object looks and behaves. For example, a Part has properties such as Position, Color, and Size which define where the part is located and how it appears.

Asset Manager

Toolbox
The Toolbox contains a selection of models, images, meshes, and audio made by Roblox or Roblox community members. It also includes all of the models, images, meshes, audio, and packages you’ve published or those published by groups you belong to. See the Toolbox article for more details.

Quick Open
The Quick Open window can be opened by pressing Ctrl + P ( Command ⌘ + P on Mac) or by adding its action button to the Quick Access Toolbar. This window lets you quickly find any instance or path in the game and it includes some useful options for searching:
Moving the Camera
Inside the game editor window, you can move the camera with these controls:
| Key/Shortcut | Action | Description |
|---|---|---|
| W | Forward | Move the camera forward. |
| S | Back | Move the camera back. |
| A | Left | Move the camera left. |
| D | Right | Move the camera right. |
| Q | Down | Move the camera down. |
| E | Up | Move the camera up. |
| Shift | Change camera speed | In combination with any movement key, changes the camera speed (camera speed can be customized within Studio settings). |
| F | Focus | Focus the camera on a selected part. |
| Right Mouse Button | Turn the camera | Hold and drag to freely move the camera view around. |
| Middle Mouse Button | Pan the camera | Hold and drag to pan (slide) the camera. |
| Mouse Scroll Wheel | Zoom in or out | Zoom the camera in or out. |
Saving and Publishing
The best way to save your work is to publish it to Roblox’s online servers. This lets you edit it from any computer that can run Studio. Publishing also lets others find and play your creations.
Select File → Publish to Roblox to publish your work. This will open a window where you can set the creation’s name, description, creator, genre, and which device types it should run on. If you already published your place in a session of Studio, this will publish the creation to the same slot.
Playtesting
There are three options for articles/game testing|playtesting a game, all accessible from the Home and Test tabs. Click on the small arrow below the button to choose one of the three options.

| Action | Description |
|---|---|
| Play | Starts simulating the game, inserting your avatar at either the SpawnLocation or coordinates of , , . |
| Play Here | Starts simulating the game, inserting your avatar at the current camera position. |
| Run | Starts simulating the game but does not insert your avatar. The simulation begins at the current camera position and you can navigate around the game world using the Studio camera controls. |
Customizing Studio
Studio Theme
Studio features both a light theme and dark theme. To change themes:
Moving Windows
The windows in Studio can be customized to fit your ideal work style.
Quick Access Toolbar
The top-left region in the Studio menu bar is called the Quick Access Toolbar and it contains shortcuts to various buttons and commands in Studio. You can freely add, remove, and rearrange actions in this section.

To quickly customize the Quick Access Toolbar, click the small arrow to the right of the toolbar. This will reveal a drop-down menu that lets you enable and disable items. You can also add and remove buttons, as well as change the order of the buttons, by selecting Customize from the drop-down menu.

Studio Shortcuts
All of the shortcuts in Studio can be customized. There are also many Studio actions without default shortcuts that can be tied to any key combo. See Roblox Studio Shortcuts for a complete list of these actions.
If the camera isn’t responding to keyboard controls, click inside the game editor window to make it active.
Explorer Window
The Explorer window shows a list containing every Instance inside of a place. It can be toggled from the View tab.
The Explorer window uses the concept of parenting to organize all of the instances. If an instance has any children, it will show a small arrow next to its name. Clicking on this arrow toggles a list of all the children of that instance.
Overview
To make an instance the child of another, simply drag-and-drop it within the Explorer window into the instance you want to be the parent.
Properties Window
The Properties window, toggled from the View tab, shows every detail about how an object looks and behaves. For example, a Part has properties such as Position, Material, and Size which define where the part is located and how it appears.
Any changes you can make with a Studio tool can also be made by setting the values inside the Properties window. You will even see some properties that don’t relate to a Studio tool!
Overview
Selecting multiple objects lets you change properties for all of them. For example, if you have multiple parts selected, changing the Material value in the Properties window will set the material for all of them at once.
Saving and Publishing
Roblox games can either be saved online to Roblox servers or offline to your local machine.
Games vs. Places
Roblox games are made up of individual places. A place is like a level or stage in a larger game — it contains the building blocks, terrain, user interfaces, game logic, and everything else that makes up a level.
Publishing to Roblox
The best way to save your work is to publish it to Roblox’s online servers. This lets you edit it from the Roblox website on any computer that can run Studio. Publishing also lets your friends find and play your creations!
Select File → Publish to Roblox As. to publish your work. This will open a window where you can select which “slot” to save to. You can choose a new slot or save over an existing one.
When you publish your work to a new slot ( New Place), you will create both a new place and a new game. The place will become the new “starting place” for the game (the entrance point for every player who loads the game). Once the starting place is set, it cannot be changed, although you’re free to add more places to the game and move players from place to place using the Teleport Service.
If you already published your place in a session of Studio, or if you opened it with the Edit button on the Roblox website, you can simply select File → Publish to Roblox to save the place to the same slot.
Local Saves
Customizing Studio
Dark Theme
Studio has two themes: the light theme (standard) and a dark theme. Many users like the dark theme when they’re working in rooms with less light.

To switch to the dark theme:
Moving Windows
The windows in Studio can be customized to fit your ideal work style.
Quick Access Toolbar
The top-left region in the Studio menu bar is called the Quick Access Toolbar and it contains shortcuts to various buttons and commands in Studio. You can freely add, remove, and rearrange actions in this section.
To quickly customize the Quick Access Toolbar, click the small arrow to the right of the toolbar. This will reveal a drop-down menu that lets you enable and disable items in the bar.
You can also add and remove buttons, as well as change the order of the buttons, by selecting Customize from the drop-down menu.
Studio Shortcuts
All of the shortcuts in Studio can be customized. There are also many Studio actions without default shortcuts that can be tied to any key combo. See Roblox Studio Shortcuts for a complete list of these actions.
How this site use cookies
This Platform uses cookies to offer you a better experience, to personalize content, to provide social media features and to analyse the traffic on our site. For further information, including information on how to prevent or manage the use of cookies on this Platform, please refer to our Privacy and Cookie Policy.
Please press Continue to go to:

© 2022 Roblox Corporation. All Rights Reserved.
Источник
Roblox Studio for Windows
Softonic review
Free game development program
Roblox Studio is a free software program that gives you the ability to create personalized video games and play other games made by the community. Available on Apple Mac and Microsoft Windows operating systems, Roblox Studio boasts a templated and interactive online environment.
Is Roblox Studio free?
Roblox Studio offers a considerable amount of customization tools for free. The community members can launch their Roblox games on the platform and earn money from their creations when players buy in-game purchases: coins, skins, etc. Developers can earn Roblox’s virtual currency, Robux, and convert them into real dollars. It becomes a great source for money.
Manage the virtual workspace
Once downloaded, Roblox Studio functions with a login system. On a Window’s device, the Roblox’s user interface is reminiscent of the Microsoft Office package’s easy—to-use aesthetic. Once logged in, you’ll be greeted with a panel on the left that contains the opportunity to begin creating a new game, and access the users’ previous, recent, and archived titles: ‘New’, ‘My Games’, ‘Recent’, and ‘Archive’.
Within the ‘New’ tab, the upper menu bar provides the community with the options of ‘All Templates’, ‘Theme’, and ‘Gameplay’. Within the ‘All Templates’ segment, people are given a multitude of landscape options to build their game upon: ‘Baseplate’, ‘Flat Terrain’, ‘Village’, ‘Castle’, ‘Suburban’, ‘Racing’, ‘Pirate Island’, ‘Western’, ‘City’, etc.
Once the preferred terrain template has been chosen, you’ll go to the development screen. Horizontally lining the upper portion of the screen is the menu bar: ‘File’, ‘Undo’, ‘Redo’, ‘Home’, ‘Model’, ‘Test’, ‘View’, and ‘Plugins’. By clicking on ‘Home’, you have access to the icon bar, which contains the basics to building the Roblox games.
Icons include ‘Select’, ‘Move’, ‘Scale’, ‘Rotate’, ‘Collisions’, ‘Constraints’, ‘Join’, ‘Editor’, ‘Toolbox’, ‘Part’, ‘UI’, ‘Material’, ‘Color’, etc. Adjacent to the ‘Home’ segment is the ‘Model’ tab which has additional customization features: ‘Effects’, ‘Insert Objects’, etc. The ‘Test’ section provides users with the ability to ‘Play’ their game with device, player, and server options.
The ‘View’ area lets the community enhance their user experience while developing the game by giving them the options to expand to full screen, record videos, take screen shots, and use breakpoints, grids, etc. Within ‘Plugins’, people can further customize their UX with third-party downloads.
To the right of the screen are the properties, which includes aspects: ‘Appearance’, ‘Data’, ‘Behavior’, etc. Within the panel to the left of the gaming screen, are the ‘Explorer’ and ‘Toolbox’ segments.
Use the ‘Explorer’ area as an organizational hub that shows which aspects are being added to the game and where they are being stored. The ‘Toolbox’ section includes the ability to use Robux to purchase developer products to improve the user experience of the game.
What script does Roblox use?
While the cross-platform freeware is available for everyone, those who want to code and take the experience one step futher will need to know the Lua programming language. Lua is considered a lightweight, simple scripting language. There are a multitude of tutorials available online to learn the Lua coding language.
How do you make your own game in Roblox?
By using the WASD keys or holding the right click portion of the mouse, you can maneuver the camera view: up, down, left, right, and zoomed in and out. You can begin building their games by inserting a ‘Part’; on the main screen, the piece will be displayed within the landscape of the game.
To strategically place parts within the terrain, click on the ‘Select’ button to maneuver the piece around. To the left of the ‘Select’ button people are able to manipulate the part by copying, pasting, cutting, and duplicating the object; this allows people to build structures.
Adjacent to the ‘Select’ key, is the ‘Move’ key which provides precise placement. Arrows will appear around the part when the ‘Move’ button is selected. To decrease and increase the size of the lot, you can choose the ‘Scale’ option within the icon bar. This feature is important for quickly creating an ideal ecosystem within the customized game.
An additional important aspect is the ‘Rotate’ key which provides the developer the opportunity to turn the object to a satisfactory position. By clicking on ‘Editor’ within the ‘Terrain’ segment in the icon bar, people can experiment with the landscape to create imaginative worlds; navigate to the lower left panel within the ‘Terrain Editor’, and discover the multitude of topography options.
Alternative game building tools
Blender and Unity are additional game development software programs. Similar to Roblox Studio, both Blender and Unity boast free access and are available on Apple Mac and Microsoft Windows operating systems. While Roblox Studio is an excellent option for people who are beginning to get acquainted to the building and scripting realm of games, Blender and Unity are geared towards more experienced modelers.
Considering the basic building options that Roblox Studio provides, Minecraft may be another strong alternative. Minecraft is open-source software that lets you experiment with the title’s creation process. The available terrain within Roblox Studio is similar to the style of the Minecraft landscape.
Personalize content for profit
While Roblox Studio is considered a development platform for beginners, the freeware allows the community to make money from their creations by launching them. If players decide to buy game passes, then the developer can profit from that purchase. You can create a variety of gaming styles: racing, obstacle courses, etc.
With a vast and active community, Roblox Studio updates the program consistently.
Источник
Roblox Studio, available for both Windows and Mac, is the essential building tool for Roblox games. It’s free to use and does not require you to purchase a license.
Roblox Studio is the building tool of Roblox that helps you to create the places of your dreams. It provides our Developers with a more comprehensive and intricate set of tools, which allows for a greater sense of control and creative expression.
Roblox Studio’s features are accessible to a variety of skill levels ranging from a novice to an experienced programmer. Tools range from simple manipulation of objects or terrain, to entering complex scripts and game functions. Studio also allows you to test your games in an isolated environment before uploading them to the Roblox website.
Make Anything
Roblox Studio lets you create anything and release with one click to smartphones, tablets, desktops, consoles, and virtual reality devices
Reach Millions of Players
Connect with a massive audience by tapping into an incredibly enthusiastic and international community of over 50 million monthly players
Official Roblox Studio tutorials and courses can be found here.
System Requirements
The following system OS/hardware will ensure Roblox Studio runs smoothly:
- PC/Windows — Windows 7, Windows 8/8.1, or Windows 10, running IE (Internet Explorer) version 11 or higher. For Windows 8/8.1 you will need to run Roblox in Desktop Mode, as Metro Mode (the tiled start-screen) is not currently supported.
- Mac — macOS 10.11 (El Capitan) and above.
- Graphics Card — A computer less than 5 years old with a dedicated video card, or a laptop less than 3 years old with an integrated video card.
- Processor — Processor with a clock speed of 1.6 GHz or better.
- Memory — At least 1 GB of system memory.
- Internet access. This keeps the software up-to-date and lets you save projects to your Roblox account. A minimum 4-8 MB/s internet connection is recommended.
- In addition, a 2-button mouse with a scroll wheel will enhance your Studio experience.
For a list of tutorials and guides, see Tutorials.
Logo of Roblox Studio since 2022.![]()
Roblox Studio is a development program developed by Roblox offering an assortment of coding and building tools for developing games for Roblox via the Lua programming language.
Roblox Studio was released in 2005 as Roblox Developer’s Environment. Roblox staff can download preview releases of the suite. It is currently available for the Windows and MacOS platforms for free, but for Chrome OS and mobile operating systems such as
Android and iOS (including iPad OS) are not supported yet.
Overview
File
New
This button will create a functional pre-established place. Said place will be accessed through a new Roblox Studio window that will originate. The new game will first off be named as «Place1» before being quickly renamed to «Baseplate» if a player chooses the game’s template to be Baseplate, they can choose from many templates, after the game completely loads in the engine. Game settings cannot be altered until a developer publishes the game to Roblox.
It is impossible to save the game to Roblox because it was created without a pre-chosen setting. However, developers can save it as a file or publish it to Roblox by clicking the «Publish to Roblox» button in the File tab. By doing that, the program will orientate the developer to set a name for the game, a description, define who is developing the game, to what genre it applies, and to what devices the game will be playable, although defining the name of the game is the minimum required for this situation. After configuring all of the settings, the developer must click the «Create» button to publish the game. Developers can also overwrite an already existing game by clicking the «Publish As» button in the File tab.
- Open Place — Opens an already existing place on an users computer. Browse to a place, click on it, then click «Open».
- Close Place — Closes the current open place.
- Save — Saves the current open place. If the place does not have a definite location on an users computer, it will request a location.
- Save As — Saves the current open place, but will always request for a location.
- Publish to Roblox — Clicking this, a user will receive an option to choose to update the place. A user’s place on the Roblox site will then be identical to the area on another users workspace.
- Save Selection as Model — Allows a user to save the currently selected block(s) onto their computer. Requests for location.
- Publish Selection as Model — Allows a user to publish the currently selected blocks as a free model on the Roblox website, or replace an existing model with their selection.
- Print — Prints what is displayed on a users screen at a printer of their choice.
- Print Preview — previews what is displayed on a users screen.
- Print Setup — Adjust the settings for a users printing from Roblox.
- Recently accessed places — links to open a users recently opened places.
- Exit — exits Roblox Studio.
Model
- Select — Selects a part/model. Note that large parts cannot be moved with this tool.
- Moves a part/model, but can only move in 6 preset directions.
- Scale — Resizes parts only. Can only scale in 6 preset directions.
- Rotate — Rotates a part.
- Transform — Combines all tools above.
- Anchor — Disallows an object from being moved by an environmental force.
- Color — Changes a part to have the color chosen by a user.
- Material — Changes material of a part.
- Union — Fuses parts together to create a union part.
- Negate — Turns the selected part into a NegativePart. When unioned with another part it will subtract from that part and create a union.
- Separate — Separates union parts.
Surface
- Smooth — Applies the «smooth» surface to a facet of a block. The smooth surface does not secure a block to another block
- Glue (Deprecated) — Applies the «glue» surface to a facet of a block. The glue surface joins a block to another but will break after a certain amount of stress is applied by a character or explosion unless anchored.
- Weld — Applies the «weld» surface to a facet of a block. The weld surface joins a block to another and can only be broken by explosions unless anchored.
- Stud — Applies the «stud» surface to a facet of a block. The stud surface only joins to inlet surfaces. Joints can only be broken by explosions unless anchored.
- Inlet — Applies the «inlet» surface to a facet of a block. The inlet surface only joins to stud surfaces. Joints can only be broken by explosions unless anchored.
- Universal — Applies the «universal» surface to a facet of a block. The universal surface joins to both studs and inlets alike. Joints can only be broken by explosions unless anchored.
- Hinge — Applies the «hinge» surface to a facet of a block. Anything on a hinged surface, except for glued or welded blocks, can rotate freely on the hinge until the joints are broken. Joints can only be broken by explosions unless anchored.
- Motor — Applies the «motor» surface to a facet of a block. Anything on a motor surface, except for glued or welded blocks, will constantly rotate on the motor until the joints are broken. Joints can only be broken by explosions unless anchored.
Terrain
- Generate — Generates random terrain. A ‘seed’ value can be set to generate random terrain.
- Add — Adds terrain using the brush. While clicking, it adds terrain.
- Subtract — The same thing with Add, but it deletes terrain when clicking.
- Paint — Paints terrain into materials.
- Grow — Like the Add tool, but makes it much smoother.
- Erode — The same thing with Grow, but it deletes it much smoother.
- Smooth — Smoothens hard edges. This will create «ridges,’ which you can get rid of by using the erode tool.
- Regions — An easy option to add, copy, paste, delete, select, move, resize, rotate and fill terrain.
Plugins
Plugins are applications that add functions to Roblox Studio.
View
Toolbox
The toolbox is one of the panes in Roblox Studio. The toolbox contains everything you need. From a block to a jet airplane, the toolbox contains everything that users have uploaded to Roblox. In order to use the toolbox, click the toolbox option, then click on the drop-down menu at the top of the toolbox. A user can browse to which category, then which object a user would like to select, then click on the object. The object will then appear in the workspace. In addition, clicking «Inventory» will have categories for publicly made models and decals, as well as models that you have made on your own.
Explorer
The Explorer is an important tool in Roblox Studio when a user’s place contains complex Hierarchy and multiple models. Upon opening the Explorer, some will find a toolbar that lists the hierarchy of the place. All objects in the place are usually stored within the Workspace.
-


Workspace
-
Camera
-
Terrain
-
-
Lighting
-
NetworkClient
-
Players
-
ReplicatedFirst
-
ReplicatedStorage
-
ServerStorage
-
ServerScriptService
-
StarterGui
-
StarterPack
-
StarterPlayer
-
StarterCharacterScripts
-
StarterPlayerScripts
-
-
SoundService
-
Chat
-
LocalizationService
-
TestService
Properties
Opening the menu will allow a user to view/edit the properties of the object they have selected, for example, if a user selects a brick, the menu will display the color, material, reflectance value, and transparency value of the brick as well as other properties.
Output
The output menu is where script errors, warnings, information messages, and log messages will show. It will always display the source of the message and the context (client or server).
Shortcuts
Here are some basic keyboard shortcuts to make your experience quicker and easier.
- New Place (Ctrl + N) — creates a new place in a new window.
- Open Place (Ctrl + O) — allows a user to browse to a place on their computer, then open it. To open a place, click this button, browse to the folder their place is in on their computer, click on the place, and click «Open».
- Save Place (Ctrl + S) — allows you to save the place you currently have open.
- Select tool (Ctrl + 1) — toggles the select tool.
- Move tool (Ctrl + 2) — toggles the move tool.
- Scale tool (Ctrl + 3) — toggles the scale tool.
- Rotate tool (Ctrl + 4) — toggles the rotate tool.
- Transform tool (Ctrl + 5) — toggles the transform tool.
- Cut (Ctrl + X) — Takes the selected object, removes it, and allows it to be pasted into a users workspace infinitely.
- Copy (Ctrl + C) — Takes the selected object and allows it to be pasted into a users workspace infinitely.
- Paste (Ctrl + V) — Must have copied or cut before using — Takes the cut/copied object and puts it into the workspace when clicked. Can be used infinitely after copying/cutting.
- Paste Into (Ctrl + ⇧ Shift + V) — Takes the cut/copied object(s) and inserts it into the selected object.
- Duplicate (Ctrl + D) — Duplicates whatever is currently selected. This is useful if a user does not want to keep spawning parts and anchoring them. Cannot paste objects that have been cut/copied.
- Undo (Ctrl + Z) — Undos the action a user just performed. The drop-down menu does not serve any purpose.
- Redo (Ctrl + Y) — Redos the action a user just performed. The drop-down menu does not serve any purpose.
- Group (Ctrl + G) — Allows a user to group the selected objects and lock the grouping so they can all be selected and moved together at need.
- Ungroup (Ctrl + U) — Breaks the connection of a selected group of objects.
- Toggle Collisions (Ctrl + ⇧ Shift + C) — Toggles whether collisions of parts is turned on or off. If it is on, a user will not be able to move parts through other objects.
- Rotate (Ctrl + R) — Rotates the selected object on a vertical axis.
- Tilt (Ctrl + T) — Rotates the selected part on a horizontal axis.
- Move upward (E) — Moves a users camera upwards.
- Move downward (Q) — Moves a users camera downwards.
- Union (Ctrl + ⇧ Shift + G) — Unions the selected parts. This fuses them together and creates a UnionOperation.
- Negate (Ctrl + ⇧ Shift + N) — Negates the selected part(s). This subtracts from other parts and creates a UnionOperation.
- Separate (Ctrl + ⇧ Shift + U) — Separates the selected union/negated part(s).
- Local/Global Space (Ctrl + L) — Changes how the currently selected object will move. Global Space will let a user move the object along the world’s X-axis, Y-axis, and Z-axis, while Local Space will move along the object’s X, Y, or Z-axis.
Keyboard shortcuts can be viewed and changed at any time by going into File > Advanced > Customize Shortcuts.
Test
Whether a user has no scripts or their entire place is scripted, they will want to test it within Studio so that players are able to catch and eliminate existing bugs in their game before they actually release it to the public. There are three options for testing, located in the ‘Test’ column:
- Play — Spawns a users character on a spawn location. If there are no spawn locations in the map, the character is spawned in the center of the map.
- Play Here — Spawns a users character where their camera currently is.
- Run — The place (scripts, animations, etc.) runs but without the character spawning.
Publishing
Once a user is finished editing and testing their place, they can upload it to Roblox so other users can play it. Go to File > Publish to Roblox, then follow the steps to get it published. Or if your game is already published, click «Publish to Roblox» to update the existing place. Depending on the size of the users place and their Internet upload speed, it may take about 5 — 30 seconds or longer for it to get published.
Team Create
Team Create is a feature on Roblox that allows a user to build on Roblox Studio if added to the list by the owner of the game. Team Create is the feature which replaced personal servers. It was released on April 13, 2016.
There are colors that change in different personal computers a user uses. But this is not changed in the original computer they use. If a team member selects an object, a colored circle appears in the left side of the object in the Explorer tab. The circle color depends on the color of the user.
How to use
To use Team Create, go to the View tab in Roblox Studio, and then click on the Team Create button. If the feature is turned off, click on the green Turn On button. The game must be published in order for team create to be used. When clicked, it will restart Roblox Studio and enable Team Create. Next, type in a username in the box on top of the panel. Once a user invite someone, have them go to the place’s page and click on the Edit button. They will then be added to the editing session. A colored transparent sphere indicates that a user is building in that area.
Group games
Group games have the ability to be used by team create. To enable group games to have team create on, simply turn it on/off. Then, anyone with the Create and edit group games permission can go into team create, regardless if invited or not.
Gallery
Icons
.png (4 KB)")
![]()
![]()
![]()
![]()
Roblox Studio Icon 2017 — 2021
![]()
New logo with watermark after 2021.
![]()
Roblox Studio logo on Mac.
![]()
Splash screens
![]()
Former splash screens
Layouts
")
The Roblox client in February 2007,[1] showcasing features reminiscent of present-day Roblox Studio at the time
")
Roblox Studio layout in 2019.
")
Roblox Studio on Windows 11.
")
Studio in March 2005.
")
Roblox Studio in 2022.
References
- ↑ https://blog.roblox.com/2007/02/scripting-with-telamon-debugging/
Содержание
- Программа для создания карт Роблокс Студио
- Технические характеристики
- Минимальные требования:
- Описание программы
- Вводный урок
- Roblox Studio for Windows
- Create virtual worlds from imagination
- Endless possibilities to play around with creativity
- How are the graphics?
- What about the content options?
- What is Robux?
- Is Roblox safe for kids?
- Our take
- Should you download it?
- Roblox Studio
Программа для создания карт Роблокс Студио
Роблокс Студия – это дополнительное программное обеспечение, необходимое для создания собственных карт в игре. Обладает широким функционалом и уже готовыми возможностями.
Чтобы создавать собственные плейсы или редактировать какие-либо объекты, пользователь должен обладать базовыми знаниями в программировании на C++ или увлекаться разработкой 3D-моделями.
Название
Операционная система Разрядность Версия
Скачать
ЛАУНЧЕР РОБЛОКС СТУДИО Windows XP, 7, 10 РОБЛОКС СТУДИО С ОФИЦИАЛЬНОГО САЙТА Windows XP, 7, 10
Технические характеристики
Требования для Студио такие же, как у самой игры. Приложение требует поддержки 3D-проработки графики, ровно также, как и сам Роблокс.
Минимальные требования:
- Операционная система от WindowsXP и выше. Также работает на платформах iOS;
- Процессоры выше AMDPhenomX2, два ядра, 1,7 Ггц;
- Видеокарта, поддерживающая DirectX 9 и модельные шейдеры 2.0;
- Место на жестком диске от 20 Мб;
- ОЗУ: от 512 Мб
Максимальные характеристики включают в себя увеличенное количество оперативной памяти от 1 Гб, что подходит для разработки и создания моделей.
Содержание:
Описание программы
Приложение имеет собственную программную строку и 3D-площадку для создания различных локаций. Пользователь может самостоятельно настроить объекты, соорудить здания и придать им различные свойства. Привязка к определенному объекту выполняется при помощи программного кода или иначе «диалога». Благодаря такой возможности, можно самостоятельно настроить различные предметы и позволить игрокам взаимодействовать вместе с ними.
ПО идет как дополнение к основной игре, поэтому при установке игры – вы сразу же получаете Студию для разработки. На официальном сайте будущий разработчик может ознакомиться с функционалом приложения, а также с мануалами, которые выполнены в видеоформате. Программа обладает панелью быстрого доступа, функциональными клавишами и широкими возможностями для тех, кто планирует самостоятельно создавать игровые площадки.
Пользователь может создать множество карт, но только одна из них будет активна.
Доступ к бесчисленному количеству плейсов есть у тех игроков, которые приобрели для себя статус VIP. Чаще всего, разработкой занимаются целый студии, которые предоставляют Роблоксу права на использование своего продукта. Создание карт приносит относительно серьезный доход, особенно, если настроить на карте систему микротранзакций или платного входа.
Вводный урок
Чтобы начать действительно создавать свои площадки, нужно разобраться с основными параметрами и инструментами. Пользователь может сразу же воспользоваться уже готовыми картами и реализовать их в игру. Представлены такие типы:
- Обби;
- Большой город;
- Вестрн;
- Карты для сражений;
- Карта, стилизованная под пиратский корабль и многое другое.
Самая первая и представляющая собой обычную площадку для редактирования – Baseplate.
Переходя в нее, игроку будут доступны самые популярные предметы, которые на данный момент используются многими разработчиками. В боковой панели также можно найти дополнительные объекты, при помощи которых можно украсить свою карту.
Начать редактирование и вводный курс, можно с настройки обычного кубика. В Роблоксе все предметы привязаны к определенному месту и состоят из отдельных компонентов. Это квадрат, который достаточно сложно изменить. Чтобы создать максимально плоский объект, например, спрайт (картинка), нужно перейти в настройки панели «Модель» — верхняя часть управления «1 Stat» или же «1/5 Stat», «Offs».
При запуске редактора, по умолчанию стоит «1stat», что обозначает возможность редактировать предмета размером в один кубик. Для создания более тонких деталей, нужно выбрать либо «Offs», либо «1/5 Stat». После этого – настройте объект так, как вам необходимо: растяните или увеличьте в высоту.
Объект можно разукрасить или добавить на него уже готовую картинку. Она расположена в боковой панели инструментов, в разделе «Decals». Выбрав нужное изображение, выделите свой объект и разместите на нем картинку. Изображение будет размещено по всей поверхности с одной стороны, вы также можете разместить картинку и на другой. Вы можете созданный объект «Вырезать», «Копировать» и ставить в абсолютно любых местах.
Достаточно обладать минимальными знаниями английского языка, чтобы полностью разобраться в программе.
Roblox Studio for Windows
Create virtual worlds from imagination
Roblox Studio is one of the most popular suites to explore your creativity, imagination, and build virtual worlds from scratch. Primarily designed for kids, this application is suitable for all age groups. Roblox for Windows gives you the ability to build structures, collect resources, and use different strategies to survive in varied environments. Available for multiple platforms, all the progress you make in the game is automatically synchronized on Android, Mac, and other versions of the suite.
Endless possibilities to play around with creativity
When you first start playing Roblox, it gives you a familiar interface in a Minecraft-style setting. However, you soon realize that the suite offers multiple tools to design complex structures, choose avatars, and utilize ‘Robux’ to enhance performance. While the Roblox app takes a cue from Lego-like pixelated worlds, the studio is a full-fledged resource to tap into the adventure games genre.
In order to start building virtual worlds in Roblox, you need to create an account. Additionally, you need to assign an avatar to your character, who’s given some real estate in one of the maps. With a simple interface, Roblox is easy to play for kids but doesn’t limit creativity. In fact, the multiple tools and configuration options assure endless possibilities to observe, learn, and build amazing worlds.
How are the graphics?
Unless you’re a fan of sandbox games, the pixelated worlds might seem outdated. Roblox app leverages user-generated content, which can sometimes be patchy. You might even experience occasional lags or crashes. Compared to Genshin Impact, Gacha Club, and other games in this category, the blurred colors and blocky visuals might not seem too appealing. However, like most sandbox games, even this one has intentionally used pixelated graphics.
Everything on the screen comes together with engaging music. As you continue to build structures, the soothing music keeps you hooked to various elements. Since there’s no common background score, every virtual world comes with different sounds and effects. While playing Roblox, it’s important to consider that the platform is meant for learning, fun, and aims to foster creativity. Just don’t compare it with adventure games from big studios, and you’ll love every bit of the journey.
What about the content options?
As mentioned earlier, Roblox App offers a huge collection of virtual worlds. Whether you’re interested in simple design tasks or wish to build complex structures, you’ll find something suitable in the gaming suite. The program comes with an intuitive search, which lets you find games from other users.
Roblox has multiple categories of content, including RPGs, MMOs, racing games, adventure games, shooting games, and more. There’s a huge library of content, which has been captivating millions of people around the world. Apart from games, you can even explore animations, short films, and other videos.
What is Robux?
While the application is free to use, you can use the in-game currency to acquire building materials, purchase clothes, upgrade avatars, attain special powers, and perform several other tasks. The in-game currency is called Robux. You can either purchase it with real money or earn points for different tasks in the games.
There’s also a Builder’s Club, which offers different subscription plans. It lets you manage multiple worlds, and removes disruptive advertisements from the app. Like other platforms, in-game purchases in the Roblox app encourage you to spend more time playing the games.
Is Roblox safe for kids?
Roblox for Windows is considered to be safe for children. However, parental guidance is still recommended. Since the platform is based on user-generated content, the app encourages social interactions. In the past, some instances of bullying have been reported.
However, Roblox has assigned a huge team of moderators, who work endlessly to remove unsuitable or malicious content. Fortunately, every account comes with a parental login, which lets adults keep a check on the kids’ in-game activity.
The best part about using Roblox is the availability of numerous user-generated adventure games. As of now, the software is used by over 100 million users across the globe every month. This makes Roblox one of the leading gaming suites for Windows.
Our take
For exploring virtual worlds, encouraging creativity, and developing games, Roblox is an ideal choice. With free usage, simplicity, and a wide range of features, the gaming suite has been able to build a solid community of fans and players around the world.
Should you download it?
When it comes to sandbox games, Roblox Studio is an amazing platform. It lets you create all kinds of virtual worlds from scratch. These can even be shared online. Most importantly, the developers release updates, improvements, and bug fixes on a regular basis.
- Comes with varied content options
- Integrates ‘parent login’ with account
- Offers multiple tools to build
- Limited features in free version
Roblox Studio
Roblox Studio 1.6.0.1115 LATEST
Windows XP / Vista / Windows 7 / Windows 8 / Windows 10
Roblox Studio 2021 full offline installer setup for PC 32bit/64bit
Roblox Studio is the building tool of Roblox that helps you to create the places of your dreams. It provides Developers with a more comprehensive and intricate set of tools, which allows for a greater sense of control and creative expression.
Roblox Studio‘s features are accessible to a variety of skill levels ranging from novice to an experienced programmer. For the aspiring builder, time invested brings great rewards. Many of the best Developers use it frequently to get the most out of their creations. Tools range from simple manipulation of objects or terrain to entering complex scripts and game functions. The app for Windows also allows you to test your games in an isolated environment before uploading them to the website.
Roblox is the best place to Imagine with Friends. With the largest user-generated online gaming platform and over 15 million games created by users, the app is the #1 gaming site for kids and teens (comScore). Every day, virtual explorers come to the app to create adventures, play games, role play, and learn with their friends in a family-friendly, immersive, 3D environment.
Make Anything
The tool lets you create anything and release with one click to smartphones, tablets, desktops, consoles, and virtual reality devices.
Reach Millions of Players
Connect with a massive audience by tapping into an incredibly enthusiastic and international community of over 50 million monthly players.
Earn Serious Cash
Creators like you are getting paid for what they love to do. «Our top developers are earning over $2M a year by providing in-game purchases.»
Features and Highlights
Build Once, Play Anywhere
Maintain a single codebase that works seamlessly across every platform supports. You can immediately ship your projects on phones, desktops, consoles, and VR with a single click.
Reach a Massive, Highly Engaged Global Community
As one of the top digital properties in the U.S. for kids under the age of 18 (comScore), players enjoy more than 600 million hours of engagement on Roblox each month.
Real-Time Social Ecosystem
Roblox isn’t just a game engine. With Roblox’s uniquely inherent social ecosystem, it’s easier than ever for developers to leverage network effects and achieve viral growth.
Fully Managed Cloud Infrastructure
App’s proprietary cloud software and fully managed infrastructure for multiplayer gameplay remove complexity from game updates, scaling, matchmaking, and monetization.
Your Imagination, Your Worlds
Your creations need not be restricted to Roblox’s classic and iconic style. The game engine and API gives you unparalleled freedom to control the look and feel of your experiences.
Build Deeply Immersive 3D Experiences
App’s best-in-class development toolset can be used to model, design, and build incredibly rich and detailed 3D worlds that can be rendered equally well across desktop, mobile, console, and VR.
Dynamic Lighting and Effects
It comes complete with all the design tools to easily create photorealistic lighting and particle effects, as well as all the APIs needed to engineer your own custom effects.
Custom User Interfaces
It supports the development of immersive 3D environments and beautiful 2D interfaces, making it easy for developers to transition between the two seamlessly during gameplay.
Create Amazing Stories
With the ability to create detailed 3D environments and immersive soundscapes, the program is a robust storytelling environment that can bring characters and worlds to life.
Wiki
The Wiki is the ultimate resource for documentation, tutorials, and samples which will help you learn to make games with Roblox Studio for PC.
Note: The installer will install you both Roblox Player and Roblox Studio for development.
-
MiniTool
-
MiniTool News Center
- Roblox Studio Download for PC/Mac and Install for Games Creation
By Vera | Follow |
Last Updated December 30, 2022
![]()
How to download Roblox Studio on Windows 10/11 PC and Mac? It is easy to do this task. This post from MiniTool focuses on Roblox Studio download for PC, & Mac and installation so that you can create your own games.
What Is Roblox Studio
Roblox Studio is an essential building tool for Roblox games. To be specific, it is a video game development platform that allows you to make anything and release it to your desktops, laptops, smartphones, tablets, consoles, and virtual reality devices with one click.
This platform can help you create anything you can imagine. Its features are appropriate for novices and experienced programmers. For developers, this software also offers a more comprehensive and intricate set of tools.
Besides, Roblox Studio is social, and with the games and creativity of the community, Studio takes the socialization to a new level.
Roblox Studio is free to download on Windows and macOS. If you want to download and install it on your machine, make sure it meets the system requirements:
- OS: Windows 7, 8, 8.1, 10 and 11 & macOS 10.13 (High Sierra) and above
- CPU: Processor with a clock speed of 1.6 GHz or better
- RAM: 2GB or above
- Disk Space: At least 10GB of free disk space after installation
- Graphics Card: A dedicated video card (a computer less than 5 years old) or an integrated video card (a laptop less than 3 years old)
- Internet Access: At least 4-8 MB/s
Next, let’s see how to download Roblox Studio for Windows PC and Mac.
Roblox Studio Download PC & Mac and Install
It is a simple way to get Roblox Studio and follow the steps here:
Step 1: Visit this page: https://www.roblox.com/create.
Step 2: Click the Start Creating button and a popup will appear. Click Download Studio.
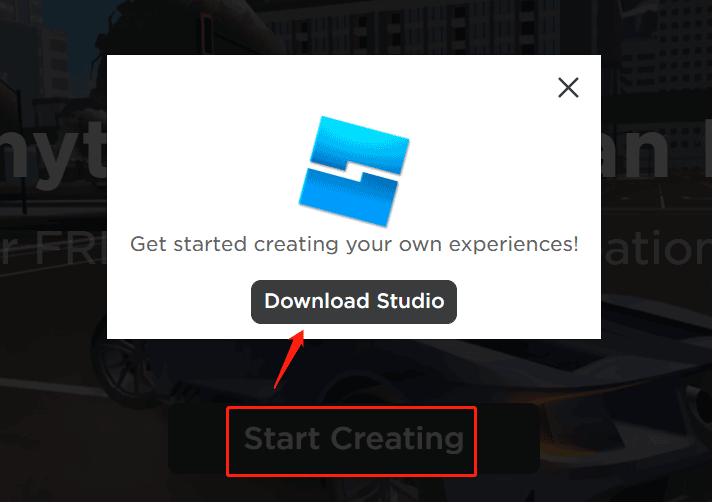
In the new popup, save the studio installer to a place on your PC. If your PC is running Windows 11/10/8/7, the file is RobloxStudio.exe. If you are running a Mac, the file is RobloxStudio.dmg. After getting the download, you need to use the file to install Roblox Studio. Here, we take Windows as an example.
Step 1: Double-click on this .exe file and the setup is connecting to Roblox.
Step 2: Then, the installation process starts, as follows.

After finishing installing Studio, launch it. To use it, you need to sign in to Roblox Studio with a Roblox account. If you are a new user, create one on roblox.com. Next, you can use this tool to start building your experience. If you don’t know how to use it, refer to the help documents to get started.
Roblox Studio Uninstall
If you need to uninstall Roblox Studio from your Windows PC, go to Control Panel, click Uninstall a program from the Programs section, then right-click Roblox Studio and choose Uninstall.
Further Reading: Attention
As mentioned in Roblox Studio Download PC, Roblox Studio is only available for Windows and macOS. When you search for “how to download Roblox Studio on mobile”, “how to download Roblox Studio on iPad”, or “how to download Roblox Studio on Android” in Google Chrome, you find many websites. Actually, they are not helpful. Roblox Studio is not officially available on Chromebook, iPad, or Android.
If you want to use Roblox Studio to create a game on mobile, you can do:
- Open roblox.com via a browser like UC browser, Google Chrome, etc. and click Continue in browser.
- Log in to the site and click Create > Three dots > Desktop site.
- Click the Create New Game button and then follow the on-screen instructions to create a game using Roblox Studio on mobile.
Bottom Line
That’s the information about Roblox Studio download for Windows 11/10/8/7 & macOS and how to install it on your machine. Besides, if you want to use Roblox Studio to create games on Android/iOS, follow the given instructions to get started.
About The Author

Position: Columnist
Vera is an editor of the MiniTool Team since 2016 who has more than 5 years’ writing experiences in the field of technical articles. Her articles mainly focus on disk & partition management, PC data recovery, video conversion, as well as PC backup & restore, helping users to solve some errors and issues when using their computers. In her spare times, she likes shopping, playing games and reading some articles.
Roblox Studio is the building tool of Roblox that helps you to create the places of your dreams. It provides Developers with a more comprehensive and intricate set of tools, which allows for a greater sense of control and creative expression.
Roblox Studio‘s features are accessible to a variety of skill levels ranging from novice to an experienced programmer. For the aspiring builder, time invested brings great rewards. Many of the best Developers use it frequently to get the most out of their creations. Tools range from simple manipulation of objects or terrain to entering complex scripts and game functions. The app for Windows also allows you to test your games in an isolated environment before uploading them to the website.
Roblox is the best place to Imagine with Friends. With the largest user-generated online gaming platform and over 15 million games created by users, the app is the #1 gaming site for kids and teens (comScore). Every day, virtual explorers come to the app to create adventures, play games, role play, and learn with their friends in a family-friendly, immersive, 3D environment.
Make Anything
The tool lets you create anything and release with one click to smartphones, tablets, desktops, consoles, and virtual reality devices.
Reach Millions of Players
Connect with a massive audience by tapping into an incredibly enthusiastic and international community of over 50 million monthly players.
Earn Serious Cash
Creators like you are getting paid for what they love to do. «Our top developers are earning over $2M a year by providing in-game purchases.»
Create your own game for free in Roblox
To create your own game on Roblox, you can use the WASD keys or the right click on your mouse to move the camera view around. To begin building, insert a «Part» on the main screen and use the «Select» button to move it around within the terrain. You can also use the «Move» button for precise placement and the «Scale» option to adjust the size of the lot.
The «Rotate» key allows you to turn the object to your desired position. To experiment with the landscape, navigate to the «Editor» within the «Terrain» segment in the icon bar and explore the different options in the «Terrain Editor.»
Features and Highlights
Build Once, Play Anywhere
Maintain a single codebase that works seamlessly across every platform supports. You can immediately ship your projects on phones, desktops, consoles, and VR with a single click.
Reach a Massive, Highly Engaged Global Community
As one of the top digital properties in the U.S. for kids under the age of 18 (comScore), players enjoy more than 600 million hours of engagement on Roblox each month.
Real-Time Social Ecosystem
Roblox isn’t just a game engine. With Roblox’s uniquely inherent social ecosystem, it’s easier than ever for developers to leverage network effects and achieve viral growth.
Fully Managed Cloud Infrastructure
App’s proprietary cloud software and fully managed infrastructure for multiplayer gameplay remove complexity from game updates, scaling, matchmaking, and monetization.
Your Imagination, Your Worlds
Your creations need not be restricted to Roblox’s classic and iconic style. The game engine and API gives you unparalleled freedom to control the look and feel of your experiences.
Build Deeply Immersive 3D Experiences
App’s best-in-class development toolset can be used to model, design, and build incredibly rich and detailed 3D worlds that can be rendered equally well across desktop, mobile, console, and VR.
Dynamic Lighting and Effects
It comes complete with all the design tools to easily create photorealistic lighting and particle effects, as well as all the APIs needed to engineer your own custom effects.
Custom User Interfaces
It supports the development of immersive 3D environments and beautiful 2D interfaces, making it easy for developers to transition between the two seamlessly during gameplay.
Create Amazing Stories
With the ability to create detailed 3D environments and immersive soundscapes, the program is a robust storytelling environment that can bring characters and worlds to life.
Wiki
The Wiki is the ultimate resource for documentation, tutorials, and samples which will help you learn to make games with Roblox Studio for PC.
Note: The installer will install you both Roblox Player and Roblox Studio for development.
Also Available: Download Roblox Studio for Mac
Download Roblox Studio Latest Version
Перейти к содержанию
На чтение 2 мин Просмотров 1.3к. Опубликовано 12 марта, 2022
Содержание
- Если вы хотите создать и опубликовать свою собственную игру Roblox, вам необходимо загрузить и установить Roblox Studio. Вот как начать этот процесс.
- Как скачать & Установите Roblox Studio
- Системные требования
Если вы хотите создать и опубликовать свою собственную игру Roblox, вам необходимо загрузить и установить Roblox Studio. Вот как начать этот процесс.
Roblox Studio – это место, где вы можете создавать игры Roblox с миллионами игроков на этой платформе. Если вы планируете узнать больше о создании игр Roblox или хотите опубликовать их в ближайшее время, вот как скачать и установить Roblox Studio. Это бесплатно (вам не требуется купите лицензию), и вам нужно выполнить несколько простых шагов, чтобы запустить его.
Как скачать & Установите Roblox Studio
Системные требования
Вот что Roblox рассказал о системных требованиях для бесперебойной работы Roblox Studio.

- PC/Windows — Windows 7, Windows 8/8.1 или Windows 10 с IE (Internet Explorer) версии 11 или выше. Для Windows 8/8.1 вам нужно будет запустить Roblox в
- режиме рабочего стола, так как режим Metro (мозаичный начальный экран) в настоящее время не поддерживается.
- Mac — macOS 10.11 (El Capitan) и выше.
- Видеокарта — компьютер моложе 5 лет с выделенной видеокартой или ноутбук моложе 3 лет со встроенной видеокартой.
- Процессор — Процессор с тактовой частотой 1,6 ГГц или лучше.
- Память — Не менее 1 ГБ системной памяти.
- Доступ в Интернет — обеспечивает актуальность программного обеспечения и позволяет вы сохраняете проекты в своей учетной записи Roblox. Рекомендуется подключение к Интернету со скоростью не менее 4–8 МБ/с.
- Кроме того, двухкнопочная мышь с колесиком прокрутки улучшит работу в Studio.
Для больше связанных с Roblox, ознакомьтесь с нашей связанной категорией.
In our next BrightChamps Guides series, you will learn the fundaments of Roblox Studios – from downloading and installation to making your first game on Roblox.
Before that, lets quickly have a look at the basics of game development and programming
A programming language is a language that we used to communicate with the computer with a proper set of grammatical rules for instructing a computing device to perform some specific tasks.
Everything that makes our work easier around us has been programmed to perform specific tasks, so coding has become an essential part of every lifelike washing machine, fan, TV, computer, AC, cellphone, and much more.
Roblox is an online 3D game platform that is very popular and these are open for the public to play in a multiplayer setting, ranging from simulations to battle royales, just like other games that are on the market also you can create your own with Roblox game using the platform known as Roblox Studio.
You can also create your creative things and at every age, people can play and create a Roblox game.
With its versatile properties jumping into Roblox game-making has been easier
What Does Coding Mean?
Coding is nothing but the process of using a programming language to get a computer to behave how you want it to behave. It will do the same actions which we have given in the particular order of instructions.
There are two types of coding or programming.
- Block-Based coding (for example, Scratch, code.org, Edublocks, and so on)
- Text-Based coding (for example, C, C++, Java, Python, Pearl, and so on)
What is Text-Based Coding?
Professional coders employ text-based coding, which is done by typing on a keyboard while following the syntax (rules and regulations or grammar) of a programming language.
It involves writing lines of code and can be introduced to people after they have learned how to use block-based coding. It is very essential while typing instructions in a programming language to follow the syntax of the particular coding language. The syntax is nothing but the grammar and spelling rules of a particular programming language.
Programming in Roblox is done in a programming language called Lua. Codes are stored and run as scripts that can be placed anywhere in the game. Meaning if you put the script in a certain section of the game when that section is loaded, Roblox runs the code.
What is Roblox?
![]()
Roblox is a prominent online 3D game platform that allows users to play in a multiplayer setting, with games ranging from simulations to battle royales. As with other games on the market, you may also design your own Roblox game using the Roblox Studio platform.
You can also make your own creative works, and people of all ages can play and create Roblox games. With its versatile properties, Roblox has made getting into game-making easier than ever before.
It was created by the ROBLOX Corporation and is not a single game, but rather an online library of games that can be played and developed by other users. Roblox is compatible with PC, Android, iOS, and Xbox One/Series X.
What is Roblox Coding?
Roblox coding is the process of creating interactive online 3D games with the Roblox Studio platform. As briefly mentioned above, Roblox employs Lua scripting language.
Lua is a widely-used programming language in game development since it is simple to learn and use while creating 3D games. It may also be used to make professional games, construct adventure maps, racecourses, and runner games, among other things.
Is Roblox for Free?
Yes, creating a Roblox account is completely free. In addition, Roblox also has a lot of free animations and games. However, not everything on the platform is free, meaning there are a lot of in-platform purchases. These purchases can be made with Robux, Roblox’s virtual currency.
Robux may be used to buy animation and accessories, among other things, in Roblox Studio. Robux can be earned through Microsoft Rewards or purchased. You can also get “free” Robux by entering contests and giveaways on a variety of websites, but it is a very high risk since not all websites can be trusted.
How to Create a Roblox Account
Follow the steps below to create a Roblox account
- Visit the official Roblox website and start your account creation process by clicking on Sign Up.
- Fill in all of the required information. Below, I’ve listed some of the most crucial and necessary details to include when creating a Roblox account
- Birthday: When creating an account, it is critical to provide your correct birth date because Roblox has security and privacy settings based on the user’s age.
- Username: It should not be your real name. Create a unique username.
- Password: Maintain a password that is difficult to guess. Keep it to yourself, unless you want to share it with your parents or guardian.
- After filling in the Gender (which is optional), click on Sign Up. When you click Sign Up, you will be presented with a Verification dialog box. Solve the challenge by clicking on Verify.
- That’s it! Your Roblox account has been created! You will now be directed to Roblox Home.
- Once you’ve created your account, enter and verify your email address in case you need to reset your password at any time.

What is Roblox Studio
Roblox Studio is a game engine created by Roblox that includes all of the tools necessary to code and create games. Simply described, it is a Roblox feature or platform that allows users to develop games.
This studio is completely equipped with an animation editor, several tools, and code functions. As previously stated, Roblox Studio supports the Lua programming language for game development. Roblox Studio is currently only available for Windows (7 or above) and macOS (10.11 or higher).
How to Download Roblox Studio
Follow the steps below to download and install Roblox studio
Step 1: Go to the Roblox Website.
Step 2: Click on the Create option at the top of Roblox homepage and then click on ‘Start Creating’.

Step 3: Now click on the Download Studio button as shown in the image below.

Step 4: The .exe file will get downloaded on Computer/PC/Laptop.
Step 5: After the download is complete, double click on the downloaded file, Roblox Studio will begin installing, as shown in the image below.
Step 6: Once the installation is complete, enter your Roblox username and password.
Your screen should now look like the one below, and you’re ready to start making games on Roblox Studio.

Roblox Studio Features
Roblox Studio includes a lot of features, but here are a few of the more significant ones:
- It has a large online library where you can find 3D models, textures, and images, among other things.
- It employs the LUA programming language which is very easy for beginners and also for game logic scripts.
- It is a well-documented API.
- You can instantly publish games to Roblox so everyone can play them.
Introduction to Roblox Studio Interface
General Interface
- As soon as we log in, you can see the Roblox Studio interface as shown in the image below. We can see the options for All Templates, Themes, and Gameplay if we click on ‘New.’ In the ‘All Templates’ menu, we can see all of the templates.

- Click on ‘My Games’ to see the games you have created. There are three alternatives available here; My Games, Group Games, and Shared With Me.

- When we click on File, we are presented with a variety of options, including New, Open from files or Roblox, Settings, and so on.

- When we select a template to build a new Roblox 3D game from the New menu, the interface will appear as shown in the image below. The same interface will appear when we choose to make changes or upgrade a game.
- Once this new interface is open, we can move about by pressing w, s, a, d, or the arrow keys. We can also use the mouse to look around, and the space key on the keyboard is used to jump.
- Home tab: It’s the first tab, above the playback icons, on the top of the screen. It is useful in the panel’s object selection and manipulation tools.
- Clipboard: We can access options like cut, copy, and duplicate from here.

Home Tab
Now will go over major sections within the Home tab; Tools, Terrain, Insert, Edit, Game Settings, and Test.
Let us look at the usage of each tool in depth.
1. Tools Section
- Click on the ‘Select’ tool in the toolbar at the top of the screen to select any object, then click on the object in your game that you wish to select. A blue border will surround an object that has been selected. We can also move an object by clicking and dragging it after we select it.
Note: If the Select, Move, Scale, or Rotate tools aren’t visible, go to the top of the screen and click the “Home” or “Model” tab.
- To delete an object, simply select it and press Delete on the keyboard.

- To move an object, simply click the ‘Move’ tool in the panel and then click on the object you wish to move. Click and drag the red, green, and blue arrows to move them around.

- We can adjust the size of an object by using the ‘Scale’ tool. To make an object larger or smaller, select it and click and drag one of the red, green, or ball icons on the side.

- The Rotate tool can be used to rotate the desired object. To rotate an object, select it and click and drag the red, green, or blue rings.

- Collision is used to collide with the player, and Joining is used to connect with the provided surface. Geometric and physical modes are available.
2. Terrain Section
- Open the Terrain editor by clicking on the Editor section that has ‘Terrain’ in it. In our design area, we can see a blue box that represents the area where the terrain will be generated.

- Choose your desired terrain features, and they will be generated at random. To pick features, go to the left side of the Terrain Editor window and scroll down to the bottom. Select the checkboxes for the features you want to generate. Water, grasslands, dunes, mountains, arctic, and canyons are some of the features.
- Adjust the size of the biomes we wish to create with the slider bar.
- Toggle the cave generation on or off by clicking the toggle switch.

- Once you’ve made all of your choices, click the Generate button and wait a few minutes for the landscape to be generated.

- Select the Edit option from the drop-down menu. This is where you can make changes to the terrain tool.

- You can choose from nine different tools depending on your needs. The list is as follows:
- Add: It is used to add new chunks of terrain to the exact size and shape of the brush.
- Subtract: It’s used to remove sections of the landscape by precisely controlling the brush’s size and shape.
- Grow: This is used to increase the elevation when the brush is clicked.
- Erode: This is used to lower the elevation of the section where the brush is clicked.
- Smooth: This is used to make the area where the brush is clicked smoother.
- Flat: Use this to flatten the surface of the area you’re brushing over.
- Paint: This is used to alter the terrain’s appearance. Select this tool, then scroll down to the Terrain Editor panel’s bottom and click on the terrain type you want to paint.
- Replace: This command is used to swap out one terrain type for another. Select the kind you wish to modify as the source material, then below ‘Target material,’ select the material you want to change it to.

- Choose the brush shape you want to use. We have the option of selecting a sphere, cube, or cylinder.
- The ‘Base size’ slider is now used to modify the brush size according to your needs. To alter the brush size to any number between one and sixty-four. You can also change the brush’s strength, which runs from 0.1 to 1, with 1 being the most powerful.

- Click one of the three buttons next to ‘Pivot position’ to try to alter the location of the selected brush. The following are the three options:
- Bot: This positions the bottom of the brush on the top of the terrain surface.
- Cen: This positions the center of the brush on top of the terrain surface.
- Top: This positions the top of the brush on top of the terrain surface.

- To change the brush settings, we can use one of three toggle switches:
- Plane lock: It shows a grid of the plain, the brush is locked, and you can only move with the plain you’ve chosen.
- Snap to the grid: These only paint grid points.
- Ignore water: it ignores water.

- Sea Level: You can use the Sea Level tool to generate a constant water level in any area.

3. Insert Section
- The Toolbox panel may be open by default, but if not, click on it and it will appear on the left side of the screen.

- From the Toolbox, we can search for anything. Search for your desired item by entering the name on the search bar.

Note: We may select the type of object we wish to search for using the drop-down option. Models, meshes, pictures, audio, video, and plug-ins are all included. Choose the option that best suits your needs.
- To add an object to your game, select it from your search results and click and drag it into it.

- The Part icon looks like a cube, and it opens a drop-down menu where you can choose one of four forms to use to make items in the game. There are four parts to it. The following are the details:
- Block: It creates a new rectangular object.
- Sphere: It creates a new object in the shape of a ball.
- Wedge: It creates a new block with an incline.
- Cylinder: It creates a round, pole-shaped object.

- The UI is used to change the options shown in the image below.

4. Edit Section
- A specific part’s material can be altered using Material. Glass, wood, concrete, metal, stone, granite, brick, and other materials are among the options.

- Click one of the colored swatches of your choice to change the color of a particular part.

- The Group option is used to group the two sections.
- The Lock option is used to lock the part, preventing it from changing any of its attributes.
- When the object is in the air, the Anchor option is used to keep it from falling.
5. Test Section
It provides options for Play, Resume, and Stop to test the game.

6. Game setting
It is used to change the permission and publish it and so on. We can test by the team and by clicking on the exit game we can come out of the game too.
Model Tab
- Select the Model tab at the top of the page (it’s the second tab). In the Roblox studio, this displays all of the modeling tool panels at the top of the page.

- We already learned about the Tools tab in the Home tab. Transform, is a new option in this case, and it’s used to manipulate the item accurately.

- There are two options in the Snap to Grid menu: Rotate and Move.
- Alignment has an align tool that is used to align the parts and models you’ve chosen.

- Union, Negate, and Separate are all part of Solid Modeling.
- When two or more components are touching, the Union tool is used to link them together so that they become one part. To link two sections together, follow the procedures below:
- Hold Shift and click the parts you want to unite.
- Click on the Union button in the panel.

- If you want to separate pieces that have been joined together, use the Separate tool.

- The Negate option is used to remove the chosen portion. It can also be used to chop out pieces of another element that cross. To use the Negate tool to cut out a portion of a part, follow these steps:
Place the portion in such a way that it intersects with another. Select the intersecting section by clicking on it. When you click the Negate button, the portion will turn red. Click on both pieces while holding down the Shift key on the keyboard, then click on Union.

- The Constraints option shows welds, constraints details, draw on top, and scale. There are numerous options in the Constraints drop-down menu, as shown in the image below. And the scale is used to increase or decrease the size of the constraints.


- The Gameplay has Effect and Span in the section.
- Effects allow us to do things like set fire, smoke, emit sparkles, or turn it to light. To add an effect to an item, select it and then click Effect. From the drop-down menu that appears, select the effect you wish to apply.

- Click Spawn Location in the top menu to add spawn places or checkpoints. The spawn position is where the player begins. Checkpoints are spawn places with several spawn locations.

- The Advanced tab has options like Insert object, collision groups, local script, model, execute script, module script, service, and script.

Test Tab
This displays all the testing tool panels at the top of the page in the Roblox studio.

- It has the simulation tab that contains Play, Pause, Resume and Stop to test our game by playing.

- The Clients and Servers tab is used for starting and cleaning up the server or the player data and is also used for setting the server and player.
- The Emulation tool has two options that are device and player. We can replace the device with a mobile phone or a tablet. Toggle the player emulation using this player.
- The Audio tool is used to mute or unmute the sound.
View Tab
It shows the tools for selecting and adding scripts/coding to our Roblox game’s objects. Scripts are used to make objects interactive, animate objects, grant or take away health points, kill players, and a variety of other things.

- The Explorer panel appears on the right of the screen when you click the Explorer tab. It has a list of all the objects and parts in our game. It navigates to the object in the Explorer panel to which you wish to add a script.


- The Workspace is the parent object of all objects in the game. All of the game pieces or objects in the game world are stored in the Workspace. To see each of the kid objects, click on the arrow icon.

- Click + to add a script to the part. When you hover your mouse over an object, a plus sign (+) appears and when you click it, a list of objects you want to or can be added to that particular portion appears.

- Click on the Script from the options. It opens a blank script in the center of the screen.

Plugin Tab
This displays all the Plugin tool panels at the top of the page in the Roblox studio.

- The plugin’s first option is Tools. Manage plugins and Plugins Folder are two of the tools available. The plugins folder is used to open the local plugins folder, and the manage plugins command is used to manage the installed plugins.

- Rig builder is a tool for creating or adding rigs around animations.
- We can use tools in Localization to hide or expose the localization.
- The avatar importer in Avatar is used to import the avatar from a .fbx file.
- View Sounds is part of Audio Discovery, and it’s used to find out what audio assets are in here, as well as who owns them.
- The Animation Editor is used to generate, preview, and publish animation clips in Animations.
KHow Does Roblox Benefit kids?
Roblox encourages kids to develop their creative thinking skills by encouraging them to not only play the game but develop them at the same time. Roblox features a built-in editor Roblox Studio which includes several features mentioned above. With the help of the Roblox Studio, kids get access to an opportunity for unlimited creativity and learning.
It can be used for a variety of educational purposes. It uses the Lua programming language to assist kids in learning to code, level design, arithmetic, and variables, and it even helps with economics thanks to Roblox’s in-game currency Robux.
Apart from this, Roblox is popular among people of all ages since it is simple to use and has a 3D environment. If we get bored with one game, we can switch to another category. Every person has distinct hobbies and interests and depending on their interests, they can play any game, thanks to a plethora of options in Roblox.
Create your First Game in Roblox- Step by Step Guide
Here we will be making a simple game in Roblox perfect for beginners – Falling Object from the Sky. Let’s get started with it!
Step 1: Open the Roblox studio and click on New and choose any template of your choice.
Step 2: Once the screen opens click on Part and choose the desired part of any object.

Step 3: Change the material, color, size, and position, but make sure the part remains in the original spot.

Step 4: Now go to the ServerScriptService and click on the + button. When playing without taking any action, the script written on the ServerScriptService runs by default.

Step 5: Select the script, so that we can write the program in it.

Step 6: Understanding the Scripting Basics
1. The for loop is a loop that repeats an action a certain number of times, and its syntax is as follows:
for initialization, maximum value, increment do

statement(s)
end

- The initialize executes first, and only once. It allows you to declare and initialize variables.
- The maximum/minimum value indicates how long the loop will run. It creates an internal condition to check or compare the initial value to the maximum/minimum value.
- After executing once, the loop the flow of the control jumps back up to the increment/decrement statement and it updates variables, only if it is true, the loop executes and after the condition becomes false, the for loop terminates or ends.
2. The wait () function is used to delay the code of execution of the next code for a certain amount of time. The syntax is as follows:
wait (millisecond)
3. The Vector has two types. Vector2 and vector3.
- Vector2 is the representation of 2D vectors, the points, and positions. It has two-axis; X-axis & Y-axis.
- Vector3 is the representation of 3D vectors and points. It is used to represent positions and has 3 axis X, Y, & Z-axis.
4. Anchor: If you keep the objects in the air, gravity will cause them to fall to the ground by default. Click the Anchored property in the Home/Model tabs to place an object in the air without falling or to lock an object in place and prevent it from moving, even if there are heavy collisions or other extreme pressures. In the script, the same team will be at work. If it’s true, the object will not fall. It falls to the ground if it is false.

5. The Position property contains three parameters: X, Y, and Z, and it is dependent on the object’s center position. The Move tool, which may be found in the Home or Model tabs, can also be used to change it.

6. Orientation refers to an object’s rotation, and it has three attributes or parameters, similar to Position but in degrees. Like Position, we use the Move tool located in the Home or Model tabs to change the orientation.

Step 7: Now write the program as shown in the image below.
Step 8: Click on play to see the action i.e. test the game.

We can see that the part/object is falling 5 times from the designated point before stopping.

Step 9: Save the game
Click on File.

- Click on Save to File As. This will open a Save menu, where you can save your game as a Roblox file to your computer.
- You can also click Save to Roblox to save the game to the Roblox server.

Step 10: Edit/Update the game
If you want to upgrade a game that we have previously saved, we use the following steps:
- Click on File.
- Click Open from File if you have a file on your computer or Open from Roblox if you have stored it in the Roblox server.
- Click on the selected Roblox game or a particular file (.rbxl) and click the Open button.
- Once it opens, you can begin the editing process.

Step 11: Publish the game
Once we’ve finished editing a game and it’s ready for people to play, we use the methods below to publish it to Roblox:
- Click on File.
- Click on Publish to Roblox As from the given options.

- Click on an existing game to replace it or click on Create a new game.
- Enter the name of the Roblox game (whatever you want to name it).
- Enter a description of the game.
- Select a creator from the drop-down menu options.
- Click the checkbox saying that your game is compatible.
- Click Create.
- Now go to the Game Setting and make it Public with permission.

- Now you can click on share and copy the link and share it all.


Ayesha M
I am a Computer Science Engineer and currently a coding educator. Aside from coding, I also enjoy writing and taking on new challenges. I hope with BrightChamps, I can help children become leaders not only in technology but also in life.
Read all my blogs here!