Обновлено 21.08.2020

Доброе времени суток. Уважаемые читатели и гости, крупного IT блога Pyatilistnik.org, занимающего в рейтинге Яндекс.Радар 2500 место, среди всех сайтов России. В прошлый раз, мы с вами решили проблему со сбоем запроса устройства. Сегодня я не хочу рассматривать новые ошибки, а поделюсь своим опытом использования утилиты Robocopy, приведу примеры использования, поговорю о параметрах утилиты и покажу, как у Robocopy использовать графический интерфейс (GUI). Данной программкой просто обязан пользоваться каждый системный администратор, ну или хотя бы знать. о ее существовании, лично у меня она находится на почетном месте в моем наборе системного инженера.
Что такое robocopy (Robust File Copy Utility)
Утилита Robocopy (Robust File Copy Utility) — это специализированное средство, в задачи которого входит тонкая настройка процесса копирования, синхронизации, удаления и переноса файлов и папок, между дисками компьютера, компьютерами, сетевыми шарами и лесами, с сохранением атрибутов, прав разрешений и многое другое.
Robocopy за счет своих алгоритмов и многопоточности позволяет проводить копирование или синхронизацию одних файловых ресурсов с другими в десятки раз быстрее, чем обычное копирование средствами проводника Windows.
Данное средство, очень часто используется в задачах системного администратора, по переносу сетевых шар и файловых ресурсов, и в сценариях синхронизации данных.
Если обратиться к Википедии (https://ru.wikipedia.org/wiki/Robocopy), то там вы обнаружите, что она создавалась как средство репликации и шла в составе такого известного комплекса инструментов, как Windows Resource Kit.
Версии утилиты Robocopy
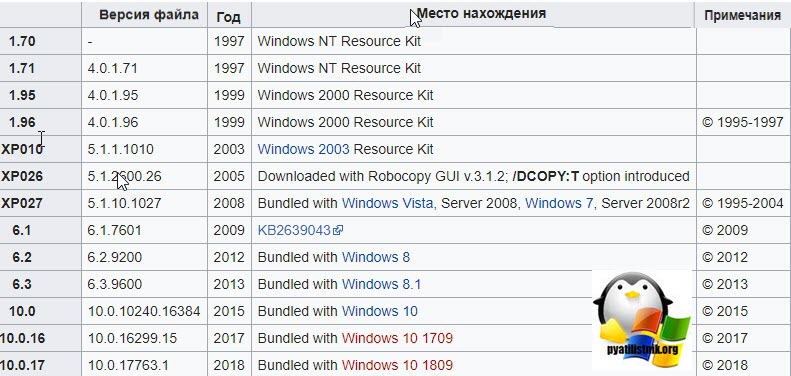
Первая версия robocopy появилась в 1997 году в составе инструментов Windows Resource Kit. На текущий момент самой свежей версией является 10.0.17763.1 входящей в состав Windows 10 1809, табличку в Википедии я подправил (https://en.wikipedia.org/wiki/Robocopy)
Где лежит Robocopy в системе?
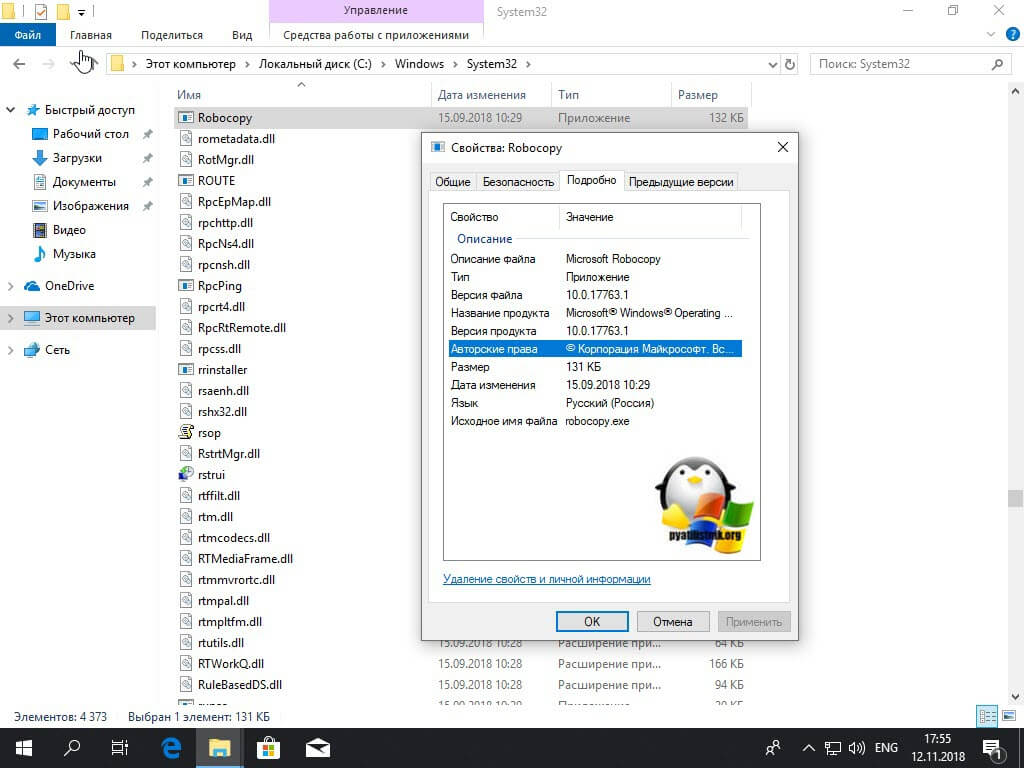
Основной исполняемый файл Robocopy.exe располагается по пути C:WindowsSystem32. Утилита очень компактная и весит всего 132 килобайта, но это не уменьшает ее мощи и функционала.
Где скачать утилиту Windows Robocopy
Начиная с Windows 7, данная программулька является ее составной частью, и я уже выше показал, что она лежит в папке C:WindowsSystem32, если по каким-то причинам у вас в ней нет файла robocopy.exe, то у вас есть несколько вариантов его скачать.
- Первый вариант, это скопировать его из другой системы
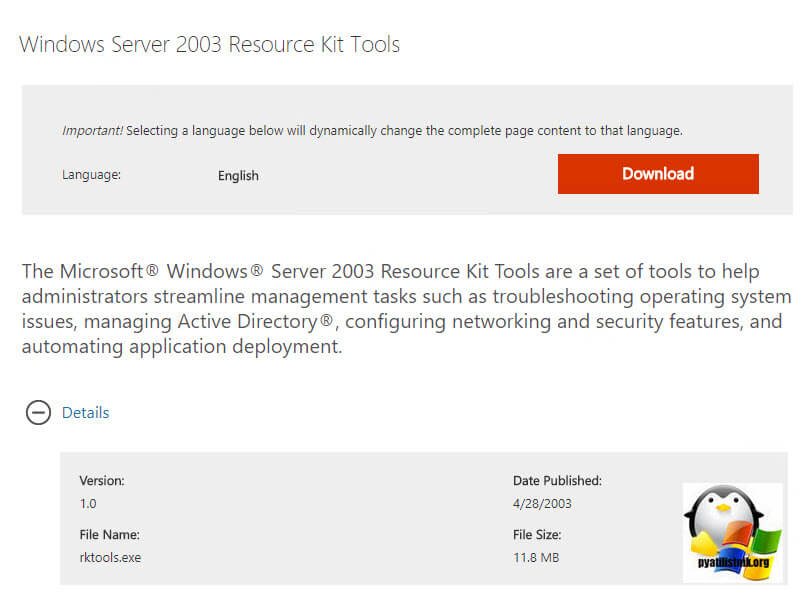
- Второй вариант, это загрузить средство Windows Server 2003 Resource Kit Tools по ссылке (https://www.microsoft.com/en-us/download/details.aspx?id=17657). В состав этого пакета входит утилита Robust File Copy Utility.
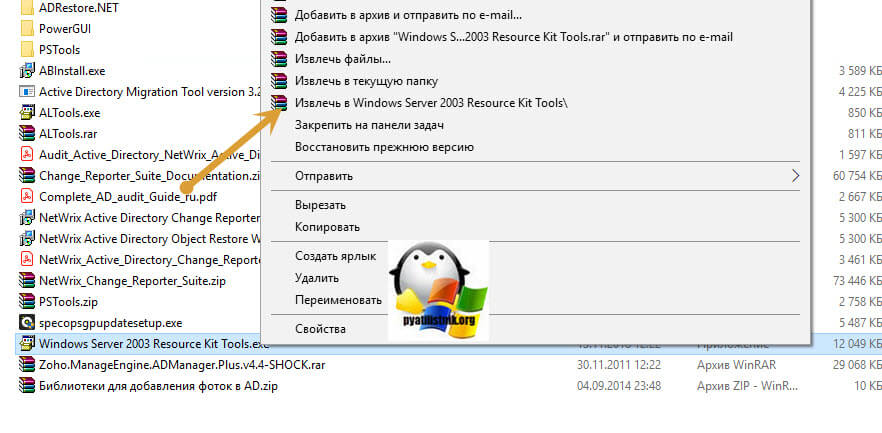
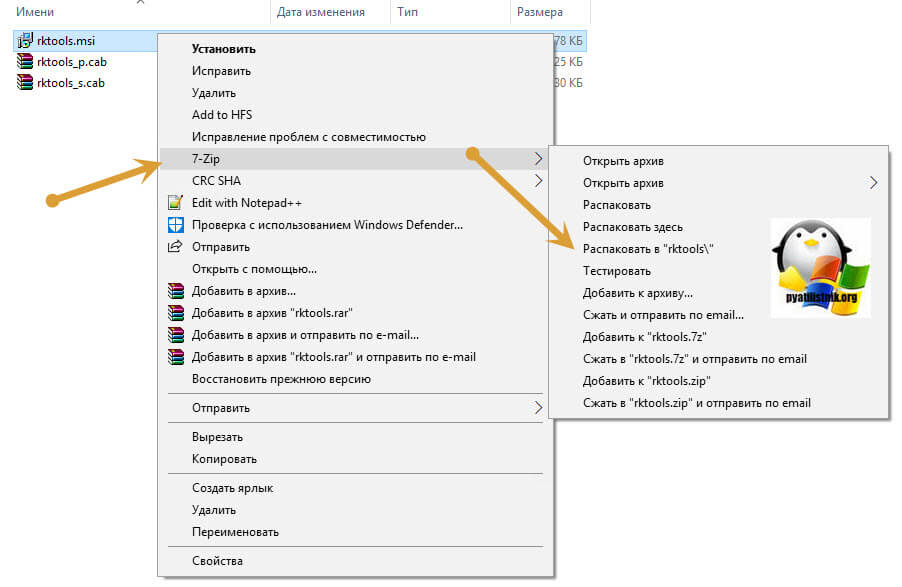
Далее полученный файла robocopy, вам необходимо разархивировать данный файл, для этого у вас должен быть архиватор winrar или 7-zip. Через правый клик извлекаем его содержимое.
Далее 7-Zip-ом распаковываем msi пакет rktools.msi.
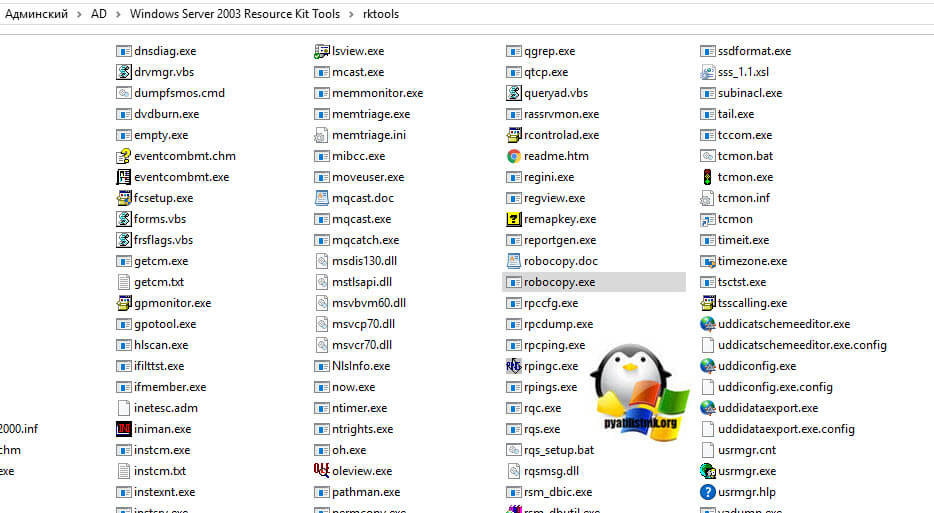
Перейдите в папку rktools, там вас будет ждать файл robocopy.exe, который вы можете скачать куда угодно.
Возможности утилиты Robocopy (Robust File Copy Utility)
И так давайте разбираться, какими функциональными возможностями обладает данная утилита. Как я и писал выше Robocopy умеет:
- Производить копирование файлов и папок
- Производить синхронизацию файлов и папок
- Копировать по расширениям файлов
- Переносить права на папки и файлы
- Копирование и перенос файлов по датам и за нужный период
- Удалять файлы и папки
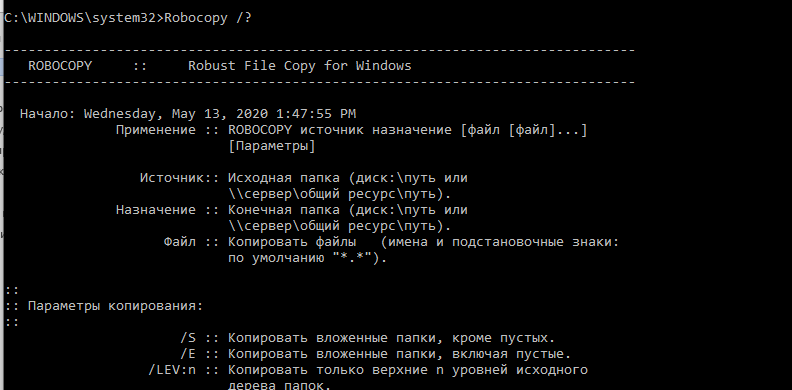
Чтобы посмотреть все ключи и их назначение, нам нужно открыть командную строку, желательно от имени администратора и ввести команду:
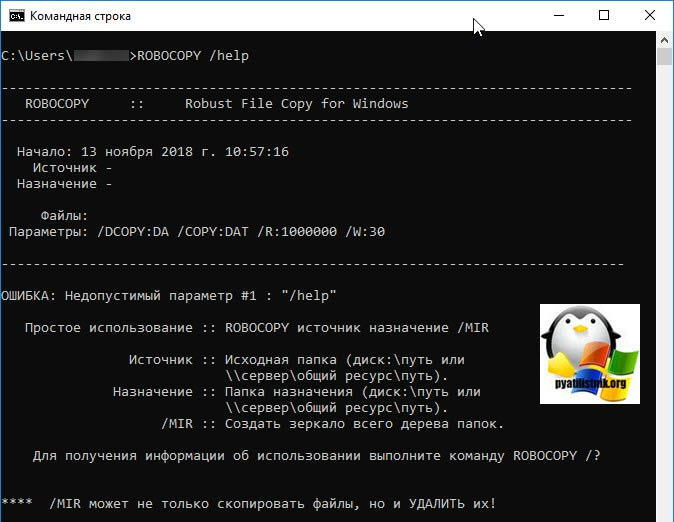
У вас появится небольшая справка, в которой вам отобразят конструкцию построения команд и несколько примеров реализации. Чтобы вывести все доступные параметры Robocopy вам необходимо ввести команду:
Тут ключи и параметры будут разбиты на несколько подкатегорий:
- Параметры копирования
- /COPY:флаги копирования
- /DCOPY:флаги копирования
- Параметры выбора файлов
- Параметры повторных попыток
- Параметры ведения журнала
- Параметры задания
- Комментарии
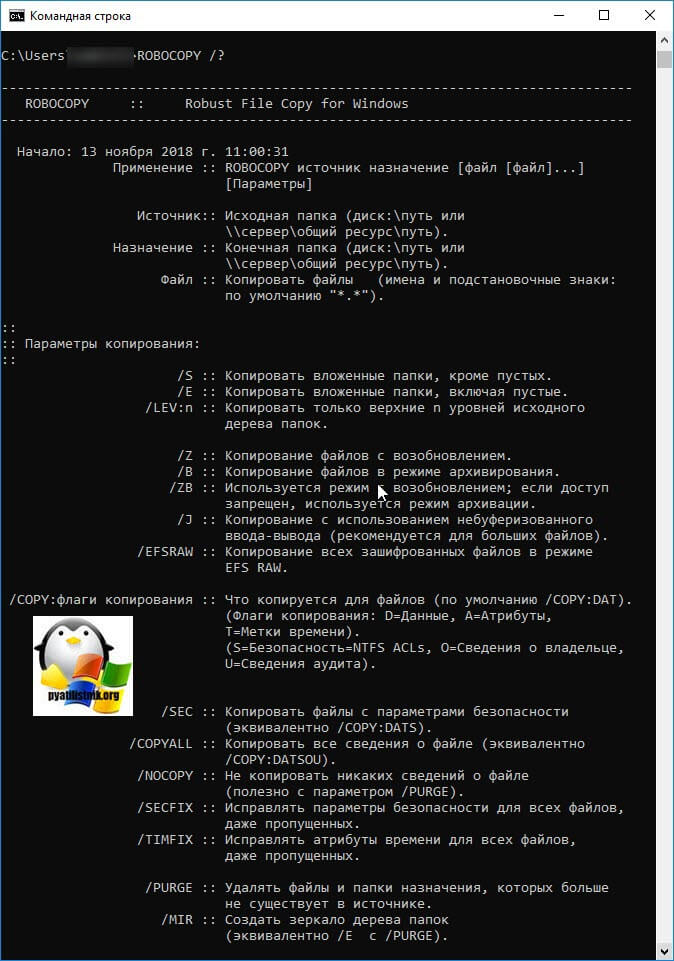
Ключи параметров копирования:
- /S — данный параметр позволит вам произвести копирование вложенных папок, за исключением пустых. Очень удобно, чтобы не перетаскивать не используемые каталоги
- /E — данный ключ, альтернатива параметру /S, так как он позволит скопировать вложенные папки, в том числе и пустые.
- /LEV:n — данный параметр копирования Robocopy позволит вам скопировать n-число уровней у текущего каталога папок. Предположим у вас есть папка, которая включает в себя еще 10 подпапок, задав n равное 5, вы скопируете структуру, только первых пяти верхних каталогов, а все, что ниже не будет затронуто.
- /Z — параметр позволяет возобновлять копирование в случае какого-то сбоя
- /B — Копирование файлов в режиме архивирования.
- /ZB — совмещение параметров Robocopy.exe, в данном случае вначале будет использоваться режим с возобновлением, но если доступа к каким либо файлам не будет, то утилита переключиться в режим архивации.
- /J — данный параметр Robocopy.exe используется при копировании крупного размера файлов, где применяется небуферезированный ввод-вывод
- /EFSRAW — будет произведено копирование всех зашифрованных файлов в режиме EFS RAW
Ключи /COPY:флаги копирования
Ключ /COPY это один из базовых ключей, который вы будите применять в своих сценариях синхронизации или копирования, он переносит (Флаги копирования: D=Данные, A=Атрибуты, T=Метки времени). (S=Безопасность=NTFS ACLs, O=Сведения о владельце, U=Сведения аудита)
- /SEC — данный флаг позволит вам скопировать файлы и каталоги вместе с их параметрами безопасности (эквивалентно /COPY:DATS)
- /COPYALL — данный ключ скажет утилите Robocopy.exe, что нужно при копировании перенести все сведения о файле (Аналог /COPY:DATSOU)
- /NOCOPY — данный ключ скажет, что не нужно копировать никаких сведений о файле (полезно с параметром /PURGE).
- /SECFIX — данный ключ будет полезен при синхронизации, когда нужно перезаписать и исправить параметры безопасности на всех папках и файлах. Простой пример, вы сделали первое копирование одного каталога с файлами в другой, и перенесли параметры безопасности (NTFS), в какой-то момент в исходном каталоге у вас поменялись разрешения на некоторые файлы, и если вы произведете синхронизацию, без этого ключа, то эти новые права доступа не перенесутся в новое место, поставив ключ /SECFIX, вы этого избежите и все будет обновлено.
- /TIMFIX — этот флаг позволит исправить атрибуты времени у всех файлов, в том числе и пропущенных
- /PURGE — позволит удалить каталоги и файлы в папке назначения, которые уже не существуют в источнике.
- /MIR — в данном случае будет создана полная копия (зеркальная) источника в назначении, аналогично выполнению Robocopy.exe с ключами /E /PURGE
- /MOV — данный ключ позволит перемещать файлы (удаление из источника после копирования, я бы назвал это аналогов вырезать в Windows)
- /MOVE — похоже на ключ /MOV, но уже вырезаться будут файлы с папками.
- /A+:[RASHCNET] — данный флаг позволяет вам добавлять атрибуты к скопированным файлам
- /A-:[RASHCNET] — данный флаг сообщает утилите Robocopy, что нужно удалить заданные атрибуты у скопированных файлов
- /CREATE — данный флаг создает дерево каталогов и файлы нулевой длины
- /FAT — Создать файлы назначения только в формате 8.3 FAT
- /256 — отключает поддерживание длинных путей свыше 256 знаков, на практике не встречал таких сценариев.
- /MON:n — robocopy в данным флагом в параметрах, будет производить мониторинг источника, и перезапустит выполнение после n изменений
- /MOT:m — Наблюдать за источником; перезапустить через m минут, если произошли изменения.
- /RH:hhmm-hhmm — тут вы говорите для Robocopy.exe в какое время нужно производить запуск, в какой момент будет запущено задание копирования файлов.
- /PF — Проверять часы запуска по файлам (не по проходам)
- /IPG:n — данный ключ поможет снизить нагрузку на сеть, когда у вас не очень хороший канал, n интервал задержки в миллисекундах.
- /SL — копирует сами символические ссылки, за место копирования целевых объектов, на которые эти селинки ссылаются.
- /MT[:n] — использование многопотокового режима, позволяет существенно увеличить скорость копирования, за счет использования процессорных моoностей системы. n может иметь значение от 1 до 128 потоков. Нельзя использовать с параметрами /IPG и /EFSRAW. Для повышения производительности перенаправьте вывод с помощью параметра /LOG.
Ключи /DCOPY:флаги копирования
Данный раздел флагов отвечает за то, что копировать для каталогов (D=Данные, A=Атрибуты, T=Метки времени)
- /NODCOPY — не производить копирование любых сведений о каталоге
- /NOOFFLOAD — Robocopy будет копировать файлы без использования механизма разгрузки копий Windows
Параметры выбора файлов
Утилита Robocopy очень тонко позволяет производить тонкую фильтрацию файлов при копировании, для этого есть огромное количество ключей и флагов.
- /A — флаг задает копирование файлов с атрибутом «Архивный»
- /M — задает копирование файлов с атрибутом «Архивный» и потом его сбросить на конечной стороне
- /IA:[RASHCNETO] — переносить файлы на которых установлены заданные атрибуты (объявленные заранее)
- /XA:[RASHCNETO] — при копирование будут исключены файлы с объявленными атрибутами
- /XF file [файл] — позволяет исключать файлы, у которых заданные имена, пути и подстановочные знаки
- /XD dirs [папки] — исключает каталоги, с заданными именами и путями
- /XC — robocopy не копирует измененные файлы
- /XN — исключить более поздние файлы
- /XO — Исключить более ранние файлы
- /XX — Исключить дополнительные файлы и папки
- /XL — Исключить отдельно расположенные файлы и папки
- /IS — Включить те же файлы
- /IT — Включить оптимизированные файлы
- /MAX:n — Robust File Copy Utility исключит файлы, у которых размер более n-байт, можно это назвать максимальным размеров копируемых файлов
- /MIN:n — данный параметр Robocopy установит минимальный размер копируемого файла, позволит исключить файлы у которых n-байт меньше заданного
- /MAXAGE:n — тут мы задаем максимальный возраст файлов. Мы исключим при копировании файлы, у которых возраст больше n дней
- /MINAGE:n — тут мы задаем минимальный возраст файлов. Мы исключим при копировании файлы, у которых возраст меньше n дней
- /MAXLAD:n — Наиболее поздняя дата последнего обращения. Будут скопированы данные, которые не использовались с даты n
- /MINLAD:n — Наиболее ранняя дата последнего обращения. Robocopy исключит файлы, которые были использованы после даты указанной в n. (Если n < 1900, то n = n дней, в противном случае n — дата в формате ДД.ММ.ГГГГ)
- /XJ — отключение точек соединения, которые по умолчанию включаются
- /FFT — Использовать время файлов FAT (двухсекундная точность)
- /DST — Тут задается. будет ли Robocopy учитывать одно часовую разницу при переходе на летнее время
- /XJD — Исключить точки соединения для папок
- /XJF — Исключить точки соединения для файлов
Ключи параметров повторных попыток
- /R:n — Число повторных попыток для неудавшихся копий, по умолчанию — 1 миллион.
- /W:n — Тут вы зададите период ожидания между повторными попытками: по умолчанию это 30 секунд.
- /REG — Сохранить /R:n и /W:n в реестре как параметры по умолчанию.
- /TBD — Ждать, пока будут определены имена общих ресурсов (ошибка повторной попытки 67).
Ключи параметров ведения журнала
- /L — получить только список, в данном случае Robust File Copy Utility файлы не копирует, не удаляет, не помечается метками времени.
- /X — Сообщать обо всех дополнительных файлах, а не только о выбранных.
- /V — Подробный вывод с указанием пропущенных файлов.
- /TS — Включать в вывод меток времени исходных файлов.
- /FP — Включать в вывод полные пути файлов.
- /BYTES — Печатать размеры файлов в байтах.
- /NS — Режим без размера, у вас не будет заноситься информация, о размерах файлов в журнал.
- /NC — Режим без класса, не заносить в журнал классы файлов.
- /NFL — Режим без списка файлов, не заносить в журнал имена файлов.
- /NDL — Режим без списка папок, не заносить в журнал имена папок.
- /NP — Режим без хода процесса, не отображать число скопированных процентов.
- /ETA — Показывать оценку времени окончания копирования файлов.
- /LOG:файл — Производить запись состояния в файл журнала (перезаписывать существующий журнал).
- /LOG+:файл — Производить запись состояния в файл журнала (добавлять к существующему журналу).
- /UNILOG:файл — Производить запись состояния в файл журнала в формате Юникод (перезаписывать существующий журнал).
- /UNILOG+:файл — Производить запись состояния в файл журнала в формате Юникод (добавлять к существующему журналу).
- /TEE — Направлять выходные данные в окно консоли и в файл журнала.
- /NJH — Без заголовка задания.
- /NJS — Без сведений о задании.
- /UNICODE — Состояние вывода в формате Юникод.
Ключи параметров задания
- /JOB:имя_задания — Взять параметры из указанного файла задания.
- /SAVE:имя_задания — Сохранить параметры в указанный файл задания
- /QUIT — Выйти после обработки командной строки (для просмотра параметров).
- /NOSD — Не указывается исходная папка.
- /NODD — Не указывается папка назначения.
- /IF — Включить следующие файлы.
Как видите у утилиты Robocopy много параметров и ключей, и я рад, что Microsoft не забросила свою полезную программку, которую я полюбил еще в Windows Server 2003 Resource Kit Tools.
Более подробно почитать, о параметрах Robocopy вы можете почитать на сайте Microsoft (https://docs.microsoft.com/en-us/previous-versions/windows/it-pro/windows-server-2008-R2-and-2008/cc733145(v=ws.10))
Варианты и примеры использования на практике
Теперь когда мы с вами разобрали параметры Robocopy, остается научиться их использовать и применять в ваших сценариях. Сценариев может быть огромное количество. например:
- Нужно скопировать только измененные файлы
- Нужно скопировать только новые файлы
- Нужно скопировать только папки или файлы с определенным расширением, например, PDF
- Нужно копировать файлы из локального расположения в сетевое
Самый простой пример использования Robocopy, это простое копирование одного каталога в другой в рамках одного диска. Предположим мне нужно продублировать содержимое папки C:Temp в C:Test_robocopy
В командной строке пишем вот такую команду
robocopy C:Temp C:Test_robocopy /E
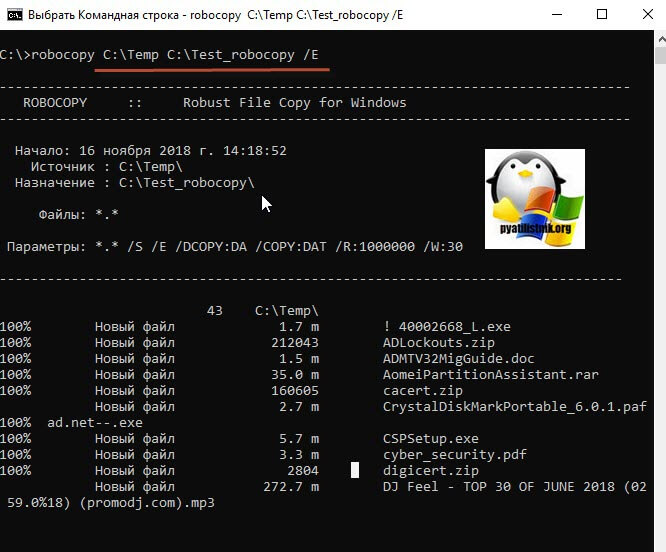
Напоминаю параметр /E копирует файлы и папки, в том числе и пустые. Сам процесс выглядит поэтапным копированием в один поток файлов.
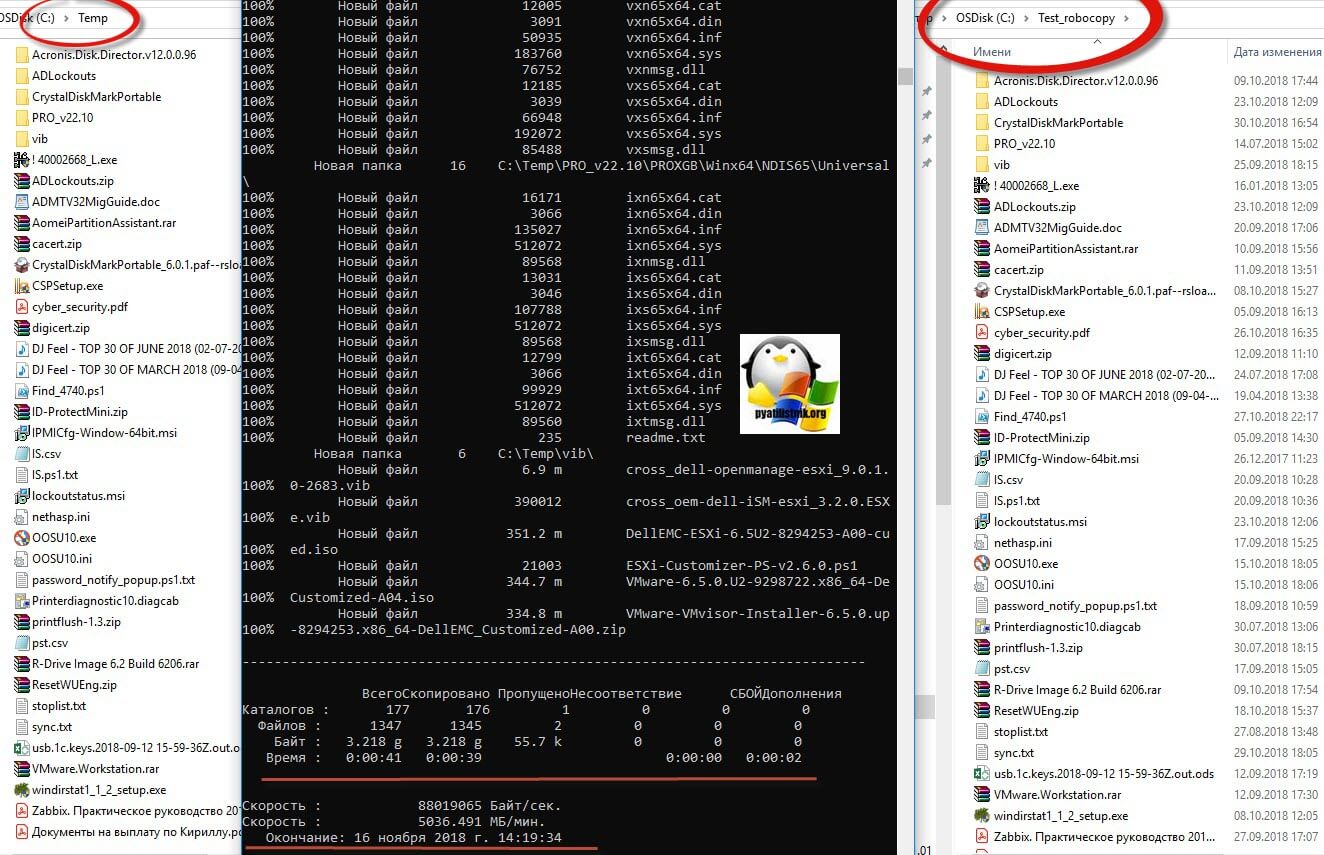
По окончании выполнения команды вы увидите сводную таблицу, в которой будет статистика по каталогам, файлам, времени, пропущенным файлам и скорости.
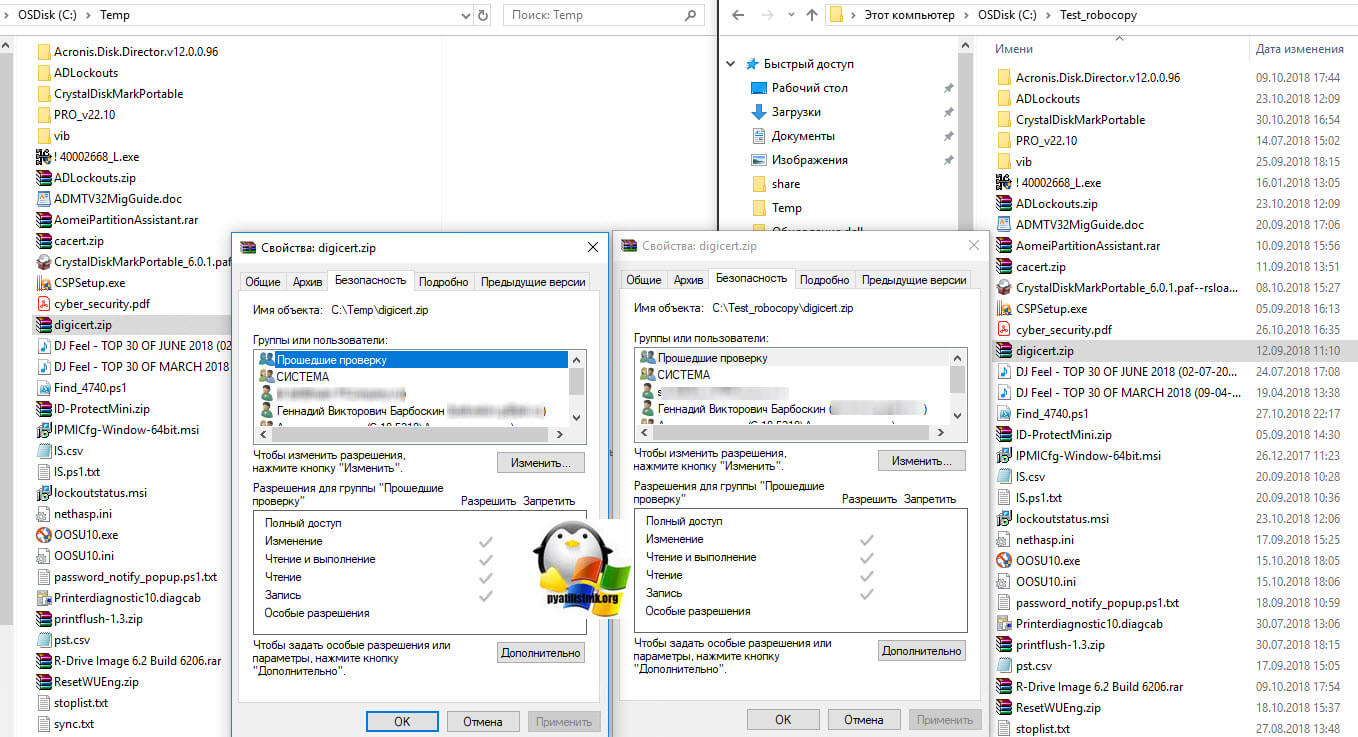
Но при таком использовании robocopy, вы на каталоге назначения получите файлы с уже другими правами на них. Видно это в свойствах.

Чтобы скопировать и исправить на файлах в каталоге назначения все права доступа (перезаписав текущие и подставив туда из источника), вам необходимо выполнить вот такую команду:
robocopy C:Temp C:Test_robocopy /E /COPYALL /SECFIX
Ключ /COPYALL переносит все сведения о файле, а параметр этого ключа /SECFIX исправит все сведения на вкладке «Безопасность».
Если у вас не перенеслись новые права на файлы, то со 100% вероятностью у вас консоль cmd в которой вы запускаете сценарии Robocopy, работает не от имени администратора, старайтесь всегда делать из под данного режима
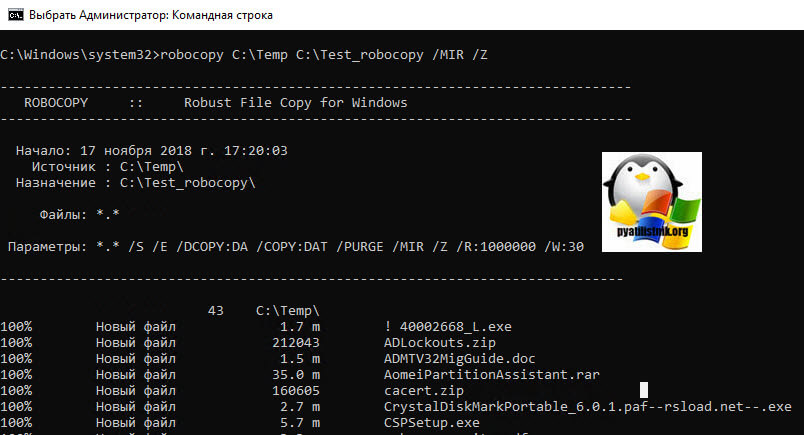
Напомню, что есть ключ /MIR параметра robocopy, он делает зеркальную копию каталогов, вот его пример использования:
robocopy C:Temp C:Test_robocopy /MIR /Z
В момент такого зеркального копирования, утилита Robust File Copy Utility, сделает на конечной стороне полную копию источника, и со всеми списками доступа (ALC) на вкладке безопасности, так же будут перенесены все атрибуты данных. При повторном запуске, будут перенесены, только изменения.
Чтобы осуществить перенос данных на сетевую шару, вы можете использовать вот такую конструкцию:
При простом копировании robocopy C:Temp \c-10-5210Test_robocopy /E
Тот же пример с синхронизацией прав robocopy C:Temp \c-10-5210Test_robocopy /E /COPYALL /SECFIX
Ну и пример использования при зеркалировании каталоговrobocopy C:Temp \c-10-5210Test_robocopy /MIR /Z
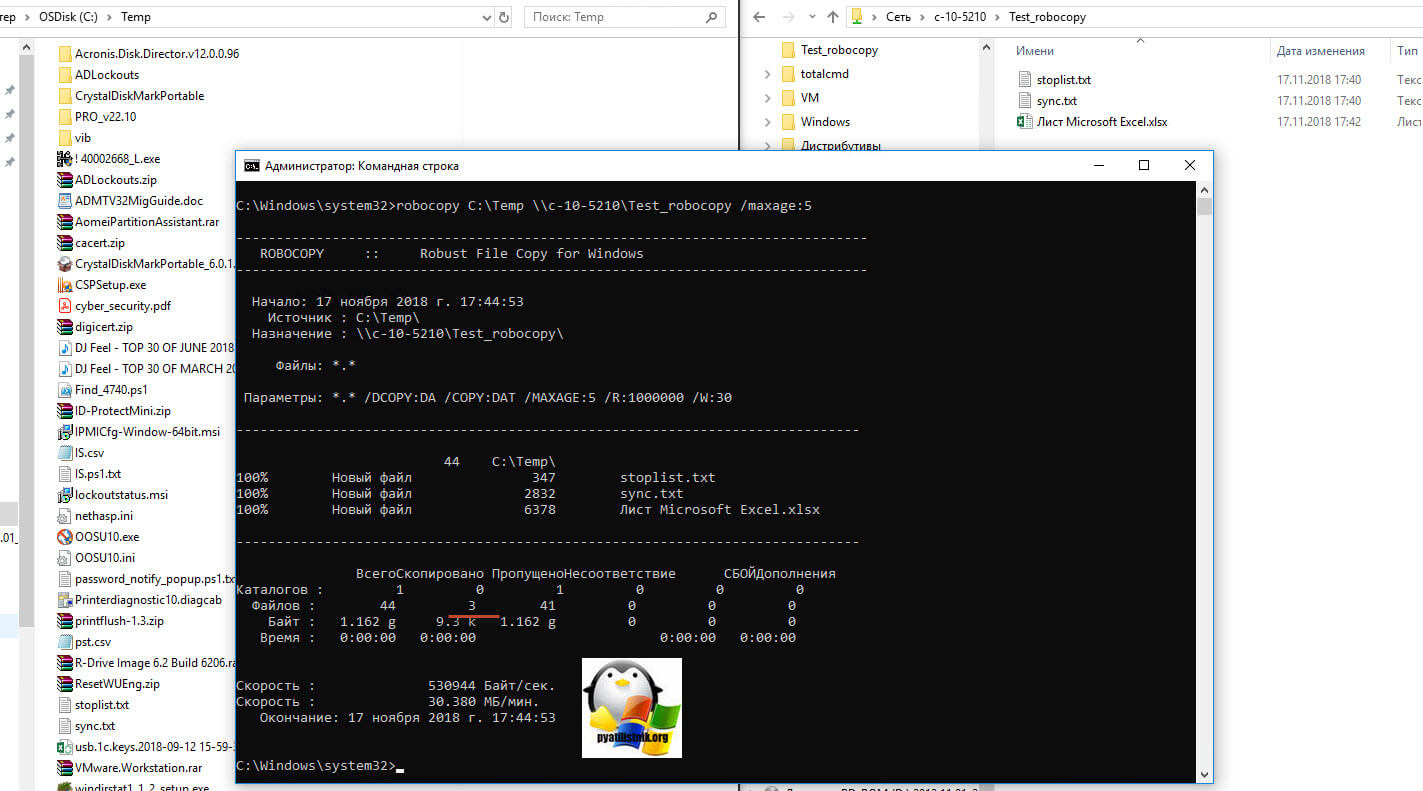
Теперь представим задачу, что вам необходимо скопировать файлы, которые были изменены за последние 5 дней, выполняем вот такую команду:
robocopy C:Temp \c-10-5210Test_robocopy /MAXAGE:5
Если нужно исключить сегодняшний день, то нужно добавить ключик /MINAGE:1
robocopy C:Temp \c-10-5210Test_robocopy /MAXAGE:5 /MINAGE:1
Если стоит задача скопировать файлы и исключить из все, возраст которых меньше 1 день, то будет выглядеть вот так:
robocopy C:Temp \c-10-5210Test_robocopy /MINAGE:1
Вот вам пример использования Robocopy, где происходит вырезание файлов в источнике и перенос их в каталог назначения, со всеми правами и атрибутами на файл, вместо сетевого пути, может быть и локальный, как в первом примере.

Иногда может возникнуть задача, перенести все, кроме срытых файлов системы, для этого сценария Robust File Copy Utility имеет ключ /XA:H
robocopy C:Temp C:Test_robocopy /E /XA:H
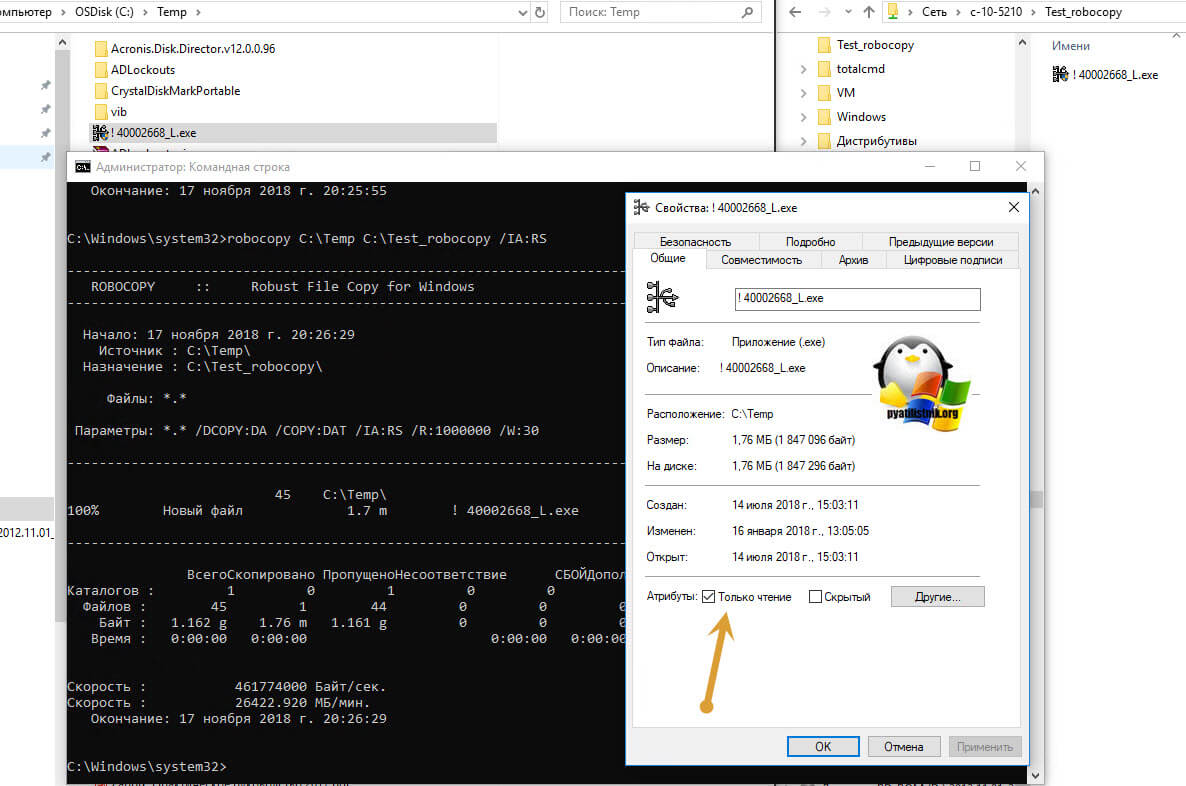
Можно переносить файлы с пометкой «Только для чтения», через такую структуру
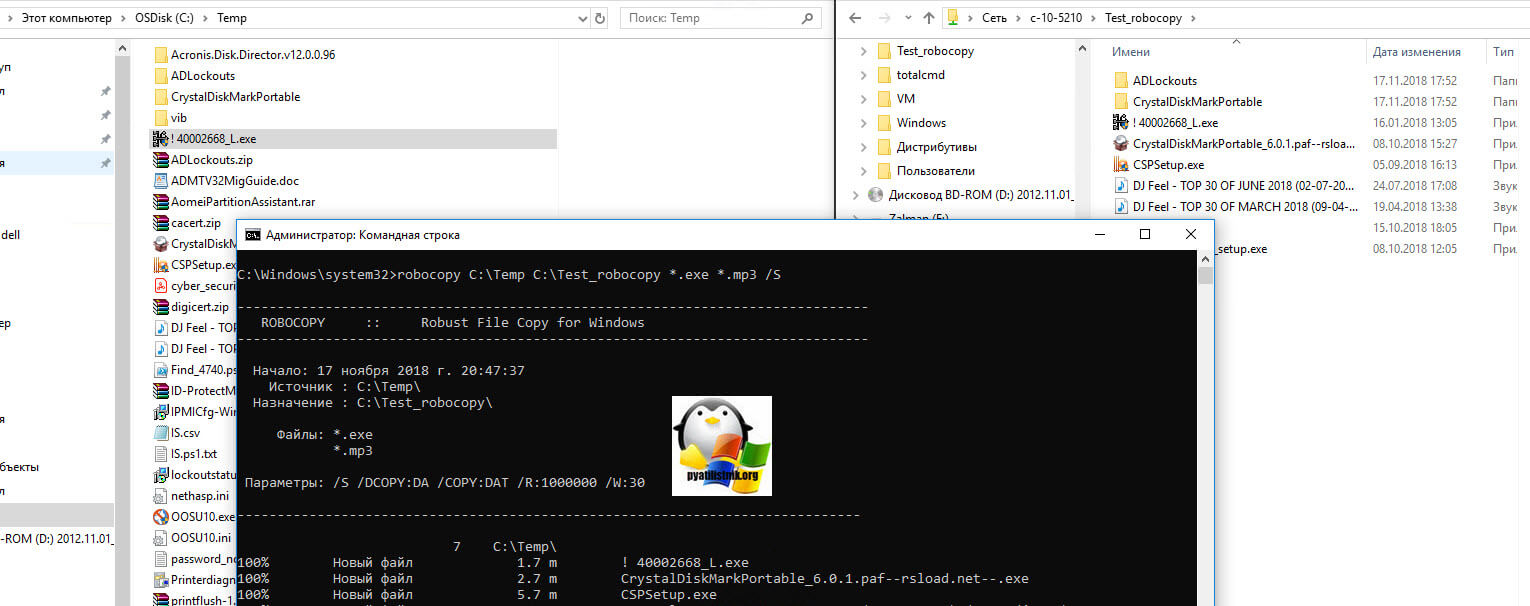
Копирование данных только с определенными форматами, например, exe и mp3, и не копировать пустые папки.
robocopy C:Temp C:Test_robocopy *.exe *.mp3 /S
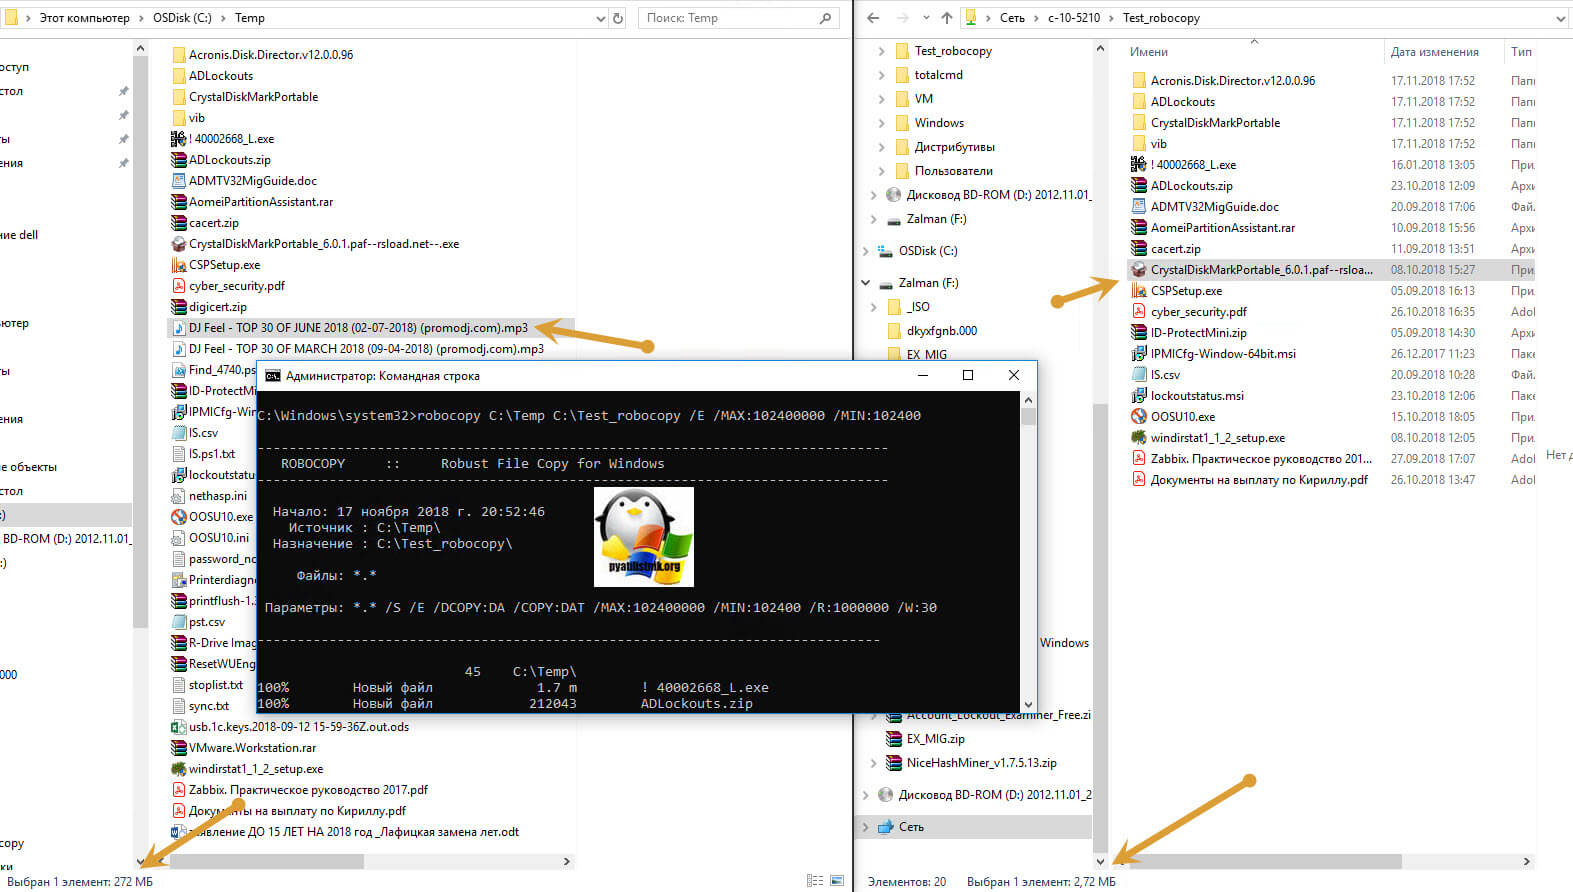
Также можно делать выборку по размеру файлов, например, мне нужно скопировать, все, что больше 100 килобайт и меньше 100 мегабайт.
robocopy C:Temp C:Test_robocopy /E /MAX:102400000 /MIN:102400
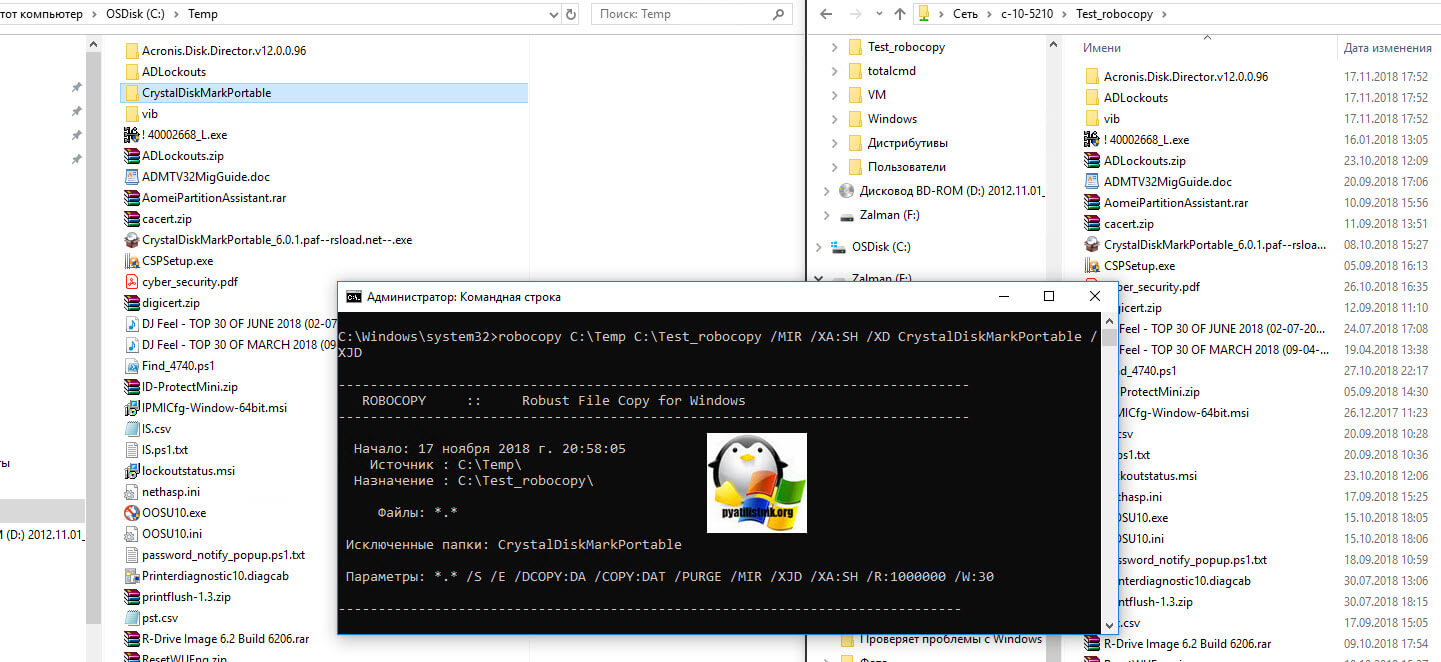
При копировании данных можно исключить не нужные вам каталоги, вот пример команды, где исключается папка CrystalDiskMarkPortable:
robocopy C:Temp C:Test_robocopy /MIR /XA:SH /XD CrystalDiskMarkPortable /XJD
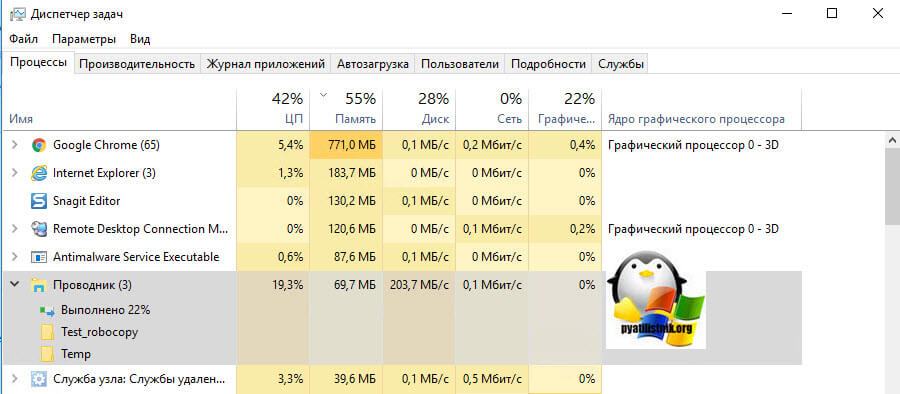
Что еще полезного умеет Robocopy, например, автоматическое копирование папок по расписанию да и еще не в один поток. Что такое поток копирования, по сути когда вы в проводнике Windows, запускаете простое копирование, то у вас в диспетчере задач, появляется задача «Проводник», которая последовательно запускает процесс и перенос данных. Когда же Robocopy делает таких потоков больше, то у вас сам процесс идет в разы быстрее, но затрачиваются больше процессорных мощностей, но в виду того, что современные процессору зачастую не дозагружаются даже на 20-30%, то глупо было бы это не использовать, особенно с серверными CPU.
Вот примеры использования команд с заданием потоков, напоминаю, что их может быть от 1 до 128. Особенный прирост скорости вы ощутите в моменты, когда у вас будет огромное количество мелких файлов.
robocopy C:Temp \c-10-5210Test_robocopy /sec /E /Z /XO /R:3 /W:5 /MT:32
Если повторно запустить данную команду, то она будет копировать и синхронизировать только измененные файлы, так называемые дельты, очень удобно при актуализации каталогов, резервных копий
Еще полезной командой будет, когда вам нужно обновить только ACL (Вкладку безопасность на всех файлах, без их повторного копирования)
robocopy <source /> /secfix /xo /xn /xc
Ошибки работы Robocopy
У данной утилиты, конечно же могут возникать и проблемы, но чаще всего они не значительные и решаются очень просто, например вы можете встретить ошибку «ОШИБКА 5 (0x00000005) Копирование параметров безопасности NTFS для конечного файла». Данная ошибка гласит, что у вас не хватает прав на перенос параметров и прав на файлы, все дело в том, что ваша cmd-консоль запущена в режиме администратора.
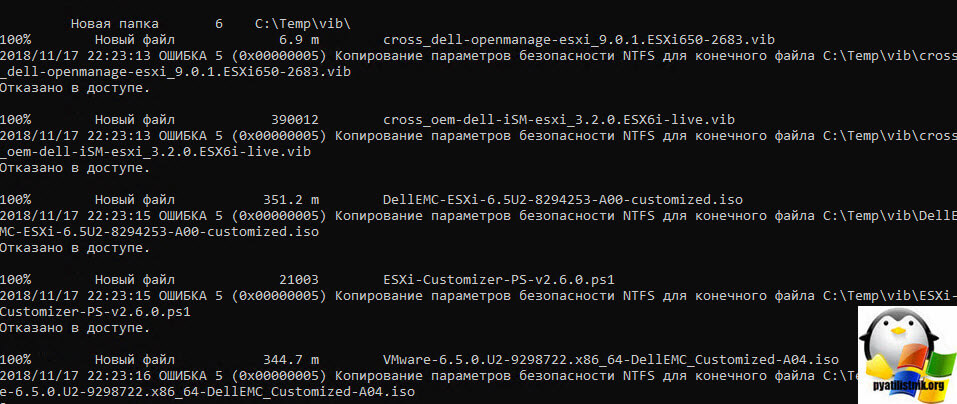
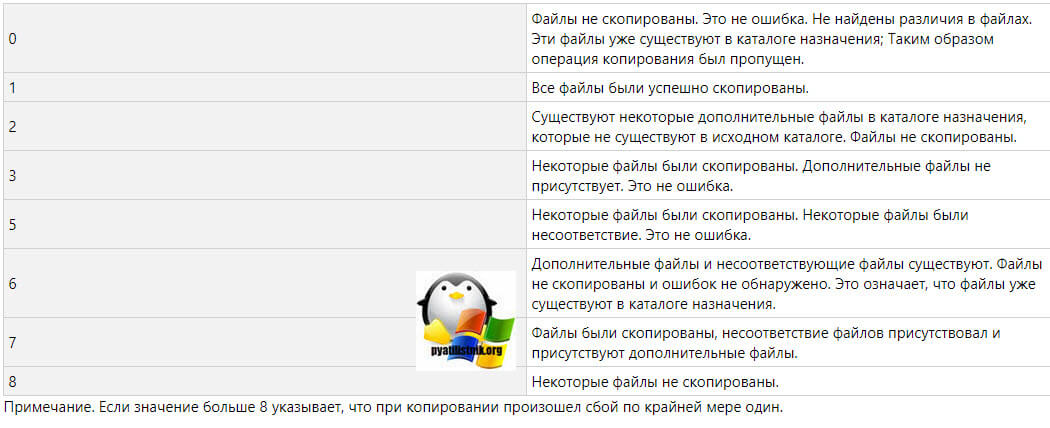
Таблица кодов ошибок, которые появляются в Robocopy
Вот вам подробная, сводная таблица в которой отражены все коды ошибок от 0-8 в данной утилите и дано подробное описание в чем проблема. (Подробнее на https://support.microsoft.com/ru-ru/help/954404/return-codes-that-are-used-by-the-robocopy-utility-in-windows-server-2)
Автоматическое копирование папок по расписанию с Robocopy
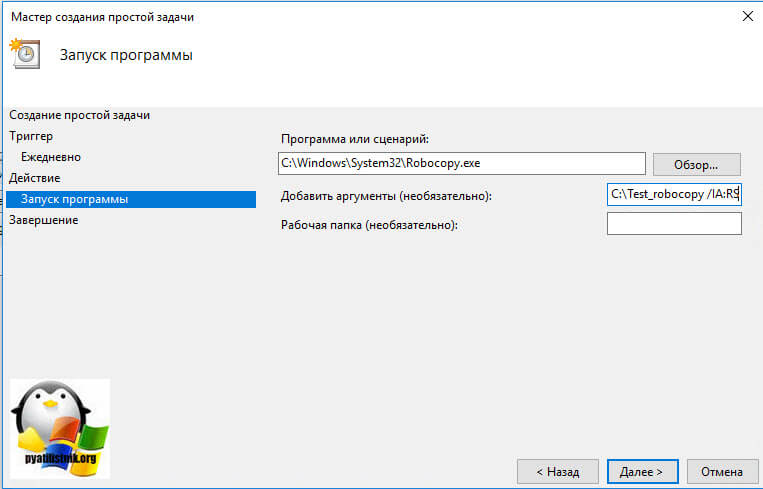
Чем хороша данная утилита, так это тем, что с ее помощью можно писать скрипты и сценарии, например в том же PowerShell. Все выше описанные команды, вы можете поместить в текстовый файл (txt), затем сменить ему расширение на bat или cmd, чтобы он стал исполняемым и далее использовать его, либо в групповой политике, или же создать с помощью него задачу в «Планировщике заданий Windows», хотя можно и прямо в нем вписывать все ключи и параметры Robocopy. Про создание задач в планировщике заданий Windows читайте по ссылке. Обратите внимание, что ключи я вписываю в поле аргументы.
Примеры скриптов при резервном копировании или синхронизации. Предположим у вас есть рабочая папка и вы бы хотели ее синхронизировать с другой или сетевой шарой, как я и писал выше вы делаете исполняемый файл или создаете задание в планировщике, вот пример команды, которая перенесет файлы, будет их синхронизировать, перенесет все атрибуты и права, а так же будет их обновлять. Папка C:Test, это источник, а вот каталог \c-10-5210shareTest, уже назначения.
robocopy C:Test \c-10-5210shareTest /sec /E /Z /XO /SECFIX /R:3 /W:5 /MT:32
если по каким-то причинам вам нужно монтировать перед эти диск, то будет выглядеть вот так:
net use z: /delete
net use z: \c-10-5210share
robocopy C:Test Z: /sec /E /Z /XO /SECFIX /R:3 /W:5 /MT:32
На самом деле примеров использования Robocopy очень много, если будет чем поделиться, пишите в комментариях.
Графический (GUI) интерфейс в Robocopy
С примерами утилиты Robocopy мы ознакомились, теперь предлагаю вам посмотреть для нее графическую оболочку, которая как ни странно есть, и я узнал, о ее существовании буквально недавно. Называется она RoboCopy GUI Utility ver. 3.1, к сожалению она использует robocopy.exe не самой последней версии, но все работает и в Windows 10 1809.
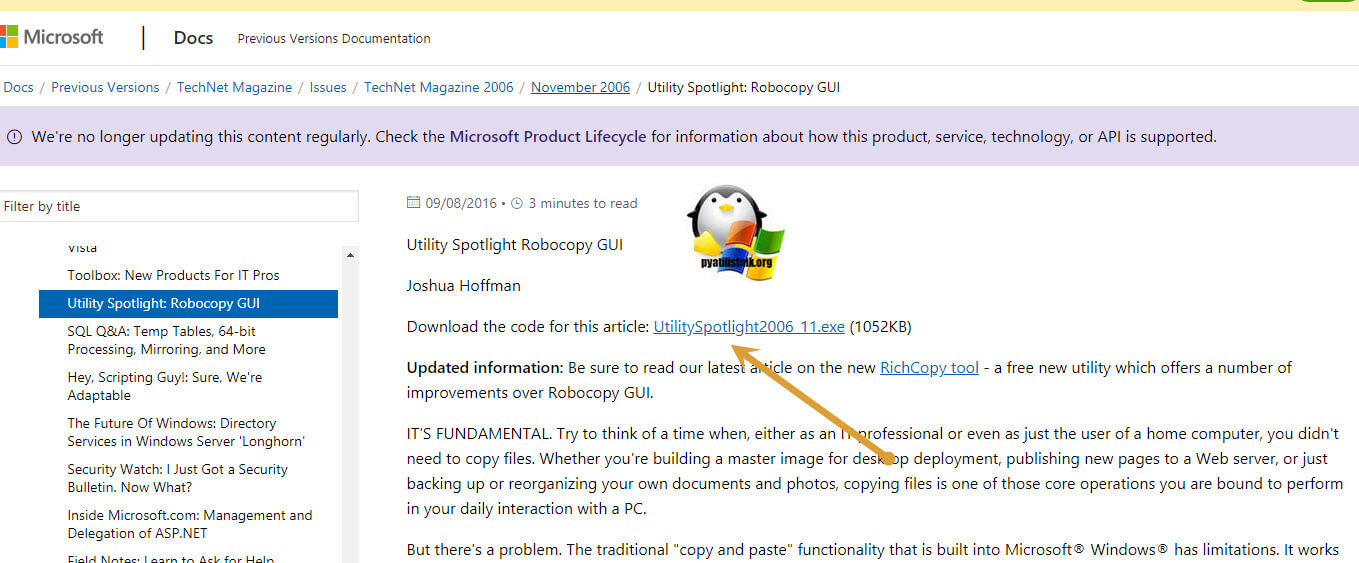
Скачать RoboCopy GUI Utility ver. 3.1 можно с официального сайта https://docs.microsoft.com/en-us/previous-versions/technet-magazine/cc160891(v=msdn.10) или у меня по ссылке с mail облака
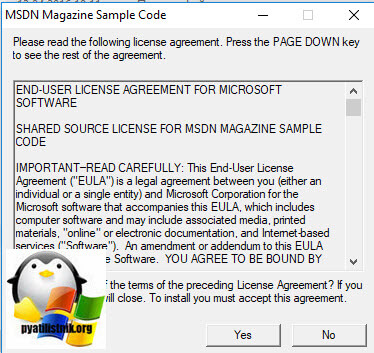
После загрузки RoboCopy GUI Utility ver. 3.1, нам его необходимо установить. Запускаем исполняемый файл. Соглашаемся с лицензионным соглашением.
Утилита вам предложит указать каталог куда будут извлечены файлы.
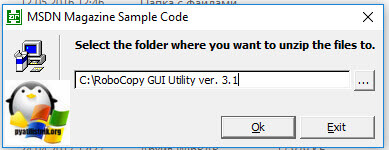
Соглашаемся с извлечением.
В итоге вы получите вот такую структуру файлов. Запускаем setup.exe.

У вас появится тривиальный мастер установки GUI интерфейса для Robocopy. Нажимаем next.
Принимаем лицензионное соглашение «I gree»
Указываете будет ли утилита устанавливаться только для вас или для всех.
next.
Установка графического интерфейса для Robocopy завершено.

У вас на рабочем столе появится ярлык Microsoft Robocopy GUI. Запускаем его и посмотрим, что из себя представляет эта утилита.

Обзор RoboCopy GUI Utility ver. 3.1
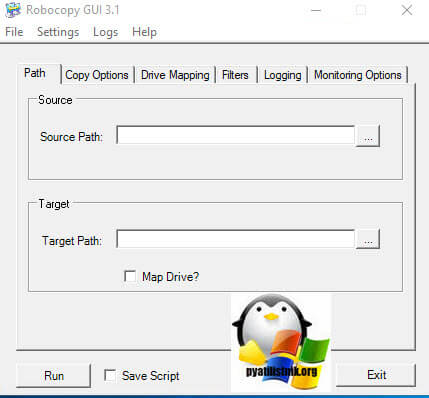
Давайте я бегло покажу, что из себя представляет данная программа. Сам графический интерфейс очень простой, так и должно быть. На первой вкладке вы увидите два действия:
- Первое, это нужно через «Source Path выбрать, что мы будем копировать»
- Второе действие, это в «Target Path мы задаем, куда мы будем переносить данные, при желании вы можете смонтировать сетевой диск, через пункт «Map Drive»»
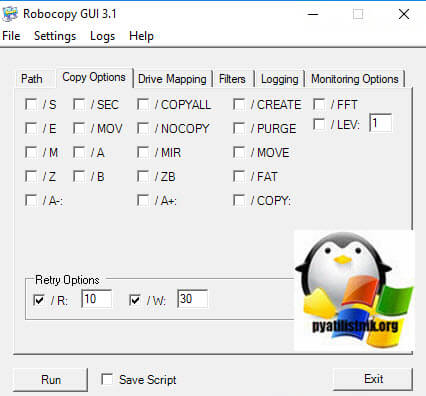
На вкладке «Copy Options», вы увидите уже знакомые параметры использования Robocopy, тут есть и ключи /SEC для переноса прав и команда /MOVE, которую мы применяли для вырезания файлов и многое другое. Тут же вы задаете количество потоков копирования.
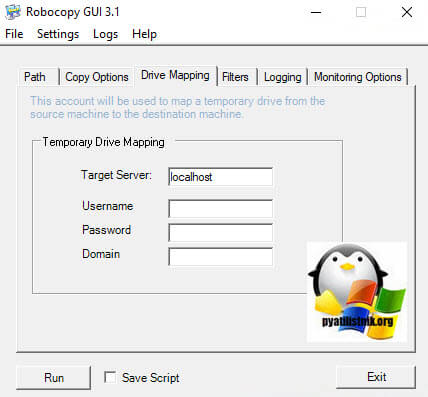
Вкладка «Drive Mapping» поможет присоединить сетевой диск, тут вы указываете ip-адрес или DNS имя сервера, и учетные данные для подключения.
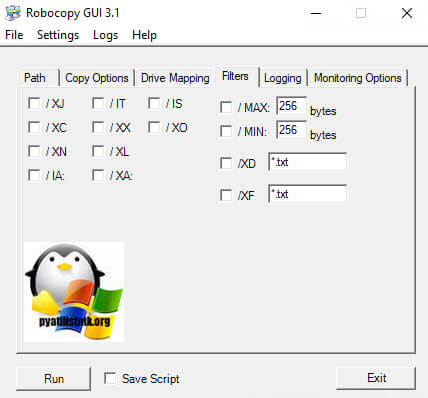
Вкладка «Filters» позволит вам указать, что именно нужно переносить и сделать фильтрацию, например, не переносить файлы длина которых в имени составляет более 256 символов, или только txt файлы.
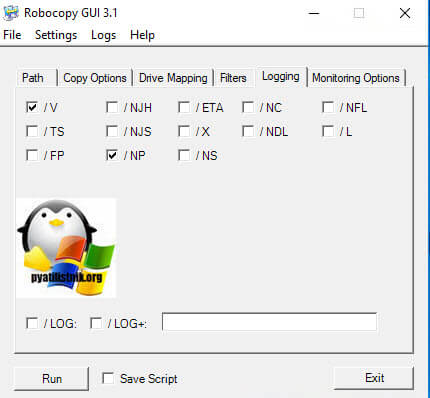
Вкладка «Logging» задает параметры ведения логирования вашего задания.
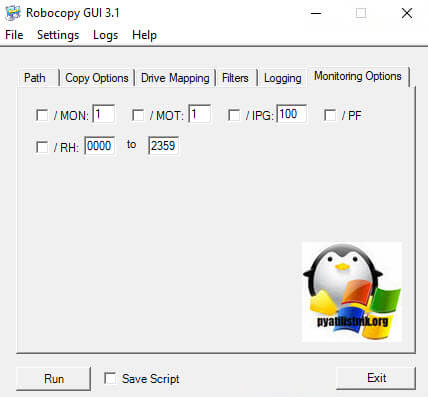
Вкладка «Monitoring Options» будет полезна для наблюдения за источником копирования, в случае проблем, все можно идентифицировать и перезапустить.
Аналоги утилиты Robocopy
Robust File Copy Utility не единственная утилита, которая позволяет копировать файлы, каталоги с атрибутами и правами, ее аналогами можно назвать утилиты:
- Total Commander
- icacls
- Xcopy
- Far
- Rsync
Вот такая вот полезная и богатая функционалом утилита Robust File Copy Utility или Robocopy.exe, надеюсь, что данный материал был для вас полезен и вы им поделитесь в социальных сетях. А с вами был Семин Иван, автор и создатель IT блога Pyatilistnik.org.
Robocopy – это консольная утилита Windows для копирования файлов, которую можно использовать для синхронизации/репликации файлов и каталогов, и в сценариях резервного копирования. Robocopy (Robust File Copy) доступна начиная с Windows NT 4.0 Resource Kit, но по умолчанию эта функция появилась только в Windows Vista и Windows Server 2008. Robocopy заменяет Xcopy и copy, как более функциональная.
Содержание:
- Основные возможности Robocopy
- Синтаксис и параметры robocopy
- Использование robocopy для зеркалирования каталогов
- Инкрементальное копирование с помощью robocopy
- Robocopy: перемещение файлов
- Пример использование robocopy в планировщике задач
- Отслеживание изменений в каталогах с помощью robocopy
- Коды возврата (ошибки) robocopy
Основные возможности Robocopy
Кроме обычного копирования файлов и папок из папки источника в каталог назначения, в Robocopy есть множество очень полезных функций:
- Устойчивость к обрывам сети (robocopy может продолжить копирования после восстановления сетевого доступа);
- Корректное копирование файлов с их атрибутами и NTFS правами доступа;
- Копирование с сохранением исходной временной метки;
- Возможность копирования файлов и директорий, запрещенных для доступа даже администратору, с помощью ключа /B (ключ позволяет игнорировать проверку прав доступа, ключ доступен только для участников группы Администраторы или Операторы архива);
- Возможность задать количество попыток копирования файла, если файл недоступен;
- Режим полного зеркалирования директорий;
- Пропуск уже существующих файлов (с одинаковым размером или временной меткой timestamp);
- Индикатор прогресса копирования;
- Корректная работа с длинными путями (более 260 символов);
- Эффективные алгоритмы и многопоточность позволяют выполнять копирование файлов намного быстрее, чем обычное копирование средствами Windows;
- Поддержка коды возврата (что позволяет использовать robocopy в различных внешних скриптах и утилитах).
Официальной графической версии robocopy (c GUI) от Microsoft нет. Существуют пользовательские версии, но их поддержка прекращена. Список неофициальных GUI для robocopy (это сторонние программы):
- EazyCopy
- RoboMirror
- RichCopy
Синтаксис и параметры robocopy
Robocopy имеет много параметров, которые на первый взгляд могут показаться сложными, но имея под рукой документацию, вы с легкостью разберетесь и сможете править скрипты под себя.
Официальная документация: https://docs.microsoft.com/en-us/windows-server/administration/windows-commands/robocopy
Синтаксис robocopy состоит из двух обязательных параметров (исходный и целевой каталог) и двух необязательных (фильтр файлов и параметры):
robocopy <source> <dest> [фильтр файлов] [параметры]
Поддерживаются как локальные пути, так и UNC, например, \serverdirectory
Полный синтаксис утилиты robocopy (все параметры и их описания) доступны по команде:
robocopy /?
Исполняемы файл robocopy.exe находится в каталоге C:WindowsSystem32.
Поскольку ключей в robocopy много, мы будем рассматривать их на практике, в готовых командах. Мы не будем рассматривать самые простые примеры использования robocopy, т.к. обычно они не вызывают вопросов. Ниже представлены готовые к применению более сложные команды robocopy, которые можно использовать в реальных сценариях.
Для тестирование различных команд robocopy без выполнения операций (копирования, перемещения или удаления) с файлами используется параметр
/L
. Данный параметр вернет список файлов и папок, которые будут скопированы вашей командой.
Использование robocopy для зеркалирования каталогов
Вы можете зеркалировать (синхронизировать) содержимое двух каталог с помощью следующей команды robocopy (под зеркалированием понимается копирование файлов из целевой папки с удалением файлов в целевом каталоге, если они удалены в источнике).
robocopy \testnode1C$source \testnode2c$dest *.txt /MIR /COPYALL /Z /B /J /R:3 /W:1 /REG /TEE /LOG+:%appdata%robocopy.log
-
\testnode1C$source
— исходный каталог, откуда копируются файлы -
\testnode2C$dest
— каталог назначения, куда скопируются файлы -
*.txt
– фильтр файлов. Синхронизируются только .txt файл и директории. -
/MIR
– полное зеркалирование данных в source и dest директориях. Файлы, удаленные из source директории или не присутствующие в ней, также будут удалены из dest. Если вы хотите, чтобы удаленные из source файлы оставались в dest, то поменяйте параметр /MIR на /E -
/COPYALL
– копирует всю информацию о файле (Атрибуты, параметры безопасности и т.д.). Как альтернатива, можно применять флаг /COPY:DT для копирования timestamp, а не всей информации. /COPALL требует прав администратора -
/Z
– robocopy продолжит копирование файла при обрыве. Полезно при копировании больших файлов (неплохая альтернатива копированию файлов по BITS) -
/B
– позволяет robocopy избегать ошибки access denied error. В этом режиме robocopy игнорирует все права на файлы, которые могли бы помешать прочитать/записать файл. Этот режим требует прав администратора либо участие в группе Операторы архива -
/J
– Копирование без буфера (файлового кэша, оперативной памяти). Эффективно для больших файлов. -
/R:3
– количество попыток скопировать недоступный файл. Значение по умолчанию – миллион, поэтому необходимо его сменить. -
/W:1
– секунды между попытками скопировать недоступный файл. Значение по умолчанию – 30 секунд. -
/REG
– сохранить текущие значения ключей /R и /W в реестр как стандартные, для будущих вызовов robocopy. -
/TEE
– разделение вывода работы команды и в лог файл, и в консоль. При фоновом вызове robocopy (например, из планировщика задача) этот параметр можно убрать, оставив только /LOG -
/LOG
– путь к файлу лога
Обратите внимание на ключ /Z даже если вы копируете небольшие файлы по устойчивому каналу. Он не несёт дополнительных расходов при использовании, но в случае обрыва, вы сможете продолжить копирование просто повторно запустив скрипт.
При копировании больших файлов (более 2 Гб) с некоторых iSCSI/SAN томов, процесс robocopy может существенно использовать оперативную память сервера. Проблем обычно связано с тем, что для данного LUN в настройках RAID используется write-through кэширование вместо write-back.
Инкрементальное копирование с помощью robocopy
Сам по себе robocopy не может полностью обеспечить инкрементальное резервное копирование каталога (копирование новых и измененных файлов), для этого мы будем использовать небольшой bat скрипт:
@echo off
set date_=%date:/=-%
set source=C:source
set dest=\testnode2C$dest%date_%
mkdir %dest%
robocopy "%source%" "%dest%" /maxage:1 /E /COPYALL /Z /B /J /R:3 /W:1 /REG /LOG+: /LOG+:%appdata%robocopy.log
@echo on
-
set date_=%date:/=-%
— эта строчка присваивает значение переменной date_ в формате DD.MM.YYYY -
/maxage:1
— Максимальный возраст файла. Исключает файлы старше N дней или даты. Дата указывается в формате YYMMDD, например, /maxage:20200421 -
/E
– копирует подпапки, без ограничения уровня вложенности. Для контроля уровня вложенности директорий можно использовать параметр /lev, например, /lev:3
Инкрементальность осуществляется за счёт параметра /maxage:1 — файлы старше суток копироваться не будут. Для первого, “базового” копирования, можно выполнить этот скрипт без параметра /maxage.
Заметка. Если файловые системы source или dest не являются NTFS, используйте ключ
/FFT
, так как на других файловых системах (включая эмулированные NTFS) может возникнуть ошибка, из-за которой robocopy будет видеть старые файлы как измененные, из-за отличий в метке времени.
Robocopy: перемещение файлов
С помощью ключа
/mov
или
/move
вы можете переместить файлы (а точнее удалить успешно скопированные файлы из исходной директории):
robocopy C:source F:dest /MOVE /E /COPYALL /Z /B /J /R:3 /W:1 /REG /TEE /LOG+:%appdata%robocopy.log
-
/MOVE
– удалить файлы и директории из исходной папки, после того как они были скопированы. Имейте в виду, что этот ключ нужно использовать вместе с /E или /S, в противном случае вы перенесете только файлы, но не директории. Если вы хотите перенести только файлы, используйте ключ /MOV
Примечание. Поведение robocopy при использовании ключей
/MOVE
и
/MOV
не интуитивно.
- Если вы используете ключ /MOVE с ключом /E, то вы перенесете все файлы, директории (включая файлы внутри них) и пустые директории. Файлы и директории удалятся из исходной папки. /MOVE с /S даст такой же результат, но пустые директории не перенесутся и будут удалены.
- Если вы используете ключ /MOV с ключом /E, то вы перенесете все файлы, включая те, которые находятся в директориях и поддиректориях, также скопируются все директории (включая пустые), но они не будут удалены из исходного каталога, в отличие от файлов. Используя /MOV с /S, вы получите такой же результат, но пустые директории не будут скопированы.
Пример использование robocopy в планировщике задач
Для примера возьмём задачу: нам необходимо с помощью robocopy регулярно синхронизировать содержимое сетевой папки между двумя серверами с ведением логов.
- Исходный путь — \testnode1C$source
- Целевая директория- \testnode2C$source
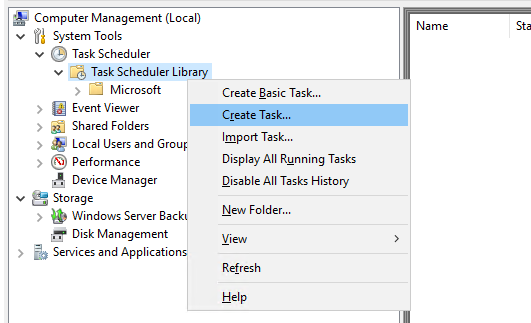
Запустите командную строку с правами администратора и введите: compmgmt.msc
Перейдите в System Tools -> Task Scheduler Library. Создайте новое задание планировщика (Create task).
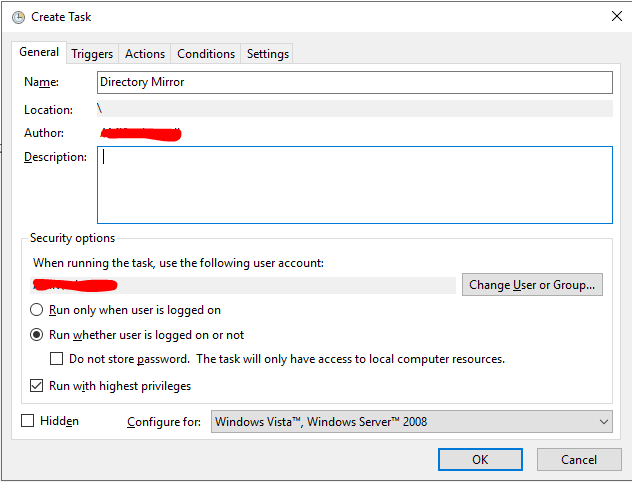
Укажите имя задания, и выберите пользователя из-под которого будет выполняться задание. Пользователь должен иметь доступ на чтению и запись в обоих каталогах (при копировании по сети между серверами домена можно использовать аккаунт System, в этом случае нужно предоставить на целевой каталог права RW для объекта computer сервера-источника) .
Выберите опцию Run whether user is logged on or not, для того чтобы задание выполнялось в фоновом режиме. Также отметьте Run with highest privileges. Эта опция сработает если аккаунт из-под которого выполняется задание, будет иметь права администратора.
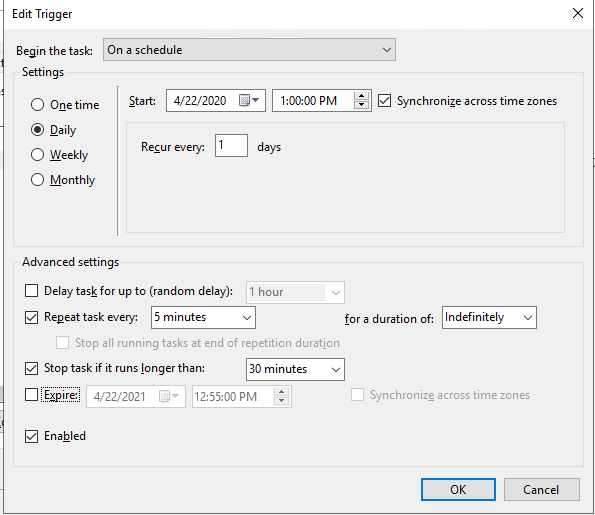
Перейдите на вкладку Triggers и создайте новый триггер.
Выберите параметр On a schedule (по расписанию), выберите время начала и отметьте Repeat task every, указав интервал выполнения. В моём случае это 5 минут – каждые 5 минут, начиная с часа дня 22 апреля (обязательно измените эту дату на ту, которая нужна вам), директории будут синхронизированы. В for a duration of поставьте Indefinitely (бесконечно)
Перейдите во вкладку Actions и нажмите New…
Выберите Start a program, и укажите путь к .bat скрипту.
Содержание robocopy-mirror.bat:
@echo off
robocopy \testnode1C$source \testnode2c$dest /MIR /COPYALL /Z /B /J /R:3 /W:1 /REG /LOG+:C:robocopy.log
@echo on
Помимо журнала выполнения задания планировщика, robocopy будет писать собственный лог файл копирования в C:robocopy.log. Если аккаунт из-под которого будет выполняться скрипт не имеет прав администратора, смените C:robocopy.log на нужный вам путь.

Остальные настройки заполнять не надо. После нажатия на кнопку ОК, вас попросит ввести пароль от учетной записи, которую вы выбрали для запуска задания.
Если вы всё настроили правильно, директории должны начать синхронизироваться. 
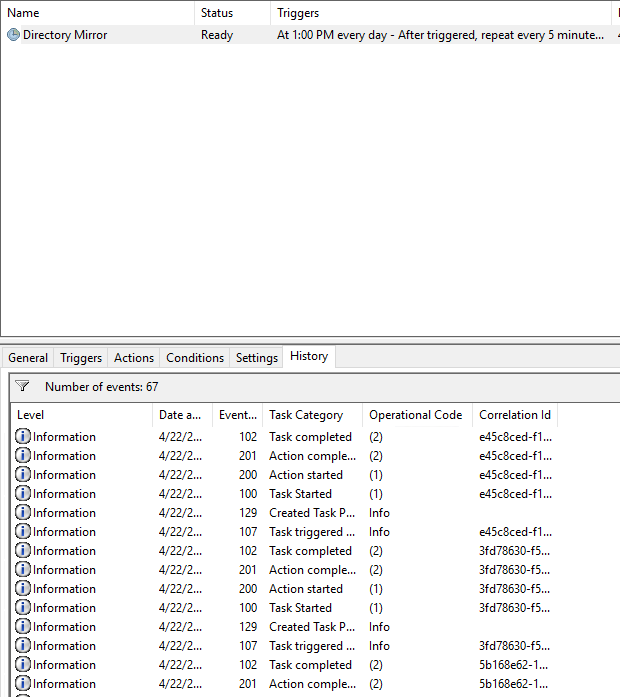
Если у вас возникли проблемы с выполнением скрипта, то обязательно проверьте вкладку History вашей задачи
Отслеживание изменений в каталогах с помощью robocopy
В robocopy есть встроенный механизм отслеживания изменений в исходном каталоге (и их последующего копирования) и встроенный планировщик – параметры
/mon
и
/mot
.
-
/mon:N
– проверяет исходную директорию на предмет изменений каждую 1 минуту, и если изменений в директории больше чем N, то будет произведено копирование в целевую директорию. Если задан параметр /mot:Y, то изменения будут проверяться каждые Y минут. -
/mot:N
– проверяет исходную директорию на предмет изменений каждые N минут. Минимальное значение N = 1, в минутах. Если параметр /mon не задан, то будет считаться что /mon:1
.bat скрипт для зеркалирования с отслеживанием изменений с интервалом в 1 минуту. Этот скрипт нужно запускать из-под аккаунта с правами администратора.
@echo off
robocopy \testnode1C$source \testnode2c$dest /MIR /COPYALL /Z /B /J /R:3 /W:1 /REG /LOG+:%appdata%robocopy.log /mon:1 /mot:1
Плюсы:
- Не нужно создавать задание в планировщике задач
- Подходит для непостоянного выполнения. Например, в течение нескольких часов, в таком случае запустить скрипт руками через CMD проще, чем создавать задание в планировщике
Минусы:
- Чтобы запустить .bat скрипт в фоновом режиме, нужно либо использовать VBS скрипт, либо стороннее ПО, например, NirCmd.
- Минимальный интервал поиска изменений и копирования – 1 минута. Для меньшего интервала нужно использовать PowerShell или bat скрипт.
Коды возврата (ошибки) robocopy
Ниже приведены стандартные коды возврата robocopy, которые можно использовать для обработки различных ошибок, которые возвращает утилита после выполнения действия копирования (кот возврата эта битовая маска).
| Hex | Decimal | Meaning if set |
| 0x00 | 0 | No errors occurred, and no copying was done. The source and destination directory trees are completely synchronized. |
| 0x01 | 1 | One or more files were copied successfully (that is, new files have arrived). |
| 0x02 | 2 | Some Extra files or directories were detected. No files were copied Examine the output log for details. |
| 0x04 | 4 | Some Mismatched files or directories were detected. Examine the output log. Housekeeping might be required. |
| 0x08 | 8 | Some files or directories could not be copied (copy errors occurred and the retry limit was exceeded). Check these errors further. |
| 0x10 | 16 | Serious error. Robocopy did not copy any files. Either a usage error or an error due to insufficient access privileges on the source or destination directories. |
| Коды возврата могут комбинироваться: | ||
| 0x03 | 3 | (2+1) Some files were copied. Additional files were present. No failure was encountered. |
| 0x05 | 5 | (4+1) Some files were copied. Some files were mismatched. No failure was encountered. |
| 0x06 | 6 | (4+2) Additional files and mismatched files exist. No files were copied and no failures were encountered. This means that the files already exist in the destination directory |
| 0x07 | 7 | (4+1+2) Files were copied, a file mismatch was present, and additional files were present. |
Любое значение больше 7 говорит о том, что при копировании через robocopy возникла ошибка. Вы можете обрабатывать эти ошибки в bat файле:
if %ERRORLEVEL% EQU 16 echo ***FATAL ERROR*** & goto end
if %ERRORLEVEL% EQU 15 echo OKCOPY + FAIL + MISMATCHES + XTRA & goto end
if %ERRORLEVEL% EQU 14 echo FAIL + MISMATCHES + XTRA & goto end
if %ERRORLEVEL% EQU 13 echo OKCOPY + FAIL + MISMATCHES & goto end
if %ERRORLEVEL% EQU 12 echo FAIL + MISMATCHES& goto end
if %ERRORLEVEL% EQU 11 echo OKCOPY + FAIL + XTRA & goto end
if %ERRORLEVEL% EQU 10 echo FAIL + XTRA & goto end
if %ERRORLEVEL% EQU 9 echo OKCOPY + FAIL & goto end
if %ERRORLEVEL% EQU 8 echo FAIL & goto end
if %ERRORLEVEL% EQU 7 echo OKCOPY + MISMATCHES + XTRA & goto end
if %ERRORLEVEL% EQU 6 echo MISMATCHES + XTRA & goto end
if %ERRORLEVEL% EQU 5 echo OKCOPY + MISMATCHES & goto end
if %ERRORLEVEL% EQU 4 echo MISMATCHES & goto end
if %ERRORLEVEL% EQU 3 echo OKCOPY + XTRA & goto end
if %ERRORLEVEL% EQU 2 echo XTRA & goto end
if %ERRORLEVEL% EQU 1 echo OKCOPY & goto end
if %ERRORLEVEL% EQU 0 echo No Change & goto end
:end
Утилита robocopy имеет огромный функционал и позволяет гибко настроить операции копирования. Как альтернативу robocopy в PowerShell можно использовать командлет Copy-Item, который хоть и менее функционален, но работает с объектной моделью PowerShell, что может быть важно, если вы часто используете PowerShell или используете цепочки автоматизации с другими языками программирования.
Robocopy (Robust File Copy) is a command-line file copy utility that comes with Windows Vista / Windows 2008 or newer. Until Vista, Robocopy was a part of Windows Resource Kit Tools as a free download (http://aka.ms/robocopydownload).
Unlike normal copy commands, Robocopy is designed for reliable copy or mirroring while maintaining the permissions, attributes, owner information, timestamps and properties of the objects copied.
A few of my customers were complaining that there is not enough documentation on robocopy usage and examples. I am trying to document some of the common scenarios where robocopy can be useful.
Table of Contents
- Robocopy Syntax
- Examples of Microsoft’s Robocopy Syntax
- #1 Simple copy
- #2 Copy all content including empty directory
- #3 List only
- #4 Move files over 14 days old
- #5 Mirror a directory with subfolders incl. empty directories
- #6 Mirror directories
- #7 Copy all changes
- #8 Mirror directory excl. deletion
- #9 Copy permissions only
- #10 Copy directory tree with timestamps
- #11 Copy with bandwidth limitation
- #12 Copy without bandwidth limitation
- Examples of Microsoft’s Robocopy Syntax
- More Information
- TechNet
- Robocopy Copy Options
- File Selection Options
- Retry Options
- Logging Options
- Job Options
- TechNet
Robocopy Syntax
ROBOCOPY <source> <destination> [file…] [options]
<source> Source Directory (local or network path)
<destination> Destination Directory (local or network path) and
[file…] Specifies the file or files to be copied. You can use wildcard characters (* or ?), if you want. If the File parameter is not specified, *.* is used as the default value.
**Skip to the end of this document for more information on Robocopy Options and Switches .
Examples of Microsoft’s Robocopy Syntax
#1 Simple copy
To copy contents of C:UserFolder to C:FolderBackup:
Robocopy C:UserFolder C:FolderBackup
This is the simplest usage for Robocopy
#2 Copy all content including empty directory
To copy all contents including empty directories of SourceFolder to DestinationFolder:
Robocopy C:SourceDir C:DestDir /E
#3 List only
List only files larger than 32 MBytes(33553332 bytes) in size.
Robocopy.exe c:sourceFolder d:targetfolder /min:33553332 /l
Note: /l — will list files matching the criteria. if /l is omitted, files matching the criteria will be copied to the taget location
#4 Move files over 14 days old
Move files over 14 days old (note the MOVE option will fail if any files are open and locked).
ROBOCOPY C:SourceFoldern D:DestinationFolder /move /minage:14
Similarly you could use the below switches
- /maxage: <N> Specifies the maximum file age (to exclude files older than N days or date).
- /minage: <N> Specifies the minimum file age (exclude files newer than N days or date).
- /maxlad: <N> Specifies the maximum last access date (excludes files unused since N).
- /minlad: <N> Specifies the minimum last access date (excludes files used since N) If N is less than 1900, N specifies the number of days. Otherwise, N specifies a date in the format YYYYMMDD
#5 Mirror a directory with subfolders incl. empty directories
/MIR is an option to ROBOCOPY where you mirror a directory tree with all the subfolders
including the empty directories and you purge files and folders on the destination server that no longer exists in source.
ROBOCOPY \sourceservershare \destinationservershare /MIR
Or
ROBOCOPY source-drive:DIR destination-drive:DIR /MIR
#6 Mirror directories
The following command will mirror the directories using Robocopy:
Robocopy \SourceServerShare \DestinationServerShare /MIR /FFT /Z /XA:H /W:5
Explanation of the switches used:
- /MIR specifies that Robocopy should mirror the source directory and the destination directory. Note that this will delete files at the destination if they were deleted at the source.
- /FFT uses fat file timing instead of NTFS. This means the granularity is a bit less precise. For across-network share operations this seems to be much more reliable — just don’t rely on the file timings to be completely precise to the second.
- /Z ensures Robocopy can resume the transfer of a large file in mid-file instead of restarting.
- /XA:H makes Robocopy ignore hidden files, usually these will be system files that we’re not interested in.
- /W:5 reduces the wait time between failures to 5 seconds instead of the 30 second default.
#7 Copy all changes
Use Robocopy to copy all changes to files in a directory called c:data to a directory that contains the date, like data_20091124. Create a batch file as follows.
@echo off
set day=%date:~0,2%
set month=%date:~3,2%
set year=%date:~6,4%
Robocopy "c:data" "c:backupdata%day%-%month%-%year%" /MAXAGE:1
#8 Mirror directory excl. deletion
To mirror the directory «C:directory» to «\server2directory» excluding \server2directorydir2″ from being deleted (since it isn’t present in C:directory) use the following command:
Robocopy "C:Folder" "\Machine2Folder" /MIR /XD \server2 directorydir2"
Robocopy can be setup as a simply Scheduled Task that runs daily, hourly, weekly etc. Note that Robocopy also contains a switch that will make Robocopy monitor the source for changes and invoke synchronization each time a configurable number of changes has
been made. This may work in your scenario, but be
aware that Robocopy will not just copy the changes, it will scan the complete directory structure just like a normal mirroring procedure. If there are a lot of files & directories, this may hamper performance.
#9 Copy permissions only
You have copied the contents from source to destination but now you made changes to the Security permissions at source. You wanted to copy only the permission changes and not data.
ROBOCOPY <Source> <Target> /E /Copy:S /IS /IT
Copy option have the following flags to use:
- D Data
- A Attributes
- T Time stamps
- S NTFS access control list (ACL)
- O Owner information
- U Auditing information
The default value for CopyFlags is DAT (data, attributes, and time stamps).
- /IS — Includes the same files.
- /IT — Includes «tweaked» files.
Sidenote: ROBOCOPY c:sourcefolder d:targetfolder /zb /sec /e /nocopy may give you similar results but useful ONLY when more permissions are added. it will not consider or update the target for permissions removed at the source.
See
How to Copy Files Multi-Threaded with Robocopy in Windows 7.
Robocopy, short for Robust File Copy, is a command-line directory replication and file copy command utility that was first made available as feature in Windows Vista and Windows Server 2008, although it has been available as part of Windows Resources Kit.
In Windows 7 and Windows Server 2008, Robocopy utility is further enhanced with ability to multi-threaded copy operation feature.
Multi-threaded support allows Robocopy to open multiple threads simultaneously, allowing many files to be copied in parallel. With multi-threaded copying, total time required to complete the operation will be drastically reduced and cut, when comparing with
with typical copying one file at time in serial sequential order.
As Robocopy is generally a command-line only utility (although a GUI add-on is available for Robocopy), the new multi-threaded operation capability has to be called via a new switch supported by Robocopy. The new multi-threaded copy feature can be enabled
and turned on with the following parameter:
/MT[:n]
Where n will instruct Robocopy to do multi-threaded copies with n threads (default 8). The value of n must be at least 1 and not greater than 128 (between 1 to 128), with 1 as single thread. In fact, Robocopy will copy files and folders in multi-threaded
operation by default, with 8 threads in one go. Note that /MT[:n] switch is not compatible with the /IPG and /EFSRAW operations.
For example,
Robocopy C:Folder1 C:Folder2 /MT:32
#10 Copy directory tree with timestamps
To copy a directory tree along with the source timestamps for folders
Robocopy C:Folder1 C:Folder2 /MIR /dcopy:T
#11 Copy with bandwidth limitation
To copy a directory using /IPG to limit bandwidth usage. General rule of thumb /IPG:750 will use roughly 1Mbps.
Robocopy /ipg:750 /z /r:3 /w:3 /tee /LOG+:c:robolog.txt //server1/share //server2/share
#12 Copy without bandwidth limitation
To copy a directory without bandwidth limitation and logging with bytes level and ETA.
Robocopy /J /tee /LOG+:c:robolog.txt /ETA /BYTES //server1/share //server2/share
More Information
TechNet
Robocopy Options and Switches: http://aka.ms/robocopy (Short url for
http://technet.microsoft.com/en-us/library/cc733145(WS.10).aspx)
Robocopy Copy Options
|
Option |
Description |
| /s | Copies subdirectories. Note that this option excludes empty directories. |
| /e | Copies subdirectories. Note that this option includes empty directories. |
| /lev:<N> | Copies only the top N levels of the source directory tree. |
| /z | Copies files in Restart mode. |
| /b | Copies files in Backup mode. |
| /zb | Uses Restart mode. If access is denied, this option uses Backup mode. |
| /efsraw |
Copies all encrypted files in EFS RAW mode. |
| /copy:<CopyFlags> |
Specifies the file properties to be copied. The following are the valid values for this option:
The default value for CopyFlags is DAT (data, attributes, and time stamps). |
| /dcopy:T | Copies directory time stamps. |
| /sec | Copies files with security (equivalent to /copy:DAT). |
| /copyall | Copies all file information (equivalent to /copy:DATSOU). |
| /nocopy | Copies no file information (useful with /purge). |
| /secfix | Fixes file security on all files, even skipped ones. |
| /timfix | Fixes file times on all files, even skipped ones. |
| /purge | Deletes destination files and directories that no longer exist in the source. |
| /mir | Mirrors a directory tree (equivalent to /e plus /purge). |
| /mov | Moves files, and deletes them from the source after they are copied. |
| /move | Moves files and directories, and deletes them from the source after they are copied. |
| /a+:[RASHCNET] | Adds the specified attributes to copied files. |
| /a-:[RASHCNET] | Removes the specified attributes from copied files. |
| /create | Creates a directory tree and zero-length files only. |
| /fat | Creates destination files by using 8.3 character-length FAT file names only. |
| /256 | Turns off support for very long paths (longer than 256 characters). |
| /mon:<N> | Monitors the source, and runs again when more than N changes are detected. |
| /mot:<M> | Monitors source, and runs again in M minutes if changes are detected. |
| /rh:hhmm-hhmm | Specifies run times when new copies may be started. |
| /pf | Checks run times on a per-file (not per-pass) basis. |
| /ipg:n | Specifies the inter-packet gap to free bandwidth on slow lines. |
| /sl | Copies the symbolic link instead of the target. |
 Important Important
|
|---|
|
When using the /SECFIX copy option, specify the type of security information you want to copy by also using one of these additional copy options:
|
File Selection Options
|
Option |
Description |
| /a | Copies only files for which the Archive attribute is set. |
| /m | Copies only files for which the Archive attribute is set, and resets the Archive attribute. |
| /ia:[RASHCNETO] | Includes only files for which any of the specified attributes are set. |
| /xa:[RASHCNETO] | Excludes files for which any of the specified attributes are set. |
| /xf <FileName>[ …] |
Excludes files that match the specified names or paths. Note that FileName can include wildcard characters (* and ?). |
| /xd <Directory>[ …] | Excludes directories that match the specified names and paths. |
| /xct | Excludes changed files. |
| /xn | Excludes newer files. |
| /xo | Excludes older files. |
| /xx | Excludes extra files and directories. Extra files are files that exist in the destination directory. |
| /xl | Excludes «lonely» files and directories. |
| /is | Includes the same files. |
| /it | Includes «tweaked» files. |
| /max:<N> | Specifies the maximum file size (to exclude files bigger than N bytes). |
| /min:<N> | Specifies the minimum file size (to exclude files smaller than N bytes). |
| /maxage:<N> | Specifies the maximum file age (to exclude files older than N days or date). |
| /minage:<N> | Specifies the minimum file age (exclude files newer than N days or date). |
| /maxlad:<N> | Specifies the maximum last access date (excludes files unused since N). |
| /minlad:<N> | Specifies the minimum last access date (excludes files used since N) If N is less than 1900, N specifies the number of days. Otherwise, N specifies a date in the format YYYYMMDD. |
| /xj | Excludes junction points, which are normally included by default. |
| /fft | Assumes FAT file times (two-second precision). |
| /dst | Compensates for one-hour DST time differences. |
| /xjd | Excludes junction points for directories. |
| /xjf | Excludes junction points for files. |
Retry Options
|
Option |
Description |
| /r:<N> | Specifies the number of retries on failed copies. The default value of N is 1,000,000 (one million retries). |
| /w:<N> |
Specifies the wait time between retries, in seconds. The default value of |
| /reg | Saves the values specified in the /r and /w options as default settings in the registry. |
| /tbd | Specifies that the system will wait for share names to be defined (retry error 67). |
Logging Options
|
Option |
Description |
| /l | Specifies that files are to be listed only (and not copied, deleted, or time stamped). |
| /x | Reports all extra files, not just those that are selected. |
| /v | Produces verbose output, and shows all skipped files. |
| /ts |
Includes source file time stamps in the output. |
| /fp | Includes the full path names of the files in the output. |
| /bytes | Prints sizes, as bytes. |
| /ns | Specifies that file sizes are not to be logged. |
| /nc | Specifies that file classes are not to be logged. |
| /nfl | Specifies that file names are not to be logged. |
| /ndl | Specifies that directory names are not to be logged. |
| /np | Specifies that the progress of the copying operation (the number of files or directories copied so far) will not be displayed. |
| /eta | Shows the estimated time of arrival (ETA) of the copied files. |
| /log:<LogFile> | Writes the status output to the log file (overwrites the existing log file). |
| /log+:<LogFile> | Writes the status output to the log file (appends the output to the existing log file). |
| /unicode | Displays the status output as Unicode text. |
| /unilog:<LogFile> | Writes the status output to the log file as Unicode text (overwrites the existing log file). |
| /unilog+:<LogFile> | Writes the status output to the log file as Unicode text (appends the output to the existing log file). |
| /tee | Writes the status output to the console window, as well as to the log file. |
| /njh | Specifies that there is no job header. |
| /njs | Specifies that there is no job summary. |
Job Options
|
Option |
Description |
| /job:<JobName> | Specifies that parameters are to be derived from the named job file. |
| /save:<JobName> | Specifies that parameters are to be saved to the named job file. |
| /quit | Quits after processing command line (to view parameters)./nosd: |
| /nodd | Indicates that no destination directory is specified. |
| /if | Includes the specified files. |
From Wikipedia, the free encyclopedia
| Developer(s) | Microsoft |
|---|---|
| Initial release | 1996, 26–27 years ago |
| Stable release |
10.0.19041.1 |
| Operating system | Windows NT 4 and later |
| Type | Command |
| License | Freeware |
| Website | docs.microsoft.com/en-us/windows-server/administration/windows-commands/robocopy |
Robocopy, for «Robust File Copy», is a command-line directory and/or file replication command for Microsoft Windows. Robocopy functionally replaces Xcopy, with more options. Created by Kevin Allen[1] and first released as part of the Windows NT 4.0 Resource Kit, it has been a standard feature of Windows since Windows Vista and Windows Server 2008. The command is robocopy.
Features[edit]
Robocopy is noted for capabilities above and beyond the built-in Windows copy and xcopy commands, including the following, some requiring appropriate command-line options:
- Ability to tolerate network interruptions and resume copy (incomplete files are marked with a date stamp of 1970-01-01 and contain a recovery record so Robocopy knows where to continue from).
- Ability to skip NTFS junction points which can cause copying failures because of infinite loops (
/XJ) - Ability to copy file data and attributes correctly, and to preserve original timestamps, as well as NTFS ACLs, owner information, and audit information using the
/COPYALLor/COPY:command line switches. - Beginning with the XP026 version, the ability to copy folder (or directory) date and timestamps (
/DCOPY:T), even with the ability to update folder timestamps (copied from existing folders) on folders already created from previous versions (that did not copy the folder date and timestamps). - Ability to assert the Windows NT «backup right» (
/B) so an administrator may copy an entire directory, including files denied readability to the administrator. - Persistence by default, with a programmable number of automatic retries if a file cannot be copied.
- A «mirror» mode, which keeps trees synchronised by also deleting files in the destination that are not present in the source.
- Ability to skip files already in the destination folder with identical size and timestamp.
- A continuously updated command-line progress indicator.
- Ability to copy paths exceeding 259 characters — up to a theoretical limit of about 32,000 characters — without errors.[2]
- Multithreaded copying introduced with Windows 7 and Windows Server 2008 R2.[3]
- Return code[4] on program termination for batch file usage.
Compression[edit]
Since Windows Server 2019 and Windows 10, a compression option is available in robocopy when copying across a network. With this switch, if the destination computer supports SMB compression and the files being copied are very compressible, there may be significant improvements to performance. The SMB compression adds inline whitespace compression to file transfers. Compression is also available with the xcopy command and Hyper-V Live Migration with SMB.[5][6]
Examples of use[edit]
Here are some examples of usage, which is not case-sensitive. If more than one option is specified, they must be separated by spaces.
- Copy directory contents of the source
Directory Ato the destinationDirectory B(including file data, attributes and timestamps), recursively with empty directories (/E):
Robocopy "C:Directory A" "C:Directory B" /E
If directory names have non-standard characters, such as spaces, they must be enclosed in double quotes, as is usual in the command line.
- Copy directory recursively (
/E), copy all file information (/COPYALL, equivalent to/COPY:DATSOU,D=Data,A=Attributes,T=Timestamps,S=Security=NTFS ACLs,O=Owner info,U=Auditing info), do not retry locked files (/R:0) (the number of retries on failed copies default value is 1 million), preserve original directories’ Timestamps (/DCOPY:T— requires version XP026 or later):
Robocopy C:A C:B /COPYALL /E /R:0 /DCOPY:T
- Mirror A to B, destroying any files in B that are not present in A (
/MIR), copy files in resume mode (/Z) in case network connection is lost:
Robocopy C:A \backupserverB /MIR /Z
For the full reference, see the Microsoft TechNet Robocopy page.[7]
Syntactic focus on copying folders[edit]
Robocopy syntax is markedly different from its predecessors (copy and xcopy), in that it accepts only folder names, without trailing backslash, as its source and destination arguments. File names and wildcard characters (such as * and ?) are not valid as source or destination arguments; files may be selected or excluded using the optional «file» filtering argument (which supports wildcards) along with various other options.[8]
For example, to copy two files from folder c:bar to c:baz, the following syntax is used:
robocopy c:bar c:baz file1.txt file2.db
And to copy all PDF files from c:bar to c:baz:
robocopy c:bar c:baz *.pdf
The files named are copied only from the folder selected for copying; fully qualified path names are not supported.
CAUTION: A long-standing issue with Robocopy means that if you back up from the root folder of a drive [ e.g., robocopy d: b:d-backup ....], the destination files will be given attributes including SH. This means that they will be invisible to normal access (including DIR in cmd.exe). To fix this, add /a-:SH to the robocopy command line — or do an ATTRIB command to remove them afterwards.
Output[edit]
Robocopy outputs to the screen, or optionally to a log file, the names of all the directories it encounters, in alphabetical order. Each name is preceded by the number of files in the directory that fulfill the criteria for being copied. If the directory does not yet exist in the target, it is marked «New Dir»; if the directory is empty and the /E option is not used, or it contains no files meeting the criteria, a new directory will not be created.
If the /NFL (no file names in log) option is not used, the files being copied will be listed after the name of the directory they are in.
At the end of the output is a table giving numbers of directories, files, and bytes. For each of these, the table gives the total number found in the source, the number copied (including directories marked «New Dir» even if they are not copied), the number skipped (because they already exist in the target), and the number of mismatches, FAILED, and extras. «Failed» can mean that there was an I/O error that prevented a file being copied, or that access was denied. There is also a row of time taken (in which the time spent on failed files seems to be in the wrong column).
Bandwidth throttling[edit]
Robocopy’s «inter-packet gap» (IPG) option allows some control over the network bandwidth used in a session. In theory, the following formula expresses the delay (D, in milliseconds) required to simulate a desired bandwidth (BD, in kilobits per second), over a network link with an available bandwidth of BA kbps:

In practice however, some experimentation is usually required to find a suitable delay, due to factors such as the nature and volume of other traffic on the network. The methodology employed by the IPG option may not offer the same level of control provided by some other bandwidth throttling technologies, such as BITS (which is used by Windows Update and BranchCache).
Limitations[edit]
- Robocopy does not copy open files. Any process may open files for exclusive read access by withholding the
FILE_SHARE_READ[9] flag during opening. Even Robocopy’s Backup mode will not touch those files. (Backup mode instead runs Robocopy as a «Backup Operator». This allows Robocopy to override permissions settings, specifically, NTFS ACLs).[10][11] Normally Volume Shadow Copy Service is used for such situations, but Robocopy does not use it. Consequently, Robocopy is not suitable for backing up live operating system volumes. However, a separate utility such as ‘ShadowSpawn’[12] (Free, Open Sourced, and MIT Licensed) or ‘GSCopyPro’[13] ($30–50) or Diskshadow[14] (included with Windows Server 2008), can be used beforehand to create a shadow copy of a given volume, which Robocopy can then back up.
- Robocopy versions on systems older than Windows Vista do not mirror properly. They ignore changed security attributes of previously mirrored files.[15][16]
- When specifying the
/MT[:n]option to enable multithreaded copying, the/NPoption to disable reporting of the progress percentage for files is ignored. By default the MT switch provides 8 threads. The n is the number of threads you specify if you do not want to use the default.[17]
GUI[edit]
Although Robocopy itself is a command-line tool, Microsoft TechNet provided a GUI front-end called Robocopy GUI. It was developed by Derk Benisch, a systems engineer with the MSN Search group at Microsoft, and required .NET Framework 2.0.[18] It included a copy of Robocopy version XP026. It is no longer available from Microsoft, but may be downloaded from the Internet Archive’s Wayback Machine.[19]
There are non-Microsoft GUIs for Robocopy:
- Cinchoo’s ChoEazyCopy, Simple and powerful RoboCopy GUI v2.0.0.1 (March 11, 2022)[20]
- «Easy RoboCopy», latest version 1.0.16 released on January 11, 2022.[21]
- «WinRoboCopy» revision 1.3.5953.40896 released on April 19, 2016.[22]
- RoboCop RoboCopy, Robocopy GUI Skin and script generator with Progress Monitoring, 10 September 2015.[23]
- A program by SH-Soft, also called «Robocopy GUI» v1.0.0.24 (October 8, 2005).[24]
Ken Tamaru of Microsoft developed a copying program with functionality similar to Robocopy, called RichCopy, discontinued in 2010. It is not based on Robocopy, and does not require .NET Framework.[25]
Versions[edit]
Several versions of Robocopy do not report the version number when executing robocopy /? on the command line. However, their version is stored inside the executable itself and can be queried with PowerShell for example (gcm robocopy | fl *) or inside Windows Explorer by right-clicking on Robocopy.exe, selecting Properties, then clicking on the Details tab.
| Product version | File version | Year | Origin |
|---|---|---|---|
| 1.54 | — | 1996 | Windows NT 4.0 Resource Kit |
| 1.70 | — | 1997 | Windows NT Resource Kit |
| 1.71 | 4.0.1.71 | 1997 | Windows NT Resource Kit |
| 1.95 | 4.0.1.95 | 1999 | Windows 2000 Resource Kit |
| 1.96 | 4.0.1.96 | 1999 | Windows 2000 Resource Kit |
| XP010 | 5.1.1.1010 | 2003 | Windows 2003 Resource Kit |
| XP026 | 5.1.2600.26 | 2005 | Downloaded with Robocopy GUI v.3.1.2; /DCOPY:T option introduced
|
| XP027 | 5.1.10.1027 | 2008 | Bundled with Windows Vista, Server 2008, Windows 7, Server 2008r2 |
| 6.1 | 6.1.7601 | 2009 | KB2639043 |
| 6.2 | 6.2.9200 | 2012 | Bundled with Windows 8 |
| 6.3 | 6.3.9600 | 2013 | Bundled with Windows 8.1 |
| 10.0 | 10.0.10240.16384 | 2015 | Bundled with Windows 10 |
| 10.0.16299 | 10.0.16299.15 | 2017 | Bundled with Windows 10 1709 |
| 10.0.17134 | 10.0.17134.1 | 2018 | Bundled with Windows 10 1803 |
| 10.0.17763 | 10.0.17763.1 | 2018 | Bundled with Windows 10 1809 |
| 10.0.18362 | 10.0.18362.1 | 2019 | Bundled with Windows 10 1903 |
| 10.0.18362.1 | 10.0.18362.1 | 2019 | Bundled with Windows 10 1909 |
| 10.0.19041.1 | 10.0.19041.1 | 2020 | Bundled with Windows 10 20H2 |
| 10.0.22000 | 10.0.22000 | 2021 | Bundled with Windows 11 21H2 |
| 10.0.22621 | 10.0.22621 | 2022 | Bundled with Windows 11 22H2 |
See also[edit]
- List of file copying software
- Command line
- List of DOS commands
- rsync
- GUI
- SyncToy
- Ultracopier
References[edit]
- ^ «AMA with Dave Plummer, creator of Task Manager». Reddit.com. 18 December 2020. Retrieved 19 December 2020.
- ^ Lewis, Dick (15 November 2004). «Robocopy XP010 FAQ». Windows IT Pro. Penton Media. p. 2. Archived from the original on 9 October 2012.
- ^ «Multi-threaded robocopy for faster copies — Grant Holliday’s Blog — Site Home — MSDN Blogs». Blogs.msdn.com. 2009-10-23. Retrieved 2012-11-11.
- ^ «Return codes that are used by the Robocopy utility in Windows Server 2008 or Windows Server 2008 R2». Support.microsoft.com. 2012-02-17. Retrieved 2012-11-11.
- ^ Sander Berkouwer (7 September 2020). «RoboCopy supports Copying Files over SMB with Compression on Windows Server 2019, and beyond». dirteam.com. Retrieved 14 February 2021.
- ^ Smith, Russell (27 November 2020). «SMB Compression Lowers Bandwidth and Improves Copy Times in Windows Server and Azure». Petri.
- ^ «Robocopy». Microsoft Technet. 7 June 2020.
- ^ «Robocopy». Microsoft Docs. Microsoft. 31 October 2016. Retrieved 14 January 2019.
- ^
https://msdn.microsoft.com/en-us/library/aa363858.aspx
«CreateFile function». MSDN.FILE_SHARE_READ […] Enables subsequent open operations on a file or device to request read access. Otherwise, other processes cannot open the file or device if they request read access.
- ^
«Robocopy.exe — Robust File Copy Utility — Version XP010» (PDF).Backup mode copies […] enable you to copy some files as a Backup Operator that you would not be able to copy as a normal user.
- ^
«Default groups». Microsoft TechNet.Backup Operators […] Members of this group can back up and restore all files […], regardless of their own individual permissions on those files.
- ^ «ShadowSpawn». Craig Andera. Retrieved 2015-07-14.
ShadowSpawn.exe is an open source MIT licensed tool that creates and manages shadow copies.
- ^ «GSCopyPro». GuruSquad. Retrieved 2013-03-06.
gscopypro.exe is a tool that works similar to robocopy but has the ability to copy open files.
- ^ «Diskshadow». Microsoft TechNet. Retrieved 2013-03-06.
DiskShadow.exe is a tool that exposes the functionality offered by the Volume Shadow Copy Service (VSS).
- ^ «Microsoft’s Robocopy compromise». ZDNet. 2008-08-04. Archived from the original on March 17, 2010. Retrieved 2012-11-11.
- ^
«Ugly bug in Robocopy — ignoring security on file level — Martin Zugec blog». Msmvps.com. 2008-03-03. Retrieved 2012-11-11. - ^
«Robocopy’s /MT option disables /NP option». Microsoft TechNet. 2009-12-13. Retrieved 2014-02-26. - ^ Joshua Hoffman (November 2006). «Utility Spotlight Robocopy GUI». TechNet Magazine. Microsoft Corporation and CMP Media, LLC. Retrieved 2008-07-17.
- ^ «Is Microsoft’s Robocopy GUI still available». Windows TenForums. Retrieved 2 May 2022.
- ^ Cinchoo (11 March 2022). «Cinchoo’s ChoEazyCopy». GitHub.
- ^ «Easy RoboCopy». TribbleSoft. Retrieved 2022-05-02.
- ^ «WinRoboCopy — UpWay2Late.com Software». Upway2late.com. Retrieved 2012-11-11.
- ^ turnssoft (10 September 2015). «RoboCop RoboCopy». SourceForge.
- ^ «SH-RoboCopy GUI». SH-Soft. Retrieved 2012-11-23.
- ^ Hoffman, Joshua (November 2006). «Free Utility: RichCopy, an Advanced Alternative to RoboCopy». TechNet Magazine. Microsoft Corporation and CMP Media, LLC. Retrieved 2008-07-17.
External links[edit]
- Official sources
- Microsoft Robocopy documentation
- Robocopy download (Version XP010) as part of Windows Server 2003 Resource Kit Tools. Includes 35-page documentation «robocopy.doc».
- Robocopy short documentation on Microsoft TechNet Library
- Robocopy GUI download (Version 3.1.2.0) on Microsoft TechNet Magazine
- Other
- ROBOCOPY.exe (XP Resource Kit/Standard Vista command)
Robocopy (Robust File Copy) is a command line folder and file replication tool available as a standard Windows feature since Windows Server 2008. The goal of this post is to give you a quick start guide by providing some Robocopy examples.
Contents
- Help and default options
- Copy examples
- Move examples
- Synchronize examples
- Filtering examples
- Networking examples
- Backup mode
- Final words
- Author
- Recent Posts

Leos has started in the IT industry in 1995. For the past 15+ years he focused on Windows Server, VMware administration and security. Recently, Leos is focusing on automation via Ansible. He is also a Certified Ethical Hacker.
Over the past 25 years, since Robocopy first became available as part of the Windows NT4 resource pack, it has not changed much. Some features, such as SMB compression, were added, but the usage is still the same. As Robocopy has many great features, such as the ability to copy NTFS ACLs (permissions), it is one of the best free tools for file copy/mirror operations. This Wikipedia post is a good starting point for getting more information about robocopy.
Before we get to the Robocopy examples, you should know the main limitation of robocopy—it cannot copy open or locked files, as it does not use VSS (Volume Shadow Copy Service).
Help and default options
Robocopy itself includes very detailed help, with a description of each option. Simply type robocopy /? to get help displayed.

Robocopy help
The basic syntax for Robocopy is:
robocopy c:tempsource c:tempdestination
This will copy all files, excluding subfolders, from the specified source (c:tempsource) to the specified destination (c:tempdestination) with a bunch of default options.
Note: If you have a folder with spaces in the name, simply put quotes around the path (“c:tempsource with spaces”).

Robocopy default options
Let’s take a closer look at what the options mean:
- *.*—Defines a file filter. The first asterisk (*) represents the filename part, and the second asterisk represents the extension. In this case, the command copies all filenames with all extensions.
- /DCOPY:DA—Defines what to copy for directories. D stands for «data» and A stands for «attributes.»
- /COPY:DAT—Defines what to copy for files. The extra T stands for «timestamps;» DA is the same as for directories.
- /R:1000000—Defines the number of retries on failed copies, for example, if a file is locked.
- /W:30—Defines the number of seconds to wait between retries.
As you can see, the number of retries is very large (one million), which is not practical in most cases. If there is a single locked file inside the directory, robocopy will do a million retries and will wait 30 seconds between them, amounting to almost 350 days. I guess this is not what you normally want.
Generally speaking, there are three things you will do using robocopy: copy, move, and synchronize folders and files.
Copy examples
The easiest way to copy a folder with all files and subfolders is to run this command:
robocopy c:tempsource c:tempdestination /E /DCOPY:DAT /R:10 /W:3
The /E switch tells Robocopy to copy all subfolders, including empty ones. If you don’t want to copy empty subfolders, use the /S switch. Note that I have specified /DCOPY:DAT (default is DA), as I usually want the folder timestamps to be the same as the source. I also limit the number of retries and wait times. If there is a file locked, it won’t usually be unlocked quickly, and it’s easier for me to check the erred files manually later rather than waiting ages for the whole command to complete.
If you are about to copy a large number of files, it might be more useful to save the output to a log file so you can review the results later, even if the command prompt is closed.
robocopy c:tempsource c:tempdestination /E /DCOPY:DAT /R:100 /W:3 /LOG:C:temprobocopylog.txt
Will give you a text log file with all the information you would normally see on screen.

Redirecting the output to a log file
Note: If the destination directory (c:tempdestination) already exists, you will see one skipped folder in the results.
In many (if not most) cases, you will need to create a completely identical copy of the source, including the NTFS owner and auditing information. For that, I add /COPYALL to the command, which is equivalent to /COPY:DATSOU.
robocopy c:tempsource c:tempdestination /E /COPYALL /DCOPY:DAT /R:100 /W:3
Note that this command has to be run from an elevated command prompt, unless you have turned off UAC, otherwise you’ll receive this error message:
ERROR : You do not have the Manage Auditing right.
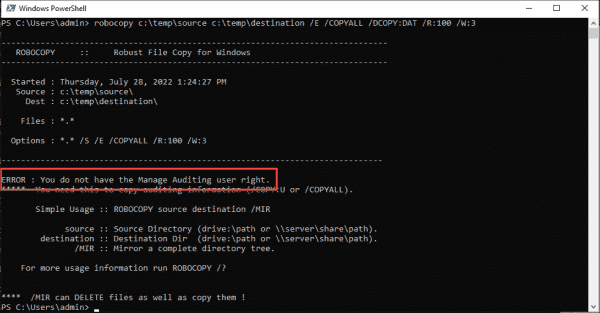
Error when using /COPYALL without elevation
Move examples
Robocopy offers two options for moving files and folders:
- /MOV—Moves files only, leaving the empty folder structure at the source
- /MOVE—Moves files and folders
Use the command below to move all files and folders, including empty ones, with all attributes. Note that the source folder will also be deleted.
robocopy c:tempsource c:tempdestination /E /COPYALL /DCOPY:DAT /MOVE /R:100 /W:3
Synchronize examples
As with move, there are two options to synchronize folders:
- /PURGE—Deletes the files and folders that are no longer present in the source but without subfolders.
- /MIR—Is equivalent to /PURGE /E. /MIR also copies all files in subfolders, including empty ones.
Be careful with this command, especially with source and destination folders. If you make a mistake here, you might get files lost in the specified folder.
robocopy c:tempsource c:tempdestination /MIR /COPYALL /DCOPY:DAT /R:100 /W:3
Filtering examples
Sometimes you might want to copy only specific files, for example, Word documents. This can be done easily by adding the *.docx filter after the destination folder before any other options.
robocopy c:tempsource c:tempdestination *.doc
You might also want to exclude some files or folders from the operation. This is done using the /XF and /XF options. To exclude all .doc files, use the command below.
robocopy c:tempsource c:tempdestination /XF *.doc
To exclude multiple subfolders, use spaces in the command:
robocopy c:tempsource c:tempdestination /XD Subfolder EmptySubfolder
Robocopy includes many more filtering options, which you can find in help under the File Selection Options section.
Networking examples
Another great feature of Robocopy is that it works well with UNC paths and can resume operation in case of a network interruption. The command below will copy the files in restartable mode.
robocopy c:tempsource \MYSERVERmyshare /Z
Backup mode
The last, but definitely not the least, option I will cover today is the backup mode option /B. This option allows administrators to copy files in a special backup mode. This is extremely useful if you are asked to copy folders to which you don’t have access. The backup mode uses the Backup and Restore security privilege to bypass the NTFS permissions and copy the files. This again requires a command prompt to be elevated. In addition, your account needs at least SeBackupPrivilege, which is usually granted to the Administrators and Backup Operators groups.
robocopy c:tempsource c:tempdestination /E /COPYALL /DCOPY:DAT /B
Final words
Robocopy is a very powerful tool for performing various file and folder operations. Many administrators use it on a daily basis for profile migrations and other similar operations. The big advantage is that it’s part of the operating system itself. There are dozens of other options that can be used with Robocopy, but to cover them all would be beyond the scope of this post.
Moving files from one location to another is one of the most basic tasks a user can perform on a computer. It’s probably slightly more complex than turning your computer on and off (unless you’re trying to turn on an iMac and didn’t realize the power button is located on the back, which is definitely not a real-world example by yours truly). However, while copying a few files here or there can be a simple undertaking, transferring vastly, hugely, mind-bogglingly large amounts of files across a network can get very complex, very quickly. But, don’t panic. This guide is here to help you out. We’re taking a deep dive into Robocopy and finding out what makes it the utility of choice when it comes to file transfers.
The “Other” Methods
I had never really given it much thought, but there are a lot of different ways to move a file. Let’s go over a few of the more common methods of transferring files and see how they stack up to the competition. If you’d like to skip all of this, you may do so by clicking here.
Drag and drop:
Hover your mouse over a file, click and hold, drag the file to another location such as another open folder or the desktop, then let go of the file.

Right-click Copy/Cut & Paste:
Right-click on a file and select Copy or Cut. Right-click anywhere in the destination folder and select paste. Copy will obviously copy the file. Cut will remove the file from the current location once it’s been moved to its new destination. This is usually my go-to method when I need stuff moved and don’t really care about the details.
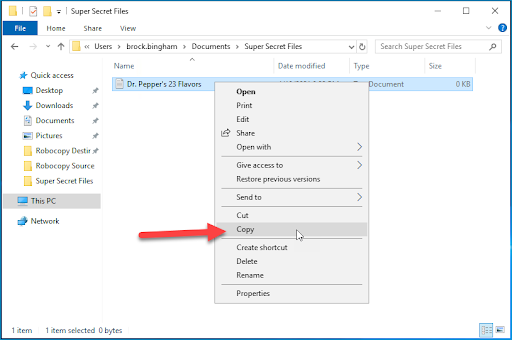
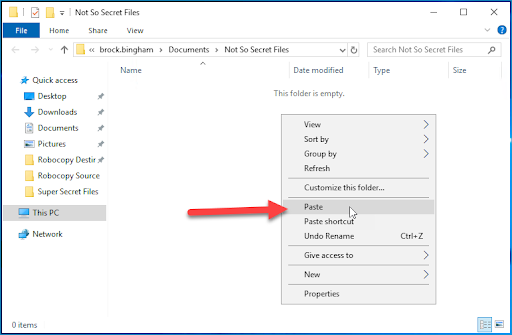
Select the file you want to copy and select Home from the ribbon menu. Next, select Move to or Copy to. If the destination you want is in the list of locations, select it; otherwise, select Choose location… and browse to the destination folder, then select either Move or Copy. (I’d be interested to see how many people actually use this method.)
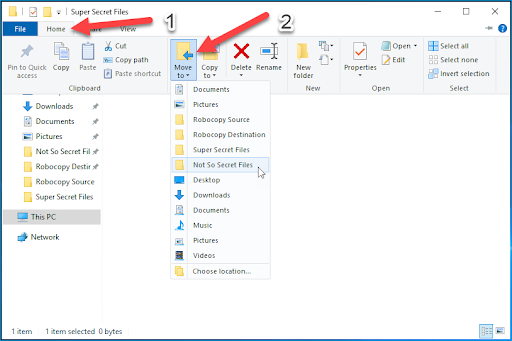
Command Prompt:
If you’re old school or aspire to be a hacker one day, then you’ve obviously been using Command Prompt to transfer files. The commands you want to use are the move or copy command. Here’s the syntax.
move "source_file" "destination"
copy "source_file" "destination"
Example:
move "C:Usersbrock.binghamMusicMovin’ On Up.mp3" "C:Usersbrock.binghamTo The East Side"
Congratulations, you have successfully passed the Hackers 101 Course!
PowerShell:
PowerShell is the option of choice for those sysadmins who try to accomplish everything, and I do mean everything, with PowerShell. Need to rename a shortcut on a desktop? PowerShell. Need to reboot? PowerShell. But, how does it compare to robocopy? Well, I know a few PowerShell fanatics, and even they usually stick with robocopy, though they may launch it from the PowerShell console instead of the command prompt. I think it’s because they prefer the color blue.
Move-Item -Path "C:Folder 1file.txt" -Destination "C:Folder 2"
Copy-Item -Path "C:Folder 1file.txt" -Destination "C:Folder 2"
Example:
Copy-Item -Path "C:Usersbrock.binghamDocumentsSuper Secret FilesUnannounced Marvel Movies Roadmap.txt" -Destination "C:Usersbrock.binghamDocumentsNot So Secret Files"
XCopy:
XCopy (extended copy) has been around for a long time. We’re talking DOS 3.2 long. XCopy was developed to provide more functionality than just the “copy” command. XCopy is still available to use with Windows 10 and Windows Server 2019, though it has been deprecated in favor of Robocopy. Here’s the syntax.
XCopy "source_file" "destination"
Example:
XCopy "C:Usersbrock.binghamDocumentsSuper Secret FilesHow The Universe Was Actually Created.txt" "C:Usersbrock.binghamDocumentsNot So Secret Files"
There are many more parameters that can be used with xcopy; this is just the basic usage.
File Copy Step In PDQ Deploy:
PDQ Deploy allows you to build custom packages that you can then deploy to hundreds or even thousands of targets. One option when creating a package in PDQ Deploy is the File Copy step. With the File Copy step, you simply select a source and a target folder. It’s about as simple as it gets. Okay, maybe it’s not quite as simple as the drag and drop method, but when you need to do it for hundreds of computers, this option is one of the best.
-
Launch PDQ Deploy
-
Click New Package
-
Name your package
-
Click New Step > File Copy
-
Select your source folder
-
Select your target folder
-
Click Save
Your new package is ready to be deployed to all of your adoring fans… I mean users.
What Is Robocopy?
Now that we’ve gone over a few of the alternative methods for transferring files, let’s take an in-depth look at Robocopy and find out why it’s my go to method for transferring all of my Vogon poetry files.
Robocopy, which stands for robust file copy (not robot copy, unfortunately), is a command-line utility for copying/replicating/moving files and directories. It was developed to be more robust (hence the name) than xcopy and essentially replaces xcopy. Robocopy was initially released as part of the Windows NT 4.0 Resource Kit and has been integrated as a standard feature of Windows since Windows Vista and Windows Server 2008.
Why You Should Use Robocopy
Options, options, options. Robocopy has more options than you can shake a stick at. If you’re the type of person that buys a fully-loaded car simply because it came with all the options, even though you’ll never use half of them, then Robocopy is for you. You’ve got options for logging, scheduling, attributes, file name lengths, file types, excluding, including, file sizes, purging, and much, much more. You will probably never use most of the options, but it’s comforting to know that they’re there.
Robocopy Options
Let’s take a moment to really break down all the options. Options in robocopy, sometimes called parameters, arguments, or switches, add to, modify, or extend a command’s functionality. If you ever want to view what additional options can be set for a given command, simply enter the command followed by /?. For example, to return all of the available options for robocopy, run this in the command prompt.
As you’ll see, this command will return a long list of available parameters, letting you copy files where, when, and how you want. To make this information a little easier to digest, I’ve gone ahead and listed all of the available parameters in this handy-dandy table. I’ve also included my own notes on each parameter detailing what they do since the included explanation from Microsoft could be considered lackluster at best.
Copy Options
File Selection Options
Retry Options
Logging Options
Job Options
Using /PURGE or /MIR on the root directory of the volume formerly caused robocopy to apply the requested operation on files inside the System Volume Information directory as well. This is no longer the case; if either is specified, robocopy will skip any files or directories with that name in the top-level source and destination directories of the copy session.
The modified files classification applies only when both source and destination filesystems support change timestamps (e.g., NTFS) and the source and destination files have different change times but are otherwise the same. These files are not copied by default; specify /IM to include them.
Using /LFSM requests robocopy to operate in ‘low free space mode’. In that mode, robocopy will pause whenever a file copy would cause the destination volume’s free space to go below a ‘floor’ value, which can be explicitly specified by the LFSM:n[KMG] form of the flag. If /LFSM is specified with no explicit floor value, the floor is set to ten percent of the destination volume’s size. Low free space mode is incompatible with /MT, /EFSRAW, /B, and /ZB.
Examples
Okay, now that my fingers are nice and numb, how about we look at some examples? The goal here isn’t to give you an example for every possible scenario. Instead, I want to provide you with a general idea of what the various parameters do and how they work. Understanding the parameters will help you envision how best to use them in your environment.
Default Parameters
Let me just knock this one out of the park real quick. Even when you provide the bare minimum with your command, robocopy still includes several parameters by default. Most of these parameters are listed as default options in the table above.
If you ever want to see what options are set by default, run the following command.
robocopy "source" "destination" /QUIT
This will return the following information.
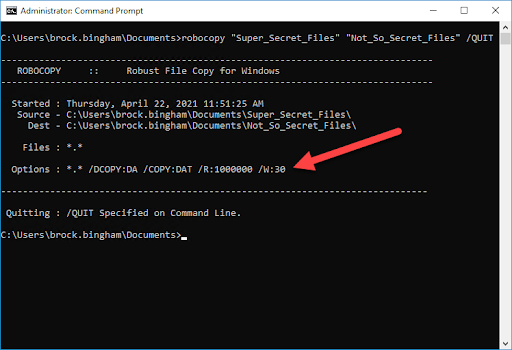
As you can see, if you don’t specify any additional parameters, the defaults are:
This is what you can expect from robocopy if you don’t specify any other options. The /QUIT parameter was added just to make sure the job didn’t actually run since I only wanted to see what the default parameters were.
Basic Copy Job
While the default options are okay even if a bit excessive with the retry settings, usually when I’m copying something, my intention is to copy everything, including subdirectories. Let’s look at a more practical example that will accomplish this.
robocopy "source" "destination" /E /DCOPY:DAT /COPY:DAT /R:5 /W:10
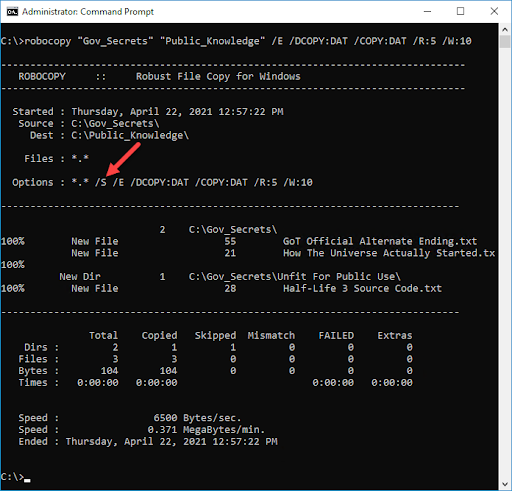
As you can see from the screenshot above, the command copied 3 files and 1 directory from C:Gov_Secrets to C:Public_Knowledge. Notice that the switch /S was added automatically. This is the expected result. Anytime you add /E to a robocopy command, /S will automatically be added. We’ve also instructed robocopy to retry 5 times and wait 10 seconds before each retry.
Mirror And Purge Examples
/MIR is simultaneously one of the best and scariest options with robocopy. If you know what you’re doing, /MIR is great. If you don’t know what you’re doing, you can be left with missing files and no backup.
/MIR sync’s two directories. Many users see this as a great backup option, which it can be. However, keep in mind that if a file gets deleted from the source accidentally, it will also be deleted in the destination copy when the robocopy command runs next. If you think you will ever need to restore a file that may have accidentally been deleted from the source, then I would not recommend using /MIR or /PURGE.
On the flip side, /MIR and /PURGE are great at keeping your backup cleaned up as you clean up your source directory. If you don’t use /MIR or /PURGE, then your destination copy may balloon in size since it will never delete any files, even if they are deleted in the source directory.
robocopy "source" "destination" /MIR /DCOPY:T /COPY:DAT /R:3 /W:5
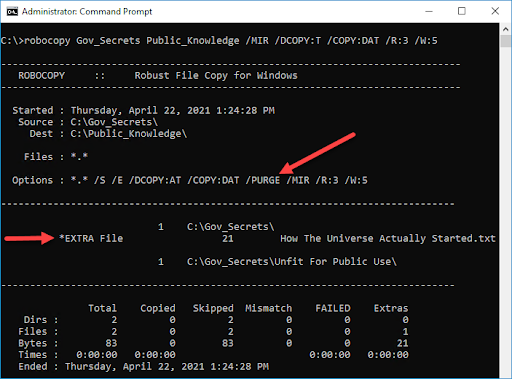
A couple of interesting things to point out after running this command. You’ll notice that the switch /PURGE was automatically added even though it wasn’t in the original command. You’ll also notice that an extra file called “How The Universe Actually Started.txt” was located in the destination folder. Because we ran the /MIR parameter, which automatically adds the /PURGE switch, this file was removed from the destination folder. Remember, /MIR can be your friend, but it can also be your crazy friend that betrays you when you least expect it. Or perhaps exactly when you expect it.
Moving Files And Directories
If you just need to move files and directories from one location to another, you can use the /MOV or /MOVE parameters. This is similar to cutting and pasting data from one directory to another. I prefer copying files from one location to another rather than manually deleting the source data, just in case the move job encounters an error, but to each their own. If you like to live dangerously, then /MOV and /MOVE may be the adrenaline fix you’re looking for. Consider adding the /ZB switch to help resolve any issues encountered during the move job.
robocopy "source" "destination" /MOVE /E /COPYALL /DCOPY:DAT /ZB /R:4 /W:7
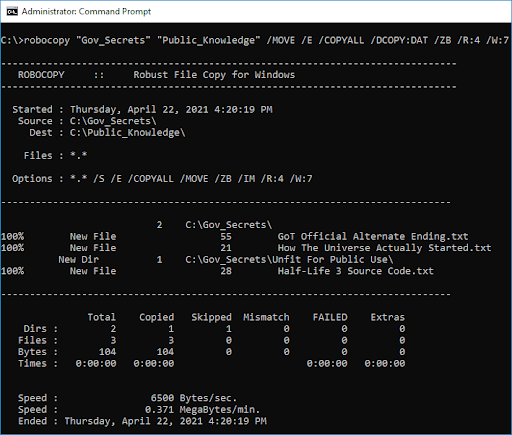
Okay, time to break this down. This command actually proved more interesting than I thought it would. The description provided with the /MOVE command is a bit deceiving. /MOVE will move the files inside the source folder to a new folder and then delete the source folder. It will not touch subdirectories.
Imagine this. You have Folder1 and Folder2. Folder1 only has files in it, no subdirectories. /MOVE will move all the files from Folder1 into Folder2, then delete Folder1.
Now, if you have subdirectories in Folder1, you will need to include /E in order to move both files and subdirectories. This is probably what most people are trying to do with this command. The /COPYALL and /DCOPY:DAT is just to ensure everything comes over unless you don’t want to bring over permissions and such. I’ve included /ZB just in case it’s a large transfer that may get interrupted and in case permissions cause a file transfer issue. Last but not least, I’ve included the /R and /W parameters. I like to add these with all of my robocopy commands to ensure something doesn’t hang forever.
Using /MON and /MOT To Monitor Backups
/MON and /MOT will allow robocopy to continually run on a system, monitoring for file changes. This allows robocopy to serve as a kind of pseudo backup service. /MON:n checks for a specified number of changes before making another copy pass. /MOT:n waits for a specified period of time before performing another copy pass. These switches can be combined, so both conditions must be met before robocopy will complete another pass.
robocopy "source" "destination" /E /MON:5 /MOT:10
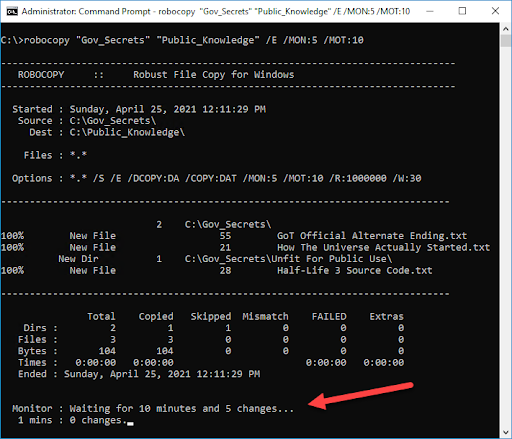
As you can see in this screenshot, robocopy is still running as it waits for the conditions to be met. /MON:5 instructs robocopy to wait for 5 changes to be detected before running another pass. /MOT:10 instructs robocopy not to make another pass for at least 10 minutes. With this combination of /MON:5 and /MOT:10, robocopy will not run for at least 10 minutes. After 10 minutes, if 5 changes have been made, then a copy pass will run. If, after 10 minutes, 5 changes haven’t been made, robocopy will continue to wait for those 5 changes before running. To end the process, simply use the CMD abort command which is CTRL+C.
Filtering Files And Folders
One of the more powerful features of robocopy may also seem like one of the simpler ones: the ability to exclude or filter files and folders. Robocopy gives you a ton of options to make sure you copy exactly what you want and only what you want. From the “File Selection Options” section in the parameters table, there are 24 different parameters to filter with. Not 42, but 24. Let that sink in. That’s a lot of options, which is the whole point. Robocopy was designed to ensure users could have complete control over their copy jobs.
Before we dive into the actual switches, it’s important to note that you can filter files without actually adding any switches. Here’s a basic example:
robocopy "source" "destination" filename
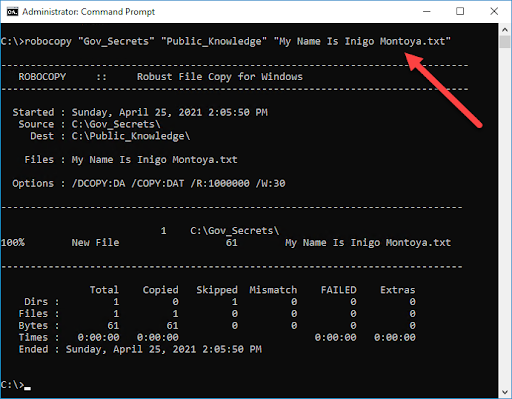
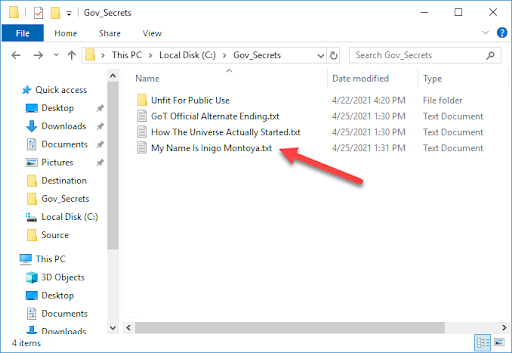
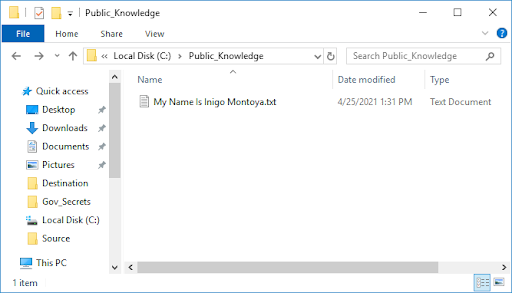
You’ll notice that since I included the actual file name that I wanted to copy, “My Name Is Inigo Montoya.txt”, only that one file was copied, even though there are other files in the source folder.
You can extend this functionality even further by using wildcard symbols. Wildcards are symbols that take the place of unspecified characters. There are two well known wildcards, and there are a couple of lesser known, or “undocumented” wildcards.
Let’s take a look at a few wildcard examples.
robocopy "source" "destination" b*
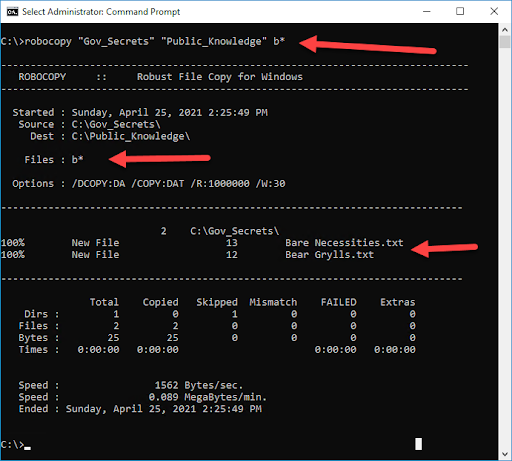
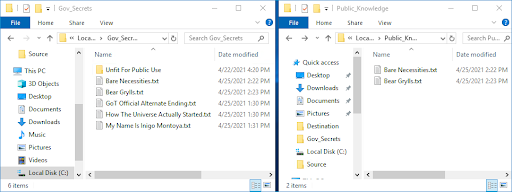
With the b* parameter included, you’re telling robocopy that you only want to copy any files that start with the letter b. In the screenshot above, you can see that “Bare Necessities.txt” and “Bear Grylls.txt” were the only files to get copied over because they both start with the letter b.
The wildcard symbol can be included at any point of a file name. In fact, when you run the most basic robocopy command, you can see that by default, the *.* file filter is included, which means all files will be included.
Here’s an example of using the ? wildcard.
robocopy "source" "destination" "file_n?me.txt"
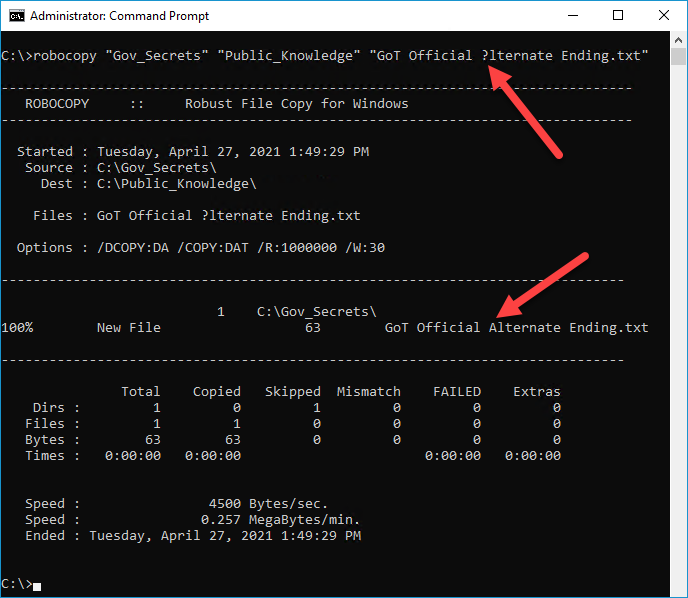
If you ever need to copy only files that do not have file extensions, you could use the < wildcard. Here is an example:
robocopy "source" "destination" "<"
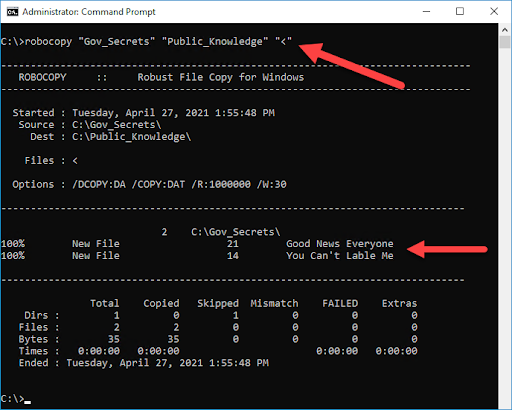
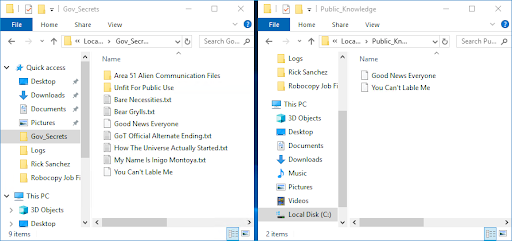
You’ll notice that only the files without file extensions were copied over. Take note that we used quotation marks surrounding the < wildcard. If you don’t enclose the < wildcard in quotes, you’ll receive an error which says “The syntax of the command is incorrect.”
You can also extend the functionality of wildcards to include directories by adding the /S or /E switch.
robocopy "source" "destination" a* /S
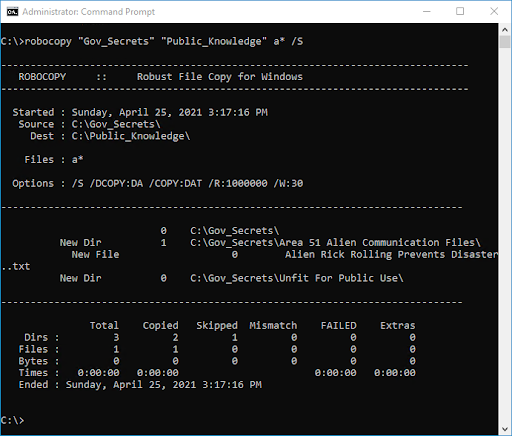
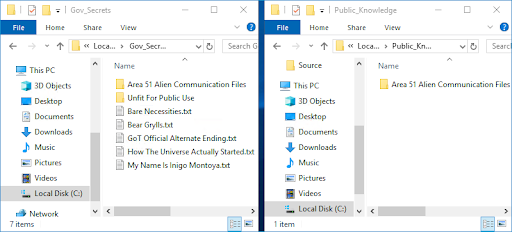
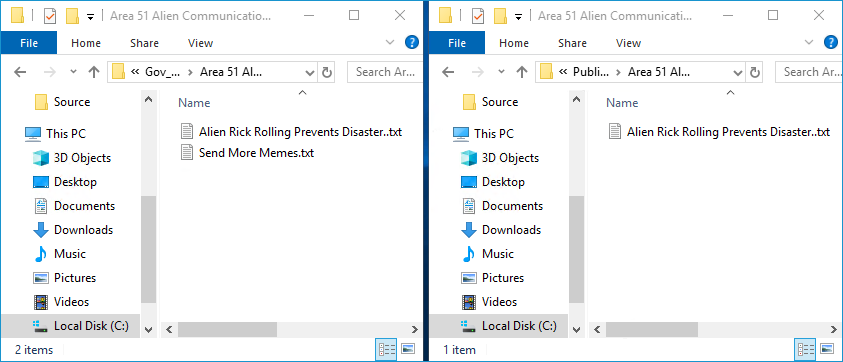
What’s important to note is that when you add a file filter and include subdirectories, the filter will be applied to both files and folders recursively. Meaning, the filter will also apply to the files contained in the subdirectories that meet the filter criteria. As you can see from the example above, since I filter anything that started with the letter “a”, the folder “Area 51 Alien Communication Files” was copied, but only one of the files inside of that folder was copied.
If you’d rather specify what you want to exclude, use /XF to specify files you wish to exclude and /XD to specify directories you want to exclude.
You can also use the wildcard symbol to filter by file type. *.docx will only include files of the .docx type. *.txt will only include files of the .txt type.
If you want to include more than one filter, simply include a space between each filter.
robocopy "source" "destination" a* b* *.txt *.docx *.jpg
This example will copy .txt, .docx, and .jpg files that start with the letter a and b.
If you want to filter based on attributes, you can use the /IA:[RASHCNETO] to include certain attributes or /XA:[RASHCNETO] to exclude specific attributes. The switch options are as follows:
/MAXAGE, /MINAGE, /MAXLAD, /MINLAD are all useful for filtering based on the age or the access date of the file. /MINAGE is especially useful for filtering out files that haven’t been touched in years.
robocopy "source" "destination" /MINAGE:365
This command will only copy files that have been modified within the last year. As you can imagine, this is great when you have those users or departments that struggle to clean up their older files.
With so many filter options, it’s difficult to cover them all, but there is one more that I would like to highlight, and that’s the /XO switch. This switch will exclude files that have newer versions in the destination directory. This is useful if you have users working out of both the source and destination folders. You don’t want to accidentally overwrite a file that a user has been working on in the destination folder, and this switch will stop that from happening.
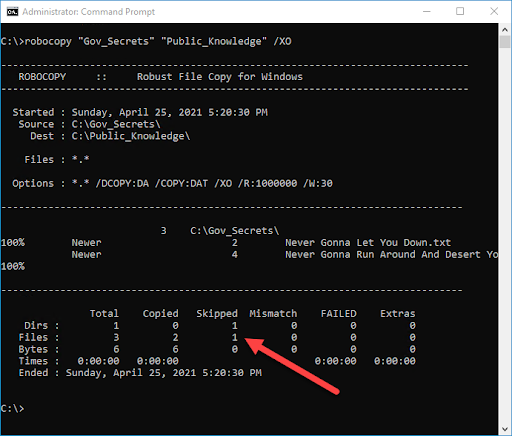
Network Transfers
Transferring files across the network can be stressful for any sysadmin depending on the situation. You may be migrating your files to a new file server or maybe just taking a backup of some network files. Regardless, there are a few robocopy options that can help you ensure a smooth transfer process.
Note — When transferring network files, users have reported issues when targeting mapped drives, so it’s recommended to use full UNC paths in your robocopy commands.
robocopy "source UNC path" "destination UNC path" /COPYALL /E /ZB /RH:1900-0500 /MT:64 /R:10 /W:10 /V /TEE /LOG:"C:LogsRobocopy_Log.txt"
These are some pretty standard options you’ll want to consider when doing a big network transfer job. We are using full UNC paths for our source and our destination. The /RH:1900-0500 option specifies that we only want robocopy to run from 7 PM to 5 AM. Once 5 AM hits, the robocopy job will pause, which should prevent robocopy from bogging down the network during work hours. We’ve included some logging options as well with /V, /TEE, and /LOG, which we will cover more in-depth in a moment.
I want to emphasize that no two network environments are the same. You will need to evaluate your network to determine which switches and options you’ll need to complete your file transfers. I strongly suggest you use /PURGE and /MIR cautiously when transferring critical network files, or really any vital data. Robocopy is terrific at deleting files if you are careless with your commands.
Logging
By default, robocopy will output quite a bit of information to the console window. I find this pretty sufficient for most small robocopy jobs. However, when you are dealing with critical files or transfers of hundreds of GB’s or even TB’s of data, it’s good practice to have an actual log file to be able to review, especially if an issue occurs.
Staying consistent with the theme of this blog, robocopy offers an abundance of logging options. While most options are user preference settings to either minimize or maximize what data is logged, there are a few standouts.
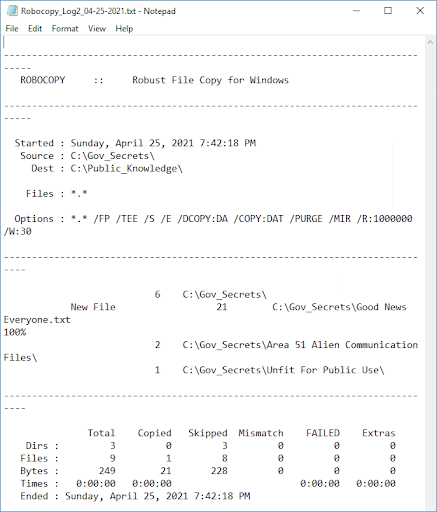
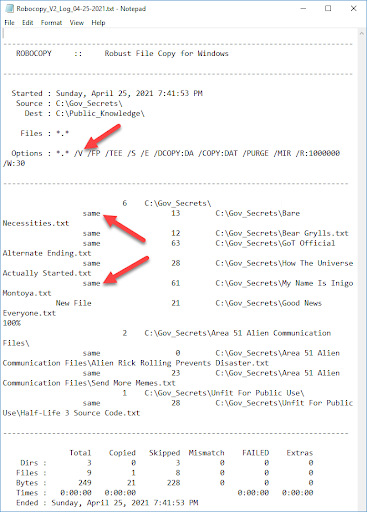
You can see the difference between these two logs, one with the verbose switch, and one without it.
Here is an example of a command which will generate a verbose log file with the date included in the file name. I use the /TEE switch to also send the output to the console window.
robocopy "source" "destination" /TEE /FP /V /LOG:"C:LogsRobocopy_V_Log_%date:~-10,2%"-"%date:~7,2%"-"%date:~-4,4%.txt
Robocopy Jobs
I feel like this may be one of the lesser known features of robocopy. Maybe it’s just something that I haven’t used very often that other sysadmins use all the time. Either way, if you are the “Robocopy Guy” at your organization and you eat a bowl of robocopy crunch for breakfast every morning, this would probably be very helpful. Then again, if you are the robocopy guy, you probably already know about robocopy jobs.
Robocopy allows you to save and call upon job files. This could be very helpful if you find yourself running the same long list of robocopy commands over and over again. Robocopy commands can grow exceedingly long, especially if you have to include a lot of filter options.
/SAVE:job_name — Saving a robocopy job is as simple as adding the /SAVE command to the end of your robocopy command. Make sure it is the last switch added to the command, as any other options added after the /SAVE switch will not be saved. The file will be saved with a .RCJ extension.
/JOB:job_name — Calling a robocopy job file is just as simple as saving it. Simply enter the /JOB switch with the name of the job file you want to run.
Here is a simple example to create a robocopy job file.
robocopy "source" "destination" /COPYALL /SAVE:"C:Robocopy Job Filesjob1" /MIR
As you can see, I’ve purposefully included the /MIR option after the /SAVE option. If I view my job file, there /MIR will not be there.
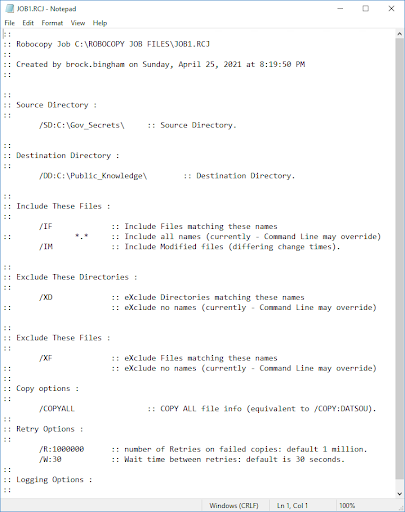
Now, if I add the /MIR parameter before the /SAVE parameter, this is what my copy options will look like.
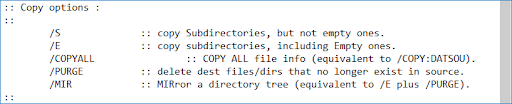
To run a job is as simple as executing robocopy with the /JOB:file_name option. You’ll see all of the parameters passed by the job file when it runs.
robocopy /JOB:"C:Robocopy Job Filesjob1.RCJ"
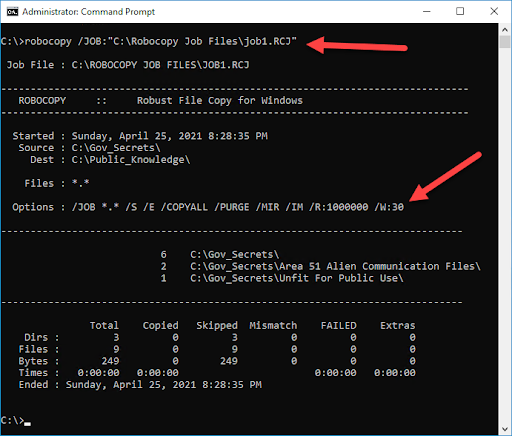
If you want to edit a job file, but you don’t want to run a command to do it, you can modify job files with any text editor. By default, the job files are filled with comments, though they can be trimmed down to the bare minimum parameters if that’s more your style.
Here’s a job file I edited to contain the bare minimum information.
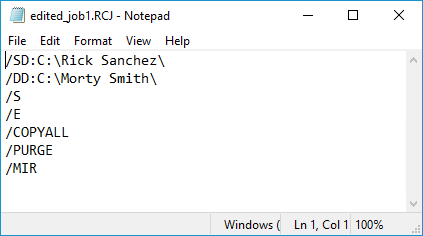
And here is the result from running the job file.

As you can see, without the comments, the job file is much smaller, and all that’s really needed is the source, destination, and switches.
Two other options I’d like to briefly go over that relate to robocopy jobs are the /NOSD and /NODD parameters. These options let you leave the source and destination locations out of your job files. When you run the job file, you will need to include the information. This is useful if you need to run the same job in multiple locations.
/NOSD — No source specified. This will automatically be added to the job file when you leave the source directory out of the command.
/NODD — No destination specified. This will automatically be added to the job file when you leave the destination directory out of the command.
robocopy *.txt /SAVE:"C:Robocopy Job Filesjob2"
When you call this job, you’ll want to include the source and destination information. The job will contain the options you previously saved, but you can append more options that aren’t in the job file if you wish.
robocopy /JOB:"C:job_file_locationjob_name.rcj" "C:source" "C:destination" /COPYALL
You can see in this example that I’ve called the job file, though I’ve also included the /COPYALL switch which wasn’t included in the job file.
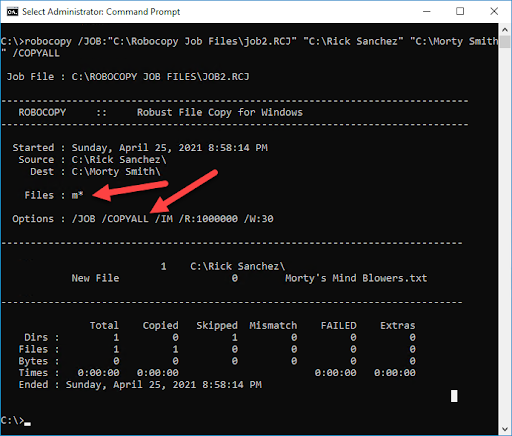
The filter m* from the job file remained intact, and the /COPYALL option was also included.
Testing Robocopy Commands
Since we like to play it safe with utilities that can easily wipe out an entire file server, it’s a good habit to start testing our robocopy commands before running them on production data. We want to do whatever we can to prevent an “Oh no, not again” type of situation. Running your commands against test files and folders is a great way to ensure your command is doing what you want it to do. However, there is one other testing method that you should probably start using before you go full contact IT on your network, and that’s the /L switch.
/L — Will provide details about the command you are running, with all of the files and folders that would have been affected, without actually running the command.
You can use the /L switch to give you a preview of what will happen when you actually run your command. I like to also send the results to a log file for review.
robocopy "source" "destination" /E /COPYALL /L /TEE /LOG:log_file
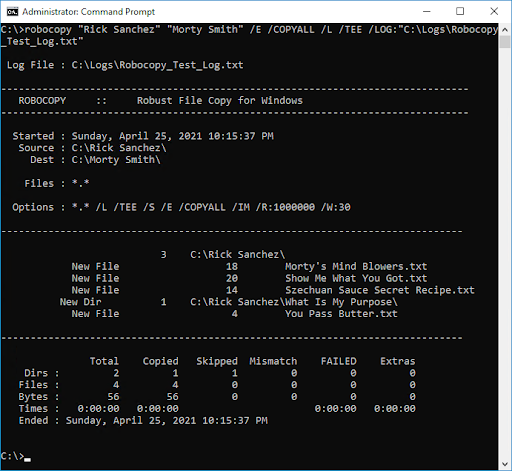
As you can see, it looks like the job runs, and it returns all of the results, but if I view the destination folder, it will be empty, just like my dreams.

Another easy way to tell if the job didn’t actually run is you won’t have the percentages next to the file indicating the copy status.
Now let’s remove the /L switch and compare the actual results.
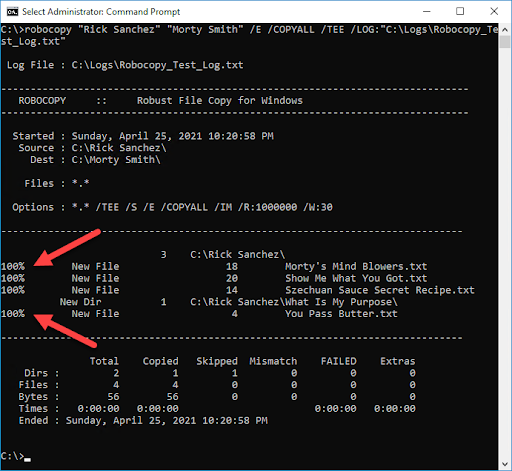
As you can see, with the /L switch removed, the copy status of the files is displayed.
Robocopy Exit Codes
Here is a list of the robocopy return codes and what they mean. Exit codes 0-7 are success codes, and anything >= 8 indicates a failure.
Running Robocopy With PDQ Deploy
Need to run a robocopy job against multiple machines? PDQ Deploy will have you transferring files all over the place in no time. PDQ Deploy allows you to deploy commands and batch files with just a few clicks. Don’t have PDQ Deploy? Download a free trial so that you can follow along.
-
With PDQ Deploy open, click New Package
-
Give your package a name
-
Click New Step > Command

-
Enter the robocopy command you want to run against targets.
-
Add the success codes 0,1,2,3,4,5,6,7
-
Click Save, and your package is now ready to deploy to your targets.
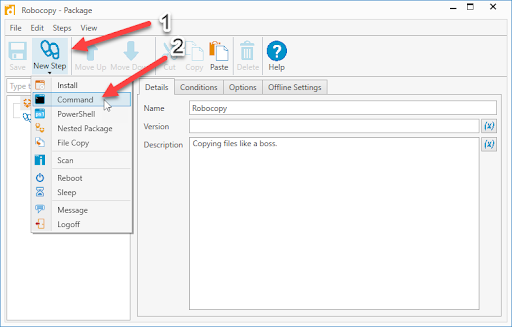
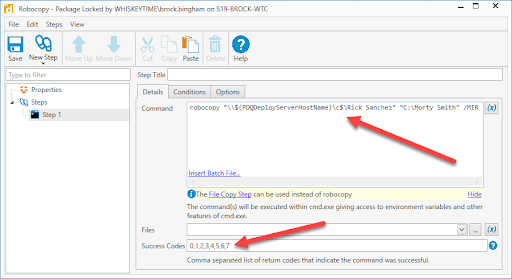
Wrapping Up
It’s really quite impressive how many options one tool can have for a task as simple as copying files. However, once you dive into the intricacies of file copying, you begin to realize why robocopy has such a massive amount of options. When it comes to protecting data, you need to account for every what-if scenario you may encounter along the way.
Hopefully, this blog has cleared up some of Microsoft’s vague parameter explanations, and you gain a better understanding of how to implement these options into your robocopy commands. Honestly, the best way to understand how most of these options work is to simply test them out. I can’t tell you how much time I spent testing the various switches to see what they did. Now, if you’ll excuse me, I need to go ice the nubs where my fingers used to be.
Updated: 03/13/2021 by
Robocopy is a robust file copy command for the Windows command line. It allows users to copy files, directories, and drives from one location to another.
Availability
Robocopy is an external command available for the following Microsoft operating systems as robocopy.exe.
- Windows NT (In resource kit)
- Windows 2000 (In resource kit)
- Windows Server 2008
- Windows Vista
- Windows 7
- Windows 8
- Windows 10
- Windows 11
Robocopy syntax
- Windows 10 and 11 syntax.
- Windows 8 and earlier syntax.
Windows 10 and 11 syntax
ROBOCOPY source destination [file [file]...] [options]
| source | Source directory (drive:path or \serversharepath). |
| destination | Destination directory (drive:path or \serversharepath). |
| file | File(s) to copy (names/wildcards: default is «*.*»). |
Copy options
| /S | Copy subdirectories, but not the empty ones. |
| /E | Copy subdirectories, including the empty ones. |
| /LEV:n | Only copy the top n levels of the source directory tree. |
| /Z | Copy files in restartable mode. |
| /B | Copy files in backup mode. |
| /ZB | Use restartable mode. If access is denied, use backup mode. |
| /J | Copy using unbuffered I/O (recommended for large files). |
| /EFSRAW | Copy all encrypted files in EFS RAW mode. |
| /COPY:[copyflags] | What to COPY for files (default is /COPY:DAT). (copyflags: D=Data, A=Attributes, T=Timestamps). (S=Security=NTFS ACLs, O=Owner info, U=aUditing info). |
| /SEC | Copy files with security (equivalent to /COPY:DATS). |
| /COPYALL | Copy all file info (equivalent to /COPY:DATSOU). |
| /NOCOPY | Copy no file info (useful with /PURGE). |
| /SECFIX | Fix file security on all files, even skipped files. |
| /TIMFIX | Fix file times on all files, even skipped files. |
| /PURGE | Delete dest files/dirs that no longer exist in the source. |
| /MIR | Mirror a directory tree (equivalent to /E plus /PURGE). |
| /MOV | Move files (delete from the source after copying). |
| /MOVE | Move files and dirs (delete from the source after copying). |
| /A+:[RASHCNET] | Add the given attributes to copied files. |
| /A-:[RASHCNET] | Remove the given attributes from copied files. |
| /CREATE | Create directory tree and zero-length files only. |
| /FAT | Create destination files using 8.3 FAT file names only. |
| /256 | Turn off a very long path (> 256 characters) support. |
| /MON:n | Monitor source; run again when more than n changes are shown. |
| /MOT:m | Monitor source; run again in m minutes time, if changed. |
| /RH:hhmm-hhmm | Run hours — times when new copies may be started. |
| /PF | Check run hours on a per file (not per pass) basis. |
| /IPG:n | Inter-packet gap (ms), to free bandwidth on slow lines. |
| /SJ | Copy junctions as junctions instead of as the junction targets. |
| /SL | Copy symbolic links as links instead of as the link targets. |
| /MT[:n] | Do multi-threaded copies with n threads (default 8). n must be at least 1 and not greater than 128. This option is incompatible with the /IPG and /EFSRAW options. Redirect output using /LOG option for better performance. |
| /DCOPY:[copyflags] | What to copy for directories (default is /DCOPY:DA). (copyflags : D=Data, A=Attributes, T=Timestamps, E=EAs, X=Skip alt data streams). |
| /NODCOPY | Copy no directory info (the default /DCOPY:DA is done). |
| /NOOFFLOAD | Copy files without using the Windows Copy Offload mechanism. |
| /COMPRESS | Request network compression during file transfer, if applicable. |
Copy File Throttling options
Note
The Copy File Throttling options are only available in Windows 11.
| /IoMaxSize:n[KMG] | Requested max I/O size per {read,write} cycle, in n [KMG] bytes. |
| /IoRate:n[KMG] | Requested I/O rate, in n [KMG] bytes per second. |
| /Threshold:n[KMG] | File size threshold for throttling, in n [KMG] bytes (see Remarks). |
File Selection options
| /A | Copy only the files with the archive attribute set. |
| /M | Copy only the files with the archive attribute and reset it. |
| /IA:[RASHCNETO] | Include only the files with any of the given attributes set. |
| /XA:[RASHCNETO] | Exclude files with any of the given attributes set. |
| /XF file [file]… | Exclude files matching given names/paths/wildcards. |
| /XD dirs [dirs]… | Exclude directories matching given names/paths. |
| /XC | Exclude changed files. |
| /XN | Exclude newer files. |
| /XO | Exclude older files. |
| /XX | Exclude extra files and directories. |
| /XL | Exclude lonely files and directories. |
| /IS | Include same files. |
| /IT | Include tweaked files. |
| /MAX:n | Maximum file size — exclude files bigger than n bytes. |
| /MIN:n | Minimum file size — exclude files smaller than n bytes. |
| /MAXAGE:n | Maximum file age — exclude files older than n days/date. |
| /MINAGE:n | Minimum file age — exclude files newer than n days/date. |
| /MAXLAD:n | Maximum last access date — exclude files unused since n. |
| /MINLAD:n | Minimum last access date — exclude files used since n. (If n < 1900 then n = n days, else n = YYYYMMDD date). |
| /FFT | Assume FAT file times (2-second granularity). |
| /DST | Compensate for one-hour DST time differences. |
| /XJ | Exclude symbolic links (for both files and directories) and junction points. |
| /XJD | Exclude symbolic links for directories and junction points. |
| /XJF | Exclude symbolic linksfor files. |
| /IM | Include modified files (differing change times). |
Retry options
| /R:n | Number of retries on failed copies: default 1 million. |
| /W:n | Wait time between retries: default is 30 seconds. |
| /REG | Save /R:n and /W:n in the registry as default settings. |
| /TBD | Wait for sharenames to be defined (retry error 67). |
| /LFSM | Operate in low free space mode, enabling copy pause and resume (see Remarks). |
| /LFSM:n[KMG] | /LFSM, specifying the floor size in n [K:kilo,M:mega,G:giga] bytes. |
Logging options
| /L | List only — don’t copy, timestamp or delete any files. |
| /X | Report all extra files, not only those selected. |
| /V | Produce verbose output, showing skipped files. |
| /TS | Include source file timestamps in the output. |
| /FP | Include full pathname of files in the output. |
| /BYTES | Print sizes as bytes. |
| /NS | No size — don’t log file sizes. |
| /NC | No class — don’t log file classes. |
| /NFL | No file list — don’t log file names. |
| /NDL | No directory list — don’t log directory names. |
| /NP | No progress — don’t display percentage copied. |
| /ETA | Show estimated time of arrival of copied files. |
| /LOG:file | Output status to LOG file (overwrite existing log). |
| /LOG+:file | Output status to LOG file (append to existing log). |
| /UNILOG:file | Output status to LOG file as UNICODE (overwrite existing log). |
| /UNILOG+:file | Output status to LOG file as UNICODE (append to existing log). |
| /TEE | Output to console window and the log file. |
| /NJH | No job header. |
| /NJS | No job summary. |
| /UNICODE | Output status as UNICODE. |
Job options
| /JOB:jobname | Take parameters from the named job file. |
| /SAVE:jobname | Save parameters to the named job file. |
| /QUIT | Quit after processing command line (to view parameters). |
| /NOSD | No source directory is specified. |
| /NODD | No destination directory is specified. |
| /IF | Include the following files. |
Using /PURGE or /MIR on the root directory of the volume formerly caused robocopy to apply the requested operation on files inside the System Volume Information directory as well. That is no longer the case. If /PURGE or /MIR is specified, robocopy skips any files or directories with that name in top-level source and destination directories of the copy session.
The modified files classification applies only when source and destination filesystems support change timestamps (e.g., NTFS), and the source and destination files have different change times. These files are not copied by default; specify /IM to include them.
The /DCOPY:E flag requests that extended attribute copying should be attempted for directories. Note that currently robocopy continues if a directory’s EAs could not be copied. This flag is also not included in /COPYALL.
Using /LFSM requests robocopy to operate in ‘low free space mode’. In that mode, robocopy pauses whenever file copying would cause the destination volume’s free space to go below a ‘floor’ value, which can be explicitly specified by the LFSM:n[KMG] form of the flag. If /LFSM is specified with no explicit floor value, the floor is set to ten percent of the destination volume’s size. Low free space mode is incompatible with /MT, /EFSRAW, /B, and /ZB.
Windows 8 and earlier syntax
ROBOCOPY source destination [file [file]...] [options]
| source | Source directory (drive:path or \serversharepath). |
| destination | Destination directory (drive:path or \serversharepath). |
| file | File(s) to copy (names/wildcards: default is «*.*»). |
Copy options
| /S | Copy subdirectories, but not the empty ones. |
| /E | Copy subdirectories, including the empty ones. |
| /LEV:n | Only copy the top n levels of the source directory tree. |
| /Z | Copy files in restartable mode. |
| /B | Copy files in backup mode. |
| /ZB | Use restartable mode. If access denied, use backup mode. |
| /EFSRAW | Copy all encrypted files in EFS RAW mode. |
| /COPY:[copyflags] | What to COPY for files (default is /COPY:DAT). (copyflags : D=Data, A=Attributes, T=Timestamps). (S=Security=NTFS ACLs, O=Owner info, U=aUditing info). |
| /DCOPY:T | COPY the directory timestamps. |
| /SEC | Copy files with security (equivalent to /COPY:DATS). |
| /COPYALL | Copy all file info (equivalent to /COPY:DATSOU). |
| /NOCOPY | Copy no file info (useful with /PURGE). |
| /SECFIX | Fix file security on all files, even skipped files. |
| /TIMFIX | Fix file times on all files, even the skipped ones. |
| /PURGE | Delete dest files/dirs that no longer exist in the source. |
| /MIR | Mirror a directory tree (equivalent to /E plus /PURGE). |
| /MOV | Move files (delete from the source after copying). |
| /MOVE | Move files and dirs (delete from the source after copying). |
| /A+:[RASHCNET] | Add the given attributes to copied files. |
| /A-:[RASHCNET] | Remove the given attributes from copied files. |
| /CREATE | Create directory tree and zero-length files only. |
| /FAT | Create destination files using 8.3 FAT file names only. |
| /256 | Turn off very long path (> 256 characters) support. |
| /MON:n | Monitor source; run again when more than n changes seen. |
| /MOT:m | Monitor source; run again in m minutes time, if changed. |
| /RH:hhmm-hhmm | Run hours — times when new copies may be started. |
| /PF | Check run hours on a per file (not per pass) basis. |
| /IPG:n | Inter-packet gap (ms), to free bandwidth on slow lines. |
| /SL | Copy symbolic links versus the target. |
| /MT[:n] | Do multi-threaded copies with n threads (default 8). n must be at least 1 and not greater than 128. This option is incompatible with the /IPG and /EFSRAW options. Redirect output using /LOG option for better performance. |
File Selection options
| /A | Copy only the files with the archive attribute set. |
| /M | Copy only the files with the archive attribute and reset it. |
| /IA:[RASHCNETO] | Include only the files with any of the given attributes set. |
| /XA:[RASHCNETO] | Exclude files with any of the given attributes set. |
| /XF file [file]… | Exclude files matching given names/paths/wildcards. |
| /XD dirs [dirs]… | Exclude directories matching given names/paths. |
| /XC | Exclude changed files. |
| /XN | Exclude newer files. |
| /XO | Exclude older files. |
| /XX | Exclude extra files and directories. |
| /XL | Exclude lonely files and directories. |
| /IS | Include same files. |
| /IT | Include tweaked files. |
| /MAX:n | Maximum file size — exclude files bigger than n bytes. |
| /MIN:n | Minimum file size — exclude files smaller than n bytes. |
| /MAXAGE:n | Maximum file age — exclude files older than n days/date. |
| /MINAGE:n | Minimum file age — exclude files newer than n days/date. |
| /MAXLAD:n | Maximum last access date — exclude files unused since n. |
| /MINLAD:n | Minimum last access date — exclude files used since n. (If n < 1900 then n = n days, else n = YYYYMMDD date). |
| /XJ | Exclude junction points. (normally included by default). |
| /FFT | Assume FAT file times (2-second granularity). |
| /DST | Compensate for one-hour DST time differences. |
| /XJD | Exclude junction points for directories. |
| /XJF | Exclude junction points for files. |
Retry options
| /R:n | Number of retries on failed copies: default 1 million. |
| /W:n | Wait time between retries: default is 30 seconds. |
| /REG | Save /R:n and /W:n in the registry as default settings. |
| /TBD | Wait for sharenames to be defined (retry error 67). |
Logging options
| /L | List only — don’t copy, timestamp or delete any files. |
| /X | Report all extra files, not only those selected. |
| /V | Produce verbose output, showing skipped files. |
| /TS | Include source file timestamps in the output. |
| /FP | Include full pathname of files in the output. |
| /BYTES | Print sizes as bytes. |
| /NS | No size — don’t log file sizes. |
| /NC | No class — don’t log file classes. |
| /NFL | No file list — don’t log file names. |
| /NDL | No directory List — don’t log directory names. |
| /NP | No progress — don’t display percentage copied. |
| /ETA | Show estimated time of arrival of copied files. |
| /LOG:file | Output status to LOG file (overwrite existing log). |
| /LOG+:file | Output status to LOG file (append to existing log). |
| /UNILOG:file | Output status to LOG file as UNICODE (overwrite existing log). |
| /UNILOG+:file | Output status to LOG file as UNICODE (append to existing log). |
| /TEE | Output to console window and the log file. |
| /NJH | No job header. |
| /NJS | No job summary. |
| /UNICODE | Output status as UNICODE. |
Job options
| /JOB:jobname | Take parameters from the named job file. |
| /SAVE:jobname | Save parameters to the named job file. |
| /QUIT | Quit after processing command line (to view parameters). |
| /NOSD | No source directory is specified. |
| /NODD | No destination directory is specified. |
| /IF | Include the following files. |
Robocopy examples
robocopy c:hope c:hope2 *.txt
In this first example, any .txt file would be copied from the hope directory into the hope2 directory. Whenever you want to copy one or more files and not a complete directory the file must be specified after the destination directory.
robocopy c:hope c:hope2
In the above example, the robocopy command would copy all files (not directories) in the hope directory to the hope2 directory.
robocopy c:hope c:hope2 /e
In the above example, all files and folders (including empty ones) are copied from the hope directory to the hope2 directory.
robocopy c:hope c:hope2 /MIR
This example mirrors what’s in c:hope into c:hope2 and purge any files in the hope2 directory that don’t exist in the hope directory. Use the /mir switch cautiously since it is deleting files that do not match in the destination directory.
robocopy \computerhope C:hope2
Next, this example would copy any of the files in the hope directory on the network computer named computer to the current computer hope2 directory.
| title | description | ms.topic | ms.assetid | author | ms.author | ms.date |
|---|---|---|---|---|---|---|
|
robocopy |
Reference article for the robocopy command, which copies file data from one location to another. |
reference |
d4c6e8e9-fcb3-4a4a-9d04-2d8c367b6354 |
jasongerend |
alalve |
01/24/2023 |
Copies file data from one location to another.
Syntax
robocopy <source> <destination> [<file>[ ...]] [<options>]
For example, to copy a file named yearly-report.mov from c:reports to a file share \marketingvideos while enabling multi-threading for higher performance (with the /mt parameter) and the ability to restart the transfer in case it’s interrupted (with the /z parameter), type:
robocopy c:reports "\marketingvideos" yearly-report.mov /mt /z
[!IMPORTANT]
If any data is copied from the root of a device, the destination directory will adopt the «hidden» attribute during the copy process.
Parameters
| Parameter | Description |
|---|---|
<source> |
Specifies the path to the source directory. |
<destination> |
Specifies the path to the destination directory. |
<file> |
Specifies the file or files to be copied. Wildcard characters (* or ?) are supported. If you don’t specify this parameter, *.* is used as the default value. |
<options> |
Specifies the options to use with the robocopy command, including copy, file, retry, logging, and job options. |
Copy options
| Option | Description |
|---|---|
| /s | Copies subdirectories. This option automatically excludes empty directories. |
| /e | Copies subdirectories. This option automatically includes empty directories. |
/lev:<n> |
Copies only the top n levels of the source directory tree. |
| /z | Copies files in restartable mode. In restartable mode, should a file copy be interrupted, Robocopy can pick up where it left off rather than recopying the entire file. |
| /b | Copies files in backup mode allowing Robocopy to override file and folder permission settings (ACLs). This allow copying of files you might otherwise not have access to assuming it’s being run under an account with sufficient privileges. |
| /zb | Copies files in restartable mode. If file access is denied, switches to backup mode. |
| /j | Copies using unbuffered I/O (recommended for large files). |
| /efsraw | Copies all encrypted files in EFS RAW mode. |
/copy:<copyflags> |
Specifies which file properties to copy. The valid values for this option are:
The default value for the /COPY option is DAT (data, attributes, and time stamps). The X flag will be ignored if either /B or /ZB is used. |
/dcopy:<copyflags> |
Specifies what to copy in directories. The valid values for this option are:
The default value for this option is DA (data and attributes). |
| /sec | Copies files with security (equivalent to /copy:DATS). |
| /copyall | Copies all file information (equivalent to /copy:DATSOU). |
| /nocopy | Copies no file information (useful with /purge). |
| /secfix | Fixes file security on all files, even skipped ones. |
| /timfix | Fixes file times on all files, even skipped ones. |
| /purge | Deletes destination files and directories that no longer exist in the source. Using this option with the /e option and a destination directory, allows the destination directory security settings to not be overwritten. |
| /mir | Mirrors a directory tree (equivalent to /e plus /purge). Using this option with the /e option and a destination directory, overwrites the destination directory security settings. |
| /mov | Moves files, and deletes them from the source after they are copied. |
| /move | Moves files and directories, and deletes them from the source after they are copied. |
| /a+:[RASHCNET] | Adds the specified attributes to copied files. The valid values for this option are:
|
| /a-:[RASHCNETO] | Removes the specified attributes from copied files. The valid values for this option are:
|
| /create | Creates a directory tree and zero-length files only. |
| /fat | Creates destination files by using 8.3 character-length FAT file names only. |
| /256 | Turns off support for paths longer than 256 characters. |
/mon:<n> |
Monitors the source and runs again when more than n changes are detected. |
/mot:<m> |
Monitors the source and runs again in m minutes if changes are detected. |
| /rh:hhmm-hhmm | Specifies run times when new copies may be started. |
| /pf | Checks run times on a per-file (not per-pass) basis. |
/ipg:<n> |
Specifies the inter-packet gap to free bandwidth on slow lines. |
| /sj | Copies junctions (soft-links) to the destination path instead of link targets. |
| /sl | Don’t follow symbolic links and instead create a copy of the link. |
/mt:<n> |
Creates multi-threaded copies with n threads. n must be an integer between 1 and 128. The default value for n is 8. For better performance, redirect your output using /log option.
The /mt parameter can’t be used with the /ipg and /efsraw parameters. |
| /nodcopy | Copies no directory info (the default /dcopy:DA is done). |
| /nooffload | Copies files without using the Windows Copy Offload mechanism. |
| /compress | Requests network compression during file transfer, if applicable. |
| /sparse | Enables retaining sparse state during copy. |
[!IMPORTANT]
When using the /secfix copy option, specify the type of security information you want to copy, using one of these additional copy options:
- /copyall
- /copy:o
- /copy:s
- /copy:u
- /sec
[!NOTE]
The /mt parameter was introduced in Windows Server 2008 R2 and its functionality applies to current versions of Windows Server.
Copy file throttling options
| Option | Description |
|---|---|
/iomaxsize:<n>[kmg] |
The requested max i/o size per read/write cycle in n kilobytes, megabytes, or gigabytes. |
/iorate:<n>[kmg] |
The requested i/o rate in n kilobytes megabytes, or gigabytes per second. |
/threshold:<n>[kmg] |
The file size threshold for throttling in n kilobytes, megabytes, or gigabytes (see Remarks). |
File selection options
| Option | Description |
|---|---|
| /a | Copies only files for which the Archive attribute is set. |
| /m | Copies only files for which the Archive attribute is set, and resets the Archive attribute. |
/ia:[RASHCNETO] |
Includes only files for which any of the specified attributes are set. The valid values for this option are:
|
/xa:[RASHCNETO] |
Excludes files for which any of the specified attributes are set. The valid values for this option are:
|
/xf <filename>[ ...] |
Excludes files that match the specified names or paths. Wildcard characters (* and ?) are supported. |
/xd <directory>[ ...] |
Excludes directories that match the specified names and paths. |
| /xc | Excludes existing files with the same timestamp, but different file sizes. |
| /xn | Source directory files newer than the destination are excluded from the copy. |
| /xo | Source directory files older than the destination are excluded from the copy. |
| /xx | Excludes extra files and directories present in the destination but not the source. Excluding extra files will not delete files from the destination. |
| /xl | Excludes «lonely» files and directories present in the source but not the destination. Excluding lonely files prevents any new files from being added to the destination. |
| /im | Include modified files (differing change times). |
| /is | Includes the same files. Same files are identical in name, size, times, and all attributes. |
| /it | Includes «tweaked» files. Tweaked files have the same name, size, and times, but different attributes. |
/max:<n> |
Specifies the maximum file size (to exclude files bigger than n bytes). |
/min:<n> |
Specifies the minimum file size (to exclude files smaller than n bytes). |
/maxage:<n> |
Specifies the maximum file age (to exclude files older than n days or date). |
/minage:<n> |
Specifies the minimum file age (exclude files newer than n days or date). |
/maxlad:<n> |
Specifies the maximum last access date (excludes files unused since n). |
/minlad:<n> |
Specifies the minimum last access date (excludes files used since n) If n is less than 1900, n specifies the number of days. Otherwise, n specifies a date in the format YYYYMMDD. |
| /xj | Excludes junction points, which are normally included by default. |
| /fft | Assumes FAT file times (two-second precision). |
| /dst | Compensates for one-hour DST time differences. |
| /xjd | Excludes junction points for directories. |
| /xjf | Excludes junction points for files. |
Retry options
| Option | Description |
|---|---|
/r:<n> |
Specifies the number of retries on failed copies. The default value of n is 1,000,000 (one million retries). |
/w:<n> |
Specifies the wait time between retries, in seconds. The default value of n is 30 (wait time 30 seconds). |
| /reg | Saves the values specified in the /r and /w options as default settings in the registry. |
| /tbd | Specifies that the system will wait for share names to be defined (retry error 67). |
| /lfsm | Operate in low free space mode which enables copy, pause and resume (see Remarks). |
/lfsm:<n>[kmg] |
Specifies the floor size in n kilobytes, megabytes, or gigabytes. |
Logging options
| Option | Description |
|---|---|
| /l | Specifies that files are to be listed only (and not copied, deleted, or time stamped). |
| /x | Reports all extra files, not just the ones that are selected. |
| /v | Produces verbose output, and shows all skipped files. |
| /ts | Includes source file time stamps in the output. |
| /fp | Includes the full path names of the files in the output. |
| /bytes | Prints sizes as bytes. |
| /ns | Specifies that file sizes are not to be logged. |
| /nc | Specifies that file classes are not to be logged. |
| /nfl | Specifies that file names are not to be logged. |
| /ndl | Specifies that directory names are not to be logged. |
| /np | Specifies that the progress of the copying operation (the number of files or directories copied so far) will not be displayed. |
| /eta | Shows the estimated time of arrival (ETA) of the copied files. |
/log:<logfile> |
Writes the status output to the log file (overwrites the existing log file). |
/log+:<logfile> |
Writes the status output to the log file (appends the output to the existing log file). |
/unilog:<logfile> |
Writes the status output to the log file as unicode text (overwrites the existing log file). |
/unilog+:<logfile> |
Writes the status output to the log file as Unicode text (appends the output to the existing log file). |
| /tee | Writes the status output to the console window, and to the log file. |
| /njh | Specifies that there is no job header. |
| /njs | Specifies that there is no job summary. |
| /unicode | Displays the status output as unicode text. |
Job options
| Option | Description |
|---|---|
/job:<jobname> |
Specifies that parameters are to be derived from the named job file. To run /job:jobname, you must first run the /save:jobname parameter to create the job file. |
/save:<jobname> |
Specifies that parameters are to be saved to the named job file. This must be ran before running /job:jobname. All copy, retry, and logging options must be specified before this parameter. |
| /quit | Quits after processing command line (to view parameters). |
| /nosd | Indicates that no source directory is specified. |
| /nodd | Indicates that no destination directory is specified. |
| /if | Includes the specified files. |
Remarks
-
Using /PURGE or /MIR on the root directory of the volume formerly caused robocopy to apply the requested operation on files inside the System Volume Information directory as well. This is no longer the case as if either is specified, robocopy will skip any files or directories with that name in the top-level source and destination directories of the copy session.
-
Modified files classification applies only when both source and destination filesystems support change timestamps, such as NTFS, and the source and destination files have different change times but are otherwise the same. These files are not copied by default. Specify /IM to include them.
-
The /DCOPY:E flag requests that extended attribute copying should be attempted for directories. Robocopy will continue if a directory’s EAs could not be copied. This flag is not included in /COPYALL.
-
If either /IoMaxSize or /IoRate are specified, robocopy will enable copy file throttling to reduce system load. Both may be adjusted to optimal values and copy parameters, but the system and robocopy are allowed to adjust them to allowed values as necessary.
-
If /Threshold is used, it specifies a minimum file size for engaging throttling. Files below that size will not be throttled. Values for all three parameters may be followed by an optional suffix character such as [KMG] (kilo, mega, giga).
-
Using /LFSM requests robocopy to operate in ‘low free space mode’. In this mode, robocopy will pause whenever a file copy would cause the destination volume’s free space to go below a ‘floor’ value. This value can be explicitly specified using /LFSM:n[KMG] flag.
-
If /LFSM is specified with no explicit floor value, the floor is set to 10% of the destination volume’s size. Low free space mode is incompatible with /MT and /EFSRAW.
Exit (return) codes
| Value | Description |
|---|---|
| 0 | No files were copied. No failure was encountered. No files were mismatched. The files already exist in the destination directory; therefore, the copy operation was skipped. |
| 1 | All files were copied successfully. |
| 2 | There are some additional files in the destination directory that are not present in the source directory. No files were copied. |
| 3 | Some files were copied. Additional files were present. No failure was encountered. |
| 5 | Some files were copied. Some files were mismatched. No failure was encountered. |
| 6 | Additional files and mismatched files exist. No files were copied and no failures were encountered meaning that the files already exist in the destination directory. |
| 7 | Files were copied, a file mismatch was present, and additional files were present. |
| 8 | Several files did not copy. |
[!NOTE]
Any value equal to or greater than 8 indicates that there was at least one failure during the copy operation.
Related links
- Command-Line Syntax Key
Копирование заблокированных файлов с HoboCopy
Автор: windata.ru
Источник.
Предположим, что вы хотите скопировать файл, который намертво заблокирован другой программой. В результате Windows нам радостно сообщит о том, что системный процесс не может получить доступа к файлу, поскольку последний заблокирован другим процессом. Как же тогда скопировать такой файл?
Что же мешает, собственно говоря, освободить файл, закрыв заблокировавшую его программу? Да ничего, но представьте, что вы настраиваете автоматическое резервное копирование файлов. Если файл заблокирован, то программа резервного копирования здесь не справится и нужный файл не будет скопирован. Вот тут-то и понадобится один рецепт, который представлен в этой статье.

Начиная с Windows XP операционная система от Microsoft поддерживает технологию теневого копирования (она же Volume Shadow Copy). Данная технология используется для резервного копирования данных и восстановления системы. В частности, теневая копия представляет собой временный “снимок” файла или раздела жесткого диска. При этом одна программа может получить доступ чтения именно к снимку, в то время как другие программы могут в это же время работать с файлом или изменять его.
Именно это нам и нужно – чтение занятого файла. И поможет нам в этом утилита для командной строки HoboCopy, предназначенная для резервного копирования файлов.
На следующей странице можно загрузить HoboCopy для Windows XP и Windows Vista/7 в версиях 32/64 бит:
Скачать HoboCopy для различных версий Windows (GitHub)
Для работы HoboCopy (да и многих других программ для резервного копирования) нам надобятся две следующих службы Windows:
- Теневое копирование тома
- MS Software Shadow Copy Provider
Если вы забыли, где просмотреть службы, то в Windows 7 перейдите по пути Панель управления > Система и безопасность > Администрирование > Службы (а в Windows XP – Панель управления > Администрирование > Службы).
Убедитесь в том, что службы не отключены. Если для них указан режим запуска Вручную, то программа HoboCopy самостоятельно запустит эти службы, когда понадобится и отключит их по завершению своей работы.
Резервное копирование одного файла с помощью HoboCopy
Как вы помните, HoboCopy – утилита командной строки. К слову сказать, в Windows 7 и Windows Vista ее нужно запускать в режиме администратора, для чего щелкните на файле программы правой кнопкой мыши, выберите команду Свойства > Дополнительно и установите флажок Запуск от имени администратора. Также будет не лишним ознакомиться со статьей Запуск программ Windows 7 в режиме администратора.
Синтаксис команды выглядит следующим образом:
hobocopy c:имя_папки d:папка_копирования <имя_файла>К примеру, мы решили скопировать файл c:userswindatamailoutlook.pst прямо вот сюда: d:backupsoutlook.pst.
Команда будет выглядеть следующим образом:
hobocopy c:userswindatamail d:backups Outlook.pstРезервное копирование каталога с помощью HoboCopy
Чем копировать по одному файлу, разумеется, куда лучше настроить резервное копирование целыми папками. Для этого нам понадобятся такие ключи:
/full – копирование всех файлов
/skipdenied – игнорировать любые сообщения ошибках, связанных с разрешением доступа
/r – рекурсивное копирование
/y – никаких запросов, копировать абсолютно все
Синтаксис команды следующий:
hobocopy /full /skipdenied /y /r c:имя_папки d:папка_копированияНапример, используя предыдущий пример, скопируем всю пользовательскую папку в папку d:backups. Для этого нам понадобится такая команда:
hobocopy /full /skipdenied /y /r c:userswindata d:backupsНа копирование понадобится какое-то время, так что можно передохнуть, перекусить и потрещать вконтактике (шутка). Результатом станет полная копия всего каталога. Если при копировании были сообщения об ошибках, связанных с разрешением доступа, программа укажет на проблемные файлы.
Инкрементное копирование файлов с помощью HoboCopy
Утилита HoboCopy поддерживает и инкрементный тип копирования. Что это такое? Весьма полезная функция, она позволяет копировать только те файлы, что изменились с момента предыдущего резервного копирования. При этом последняя дата копирования хранится в файле, который вам нужно указать непосредственно в команде утилиты.
Для инкрементного копирования потребуются два ключа:
/statefile=имя_файла – это имя файла, в котором будут записаны данные о последнем копировании
/incremental – а это, как понятно из названия, ключ для инкрементного копирования
Синтаксис команды выглядит так:
hobocopy /incremental /statefile=имя_файла /y /r c:имя_папки d:папка_копированияПример:
hobocopy /incremental /statefile=d:lastbackup.dat /y /r c:userswindata d:backupsВажно. При первом запуске программы необходимо указать ключ /full вместо /incremental, иначе будет выдано сообщение об ошибке, так как файл с данными о предыдущем состоянии еще не будет создан. А вот уже все последующие команды нужно указывать с ключом /incremental.
Таким образом, утилита HoboCopy позволяет настроить автоматическое копирование папок, для чего нужно лишь запланировать процедуру копирования. В Windows 7/Vista для этого используйте системную программу Планировщик заданий (Панель управления > Система и безопасность > Администрирование > Расписание выполнения задач), а в Windows XP – окно Назначенные задания (Панель управления > Назначенные задания).