A router is a device that manages the flow of data between network segments subnets. A router directs packets based on the information it has in its own routing table. In most cases, you would implement a dedicated hardware router.
However, you may decide that a software-based router is an appropriate solution. Generally, dedicated hardware routers handle heavier routing demands much better than software based routers.
Microsoft provides as part of the server operating system, a fully functional software-based routing solution. Not only does Windows Server provide a routing solution, but also provides other remote access services within the Routing and Remote Access role.
Installing Routing and Remote Access Service
You install the Routing and Remote Access service by using the Add Roles Wizard. Membership in the local Administrators group, or equivalent, is the minimum required to complete this procedure. Follow the steps outline.
- Launch Server Manager from the Administrative Tools Folder.
- In the Server Manager console, under Roles Summary, click Add roles.
- In the Add Roles Wizard, click Next.
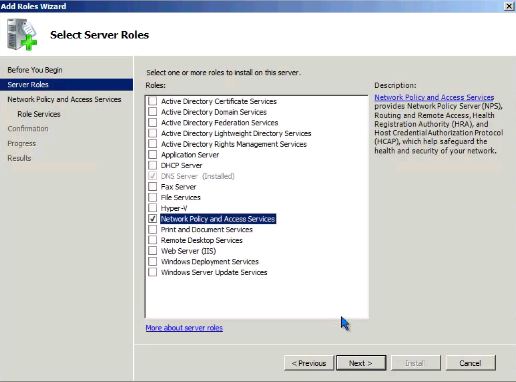
- In the list of server roles, select Network Policy and Access Services. Click Next twice.
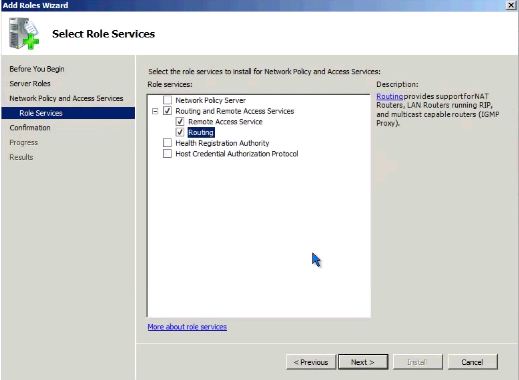
- In the list of role services, select Routing and Remote Access Services to select all of the role services.
- Proceed through the steps in the Add Roles Wizard to complete the installation.
After you add the Network Policy and Access Services Role and complete the installation, the Routing and Remote Access service is installed in a disabled state. To enable and configure the remote access server, you must be logged on as a member of the Administrators group.
The next step is to enable the Routing and Remote Access service (RRAS). If the RRAS server is a member of the domain, you need to add the computer account of this server to the RAS and IAS Servers security group in the domain of which this server is a member.
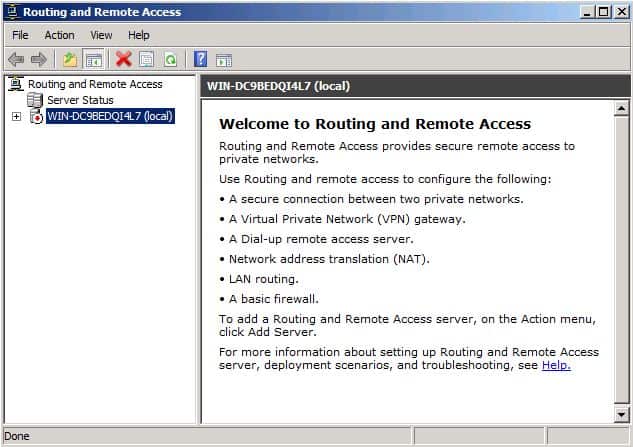
- Start the Routing and Remote Access console in the Administrative Tools Folder.
- Right-click the server object, and then click Configure and Enable Routing and Remote Access.

- Follow through the steps in the wizard to complete the configuration of RRAS.


Обновлено 24.08.2016
Как установить службу маршрутизации и удаленного доступа в Windows Server 2008 R2-01
Всем привет сегодня хочу рассказать как установить службу маршрутизации и удаленного доступа в Windows Server 2008 R2.
Служба маршрутизации и удаленного доступа (RRAS) в операционных системах Windows Server 2008 R2 и Windows Server 2008 поддерживает связь удаленных пользователей или сайтов с использованием VPN-подключений или подключений удаленного доступа. Служба маршрутизации и удаленного доступа включает в себя следующие компоненты:
- Удаленный доступ. С помощью службы маршрутизации и удаленного доступа можно развертывать подключения виртуальной частной сети (VPN) и обеспечивать удаленный доступ конечных пользователей к сети организации. Кроме того, можно создать VPN-подключение типа «сеть-сеть» между двумя серверами, находящимися в разных местах.
- Маршрутизация. Служба маршрутизации и удаленного доступа представляет собой программный маршрутизатор на базе открытой платформы и обеспечивает маршрутизацию и сетевые подключения. Служба предоставляет организациям возможности маршрутизации в средах локальных и глобальных сетей, а также в среде Интернета с использованием защищенных VPN-подключений. Маршрутизация используется в службах многопротокольной маршрутизации пакетов между локальными сетями, между локальными и глобальными сетями, а также в случае использования виртуальных частных сетей (VPN) и преобразования сетевых адресов (NAT).
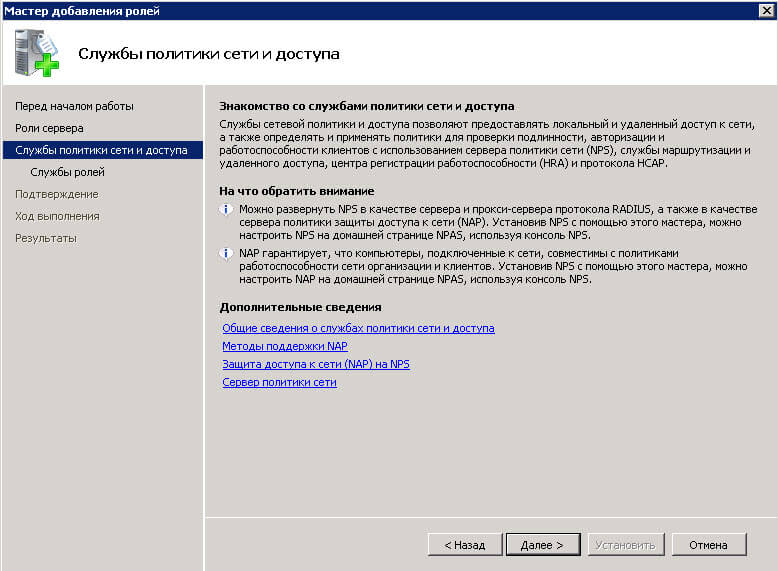
Открываем диспетчер сервера и жмем справа сверху Добавить роли.
Как установить службу маршрутизации и удаленного доступа в Windows Server 2008 R2-02
выбираем роль Службы политики сети и доступа

Как установить службу маршрутизации и удаленного доступа в Windows Server 2008 R2-03
в следующем окне мастера жмем далее.
Как установить службу маршрутизации и удаленного доступа в Windows Server 2008 R2-04
Так как мне нужно только натирование, то я ставлю галку только на Службы маршрутизации и удаленного доступа, две галки Служба удаленного доступа и Маршрутизация проставятся автоматически.
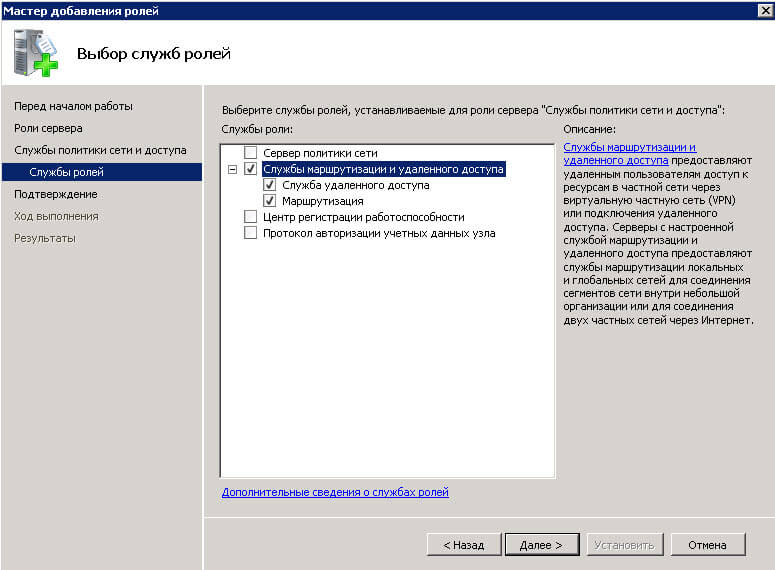
Как установить службу маршрутизации и удаленного доступа в Windows Server 2008 R2-05
Установить.
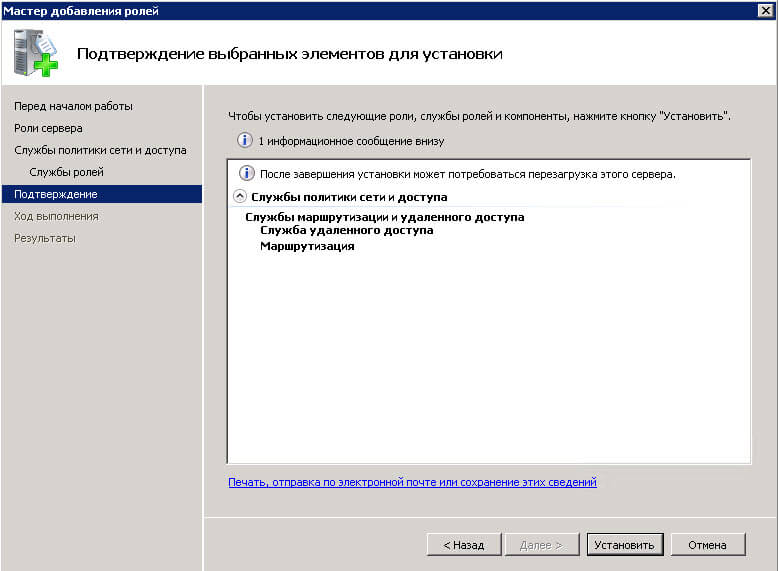
Как установить службу маршрутизации и удаленного доступа в Windows Server 2008 R2-06
После установки RRAS службы маршрутизации и удаленного доступа жмем закрыть.
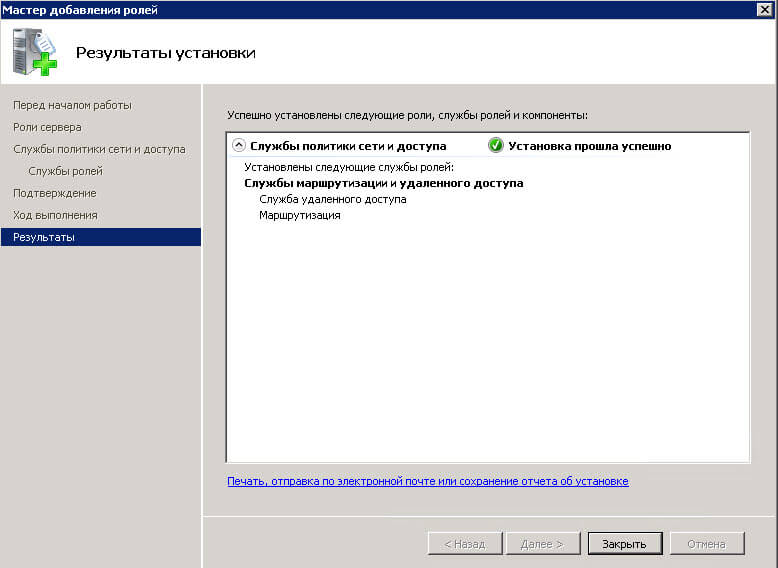
Как установить службу маршрутизации и удаленного доступа в Windows Server 2008 R2-07
ввот так вот просто установить RRAS. В следующей статье мы рассмотрим как настроить NAT между двумя сетями с помощью службы маршрутизации и удаленного доступа в Windows Server 2008 R2.
Материал сайта pyatilistnik.org
Авг 24, 2016 22:51
Do you want to connect multiple LANs using Windows 2008 R2 Routing and Remote Access Service (RRAS)? This is the step by step tutorial.
First of all, you have to have multiple NICs connected to the different LANs. NICs should have an IP addresses of the LAN it is connected to. This IP address is the Default Gateway of that LAN.
On the server, go Server Manager. Right Click on Roles and select Add Roles.

Review the information and click Next.

Select check box next to Network Policy and Access Services and click Next.
Click Next on Introduction Network Policy and Access Services.

Select checkbox next to Routing and Remote Access Services. It will automatically select necessary services. Click Next.

Click Install on Confirm Installation Selection.

Click Close on Installation Results.

Go to Start, Administrative Tools, Routing and Remote Access.

Right click on your server and select Configure and Enable Routing and Remote Access.

Click Next on the Welcome screen.

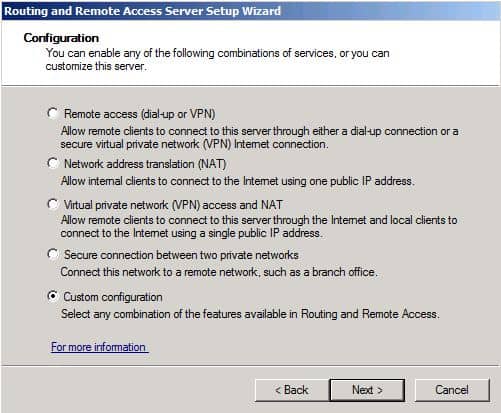
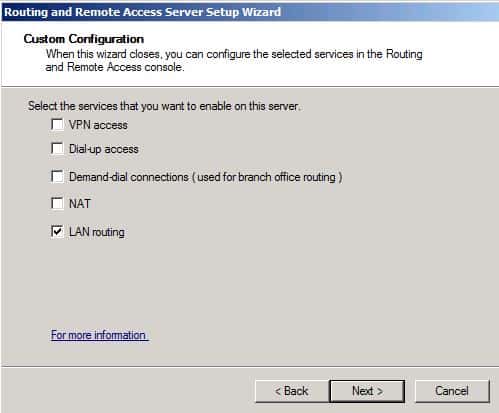
Select Custom Configuration and click Next.

Select LAN Routing and click Next.

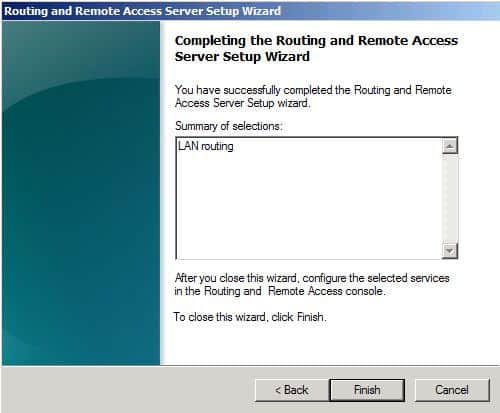
Click Finish to Complete Routing and Remote Access Setup Wizard.

Click Start Service.

Your Routing and Remote Access Server is ready. Your Private Networks should communicate now.

Related posts
1/ Preparation
We need to check the Network interface status. At the command prompt, type:
ncpa.cpl
As you can see, we do have a spare interface and currently it is disabled. In this exercise, we will use only one NIC; i.e., the active one for the LAN for the VPN connection as well.

At this point, the interface called LAN has the following IP address settings:

2/ Add the Network Policy and Access Services roles
In Server 2008 R2, the Routing and Remote Access Server is under the Network Policy and Access Services. So we need to add this role. Launch Server Manager and click Add Roles.

Click Skip this page by default and click Next.

Choose Network Policy and Access Services.

Click Next at the introduction screen.

Choose Routing and Remote Access Services and click Next.

Click Install.

Click Close when finish.

Click Start -> Administrative Tools -> Routing and Remote Access.

You will see this screen.

Right-click the server name and choose Configure and Enable Routing and Remote Access.

At the Welcome screen click Next.

Choose Custom Configuration and click Next.

Choose VPN access and click Next.

Click Finish.

Click Start service.

You will see that the status of the Server changes to Active (green icon with the up arrow).

Choose No to RADIUS server.

Click Finish when done.
After the configuration, the main Routing and Remote Access screen looks like this:

Now open Active Directory Users and Computers snap-in Console.

Select the user you want to give access to the VPN connection.

Right-click on the user and choose Properties. Click Dial-in tab. Choose Allow access. Click OK.

3/ Testing
Right now, since the firewall does not have a rule that forward port 1723 (PPTP) to the RRAS server, the VPN connection will not work. The firewall that I have is a Linux Shorewall. I am monitoring the live debug log while connecting to the RRAS server from remotely.
As you can see from the debug trace log, the Linux firewall says that the VPN traffic is being dropped due to the reason that port TCP/1723 is not processed properly.

Now on the network firewall, ensure that traffic destined to port TCP/1723 is forwarded to this VPN server:
vi /etc/shorewall/rules
DNAT net loc:192.168.0.4:1723 tcp 1723
Then restart shorewall: service shorewall restart
On a client computer outside of the network on the Internet, do the following to create a new connection.
Open Control Panel.

Click Setup a new connection or Network.

Choose Connect to a workplace and click Next.

Choose Create a new connection and click Next.

Choose Use my Internet Connection (VPN).

Enter the public IP address of the remote site (the site where the VPN RRAS server is located), input the connection name, and click Create.

Click Change adapter settings.

Double-click the newly created connection to connect.

Choose the VPN connection to connect, in this case, the “My Second VPN Connection” one that we just created and click Connect.

Enter credentials and click OK.

When connected, you will see the status changed to “Connected.”

Right-click on the connection and click Properties.

Click Networking tab, highlight Internet Protocol Version 4 (TCP/IPv4) and click Properties.

Click Advanced.

Ensure that the Use default gateway on remote network is turned off and click OK.

Try to ping a local computer on the remote network.

When the connection is established, there are two interesting things one can observe. The RRAS server shows the active connection:

And also, on the local client computer, a route is added.
At the command prompt, type
route print
to see the routing table.

When disconnected, the route will disappear.

In this lab, we have successfully created a PPTP VPN connection on Windows 2008 R2 with one single NIC card. We also performed port forwarding on a Linux Firewall to allow PPTP traffic to be forwarded to the RRAS box. Using SOHO routers such as Linksys and DLINK, it would be very easy to perform this port forwarding so I did not want to cover it in this article. We have also successfully connected to the VPN server and accessed the network on the remote end.
Components of a Network Access Services
Infrastructure
In Windows Server 2008, Network Access Service includes the following:
-
VPN Server
-
Active Directory Domain services
(AD DS) -
IEEE 802.1X Devices – provides
port based authentication of users -
Dynamic Host Configuration
Protocol (DHCP) Server – Responsible for leasing IP addresses -
NAP Health Policy Server –
Provides authentication services for other network access components -
Health Registration Authority –
Obtains health certificates for clients passing the health
policy verification -
Remediation Servers – A new
server for Windows Server 2008 on a limited network, designed to treat machines that do not have the latest antivirus or Windows
updates, by pushing the updates down to the NAP client sitting in
the restricted network before the client accesses the main network

Network Policy and Access Services Role
The Network Policy and Access Services
Role in Windows Server 2008 provides these components:
| Component | Description |
| Network Policy Server | Microsoft implementation of the RADIUS Server and proxy |
| Routing and Remote Access |
Provides shares Internet |
| Health Registration Authority |
Issues health certificates to clients that are using Ipsec NAP enforcement |
| Host Credential Authorization Protocol |
Integrates with Cisco network access control server |
RADIUS: Remote Authentication
Dial in User Service, is a networking protocol that provides
centralized Authentication, Authorization, and Accounting (AAA)
management for computers to connect to a network. RADIUS is a
client/server protocol. The RADIUS server usually runs as a background
process on a UNIX or Microsoft Windows server.
The Network Policy and Access Services
Role in Windows Server 2008 provides these network connectivity
solutions:
-
NAP: enforce health policies
-
Secure wireless and wired access:
with a secure certificate or password-based authentication method -
Remote access solutions: VPN or
dial-up -
Central network policy management
with RADIUS server and proxy

What is Routing and Remote Access?
Routing and Remote Access is built into
Windows Server 2008 and can be used to:
-
Provide remote users access to
resources on a private network using Dial-up or VPN services -
Provide Network Address Translation NAT services: when you
deploy VPN and NAT, computers on the Internet will not be able to
determine the IP address of computers on the private network, even
though VPN clients can connect to computers on the private network
as if they are on the same network. -
Provide LAN and WAN routing
services in order to connect the network segments
How to Install Routing and Remote Access Services
-
Go to Server Manager
-
Select Roles
-
Select Add Roles
-
Click Next
-
On the Select Server Roles
page, check Network and Policy Access Services -
Click Next
-
On the Network Policy Access
Services page, read the material and check out the links to
Microsoft help, if desired, and click Next -
On Select Role Services page,
check Network Policy Server, Routing and Remote Access Services -
Click Next
-
Click Install
After the install is completed, click
Close to close Server Manager. You will see the Network
and Policy and Access Services role in Server Manager. You will
see a red arrow underneath to indicate
Routing and Remote Access is not yet configured.

Network Authentication and Authorization
To access the Windows Server 2008
network, you must go through the Authentication and
Authorization process.
Authentication verifies your
credentials (user name and password) and uses an authentication
protocol to send the encrypted user name and password from the
remote access client to the remote access server.
Authorization verifies the
connection attempt is allowed which occurs after a successful
authentication.
Authentication Methods
| Protocol | Description | Security |
| PAP (Password Authentication Protocol) |
Try to avoid because it passes the password over in plain text. |
Least secure protocol. |
| CHAP (Challenge Handshake Protocol) |
A challenge-response authentication protocol that uses the industry-standard MD5 (message digest) hashing scheme to encrypt the response. |
An Requires a plain text |
| MS-CHAPv2 | An upgrade to MS-CHAP and is known as mutual authentication. |
Stronger security than CHAP. |
| EAP (Extensible Authentication Protocol) |
Uses an arbitrary authentication method of a remote access connection using authentication schemes, known as EAP types. |
Strongest method of authenticating. |
| Smart Cards | You must use EAP with the smart card or other certificate (TLS) EAP type, known as EAP-TLS. |
Strongest form of authentication in the Windows Server 2008 family. |

Integrating DHCP Servers with Routing and Remote
Access Service
DHCP servers can be integrated into the
Routing and Remote Access Service. To provide remote clients
with an IP address, you can use either:
-
The RRAS (Routing and Remote
Access) server starts with the Use DHCP to assign remote
TCP/IP addresses option, to obtain a pool of ten IP addresses
from the DHCP server. Ten IP addresses will be allocated with the
RRAS server taking one of the IP addresses and the remaining nine IP
addresses for the remote connections. When these ten IP addresses
are used up, the RRAS server will acquire ten more from the DHCP
server. The IP addresses are freed when remote clients disconnect,
and are subsequently reused. When Routing and Remote Access service stops,
all IP addresses are released. -
Use the corporate DHCP server
located on the corporate LAN
DHCP servers running Windows Server
2008 have a predefined user class called the Default Routing and
Remote Access Class. This is used for assigning options to the
Routing and Remote Access clients.
Configure VPN Access
VPNs provide a point-to-point
connection between the components of a private network through a
public network, using tunneling protocols.
Components of a VPN Connection
VPN Client: the Client Operating System
has to be capable of communicating with a VPN, like Microsoft has all
the way back to Windows NT and Windows 95.
VPN Tunnel: a secure tunnel is created
over the Internet to the VPN server.
VPN Server: the VPN server is then
connected to our internal network, and the client has access to the
internal network through the VPN Server.
VPN Protocol: VPN Point-to-Point
Tunneling Protocol (PPTP), Layer 2 Tunneling Protocol (L2TP), or if
the client is Windows Vista Svc Pk 1 or later, we can use Secure
Socket Tunneling Protocol (SSTP).

Tunneling Protocols
For a tunneling protocol for a VPN
connection into our network, we can use:
-
PPTP (Point-to-Point Tunneling Protocol): Encrypts and encapsulates in an IP header
multi-protocol traffic and sends it across an IP network or public IP
network. PPTP can be used for remote access and site-to-site VPN
connections. PPTP traffic is sent over port 1723, which may be blocked by default on company firewalls, web proxies, or NAT routers, preventing successful VPN connections.-
PPTP encapsulates PPP frames in
IP datagrams. -
The PPP payload (IPV4 packet)
frame is encrypted with Microsoft Point-to-Point Encryption (MPPE).
The encryption keys are generated from the MS-CHAPv2 or EAP-TLS
authentication protocol.
-
-
L2TP (Layer 2 Tunneling Protocol): Encrypts multi-protocol traffic and sends over
mediums supporting point-to-point-datagram delivery, such as IP or
asynchronous transfer mode (ATM). L2TP presents the best features of PPTP and Layer2 Forwarding (L2F).
L2TP uses Ipsec in Transport Mode for encryption, known as
L2TP/IPSEC. L2TP/IPSEC-based VPN connections requires manually opening ports on firewalls to ensure a successful VPN connection. The VPN client and server must support L2TP and Ipsec.
L2TP is built into Windows XP, Windows Vista, and Windows 7 remote
access clients. VPN server support for L2TP is built into Windows
Server 2008 and Windows Server 2003. L2TP traffic is sent over port 1701.-
Encapsulation for the L2TP/Ipsec
packets consists of the two layers.-
The first layer encapsulates a
PPP frame (IP datagram) wrapped with an L2TP header and a User
Datagram Protocol (UDP) header. -
The second layer, the Ipsec
encapsulation, wraps the resulting L2TP message with an Ipsec
Authentication trailer that provides authentication, and a final
IP header. The IP header contains the source and destination IP
address corresponding to the VPN client and server.
-
-
The L2TP message is encrypted
with either Advanced Encryption Standard (AES) or Triple DES (3DES)
using encryption keys the IKE negotiation process generates.
-
-
SSTP(Secure Socket Tunneling Protocol): Available if the clients are running at least Windows
Vista Svc Pk1 or Windows Server 2008. It uses TCP port 443 to pass
the point-to-point (PPP) data frames over the network through
firewalls and web proxies that could block PPTP and L2TP/IPSEC
traffic. TCP Port 443 is used for all secure websites. SSTP is only suitable for Vista Svc Pk1 or Windows Server 2008.-
SSTP encapsulates PPP traffic
over the Secure Sockets Layer (SSL) channel of the HTTPS protocol.
-
Encryption is performed by the
SSL channel of the Secure Hypertext Transfer Protocol (HTTPS)
protocol. -
SSTP VPN connections require a CA computer certificate issued by a CA trusted by the VPN server. The root CA certificate of the VPN server’s computer certificate should be installed on the client computers.
-
To ensure clients are able to obtain a certificate over the Internet from the VPN, you should install the AD CS and the IIS roles. After installing AD CS and IIS, you should install the Server Authentication certificate in the VPN server.
-
-
IKEv2 (Internet Key Exchange version 2 (IKEv2): uses the Ipsec Tunnel Mode protocol over UDP
port 500. IKEv2 is a good choice for mobile users because of its
support for mobility (MOBIKE). IKEv2 is very resilient for changing
network connectivity and for users what switch from a wired to a
wireless connections and is required for VPN Reconnect. VPN
Reconnect is a feature in Windows Server 2008 R2 and Windows 7
that maintains connectivity across the network, seamlessly. It
automatically re-establishes VPN connections when connectivity is
available, and maintains the connection even if users move between
different networks, while making the connection status transparent
to users. Public Key Infrastructure (PKI) is required because a
computer certificate is required for a remote connection.-
Datagrams are encapsulated using
Ipsec ESP or AH headers.
-
Messages are encrypted with
encryption keys generated in the IKEv2 negotiation process:
Advanced Encryption Standard (AES) 256, AES 192, AES 128, and 3DES
encryption algorithms.
-

Question: Your company has an Activer Direcory domain. All servers in your network run Windows Server 2008. All client computers run Windows7. Some users occaisionally work from a remote location and they are a member of the domain. The network has a firewall to keep out unauthorized users.
You install Routing and Remote Access on one of your servers and name it VPN1. You decide to configure the server as a virtual private networking(VPN) server. You decide to configure the server to use (SSTP) Secure Socket Tunneling Protocol, to prevent any VPN connectivity problems when the users are behind firewalls, proxies. or network translation routers (NAT).
You install the Internet Information Services (IIS) and Active Directory Certificate Services (AD CS) roles on VPN1 to issue the required computer certificate for an SSTP-based VPN connection. You create and install the Server Authentication certificate on VPN1.
What is the next thing you should do to make sure clients are able to connect to the VPN1 using SSTP-based VPN connections?
Answer: Install the root CA certificate of the VPN Server’s computer certificate on the client computers. SSTP VPN connections require a computer certificate issued by a CA trusted by the VPN server. Therefore, install the AD CS role in your network. When you want to ensure clients can obtain a certificate over the Internet from VPN1, you should install the IIS role. IIS is a required role for the Certificate Authority Web Enrollment Web Service. After installing AD CS and IIS, you should create and install the Server Authentication certificate on the VPN server. A VPN client must have the root CA certificate of the VPN server’s computer certificate installed in order to use an SSTP connection.
What are the VPN server configuration
requirements?
-
Two network interfaces (Configure
one for the public Internet and one for the private network.
Consider naming the network interfaces appropriately so your remote
access VPN server will operate correctly.) - IP Address allocation (use a
static pool on the Routing and Remote Access Server or use DHCP.
Note: if the DHCP server is not on the same subnet as your internal
network, you might need DHCP relay (also called BOOTP forwarding) agents. If your router is running
Windows Server 2008 or Windows Server 2008 R2, you can configure the
DHCP Relay Agent service on the router to forward DHCPINFORM
messages between subnets.). DHCP Relay is defined RFC 1542 and must be enabled on the server running Routing and Remote Access. -
Authentication provide (NPS/Radius
or the VPN server) -
Local Admin group membership or
equivalent required
How to Configure VPN Access

Configure a VPN Client Connection on a Windows
Vista client
-
Start | Connect To
-
Select Set
up a connection or network -
On the Connect to a network
page, select Connect to a workplace -
Click Next
-
Select Use my Internet
connection (VPN) -
On the page that displays, you can
either use the IP address or the FQDN of the VPN server. On the
same page, you can indicate:-
If you want to logon with a
smart card -
If you want other people to use
this connection -
Or, if you just want to set it up
and connect later (we will choose this option, for now)
-
-
Click Next
-
Type your user name and
password in the space provided -
Select Create
-
Click Close
-
Start | Connect To
-
You can now see your VPN
connection. Highlight and you will see the VPN Properties: the
General tab, the Options tab, the Security tab,
the Networking and Sharing tabs. -
Click OK
-
Click Connect or Cancel
Configure a VPN Server
-
Start | Administrative Tools |
Routing and Remote Access -
Right click the server name and
select Configure and Enable Routing and Remote Access -
The Wizard appears. Click Next.
-
Select Remote access (dial-up
or VPN) -
Click Next
-
On the Remote Access display,
the options are VPN or Dial-up, choose VPN -
Click Next
-
Now, you can select the network
interface adapter (best practice is to reconfigure the name on the
adapter to indicate public and the external adapter and reconfigure
the name on the internal adapter to indicate private network) -
You can enable security on the
selected interface by marking the check box and click Next -
On the IP Address Assignment
page, indicate How do you want IP addresses to be assigned to
remote clients? Select Automatically or From a
specified range of addresses. -
Click Next
-
Indicate whether you want to use
RADIUS to authenticate -
Click Next
-
Click Finish to start the
Routing and Remote Access service -
A message alert displays, “
Routing and Remote Access has created a default connection
request policy called Microsoft Routing and Remote Access
Service Policy. To ensure that this new policy does not conflict
with the existing Network Policy Server (NPS) connection request
policies, open the NPS console and verify that it is configured
properly. -
Click OK.
-
Another message alert displays,
“To support the relaying of DHCP messages from remote access
clients, you must configure the properties of the DHCP Relay Agent
with the IP address of your DHCP server. Click Help for more
information.” -
Click OK.
-
The Routing and Remote Access
Service starts. -
If you expand the server node, you
will see the following nodes: Network Interfaces, Ports, Remote
Access Clients (0), Remote Access Logging & Policies.
Complete Additional Tasks
-
Configure static packet filters
to create inbound and outbound rules for traffic, such as a packet
filter for ICMP (this can be done through Windows Firewall), to
protect your network. -
Configure services and ports
you want to make available for remote access users. -
Adjust logging levels for
routing protocols -
Configure number of available
VPN ports (add or remove VPN ports) -
Create a Connection Manager
profile for users to simply configuration and troubleshooting of
client connections. -
Add Certificate Services for
Active Directory. Configure and manage a certification authority
(CA) on a server for use in a PKI. Make sure you install the root Certification Authority (CA) certificate of the VPN server’s computer certificate on the client computers. -
Increase remote access security
by enforcing use of secure authentication methods. -
Increase VPN security by
requiring the use of secure tunneling protocols, account lockout,
etc. -
Consider VPN Reconnect to
provide seamless VPN connections.
SSTP Remote Access Step-by-Step Guide: Deployment

What is a Network Policy?
A network policy is a set of
conditions, constraints, and settings. A network policy allows or
prevents a user from gaining access to a VPN or a remote access
solution. Examples of some of the conditions are:
-
Does the user have dial-in
permission? -
Is the user accessing with the
correct type of protocol? -
Does the user belong to a group
and is that group allowed remote access? -
Is the user connecting at the
correct time? -
Is there any call back selected
for this user?
Note: when you have NAP deployed,
health policy is added to the network policy configuration and NPS
performs client health checks during authorization.
What is the process for creating and configuring
a network policy?
-
Determine authorization by user or
group -
Determine appropriate settings for
the user account’s network access permissions -
Configure the New Network Policy
Wizard:-
Network Policy conditions
-
Network Policy constraints
-
Network Policy settings
-
How are network policies processed?
-
The server is checked to see if
there are policies to process. -
If there are network policies,
does the connection attempt match the policy conditions? If the
answer is no, the next policy is checked. -
If the answer to the above is yes,
is the remote access permission for the user account set to Deny
Access? -
If the answer to the above is yes,
the server rejects the connection attempt. -

If the answer is no, is the remote
access permission for the user account set to Allow
Access? If yes, does the connection attempt match the
user object and profile settings? If yes, the connection attempt is
accepted. If no, the connection attempt is rejected.

You can configure network policy in
the NPS MMC snap-in or the Routing and Remote Access Service MMC
snap-in.
Create and Configure a Network Policy
-
START | Administrative Tools |
Network Policy Server -
Select the Policies folder
-
Select Network Policies and
right-click -
Select New
-
In the Policy Name: text
box, type in a policy name -
Under the Type of network
access server:, we will select Remote Access Server (VPN-Dial
up) -
Under Vendor specific, enter
any hardware settings the vendor might have provided -
Click Next
-
On the Specify Conditions page,
select the conditions. The list is huge. We will select User
Groups. -
Click the Add button. On
the Select Group page, enter Domain Admins (provides
access to the VPN server to Domain Administrators) -
Click Check Names and OK
(now the User Groups belongs to Domain Admins) -
Click Next
-
On the Specify Access
Permission page, we will select Access granted (Grant access
if client connection attempts match the conditions of this policy.) -
Click Next
-
On the Configure Authentication
Methods page, we will select Microsoft Encrypted
Authentication version 2 (MS-CHAP-v2) -
Click Next
-
On the Configure Constraints
page, the first constraint is Idle Timeout. We will
specify 5 minutes as the maximum time the server can remain idle
before the connection is disconnected. -
You also have Session Timeout,
Called Station ID, Day and time restrictions, and NAS Port
Type. Under Nas Port Type, we will check Virtual (VPN) -
Click Next
-
On the Configure Settings page,
under the Routing and Remote Access section, under
Encryption, we will deselect No encryption and leave
Basic, Strong, and Strongest encryption for our
clients. -
Click Next
-
Click Finish
![]()
Connection Manager Administration Kit
How do you control and configure the
client network connections?
Built into Windows Server 2008, is
CMAK, the Connection Manager Administrative Kit. CMAK
configures the client settings and distributes them as an .exe to the
client computers and allows them to connect to a remote network, such
as an Internet Service Provider (ISP) or a corporate network
protected by a VPN server. The client executes the .exe and their
computer is automatically configured to establish a network
connection that you have designed. This reduces the end user errors
and help desk calls.
CMAK is not installed by
default.
To install CMAK:
-
Launch Server Manager.
-
CMAK is configured as a
Feature. Select Features. Select Add Features. -
The Add Features Wizard
appears. Check off Connection Manager Administration Kit. -
Click Next.
-
Select Install.
-
Click Close.
-
Click Next
-
Select Features and F5
to refresh and you can see the Connection Manager
Administration Kit in the Features Summary. -
Close Server Manager
-
Go to the START |
Administrative Tools | Connection Manager Administration Kit to
create a connection profile.
How to Configure a Connection Profile
CMAK contains the Connection Profile
Wizard that will assist us in creating client connection profiles.
-
START | Connection Manager
Administrative Kit -
Click Next
-
In the Select Target Operating
System, we are will choose Windows Vista as the operating
system on which this Connection Manager profile will run. -
Click Next
-
Select New Profile
-
Click Next
-
On the Specify the Service Name
and the File Name page, Type the name that will appear in
Connection Manager and Type the file name that will identify
the Connection Manager profile on disk. We will use Company
VPN for the Service Name and company
for the file name. -
Click Next
-
On the Specify a Realm Name
page, select Do not add a realm name to the user name for
this example -
Click Next
-
We can choose to Merge
Information from Other Profiles on the next page. -
Click Next
-
On the Add Support for VPN
Connections page, we choose Phone book from this profile and
enter the VPN server name or IP address. -
Then, we choose to Use the
same user name and password for VPN and dial-up connections. -
Click Next
-
We can Create or Modify a VPN
Entry -
You can click on Edit to
review and/or change the settings -
Click OK
-
Click Next
-
On the Add a Custom Phone Book
(a collection of access numbers that users can dial to connect
to a remote dial-up network) page, click Next because
we are using a single VPN server. -
On the Configure Dial-up
Networking Entries page, click Next -
On the Specify Routing Table
Updates page, Click Next -
On the Configure Proxy Settings
for Internet Explorer page, Click Next -
We can Add Custom Actions to
perform additional configuration tasks on client computers, if
desired. -
Click Next
-
We can display custom graphics on
the connection attempt, on the Display a Custom Logon Bitmap
page. -
Click Next
-
On the Display a Custom Phone
Book Bitmap page, click Next -
On the Display Custom Icons
page, Click Next -
You can Include a Custom Help
File. Click Next -
You can Display Custom Support
Information by entering a phone number for custom support help.
Click Next -
Display a Custom License
Agreement is where you enter the license agreement that is
displayed on the client side when the .exe file is run. Click Next -
Install Additional Files with
the Connection Manager profile. Click Next -
You can select Advanced
customization on the Build the Connection Manager Profile and
Its Installation Program page. Insert a check mark for this
example. -
On the next page, we can choose
the File name, Section name, Key name, and Value. Click Next -
Click Finish to create the
profile. Note the profile path name. Copy it into Windows
Explorer or the Run command and open. A text box appears asking “Do
you wish to install Company VPN?” You can
also browse to the file path to view it. -
After the .exe is installed on
the client side, the user clicks Yes, a display box appears allowing
them to connect to the Company VPN.

Distribute Your Connection Profile to Your Users
Troubleshooting Routing and Remote Access
TCP/IP Troubleshooting Tools
| Command | Description |
| Ipconfig | Displays current TCP/IP network configuration, updates and releases; DHCP allocated leases; displays, registers, and flushes DNS names |
| Ping | Sends ICMP Echo Request msgs to verify TCP/IP is configured correctly and that a host is available |
| Pathping | Displays the path of a TCP/IP host and packet losses at routers |
| Tracert | Displays path of a TCP/IP host |
Example:
START | CMD
Ipconfig /all
Ipconfig /? For HELP menu for
ipconfig (up and down arrow lets you scroll through your previous
typed commands)
Ipconfig /flushdns (flushes
client machine resolver cache)
Ping computer name (verify
the host name is being resolved to its correct IP address. The ping
might not be successful due to packet filtering that prevents the
delivery of ICMP messages to and from the VPN server)
Ping /?
Ping –t computer name
(ping the host until stopped) (terminate the ping by using Control-C)
Cls to clear the screen
Pathping computer name (gives
percentage values for packet loss). If you have a huge loss, it could
indicate a damaged cable or other device or under-performing server.
Tracert computer name (to
trace how many hops on route to a server)
Authentication and Accounting Logging (3 types)
-
Event logging for auditing and
troubleshooting connection attempts -
Logging authentication and
accounting requests to a local file -
Logging authentication and
accounting requests to a SQL server database
Note: You should keep the log files on
a separate partition from the system partition, in order to prevent
loss of hard-drive space. NPS in Windows Server 2008 stops processing
connection requests if RADIUS accounting fails dues to a full
hard-disk drive or other causes. NPS in Windows Server 2008 R2 can be
configured to continue processing connections requests when logging
fails.
Best Practices for NPS
The Cable Guy: The New and Improved Network Policy Server
Configure Log File Properties
Applies To: Windows Server 2008 R2
You can configure Network Policy Server (NPS) to perform Remote Authentication Dial-In User Service (RADIUS) accounting for:
- user authentication requests
- Access-Accept messages
- Access-Reject messages
- accounting requests and responses
- periodic status updates
You can use this procedure to configure the log files in which you want to store the accounting data.
To prevent the log files from filling the hard drive, it is strongly recommended that you keep them on a partition that is separate from the system partition. The following provides more information about configuring accounting for NPS:
- To send the log file data for collection by another process, you can configure NPS to write to a named pipe. To use named pipes, set the log file folder to \.pipe or \ComputerNamepipe. The named pipe server program creates a named pipe called \.pipeiaslog.log to accept the data. In the Local file properties dialog box, in Create a new log file, select Never (unlimited file size) when you use named pipes.
- The log file directory can be created by using system environment variables (instead of user variables), such as %systemdrive%, %systemroot%, and %windir%. For example, the following path, using the environment variable %windir%, locates the log file at the system directory in the subfolder System32Logs (that is, %windir%System32Logs).
- Switching log file formats does not cause a new log to be created. If you change log file formats, the file that is active at the time of the change will contain a mixture of the two formats (records at the start of the log will have the previous format, and records at the end of the log will have the new format).
- If RADIUS accounting fails due to a full hard disk drive or other causes, NPS stops processing connection requests, preventing users from accessing network resources.
- NPS provides the ability to log to a Microsoft® SQL Server™ database in addition to, or instead of, logging to a local file.
Configuring Remote Access Logging
Start | Administrative Tools |
Routing and Remote Access
Right-click servername | Properties
Click the Logging tab to view
available options for the tracing log:
-
Log errors only
-
Log errors and warnings
-
Log all events
-
Not log any events
-
Log additional routing and remote
access info (enables you to specify whether the events in the PPP
connection-establishment process for remote access and demand-dial
routing connections are written to the PPP.LOG file stored in
systemrootTracing folder
How to use command line for configuring Routing and Remote Access Server
The Routing and Remote Access service
in Windows Server 2008 R2 has an extensive tracing capability.
To enable and disable tracing for a
specific component:
Netsh ras set tracing component
enabled | disabled
Where component is a component
in the list of Routing and Remote Access service components found in
the registry under HKEY_LOCAL_MACHINESOFTWAREMicrosoftTracing
To enable tracing for all components:
Netsh ras set tracing * enabled
-
Netsh
-
Netsh ras diagnostics set
rastracing * enabled (enables tracing on all components in RAS)
-
-
Registry
-
HKEY_LOCAL_MACHINESOFTWAREMicrosoftTracing
-
You
can enable and disable tracing for components while the Routing and
Remote Access service is running. Each component is capable of
tracing and appears as a subkey under the preceding Registry key.
Troubleshooting Remote Access
Note: Tracing consumes resources, so
you should disable it when finished troubleshooting
Configure NPS Log File Properties
-
Open the NPS (Network Policy
Server) MMC snap-in -
Click Accounting
-
In the details pane, right-click
Local File Logging, then click Configure Local File
Logging -
In the dialog box,
on the Log File tab, in Directory, type where you want
to store NPS log files. The default location is
systemrootSystem32LogFiles folder -
In Format, click
Database-compatible. If you would like to keep your log files
in IAS format, click IAS. -
To configure NPS to
start new log files at specified intervals, click the interval you
want to use:-
Daily: Heavy
transaction volume and logging activity -
Weekly or
Monthly: Less transaction volume and logging activity -
Never (unlimited
file size): All transactions in one log file -
When log file
reaches this size: To limit the size of each log file, type the
file size. The default is 10 MB
-
-
To delete log files
automatically when the disk is full, click When disk is full
delete older log files
Note: You must be a
member of the Domain Admins, Enterprise Admins, or Administrators
group on the local computer.
Check Logging in Event Viewer
- Start | Administrative Tools | Event Viewer
- Expand Windows Log
- Select System
- Review the entries in the detail pane for the source RemoteAccess to see the logged data
- Close Event Viewer
Common Troubleshooting Solutions
-
Error 800: VPN unreachable
-
Cause: PPTP/L2TP/SSTP packets
cannot reach the VPN server.
-
Solution: Could be the firewall
on the client computer-
L2TP: Open UDP port 1701
and allow IPsec ESP formatted packets (IP protocol 50) -
SSTP: enable TCP 443
-
-
Error 721: Remote computer not
responding-
Cause: Firewall does not permit
GRE traffic (IP protocol 47). PPTP uses GRE for tunneled data. -
Solution: Configure network
firewall to permit GRE and permit TCP traffic on port 1723.
-
-
Error 741/742: Encryption
mismatch-
Cause: VPN client requests an invalid encryption level or the VPN server does not support this
type of encryption -
Solution: Check the Security
tab properties of the VPN connection on the VPN client. If
Require data encryption is selected, clear the selection and retry
connection. If using NPS, check the encryption level in the network
policy in the NPS console or policies on other RADIUS servers.
-
-
L2TP/IPsec Authentication
Issues-
No certificate: Check the
Local computer certificate stores of the remote access client and
remote access server to ensure a suitable certificate exists
(required for L2TP/IPsec connections) -
Incorrect certificate:
-
A NAT device exists between
the remote access client and remote access server: Client and
server must both support IPsec NAT-T, if NAT is present. -
A firewall exists between the
remote access client and remote access server: verify the
firewall allows forwarding of L2TP/IPsec traffic.
-
-
EAP-TLS Authentication Issues
-
Current date must be within the
certificate validity dates.
-
Certificate has been revoked.
-
Certificate must have valid
digital signature, with the exception of the root CA certificate.
-
Question: Your network is having intermittent problems. Some segments are lost during peak periods. It seems this problem occurs because of router congestion during these peak periods. What can you do about this?
Answer: You should enabled Explicit Congestion Notification (ECN) in your network. ECN was designed for just this type of problem. Routers that are having congestion problems will flag packets passing through the router. Hosts receiving these packets lower their transmission rate to the router’s transmission rate. This lowers the congestion and helps to stop the packet loss in the network segment. This has minimal impact on network performance.
Skip to content
How to setup RRAS / VPN on server 2008 R2
Requirements to deploy VPN in an organisation:
- VPN Server (Windows 2008 R2)
- Public IP with Internet and Network infrastructure ( AD, DNS and DHCP )
- VPN Clients (Windows 7, Windows XP)
Adding RRAS Role on Windows 2008 R2:
- Open Server Manager, Select role and then click on Add Roles


- Select Network Policy and Access Services then Click Next.

- Introduction to Network Policy and Access Services

- Select Routing and Remote Access Services and then Click on Next.

- To Install the RRAS role service, click Install.

After installation finish. We need to configure the Routing and Remote Access Services.


Configuring the Routing and Remote Access Services
Expand the Roles to select Routing and Remote Access in Server Manager Console, right click and Select Configure and Enable Routing and Remote Access.

- Follow the routing and remote access server Setup Wizard.

- Select the option Remote access( dial-up or VPN)

- Select VPN

- Select the network Interface which is connected to Internet.

- Select the option From a specified range of addresses

- Specify the starting and end IP address range.


- Select No, use Routing and Remote Access to authenticate connection requests option if you have active directory infrastructure.

- Click Finish to complete the RRAS setup Wizard.


С удалением OSPF мы остались либо с 1) статической маршрутизацией и 2) с динамической маршрутизацией с RIPV2. Давайте выясним, как каждая из них работает.
Что лучше – статическая или динамическая маршрутизация?
Вопрос, что следует ли использовать статическую или динамическую маршрутизацию, – это личное дело администратора. В конце концов, результирующий сетевой трафик, направляемый в определенную сеть, должен быть одинаковым, вне зависимости от используемого метода.
При статической маршрутизации вы должны сделать запись на вашем сервере Windows для каждой сети, которая маршрутизируется вашим сервером. Таким образом, для простой сети с одним сервером при маршрутизируемом трафике между двумя сетями статическая маршрутизация не представляет особой сложности. Вы можете ее настроить всего двумя командами route add.
С другой стороны, если вы хотите, чтобы система Windows Server 2008 занималась маршрутизацией 25 сетей или обменивалась маршрутами с сетью Cisco, использующей RIP, вам нужно было бы выбрать динамическую маршрутизацию. Конечно, вам ведь не захочется вручную настраивать работу 25 сетей, да и вы не смогли бы реализовать все действительно динамические возможности, обеспечиваемые RIP.
Итак, что же дает нам динамическая маршрутизация? Перечислим некоторые ее возможности.
- Возможность автоматического добавления сетей, получая данные о них от других маршрутизаторов RIP
- Возможность автоматически удалять записи из таблицы маршрутизации, когда другие маршрутизаторы RIP удаляют их
- Возможность выбора наилучшего маршрута на основе особой метрики
- Упрощать конфигурацию маршрутизаторных систем Windows Server, имеющих более некоторого количества статических маршрутов, которые необходимо добавить
Итак, как же производить настройку статической и динамической маршрутизации в Windows Server 2008?
Статическая маршрутизация в Windows Server 2008
Статическая маршрутизация в Windows Server не представляет ничего нового. Мы годами использовали команду route. Вы можете настраивать статическую маршрутизацию в Windows 2008 Server либо с помощью командной строки, либо через GUI. Однако если вы используете интерфейс Windows GUI, эти маршруты не будут указываться в списке интерфейса CLI, когда вы набираете route print. Поэтому я категорически рекомендую при использовании статической маршрутизации в Windows 2008 работать только с командой route из командной строки.
Давайте посмотрим на примеры того, как можно настраивать статическую маршрутизацию с помощью команды route:
Просмотр таблицы маршрутизации
Просмотреть таблицу маршрутизации очень просто, достаточно использовать команду route print, как вы видите на Рисунке 1 ниже.

Рисунок 1: Просмотр таблицы IP-маршрутизации в Windows Server 2008
При выводе таблицы маршрутизации первое, на что важно обратить внимание, это список интерфейсов. IP-интерфейсы Windows Server обозначены с номером интерфейса. Номера интерфейсов на Рисунке 1 – 16, 14, 1, 15, 20 и 12. Эти номера интерфейсов используются всегда, когда вы добавляете или удаляете номера маршрутов из таблицы.
Вторая по важности – таблица маршрутизации IPv4. Тут указывается адрес сети, маска сети, шлюз по умолчанию, интерфейс и метрика. Эта таблица указывается серверу Windows, куда направлять трафик.
Ниже находится таблица маршрутизации IPv6.
Добавление статического маршрута
Как же вам добавить статический маршрут через командную строку? Ответ прост – используйте команду добавления маршрута следующим образом:
route add 1.1.1.0 mask 255.255.255.0 10.0.1.1 if 1Как вы видите на Рисунке 2, результат добавления маршрута был положительный: «ОК!»

Рисунок 2: Использование команды добавления маршрута в Windows 2008
Важным в команде добавления маршрута является указание сети, которую мы хотим добавить, подсети, адреса/шлюза, а также интерфейса для данного маршрута.
Удаление статического маршрута
Удаление маршрута происходит еще проще. Все, что вам нужно сделать – ввести команду route delete и сеть, которую вы хотите удалить, как это показано на Рисунке 3.

Рисунок 3: Команда удаления маршрута в Windows 2008
Это и есть основы настройки статических маршрутов с помощью командной строки. Теперь давайте узнаем про настройку динамической маршрутизации.
Динамическая маршрутизация в Windows Server 2008 с использованием RIPV2
Выше в этой статье я говорил о преимуществах работы с динамической маршрутизацией. Теперь позвольте мне рассказать вам о шагах по настройке RIPv2 в Windows 2008:
- Сначала нужно установить роль Routing and Remote Access (RRAS) в Windows 2008 Server. Если вы воспользуетесь мастером Add Roles, роль RRAS будет трудно найти, так как вам в действительности нужно добавить сначала роль Network Policy and Access Services, а уже после этого – роль RRAS (см. Рисунок 4 и Рисунок 5).

Рисунок 4: Добавление роли RRAS через Network Policy and Access Services

Рисунок 5: Role Services в Win 2008 является частью роли Network Policy and Access Services
После установки вы можете настроить RRAS из приложения Server Manager, но я предпочитаю приложение Routing and Remove Access.
- Следующим шагом является настройка Routing and Remote Access. Откройте RRAS MMC, щелкните правой кнопкой мыши на имени сервера, и щелкните на Configure and Enable Routing and Remote Access. Вот пример:

Рисунок 6: Настройка и включение RRAS
Убедитесь, что вы осуществляете настройку Custom Configuration при вопросе, какой протокол RRAS устанавливать. Затем выберите установку LAN ROUTING и запустите службу.
Теперь вы видите, что сетевые интерфейсы управляются RRAS, и особые настройки для IPv4 и IPv6.
Теперь вы можете расширить IPV4, перейти к General, а затем – к New Routing Protocol.

Рисунок 7: Добавление нового протокола маршрутизации
Теперь выберите установку RIPV2 в качестве протокола маршрутизации.

Рисунок 8: Добавление RIP V2
- Теперь, когда у вас установлен RIPv2, вы можете его настроить. Настройка его так же проста, как и добавление интерфейсов, которые вы захотите использовать для обмена маршрутами RIP. Для этого перейдите в секцию RIP, щелкните правой кнопкой, щелкните на New Interface, выберите интерфейс, который собираетесь добавить под RIP (Рисунок 9).

Рисунок 9: Добавление нового интерфейса RIP
- После выбора интерфейса у вас появляется возможность огромное количество свойств соединения RIP (Рисунок 10). Больше я не буду говорить в этой статье о настройке RIP, так как может быть и очень простой, и очень сложной в зависимости от ситуации.

Рисунок 10: Настройка нового интерфейса RIP
- После добавления интерфейсов RIP вы можете проверить, отправляются и принимаются ли запросы и ответы на вашем интерфейсе RIP (это стоит сделать). Вы также можете проверить, есть ли у вас соседи по RIP, щелкнув правой кнопкой мыши на протоколе RIP, а после этого выбрав Show Neighbors.
Перед тем, как закончить эту секцию о RIP в Windows, я хочу указать на пару отличных ресурсов, которыми я пользовался при подготовке этой статьи:
- Недавно я просмотрел видео Эда Либермана Train Signal Windows 2008 Network Infrastructure. В этом видео, кроме объяснения маршрутизации и различий между статической и динамической маршрутизацией, Эд показывает, как, шаг за шагом, настроить RIPv2 в Windows 2008. Я считаю видео очень полезным и рекомендую его вам, хотите ли вы просто узнать о Win 2008 и маршрутизации или собираетесь сдавать экзамен по сетевой инфраструктуре Microsoft’s Windows 2008 (70-642). Вот скриншот такой настройки у Эда:

Рисунок 11: Видео Train Signal’s Windows 2008 на тему установки и настройки RIPV2
- В базе знаний Petri IT Knowledgebase я написал статью о настройке Windows 2003, затем другую статью об обмене маршрутами между маршрутизатором Cisco и сервером Windows. Если говорить о Win 2008, процесс настройки RIP на Win 2003 аналогичен, и настройка обмена маршрутами с маршрутизатором Cisco очень похожа.
Автор: Daniel Petri