Introduction
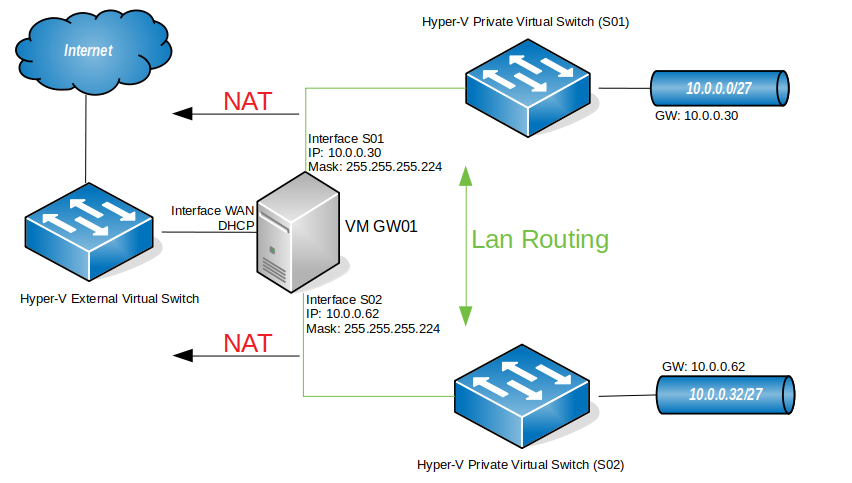
In this article I’m setting up a 3 way router with Windows Server 2016, which will be performing LAN routing between two subnets and NAT for both subnets. This setup will replace the gateway I had in my Hyper-V virtual lab. So, basically, I needed to add a new subnet to my virtual lab (10.0.0.32/27) and I needed both subnets to communicate and both to have internet access. I could have done this by adding a router between both subnets, but for that I would need to add a new virtual machine, which would be consuming additional resources from my Hyper-V server. This way, I’ll have a solution that will grow with the virtual lab. In case I need to add a new subnet to the lab, I just have to add a new interface to the router and all subnets will be automatically routed between each other. Perfect!
My virtual lab
Please note that this is my virtual lab configuration. You will have to configure the router to match your own network config, but, if you are reading this, I assume you already know that. Also, DNS servers are not in place here. After configuring the router, your client PCs will need to have a DNS server configured – usually your internet router – so that they will be able to browse the internet. Again, if you are reading this article I assume you have a basic understanding how these things work.
Let’s start
First things first
You will need a machine with Windows Server 2016 installed, for which you can find a guide here, with three network cards attached to it, as per the diagram above.
Adding the Remote Access role
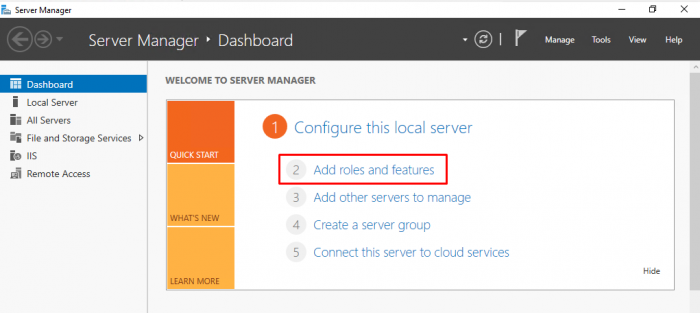
- Open “Server Manager”. Click on the start button and find “Server Manager”.
- Click on “Add roles and features”.
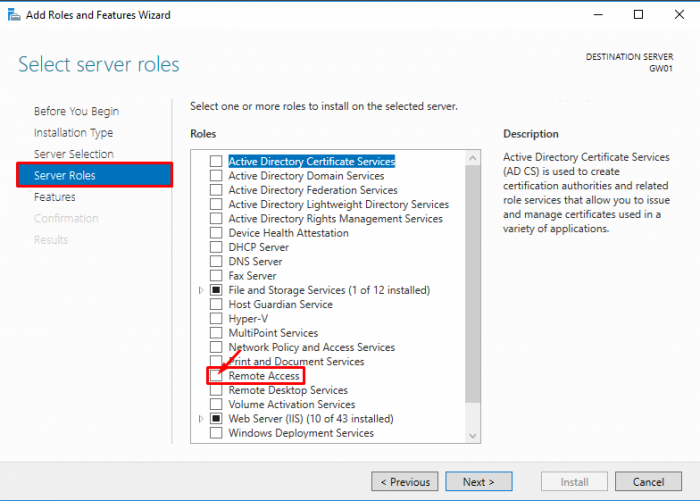
- Click “Next” until you reach the “Select server roles” window. Check the “Remote Access” box and click “Next”.

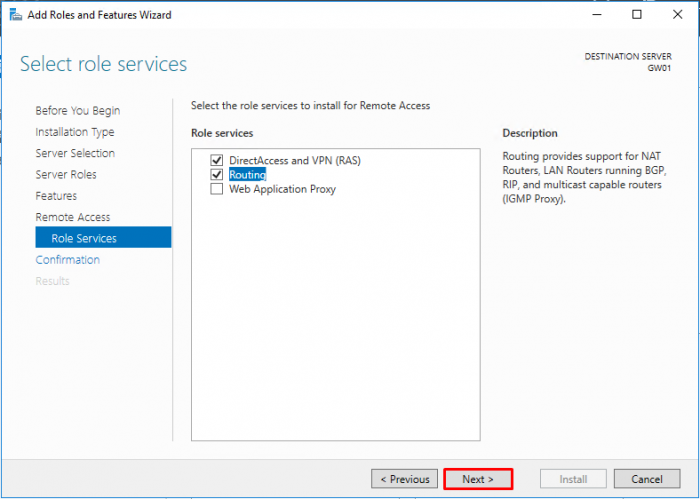
- Click “Next” until you reach the “Select role services” window.
- Select “Routing”
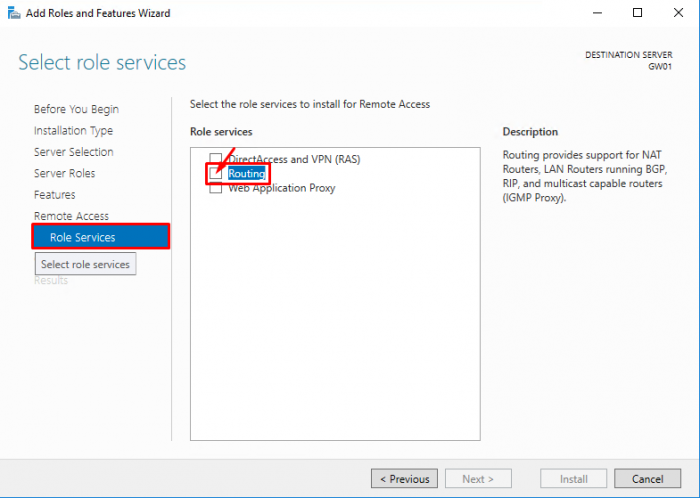
- Click on “Add Features”
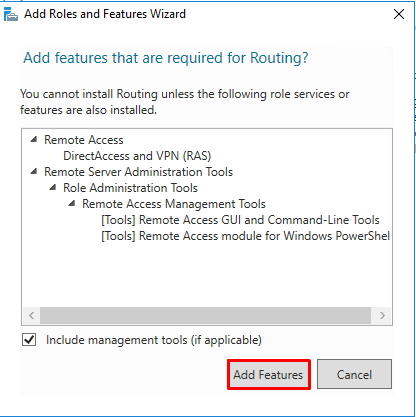
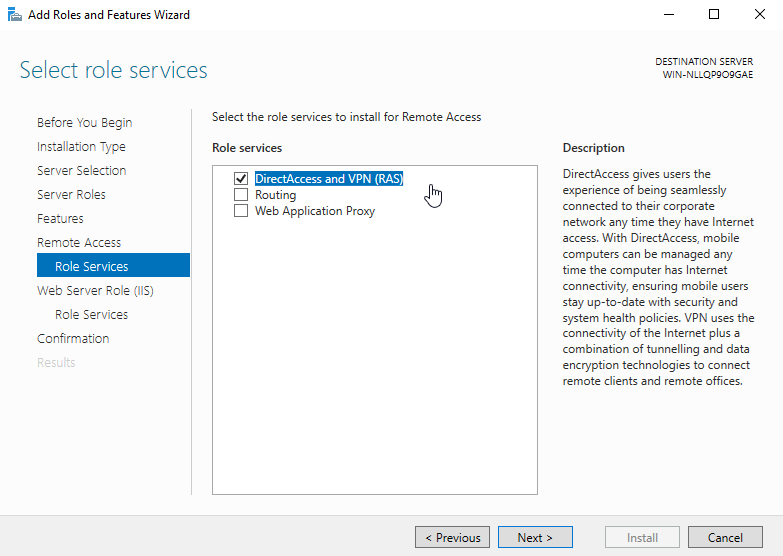
- Note that “DirectAccess and VPN (RAS)” are selected by default. No need to make any changes. Press “Next”.
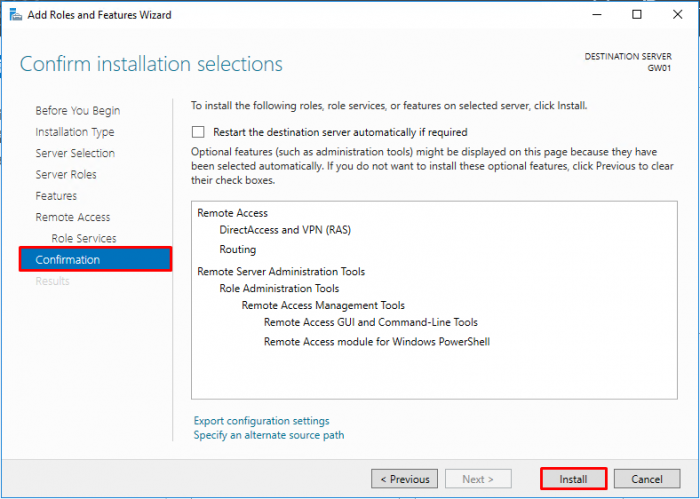
- Click on “Install” on the “Confirmation” window and wait for the role to be installed.
Configuring the Remote Access Role
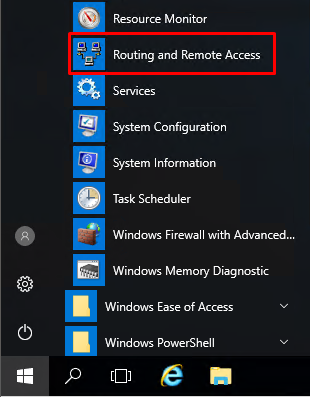
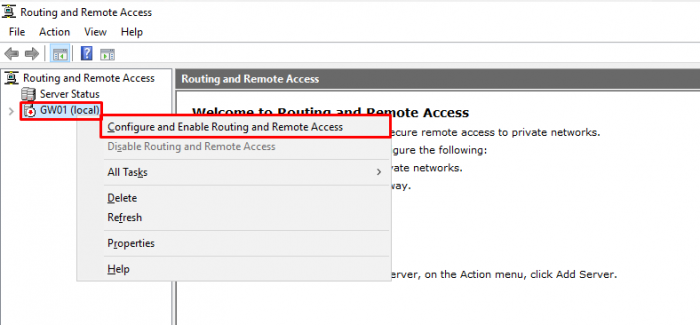
- Press the “Start” button and find the “Routing and Remote Access” console. Open it.
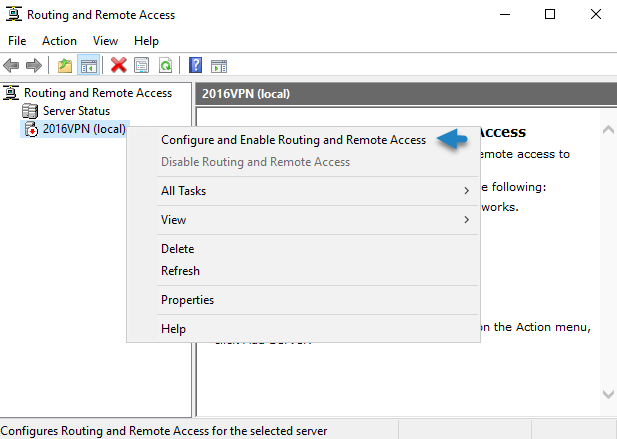
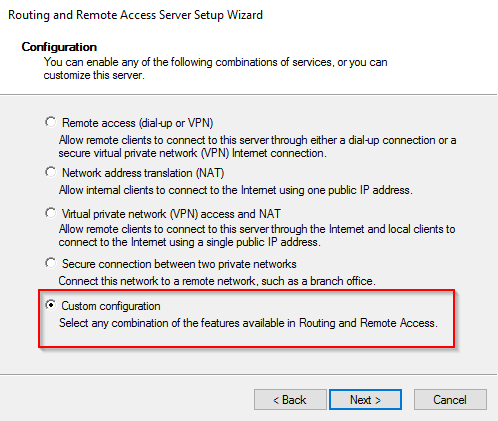
- Right-click on the (local) server and select “Configure and Enable Routing and Remote Access”
- Press “Next” at the welcome window of the “Routing and Remote Access Server Setup Wizard”.
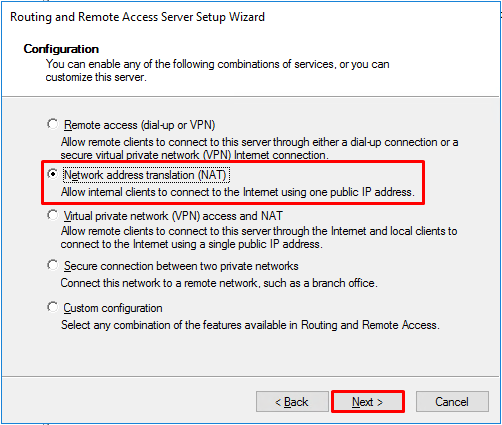
- On the “Configuration” window, select “Network address translation (NAT)” and press “Next”.
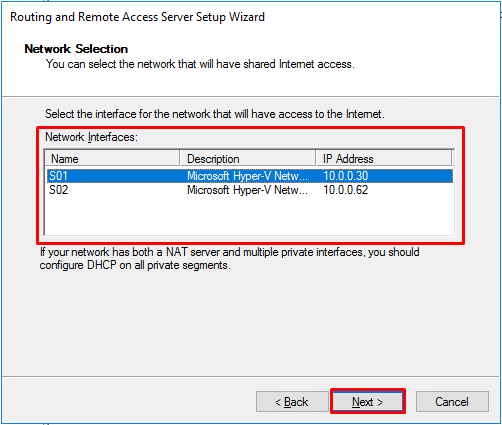
- Select the public interface that you are using to connect to the internet. Press “Next”.
- Select the interface that will have access to internet. Select the first interface and press “Next”. We’ll deal with the second interface later.
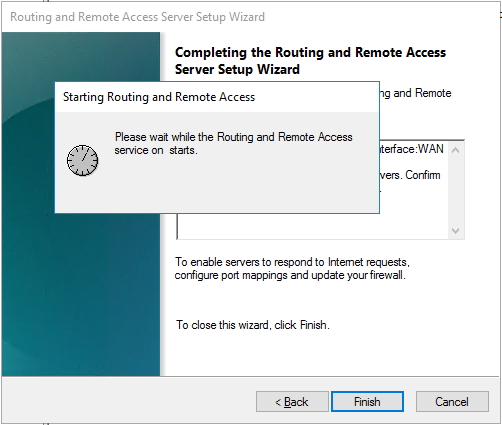
- Click on “Finish” to close the setup wizard. If a pop-up window comes up warning about firewall ports for VPN connections, you can safely ignore this warning as we are not setting up any VPN access. Just press “OK” and wait for the “Routing and Remote” access service to start.
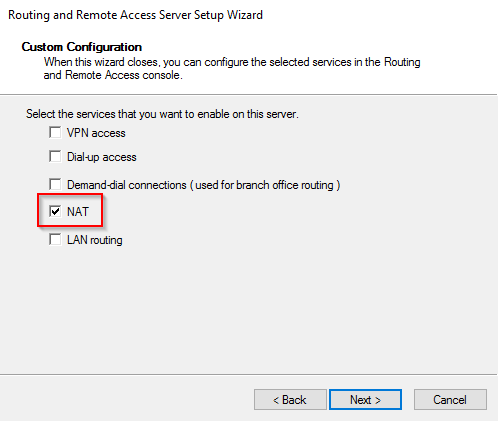
Adding the second NAT interface
So, during the Routing and Remote Access setup wizard, we’ve configured NAT for one of the subnets, but if we want (and we do!) to provide internet access to another subnet, we must configure NAT for the second (n) interface.
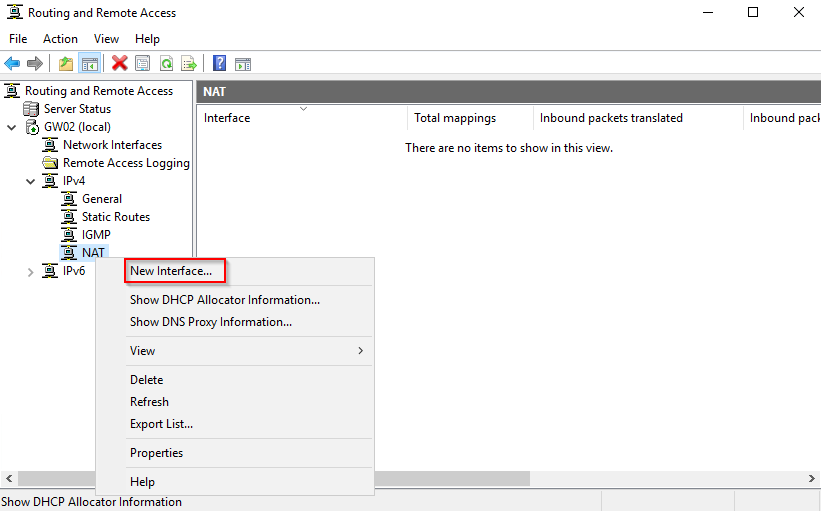
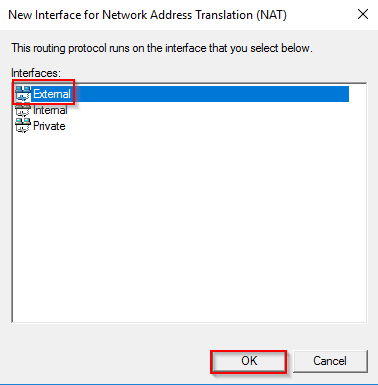
- On the “Routing and Remote Access” console, under IPv4, right-click “NAT” and select “New Interface…”
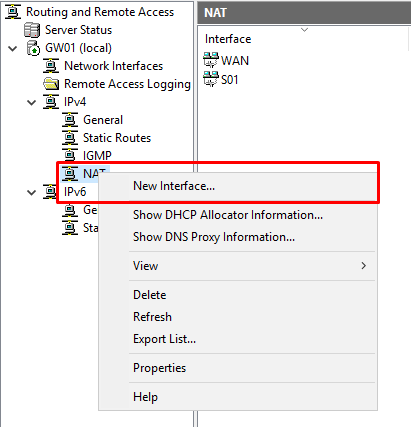
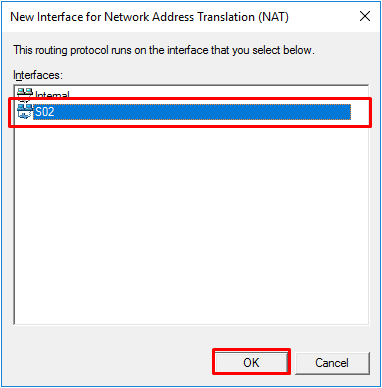
- Select the interface for the second subnet and press “OK”.
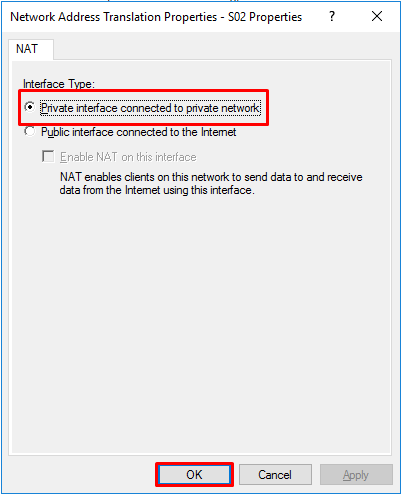
- Select “Private interface connected to private network” and click “OK”
And this ends setting up the server. Now it’s time to test if all is working as it should!
Checking the configuration
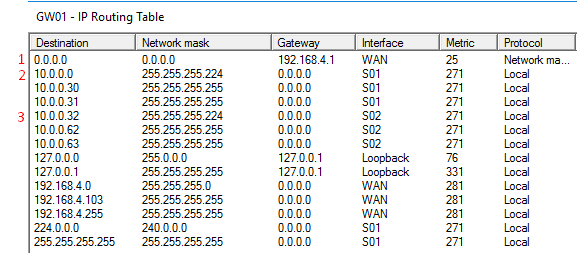
In the “Routing and Remote Access” console, under IPv4, right-click “Static Routes” and choose “Show IP Routing Table…”. A new window, with the known routes to this computer, will pop-up. Analyzing that window (please always remember that this IP Routing table is regarding my setup, which is the one described in the diagram on the top of the page), you will see that we have:
1 – A gateway! All traffic that the router doesn’t know where to direct it, will direct it to the gateway.
2- Traffic for the network (subnet) 10.0.0.0 with a netmask of 255.255.255.224 (/27) will be directed to the interface S01, which is the interface connected to that subnet.
3- Traffic for the network 10.0.0.32 with a netmask of 255.255.255.224 will be directed to the interface S02, which is the interface connected to that subnet.
Testing the LAN Routing and NAT
NOTE: for all to work properly, ideally you should have a DHCP assigning IP addresses on each subnet and also a DNS server for your client computers to be able to resolve names and browse the internet.
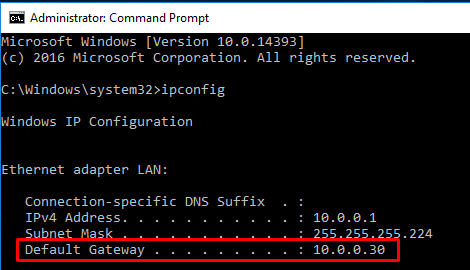
Having said that, from one of the computer clients connected to S01, you should be able to ping S02. This is the IP config I have at one of my servers in S01. You’ll see that the gateway for this subnet is the IP of the router (10.0.0.30).
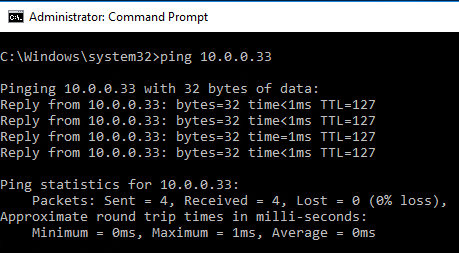
If you ping an IP address in the S02 subnet, this should be the result:
And if you try and browse the internet, voilá!
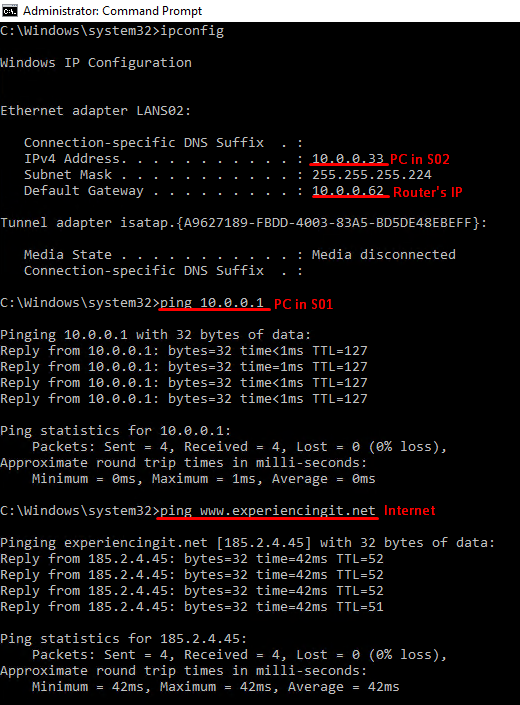
And the sames goes from a computer on subnet S02:
If you run into any issues, ie, not pinging from one subnet to the other, disable the router firewall and try again. That should do it. Or, instead of disabling the firewall completely, add – or enable – rules to allow traffic between both subnets. In my case, I disabled the firewall completely because this is a lab environment, with no direct connection to the internet.
As always, if you found this article useful, share it with your friends.
If you have any questions or suggestions, please leave your comment.
And… Thank you for reading!

If you’re looking for an easy remote access solution for your network and you’re using Windows Server, you may want to consider installing the Routing and Remote Access Role included in Windows Server. There are different types of VPNs that you can use, such as PPTP, L2TP and SSTP.
This article will assume that you have an Active Directory Domain already configured within your network to control remote access. If you are not using ADDS yet, check out this article to get it configured. Please keep in mind that you will also need to forward the appropriate ports through your outside firewall to allow clients to connect from the outside.
Have a SonicWALL UTM Device? Consider Using SSL VPN Instead: Article Here
Installing the Routing and Remote Access Role
1. Log into the server with administrative credentials
2. Open Server Manager ![]()
3. On the Dashboard, locate and click Add roles and features
4. Click Next to skip the Before you begin page
5. Choose Role-based or feature-based installation and click Next

6. Make sure that the server you are installing on is selected from the pool. Click Next to continue.

7. Scroll through the list to locate Remote Access and select it. Click Next.

8. You will be greeted with a welcome page for the Remote Access Role. Click Next to continue.

9. Because we’re configuring this server for VPN connectivity, select DirectAccess and VPN (RAS) from the list, then when prompted, click Add Features in the pop up window. Click Next to continue.


10. The Wizard will now guide you through installing the Web Server Role (IIS) as the Remote Access Role has dependencies on IIS to function. Click Next to continue.

11. Leave the default options checked and click Next to continue.

12. Finally check the information provided and click Install to begin installing the Roles.

13. Once the installation is finished, click Close. Additional configuration will be required.

Configure the Remote Access Role
Now that the installation is completed, we will want to actually configure the role.
1. Log into the server with administrative credentials
2. Open Server Manager ![]()
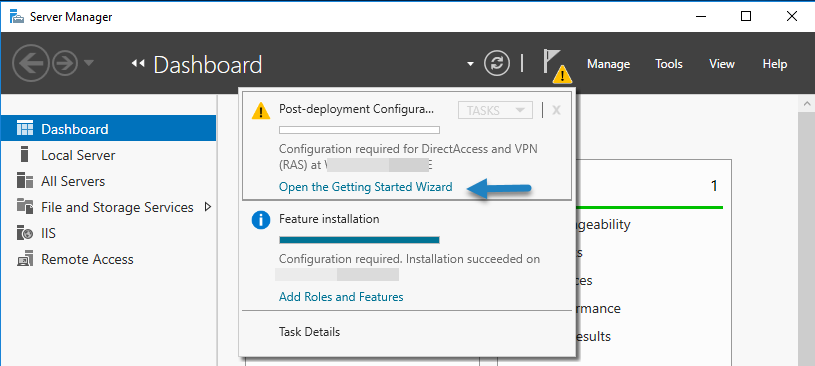
3. In the top right you will see the Action Required flag ![]() , click the icon and click Open the Getting Started Wizard.
, click the icon and click Open the Getting Started Wizard.

Note: When I clicked this in Windows Server 2016 Technical Preview 4, nothing happened. I will continue by opening the Remote Access Management Console.
4. If the getting started wizard does not show up for you, go to Start > All Apps > Windows Administrative Tools > Remote Access Management
5. In the Remote Access Management Console, click DirectAccess and VPN under Configuration, then click Run the Getting Started Wizard

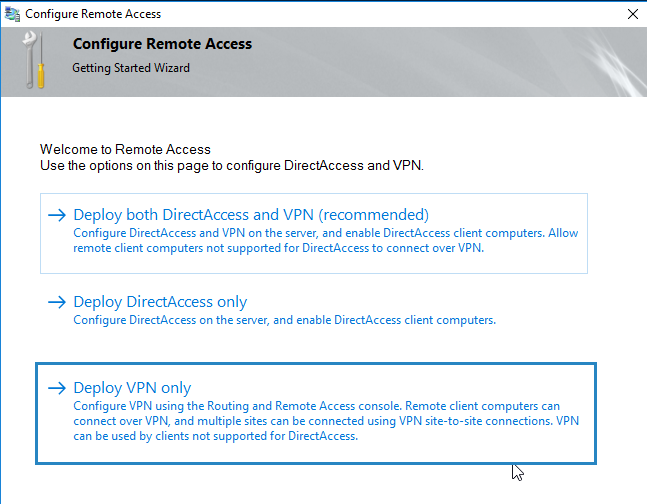
6. In the Configure Remote Access Wizard, choose whether to deploy Direct Access, VPN, or Deploy both DirectAccess and VPN (recommended).

7. Choose the option that describes your network topology best. In most cases, this will be Behind an edge device (with a single network adapter). Then enter the outside host name or public IP Address that clients will use to connect to the server (for example, Remote.MyCompany.com)

8. Finally, click Finish

We’ve completed all of the initial steps to get the server configured. You will need to configure your clients to connect using the built in VPN client in Microsoft Windows. Be sure that you either configure the correct NPS policies to allow access from your clients, or manually allowing users to connect by changing the setting on the Dial In tab within the user object in Active Directory.
Tags: 20122016AccessConfigureDirectDirectAccessHowL2TPmanagerPPTPRemoteRoutingRRASServerSetupSSTPToVPNWindowsWizard
In this tutorial you will find step by instructions to setup a PPTP VPN Server 2016, in order to access your local network resources from anywhere in the world. So, if you have a Windows 2016 server with one network card and you want to setup a VPN connection in order to connect and access server or network files from everywhere, continue reading below…*
* Note: If you want to setup a more secure VPN Server for your network, then read this article: How to Setup L2TP VPN Server 2016 with a Custom Preshared Key for Authentication.
How to Install a PPTP VPN Server 2016 (With only One NIC).
To install and configure the Server 2016 to act as a PPTP VPN access server follow the steps below:
Step 1. Install the Routing and Remote Access Role on Server 2016.
Step 2. Enable the Routing and Remote Access on Server 2016.
Step 3. Configure VPN Server Settings (Security, IP Range, etc.).
Step 4. Allow Routing and Remote Access Inbound Traffic in Windows Firewall.
Step 5. Select the VPN Users.
Step 6. Configure the VPN Server to Allow the Network Access.
Step 7. Configure ISP’s Firewall to Allow the PPTP Connections.
Step 8. Setup the PPTP Connection on Clients.
.
Step 1. How to Add Remote Access (VPN Access) Role on a Server 2016.
The first step to setup a Windows Server 2016, as a VPN server is to add the Remote Access role to your Server 2016. *
* Info: For this example we’re going to setup VPN on a Windows Server 2016 machine, named «Srv1» and with IP Address «192.168.1.8».
1. To install VPN role on Windows Server 2016, open ‘Server Manager’ and click on Add Roles and Features.

2. At the first screen of ‘Add Roles and Features wizard’, leave the Role-based or feature-based installation option and click Next.

3. At the next screen, leave the default option «Select server from the server pool» and click Next.

4. Then select the Remote Access role and click Next.

5. At ‘Features’ screen leave the default settings and click Next.

6. At ‘Remote Access’ information screen, click Next.

7. At ‘Remote Services’, choose the Direct Access and VPN (RAS) role services and then click Next.

8. Then click Add Features.

9. Click Next again.

10. Leave the default settings and click Next (twice) at ‘Web Server Role (IIS)’ and ‘Role Services’ screens.

11. At ‘Confirmation’ screen, select Restart the destination server automatically (if required) and click Install.

12. At the final screen, ensure that the installation of the Remote Access role is successful and Close the wizard.

13. Then (from Server Manager) Tools menu, click on Remote Access Management.
14. Select Direct Access and VPN on the left and then click to Run the Getting Started Wizard.

15. Then click Deploy VPN only.

16. Continue to step-2 below to configure Routing and Remote Access.
Step 2. How to Configure and Enable Routing and Remote Access on Server 2016.
The next step is to enable and configure the VPN access on our Server 2016. To do that:
1. Right click on the Server’s name and select Configure and Enable Routing and Remote Access. *
* Note: You can also launch Routing and Remote Access settings, by using the following way:
1. Open Server Manager and from Tools menu, select Computer Management.
2. Expand Services and Applications
3. Right click on Routing and Remote Access and select Configure and Enable Routing and Remote Access.

2. Click Next at ‘Routing and Remote Access Server Setup Wizard’.

3. Choose Custom configuration and click Next.

4. Select VPN access only in this case and click Next.

5. Finally click Finish. *
* Note: If you receive an error says » Remote Access Service in unable to enable Routing and Remote Access ports in Windows Firewall…», ignore it and click OK to continue.

6. When prompted to Start the service click Start.

Step 3. Configure VPN Server Settings (Security, IP Range, etc.)
1. At Routing and Remote access panel, right click on your server’s name and select Properties.

2a. At ‘Security’ tab, select the Windows Authentication as the Authentication Provider. and then click the Authentication Methods button.

2b. Make sure that the Microsoft encrypted authentication version 2 (MS-CHAP v2) is selected and then click OK.

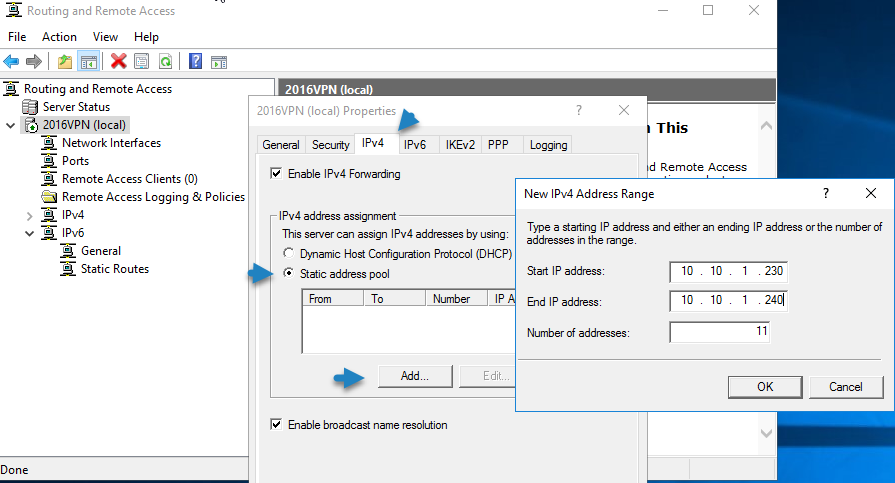
3a. Now select the IPv4 tab, choose the Static address pool option and click Add.

3b. Now type the IP Address Range that will be assigned to VPN clients and click OK twice to close all windows.
e.g. For this example we’re going to use the IP address range: 192.168.1.200 – 192.168.1.209.

Step 4. Allow Routing and Remote Access Inbound Traffic in Windows Firewall
1. Go To Control Panel > All Control Panel Items > Windows Firewall.
2. Click Advanced settings on the left.

3. Select Inbound Rules on the left.
4a. At the right pane, double click at Routing and Remote Access (PPTP-In)

4b. At ‘General’ tab, choose Enabled, Allow the connection and click OK.

5a. Then double click at Routing and Remote Access (GRE-In).

5b. At General tab, choose Enabled, Allow the connection and click OK.

6. Close the Firewall settings and restart your server.
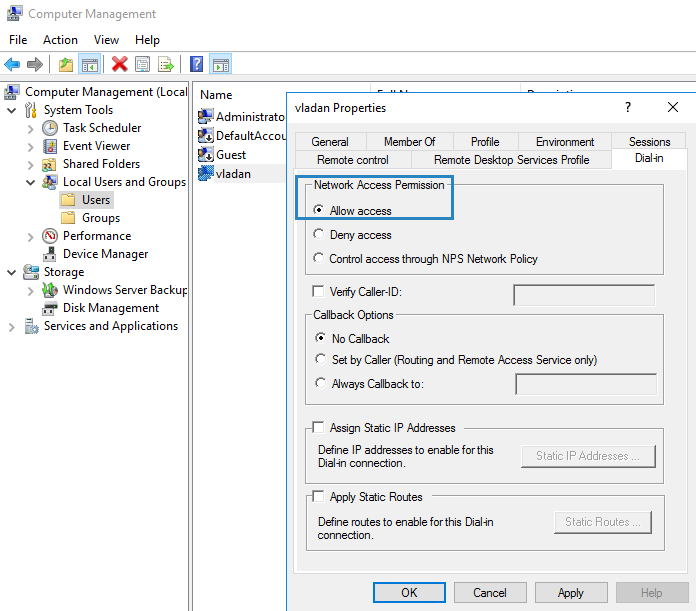
Step 5. How to Select which users will have VPN Access.
Now it’s time to specify which users will be able to connect to the VPN server (Dial-IN permissions).
1. Open Server Manager.
2. From Tools menu, select Active Directory Users and Computers. *
* Note: If your server doesn’t belong to a domain, then go to Computer Management -> Local Users and Groups.

3. Select Users and double click on the user that you want to allow the VPN Access.
4. Select the Dial-in tab and select Allow access. Then click OK.

Step 6. How to Configure the Network Policy Server to Allow the Network Access.
In order to allow the VPN users to access the network through the VPN connection, proceed and modify the Network Policy Server as follows:

2. Under the NPS (Local) select Network Policies on the left.
3a. Double click at Connections to Microsoft Routing and Remote Access server policy.

3b. At the ‘Overview’ tab, select the following settings and click OK:
-
- Grant access: If the connection request matches this policy.
- Remote Access Server (VPN-Dial up)

4a. Now open the Connections to other access servers policy, select the same settings and click OK.
-
- Grant access: If the connection request matches this
policy. - Remote Access Server (VPN-Dial
up)
- Grant access: If the connection request matches this

5. Close the Network Policy Server settings.

Step 7. How to Configure Firewall to Allow PPTP VPN Access (Port Forwarding).
The next step is allow the PPTP VPN connections on your ISP’s Router/Firewall.
1. At the top of our browser type your router’s IP address: (e.g. «http://192.168.1.1» in this example) and login to router’s web interface.
2. Inside the Router configuration setup, forward the port 1723 to the IP address of the VPN Server. (See your Router’s manual on how to configure Port Forward). *
- For example, if your VPN Server has the IP address «192.168.1.8» then you have to forward the port 1723 to the IP «192.168.1.8».

Step 8. How to Setup the PPTP VPN Connection on CLIENTS *
* Notes & Additional Help:
1. In order to be able to connect to your VPN server from a distance you have to know the public IP Address of the VPN server. To find the pubic IP Address navigate to this link: http://www.whatismyip.com/ (from VPN Server 2016).
2. To ensure that you can always connect to your VPN server it is better to have a Static Public IP Address. To obtain a Static Public IP Address you must contact your internet service provider. If you don’t want to pay for a static IP Address, then you can setup a free Dynamic DNS service (e.g. no-ip.) on your router’s (VPN Server) side.
To setup a PPTP VPN Connection on Windows 10:
1. From Settings ![]() click Network and Internet, OR, right click at the Network icon on the taskbar and choose Open Network & Internet settings.
click Network and Internet, OR, right click at the Network icon on the taskbar and choose Open Network & Internet settings.

2. Click VPN on the left and then click + to Add a VPN connection.

3. At the next screen, fill out the following information and click Save:
a. VPN provider: Select Windows (built-in).
b. Connection name: Type a friendly name for the VPN connection. (e.g.. «VPN_OFFICE»)
c. Server name or address: Type the VPN’s server host name or the public IP address or the VPN server.
d. VPN Type: Use the drop down arrow to select the type of the VPN connection that your company uses. {e.g. «Point to Point Tunneling Protocol (PPTP)»}.
e. Type of sign-in info: Use the drop down arrow and select the authentication type for the VPN connection. (e.g. «User name and password»).
f. User Name: Type the VPN user name.
g. Password: Type the VPN password.
h. Check the «Remember my sign-in info» checkbox, if you want to save your sign-in credentials for the VPN connection and then click Save

4. Under Related settings, choose Change adapter options.

5. Right click on the VPN connection and choose Properties.

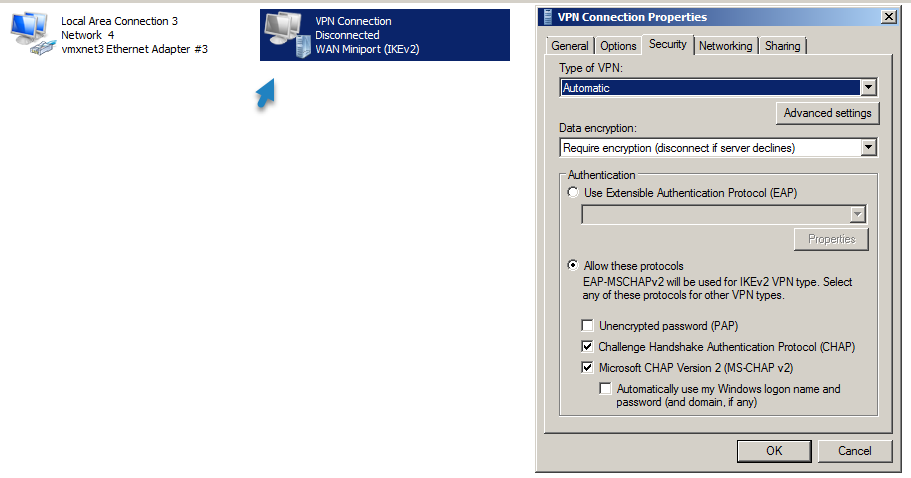
6. At Security Tab, select Allow these protocols, and check the following protocols:
-
- Challenge Handshake Authentication Protocol (CHAP)
- Microsoft CHAP Version 2 (MS-SHAP v2)

7. At Networking tab, select the Internet Protocol Version 4 (TCP/IPv4) and click Properties.

7a. Click Advanced.

7b. Uncheck the «Use default gateway on remote network» and click OK three (3) times to apply changes and close all windows.

8. Now you’re ready to connect to your VPN Server 2016.

That’s it! Let me know if this guide has helped you by leaving your comment about your experience. Please like and share this guide to help others.
If this article was useful for you, please consider supporting us by making a donation. Even $1 can a make a huge difference for us in our effort to continue to help others while keeping this site free:

If you want to stay constantly protected from malware threats, existing and future ones, we recommend that you install Malwarebytes Anti-Malware PRO by clicking below (we
do earn a commision from sales generated from this link, but at no additional cost to you. We have experience with this software and we recommend it because it is helpful and useful):
Full household PC Protection — Protect up to 3 PCs with NEW Malwarebytes Anti-Malware Premium!
| title | description | ms.topic | ms.author | author | ms.date | ms.reviewer |
|---|---|---|---|---|---|---|
|
Configure the Remote Access Server for Always On VPN |
RRAS is designed to perform well as both a router and a remote access server; therefore, it supports a wide array of features. |
article |
inhenkel |
Teresa-MOTIV |
11/16/2021 |
deverette |
Step 3. Configure the Remote Access Server for Always On VPN
Applies to: Windows Server 2022, Windows Server 2019, Windows Server 2016, Windows Server 2012 R2, Windows 10
- Previous: Step 2. Configure the Server Infrastructure
- Previous: Step 4. Install and configure the Network Policy Server (NPS)
RRAS is designed to perform well as both a router and a remote access server because it supports a wide array of features. For the purposes of this deployment, you require only a small subset of these features: support for IKEv2 VPN connections and LAN routing.
IKEv2 is a VPN tunneling protocol described in Internet Engineering Task Force Request for Comments 7296. The primary advantage of IKEv2 is that it tolerates interruptions in the underlying network connection. For example, if the connection is temporarily lost or if a user moves a client computer from one network to another, IKEv2 automatically restores the VPN connection when the network connection is reestablished—all without user intervention.
Configure the RRAS server to support IKEv2 connections while disabling unused protocols, which reduces the server’s security footprint. Additionally, configure the server to assign addresses to VPN clients from a static address pool. You can feasibly assign addresses from either a pool or a DHCP server; however, using a DHCP server adds complexity to the design and delivers minimal benefits.
[!IMPORTANT]
It is important to:
Install two Ethernet network adapters in the physical server. If you are installing the VPN server on a VM, you must create two External virtual switches, one for each physical network adapter; and then create two virtual network adapters for the VM, with each network adapter connected to one virtual switch.
Install the server on your perimeter network between your edge and internal firewalls, with one network adapter connected to the External Perimeter Network, and one network adapter connected to the Internal Perimeter Network.
[!WARNING]
Before you get started, make sure to enable IPv6 on the VPN server. Otherwise, a connection cannot be established and an error message displays.
Install Remote Access as a RAS Gateway VPN Server
In this procedure, you install the Remote Access role as a single tenant RAS Gateway VPN server. For more information, see Remote Access.
Install the Remote Access role by using Windows PowerShell
-
Open Windows PowerShell as Administrator.
-
Enter and run the following cmdlet:
Install-WindowsFeature DirectAccess-VPN -IncludeManagementTools
After installation completes, the following message appears in Windows PowerShell.
| Success | Restart Needed | Exit Code |               Feature Result               |
|---------|----------------|-----------|--------------------------------------------|
|  True   |       No       |  Success  | {RAS Connection Manager Administration Kit |
Install the Remote Access role by using Server Manager
You can use the following procedure to install the Remote Access role using Server Manager.
-
On the VPN server, in Server Manager, select Manage and select Add Roles and Features.
The Add Roles and Features Wizard opens.
-
On the Before you begin page, select Next.
-
On the Select Installation Type page, select the Role-Based or feature-based installation option and select Next.
-
On the Select destination server page, select the Select a server from the server pool option.
-
Under Server Pool, select the local computer and select Next.
-
On the Select server roles page, in Roles, select Remote Access, then Next.
-
On the Select features page, select Next.
-
On the Remote Access page, select Next.
-
On the Select role service page, in Role services, select DirectAccess and VPN (RAS).
The Add Roles and Features Wizard dialog box opens.
-
On the Add Roles and Features dialog, select Add Features then select Next.
-
On the Web Server Role (IIS) page, select Next.
-
On the Select role services page, select Next.
-
On the Confirm installation selections page, review your choices, then select Install.
-
When the installation is complete, select Close.
Configure Remote Access as a VPN Server
In this section, you can configure Remote Access VPN to allow IKEv2 VPN connections, deny connections from other VPN protocols, and assign a static IP address pool for the issuance of IP addresses to connecting authorized VPN clients.
-
On the VPN server, in Server Manager, select the Notifications flag.
-
In the Tasks menu, select Open the Getting Started Wizard
The Configure Remote Access wizard opens.
[!NOTE]
The Configure Remote Access wizard might open behind Server Manager. If you think the wizard is taking too long to open, move or minimize Server Manager to find out whether the wizard is behind it. If not, wait for the wizard to initialize. -
Select Deploy VPN only.
The Routing and Remote Access Microsoft Management Console (MMC) opens.
-
Right-click the VPN server, then select Configure and Enable Routing and Remote Access.
The Routing and Remote Access Server Setup Wizard opens.
-
In the Welcome to the Routing and Remote Access Server Setup Wizard, select Next.
-
In Configuration, select Custom Configuration, and then select Next.
-
In Custom Configuration, select VPN access, and then select Next.
The Completing the Routing and Remote Access Server Setup Wizard opens.
-
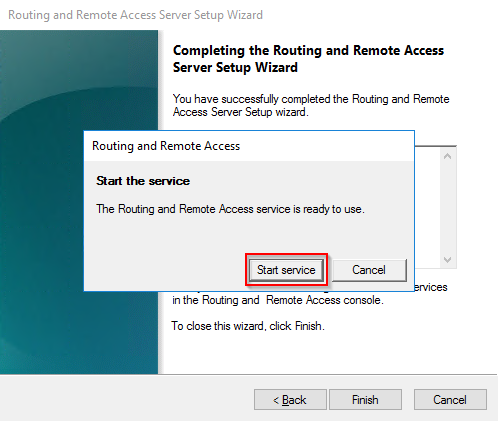
Select Finish to close the wizard, then select OK to close the Routing and Remote Access dialog box.
-
Select Start service to start Remote Access.
-
In the Remote Access MMC, right-click the VPN server, then select Properties.
-
In Properties, select the Security tab and do:
a. Select Authentication provider and select RADIUS Authentication.
b. Select Configure.
The RADIUS Authentication dialog box opens.
c. Select Add.
The Add RADIUS Server dialog box opens.
d. In Server name, enter the Fully Qualified Domain Name (FQDN) of the NPS server on your Organization/Corporate network.
For example, if the NetBIOS name of your NPS server is NPS1 and your domain name is corp.contoso.com, enter NPS1.corp.contoso.com.
e. In Shared secret, select Change.
The Change Secret dialog box opens.
f. In New secret, enter a text string.
g. In Confirm new secret, enter the same text string, then select OK.
[!IMPORTANT]
Save this text string. When you configure the NPS Server on your Organization/Corporate network, you will add this VPN Server as a RADIUS Client. During that configuration, you will use this same shared secret so that the NPS and VPN Servers can communicate. -
In Add RADIUS Server, review the default settings for:
-
Time-out
-
Initial score
-
Port
-
-
If necessary, change the values to match the requirements for your environment and select OK.
A NAS is a device that provides some level of access to a larger network. A NAS using a RADIUS infrastructure is also a RADIUS client, sending connection requests and accounting messages to a RADIUS server for authentication, authorization, and accounting.
-
Review the setting for Accounting provider:
If you want the… Then… Remote Access activity logged on the Remote Access server Make sure that Windows Accounting is selected. NPS to perform accounting services for VPN Change Accounting provider to RADIUS Accounting and then configure the NPS as the accounting provider. -
Select the IPv4 tab and do:
a. Select Static address pool.
b. Select Add to configure an IP address pool.
The static address pool should contain addresses from the internal perimeter network. These addresses are on the internal-facing network connection on the VPN server, not the corporate network.
c. In Start IP address, enter the starting IP address in the range you want to assign to VPN clients.
d. In End IP address, enter the ending IP address in the range you want to assign to VPN clients, or in Number of addresses, enter the number of the address you want to make available. If you’re using DHCP for this subnet, ensure that you configure a corresponding address exclusion on your DHCP servers.
[!NOTE]
For optimal network performance, the VPN server itself should not have a network interface in the same IPv4 subnet that assigns IPv4 addresses to the clients. If the VPN server does have a network interface in that subnet, a broadcast or multicast that is sent to that subnet could cause a latency spike.e. (Optional) If you are using DHCP, select Adapter, and in the list of results, select the Ethernet adapter connected to your internal perimeter network.
-
(Optional) If you are configuring conditional access for VPN connectivity, from the Certificate drop-down list, under SSL Certificate Binding, select the VPN server authentication.
-
(Optional) If you are configuring conditional access for VPN connectivity, in the NPS MMC, expand PoliciesNetwork Policies and do:
a. Right-the Connections to Microsoft Routing and Remote Access Server network policy and select Properties.
b. Select the Grant access. Grant access if the connection request matches this policy option.
c. Under Type of network access server, select Remote Access Server (VPN-Dial up) from the drop-down.
-
In the Routing and Remote Access MMC, right-click Ports, and then select Properties.
The Ports Properties dialog box opens.
-
Select WAN Miniport (SSTP) and select Configure. The Configure Device — WAN Miniport (SSTP) dialog box opens.
a. Clear the Remote access connections (inbound only) and Demand-dial routing connections (inbound and outbound) check boxes.
b. Select OK.
-
Select WAN Miniport (L2TP) and select Configure. The Configure Device — WAN Miniport (L2TP) dialog box opens.
a. In Maximum ports, enter the number of ports to match the maximum number of simultaneous VPN connections that you want to support.
b. Select OK.
-
Select WAN Miniport (PPTP) and select Configure. The Configure Device — WAN Miniport (PPTP) dialog box opens.
a. In Maximum ports, enter the number of ports to match the maximum number of simultaneous VPN connections that you want to support.
b. Select OK.
-
Select WAN Miniport (IKEv2) and select Configure. The Configure Device — WAN Miniport (IKEv2) dialog box opens.
a. In Maximum ports, enter the number of ports to match the maximum number of simultaneous VPN connections that you want to support.
b. Select OK.
-
If prompted, select Yes to confirm restarting the server and select Close to restart the server.
Next step
Step 4. Install and configure the Network Policy Server (NPS): In this step, you install Network Policy Server (NPS) by using either Windows PowerShell or the Server Manager Add Roles and Features Wizard. You also configure NPS to handle all authentication, authorization, and accounting duties for connection requests that it receives from the VPN server.
I did previously setup during a few occasions, VPN access on Windows Server 2012 R2, but haven’t tested that on the newly released Windows Server 2016.
Remote access role is a VPN which protects the network connection or your remote connection from one side to another and protecting both sides from attacks or data sniffing as VPN protocol uses a tunnel inside of a standard data connection.

Conventional Disaster Recovery options for virtualized IT environments running on Microsoft Windows Server 2016
Learn from this video about:
- What you should prepare your IT environment for
- Storage Replica vs. Veeam Backup & Replication vs. Hyper-V Replica
- Demonstrating each disaster recovery site option in use
Free of Charge. No Registration.
Note: You’ll need to open a TCP port 1723 on your firewall as this port is used for the VPN access.
Also, I’d like to point out that this might not be a guide for enterprise deployment as there you’ll perhaps use a hardware VPN from your router or use a Direct Access feature which however relies on Internet Protocol version six (IPv6) technologies to establish client connections.
How to install VPN on Windows Server 2016 – The steps:
Install a Remote access role via the Add Roles and Features Wizard. Open Server Manager either locally on the server that will host the remote access role or on a computer that has Server Manager configured to connect to the server you’re deploying the role.
Then select Add Roles and Features Wizard from the Manage Menu. Click next on the before you begin page if it is displayed. Then select Role-Based or Feature-Based installation and click next.
On the Select Server Role page, scroll down and then select check box Remote Access. And then click next.

You’ll need to click two more times to get to the Remote access Role Services, where you’ll have to select Direct Access and VPN.
Accept the installation of sub-components, such as IIS… Accept all the defaults.
It will take some time to finish the installation of all components and sub-components.
Then click on the link Open the Getting Started Wizard to open the configuration wizard.
A new window will appear. You’ll need to click Deploy VPN only which will configure VPN by using the Routing and Remote Access console.
After you click on that part, you’ll open the Routing and Remote Access console. Right click on the Server name and click on Configure and Enable Routing and Remote Access.
Note: You can also launch this console via Control Panel > System and Security > Administrative tools.
Click Next and Select Custom Configuration.
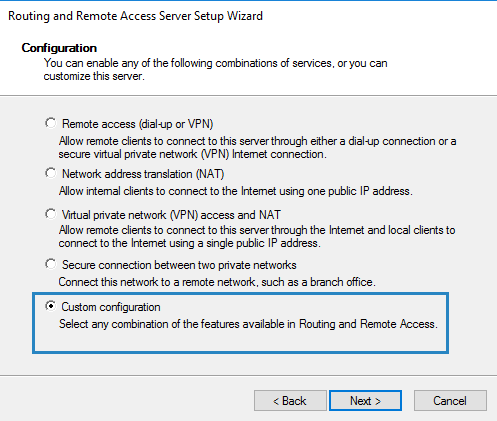
So far, it’s been very simple. Let’s go and finish the configuration. All we need to do on the next screen is to tick the checkbox VPN access as we only want this feature to be active.

You’ll then have only one page which displays the summary of your selections. Confirm by clicking the Finish button. After few seconds, you’ll see a pop-up window asking you to start the Routing and Remote Access service. Click on Start Service button.
StarWind HyperConverged Appliance is a turnkey hyper-converged hardware platform fitted into a small two-node footprint. You don’t need anything else to build a budget-friendly new IT infrastructure or upgrade an existing one. All your systems will be “babysitted” by StarWind 24/7/365, troubleshooting any concerns without your involvement. Everything’s operated through a neat web UI. We’ll also migrate your workloads at no extra cost.
Dramatically decrease your CapEx, OpEx, and IT management costs, while visibly increasing return on investment (ROI) with hyperconvergence for ROBO, SMB & Edge from StarWind.
Next Step – Allow some users to connect to your newly configured VPN server
Usually this kind of small environment can be used for system administrators requiring access to remotely installed server, or for a small group of users within an organization. Depending on the architecture, the server can be part of a Microsoft Domain and have a central management of users through an Active Directory (AD) or it can be a standalone server which is just outside of any domain.
For the sake of simplicity, we consider this case, but in both cases, you’ll need to configure at least one user to access through the VPN and we’ll show you how.
So if you’re in “Workgroup” environment you can use a Computer Management Console (MMC), and if you’re in a domain environment this can be done in the user properties of an Active Directory user.
Usually, there is a DHCP server within a company environment. If that’s not the case, you’ll have to add a static address pool.
You can find the settings in the properties of your VPN server, where you can click on the IPv4 tab and enable and configure the Static address pool. Make sure to use the same subnet as your static address of your server.
Well, this is about.
From the client’s perspective. The client has to configure a VPN connection from the client’s end. So, depending on the Operating system the client is using, the setup might differ.
But basically, you’ll should set up new VPN connection.
And then
This will create a new connection within the network connection window there.
To finally get this screen after connecting and entering your password.
Wrap up: Windows Server VPN
This is the simplest way of doing it. It involves, however, opening the TCP 1723 port on the firewall. Note that another solution of remote access exists, but they usually involve installation of third party tools on the server side, and also on the client side.
You may want to avoid installing those tools on company servers and stick to traditional Built-in VPN from Microsoft, for remote administration.
You may also be limited with your budget as those tools usually cost money when used in the enterprise environment on server systems.
- How-to Create Bootable Windows Server 2016 USB Thumb Drive for Installing OS
- Why moving from Windows Server 2012 R2 to 2016 for Hyper-V
I am setting up a Hyper-V host on a Windows Server Core 2016 to host a bunch of testing VMs that need to be totally separated from the main network. That’s why I need the Route and Remote Access service enabled on server core to act as a NAT to provide Internet access to all these VMs.
1. On Server Core console, type PowerShell to start.
2. Install Remote Access feature by
Install-WindowsFeature RemoteAccess
Then, type Restart-Computer to restart the computer.
3. Once rebooted, install Remote Access PowerShell module by:
Install-WindowsFeature RSAT-RemoteAccess-PowerShell
No need to restart the computer.
4. Install the Routing feature by:
Install-WindowsFeature Routing
Type Restart-Computer to restart the computer.
Configure and enable Routing
It’s easier to use Remote Access Management Console on Windows 10 computer to configure and enable the routing feature. Download and install Remote Server Administration Tools for Windows 10 as Remote Access Manager is part of that toolkit.
Launch Remote Access Management Console and click Manage a Remote Server on the right Tasks list.

Once connected successfully, click DirectAccess and VPN on the left pane and Open RRAS Management under VPN on the right.

In Route and Remote Access, click Action and choose Configure and Enable Routing and Remote Access to launch the configuration wizard.

Select Network address translation (NAT) option from the list, and Next.

Select the NIC that has internet access to Provide internet and the private Virtual Switch for VMs as the Internal Network. If all go well as planned, you will be up and running in a few seconds.

post views: 20,880
Introduction
This is a post on a subject I’m usually not addressing on my blog, but I think having a lab is crucial and super important for any IT pro. A lab for testing and screwing up before screwing up in production is key!
In my example, I’m running a lab in a private and isolated network, but I’m still very interested in providing Internet access for the servers and workstations running inside the lab. This is how to do just that, using the routing feature within Windows Server 2016. (I’m aware that Hyper-V in Server 2016/Windows 10 has a new NAT feature which can do this too, where a router is preferred in a more complex lab with several networks).
Configuration
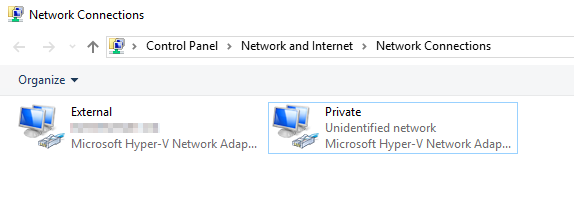
- First off, we obviously need a machine in Hyper-V running Windows Server 2016 (In this case my GW02). This virtual machine needs to be configured with 2 network adapters; 1 for the private network and 1 for the external network (where the Internet is available). I assume the Hyper-V switches are created already. If not, you should create those first directly in the Hyper-V Manager in the Action pane: Virtual Switch Manager. Create a switch for the private network and another for the external network.
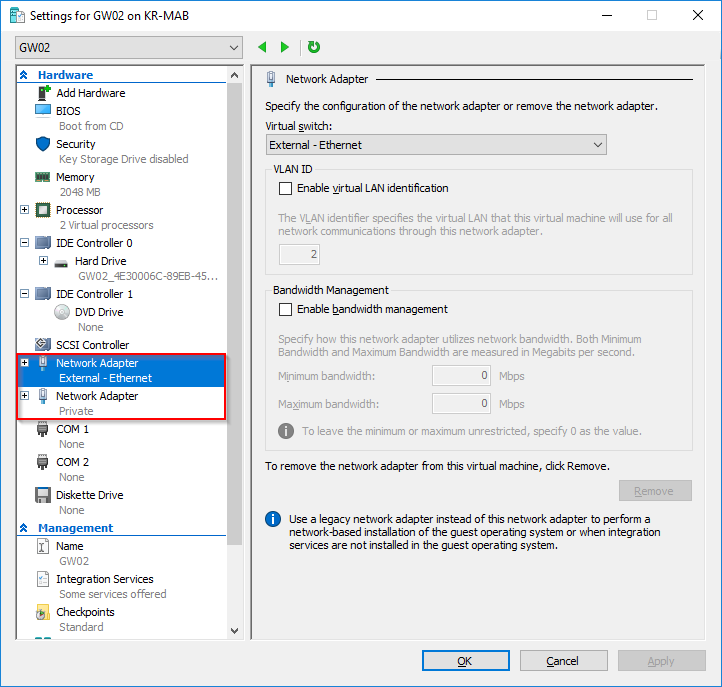
- Secondly, we need to add the required roles and features to the Windows Server 2016 acting as the router (this is still my GW02). In the Server Manager, click Add Roles and Features and add Remote Access as shown below:
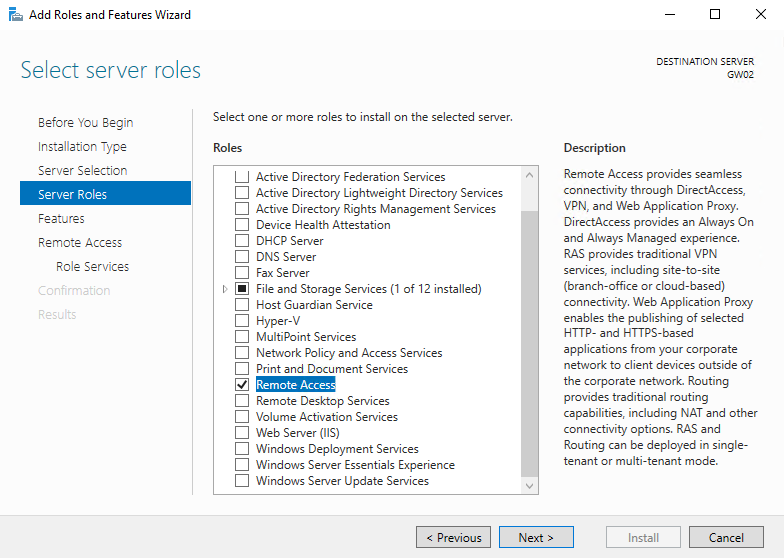
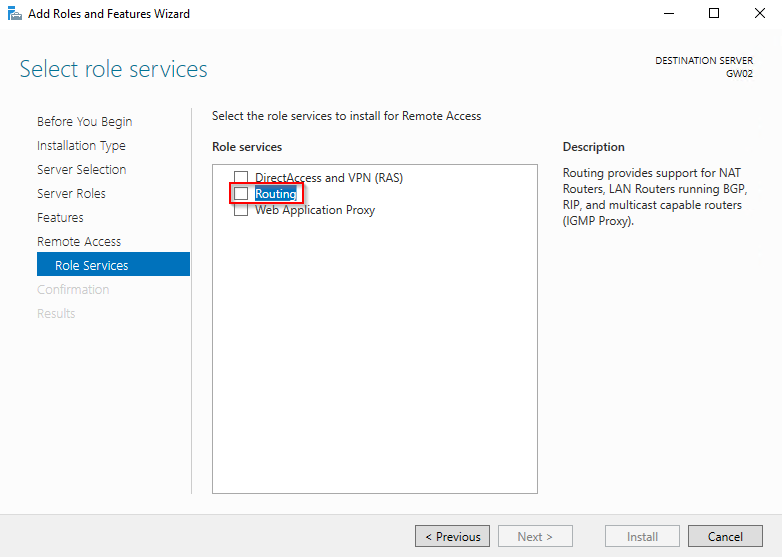
- Select the Routing role service and accept all the defaults following this selection (including accepting additional stuff like IIS etc.).
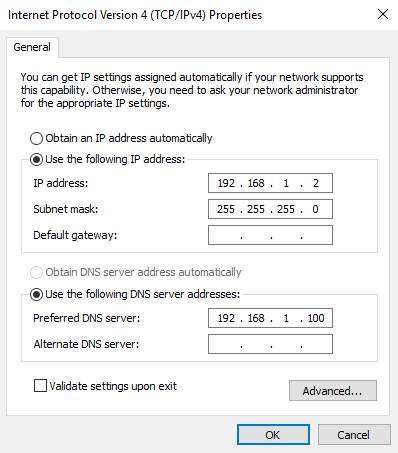
- Next up is time to configure the two network adapters. For good measures, I’ve also renamed them to something more recognizable. The external facing NIC is configured with DHCP, the Private NIC is configured with 192.168.1.2/24. 192.168.1.100 is my DC and DNS. This can be configured to whatever you prefer and what suits your own lab.
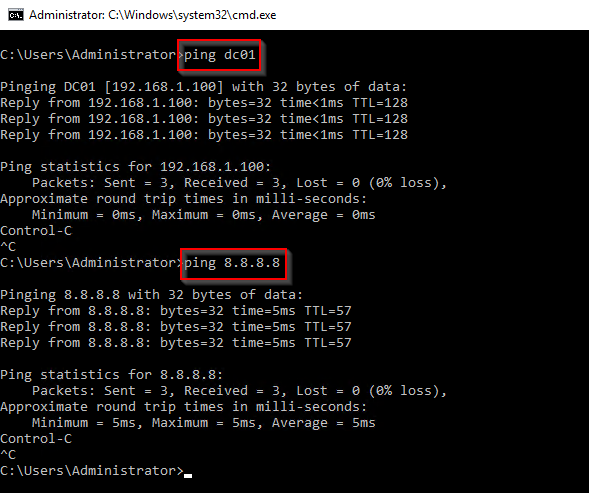
- Confirming that GW02 can communicate with both the Internet and the private network.
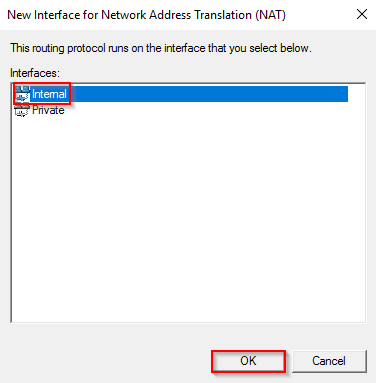
- Configure the router through Server Manager > Tools > Routing and Remote Access and follow below snippets.
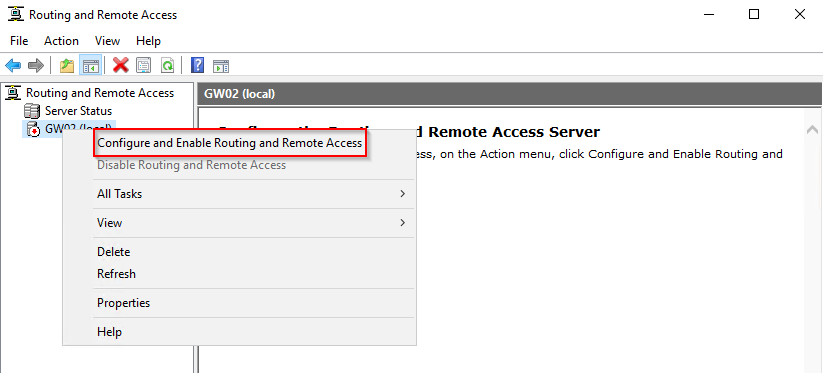
- Expand the IPv4 node and right click on NAT and select New Interface.
- First off, select External and click OK.
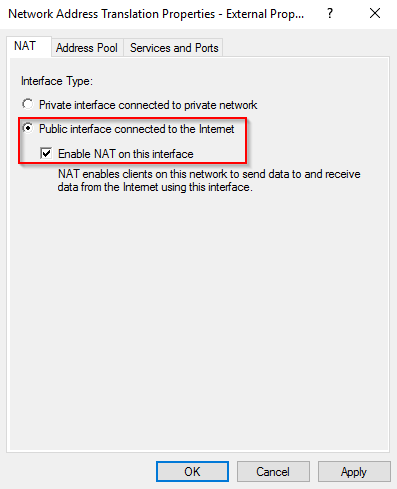
- Make sure that Public interface connected to the Internet is selected as well as Enable NAT on this interface.
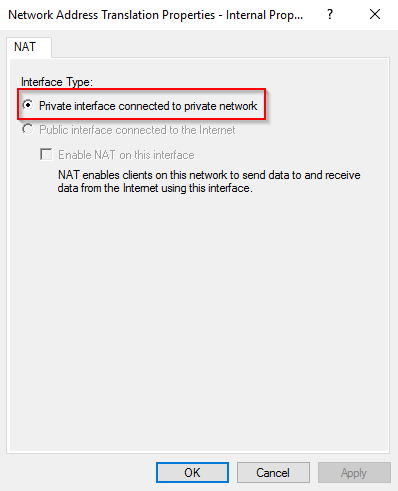
- Repeat the process for Internal (Private) interface.
- And remember to select Private interface connected to private network.
Finally
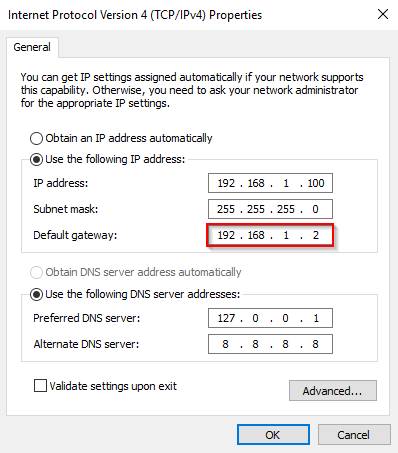
That’s it. The router is configured. To confirm everything is working as expected, you can configure the default gateway on one or more of your machines in your private Hyper-V lab. In this example, the default gateway should be 192.168.1.2 and below example is my DC which only has a private NIC configured.
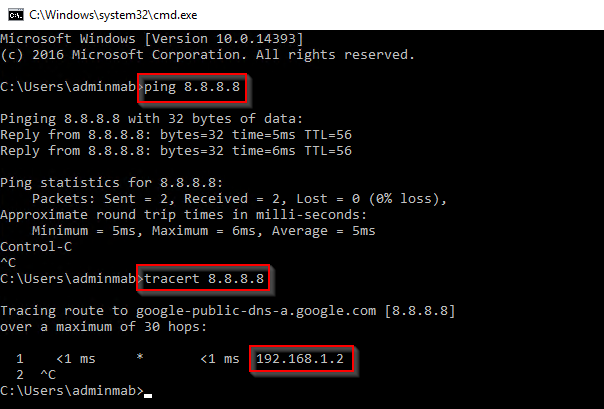
And again, confirming that my DC now has access to the Internet and that it happens through my newly configured router (GW02, 192.168.1.2).
Please leave a comment if this was helpful – thank you 🙂
Installing and configuring a VPN server using Windows Server 2016 is easy way. By following the guidance in this article, a VPN server can be implemented in just a few minutes.
VPN provides secure access to organizations’ internal data and applications to clients and devices that are using the Internet.
To properly implement and support a VPN environment within your organization, you must understand how to select a suitable tunnelling protocol, configure VPN authentication, and configure the server role to support your chosen configuration.
For this demo purposes, i will be using 2 VM, and 1 Windows 10 client VM which is all running in Hyper-V.
Lets get started VPN configuration.
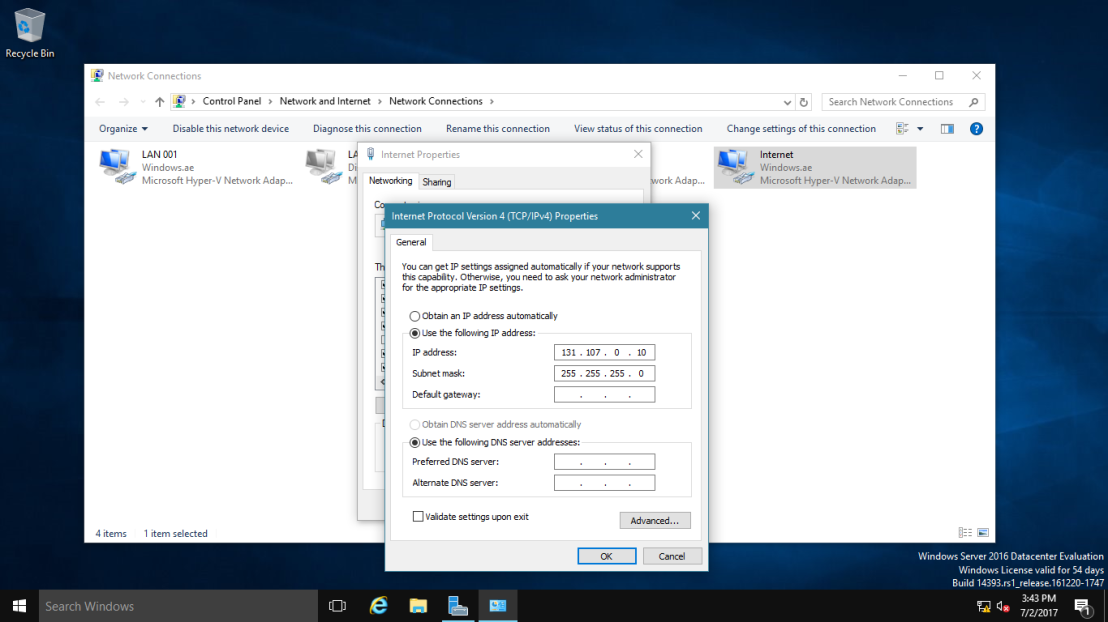
01 – lets verify the network configuration for VPN Server. (Please Refer to the Pictures)
1 – VPN Server Require 2 NIC :
- Ethernet 1 : LAN
- Ethernet 2 : Internet

Ethernet 1 : LAN

Ethernet 2 : Internet
2 – Windows 10 Client.
- Require 1 NIC :
- Ethernet 1 : Internet

02 – Creating VPNUsers OU & User in Active Directory.
1 – Create a new OU – In the New Object – Organizational Unit dialog box, in the Name box, type VPNUsers, and then click OK.


2 – In the Active Directory Users and Computers console, expand Windows.ae, right-click VPNUsers OU, click New, and then click User.


3 – right-click user, Properties, Allow Access enabled for Remote Access to connect to your VPN Server. and Okay. (Please Refer to the Pictures)


03 – Installation
1 – open your Server Manager and click on Add Roles and Features.
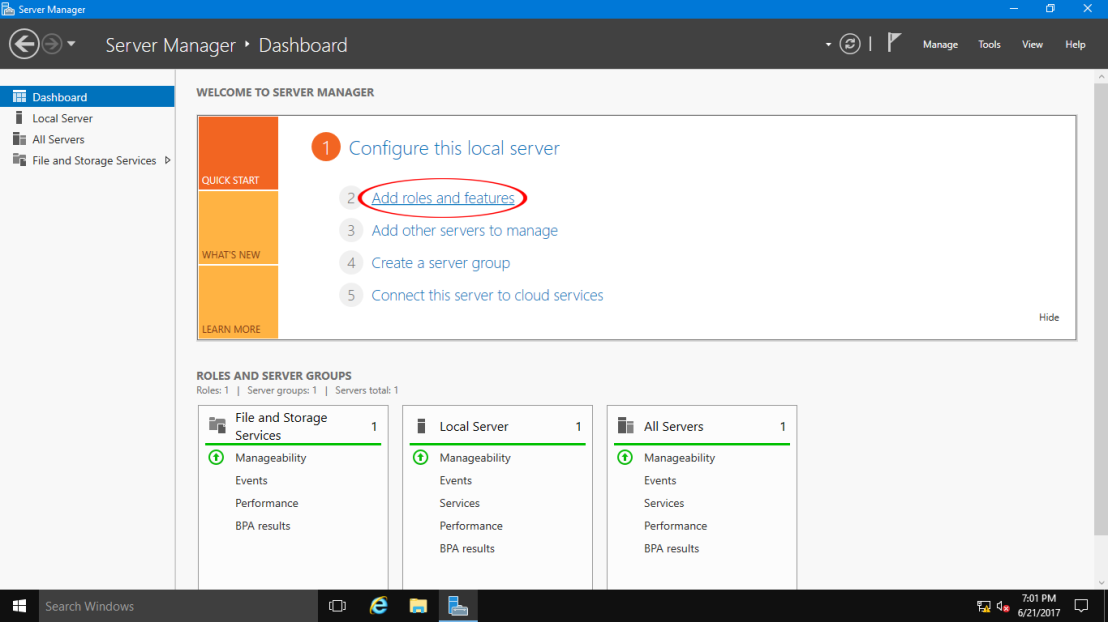
2 – click on Next.

3 – Now select Role-based or feature-based installation option and click on Next.

4 – Now select desired server you’d like to install Routing and Remote Access on.

5 – From the Roles lists select Remote Access and click on Next.

6 – Click Next, no additional features required at this point.

7 – Just click on Next.

8 – In next tab you need to select DirectAccess and VPN (RAS), Click Add Features in the popup window.


9 – On confirmation page click Install to begin.

10 – After installation process is finished, click on Open the Getting Started Wizard.

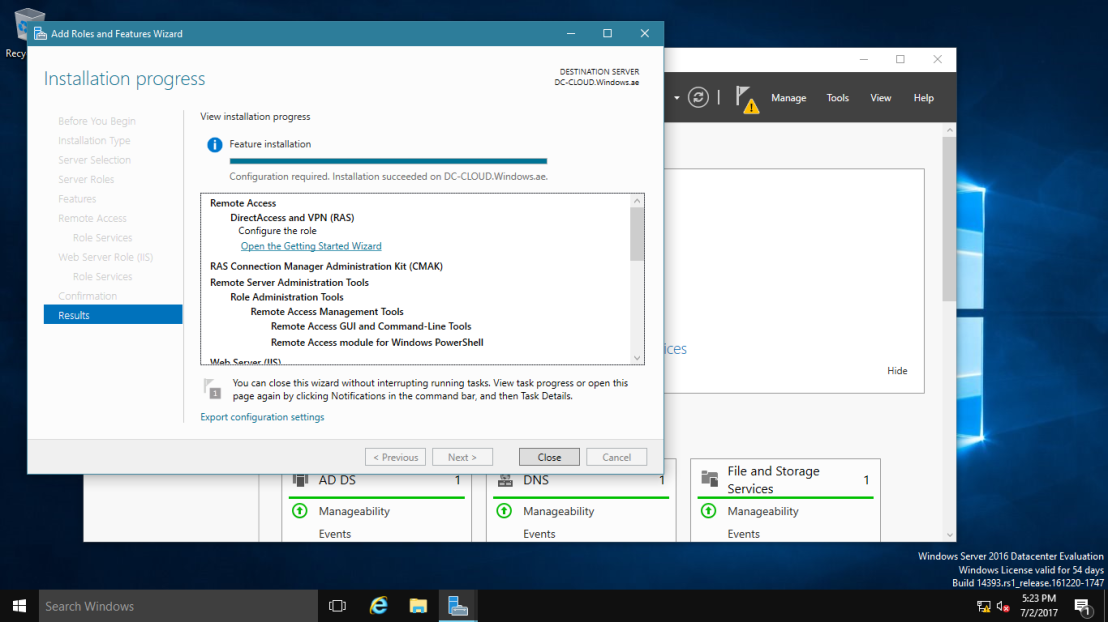
11 – In this tab press Deploy VPN only.

04 – Configuration
1 – Right click on your server and choose Configure and Enable Routing and Remote Access.

2 – Click on Next.

3 – On the new wizard select Remote Access (dial-up or VPN).

4 – On the next page select VPN.

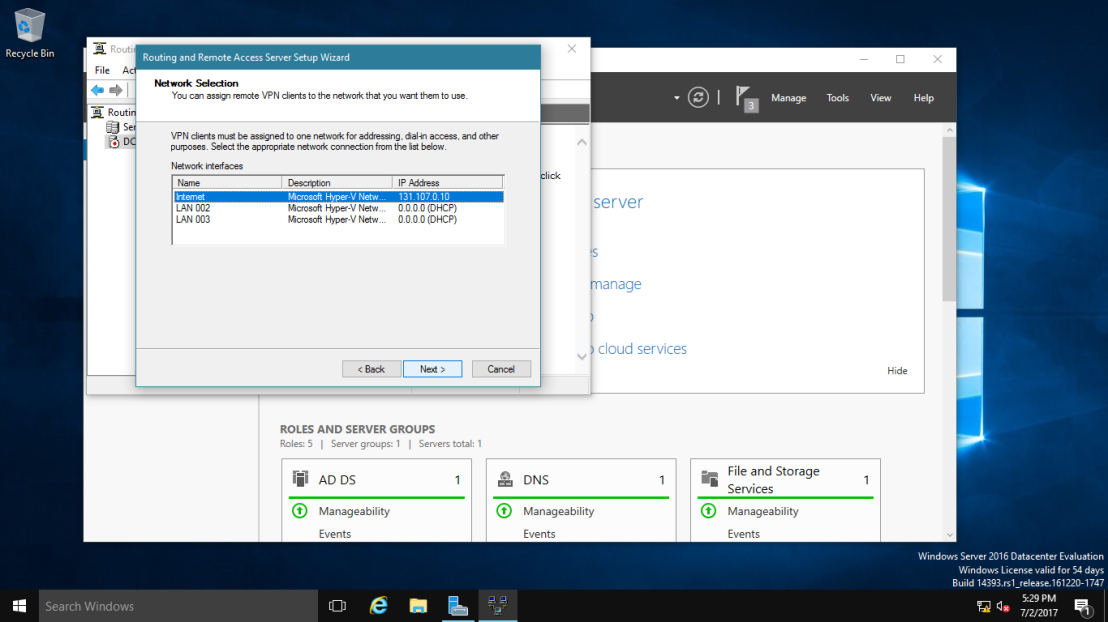
5 – Here select network adapter that connects your server to the Internet.

6 – Here select network adapter that connects your server to the VPN Clients.
7 – Here you can choose the method of distribution for IP addresses – via DHCP or manually. Select the second way.

8 – In this tab press New.

9 – In popup window specify range of IP addresses, press OK, return to previous tab and click on Next.

10 – In this tab you can choose the method of authentification. Select Routing and Remote Access.

11 – Press Finish. and Click Okay, Now configuration is finished.


12 – Next, in the Routing and Remote Access console, expand DC-CLOUD, right-click ports, click Properties.

13 – Verify that 128 ports exist for SSTP, IKEv2, PPTP, and L2TP, then double-click WAN Miniport (SSTP). Maximum ports box, type 5, and then click OK, Routing and Remote Access message box, click Yes.

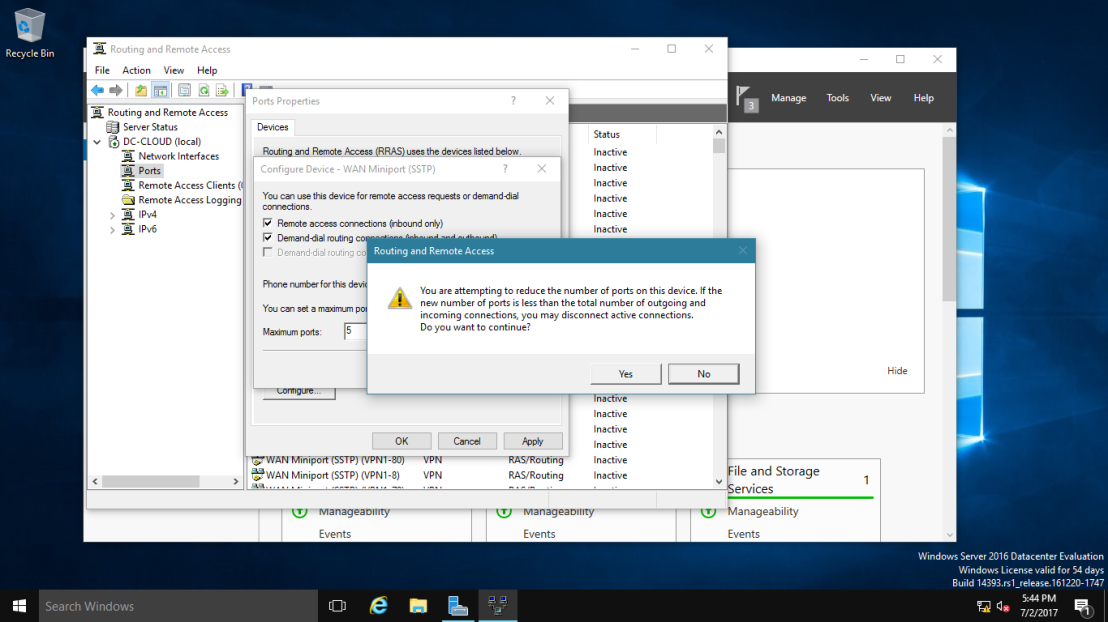
14 – Repeat the same step no:13 for IKEv2, PPTP, and L2TP, then click OK.

05 – Client Connectivity Testing
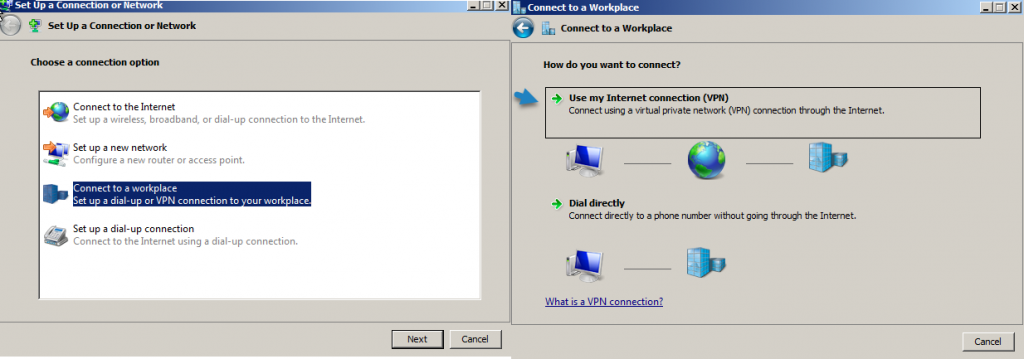
1 – On the Windows 10 client PC, open Network and Sharing Center, then click Set up a new connection or network.

2 – Next, on the Choose a connection option interface, click Connect to a workplace, and then click Next.

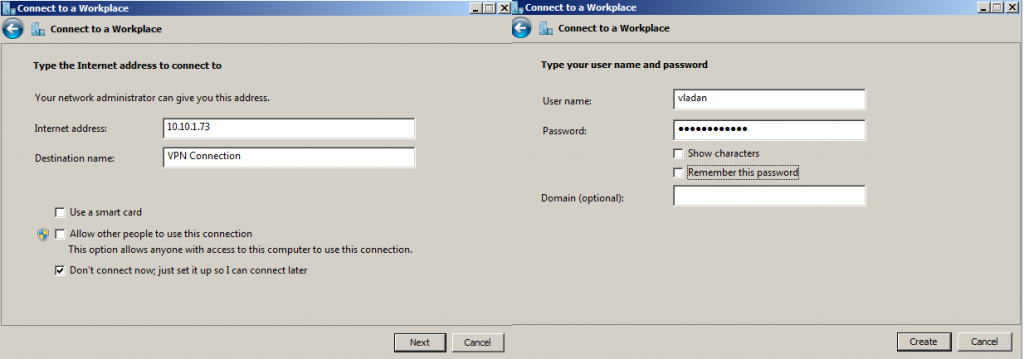
3 – On the How do you want to connect? interface, click Use my Internet connection (VPN).

4 – On the Connect to a Workplace interface, click I’ll set up an Internet connection later.

5 – In the Internet address box, type 131.107.0.10 (DC-CLOUD VPN Server IP Address).
— In the Destination name box, type NewHelpTech VPN connection, select Allow other people to use this connection checkbox, and then click Create. —

6 – Next, right click NewHelpTech VPN connection, and then click Connect.


7 – In the sign-in dialog box, type the domain user from VPNUsers OU Name Sifad and box, type Password, and then click OK.

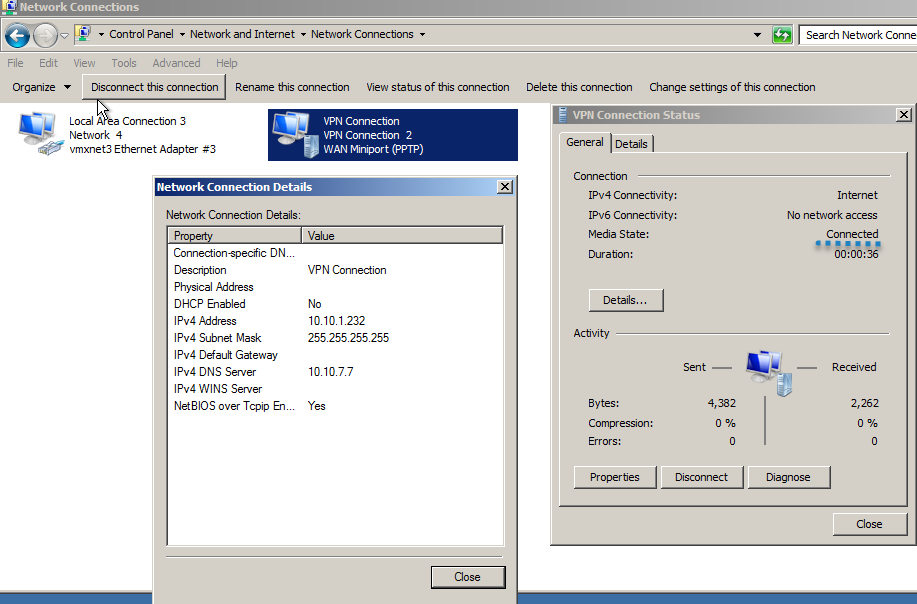
8 – Verify that you are connected to Windows by using a PPTP connection, right click NewHelpTech VPN connection, and then click Status.

 Orait, that all for now, we’ve connected to NewHelpTech VPN connection successfully.
Summary
Implementing a client-based VPN solution for secure remote access using Windows Server 2016 has many advantages over dedicated and proprietary security appliances. Windows-based VPN servers are easy to manage, cost effective, and offer greater deployment flexibility. However, at this point additional configuration is required to properly secure incoming connections.
that’s all for now.., any Doubts type a commend.. 🙂