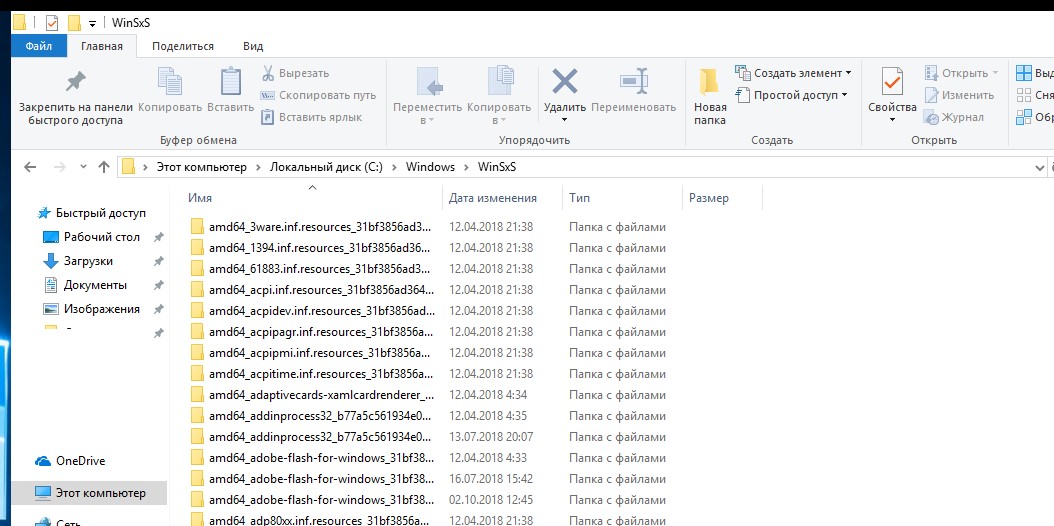
![]() Только что установленная Windows Server 2012 R2 Standard EN после установки всех обновлений, доступных в службе Windows Update занимает почти 22GB. В случае, если система готовится в качестве шаблона, с которого в дальнейшем планируется выполнять клонирование серверов, или же мы стали испытывать нехватку свободного места на системном диске уже функционирующего сервера, нам потребуется найти пути оптимизации используемого дискового пространства. Одним из возможных вариантов штатной оптимизации, заложенной в Windows Server, является операция обслуживания так называемого хранилища компонент в каталоге %windir%WinSxS.
Только что установленная Windows Server 2012 R2 Standard EN после установки всех обновлений, доступных в службе Windows Update занимает почти 22GB. В случае, если система готовится в качестве шаблона, с которого в дальнейшем планируется выполнять клонирование серверов, или же мы стали испытывать нехватку свободного места на системном диске уже функционирующего сервера, нам потребуется найти пути оптимизации используемого дискового пространства. Одним из возможных вариантов штатной оптимизации, заложенной в Windows Server, является операция обслуживания так называемого хранилища компонент в каталоге %windir%WinSxS.
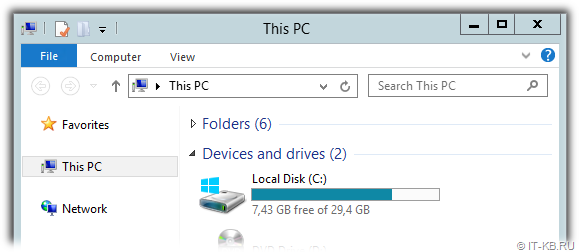
Перед нами показатель заполненности системного диска на только что установленном и обновлённом виртуальном сервере с ОС Windows Server 2012 R2 Standard.
Анализ текущего состояния хранилища компонент Windows и его последующую очистку мы можем провести с помощью утилиты, входящей в состав ОС – Dism.exe (сокращение от Deployment Image Servicing and Management).
Запускается анализ следующей командой (требуются права Администратора):
Dism.exe /Online /Cleanup-Image /AnalyzeComponentStore
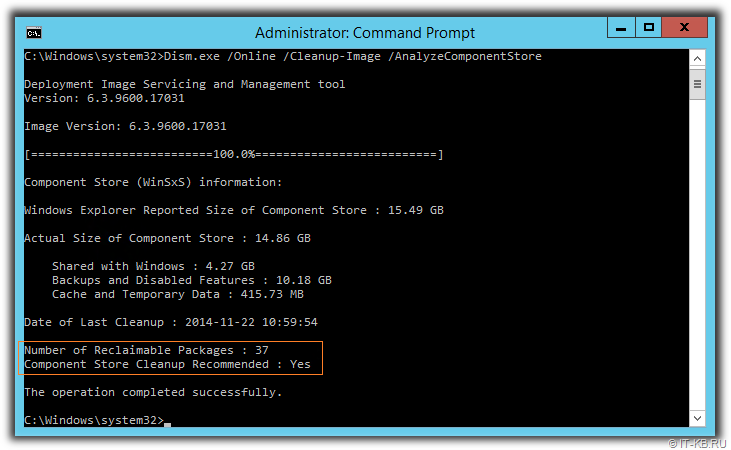
По окончании выполнения команды, изучим её вывод и обратим внимание на показатель «Number of Reclaimable Packages«, который определяет число пакетов, заменённых в процессе обновления системы через Windows Update. То есть, это те пакеты, которые могут быть безболезненно вычищены из хранилища.
Значение «Yes» в строке «Component Store Cleanup Recommended» говорит о том, что, по данным проведённого анализа, очистка возможна и рекомендуема.
Прежде, чем запускать нижеуказанную команду, нужно иметь ввиду, что в ходе её выполнения длительное время может быть ощутимо нагружен процессор. Поэтому планировать такую процедуру для уже работающих систем Windows лучше на время, когда не требуется продуктивная работа с системой.
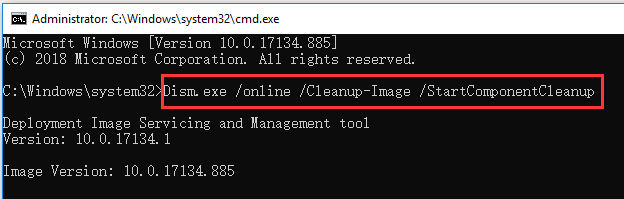
Запуск процедуры очистки хранилища компонент Windows выполняется командой:
Dism.exe /Online /Cleanup-Image /StartComponentCleanup
В нашем примере на только что установленной Windows Server 2012 R2 (с выполненной последующей доустановкой ~200 обновлений) время выполнения процедуры очистки заняло более двух часов.

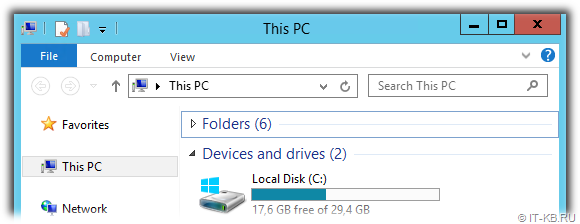
Дождавшись успешного завершения, посмотрим, как изменилась ситуация на диске.
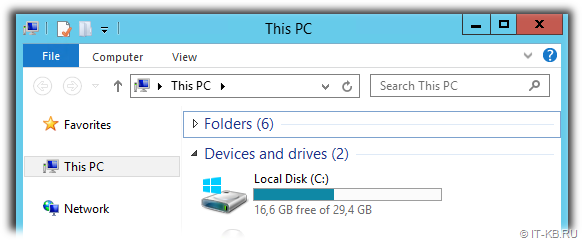
Как видим, вместо ранее имеющейся величины свободного места в 7,43 GB, теперь мы имеем 16,6 GB, то есть операция очистки высвободила в нашем случае 9,17 GB. Результат очень даже ощутимый.
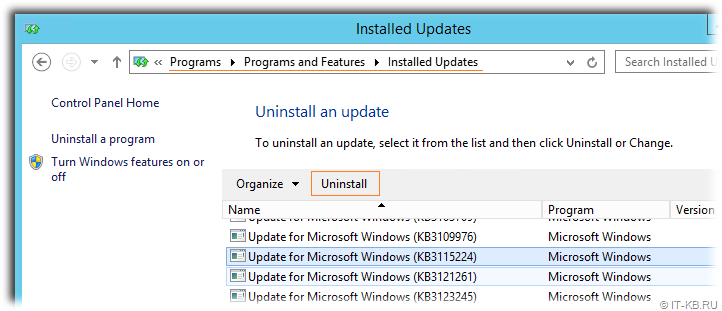
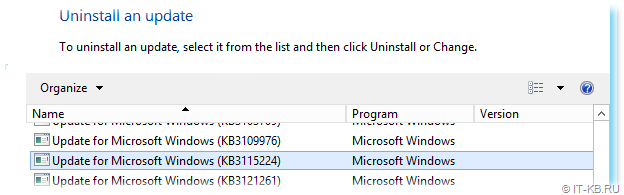
Однако в системе по-прежнему остаются файлы, которые могут использоваться для отката установленных обновлений, поддерживающих процедуру деинсталляции. Это хорошо видно, если в оснастке управления установки/удаления программ appwiz.cpl перейти в режим отображения информации об обновлениях. Здесь на большинстве обновлений мы увидим возможность удаления, то есть фактического отката заменяемых обновлениями файлов на их ранние версии.
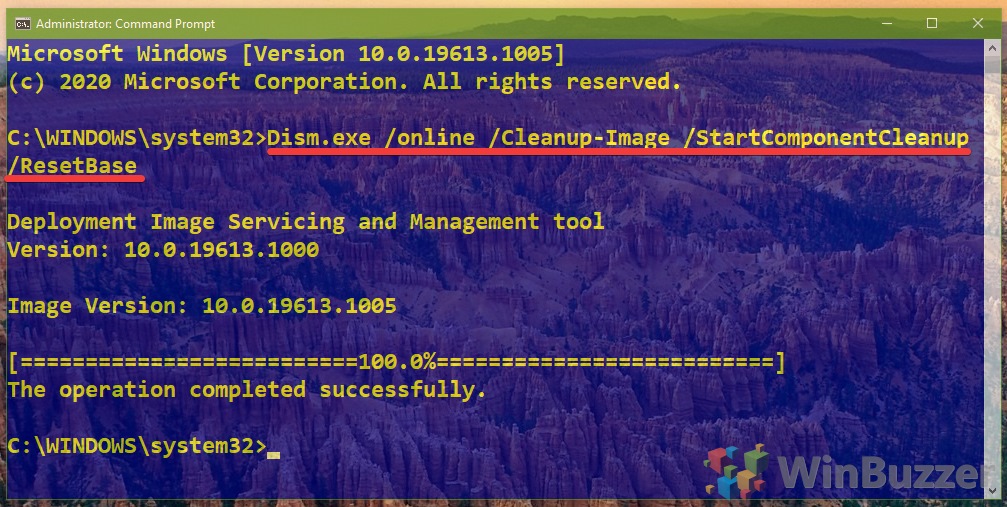
Если мы считаем, что система работает стабильно и имеем уверенность в том, что нам не потребуется выполнять удаление каких-либо обновлений, то мы можем выполнить дополнительную процедуру удаления предыдущих версий для всех компонент, которые были изменены установленными обновлениями. Нужно понимать, что тем самым мы лишим себя возможности отката установленных обновлений. В таком случае, ранее используемую команду выполняем с дополнительной опцией /ResetBase:
Dism.exe /Online /Cleanup-Image /StartComponentCleanup /ResetBase
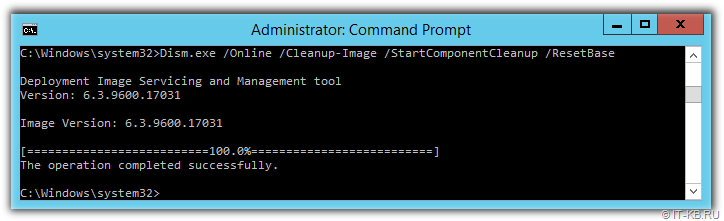
Снова посмотрим, как изменилась ситуация на диске.
Как видим, на этот раз мы смогли высвободить ещё 1 GB ёмкости дискового тома.
И теперь, если мы снова заглянем в оснастку управления установки/удаления программ appwiz.cpl в режиме отображения информации об обновлениях, то увидим, что при выборе любого из обновлений кнопка Uninstall более нам недоступна.
Таким образом, если мы решили прибегнуть к описанной выше процедуре очистки хранилища компонент Windows в каталоге WinSxS, то сначала лучше использовать более щадящую команду очистки, то есть без ключа /ResetBase, так как результат такой очистки в большинстве случаев даёт нам вполне удовлетворительный размер освобождаемого места, оставляя при этом больше «шансов для манёвра» в случае проблем с уже установленными обновлениями. То есть команду очистки с ключом /ResetBase предлагается использовать только в крайних исключительных случаях.
Дополнительные источники информации:
- Вадим Стеркин — Как работает и сколько места экономит оптимизация папки WinSxS в Windows 10, 8.1 и 8
- Вадим Стеркин — Как грамотно уменьшить размер папки WinSxS в Windows 10, 8.1 и 8
В этой статье мы поговорим о каталоге WinSxS в Windows, причинах его постоянного роста и способах очистки. Каталог C:windowsWinSxS является хранилищем компонентов Windows. В этом каталоге хранятся dll библиотеки, бинарные и xml файлы, необходимые для установки и работы различных ролей и компонентов Windows. Каждый раз когда вы устанавливаете обновления Windows (это происходит ежемесячно), новая версия обновляемого компонента устанавливается в систему, а старая сохраняется в хранилище компонентов WinSxS (это необходимо для обеспечения совместимости и возможности “отката“ к старым версиям компонентов при удалении проблемного обновления).
Со временем размер каталога WinSxS постоянно увеличивается. Причем его размер ничем не ограничен (хотя на практике размер папки WinSxS в Windows 10 редко превышает 15-20 Гб.)
В этой статье мы рассмотрим наиболее безвредные способы очистки папки WinSxS в Windows 10 и Windows Server.
- Оптимизация хранилища компонентов и удаление старых версий компонентов, оставшихся после установки обновлений Windows;
- Технология Features on Demand (функции по требованию), позволяющая удалить неиспользуемые компоненты Windows с диска;
- Сжатие файлов в папке WinSxS – способ уменьшить размер каталога WinSxS за счет включения NTFS компрессии.
У многих пользователей возникает естественный вопрос можно ли вручную удалить файлы из папки WinSxS. Ответ на этот вопрос – категоричное НЕТ! Такими действиями с большой долей вероятности вы сломаете свою Windows. И хотя отдельные попытки удаления конкретных файлов из папки WinSxS могут быть удачными, рекомендовать этот способ нельзя.
Содержание:
- Как узнать реальный размер папки WinSxS в Windows 10?
- Очистка хранилища компонентов WinSxS в Windows
- Удаление неиспользуемых компонентов Windows (Windows Server)
- Включаем NTFS сжатие на папке WinSxS в Windows
Как узнать реальный размер папки WinSxS в Windows 10?
Самый простой способ получить текущий размер каталога WinSxS в Windows, запустить проводник File Explorer и открыть свойства папки %windir%WinSxS (или воспользоваться скриптом PowerShell). Но имейте в виду, что большинство файловых менеджеров (в том числе File Explorer) показывают несколько больший размер каталога WinSxS, чем он занимает на диске.
Дело в том, что в каталоге WinSxS есть большое количество hard links (жестких символических ссылок) на файлы в других системных каталогах. Файловые менеджеры при подсчете размера папки WinSxS учитывают объем файлов, на которые ссылаются жесткие ссылки, а это не корректно.
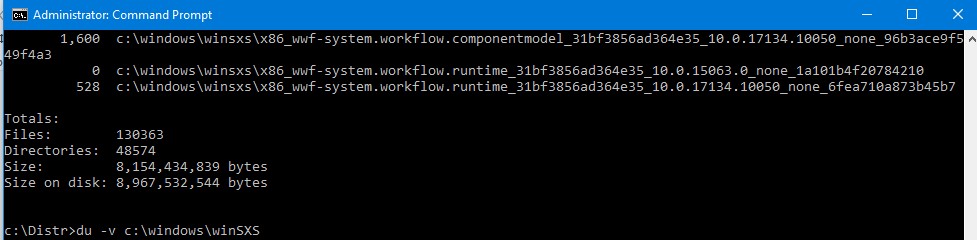
Чтобы реальный (без учета жестких ссылок) размер папки WinSxS, воспользуйтесь утилитой SysInternal du:
du -v c:windowswinSXS
Но проще всего проанализировать размер хранилища компонентов в папке WinSxS с помощью команды DISM:
Dism.exe /Online /Cleanup-Image /AnalyzeComponentStore
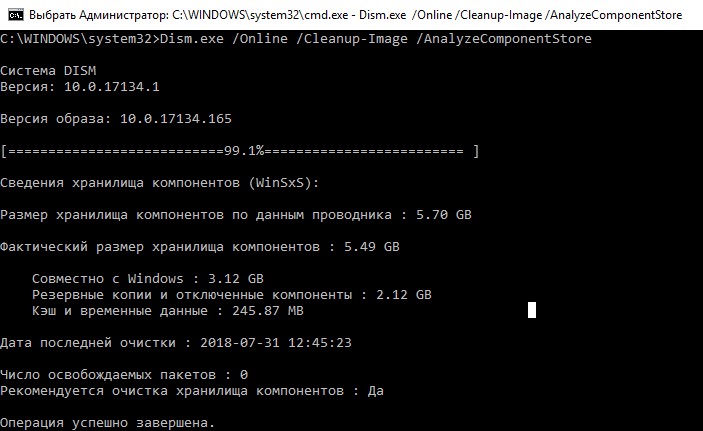
Разберемся, что возвращает данная команда:
Размер хранилища компонентов по данным проводника : 5.70 GB (это размер хранилища с учета жестких ссылок, который отображается в проводнике)
Фактический размер хранилища компонентов : 5.49 GB (реальный размер хранилища компонентов за исключением жестких ссылок)
Совместно с Windows : 3.12 GB (обязательные файлы системы, не могут быть удалены)
Резервные копии и отключенные компоненты : 2.12 GB (устаревшие файлы компонентов, которые нужны на случай проблем с установленными обновлениями)
Кэш и временные данные : 245.87 MB (файлы используются для ускорения работы системы обслуживания)
Дата последней очистки : 2018-07-31 12:45:23
Число освобождаемых пакетов : 10 (файлы, которые обновились после установки обновлений Windows, они будут удалены при очистке хранилища)
Рекомендуется очистка хранилища компонентов : Да
Как вы видите, в данном случае можно уменьшить размер каталога WinSxS на 2.1 Гб + 250 Мб.
Очистка хранилища компонентов WinSxS в Windows
Самый быстрый и простой способ освободить место в хранилище компонентов Windows (т.е. очистить папку WinSxS) – оптимизация хранилища командой:
Dism.exe /Online /Cleanup-Image /StartComponentCleanup
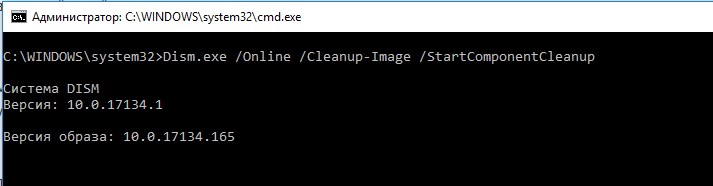
Опция Dism /StartComponentCleanup поддерживается во всех версиях Windows, начиная с Windows 8/Windows Server.
После окончания очистки проверьте текущий размер хранилища компонентов:
Dism.exe /Online /Cleanup-Image /AnalyzeComponentStore
В моем примере это помогло уменьшить размер папки WinSxS на 2,5 Гб.
С помощью еще одного параметра /ResetBase вы можете удалить все предыдущие версии компонентов, оставшиеся после установки обновлений Windows. После этого вы не сможете удалить установленные обновления или Service Pack, а в панели обновлений
appwiz.cpl
у обновлений пропадет кнопка «Удалить»).
Чтобы очистить старые версии компонентов, выполните:
Dism.exe /Online /Cleanup-Image /StartComponentCleanup /ResetBase
В Windows 7 и Windows Server 2008 R2 для очистки старых версий компонентов, оставшихся после установки сервис пака, использовался еще один параметр DISM:
dism /online /Cleanup-Image /spsuperseded
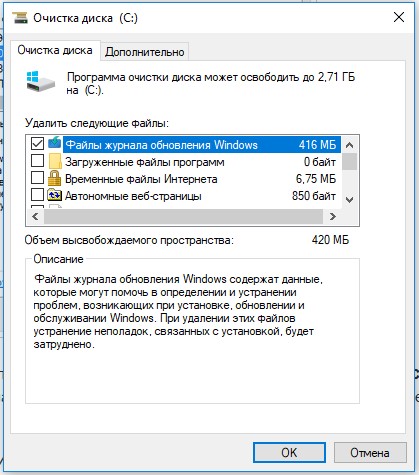
Также вы можете удалить устаревшие обновления с помощью мастера очистки диска. Выполните команду cleanmgr c правами администратора.
В окне утилиты выберите диск и в следующем окне нажмите кнопку «Очистить системны файлы».
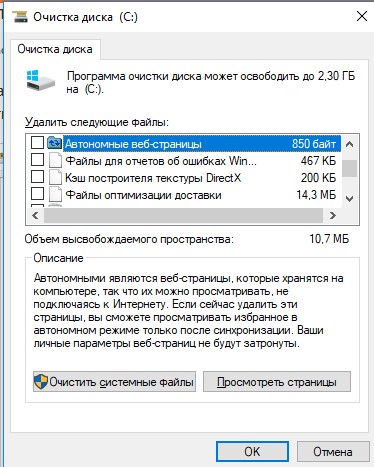
Далее выберите опцию “Файлы журнала обновления Windows» и нажмите ОK. Утилита очистки диска покажет сколько места вы можете освободить, удалив файлы журнала старых обновлений Windows. В моем примере это 427 Мб.
После окончания очистки хранилища с помощью DISM проверьте сколько освободилось места на диске.
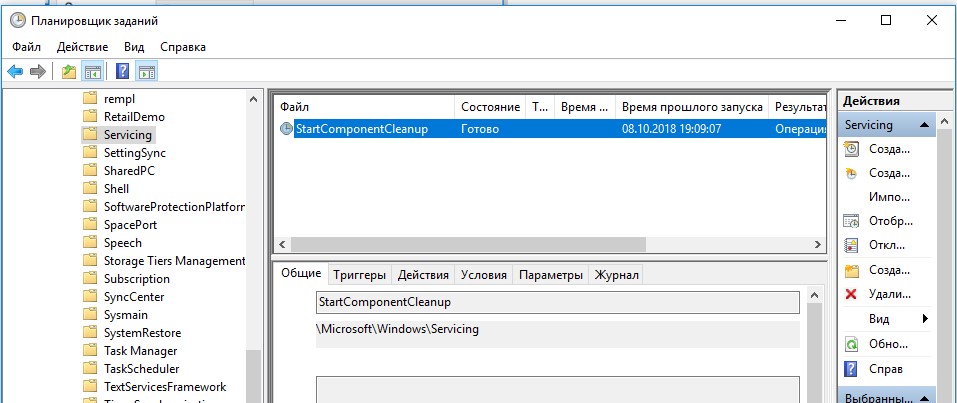
В планировщике задания Windows 10 и Windows Server 2016 есть специальное задание автоматического обслуживания, которое регулярно выполняет оптимизацию и очистку каталога WinSxS (выполняется действия, аналогичные команде dism с ключом StartComponentCleanup). Это задание StartComponentCleanup находится в разделе MicrosoftWindowsServicing. Данное задание запускается в фоновом режиме и автоматически удаляет версии компонентов старше 30 дней, которое были заменены более новыми версиями.
Можно запустить это задание вручную так:
schtasks.exe /Run /TN "MicrosoftWindowsServicingStartComponentCleanup"
Удаление неиспользуемых компонентов Windows (Windows Server)
В статье Безопасная очистка папки WinSxS в Windows Server 2016/2012 мы рассмотрели функцию Features on Demand (функции по требованию), предоставляющую возможность удаления с диска бинарных файлов неиспользуемых ролей и компонентов из каталога WinSxS. Для этого в Windows Server используется командлет PoweShell Uninstall-WindowsFeature.
В Windows 10 командлет Uninstall-WindowsFeature отсуствует, и для удаления компонентов Windows из образа нужно использовать DISM.
DISM в отличии от Uninstall-WindowsFeature не удаляет зависимые компоненты.
Полный список доступных функций в образе Windows 10 можно получить с помощью команды:
DISM.exe /Online /English /Get-Features /Format:Table
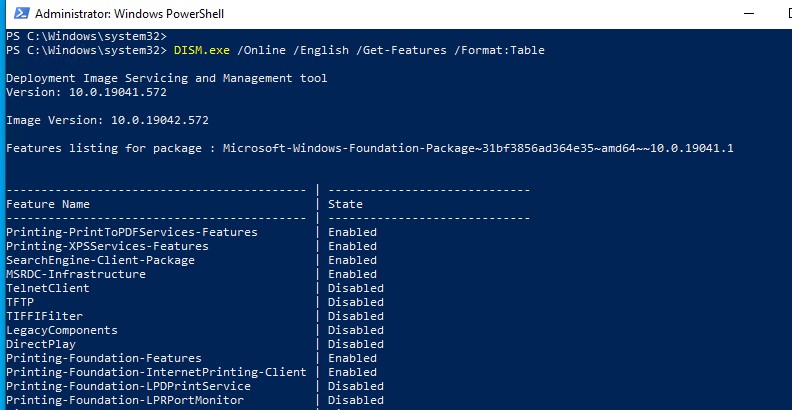
Чтобы удалить, например компонент TelnetClient с диска (из каталога WinSxS), выполните команду:
DISM.exe /Online /Disable-Feature /Featurename:TelnetClient /Remove

Если еще раз вывести список всех доступных функций по требованию в Windows, вы увидите, что статус компонента изменится на Disabled with Payload Removed.
Таким образом в Windows можно существенно уменьшить размер папки WinSxS, удалив с диска неиспользуемые компоненты. Единственный нюанс, это вариант очистки каталога WinSxS подойдет для достаточной продвинутых пользователей, которые разбираются в компонентах Windows 10 и их назначении.
Включаем NTFS сжатие на папке WinSxS в Windows
Еще один способ уменьшить размера каталога WinSxS в Windows 10 – сжать содержимое каталога на уровне файловой системы NTFS.
- Откройте командную строку с правами администратора;
- Остановите и отключите службы Windows Installer и Windows Module Installer:
sc stop msiserver

sc stop TrustedInstaller

sc config msiserver start= disabled

sc config TrustedInstaller start= disabled
- Создайте резервную копию списков доступа (ACL) назначенных на файлы и папки в каталоге WinSxS с помощью утилиты icacls. Резервная копия ACL представляет собой обычной текстовый файл, в котором указаны все файлы и каталоги и назначенные на них NTFS разрешения (в дальнейшем этот файл понадобиться для восстановления оригинальных ACL):
icacls "%WINDIR%WinSxS" /save "%WINDIR%WinSxS_NTFS.acl" /t

- Назначьте себя владельцем папки WinSxS и всех вложенных каталогов:
takeown /f "%WINDIR%WinSxS" /r
- Предоставьте своей учетной записи полные права на каталог WinSxS:
icacls "%WINDIR%WinSxS" /grant "%USERDOMAIN%%USERNAME%":(F) /t
- Теперь можно выполнить сжатие файлов в каталоге WinSxS с помощью команды compact. Т.к. часть файлов может использоваться Windows, нужно указать параметр /i. Иначе сжатие будет остановлено на первом же занятом файле (в Windows 10 можно использовать более прогрессивное LZX сжатие):
compact /s:"%WINDIR%WinSxS" /c /a /i *

- Теперь нужно восстановить TrustedInstaller как владельца каталога WinSxS:
icacls "%WINDIR%WinSxS" /setowner "NT SERVICETrustedInstaller" /t
- И вернуть оригинальные NTFS разрешения на каталог WinSxS из резервной копии ACL:
icacls "%WINDIR%" /restore "%WINDIR%WinSxS_NTFS.acl" - Измените типа тип запуска служб Windows Installer и Windows Module Installer:
sc config msiserver start= demand

sc config TrustedInstaller start= demand


Проверьте текущий размер каталога WinSxS.
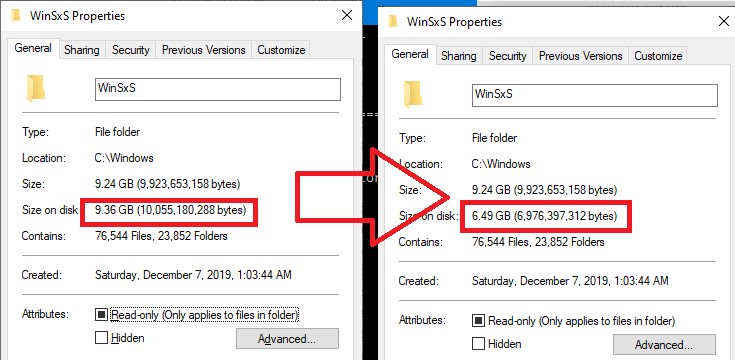
Как вы видите, в нашем примере размер папки WinSxS за счет сжатия уменьшился с 9,36 Гб до 6,5 Гб (примерно на треть). Неплохо, особо для небольшого по размеру SSD-диска.
Указанные команды можно выполнять по отдельности (так проще контролировать успешность выполнения каждой из них), либо можно объединить все операции в один файл скрипт. Вы можете скачать готовый bat файл для сжатия WinSxS здесь compress_winsxs.bat
Данный скрипт нужно запускать периодически, т.к. в каталоге WinSxS будут появляться новые «несжатые» файлы после установки новых обновлений Windows и программ.
На что может повлиять сжатие каталога WinSxS? Windows работает со сжатыми файлами в прозрачном режиме, однако при обработке таких файлов, ей может понадобиться дополнительное время на их декомпрессию/компрессию. Это может вызвать небольшое замедление при установке компонентов Windows или обновлений. Однако для современных процессоров (CPU) операция компрессии/декомпрессии файлов выполняется практически мгновенно, так что реального уменьшения скорости пользователь даже не заметит.
 in Windows 10")
Contents
- 1 How to Cleanup WinSxS in Windows 10 with Task Scheduler
- 2 How to Cleanup WinSxS with the StartComponentCleanup Command
- 3 How to Clean up the Component Store and Delete All Old Component Versions
- 4 How to Clear Service Pack Backup Components via DISM
- 5 How to Perform an Extended Disk Cleanup to Free Up More Space
When searching for disk space hogs, users often come across the WinSxS folder, a seemingly hefty file that Windows Explorer tells them is 8GB+ and contains tens of thousands of files. They’ll quickly find there’s no way to delete WinSxS entirely (for good reason) but it is possible to clean WinSxS to free up some space.
What is WinSxS?
The WinSxS folder, also known as the component store, holds all essential Windows components. Though you may see such components elsewhere in Windows 10, in reality, they’re just links back to WinSxS, which handles the heavy lifting.
As a result, deleting WinSxS would not be good. There’s a good chance your system would be unable to boot, and as WinSxS also contains backups of older component versions, you may not be able to repair, either.
However, that’s not to say the Windows SxS folder doesn’t contain files you don’t need. It keeps older versions in case you need to roll back to an older version of Windows 10, which means it grows with each Windows Update. If you’re happy with your system stability, it’s possible to perform a WinSxS folder cleanup and regain some space.
Generally, Windows 10 is quite good at doing this automatically, but if you need space right now, you may not have time to wait for its scheduled maintenance. We’re going to show you how to safely clean WinSxS so you can get your system running smoothly again.
How to Cleanup WinSxS in Windows 10 with Task Scheduler
The most user-friendly way to clean WinSxS is Windows 10’s built-in Task Scheduler app.
- Open Task Scheduler
Press “Windows + R” to open the ‘Run’ dialog, type “taskschd.msc”, and press “Enter”.

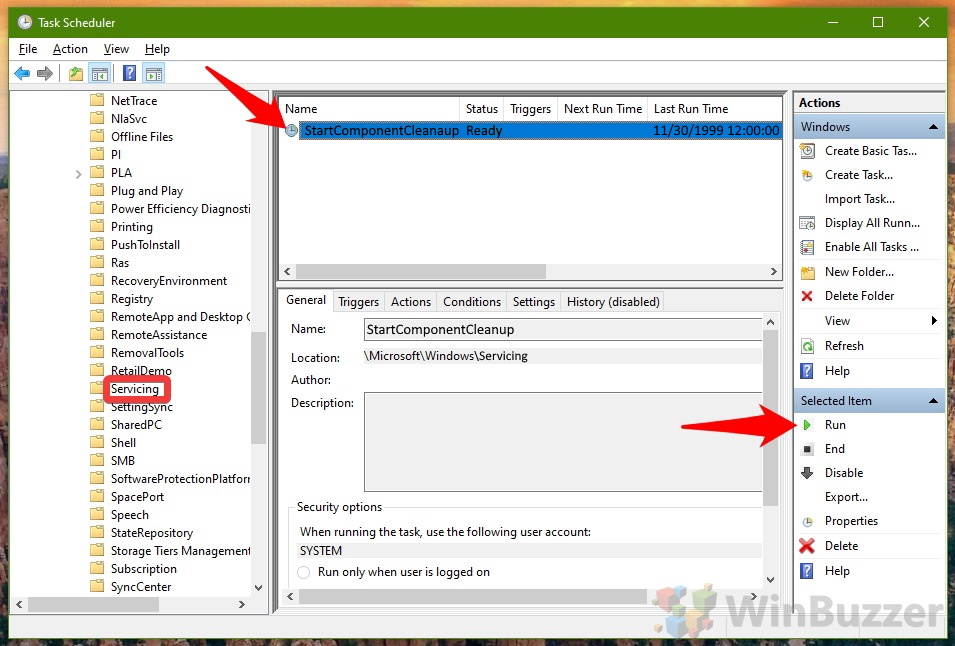
- Navigate to the Windows Servicing folder and run WinSxS folder cleanup
Using Task Scheduler’s left sidebar, make your way to
Task Scheduler LibraryMicrosoftWindowsServicing. Find “StartComponentCleanup” and click “Run”.
- Wait for the Windows Component Clean tool to run
The Windows Component Clean tool when then start to clear up your files, which you’ll note when the status in Task Scheduler changes from “Ready” to “Running”. It may take some time to fully complete.


How to Cleanup WinSxS with the StartComponentCleanup Command
The Command Prompt is often a faster way to get things done. Those familiar with the tool or without UI access can perform a WinSxS folder cleanup via two DISM methods. The first gives similar results to the Task Scheduler:
- Open an elevated Command Prompt
Press the “Start” button and type “Command Prompt”. Windows will automatically select the program and you can click “Run as administrator”.

- Run the Windows Component Clean tool from the command-line
Type the command
Dism.exe /online /Cleanup-Image /StartComponentCleanupand press “Enter”. It will return a progress bar. Wait for it to finish and close the window when ready.


How to Clean up the Component Store and Delete All Old Component Versions
If you’d like a little more space and are happy to risk being unable to roll back, you can also use DISM to delete all older Windows component versions. Doing so will mean you’re unable to uninstall updates.
- Open an elevated Command Prompt
Press the “Start” button and type “Command Prompt”. Windows will automatically select the program and you can click “Run as administrator”.
- Run the WinSxS clean up tool with the Reset Base command
Type the following command:
Dism.exe /online /Cleanup-Image /StartComponentCleanup /ResetBase
Press “Enter” and wait for it to complete.


How to Clear Service Pack Backup Components via DISM
Those who are on older Windows versions can also remove backups of Service Pack components that are retained in case of uninstallation. As Windows 10 doesn’t have Service Packs, this won’t be necessary for most people.
- Open an elevated Command Prompt
Press the “Start” button and type “Command Prompt”. Windows will automatically select the program and you can click “Run as administrator”.
- Enter the WinSxS Service Pack Clean Command
In the Command Prompt window, type the following and press “Enter”:
Dism.exe /online /Cleanup-Image /SPSuperseded
Wait for it to finish and close Command Prompt.


How to Perform an Extended Disk Cleanup to Free Up More Space
You can reduce your Windows Component size and delete other unnecessary Windows 10 files via the Disk Cleanup tool. Here’s a full tutorial, or you can read our quick guide below:
- Open an elevated Command Prompt
Press the “Start” button and type “Command Prompt”. Windows will automatically select the program and you can click “Run as administrator”.
- Run the cleanmgr command and free up space
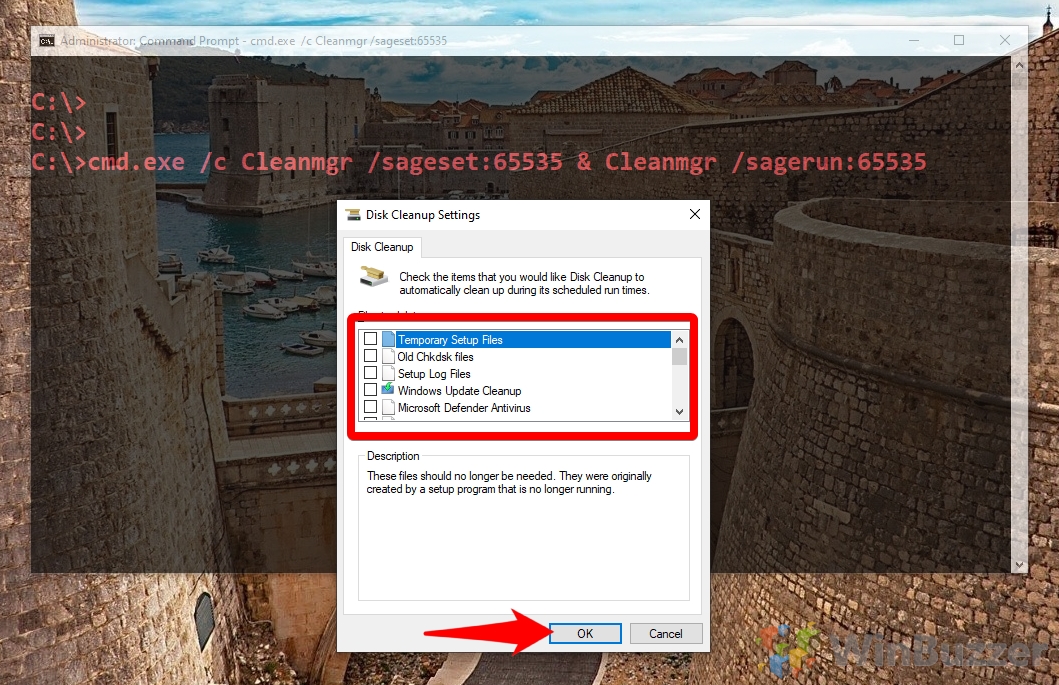
In the command window, type the following and press “Enter” on your keyboard.
cmd.exe /c Cleanmgr /sageset:65535 & Cleanmgr /sagerun:65535
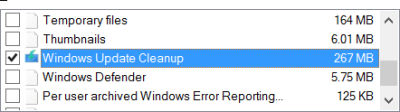
Windows 10 will then launch the Extended Disk Cleanup tool. Tick the files you’d like to remove, including “Windows Update Cleanup” if you want to delete WinSxS files. Wait for the process to complete, keeping Command Prompt open while it does so.


WinSxS folder is very big in size and takes up much space of your computer hard disk. Follow the steps in this tutorial to conduct the WinSxS folder cleanup on Windows 10/8/7 and reduce the size of WinSxS folder to save space for Windows 10/8/7. To better manage your computer hard drive, MiniTool partition manager is helpful to allow you resize/extend/shrink partition and more.
How to do a WinSxS folder cleanup on Windows 10/8/7 to reduce the size of WinSxS folder to save more disk space on computer?
What Is WinSxS?
WinSxS, short for Windows Side By Side, is a folder located at C:WindowsWinSxS in Windows 10/8/7. WinSxS folder stores different copies of DLL and system files, for instance, all installed Windows updates incl. those old versions of system components, files needed for Windows installation, backups and updates to those files. WinSxS folder also contains files of uninstalled, disabled Windows components.
Therefore, WinSxS folder general takes up several gigabytes of disk space and eats up more space each time you perform the Windows Update. If WinSxS folder becomes extremely large, your computer may run slower.
You can’t directly delete WinSxS folder to free up disk space because some of the WinSxS files are important for Windows to run and update.
However, you do have some feasible ways to perform the WinSxS folder cleanup on Windows 10/8/7 to reduce the size of WinSxS folder, so as to free up more disk space for your computer hard drive.
Check below how to clean up WinSxS folder on Windows 10/8/7 with Disk Cleanup tool and Command Prompt.
How to Do WinSxS Folder Cleanup Windows 10/8/7 with Disk Cleanup
You can use Windows built-in tool – Disk Cleanup – to safely clean up old Windows updates folders from WinSxS folder.
Step 1. You can click Start or the Search Box at the toolbar, and type disk cleanup. Select the best match result Disk Cleanup desktop app from the list to open Windows Disk Cleanup tool.
Step 2. Select the drive you want to clean up.
Step 3. Next click Clean up system files button, and tick Windows Update Cleanup option. Click OK to start to free up more disk space by cleaning up system files in WinSxS folder.
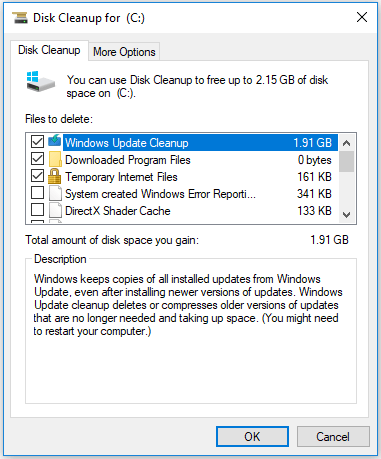
Tip: If you don’t see the Windows Update Cleanup option, it means there aren’t any WinSxS folder files that can be safely deleted.
How to Reduce the Size of WinSxS Folder on Windows 10/8/7 with DISM Command
You can also use Windows built-in command-line tool – DISM – to clean up and delete unneeded files in WinSxS folder to save disk space.
Step 1. You can click Start and type command prompt. Right-click Command Prompt and choose Run as administrator to open and run Windows Command Prompt as Administrator.
Step 2. Copy and paste this command line in Command Prompt window and hit Enter.
Dism.exe /online /Cleanup-Image /StartComponentCleanup
Step 3. After the DISM tool finishes analyzing the WinSxS folder, you can see the details of WinSxS folder components, along with a recommendation to clean up WinXSxS folder or not.
Step 4. Type the following command lines to perform WinSxS folder cleanup Windows 10/8/7.
Dism.exe /online /Cleanup-Image /StartComponentCleanup (this command will delete all previous versions of updated components)
DISM.exe /online /Cleanup-Image /SPSuperseded (this command helps remove files needed for uninstallation of service packs. It won’t uninstall any currently installed service packs)
DISM.exe /online /Cleanup-Image /StartComponentCleanup /ResetBase (this command removes all old versions of every component)
By using these two ways, you can clean WinSxS folder Windows 10/8/7 to reduce the size of WinSxS folder to save more disk space on your computer.
If you want to free up more disk space on your Windows 10/8/7 computer, you can use the Space Analyzer function of MiniTool Partition Wizard.
MiniTool Partition Wizard is a 100% clean and free partition manager compatible with Windows 10/8/7. You can use this free tool to analyze disk space and delete unnecessary large files and folders to release more free space.
You can also use this software to resize/extend/shrink partition in Windows 10/8/7 without data loss. It also allows you to merge/split/create/delete/copy/format/wipe partition, convert/check/copy/wipe disk and more.
Download MiniTool Partition Wizard on Windows 10/8/7 PC and follow the steps below to analyze disk space and deleted unnecessary large files.
Step 1. Launch MiniTool Partition Wizard and click Space Analyzer function in the toolbar.
Step 2. Select a drive or partition and click Scan button to analyze the disk space usage.
Step 3. Browse from the scan result to check all files in computer hard disk. You can right-click certain files or folders to choose Delete (to Recycle Bin) or Delete (Permanently) to delete those unneeded large files to free up more space.
You can choose to view the files and folders in computer by Tree View, File View, Folder View. You can also click Size column to view the files and folders with an ascending or descending order in size to quickly which files or folders occupy the most space of your computer hard disk.

The End
By using the two ways in this post, hope you can now clean up WinSxS folder on Windows 10/8/7 to reduce the size of WinSxS folder to save space on Windows 10/8/7. MiniTool Partition Wizard also helps you better manage your computer hard disk space with its Space Analyzer function.

on
March 11, 2016, 2:47 PM PST
How to clean up Windows 10’s WinSxS folder using the StartComponentCleanup task
Task Scheduler offers a preconfigured task that may help you clean out additional files from the WinSxS folder. This walk-through shows you how it works.

In last week’s article, How to clean up system files with the Windows 10 Disk Cleanup tool, I told you about the WinSxS folder and how it can accumulate a lot of extraneous files. I then showed you how to enable and use the Cleanup System Files feature in the Disk Cleanup tool to remove unnecessary files from the WinSxS folder as well as from other locations on your hard disk.
In measuring the success of Disk Cleanup’s work with the WinSxS folder, I mentioned that the Clean Up System Files feature removes only those files in the WinSxS folder that it determines are no longer needed by the system. As a result, you may find that a lot of files have been removed from your system–or that very few files have been removed from your system. It all depends on how many files Windows deems are necessary.
In this article, I’ll show you another method you can use to take a whack at the WinSxS folder.
Warning!
Before I get started, I need to provide you with a warning. After the last article was published, I received a couple of emails from readers asking why you can’t just open the WinSxS folder and delete everything in sight. That may sound like a good idea, but it’s not. I should have included this warning in the first article.
The purpose of the WinSxS folder is to store all the files that the operating system may need to keep functioning stably during and after various update procedures. If you were to delete everything in the WinSxS folder, Windows would become severely unstable and could even be damaged so badly the system might not boot. And even if the system were able to boot, it would be impossible to update. So it’s best to stick with the prescribed methods of cleaning up the WinSxS folder.
The Task Scheduler method
By default, Windows comes with a preconfigured task in Task Scheduler called StartComponentCleanup. While Task Scheduler will automatically run the StartComponentCleanup task on a regular basis, you can also run it manually at any time. Let’s take a closer look.
The easiest way to launch Task Scheduler is to access the Run command by pressing [Windows]+R and typing taskschd.msc in the Open box, as shown in Figure A. To continue, click OK.
Figure A

Use the Run command to launch Task Scheduler.
Once Task Scheduler launches, expand the console tree on the left and navigate to Task Scheduler LibraryMicrosoftWindowsServicing. Then, select StartComponentCleanup, as shown in Figure B.
Figure B

The StartComponentCleanup task runs on a regular basis.
Unfortunately, even though the StartComponentCleanup task runs on a regular basis, you really can’t find out much about how and why it runs or even when it will run next. As you can see, the Triggers column is blank, as is the Next Run Time column. You’ll also notice that the History option is disabled. All you can see for sure are the date and time in the Last Run Time column.
In most cases, the Last Run Result shows “The operation completed successfully. (0x0).” However, as you can see on this example system, the Last Run Result is the code 0x800F080A, which is cryptic to say the least. As far as I’ve been able to determine, it translates to “session object updated, must recreate session.” So I assume that indicates a failure.
To manually launch the StartComponentCleanup task, right click it and select Run from the context menu. The Status column will then read Running. When the StartComponentCleanup task runs, it analyzes the contents of the WinSxS folder and looks for files that are identified as being safe to remove and that have been in the folder for at least 30 days after the updated component has been installed.
Keep in mind that running the StartComponentCleanup task will take a long time–and there isn’t a gauge, like the one in Disk Cleanup, to keep you informed of the progress of the operation. Also note that when you run the StartComponentCleanup task manually, it’s configured to automatically stop the task if it runs longer than one hour.
What’s your take?
Have you used the StartComponentCleanup task in Windows 10? If so, what kind of disk space savings did you encounter? Share your advice and experiences with fellow TechRepublic members.
Also read…
- Microsoft updates Office 365 with six new Excel functions
- How to use Windows 10’s System Restore as a recovery tool
- From DOS to the golden age of Windows: The classic operating systems you can run in the browser (pictures)
- How to access Safe Mode in Windows 10
-
Microsoft
-
Software
-
Yes, as Linux scripts cannot integrate any updates, including the Enablement Packs that turn 2004 into 21H1.
Base build for 2004, 2009 and 21H1 is always 19041.1.
-

Should I tick «Run component cleanup (Windows converter only)» before I download the script? I remember back in the day there was a bug with cleanup and wouldn’t let you update to next monthly updates getting an error see here, lmao that error is PTSD not gonna lie.
Stop hovering to collapse…
Click to collapse…
Hover to expand…
Click to expand…
-
You can use it to get a smaller ISO, with fresh installs it never gave me an error afterwards, as i explained in my next reply to you back then, it had to do with badly created IP patches and online cleanups.
If you don’t care for the file size advantages you don’t have to run cleanup.
You can also edit the convertconfig.ini file manually, after extracting the zip and before running the download cmd, when needed.
Stop hovering to collapse…
Click to collapse…
Hover to expand…
Click to expand…
-
How do I solve this error??
==== ERROR ====
UPP Edition file is not found in specified directoryPress 0 to exit
-
What editions (SKUs) did you select at uup dump and what is the content of the UUPs folder?
Open commandprompt in the UUPs folder and run:
and copy the content of the window and paste it here, in code tags.
Stop hovering to collapse…
Click to collapse…
Hover to expand…
Click to expand…
-
I took the Windows 10 21H1 (19043.1110) Swedish version Professional,
I also choose the Conversion Option:
Include Updates
Run comp cleanup
Integrate .NET Framwork
Use solid (ESD) compressionHere’s the tree /a /f:
Windows4BFFC:.
| aria2_download.log
| convert-UUP.cmd
| ConvertConfig.ini
| create_virtual_editions.cmd
| multi_arch_iso.cmd
| ReadMe.html
| uup_download_linux.sh
| uup_download_macos.sh
| uup_download_windows.cmd
|
+—bin
| | 7z.dll
| | 7z.exe
| | bcdedit.exe
| | bfi.exe
| | bootmui.txt
| | bootwim.txt
| | cabarc.exe
| | cdimage.exe
| | imagex.exe
| | libwim-15.dll
| | offlinereg.exe
| | offreg.dll
| | PSFExtractor.exe
| | PSFExtractor.exe.config
| | SxSExpand.exe
| | Updates.bat
| | wimlib-imagex.exe
| |
| —bin64
| libwim-15.dll
| wimlib-imagex.exe
|
+—files
| 7zr.exe
| aria2c.exe
| aria2_script.7745.txt
| convert.sh
| convert_config_linux
| convert_config_macos
| convert_ve_plugin
| uup-converter-wimlib.7z
|
—UUPs
.README
microsoft-onecore-applicationmodel-sync-desktop-fod-package-amd64.cab
microsoft-onecore-directx-database-fod-package-amd64.cab
microsoft-windows-client-desktop-required-package.esd
microsoft-windows-client-desktop-required-wow64-package.esd
microsoft-windows-client-features-package.esd
microsoft-windows-client-features-wow64-package.esd
microsoft-windows-client-languagepack-package_sv-se-amd64-sv-se.esd
microsoft-windows-editionpack-professional-package.esd
microsoft-windows-editionpack-professional-wow64-package.esd
microsoft-windows-editionspecific-professional-package.esd
microsoft-windows-editionspecific-professional-wow64-package.esd
microsoft-windows-foundation-package.esd
microsoft-windows-hello-face-migration-package-amd64.cab
microsoft-windows-hello-face-package-amd64.cab
microsoft-windows-internetexplorer-optional-package-amd64.cab
microsoft-windows-languagefeatures-basic-sv-se-package-amd64.cab
microsoft-windows-languagefeatures-handwriting-sv-se-package-amd64.cab
microsoft-windows-languagefeatures-ocr-sv-se-package-amd64.cab
microsoft-windows-languagefeatures-texttospeech-sv-se-package-amd64.cab
microsoft-windows-mediaplayer-package-amd64.cab
microsoft-windows-mspaint-fod-package-amd64.cab
microsoft-windows-not-supported-on-ltsb-package.esd
microsoft-windows-not-supported-on-ltsb-wow64-package.esd
microsoft-windows-notepad-fod-package-amd64.cab
microsoft-windows-powershell-ise-fod-package-amd64.cab
microsoft-windows-printing-pmcppc-fod-package-amd64.cab
microsoft-windows-printing-wfs-fod-package-amd64.cab
microsoft-windows-quickassist-package-amd64.cab
microsoft-windows-regulatedpackages-package.esd
microsoft-windows-regulatedpackages-wow64-package.esd
microsoft-windows-required-shellexperiences-desktop-package.esd
microsoft-windows-required-shellexperiences-desktop-wow64-package.esd
microsoft-windows-stepsrecorder-package-amd64.cab
microsoft-windows-tabletpcmath-package-amd64.cab
microsoft-windows-userexperience-desktop-package-amd64.cab
microsoft-windows-wordpad-fod-package-amd64.cab
microsoft.modernapps.client.all.esd
microsoft.modernapps.client.professional.esd
microsoft.modernapps.clientn.all.esd
openssh-client-package-amd64.cab
professional_sv-se.esd
ssu-19041.1081-x64.cab
windows10.0-kb5000736-x64.cab
windows10.0-kb5000983-x64.cab
windows10.0-kb5001679-x64.cab
windows10.0-kb5003716-x64.cab
windows10.0-kb5004237-x64.cab -
This is the list of files, as far as i checked your list is the same, i’ve included the sha1 info too (when you know how to verify your files using this i would advise to do that):
b1af31e9e200a098c58040d6ab1290f9c95daaca *microsoft.modernapps.client.all.esd
8dbeedad51e23fcf0554be34b8052d31213013b2 *microsoft.modernapps.client.professional.esd
167d941895015c7539c524f3f33b177e1314f1aa *microsoft.modernapps.clientn.all.esd
daa92c0d936815001434f156ae784471db39072d *microsoft-onecore-applicationmodel-sync-desktop-fod-package-amd64.cab
017ec2cf810d3a560c72fb9a71c204753f013a33 *microsoft-onecore-directx-database-fod-package-amd64.cab
69de5428eb421f04e17e9ace9d7faa1b10c6ab5c *microsoft-windows-client-desktop-required-package.esd
57f34d5f5523f044d759081e1c3b3486ad9037ff *microsoft-windows-client-desktop-required-wow64-package.esd
24296d84be7c75c0e080b165849fcfc4c3f2a18d *microsoft-windows-client-features-package.esd
421c7e9f5d41a022fa492dac1c9693018ba0dde8 *microsoft-windows-client-features-wow64-package.esd
bc3b88dcc2793a80b0a76b633b30b5f008ae72bd *microsoft-windows-client-languagepack-package_sv-se-amd64-sv-se.esd
f83212e4b76d67cbdcea90aa50a5ef872fc2dbe0 *microsoft-windows-editionpack-professional-package.esd
c1ee9426a6a6cdc9330cf10c950d5a79c3f800cc *microsoft-windows-editionpack-professional-wow64-package.esd
0809047e677ec4df2cc198c5c413fed27d868d0b *microsoft-windows-editionspecific-professional-package.esd
b6d54fd84980d1dae8c3e3562ce1378647830f18 *microsoft-windows-editionspecific-professional-wow64-package.esd
7876ed369953ae059421d081ff7fade971c9adea *microsoft-windows-foundation-package.esd
a6d01b854f74069b5fecaebb908242e29b66a6d3 *microsoft-windows-hello-face-migration-package-amd64.cab
14ae581f1523a57254d28e22e3341b9734b68296 *microsoft-windows-hello-face-package-amd64.cab
3a44e27ac7fa422e2e2b4e1b28478d4def16dd3b *microsoft-windows-internetexplorer-optional-package-amd64.cab
344598e4bdc2a46385a752b065881f442fa60d72 *microsoft-windows-languagefeatures-basic-sv-se-package-amd64.cab
586f67d9aad14bd4a650261e3b4dbfd39d2da30e *microsoft-windows-languagefeatures-handwriting-sv-se-package-amd64.cab
a9b72ac30a17d1a7091a258ed836d099f90be813 *microsoft-windows-languagefeatures-ocr-sv-se-package-amd64.cab
d9c394939dd1cb85a05075728cc4e9c73dab5168 *microsoft-windows-languagefeatures-texttospeech-sv-se-package-amd64.cab
e1706f9da81ccc9ac4e60a0d2e5dcd5cabc8dc01 *microsoft-windows-mediaplayer-package-amd64.cab
785ad6583ff7f898cc62fd41755d9930452b3527 *microsoft-windows-mspaint-fod-package-amd64.cab
281d2fa7d9f4cb0d38a3965b2f02f6c7f30a02c8 *microsoft-windows-notepad-fod-package-amd64.cab
4b829feaedb77f661e24338670f2c4c7305eb601 *microsoft-windows-not-supported-on-ltsb-package.esd
30b871f75c42d655395c86f0e2cb6b9b6f5cd82d *microsoft-windows-not-supported-on-ltsb-wow64-package.esd
8da96965121b9ea5177e7cab5c774dfd191253b6 *microsoft-windows-powershell-ise-fod-package-amd64.cab
f08e5cdee24d16712d3147251993e3489b490b4d *microsoft-windows-printing-pmcppc-fod-package-amd64.cab
7d1db7d400bb29988edfd3fdf368e1de89006414 *microsoft-windows-printing-wfs-fod-package-amd64.cab
3c2ffb0dee2611ff62c0325c4bac799e12d0cd02 *microsoft-windows-quickassist-package-amd64.cab
593aef7ab812e66e53a72758685c26ce71128242 *microsoft-windows-regulatedpackages-package.esd
07671c0a26f2b9fe84d0752250c2a2765f8070cf *microsoft-windows-regulatedpackages-wow64-package.esd
42358493ad676134a8d5c6dafbb6396320fd6e59 *microsoft-windows-required-shellexperiences-desktop-package.esd
7308afe87c382f95d453305be52b701f687216d5 *microsoft-windows-required-shellexperiences-desktop-wow64-package.esd
079b54fee7e9e0efe2f8aeb376d3bba888c1eb97 *microsoft-windows-stepsrecorder-package-amd64.cab
107597c5c01c271d194e1286331b4c64d48ff764 *microsoft-windows-tabletpcmath-package-amd64.cab
3ea6c17ac9df2b71ff65fd7010e3d4f784a93c79 *microsoft-windows-userexperience-desktop-package-amd64.cab
73f98a7e66a487309d0c8e699ca7761d060acc79 *microsoft-windows-wordpad-fod-package-amd64.cab
2854d6b285898ea72e6d7aaf2b3d1ebbc7f1f078 *openssh-client-package-amd64.cab
a320fa2fb0a54a47431c8ed0d2a09bd659762c6f *professional_sv-se.esd
9da848c2cef8952d28dfcf1891fa1a685a624a4b *ssu-19041.1081-x64.cab
2468f0824ff7363a3bc1debc592096ae4c2394fd *windows10.0-kb5000736-x64.cab
1652e61bb134adeb190a119aa738486e4ac9b462 *windows10.0-kb5000983-x64.cab
6773983c33c19f68c8874e49d90034800a1e938c *windows10.0-kb5001679-x64.cab
7d6b23db6559449bac5deccb09cc00b06c39e7f1 *windows10.0-kb5003716-x64.cab
8e5821a3e31b2c08152772311d7abebbfaf991be *windows10.0-kb5004237-x64.cab
My conversion ran fine (no options selected for speeding up testing).
Can you re-run convert-UUP.cmd?
Stop hovering to collapse…
Click to collapse…
Hover to expand…
Click to expand…
-
for 21H2: it seems that the latest UUPdump.net menu listed the arm64 builds twice and skipped over the amd64 build:

any suggestions?
-
Stop hovering to collapse…
Click to collapse…
Hover to expand…
Click to expand…
-
Enthousiast.
Has latest build 19043.1165 still issues with the SKU? Because until 1151 I needed to exchange the SSU 19043.1151 with SSU 19043.1081. If not do, I still got errors. -
-
Enthousiast
Downloaded without any error. If I exchange ssu-19041.1161-x64 with ssu-19041.1081-x64, I don´t get any error. Since 19043.1141 I get this errors!
============================================================
Running UUP -> ISO v67
============================================================

============================================================
Checking UUP Info . . .
============================================================

============================================================
Configured Options . . .
============================================================

AutoStart 1
AddUpdates 1
Cleanup
NetFx3
StartVirtual

============================================================
Preparing Reference ESDs . . .
============================================================

CAB->ESD: microsoft-onecore-applicationmodel-sync-desktop-fod-package-amd64
CAB->ESD: microsoft-onecore-directx-database-fod-package-amd64
CAB->ESD: microsoft-windows-hello-face-migration-package-amd64
CAB->ESD: microsoft-windows-hello-face-package-amd64
CAB->ESD: microsoft-windows-internetexplorer-optional-package-amd64
CAB->ESD: microsoft-windows-languagefeatures-basic-de-de-package-amd64
CAB->ESD: microsoft-windows-languagefeatures-handwriting-de-de-package-amd64
CAB->ESD: microsoft-windows-languagefeatures-ocr-de-de-package-amd64
CAB->ESD: microsoft-windows-languagefeatures-speech-de-de-package-amd64
CAB->ESD: microsoft-windows-languagefeatures-texttospeech-de-de-package-amd64
CAB->ESD: microsoft-windows-mediaplayer-package-amd64
CAB->ESD: microsoft-windows-mspaint-fod-package-amd64
CAB->ESD: microsoft-windows-notepad-fod-package-amd64
CAB->ESD: microsoft-windows-powershell-ise-fod-package-amd64
CAB->ESD: microsoft-windows-printing-pmcppc-fod-package-amd64
CAB->ESD: microsoft-windows-printing-wfs-fod-package-amd64
CAB->ESD: microsoft-windows-quickassist-package-amd64
CAB->ESD: microsoft-windows-stepsrecorder-package-amd64
CAB->ESD: microsoft-windows-tabletpcmath-package-amd64
CAB->ESD: microsoft-windows-userexperience-desktop-package-amd64
CAB->ESD: microsoft-windows-wordpad-fod-package-amd64
CAB->ESD: openssh-client-package-amd64

============================================================
Creating Setup Media Layout . . .
============================================================


============================================================
Creating install.wim . . .
============================================================

Using LZX compression with 8 threads
Archiving file data: 7254 MiB of 7254 MiB (100%) done
Using LZX compression with 8 threads
Archiving file data: 201 MiB of 201 MiB (100%) done
Using LZX compression with 8 threads
Archiving file data: 249 MiB of 249 MiB (100%) done
Using LZX compression with 8 threads
Archiving file data: 227 MiB of 227 MiB (100%) done

============================================================
Updating install.wim / 4 image(s) . . .
============================================================

1/6: ssu-19041.1161-x64.cab [SSU]
2/6: windows10.0-kb5000736-x64.cab [Enablement]
3/6: windows10.0-kb5000983-x64.cab [WinPE]
4/6: windows10.0-kb5001679-x64.cab
5/6: windows10.0-kb5004313-x64.cab [Setup DU]
6/6: windows10.0-kb5005033-x64.cab [LCU]

Deployment Image Servicing and Management tool
Version: 10.0.14393.4169

Mounting image
[==========================100.0%==========================]
The operation completed successfully.

Deployment Image Servicing and Management tool
Version: 10.0.14393.4169

Image Version: 10.0.19041.1

Processing 1 of 1 - Adding package Package_for_ServicingStack~31bf3856ad364e35~amd64~~19041.1161.1.1
[==========================100.0%==========================]
The operation completed successfully.

Deployment Image Servicing and Management tool
Version: 10.0.14393.4169

Image Version: 10.0.19041.1


Error: 87

The add-package option is unknown.
For more information, refer to the help by running DISM.exe /?.

The DISM log file can be found at C:WindowsLogsDISMDismUpdt.log

Deployment Image Servicing and Management tool
Version: 10.0.14393.4169

Image File : C:UsersAdministratorDocuments19043.1165_amd64_de-de_multi_08b7d0f9_convert_virtualISOFOLDERsourcesinstall.wim
Image Index : 1
Unmounting image
[==========================100.0%==========================]
The operation completed successfully.

Deployment Image Servicing and Management tool
Version: 10.0.14393.4169


Error: 2

Unable to access the image.
Make sure that the image path and the Windows directory for the image exist and you have Read permissions on the folder.

The DISM log file can be found at C:WindowsLogsDISMDismNetFx3.log

Deployment Image Servicing and Management tool
Version: 10.0.14393.4169


Error: 2

Unable to access the image.
Make sure that the image path and the Windows directory for the image exist and you have Read permissions on the folder.

The DISM log file can be found at C:WindowsLogsDISMDismNetFx3.log

Deployment Image Servicing and Management tool
Version: 10.0.14393.4169


Error: 50

The request is not supported.

The DISM log file can be found at C:WindowsLogsDISMdism.log

Deployment Image Servicing and Management tool
Version: 10.0.14393.4169


Error: 50

The request is not supported.

The DISM log file can be found at C:WindowsLogsDISMdism.log

Deployment Image Servicing and Management tool
Version: 10.0.14393.4169

Mounting image
[==========================100.0%==========================]
The operation completed successfully.

Deployment Image Servicing and Management tool
Version: 10.0.14393.4169

Image Version: 10.0.19041.1

Processing 1 of 1 - Adding package Package_for_ServicingStack~31bf3856ad364e35~amd64~~19041.1161.1.1
[==========================100.0%==========================]
The operation completed successfully.

Deployment Image Servicing and Management tool
Version: 10.0.14393.4169

Image Version: 10.0.19041.1


Error: 87

The add-package option is unknown.
For more information, refer to the help by running DISM.exe /?.

The DISM log file can be found at C:WindowsLogsDISMDismUpdt.log

Deployment Image Servicing and Management tool
Version: 10.0.14393.4169

Image File : C:UsersAdministratorDocuments19043.1165_amd64_de-de_multi_08b7d0f9_convert_virtualISOFOLDERsourcesinstall.wim
Image Index : 2
Unmounting image
[==========================100.0%==========================]
The operation completed successfully.

Deployment Image Servicing and Management tool
Version: 10.0.14393.4169


Error: 2

Unable to access the image.
Make sure that the image path and the Windows directory for the image exist and you have Read permissions on the folder.

The DISM log file can be found at C:WindowsLogsDISMDismNetFx3.log

Deployment Image Servicing and Management tool
Version: 10.0.14393.4169


Error: 2

Unable to access the image.
Make sure that the image path and the Windows directory for the image exist and you have Read permissions on the folder.

The DISM log file can be found at C:WindowsLogsDISMDismNetFx3.log

Deployment Image Servicing and Management tool
Version: 10.0.14393.4169


Error: 50

The request is not supported.

The DISM log file can be found at C:WindowsLogsDISMdism.log

Deployment Image Servicing and Management tool
Version: 10.0.14393.4169


Error: 50

The request is not supported.

The DISM log file can be found at C:WindowsLogsDISMdism.log

Deployment Image Servicing and Management tool
Version: 10.0.14393.4169

Mounting image
[==========================100.0%==========================]
The operation completed successfully.

Deployment Image Servicing and Management tool
Version: 10.0.14393.4169

Image Version: 10.0.19041.1

Starting to update components...
Starting to install product key...
Finished installing product key.

Adding package Microsoft-Windows-ProfessionalEdition~31bf3856ad364e35~amd64~~10.0.19041.1
Removing package Microsoft-Windows-CoreEdition~31bf3856ad364e35~amd64~~10.0.19041.1
[==========================100.0%==========================]

Finished updating components.

Starting to apply edition-specific settings...
Finished applying edition-specific settings.

The operation completed successfully.

Deployment Image Servicing and Management tool
Version: 10.0.14393.4169

Saving image
[==========================100.0%==========================]
Unmounting image
[==========================100.0%==========================]
The operation completed successfully.

Deployment Image Servicing and Management tool
Version: 10.0.14393.4169

Mounting image
[==========================100.0%==========================]
The operation completed successfully.

Deployment Image Servicing and Management tool
Version: 10.0.14393.4169

Image Version: 10.0.19041.1

Starting to update components...
Starting to install product key...
Finished installing product key.

Adding package Microsoft-Windows-ProfessionalNEdition~31bf3856ad364e35~amd64~~10.0.19041.1
Removing package Microsoft-Windows-CoreNEdition~31bf3856ad364e35~amd64~~10.0.19041.1
[==========================100.0%==========================]

Finished updating components.

Starting to apply edition-specific settings...
Finished applying edition-specific settings.

The operation completed successfully.

Deployment Image Servicing and Management tool
Version: 10.0.14393.4169

Saving image
[==========================100.0%==========================]
Unmounting image
[==========================100.0%==========================]
The operation completed successfully.

"ISOFOLDERsourcesinstall.wim" original size: 3298006 KiB
Using LZX compression with 8 threads
Archiving file data: 7765 MiB of 7765 MiB (100%) done
"ISOFOLDERsourcesinstall.wim" optimized size: 3127074 KiB
Space saved: 170931 KiB

============================================================
Adding setup dynamic update(s) . . .
============================================================

windows10.0-kb5004313-x64.cab

============================================================
Creating winre.wim . . .
============================================================

Using LZX compression with 8 threads
Archiving file data: 1004 MiB of 1004 MiB (100%) done

============================================================
Updating winre.wim / 1 image(s) . . .
============================================================


Deployment Image Servicing and Management tool
Version: 10.0.14393.4169

Mounting image
[==========================100.0%==========================]
The operation completed successfully.

Deployment Image Servicing and Management tool
Version: 10.0.14393.4169

Image Version: 10.0.19041.1

Processing 1 of 1 - Adding package Package_for_ServicingStack~31bf3856ad364e35~amd64~~19041.1161.1.1
[==========================100.0%==========================]
The operation completed successfully.

Deployment Image Servicing and Management tool
Version: 10.0.14393.4169

Image Version: 10.0.19041.1


Error: 87

The add-package option is unknown.
For more information, refer to the help by running DISM.exe /?.

The DISM log file can be found at C:WindowsLogsDISMDismWinPE.log

Deployment Image Servicing and Management tool
Version: 10.0.14393.4169

Image File : C:UsersAdministratorDocuments19043.1165_amd64_de-de_multi_08b7d0f9_convert_virtualtempwinre.wim
Image Index : 1
Unmounting image
[==========================100.0%==========================]
The operation completed successfully.

Deployment Image Servicing and Management tool
Version: 10.0.14393.4169


Error: 50

The request is not supported.

The DISM log file can be found at C:WindowsLogsDISMdism.log

Deployment Image Servicing and Management tool
Version: 10.0.14393.4169


Error: 50

The request is not supported.

The DISM log file can be found at C:WindowsLogsDISMdism.log

"tempwinre.wim" original size: 388242 KiB
Using LZX compression with 8 threads
Archiving file data: 1004 MiB of 1004 MiB (100%) done
"tempwinre.wim" optimized size: 388242 KiB
Space saved: 0 KiB

============================================================
Adding winre.wim to install.wim . . .
============================================================


============================================================
Creating boot.wim . . .
============================================================


============================================================
Checking Distribution Info . . .
============================================================

============================================================
Configured Virtual Options . . .
============================================================

AutoStart
AutoEditions: CoreSingleLanguage,ProfessionalWorkstation,ProfessionalEducation,Education,Enterprise,ServerRdsh,ProfessionalWorkstationN,ProfessionalEducationN,EducationN,EnterpriseN

============================================================
Copying install.wim . . .
============================================================

============================================================
Creating Edition: Enterprise
============================================================


Setting the WINDOWS/EDITIONID property of image 5 to "Enterprise".
Setting the FLAGS property of image 5 to "Enterprise".
Setting the DISPLAYNAME property of image 5 to "Windows 10 Enterprise".
Setting the DISPLAYDESCRIPTION property of image 5 to "Windows 10 Enterprise".

============================================================
Creating Edition: Education
============================================================


Setting the WINDOWS/EDITIONID property of image 6 to "Education".
Setting the FLAGS property of image 6 to "Education".
Setting the DISPLAYNAME property of image 6 to "Windows 10 Education".
Setting the DISPLAYDESCRIPTION property of image 6 to "Windows 10 Education".

============================================================
Creating Edition: Pro Education
============================================================


Setting the WINDOWS/EDITIONID property of image 7 to "ProfessionalEducation".
Setting the FLAGS property of image 7 to "ProfessionalEducation".
Setting the DISPLAYNAME property of image 7 to "Windows 10 Pro Education".
Setting the DISPLAYDESCRIPTION property of image 7 to "Windows 10 Pro Education".

============================================================
Creating Edition: Pro for Workstations
============================================================


Setting the WINDOWS/EDITIONID property of image 8 to "ProfessionalWorkstation".
Setting the FLAGS property of image 8 to "ProfessionalWorkstation".
Setting the DISPLAYNAME property of image 8 to "Windows 10 Pro for Workstations".
Setting the DISPLAYDESCRIPTION property of image 8 to "Windows 10 Pro for Workstations".

============================================================
Creating Edition: Enterprise N
============================================================


Setting the WINDOWS/EDITIONID property of image 9 to "EnterpriseN".
Setting the FLAGS property of image 9 to "EnterpriseN".
Setting the DISPLAYNAME property of image 9 to "Windows 10 Enterprise N".
Setting the DISPLAYDESCRIPTION property of image 9 to "Windows 10 Enterprise N".

============================================================
Creating Edition: Education N
============================================================


Setting the WINDOWS/EDITIONID property of image 10 to "EducationN".
Setting the FLAGS property of image 10 to "EducationN".
Setting the DISPLAYNAME property of image 10 to "Windows 10 Education N".
Setting the DISPLAYDESCRIPTION property of image 10 to "Windows 10 Education N".

============================================================
Creating Edition: Pro Education N
============================================================


Setting the WINDOWS/EDITIONID property of image 11 to "ProfessionalEducationN".
Setting the FLAGS property of image 11 to "ProfessionalEducationN".
Setting the DISPLAYNAME property of image 11 to "Windows 10 Pro Education N".
Setting the DISPLAYDESCRIPTION property of image 11 to "Windows 10 Pro Education N".

============================================================
Creating Edition: Pro N for Workstations
============================================================


Setting the WINDOWS/EDITIONID property of image 12 to "ProfessionalWorkstationN".
Setting the FLAGS property of image 12 to "ProfessionalWorkstationN".
Setting the DISPLAYNAME property of image 12 to "Windows 10 Pro N for Workstations".
Setting the DISPLAYDESCRIPTION property of image 12 to "Windows 10 Pro N for Workstations".

============================================================
Creating Edition: Home Single Language
============================================================


Setting the WINDOWS/EDITIONID property of image 13 to "CoreSingleLanguage".
Setting the FLAGS property of image 13 to "CoreSingleLanguage".
Setting the DISPLAYNAME property of image 13 to "Windows 10 Home Single Language".
Setting the DISPLAYDESCRIPTION property of image 13 to "Windows 10 Home Single Language".

============================================================
Creating Edition: Enterprise multi-session
============================================================


Setting the WINDOWS/EDITIONID property of image 14 to "ServerRdsh".
Setting the FLAGS property of image 14 to "ServerRdsh".
Setting the DISPLAYNAME property of image 14 to "Windows 10 Enterprise multi-session".
Setting the DISPLAYDESCRIPTION property of image 14 to "Windows 10 Enterprise multi-session".

============================================================
Rebuilding install.wim . . .
============================================================

"ISOFOLDERsourcesinstall.wim" original size: 3812458 KiB
Using LZX compression with 8 threads
Archiving file data: 8839 MiB of 8839 MiB (100%) done
"ISOFOLDERsourcesinstall.wim" optimized size: 3687434 KiB
Space saved: 125024 KiB

============================================================
Creating ISO . . .
============================================================

OSCDIMG 2.56 CD-ROM and DVD-ROM Premastering Utility
Copyright (C) Microsoft, 1993-2012. All rights reserved.
Licensed only for producing Microsoft authorized content.


Scanning source tree (500 files in 41 directories)
Scanning source tree complete (905 files in 86 directories)

Computing directory information complete

Image file is 4476600320 bytes (before optimization)

Writing 905 files in 86 directories to 19041.1.191206-1406.VB_RELEASE_CLIENTMULTI_X64FRE_DE-DE.ISO

100% complete

Storage optimization saved 24 files, 14194688 bytes (1% of image)

After optimization, image file is 4464463872 bytes
Space saved because of embedding, sparseness or optimization = 14194688

Done.


============================================================
Removing temporary files . . .
============================================================

Press 0 to exit.
-
I’m having the same issue I had with a Win10 build, the script is not integrating CUs to create a 22000.120 ISO, only 22000.1 is being created.
Nevermind, I think there was leftovers from a previous attempt, I started from scratch and now a 22000.120 iso was properly created.
-
I don´t have any issues to create Win 11 ISO. It is just with Windows 10 since 19043.1141.
-
-
when will uup dump be updated to use uup > iso v68?
-
-


Not many of you may know this, nor has this been blogged anywhere – yet; but Windows 11/10/8.1/8 lets you safely clean up the WinSxS folder. In fact, you can even automate WinSxS folder cleanup using the Task Scheduler. The WinSxS folder, which stands for ‘Windows Side By Side’, is a Windows native assembly cache with Libraries which are being by multiple applications being stored there. It is the location for storing Windows Component Store files.
Some common questions which Windows users asked were – Is there a way to clean up the WinSxS folder so as to reduce its size? Can I delete the WinSxS folder? Or move WinSxS folder to another drive. The short answer, as we had seen in the earlier post was: No.
In Windows 11/10/8.1/8, however, things have become easier. Windows will automatically reduce the size of the WinSxS. These methods include internal processes, such as uninstalling and deleting packages with components that have been replaced by other newer components. Previous versions are then kept for a period, after which they are automatically removed.
We saw that Windows 8.1 introduced a new command-line option for DISM.exe, /AnalyzeComponentStore. Running this command, will analyze the WinSxS folder and tell you whether a Component Store Cleanup is recommended or not.
Windows 11/10/8 offers a number of ways to cleanup of the WinSxS folder which includes the Windows Component Store. It may compress certain files, or it may delete some packages. Let us see how you can clean up the WinSxS folder in these latest versions of the Windows operating system. There are three ways how you can do it.
1] Using StartComponentCleanup
The StartComponentCleanup task was created in Windows 8 to regularly clean up components automatically when the system is not in use. This task is set to run automatically when triggered by the operating system. When run automatically, the task will wait at least 30 days after an updated component has been installed before uninstalling the previous versions of the component.
To run it, open Task Scheduler and navigate to the following task:
Task Scheduler LibraryMicrosoftWindowsServicingStartComponentCleanup

In the right pane, under Selected Items, you will see Run. Click on it to start the StartComponentCleanup task.
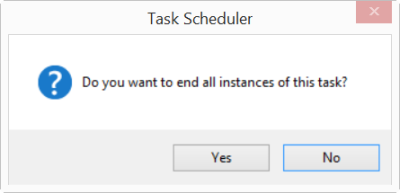
This will start a process called TiWorker.exe or Windows Modules Installer Worker. You will not see any confirmation dialog box that the process has been started, but you will be able to see it in the Task Manager – and feel a lot of hot air coming out of your laptop’s vent! By default, in Windows 10/8, if this task runs for more than 1 hour, it will terminate automatically. To end this process, you can click on End. You will, in this case, see Windows asking you for confirmation: Do you want to end all instances of this task. Click Yes.
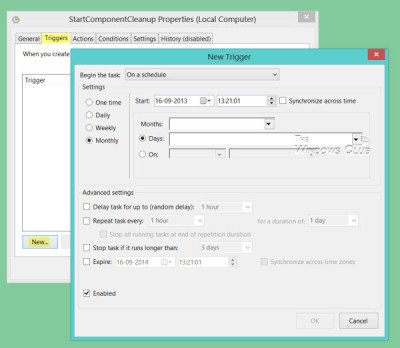
You may run it manually, or you may schedule it to run, say every month using the StartComponentCleanup command, to clean up and compress the components. You may automate the process by setting up a Trigger for the task to run using the Task Scheduler.
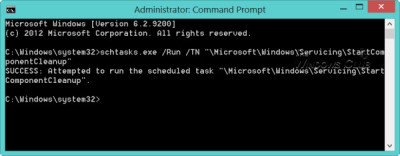
Alternatively, you can also run the StartComponentCleanup task using an elevated Command Prompt, using the following command:
schtasks.exe /Run /TN "MicrosoftWindowsServicingStartComponentCleanup"
If you are successful, you will see a SUCCESS message returned.
2] Using Deployment Image Servicing and Management
Using DISM you can configure and update Windows features, packages, drivers and so on. The /Cleanup-Image parameter of Dism.exe, will provide you with advanced options to reduce the size of the WinSxS folder, writes TechNet.
A) Using the /StartComponentCleanup parameter of Dism.exe on a running version of Windows 8.1 gives you similar results to running the StartComponentCleanup task in Task Scheduler.
Open an elevated command prompt, type the following and hit Enter:
Dism.exe /online /Cleanup-Image /StartComponentCleanup
B) If you use the /ResetBase switch with the /StartComponentCleanup parameter, you will be able to remove all superseded versions of every component in the component store.
From the elevated command prompt, type the following and hit Enter:
Dism.exe /online /Cleanup-Image /StartComponentCleanup /ResetBase
C) If you want to reduce the amount of space used by a Service Pack, use the /SPSuperseded parameter of Dism.exe on a running version of Windows 8.1 to remove any backup components needed for the uninstallation of the service pack.
From the elevated command prompt, type the following and hit Enter:
Dism.exe /online /Cleanup-Image /SPSuperseded
Do note that if you carry out this command, you will not be able to uninstall existing service packs and updates.
3] Disk Cleanup Tool
Home users should stick to using the Disk Cleanup Tool. Open the Disk Cleanup Utility and click on the Clean System Files button. You will see the option for Windows Update Cleanup. Check this option. This will help reduce the size of the component store.
Do note that deleting files from the WinSxS folder or deleting the entire WinSxS folder may damage your system and make it unbootable. You may not also be able to install, uninstall or update Windows components, so exercise utmost precautions. For regular Windows users, you may create a system restore point first and then try Method 1 or Method 3 mentioned above. Method 2 is for advanced users.
Windows 7 users too can now use the Windows Update Cleanup option in the Disk Cleanup tool.