TL;DR:
Q: Can Windows containers run on Linux?
A: No. They cannot.
Containers are using the underlying operating system resources and drivers, so Windows containers can run on Windows only, and Linux containers can run on Linux only.
Q: But what about Docker for Windows? Or other VM-based solutions?
A: Docker for Windows allows you to simulate running Linux containers on Windows, but under the hood a Linux VM is created, so still Linux containers are running on Linux, and Windows containers are running on Windows.
Bonus: Read this very nice article about running Linux docker containers on Windows.
Q: So, what should I do with a .NET Framework 462 application, if I would like to run in a container?
A: It depends. Consider the following recommendations:
-
If it is possible, move to .NET Core. Since .NET Core brings support to most major features of .NET Framework, and .NET Framework 4.8 will be the last version of .NET framework
-
If you cannot migrate to .NET Core — As @Sebastian mentioned — you can convert your libraries to .NET Standard, and have two versions of the application — one on .NET Framework 4.6.2, and one on .NET Core — it is not always obvious. Visual Studio supports it pretty well (with multi-targeting), but some dependencies can require extra care.
-
(Less recommended) In some cases, you can run Windows containers. Windows containers are becoming more and more mature, with better support in platforms like Kubernetes. But to be able to run .NET Framework code, you still need to run on base image of «Server Core», which occupies about 1.4 GB. In same rare cases, you can migrate your code to .NET Core, but still run on Windows Nano server, with an image size of 95 MB.
Leaving also the old updates for history
Update 2: 08.2018
If you are using Docker-for-Windows, you can run now both Windows and Linux containers simultaneously: Running Docker Windows and Linux Containers Simultaneously
Bonus: Not directly related to the question, but you can now run not only the Linux container itself, but also an orchestrator like Kubernetes: Kubernetes is Now Available In Docker Desktop Stable Channel
Updated at 2018:
Original answer in general is right, BUT several months ago, Docker added experimental feature LCOW (official GitHub repository).
From this post:
Doesn’t Docker for Windows already run Linux containers? That’s right.
Docker for Windows can run Linux or Windows containers, with support
for Linux containers via a Hyper-V Moby Linux VM (as of Docker for
Windows 17.10 this VM is based on LinuxKit).The setup for running Linux containers with LCOW is a lot simpler than
the previous architecture where a Hyper-V Linux VM runs a Linux Docker
daemon, along with all your containers. With LCOW, the Docker daemon
runs as a Windows process (same as when running Docker Windows
containers), and every time you start a Linux container Docker
launches a minimal Hyper-V hypervisor running a VM with a Linux
kernel, runc and the container processes running on top.Because there’s only one Docker daemon, and because that daemon now
runs on Windows, it will soon be possible to run Windows and Linux
Docker containers side-by-side, in the same networking namespace. This
will unlock a lot of exciting development and production scenarios for
Docker users on Windows.
Original:
As mentioned in comments by @PanagiotisKanavos, containers are not for virtualization, and they are using the resources of the host machine. As a result, for now a Windows container cannot run «as-is» on a Linux machine.
But — you can do it by using VM — as it works on Windows. You can install a Windows VM on your Linux host, which will allow to run Windows containers.
With it, IMHO running it this way in a production environment will not be the best idea.
Also, this answer provides more details.
Приветствую!
Возможно глупый вопрос, но всё же.
Есть машинка с Debian, на ней установлен Docker CE.
И мой вопрос — можно ли запустить в контейнере Docker Windows приложение (например я хочу попробовать www.passmark.com/products/pt.htm)
EN-форумы утверждают, что нет, но это было до выхода Docker for Windows.
Сейчас же на странице Docker висит красивая диаграмма, утверждающая, что можно запустить любое приложение на любой ОС, но видимо речь о собственных приложениях 
-
Вопрос заданболее трёх лет назад
-
7330 просмотров
ну читайте же внимательнее )
You can run Windows-based containers on Windows Server 2016 and Windows 10. Windows-based containers require a Windows kernel to run, in the same way that Linux-based containers require a Linux kernel to run. You can even run Windows-based containers on a Windows virtual machine running on an macOS or Linux host. Docker Machine is not necessary if you run macOS 10.10.3 Yosemite, Windows Server 2016, or Windows 10.
https://docs.docker.com/engine/faq/
Пригласить эксперта
Нет.
Докер — это не особо большая НАДСТРОЙКА над ядром Линукса.
Он просто удобным способом позволяет изолировать и запускать родные приложения Линукса.
Из неродных вариантов — разве только запуск Линуксовых приложений из под Докера ФриБСД или напротив запуск Фришных приложение из под Докера Линуха — так как эти операционные системы близки.
С Виндовс сие невозможно в принципе.
Тот Докер что устанавливается в Виндовс — тянет за собой полноценный Линукс. И только это делает возможным запуска Линукс приложений в Докере Виндовс.
Обратная процедура также нетривиальна.
Если вам нужен аналог Докера для запуска приложений Виндовс — обратитесь к технологии Windows Container.
-
Показать ещё
Загружается…
04 февр. 2023, в 21:37
4500 руб./за проект
04 февр. 2023, в 20:45
1000 руб./за проект
04 февр. 2023, в 20:04
35000 руб./за проект
Минуточку внимания
A Step-by-Step Guide to Containerizing a Windows Virtual Machine — with RDP Access — on a Linux Docker Platform with KVM Hypervisor
Background
Recently, I was tasked with developing a PoC of a lab environment where students can access their pre-installed and pre-configured machines — Linux and Windows — to do necessary training exercises. I wanted to make the access to all machines uniform over HTTP/HTTPS (browser-based). While the web-based access to machines can easily be implemented using a platform like Guacamole, the greater challenge was how to deploy the machines in a way that utilizes system resources — particularly, CPU, RAM, and HDD — efficiently and with speed. It became evident by that point that technology like Docker containerization is the best way to go. However, that presented other challenges.
Each of Windows and Linux machines have their own containerization requirements — as will be discussed in the next section. Natively, one cannot run Linux and Windows containers simultaneously on the same Docker daemon. After some research, the solution that presented itself as the most viable was to install each Windows machine as a virtual machine inside a single Linux container. From the perspective of the Docker daemon, all containers are Linux-based. However, some of those containers run a hypervisor, and on top of which there is a Windows VM. Even though a container with a VM in it takes more disk space than other containers, the efficiency in saving disk space when we have many containerized VMs is still high compared to running un-containerized VMs.
Ultimately, I wanted to access a containerized Windows machine using RDP, and enjoy the full remote desktop access to that machine. Unfortunately, there are not satisfactory detailed tutorials and complete walkthroughs that explain the entire procedure easily and clearly. And I had to face many small challenges along the way. During my research, I have also seen many people — on various technical forums — struggling with such an implementation and expressing their frustration! I hope that this document serves as a complete guide to solving that problem.
Why Containerizing a VM: Our Use Case
You might be asking yourself why would someone want to install a VM inside a Container? It looks strange at first since the Container layer seems unnecessary and one can simply install the VM directly on the base OS. However, there are different reasons why this can be a solution and a necessary requirement.
Our particular use case involves spinning up multiple identical Windows VMs to be used by different users. Had we wanted a single VM only, then, there would not be any need to containerize it. But since we want to create many identical VMs, we will save tremendous resources (HDD, RAM, and CPU) by containerizing those VMs.
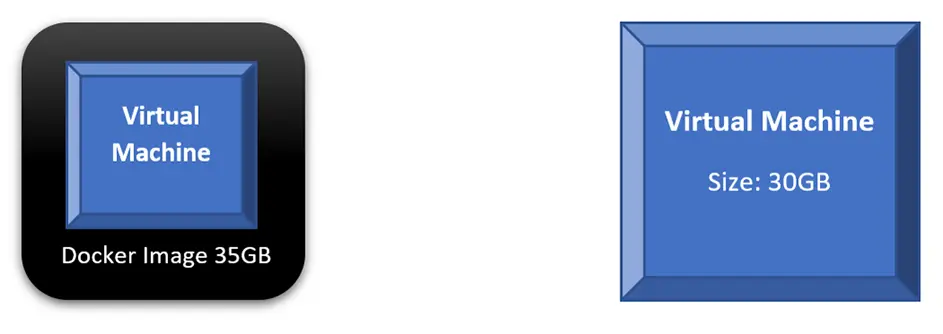
If we compare the scenario where we run a single VM directly on our base OS to a scenario of containerizing that VM, we will find out that both will consume similar disk space and other resources. In fact, every time we want to run the containerized VM, we will do two steps: run the container and then power on the VM. The following diagram shows those two scenarios; a direct VM occupies 30GB on the HDD, while the Docker Image occupies 35GB. Not much benefit — in terms of saving system resources — is achieved here.
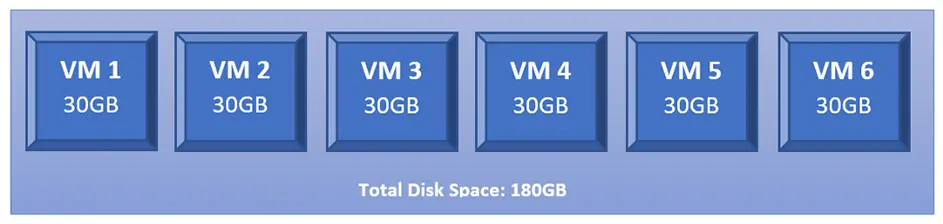
However, what happens if we want to run 6 copies of our intended VMs? We will have to create 6 copies of that VM where each occupies the same disk space as the original one. Thus, if the original VM is 30GB, having 6 copies will occupy 180GB on the HDD.
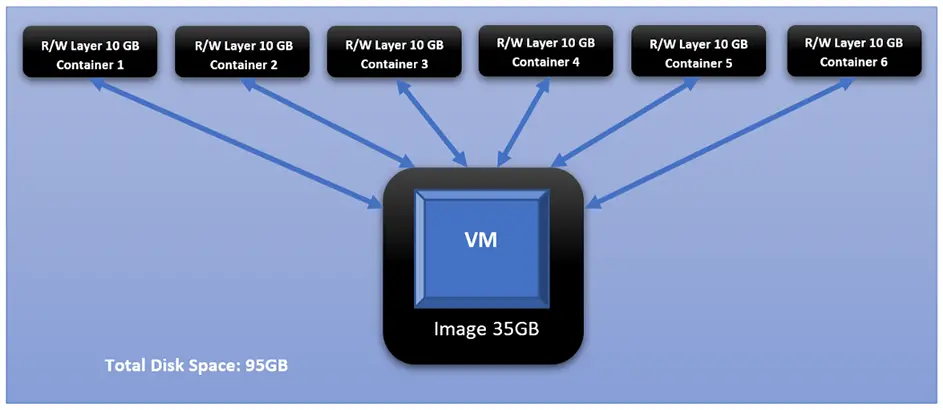
This changes dramatically when we containerize each of those identical VMs. This is the added value of Docker containerization technology. And it owes its value to how Docker differentiates between two main concepts: images and containers. Images are read-only and form the base of containers. Containers created from the same Image share the same read-only core (i.e., the image), while each container adds its own read-write layer that interacts with the read-only image. For more discussion on the difference between Images and Containers, please check this document: <click here>
If we take the 35GB Docker Image, in our example, and creates 6 Containers from it, each Container will create its own read-write layer through which will access the read-only image. At the time of creation, that R/W layer has 0 size; however, as the user starts interacting with the Container — doing things like powering on the VM — that layer’s size starts increasing. And if we assume that all dynamic changes in a single layer have accumulated size of 10GB, that means all 6 containers have added a total of 60BG on top of the original 35GB of the image.
Challenges
Challenge 1 Windows containers on Windows platform, and Linux containers on Linux platform
One of the biggest obstacles you face with Docker, and containerization in general, is that you cannot have Linux and Windows containers running simultaneously on the same platform (i.e., same Docker daemon). The reason for this is that Docker is an OS-Level Virtualization; meaning, its main function is to contain and isolate applications as they run on an Operating System. The Docker daemon provides each container with any necessary kernel-level properties so that the containerized application can run. Because of that, containers running Linux services/applications need to run on a Linux platform, and containers running Windows services/applications need to run on a Windows platform.
The Windows Docker Desktop has the feature of providing a Linux Subsystem; and in this case, running a Linux container can ultimately run on Windows. However, we should note that if this feature is enabled, only Linux containers can run while Windows containers cannot. One has to switch off this feature to run Windows containers; and in this scenario, Linux containers cannot run. It is still not possible to run both Linux and Windows containers simultaneously on the same platform.
If one needs to have Linux and Windows containers running simultaneously and communicating with others, a possible solution is to have each group run on their respective platform, then, configure the network routing, NAT, and port-forwarding rules.
Challenge 2 Windows Docker containers cannot be accessed through RDP or VNC, i.e., no graphical desktop
Even if we decided to have two separate platforms — Windows platform for Windows containers, and Linux platform for Linux containers — with appropriate network configuration, we will face the challenge that Windows containers cannot have a desktop environment. This is a fact for all Windows containers. They are designed and built to run services and applications, and they can be accessed using PowerShell/CMD command-line interface.
Unlike the Linux system where the Desktop environment is an installable service, Windows Desktop comes bundled directly with the OS as shipped by Microsoft. And when it comes to Windows-based containers, Microsoft has published certain images (known as base images) which form the base of any Windows container. Those base images do not come up with a Desktop service, and one does not have the luxury to install it later as an add-on.
For more information about Windows containers/images, <Click Here>
Architecture Overview
Our ultimate goal here is to have a fully running Windows OS, accessible through RDP, and containerized and managed by Docker daemon. And to achieve that, we will have the following:
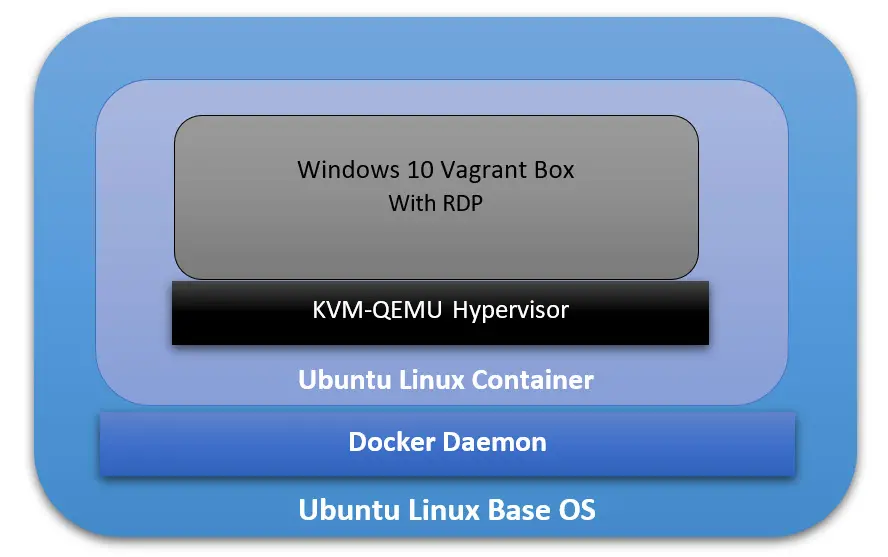
- The Base Operating System: it will be the main platform hosting everything else. In our particular example, it will be an Ubuntu 18.04 Linux machine.
- The Docker Daemon: this is the containerization platform installed on the Base OS. Through Docker, we will create our final “image” out of which we will spawn many containers.
- A Docker Image with an Operating System: This OS will be part of every created container, and its main function is to run a hypervisor on which the Windows VM will be running. In our case here, we will use the Ubuntu:18.04 Docker Image (available on Docker Hub).
- A Hypervisor on the Docker Image: Inside the Ubuntu Docker Image, we will also have a Hypervisor that will allow us to install the Windows VM later. In our particular case, we will use the KVM-QEMU hypervisor.
- The Windows Virtual Machine: this is the machine we are going to access at the end through RDP. In our example, we will use a pre-packaged Windows 10 Vagrant Box available at (https://app.vagrantup.com/peru/boxes/windows-10-enterprise-x64-eval)
Installing Docker on the Main Platform
The first thing we need to do is to install Docker into our main Operating System. For the sake of this tutorial, our main system is Ubuntu 20.04 (Linux Kernel 5.4.0–40-generic) with 70GB HDD, 4GB RAM, and 2 CPU Cores.
Follow the following steps to install Docker:
[1] Update the apt package index and install packages to allow apt to use a repository over HTTPS:
sudo apt-get update

sudo apt-get install apt-transport-https ca-certificates curl gnupg-agent software-properties-common
[2] Add Docker’s official GPG key:
curl -fSSL https://download.docker.com/linux/ubuntu/gpg | sudo apt-key add

sudo apt-key fingerprint 0EBFCD88
[3] Set up the stable Docker’s repository:
sudo add-apt-repository "deb [arch=amd64] https://download.docker.com/linux/ubuntu $(lsb_release -cs) stable"sudo apt updateNote: This is an important step after adding the new repository in Step 3.
[5] Install the latest version of Docker Engine:
sudo apt install docker-ce -yNote: You don’t need to install docker-ce-cli or containerd.io packages since they are installed directly with the docker-ce package.
[6] Start Docker now and configure it to automatically start after a reboot:
sudo systemctl start docker

sudo systemctl enable docker
Building the Right Docker Image
Now that Docker is installed, we can start building the image that will be the base for our Container on which we will have the VM. The first section below explains how to build this image manually without using a Dockerfile. Then, in the second section, I will explain how to automate building the image using a Dockerfile.
However, before building the image, we need to check if our system supports virtualization. Since our Container will run a hypervisor, it will not work unless the main platform supports virtualization. Otherwise, we will face an error later on when trying to install the VM. We can run the following command:
sudo egrep -c '(vmx|svm)' /proc/cpuinfoIf the output is a number greater than 0, then, you are good to proceed further. Otherwise, you need to make sure virtualization (VT-x) is enabled in the BIOS settings. If your main platform is itself a virtual machine, make sure VT-x is enabled through the virtualization software.
- Enable VT-x in VMWare Workstation
- Enable VT-x in Virtualbox
Building the Image without a Dockerfile
[1] Pull the core Docker image ubuntu:18.04:
sudo docker pull ubuntu:18.04Note: to verify that the image has been added successfully, issue the following command:
sudo docker image ls
[2] Run a Container (with the name ubuntukvm) from the Image ubuntu:18:04 with some privileged parameters:
sudo docker run --privileged -it --name ubuntukvm --device=/dev/kvm --device=/dev/net/tun -v /sys/fs/cgroup:/sys/fs/cgroup:rw --cap-add=NET_ADMIN --cap-add=SYS_ADMIN ubuntu:18.04 /bin/bashSince we will install a hypervisor (QEMU-KVM) in this container, we need to run it with certain parameters as follows:
— device=/dev/kvm will map the device /dev/kvm in the main OS inside the Container.
— device=/dev/net/tun will map the device /dev/net/tun in the main OS inside the Container.
—v /sys/fs/cgroup:/sys/fs/cgroup:rw will map the directory /sys/fs/cgroup in the main OS inside the Container, and the Container will have read-write permissions on that directory.
— cap-add=NET_ADMIN will add network admin capabilities to the Container.
— cap-add=SYS_ADMIN will add system admin capabilities to the Container.
Once the command runs successfully, you should be inside the Container with a shell prompt:
root@<container_id>:/#[3] Inside the Container, update the apt package index:
root@<container_id>:/# apt-get update -y[4] Inside the Container, install the hypervisor package QEMU-KVM and Libvirt:
root@<container_id>:/# apt-get install -y qemu-kvm libvirt-daemon-system libvirt-devYou don’t have to install libvirt-clients and bridge-utils as they would already be installed along with libvirt-daemon-sys.
The libvirt-dev is an important package specially to run Vagrant Boxes on.
[5] Change group ownership of /dev/kvm:
root@<container_id>:/# chown root:kvm /dev/kvmNote: the device /dev/kvm must be owned by the group kvm, and any user who needs to run VMs needs to be part of the kvm group.
[6] Start the Libvirt services:
root@<container_id>:/# service libvirtd start

root@<container_id>:/# service virtlogd start
[7] Install the Linux Image package which contains any necessary Kernel modules:
root@<container_id>:/# apt-get install -y linux-image-$(uname -r)Note: this is an important step. There are certain modules (e.g., ip_tables and ip6_tables) that are needed at a later stage; and if they are missing, an error message would be generated.
[8] Install the curl package (it is used to download the Vagrant application):
root@<container_id>:/# apt-get install curl -y[9] Install the net-tools package (it provides ipconfig utility):
root@<container_id>:/# apt-get install net-tools -y[10] Download and run the latest version Vagrant application:
root@<container_id>:/# apt-get install jq -y

root@<container_id>:/# vagrant_latest_version=$(curl -s https://checkpoint-api.hashicorp.com/v1/check/vagrant  | jq -r -M '.current_version')

root@<container_id>:/# echo $vagrant_latest_version

root@<container_id>:/# curl -O https://releases.hashicorp.com/vagrant/$(echo $vagrant_latest_version)/vagrant_$(echo $vagrant_latest_version)_x86_64.deb

root@<container_id>:/# dpkg -i vagrant_$(echo $vagrant_latest_version)_x86_64.deb
Note 1: The above commands perform the following actions:
— Install the JSON Query parser tool, jq, which will be used in the next command.
— Get the Vagrant latest version value and store it in the environment variable vagrant_latest_version.
— Download the latest version of Vagrant package.
— Install the downloaded Vagrant package.
Note 2: It is very important and critical that you download and install Vagrant in this method. Do NOT get it from the Ubuntu repository (or any other Linux repositories, like Red Hat’s) using the command apt-get install vagrant. The reason for this is that the WinRM library is not shipped with Vagrant packages provided by Linux distribution and is shipped natively with the official package. WinRM library is needed to run Windows Vagrant boxes.
[11] Install the Vagrant Libvirt plugin:
root@<container_id>:/# vagrant plugin install vagrant-libvirt[12] Download and install Windows10 Vagrant box:
root@<container_id>:/# mkdir /win10

root@<container_id>:/# cd /win10

root@<container_id>:/win10# vagrant init peru/windows-10-enterprise-x64-eval

root@<container_id>:/win10# VAGRANT_DEFAULT_PROVIDER=libvirt vagrant up
the vagrant init command will download a Vagrantfile which contains the instructions fof building the Vagrant box.
the vagrant up command will build the box. Please note that this command takes some time. The particular Vagrant box we are downloading here (peru/windows-10-enterprise-x64-eval) has a size of 5.62 GB.
once the above command finishes execution, type the following command which will attempt to access the box over RDP. Even though it will fail (since there is no RDP client installed in the Container), we will get the IP address of the Vagrant box:
root@< container_id >:/win10# vagrant rdp==> default: Detecting RDP info…
 default: Address: 192.168.121.68:3389
 default: Username: vagrant
==> default: Vagrant will now launch your RDP client with the connection parameters
==> default: above. If the connection fails, verify that the information above is
==> default: correct. Additionally, make sure the RDP server is configured and
==> default: running in the guest machine (it is disabled by default on Windows).
==> default: Also, verify that the firewall is open to allow RDP connections.
An appropriate RDP client was not found. Vagrant requires either
`xfreerdp` or `rdesktop` in order to connect via RDP to the Vagrant
environment. Please ensure one of these applications is installed and
available on the path and try again.
[13] Set up iptables port forwarding rules:
If you want to access the RDP port on the Vagrant box from out the Container, this is an important step. By default, the Vagrant application configures firewall rules to allow access only from within the Container to the Vagrant box and vice versa. Machines outside the Container do not have any access to the Vagrant box. We would like to set up the rules in such a way to allow our main OS (Ubuntu) to access the Vagrant box on RDP. The following diagram logically illustrates this:

Add the following rules to NAT/Port Forward connections from the main OS to the container on port 3389 to be forwarded to the Vagrant Box on port 3389:
root@<container_id>:/# iptables -A FORWARD -i eth0 -o virbr1 -p tcp --syn --dport 3389 -m conntrack --ctstate NEW -j ACCEPT

root@<container_id>:/# iptables -A FORWARD -i eth0 -o virbr1 -m conntrack --ctstate ESTABLISHED,RELATED -j ACCEPT

root@<container_id>:/# iptables -A FORWARD -i virbr1 -o eth0 -m conntrack --ctstate ESTABLISHED,RELATED -j ACCEPT

root@<container_id>:/# iptables -t nat -A PREROUTING -i eth0 -p tcp --dport 3389 -j DNAT --to-destination 192.168.121.68

root@<container_id>:/# iptables -t nat -A POSTROUTING -o virbr1 -p tcp --dport 3389 -d 192.168.121.68 -j SNAT --to-source 192.168.121.1
After that, we should remove the rules that reject all traffic to/from virb1 interface; these rules take precedent over our newly inserted rules:
root@<container_id>:/# iptables -D FORWARD -o virbr1 -j REJECT --reject-with icmp-port-unreachable

root@<container_id>:/# iptables -D FORWARD -i virbr1 -j REJECT --reject-with icmp-port-unreachable

root@<container_id>:/# iptables -D FORWARD -o virbr0 -j REJECT --reject-with icmp-port-unreachable

root@<container_id>:/# iptables -D FORWARD -i virbr0 -j REJECT --reject-with icmp-port-unreachable
if you mess up the iptables, or if the communication is problematic later, you may want to clear up all tables and then add the rules (mentioned above) on a clean slate. To clear the iptables, issue the following:
root@<container_id>:/# sudo iptables-save > $HOME/firewall.txt

root@<container_id>:/# sudo iptables -X

root@<container_id>:/# sudo iptables -t nat -F

root@<container_id>:/# sudo iptables -t nat -X

root@<container_id>:/# sudo iptables -t mangle -F

root@<container_id>:/# sudo iptables -t mangle -X

root@<container_id>:/# sudo iptables -P INPUT ACCEPT

root@<container_id>:/# sudo iptables -P FORWARD ACCEPT

root@<container_id>:/# sudo iptables -P OUTPUT ACCEPT
[14] Commit all Changes to Create a New Image:
Up to this point, we have a fully running Container with the desired Windows VM. However, we cannot transfer or store that Container. In addition, we cannot create multiple copies of this Container without going through all the steps we have done so far. For this reason, we need to commit the changes to a new Docker Image. The Image can be transferred or stored. Multiple Containers can be created — instantiated — almost immediately.
To commit the changes to a new Image, we need first to exit the Container:
root@<container_id>:/win10# exit

$ sudo docker ps -a
Take note of the Container ID; and then, issue the following command:
$ sudo docker commit <container_id> ubuntukvmNote 1: You can substitute the name “ubuntukvm” with any name you like. This will be the name of the new Image.
Building the Image Using a Dockerfile
Instead of building the Image in a manual way — as shown in the previous section, we can automate the whole process using a Dockerfile.
[1] Prepare the Dockerfile:
In a new directory, create a Dockerfile (with the name Dockerfile), and write the following commands in it. Mostly, they are the same commands we have executed individually in the previous section:
[2] Prepare a Startup Shell Script (startup.sh):
This file will be copied to the Image and will run automatically every time you instantiate a Container from that Image. The script will assign certain permissions and startup the necessary services. In addition, it will create the iptables rules that will port forward RDP traffic.
[3] Build the Container from the Docker file:
sudo chmod +x startup.sh

sudo docker build -t ubuntukvm:latest -f Dockerfile .
[4] Instantiate a Container and Run it:
sudo docker run --privileged -it --name kvmcontainer1 --device=/dev/kvm --device=/dev/net/tun -v /sys/fs/cgroup:/sys/fs/cgroup:rw --cap-add=NET_ADMIN --cap-add=SYS_ADMIN ubuntukvm bashTesting the RDP Access
By now, we should be able to access the RDP service on the Windows Vagrant box by connecting to the IP address of the Docker container. To test that port 3389/tcp (RDP) is reachable from the main OS, we will use a simple Nmap command.
First, if you are inside the Docker container, press Ctrl+p+q to put the Container in the background while running; this should return you to the main OS terminal prompt:
root@<container_id>:/win10# <Ctrl+p+q>

$ sudo nmap -Pn -p 3389 172.17.0.2
Next, we need to install an RDP client for Linux. A popular one is RDesktop:
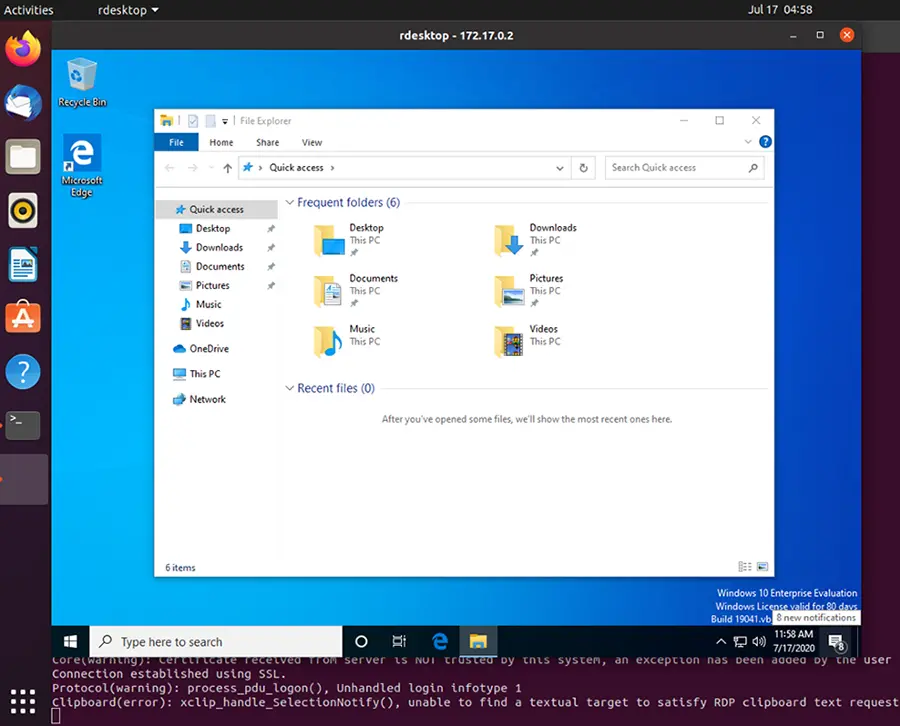
sudo apt-get install rdesktopFinally, we can access the Windows VM:
sudo rdesktop 172.17.0.2The Windows Vagrant box that we have installed has two built-in accounts:
- Username: vagrant Password: vagrant
- Username: Administrator Password: vagrant
Conclusion
I hope this post has been a comprehensive guide to containerize a virtual machine. There are different advantages of running a VM in a Container; one of them is running multiple Containers simultaneously. You can automatically build the desired image using a Dockerfile, or you can build it manually by running each command individually. We have covered both ways in this post.
Нет, вы не можете запускать контейнеры Windows непосредственно в Linux. Но вы можете запустить Linux в Windows. Вы можете переключаться между контейнерами ОС Linux и Windows, щелкнув правой кнопкой мыши на докере в меню на панели задач. Контейнеры используют ядро ОС.
Могу ли я запустить Windows в контейнере Docker?
Компания Docker демон предоставляет каждому контейнеру все необходимые свойства уровня ядра, чтобы контейнерное приложение могло работать. … Рабочий стол Windows Docker поддерживает подсистему Linux; и в этом случае запущенный контейнер Linux может в конечном итоге работать в Windows.
Могу ли я запустить Windows 10 в Docker?
Docker работает на разных платформах и поддерживает выполнение на узле Windows, включая Windows 10 (Pro или Enterprise). Это делает Windows 10 идеальной средой разработки для сценариев использования Docker. Вдобавок к этому Windows также является единственной платформой, по крайней мере на данный момент, которая может запускать контейнеры на базе Windows и Linux.
Контейнеры работают в Linux?
Ты могу бегать и то и другое Linux и программы и исполняемые файлы Windows в Docker контейнеры. Платформа Docker изначально работает на Linux (на x86-64, ARM и многих других архитектурах ЦП) и в Windows (x86-64). Docker Inc. создает продукты, которые позволяют создавать и запускать контейнеры on Linux, Windows и macOS.
Что такое Kubernetes vs Docker?
Принципиальное различие между Kubernetes и Docker заключается в том, что Kubernetes предназначен для работы в кластере, в то время как Docker работает на одном узле.. Kubernetes более обширен, чем Docker Swarm, и предназначен для эффективной координации масштабных кластеров узлов в производственной среде.
Докер лучше Windows или Linux?
С технической точки зрения там нет реальной разницы между использованием Docker в Windows и Linux. Вы можете добиться того же с помощью Docker на обеих платформах. Не думаю, что можно сказать, что Windows или Linux «лучше» для размещения Docker.
Могут ли контейнеры Docker иметь другую ОС?
Нет. Докер использует контейнеризацию как основная технология, основанная на концепции совместного использования ядра между контейнерами. Если один образ Docker основан на ядре Windows, а другой — на ядре Linux, вы не сможете запустить эти два образа в одной ОС.
Требуется ли Hyper-V для Docker?
README для пользователей Docker Toolbox и Docker Machine: Microsoft Hyper-V требуется для запуска Docker Desktop. Установщик Docker Desktop для Windows при необходимости включает Hyper-V и перезагружает компьютер.
Докер лучше ВМ?
Хотя Docker и виртуальные машины имеют свои преимущества перед аппаратными устройствами, Docker — более эффективный из двух с точки зрения использования ресурсов.. Если бы две организации были полностью идентичны и использовали одно и то же оборудование, то компания, использующая Docker, могла бы поддерживать больше приложений.
Как узнать, работает ли Docker в Linux?
Независимый от операционной системы способ проверить, работает ли Docker, — это спросить Docker, используя команду docker info. Вы также можете использовать служебные программы операционной системы, такие как sudo systemctl is-active docker или sudo status docker или sudo service docker status, или проверить состояние службы с помощью утилит Windows.
Как контейнеры работают в Linux?
Контейнеры Linux работать изначально в операционной системе, разделяя его между всеми вашими контейнерами, чтобы ваши приложения и сервисы оставались легкими и быстро работали параллельно. Контейнеры Linux — это еще один эволюционный скачок в том, как мы разрабатываем, развертываем и управляем приложениями.
Как использовать контейнеры в Linux?
Как начать использовать контейнеры в Linux
- Установите LXC: sudo apt-get install lxc.
- Создайте контейнер: sudo lxc-create -t fedora -n fed-01.
- Перечислите свои контейнеры: sudo lxc-ls.
- Запустите контейнер: sudo lxc-start -d -n fed-01.
- Получите консоль для своего контейнера: sudo lxc-console -n fed-01.
Содержание
- Docker Desktop WSL 2 backend
- Prerequisites
- Best practices
- Download
- Install
- Develop with Docker and WSL 2
- GPU support
- Feedback
- Linux machine with docker deploy windows container
- 1 Answer 1
- Update 2019
- In theory (original answer Oct 2015):
- Actually. (update Dec. 2016)
- Можно ли размещать контейнеры Windows в linux?
- 6 ответов:
- Preview: Linux Containers on Windows
- Running Docker Linux Containers on Windows with LinuxKit
- Setup Docker and LinuxKit
- Try it
- Looking ahead
- Mixing Windows and Linux containers with Docker Compose
- Setting up your environment
- Source Code
- Docker-Compose
- 3 comments
Docker Desktop WSL 2 backend
Estimated reading time: 8 minutes
Update to the Docker Desktop terms
Windows Subsystem for Linux (WSL) 2 introduces a significant architectural change as it is a full Linux kernel built by Microsoft, allowing Linux containers to run natively without emulation. With Docker Desktop running on WSL 2, users can leverage Linux workspaces and avoid having to maintain both Linux and Windows build scripts. In addition, WSL 2 provides improvements to file system sharing, boot time, and allows access to some cool new features for Docker Desktop users.
Docker Desktop uses the dynamic memory allocation feature in WSL 2 to greatly improve the resource consumption. This means, Docker Desktop only uses the required amount of CPU and memory resources it needs, while enabling CPU and memory-intensive tasks such as building a container to run much faster.
Additionally, with WSL 2, the time required to start a Docker daemon after a cold start is significantly faster. It takes less than 10 seconds to start the Docker daemon when compared to almost a minute in the previous version of Docker Desktop.
Prerequisites
Before you install the Docker Desktop WSL 2 backend, you must complete the following steps:
Best practices
Download
Install
Ensure you have completed the steps described in the Prerequisites section before installing the Docker Desktop Stable 2.3.0.2 release.
From the Docker menu, select Settings > General.

Select the Use WSL 2 based engine check box.
If you have installed Docker Desktop on a system that supports WSL 2, this option will be enabled by default.
Ensure the distribution runs in WSL 2 mode. WSL can run distributions in both v1 or v2 mode.
To check the WSL mode, run:
To upgrade your existing Linux distro to v2, run:
To set v2 as the default version for future installations, run:
When Docker Desktop restarts, go to Settings > Resources > WSL Integration.
Optionally, select any additional distributions you would like to enable the Docker-WSL integration on.
The Docker-WSL integration components running in your distro depend on glibc. This can cause issues when running musl-based distros such as Alpine Linux. Alpine users can use the alpine-pkg-glibc package to deploy glibc alongside musl to run the integration.

Develop with Docker and WSL 2
The following section describes how to start developing your applications using Docker and WSL 2. We recommend that you have your code in your default Linux distribution for the best development experience using Docker and WSL 2. After you have enabled WSL 2 on Docker Desktop, you can start working with your code inside the Linux distro and ideally with your IDE still in Windows. This workflow can be pretty straightforward if you are using VSCode.
Now, you can start working in VSCode remotely. To do this, open your terminal and type:
This opens a new VSCode connected remotely to your default Linux distro which you can check in the bottom corner of the screen.
GPU support
Starting with Docker Desktop 3.1.0, Docker Desktop supports WSL 2 GPU Paravirtualization (GPU-PV) on NVIDIA GPUs. To enable WSL 2 GPU Paravirtualization, you need:
To validate that everything works as expected, run the following command to run a short benchmark on your GPU:
Feedback
Your feedback is very important to us. Please let us know your feedback by creating an issue in the Docker Desktop for Windows GitHub repository and adding the WSL 2 label.
Источник
Linux machine with docker deploy windows container
I have a Linux server with 16GB ram with docker host installed. I would like to deploy on it a Windows Server container. Is it possible? Anyone has just tried this solution?
1 Answer 1
Update 2019
Microsoft has improved the network options for containers and now allows multiple containers per pod with improved namespace.
In theory (original answer Oct 2015):
There is no «Windows container» running on a Linux host.
And a Linux container would not run directly on a Windows server, since it relies on system calls to a Linux kernel.
You certainly can run those Linux containers on any Windows machine through a VM.
That is what docker toolbox will install.
There will be support for docker on Windows soon, but that would be for Windows container, not Linux containers.
Update 2017: yes, LinuxKit allows to run a linux container through aa Hyper-V isolation wrapper on a Windows platform, through a minimal Linux OS built from linuxkit.
That is still the same idea: linux running inside a VM on Windows.
That is not a Linux server deployed on a Windows server: only deployed inside a Linux server running in a VM on Windows.
Actually. (update Dec. 2016)
Kubernetes 1.5 includes alpha support for both Windows Server Containers, a shared kernel model similar to Docker, and Hyper-V Containers, a single-kernel model that provides better isolation for multi-tenant environments (at the cost of greater latency).
The end result is the ability to create a single Kubernetes cluster that includes not just Linux nodes running Linux containers or Windows nodes running Windows containers, but both side by side, for a truly hybrid experience.
For example, a single service can have PODs using Windows Server Containers and other PODs using Linux containers.
Though it appears fully functional, there do appear to be some limitations in this early release, including:
Источник
Можно ли размещать контейнеры Windows в linux?
Я использую бета-версию от Докер для windows
Если нет, то почему windows может запускать контейнеры linux, а не и наоборот?
Как прошло некоторое время и этот вопрос популярный. Я хотел бы добавить здесь одно замечание, что обходной путь заключается в использовании нового netstandard. Это позволило мне упаковать 4.6.2 framework в новую библиотеку.
6 ответов:
бонус: не имеет прямого отношения к вопросу, но теперь вы можете запускать не только сам контейнер linux, но и оркестратор, такой как kubernetes: https://blog.docker.com/2018/07/kubernetes-is-now-available-in-docker-desktop-stable-channel/
Обновлено в 2018 году:
оригинальный ответ в целом правильный, но несколько месяцев назад, докер добавили экспериментальная функция LCOW (официальный репозиторий github).
Не Докер для Windows уже работает Linux контейнеры? Вот именно. Docker для Windows может запускать контейнеры Linux или Windows с поддержкой для контейнеров Linux через виртуальную машину Hyper-V Moby Linux (начиная с Docker для Windows 17.10 эта виртуальная машина основана на LinuxKit).
установка для запуска контейнеров Linux с LCOW намного проще, чем предыдущая архитектура где виртуальная машина Hyper-V Linux запускает Докер Linux демон, вместе со всеми вашими контейнерами. С lcow, демон Docker запускается как процесс Windows (то же самое как и при запуске Docker Windows контейнеры), и каждый раз, когда вы запускаете докер контейнера Linux запуск минимального гипервизора Hyper-V под управлением виртуальной машины с Linux ядра, рунк и контейнер процессов, запущенных на вершине.
потому что есть только один демон Docker, и потому что этот демон сейчас работает на Windows, it скоро можно будет запускать Windows и Linux Контейнеры Docker бок о бок, в том же сетевом пространстве имен. Этот будет разблокировать много захватывающие сценарии развития и производства для Пользователи Docker в Windows.
Оригинал:
Как уже упоминалось в комментариях @PanagiotisKanavos, контейнеры не предназначены для виртуализации, и они используют ресурсы главной машины. В результате на данный момент контейнер windows не может работать «как есть» на машине linux.
с ним, ИМХО запустить его таким образом на среде PROD не будет лучшей идеей.
и ответ предоставляет более подробную информацию.
нет, вы не можете запускать контейнеры windows непосредственно на Linux.
но Windows Server поставляется в комплекте с базовым образом ubuntu OS (после сентября 2016 бета-версии пакета обновления). Именно по этой причине вы можете запускать linux на windows, а не по-другому. Проверьте здесь. https://thenewstack.io/finally-linux-containers-really-will-run-windows-linuxkit/
вы можете переключаться между контейнерами ОС Linux и windows, щелкнув правой кнопкой мыши на ДОКере в меню лотка.


вы можете использовать VirtualBox, просто включите интерфейс Hyper-V внутри системы / ускорения / паравиртуализации.
после этого, если Docker не запускается из-за ошибки, используйте «переключиться на контейнеры Windows. «в настройках.
(Это может быть перемещено в качестве комментария к принятому ответьте, но у меня недостаточно репутации, чтобы сделать это)
в отличие от виртуализации, контейнеризация использует одну и ту же ОС хоста. Таким образом, контейнер, построенный на linux, не может быть запущен на windows и наоборот.
в windows вы должны воспользоваться помощью виртуализации (с помощью Hyper-v), чтобы иметь ту же ОС, что и ОС ваших контейнеров, а затем вы должны иметь возможность запускать то же самое.
Docker для windows-это аналогичное приложение, которое построено на Hyper-v и помогает в запуске контейнера Linux docker в windows. Но насколько я знаю, нет ничего такого что помогает запускать контейнеры windows на linux.
вы можете запустить MSSQL и DOTNET на Linux, и, следовательно, внутри контейнеров Linux, в настоящее время.
контейнеры Windows не работают на Linux, а также вы не можете запускать контейнеры Linux на Windows напрямую.
Источник
Preview: Linux Containers on Windows

Microsoft is getting ready for the next big update for Windows Server (check out today’s complimentary Microsoft blog post ) and some of the new features are very exciting for Docker users. One of the most important enhancements is that Docker can now run Linux containers on Windows (LCOW), using Hyper-V technology.
Running Docker Linux containers on Windows requires a minimal Linux kernel and userland to host the container processes. This is exactly what the LinuxKit toolkit was designed for: creating secure, lean and portable Linux subsystems that can provide Linux container functionality as a component of a container platform.
We’ve been busy prototyping LinuxKit support for Docker Linux containers on Windows and have a working preview for you to try. This is still a work in progress, and requires either the recently announced “Windows Server Insider” or Windows 10 Insider builds.
UPDATE: LCOW support is available in Windows 10 Fall Creators Update and in Windows Server 1709. The simplest way to try it out on Windows 10 is to install the edge variant of Docker for Windows (details). On Windows Server 1709, install EE preview.
Running Docker Linux Containers on Windows with LinuxKit
The instructions below have been tested on Windows 10 and Windows Server Insider builds 16278 and 16281.
Be sure to install Docker for Windows (Windows 10) or Docker Enterprise Edition (Windows Server Insider) before starting.
Setup Docker and LinuxKit
A preview build of LinuxKit is available by simply running the following commands in PowerShell (with Administrator rights):
Now get a master branch build of the Docker daemon that contains preview support for Linux containers on Windows:
Start a new Docker daemon listening on a separate pipe and using a separate storage location from the default install:
Try it
Run a Linux container:
Docker just launched a minimal VM running a LinuxKit instance hosting the Linux container!
Since this is an early preview there are some limitations, but basic Docker operations like pull and run work.
Looking ahead
Both Windows Server Insider builds and Docker support for Linux containers on Windows are in early preview mode. When GA, Docker Linux containers on Windows will improve the Docker Linux container experience for both Windows developers and server administrators. Developers will be able to more easily build and test mixed Windows/Linux Docker applications by running containers for both platforms side-by-side on the same system.
And IT-admins that prefer Windows will soon be able to easily run (mostly) Linux-only software like HAProxy and Redis on Windows systems by way of Docker Linux containers on Windows. For example, Docker Linux containers on Windows will make setting up Docker Enterprise Edition and Universal Control Plane (which relies on some Linux-only components) on Windows Server much simpler.
Источник
Mixing Windows and Linux containers with Docker Compose

Premier Developer Consultant Randy Patterson explores how to mix Windows and Linux containers with Docker Compose.
Running Linux containers on a Windows host has been available for awhile now. However, getting Windows and Linux containers to communicate without Docker Compose results in using the containers’ IP Addresses. This is not a good solution since container IP Addresses change often. A better solution is to take advantage of the Docker Compose networking and use the service name instead of the IP address. A Windows host has no problem running Linux containers but Docker Compose does not automatically support multi-platform hosts.
The platform configuration option was added to Docker Compose files starting with version 2.4 and then removed beginning with version 3.x. It is a know bug and the expectation is that the platform option will return soon. When this article was written, it has not yet appeared in version 3.x so we will continue to use file format version 2.4 for our Docker Compose yaml files.
Setting up your environment
Running Linux containers on Windows and platform support in Docker Compose requires Windows 1803 or greater. I am running Windows 10 1809.

In addition, you must be running the latest version of Docker for Windows and have the experimental features enabled.

If you are running different versions of Windows or Docker your mileage may vary.
Source Code
Next, grab the source code located in the GitHub repo here containing two solutions
The application is a simple web page that displays the hostname of the Web Tier then calls the API Tier to get and display the API hostname. When running in containers, the container Id is displayed. Your Id’s will be different

Docker-Compose
The docker-compose.yml file, located in the root of the solution, adds the platform: windows parameter to the webtier service and the platform: linux parameter to the apitier service.
Next, bring up the multi-container, multi-platform application using docker-compose. Start a powershell prompt in the solutions root folder, the same folder that contains the docker-compose.yml file. Type the command:
Docker Compose will create the images if they do not already exist, then create the virtual network to host the containers and finally start the containers in the correct order.

Finally, retrieve the host port of the webtier container

Use your browser to navigate to http://localhost:38736 (your port number will be different)

If the Windows Web Tier was able to communicate with the Linux API Tier, you will see the id for each of the containers (your id’s will be different) on the web page.
Using the platform option in your configuration files allows Docker Compose to mix Windows and Linux containers when hosted on a multi-platform host like Windows. Keep in mind that this is an experimental feature and is not yet ready for production environments.
Developer Support
App Dev Customer Success Account Manager, Microsoft Developer Support
Read next

Hi,
a very nice article.
I am using LCOW for several months and it works for integration tests ina mixed environment very well.But now I have a problem using microsoft/dotnet:2.2-aspnetcore-runtime(or …-alpine) for the linux images.
Building the docker image on linux with this base image and running it in anLCOW environment works in that way that the container starts and itsfunctions are available.
But if I want to stop the container it takes several minutes to stop thecontainer.
Do you have any idea why it takes so long?
Best regardsChristian
Thanks for the comment Christian. LCOW containers taking a long time to stop is a known issue that hasn’t been fixed yet. I don’t always experience it with ‘docker stop’ but I do with ‘docker-compose down’. Just be patient for now and don’t kill the process. ‘docker-compose down’ will also remove the network it created and if that gets interupted it can be difficult to fix.
Источник
So far, in this series, Nicolas has shown how to get simple container instances up and running with just some basic background information. Now we need to understand the differences between Linux containers, Windows Server containers and Hyper-V containers. We can then define, create and run multi-container Docker applications, and port existing Windows Container VMs to Docker.
- First Part – The basics: the basic principles of how container virtualization is implemented in Windows Server 2016 operating system.
- Second part – Up and Running: creating and managing Windows Server Containers using Docker.
- Third part – Into your Stride Working with Windows Containers and Docker
- Fourth part — Save the Container Data
In this article I’ll be explaining some of the differences between Windows containers and Docker. To allow us to do more with Windows Containers and Docker, I’ll need to explain a couple of new techniques such as using Docker-Compose to build a multi-container application, and using Image2Docker to port existing Windows application workloads from virtual machines to Docker images. I’ll then go on to explain and demonstrate Hyper-V Isolation because it affects whether you can run a Hyper-V container on Windows Server.
Linux Containers on Windows: Bridging the Gap
Before going further with this article, I must demonstrate that if I try to run a Linux Container on my Windows Container Host, the attempt will fail because the Windows and Linux kernels are fundamentally different. We can’t currently run Linux-based containers on a Windows container host:
|
PS > docker pull wordpress Using default tag: latest latest: Pulling from library/wordpress image operating system «linux» cannot be used on this platform |
This problem is being solved, and developers will soon be able to run Linux containers natively on Windows Server using the Hyper-V container isolation technology. Microsoft announced this fact during DockerCon 2017 conference, taking place in Austin, Texas. When this is released, it will remove the need for separate infrastructures and development tools for the two operating systems. At the same DockerCon event, The Docker team announced LinuxKit, a secure and portable Linux subsystem for the container movement. LinuxKit will provide the tooling that will allow us to build custom Linux subsystems that include just the components that are required by the runtime platform. The project to enable this new capability was officially launched at the event. Docker will be working with Microsoft to integrate the LinuxKit subsystem with Hyper-V isolation.
Docker-Compose
Although Docker provides us with a container platform that allows simple and fast deployment, the process of setting up a new environment can be time-consuming, especially if you have more than one service to deploy. Docker-Compose simplifies the installation process to a single deployment command. Docker-Compose is a tool that greatly reduces the time and effort required to define and run multi-container Docker applications. With Docker-Compose, you use a special docker-compose.yml file to configure your application’s services. Then, just by using a single command, you can use data in the file to create and start all the services from your configuration.
There are two steps to Using Docker-Compose:
- Define the services that make up your app in docker-compose.yml to be run together in an isolated environment
- Run docker-compose to run your entire app
You must install the Docker-Compose executable using this command:
|
PS > Invoke-WebRequest https://dl.bintray.com/docker-compose/master/docker-compose-Windows-x86_64.exe -UseBasicParsing -OutFile $env:ProgramFilesdockerdocker-compose.exe |
If you already have a Docker-Compose.yml file, then you just have to run the following:
|
PS > docker-compose -f docker-compose.yml up |
That’s it. Your App is deployed!
What’s happening here?
When I run the Docker-Compose command, Docker will build a Windows container from the Docker-Compose.yml file. Instead of using one or more dockerfile(s), here I can deploy, for example, an entire application based on a web server and a database. Below is an example of a Docker-Compose.yml file example, written in YAML:
|
1 2 3 4 5 6 7 8 9 10 11 12 13 14 15 16 17 18 19 20 |
version: ‘3’ services: db: image: microsoft/mssql-server-windows-express environment: sa_password: «Password» ports: — «1433:1433» web: image: getcmd/MyIIS environment: — «Data:DefaultConnection:ConnectionString=Server=db,1433;Database=MyIISWebSite;User Id=sa;Password=Password;MultipleActiveResultSets=True» depends_on: — «db» ports: — «5000:5000» networks: default: external: name: nat |
The “Services:” section will define two services: “db” and “web”. The “db” service is a Microsoft SQL Express image from Microsoft. This service includes some parameters:
- The password for the SA account is set to “Password1”
- Port 1433 on the host is mapped to the exposed port 1433 in the container
Next, the second service named “Web” is built from my custom repository and especially from my custom IIS image which contains a custom website. Then we use an environment variable which defines where the database is, and how to connect to it. Finally, port 5000 is mapped to the exposed port 5000 in the container. The two services are added to an existing network, named nat.
Docker Compose is a particularly good way of managing multi-containers that contain databases and web frontends.
Image2Docker
It is difficult to migrate apps out of Virtual Machines, especially distributed apps with multiple components. Image2Docker may be the simplest way of getting your older applications working on newer operating systems.
What is Image2Docker?
Image2Docker is a PowerShell module that ports existing Windows application workloads from virtual machines to Docker images. It supports multiple application types, but the initial focus is on IIS. You can use Image2Docker to extract ASP.NET websites from a VM, so you can then run them in a Docker container with no application changes. You will need Windows Server 2016 or Windows 10 in order to use Image2Docker.
How does it work?
Image2Docker first inspects the artifacts in a Windows Server 2003, 2008, 2012 or 2016 VM image – in WIM, VHD or VHDX format. It then extracts either an entire VM or specific artifacts from a VHD file. Next, it will generate a Dockerfile which you can build into a Docker image. This PowerShell module requires PowerShell 5.0, or later.
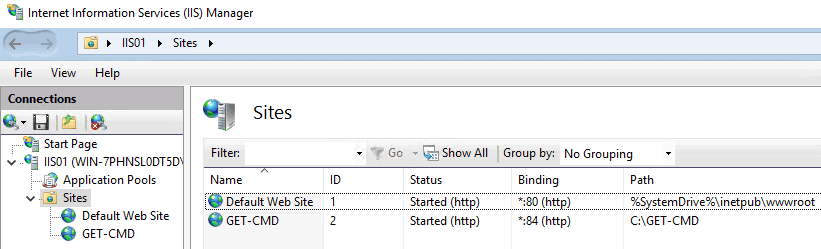
I will now describe the steps that are needed to extract IIS artifacts. In the screenshot below, I deployed a Windows Server 2016 Virtual Machine with the IIS role installed named “IIS01”. This VM has two IIS websites:
First, install the Image2Docker PowerShell module on your container host:
|
PS > Install-Module Image2Docker Untrusted repository You are installing the modules from an untrusted repository. If you trust this repository, change its InstallationPolicy value by running the Set-PSRepository cmdlet. Are you sure you want to install the modules from ‘PSGallery’? [Y] Yes [A] Yes to All [N] No [L] No to All [S] Suspend [?] Help (default is «N»): Y |
Next, you can use the ConvertTo-DockerFile cmdlet. This cmdlet will scan your source image (e.g. VHDX or WIM file) to determine the artifact. Image2Docker currently supports discovery of the following artifacts:
|
PS > Get-WindowsArtifact AddRemovePrograms AllWindowsFeatures Apache DHCPServer DNSServer IIS MSMQ SQLServer |
To scan an image, you just need to call the ConvertTo-Dockerfile cmdlet and specify the -ImagePath parameter which contains the VHDX file. The output folder will contain the generated dockerfile. Before scanning your image, you must power-off the virtual machine.
|
1 2 3 4 5 6 7 8 9 10 11 12 13 14 15 16 17 18 19 20 21 22 23 24 25 26 27 28 29 30 31 32 33 |
PS > Import-Module Image2Docker PS > ConvertTo-Dockerfile -ImagePath «C:Hyper-VIIS01Virtual Hard DisksIISV01.vhdx» -OutputPath «C:Containers» -Artifact IIS -Verbose VERBOSE: Reading image file: C:Hyper-VIIS01Virtual Hard DisksIIS01.vhdx VERBOSE: Image file appears to be a valid WIM or VHDX file. VERBOSE: Image file C:Hyper-VIIS01Virtual Hard DisksIIS01.vhdx contains 1 images VERBOSE: This image appears to be a valid Virtual Hard Drive (VHDX) file. VERBOSE: Image type is: VHDX VERBOSE: User didn‘t specify a mount path. Using: C:UsersNicolasAppDataLocalTemp94decd22-a9aa-45d7-9402-a309c2fa39b0-mount VERBOSE: Finished mounting image C:Hyper-VIIS01Virtual Hard DisksIIS01.vhdx at mount point C:UsersNicolasAppDataLocalTemp94decd22-a9aa-45d7-9402-a309c2fa39b0-mount VERBOSE: Finished mounting image to: C:UsersNicolasAppDataLocalTemp94decd22-a9aa-45d7-9402-a309c2fa39b0-mount VERBOSE: Starting conversion process VERBOSE: Started discovering IIS artifact VERBOSE: Checking IIS ApplicationHost config for Windows Version: 10.0 VERBOSE: Target Image Version 10.0.14393.0 VERBOSE: IIS service is present on the system VERBOSE: ASP.NET is NOT present on the system VERBOSE: .NET 3.5 is NOT present on the system VERBOSE: Finished discovering IIS artifact VERBOSE: Generating Dockerfile based on discovered artifacts in :C:UsersNicolasAppDataLocalTemp94decd22-a9aa-45d7-9402-a309c2fa39b0-mount VERBOSE: Generating result for IIS component VERBOSE: Copying IIS configuration files VERBOSE: Writing instruction to create site Default Web Site VERBOSE: Processing source directory: C:inetpubwwwroot VERBOSE: Writing instruction to expose port for site Default Web Site VERBOSE: Writing instruction to create site GET-CMD VERBOSE: Processing source directory: C:GET-CMD VERBOSE: Writing instruction to expose port for site GET-CMD VERBOSE: Finished generating the Dockerfile VERBOSE: Finished dismounting the Windows image from C:UsersNicolasAppDataLocalTemp94decd22-a9aa-45d7-9402-a309c2fa39b0-mount |
You can also extract a single website from an IIS virtual machine using the –ArtifactParam parameter followed by the IIS website name:
|
PS > ConvertTo-Dockerfile -ImagePath «C:Hyper-VIIS01Virtual Hard DisksIIS01.vhdx» -OutputPath «C:Containers» -Artifact IIS -ArtifactParam «GET-CMD» –Verbose |
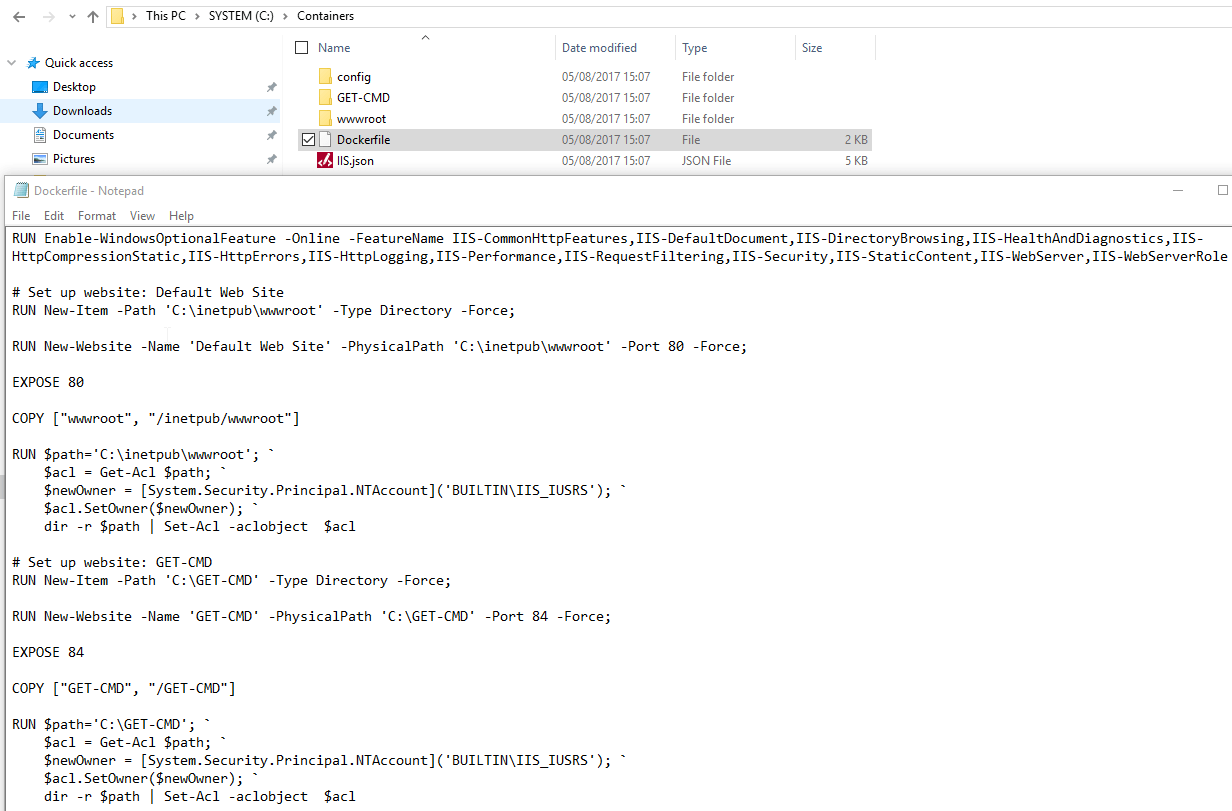
Now, you can go to the output folder, and you’ll notice that a Dockerfile has been created.
If you only have a VMDK file, you can use the Microsoft Virtual Machine Converter Tool to convert VMDK images to VHD images.
Hyper-V Isolation
When you are running on Windows 10, you can only work with Hyper-V containers, but when you are running on Windows Server 2016, you can choose between Hyper-V and Windows Server containers. By default, when you use the docker run command, it will start a Windows Server container, but you can specify that you want to run a Hyper-V container by using the —isolation=hyperv parameter.
Before running a Hyper-V container, you must install the Hyper-V role on your container host:
|
PS > Install-WindowsFeature -Name Hyper-V |
When running the previous command, you will probably get the following error message if your container host is a virtual machine:
|
Hyper-V cannot be installed: The processor does not have required virtualization capabilities |
It means that Nested Virtualization is not enabled on the system. Nested Virtualization allows you to run a Hypervisor inside a Virtual Machine running on a Hypervisor. To enable Nested Virtualization in Hyper-V, you must first shutdown the Container Host Virtual Machine and then run the following PowerShell command:
|
PS > Set-VMProcessor -VMName «VMName» -ExposeVirtualizationExtensions $true |
This feature is currently Intel-only: Intel VT-x is required. Once the Hyper-V role is installed, you can run your first Hyper-V container using the following script on your container host:
|
PS > docker run —rm -it —name MyNanoHYPV —isolation=hyperv microsoft/nanoserver:latest |
In this example, I deploy a Hyper-V container named “MyNanoHYPV” with the —isolation=hyperv parameter which is based on the Nano Server image from Microsoft.
|
Microsoft Windows [Version 10.0.14393] (c) 2016 Microsoft Corporation. All rights reserved. C:>ipconfig Windows IP Configuration Ethernet adapter Ethernet: Connection-specific DNS Suffix . : Link-local IPv6 Address . . . . . : fe80::2890:b928:39d6:c8a%4 IPv4 Address. . . . . . . . . . . : 172.21.158.25 Subnet Mask . . . . . . . . . . . : 255.255.240.0 Default Gateway . . . . . . . . . : 172.21.144.1 C:>hostname b97558fd884a |
As you can see, the Hyper-V container boots in seconds; much faster than a virtual machine. To confirm that you are running a Hyper-V container, you can run a very simple check. Open the PowerShell console, and use the Get-Process cmdlet to list the process named “VMWP” which corresponds to the Hyper-V process:
|
PS > Get-Process -Name vmwp Handles NPM(K) PM(K) WS(K) CPU(s) Id SI ProcessName ———— ——— ——— ——— ——— — — —————— 3386 18 38796 20048 4.39 3632 0 vmwp 235 14 35888 16128 2.63 5224 0 vmwp |
We can see from this result that there are two processes running on the container host. Now, just type the “exit” command inside your Hyper-V container and rerun the previous command:
|
PS C:UsersAdministrator> Get-Process -Name vmwp Handles NPM(K) PM(K) WS(K) CPU(s) Id SI ProcessName ———— ——— ——— ——— ——— — — —————— 235 14 35888 16128 2.63 5224 0 vmwp PS C:UsersAdministrator> |
There is only one process. Why? Hyper-V container is like a virtual machine in some ways but different in others. When you run your Hyper-V container, Windows will create what seems to be a VM but it’s not actually a virtual machine, it’s a Hyper-V container! Of course, you can’t see this VM in the Hyper-V console manager. The only thing that you can see is the process. The use of a Hyper-V container provides a kernel-mode isolation instead of user-mode isolation.
Ok, now let’s examine another example to understand the difference between Windows Server containers and Hyper-V containers. Run the following command:
|
PS > docker run -d —name NanoWithoutHYPV microsoft/nanoserver:latest ping localhost –t |
This command deploys a Windows Server container based on the Nano Server image. We run a permanent ping inside the container. Now, use the Docker Top command to display the list of the process running inside this container:
|
1 2 3 4 5 6 7 8 9 10 11 12 13 14 15 16 17 18 19 20 21 22 |
PS > docker top NanoWithoutHYPV Name PID CPU Private Working Set smss.exe 5384 00:00:00.140 208.9kB csrss.exe 1920 00:00:00.437 356.4kB wininit.exe 3320 00:00:00.031 651.3kB services.exe 5780 00:00:00.203 1.487MB lsass.exe 5752 00:00:00.234 1.95MB svchost.exe 2800 00:00:00.062 1.241MB svchost.exe 2856 00:00:00.031 1.323MB svchost.exe 5852 00:00:00.125 2.179MB svchost.exe 5800 00:00:00.000 1.434MB svchost.exe 4544 00:00:00.140 3.752MB svchost.exe 4412 00:00:00.156 1.942MB svchost.exe 4844 00:00:00.062 1.47MB svchost.exe 5876 00:00:00.328 4.039MB svchost.exe 3016 00:00:00.109 2.327MB CExecSvc.exe 3136 00:00:00.000 737.3kB PING.EXE 3912 00:00:00.000 536.6kB PS C:UsersAdministrator> get-process *PING* Handles NPM(K) PM(K) WS(K) CPU(s) Id SI ProcessName ———— ——— ——— ——— ——— — — —————— 62 5 720 3480 0.00 3912 3 PING |
We can see that the last process, called “PING.EXE”, corresponds to the ping command inside the container. But, running the Get-Process cmdlet on the container host, notice that the same process exists with the same PID! It means that our Windows Server container uses the Kernel resources from my container host. OK, now stop this container with the Docker Stop command and do the same thing by appending the —isolation=hyperv parameter:
|
PS > docker run -d —name NanoWithHYPV —isolation=hyperv microsoft/nanoserver:latest ping localhost –t |
And run the Docker Top command:
|
1 2 3 4 5 6 7 8 9 10 11 12 13 14 15 16 17 18 19 20 21 22 23 24 25 |
PS > docker top NanoWithHYPV Name PID CPU Private Working Set smss.exe 828 00:00:00.312 213kB csrss.exe 848 00:00:00.703 356.4kB wininit.exe 888 00:00:00.140 618.5kB services.exe 900 00:00:00.453 1.384MB lsass.exe 916 00:00:00.406 1.933MB svchost.exe 1008 00:00:00.109 1.237MB svchost.exe 216 00:00:00.125 1.245MB svchost.exe 444 00:00:00.187 1.184MB svchost.exe 724 00:00:00.062 1.073MB svchost.exe 984 00:00:00.375 3.895MB svchost.exe 712 00:00:00.265 1.88MB svchost.exe 1028 00:00:00.078 1.528MB svchost.exe 1056 00:00:00.296 3.441MB svchost.exe 1168 00:00:00.390 2.273MB CExecSvc.exe 1188 00:00:00.031 737.3kB PING.EXE 1396 00:00:00.046 532.5kB PS C:UsersAdministrator> get-process *PING* get-process : Cannot find a process with the name «ping». Verify the process name and call the cmdlet again. At line:1 char:1 + get-process -Name ping + ~~~~~~~~~~~~~~~~~~~~~~ + CategoryInfo : ObjectNotFound: (ping:String) [Get-Process], ProcessCommandException + FullyQualifiedErrorId : NoProcessFoundForGivenName,Microsoft.PowerShell.Commands.GetProcessCommand |
PowerShell error! No PING process exists on the container host. It means that due to the Hyper-V isolation and especially the kernel mode isolation, the kernel resources are not shared between the container host and the Hyper-V containers.
For those of you who are getting the following error:
|
PS C:UsersAdministrator> docker run —rm -it —name nanohyperv —isolation=hyperv microsoft/nanoserver:latest C:Program FilesDockerdocker.exe: Error response from daemon: container 2f83bfc2bbbbed5a0425a0219a7a747c971a1eeb032ce11b76149f17b397f17b en countered an error during CreateContainer: failure in a Windows system call: No hypervisor is present on this system. (0xc0351000) |
It means that Hyper-V role is not installed on your system, so you can’t run Hyper-V containers. If you have some trouble using a specific container, you can use the Docker Logs command to troubleshoot. The Docker logs command shows information logged by a running container. The information that is logged and the format of the log depends almost entirely on the container’s endpoint command:
|
PS > docker logs NanoWithHYPV |
Conclusion
In this part, we discussed about Docker Compose. To build a multi-container application, Docker has developed Docker-Compose which makes it easier to configure and run applications made up of multiple containers. Docker-Compose starts all the required containers with a single command.
Next, we used Image2Docker that allows you to take a virtualized web server in a Hyper-V VM and extract a Docker image for each website in the Virtual Machine. It looks at the disk for known artifacts, compiles a list of all the artifacts installed on the VM and generates a Dockerfile to package the artifacts.
Finally, we described the Hyper-V container concept. Hyper-V containers provide a kernel mode isolation instead of user mode isolation. Hyper-V containers use an automatically generated Hyper-V VM where the container instances run.
With Docker Desktop, developers using Windows 10 can not only run Windows containers, but also Linux containers.
Windows and Linux container modes
The way this works is that Docker for Desktop has two modes that you can switch between: Windows containers, and Linux containers. To switch, you use the right-click context menu in the system tray:

When you’re in Linux containers mode, behind the scens, your Linux containers are running in a Linux VM. However, that is set to change in the future thanks to Linux Containers on Windows (LCOW), which is currently an «experimental» feature of Docker Desktop. And the upcoming Windows Subsystem for Linux 2 (WSL2) also promises to make this even better.
But in this article, I’m using Docker Desktop without these experimental features enabled, so I’ll need to switch between Windows and Linux modes.
Mixed container types
What happens if you have a microservices application that needs to use a mixture of Windows and Linux containers? This is often necessary when you have legacy services that can only run on Windows, but at the same time you want to benefit from the smaller size and lower resource requirements of Linux containers when creating new services.
We’re starting to see much better support for mixing Windows and Linux containers in the cloud. For example, Azure Kubernetes Service AKS, allows multiple node pools allowing you to add a Windows Server node pool to your cluster.
But if you create an application using a mix of Windows and Linux container types, is it possible to run it locally with Docker Desktop?
The answer is, yes you can. When you switch modes in Docker for Desktop, any running containers continue to run. So it’s quite possible to have both Windows and Linux containers running locally simultaneously.
Testing it out
To test this out, I created a very simple ASP.NET Core web application. This makes it easy for me to build both Linux and Windows versions of the same application. The web application displays a message showing what operating system the container is running in, and then makes a request to an API on the other container, allowing me to prove that both the Linux and Windows containers are able to talk to each other.
I created the app with dotnet new webapp, which uses Razor pages, and added a simple Dockerfile:
FROM mcr.microsoft.com/dotnet/core/sdk:3.0 AS build
WORKDIR /app

# copy csproj and restore as distinct layers
COPY *.csproj .
RUN dotnet restore

# copy everything else and build app
COPY . .
RUN dotnet publish -c Release -o /out/

FROM mcr.microsoft.com/dotnet/core/aspnet:3.0 AS runtime
WORKDIR /app
COPY --from=build /out .
ENTRYPOINT ["dotnet", "cross-plat-docker.dll"]
In the main index.cshtml razor page view, I display a simple message to show the OS version and the message received from the other container.
    <h1 class="display-4">Welcome from @System.Environment.OSVersion.VersionString</h1>
    <p>From @ViewData["Url"]: @ViewData["Message"]</p>
In the code behind, we get the URL to fetch from config, and then call it, adding its response to the ViewData dictionary.
public async Task OnGet()
{
    var client = _httpClientFactory.CreateClient();
    var url = _config.GetValue("FetchUrl","https://markheath.net/");
    ViewData["Url"] = url;
    try
    {
        var message = await client.GetStringAsync(url);
        ViewData["Message"] = message.Length > 4000 ? message.Substring(0, 4000) : message;
    }
    catch (Exception e)
    {
        _logger.LogError(e, $"couldn't download {url}");
        ViewData["Message"] = e.Message;
    }
}
This page also has an additional GET endpoint for the other container to call. This uses a routing feature of ASP.NET Core web pages called named handler methods that was new to me. If we create a method on our Razor page called OnGetXYZ, then if we call the page route with the query string ?Handler=XYZ it will get handled by this method, instead of the regular OnGet method.
This allowed me to return some simple JSON.
public async Task<IActionResult> OnGetData()
{
    return new JsonResult(new[] { "Hello world",
    Environment.OSVersion.VersionString });
}
I’ve put the whole project up on GitHub if you want to see the code.
Building the containers
To build the Linux container, switch Docker Desktop into Linux mode (you can check it’s completed the switch by running docker version), and issue the following command from the folder containing the Dockerfile.
docker image build -t crossplat:linux .
And then to build the Windows container, switch Docker into Windows mode, and issue this command:
docker image build -t crossplat:win .
Running the containers
To run the contains, we need to use docker run, and expose a port. I’m setting up the app in the container to listen on port 80, and exposing it as port 57000 for the Windows container and 32770 for the Linux container.
But I’m also using an environment variable to tell each container where to find the other. This raises the question of what IP address should the Linux and Windows containers use in order to communicate with each other.
I tried a few different approaches. localhost doesn’t work, and if you try using one of the IP addresses of your machine (as listed by ipconfig) you might be able to find one that works. However, I chose to go for 10.0.75.1. This is a special IP address used by Docker Desktop. This worked for me with both the Windows and Linux containers able to contact each other, but I don’t know whether this is the best choice.
With Docker Desktop in Linux mode, I ran the following command to start the Linux container, listening on port 32770 and attempting to fetch data from the Windows container:
docker run -p 32770:80 -d -e ASPNETCORE_URLS="http://+80" `
    -e FetchUrl="http://10.0.75.1:57000/?handler=data" crossplat:linux
And with Docker Desktop in Windows mode, I ran the following command to listen on port 57000 and attempting to fetch data from the Linux container.
docker run -p 57000:80 -d -e ASPNETCORE_URLS="http://+80" `
    -e FetchUrl="http://10.0.75.1:32770/?handler=data" crossplat:win
Results
Here’s the Linux container successfully calling the Windows container: 
And here’s the Windows Container successfully calling the Linux container: 
In this post, we’ve demonstrated that it’s quite possible to simultaneously run Windows and Linux containers on Docker Desktop, and for them to communicate with each other.
Apart from the slightly clunky mode switching that’s required, it was easy to do (and that mode switching could well go away in the future thanks to LCOW and WSL2).
What this means is that it’s very easy for teams that need to work on a mixture of container types to do so locally, as well as in the cloud.