Приветствую Вас, уважаемые читатели! В настоящее время на большинстве настольных ПК и ноутбуках установлена операционная система Windows. И наверняка многие из Вас сталкивались с проблемой, что она (Windows) не загружается. Но не все знают, что решить проблему загрузки операционной системы можно в безопасном режиме. Сегодня мы и поговорим о том как загрузиться в безопасном режиме и что это вообще за такой режим.
Что такое безопасный режим
Безопасный режим в Windows (Safe Mode) — это специальный режим работы системы, который служит для устранения неполадок, вызванных некорректной работной программных и аппаратных ресурсов персонального компьютера (ПК). В безопасном режиме Windows загружает минимальный набор драйверов устройств и системных служб.
Поэтому всякий раз, когда у вас не получается загрузить Windows в следствии заражения компьютерными вирусами или после установки нового драйвера и программного обеспечения, то вы всегда можете загрузить ПК в безопасном режиме и устранить неисправности. Загрузившись в Safe Mode у вас появится возможность просканировать компьютер на наличие вирусов, удалить драйвер или программу после установки которых Windows перестала загружаться, либо вообще выполнить откат системы. Обычно этих действий хватает для восстановления работоспособности операционной системы. Кстати о том как удалять программы в безопасном режиме вы можете почитать в этом посте.
Как загрузить Windows 7 в безопасном режиме
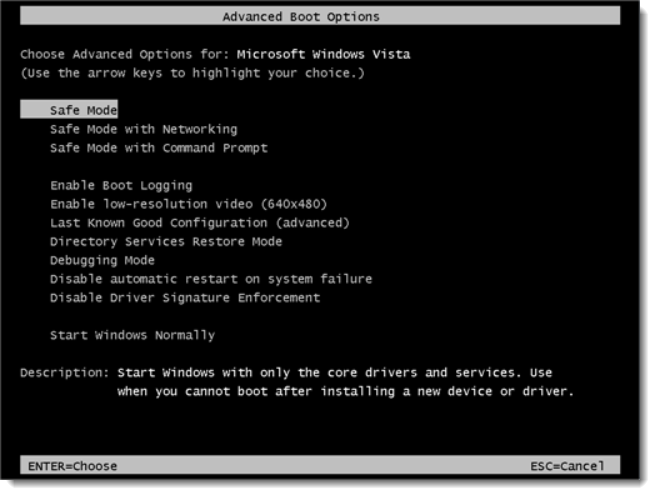
Чтобы загрузить систему в безопасном режиме достаточно несколько раз нажать клавишу F8 при загрузке компьютера. В случае успеха на экране появится меню выбора вариантов загрузки:

Примечание: на некоторых компьютерах если при загрузке нажать клавишу F8 может появиться меню выбора устройства с которого производить загрузку. В этом случае выбираете нужный жесткий диск на котором установлена операционная система, нажимаете Enter и продолжаете нажимать F8. После этого появиться экран с меню выбора дополнительных вариантов загрузки.
В меню выбора способов загрузки есть несколько вариантов:
- Безопасный режим (Safe Mode) — загрузка операционной системы Windows только с основными драйверами и службами необходимыми для запуска системы.
-
Безопасный режим с загрузкой сетевых драйверов (Safe Mode with Networking) — аналогично предыдущему пункту плюс загрузка драйверов сетевого устройства и служб необходимых для доступа в сеть.
-
Безопасный режим с поддержкой командной строки (Safe Mode with Command Prompt) — запуск системы в безопасном режиме, но вместо привычного интерфейса загружается командная строка.
- Включить протоколирование загрузки (Enable Boot Logging) — перед загрузкой операционной системы создает файл ntbtlog.txt, в который записываются все драйверы, которые были загружены во время запуска Windows, включая последний файл, который был загружен перед сбоем.
- Включить режим VGA (Enable low-resolution) — загрузка системы с драйвером видеокарты установленным по умолчанию с низкими частотами и разрешении экрана 640×480. Этот режим помогает, когда при установке нового монитора windows выдает черный экран. Тогда загружаетесь в данном режиме и устанавливаете нужные настройки.
- Загрузка последней удачной конфигурации (last Known Good Configuration) — при каждом выключении компьютера windows запоминает наиболее важные параметры отвечающие за запуск системы. Поэтому в случае неудачной загрузки операционной системы, первое что следует попробовать это запустить windows в этом режиме.
- Восстановление службы каталогов (Directory Services Restore Mode) — режим запускающий службу каталогов Active Directory. Актуален для систем работающих на контроллере домена.
- Режим отладки (Debugging Mode) — запуск windows в расширенном режиме отладки.
- Отключить автоматическую перезагрузку при отказе системы (Disable automatic restart on system failure) — режим необходим для диагностики ошибок, в случае если операционная система сразу перезагружается при возникновении сбоев.
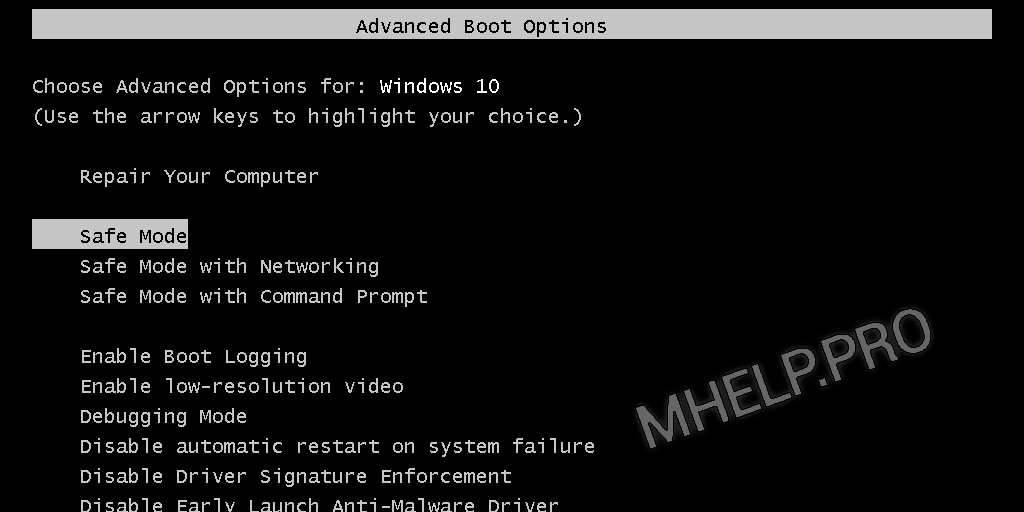
Далее с помощью клавиш со стрелками выбираете «Безопасный режим» и нажимаете клавишу «Enter». В случае необходимости можно выбрать «Безопасный режим с поддержкой командной строки» или «Безопасный режим с загрузкой сетевых драйверов» и также нажать «Enter».
После этого система загрузиться в безопасном режиме — с черным фоном рабочего стола и надписью «Безопасный режим» в углах экрана. Далее проводите необходимые операции: делаете откат системы, удаляете конфликтные драйверы или программы и другие действия.
На этом все! До новых встреч на страницах блога.
![]() Loading…
Loading…
The Advanced Boot Options screen lets you start Windows in advanced troubleshooting modes. You can access the menu by turning on your computer and pressing the F8 key before Windows starts.
Some options, such as safe mode, start Windows in a limited state, where only the bare essentials are started. If a problem doesn’t reappear when you start in safe mode, you can eliminate the default settings and basic device drivers and services as possible causes. Other options start Windows with advanced features intended for use by system administrators and IT professionals. For more information, go to the Microsoft website for IT professionals.
Repair Your Computer
Shows a list of system recovery tools you can use to repair startup problems, run diagnostics, or restore your system. This option is available only if the tools are installed on your computer’s hard disk. If you have a Windows installation disc, the system recovery tools are located on that disc.
Safe Mode
Starts Windows with a minimal set of drivers and services.
To start in safe mode:
-
Remove all floppy disks, CDs, and DVDs from your computer, and then restart your computer. Click the Start button , click the arrow next to the Shut Down button (or the arrow next to the Lock button), and then click Restart.
-
Do one of the following:
-
If your computer has a single operating system installed, press and hold the F8 key as your computer restarts. You need to press F8 before the Windows logo appears. If the Windows logo appears, you’ll need to try again by waiting until the Windows logon prompt appears, and then shutting down and restarting your computer.
-
If your computer has more than one operating system, use the arrow keys to highlight the operating system you want to start in safe mode, and then press F8.
-
-
On the Advanced Boot Options screen, use the arrow keys to highlight the safe mode option you want, and then press Enter.
-
Log on to your computer with a user account that has administrator rights.
-
Safe Mode with Networking. Starts Windows in safe mode and includes the network drivers and services needed to access the Internet or other computers on your network.
-
Safe Mode with Command Prompt. Starts Windows in safe mode with a command prompt window instead of the usual Windows interface. This option is intended for IT professionals and administrators.
-
Enable Boot Logging. Creates a file, ntbtlog.txt, that lists all the drivers that are installed during startup and that might be useful for advanced troubleshooting.
-
Enable low-resolution video (640×480). Starts Windows using your current video driver and using low resolution and refresh rate settings. You can use this mode to reset your display settings. For more information, see Change your screen resolution.
-
Last Known Good Configuration (advanced). Starts Windows with the last registry and driver configuration that worked successfully.
-
Directory Services Restore Mode. Starts Windows domain controller running Active Directory so that the directory service can be restored. This option is intended for IT professionals and administrators.
-
Debugging Mode. Starts Windows in an advanced troubleshooting mode intended for IT professionals and system administrators.
-
Disable automatic restart on system failure. Prevents Windows from automatically restarting if an error causes Windows to fail. Choose this option only if Windows is stuck in a loop where Windows fails, attempts to restart, and fails again repeatedly.
-
Disable Driver Signature Enforcement. Allows drivers containing improper signatures to be installed.
-
Start Windows Normally. Starts Windows in its normal mode.
Need more help?
Booting your computer into Safe Mode with Networking causes your computer to load with only the essential drivers and services, thus limiting the impact that software and malware (viruses) have on your computer. Booting in Safe Mode can eliminate problems related to: Antivirus Program Security Settings, Software Issues, and Malware/Spyware
To boot your Windows 10 computer into Safe Mode with Networking you will need to do the following:
- Click the Start button or press the Windows key on the keyboard
- Click Power
- While holding SHIFT on the keyboard, click Restart
- Windows will reboot and prompt with a few different options
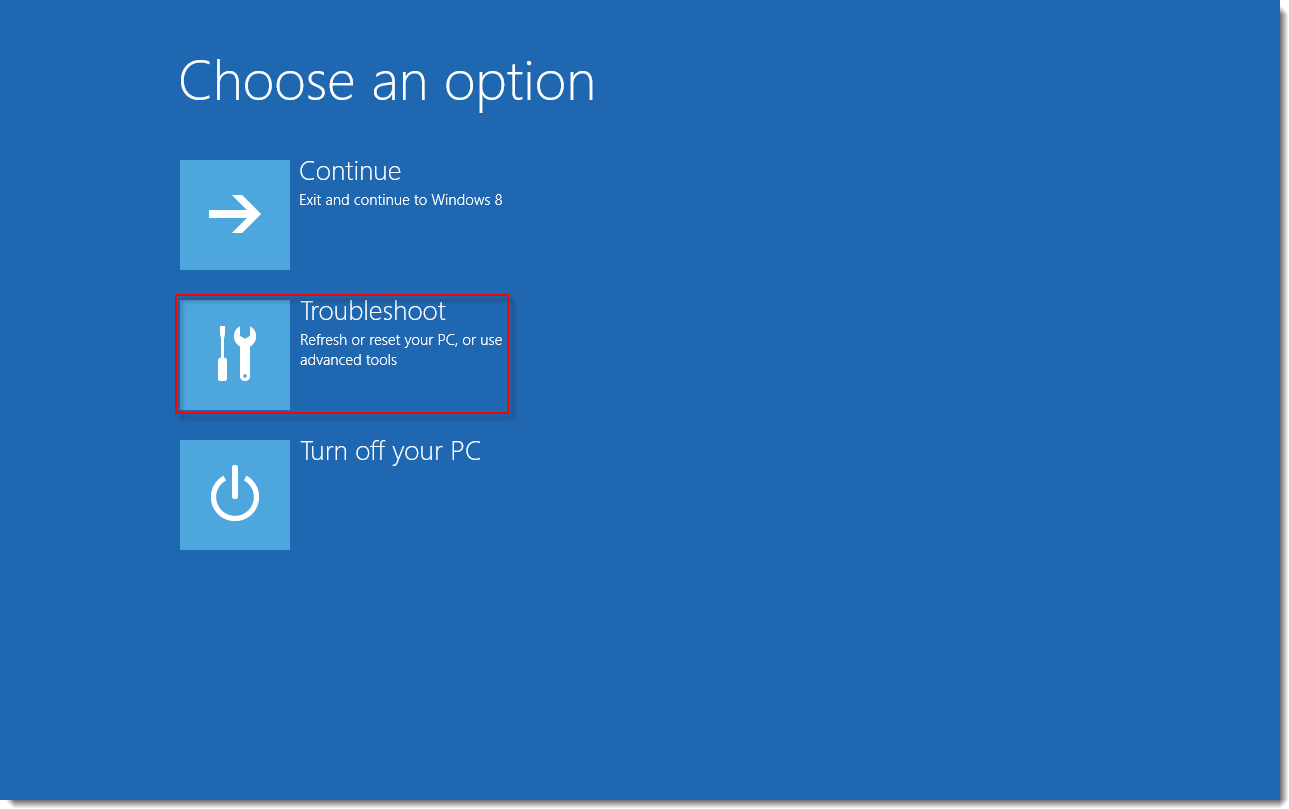
- Choose Troubleshoot
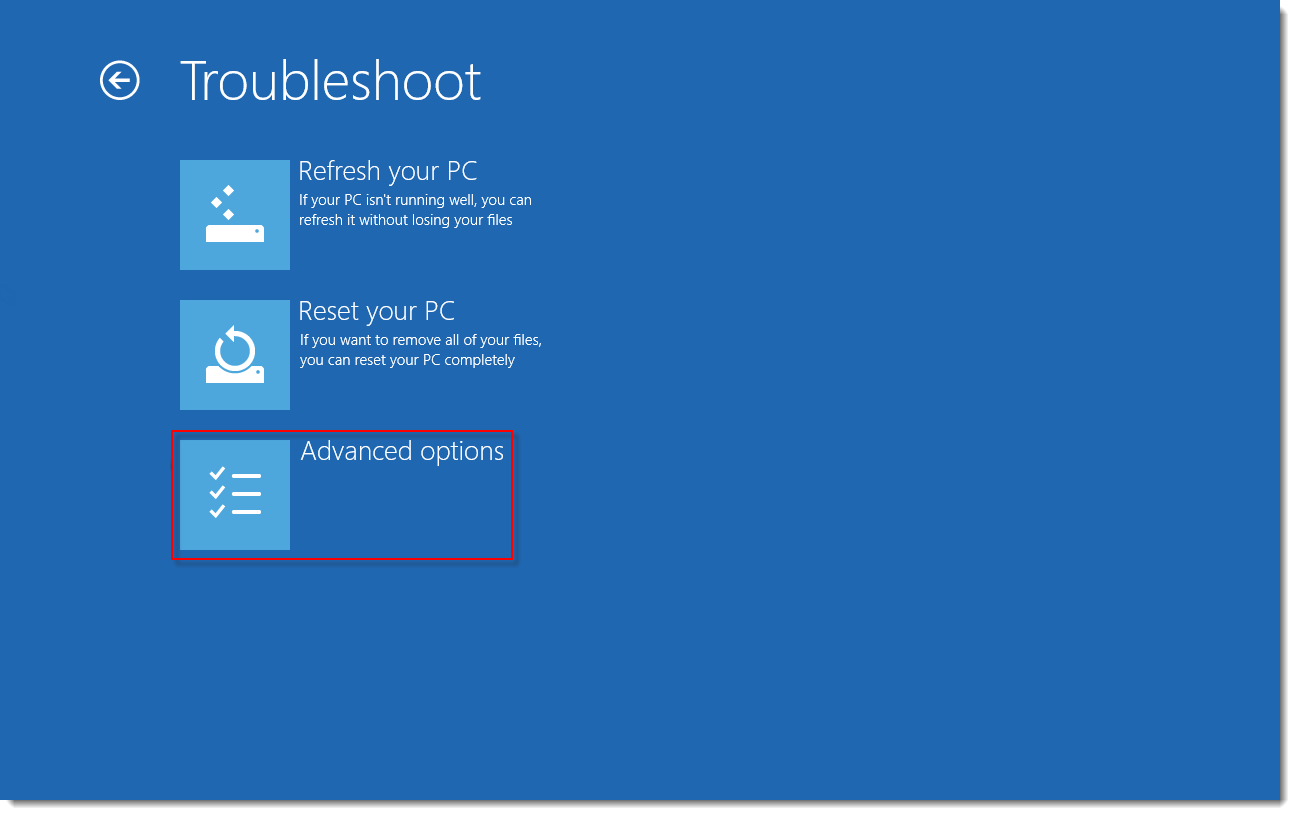
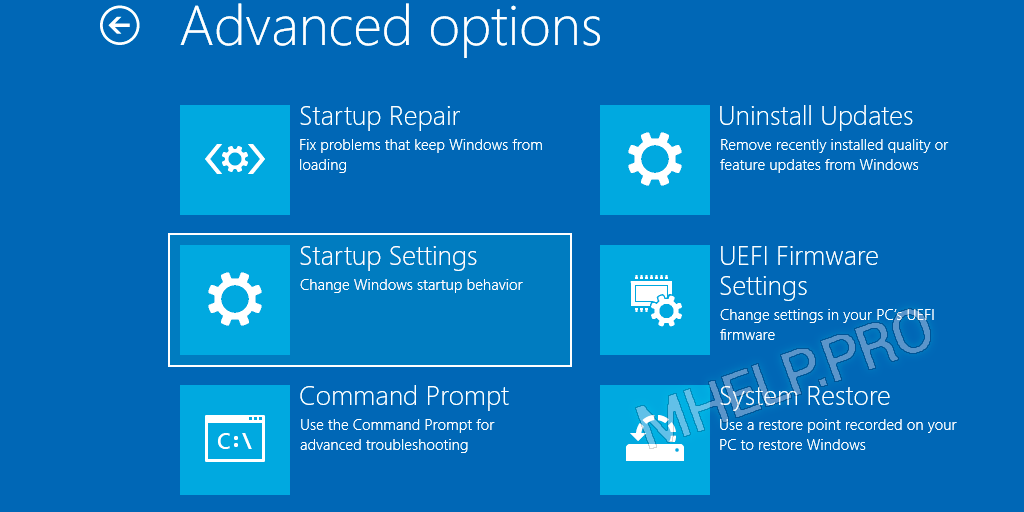
- Choose Advanced Options
- Choose Startup Settings
- Click Restart
- After rebooting, Windows will prompt with several different startup options
- Choose Safe Mode with Networking and press Enter
Windows 8.1
To boot your Windows 8.1 computer into Safe Mode with Networking you will need to do the following:
- Navigate to the desktop on your Windows 8.1 PC
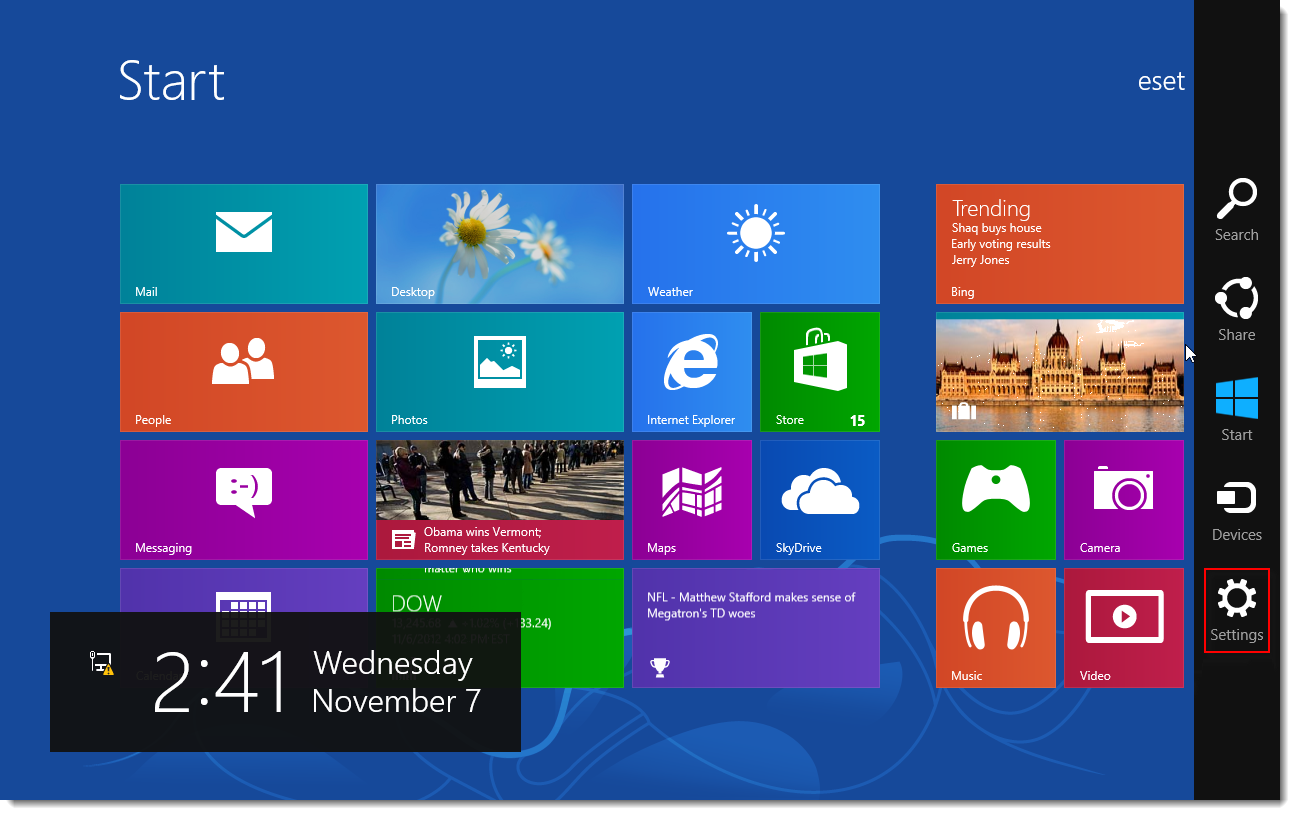
- Press the WINDOWS Windows 8 Keyboard Icon and «i» key on your keyboard simultaneously, or move your mouse into the top right-hand corner of the screen to bring up your Charms bar
- Select Settings
- Select the Power icon, then hold down the SHIFT key on your keyboard and select Restart
- Your PC will now reboot and load the Advanced Start up Menu
- Choose Troubleshoot
- Select Advanced Options
- Select Startup Settings
- Click Restart
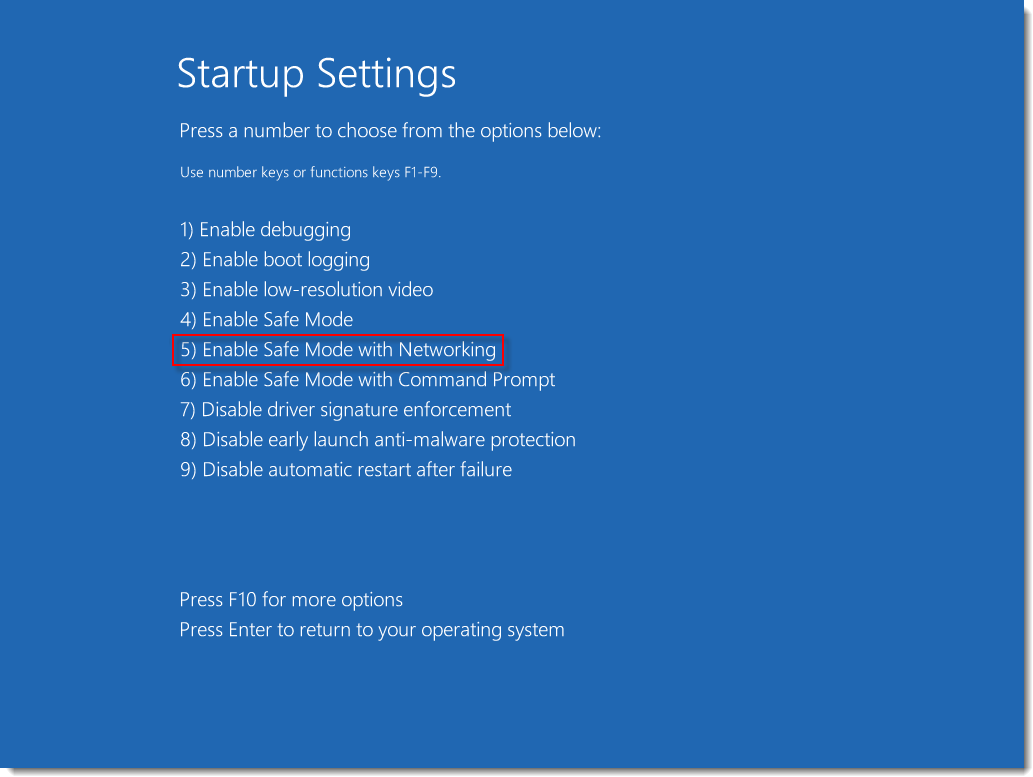
- Press the F5 key on your keyboard to select 5) Enable Safe Mode with Networking
Windows XP, Vista, and Windows 7
To boot your Windows XP, Vista, or Windows 7 computer into Safe Mode with Networking you will need to do the following:
- Power off your computer
- Restart your computer and immediately start pressing the F8 key, located on your keyboard. Continue to press F8 repeatedly until the Boot Menu appears
- Select Safe Mode with Networking from the list of options using the arrow keys on your keyboard, followed by the ENTER key
- Log on to your computer if prompted. Once logged in you will notice that the desktop looks different when compared to booting up your computer in normal mode. Your display may seem enlarged and unclear, but this is normal while in Safe Mode; the desktop will revert back to its previous state when you exit Safe Mode
When you are ready to exit Safe Mode, simply restart your computer.
-
Apps and Tools
-
Product Agnostic
-
Malware and Technologies
- KB2268
Issue
- Start Windows 7/Vista/XP in Safe Mode with Networking
- Start Windows 8 in Safe Mode with networking
- Start Windows 10 in Safe Mode with networking
Microsoft Azure/Amazon VM users
It is not recommended to start Windows in Safe Mode. Microsoft Azure/Amazon VMs do not have RDP connectivity when in Safe Mode therefore they lock up when restarting them in Safe Mode.
![]() I am a Mac user
I am a Mac user
Solution
Safe Mode is a troubleshooting option that limits Windows operation to basic functions. Safe Mode starts Windows with only core drivers and services. Safe Mode with Networking starts Windows with only core drivers, plus networking support. To start your computer in Safe Mode or Safe Mode with Networking, follow the instructions below.
Start Windows 7/Vista/XP in Safe Mode with Networking
-
Immediately after the computer is powered on or restarted, tap the F8 key on your keyboard in 1-second intervals.
-
After your computer displays hardware information and runs a memory test, the Advanced Boot Options menu will appear.
-
Use the arrow keys to select Safe Mode or Safe Mode with Networking and press the Enter key on your keyboard. For more information about Safe Mode options, see Safe Mode options for Windows Vista/Windows 7.
Click the image to view larger in new window
-
When you have finished troubleshooting, repeat steps 1-3 and select Start Windows Normally to return to your normal Windows configuration.
Start Windows 8 in Safe Mode with networking
If you cannot start Windows 8 after installing your ESET product
At the Windows 8 login screen: hold the Shift key on your keyboard, click Power and then click Restart (click to view a screenshot). Proceed to step 3 below.
- Press the Windows
 key + C on your keyboard and then click Settings.
Click the image to view larger in new window
- Click Power, hold down Shift on your keyboard and then click Restart.

Click the image to view larger in new window
- Click Troubleshoot.
Click the image to view larger in new window
- Click Advanced options.
Click the image to view larger in new window
- Click Startup Settings.
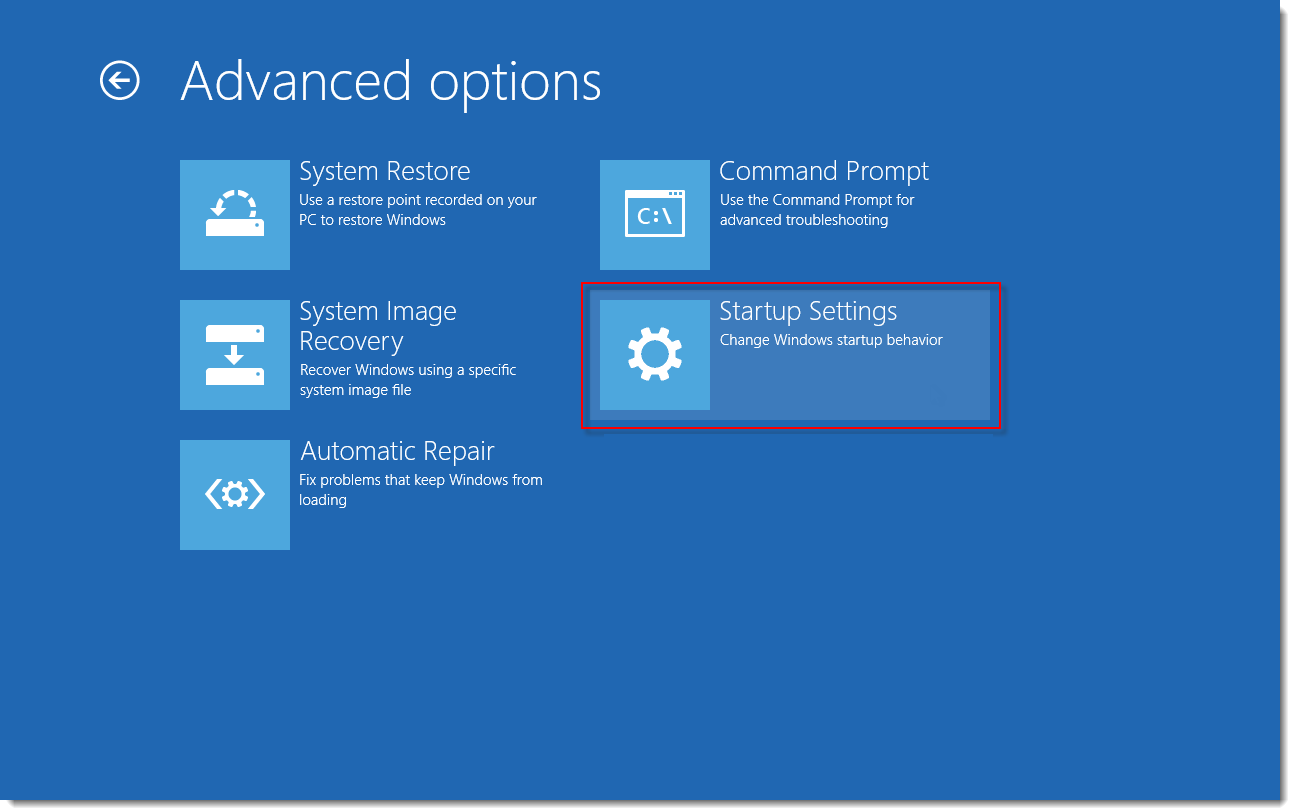
Click the image to view larger in new window
- Click Restart.
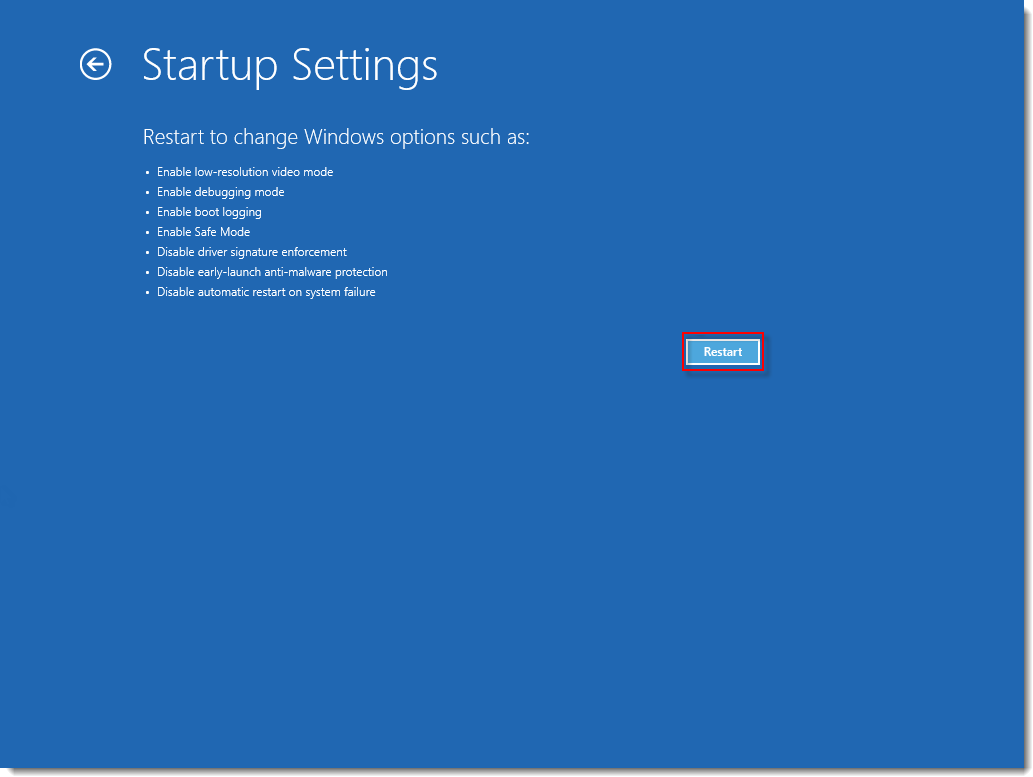
Click the image to view larger in new window
- Press 5 on your keyboard to Enable Safe Mode with Networking. Windows will start in Safe Mode with Networking.
Click the image to view larger in new window
- Click Start → Power and then click Restart to return to your normal Windows configuration.
Start Windows 10 in Safe Mode with networking
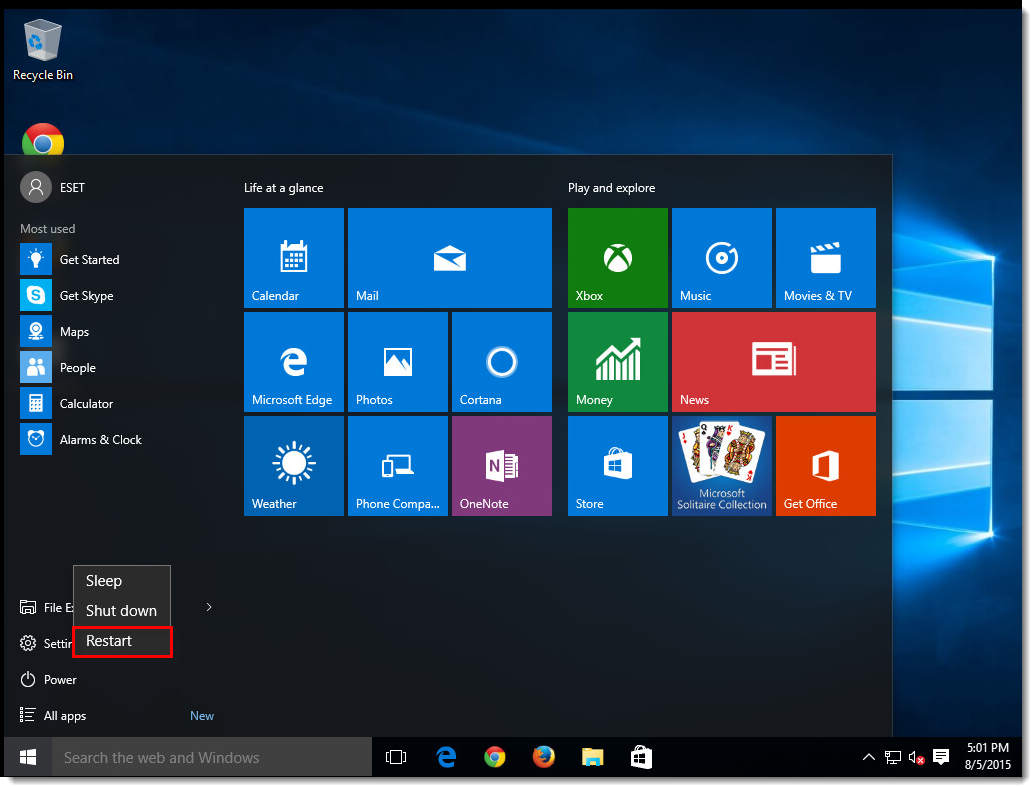
- Click Start → Power and then hold the Shift key on your keyboard and click Restart.
Click the image to view larger in new window
- Click Troubleshoot.
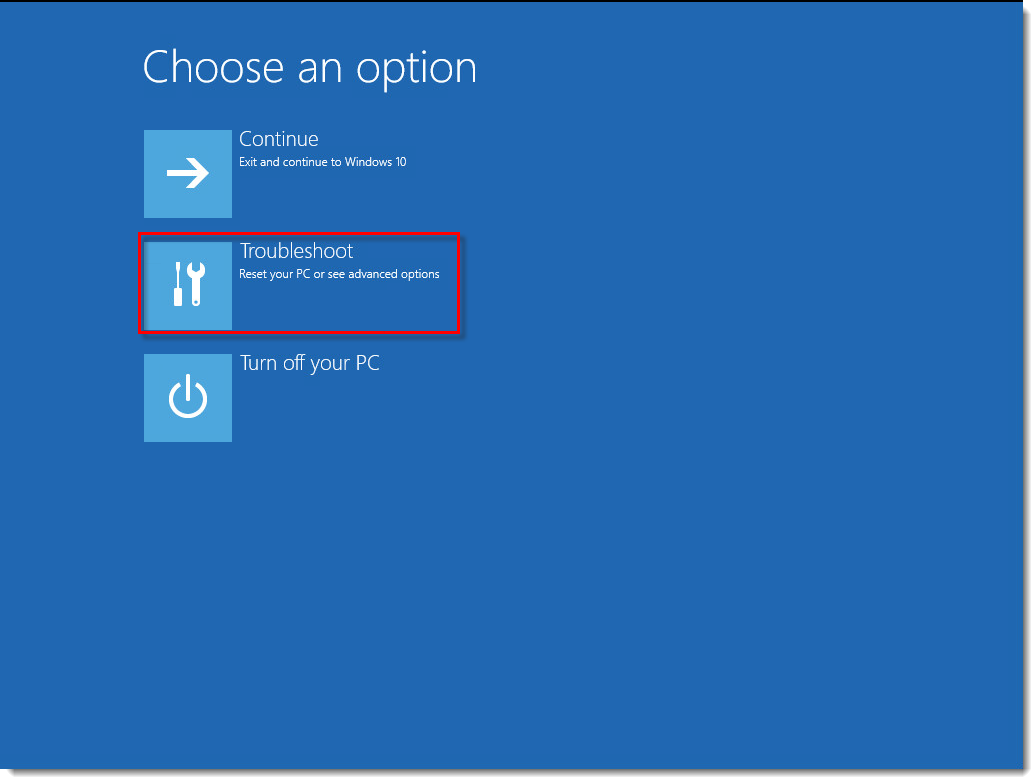
Click the image to view larger in new window
- Click Advanced options.

Click the image to view larger in new window
- Click Startup Settings.

Click the image to view larger in new window
- Click Restart.
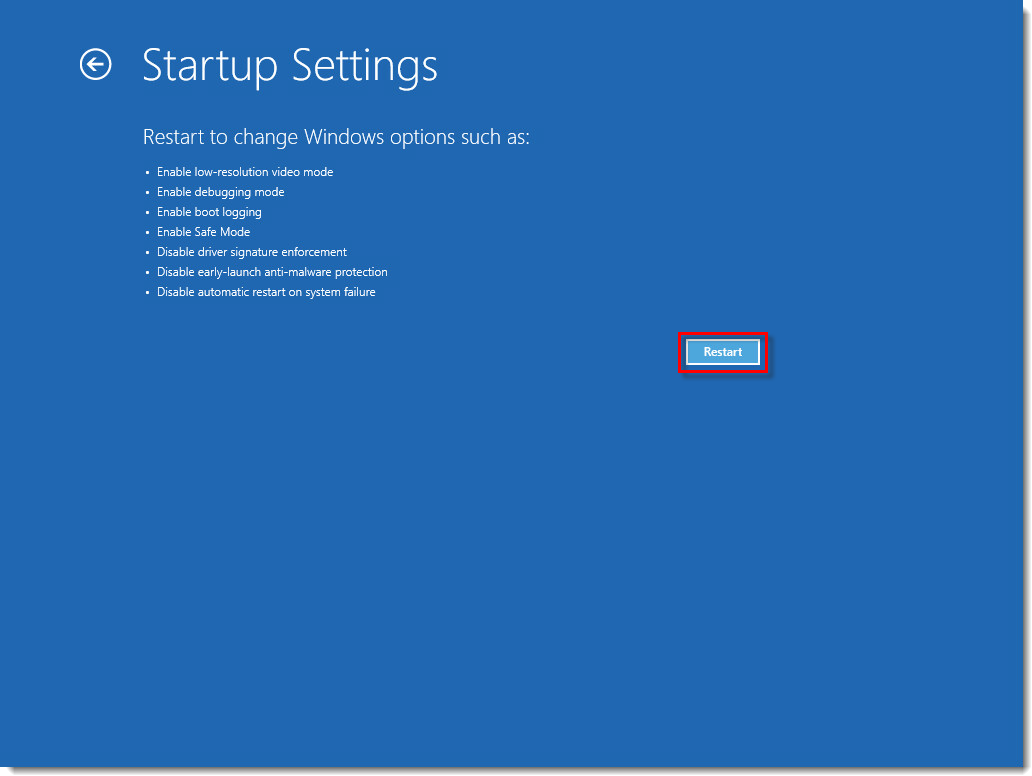
Click the image to view larger in new window
- After your computer restarts, press 5 on your keyboard to select Safe Mode with Networking.

Click the image to view larger in new window
-
Type in your username and password to start Windows in Safe Mode with Networking.
-
Click Start
→ Power and then click Restart to return to your normal Windows configuration.
Last Updated: Aug 5, 2022
Additional resources
Need further assistance?
More Information
214
214 people found this article helpful
Easy, 5-minute-or-less process!
Updated on November 30, 2021
What to Know
- Turn on or restart your PC. Before the splash screen appears, press F8 to enter Advanced Boot Options.
- Highlight Safe Mode, Safe Mode with Networking, or Safe Mode with Command Prompt and press Enter.
- To start Windows 7 in Safe Mode, log in with an account that has administrator permissions.
Starting Windows 7 in Safe Mode is the next step when starting Windows normally is not possible. Safe Mode only starts the most important Windows 7 processes, so depending on the problem, you might be able to troubleshoot or fix the problem from here.
As of January 2020, Microsoft is no longer supporting Windows 7. We recommend upgrading to Windows 10 to continue receiving security updates and technical support.
How to Start Windows 7 in Safe Mode
Follow these instructions to start Windows 7 in Safe mode.
-
Turn on or restart your PC.
-
Just before the Windows 7 splash screen appears, press the F8 key to enter Advanced Boot Options.
-
You should now see the Advanced Boot Options screen. If not, you may have missed the short window of opportunity to press F8 in the previous step and Windows 7 is probably now continuing to boot normally, assuming it’s able to. If this is the case, just restart your computer and try pressing F8 again.
-
Once you’re in the Advanced Boot Options, you are presented with three variations of Windows 7 Safe Mode you can enter. Using the arrow keys on your keyboard, highlight either Safe Mode, Safe Mode with Networking, or Safe Mode with Command Prompt and press Enter.
- Safe Mode: This is the default option and is usually the best choice. This mode will load only the absolute minimum processes necessary to start Windows 7.
- Safe Mode with Networking: This option loads the same processes as Safe Mode but also includes those that allow the networking functions in Windows 7 to work. You should choose this option if you think you might need to access the internet or your local network while troubleshooting in Safe Mode.
- Safe Mode with Command Prompt: This version of Safe Mode also loads a minimum set of processes but starts the Command Prompt instead of Windows Explorer, the usual user interface. This is a valuable option if the Safe Mode option didn’t work.
Screenshot
-
Wait for the Windows 7 files to load. The minimum system files necessary to run Windows 7 will now load. Each file being loaded will be displayed on the screen.
If Safe Mode freezes here, document the last Windows 7 file being loaded, then search the internet for troubleshooting advice.
You don’t need to do anything here, but this screen could provide a good place to start troubleshooting if your computer is experiencing very serious problems and Safe Mode won’t completely load.
-
To start Windows 7 in Safe Mode, you must log on with an account that has administrator permissions. If you’re not sure if any of your personal accounts have administrator privileges, log in using your own account and see if that works.
-
Entry into Windows 7 Safe Mode should now be complete. Make any changes you need to make and then restart the computer. Assuming there are no remaining problems preventing it, the computer should boot to Windows 7 normally after a restart.
As you can see in the screenshot above, it’s very easy to identify if a Windows 7 computer is in Safe Mode. The text «Safe Mode» will always appear in each corner of the screen when in this special diagnostic mode of Windows 7.
Thanks for letting us know!
Get the Latest Tech News Delivered Every Day
Subscribe
What is Safe Mode and how to boot Safe mode Windows.
💡 For Windows 10, 8, 7; for laptop and computer.
Contents
- Safe Mode and Options
- Safe Mode after reboot (Windows 10,
- Using msconfig (Windows 10, 8, 7)
- Enable Advanced Boot Options (Windows 10,
- Safe Mode from System Restore (Windows 10,
- Safe mode from the command prompt (bcdedit)
- Safe mode using shutdown utility

Article in other languages:
🇪🇸 – Cómo iniciar Windows en Modo Seguro
🇷🇺 – Как зайти в безопасный режим Windows
🇫🇷 – Comment entrer en Mode sans échec Windows
🇩🇪 – So starten Sie Windows 10 im abgesicherten Modus
🇳🇱 – Hoe start je Windows in de veilige modus
Safe Mode and Options
Safe Mode is a diagnostic mode of a computer operating system. Safe mode is intended to help fix most, if not all problems within an operating system.
Wikipedia
Booting in Safe Mode Windows is often used to remove viruses and programs that cannot be removed during normal mode of the Operating System (OS).

In this mode, the minimum set of system programs and services necessary to start the system is loaded.
Starting non-system services from startup and not system programs is ignored.
🔔 The ability to work in this mode is limited.
There are three modes for starting Windows Safe Mode:
| Safe Mode | The minimum set of system services is loaded, the launch of not system programs and services is disabled. |
| Safe mode with Networking | The minimum set of system services and network services is loaded, the launch of not system programs and services is disabled. |
| Safe mode with Command Promt | The minimum set of system services + network services is loaded, the launch of not system programs and services is disabled. The command line starts, before starting Windows Explorer. |
The mode is designed to diagnose startup, fix problems and errors OS.
Safe mode after reboot (Windows 10,
An easy way to reboot Windows in safe mode.
💡 Suitable for Windows 10, 8.
- Press the START button;
- Click the Power button;
- Press and hold the SHIFT button and then click Restart. The advanced Windows boot menu is loading;
- Select the Troubleshoot;
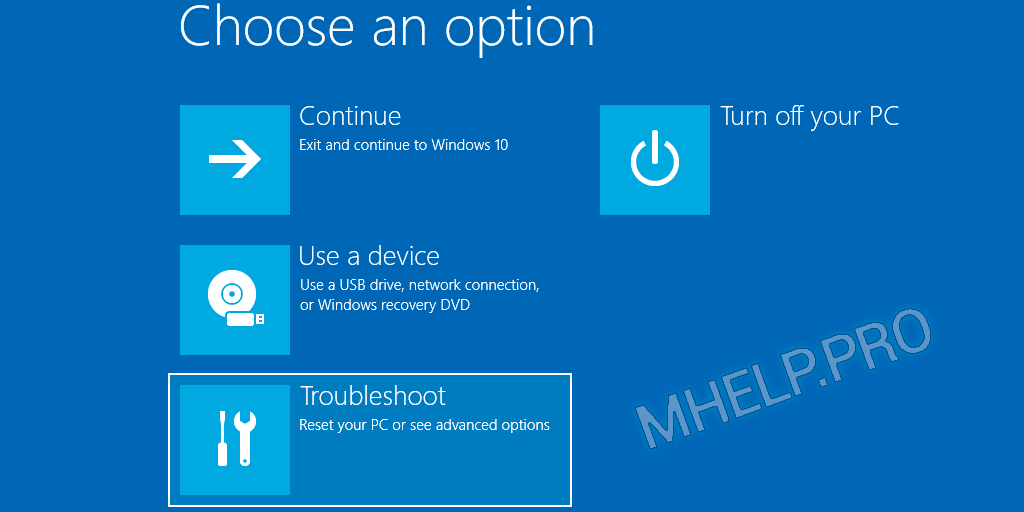
5. In the Troubleshoot window, select the Advanced options;

6. In the Advanced options window, select the Startup Settings;
7. In the Startup Setting window, click the Restart button;

8. After restarting your computer, In the Boot Options window (Advanced Boot Options), select the required Windows boot mode.
Windows will boot in Safe mode.
To exit Safe Mode, restart your computer.
Using msconfig (Windows 10, 8, 7)
We use the msconfig utility to boot Windows in safe mode.
💡 Suitable for Windows 10, 8, 7.
- Right-click on the START button and select Run or press the key combination Windows+R;
- Enter the name of the msconfig utility and click OK;
- Switch to the Boot tab, check the Safe Mode checkbox, select Minimal and press ОК;
- Click Restart to start Windows Safe Mode.
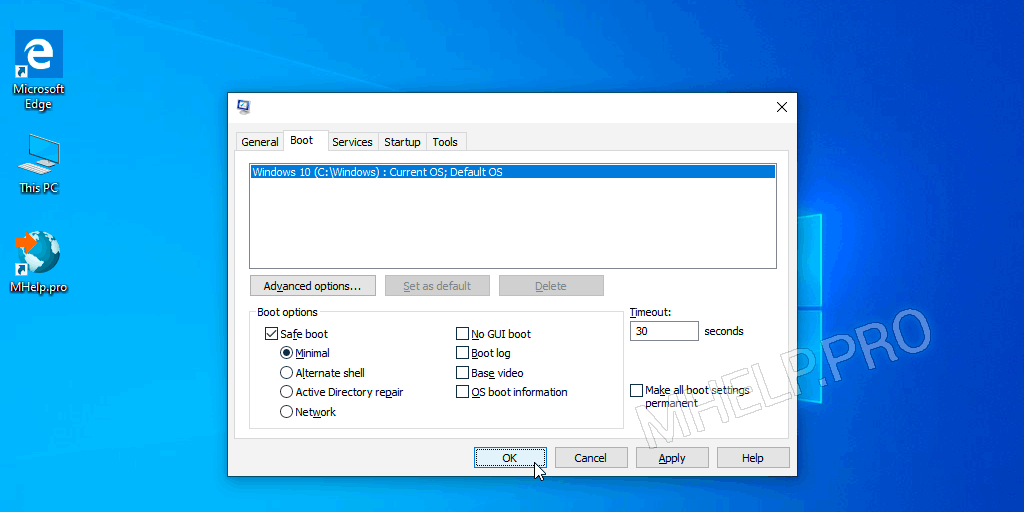
To exit Safe mode, restart your computer.
🔔 The msconfig utility provides additional options for starting the computer (disabling the launch of services and applications).
Enable Advanced boot options (Windows 10,
💡 Suitable for Windows 10, 8.
In Windows 7, XP, when loading the OS, pressing the F8 button opened the Advanced boot options menu.
In Windows 10, 8, the call to this menu with the F8 button must be turned on manually.
- Run the command prompt as administrator;
- Enter the command:
bcdedit /set {default} bootmenupolicy legacy
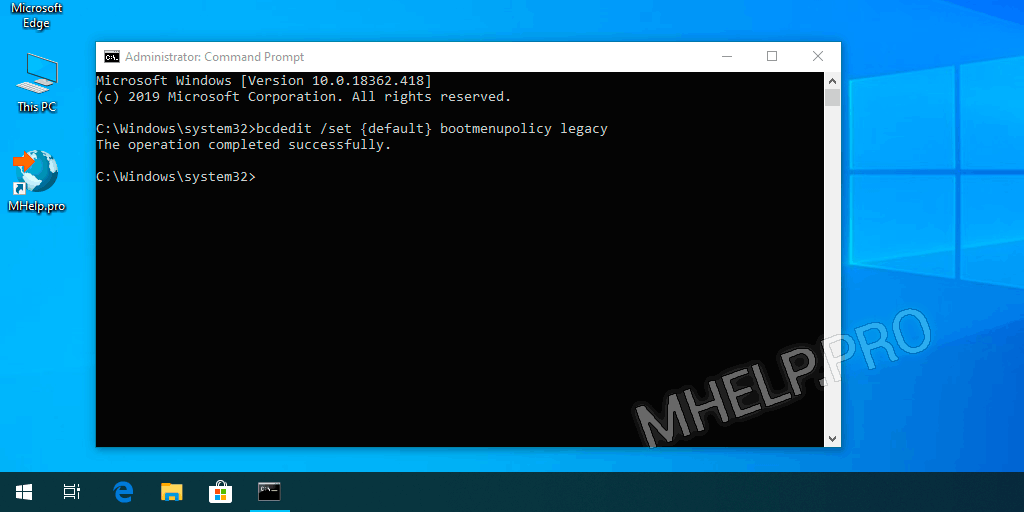
Close the command prompt window, restart the computer.
Before loading the operating system, press the F8 button, the Advanced boot options menu opens, where we can choose several options for starting Safe Mode or other Windows boot options.
🔔 If you have a laptop, you may have to press the Fn + F8 key combination.
Safe Mode from System Restore (Windows 10,
💡 Suitable for Windows 10, 8.
You can boot Safe Mode Windows 10, 8 from Recovery mode, after an incorrect OS boot.
After three consecutive power outages when loading Windows 10, 8, the system will start to boot Recovery mode.

Select See advanced repair options recovery options.
Further, the launch of Safe Mode will occur as in paragraph – Safe Mode after reboot (Windows 10, 8).
🔔 We dont recommend using this method of loading Windows Safe Mode, as this can cause permanent damage to the system!
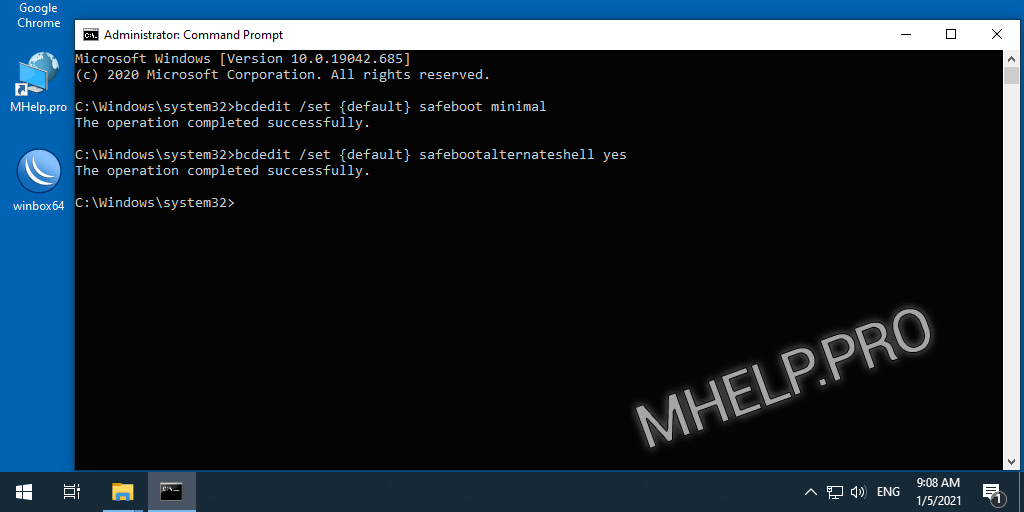
Safe mode from the command prompt (bcdedit)
The bcdedit command changes persistent Windows boot options. After enabling Safe Mode, enter the command to change the configuration and disable booting into Safe Mode.
You can also use the bcdedit command in the command prompt in Windows Recovery mode.
You can boot Windows in Safe Mode by running the bcdedit command in the Command Prompt running with administrator rights.
Enable Safe Mode:
bcdedit /set {default} safeboot minimal
Enable Safe Mode with Networking:
bcdedit /set {default} safeboot network
Enable Safe Mode with Command Prompt (enter two commands):
bcdedit /set {default} safeboot minimal
bcdedit /set {default} safebootalternateshell yes
Restart your computer to apply the new configuration settings.
To disable booting Safe Mode, in Windows configuration, run:
bcdedit /deletevalue {default} safeboot
Safe mode using shutdown utility
The shutdown utility is a built-in Windows program that allows you to restart, shutdown, hibernate, or end a user session.
Run in Command Prompt or PowerShell:
shutdown.exe /r /o

After rebooting, in the System Restore window, select the required option.
Learn more about the startup parameters of the shutdown utility – here.
I hope you were able to boot Windows in Safe Mode in a convenient way.
How to boot Windows Safe Mode:
- SHIFT button and Reboot
Hold the SHIFT button and press Reset button. More…
- Msconfig utility
Run the msconfig utility, select the Safe Mode – Minimal option. More…
- Enabling the Advanced Boot Menu
Use the bcdedit command to enable the Advanced boot menu and the press F8 button (as on Windows 7, XP) to call up the menu, when the Windows boot. More…
- System shutdown
Three times, power off the system to enable the Recovery mode and boot Windows Safe Mode. More…
These were the available options for boot Safe Mode Windows 10, 8, 7.
🟢 How to boot Safe Mode in Windows 10, 8, 7 was discussed in this article. I hope you can now configure Windows to start in Safe Mode. However, if you run into any problems, do not hesitate to write in the comments. I will try to help.
![]()
Download Article
![]()
Download Article
Are you battling a nasty computer virus, or a program that refuses to uninstall itself? Safe Mode is a way to load Windows with only the basic files that it needs to run. This mode will allow you to perform lots of troubleshooting tasks that would be difficult or impossible to do in a normal Windows session. Loading Safe Mode is a straightforward process, and you can do it even if you can’t load Windows normally. See Step 1 below to learn how.
Steps
-
1
Determine if you need to run Safe Mode. Safe Mode works by only allowing the most essential files and drivers to load. Anything which is not required to boot the operating system (like start-up software) is not loaded. If you are having trouble booting your computer or something is acting fishy shortly after starting up your machine, reboot in Safe Mode to start troubleshooting.
-
2
Remove all disks from the computer. This includes CDs, DVDs, floppy disks and USB drives. This will prevent any of them from attempting to boot when you restart your computer.
Advertisement
-
3
Reboot the computer into Safe Mode. You have two different options when it comes to booting into Safe Mode. You can reboot your computer and rapidly strike the F8 key to load the Advanced Startup menu, or you can set Windows to boot directly into Safe Mode. The first option is useful when you can’t load Windows, while the second is useful if you can access Windows normally already.
- For the first option, rapidly press the «F8» key while your computer restarts. Make sure you do this before the Windows splash screen appears (this is the black screen with the Windows logo). If the splash screen appears, you will need to restart the computer again and try again.[1]
- For the second option, set your computer to boot into Safe Mode from Windows. To do this, open the Run dialog (Windows key + R) and type “msconfig”. This will open the System Configuration box. Click the Boot tab, and then check the “Safe boot” box. This will allow you to select what kind of Safe Mode you would like to use. The most common choices will be Minimal and Networking (see next step).[2]
- For the first option, rapidly press the «F8» key while your computer restarts. Make sure you do this before the Windows splash screen appears (this is the black screen with the Windows logo). If the splash screen appears, you will need to restart the computer again and try again.[1]
-
4
Choose the type of Safe Mode you want to run. After hitting F8, you will be taken to the «Advanced Boot Options» screen. At the top of the list will be three different ways to load Safe Mode. If you set Windows to boot directly to Safe Mode, you won’t see this menu.
- Safe Mode — This is the best option if you aren’t sure what you should choose. This option will load the fewest drivers necessary to boot Windows 7. You will not be able to connect to the internet. This is the “Minimal” option when setting Windows to boot to Safe Mode.
- Safe Mode with Networking — This option loads all the drivers and files that the first option does, but also loads any processes that are needed to allow networking. Choose this option if you think you’ll need to get on the internet or your local network while troubleshooting.
- Safe Mode with Command Prompt — This mode loads the same processes as the first option but gives you immediate access to the command prompt. This option is suited for advanced users who need to do troubleshooting from the command line. The Windows graphical environment will not be loaded.
-
5
Wait for the necessary files to load. The next screen will show every file that is being loaded. You don’t need to do anything while this is happening unless the files do not all load correctly. If the screen freezes at this point, make a note of the last file that successfully loaded and then search the internet for troubleshooting tips based on that information.
-
6
Log into Windows 7. When the login screen appears, log in to an account with administrator privileges. If you only have 1 user account on your computer, it is likely that it has administrator privileges. If you only have one account and no password, you will most likely be logged in automatically.
-
7
Start troubleshooting. You will know if your computer is in Safe Mode because «Safe Mode» will be written in all four corners of the screen. Safe Mode is a great place to run virus and malware scans, uninstall troublesome programs, and edit the registry.
- When you are finished in Safe Mode, reboot your computer to return to a normal Windows 7 session.
- If you set your computer to boot into Safe Mode through the System Configuration box, you will need to open it again while you are in Safe Mode and uncheck the “Safe boot” option in the Boot tab. If you don’t, your computer will continue booting into Safe Mode when it restarts.


Advertisement
Add New Question
-
Question
How to fix sound system in Windows 7 safe mode?

WikiHowUser20180704181044
Community Answer
Sound is a full system function. Safe mode and system sound are mutually exclusive.
-
Question
My HP laptop stated two days ago I needed to update it. However, for the past two days, my laptop has the error message «We couldn’t compete the updates. Undoing changes. Don’t turn off your computer.» I can’t get it into safe mode to eliminate the updates. What do I do?
The update may be corrupted. Do not restart or turn off your computer during updates. To fix this, you may need to get a new hard drive, or to go to an IT service to get your current HD wiped.
Ask a Question
200 characters left
Include your email address to get a message when this question is answered.
Submit
Advertisement
-
Virus scan software will run faster in safe mode.
Thanks for submitting a tip for review!
Advertisement
About This Article
Thanks to all authors for creating a page that has been read 163,773 times.