Главная » Microsoft Word » Лазерное МФУ начального уровня SCX-3200 от “Самсунг”: идеальное решение для малых подсистем печати и сканирования
Лазерное МФУ начального уровня SCX-3200 от “Самсунг”: идеальное решение для малых подсистем печати и сканирования
Как сканировать на принтере Samsung scx 3200?
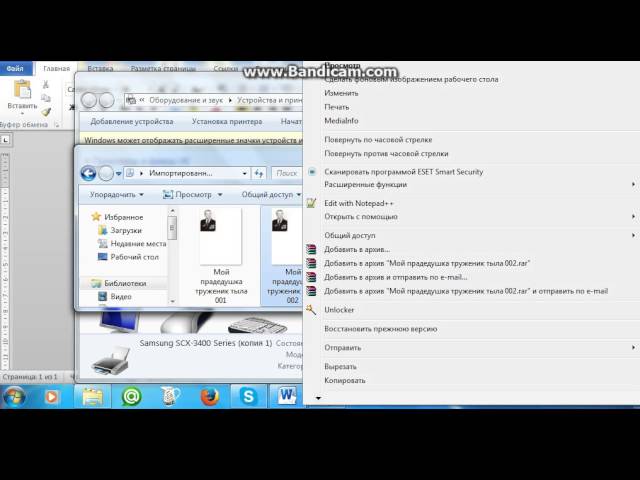
- Открываем «Панель управления» (клавишами W+X или через «Пуск» и в поиск написать панель управления)
- В панели управления вверху в поиске пишем «Принтер» и выбираем «Устройства и принтеры»
- Выбираем наш принтер — нажимаем правой кнопкой мыши — начать сканирование
- Убедитесь, что устройство и компьютер правильно подключены друг к другу и включены.
- Поместите фотографию или страницу на стекло экспонирования или в автоподатчик.
- После установки программы Samsung значок SmarThru 4 появится на рабочем столе. .
- Нажмите кнопку Сканировать.
В каких случаях применим этот лазерный принтер? Его комплектация
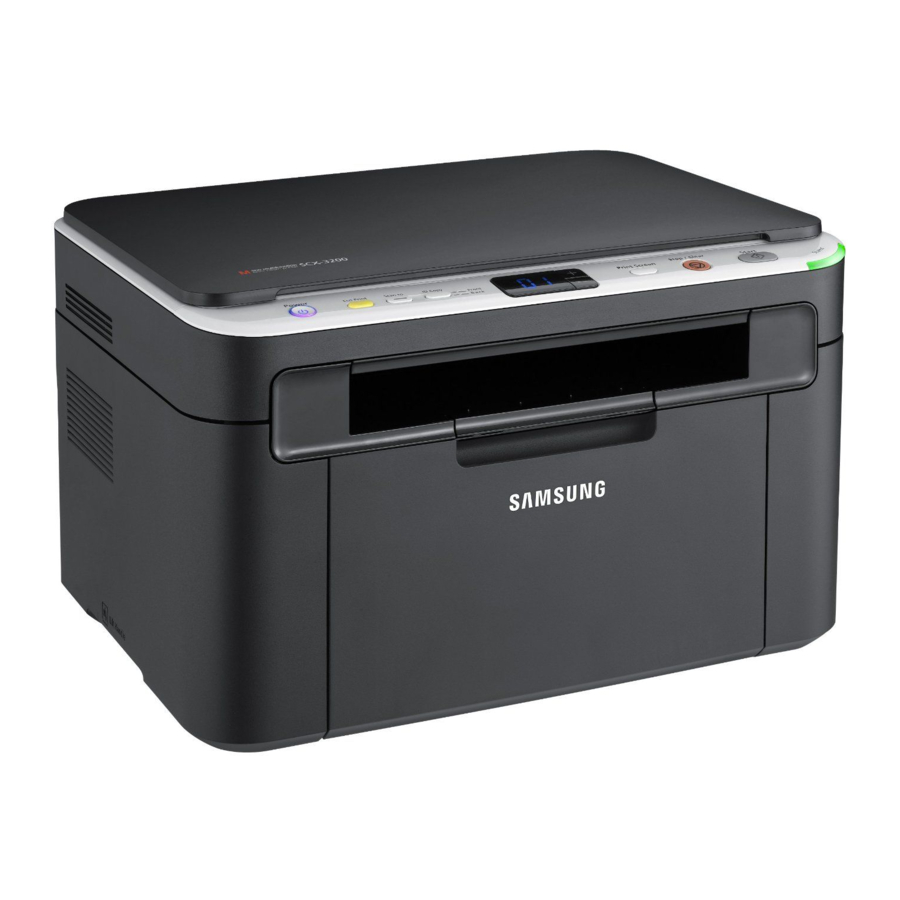
Месячный лимит по печати для “Самсунг» SCX-3200 установлен производителем на отметке в 5000 страниц. Подобного объема будет уж точно достаточно для компактного офиса, число рабочих мест в котором не превышает 10 штук. Также вполне успешно это МФУ может использоваться и в рамках малой рабочей компьютерной группы. Еще одно возможное место для работы такого продукта — это в домашних условиях. Во всех остальных случаях можно тоже применить такое многофункциональное устройство. Только для полного покрытия потребности в печати придется дополнительно покупать еще и другие принтеры или МФУ. Список того, что входит в комплект устройства:
Картридж с исходным наполнением тонером. Его ресурс печати составляет 70 процентов от максимально возможного.
Внешний адаптер питания с силовым электрокабелем.
CD-диск с прикладным софтом, электронной документации и, конечно же, драйверами.
Шнур компьютерный интерфейсный формата USB.
Расширенное руководство пользователя в бумажном виде.
Набор рекламных буклетов с возможностями данного периферийного продукта.
Всего этого уж точно достаточно для запуска такой локальной подсистемы печати.
Как сканировать на принтере Samsung SCX 4600?
Загрузите оригиналы документов в автоподатчик лицевой стороной вверх либо поместите один оригинал на стекло экспонирования лицевой стороной вниз. Нажмите кнопку («Сканирование») на панели управления. Нажимайте клавиши со стрелками влево/вправо. Когда появится пункт Сканир.
Как сохранять отсканированные документы
Некоторые «родные» приложения для МФУ отсканированные файлы не сохраняют, а просто открывают в приложении для просмотра изображений. При таком варианте вы просто нажмите сочетание клавиш «Ctrl+S» и выберите папку, куда должен быть помещен документ. Лучше устанавливать софт, который проверен другими пользователями и может сохранять ксерокопии автоматически. Среди людей популярны Adobe Reader или DjvuReaser. Просто задайте формат для изображения и место хранения.
Устройство может отсканировать ваш файл с черными полями и перед сохранением на компьютер их следует обязательно обрезать в редакторе. Стандартным разрешением считается 150 точек на дюйм, для официальных справок – 300. На размер конечного файла влияет формат, в котором вы сохранили электронный документ, к примеру, jpg имеет наименьшее значение, а tif и bmp гораздо больше.
Удаление samsung universal print driver
Установка и удаление драйвера Samsung Universal Print Driver_ 6
Удаление Samsung Universal Print Driver
Чтобы удалить Samsung Universal Print Driver, выполните указанные ниже действия.
1. В меню «Пуск» Windows выберите пункты Все программы > Samsung Universal Print Driver >
Обслуживание.
Появится мастер установки Samsung Universal Print Driver.
2. Выберите пункт Удалить и нажмите кнопку Далее.
3. Выберите компоненты, которые необходимо удалить, и нажмите кнопку Далее.
4. В окне подтверждения нажмите кнопку Да.
5. После завершения удаления нажмите кнопку Готово.


Да

Нет
Содержание
- Samsung scx 3200 как сканировать?
- Как отсканировать документ на мфу samsung?
- Как отсканировать документ на компьютер с принтера Samsung SCX 3400?
- Как сканировать документ на принтере Самсунг SCX 4200?
- Как сканировать на принтере Samsung SCX 4600?
- Как отсканировать документ на принтере Epson?
- Как отсканировать документ на сканере?
- Как подключить принтер Самсунг SCX 3405w к компьютеру?
- Как подключить принтер Samsung SCX 3400 через wi fi?
- Как правильно отсканировать документ?
- Как подключить принтер к ноутбуку SCX 4200?
- Как сканировать документы с принтера на компьютер?
- Как подключить сканер к компьютеру?
- Как сканировать на мфу canon 3010?
- Как сканировать на самсунг scx 3200?
- Как отсканировать документ на компьютер с принтера Samsung SCX 3400?
- Как сканировать на Samsung m2070?
- Как отсканировать документ на компьютер с принтера Samsung?
- Как сканировать на принтере Samsung SCX 4600?
- Как отсканировать документ на компьютер с принтера Epson?
- Как отсканировать документ на принтере Samsung SCX 4220?
- Как сканировать на принтере Самсунг?
- Как подключить принтер по сети Samsung?
- Как сканировать фото на принтере Самсунг?
- Как с принтера сканировать документ на компьютер?
- Как отсканировать документ в формате Word?
- Как подключить сканер самсунг к компьютеру?
- Как сканировать на мфу canon 3010?
- Samsung Universal Print Driver Руководство пользователя пред.
- Авторское право
- Содержание АВТОРСКОЕ ПРАВО.
- Введение, Требования к системе
- Установка samsung universal print driver, Установка и удаление драйвера, Samsung universal print driver
- Удаление samsung universal print driver
- Доступ к драйверу samsung universal print driver, Использование драйвера, Samsung universal print driver
- Внешний вид окна драйвера
- Samsung scx 3200 как сканировать?
- Как отсканировать документ на мфу samsung?
- Как отсканировать документ на компьютер с принтера Samsung SCX 3400?
- Как сканировать документ на принтере Самсунг SCX 4200?
- Как сканировать на принтере Samsung SCX 4600?
- Как отсканировать документ на принтере Epson?
- Как отсканировать документ на сканере?
- Как подключить принтер Самсунг SCX 3405w к компьютеру?
- Как подключить принтер Samsung SCX 3400 через wi fi?
- Как правильно отсканировать документ?
- Как подключить принтер к ноутбуку SCX 4200?
- Как сканировать документы с принтера на компьютер?
- Как подключить сканер к компьютеру?
- Как сканировать на мфу canon 3010?
- Драйвер для Samsung SCX-3200
- Установка драйвера в Windows 10
Samsung scx 3200 как сканировать?
Как отсканировать документ на мфу samsung?
Поместите одностраничный документ лицевой стороной вниз на стекло сканера или загрузите документы лицевой стороной вверх в устройство подачи документов. В зависимости от модели вашего принтера выполните одно из следующих действий: Нажмите кнопку Сканирование на панели управления, затем выберите Сканировать на ПК.
Как отсканировать документ на компьютер с принтера Samsung SCX 3400?
Сканируем стандартным способом от Windows
Как сканировать документ на принтере Самсунг SCX 4200?
Сканирование на Samsung SCX-4200
Как сканировать на принтере Samsung SCX 4600?
Загрузите оригиналы документов в автоподатчик лицевой стороной вверх либо поместите один оригинал на стекло экспонирования лицевой стороной вниз. Нажмите кнопку («Сканирование») на панели управления. Нажимайте клавиши со стрелками влево/вправо. Когда появится пункт Сканир.
Как отсканировать документ на принтере Epson?
Сканирование с компьютера
Как отсканировать документ на сканере?
Как отсканировать документ: общая инструкция
Как подключить принтер Самсунг SCX 3405w к компьютеру?
Подключите устройство к компьютеру и включите его. Зайдите в «Диспетчер устройств» и найдите там Samsung SCX-3405W. Правой кнопкой мыши вызовите контекстное меню.
…
Как подключить принтер Samsung SCX 3400 через wi fi?
В меню Пуск выберите Программы или Все программы > Samsung Printers > Samsung Easy Printer Manager > Параметры устройств > Сеть.
Как правильно отсканировать документ?
Как отсканировать документ
Как подключить принтер к ноутбуку SCX 4200?
Установка программного обеспечения Samsung SCX-4200 в Windows
Как сканировать документы с принтера на компьютер?
Как отсканировать документ на компьютер с принтера?
Как подключить сканер к компьютеру?
Нажмите кнопку Пуск > Параметры > Устройства > Принтеры и сканеры или используйте следующую кнопку. Выберите Добавить принтер или сканер. Подождите, пока компьютер найдет находящиеся рядом сканеры, а затем выберите тот, который вы хотите использовать, и нажмите кнопку Добавить устройство.
Как сканировать на мфу canon 3010?
Чтобы отсканировать нужный документ, зайдите в меню «Пуск», дальше «Устройства и принтеры». В открывшемся окошке вы увидите доступные (подключенные) устройства, из списка выберите нужное МФУ Сanon mf3010 и кликните по нему мышкой. Появится панель с несколькими параметрами.
Источник
Как сканировать на самсунг scx 3200?
Как отсканировать документ на компьютер с принтера Samsung SCX 3400?
Сканируем стандартным способом от Windows
Как сканировать на Samsung m2070?
Как отсканировать документ на компьютер с принтера Samsung?
Зайти по пути «Панель управленияОборудование и звукУстройства и принтеры». Кликаем по иконке принтера правой кнопкой мышки и выбираем «Начать сканирование«. В открывшемся окошке задаем необходимые параметры, жмем «Просмотр» и если нас все устраивает — нажимаем «Сканировать».
Как сканировать на принтере Samsung SCX 4600?
Загрузите оригиналы документов в автоподатчик лицевой стороной вверх либо поместите один оригинал на стекло экспонирования лицевой стороной вниз. Нажмите кнопку («Сканирование») на панели управления. Нажимайте клавиши со стрелками влево/вправо. Когда появится пункт Сканир.
Как отсканировать документ на компьютер с принтера Epson?
Сканирование с компьютера
Как отсканировать документ на принтере Samsung SCX 4220?
Использование Samsung SmarThru
Как сканировать на принтере Самсунг?
Как отсканировать документ
Как подключить принтер по сети Samsung?
В меню Пуск выберите Программы или Все программы > Samsung Printers > Samsung Easy Printer Manager > Параметры устройств > Сеть.
Как сканировать фото на принтере Самсунг?
Включите устройство, фото положите на сканирующую поверхность «лицом вниз». Затем поищите на рабочем столе компьютера ярлык сканера. Если его там нет, найдите значок устройства в папке «Мой компьютер» или меню «Пуск» — «Принтеры и факсы». Кликнув на него дважды, Вы запустите сканирование.
Как с принтера сканировать документ на компьютер?
Как отсканировать документ на компьютер с принтера?
Как отсканировать документ в формате Word?
Сканирование в Microsoft Word
Как подключить сканер самсунг к компьютеру?
При подключении сканера к компьютеру с помощью кабеля USB
Как сканировать на мфу canon 3010?
Чтобы отсканировать нужный документ, зайдите в меню «Пуск», дальше «Устройства и принтеры». В открывшемся окошке вы увидите доступные (подключенные) устройства, из списка выберите нужное МФУ Сanon mf3010 и кликните по нему мышкой. Появится панель с несколькими параметрами.
Источник
10 страниц подробных инструкций и пользовательских руководств по эксплуатации
SCX-3200 Захватывает несколько листов. Замятие бумаги
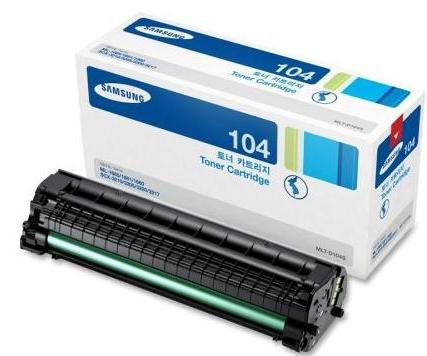
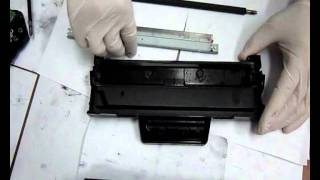
Заправка картриджа Samsung D104S/3200/1660/1665/1860/1865/3205
Прошивка принтера samsung scx 3200
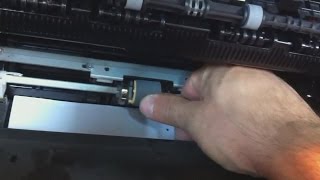
Samsung SCX-3200 не захватывает бумагу
SAMSUNG SCX-3205 разблокировка,сброс
The Samsung scx-3200 is a red light mistake. How to reset the Samsung scx-3200. Samsung toner refill
Samsung SCX-3200 • Riparazione Sistema di Pick-up Carta
Samsung Universal Print Driver Руководство пользователя пред.
Samsung universal print driver
Samsung Universal Print

Авторское право
Авторское право_ 2
© 2009 Samsung Electronics Co., Ltd. Все права защищены.
Данное руководство администратора предназначено только для ознакомления. Любая информация,
содержащаяся в нем, может быть изменена без предупреждения.
Корпорация Samsung Electronics не несет ответственности за какие бы то ни было убытки, прямые или косвенные,
вызванные использованием данного руководства или связанные с ним.
Samsung Universal Print Driver является товарным знаком компании Samsung Electronics Co., Ltd.
Samsung и эмблема Samsung являются товарными знаками компании Samsung Electronics Co., Ltd.
Microsoft, Windows, Internet Explorer и Windows Vista являются охраняемыми товарными знаками корпорации
Microsoft в США и других странах.
Прочие торговые знаки, названия товаров и компаний, упомянутые в документе, могут быть товарными
знаками соответствующих владельцев.

Содержание АВТОРСКОЕ ПРАВО.

Введение, Требования к системе
Драйвер Samsung Universal Print Driver поддерживает различные модели принтеров. Он
позволяет пользоваться не только устройствами печати Samsung, но и принтерами на базе
PDL других компаний, не загружая отдельные драйверы.
PDL означает PCL и PS.
Компания Samsung не гарантирует качество печати принтеров других производителей и
неподдерживаемых моделей Samsung (чтобы просмотреть список поддерживаемых устройств Samsung,
щелкните ).
Для неподдерживаемых моделей Samsung драйвер автоматически переключается в
режим PDL, заданный по умолчанию.
Samsung Universal Print Driver и драйверы для конкретных моделей
В таблице ниже показаны различия между драйвером Samsung Universal Print Driver и драйверами для отдельных
продуктов.
Требования к системе
Ниже приведены минимальные требования к системе для драйвера Samsung Universal Print Driver.
SAMSUNG UNIVERSAL PRINT DRIVER
ДРАЙВЕРЫ ДЛЯ КОНКРЕТНЫХ
Единый интерфейс пользователя.
Различные интерфейсы пользователя.
Наличие файла установщика, который
загружается вместе в драйвером
Samsung Universal Print Driver.
Установка с помощью файла
установщика.
Поиск, загрузка и установка драйверов
для каждого устройства.
Установка при автоматическом
запуске компакт-диска или с помощью
мастера установки принтеров.
Простой поиск предложенных устройств
из числа принтеров Samsung.
Поиск устройств вручную.
Предлагается на веб-сайте Samsung.
Предлагается на компакт-диске, который
входит в комплект поставки;
предоставляется отдельно для каждого
продукта.
Pentium III, 933 МГц (Pentium IV, 1 ГГц)
Pentium II, 400 МГц (Pentium III, 933 МГц)
32- или 64-разрядный процессор
Pentium IV, 1 ГГц или более мощный
Графическая карта с объемом памяти 128 Мб и поддержкой DirectX 9
Windows Server 2003
Pentium III, 933 МГц (Pentium IV, 1 ГГц)
Windows Server 2008
Pentium IV, 1 ГГц (Pentium IV, 2 ГГц)
Windows Server 2008
(R2)
Pentium IV, 1 ГГц (x86) или 1,4 ГГц (x64)
(2 ГГц или выше)

Установка samsung universal print driver, Установка и удаление драйвера, Samsung universal print driver
Установка и удаление драйвера Samsung Universal Print Driver_ 5
Установка и удаление драйвера Samsung
Universal Print Driver
В этой главе приведены пошаговые инструкции по установке и удалению драйвера
Samsung Universal Print Driver.
Ниже описаны окна для драйвера PCL в Windows XP. Окна для драйвера PS могут отличаться от
представленных ниже, но порядок действий для этих драйверов совпадает.
Установка Samsung Universal Print Driver
Перед установкой драйвера проверьте соответствие рекомендуемым минимальным требованиям к системе (см.
раздел «Требования к системе» на стр. 4).
1. Запустите веб-браузер и откройте страницу www.samsung.com.
2. Выполните поиск установочного файла Samsung Universal Print Driver.
3. Запустите установочный файл.
Появится мастер установки Samsung Universal Print Driver.
4. Нажмите кнопку Далее. При необходимости выберите нужный язык из раскрывающегося списка.
После появления окна установки дождитесь ее завершения.
5. После окончания установки нажмите кнопку Готово.
Для того чтобы зарегистрироваться как пользователь принтера Samsung, установите соответствующий
флажок и нажмите кнопку Готово. Регистрация позволит получать информацию от компании Samsung.
Если драйвер установлен правильно, в папку Принтеры и факсы будет добавлен элемент Samsung Universal
Print Driver.

Удаление samsung universal print driver
Установка и удаление драйвера Samsung Universal Print Driver_ 6
Удаление Samsung Universal Print Driver
Чтобы удалить Samsung Universal Print Driver, выполните указанные ниже действия.
1. В меню «Пуск» Windows выберите пункты Все программы > Samsung Universal Print Driver >
Обслуживание.
Появится мастер установки Samsung Universal Print Driver.
2. Выберите пункт Удалить и нажмите кнопку Далее.
3. Выберите компоненты, которые необходимо удалить, и нажмите кнопку Далее.
4. В окне подтверждения нажмите кнопку Да.
5. После завершения удаления нажмите кнопку Готово.
Доступ к драйверу samsung universal print driver, Использование драйвера, Samsung universal print driver
Использование драйвера Samsung Universal Print Driver_ 7
Использование драйвера Samsung
Universal Print Driver
Основная задача драйвера Samsung Universal Print Driver заключается в том, чтобы можно
было установить один драйвер (Samsung Universal Print Driver) и использовать его для
различных устройств печати. Тем не менее Samsung Universal Print Driver поддерживает и
другие возможности, например поиск устройств печати, создание папки избранного и
проверку состояния устройства.
Доступ к драйверу Samsung Universal Print Driver
1. В меню Пуск Windows выберите пункт Принтеры и факсы.
2. Щелкните правой кнопкой мыши Samsung Universal Print Driver.
3. Выберите команду Настройка печати или Свойства.
Появится окно Samsung Universal Print Driver.
Если принтеры давно не использовались, появится всплывающее окно с запросом на поиск принтеров. Для
поиска подключенных принтеров нажмите кнопку ОК.

Внешний вид окна драйвера
Использование драйвера Samsung Universal Print Driver_ 8
Внешний вид окна драйвера
Включает параметры отображения.
: Выберите макет окна Samsung Universal Print Driver. Если
выбрать макет Рисунок2 и установить программу Samsung Smart Panel,
будет доступно окно состояния (4).
: Обновление сведений о принтерах в списке.
: Выбор представления для списка принтеров. При выборе
значения Вид — таблица выводятся сведения о принтерах, такие как
Адрес, Размещение, Статус и Системное имя. При выборе значения Вид
— изображение кроме этого выводится крупное изображение принтера.
Этот параметр поддерживается только в Windows XP и более поздних
версиях.
: Вывод групп принтеров. Чтобы систематизировать принтеры,
распределив их по группам, нажмите эту кнопку. Этот параметр
поддерживается только в Windows XP и более поздних версиях.
: Поиск принтера в списке по ключевому слову (например, по
: Вызов окна справки.
: Вывод сведений о драйвере Samsung Universal Print Driver.
Источник
Samsung scx 3200 как сканировать?
Как отсканировать документ на мфу samsung?
Поместите одностраничный документ лицевой стороной вниз на стекло сканера или загрузите документы лицевой стороной вверх в устройство подачи документов. В зависимости от модели вашего принтера выполните одно из следующих действий: Нажмите кнопку Сканирование на панели управления, затем выберите Сканировать на ПК.
Как отсканировать документ на компьютер с принтера Samsung SCX 3400?
Сканируем стандартным способом от Windows
Как сканировать документ на принтере Самсунг SCX 4200?
Сканирование на Samsung SCX-4200
Как сканировать на принтере Samsung SCX 4600?
Загрузите оригиналы документов в автоподатчик лицевой стороной вверх либо поместите один оригинал на стекло экспонирования лицевой стороной вниз. Нажмите кнопку («Сканирование») на панели управления. Нажимайте клавиши со стрелками влево/вправо. Когда появится пункт Сканир.
Как отсканировать документ на принтере Epson?
Сканирование с компьютера
Как отсканировать документ на сканере?
Как отсканировать документ: общая инструкция
Как подключить принтер Самсунг SCX 3405w к компьютеру?
Подключите устройство к компьютеру и включите его. Зайдите в «Диспетчер устройств» и найдите там Samsung SCX-3405W. Правой кнопкой мыши вызовите контекстное меню.
…
Как подключить принтер Samsung SCX 3400 через wi fi?
В меню Пуск выберите Программы или Все программы > Samsung Printers > Samsung Easy Printer Manager > Параметры устройств > Сеть.
Как правильно отсканировать документ?
Как отсканировать документ
Как подключить принтер к ноутбуку SCX 4200?
Установка программного обеспечения Samsung SCX-4200 в Windows
Как сканировать документы с принтера на компьютер?
Как отсканировать документ на компьютер с принтера?
Как подключить сканер к компьютеру?
Нажмите кнопку Пуск > Параметры > Устройства > Принтеры и сканеры или используйте следующую кнопку. Выберите Добавить принтер или сканер. Подождите, пока компьютер найдет находящиеся рядом сканеры, а затем выберите тот, который вы хотите использовать, и нажмите кнопку Добавить устройство.
Как сканировать на мфу canon 3010?
Чтобы отсканировать нужный документ, зайдите в меню «Пуск», дальше «Устройства и принтеры». В открывшемся окошке вы увидите доступные (подключенные) устройства, из списка выберите нужное МФУ Сanon mf3010 и кликните по нему мышкой. Появится панель с несколькими параметрами.
Источник
Драйвер для Samsung SCX-3200

Windows XP/Vista/7/8/8.1/10 32/64-bit (универсальный драйвер — рекомендуем для установки)
Данная программа подходит почти для всех версий Windows. Чтобы проверить — установку для вашей версий перейдите по ссылке и установите программу для скачивания драйверов для вашего устройства.
Windows 2000 / 2003 / 2008 / XP / Vista / 7
Размер: 18.5 MB (принтер) и 45.8 MB (сканер)
Установка драйвера в Windows 10
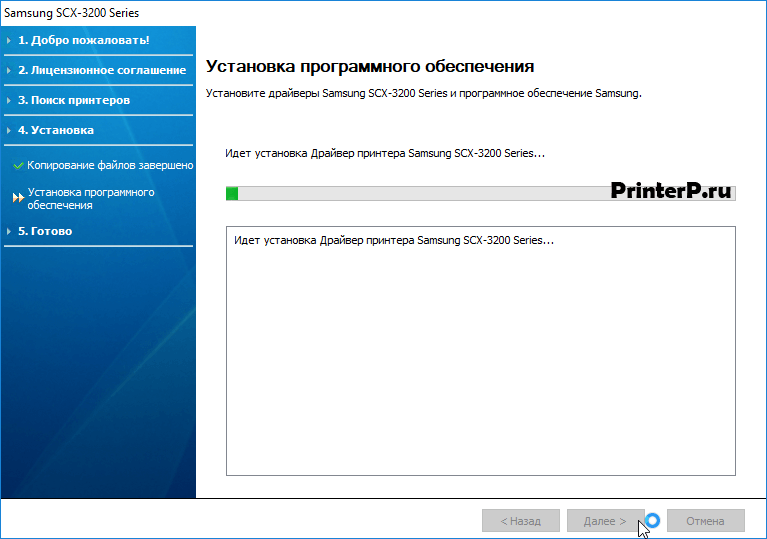
Программное обеспечения для принтера Samsung SCX-3200 можно скачать на нашем сайте по ссылке выше. Если вы скачете установочные файлы с официального сайта, процесс установки будет аналогичен. На первом этапе выбираем любую папку для извлечения системных файлов. Отмечаем «Запустить после завершения», нажимаем «Извлечь».

Далее выберете единственный пункт – «Установить сейчас».

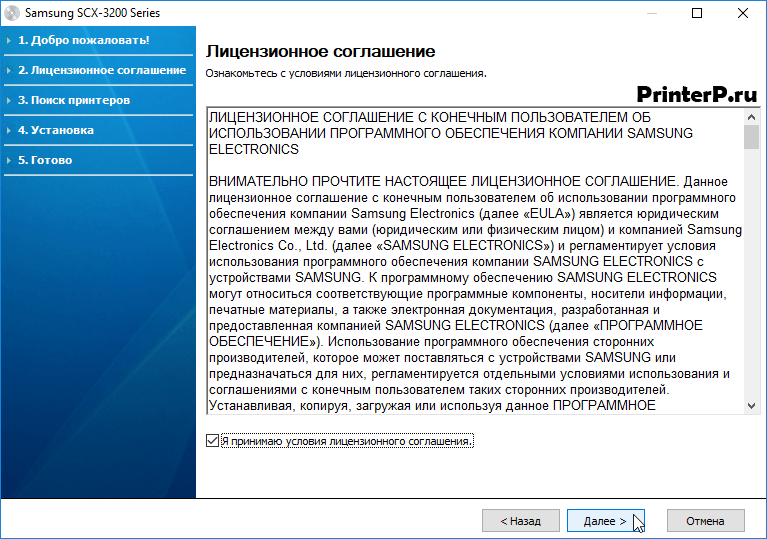
Прочтите лицензионное соглашение. Здесь будут указаны все условия использования данного программного продукта. После изучения информации отмечаем «Я принимаю условия лицензионного соглашения». Для продолжения установки нажимаем «Далее».

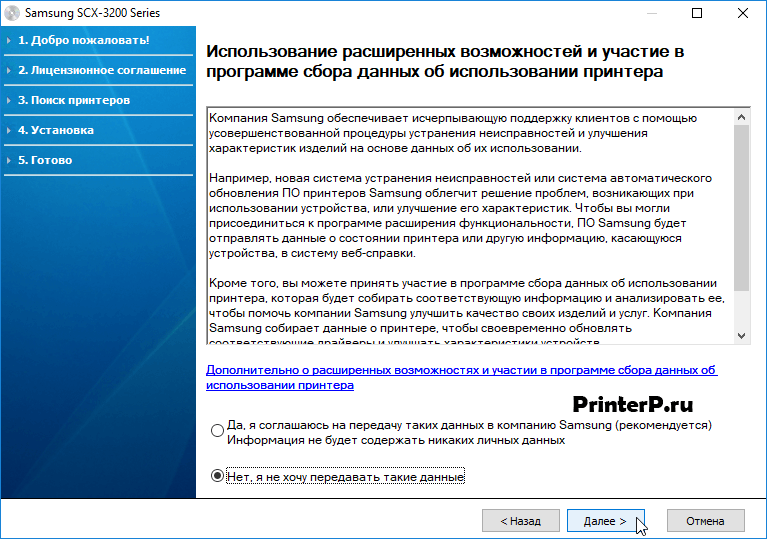
Для большинства пользователей следующий пункт установки скорее всего не пригодится. Если вы не желаете передавать в компанию Samsung отчеты, то отметьте флажком кнопку «Нет, я не хочу передавать такие данные».

На данном этапе все шаги установки выполнены. Подождите несколько минут, пока установщик загрузит необходимые системные файлы для правильной работы принтера. Обычно данная процедура не занимает много времени. Зеленая шкала отображает прогресс установки.

Установка драйвера завершена. Регистрировать ПО не обязательно, поэтому прост о жмём кнопку «Готово».
Источник
Содержание
- Драйвер для Samsung SCX-3200
- Установка драйвера в Windows 10
- Samsung scx 3200 как сканировать на компьютер
- Как отсканировать документ на компьютер с принтера Samsung SCX 3400?
- Как сканировать на Samsung m2070?
- Как отсканировать документ на компьютер с принтера Samsung?
- Как сканировать на принтере Samsung SCX 4600?
- Как отсканировать документ на компьютер с принтера Epson?
- Как отсканировать документ на принтере Samsung SCX 4220?
- Как сканировать на принтере Самсунг?
- Как подключить принтер по сети Samsung?
- Как сканировать фото на принтере Самсунг?
- Как с принтера сканировать документ на компьютер?
- Как отсканировать документ в формате Word?
- Как подключить сканер самсунг к компьютеру?
- Как сканировать на мфу canon 3010?
- Использование функций сканирования в программе Easy Document Creator
- Сканирование нескольких страниц в один файл
- hp-feedback-input-portlet
- hp-feedback-banner-portlet
- hp-country-locator-portlet
- Выбор местоположения
- Северная и Южная Америка
- Европа, Ближний Восток, Африка
- Азиатско-Тихоокеанский регион и Океания
- Выберите язык
- hp-detect-load-my-device-portlet
- hp-hero-support-search
- Зачем нужен и что такое цветовой профиль
- Скачиваем драйверы для принтера Samsung SCX 3400
- Способ 1: Официальный сайт
- Способ 2: Сторонние программы
- Способ 3: ID оборудования
- Способ 4: Встроенная утилита Windows
- Установка драйверов
- Без диска
- Процесс сканирования документов с МФУ Samsung scx 4200, scx и других моделей
- Поиск прошивки Samsung
- Как соединить принтер с ноутбуком
- Через USB
- По Wi-Hi
- Установка драйвера в Windows 10
Драйвер для Samsung SCX-3200

Windows XP/Vista/7/8/8.1/10 32/64-bit (универсальный драйвер — рекомендуем для установки)
Данная программа подходит почти для всех версий Windows. Чтобы проверить — установку для вашей версий перейдите по ссылке и установите программу для скачивания драйверов для вашего устройства.
Windows 2000 / 2003 / 2008 / XP / Vista / 7
Размер: 18.5 MB (принтер) и 45.8 MB (сканер)
Установка драйвера в Windows 10
Программное обеспечения для принтера Samsung SCX-3200 можно скачать на нашем сайте по ссылке выше. Если вы скачете установочные файлы с официального сайта, процесс установки будет аналогичен. На первом этапе выбираем любую папку для извлечения системных файлов. Отмечаем «Запустить после завершения», нажимаем «Извлечь».

Далее выберете единственный пункт – «Установить сейчас».

Прочтите лицензионное соглашение. Здесь будут указаны все условия использования данного программного продукта. После изучения информации отмечаем «Я принимаю условия лицензионного соглашения». Для продолжения установки нажимаем «Далее».
Для большинства пользователей следующий пункт установки скорее всего не пригодится. Если вы не желаете передавать в компанию Samsung отчеты, то отметьте флажком кнопку «Нет, я не хочу передавать такие данные».
На данном этапе все шаги установки выполнены. Подождите несколько минут, пока установщик загрузит необходимые системные файлы для правильной работы принтера. Обычно данная процедура не занимает много времени. Зеленая шкала отображает прогресс установки.
Установка драйвера завершена. Регистрировать ПО не обязательно, поэтому прост о жмём кнопку «Готово».
Источник
Samsung scx 3200 как сканировать на компьютер
Ключевые слова: не удалось выполнить преобразование текущего изображения, samsung SCX-3200 не сканирует, как сканировать с принтера на компьютер samsung scx 3200,
Проблема явно програмная, но для обнаружении причины нужна дополнительная информация — какие параметры сканирования? что происходит, если выбрать другой диск для сохраниня отсканированных копий? сколько свободного места на жестком диске?
Аналогичная проблема. Причем указывал разное расположение файлов, и разные размеры изображения. Пишет «Не удалось выполнить преобразование текущего изображения. Возможно, проблема возникла из-за нехватки памяти в системе»
На жестком диске памяти полно, опративной 500 мб свободно. пока не разобрался
То же самое и вылезло неожиданно и весьма некстати, причем ПО к МФУ какое то левое, его даже обновить на виндовс 7 не получается, обновления просто не устанавливаются.
Друзья, столкнулся с такой же проблемой. Дело оказалось в некорректном именовании файла т.е. я написал ххххх/2.ххх, и получил ошибку. Убрал «/» и всё заработало. Всем удачи.
НУ сайт бл..ть класный и у меня таже хрень! Че одмины спят.
Столкнулся с тоже с этой проблемой, принтеру несколько лет, очень обидно, теперь видимо не МФУ, а просто принтер.
тех поддержка самсунг может поможет советом?
ну *** вы и олухи! просто сначала научитесь пользоваться компом))))
Спасибо.
Несколько лет жил с тем что в Диспечере устройств стоял восклицательный знак на МФУ самсунга. Как так выходит что драйвера на официальном сайте хуже. Слов нет.
нет сканирования с принтера Samsung -3200 series,установку принтера сделала автоматически ,т.е.драйвера установились автоматом,а в самом устройстве нет окошечка СКАНИРОВАНИЕ,Помогите пожайлуста.
Та же хрень была.
В названии файла был символ ‘
Его убрал и все ок.
Поражаюсь на самсунг — вместо того, чтобы сказать «недопустимые символы в имени файла» пишет какую-то ересь.
Столкнулся с этой же проблемой. Проблему решил, выбрав формат файла не jpeg, а png.
т.е. сохранил отсканированную страницу как .jpg, а не как .jpg, который по умолчанию
Спасибо Николаю! Все заработало! Народ, еще раз: надо изменить тип файла с JPEG на PNG и все снова работает!
Как отсканировать документ на компьютер с принтера Samsung SCX 3400?
Сканируем стандартным способом от Windows
- Открываем «Панель управления» (клавишами W+X или через «Пуск» и в поиск написать панель управления)
- В панели управления вверху в поиске пишем «Принтер» и выбираем «Устройства и принтеры»
- Выбираем наш принтер — нажимаем правой кнопкой мыши — начать сканирование
Как сканировать на Samsung m2070?
Как отсканировать документ на компьютер с принтера Samsung?
Зайти по пути «Панель управленияОборудование и звукУстройства и принтеры». Кликаем по иконке принтера правой кнопкой мышки и выбираем «Начать сканирование«. В открывшемся окошке задаем необходимые параметры, жмем «Просмотр» и если нас все устраивает — нажимаем «Сканировать».
Как сканировать на принтере Samsung SCX 4600?
Как отсканировать документ на компьютер с принтера Epson?
Сканирование с компьютера
Как отсканировать документ на принтере Samsung SCX 4220?
Использование Samsung SmarThru
Как сканировать на принтере Самсунг?
Как отсканировать документ
Как подключить принтер по сети Samsung?
В меню Пуск выберите Программы или Все программы > Samsung Printers > Samsung Easy Printer Manager > Параметры устройств > Сеть.
- Включение и выключение прямого подключения к Wi-Fi: Выберите Вкл., чтобы включить.
- Имя устройства: Введите имя принтера, которое будет отображаться в беспроводной сети.
Как сканировать фото на принтере Самсунг?
Как с принтера сканировать документ на компьютер?
Как отсканировать документ на компьютер с принтера?
Как отсканировать документ в формате Word?
Сканирование в Microsoft Word
Как подключить сканер самсунг к компьютеру?
При подключении сканера к компьютеру с помощью кабеля USB
Как сканировать на мфу canon 3010?
Чтобы отсканировать нужный документ, зайдите в меню «Пуск», дальше «Устройства и принтеры». В открывшемся окошке вы увидите доступные (подключенные) устройства, из списка выберите нужное МФУ Сanon mf3010 и кликните по нему мышкой. Появится панель с несколькими параметрами.
Перед сканированием с принтера необходимо загрузить и установить программы Easy Printer Manager и Easy Document Creator.
Чтобы загрузить программное обеспечение для сканирования Easy Printer Manager или Easy Document Creator, перейдите в раздел Software and Drivers (Программное обеспечение и драйверы) и в поле поиска введите модель принтера. Программное обеспечение для сканирования доступно на вкладке Software (Программное обеспечение).
Использование функций сканирования в программе Easy Document Creator
Убедитесь, что установлены последние версии драйверов печати и сканирования.
Последние версии драйверов сканирования доступны в разделе Software and Drivers (Программное обеспечение и драйверы).

На панели задач Windows правой кнопкой мыши щелкните значок Easy Printer Manager () и выберите Easy Printer Manager .
Если на рабочем столе нет значка, откройте скрытые значки.

Рис. : Выбор программы Samsung Easy Printer Manager
В программе Easy Printer Manager на левой панели выберите принтер, а затем в разделе Quick Links (Быстрый переход) выберите вариант сканирования.
Если экран Easy Document Creator не открывается, перейдите в раздел Software and Drivers (Программное обеспечение и драйверы), чтобы загрузить последнюю версию программы.
Щелкните значок сканера, чтобы изменить параметры сканирования изображений.
Если значок сканера не отображается в левом нижнем углу экрана Easy Document Creator , щелкните Search (Поиск), чтобы найти подключенный сканер.
Выберите необходимый параметр в зависимости от типа бумаги, используемой для сканирования.

После выбора отобразится предварительно отсканированное изображение с учетом выбранных параметров.
Рис. : Предварительно отсканированное изображение
В раскрывающемся списке Size (Размер) выберите размер бумаги.
В раскрывающемся списке Resolution (Разрешение) выберите параметр разрешения.
Выберите More Options (Дополнительные параметры), чтобы настроить изображение для сканирования, и щелкните Scan (Сканировать).

После сканирования изображения измените параметры файла, чтобы сохранить файл.
В раскрывающемся списке File Format (Формат файла) выберите формат файла, а в текстовом поле введите имя файла.
В разделе Save to Location (Место сохранения) щелкните значок лупы, чтобы выбрать папку для сохранения файла.
После изменения параметров щелкните Save (Сохранить).
В открывшемся окне выберите один из следующих вариантов.

После выбора параметра No (Нет) появится экран Easy Document Creator .
Рис. : Выход из программы Easy Document Creator
Сканирование нескольких страниц в один файл
Убедитесь, что установлены последние версии драйверов печати и сканирования.
Последние версии драйверов сканирования доступны в разделе Software and Drivers (Программное обеспечение и драйверы).
Выберите принтер, а затем в разделе Quick links (Быстрый переход) выберите ссылку для сканирования.
Выберите необходимый параметр в зависимости от типа бумаги, используемой для сканирования.
В раскрывающемся списке Document Source (Источник документов) выберите параметр ADF (Устройство АПД) и щелкните Scan (Сканировать) в нижней части экрана.
В раскрывающемся списке File Format (Формат файла) выберите формат файла PDF или Multiple page TIFF (Многостраничный TIFF), а в текстовом поле Name (Имя) введите имя файла.
Рис. : Выбор PDF в качестве формата файла

Рис. : Имя файла для отсканированного изображения
В разделе Save to Location (Место сохранения) выберите папку для сохранения файла и щелкните Save (Сохранить).
В зависимости от места для сохранения файла щелкните No (Нет) или Yes (Да).
hp-feedback-input-portlet
hp-country-locator-portlet
Выбор местоположения
Северная и Южная Америка
Европа, Ближний Восток, Африка
Азиатско-Тихоокеанский регион и Океания
Выберите язык
hp-detect-load-my-device-portlet
hp-hero-support-search
Примеры: “LaserJet Pro M1132 замятие бумаги”, “HP 250 G5 bluetooth”

Благодаря процессу сканирования можно превращать различные документы в файлы изображения, что расширяет возможность дальнейших действий. Во-первых, этими файлами можно обмениваться с помощью социальных сетей, электронной почты и т. д. Во-вторых, их можно отсылать по факсу (используя для этого линию телефона).
Зачем нужен и что такое цветовой профиль
Цветовой ICC-профиль прописывается для строго определённого сочетания — принтер + чернила + бумага. При изменении какого-либо «слагаемого» должен меняться и профиль. Фирменные профили, прописанные в драйвере принтера — это усреднённые данные именно для этой модели печатающего устройства, его родных чернил и РЕКОМЕНДОВАННОЙ бумаги этого же производителя. При использовании совместимых чернил (или неоригинальных дешевых картриджей) или фотобумаги будет происходить изменение в цветопередаче, которое будет больше заметно на сочетаниях основных цветов и полутонах.
При печати с использованием профиля в идеале должны использоваться те же настройки, которые использовались при создании профиля. Хороший вариант – сохранить эти настройки принтера в драйвере (если возможно).
Скачиваем драйверы для принтера Samsung SCX 3400
Ниже будут приведены детальные инструкции, которые обязательно помогут вам найти и установить нужные файлы. Важно лишь следовать шагам и обращать внимание на определенные детали, тогда все получится.
Способ 1: Официальный сайт
Не так давно компания Samsung решила прекратить производство принтеров, поэтому их филиалы были проданы компании HP. Теперь все обладателям подобных устройств потребуется переходить на оф. сайт вышеупомянутой компании, чтобы загрузить свежие драйверы.
Перейти на официальный сайт HP
Способ 2: Сторонние программы
Сейчас множество разработчиков стараются делать софт, максимально облегчающий пользование за ПК. Одной из таких разновидностей программ является ПО для поиска и установки драйверов. Оно не только определяет встроенные комплектующие, но и производит поиск файлов к периферийным устройствам. В другом нашем материале вы сможете найти список лучших представителей подобного софта и выбрать для себя наиболее подходящий.
Подробнее: Лучшие программы для установки драйверов
Кроме этого на нашем сайте находится подробная инструкция по поиску и инсталляции драйверов с помощью известной многим программы DriverPack Solution. В ней вам всего лишь потребуется запустить автоматическое сканирование, предварительно проверив подключение к интернету, указать необходимые файлы и произвести их установку. Подробнее об этом процессе читайте в статье по ссылке ниже.
Подробнее: Как обновить драйверы на компьютере с помощью DriverPack Solution
Способ 3: ID оборудования
Каждому подключенному девайсу или комплектующему присваивается собственный номер, благодаря которому происходит его идентификация в операционной системе. Используя данный ID, любой пользователь с легкостью сможет выполнить поиск и установку программного обеспечения на свой компьютер. Для принтера Samsung SCX 3400 он будет следующий:
Ниже вы найдете детальные инструкции по выполнению этой операции.
Подробнее: Поиск драйверов по ID оборудования
Способ 4: Встроенная утилита Windows
Разработчики операционной системы Виндовс позаботились о том, чтобы их юзеры смогли без проблем добавлять новое оборудование, не затрудняя процесс подключения поиском и скачиванием драйверов. Встроенная утилита сделает все сама, только задайте правильные параметры, а осуществляется это так:
- Откройте «Пуск» и кликните по разделу «Устройства и принтеры».
- Вверху найдите кнопку «Установка принтера» и нажмите на нее.
- Укажите тип устанавливаемого устройства. В этом случае вы должны выбрать «Добавить локальный принтер».
- Далее потребуется указать используемый порт, чтобы девайс был распознан системой.
- Запустится окно сканирования устройств. Если список не появляется долгое время или в нем нет вашей модели, кликните на кнопку «Центр обновления Windows».
- Дождитесь окончания сканирования, выберите производителя и модель оборудования, после чего нажмите «Далее».
- Осталось только задать имя принтера. Вы можете ввести совершенно любое название, лишь бы вам было комфортно работать таким именем в различных программах и утилитах.
На этом все, встроенное средство самостоятельно проведет поиск и произведет инсталляцию ПО, после чего вам останется только приступить к работе с принтером.
Установка драйверов
Мало установить технику, для корректной работы необходимо также настроить драйверы, подходящие под определенную операционную систему.
Без диска
Если аппарат достался вам без установочного диска, самостоятельно загрузить драйвера можно при помощи функции обновления. Для этого зайдите в диспетчер программ, найдите раздел одноименный раздел и разверните. Найдите необходимый, кликните по нему правой кнопкой. В появившемся списке выберите строку “Обновление драйверов”. Выберите вариант «Автоматический поиск» и следуйте подсказкам системы.
Процесс сканирования документов с МФУ Samsung scx 4200, scx и других моделей
Откройте крышку устройства и приложите над стеклом экспонирования наш документ. Документ должен быть направлен лицевой стороной к стеклу. Закрыв крышку, активируйте программу, о которой говорили, и нажмите на изображении с надписью «Сканирование».
Около окна приложения образуется дополнительная панель, где в меню предлагаются различные варианты и параметры сканирования.
Например, выбрав пункт «Приложение» отсканированный нами источник автоматически будет отправлен в какую-нибудь программу.
Выбрав пункт «Электронная почта», отсканированное нами изображение сразу же отправится на указанный заранее email.
Выбрав раздел «Папка» отсканированные файлы будут сохраняться на вашем ПК или ноутбуке.
Папка же «Распознание» подразумевает автоматическую отправку отсканированного документа в программу распознавания текстов.
Определившись с этим пунктом, вам нужно также будет установить цветовые настройки сканируемого файла и в каком он будет формате, а затем просто нажать клавишу «сканировать».
Для сканирования существует большое количество различных способов и приложений. Мы рекомендуем использовать приложение от официального производителя вашего МФУ для полноценной работы.
Поиск прошивки Samsung
Распаковываем архив с скачанной программой SamFirm и запускаем. Откроется окно программы, в котором вводим полное название модели и регион. Для России и СНГ прописываем «SER».
Кликаем по кнопке «Check Update». Некоторое время ждём пока программа не найдёт актуальную прошивку для Samsung устройства. Скачиваем нажав на кнопку «Download» в правом верхнем углу.
Прежде всего, перед прошивкой, отвяжите смартфон Samsung от всех аккаунтов.
Прежде всего нужно отвязать телефон от всех аккаунтов, если это возможно. Нужно это для того, чтобы после прошивки Samsung гаджета, не было проблем при первом запуске.
Отвязать смартфон от аккаунтов очень просто. Заходим в настройки (Settings) – Учётные записи и резервное копирование (Accounts and backup) – Учётные записи (Accounts). Удаляем все свои аккаунты.
Следующим шагом включаем опцию «для разработчиков». Настройки – Сведения о телефоне – Сведение о ПО. Находим пункт «Номер сборки» и тапаем по нему 6 – 7 раз, пока на экране не появится надпись: «Режим разработчика включен».
Режим разработчика включён, теперь можно переходить к следующим действиям прошивки смартфона Samsung.
Для включения режима загрузки прошивки Samsung, зажмите следующие кнопки на смартфоне.
Вводим смартфон в состояние загрузки программного обеспечения (Download mode). На многих Samsung это комбинация из трёх кнопок: «Домой» (Home), «Питание», «Уменьшение громкости».
Распаковываем загруженную с помощью программы SamFirm прошивку. Распаковать желательно на диск «C» Вашего компьютера. При распаковке должно получится 5 файлов.
Устанавливаем драйвера для Samsung смартфона. Смартфон у нас пока не подключен к ПК USB шнуром. Просто открываем архив с драйверами и тапаем по файлу установки. Дожидаемся окончания процесса. Подсоединяем смартфон к компьютеру, проверяем что драйвера установились. Отключаем гаджет от ПК.
Запускаем программу для прошивки Odin. Подключаем смартфон к компьютеру. В окне программы должно подсветится подтверждение, что устройство инициализировано. Кликаем кнопку «BL», выбираем в появившемся окне папку с распакованной прошивкой, кликаем по ней и выбираем файл, начинающийся с латинских букв «BL».
Аналогичную операцию проделываем и для других кнопок: «AP»; «CP»; «CSC». Кнопку «USERDATA» не трогаем! Переходим на вкладку «Options». В открывшейся вкладке обязательно должно стоять две галочки «Auto Reboot» и «F. Reset Time». Жмём кнопочку «Start». Всё, прошивка Samsung запущена.
После распаковки папки с прошивкой Samsung, обязательно должны быть данные файлы
Тапаем 2 раза по папке архиву с драйверами Samsung
Запускаем установочный файл драйверов Samsung прямо из архива
Запускаем программу Odin для прошивки Samung. Смартфон отключен от ПК.
Окно программы Odin после подключения смартфона Samsung для прошивки
На этом прошивка Samsung завершена. При возникновении вопросов пишите ниже в комментариях, обязательно помогу. Также обязательно делитесь статьёй в соц. сетях кликая по кнопкам, это для меня лучшая награда. Всем всего доброго и до встречи!
Как соединить принтер с ноутбуком
Через USB
Ноутбук, как и любой другой персональный компьютер, можно соединить с принтером обычным USB шнуром. Такой тип подключения поддерживают все без исключения модели печатающей техники. А сам вход точно присутствует на портативном «девайсе». Главное, чтобы совпадали версии используемых интерфейсов. Если ЮСБ 1.0 уже не встретить, то 2.0 и 3.0 на пике популярности.
Когда связь установлена, то нужно немного подождать пока не услышите звуковой сигнал. Еще через некоторое время будет произведена автоматическая установка программного обеспечения самой операционной системой Виндовс и можно переходить к разделу по настройке печати. Если этого не произошло, то драйвера придется устанавливать вручную. В этом нет ничего сложного и легко сделать даже без установочного диска.
По Wi-Hi
WPS расшифровывается как Wi-Hi Protected Setup, что в переводе означает «защищённая Вай-Фай установка». Чтобы воспользоваться этой технологией, она должна поддерживаться роутером и самим принтером. Наличие Wi-Hi на ноутбуке не ставится под сомнение, так как моделей без него не существует в природе.
Производим подключение по такой схеме:
- Ищем кнопку WPS на корпусе роутера. Как правило, она размещена с обратной стороны в большинстве случаев.
- В течение двух минут активируем аналогичную кнопку на печатающем устройстве.
- Ждем окончания создания соединения между устройствами.
- Если ноутбук находится в той же Wi-Hi сети, то проблем с печатью не должно возникнуть.
- Подключаемся к принтеру, как к сетевому.
Если кнопки WPS не нашли на корпусе модема или включить не получается, то попробуем сделать это через веб-интерфейс управления роутером. В большинстве случаев, чтобы зайти в его настройки, нужно в любом браузере ввести адрес в формате IP или попробуйте Введите логин «admin» и такой же пароль, если он не менялся. В настройках найдите раздел «Wireless», а в его подразделах отключите MAC фильтрацию и включите функцию WPS.
Если автоматическая установка соединения, описанная в подразделе Выше, невозможна на Ваших моделях техники, то Вай-Фай подключение можно произвести ручным способом. Все, что требуется для настройки это знать название сети и код доступа к ней. Такие данные могут быть указаны на крышке модема или в документах от компании поставщика услуг Интернета.
Порядок ручной настройки:
Независимо был ли подключен принтер в сеть по Wi-Hi, как описано выше, через другой ПК или напрямую патч-кордом в розетку Ethernet, теперь к нему нужно подключится и установить специальное программное обеспечение (драйвера) для правильной работы. Установить соединение можно несколькими способами.
Windows 2000 / 2003 / 2008 / XP / Vista / 7
Размер: 18.5 MB (принтер) и 45.8 MB (сканер)
Установка драйвера в Windows 10
Программное обеспечения для принтера Samsung SCX-3200 можно скачать на нашем сайте по ссылке выше. Если вы скачете установочные файлы с официального сайта, процесс установки будет аналогичен. На первом этапе выбираем любую папку для извлечения системных файлов. Отмечаем «Запустить после завершения», нажимаем «Извлечь».

Далее выберете единственный пункт – «Установить сейчас».

Прочтите лицензионное соглашение. Здесь будут указаны все условия использования данного программного продукта. После изучения информации отмечаем «Я принимаю условия лицензионного соглашения». Для продолжения установки нажимаем «Далее».

Для большинства пользователей следующий пункт установки скорее всего не пригодится. Если вы не желаете передавать в компанию Samsung отчеты, то отметьте флажком кнопку «Нет, я не хочу передавать такие данные».

На данном этапе все шаги установки выполнены. Подождите несколько минут, пока установщик загрузит необходимые системные файлы для правильной работы принтера. Обычно данная процедура не занимает много времени. Зеленая шкала отображает прогресс установки.

Установка драйвера завершена. Регистрировать ПО не обязательно, поэтому прост о жмём кнопку «Готово».
Источник

Options
- Mark as New
- Bookmark
- Subscribe
- Mute
- Subscribe to RSS Feed
- Highlight
- Report Inappropriate Content
I have scx-3200 scanner/printer. I’ve just bought a new (Windows 10, 64 bit) PC. I plugged in the USB & it has installed the printer & it is working. But I can’t work out how to scan. www.samsung.com says «Sorry. We weren’t able to find any results for your search» when I search for 3200, or scx-3200, or scx 3200. Come on Samsung, even if you don’t support it, couldn’t you at least say «Sorry this product is no longer supported. Splash out & buy a new one» or something.
So the printer works, but is there a way to install the samsung control panel that I used to have on my old Vista laptop (which died last week)?
Thank you
- printer
- scanner
- scx 3200
- windows 10
-
All forum topics -
Previous Topic -
Next Topic
2 Solutions

Options
- Mark as New
- Bookmark
- Subscribe
- Mute
- Subscribe to RSS Feed
- Highlight
Hi there @RicardoVerdi,
There is a scanner driver available for download on our website here, however, due to the age of the printer, we cannot guarantee compatibility with Windows 10.
There is another option you could try, however there is a chance that the software is too new for the printer. But if you’d like to give it a go, you can try printing using the Easy Document Creator scanning software, which can be downloaded here.
Click «Install Software Only» at the bottom of the home page, then you should see the Easy Document Creator. When asked to select your printer model choose type: colour multifunction and model: SL-C460W. This will then bring up a list of software — select EDC and install it.

Options
- Mark as New
- Bookmark
- Subscribe
- Mute
- Subscribe to RSS Feed
- Highlight
- Report Inappropriate Content
I had same problem, had been working on Win 10, stopped. I tried reinstalling printer multiple times, installed new driver, reboot, power cycle, etc- no good. I had had the 3.12.13 driver, not the 3.13.12 driver FWIW
- Windows Scan/Fax worked when the Samsung Easy Document creator did not.
- on the Samsung site https://samsung-printerdrivers.com/samsung-printer-scx-3400-drivers/ there is also an OCR package. After installing THAT, for some reason the scanning started working again!!. (and OCR, tho not very well.)
So two ways that might work. Good luck!!
19 REPLIES 19
-
Previous
-
- 1
- 2
-
Next
Options
- Mark as New
- Bookmark
- Subscribe
- Mute
- Subscribe to RSS Feed
- Highlight
- Report Inappropriate Content
Here’s an update. I’ve manage to get the scanner working with Windows 10. I managed to download something called Samsung Universal Print Driver 2. This gives me a menu including the option to scan It’s a bit different to what I’m used to, but the main thing is, it works. What a shame Samsung don’t seem to have any mention of it on their website. I had to download the driver from a third party website.
Options
- Mark as New
- Bookmark
- Subscribe
- Mute
- Subscribe to RSS Feed
- Highlight
Hi there @RicardoVerdi,
There is a scanner driver available for download on our website here, however, due to the age of the printer, we cannot guarantee compatibility with Windows 10.
There is another option you could try, however there is a chance that the software is too new for the printer. But if you’d like to give it a go, you can try printing using the Easy Document Creator scanning software, which can be downloaded here.
Click «Install Software Only» at the bottom of the home page, then you should see the Easy Document Creator. When asked to select your printer model choose type: colour multifunction and model: SL-C460W. This will then bring up a list of software — select EDC and install it.

Options
- Mark as New
- Bookmark
- Subscribe
- Mute
- Subscribe to RSS Feed
- Highlight
15-09-2017
01:50 PM
— last edited
15-09-2017
02:20 PM
) in
Computers & IT
Hi @Telbakiroglu. :robothappy:
Just a quick post to say that I’ve edited your email address out of your post above to stop you being targeted by spammers etc.
But it’s great that you want to help folks out! :thumbsup:
Any tips and advice for solutions please definitely do share with the Community, but if you do need or want to share your email address with folks on here, just send them a PM. :robothappy:
Options
- Mark as New
- Bookmark
- Subscribe
- Mute
- Subscribe to RSS Feed
- Highlight
- Report Inappropriate Content
I had same problem, had been working on Win 10, stopped. I tried reinstalling printer multiple times, installed new driver, reboot, power cycle, etc- no good. I had had the 3.12.13 driver, not the 3.13.12 driver FWIW
- Windows Scan/Fax worked when the Samsung Easy Document creator did not.
- on the Samsung site https://samsung-printerdrivers.com/samsung-printer-scx-3400-drivers/ there is also an OCR package. After installing THAT, for some reason the scanning started working again!!. (and OCR, tho not very well.)
So two ways that might work. Good luck!!

Options
- Mark as New
- Bookmark
- Subscribe
- Mute
- Subscribe to RSS Feed
- Highlight
- Report Inappropriate Content

Options
- Mark as New
- Bookmark
- Subscribe
- Mute
- Subscribe to RSS Feed
- Highlight
- Report Inappropriate Content
I also have Samsung SCX 3205 and Windows10.
Printers works correctly, but I still have problems with scanner.
I can scan documents manually using software — «Samsung Easy Documents Creator» but hw button on the printer «Scan to» is not working.
In the past I have been using this printer with Windows XP and button worked correctly.
How to setup scanner to scan with «Scan To» button????
![]()
-
Previous
-
- 1
- 2
-
Next
 09:19
09:19
SCX-3200 Захватывает несколько листов. Замятие бумаги
 09:56
09:56
Заправка картриджа Samsung D104S/3200/1660/1665/1860/1865/3205
 03:07
03:07
Прошивка принтера samsung scx 3200
 05:01
05:01
Samsung SCX-3200 — забирает два листа бумаги, щелкает лотком
 03:08
03:08
Samsung SCX-3200 не захватывает бумагу
 01:57
01:57
SAMSUNG SCX-3205 разблокировка,сброс
 02:14
02:14
The Samsung scx-3200 is a red light mistake. How to reset the Samsung scx-3200. Samsung toner refill
 26:10
26:10
Samsung SCX-3200 • Riparazione Sistema di Pick-up Carta
Samsung Universal Print
Driver
Руководство пользователя
представьте
возможности
Авторское право_ 2
Авторское право
© 2009 Samsung Electronics Co., Ltd. Все права защищены.
Данное руководство администратора предназначено только для ознакомления. Любая информация,
содержащаяся в нем, может быть изменена без предупреждения.
Корпорация Samsung Electronics не несет ответственности за какие бы то ни было убытки, прямые или косвенные,
вызванные использованием данного руководства или связанные с ним.
•
Samsung Universal Print Driver является товарным знаком компании Samsung Electronics Co., Ltd.
•
Samsung и эмблема Samsung являются товарными знаками компании Samsung Electronics Co., Ltd.
•
Microsoft, Windows, Internet Explorer и Windows Vista являются охраняемыми товарными знаками корпорации
Microsoft в США и других странах.
•
Прочие торговые знаки, названия товаров и компаний, упомянутые в документе, могут быть товарными
знаками соответствующих владельцев.
ВЕРСИЯ 1.01
Введение_ 4
1.
Введение
Драйвер Samsung Universal Print Driver поддерживает различные модели принтеров. Он
позволяет пользоваться не только устройствами печати Samsung, но и принтерами на базе
PDL других компаний, не загружая отдельные драйверы.
•
PDL означает PCL и PS.
•
Компания Samsung не гарантирует качество печати принтеров других производителей и
неподдерживаемых моделей Samsung (чтобы просмотреть список поддерживаемых устройств Samsung,
щелкните ).
Для неподдерживаемых моделей Samsung драйвер автоматически переключается в
режим PDL, заданный по умолчанию.
Samsung Universal Print Driver и драйверы для конкретных моделей
В таблице ниже показаны различия между драйвером Samsung Universal Print Driver и драйверами для отдельных
продуктов.
Требования к системе
Ниже приведены минимальные требования к системе для драйвера Samsung Universal Print Driver.
SAMSUNG UNIVERSAL PRINT DRIVER
ДРАЙВЕРЫ ДЛЯ КОНКРЕТНЫХ
МОДЕЛЕЙ
Интерфейс
пользователя
Единый интерфейс пользователя.
Различные интерфейсы пользователя.
Установка
•
Наличие файла установщика, который
загружается вместе в драйвером
Samsung Universal Print Driver.
•
Установка с помощью файла
установщика.
•
Поиск, загрузка и установка драйверов
для каждого устройства.
•
Установка при автоматическом
запуске компакт-диска или с помощью
мастера установки принтеров.
Поиск устройств
Простой поиск предложенных устройств
из числа принтеров Samsung.
Поиск устройств вручную.
Доступность
Предлагается на веб-сайте Samsung.
Предлагается на компакт-диске, который
входит в комплект поставки;
предоставляется отдельно для каждого
продукта.
ОПЕРАЦИОННАЯ
СИСТЕМА
ТРЕБОВАНИЯ
(РЕКОМЕНДУЕМЫЕ)
ЦП
ОЗУ
СВОБОДНОЕ МЕСТО
НА ЖЕСТКОМ ДИСКЕ
Windows Vista
Pentium IV 3 ГГц
512 Мб (1 Гб)
15 Гб
Windows XP
Pentium III, 933 МГц (Pentium IV, 1 ГГц)
128 Мб (256 Мб)
1,5 Гб или больше
Windows 2000
Pentium II, 400 МГц (Pentium III, 933 МГц)
64 Мб (128 Мб)
600 Мб
Windows 7
32- или 64-разрядный процессор
Pentium IV, 1 ГГц или более мощный
1 Гб (2 Гб)
16 Гб
•
Графическая карта с объемом памяти 128 Мб и поддержкой DirectX 9
(для темы Aero).
•
Дисковод DVD-R/W.
Windows Server 2003
Pentium III, 933 МГц (Pentium IV, 1 ГГц)
128 Мб (512 Мб)
1,25−2 Гб
Windows Server 2008
Pentium IV, 1 ГГц (Pentium IV, 2 ГГц)
512 Мб (2 Гб)
10 Гб
Windows Server 2008
(R2)
Pentium IV, 1 ГГц (x86) или 1,4 ГГц (x64)
(2 ГГц или выше)
512 Мб (2 Гб)
10 Гб
Установка samsung universal print driver, Установка и удаление драйвера, Samsung universal print driver
Страница 5
- Изображение
- Текст
Установка и удаление драйвера Samsung Universal Print Driver_ 5
2.
Установка и удаление драйвера Samsung
Universal Print Driver
В этой главе приведены пошаговые инструкции по установке и удалению драйвера
Samsung Universal Print Driver.
Ниже описаны окна для драйвера PCL в Windows XP. Окна для драйвера PS могут отличаться от
представленных ниже, но порядок действий для этих драйверов совпадает.
Установка Samsung Universal Print Driver
Перед установкой драйвера проверьте соответствие рекомендуемым минимальным требованиям к системе (см.
раздел «Требования к системе» на стр. 4).
1. Запустите веб-браузер и откройте страницу www.samsung.com.
2. Выполните поиск установочного файла Samsung Universal Print Driver.
3. Запустите установочный файл.
Появится мастер установки Samsung Universal Print Driver.
4. Нажмите кнопку Далее. При необходимости выберите нужный язык из раскрывающегося списка.
После появления окна установки дождитесь ее завершения.
5. После окончания установки нажмите кнопку Готово.
Для того чтобы зарегистрироваться как пользователь принтера Samsung, установите соответствующий
флажок и нажмите кнопку Готово. Регистрация позволит получать информацию от компании Samsung.
Если драйвер установлен правильно, в папку Принтеры и факсы будет добавлен элемент Samsung Universal
Print Driver.
Установка и удаление драйвера Samsung Universal Print Driver_ 6
Удаление Samsung Universal Print Driver
Чтобы удалить Samsung Universal Print Driver, выполните указанные ниже действия.
1. В меню «Пуск» Windows выберите пункты Все программы > Samsung Universal Print Driver >
Обслуживание.
Появится мастер установки Samsung Universal Print Driver.
2. Выберите пункт Удалить и нажмите кнопку Далее.
3. Выберите компоненты, которые необходимо удалить, и нажмите кнопку Далее.
4. В окне подтверждения нажмите кнопку Да.
5. После завершения удаления нажмите кнопку Готово.
Доступ к драйверу samsung universal print driver, Использование драйвера, Samsung universal print driver
Страница 7
- Изображение
- Текст
Использование драйвера Samsung Universal Print Driver_ 7
3.
Использование драйвера Samsung
Universal Print Driver
Основная задача драйвера Samsung Universal Print Driver заключается в том, чтобы можно
было установить один драйвер (Samsung Universal Print Driver) и использовать его для
различных устройств печати. Тем не менее Samsung Universal Print Driver поддерживает и
другие возможности, например поиск устройств печати, создание папки избранного и
проверку состояния устройства.
Доступ к драйверу Samsung Universal Print Driver
1. В меню Пуск Windows выберите пункт Принтеры и факсы.
2. Щелкните правой кнопкой мыши Samsung Universal Print Driver.
3. Выберите команду Настройка печати или Свойства.
Появится окно Samsung Universal Print Driver.
Если принтеры давно не использовались, появится всплывающее окно с запросом на поиск принтеров. Для
поиска подключенных принтеров нажмите кнопку ОК.
Использование драйвера Samsung Universal Print Driver_ 8
Внешний вид окна драйвера
1
Панель макета
Включает параметры отображения.
•
: Выберите макет окна Samsung Universal Print Driver. Если
выбрать макет Рисунок2 и установить программу Samsung Smart Panel,
будет доступно окно состояния (4).
•
: Обновление сведений о принтерах в списке.
•
: Выбор представления для списка принтеров. При выборе
значения Вид — таблица выводятся сведения о принтерах, такие как
Адрес, Размещение, Статус и Системное имя. При выборе значения Вид
— изображение кроме этого выводится крупное изображение принтера.
Этот параметр поддерживается только в Windows XP и более поздних
версиях.
•
: Вывод групп принтеров. Чтобы систематизировать принтеры,
распределив их по группам, нажмите эту кнопку. Этот параметр
поддерживается только в Windows XP и более поздних версиях.
•
: Поиск принтера в списке по ключевому слову (например, по
названию модели).
•
: Вызов окна справки.
•
: Вывод сведений о драйвере Samsung Universal Print Driver.

Использование драйвера Samsung Universal Print Driver…
Страница 9
- Изображение
- Текст
Использование драйвера Samsung Universal Print Driver_ 9
2
Основные меню
•
Недавние
—
Недавно использ. принтеры: вывод списка недавно использованных
принтеров. Последний использованный принтер указывается вверху
списка.
—
Недавно найденные принтеры: вывод списка недавно найденных
принтеров. Последний найденный принтер указывается вверху списка.
•
Поиск
—
Начать поиск: поиск принтеров, подключенных через USB-порт или по
сети.
—
Поиск по адресу: поиск принтера по его IP-адресу.
•
Мой принтер
—
Создать папку избранного: создание папки для часто используемых
принтеров.
•
Параметры: параметры поиска и всплывающих окон.
3
Список принтеров
Вывод списка принтеров. Если нажата кнопка
на панели макета, принтеры
можно распределить по группам. Щелкните список принтеров правой кнопкой
мыши. Выберите вариант распределения принтеров по группам.
•
Подключен/неизвестно: распределение принтеров в соответствии с
текущим состоянием каждого из них.
•
Дата: распределение по дате последнего использования, например
сегодня, вчера, на этой неделе, в этом месяце и т. д.
•
Цветная/черно-белая печать: распределение принтеров по типу:
(цветной или монохромный).
•
Односторонняя/двусторонняя печать: распределение в зависимости от
наличия функции двусторонней печати.
4
Окно состояния
Выводит сведения о состоянии принтера, выбранного в списке. Для
отображения этого окна необходимо выбрать макет Рисунок2 и установить
программу Samsung Smart Panel.
•
Начать обновление: обновление сведений о выбранном принтере.
•
Расходные материалы: открытие веб-сайта для приобретения расходных
материалов.
•
Рук. по устр. неполадок: вызов главы руководства пользователя,
посвященной устранению неполадок. Для просмотра руководства
требуется установить программу Smart Panel для используемой модели.
•
Параметры принтера: запуск службы SyncThru Web Service,
предназначенной для настройки принтера и управления им. Этот параметр
поддерживается только сетевыми принтерами.

Использование драйвера Samsung Universal Print Driver_ 10
Изменение параметров Samsung Universal Print Driver
Настройка всплывающего окна
Можно настроить вывод окна Samsung Universal Print Driver при печати. Доступно четыре варианта вывода
всплывающего окна.
1. Нажмите кнопку Параметры в нижнем левом углу.
2. В открывшемся окне имеется переключатель Всплывающее окно.
•
Только когда последний использованный принтер недоступен: окно Samsung Universal Print Driver
выводится только в том случае, если принтер, использовавшийся последним, недоступен.
•
При появлении интерфейсного сообщения драйвера: окно Samsung Universal Print Driver выводится
при открытии окна Настройки печати (Свойства).
•
При каждой печати: окно Samsung Universal Print Driver выводится каждый раз при печати.
•
Только при первой печати: окно Samsung Universal Print Driver выводится только при первом выборе
драйвера Samsung Universal Print Driver из приложения.
3. Нажмите кнопку ОК.

Комментарии
-
Contents
-
Table of Contents
-
Troubleshooting
-
Bookmarks
Quick Links
SCX-3200 Series
Multi-Functional Mono Printer
User’s Guide
imagine the possibilities
Thank you for purchasing a Samsung product.
Related Manuals for Samsung SCX-3200 Series
Summary of Contents for Samsung SCX-3200 Series
-
Page 1
SCX-3200 Series Multi-Functional Mono Printer User’s Guide imagine the possibilities Thank you for purchasing a Samsung product. -
Page 2
This user’s guide is provided for information purposes only. All information included herein is subject to change without notice. Samsung Electronics is not responsible for any direct or indirect damages, arising from or related to use of this user’s guide. -
Page 3: Safety Information
safety information These warnings and precautions are included to prevent injury to you and others, and to prevent any potential damage to your machine. Be sure to read and understand all of these instructions before using the machine. Use common sense for operating any electrical appliance and whenever using your machine. Also, follow all warnings and instructions marked on the machine and in the accompanying literature.
-
Page 4
If the machine gets overheated, it releases smoke, makes strange noises, or generates an odd odor, immediately turn off the power switch and unplug the machine. ► This could result in electric shock or fire. Caution During an electrical storm or for a period of non-operation, remove the power plug from the electrical outlet. -
Page 5
INSTALLATION / MOVING Warning Do not place the machine in an area with dust, humidity or water leaks. ► This could result in electric shock or fire. Caution Before moving the machine, turn the power off and disconnect all cords. Then lift the machine: •… -
Page 6
► Otherwise, this could result in electric shock or fire. Do not remove any covers or guards that are fastened with screws. ► The machine should only be repaired by a Samsung service technician. SUPPLY USAGE Caution Do not disassemble the toner cartridge. -
Page 7: Regulatory Information
During normal operation, this machine produces ozone. The ozone produced does not present a hazard to the operator. However, it is advisable that the machine be operated in a well ventilated area. If you need additional information about ozone, contact your local Samsung dealer. Regulatory information_ 7…
-
Page 8: Power Save
POWER SAVE This printer contains advanced energy conservation technology that reduces power consumption when it is not in active use. When the printer does not receive data for an extended period of time, power consumption is automatically lowered. ENERGY STAR and the ENERGY STAR mark are registered U.S. marks. For more information on the ENERGY STAR program see http://www.energystar.gov.
-
Page 9: United States Of America
• Reorient or relocate the receiving antenna. • Increase the separation between the equipment and receiver. • Connect the equipment into an outlet on a circuit different from that to which the receiver is connected. • Consult the dealer or experienced radio TV technician for help. Change or modifications not expressly approved by the manufacturer responsible for compliance could void the user’s authority to operate the equipment.
-
Page 10
SCX-3200 Series: Low Voltage Directive (2006/95/EC), EMC Directive (2004/108/EC) SCX-3205W(K): R&TTE Directive (1999/5/EC) The declaration of conformity may be consulted at www.samsung.com/printer, go to Support > Download center and enter your printer (MFP) name to browse the EuDoC. January 1, 1995: Council Directive 2006/95/EC Approximation of the laws of the member states related to low voltage equipment. -
Page 11
PBXs of the European countries: In the event of problems, you should contact the Euro QA Lab of Samsung Electronics Co., Ltd. in the first instance. The product has been tested against TBR21. To assist in the use and application of terminal equipment which complies with this standard, the European Telecommunication Standards Institute (ETSI) has issued an advisory document (EG 201 121) which contains notes and additional requirements to ensure network compatibility of TBR21 terminals. -
Page 12: Openssl License
In environments where the risk of interference to other devices or services is harmful or perceived as harmful, the option to use a wireless device may be restricted or eliminated. Airports, Hospitals, and Oxygen or flammable gas laden atmospheres are limited examples where use of wireless devices may be restricted or eliminated.
-
Page 13
3. All advertising materials mentioning features or use of this software must display the following acknowledgement: «This product includes cryptographic software written by Eric Young (eay@cryptsoft.com)» The word ‘cryptographic’ can be left out if the routines from the library being used are not cryptographic related. 4. -
Page 14
CHINA ONLY Regulatory information_ 14… -
Page 15
about this user’s guide This user’s guide provides information about basic understanding of the machine as well as detailed explanation on each step during actual usage. It is a valuable resource for both novice and professional users for the proper installation and use of the machine. -
Page 16: Finding More Information
This help provides you with information about the printer driver and instructions for setting up the options for printing (See «Using help» on page 56). Samsung website If you have Internet access, you can get help, support, machine drivers, manuals, and order information from the Samsung website, www.samsung.com/printer. Downloadable You can download useful software programs from the Samsung website.
-
Page 17: Features Of Your New Product
features of your new product Your new machine is equipped with a number of special features that improve the quality of the documents you print. SPECIAL FEATURES Print with excellent quality and speed • You can print with a resolution of up to 1200 x 1200 dpi effective output.
-
Page 18: Features By Models
SyncThru™ Web Service a. Depending on your country, wireless LAN card may not be available. For some counties, only 802.11 b/g can be applied. Contact your local Samsung dealer or the retailer where you bought your machine. (●: Included, Blank: Not included)
-
Page 19: Machine Overview
introduction This chapter gives you an overview of your machine: This chapter includes: • Machine overview • Control panel overview MACHINE OVERVIEW Front view This illustration may differ from your machine depending on its model. Scanner lid Scanner glass Control panel Output tray (face down) Output support •…
-
Page 20: Rear View
Rear view This illustration may differ from your machine depending on its model. USB port Power cord receptacle Network port a. SCX-3205W(K) only Introduction_ 20…
-
Page 21: Control Panel Overview
CONTROL PANEL OVERVIEW This control panel may differ from your machine depending on its model. Allows you to turn the power on or off (See «Power button» on page 23). Power ( Eco Print Turn the Eco mode on or off (See «Eco Print button» on page 22). Scan to Sends scanned data (See «Scanning originals and sending to your computer (Scan to PC)»…
-
Page 22: Understanding The Status Led
Samsung cannot guarantee a non-genuine Samsung toner cartridge’s quality. Service or repair required as a result of using non-genuine Samsung toner cartridges will not be covered under the machine warranty. All printing errors will appear in the Smart Panel program window. If the problem persists, contact a service representative.
-
Page 23: Power Button
Stop/Clear button By pressing Stop/Clear button, you can do the following functions. FUNCTION DESCRIPTION Printing a configuration In ready mode, press and hold this button report long enough (about two seconds) until the Status LED blinks slowly, and release the button (See «To print a configuration report»…
-
Page 24: Getting Started
If you are a Windows or Macintosh OS user, install the software from the supplied CD and if you are a Linux OS user, download the software from the Samsung website (www.samsung.com/printer) and install. Machine software is occasionally updated for reasons like the release of new operating system and etc.
-
Page 25: System Requirements
This program is the accompanying Windows-based software for your multifunctional machine. • Samsung Scan and Fax Manager: You can find out about Samsung Scan and Fax Manager program information and installed scan driver’s condition. • Printer Settings Utility: This program allows you to set up printer’s other options from your computer.
-
Page 26
REQUIREMENTS (RECOMMENDED) OPERATING SYSTEM Mac OS X • Intel® 512 MB (1 GB) 10.5 Processors • 867 MHz or faster Power PC G4/ G5 Mac OS X • Intel® 1 GB (2 GB) 10.6 Processors Linux ITEM REQUIREMENTS Operating RedHat® Enterprise Linux WS 4, 5 (32/64 bit) system Fedora 4, 5, 6, 7, 8, 9, 10, 11, 12 (32/64 bit) SuSE Linux 10.0, 10.1 (32 bit) -
Page 27
7. If the test page prints out correctly, click Yes. If not, click No to reprint it. 8. If you want to register your machine on Samsung web site, click On-line Registration. If your machine is not connected yet to the network or computer, click How to connect?. -
Page 28: Installing The Unified Linux Driver
Click Continue. When the uninstall is done, click Quit. Linux You need to download Linux software packages from the Samsung website to install the printer software. Follow the steps below to install the software. Installing the Unified Linux Driver 1.
-
Page 29: Sharing Your Machine Locally
SHARING YOUR MACHINE LOCALLY Follow the steps below to set up computers to share your machine locally. If the Host computer is directly connected to the machine by a USB cable and is also connected to the local network environment, the client computer connected to the local network can use the shared machine through the host computer to print.
-
Page 30: Using A Wired Network
Depending on your country, wireless LAN card may not be available. For some counties, only 802.11 b/g can be applied. Contact your local Samsung dealer or the retailer where you bought your machine. INTRODUCING USEFUL NETWORK PROGRAMS There are several programs available to setup the network settings easily in network environment.
-
Page 31: Setting Ip Address
Starting the program 1. Connect your machine to the network with a network cable. 2. Turn on the machine. 3. From the Windows Start menu, select All Programs > Samsung Printers > SetIP > SetIP. 4. Click on the icon (third from left) in the SetIP window to open the TCP/IP configuration window.
-
Page 32: Network Parameter Setting
1. Print the machine’s network configuration report to find your machine’s MAC address. 2. Open the /opt/Samsung/mfp/share/utils/. 3. Double-click the SetIPApplet.html file. 4. Click to open the TCP/IP configuration window. 5. Enter the network card’s MAC address, IP address, subnet mask, default gateway, and then click Apply.
-
Page 33
7. If the test page prints out correctly, click Yes. If not, click No to reprint it. 8. If you want to register your machine on Samsung website, click On-line Registration. If your machine is not connected yet to the network, click How to connect?. -
Page 34: Ipv6 Configuration
22. For Mac OS X 10.3, if Auto Select does not work properly, select Samsung in Printer Model and your machine name in Model Name. • For Mac OS X 10.4, if Auto Select does not work properly, select Samsung in Print Using and your machine name in Model.
-
Page 35: Installing Printer Driver
Manual address configuration 1. Start a web browser such as Internet Explorer that supports IPv6 addressing as a URL (See «Using SyncThru™ Web Service (SCX-3205W(K) only)» on page 69). For IPv4, enter the IPv4 address (http://xxx.xxx.xxx.xxx) in the address field and press the Enter key or click Go. 2.
-
Page 36: Setting Wireless Network With Wps Button
wireless network setup (scx-3205w(k)) This chapter gives you step-by-step instructions for setting up the wireless network connected machine and software. This chapter includes: • Setting a wireless network with the WPS button • Using a wireless network from the computer •…
-
Page 37
connecting to the access point (or wireless router). : When the machine is successfully connected to the wireless network, the wireless LED light stays on. Re-connecting to the wireless network When the wireless function is off, the machine automatically tries to re-connect to the access point (or wireless router) with the previously used wireless connection settings and address. -
Page 38
network cable» on page 42). SETTING A WIRELESS NETWORK WITH USB CABLE Refer to your network administrator, or the person that set up your wireless network, for information about your network configuration. Installing the machine on a wireless network with an access point (Windows) Items to prepare Ensure you have next items ready. -
Page 39
7. After searching the wireless network, a list of wireless network your machine has searched appears. If you want to use the Samsung default ad-hoc setting, select the last wireless network on the list, which Network Name(SSID) is airportthru and Signal is Printer Self Network. -
Page 40
5. Double-click the MAC_Installer folder. 6. Double-click the Installer OS X icon. 7. Enter the password and click OK. 8. The Samsung Installer window opens. Click Continue. 9. Read the license agreement and click Continue. 10. Click Agree to agree to the license agreement. -
Page 41
5. Double-click the MAC_Installer folder. 6. Double-click the Installer OS X icon. 7. Enter the password and click OK. 8. The Samsung Installer window opens. Click Continue. 9. Read the license agreement and click Continue. 10. Click Agree to agree to the license agreement. -
Page 42
14. After searching the wireless network, a list of wireless network your machine has searched appears. If you want to use the Samsung default ad-hoc setting, select the last wireless network on the list, which Network Name(SSID) is airportthru and Signal is Printer Self Network. -
Page 43: Configuring The Machine’s Wireless Network
Starting the program 1. Connect your machine to the network with a network cable. 2. Turned on the machine. 3. From the Windows Start menu, select All Programs > Samsung Printers > SetIP > SetIP. 4. Click on the icon (third from left) in the SetIP window to open the TCP/IP configuration window.
-
Page 44: Troubleshooting
COMPLETING THE INSTALLATION After you have installed your Samsung wireless network printer, print another copy of the Network Configuration Report and keep it for future reference. You are now ready to use your new Samsung wireless printer on your network. TROUBLESHOOTING Solve problems that might occur during wireless setting and installing the machine driver.
-
Page 45: Solving Other Problems
• You cannot use infrastructure mode and Ad-hoc mode at the same time for Samsung wireless network machine. • The machine is within the range of the wireless network. For most networks, the machine should be within 30 meters (100 feet) of the wireless access point (or wireless router).
-
Page 46: Altitude Adjustment
Mac OS X (See «Using the Smart Panel program» on page 70). Or, if you are a Windows user, you can launch it from the Start menu, select Programs or All Programs > Samsung Printers > your printer driver name > Smart Panel.
-
Page 47
Mac OS X. Or, if you are a Windows user, you can launch it from the Start menu, select Programs or All Programs > Samsung Printers > your printer driver name > Smart Panel. 2. Click Printer Setting. -
Page 48: Media And Tray
media and tray This chapter provides information on how to load print media into your machine. This chapter includes: • Loading originals • Selecting print media • Changing the tray size LOADING ORIGINALS You can use the scanner glass to load an original for copying or scanning. On the scanner glass Using the scanner glass, you can copy or scan originals.
-
Page 49: Media Sizes Supported In Each Mode
the warranty or service agreements. The amount of paper put into the tray may differ according to media type used (See «Print media specifications» on page 93). • Using inflammable print media can cause a fire. • Use designated print media (See «Print media specifications» on page 93).
-
Page 50: Loading Paper In The Tray
4. Pinch the paper length guide to adjust the guide so that it is flush up against the rear edge of the paper; then pinch the paper width guides so they are flush against the sides of the paper. • Do not push the paper width guide too far causing the media to warp.
-
Page 51: Printing On Special Media
If you are printing multiple pages, load the next sheet after the first page prints out, and press Start button. Repeat this step for every page to be printed. PRINTING ON SPECIAL MEDIA The table below shows the available special media for printing. When printing on a special media, we recommend you feed one paper at a time.
-
Page 52
Transparencies To avoid damaging the machine, use only transparencies designed for laser printers. • Transparencies used in the machine must be able to withstand machine’s fusing temperature. • Place them on a flat surface after removing them from the machine. •… -
Page 53: Using The Output Support
USING THE OUTPUT SUPPORT The surface of the output tray may become hot if you print a large number of pages at once. Make sure that you do not touch the surface, and do not allow children near it. The printed pages stack on the output tray, and the output support will help the printed pages to align.
-
Page 54: Basic Printing
This tool helps you to screen-capture, preview, scrap and print the screen of Windows Internet Explorer more easily, than when you use the ordinary program. Click Start > All programs > Samsung Printers > Samsung AnyWeb Print > Download the latest version to link the website where the tool is available for the download.
-
Page 55: Opening Printing Preferences
4. Click Properties or Preferences. Using Presets setting The Presets option, which is visible on each of the preferences tab except for the Samsung tab, allows you to save the current preferences for future use. To save a Presets item: 1.
-
Page 56: Using Help
Then a pop up window appears with information about that option’s feature which is provided from the driver. If you want to search information via a keyword, click the Samsung tab in the Printing Preferences window, and enter a keyword in the input line of the Help option.
-
Page 57: Using Watermarks
3. From the Double-Sided Printing (Manual) section, select the binding option you want. • None • Long Edge: This option is the conventional layout used in bookbinding. • Short Edge: This option is the conventional layout used in calendars. 4. Click the Paper tab, select the Size, Source, and Type. 5.
-
Page 58: Using Overlays
Deleting a watermark 1. To change the print settings from your software application, access Printing Preferences (See «Opening printing preferences» on page 55). 2. Click the Advanced tab, select Edit from the Watermark drop-down list. The Edit Watermarks window appears. 3.
-
Page 59: Changing The Default Print Settings
CHANGING THE DEFAULT PRINT SETTINGS Most Windows applications will override settings you specify in the printer driver. Change all print settings available in the software application first, and change any remaining settings using the printer driver. 1. Click the Windows Start menu. 2.
-
Page 60: Changing Printer Settings
Changing printer settings You can use advanced printing features provided by your machine. Open an application and select Print from the File menu. The machine name, which appears in the printer properties window may differ depending on the machine in use. Except for the name, the composition of the printer properties pane is similar to the following.
-
Page 61: Printing Files
3. From the LPR GUI window, select the model name of your machine from the printer list and click Properties. 4. Change the print job properties using the following four tabs displayed at the top of the window. • General: This option allows you to change the paper size, the paper type, and the orientation of the documents.
-
Page 62: Basic Copying
Notification Area in Linux). You can also click Smart Panel on the status bar in Mac OS X. Or, if you are a Windows user, you can launch it from the Start menu, select Programs or All Programs > Samsung Printers > your printer driver name > Smart Panel.
-
Page 63: Id Card Copying
ID CARD COPYING Your machine can print 2-sided originals on one sheet. The machine prints one side of the original on the upper half of the paper and the other side on the lower half without reducing the size of the original. This feature is helpful for copying a small-sized item such as business card.
-
Page 64: Basic Scanning Method
SCANNING ORIGINALS AND SENDING TO YOUR COMPUTER (SCAN TO PC) You can scan an image on the machine via the Samsung Scan and Fax Manager program that is installed in your USB connected computer. Scan to PC feature only works when your machine is connected via USB.
-
Page 65: Set Scan Button Tab
IP or Host name: Enter in your machine’s IP address to detect your machine. Scan Assistant When you press Quick Scan in Samsung Scan and Fax Manager, the Scan Assistant window appears. Scan Assistant allows you to adjust scan settings and start the scanning process.
-
Page 66: Scanning Using The Wia Driver
SCANNING USING THE WIA DRIVER Your machine also supports the Windows Image Acquisition (WIA) driver for scanning images. WIA is one of the standard components provided by Microsoft Windows XP and works with digital cameras and scanners. Unlike the TWAIN driver, the WIA driver allows you to scan and easily adjust images without using additional software.
-
Page 67: Linux Scanning
in Bonjour Devices. If you want to scan using TWAIN, refer to the Mac OS X 10.4 steps above. 6. Set the scan options on this program. 7. Scan and save your scanned image. • For Mac OS X 10.3, use TWAIN-compliant software. •…
-
Page 68: Using The Image Manager
To save a new Job Type setting 1. Change the options from the Scanner Properties window. 2. Click Save As. 3. Enter the name for your setting. 4. Click OK. Your setting is added to the Saved Settings drop-down list. To save a Job Type setting for the next scan job 1.
-
Page 69: Management Tools
management tools This chapter introduces management tools provided to help you make full use of your machine. This chapter includes: • Introducing useful management tools • Using SyncThru™ Web Service (SCX-3205W(K) only) • Using the Smart Panel program Supported optional devices and features may differ according to your model.
-
Page 70: Maintenance Tab
Macintosh, Smart Panel is installed automatically when you install the machine software. For Linux, you can download Smart Panel from the Samsung website and install (See «Installing the Smart Panel» on page 28). To use this program, your computer has to meet the following system requirements: •…
-
Page 71: Opening The Unified Driver Configurator
Opening the Unified Driver Configurator 1. Double-click the Unified Driver Configurator on the desktop. You can also click the Startup Menu icon and select Samsung Unified Driver > Unified Driver Configurator. 2. Click each button on the left to switch to the corresponding configuration window.
-
Page 72: Printers Configuration Window
To use the on screen help, click Help. 3. After changing the configurations, click Exit to close the Unified Driver Configurator. Printers configuration window Printers configuration has the two tabs: Printers and Classes. Printers tab View the current system’s printer configuration by clicking on the machine icon button on the left side of the Unified Driver Configurator window.
-
Page 73: Scanners Configuration
“consumer” applications to these devices via the single I/O port. The Unified Linux Driver package provides an appropriate port sharing mechanism that is used by Samsung printer and scanner drivers. The drivers talk to their devices via so-called machine ports. The current status of any machine port can be viewed via the Ports configuration.
-
Page 74: Printing A Machine Report
maintenance This chapter provides information about maintaining your machine and the toner cartridge. This chapter includes: • Printing a machine report • Cleaning the machine PRINTING A MACHINE REPORT You can print a configuration page to view current printer settings, or to help troubleshoot printer problems.
-
Page 75: Storing The Toner Cartridge
STORING THE TONER CARTRIDGE Toner cartridge storage Toner cartridges contain components that are sensitive to light, temperature, and humidity. Samsung suggests users follow the recommendations to ensure the optimum performance, highest quality, and longest life from your new Samsung toner cartridge.
-
Page 76: Handling Instructions
Use of non-Samsung and refilled toner cartridge Samsung Electronics does not recommend or approve the use of non-Samsung brand toner cartridges in your printer including generic, store brand, refilled, or remanufactured toner cartridges.
-
Page 77: Redistributing Toner
troubleshooting This chapter gives helpful information for what to do if you encounter an error. This chapter includes: • Redistributing toner • Tips for avoiding paper jams REDISTRIBUTING TONER When the toner cartridge is near the end of its life: •…
-
Page 78: Tips For Avoiding Paper Jams
into place completely. 6. Close the inner cover and the scan unit completely in order. Ensure that they are securely closed. TIPS FOR AVOIDING PAPER JAMS By selecting the correct media types, most paper jams can be avoided. When a paper jam occurs, refer to the guidelines below: •…
-
Page 79: Inside The Machine
3. Remove the jammed paper by gently pulling it straight out. If the paper does not move when you pull, or if you do not see the paper in this area, check inside the machine (See «Inside the machine» on page 79).
-
Page 80
See «Copying problems» on page 85. • See «Scanning problems» on page 86. • See «Samsung Scan and Fax Manager Problem» on page 86. • See «Common Windows problems» on page 87. • See «Common Linux problems» on page 87. -
Page 81: Power Problems
Power problems Click this link to open an animation about solving power problems. CONDITION SUGGESTED SOLUTIONS The machine is • Plug in the power cord and press not receiving button on the control panel. power, or the connection cable between the computer and the machine is not connected…
-
Page 82: Printing Problems
Printing problems POSSIBLE CONDITION SUGGESTED SOLUTIONS CAUSE The machine The machine is Check the power cord does not print. not receiving connections. power. The machine is Select your machine as your not selected as default machine in your Windows. the default machine.
-
Page 83: Printing Quality Problems
POSSIBLE CONDITION SUGGESTED SOLUTIONS CAUSE The machine If you are in a See «Changing font setting» on prints, but the page 47. text is wrong, environment, the garbled, or font setting for incomplete. your machine may be set incorrectly. Pages print, but The toner Redistribute the toner, if they are blank.
-
Page 84
CONDITION SUGGESTED SOLUTIONS White Spots If white spots appear on the page: • The paper is too rough and a lot of dirt from a paper falls to the inner devices within the machine, so the transfer roller may be dirty. Clean the inside of your machine (See «Cleaning the inside»… -
Page 85: Copying Problems
CONDITION SUGGESTED SOLUTIONS Curl or wave • Ensure that the paper is loaded properly. • Check the paper type and quality. Both high temperature and humidity can cause paper curl (See «Print media specifications» on page 93). • Turn the stack of paper over in the tray. Also try rotating the paper 180°…
-
Page 86: Scanning Problems
• Invalid handle. • Scanning has failed. Samsung Scan and Fax Manager Problem CONDITION Samsung Scan and Check your system requirements. Samsung Scan Fax Manager does and Fax Manager works in Windows and Mac OS not work.
-
Page 87: Common Windows Problems
Common Windows problems CONDITION SUGGESTED SOLUTIONS “File in Use” Exit all software applications. Remove all software message appears from the startup group, then restart Windows. during installation. Reinstall the printer driver. “General Protection Close all other applications, reboot Windows and Fault”, “Exception try printing again.
-
Page 88: Common Macintosh Problems
CONDITION SUGGESTED SOLUTIONS I cannot scan via Check if Gimp Front-end has Xsane: Device Gimp Front-end. dialog on the Acquire menu. If not, you should install Xsane plug-in for Gimp on the your computer. You can find Xsane plug-in package for Gimp on Linux distribution CD or Gimp home page.
-
Page 89: Available Maintenance Parts
HOW TO PURCHASE To order Samsung-authorized supplies, accessories, and maintenance parts, contact your local Samsung dealer or the retailer where you purchased your machine. You can also visit www.samsung.com/supplies, select your country/region, and obtain information on calling for service.
-
Page 90
1. Turn the machine off, then wait a few minutes for the machine to cool. 2. Open the scan unit. 3. Open the inner cover. 4. Pull the toner cartridge out. 5. Take a new toner cartridge out of its package. 6. -
Page 91: Specifications
• Hardware specifications • Environmental specifications • Electrical specifications • Print media specifications The specification values are listed below: specifications are subject to change without notice: See www.samsung.com/printer for possible changes in information. HARDWARE SPECIFICATIONS ITEM Dimension Height Depth Width…
-
Page 92
ITEM 110 volt models Power rating 220 volt models Power consumption Average operating mode Ready mode Power save mode Power off mode a. See the rating label on the machine for the correct voltage (V), frequency (hertz) and type of current (A) for your machine. DESCRIPTION AC 110 — 127 V AC 220 — 240 V… -
Page 93: Print Media Specifications
PRINT MEDIA SPECIFICATIONS TYPE SIZE Plain paper Letter 216 x 279 mm (8.50 x 11.00 inches) Legal 216 x 356 mm (8.50 x 14.00 inches) US Folio 216 x 330 mm (8.50 x 13.00 inches) 210 x 297 mm (8.27 x 11.69 inches) Oficio 216 x 343 mm (8.50 x 13.50 inches) JIS B5…
-
Page 94: Contact Samsung Worldwide
If you have any comments or questions regarding Samsung products, contact the Samsung customer care center. COUNTRY/REG CUSTOMER CARE CENTER ARGENTINE 0800-333-3733 ARMENIA 0-800-05-555 AUSTRALIA 1300 362 603 AUSTRIA 0810-SAMSUNG (7267864, € 0.07/min) AZERBAIJAN 088-55-55-555 BAHRAIN 8000-4726…
-
Page 95
VENEZUELA VIETNAM www.samsung.com www.samsung.com www.samsung.com www.samsung.com www.samsung.ru www.samsung.com www.samsung.com www.samsung.com www.samsung.com www.samsung.com www.samsung.com www.samsung.com www.samsung.com www.samsung.com www.samsung.com www.samsung.com www.samsung.com www.samsung.com www.samsung.ua www.samsung.com/ua_ru Contact SAMSUNG worldwide_ 95 CUSTOMER CARE WEB SITE CENTER 8-10-800-500-55-500 www.samsung.com/kz_ru 0-800-100-5303 www.samsung.com 1 800 588 889 www.samsung.com… -
Page 96: Control Panel
glossary The following glossary helps you get familiar with the product by understanding the terminologies commonly used with printing as well as mentioned in this user’s guide. 802.11 802.11 is a set of standards for wireless local area network (WLAN) communication, developed by the IEEE LAN/MAN Standards Committee (IEEE 802).
-
Page 97: Fuser Unit
The Domain Name Server (DNS) is a system that stores information associated with domain names in a distributed database on networks, such as the Internet. Dot Matrix Printer A dot matrix printer refers to a type of computer printer with a print head that runs back and forth on the page and prints by impact, striking an ink-soaked cloth ribbon against the paper, much like a typewriter.
-
Page 98: Mac Address
Intranet A private network that uses Internet Protocols, network connectivity, and possibly the public telecommunication system to securely share part of an organization’s information or operations with its employees. Sometimes the term refers only to the most visible service, the internal website.
-
Page 99: Print Media
NetWare A network operating system developed by Novell, Inc. It initially used cooperative multitasking to run various services on a PC, and the network protocols were based on the archetypal Xerox XNS stack. Today NetWare supports TCP/IP as well as IPX/SPX. Organic Photo Conductor (OPC) is a mechanism that makes a virtual image for print using a laser beam emitted from a laser printer, and it is usually green or rust colored and has a cylinder shape.
-
Page 100: Toner Cartridge
Subnet Mask The subnet mask is used in conjunction with the network address to determine which part of the address is the network address and which part is the host address. TCP/IP The Transmission Control Protocol (TCP) and the Internet Protocol (IP); the set of communications protocols that implement the protocol stack on which the Internet and most commercial networks run.
-
Contents
-
Table of Contents
-
Troubleshooting
-
Bookmarks
Quick Links
SCX-3200 Series
Multi-Functional Mono Printer
User’s Guide
imagine the possibilities
Thank you for purchasing a Samsung product.
Related Manuals for Samsung SCX-3200 Series
Summary of Contents for Samsung SCX-3200 Series
-
Page 1
SCX-3200 Series Multi-Functional Mono Printer User’s Guide imagine the possibilities Thank you for purchasing a Samsung product. -
Page 2
This user’s guide is provided for information purposes only. All information included herein is subject to change without notice. Samsung Electronics is not responsible for any direct or indirect damages, arising from or related to use of this user’s guide. -
Page 3: Safety Information
safety information These warnings and precautions are included to prevent injury to you and others, and to prevent any potential damage to your machine. Be sure to read and understand all of these instructions before using the machine. Use common sense for operating any electrical appliance and whenever using your machine. Also, follow all warnings and instructions marked on the machine and in the accompanying literature.
-
Page 4
If the machine gets overheated, it releases smoke, makes strange noises, or generates an odd odor, immediately turn off the power switch and unplug the machine. ► This could result in electric shock or fire. Caution During an electrical storm or for a period of non-operation, remove the power plug from the electrical outlet. -
Page 5
INSTALLATION / MOVING Warning Do not place the machine in an area with dust, humidity or water leaks. ► This could result in electric shock or fire. Caution Before moving the machine, turn the power off and disconnect all cords. Then lift the machine: •… -
Page 6
► Otherwise, this could result in electric shock or fire. Do not remove any covers or guards that are fastened with screws. ► The machine should only be repaired by a Samsung service technician. SUPPLY USAGE Caution Do not disassemble the toner cartridge. -
Page 7: Regulatory Information
During normal operation, this machine produces ozone. The ozone produced does not present a hazard to the operator. However, it is advisable that the machine be operated in a well ventilated area. If you need additional information about ozone, contact your local Samsung dealer. Regulatory information_ 7…
-
Page 8: Power Save
POWER SAVE This printer contains advanced energy conservation technology that reduces power consumption when it is not in active use. When the printer does not receive data for an extended period of time, power consumption is automatically lowered. ENERGY STAR and the ENERGY STAR mark are registered U.S. marks. For more information on the ENERGY STAR program see http://www.energystar.gov.
-
Page 9: United States Of America
• Reorient or relocate the receiving antenna. • Increase the separation between the equipment and receiver. • Connect the equipment into an outlet on a circuit different from that to which the receiver is connected. • Consult the dealer or experienced radio TV technician for help. Change or modifications not expressly approved by the manufacturer responsible for compliance could void the user’s authority to operate the equipment.
-
Page 10
SCX-3200 Series: Low Voltage Directive (2006/95/EC), EMC Directive (2004/108/EC) SCX-3205W(K): R&TTE Directive (1999/5/EC) The declaration of conformity may be consulted at www.samsung.com/printer, go to Support > Download center and enter your printer (MFP) name to browse the EuDoC. January 1, 1995: Council Directive 2006/95/EC Approximation of the laws of the member states related to low voltage equipment. -
Page 11
PBXs of the European countries: In the event of problems, you should contact the Euro QA Lab of Samsung Electronics Co., Ltd. in the first instance. The product has been tested against TBR21. To assist in the use and application of terminal equipment which complies with this standard, the European Telecommunication Standards Institute (ETSI) has issued an advisory document (EG 201 121) which contains notes and additional requirements to ensure network compatibility of TBR21 terminals. -
Page 12: Openssl License
In environments where the risk of interference to other devices or services is harmful or perceived as harmful, the option to use a wireless device may be restricted or eliminated. Airports, Hospitals, and Oxygen or flammable gas laden atmospheres are limited examples where use of wireless devices may be restricted or eliminated.
-
Page 13
3. All advertising materials mentioning features or use of this software must display the following acknowledgement: «This product includes cryptographic software written by Eric Young (eay@cryptsoft.com)» The word ‘cryptographic’ can be left out if the routines from the library being used are not cryptographic related. 4. -
Page 14
CHINA ONLY Regulatory information_ 14… -
Page 15
about this user’s guide This user’s guide provides information about basic understanding of the machine as well as detailed explanation on each step during actual usage. It is a valuable resource for both novice and professional users for the proper installation and use of the machine. -
Page 16: Finding More Information
This help provides you with information about the printer driver and instructions for setting up the options for printing (See «Using help» on page 56). Samsung website If you have Internet access, you can get help, support, machine drivers, manuals, and order information from the Samsung website, www.samsung.com/printer. Downloadable You can download useful software programs from the Samsung website.
-
Page 17: Features Of Your New Product
features of your new product Your new machine is equipped with a number of special features that improve the quality of the documents you print. SPECIAL FEATURES Print with excellent quality and speed • You can print with a resolution of up to 1200 x 1200 dpi effective output.
-
Page 18: Features By Models
SyncThru™ Web Service a. Depending on your country, wireless LAN card may not be available. For some counties, only 802.11 b/g can be applied. Contact your local Samsung dealer or the retailer where you bought your machine. (●: Included, Blank: Not included)
-
Page 19: Machine Overview
introduction This chapter gives you an overview of your machine: This chapter includes: • Machine overview • Control panel overview MACHINE OVERVIEW Front view This illustration may differ from your machine depending on its model. Scanner lid Scanner glass Control panel Output tray (face down) Output support •…
-
Page 20: Rear View
Rear view This illustration may differ from your machine depending on its model. USB port Power cord receptacle Network port a. SCX-3205W(K) only Introduction_ 20…
-
Page 21: Control Panel Overview
CONTROL PANEL OVERVIEW This control panel may differ from your machine depending on its model. Allows you to turn the power on or off (See «Power button» on page 23). Power ( Eco Print Turn the Eco mode on or off (See «Eco Print button» on page 22). Scan to Sends scanned data (See «Scanning originals and sending to your computer (Scan to PC)»…
-
Page 22: Understanding The Status Led
Samsung cannot guarantee a non-genuine Samsung toner cartridge’s quality. Service or repair required as a result of using non-genuine Samsung toner cartridges will not be covered under the machine warranty. All printing errors will appear in the Smart Panel program window. If the problem persists, contact a service representative.
-
Page 23: Power Button
Stop/Clear button By pressing Stop/Clear button, you can do the following functions. FUNCTION DESCRIPTION Printing a configuration In ready mode, press and hold this button report long enough (about two seconds) until the Status LED blinks slowly, and release the button (See «To print a configuration report»…
-
Page 24: Getting Started
If you are a Windows or Macintosh OS user, install the software from the supplied CD and if you are a Linux OS user, download the software from the Samsung website (www.samsung.com/printer) and install. Machine software is occasionally updated for reasons like the release of new operating system and etc.
-
Page 25: System Requirements
This program is the accompanying Windows-based software for your multifunctional machine. • Samsung Scan and Fax Manager: You can find out about Samsung Scan and Fax Manager program information and installed scan driver’s condition. • Printer Settings Utility: This program allows you to set up printer’s other options from your computer.
-
Page 26
REQUIREMENTS (RECOMMENDED) OPERATING SYSTEM Mac OS X • Intel® 512 MB (1 GB) 10.5 Processors • 867 MHz or faster Power PC G4/ G5 Mac OS X • Intel® 1 GB (2 GB) 10.6 Processors Linux ITEM REQUIREMENTS Operating RedHat® Enterprise Linux WS 4, 5 (32/64 bit) system Fedora 4, 5, 6, 7, 8, 9, 10, 11, 12 (32/64 bit) SuSE Linux 10.0, 10.1 (32 bit) -
Page 27
7. If the test page prints out correctly, click Yes. If not, click No to reprint it. 8. If you want to register your machine on Samsung web site, click On-line Registration. If your machine is not connected yet to the network or computer, click How to connect?. -
Page 28: Installing The Unified Linux Driver
Click Continue. When the uninstall is done, click Quit. Linux You need to download Linux software packages from the Samsung website to install the printer software. Follow the steps below to install the software. Installing the Unified Linux Driver 1.
-
Page 29: Sharing Your Machine Locally
SHARING YOUR MACHINE LOCALLY Follow the steps below to set up computers to share your machine locally. If the Host computer is directly connected to the machine by a USB cable and is also connected to the local network environment, the client computer connected to the local network can use the shared machine through the host computer to print.
-
Page 30: Using A Wired Network
Depending on your country, wireless LAN card may not be available. For some counties, only 802.11 b/g can be applied. Contact your local Samsung dealer or the retailer where you bought your machine. INTRODUCING USEFUL NETWORK PROGRAMS There are several programs available to setup the network settings easily in network environment.
-
Page 31: Setting Ip Address
Starting the program 1. Connect your machine to the network with a network cable. 2. Turn on the machine. 3. From the Windows Start menu, select All Programs > Samsung Printers > SetIP > SetIP. 4. Click on the icon (third from left) in the SetIP window to open the TCP/IP configuration window.
-
Page 32: Network Parameter Setting
1. Print the machine’s network configuration report to find your machine’s MAC address. 2. Open the /opt/Samsung/mfp/share/utils/. 3. Double-click the SetIPApplet.html file. 4. Click to open the TCP/IP configuration window. 5. Enter the network card’s MAC address, IP address, subnet mask, default gateway, and then click Apply.
-
Page 33
7. If the test page prints out correctly, click Yes. If not, click No to reprint it. 8. If you want to register your machine on Samsung website, click On-line Registration. If your machine is not connected yet to the network, click How to connect?. -
Page 34: Ipv6 Configuration
22. For Mac OS X 10.3, if Auto Select does not work properly, select Samsung in Printer Model and your machine name in Model Name. • For Mac OS X 10.4, if Auto Select does not work properly, select Samsung in Print Using and your machine name in Model.
-
Page 35: Installing Printer Driver
Manual address configuration 1. Start a web browser such as Internet Explorer that supports IPv6 addressing as a URL (See «Using SyncThru™ Web Service (SCX-3205W(K) only)» on page 69). For IPv4, enter the IPv4 address (http://xxx.xxx.xxx.xxx) in the address field and press the Enter key or click Go. 2.
-
Page 36: Setting Wireless Network With Wps Button
wireless network setup (scx-3205w(k)) This chapter gives you step-by-step instructions for setting up the wireless network connected machine and software. This chapter includes: • Setting a wireless network with the WPS button • Using a wireless network from the computer •…
-
Page 37
connecting to the access point (or wireless router). : When the machine is successfully connected to the wireless network, the wireless LED light stays on. Re-connecting to the wireless network When the wireless function is off, the machine automatically tries to re-connect to the access point (or wireless router) with the previously used wireless connection settings and address. -
Page 38
network cable» on page 42). SETTING A WIRELESS NETWORK WITH USB CABLE Refer to your network administrator, or the person that set up your wireless network, for information about your network configuration. Installing the machine on a wireless network with an access point (Windows) Items to prepare Ensure you have next items ready. -
Page 39
7. After searching the wireless network, a list of wireless network your machine has searched appears. If you want to use the Samsung default ad-hoc setting, select the last wireless network on the list, which Network Name(SSID) is airportthru and Signal is Printer Self Network. -
Page 40
5. Double-click the MAC_Installer folder. 6. Double-click the Installer OS X icon. 7. Enter the password and click OK. 8. The Samsung Installer window opens. Click Continue. 9. Read the license agreement and click Continue. 10. Click Agree to agree to the license agreement. -
Page 41
5. Double-click the MAC_Installer folder. 6. Double-click the Installer OS X icon. 7. Enter the password and click OK. 8. The Samsung Installer window opens. Click Continue. 9. Read the license agreement and click Continue. 10. Click Agree to agree to the license agreement. -
Page 42
14. After searching the wireless network, a list of wireless network your machine has searched appears. If you want to use the Samsung default ad-hoc setting, select the last wireless network on the list, which Network Name(SSID) is airportthru and Signal is Printer Self Network. -
Page 43: Configuring The Machine’s Wireless Network
Starting the program 1. Connect your machine to the network with a network cable. 2. Turned on the machine. 3. From the Windows Start menu, select All Programs > Samsung Printers > SetIP > SetIP. 4. Click on the icon (third from left) in the SetIP window to open the TCP/IP configuration window.
-
Page 44: Troubleshooting
COMPLETING THE INSTALLATION After you have installed your Samsung wireless network printer, print another copy of the Network Configuration Report and keep it for future reference. You are now ready to use your new Samsung wireless printer on your network. TROUBLESHOOTING Solve problems that might occur during wireless setting and installing the machine driver.
-
Page 45: Solving Other Problems
• You cannot use infrastructure mode and Ad-hoc mode at the same time for Samsung wireless network machine. • The machine is within the range of the wireless network. For most networks, the machine should be within 30 meters (100 feet) of the wireless access point (or wireless router).
-
Page 46: Altitude Adjustment
Mac OS X (See «Using the Smart Panel program» on page 70). Or, if you are a Windows user, you can launch it from the Start menu, select Programs or All Programs > Samsung Printers > your printer driver name > Smart Panel.
-
Page 47
Mac OS X. Or, if you are a Windows user, you can launch it from the Start menu, select Programs or All Programs > Samsung Printers > your printer driver name > Smart Panel. 2. Click Printer Setting. -
Page 48: Media And Tray
media and tray This chapter provides information on how to load print media into your machine. This chapter includes: • Loading originals • Selecting print media • Changing the tray size LOADING ORIGINALS You can use the scanner glass to load an original for copying or scanning. On the scanner glass Using the scanner glass, you can copy or scan originals.
-
Page 49: Media Sizes Supported In Each Mode
the warranty or service agreements. The amount of paper put into the tray may differ according to media type used (See «Print media specifications» on page 93). • Using inflammable print media can cause a fire. • Use designated print media (See «Print media specifications» on page 93).
-
Page 50: Loading Paper In The Tray
4. Pinch the paper length guide to adjust the guide so that it is flush up against the rear edge of the paper; then pinch the paper width guides so they are flush against the sides of the paper. • Do not push the paper width guide too far causing the media to warp.
-
Page 51: Printing On Special Media
If you are printing multiple pages, load the next sheet after the first page prints out, and press Start button. Repeat this step for every page to be printed. PRINTING ON SPECIAL MEDIA The table below shows the available special media for printing. When printing on a special media, we recommend you feed one paper at a time.
-
Page 52
Transparencies To avoid damaging the machine, use only transparencies designed for laser printers. • Transparencies used in the machine must be able to withstand machine’s fusing temperature. • Place them on a flat surface after removing them from the machine. •… -
Page 53: Using The Output Support
USING THE OUTPUT SUPPORT The surface of the output tray may become hot if you print a large number of pages at once. Make sure that you do not touch the surface, and do not allow children near it. The printed pages stack on the output tray, and the output support will help the printed pages to align.
-
Page 54: Basic Printing
This tool helps you to screen-capture, preview, scrap and print the screen of Windows Internet Explorer more easily, than when you use the ordinary program. Click Start > All programs > Samsung Printers > Samsung AnyWeb Print > Download the latest version to link the website where the tool is available for the download.
-
Page 55: Opening Printing Preferences
4. Click Properties or Preferences. Using Presets setting The Presets option, which is visible on each of the preferences tab except for the Samsung tab, allows you to save the current preferences for future use. To save a Presets item: 1.
-
Page 56: Using Help
Then a pop up window appears with information about that option’s feature which is provided from the driver. If you want to search information via a keyword, click the Samsung tab in the Printing Preferences window, and enter a keyword in the input line of the Help option.
-
Page 57: Using Watermarks
3. From the Double-Sided Printing (Manual) section, select the binding option you want. • None • Long Edge: This option is the conventional layout used in bookbinding. • Short Edge: This option is the conventional layout used in calendars. 4. Click the Paper tab, select the Size, Source, and Type. 5.
-
Page 58: Using Overlays
Deleting a watermark 1. To change the print settings from your software application, access Printing Preferences (See «Opening printing preferences» on page 55). 2. Click the Advanced tab, select Edit from the Watermark drop-down list. The Edit Watermarks window appears. 3.
-
Page 59: Changing The Default Print Settings
CHANGING THE DEFAULT PRINT SETTINGS Most Windows applications will override settings you specify in the printer driver. Change all print settings available in the software application first, and change any remaining settings using the printer driver. 1. Click the Windows Start menu. 2.
-
Page 60: Changing Printer Settings
Changing printer settings You can use advanced printing features provided by your machine. Open an application and select Print from the File menu. The machine name, which appears in the printer properties window may differ depending on the machine in use. Except for the name, the composition of the printer properties pane is similar to the following.
-
Page 61: Printing Files
3. From the LPR GUI window, select the model name of your machine from the printer list and click Properties. 4. Change the print job properties using the following four tabs displayed at the top of the window. • General: This option allows you to change the paper size, the paper type, and the orientation of the documents.
-
Page 62: Basic Copying
Notification Area in Linux). You can also click Smart Panel on the status bar in Mac OS X. Or, if you are a Windows user, you can launch it from the Start menu, select Programs or All Programs > Samsung Printers > your printer driver name > Smart Panel.
-
Page 63: Id Card Copying
ID CARD COPYING Your machine can print 2-sided originals on one sheet. The machine prints one side of the original on the upper half of the paper and the other side on the lower half without reducing the size of the original. This feature is helpful for copying a small-sized item such as business card.
-
Page 64: Basic Scanning Method
SCANNING ORIGINALS AND SENDING TO YOUR COMPUTER (SCAN TO PC) You can scan an image on the machine via the Samsung Scan and Fax Manager program that is installed in your USB connected computer. Scan to PC feature only works when your machine is connected via USB.
-
Page 65: Set Scan Button Tab
IP or Host name: Enter in your machine’s IP address to detect your machine. Scan Assistant When you press Quick Scan in Samsung Scan and Fax Manager, the Scan Assistant window appears. Scan Assistant allows you to adjust scan settings and start the scanning process.
-
Page 66: Scanning Using The Wia Driver
SCANNING USING THE WIA DRIVER Your machine also supports the Windows Image Acquisition (WIA) driver for scanning images. WIA is one of the standard components provided by Microsoft Windows XP and works with digital cameras and scanners. Unlike the TWAIN driver, the WIA driver allows you to scan and easily adjust images without using additional software.
-
Page 67: Linux Scanning
in Bonjour Devices. If you want to scan using TWAIN, refer to the Mac OS X 10.4 steps above. 6. Set the scan options on this program. 7. Scan and save your scanned image. • For Mac OS X 10.3, use TWAIN-compliant software. •…
-
Page 68: Using The Image Manager
To save a new Job Type setting 1. Change the options from the Scanner Properties window. 2. Click Save As. 3. Enter the name for your setting. 4. Click OK. Your setting is added to the Saved Settings drop-down list. To save a Job Type setting for the next scan job 1.
-
Page 69: Management Tools
management tools This chapter introduces management tools provided to help you make full use of your machine. This chapter includes: • Introducing useful management tools • Using SyncThru™ Web Service (SCX-3205W(K) only) • Using the Smart Panel program Supported optional devices and features may differ according to your model.
-
Page 70: Maintenance Tab
Macintosh, Smart Panel is installed automatically when you install the machine software. For Linux, you can download Smart Panel from the Samsung website and install (See «Installing the Smart Panel» on page 28). To use this program, your computer has to meet the following system requirements: •…
-
Page 71: Opening The Unified Driver Configurator
Opening the Unified Driver Configurator 1. Double-click the Unified Driver Configurator on the desktop. You can also click the Startup Menu icon and select Samsung Unified Driver > Unified Driver Configurator. 2. Click each button on the left to switch to the corresponding configuration window.
-
Page 72: Printers Configuration Window
To use the on screen help, click Help. 3. After changing the configurations, click Exit to close the Unified Driver Configurator. Printers configuration window Printers configuration has the two tabs: Printers and Classes. Printers tab View the current system’s printer configuration by clicking on the machine icon button on the left side of the Unified Driver Configurator window.
-
Page 73: Scanners Configuration
“consumer” applications to these devices via the single I/O port. The Unified Linux Driver package provides an appropriate port sharing mechanism that is used by Samsung printer and scanner drivers. The drivers talk to their devices via so-called machine ports. The current status of any machine port can be viewed via the Ports configuration.
-
Page 74: Printing A Machine Report
maintenance This chapter provides information about maintaining your machine and the toner cartridge. This chapter includes: • Printing a machine report • Cleaning the machine PRINTING A MACHINE REPORT You can print a configuration page to view current printer settings, or to help troubleshoot printer problems.
-
Page 75: Storing The Toner Cartridge
STORING THE TONER CARTRIDGE Toner cartridge storage Toner cartridges contain components that are sensitive to light, temperature, and humidity. Samsung suggests users follow the recommendations to ensure the optimum performance, highest quality, and longest life from your new Samsung toner cartridge.
-
Page 76: Handling Instructions
Use of non-Samsung and refilled toner cartridge Samsung Electronics does not recommend or approve the use of non-Samsung brand toner cartridges in your printer including generic, store brand, refilled, or remanufactured toner cartridges.
-
Page 77: Redistributing Toner
troubleshooting This chapter gives helpful information for what to do if you encounter an error. This chapter includes: • Redistributing toner • Tips for avoiding paper jams REDISTRIBUTING TONER When the toner cartridge is near the end of its life: •…
-
Page 78: Tips For Avoiding Paper Jams
into place completely. 6. Close the inner cover and the scan unit completely in order. Ensure that they are securely closed. TIPS FOR AVOIDING PAPER JAMS By selecting the correct media types, most paper jams can be avoided. When a paper jam occurs, refer to the guidelines below: •…
-
Page 79: Inside The Machine
3. Remove the jammed paper by gently pulling it straight out. If the paper does not move when you pull, or if you do not see the paper in this area, check inside the machine (See «Inside the machine» on page 79).
-
Page 80
See «Copying problems» on page 85. • See «Scanning problems» on page 86. • See «Samsung Scan and Fax Manager Problem» on page 86. • See «Common Windows problems» on page 87. • See «Common Linux problems» on page 87. -
Page 81: Power Problems
Power problems Click this link to open an animation about solving power problems. CONDITION SUGGESTED SOLUTIONS The machine is • Plug in the power cord and press not receiving button on the control panel. power, or the connection cable between the computer and the machine is not connected…
-
Page 82: Printing Problems
Printing problems POSSIBLE CONDITION SUGGESTED SOLUTIONS CAUSE The machine The machine is Check the power cord does not print. not receiving connections. power. The machine is Select your machine as your not selected as default machine in your Windows. the default machine.
-
Page 83: Printing Quality Problems
POSSIBLE CONDITION SUGGESTED SOLUTIONS CAUSE The machine If you are in a See «Changing font setting» on prints, but the page 47. text is wrong, environment, the garbled, or font setting for incomplete. your machine may be set incorrectly. Pages print, but The toner Redistribute the toner, if they are blank.
-
Page 84
CONDITION SUGGESTED SOLUTIONS White Spots If white spots appear on the page: • The paper is too rough and a lot of dirt from a paper falls to the inner devices within the machine, so the transfer roller may be dirty. Clean the inside of your machine (See «Cleaning the inside»… -
Page 85: Copying Problems
CONDITION SUGGESTED SOLUTIONS Curl or wave • Ensure that the paper is loaded properly. • Check the paper type and quality. Both high temperature and humidity can cause paper curl (See «Print media specifications» on page 93). • Turn the stack of paper over in the tray. Also try rotating the paper 180°…
-
Page 86: Scanning Problems
• Invalid handle. • Scanning has failed. Samsung Scan and Fax Manager Problem CONDITION Samsung Scan and Check your system requirements. Samsung Scan Fax Manager does and Fax Manager works in Windows and Mac OS not work.
-
Page 87: Common Windows Problems
Common Windows problems CONDITION SUGGESTED SOLUTIONS “File in Use” Exit all software applications. Remove all software message appears from the startup group, then restart Windows. during installation. Reinstall the printer driver. “General Protection Close all other applications, reboot Windows and Fault”, “Exception try printing again.
-
Page 88: Common Macintosh Problems
CONDITION SUGGESTED SOLUTIONS I cannot scan via Check if Gimp Front-end has Xsane: Device Gimp Front-end. dialog on the Acquire menu. If not, you should install Xsane plug-in for Gimp on the your computer. You can find Xsane plug-in package for Gimp on Linux distribution CD or Gimp home page.
-
Page 89: Available Maintenance Parts
HOW TO PURCHASE To order Samsung-authorized supplies, accessories, and maintenance parts, contact your local Samsung dealer or the retailer where you purchased your machine. You can also visit www.samsung.com/supplies, select your country/region, and obtain information on calling for service.
-
Page 90
1. Turn the machine off, then wait a few minutes for the machine to cool. 2. Open the scan unit. 3. Open the inner cover. 4. Pull the toner cartridge out. 5. Take a new toner cartridge out of its package. 6. -
Page 91: Specifications
• Hardware specifications • Environmental specifications • Electrical specifications • Print media specifications The specification values are listed below: specifications are subject to change without notice: See www.samsung.com/printer for possible changes in information. HARDWARE SPECIFICATIONS ITEM Dimension Height Depth Width…
-
Page 92
ITEM 110 volt models Power rating 220 volt models Power consumption Average operating mode Ready mode Power save mode Power off mode a. See the rating label on the machine for the correct voltage (V), frequency (hertz) and type of current (A) for your machine. DESCRIPTION AC 110 — 127 V AC 220 — 240 V… -
Page 93: Print Media Specifications
PRINT MEDIA SPECIFICATIONS TYPE SIZE Plain paper Letter 216 x 279 mm (8.50 x 11.00 inches) Legal 216 x 356 mm (8.50 x 14.00 inches) US Folio 216 x 330 mm (8.50 x 13.00 inches) 210 x 297 mm (8.27 x 11.69 inches) Oficio 216 x 343 mm (8.50 x 13.50 inches) JIS B5…
-
Page 94: Contact Samsung Worldwide
If you have any comments or questions regarding Samsung products, contact the Samsung customer care center. COUNTRY/REG CUSTOMER CARE CENTER ARGENTINE 0800-333-3733 ARMENIA 0-800-05-555 AUSTRALIA 1300 362 603 AUSTRIA 0810-SAMSUNG (7267864, € 0.07/min) AZERBAIJAN 088-55-55-555 BAHRAIN 8000-4726…
-
Page 95
VENEZUELA VIETNAM www.samsung.com www.samsung.com www.samsung.com www.samsung.com www.samsung.ru www.samsung.com www.samsung.com www.samsung.com www.samsung.com www.samsung.com www.samsung.com www.samsung.com www.samsung.com www.samsung.com www.samsung.com www.samsung.com www.samsung.com www.samsung.com www.samsung.ua www.samsung.com/ua_ru Contact SAMSUNG worldwide_ 95 CUSTOMER CARE WEB SITE CENTER 8-10-800-500-55-500 www.samsung.com/kz_ru 0-800-100-5303 www.samsung.com 1 800 588 889 www.samsung.com… -
Page 96: Control Panel
glossary The following glossary helps you get familiar with the product by understanding the terminologies commonly used with printing as well as mentioned in this user’s guide. 802.11 802.11 is a set of standards for wireless local area network (WLAN) communication, developed by the IEEE LAN/MAN Standards Committee (IEEE 802).
-
Page 97: Fuser Unit
The Domain Name Server (DNS) is a system that stores information associated with domain names in a distributed database on networks, such as the Internet. Dot Matrix Printer A dot matrix printer refers to a type of computer printer with a print head that runs back and forth on the page and prints by impact, striking an ink-soaked cloth ribbon against the paper, much like a typewriter.
-
Page 98: Mac Address
Intranet A private network that uses Internet Protocols, network connectivity, and possibly the public telecommunication system to securely share part of an organization’s information or operations with its employees. Sometimes the term refers only to the most visible service, the internal website.
-
Page 99: Print Media
NetWare A network operating system developed by Novell, Inc. It initially used cooperative multitasking to run various services on a PC, and the network protocols were based on the archetypal Xerox XNS stack. Today NetWare supports TCP/IP as well as IPX/SPX. Organic Photo Conductor (OPC) is a mechanism that makes a virtual image for print using a laser beam emitted from a laser printer, and it is usually green or rust colored and has a cylinder shape.
-
Page 100: Toner Cartridge
Subnet Mask The subnet mask is used in conjunction with the network address to determine which part of the address is the network address and which part is the host address. TCP/IP The Transmission Control Protocol (TCP) and the Internet Protocol (IP); the set of communications protocols that implement the protocol stack on which the Internet and most commercial networks run.
Содержание
- Драйвер для Samsung SCX-3200
- Установка драйвера в Windows 10
- Драйвер для Samsung SCX-3200-серии (модели: SCX-3200, SCX-3201, SCX-3205, SCX-3205W, SCX-3206, SCX-3207, SCX-3208) + инструкция
- Windows
- Универсальный
- Специальный
- Mac OS X
- Для принтера
- Для сканера
- Дополнительные материалы
- Утилиты
- Программа Smart Panel
- Инструкции
- Samsung SCX-3200 driver
- Samsung SCX-3200 drivers Supported Windows Operating Systems
- Samsung SCX-3200 drivers Supported Macintosh Operating Systems
- Samsung SCX-3200 drivers Supported Linux Operating Systems
- Specifications
- Драйвер для Samsung SCX-3200
- Как установить драйвер в Windows 10
- Дайвер для Samsung SCX-3200
- Как установить драйвер
Драйвер для Samsung SCX-3200
Windows XP/Vista/7/8/8.1/10 32/64-bit (универсальный драйвер — рекомендуем для установки)
Данная программа подходит почти для всех версий Windows. Чтобы проверить — установку для вашей версий перейдите по ссылке и установите программу для скачивания драйверов для вашего устройства.
Windows 2000 / 2003 / 2008 / XP / Vista / 7
Размер: 18.5 MB (принтер) и 45.8 MB (сканер)
Установка драйвера в Windows 10
Программное обеспечения для принтера Samsung SCX-3200 можно скачать на нашем сайте по ссылке выше. Если вы скачете установочные файлы с официального сайта, процесс установки будет аналогичен. На первом этапе выбираем любую папку для извлечения системных файлов. Отмечаем «Запустить после завершения», нажимаем «Извлечь».
Далее выберете единственный пункт – «Установить сейчас».
Прочтите лицензионное соглашение. Здесь будут указаны все условия использования данного программного продукта. После изучения информации отмечаем «Я принимаю условия лицензионного соглашения». Для продолжения установки нажимаем «Далее».
Для большинства пользователей следующий пункт установки скорее всего не пригодится. Если вы не желаете передавать в компанию Samsung отчеты, то отметьте флажком кнопку «Нет, я не хочу передавать такие данные».
На данном этапе все шаги установки выполнены. Подождите несколько минут, пока установщик загрузит необходимые системные файлы для правильной работы принтера. Обычно данная процедура не занимает много времени. Зеленая шкала отображает прогресс установки.
Установка драйвера завершена. Регистрировать ПО не обязательно, поэтому прост о жмём кнопку «Готово».
Источник
Драйвер для Samsung SCX-3200-серии (модели: SCX-3200, SCX-3201, SCX-3205, SCX-3205W, SCX-3206, SCX-3207, SCX-3208) + инструкция
Драйверы для принтеров Samsung SCX-3200, 3201, 3205, 3205W, 3206, 3207, 3208 для Windows 10 — XP и Mac OS X 10.10 — 10.4 на русском.
Windows
Универсальный
Драйвер печати (подойдет «Основной») под Windows 10 — XP можно скачать здесь.
Специальный
ОС: Windows 7 — XP
Разрядность: 32/64
Язык: Русский
Дата: 1.09.2017
Подключаем устройство к компьютеру, скачиваем драйвер и устанавливаем.
Mac OS X
Для принтера
Язык: Русский
Версия: 5.00
Дата: 11.10.2012
Для сканера
Язык: Русский + другие
Дополнительные материалы
Утилиты
Программа Smart Panel
ОС: Windows 7 — XP
Разрядность: 32/64
Язык: Русский
Дата: 13.08.2015
Позволяет контролировать, настраивать и следить за состоянием устройства.
Инструкции
Печатайте с удовольствием.
Спасибо огромное! У меня с универсальным драйвером не работала smart panel (просила установить драйвер) и я не мог настроить контраст копии (слишком темная была). А с вашим драйвер+SP все встало на свои места.
Покупала принтер давно. Первый раз все устанавливалось хорошо. Теперь на новый Windows нужно установить, но у меня при установке все зависает, после того как я ставлю галочку, что ознакомилась с прочитанным. Т.Е. Я нажимаю установить прямо сейчас, далее идет условия лиц.соглашения, я ознакомился, далее…и все зависло. Дальше идет поиск принтеров, но у меня на него не переходит. Еще есть только один кабель USB, но их разве не должно быть два?
Источник
Samsung SCX-3200 driver

The user’s desire for a robust machine with a reasonable size and can withstand certain conditions is not wrong. Samsung must have these factors in mind when building the Samsung SCX-3200 model of printer. It has outstanding qualities that favor it, among many other Samsung printers. For instance, it is very affordable to use by both small and medium scale businesses. This machine can make up to 5000 impressions in a single month without compromising the print quality.
Samsung SCX-3200 drivers Supported Windows Operating Systems
Samsung SCX-3200 drivers Supported Macintosh Operating Systems
Samsung SCX-3200 drivers Supported Linux Operating Systems
Linux (32-bit), Linux (64-bit)
Specifications
In other words, it possesses a standard memory of 32 MB of RAM with a first print out time of 8.5 seconds. The display component of the machine also supports two lines and 16 characters. It is compatible with Microsoft Windows 7 OS version as well as Mac OS and Linux. The included cartridge in the printer package is the MLT-D1042S model that can hold up to 700 pages of plain sheets.
Samsung SCX-3200 is a multifunction printer with the ability to not only print but also to copy and scan documents. In other words, this machine can run a copying function at speed up to 16 pages per minute (ppm). Also, the copy resolution is up to 1200 x 1200 dots per inch (dpi) at optimum performance. Whereas, it produces the first page in less than 10 seconds for 99 copies from a single original document.
When printing, however, the resolution is the same as copying, up to 1200 x 1200 dots per inch (dpi). The speed is also the same as that of reproduction, at 16 ppm, but supported emulations are PCl5e and SPL. Samsung SCX-3200 also has an installed memory of 32 MB of RAM that is non-expandable. The sound emission when the machine is idle is about 26 dB and 49 dB when in operation. Legal paper is also the maximum supported size by this machine. Download Samsung SCX-3200 driver from HP website
Источник
Драйвер для Samsung SCX-3200
Windows 2000 / 2003 / 2008 / XP / Vista / 7 / 8 / 8.1 / 10 — универсальные драйвера
Драйвер Samsung SCX-3200 вы очень быстро можете установить с помощью утилиты от компании Samsung. Подробно с картинками о ней мы рассказывали в одной из наших статей, которую рекомендуем вам прочитать.
Windows 2000 / 2003 / 2008 / XP / Vista / 7
Варианты разрядности: x32/x64
Размер драйвера: 18 MB
Smart Panel для этого устройства
Подходит для: Windows 2000 / 2003 / 2008 / XP / Vista / 7
Варианты разрядности: x32/x64
Размер программы: 8 MB
Как установить драйвер в Windows 10
Первым этапом установки драйвера Samsung SCX-3200 является загрузка исполняемого файла. После чего скачанный файл следует запустить. Для Windows 8 и выше делать это следует «От имени Администратора».
Показанное выше окно будет первым после запуска исполняемого файла с драйвером. Нам предлагается распаковать необходимые для установки файлы. Отмечаем «Запустить после завершения» и нажимаем «Извлечь».
После распаковки, занимающей не более минуты, появится второе окно. В нём клацаем «Установить сейчас» и переходим к непосредственной установке драйвера.
Отмечаем «Я принимаю условия лицензионного соглашения». После этого становится доступна кнопка «Далее» — нажимаем на неё. Читать само соглашение не обязательно.
Сразу переставляем отметку на «Нет, я не хочу передавать такие данные». Это партнёрская программа Samsung для сбора информации о работе устройств и программного обеспечения. Участвовать в ней не будем. Клацаем «Далее».
Отмечаем поле «Убедитесь в том, что необходимо установить программное обеспечение без подключения к принтеру». Делать это нужно если принтер не подключён или не определяется. Становится доступной кнопка «Далее», которую и следует нажать для продолжения.
По завершении установки жмём «Готово».
Теперь можно подключать принтер, если это не было проделано ранее, и переходить к его использованию.
Источник
Дайвер для Samsung SCX-3200
Драйвера подходят для: Windows 2000 / 2003 / 2008 / XP / Vista / 7 / 8.1 / 8 / 10
Windows 2000 / 2003 / 2008 / XP / Vista / 7 / 8.1 / 8 / 10
Windows 2000 / 2003 / 2008 / XP / Vista / 7
Для скачивания нажмите на ссылку: Samsung SCX-3200 и сканер Samsung SCX-3200
Для работы с устройством можете использовать программу Smart Panel.
Как установить драйвер
Драйвер – это программное обеспечение, установка которого выполняется в процессе подключения к ПК оборудования для печати. Именно оно позволяет компьютеру найти и определить МФУ, а затем выполнить настройку операционной системы для совместной с ним работы. Скачать драйвер Samsung SCX-3200 можно нажатием на ссылку, размещенную на данной странице. Файл будет отправлен в каталог «Загрузки», если пользователь не выберет иной.
Для начала установки нужно перейти в папку и дважды нажать на SCX-3200_Print.exe. В открывшемся окне указать, куда должны быть сохранены файлы, кликнув на кнопку «Обзор». Затем нужно поставить метку возле строки «Запустить после завершения» и нажать «Извлечь».

Появится окно мастера установки. В нижней его части при необходимости можно изменить язык (по умолчанию выбран русский). Затем кликнуть «Установить сейчас».

На экране появится окно, в котором изложены параметры лицензионного соглашения. Нужно их прочитать, поставить ниже галочку, чтобы принять их и нажать «Далее».

В следующем окне пользователю будет предложено поучаствовать в программе, собирающей сведения о том, как работает техника для печати. Нужно согласиться или отказаться от этого предложения и нажать «Далее».

Появится уведомление, предупреждающее, что обнаружить МФУ не удалось. При инсталляции драйвера без подключения техники для печати нужно поставить галочку в строке «Убедитесь, что необходимо установить ПО без подключения к принтеру» и нажать «Далее».

Установка будет завершена без подключения МФУ. Чтобы приступить к работе с устройством, нужно нажать на кнопку «Готово», а затем подсоединить оборудование кабелем USB к компьютеру.
Источник