Repair L2TP VPN error using our practical solutions or VPN pick
by Milan Stanojevic
Milan has been enthusiastic about technology ever since his childhood days, and this led him to take interest in all PC-related technologies. He’s a PC enthusiast and he… read more
Updated on September 20, 2022
Reviewed by
Edgar Nicov

Since the dial-up Internet era, Edgar was interested in online resources. From forums to e-commerce websites, he started digging into how those resources could generate revenue. Today he… read more
- VPN error 789 appears when a Windows system isn’t configured properly while using the L2TP protocol.
- This error can be fixed with a quick network adapter reset from Device Manager.
- IPSec configuration should be changed as well as a fallback solution, so tweak the services as shown in our guide.
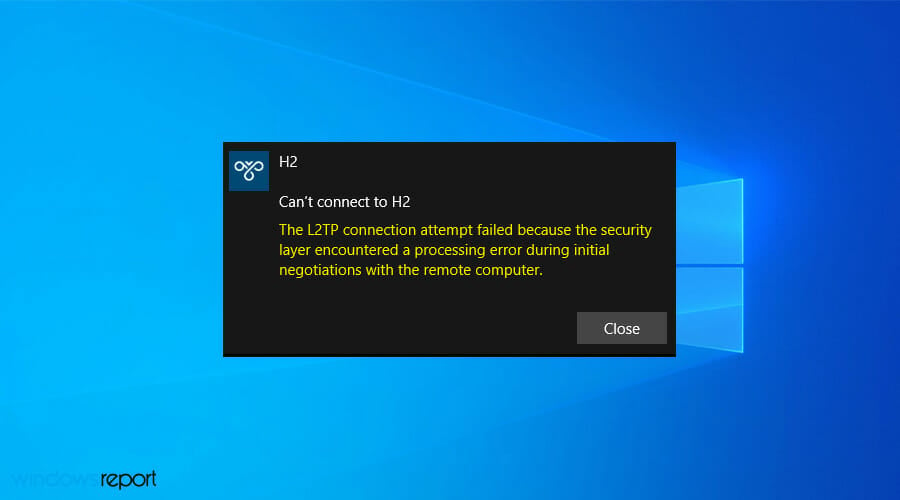
Using a VPN is a great way to protect your online privacy, but sometimes you might experience issues with it. Many Windows 10/11 users reported VPN error 789 which states the following message:
The L2TP connection attempt failed because the security layer encountered a processing error during initial negotiations with the remote computer
This issue will prevent you from achieving a safe connection on your PC, so it’s crucial that you fix it. So keep on reading to find out how to fix this problem once and for all.
Why does VPN error 789 appear?
This error pops up when your system is not properly set up to connect to an L2TP server, thus the connection attempt fails even before you establish a connection with the server.
It is also linked to the incorrect configuration of your operating system like Windows 10 in this case. This generic error is thrown when the IPSec negotiation fails for the L2TP/IPSec connections.
Other possible causes include:
- L2TP-based VPN client (or VPN server) is behind NAT
- The wrong certificate or pre-shared key is set on the VPN server or client
- A machine certificate or trusted root machine certificate is not present on the VPN server
- Machine Certificate on VPN Server does not have Server Authentication as the EKU
Before trying any of these solutions, ensure that L2TP and IPSec pass-through options are enabled from your router.
If you configured your VPN service manually, then make sure you use the preshared key 12345678. If this doesn’t work, here are more solutions you can use to fix this problem on your PC.
How do I fix the VPN error 789 on Windows 10 & 11?
- Reset network adapter
- Check the certificate
- Use a reliable VPN service
- Re-enable IPSec on your computer
1. Reset network adapter
- Press the Windows key + X and select Device Manager.

- Identify your network adapter and right-click on it then select Uninstall device.

- Click on Uninstall to confirm.

- Restart your computer. The device will reinstall and should reset it to default settings.

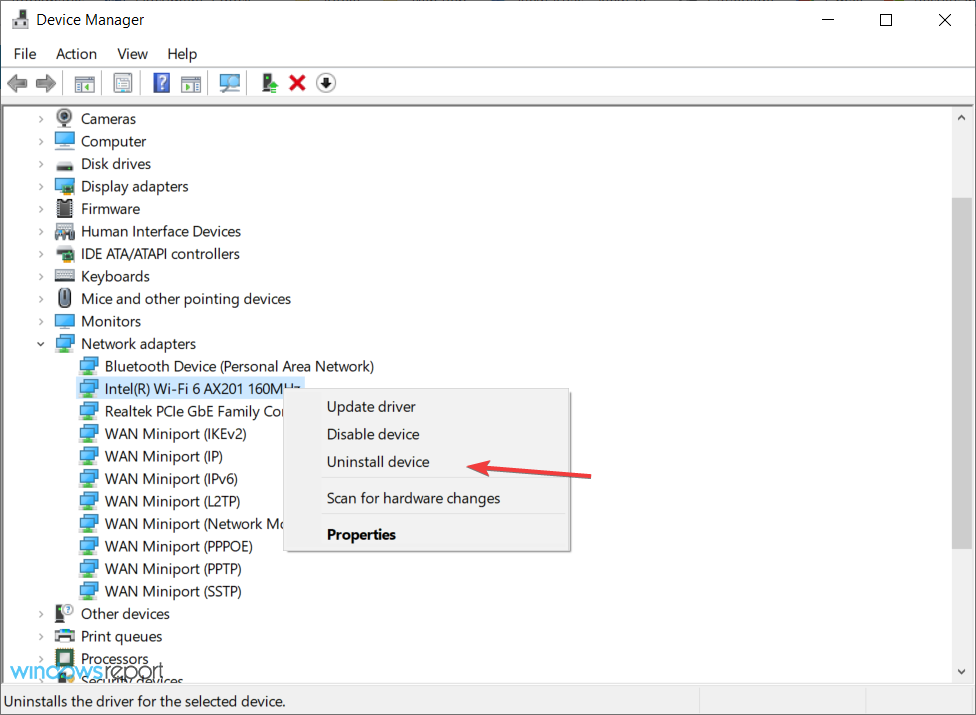
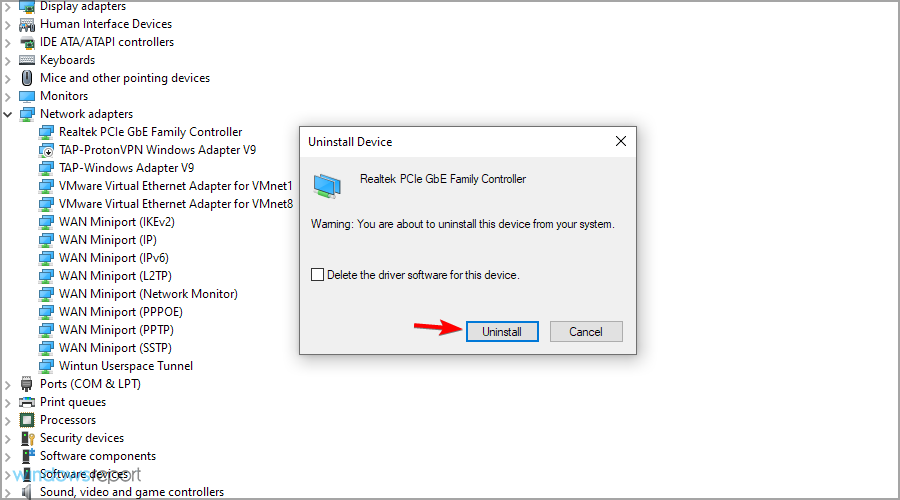
Refreshing the network adapter driver can make this problem go away quickly so make sure you try it out by performing the steps above.
2. Check the certificate
It is very important to ensure the correct certificate is used both on the client and the server side.
In case the two don’t match, you won’t be able to use the virtual private network. You might need to renew the certificate with your provider.
If you are using a Pre Shared Key (PSK), ensure that the same PSK is configured on the client-side, and the VPN server machine.
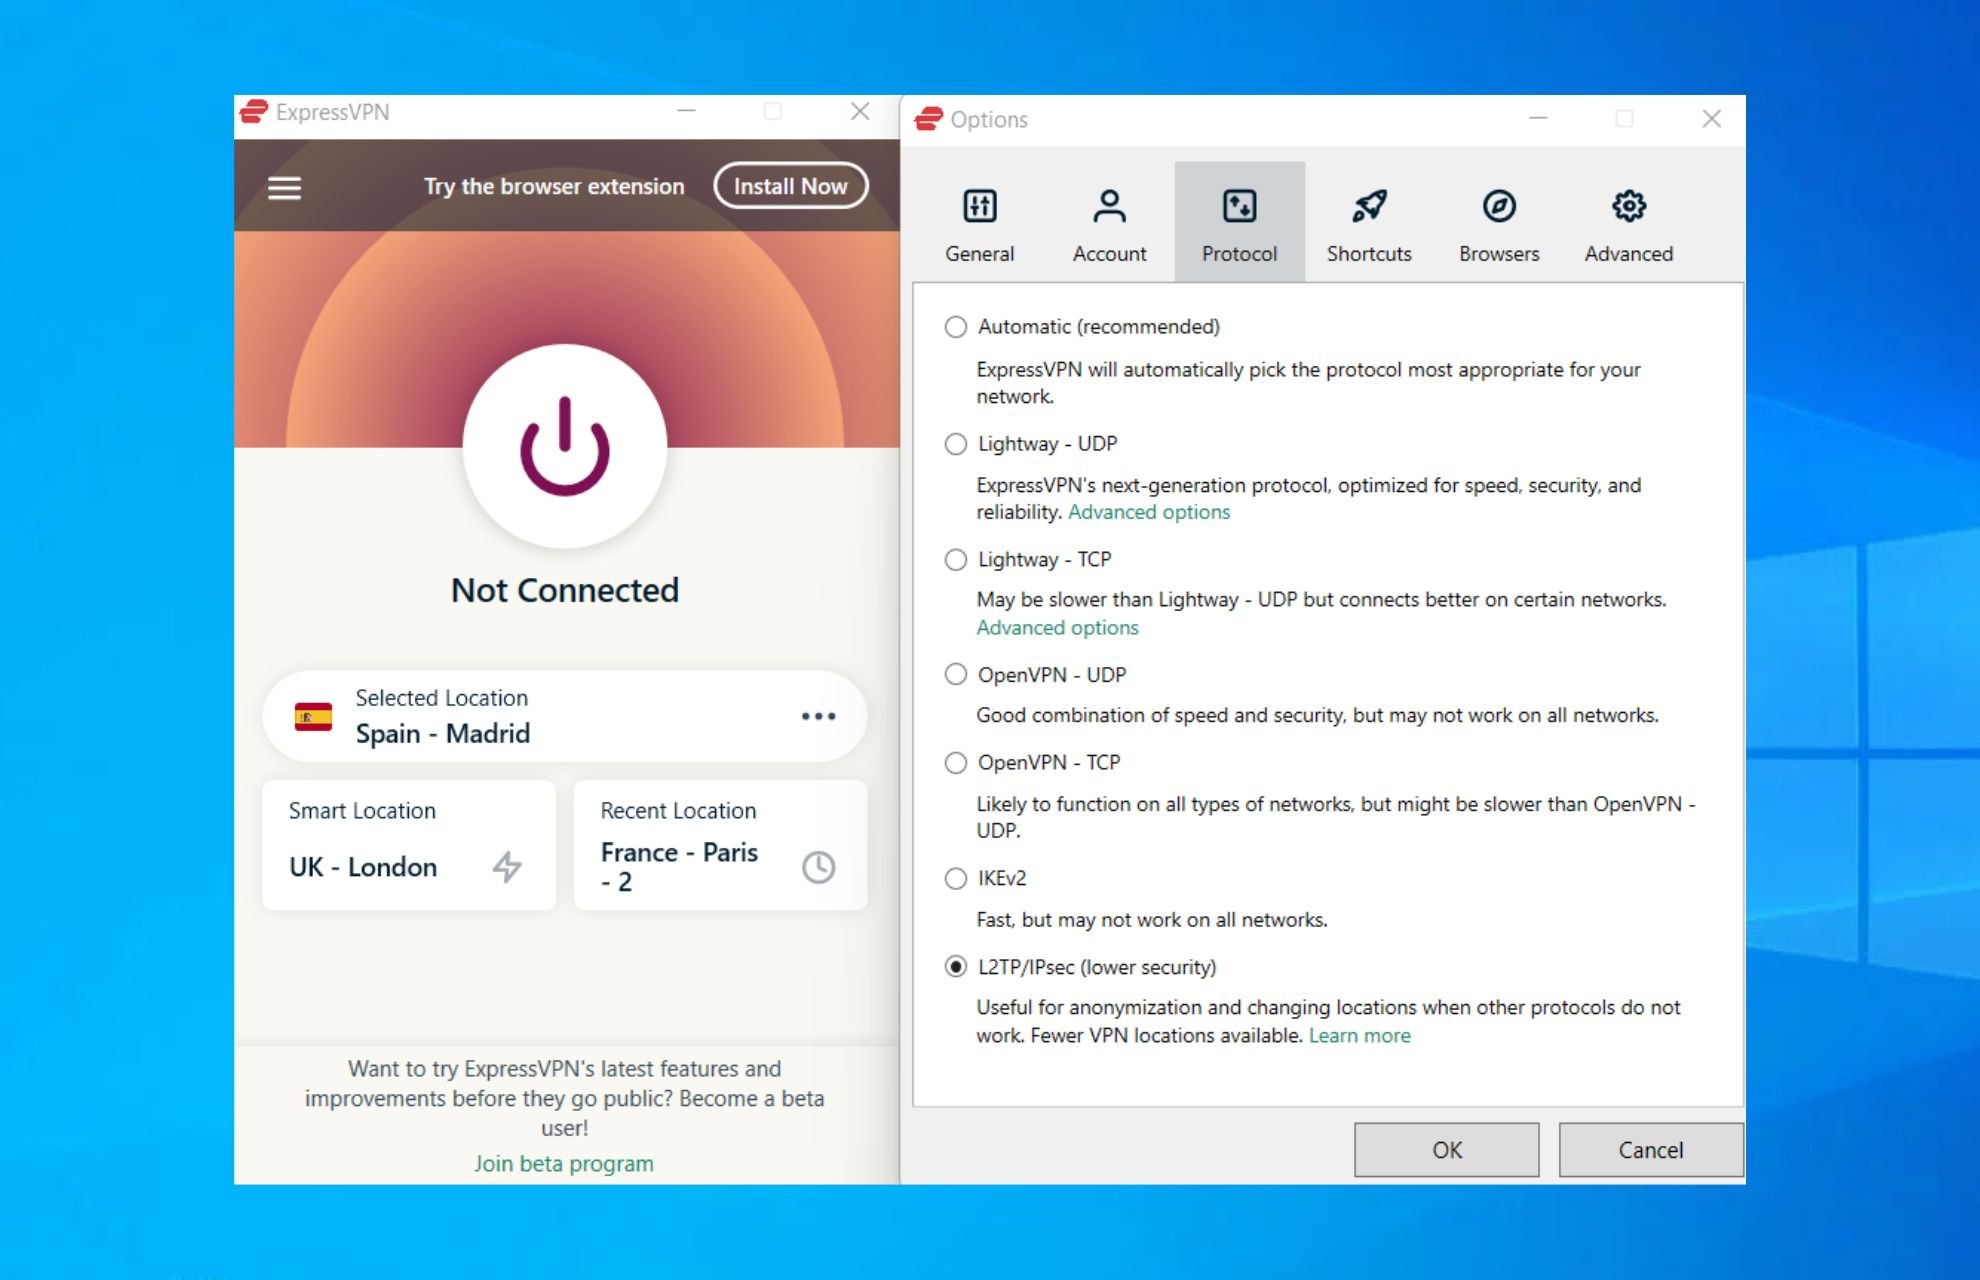
3. Use a reliable VPN service
It is very likely that the root of this problem is that the servers you use are not very optimal for your connection. For this reason, it is recommended to use a top-level VPN service.
To make sure you will not encounter this kind of issue in the future, look for a VPN service that has a large number of servers worldwide. That guarantees an increased chance of server availability and functionality.
We used and tested ExpressVPN with 3,000 servers across the globe and multiple locations in the US to access restricted content like streaming shows or sports from overseas.
Plus, it is easy to use, you don’t need any level of proficiency to get an optimal connection.
To get started, select the subscription plan of your choice, create an account and install it. When the app is ready to open, connect to a secure server with just one click.
This VPN is amongst the most secure services out there, with a verified no-logs policy. It provides a remarkably fast connection and free content access for geo-blocked content globally.
ExpressVPN
Overcome the VPN error 789 and enjoy secure and fast browsing across the whole globe.
4. Re-enable IPSec on your computer
- Press the Windows key + R keyboard shortcut to start Run.
- Type services.msc and press Enter or click OK.
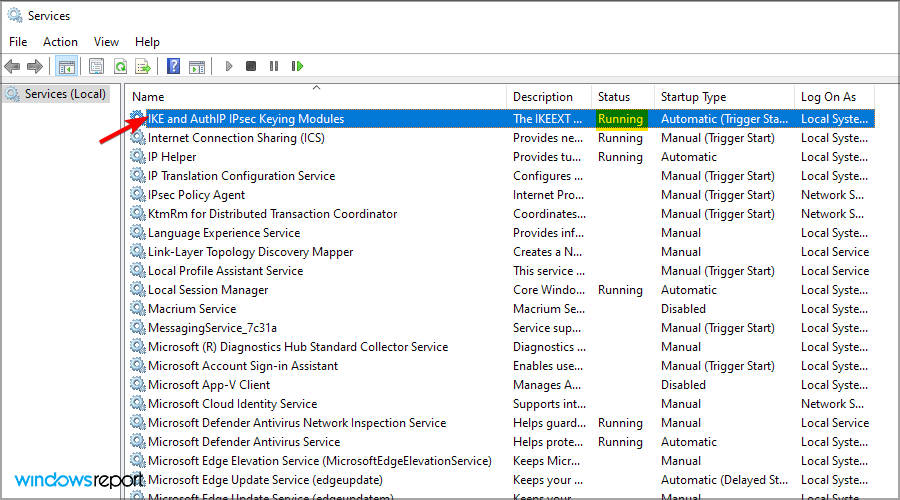
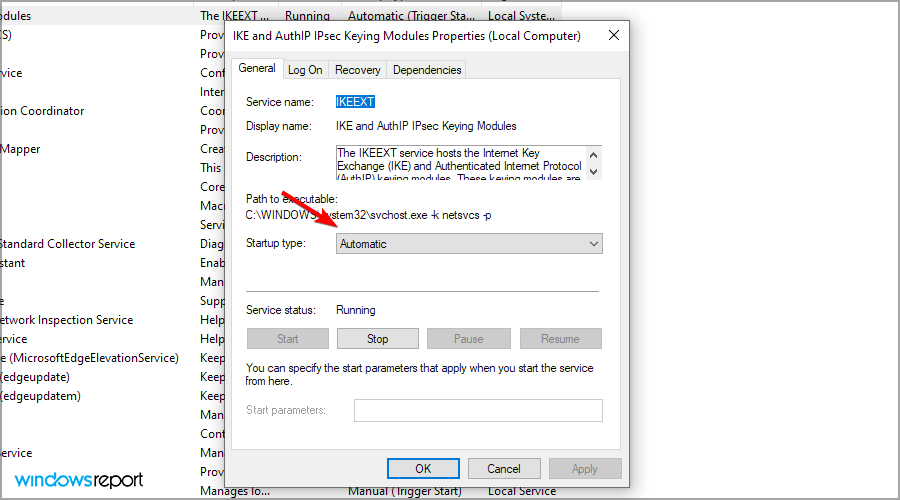
- Double-click the IKE and AuthIP IPSec Keying Modules service.
- Set the Startup type to Automatic. If the service is running, click Stop and then Start. If it’s disabled, just click Start.
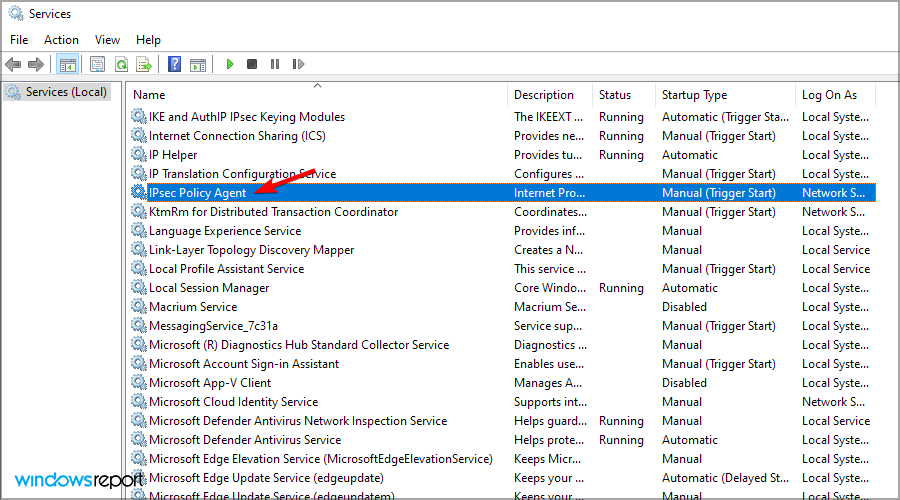
- Find IPSec Policy Agent and double-click it.
- Set the Startup type to Automatic. If the service is running, stop it and start it again. If it’s not running, start it.
- Save the changes.
- Restart your VPN service.


Once you have done all the steps above carefully, the VPN should work smoothly as the protocol settings have been reset to default.
If, however, it doesn’t work, you have to manually set the encryption method both for the server and the client-side, in order for them to be compatible.
In case you have a user-specific issue on your computer yet you still get the L2TP connection attempt failed error, you can also contact the customer care or tech support team for your specific VPN provider.
- Fix: The Local Device Name is Already in Use in Windows 10
- How to Play DVDs on Windows 11 [Easy & Free Methods]
- WaasMedic Agent.exe High Disk Usage: How to Stop It?
- Looking for a lightweight Windows 11? Tiny11 is the answer
- How to Fix AnyDesk ID Not Showing in Windows 11?
How do I fix Windows 11’s VPN error 789?
The following guide presents a useful method to resolve the VPN 789 error on Windows 11 PC.
Before starting this system process, be sure you understood it correctly and apply the steps as shown below to avoid potential registry damages.

NOTE
This method works only if your system is behind a NAT.
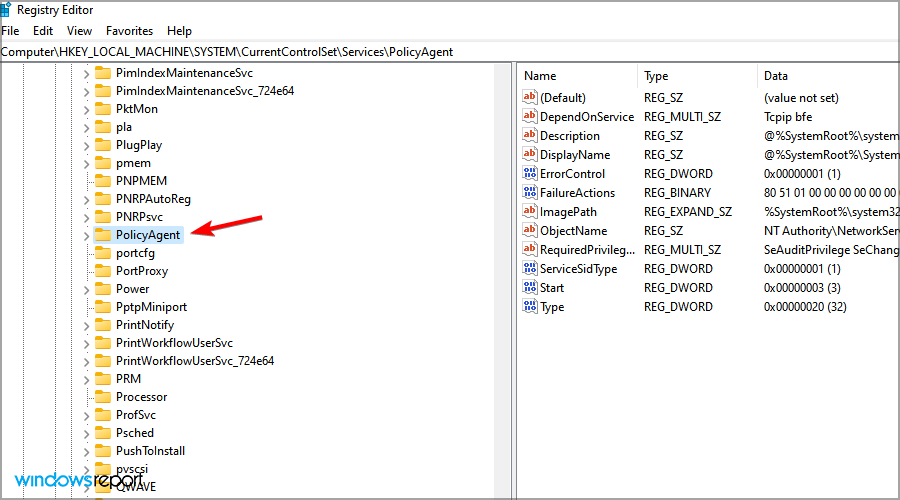
- Press Windows key + R and enter regedit.
- Navigate to the following path:
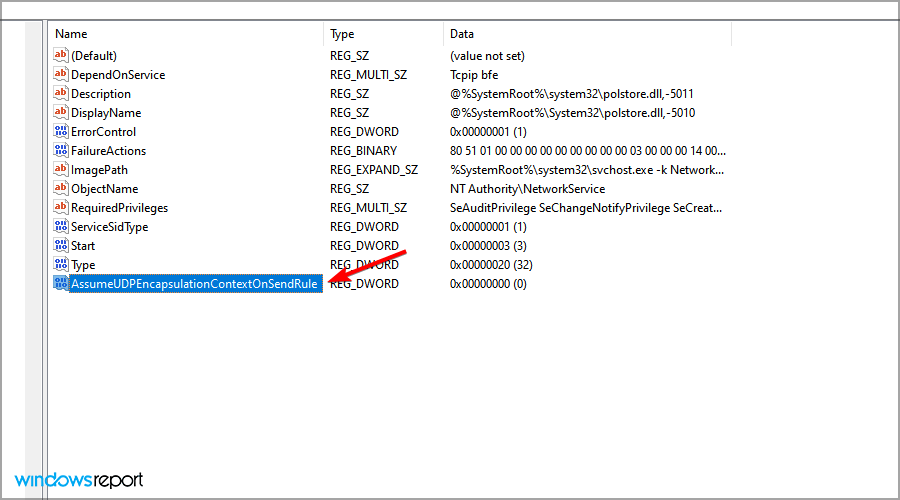
HKEY_LOCAL_MACHINESYSTEMCurrentControlSetServicesPolicyAgent - Right-click the space in the right pane and expand the New section. Select DWORD (32-bit) Value.
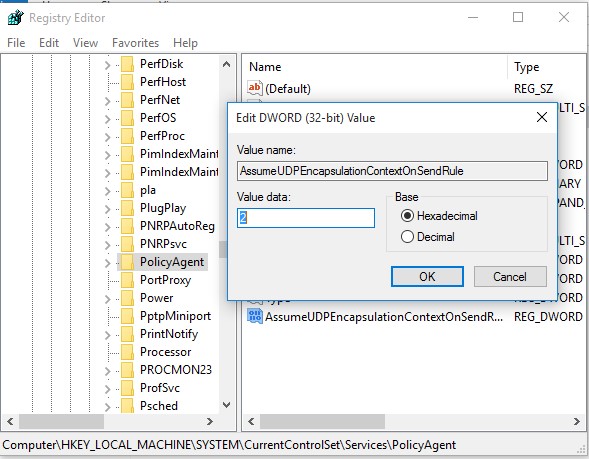
- Enter AssumeUDPEncapsulationContextOnSendRule as the name of the DWORD and double-click it.
- Set the Value data to 2 and click OK to save changes.


How does L2TP work?
Layer 2 Tunneling Protocol, also known as L2TP, is a tunneling protocol used by many VPN software.
It combines the features of other protocols including PPTP and L2F and establishes a safe connection between the VPN client and the server.
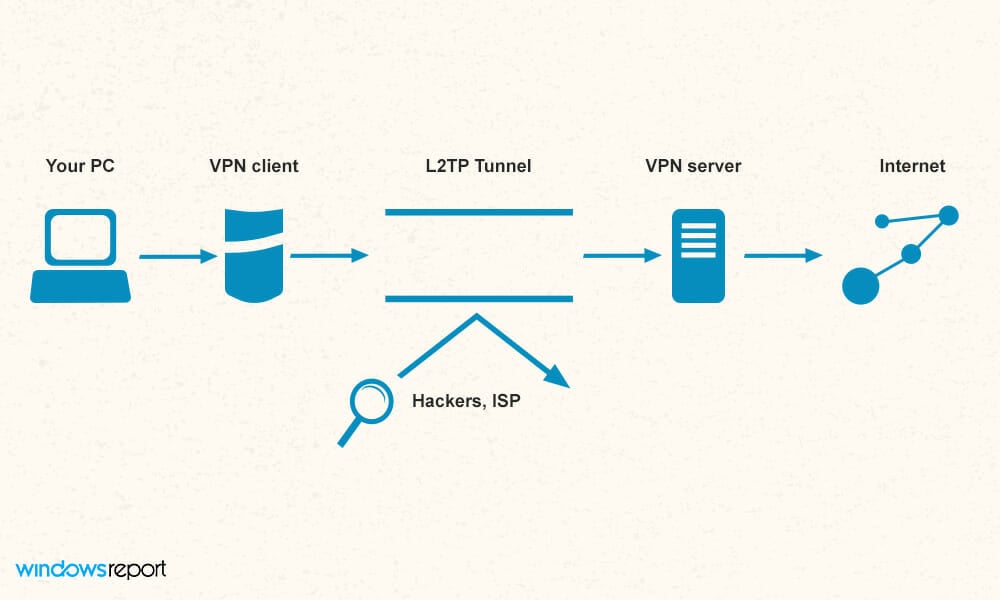
It’s important to mention that L2TP doesn’t offer encryption, and this is why it’s always paired with IPSec in order to provide the necessary security.
L2TP is also considered better than PPTP. It secures the traffic passing by it in an IPsec tunnel. If you have issues with it, we have an excellent guide on how to fix L2TP problems.
In addition, the ports you need to open are 500 and 4500 for UDP. You have the complete guide on unblocking L2TP for other ports and more.
Which is better, paid or free VPN?
While free VPNs are useful, they usually come with major limitations. In most cases, you’ll have a daily bandwidth cap. Other restrictions include the number of servers or the maximum speed that you can achieve.
With a reliable and paid VPN, you’ll have unlimited access to any server and no data restrictions, which makes it a superior choice for most users.
Fixing VPN error 789 is relatively simple, and we hope that this guide helped you solve the issue on your PC.
If the issue is still there, you can change your software completely. Just check our list including the best VPNs for Windows 10 and pick the one that suits your needs.
Do let us know if any of these solutions fixed VPN error 789 by leaving a comment in the section below.
![]()
Newsletter
Repair L2TP VPN error using our practical solutions or VPN pick
by Milan Stanojevic
Milan has been enthusiastic about technology ever since his childhood days, and this led him to take interest in all PC-related technologies. He’s a PC enthusiast and he… read more
Updated on September 20, 2022
Reviewed by
Edgar Nicov
Since the dial-up Internet era, Edgar was interested in online resources. From forums to e-commerce websites, he started digging into how those resources could generate revenue. Today he… read more
- VPN error 789 appears when a Windows system isn’t configured properly while using the L2TP protocol.
- This error can be fixed with a quick network adapter reset from Device Manager.
- IPSec configuration should be changed as well as a fallback solution, so tweak the services as shown in our guide.
Using a VPN is a great way to protect your online privacy, but sometimes you might experience issues with it. Many Windows 10/11 users reported VPN error 789 which states the following message:
The L2TP connection attempt failed because the security layer encountered a processing error during initial negotiations with the remote computer
This issue will prevent you from achieving a safe connection on your PC, so it’s crucial that you fix it. So keep on reading to find out how to fix this problem once and for all.
Why does VPN error 789 appear?
This error pops up when your system is not properly set up to connect to an L2TP server, thus the connection attempt fails even before you establish a connection with the server.
It is also linked to the incorrect configuration of your operating system like Windows 10 in this case. This generic error is thrown when the IPSec negotiation fails for the L2TP/IPSec connections.
Other possible causes include:
- L2TP-based VPN client (or VPN server) is behind NAT
- The wrong certificate or pre-shared key is set on the VPN server or client
- A machine certificate or trusted root machine certificate is not present on the VPN server
- Machine Certificate on VPN Server does not have Server Authentication as the EKU
Before trying any of these solutions, ensure that L2TP and IPSec pass-through options are enabled from your router.
If you configured your VPN service manually, then make sure you use the preshared key 12345678. If this doesn’t work, here are more solutions you can use to fix this problem on your PC.
How do I fix the VPN error 789 on Windows 10 & 11?
- Reset network adapter
- Check the certificate
- Use a reliable VPN service
- Re-enable IPSec on your computer
1. Reset network adapter
- Press the Windows key + X and select Device Manager.
- Identify your network adapter and right-click on it then select Uninstall device.
- Click on Uninstall to confirm.
- Restart your computer. The device will reinstall and should reset it to default settings.
Refreshing the network adapter driver can make this problem go away quickly so make sure you try it out by performing the steps above.
2. Check the certificate
It is very important to ensure the correct certificate is used both on the client and the server side.
In case the two don’t match, you won’t be able to use the virtual private network. You might need to renew the certificate with your provider.
If you are using a Pre Shared Key (PSK), ensure that the same PSK is configured on the client-side, and the VPN server machine.
3. Use a reliable VPN service
It is very likely that the root of this problem is that the servers you use are not very optimal for your connection. For this reason, it is recommended to use a top-level VPN service.
To make sure you will not encounter this kind of issue in the future, look for a VPN service that has a large number of servers worldwide. That guarantees an increased chance of server availability and functionality.
We used and tested ExpressVPN with 3,000 servers across the globe and multiple locations in the US to access restricted content like streaming shows or sports from overseas.
Plus, it is easy to use, you don’t need any level of proficiency to get an optimal connection.
To get started, select the subscription plan of your choice, create an account and install it. When the app is ready to open, connect to a secure server with just one click.
This VPN is amongst the most secure services out there, with a verified no-logs policy. It provides a remarkably fast connection and free content access for geo-blocked content globally.
ExpressVPN
Overcome the VPN error 789 and enjoy secure and fast browsing across the whole globe.
4. Re-enable IPSec on your computer
- Press the Windows key + R keyboard shortcut to start Run.
- Type services.msc and press Enter or click OK.
- Double-click the IKE and AuthIP IPSec Keying Modules service.
- Set the Startup type to Automatic. If the service is running, click Stop and then Start. If it’s disabled, just click Start.
- Find IPSec Policy Agent and double-click it.
- Set the Startup type to Automatic. If the service is running, stop it and start it again. If it’s not running, start it.
- Save the changes.
- Restart your VPN service.
Once you have done all the steps above carefully, the VPN should work smoothly as the protocol settings have been reset to default.
If, however, it doesn’t work, you have to manually set the encryption method both for the server and the client-side, in order for them to be compatible.
In case you have a user-specific issue on your computer yet you still get the L2TP connection attempt failed error, you can also contact the customer care or tech support team for your specific VPN provider.
- Fix: The Local Device Name is Already in Use in Windows 10
- How to Play DVDs on Windows 11 [Easy & Free Methods]
- WaasMedic Agent.exe High Disk Usage: How to Stop It?
How do I fix Windows 11’s VPN error 789?
The following guide presents a useful method to resolve the VPN 789 error on Windows 11 PC.
Before starting this system process, be sure you understood it correctly and apply the steps as shown below to avoid potential registry damages.
NOTE
This method works only if your system is behind a NAT.
- Press Windows key + R and enter regedit.
- Navigate to the following path:
HKEY_LOCAL_MACHINESYSTEMCurrentControlSetServicesPolicyAgent - Right-click the space in the right pane and expand the New section. Select DWORD (32-bit) Value.
- Enter AssumeUDPEncapsulationContextOnSendRule as the name of the DWORD and double-click it.
- Set the Value data to 2 and click OK to save changes.
How does L2TP work?
Layer 2 Tunneling Protocol, also known as L2TP, is a tunneling protocol used by many VPN software.
It combines the features of other protocols including PPTP and L2F and establishes a safe connection between the VPN client and the server.
It’s important to mention that L2TP doesn’t offer encryption, and this is why it’s always paired with IPSec in order to provide the necessary security.
L2TP is also considered better than PPTP. It secures the traffic passing by it in an IPsec tunnel. If you have issues with it, we have an excellent guide on how to fix L2TP problems.
In addition, the ports you need to open are 500 and 4500 for UDP. You have the complete guide on unblocking L2TP for other ports and more.
Which is better, paid or free VPN?
While free VPNs are useful, they usually come with major limitations. In most cases, you’ll have a daily bandwidth cap. Other restrictions include the number of servers or the maximum speed that you can achieve.
With a reliable and paid VPN, you’ll have unlimited access to any server and no data restrictions, which makes it a superior choice for most users.
Fixing VPN error 789 is relatively simple, and we hope that this guide helped you solve the issue on your PC.
If the issue is still there, you can change your software completely. Just check our list including the best VPNs for Windows 10 and pick the one that suits your needs.
Do let us know if any of these solutions fixed VPN error 789 by leaving a comment in the section below.
![]()
Newsletter
Столкнулись с интересной проблемой у одного из заказчиков после перенастройки VPN сервера Windows Server 2012 с PPTP на L2TP/ IPSec (из за отключения поддержки PPTP VPN в iOS). Изнутри корпоративной сети VPN клиенты без каких-либо проблем подключаются к VPN серверу, а вот внешние Windows клиенты при попытке установить соединение с L2TP VPN сервером, выдают такую ошибку:
The network connection between your computer and the VPN server could not be established because the remote server is not responding. This could be because one of the network devices (e.g. firewalls, NAT, routers, etc) between your computer and the remote server is not configured to allow VPN connections. Please contact your Administrator or your service provider to determine which device may be causing the problem.

В других версиях Windows о наличии аналогичной проблемы могут свидетельствовать ошибки VPN подключения 800, 794 или 809.
Стоит отметить, что данный VPN сервер находится за NAT, а на маршрутизаторе настроен проброс портов, необходимых для работы L2TP:
- UDP 1701 — Layer 2 Forwarding Protocol (L2F) & Layer 2 Tunneling Protocol(L2TP)
- UDP 500
- UDP 4500 NAT-T – IPSec Network Address Translator Traversal
- Protocol 50 ESP
В правилах Windows Firewall VPN сервера эти порты также открыты. Т.е. используется классическая конфигурация. Для подключения используется встроенный VPN клиент Windows.
Если подключаться к этому же VPN серверу через PPTP, подключение успешно устанавливается.
VPN ошибка 809 для L2TP/IPSec в Windows за NAT
Как оказалось, проблема эта уже известна и описана в статье https://support.microsoft.com/en-us/kb/926179. По умолчанию встроенный VPN клиент Windows не поддерживает подключение к L2TP/IPsec через NAT. Дело в том, что IPsec использует протокол ESP (Encapsulating Security Payload) для шифрования пакетов, а протокол ESP не поддерживает PAT (Port Address Translation). Если вы хотите использовать IPSec для коммуникации, Microsoft рекомендует использовать белые IP адреса на VPN сервере.
Но есть и обходное решение. Можно исправить этот недостаток, включив поддержку протокола NAT—T, который позволяет инкапсулировать пакеты протокола ESP 50 в UDP пакеты по порту 4500. NAT-T включен по-умолчанию почти во всех операционных системах (iOS, Android, Linux), кроме Windows.
Если VPN сервер L2TP/IPsec находится за NAT, то для корректного подключения внешних клиентов через NAT необходимо на стороне Windows сервера и клиента внести изменение в реестр, разрешающее UDP инкапсуляцию пакетов для L2TP и поддержку (NAT-T) для IPsec.
- Откройте редактор реестра
regedit.exe
и перейдите в ветку:- Для Windows 10,8.1,7 и Windows Server 2016,2012R2,2008R2 — HKEY_LOCAL_MACHINESYSTEMCurrentControlSetServicesPolicyAgent
- Для Windows XP/Windows Server 2003 — HKEY_LOCAL_MACHINESYSTEMCurrentControlSetServicesIPSec
- Создайте DWORD параметр с именем AssumeUDPEncapsulationContextOnSendRule и значением 2;

Примечание. Возможные значения параметра AssumeUDPEncapsulationContextOnSendRule:
- 0 – (значение по-умолчанию), предполагается, что VPN сервер подключен к интернету без NAT;
- 1 – VPN сервер находится за NAT;
- 2 — и VPN сервер и клиент находятся за NAT.
- Осталось перезагрузить компьютер и убедиться, что VPN туннель успешно создается.
Если и Windows VPN сервер и клиент находятся за NAT, нужно изменить это параметре на обоих системах.
Можно использовать командлет PowerShell для внесения изменений в реестр:
Set-ItemProperty -Path "HKLM:SYSTEMCurrentControlSetServicesPolicyAgent" -Name "AssumeUDPEncapsulationContextOnSendRule" -Type DWORD -Value 2 –Force;
После включения поддержки NAT-T, вы сможете успешно подключаться к VPN серверу с клиента через NAT (в том числе двойной NAT).
В некоторых случаях для корректной работы VPN необходимо открыть дополнительное правило в межсетевом экране для порта TCP 1701 (в некоторых реализациях L2TP этот порт используется совмести с UDP 1701).
NAT-T не корректно работал в ранних редакциях Windows 10, например, 10240, 1511, 1607. Если у вас старая версия, рекомендуем обновить билд Windows 10.
L2TP VPN не работает на некоторых Windows компьютерах в локальной сети
Есть еще один интересный баг. Если в вашей локальной сети несколько Windows компьютеров, вы не сможете установить более одного одновременного подключения к внешнему L2TP/IPSec VPN серверу. Если при наличии активного VPN туннеля с одного клиента, вы попытаетесь подключиться к тому же самому VPN серверу с другого компьютера, появится ошибка с кодом 809 или 789:
Error 789: The L2TP connection attempt failed because the security layer encountered a processing error during initial negotiations with the remove computer.
Что интересно, эта проблема наблюдется только с Windows-устройствами. На устройствах с Linux/MacOS/Android в этой же локальной сети таких проблем нет. Можно без проблем одновременно подключиться к VPN L2TP серверу с нескольких устройств.
По информации на TechNet проблема связана с некорректной реализацией клиента L2TP/IPSec клиента в Windows (не исправляется уже много лет).
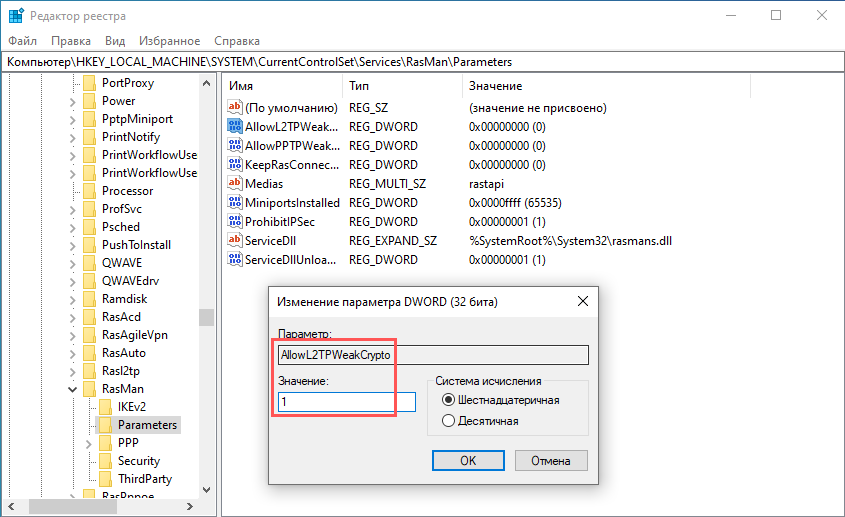
Для исправления этого бага нужно изменить два параметра реестра в ветке HKEY_LOCAL_MACHINESYSTEMCurrentControlSetServicesRasManParameters и перезагрузите компьютре:
- AllowL2TPWeakCrypto – изменить на 00000001 (ослабляет уровень шифрования, для L2TP/IPSec используются алгоритмы MD5 и DES)
- ProhibitIPSec – изменить на 00000000 (включает шифрование IPsec, которое часто отключается некоторыми VPN клиентами или утилитами)
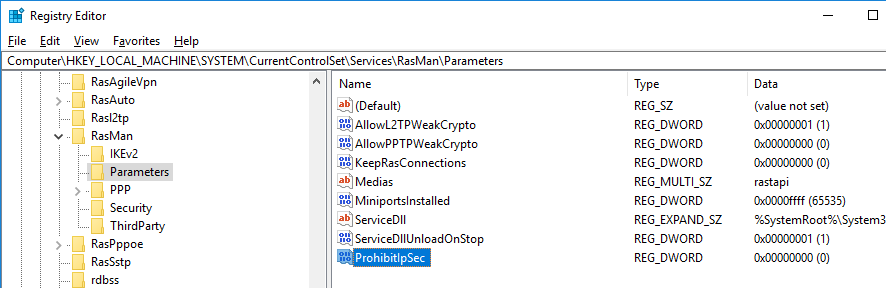
Для изменения этих параметров реестра достаточно выполнить команды:
reg add "HKEY_LOCAL_MACHINESystemCurrentControlSetServicesRasmanParameters" /v AllowL2TPWeakCrypto /t REG_DWORD /d 1 /f
reg add "HKEY_LOCAL_MACHINESystemCurrentControlSetServicesRasmanParameters" /v ProhibitIpSec /t REG_DWORD /d 0 /f
Это включает поддержку нескольких одновременных L2TP/IPSec-подключений в Windows через общий внешний IP адрес (работает на всех версиях, начиная с Windows XP и заканчивая Windows 10).
![]()
В Windows 10 существует проблема с подключением по VPN в качестве клиента по протоколу L2TP/IPSec. В очередной раз столкнулся с ней недавно, когда свежеустановленная система отказалась подключаться к VPN-серверу, запущенному в другой квартире на роутере Keenetic.
С учетом того, что вряд ли эту проблему исправят в грядущих обновлениях, публикую памятку по ее самостоятельному исправлению.
Содержание
- 1 Причина и симптомы
- 2 Решение проблемы
- 2.1 Вариант 1 — через редактор реестра
- 2.2 Вариант 2 — через Powershell
- 3 Заключение
Причина и симптомы
Симптомы. При попытке подключения со всеми корректно введенными настройками система долго думает и в конце концов выдает ошибку:
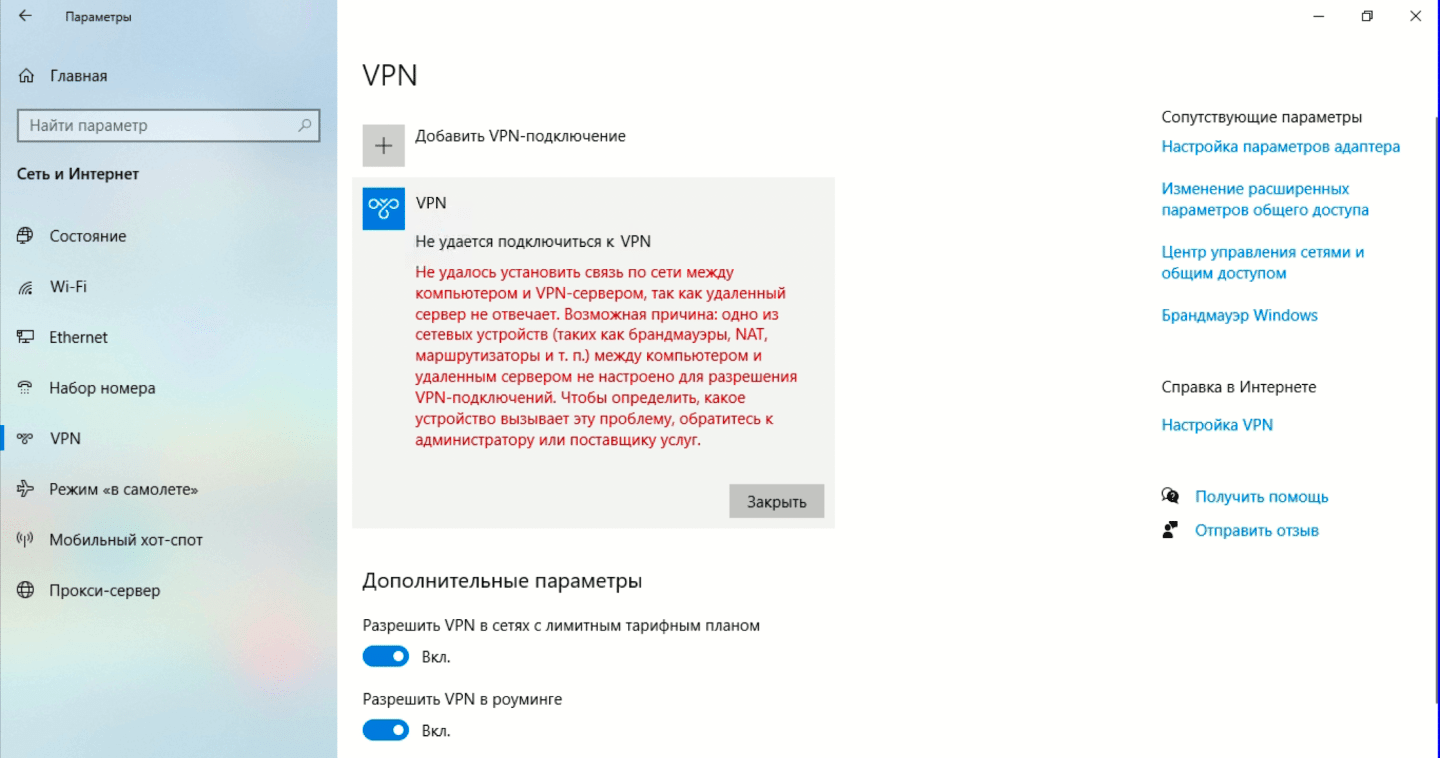
Не удалось установить связь по сети между компьютером и VPN-сервером, так как удаленный сервер не отвечает.
Причина заключается в том, что с настройками по умолчанию встроенный VPN-клиент Windows не поддерживает подключение через NAT.
В двух словах про NAT
NAT — это механизм преобразования роутером внешнего IP-адреса (предоставляемого провайдером при подключении) в локальные IP-адреса устройств, подключенных к вашей домашней сети. Практически все пользователи домашнего интернета «сидят за NATом», исключение составляют лишь случаи, когда интернет-кабель от провайдера подключен непосредственно к компьютеру в обход роутеров и свитчей.
В целом родной VPN-клиент в Windows 10 способен работать за NAT, но для этого необходимо поменять один пункт в его настройках — и делается это не самым очевидным способом.
Решение проблемы
Для решения проблемы нужно открыть следующую ветку реестра:
HKEY_LOCAL_MACHINESYSTEMCurrentControlSetServicesPolicyAgent
И внести в нее параметр AssumeUDPEncapsulationContextOnSendRule со значением 2.
Вариант 1 — через редактор реестра
Запускаем редактор реестра, открыв окно поиска и введя в нем regedit:

Находим в реестре ветку HKEY_LOCAL_MACHINESYSTEMCurrentControlSetServicesPolicyAgent и создаем в нем 32-битный параметр DWORD с именем AssumeUDPEncapsulationContextOnSendRule и значением 2:

Вариант 2 — через Powershell
Запускаем Windows PowerShell, введя powershell в окне поиска и выбрав в контекстном меню запуск от имени администратора:

В открывшемся окне выполняем следующую команду:
Set-ItemProperty -Path "HKLM:SYSTEMCurrentControlSetServicesPolicyAgent" -Name "AssumeUDPEncapsulationContextOnSendRule" -Type DWORD -Value 2 –Force;

Заключение
После внесения изменений, независимо от способа которым они были внесены, необходимо перезагрузить компьютер чтобы параметр подтянулся в используемые настройки. Затем снова запускаем подключение к VPN-серверу и убеждаемся, что оно успешно стартует.
Стоит отметить, что данная проблема присуща исключительно Windows и не встречается ни в Linux, ни в macOS, ни в iOS.
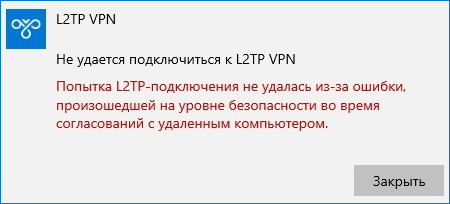
Ошибка «Попытка L2TP-подключения не удалась из-за ошибки, произошедшей на уровне безопасности…» при подключении к VPN в Windows 10

В Windows 10 вы можете настроить VPN -сеть средствами операционной системы, не прибегая к помощи сторонних программ. Для удобного создания VPN-подключения в Windows 10 и 11 разработчиками был реализован соответствующий графический интерфейс раздела приложения «Параметры», в котором пользователю предлагается ввести данные провайдера VPN . К сожалению, данная функция не отшлифована до конца.
На что указывают разные ошибки, время от времени выдаваемые системой при подключении к виртуальной сети.
Наиболее распространённой неполадкой при подключении к VPN в Windows 10 является сбой соединения L2TP , при этом система выдает сообщение «Попытка L2TP-подключения не удалась из-за ошибки, произошедшей на уровне безопасности…» . Неполадка может быть вызвана некорректными настройками одного или нескольких сетевых устройств, однако, если вы не вносили изменений в их конфигурацию и до появления первого сбоя всё работало нормально, высока вероятность того, что причиной сбоя стали баги в обновлениях операционной системы.
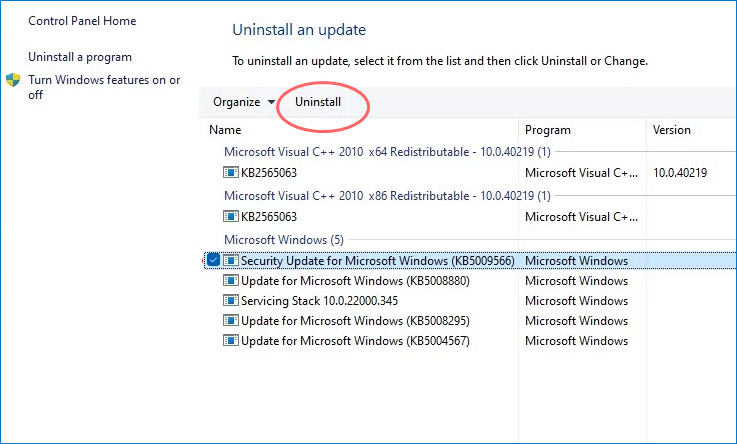
Так, было замечено, что указанная ошибка в Windows 10 стала появляться после установки накопительных обновлений безопасности KB5009543 и KB5009566 .
Откройте журнал обновлений и посмотрите, имеются ли эти апдейты на вашем ПК.
Если да, удалите их и перезагрузите компьютер.
Если решение не дало положительного результата или обновления не установлены, переходим к другим способам устранения неполадки.
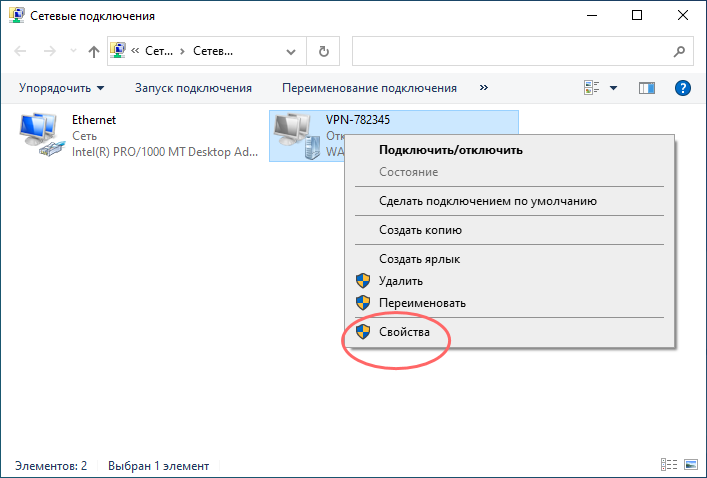
Проверьте настройки виртуального адаптера
- Откройте командой ncpa.cpl настройки сетевых подключений, кликните по вашему виртуальному адаптеру правой кнопкой мыши и выберите «Свойства»;
- Переключитесь в окошке свойств на вкладку «Безопасность», активируйте радиокнопку «Разрешить следующие протоколы» и отметьте флажком пункт «Протокол Microsoft CHAP версии 2»;
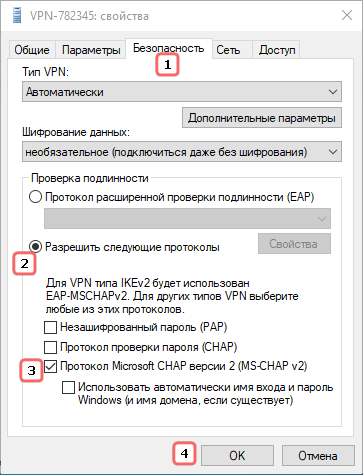
- Переключитесь на вкладку «Параметры» и нажмите кнопку «Параметры PPP»;
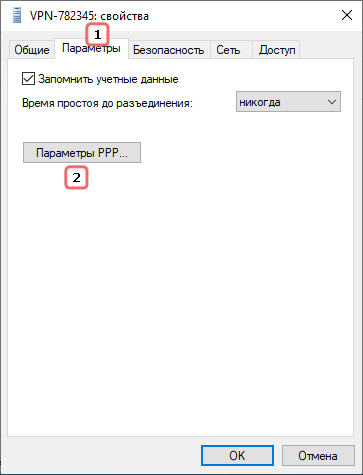
- Откроется диалоговое окошко параметров PPP. Убедитесь, что в пункте «Включить расширения LCP» установлена галочка. Если ее нет, поставьте и сохраните настройки.

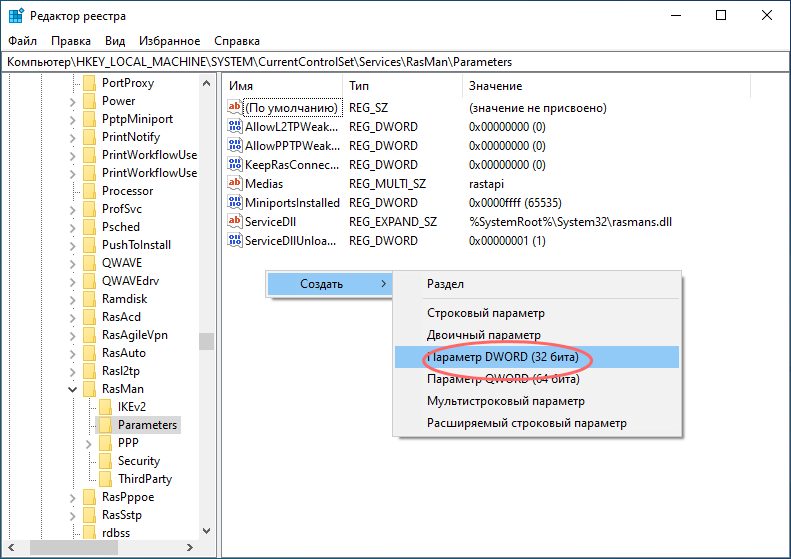
Отсутствие или неверные настройки ключей реестра
Ошибка подключения L2TP может быть вызвана отсутствием или неверным значением предварительных ключей ProhibitIPSec и AllowL2TPWeakCrypto , обеспечивающих соединение с использованием протокола L2TP/IPSec .
Если в свойствах VPN-подключения у вас выставлен тип L2TP, стоит проверить записи ветки реестра:
HKLMSystemCurrentControlSetServicesRasmanParameters
Откройте редактор реестра командой regedit , перейдите к указанной ветке и проверьте наличие в правой колонке DWORD -параметра ProhibitIPSec. Если таковой отсутствует, создайте его вручную.
И установите в качестве его значения 1.
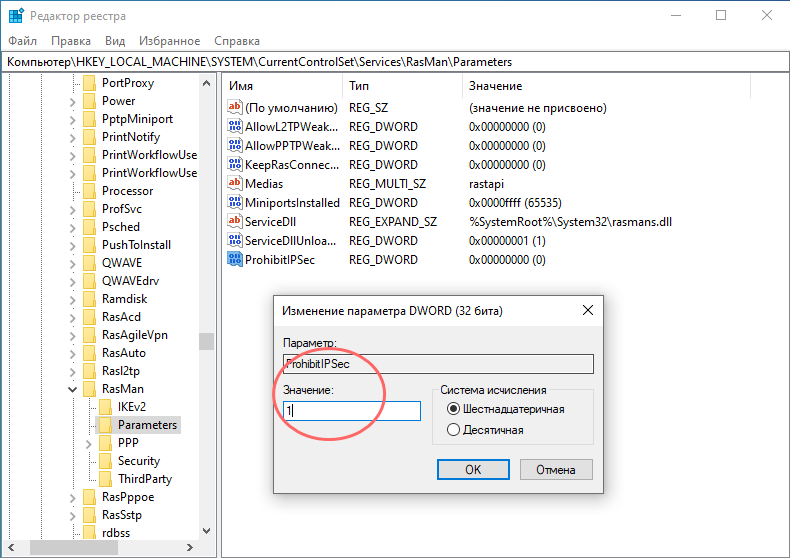
Заодно проверяем наличие DWORD -параметра AllowL2TPWeakCrypto, он также должен иметь значение 1.
Если параметр отсутствует, создаем его, сохраняем настройки, перезагружаем компьютер и пробуем подключиться к VPN .

Не так давно мы опубликовали статью, посвященную NAS — персональному устройству для хранения файлов и .

Чтобы обеспечить более быстрое соединение устройств в локальной сети, Windows сохраняет установленные при первом подключении .

Просмотреть, а при необходимости и сконфигурировать подключения к сети в Windows можно разделе «Сетевые подключения», .

Уровень мощности сигнала Wi-Fi оказывает самое непосредственное влияние не только на скорость соединения, но и .
Источник
Исправляем проблему подключения к L2TP/IPSec VPN серверу за NAT
Столкнулись с интересной проблемой у одного из заказчиков после перенастройки VPN сервера Windows Server 2012 с PPTP на L2TP/ IPSec (из за отключения поддержки PPTP VPN в iOS). Изнутри корпоративной сети VPN клиенты без каких-либо проблем подключаются к VPN серверу, а вот внешние Windows клиенты при попытке установить соединение с L2TP VPN сервером, выдают такую ошибку:
The network connection between your computer and the VPN server could not be established because the remote server is not responding. This could be because one of the network devices (e.g. firewalls, NAT, routers, etc) between your computer and the remote server is not configured to allow VPN connections. Please contact your Administrator or your service provider to determine which device may be causing the problem.
В других версиях Windows о наличии аналогичной проблемы могут свидетельствовать ошибки VPN подключения 800, 794 или 809.
Стоит отметить, что данный VPN сервер находится за NAT, а на маршрутизаторе настроен проброс портов, необходимых для работы L2TP:
- UDP 1701 — Layer 2 Forwarding Protocol (L2F) & Layer 2 Tunneling Protocol(L2TP)
- UDP 500
- UDP 4500 NAT-T – IPSec Network Address Translator Traversal
- Protocol 50 ESP
В правилах Windows Firewall VPN сервера эти порты также открыты. Т.е. используется классическая конфигурация. Для подключения используется встроенный VPN клиент Windows.
VPN ошибка 809 для L2TP/IPSec в Windows за NAT
Как оказалось, проблема эта уже известна и описана в статье https://support.microsoft.com/en-us/kb/926179. По умолчанию встроенный VPN клиент Windows не поддерживает подключение к L2TP/IPsec через NAT. Дело в том, что IPsec использует протокол ESP (Encapsulating Security Payload) для шифрования пакетов, а протокол ESP не поддерживает PAT (Port Address Translation). Если вы хотите использовать IPSec для коммуникации, Microsoft рекомендует использовать белые IP адреса на VPN сервере.
Но есть и обходное решение. Можно исправить этот недостаток, включив поддержку протокола NAT—T, который позволяет инкапсулировать пакеты протокола ESP 50 в UDP пакеты по порту 4500. NAT-T включен по-умолчанию почти во всех операционных системах (iOS, Android, Linux), кроме Windows.
Если VPN сервер L2TP/IPsec находится за NAT, то для корректного подключения внешних клиентов через NAT необходимо на стороне Windows сервера и клиента внести изменение в реестр, разрешающее UDP инкапсуляцию пакетов для L2TP и поддержку (NAT-T) для IPsec.
- Откройте редактор реестра regedit.exe и перейдите в ветку:
- Для Windows 10,8.1,7 и Windows Server 2016,2012R2,2008R2 — HKEY_LOCAL_MACHINESYSTEMCurrentControlSetServicesPolicyAgent
- Для Windows XP/Windows Server 2003 — HKEY_LOCAL_MACHINESYSTEMCurrentControlSetServicesIPSec
- Создайте DWORD параметр с именем AssumeUDPEncapsulationContextOnSendRule и значением 2;

- – (значение по-умолчанию), предполагается, что VPN сервер подключен к интернету без NAT;
- 1 – VPN сервер находится за NAT;
- 2 — и VPN сервер и клиент находятся за NAT.
Set-ItemProperty -Path «HKLM:SYSTEMCurrentControlSetServicesPolicyAgent» -Name «AssumeUDPEncapsulationContextOnSendRule» -Type DWORD -Value 2 –Force;
После включения поддержки NAT-T, вы сможете успешно подключаться к VPN серверу с клиента через NAT (в том числе двойной NAT).
L2TP VPN не работает на некоторых Windows компьютерах в локальной сети
Есть еще один интересный баг. Если в вашей локальной сети несколько Windows компьютеров, вы не сможете установить более одного одновременного подключения к внешнему L2TP/IPSec VPN серверу. Если при наличии активного VPN туннеля с одного клиента, вы попытаетесь подключиться к тому же самому VPN серверу с другого компьютера, появится ошибка с кодом 809 или 789:
По информации на TechNet проблема связана с некорректной реализацией клиента L2TP/IPSec клиента в Windows (не исправляется уже много лет).
Для исправления этого бага нужно изменить два параметра реестра в ветке HKEY_LOCAL_MACHINESYSTEMCurrentControlSetServicesRasManParameters и перезагрузите компьютре:
- AllowL2TPWeakCrypto – изменить на 00000001 (ослабляет уровень шифрования, для L2TP/IPSec используются алгоритмы MD5 и DES)
- ProhibitIPSec – изменить на 00000000 (включает шифрование IPsec, которое часто отключается некоторыми VPN клиентами или утилитами)
Для изменения этих параметров реестра достаточно выполнить команды:
reg add «HKEY_LOCAL_MACHINESystemCurrentControlSetServicesRasmanParameters» /v AllowL2TPWeakCrypto /t REG_DWORD /d 1 /f
reg add «HKEY_LOCAL_MACHINESystemCurrentControlSetServicesRasmanParameters» /v ProhibitIpSec /t REG_DWORD /d 0 /f
Это включает поддержку нескольких одновременных L2TP/IPSec-подключений в Windows через общий внешний IP адрес (работает на всех версиях, начиная с Windows XP и заканчивая Windows 10).
Источник
How to troubleshoot a Microsoft L2TP/IPSec virtual private network client connection
This article describes how to troubleshoot L2TP/IPSec virtual private network (VPN) connection issues.
Applies to: В Windows 10 — all editions
Original KB number: В 325034
Summary
You must have an Internet connection before you can make an L2TP/IPSec VPN connection. If you try to make a VPN connection before you have an Internet connection, you may experience a long delay, typically 60 seconds, and then you may receive an error message that says there was no response or something is wrong with the modem or other communication device.
When you troubleshoot L2TP/IPSec connections, it’s useful to understand how an L2TP/IPSec connection proceeds. When you start the connection, an initial L2TP packet is sent to the server, requesting a connection. This packet causes the IPSec layer on your computer to negotiate with the VPN server to set up an IPSec protected session (a security association). Depending on many factors including link speed, the IPSec negotiations may take from a few seconds to around two minutes. When an IPSec security association (SA) has been established, the L2TP session starts. When it starts, you receive a prompt for your name and password (unless the connection has been set up to connect automatically in Windows Millennium Edition.) If the VPN server accepts your name and password, the session setup completes.
A common configuration failure in an L2TP/IPSec connection is a misconfigured or missing certificate, or a misconfigured or missing preshared key. If the IPSec layer can’t establish an encrypted session with the VPN server, it will fail silently. As a result, the L2TP layer doesn’t see a response to its connection request. There will be a long delay, typically 60 seconds, and then you may receive an error message that says there was no response from the server or there was no response from the modem or communication device. If you receive this error message before you receive the prompt for your name and password, IPSec didn’t establish its session. If that occurs, examine your certificate or preshared key configuration, or send the isakmp log to your network administrator.
A second common problem that prevents a successful IPSec session is using a Network Address Translation (NAT). Many small networks use a router with NAT functionality to share a single Internet address among all the computers on the network. The original version of IPSec drops a connection that goes through a NAT because it detects the NAT’s address-mapping as packet tampering. Home networks frequently use a NAT. This blocks using L2TP/IPSec unless the client and the VPN gateway both support the emerging IPSec NAT-Traversal (NAT-T) standard. For more information, see the «NAT Traversal» section.
If the connection fails after you receive the prompt for your name and password, the IPSec session has been established and there’s probably something wrong with your name and password. Other server settings may also be preventing a successful L2TP connection. In this case, send the PPP log to your administrator.
NAT Traversal
With the IPSec NAT-T support in the Microsoft L2TP/IPSec VPN client, IPSec sessions can go through a NAT when the VPN server also supports IPSec NAT-T. IPSec NAT-T is supported by Windows Server 2003. IPSec NAT-T is also supported by Windows 2000 Server with the L2TP/IPSec NAT-T update for Windows XP and Windows 2000.
For third-party VPN servers and gateways, contact your administrator or VPN gateway vendor to verify that IPSec NAT-T is supported.
More information
The configuration utility also provides a check box that enables IPSec logging. If you can’t connect, and your network administrator or support personnel have asked you to provide them a connection log, you can enable IPSec logging here. When you do so, the log (Isakmp.log) is created in the C:Program FilesMicrosoft IPSec VPN folder. When you create a connection, also enable logging for the PPP processing in L2TP. To do so:
- Right-click the Dialup Networking folder, and then click Properties.
- Click the Networking tab, and then click to select the Record a log file for this connection check box.
Источник

Как у самурая нет цели, а есть только путь, так и Windows движется своим особым путём, порой идущим вразрез с общепринятыми стандартами. Сегодня хочу рассказать почему в Windows 10 не работает подключение к VPN серверу по протоколу L2TP/IPSec и как можно решить данную проблему.
Не удалось установить связь по сети между компьютером и VPN-сервером, так как удаленный сервер не отвечает. Возможная причина: одно из сетевых устройств (таких как брандмауэры, NAT, маршрутизаторы и т.п.) между компьютером и удаленным сервером не настроено для разрешения VPN-подключений. Чтобы определить, какое устройство вызывает эту проблему, обратитесь к администратору или поставщику услуг.
Однако не стоит верить написанному, так как «винда» направляет нас по ложному следу в поисках проблемы. Виноваты все, кроме самой операционной системы Windows, хотя дело именно в ней и проблема эта уже давно известна и описана в статье https://support.microsoft.com/en-us/kb/926179.
Всё дело в том, что встроенный VPN клиент Windows, по умолчанию, не поддерживает подключение L2TP/IPsec через NAT. Что такое NAT, маскарад и проброс портов простыми словами я рассказывал ранее, кому интересно переходите по ссылке.
Если совсем кратко, то практически все домашние сети (роутеры) работают именно в таком режиме и для успешного прохождения L2TP/IPsec через NAT требуется поддержка протокола NAT Traversal (или NAT-T), которая по умолчанию включена почти во всех операционных системах (Linux, macOS, iOS, Android), кроме Windows.
Для самой популярной и дружелюбной операционной системы в мире, поддержку протокола NAT-T приходится включать вручную, естественно полазив в системном реестре. Для чего перемещаемся в редактор реестра regedit и находим там ветку:
HKEY_LOCAL_MACHINESYSTEMCurrentControlSetServicesPolicyAgent
Для Windows XP ветка будет немного иная, читайте по ссылке приведённой ранее на сайте Microsoft (смысла рассказывать здесь не вижу, в виду сильного устаревания системы).
Создаём недостающий DWORD параметр с именем AssumeUDPEncapsulationContextOnSendRule и значением 2:
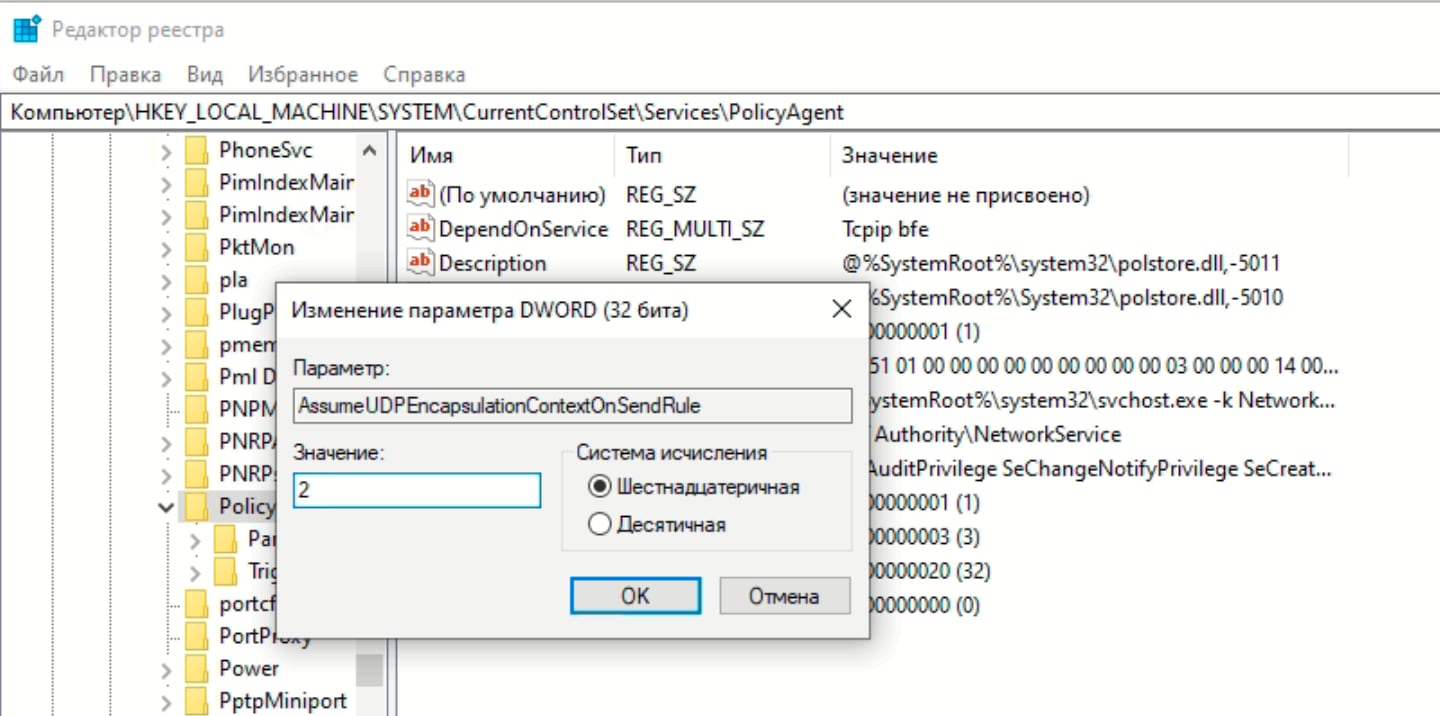
Примечание: Возможные значения параметра AssumeUDPEncapsulationContextOnSendRule:
- 0 – (значение по-умолчанию), VPN сервер подключен к интернету без NAT;
- 1 – VPN сервер находится за NAT;
- 2 — клиент и сервер находятся за NAT.
По идее, произведённые настройки вступают в силу без перезагрузки операционной системы, но если перезагрузитесь, хуже не будет. Теперь подключение к VPN серверу должно успешно заработать через NAT (в том числе двойной NAT).
Если вам не хочется возиться с реестром вручную, можно использовать воспользоваться PowerShell:
Set-ItemProperty -Path "HKLM:SYSTEMCurrentControlSetServicesPolicyAgent" -Name "AssumeUDPEncapsulationContextOnSendRule" -Type DWORD -Value 2 –Force;
Подписывайтесь на канал
Яндекс.Дзен
и узнавайте первыми о новых материалах, опубликованных на сайте.