Microsoft Windows XP Professional Microsoft Windows XP Home Edition Windows Server 2008 Datacenter without Hyper-V Windows Server 2008 Enterprise without Hyper-V Windows Server 2008 for Itanium-Based Systems Windows Server 2008 R2 Datacenter Windows Server 2008 R2 Enterprise Windows Server 2008 R2 Standard Windows Server 2008 Service Pack 2 Windows Server 2008 Standard without Hyper-V Windows Server 2008 Datacenter Windows Server 2008 Enterprise Windows Server 2008 Standard Windows Vista Enterprise 64-bit Edition Windows Vista Home Basic 64-bit Edition Windows Vista Home Premium 64-bit Edition Windows Vista Ultimate 64-bit Edition Windows Vista Business Windows Vista Enterprise Windows Vista Home Basic Windows Vista Starter Windows Vista Ultimate Windows 7 Enterprise Windows 7 Home Premium Windows 7 Professional Windows 7 Ultimate Windows 7 Home Basic Windows 8 Enterprise Windows 8 Pro Windows 8 Windows 8.1 Enterprise Windows 8.1 Pro Windows 8.1 Еще…Меньше
Аннотация
Если не удается подключиться к Интернету, можно сбросить параметры протокола TCP/IP. Данная статья описывает два способа сброса настроек TCP/IP. Чтобы автоматически сбросить настройки TCP/IP, перейдите к разделу Простое исправление. Чтобы сбросить настройки TCP/IP вручную, перейдите к разделу Самостоятельное решение проблемы.
Простое исправление
Чтобы сбросить TCP/IP автоматически, нажмите кнопку Скачать. В диалоговом окне Скачивание файла нажмите кнопку Выполнить или Открыть и следуйте инструкциям мастера простого исправления.
-
Возможно, мастер доступен только на английском языке. При этом автоматическое исправление подходит для любых языковых версий Windows.
-
Если вы работаете не на том компьютере, на котором возникла проблема, решение «Простое исправление» можно сохранить на устройстве флэш-памяти или компакт-диске, а затем запустить на нужном компьютере.
Windows 8.1, Windows 8, Windows RT, Windows 7, Windows Server 2012 R2, Windows Server 2012, Windows Server 2008 R2
Windows Vista, Windows XP, Windows Server 2008 или Windows Server 2003
Чтобы сбросить параметры протокола TCP/IP вручную, выполните указанные ниже действия.
Примечание. Чтобы выполнить инструкции ниже, необходимо войти в систему по учетной записи администратора.
Windows 8 и Windows 8.1
-
На начальном экране введите команду CMD. В результатах поиска щелкните правой кнопкой мыши пункт Командная строка и выберите команду Запуск от имени администратора.
-
Введите в командной строке следующую команду и нажмите клавишу ВВОД:netsh int ip reset c:resetlog.txt Примечание. Если вы не хотите указывать путь к каталогу с файлом журнала, выполните следующую команду:netsh int ip reset
-
Перезагрузите компьютер.
Windows 7 и Windows Vista
-
Чтобы открыть командную строку, нажмите кнопку Пуск, а затем в поле Найти программы и файлы введите CMD.
-
В списке Программы щелкните правой кнопкой мыши файл CMD.exe и выберите команду Запуск от имени администратора.
-
В окне Контроль учетных записей нажмите кнопку Да.
-
Введите в командной строке следующую команду и нажмите клавишу ВВОД:netsh int ip reset c:resetlog.txt Примечание. Если вы не хотите указывать путь к каталогу с файлом журнала, выполните следующую команду:netsh int ip reset resetlog.txt
-
Перезагрузите компьютер.
Windows XP
-
Чтобы открыть командную строку, нажмите кнопку Пуск, а затем щелкните Выполнить. Введите в поле Открыть следующую команду и нажмите клавишу ВВОД:
cmd
-
Введите в командной строке следующую команду и нажмите клавишу ВВОД:netsh int ip reset c:resetlog.txt Примечание. Если вы не хотите указывать путь к каталогу с файлом журнала, выполните следующую команду:
netsh int ip reset resetlog.txt
-
Перезагрузите компьютер.
Запуск команды reset перезаписывает следующие разделы реестра, которые используются протоколом TCP/IP:
SYSTEMCurrentControlSetServicesTcpipParameters
SYSTEMCurrentControlSetServicesDHCPParameters
Это то же самое, что удалить и вновь установить протокол TCP/IP. Для успешного выполнения команды вручную необходимо указать имя файла журнала, в который будут записываться действия, выполняемые программой netsh. (В ранее упомянутых в этом разделе процедурах, выполняемых вручную, этот файл называется «resetlog.txt».)
Дополнительная информация
Проблема устранена? Проверьте, устранена ли проблема. Если проблема устранена, можно пропустить дальнейшую информацию из этой статьи. Если же нет, обратитесь в службу технической поддержки.
Ниже представлен пример файла журнала, созданного по результатам выполнения команды netsh для сброса настроек протокола TCP/IP. Содержимое файла журнала может отличаться в зависимости от конфигурации компьютера. Если исходная конфигурация разделов реестра, касающихся протокола TCP/IP, не изменялась, журнал может остаться пустым. reset SYSTEMCurrentControlSetServicesDhcpParametersOptions15RegLocation
old REG_MULTI_SZ =
SYSTEMCurrentControlSetServicesTcpipParametersInterfaces?DhcpDomain
SYSTEMCurrentControlSetServicesTcpIpParametersDhcpDomain
added SYSTEMCurrentControlSetServicesNetbtParametersInterfacesTcpip_{2DDD011E-B1B6-4886-87AC-B4E72693D10C}NetbiosOptions
added SYSTEMCurrentControlSetServicesNetbtParametersInterfacesTcpip_{BAA9D128-54BB-43F6-8922-313D537BE03E}NetbiosOptions
reset SYSTEMCurrentControlSetServicesNetbtParametersInterfacesTcpip_{BD2859BA-B26A-4E2B-A3FE-3D246F90A81A}NameServerList
old REG_MULTI_SZ =
10.1.1.2
deleted SYSTEMCurrentControlSetServicesNetbtParametersEnableLmhosts
added SYSTEMCurrentControlSetServicesTcpipParametersInterfaces{2DDD011E-B1B6-4886-87AC-B4E72693D10C}AddressType
added SYSTEMCurrentControlSetServicesTcpipParametersInterfaces{2DDD011E-B1B6-4886-87AC-B4E72693D10C}DefaultGatewayMetric
added SYSTEMCurrentControlSetServicesTcpipParametersInterfaces{2DDD011E-B1B6-4886-87AC-B4E72693D10C}DisableDynamicUpdate
deleted SYSTEMCurrentControlSetServicesTcpipParametersInterfaces{2DDD011E-B1B6-4886-87AC-B4E72693D10C}DontAddDefaultGateway
reset SYSTEMCurrentControlSetServicesTcpipParametersInterfaces{2DDD011E-B1B6-4886-87AC-B4E72693D10C}EnableDhcp
old REG_DWORD = 0
added SYSTEMCurrentControlSetServicesTcpipParametersInterfaces{2DDD011E-B1B6-4886-87AC-B4E72693D10C}NameServer
added SYSTEMCurrentControlSetServicesTcpipParametersInterfaces{2DDD011E-B1B6-4886-87AC-B4E72693D10C}RawIpAllowedProtocols
added SYSTEMCurrentControlSetServicesTcpipParametersInterfaces{2DDD011E-B1B6-4886-87AC-B4E72693D10C}TcpAllowedPorts
added SYSTEMCurrentControlSetServicesTcpipParametersInterfaces{2DDD011E-B1B6-4886-87AC-B4E72693D10C}UdpAllowedPorts
added SYSTEMCurrentControlSetServicesTcpipParametersInterfaces{5B3675C3-6EB9-4936-B991-04DA31024C4E}DisableDynamicUpdate
reset SYSTEMCurrentControlSetServicesTcpipParametersInterfaces{5B3675C3-6EB9-4936-B991-04DA31024C4E}EnableDhcp
old REG_DWORD = 0
reset SYSTEMCurrentControlSetServicesTcpipParametersInterfaces{5B3675C3-6EB9-4936-B991-04DA31024C4E}IpAddress
old REG_MULTI_SZ =
12.12.12.12
deleted SYSTEMCurrentControlSetServicesTcpipParametersInterfaces{5B3675C3-6EB9-4936-B991-04DA31024C4E}IpAutoconfigurationAddress
deleted SYSTEMCurrentControlSetServicesTcpipParametersInterfaces{5B3675C3-6EB9-4936-B991-04DA31024C4E}IpAutoconfigurationMask
deleted SYSTEMCurrentControlSetServicesTcpipParametersInterfaces{5B3675C3-6EB9-4936-B991-04DA31024C4E}IpAutoconfigurationSeed
reset SYSTEMCurrentControlSetServicesTcpipParametersInterfaces{5B3675C3-6EB9-4936-B991-04DA31024C4E}RawIpAllowedProtocols
old REG_MULTI_SZ =
0
reset SYSTEMCurrentControlSetServicesTcpipParametersInterfaces{5B3675C3-6EB9-4936-B991-04DA31024C4E}SubnetMask
old REG_MULTI_SZ =
255.255.255.0
reset SYSTEMCurrentControlSetServicesTcpipParametersInterfaces{5B3675C3-6EB9-4936-B991-04DA31024C4E}TcpAllowedPorts
old REG_MULTI_SZ =
0
reset SYSTEMCurrentControlSetServicesTcpipParametersInterfaces{5B3675C3-6EB9-4936-B991-04DA31024C4E}UdpAllowedPorts
old REG_MULTI_SZ =
0
added SYSTEMCurrentControlSetServicesTcpipParametersInterfaces{BAA9D128-54BB-43F6-8922-313D537BE03E}AddressType
added SYSTEMCurrentControlSetServicesTcpipParametersInterfaces{BAA9D128-54BB-43F6-8922-313D537BE03E}DefaultGatewayMetric
added SYSTEMCurrentControlSetServicesTcpipParametersInterfaces{BAA9D128-54BB-43F6-8922-313D537BE03E}DisableDynamicUpdate
deleted SYSTEMCurrentControlSetServicesTcpipParametersInterfaces{BAA9D128-54BB-43F6-8922-313D537BE03E}DontAddDefaultGateway
reset SYSTEMCurrentControlSetServicesTcpipParametersInterfaces{BAA9D128-54BB-43F6-8922-313D537BE03E}EnableDhcp
old REG_DWORD = 0
added SYSTEMCurrentControlSetServicesTcpipParametersInterfaces{BAA9D128-54BB-43F6-8922-313D537BE03E}NameServer
added SYSTEMCurrentControlSetServicesTcpipParametersInterfaces{BAA9D128-54BB-43F6-8922-313D537BE03E}RawIpAllowedProtocols
added SYSTEMCurrentControlSetServicesTcpipParametersInterfaces{BAA9D128-54BB-43F6-8922-313D537BE03E}TcpAllowedPorts
added SYSTEMCurrentControlSetServicesTcpipParametersInterfaces{BAA9D128-54BB-43F6-8922-313D537BE03E}UdpAllowedPorts
reset SYSTEMCurrentControlSetServicesTcpipParametersInterfaces{BD2859BA-B26A-4E2B-A3FE-3D246F90A81A}DefaultGateway
old REG_MULTI_SZ =
10.1.1.2
reset SYSTEMCurrentControlSetServicesTcpipParametersInterfaces{BD2859BA-B26A-4E2B-A3FE-3D246F90A81A}DefaultGatewayMetric
old REG_MULTI_SZ =
0
added SYSTEMCurrentControlSetServicesTcpipParametersInterfaces{BD2859BA-B26A-4E2B-A3FE-3D246F90A81A}DisableDynamicUpdate
reset SYSTEMCurrentControlSetServicesTcpipParametersInterfaces{BD2859BA-B26A-4E2B-A3FE-3D246F90A81A}EnableDhcp
old REG_DWORD = 0
reset SYSTEMCurrentControlSetServicesTcpipParametersInterfaces{BD2859BA-B26A-4E2B-A3FE-3D246F90A81A}IpAddress
old REG_MULTI_SZ =
10.1.1.1
deleted SYSTEMCurrentControlSetServicesTcpipParametersInterfaces{BD2859BA-B26A-4E2B-A3FE-3D246F90A81A}IpAutoconfigurationAddress
deleted SYSTEMCurrentControlSetServicesTcpipParametersInterfaces{BD2859BA-B26A-4E2B-A3FE-3D246F90A81A}IpAutoconfigurationMask
deleted SYSTEMCurrentControlSetServicesTcpipParametersInterfaces{BD2859BA-B26A-4E2B-A3FE-3D246F90A81A}IpAutoconfigurationSeed
reset SYSTEMCurrentControlSetServicesTcpipParametersInterfaces{BD2859BA-B26A-4E2B-A3FE-3D246F90A81A}NameServer
old REG_SZ = 10.1.1.2,10.1.1.3
reset SYSTEMCurrentControlSetServicesTcpipParametersInterfaces{BD2859BA-B26A-4E2B-A3FE-3D246F90A81A}RawIpAllowedProtocols
old REG_MULTI_SZ =
0
reset SYSTEMCurrentControlSetServicesTcpipParametersInterfaces{BD2859BA-B26A-4E2B-A3FE-3D246F90A81A}SubnetMask
old REG_MULTI_SZ =
255.255.255.0
reset SYSTEMCurrentControlSetServicesTcpipParametersInterfaces{BD2859BA-B26A-4E2B-A3FE-3D246F90A81A}TcpAllowedPorts
old REG_MULTI_SZ =
0
reset SYSTEMCurrentControlSetServicesTcpipParametersInterfaces{BD2859BA-B26A-4E2B-A3FE-3D246F90A81A}UdpAllowedPorts
old REG_MULTI_SZ =
0
deleted SYSTEMCurrentControlSetServicesTcpipParametersDontAddDefaultGatewayDefault
deleted SYSTEMCurrentControlSetServicesTcpipParametersEnableIcmpRedirect
deleted SYSTEMCurrentControlSetServicesTcpipParametersEnableSecurityFilters
deleted SYSTEMCurrentControlSetServicesTcpipParametersSearchList
deleted SYSTEMCurrentControlSetServicesTcpipParametersUseDomainNameDevolution
<completed>Примечание. В Windows Server 2003 с пакетом обновления 1 можно восстановить WinSock с помощью команды netsh winsock reset.
Для получения дополнительной информации щелкните приведенные ниже номера статей базы знаний Майкрософт:
314067 Как устранить проблемы, связанные с подключением по протоколу TCP/IP, в Windows XP
811259 Как проверить целостность конфигурации Winsock2 и восстановить ее при повреждении в Windows Server 2003, Windows XP и Windows Vista
314053 Параметры конфигурации TCP/IP и NBT для Windows XP
Нужна дополнительная помощь?
Microsoft Windows XP Professional Microsoft Windows XP Home Edition Windows Server 2008 Datacenter without Hyper-V Windows Server 2008 Enterprise without Hyper-V Windows Server 2008 for Itanium-Based Systems Windows Server 2008 R2 Datacenter Windows Server 2008 R2 Enterprise Windows Server 2008 R2 Standard Windows Server 2008 Service Pack 2 Windows Server 2008 Standard without Hyper-V Windows Server 2008 Datacenter Windows Server 2008 Enterprise Windows Server 2008 Standard Windows Vista Enterprise 64-bit Edition Windows Vista Home Basic 64-bit Edition Windows Vista Home Premium 64-bit Edition Windows Vista Ultimate 64-bit Edition Windows Vista Business Windows Vista Enterprise Windows Vista Home Basic Windows Vista Starter Windows Vista Ultimate Windows 7 Enterprise Windows 7 Home Premium Windows 7 Professional Windows 7 Ultimate Windows 7 Home Basic Windows 8 Enterprise Windows 8 Pro Windows 8 Windows 8.1 Enterprise Windows 8.1 Pro Windows 8.1 More…Less
You can try to reset TCP/IP if you have Internet connection issues. This article describes two ways to reset TCP/IP. To have us reset TCP/IP for you, go to the «Here’s an easy fix» section. If you prefer to reset TCP/IP manually, go to the «Let me fix it myself» section.
Reset TCP/IP automatically
To reset TCP/IP automatically, click the Download button. In the File Download dialog box, click Run or Open, and then follow the steps in the easy fix wizard.
Windows 8.1, Windows 8, Windows RT, Windows 7, Windows Server 2012 R2, Windows Server 2012, Windows Server 2008 R2
Windows Vista, Windows XP, Windows Server 2008 or Windows Server 2003
Notes:
-
This wizard may be in English only. However, the automatic fix also works for other language versions of Windows.
-
If you’re not on the computer that has the problem, save the easy fix solution to a flash drive or a CD, and then run it on the computer that has the problem.
Manually reset TCP/IP
To manually reset TCP/IP, follow these steps:
-
On the Start screen, type CMD. In the search results, right-click Command Prompt, and then select Run as administrator.
-
At the command prompt, enter the following command, and then press Enter:
netsh int ip reset c:resetlog.txt
Note If you don’t want to specify a directory path for the log file, run the following command instead:netsh int ip reset
-
Restart the computer.
-
To open a command prompt, select Start and then type cmd in the Search programs and files box.
-
Under Programs, right-click the CMD.exe icon, and then select Run as administrator.
-
When the User Account Control box appears, select Yes.
-
At the command prompt, enter the following command, and then press Enter:
netsh int ip reset c:resetlog.txt
Note If you don’t want to specify a directory path for the log file, run the following command instead:netsh int ip reset resetlog.txt
-
Restart the computer.
-
To open a command prompt, select Start > Run. In the Open box, enter the following command, and then press Enter:
netsh int ip reset c:resetlog.txt
Note If you don’t want to specify a directory path for the log file, run the following command instead:netsh int ip reset resetlog.txt
-
Restart the computer.
When you run the reset command, it overwrites the following registry keys, both of which are used by TCP/IP:
SYSTEMCurrentControlSetServicesTcpipParameters
SYSTEMCurrentControlSetServicesDHCPParameters
This has the same effect as removing and reinstalling TCP/IP. To run the manual command successfully, you must specify a name for the log file in which the netsh actions will be recorded. (This log file is referred to as «resetlog.txt» in the manual procedures earlier in this section.)
Note You must be logged on to the computer as an administrator to perform the steps.
More Information
Did this fix the problem? Check whether the problem is fixed. If it is, you are finished with this article. If the problem is not fixed, you can contact Support.
The following is a sample of the log file that is generated by netsh when an IP reset command is issued. The actual log file might vary, depending on the configuration of the computer. When the TCP/IP registry keys have not been altered from their original configuration, there might be no actions logged in the file. reset SYSTEMCurrentControlSetServicesDhcpParametersOptions15RegLocation
old REG_MULTI_SZ =
SYSTEMCurrentControlSetServicesTcpipParametersInterfaces?DhcpDomain
SYSTEMCurrentControlSetServicesTcpIpParametersDhcpDomain
added SYSTEMCurrentControlSetServicesNetbtParametersInterfacesTcpip_{2DDD011E-B1B6-4886-87AC-B4E72693D10C}NetbiosOptions
added SYSTEMCurrentControlSetServicesNetbtParametersInterfacesTcpip_{BAA9D128-54BB-43F6-8922-313D537BE03E}NetbiosOptions
reset SYSTEMCurrentControlSetServicesNetbtParametersInterfacesTcpip_{BD2859BA-B26A-4E2B-A3FE-3D246F90A81A}NameServerList
old REG_MULTI_SZ =
10.1.1.2
deleted SYSTEMCurrentControlSetServicesNetbtParametersEnableLmhosts
added SYSTEMCurrentControlSetServicesTcpipParametersInterfaces{2DDD011E-B1B6-4886-87AC-B4E72693D10C}AddressType
added SYSTEMCurrentControlSetServicesTcpipParametersInterfaces{2DDD011E-B1B6-4886-87AC-B4E72693D10C}DefaultGatewayMetric
added SYSTEMCurrentControlSetServicesTcpipParametersInterfaces{2DDD011E-B1B6-4886-87AC-B4E72693D10C}DisableDynamicUpdate
deleted SYSTEMCurrentControlSetServicesTcpipParametersInterfaces{2DDD011E-B1B6-4886-87AC-B4E72693D10C}DontAddDefaultGateway
reset SYSTEMCurrentControlSetServicesTcpipParametersInterfaces{2DDD011E-B1B6-4886-87AC-B4E72693D10C}EnableDhcp
old REG_DWORD = 0
added SYSTEMCurrentControlSetServicesTcpipParametersInterfaces{2DDD011E-B1B6-4886-87AC-B4E72693D10C}NameServer
added SYSTEMCurrentControlSetServicesTcpipParametersInterfaces{2DDD011E-B1B6-4886-87AC-B4E72693D10C}RawIpAllowedProtocols
added SYSTEMCurrentControlSetServicesTcpipParametersInterfaces{2DDD011E-B1B6-4886-87AC-B4E72693D10C}TcpAllowedPorts
added SYSTEMCurrentControlSetServicesTcpipParametersInterfaces{2DDD011E-B1B6-4886-87AC-B4E72693D10C}UdpAllowedPorts
added SYSTEMCurrentControlSetServicesTcpipParametersInterfaces{5B3675C3-6EB9-4936-B991-04DA31024C4E}DisableDynamicUpdate
reset SYSTEMCurrentControlSetServicesTcpipParametersInterfaces{5B3675C3-6EB9-4936-B991-04DA31024C4E}EnableDhcp
old REG_DWORD = 0
reset SYSTEMCurrentControlSetServicesTcpipParametersInterfaces{5B3675C3-6EB9-4936-B991-04DA31024C4E}IpAddress
old REG_MULTI_SZ =
12.12.12.12
deleted SYSTEMCurrentControlSetServicesTcpipParametersInterfaces{5B3675C3-6EB9-4936-B991-04DA31024C4E}IpAutoconfigurationAddress
deleted SYSTEMCurrentControlSetServicesTcpipParametersInterfaces{5B3675C3-6EB9-4936-B991-04DA31024C4E}IpAutoconfigurationMask
deleted SYSTEMCurrentControlSetServicesTcpipParametersInterfaces{5B3675C3-6EB9-4936-B991-04DA31024C4E}IpAutoconfigurationSeed
reset SYSTEMCurrentControlSetServicesTcpipParametersInterfaces{5B3675C3-6EB9-4936-B991-04DA31024C4E}RawIpAllowedProtocols
old REG_MULTI_SZ =
0
reset SYSTEMCurrentControlSetServicesTcpipParametersInterfaces{5B3675C3-6EB9-4936-B991-04DA31024C4E}SubnetMask
old REG_MULTI_SZ =
255.255.255.0
reset SYSTEMCurrentControlSetServicesTcpipParametersInterfaces{5B3675C3-6EB9-4936-B991-04DA31024C4E}TcpAllowedPorts
old REG_MULTI_SZ =
0
reset SYSTEMCurrentControlSetServicesTcpipParametersInterfaces{5B3675C3-6EB9-4936-B991-04DA31024C4E}UdpAllowedPorts
old REG_MULTI_SZ =
0
added SYSTEMCurrentControlSetServicesTcpipParametersInterfaces{BAA9D128-54BB-43F6-8922-313D537BE03E}AddressType
added SYSTEMCurrentControlSetServicesTcpipParametersInterfaces{BAA9D128-54BB-43F6-8922-313D537BE03E}DefaultGatewayMetric
added SYSTEMCurrentControlSetServicesTcpipParametersInterfaces{BAA9D128-54BB-43F6-8922-313D537BE03E}DisableDynamicUpdate
deleted SYSTEMCurrentControlSetServicesTcpipParametersInterfaces{BAA9D128-54BB-43F6-8922-313D537BE03E}DontAddDefaultGateway
reset SYSTEMCurrentControlSetServicesTcpipParametersInterfaces{BAA9D128-54BB-43F6-8922-313D537BE03E}EnableDhcp
old REG_DWORD = 0
added SYSTEMCurrentControlSetServicesTcpipParametersInterfaces{BAA9D128-54BB-43F6-8922-313D537BE03E}NameServer
added SYSTEMCurrentControlSetServicesTcpipParametersInterfaces{BAA9D128-54BB-43F6-8922-313D537BE03E}RawIpAllowedProtocols
added SYSTEMCurrentControlSetServicesTcpipParametersInterfaces{BAA9D128-54BB-43F6-8922-313D537BE03E}TcpAllowedPorts
added SYSTEMCurrentControlSetServicesTcpipParametersInterfaces{BAA9D128-54BB-43F6-8922-313D537BE03E}UdpAllowedPorts
reset SYSTEMCurrentControlSetServicesTcpipParametersInterfaces{BD2859BA-B26A-4E2B-A3FE-3D246F90A81A}DefaultGateway
old REG_MULTI_SZ =
10.1.1.2
reset SYSTEMCurrentControlSetServicesTcpipParametersInterfaces{BD2859BA-B26A-4E2B-A3FE-3D246F90A81A}DefaultGatewayMetric
old REG_MULTI_SZ =
0
added SYSTEMCurrentControlSetServicesTcpipParametersInterfaces{BD2859BA-B26A-4E2B-A3FE-3D246F90A81A}DisableDynamicUpdate
reset SYSTEMCurrentControlSetServicesTcpipParametersInterfaces{BD2859BA-B26A-4E2B-A3FE-3D246F90A81A}EnableDhcp
old REG_DWORD = 0
reset SYSTEMCurrentControlSetServicesTcpipParametersInterfaces{BD2859BA-B26A-4E2B-A3FE-3D246F90A81A}IpAddress
old REG_MULTI_SZ =
10.1.1.1
deleted SYSTEMCurrentControlSetServicesTcpipParametersInterfaces{BD2859BA-B26A-4E2B-A3FE-3D246F90A81A}IpAutoconfigurationAddress
deleted SYSTEMCurrentControlSetServicesTcpipParametersInterfaces{BD2859BA-B26A-4E2B-A3FE-3D246F90A81A}IpAutoconfigurationMask
deleted SYSTEMCurrentControlSetServicesTcpipParametersInterfaces{BD2859BA-B26A-4E2B-A3FE-3D246F90A81A}IpAutoconfigurationSeed
reset SYSTEMCurrentControlSetServicesTcpipParametersInterfaces{BD2859BA-B26A-4E2B-A3FE-3D246F90A81A}NameServer
old REG_SZ = 10.1.1.2,10.1.1.3
reset SYSTEMCurrentControlSetServicesTcpipParametersInterfaces{BD2859BA-B26A-4E2B-A3FE-3D246F90A81A}RawIpAllowedProtocols
old REG_MULTI_SZ =
0
reset SYSTEMCurrentControlSetServicesTcpipParametersInterfaces{BD2859BA-B26A-4E2B-A3FE-3D246F90A81A}SubnetMask
old REG_MULTI_SZ =
255.255.255.0
reset SYSTEMCurrentControlSetServicesTcpipParametersInterfaces{BD2859BA-B26A-4E2B-A3FE-3D246F90A81A}TcpAllowedPorts
old REG_MULTI_SZ =
0
reset SYSTEMCurrentControlSetServicesTcpipParametersInterfaces{BD2859BA-B26A-4E2B-A3FE-3D246F90A81A}UdpAllowedPorts
old REG_MULTI_SZ =
0
deleted SYSTEMCurrentControlSetServicesTcpipParametersDontAddDefaultGatewayDefault
deleted SYSTEMCurrentControlSetServicesTcpipParametersEnableIcmpRedirect
deleted SYSTEMCurrentControlSetServicesTcpipParametersEnableSecurityFilters
deleted SYSTEMCurrentControlSetServicesTcpipParametersSearchList
deleted SYSTEMCurrentControlSetServicesTcpipParametersUseDomainNameDevolution
<completed> Note In Windows Server 2003 Service Pack 1, you can use the netsh winsock reset command to repair Winsock.
For more information, click the following article numbers to view the articles in the Microsoft Knowledge Base:
314067 How to troubleshoot TCP/IP connectivity with Windows XP
811259 How to determine and recover from Winsock2 corruption in Windows Server 2003, in Windows XP, and in Windows Vista
314053 TCP/IP and NBT configuration parameters for Windows XP
Need more help?
![]()
In earlier versions of Windows, TCP/IP was a separate optional component that could be removed or added like any other protocol. In Windows XP/2003, TCP/IP is a core component of the operating system that cannot be removed. Especially on a Windows Server 2003, TCP/IP functionally is critical for network operations and Active Directory domain environment. The entire Active Directory architecture is based on DNS hierarchy, which relies on TCP/IP.
There are situations where one may encounter a corrupt TCP/IP stack. Although rare, this situation causes a major problem because you can’t remove and reinstall TCP/IP anymore. So what’s the solution? Re-installing the operating system? Well, that’s one option. Another option is to reset TCP/IP to the default state at the time when the operating system was installed. You can use the NetShell (netsh.exe) utility to reset TCP/IP. This document describes how you can use the NetShell utility to reset TCP/IP on Windows XP and Windows Server 2003. When you reset TCP/IP, it will rewrite all the important keys in the registry which has the effect of removing and reinstalling the entire TCP/IP stack.
Resetting TCP/IP
The NetShell utility is a command line tool (netsh.exe) that allows you to monitor and configure networking components on Windows XP/2003. To run this tool, go to the command prompt and type netsh. To display a list of commands that are available, type help, or simply type a question mark “?”.
C:>netsh
netsh>?
The following commands are available:
Commands in this context:
.. – Goes up one context level.
? – Displays a list of commands.
abort – Discards changes made while in offline mode.
add – Adds a configuration entry to a list of entries.
alias – Adds an alias.
bridge – Changes to the `netsh bridge’ context.
bye – Exits the program.
commit – Commits changes made while in offline mode.
delete – Deletes a configuration entry from a list of entries.
diag – Changes to the `netsh diag’ context.
dump – Displays a configuration script.
exec – Runs a script file.
exit – Exits the program.
firewall – Changes to the `netsh firewall’ context.
help – Displays a list of commands.
interface – Changes to the `netsh interface’ context.
offline – Sets the current mode to offline.
online – Sets the current mode to online.
popd – Pops a context from the stack.
pushd – Pushes current context on stack.
quit – Exits the program.
ras – Changes to the `netsh ras’ context.
routing – Changes to the `netsh routing’ context.
set – Updates configuration settings.
show – Displays information.
unalias – Deletes an alias.
winsock – Changes to the `netsh winsock’ context.
The following sub-contexts are available:
bridge diag firewall interface ras routing winsock
To view help for a command, type the command, followed by a space, and then
type ?.
Tip: You can use abbreviations, or just the beginning part of a command instead of typing the entire command. For example, you can type int for interface, h for help, and either q or b to exit the program. If you want to go one level up in the path, type “..” without the quotes. You can also type the entire command without going into the individual contexts of netsh.
To reset TCP/IP, type the following at the command prompt.
netsh interface ip reset logfile_name
Where logfile_name is the name of a log file in the current directory, e.g. resetlog.txt. You can also create a log file in a different folder if you provide the full path.
When you reset TCP/IP, the two areas of registry that are affected include:
SYSTEMCurrentControlSetServicesDHCPParameters
SYSTEMCurrentControlSetServicesTcpipParameters
For a sample Windows XP TCP/IP reset log, check out resetlog.txt. If you notice that your log is empty, it could be because the TCP/IP entries on your computer have not been changed since the default installation.
Copyright ©2005 Zubair Alexander. All rights reserved.
This div height required for enabling the sticky sidebar
We use cookies on our website to give you the most relevant experience by remembering your preferences and repeat visits. By clicking “Accept”, you consent to the use of ALL the cookies.
Обычно сброс сетевых настроек в Windows это последнее средство, которое стоит попробовать для решения сложных проблем с доступом к локальной сети или Интернету. При этом на компьютере сбрасываются настройки сетевых адаптеров, настройки стека TCP/IP до стандартных настроек в чистой Windows, удаляются и переустанавливаются все сетевые адаптеры компьютера. В этой статье мы рассмотрим особенности сброса сетевых настроек в Windows из графического интерфейса и с помощью командной строки.
Прежде чем прибегать к сбросу сетевых настроек, убедитесь, что вы попробовали все стандартные средства диагностики работы с сетью: проверили настройки IP, работу маршрутизатора/роутера/провайдера, обновили драйвера сетевых адаптеров, перезагружали компьютер, воспользовались встроенным Windows Network Troubleshooter (команда
msdt.exe /id NetworkDiagnosticsNetworkAdapter
) и т.д. Если ни один инструментов не помог исправить сетевую проблему, можно попробовать сбросить сетевые настройки.
Содержание:
- Сохраните текущие сетевые настройки Windows
- Сброс сетевых настроек из панели управления Windows
- Сброс сетевых настроек из командной строки Windows
Сохраните текущие сетевые настройки Windows
При сбросе сети в Windows будут потеряны все настройки, которые вы задали вручную: IP адреса, DNS сервера, статические маршруты, настройки сетевых драйверов, очищены сохраненные Wi-Fi сети и т.д. Поэтому перед сбросом важно сохранить текущие настройки.
Выведите список сетевых адаптеров:
Get-NetAdapter|select name,InterfaceIndex,InterfaceDescription,InterfaceOperationalStatus,MediaConnectionState,DriverInformation|ft

Для всех подключенных сетевых адаптеров проверьте, получают ли они настройки автоматически (через DHCP) или вручную:
Get-NetIPInterface -InterfaceIndex 7

Если для интерфейса значение
Dhcp=Disabled
, значит для адаптера настройки IP заданы вручную и вам нужно сохранить текущие настройки в файл:
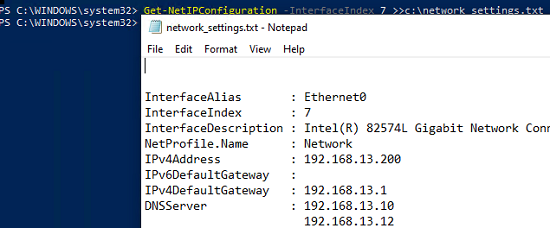
Get-NetIPConfiguration -InterfaceIndex 7 >>c:network_settings.txt
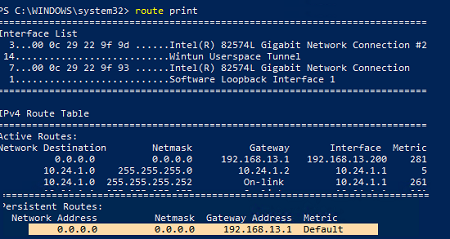
Выведите и запишите все статические маршруты в таблице маршрутизации (из секции Persistent Routes):
Route print
С помощью PowerShell выведите список VPN подключений, запишите их настройки:
Get-VpnConnection
В моем случае настройки сохраненных VPN подключений не были сброшены. Также не был удален виртуальный адаптер OpenVPN Wintun (адаптер для подключения к OpenVPN серверу).
Выведите WLAN профили и сохраните настройки беспроводных сетей в файл:
netsh wlan show profile
netsh wlan export profile name="Xiaomi_20F5" key=clear folder=c:ps
Сохраните настройки Winsock:
netsh winsock show catalog > c:winsock-backup.txt
После сброса сети сохраненная информация поможет вам восстановить все сетевые настройки, заданные вручную.
Сброс сетевых настроек из панели управления Windows
В Windows 10 (1607+), Windows 11 и Windows Server 2019/2022 можно сбросить сетевые настройки из панели Параметры (Settings). Перейдите в раздел Settings -> Network (или выполните команду быстрого доступа к ms-settings: ms-settings:network). Нажмите кнопку Network reset -> Reset now.
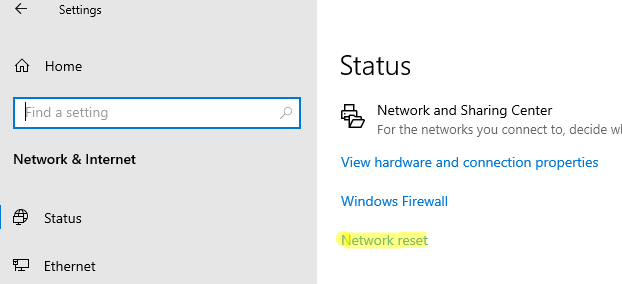
Подтвердите сброс сетевых настроек. Windows очистит все сетевые настройки и удалит сетевые карты (сетевые адаптеры не будут отображаться в Панели Управления). Настройки сети будут сброшены до заводских. Windows автоматически перезагрузится через 5 минут.
После загрузки Windows обнаружит все подключенные сетевые адаптеры и устанвит драйвера. Останется настроить параметры сетевых подключение и проверить, исправлена ли проблема.
Сброс сетевых настроек из командной строки Windows
Все те же действия, которая выполнила процедура сброса сети из панели Settings можно выполнить из командной строки.
Сбросьте кэш DNS:
ipconfig /flushdns
Сбросьте настройки WinSock:
netsh winsock reset
Sucessfully reset the Winsock Catalog.
You must restart the computer in order to complete the reset.
Команда сбрасывает настройки в ветке реестра HKEY_LOCAL_MACHINESYSTEMCurrentControlSetServicesWinSock2Parameters . При этом старые настройки сохраняются в ветку Protocol_Catalog_Before_Reset. 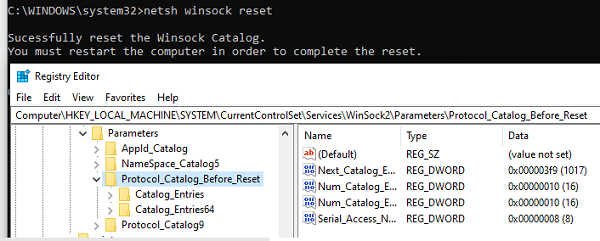
Сброс настроек стека TCP/IP:
netsh int ip reset
Для сброса настроек TCP/IPv6:
netsh int ipv6 reset
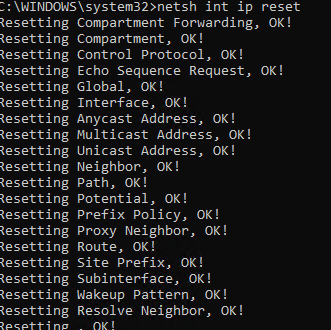
Resetting Compartment Forwarding, OK!
Resetting Compartment, OK!
Resetting Control Protocol, OK!
Resetting Echo Sequence Request, OK!
Resetting Global, OK!
Resetting Interface, OK!
Resetting Anycast Address, OK!
Resetting Multicast Address, OK!
Resetting Unicast Address, OK!
 Resetting Neighbor, OK!
Resetting Path, OK!
Resetting Potential, OK!
Resetting Prefix Policy, OK!
Resetting Proxy Neighbor, OK!
Resetting Route, OK!
Resetting Site Prefix, OK!
Resetting Subinterface, OK!
Resetting Wakeup Pattern, OK!
Resetting Resolve Neighbor, OK!
Resetting , OK!
Restart the computer to complete this action.
Сбрасываются настройки в ветках реестра HKLMSYSTEMCurrentControlSetServicesTcpipParameters и SYSTEMCurrentControlSetServicesDHCPParameters.
Удалите все сетевые адаптеры:
netcfg -d
Successfully removed all MUX Objects.
Removing device "Intel(R) 82574L Gigabit Network Connection"
Removing device "WAN Miniport (PPPOE)"
Skipping the removal of "Wintun Userspace Tunnel"
Removing device "WAN Miniport (PPTP)"
Removing device "WAN Miniport (IKEv2)"
Check to see if the "Microsoft Kernel Debug Network Adapter" bindings should be reset
"Microsoft Kernel Debug Network Adapter" binding check complete
Removing device "WAN Miniport (Network Monitor)"
Removing device "WAN Miniport (IP)"
Removing device "WAN Miniport (SSTP)"
Removing device "WAN Miniport (IPv6)"
Removing device "WAN Miniport (L2TP)"
Please reboot the computer...
Сброс всех правил Windows Defender Firewall:
netsh advfirewall reset
В PowerShell также есть отдельная команда для сброса расширенных настроек конкретного сетевого адаптера. Сначала вы можете получить текущие настройки адаптера:
Get-NetAdapterAdvancedProperty -Name Ethernet0|ft -AutoSize
Name DisplayName DisplayValue RegistryKeyword RegistryValue
---- ----------- ------------ --------------- -------------
Ethernet0 Flow Control Rx & Tx Enabled *FlowControl {3}
Ethernet0 Interrupt Moderation Enabled *InterruptModeration {1}
Ethernet0 IPv4 Checksum Offload Rx & Tx Enabled *IPChecksumOffloadIPv4 {3}
Ethernet0 Jumbo Packet Disabled *JumboPacket {1514}
Ethernet0 Large Send Offload V2 (IPv4) Enabled *LsoV2IPv4 {1}
Ethernet0 Large Send Offload V2 (IPv6) Enabled *LsoV2IPv6 {1}
Ethernet0 Maximum Number of RSS Queues 2 Queues *NumRssQueues {2}
Ethernet0 Packet Priority & VLAN Packet Priority & VLAN Enabled *PriorityVLANTag {3}
Ethernet0 Receive Buffers 256 *ReceiveBuffers {256}
Ethernet0 Receive Side Scaling Enabled *RSS {1}
Ethernet0 Speed & Duplex Auto Negotiation *SpeedDuplex {0}
Ethernet0 TCP Checksum Offload (IPv4) Rx & Tx Enabled *TCPChecksumOffloadIPv4 {3}
Ethernet0 TCP Checksum Offload (IPv6) Rx & Tx Enabled *TCPChecksumOffloadIPv6 {3}
Ethernet0 Transmit Buffers 512 *TransmitBuffers {512}
Ethernet0 UDP Checksum Offload (IPv4) Rx & Tx Enabled *UDPChecksumOffloadIPv4 {3}
Ethernet0 UDP Checksum Offload (IPv6) Rx & Tx Enabled *UDPChecksumOffloadIPv6 {3}
Ethernet0 Adaptive Inter-Frame Spacing Disabled AdaptiveIFS {0}
Ethernet0 Interrupt Moderation Rate Adaptive ITR {65535}
Ethernet0 Log Link State Event Enabled LogLinkStateEvent {51}
Ethernet0 Gigabit Master Slave Mode Auto Detect MasterSlave {0}
Ethernet0 Locally Administered Address -- NetworkAddress {--}
Ethernet0 Wait for Link Auto Detect WaitAutoNegComplete {2}
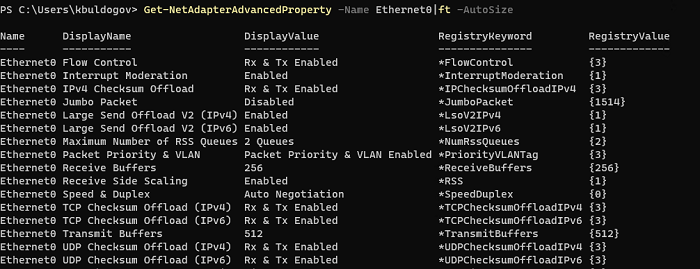
Здесь можно вывести настройки Jumbo Packet, VLAN, настройки буферов и т.д.
Для сброса этих параметров, выполните:
Reset-NetAdapterAdvancedProperty -Name Ethernet0
Перезагрузите компьютер и задайте все сетевые настройки заново. Если компьютер настроен на автоматическое получение IP адреса и настроек сети от DHCP сервера, ничего дополнительно настраивать не придется.
If the internet is not working on a Windows PC where everything related to networking is properly configured, the command netsh winsock reset might save your day. Furthermore, this command will also help you fix the Windows Sockets registry entries required for network connectivity are missing error that is shown when you run Windows network diagnostics.
Contents
- Understanding Winsock
- Why a Winsock reset is required
- How to reset the Winsock Catalog
- Conclusion
- Author
- Recent Posts

Surender Kumar has more than twelve years of experience in server and network administration. His fields of interest are Windows Servers, Active Directory, PowerShell, web servers, networking, Linux, virtualization, and penetration testing. He loves writing for his blog.
Latest posts by Surender Kumar (see all)
- Extending LVM space in Ubuntu — Thu, Feb 2 2023
- Backup in Proxmox VE — Thu, Jan 26 2023
- Snapshots in Proxmox VE — Wed, Jan 25 2023
If you already know about the netsh winsock reset command but still wonder what it actually does, this post will help you understand it.

Windows Sockets registry entries required for network connectivity are missing
Understanding Winsock
Winsock (Windows Sockets) is an API that defines how network applications in Windows can access network services, such as TCP/IP. Basically, Windows stores information related to Winsock in a database known as the Winsock Catalog. When this catalog becomes corrupt, you will start seeing weird network or internet connectivity problems. The following registry key holds the information about the Winsock catalog:
HKEY_LOCAL_MACHINESYSTEMCurrentControlSetServicesWinSock2ParametersProtocol_Catalog9
When you run the netsh winsock reset command, the existing Protocol_Catalog9 registry key is saved to Protocol_Catalog_Before_Reset and a new registry key is created with default parameters. The full path to the backup key is:
HKEY_LOCAL_MACHINESYSTEMCurrentControlSetServicesWinSock2ParametersProtocol_Catalog_Before_Reset

Viewing the registry keys related to the Winsock Catalog
Remember that the aforementioned registry keys hold the Winsock parameters in binary format, which is difficult to understand. Later in this guide, I will show you a way to export the Winsock Catalog parameters to a text file that you can easily read and understand.
Why a Winsock reset is required
Before actually resetting the Winsock Catalog, let’s first understand why you would need to do it. The Winsock Catalog could become corrupt for various reasons, such as:
Malware or adware infection—Cleaning up malware from a PC can corrupt the Winsock Catalog.
Incorrect network device installation or removal—When you install (or remove) a network device or VPN software incorrectly, it could lead to a corrupt Winsock Catalog.
Registry cleaning or optimization utility—Sometimes, a registry cleaner or optimization tool can mess up the registry, which in turn could cause the Winsock Catalog to become corrupt.
There may be other reasons in addition to these. No matter how the Winsock Catalog becomes corrupt, you need to reset it to fix the issue.
How to reset the Winsock Catalog
Now that you understand the Winsock Catalog and its importance in Windows, let’s discuss how to reset it. To reset the Winsock:
Launch an elevated command prompt or PowerShell console (run cmd or PowerShell as administrator).
[Optional] If you want to view the Winsock parameters, use the following command (as discussed earlier, the Winsock parameters are stored in the registry in binary format, which is hard to read and understand):
netsh winsock show catalog

Viewing the Winsock Catalog using the netsh command
This command displays all the parameters, and the command output can be overwhelming. So, you might want to store the output in a file using netsh winsock show catalog > d:winsock-before.txt command, as shown in the following screenshot:

Saving the Winsock Catalog parameters to a text file and reading them when needed
This command stores the output in a text file that you can read and even compare later on after the Winsock reset.
Now, use the following command to reset the Winsock catalog:
netsh winsock reset

Running the netsh winsock reset command to reset the Winsock Catalog in Windows
You need to restart your computer to complete the reset process.
To restart the computer, use the following PowerShell command:
restart-computer -force
When the PC reboots, your network problem should go away. If you still experience the problem, launch the elevated command prompt (or PowerShell) again, and follow the remaining steps.
If the problem persists, you might need to perform a TCP/IP reset on your PC. Note that this will completely remove the custom TCP/IP configurations from your network adapters. So, if you’re using a manually configured IP address, gateway, and DNS settings, you might want to run the following command:
netsh int ip show config > d:net_config.txt

Saving the current IP configuration for all network adapters to a text file using the netsh command
This command saves all the IP configurations to a text file that you can refer to later on to manually configure the network adapters after reset.
Now use the following command to reset the TCP/IP protocol stack on your PC:
netsh int ip reset

Resetting the TCP IP protocol stack using the netsh command
This command overwrites the following two registry keys:
HKEY_LOCAL_MACHINESYSTEMCurrentControlSetServicesTcpipParameters
HKEY_LOCAL_MACHINESYSTEMCurrentControlSetServicesDHCPParameters
These registry keys are used by the TCP/IP protocol stack; running the netsh int ip reset command is essentially equivalent to removing and reinstalling the TCP/IP stack. By the way, you could save the output of the reset command to a file using the netsh int ip reset > d:ip_reset_log.txt command.
Once this command is finished, you need to restart the computer and then reconfigure the TCP/IP settings for your network adapters. The backup of configuration settings comes in handy here if you don’t remember them. If you use a DHCP server, your PC will automatically obtain the dynamic IP configuration. If it still doesn’t pull the settings, use the ipconfig /renew command.
Conclusion
I hope this guide helps you fix the network or internet connectivity problems that are caused by a corrupt Winsock Catalog or a broken TCP/IP protocol stack.
![]()