Обновлено 06.05.2016
 Достаточно часто в случае поражения вашего компьютера вирусами или другими системными сбоями, могут наблюдаться непонятные проблемы с сетевыми приложениями, начиная с того, что могут просто не отображаться Web-станицы и заканчивая невозможностью подключиться к сети. Поэтому в таких случаях бывает целесообразно выполнить полный сброс параметров протокола TCP/IP в Windows 7 или Windows 2008, в результате можно вернуть все сетевые настройки и состояние библиотеки WinSock в первоначальные «чистые» настройки, т.е. фактически это переустановка TCP/IP. Сбросить настройки TCP/IP можно следующим образом:
Запустите командную строку cmd с правами администратора («Run As Administrator»)
Затем последовательно выполните следующие команды.
ipconfig /flushdns
сброс настроек tcp ip
сброс настроек протокола tcp ip производится старой доброй утилитой netsh. Утилита очень богата функционалом, советую брать ее на вооружение. И так приступаем.
nbtstat -R
nbtstat -RR
netsh int reset all
netsh int ip reset
netsh winsock reset
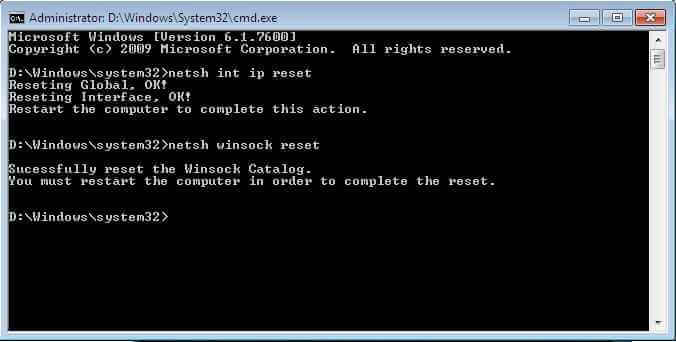
Как сбросить настроеки протокола TCP-IP в Windows 7-Windows Server 2008R2
Затем выполните следующую команду, отключающую TCP автотюнинг
netsh interface tcp set global autotuninglevel=disabled
Перезагрузите компьютер
Для ленивых есть фикс от MS, скачиваете устанавливаете, перезагружаетесь. Скачать тут. Сам фикс из себя представляет msi пакет, который так же делает сброс настроек tcp ip. Весит он буквально копейки, всего 120 кб. Запускаете его, вам покажут что это fix 20140, жмем далее.

Данный fix создаст точку восстановления системы, чтобы в случае какого то глюка вы всегда могли быстро откатиться до момента установки.
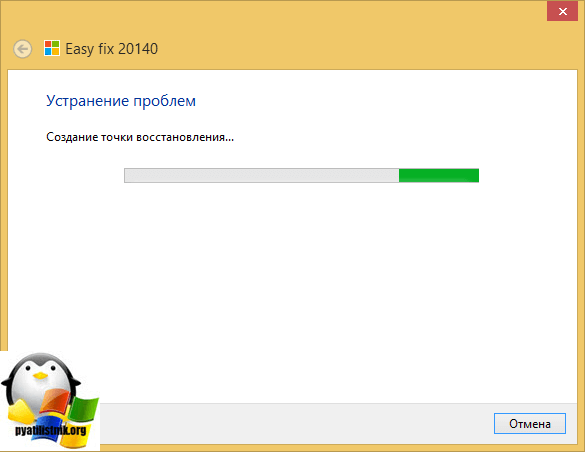
После того как данная утилита отработает, следует произвести перезагрузку системы.

Материал сайта Pyatilistnik.org
Май 6, 2016 10:50
- Remove From My Forums
-
Question
-
Hi Guys,
I have had an ongoing issue with TCP on a particular server for a while now and something is seriously messed up, for some reason when a external client connects using the pptp vpn to the server, it then disconnects the internal clients that are in the same
building from the server and attempting to ping them from the server results in a general failure, while the clients working from home etc on the vpn work fine, somehow there is a route that changes the default gateway of the server to the ip of the VPN connected
client, its almost a bit comedic.Anyhoo, Ive spent enough time on trying to fix it so now id just like to reset tcp/ip completely delete all routes etc and start from scratch, what is the best way to go about this ?
Cheers
Matt clifford
-
Moved by
Thursday, July 14, 2016 9:32 PM
Relocated
-
Moved by
Answers
-
-
Proposed as answer by
Cartman ShenMicrosoft contingent staff
Wednesday, July 20, 2016 7:53 AM -
Marked as answer by
Cartman ShenMicrosoft contingent staff
Monday, August 1, 2016 5:27 AM
-
Proposed as answer by
Are you having Windows network connectivity issues with software such as email clients and web browsers? Sometimes, these issues stem from a corrupt network configuration. The netsh winsock reset command will set important network settings to their defaults, often fixing these network problems!
In this article, you will learn how to reset the Winsock catalog which is a database of network settings, where incorrect configurations and malware affect your network connectivity. Read on to learn practical tips on fixing your network connection and what this cryptic Winsock term is all about!
Prerequisites
This article will be a tutorial. If you plan on following along step-by-step, use any supported version of Windows along with local administrative rights.
What is Winsock?
Based on the Berkeley UNIX Sockets interface, Winsock is an application programming interface (API) that orchestrates different network protocols communication between applications, such as a web browser, and actual network devices.
Included below is a great diagram to demonstrate where exactly the Winsock wsock32.dll library sits in the Windows networking stack.
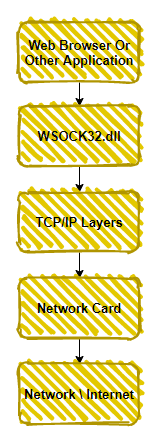
Besides acting as an API, Winsock stores its settings in a database known as the Winsock catalog. In Windows 10 the catalog stores both namespace providers, providing a map between Winsock and a service such as DNS, and base service providers which provides detail on network protocols, such as TCP/IP.
Why “Resetting” Winsock is Necessary
Sometimes the Winsock catalog contains incorrect entries or becomes corrupt. Performing a Winsock reset via the netsh winsock reset in the Windows command prompt will set the Winsock catalog and associated registry settings to their defaults. The relevant registry settings are located in the below path.
HKEY_LOCAL_MACHINESYSTEMCurrentControlSetServicesWinSock2ParametersProtocol_Catalog9Why would you want to perform Winsock reset after all?
- Malware or adware that uses Winsock to get in between the user and the internet.
- A network device is incorrectly installed or removed.
- Registry or file system issues corrupt the Winsock catalog.
A real-life example of Winsock malware is HackTool.Win32.Proxifier.A, from the Trend Micro Threat Encyclopedia. Don’t worry, this won’t download any malware!
Prior to Windows Server 2012 and Windows Vista, incorrect settings and malware often existed as Layered Service Providers (LSP) in the Winsock catalog, as described in further detail later in the article. In recent versions of Windows, LSPs were deprecated with functionality moved into the Windows filtering platform.
Winsock problems do not crop up as often anymore, but they still can! Learn to fix incorrectly installed network devices or corrupted Winsock catalogs by reading on.
How to Reset Winsock with netsh winsock reset
Resetting Winsock is best done through the Windows command-line tool netsh. The netsh command displays and modifies the running computer’s network configuration, along with resetting the Winsock catalog.
When performing any Winsock change, you should first save a before and after snapshot of the changed settings, as shown in the below steps.
- Open a Command Prompt as an administrator.
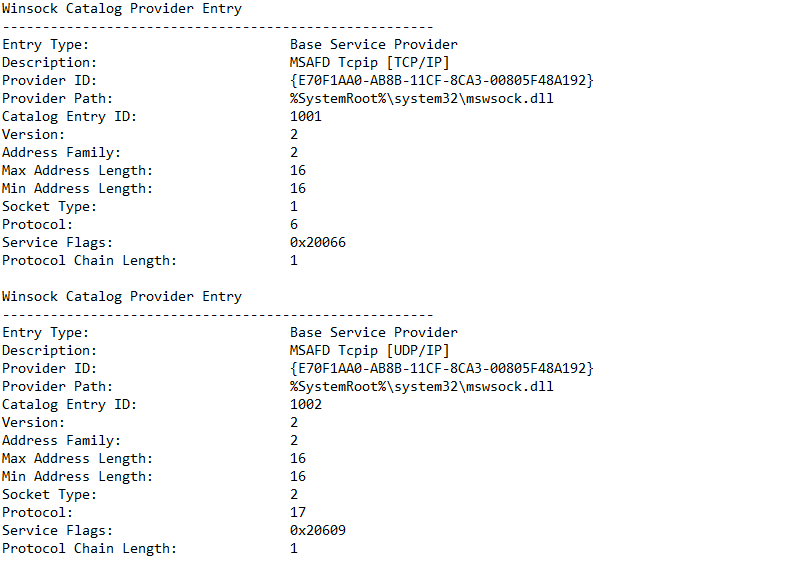
2. Copy and run the command shown below to save the results of the Winsock catalog to the file C:winsock-before.txt prior to resetting the Winsock catalog.
The command below assumes you are in the C: directory, otherwise the file will save to the directory your command prompt is currently in.
netsh winsock show catalog > winsock-before.txtAn example of the saved Winsock catalog is shown below. Yours will look similar to this, reflecting your network devices and entries.
3. Next, reset the Winsock catalog by running the following command.
netsh winsock reset command.Upon performing the reset command, the
Protocol_Catalog9registry entry is saved to:HKEY_LOCAL_MACHINESYSTEMCurrentControlSetServicesWinSock2ParametersProtocol_Catalog_Before_Reset. These entries are binary encoded, so it is much easier to read in plaintext.
4. Now take another snapshot of the Winsock Catalog again to document the changes just made.
netsh winsock show catalog > winsock-after.txt5. Restart the computer to complete the network reset.
Not all network issues can be solved using the netsh winsock reset command, and in those cases, the netsh int ip reset command comes in handy! Read on to learn when and where to use this command.
Reset TCP/IP Settings with netsh int ip reset
The Winsock catalog is not the only set of network settings that can cause problems. As mentioned earlier, malware and incorrect settings often existed as Winsock LSPs, which are not as prevalent anymore due to their deprecation in newer versions of Windows.
More commonly, network issues exist with TCP/IP configurations. If you have any of the following network problems, then read on to learn how to reset your TCP/IP settings.
- DNS lookup issues, provided that DNS is configured correctly.
- DHCP IP address assignment problems, perhaps
ipconfig /renewis not working correctly.
- Limited or no connectivity in your web browser or email client.
In the same local administrator command-prompt, follow the below steps to reset your TCP/IP settings.
- Before resetting your IP settings, run the following command to see a snapshot of your current IP settings. In case the reset fails, it is helpful to have a record of your prior network settings.
2. Run the following command in the command prompt to reset your IP settings.
To save the output of the reset command, redirect the output to a file using a command such as:
netsh int ip reset > log.txt.
When you reset the TCP/IP settings using the netsh int ip reset command, the following registry settings are overwritten.
SYSTEMCurrentControlSetServicesTcpipParameters
 SYSTEMCurrentControlSetServicesDHCPParameters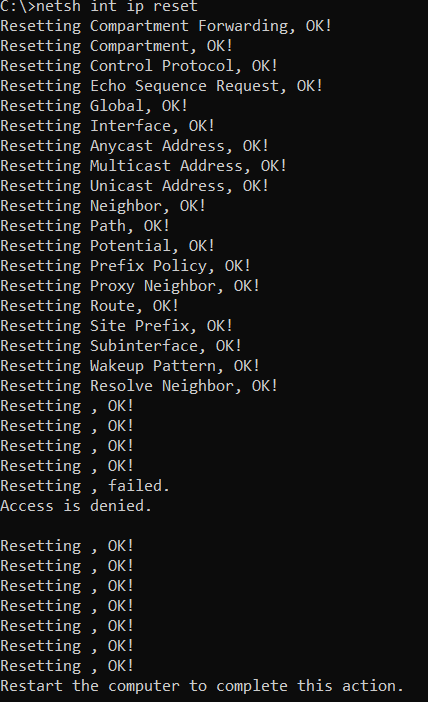
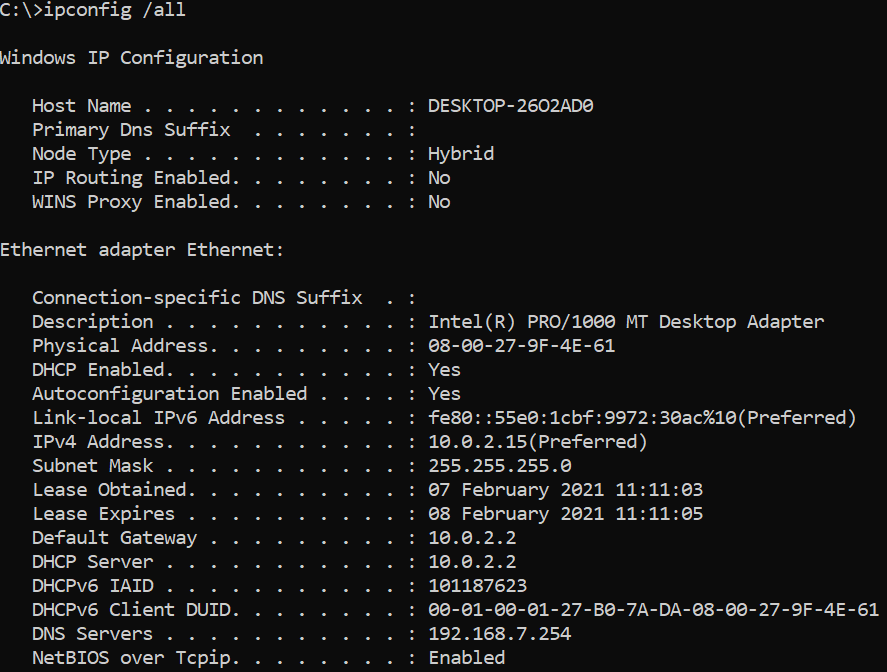
3. Verify your network settings with the ipconfig /all command again, such as IP addresses, default gateways, and DNS settings.
Further Reading & Next Steps
Networking is a complicated topic with many potential issues, but two additional resources that may help are linked below.
- Fix Wi-Fi connection issues in Windows
- Fix network connection issues in Windows 10
Although not all networking issues may be resolved by performing a netsh winsock reset or netsh int ip reset command, both commands provide a great starting point!
If the internet is not working on a Windows PC where everything related to networking is properly configured, the command netsh winsock reset might save your day. Furthermore, this command will also help you fix the Windows Sockets registry entries required for network connectivity are missing error that is shown when you run Windows network diagnostics.
Contents
- Understanding Winsock
- Why a Winsock reset is required
- How to reset the Winsock Catalog
- Conclusion
- Author
- Recent Posts

Surender Kumar has more than twelve years of experience in server and network administration. His fields of interest are Windows Servers, Active Directory, PowerShell, web servers, networking, Linux, virtualization, and penetration testing. He loves writing for his blog.
Latest posts by Surender Kumar (see all)
- Extending LVM space in Ubuntu — Thu, Feb 2 2023
- Backup in Proxmox VE — Thu, Jan 26 2023
- Snapshots in Proxmox VE — Wed, Jan 25 2023
If you already know about the netsh winsock reset command but still wonder what it actually does, this post will help you understand it.

Windows Sockets registry entries required for network connectivity are missing
Understanding Winsock
Winsock (Windows Sockets) is an API that defines how network applications in Windows can access network services, such as TCP/IP. Basically, Windows stores information related to Winsock in a database known as the Winsock Catalog. When this catalog becomes corrupt, you will start seeing weird network or internet connectivity problems. The following registry key holds the information about the Winsock catalog:
HKEY_LOCAL_MACHINESYSTEMCurrentControlSetServicesWinSock2ParametersProtocol_Catalog9
When you run the netsh winsock reset command, the existing Protocol_Catalog9 registry key is saved to Protocol_Catalog_Before_Reset and a new registry key is created with default parameters. The full path to the backup key is:
HKEY_LOCAL_MACHINESYSTEMCurrentControlSetServicesWinSock2ParametersProtocol_Catalog_Before_Reset

Viewing the registry keys related to the Winsock Catalog
Remember that the aforementioned registry keys hold the Winsock parameters in binary format, which is difficult to understand. Later in this guide, I will show you a way to export the Winsock Catalog parameters to a text file that you can easily read and understand.
Why a Winsock reset is required
Before actually resetting the Winsock Catalog, let’s first understand why you would need to do it. The Winsock Catalog could become corrupt for various reasons, such as:
Malware or adware infection—Cleaning up malware from a PC can corrupt the Winsock Catalog.
Incorrect network device installation or removal—When you install (or remove) a network device or VPN software incorrectly, it could lead to a corrupt Winsock Catalog.
Registry cleaning or optimization utility—Sometimes, a registry cleaner or optimization tool can mess up the registry, which in turn could cause the Winsock Catalog to become corrupt.
There may be other reasons in addition to these. No matter how the Winsock Catalog becomes corrupt, you need to reset it to fix the issue.
How to reset the Winsock Catalog
Now that you understand the Winsock Catalog and its importance in Windows, let’s discuss how to reset it. To reset the Winsock:
Launch an elevated command prompt or PowerShell console (run cmd or PowerShell as administrator).
[Optional] If you want to view the Winsock parameters, use the following command (as discussed earlier, the Winsock parameters are stored in the registry in binary format, which is hard to read and understand):
netsh winsock show catalog

Viewing the Winsock Catalog using the netsh command
This command displays all the parameters, and the command output can be overwhelming. So, you might want to store the output in a file using netsh winsock show catalog > d:winsock-before.txt command, as shown in the following screenshot:

Saving the Winsock Catalog parameters to a text file and reading them when needed
This command stores the output in a text file that you can read and even compare later on after the Winsock reset.
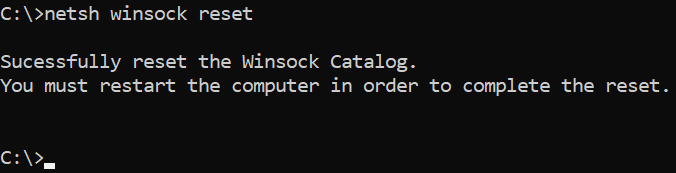
Now, use the following command to reset the Winsock catalog:
netsh winsock reset

Running the netsh winsock reset command to reset the Winsock Catalog in Windows
You need to restart your computer to complete the reset process.
To restart the computer, use the following PowerShell command:
restart-computer -force
When the PC reboots, your network problem should go away. If you still experience the problem, launch the elevated command prompt (or PowerShell) again, and follow the remaining steps.
If the problem persists, you might need to perform a TCP/IP reset on your PC. Note that this will completely remove the custom TCP/IP configurations from your network adapters. So, if you’re using a manually configured IP address, gateway, and DNS settings, you might want to run the following command:
netsh int ip show config > d:net_config.txt

Saving the current IP configuration for all network adapters to a text file using the netsh command
This command saves all the IP configurations to a text file that you can refer to later on to manually configure the network adapters after reset.
Now use the following command to reset the TCP/IP protocol stack on your PC:
netsh int ip reset

Resetting the TCP IP protocol stack using the netsh command
This command overwrites the following two registry keys:
HKEY_LOCAL_MACHINESYSTEMCurrentControlSetServicesTcpipParameters
HKEY_LOCAL_MACHINESYSTEMCurrentControlSetServicesDHCPParameters
These registry keys are used by the TCP/IP protocol stack; running the netsh int ip reset command is essentially equivalent to removing and reinstalling the TCP/IP stack. By the way, you could save the output of the reset command to a file using the netsh int ip reset > d:ip_reset_log.txt command.
Once this command is finished, you need to restart the computer and then reconfigure the TCP/IP settings for your network adapters. The backup of configuration settings comes in handy here if you don’t remember them. If you use a DHCP server, your PC will automatically obtain the dynamic IP configuration. If it still doesn’t pull the settings, use the ipconfig /renew command.
Conclusion
I hope this guide helps you fix the network or internet connectivity problems that are caused by a corrupt Winsock Catalog or a broken TCP/IP protocol stack.
![]()
- Netsh
- Winsock
- Как использовать Netsh?
При поиске решений проблем с сетевыми подключениями в интернете пользователи рано или поздно попадают на сайты, на которых говорится о необходимости сброса настроек TCP/IP при помощи специфических команд — netsh winsock reset. Разберемся, что это вообще такое.
Netsh
В приведенной выше команде winsock является только «вложением» (контекстом) в основную команду — netsh. Netsh — это небольшая системная программа (сетевая оболочка), предназначенная для управления сетевыми параметрами Windows и конфигурирования параметров интерфейсов связи сетевых устройств (сетевых плат/адаптеров).
Назначений у программы Netsh довольно много, но чаще всего она используется именно для сброса рабочих параметров TCP/IP. Кроме того, при помощи этой программы (команды) можно изменять IP-адрес, маску подсети, основной шлюз и DNS-сервер любого существующего сетевого подключения (интерфейса).
Winsock
Как отмечалось выше, winsock — один из многочисленных контекстов (будем называть параметров) основной команды netsh. По сути — это техническая спецификация, определяющая способы взаимодействия всего установленного программного обеспечения с сетевыми сервисами, включая TCP/IP. Если простыми словами, Winsock «указывает» какой-либо сетевой программе (браузеру, например), к какому из доступных сетевых подключений ей обращаться для передачи данных во внешнюю сеть.
Как использовать Netsh?
Не будем изобретать велосипед и в качестве примера приведем команды для сброса настроек TCP/IP и изменения основных сетевых параметров одного из подключений.
Сброс TCP/IP при помощи Netsh. Первым делом нужно запустить командную строку Windows от имени администратора (в противном случае система откажет в доступе к своим настройкам):
- Введите в поисковую строку Windows, что расположена в/около меню «Пуск», фразу «командная строка».
- В результатах поиска кликните правой кнопкой мыши по найденному элементу «Командная строка», затем выберите пункт «Запустить от имени администратора».

Для сброса сетевой конфигурации системы обычно достаточно использовать две команды:
netsh int ip reset
netsh winsock reset
Введите их последовательно (завершая ввод клавишей «Enter») в окно командной строки.
В сети по-прежнему можно найти инструкции по сбросу TCP/IP, в которых первой используется другая команда: netsh int ip reset all. В Windows 10 эта команда не работает. Попробуйте ввести ее, получите ошибку. Очень жаль, потому что в параметре int команды netsh содержатся настройки не только для ip, но и для других сетевых объектов.
Если использование netsh int ip reset оказалось недостаточным для «ремонта» сетевого подключения, всегда можно сбросить и другие параметры int, поочередно вводя:
netsh int httpstunnel reset
netsh int ipv6 reset
netsh int tcp reset
netsh int portproxy reset
Если и это не поможет восстановить работоспособность сетевого подключения, проблему следует искать где-нибудь в другом месте (в драйвере, например).
Смена основных сетевых параметров при помощи Netsh. Конечно, эти параметры легче изменить стандартным способом — через свойства интернет-протокола IPv4 конкретного сетевого подключения. Но все же не будет лишним научиться делать это и через Windows-консоль, ведь стандартный способ может и не сработать, особенно, если компьютер заражен каким-нибудь вирусом-блокировщиком.
Для начала нужно узнать имя сетевого интерфейса, с которым предстоит работать. Для этого используем команду:
netsh int show interface
В нашем случае имеется всего одно единственное подключение, имя которого — Ethernet (это обычное подключение по локальной сети).
Меняем IP-адрес, маску подсети и основной шлюз на требуемом интерфейсе. Для этого используем команду:
netsh int ip set address ethernet static 192.168.0.25 255.255.255.0 192.168.0.1
Здесь:
- Параметр ethernet — имя перенастраиваемого сетевого подключения. Если в имени содержаться пробелы (например, оно названо «Подключение по локальной сети Ethernet»), его необходимо писать в кавычках — » Подключение по локальной сети Ethernet «.
- Параметр static указывает, что устанавливаемые сетевые параметры будут являться статичными. Т.е. процедура по смене IP, маски и шлюза через командную строку равнозначна процедуре смены сетевых параметров стандартным способом.
- Параметр 168.0.25 — новый IP-адрес для нашего подключения.
- Параметр 255.255.0 — новая маска подсети.
- Параметр 168.0.1 — новый основной шлюз.
Возникает вопрос — а где новый DNS-сервер? Этот параметр не является обязательным — он, скорее, добавочный. Т.е. нам предстоит добавить новый элемент в наше сетевое подключение. Делается это следующим образом:
netsh int ip add dnsserver ethernet 8.8.4.4
Здесь, впрочем, все понятно. Указанный нами DNS-сервер — это общедоступный сервер от Google. Вы можете использовать вместо него DNS, выданный вашим интернет-провайдером.
Кстати, если использовать команду повторно с другим адресом DNS-сервера, он запишется в поле «Альтернативный DNS-сервер».
Результат выполнения команды можно посмотреть в свойствах сетевого подключения: