Содержание
- Установка Windows 7 с USB на системы с набором системной логики Intel 100-й и 200-й серии
- Создаем загрузочную флешку с Windows 7
- Патчим установочный диск Windows 7
- Что делать, если Windows 7 при установке требует драйвер
- Решение проблемы с требованием драйвера при установке Windows 7
- Причина 1: Некачественный дистрибутив Windows
- Причина 2: Некорректно работающий носитель
- Причина 3: Проблемный жесткий диск
- Причина 4: Несовместимость железа
- Причина 5: Проблемы с дисководом или USB-разъемом
- Заключение
- Fix Select the driver to be installed when installing Windows
- FIX: Select the driver to be installed during Windows 7 USB Install.
- How to bypass the «Select the driver to be installed» error when you try to install Windows from USB.
- Select the driver to be installed windows 7 что делать
Установка Windows 7 с USB на системы с набором системной логики Intel 100-й и 200-й серии
Те, кто впервые устанавливает операционную систему Windows 7 на платформы с набором системной логики Intel 100/200-й серии при помощи USB-накопителя, столкнутся с невозможностью продолжения установки из-за отсутствия специального драйвера.
Собственно в моем новом корпусе Fractal Design Define Mini C (о котором мы еще поговорим отдельно) вообще отсутствует место для установки DVD-привода (ODD), так что единственный вариант – установка операционной системы с USB флеш-накопителя.
Проблема заключается в том, что ОС Windows 7 использует устаревший набор драйверов, в то время как все системные платы на базе чипсетов 100-й и 200-й серии требуют новый драйвер. Под данное ограничение подпадает огромное количество системных плат на базе логики Intel B150, B250, H110, H170, H270, Z170 и Z270; в частности это все новые конфигурации на базе процессоров Intel Skylake и Kaby Lake (сокет LGA1151, 6 и 7 поколение процессоров).

В конкретно моем случае это материнская плата GA-Z170M-D3H производства Gigabyte и процессор Intel Core i5-6500. И да, можно было взять i5-7400/7500, но ПК собирался в январе 2017-го, в то время как заметку я пишу только сейчас. Так что сейчас не об этом.
В общем, если вы попытаетесь установить Windows 7, получите следующую ошибку:
No device drivers were found. Make sure that installation media contains the correct drivers, and then click OK.
Select the driver to be installed.

В переводе это обозначает: не обнаружены драйвера устройства. Убедитесь что установочное устройство содержит подходящие драйверы и затем нажмите OK. Выберите драйвер для установки.
Что же делать? Ничего сложного нет, проблема решается достаточно просто, правда вам потребуется:
Также для дальнейшей работы необходимо скачать 2 дополнительные утилиты, обо всем по порядку.
Создаем загрузочную флешку с Windows 7
Просто скопировать файлы дистрибутива Windows на флешку нельзя, поскольку дополнительно необходимо создать загрузочные записи.
Для создания загрузочной установочной флешки с Windows 7, лично я предпочитаю использовать фирменную утилиту от Microsoft под названием «Windows USB/DVD Download Tool». Скачать её можно абсолютно бесплатно с ресурсов Microsoft по ссылке чуть выше.

Шаг 1. Запускаем Windows USB/DVD Download Tool и следуем подсказкам мастера. На первом этапе (Shoose ISO file) следует выбрать исходный ISO-файл (образ) с дистрибутивом Windows 7. Какой образ и какую версию использовать – решать вам, это может быть как образ оригинального имеющегося у вас DVD-диска, либо официальный MSDN-образ. Лично я предпочитаю использовать официальный образ, без стороннего вмешательства «умельцев». Главное, чтобы версия Windows 7 совпадала с имеющейся у вас лицензией, в противном случае вы не сможете выполнить активацию ОС имеющимся ключом.
Напротив Source file нажимаем Browse и указываем дистрибутив, в конкретном примере это ru_windows_7_professional_with_sp1_x64_dvd_u_677024.iso, после чего нажимаем Next (далее).

Шаг 2. На втором этапе (Choose media type) следует выбрать тип конечного носителя, на который будет записан дистрибутив. Доступно всего 2 варианта – USB device и DVD. Как несложно догадаться, нам нужен первый вариант, нажимаем USB device.

Шаг 3. В появившемся новом окне (Insert USB device) необходимо в выпадающем списке необходимо выбрать конечный накопитель, после чего нажать Begin copying (начать копирование).

Шаг 4. Процесс копирования файлов (Copying files) и создания загрузочного USB-устройства (Creating bootable USB device) занимает некоторое время, наберитесь терпения и дождитесь завершения процесса. Скорость зависит от характеристик флешки, чем быстрее флешка – тем быстрее процесс создания. Иногда может показаться, что процесс завис, не спешите отменять задание, просто подождите пару минут.

Статус Bootable USB Device created successfully говорит о том, что диск успешно создан, нажимаем Start over либо закрываем окно и переходим к следующему этапу.
Патчим установочный диск Windows 7
После того как успешно создан загрузочный установочный диск, его необходимо пропатчить, а точнее, добавить в него необходимые драйверы. Просто скопировать файлы нельзя, поэтому используем софт под названием Windows USB Installation Tool.
Утилита Windows USB Installation Tool едина для всех материнских плат на системной логике 100-й и 200-й серии, так что подойдет не только для материнских плат от Gigabyte.
Скачать Windows USB Installation Tool можно на сайте Gigabyte в разделе загрузок (Support – Downloads – Utility) для любой платы на базе чипсетов 100/200 серии. Есть аналогичные утилиты и у ASRock, и у MSI. Оболочки разные, но суть одинаковая – добавить драйвер в образ.
Ниже прямые ссылки на загрузку утилиты:
На момент написания, актуальна версия B16.1102.1, если ссылки не работают – ищите утилиту на официальном сайте.
После скачивания необходимо разархивировать файл, ничего устанавливать не требуется, просто запустите WindowsImageTool.exe

Далее в выпадающем списке Destination Path (USB Drive) выбираем свой накопитель.
После выбора накопителя, следует установить одну или несколько опций, всего их три.
Если вы устанавливаете Windows 7 на обычные SSD/HDD, достаточно выбрать только первую опцию. Если же выбрать все опции, установки займет продолжительное время, но при помощи данной флешки можно будет установить ОС на любую систему.

Нажимаем Start и дожидаемся завершения процесса. На этом собственно всё, теперь можно загружаться с флешки и приступать к установке операционной системы.

Для последующей более удобной и быстрой установки обновлений, уже после установки ОС, можно воспользоваться пакетом UpdatePack7R2.
Источник
Что делать, если Windows 7 при установке требует драйвер

Нередко при установке чистой Windows 7 пользователи сталкиваются с отсутствием драйвера носителя. Без выполнения этого требования процесс инсталляции продолжить невозможно. Это может быть связано с определенными ошибками или реальной необходимостью установки программного обеспечения. В этой статье мы рассмотрим способы решения возникшего вопроса.
Решение проблемы с требованием драйвера при установке Windows 7
Рассматриваемая ситуация очень нестандартная и возможные ее источники могут быть программными и аппаратными. Разберем основные неисправности и методы их устранения. Сразу же следует отметить, что обычно виноваты «кривые» сборки операционной системы, а в редких случаях проявившееся уведомление может свидетельствовать о неочевидных проблемах вроде неправильно работающей оперативной памяти, повреждающей файлы при копировании.

Причина 1: Некачественный дистрибутив Windows
Пользовательские сборки Windows, которые можно найти на любом торрент-трекере, часто имеют массу недочетов и ошибок ввиду непрофессиональности их авторов. Старые сборки также могут быть несовместимы с новым оборудованием от NVIDIA, поэтому наиболее простое решение — выбрать другой дистрибутив ОС.
Иногда же драйверы носителей умышленно удаляются из образа системы. При появлении сообщения об отсутствии драйвера просто подключите носитель с заводскими драйверами компьютера. Собственно, именно об этом и написано в тексте самого уведомления. Поскольку инсталляционный процесс будет находиться в оперативной памяти, вы можете без труда доставать диск/флешку с Windows, устанавливать программное обеспечение через кнопку «Обзор» с другого CD/USB, а затем повторно вставлять носитель с дистрибутивом ОС.
Если же проблема так не решилась, попробуйте следующие варианты.
Причина 2: Некорректно работающий носитель
Не исключено, что один из этих пунктов отрицательно повлиял на установку:

Аналогичный симптом может проявляться при подключении поврежденной флешки. Попробуйте устранить битые сектора, а если это не помогло, подключить другой USB-накопитель.
В дополнение ко всему можем посоветовать выбрать программу для записи образа системы отличную от той, что вы использовали в первый раз.
Причина 3: Проблемный жесткий диск
Из-за HDD вы также можете столкнуться с просьбой установки драйверов. Вариантов что делать, как минимум, 3:


Причина 4: Несовместимость железа
Реже описанные симптомы проявляются из-за комбинирования старых и новых комплектующих. Подобная картина возникает при использовании комплектующих от различных производителей, к примеру, AMD и NVIDIA. Единственное решение – грамотный подбор совместимого железа.
Причина 5: Проблемы с дисководом или USB-разъемом
Здесь есть сразу несколько моментов, которые могут стать точкой преткновения в попытках выполнить инсталляцию Виндовс 7. Пойдем от простого к сложному:
Подключение USB через интерфейс 2.0 вместо 3.0
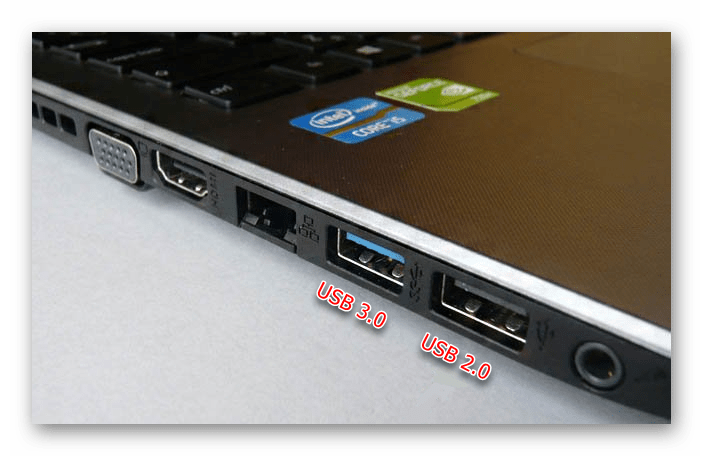
Если в вашем ПК или ноутбуке есть USB 3.0, через который происходит установка операционной системы, возможно, именно такое подключение и вызывает сообщение, препятствующее дальнейшему проведению процедуры. В этом случае установщик действительно просит драйвер, который по умолчанию в нем отсутствует. Переподключение флешку к порту 2.0 и решает возникшую трудность. Различить их просто — у 3.0 цвет разъема наполовину синий.
Скачивание драйвера для USB 3.0 на флешку с образом Windows 7
При отсутствии 2.0 разъема вам понадобится скачать драйвер для USB 3.0 с сайта производителя материнской платы либо ноутбука. Сделать это можно по инструкции для скачивания SATA-драйвера, расписанной выше, в «Причине 3». Разница заключается в том, что нужно скачать не «SATA», а «Chipset».

В крайнем случае драйвер для чипсета можно поискать на сайте Intel или AMD, в зависимости от установленного на вашу плату комплектующего.
Поломка компонента ПК
Самое неприятное – полный или частичный выход из строя CD/DVD-привода или же USB-интерфейса. Спасти ситуацию можно только путем замены неисправных устройств.
Заключение
Итак, мы рассмотрели все возможные способы устранения проблем с драйверами при инсталляции ОС. Чаще всего юзеры имеют дело с недоброкачественными дистрибутивами Windows. Именно поэтому рекомендуется первым делом воспользоваться другой версией операционной системы, а уж потом приступать к проверке аппаратуры.
Помимо этой статьи, на сайте еще 12387 инструкций.
Добавьте сайт Lumpics.ru в закладки (CTRL+D) и мы точно еще пригодимся вам.
Отблагодарите автора, поделитесь статьей в социальных сетях.
Источник
Fix Select the driver to be installed when installing Windows
After I replaced the hard drive of my laptop with a faster Solid State Drive two days ago, I had to install an operating system on the device as the disk was empty.
I picked Windows 7 at first, downloaded the ISO image from Technet, used Microsoft’s Windows 7 USB/DVD Download Tool to copy it to an 8 Gigabyte USB Flash Drive and started the installation afterwards by simply plugging the drive into one of the computer’s USB ports.
Everything went fine for a while, but eventually I would run into a driver issue. Windows was telling me that a driver was missing, and that it could not find the driver on its own.
What made this particularly interesting was that there was no indication of what kind of driver the operating system was expecting.
Well, that is not entirely correct, as it told me that a CD/DVD device driver was missing. Since the laptop did not ship with an optical drive, it did not made a whole lot of sense though.

The issue was quite puzzling at first, and I went to Lenovo’s website to download drivers and updates for the device as I hoped that they would contain the necessary drivers to fix the issue.
The page listed lots of drivers, and before I started to copy them all to the Flash drive, I decided to investigate another possible solution.
Then I remembered that the Thinkpad E145 had two USB 3.0 and one USB 2.0 port. The Flash drive was plugged in one of the USB 3.0 ports, and maybe Windows was having issues because of it.
I connected the Flash drive to the USB 2.0 port on the device instead and ran the installation again. The drive was formatted again, data was copied, and the «Select the driver to be installed» message did not appear at all.
Could it really have been that simple?
Grabbing USB 3.0 drivers for the PC from the Lenovo website should fix the issue as well, as Windows 7 apparently ships without USB 3.0 driver support.
So, if you want to install Windows 7 on a device without USB 2.0 port, you need to pick up the drivers from the manufacturer of the device to continue with the installation.
There are other solutions that users have posted over the years, for instance to add USB 3.0 drivers to the installation files, which can be useful if you use the copy to install Windows 7 regularly on other devices.
What about Windows 8?
I decided to test Windows 8 to see if it would throw the error as well. Did download Windows 8.1 Pro from Technet, used the same Windows 7 USB/DVD Download Tool to copy it to the Flash drive to install it on the laptop.
Turns out that Windows 8 has the exact same issue that Windows 7 has. The operating system displayed the select the driver to be installed notification during installation from an USB 3.0 port, while the setup ran through without issues when the drive was connected to an USB 2.0 port.
You can alternatively load the USB driver by downloading it from the manufacturer’s website so that Windows can load it.
Источник
FIX: Select the driver to be installed during Windows 7 USB Install.
The following error may occurred while trying to install Windows OS from a USB installation disk: «Select the driver to be installed. Load Driver. A required CD/DVD drive device is missing. II f you have a driver floppy disk, CD, DVD, or USB flash drive, please insert it now. Note: If the Windows installation media is in the CD/DVD drive, you can safely remove it for this step«.

The «Select the driver to installed» setup error message, is occurred during Windows 7 installation through a USB flash drive, by using a USB 3.0 port. This problem is caused because the Windows installer media doesn’t have a USB 3.0 driver to install Windows through the USB 3.0 port.
How to bypass the «Select the driver to be installed» error when you try to install Windows from USB.
In order to resolve the «Select the driver to be installed» USB Windows installation error:
Method 1. Remove and Reinsert the USB media.
1. When the «Select the driver to be installed» error, appears click Cancel. (This will bring you back to the first setup screen)
2. Remove and re-insert the USB installation media.
3. Now try to install Windows.
Method 2. install Windows from USB 2.0 Port or from DVD.
1. Shut down the computer.
2. Plug your USB flash drive that contains the Windows setup files to a USB 2.0 port on the computer and start the installation again. *
* Note: If your computer doesn’t have a USB 2.0 port then disable the USB 3.0 support in BIOS settings (if supported), or install Windows from a DVD media.
Method 3. Add USB 3.0 drivers to your Windows USB Media by using Gigabyte’s Windows USB Installation Tool.
The second method to resolve the «Select the driver to be installed» error, is to add USB 3.0 support (drivers) to your Windows 7 installation media.*
* Note: The process requires to have access to another working computer with Windows 8.1 or Windows 10 OS. Use this method if your computer doesn’t have USB 2.0 ports or if you cannot install Windows by using a Windows DVD media.
Step 1. Create a Windows USB Installation Media.
Create a Windows USB installation media by using Microsoft’s USB Creator Tool or by using the Rufus Creator utility.
Related Articles.
Step 2. Download the Windows USB Installation Tool.
1. Navigate to Gigabyte’s Support Site.
2. At the search box type «Windows USB Installation Tool» (without quotes).

3. Download the corresponding ‘Windows USB Installation Tool’ according to your motherboard series.
4. Unzip the downloaded file and then continue to next step.
Step 3. Add USB 3.0/3.1 Driver Support to Windows 7 USB.
1. Plug the Windows USB Installation Media on the computer.
2. From the extracted folder, double click to run the «WindowsImageTool.exe» application.
3. Now perform the following:

4. Eject the USB drive and use it to install Windows.
Method 4. Add USB 3.0 Support to Windows 7 by using Intel’s Windows 7* USB 3.0 Creator Utility. *
* Note: This method is no longer working because Intel has removed the ‘USB Creator utility’ from its website.

5. Click Browse <…>and select the USB drive letter (that contains the Windows installation files).

6. Finally press the Create Image button and wait until the process is completed.

7. Unplug the USB disk and use it to install Windows.
That’s all folks! Did it work for you?
Please leave a comment in the comment section below or even better: like and share this blog post in the social networks to help spread the word about this.
Источник
Select the driver to be installed windows 7 что делать
Сообщения: 2
Благодарности:
В моем случае оба способа из шапки и советы (в теме далее) тоже не помогли.
1. USB3.0 на нетбуке не было, только USB2.0/USB1.0
2. Переключения в BIOS’е с AHCI-mode на IDE-mode и обратно не помогали.
3. Сборка проверенная.
Сообщение так и не пропадало.
В случае с записью сохранённого ранее готового ISO-образа грешил на его повреждение, т.к. контрольные суммы после многих переносов с компа на комп и с винта на винт не сохранились.
Пересоздание образа с болванки с последующей переносом его на флешку тоже не помогало. Сообщение так и не исчезало. Думал, что уже и болванка повреждена.
Получилось как в старом анекдоте:
— Можно ли изнасиловать женщину днём на главной площади.
— Нет. Советами замучают.
Скажу так: если взялись делать что-то по совету человека, то НЕУКОСНИТЕЛЬНО следуйте ЕГО инструкциям и не отвлекайтесь на советы других «умников». И если в итоге не выйдет, то можно будет сказать, что ЕГО способ не работает, и пробовать другой способ.
А в моём случае, проблема оказалась в том, что при создании загрузочной флешки и записи ISO-образа на неё в Ultra ISO выбирался метод записи: USB-HDD+ (или потом USB-HDD+ v2) и ставилась галочка в пункте [v] Create Boot Partition.
При этом, в результате флешка разбивалась на две партиции, одна из которых была скрытой.
Инсталляция Windows 7 с флешки стартовала, но в процессе появлялось сообщение (которое и привело всех в эту тему) и на этом всё и стопорилось.
Последующие «танцы с бубном» (описывать которые нет смысла), только множили проблемы (а всё из-за неверного первого шага).
В конечном итоге:
Было выполнено форматирование USB-флешки в программе SDFormatter с удалением всех скрытых разделов.
При записи образа жесткого диска в Ultra ISO был выбран метод записи: USB-HDD и поставлена галочка в пункте [v] Create Boot Partition.
В результате, на флешке был создан один общий нескрытый раздел (размером на всю флешку), куда и была записана инсталляция Windows 7.
При желании туда же можно было бы записать и прочее (драйверы, инсталляции программ и т.п.), но решено было ничего лишнего не дописывать, дабы не множить неопределённости.
Записанная таким образом флешка нормально стартовала, и в процессе установки Win7 сообщение о необходимости драйверов для CD/DVD больше не появлялось. Инсталляция прошла успешно.
Потому, могу только ещё раз посоветовать быть внимательным и неукоснительно следовать одной выбранной методике. И либо всё получится, либо эта методика неверна в данном конкретном случае.
Источник
The following error may occurred while trying to install Windows OS from a USB installation disk: «Select the driver to be installed. Load Driver. A required CD/DVD drive device is missing. II f you have a driver floppy disk, CD, DVD, or USB flash drive, please insert it now. Note: If the Windows installation media is in the CD/DVD drive, you can safely remove it for this step«.
The «Select the driver to installed» setup error message, is occurred during Windows 7 installation through a USB flash drive, by using a USB 3.0 port. This problem is caused because the Windows installer media doesn’t have a USB 3.0 driver to install Windows through the USB 3.0 port.
How to bypass the «Select the driver to be installed» error when you try to install Windows from USB.
In order to resolve the «Select the driver to be installed» USB Windows installation error:
Method 1. Remove and Reinsert the USB media.
1. When the «Select the driver to be installed» error, appears click Cancel. (This will bring you back to the first setup screen)
2. Remove and re-insert the USB installation media.
3. Now try to install Windows.
Method 2. install Windows from USB 2.0 Port or from DVD.
1. Shut down the computer.
2. Plug your USB flash drive that contains the Windows setup files to a USB 2.0 port on the computer and start the installation again. *
* Note: If your computer doesn’t have a USB 2.0 port then disable the USB 3.0 support in BIOS settings (if supported), or install Windows from a DVD media.
Method 3. Add USB 3.0 drivers to your Windows USB Media by using Gigabyte’s Windows USB Installation Tool.
The second method to resolve the «Select the driver to be installed» error, is to add USB 3.0 support (drivers) to your Windows 7 installation media.*
* Note: The process requires to have access to another working computer with Windows 8.1 or Windows 10 OS. Use this method if your computer doesn’t have USB 2.0 ports or if you cannot install Windows by using a Windows DVD media.
Step 1. Create a Windows USB Installation Media.
Create a Windows USB installation media by using Microsoft’s USB Creator Tool or by using the Rufus Creator utility.
Related Articles.
- How to create a Windows 10 USB installation media using Media Creation Tool.
- How to Create Windows 10 USB Installation Using RUFUS Creator Utility.
Step 2. Download the Windows USB Installation Tool.
1. Navigate to Gigabyte’s Support Site.
2. At the search box type «Windows USB Installation Tool» (without quotes).
3. Download the corresponding ‘Windows USB Installation Tool’ according to your motherboard series.
4. Unzip the downloaded file and then continue to next step.
Step 3. Add USB 3.0/3.1 Driver Support to Windows 7 USB.
1. Plug the Windows USB Installation Media on the computer.
2. From the extracted folder, double click to run the «WindowsImageTool.exe» application.
3. Now perform the following:
-
- Select None-Add USB drivers in Source Path.
- Choose the Windows 7 USB installation disk in the Destination Path.
- Finally click Start.
- When the process is completed click Close.
4. Eject the USB drive and use it to install Windows.
Method 4. Add USB 3.0 Support to Windows 7 by using Intel’s Windows 7* USB 3.0 Creator Utility. *
* Note: This method is no longer working because Intel has removed the ‘USB Creator utility’ from its website.
1. Download Intel’s Windows 7* USB 3.0 Creator Utility.
2. Extract the «Win7-USB3.0-Creator-V3.zip» file.
3. Plug the USB flash drive that contains the Windows installation files on the computer.
4. From the extracted «Win7-USB3.0-Creator-V3» folder, right-click at the «Installer_Creator.exe» and select Run as administrator.
5. Click Browse {…} and select the USB drive letter (that contains the Windows installation files).
6. Finally press the Create Image button and wait until the process is completed.
7. Unplug the USB disk and use it to install Windows.
That’s all folks! Did it work for you?
Please leave a comment in the comment section below or even better: like and share this blog post in the social networks to help spread the word about this.
If this article was useful for you, please consider supporting us by making a donation. Even $1 can a make a huge difference for us.

Download PC Repair Tool to quickly find & fix Windows errors automatically
We install windows 11/10 on our PCs when we buy a new one or upgrading an old one. Some users are facing Select the driver to be installed during Windows installation error while they are trying to install Windows on their PC. In this guide, we have a few solutions that fix the issue and let you continue with the installation of Windows.
Generally, the drivers required for our PC are bundled together with the Windows. They get installed automatically along with the Windows. There are some instances where they don’t get detected for installation and we see the error to select the driver for installation. The possible causes for the error are:
- Faulty or corrupted ISO media
- USB port malfunction
- Installation media using SATA instead of IDE
Let’s fix the issue and install Windows and its drivers normally.

When the drivers fail to get installed during installation, the issue can be fixed in the following ways.
- Change USB Port
- Change Settings in BIOS
- Format USB drive to FAT32
- Re-download the ISO
Let’s get into the details of each fix and resolve the issue.
1] Change USB Port
The port you used to connect USB to install windows might be a faulty one. The connection might be unstable due to that which makes it hard to detect the required files. Change the port and plug the USB into a different port and try installing the issue. If the issue had occurred due to faulty port, it would have been fixed by now.
2] Format USB drive to FAT32
Sometimes the NTFS file system might not be supported by your PC. The error might have occurred due to this. Format your USB drive to FAT32 and create a bootable USB using the Media Creation tool or Rufus tool.
3] Change Settings in BIOS
Sometimes a wrong setting in BIOS might be the cause of this issue. When the machine uses Integrated Drive Electronics (IDE) and the installation media boots with Serial Advanced Technology Attachment (SATA), this error might occur. Boot into BIOS and change the storage configuration from SATA to IDE and try installing the Windows.
4] Re-download the ISO
Missing files in the ISO or corrupted files may result in this issue. You have to re-download the ISO from Microsoft and create a bootable disc or USB with that file. Then try reinstalling the Windows.
These are the ways using which you can fix select the driver to be installed during Windows installation error.
How do I install a driver while installing Windows?
The drivers required for your PC are installed automatically along with the Windows. You don’t have to do anything unless you face any issue with the installation of drivers. You can manually update the drivers if you face any issues after the installation.
How do I fix drivers for Windows 10 installation?
If you are facing issues installing drivers during the Windows installation, you can fix them easily by changing the USB port, changing BIOS settings, re-download ISO.
Related Read: Windows install is stuck during Installation – Different scenarios

Guru Mandadi is a tech enthusiast and a movie buff who loves writing about computers and movies. He dreams of living a month devoid of all tech and modern-day advancements in a forest.

Windows 7 installation Error — Select the driver to be installed
Error —A required CD/DVD drive device driver is missing. If you have a driver floppy disk, CD, DVD, or USB flash drive, please insert it now.
Note: If the Windows installation media is in the CD/DVD drive, you can safely remove it for this step.
To Fix this error:
To install Windows 7 you need 3 softwares:
1- Windows 7 ISO image
Download link- download windows 7 iso image
2- Rufus bootable software
Download link- rufus-create-bootable-usb.html
3- Intel USB 3.0 Driver
Download link- Intel® USB 3.0 eXtensible Host Controller Driver
Step 1 — Make a Windows 7 bootable USB drive
Step 2 — Download Intel USB 3.0 driver.
Download link — Intel® USB 3.0 eXtensible Host Controller Driver
Step 3 — Extract «Intel USB 3.0 eXtensible host controller » folder
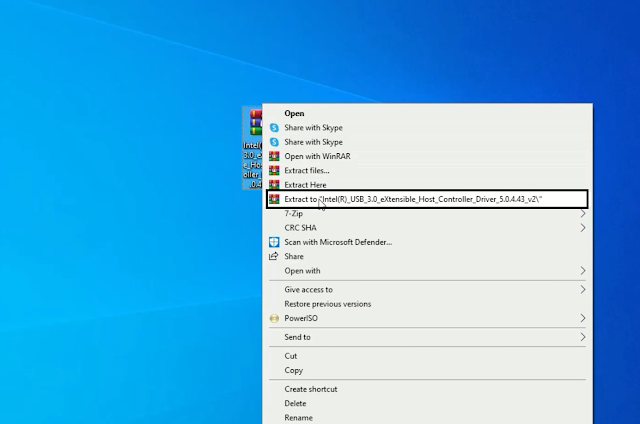
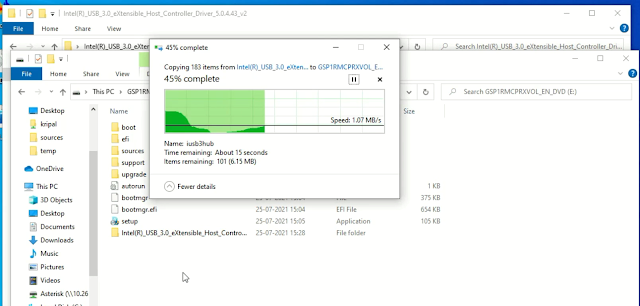
Step 4 — Then copy-past Intel USB 3.0 folder in your Bootable USB drive.
Please checkout below mention video for more detail:

- Remove From My Forums
-
Question
-
Hi,
I insert windows 7 Dvd on dvd drive.but i have the below message when i want install windows 7. i don’t use any usb.
A required CD/DVD device driver is missing, usb installation
Asus X550L
what i do?
-
Edited by
Arash_89
Monday, October 13, 2014 7:42 PM
-
Edited by
Answers
-
-
Marked as answer by
Arash_89
Tuesday, October 14, 2014 11:24 AM
-
Marked as answer by
All replies
-
Kindly have a look at the following links:
http://answers.microsoft.com/en-us/windows/forum/windows_7-hardware/a-required-cddvd-device-driver-is-missing-usb/61eda679-66cc-4512-b175-d02871394461
http://answers.microsoft.com/en-us/windows/forum/windows_7-windows_install/windows-7-pro-64-bit-installation-issues-cddvd/2e20cefb-8add-473d-bd95-e11c8730d352
Balaji Kundalam
-
-
Marked as answer by
Arash_89
Tuesday, October 14, 2014 11:24 AM
-
Marked as answer by
-
#1
So I just got a new laptop Dell L501X, it came with Dell Home Premium and some bloatware so I decided to do a fresh install of Windows 7 Ultimate…
My problem is I am stuck in the «Collecting information» state of installing windows on the screen where it asks for me to «Select driver to be installed» and gives a warning message that «A required CD/DVD drive device driver is missing. If you have a driver floppy disk, CD, DVD, or USB flash drive, please insert it now.»
Steps I have tried so far..
Installing tons of different versions of windows. Home premium, Ultimate, XP Pro. I extracted all of the dell drivers and put them on a cd, nothing gets me passed this screen. I took out one ram incase it was a problem with having 6gb.. Nothing has got me passed this screen.
Any ideas?
Thanks.
Advertisements
-
#2
I’ll assume that you’re booting with the DVD drive set as the «First Boot Device» in the notebook’s BIOS? I’ll also assume that you’re putting in the install DVD and rebooting to start the install?
Don’t try to do an «upgrade» install over the existing Home Premium.
Wipe the hard drive clean and delete the partitions then create the partition sizes you desire and go from there.
I hope this helps. Let us know what else is going on and exactly how you’re doing this install.
Many Thanks,
~Nibs
P.S.
Welcome to the Windows 7 Forums website — stevo9er!! :ciao:
-
#3
Thanks for the quick reply.
I am using a usb drive to attempt the installs, my boot order is USB/CD/HDD/Removable.
I used gparted to delete -> format to ntfs, my drive before starting installation.
When I go to load drivers in the window I am stuck in it posts a message «No new devices could be found. Make sure the driver files are correct and located on the driver installation media.»

yodap
No longer shovelling
-
#4
Hey stevo9er, welcome!
I guess it’s possible to install from a thumb drive. I’ve not tried it.
If you formatted to NTFS you have created a partition. Try deleting the partition with G-parted and see if you can install. Let windows format the drive for you. Worth a try.
-
#5
Tried it with just leaving all the space unallocated unformatted, no dice. Thanks for the reply nonetheless.
-
#6
Did you use the Microsoft Windows 7 USB/DVD Download Tool to install the Windows 7 Install DVD ISO to the thumb flash drive?
I have used it and it works flawlessly.
Here’s info from the Microsoft Store:
Installation
To install the Windows 7 USB/DVD Download tool:
- Click to open the Windows 7 USB/DVD Download tool installation file.
- When you are prompted to either save the file to disk or run it, choose Run if you’re using IE8 or Save if you’re using another browser.
- Follow the steps in the setup dialogs. You’ll have the option to specify where to install the Windows 7 USB/DVD Download Tool.
Note: You need to be an administrator on the computer you are installing the Windows 7 USB/DVD Download tool on. The tool requires the Microsoft .NET Framework version 2.0 or higher.
System Requirements
- Windows XP SP2, Windows Vista, or Windows 7 (32-bit or 64-bit)
- Pentium 233-megahertz (MHz) processor or faster (300 MHz is recommended)
- 50MB of free space on your hard drive
- DVD-R drive or 4GB removable USB flash drive
Using the Windows 7 USB/DVD Download Tool
Before you run the Windows 7 USB/DVD Download Tool, make sure you have already purchased the Windows 7 ISO download from Microsoft Store and have downloaded the Windows 7 ISO file to your hard drive. If you have purchased Windows 7 but have not yet downloaded the ISO file, you can download the file from your Microsoft Store Account.
To make a copy of your Windows 7 ISO file:
- Click the Windows Start button, and click Windows 7 USB/DVD Download Tool in the All Programs list to open the Windows 7 USB/DVD Download Tool.
- In the Source File box, type the name and path of your Windows 7 ISO file, or click Browse and select the file from the Open dialog box. Click Next.
- Select USB Device to create a copy on a USB flash drive or select DVD disk to create a copy on a DVD disk.
- If you are copying the file to a USB flash drive, select your USB device in the drop-down list and click Begin copying. If you are copying the file up to a DVD, click Begin burning.
When your Windows 7 ISO file is copied onto your chosen media, install Windows 7 by moving to the root folder of your DVD or USB flash drive, and then double-click Setup.exe.
Frequently Asked Questions
The following are frequently asked questions about using the Windows 7 USB/DVD Download Tool:
Where can I download .NET Framework 2.0?
The .NET framework can be downloaded here.
What size USB flash drive is required?
You need a USB flash drive with a minimum of 4 GB of free space.
Advertisements
-
#7
Yeah I have tried using Windows 7 USB DVD Download Tool, unetbootin, and diskpart. All produce this same situation where its asking for drivers before the installation starts but none of my drivers work.

-
#8
I’m guessing there is no detail to even tell what the device is. Isn’t there an option like skip/cancel/abort? If you can simply bypass that driver it may be much easier to tell what is missing once the install completes and you can look under device manager.
-
#9
Nah there is absolutely no way around it. From what I have read most people assume it is either a SATA driver or there is some sort of hardware problem. The SATA driver doesn’t load in this window and my HDD and Memory checks all pass.. I have never been this lost with a computer problem before.
-
#10
Well it isn’t my hardware… I successfully got Fedora installed. It must just be these a driver I need, and when I chatted with Dell their solution was to link me to the ftp with all the drivers I already had in exe format.
-
#11
You are installing linux on the same laptop? Everything I’ve read says you must install Windows first.
Also it’s a Dell so does it have a hidden partition for restore — another user had trouble with his install until he made that partition visible. And it cannot handle more than 4 partitions in total on a HD.
Also is the drive formatted NTFS? And are you letting windows use it’s boot manager, as others can give it fits.
Last edited: Jan 5, 2011
Advertisements
-
#12
I only installed linux to see if I could successfully install something on the laptop. My ultimate goal is to get windows 7 on this thing. Between each install attempt I am running gparted and reformatting the drive. So when I tried Fedora I ran gparted and formatted it to ext4, then for windows I reformatted it back to ntfs.
-
#13
I wanted to update this thread in case someone else has a similar problem. I finally was able to get a dvd burned of dell windows home premium (I am in rural Thailand, took awhile!). And alas the DVD worked, while only Fedora was able to be installed from USB (I tried every windows install xp to windows 7 ultimate 32/64 bit, and Ubuntu also).
I believe the problem is that the Dell L501X has two 3.0 USB drives and no 2.0 drives, and they do not play nice without the Dell Reneas drivers. Even after I installed windows 7 from the DVD they would not work until the dell driver was installed.
Thanks for the time spent trying to help me! Peace!

Core
all ball, no chain
-
#14
Thank you for letting us know what worked, and marking the thread solved!
-
#15
USB 3.0 was the issue
I can confirm, having the exact same error, that my issue was also USB3.0 port.
I moved the usb stick over to a USB 2.0 port and it worked without even restarting the laptop.
-
#16
FIXED! — Ok, so I have read in multiple places that this issue (installing Windows 7 via a USB/THUMB DRIVE) is due to missing drivers or possibly an incompatible usb port of 2.0 or 3.0. I tried selecting browser and clicking on the thumb drive that has all the appropriate drivers multiple times with the thumb drive in each of the 4 ports on this laptop (note: i dont know if they are 2.0 or 3.0). I clicked the «X» in the top right hand corner of the box to X out the window with the thumb drive in the last possible usb port on the laptop, i then clicked the install button to continue like normal and it didn’t show the «Select the driver to be installed» window and continued as it should.
IN SHORT:
Try another usb port, close the window «Select the driver to be installed» and click the install button again — repeat until you’ve tried all usb ports, if this doesn’t work, i’m sorry and good luck!
Advertisements
-
#17
What happens if you already have the installation disc and don’t have to download the files, would I HAVE to download it?
-
#18
The W7 ISO includes hundreds of drivers, so it can find most of the drivers it needs already, but there is some newer technology that did not exist or was not formalized when W7 was released. Even most of those drivers can be gotten once the computer gets online. The problem is the few missing drivers needed to get things going in order to even get online. Most commonly these are RAID and/or SSD drivers to access the hard drive and some newer Lan or wi-fi drivers; these drivers you would need to supply yourself if it requests them. USB 3.0 did not exist when W7 came out so, to install from USB, it’s best to use a 2.0 port but I believe a 3.0 port should function as 2.0; if it doesn’t and you only have 3.0 then you probably need to supply 3.0 drivers as well.
If the installation doesn’t request drivers then it doesn’t think it needs them to complete. And any others you should be able to download after you connect to the internet.
-
#19
So what will i need to do with w7 iso can you give directions? Note: (i cant access the pc just the outside of it) and at least, what size Pin drive will i need?
Advertisements
-
#20
If it has a DVD player I would burn the ISO to a DVD, too many people seem to have issues when they try the USB/DVD download tool. But if you insist then the pen/thumb drive must be at least 4GB.
Instructions to make a bootable DVD
For a flash drive you still need to save the .ISO file but then you need the USB DVD Download tool and you have to run it, pointing to the ISO as input and an empty 4GB (or more) flash drive as the output.
Then reboot the computer with the DVD or Flash drive as the primary boot device. After some files load the Installation menu should appear.
Last edited: Jun 15, 2014
Содержание
- Решение проблемы с требованием драйвера при установке Windows 7
- Причина 1: Некачественный дистрибутив Windows
- Причина 2: Некорректно работающий носитель
- Причина 3: Проблемный жесткий диск
- Причина 4: Несовместимость железа
- Причина 5: Проблемы с дисководом или USB-разъемом
- Заключение
- Вопросы и ответы
Нередко при установке чистой Windows 7 пользователи сталкиваются с отсутствием драйвера носителя. Без выполнения этого требования процесс инсталляции продолжить невозможно. Это может быть связано с определенными ошибками или реальной необходимостью установки программного обеспечения. В этой статье мы рассмотрим способы решения возникшего вопроса.
Рассматриваемая ситуация очень нестандартная и возможные ее источники могут быть программными и аппаратными. Разберем основные неисправности и методы их устранения. Сразу же следует отметить, что обычно виноваты «кривые» сборки операционной системы, а в редких случаях проявившееся уведомление может свидетельствовать о неочевидных проблемах вроде неправильно работающей оперативной памяти, повреждающей файлы при копировании.
Причина 1: Некачественный дистрибутив Windows
Пользовательские сборки Windows, которые можно найти на любом торрент-трекере, часто имеют массу недочетов и ошибок ввиду непрофессиональности их авторов. Старые сборки также могут быть несовместимы с новым оборудованием от NVIDIA, поэтому наиболее простое решение — выбрать другой дистрибутив ОС.
Иногда же драйверы носителей умышленно удаляются из образа системы. При появлении сообщения об отсутствии драйвера просто подключите носитель с заводскими драйверами компьютера. Собственно, именно об этом и написано в тексте самого уведомления. Поскольку инсталляционный процесс будет находиться в оперативной памяти, вы можете без труда доставать диск/флешку с Windows, устанавливать программное обеспечение через кнопку «Обзор» с другого CD/USB, а затем повторно вставлять носитель с дистрибутивом ОС.
Если же проблема так не решилась, попробуйте следующие варианты.
Причина 2: Некорректно работающий носитель
Не исключено, что один из этих пунктов отрицательно повлиял на установку:
- Затертый диск или мелкие царапины. То и другое препятствуют считыванию данных с CD, в результате чего часть файлов операционной системы не копируется в память компьютера. Выход здесь очевиден: при обнаружении внешних повреждений попробуйте записать образ Виндовс на другой диск.

Читайте также: Создание загрузочного диска с Windows 7
Аналогичный симптом может проявляться при подключении поврежденной флешки. Попробуйте устранить битые сектора, а если это не помогло, подключить другой USB-накопитель.
Читайте также:
Создаем загрузочную флешку с Windows 7
Проверка работоспособности флеш-накопителей
Программы для восстановления флешки - Использование физически старого оптического диска. Взяв для установки CD, который уже давно не использовался, вы можете столкнуться с тем, что он будет работать лишь частично. Это обуславливается особенностью типа хранителя информации — оптика часто недолговечна и полежав без дела длительный срок, она может испортиться.
- Образ ОС записан на DVD-RW. Выберите другие виды дисков для записи Windows.
В дополнение ко всему можем посоветовать выбрать программу для записи образа системы отличную от той, что вы использовали в первый раз.
Причина 3: Проблемный жесткий диск
Из-за HDD вы также можете столкнуться с просьбой установки драйверов. Вариантов что делать, как минимум, 3:
- Иногда системе необходимы драйверы винчестера. При таком раскладе проверьте коннектор HDD, сняв крышку компьютера. Отключите, а затем подключите соединитель SATA (дополнительно можно подсоединить к другому порту), после чего повторите процесс инсталляции Windows. По возможности, кабель SATA следует заменить.
- Если ручные манипуляции не помогли, можете попробовать установить драйвер на SATA, скачав его с официального сайта производителя материнской платы. Рассмотрим этот процесс на примере ASUS:
- Перейдите на официальный сайт разработчика, в графе поиска найдите нужный продукт.
Читайте также: Определяем модель материнской платы
- Откройте вкладку с поддержкой устройства и выберите нужную ОС, в нашем случае Windows 7 x64 либо x86.
- Найдите раздел с SATA, скачайте его.
- Распакуйте архив (обратите внимание, необходимо именно разархивировать а не перемещать в виде ZIP/RAR или EXE) и папку поместите на флешку/оптический диск рядом с операционной системой и при появлении сообщения нажмите на «Обзор», указав папку с SATA-драйвером.
- В случае успешной установки ПО продолжите инсталляцию Виндовс.


- Перейдите на официальный сайт разработчика, в графе поиска найдите нужный продукт.
- Не стоит исключать наличие битых секторов на жестком диске. Настоятельно рекомендуется выполнить проверку специальными программами или же подключить другой жесткий диск.

Подробнее: Как проверить жесткий диск на битые сектора


Причина 4: Несовместимость железа
Реже описанные симптомы проявляются из-за комбинирования старых и новых комплектующих. Подобная картина возникает при использовании комплектующих от различных производителей, к примеру, AMD и NVIDIA. Единственное решение – грамотный подбор совместимого железа.
Причина 5: Проблемы с дисководом или USB-разъемом
Здесь есть сразу несколько моментов, которые могут стать точкой преткновения в попытках выполнить инсталляцию Виндовс 7. Пойдем от простого к сложному:
Подключение USB через интерфейс 2.0 вместо 3.0
Если в вашем ПК или ноутбуке есть USB 3.0, через который происходит установка операционной системы, возможно, именно такое подключение и вызывает сообщение, препятствующее дальнейшему проведению процедуры. В этом случае установщик действительно просит драйвер, который по умолчанию в нем отсутствует. Переподключение флешку к порту 2.0 и решает возникшую трудность. Различить их просто — у 3.0 цвет разъема наполовину синий.
Скачивание драйвера для USB 3.0 на флешку с образом Windows 7
При отсутствии 2.0 разъема вам понадобится скачать драйвер для USB 3.0 с сайта производителя материнской платы либо ноутбука. Сделать это можно по инструкции для скачивания SATA-драйвера, расписанной выше, в «Причине 3». Разница заключается в том, что нужно скачать не «SATA», а «Chipset».
В крайнем случае драйвер для чипсета можно поискать на сайте Intel или AMD, в зависимости от установленного на вашу плату комплектующего.
Поломка компонента ПК
Самое неприятное – полный или частичный выход из строя CD/DVD-привода или же USB-интерфейса. Спасти ситуацию можно только путем замены неисправных устройств.
Читайте также:
Не работает USB-порт: что делать
Причины неработоспособности дисковода
Заключение
Итак, мы рассмотрели все возможные способы устранения проблем с драйверами при инсталляции ОС. Чаще всего юзеры имеют дело с недоброкачественными дистрибутивами Windows. Именно поэтому рекомендуется первым делом воспользоваться другой версией операционной системы, а уж потом приступать к проверке аппаратуры.