There are many methods out there to copy photos from Windows 10 to your iPhone, starting with iTunes and ending with various cloud solutions and third-party transfer tools. If you’re now looking for a way to transfer photos from Windows 10 to iPhone, this guide is for you. In this guide, we collect some workable ways to pass your photos from Windows to iPhone. Plus, if you want to get these transferred photos back to your iPhone, apply the bonus tip to do it.
Tip 1. How to Transfer Photos from Windows 10 to iPhone Without iTunes
iTunes is considered as the default way to sync data from computer to iPhone, be it PC or Mac. However, an inevitable flaw of using iTunes is that it will replace the existing content on your iOS device with the synced content. That means it will cause data loss on your iPhone. Therefore, many users want to copy photos from Windows 10 to iPhone without iTunes.
Luckily, in addition to using iTunes, there are many other practical ways available to transfer pictures from Windows PC to iPhone, iPad, or iPod. There are three of them:
Method 1. Transfer Pictures from Windows 10 to iPhone with Free iPhone Transfer Software
«How do I transfer photos from PC to iPhone using USB?»
If you have the same question as the one shown above, you will like the free iPhone data transfer software — EaseUS MobiMover. It works well to transfer photos, videos, music, ringtones, books, contacts, and more between your iPhone and Windows 10 PC or between two iDevices, without the installation of iTunes.
Whether you want to transfer photos from iPhone to PC or vice versa, you can get things done easily with this tool.
To transfer photos from Windows 10 to iPhone:
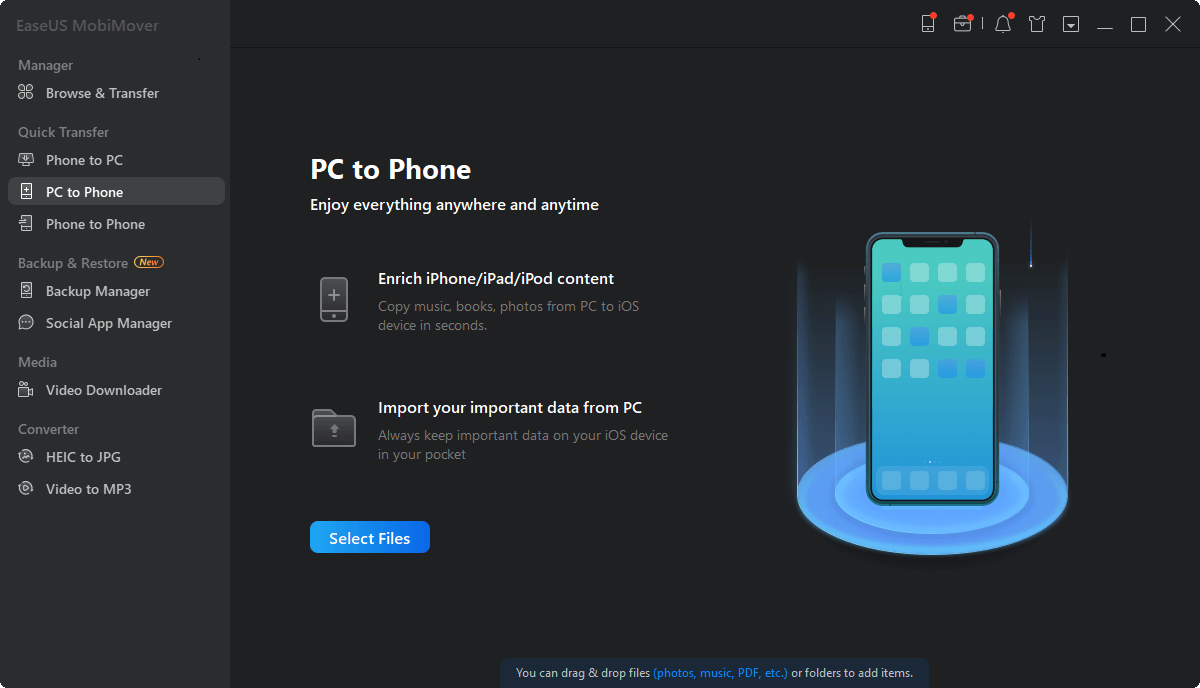
Step 1. Use a USB cable to connect your iPhone to your Mac/PC. Run EaseUS MobiMover, choose «PC to Phone» mode and click «Select Files» to move on.
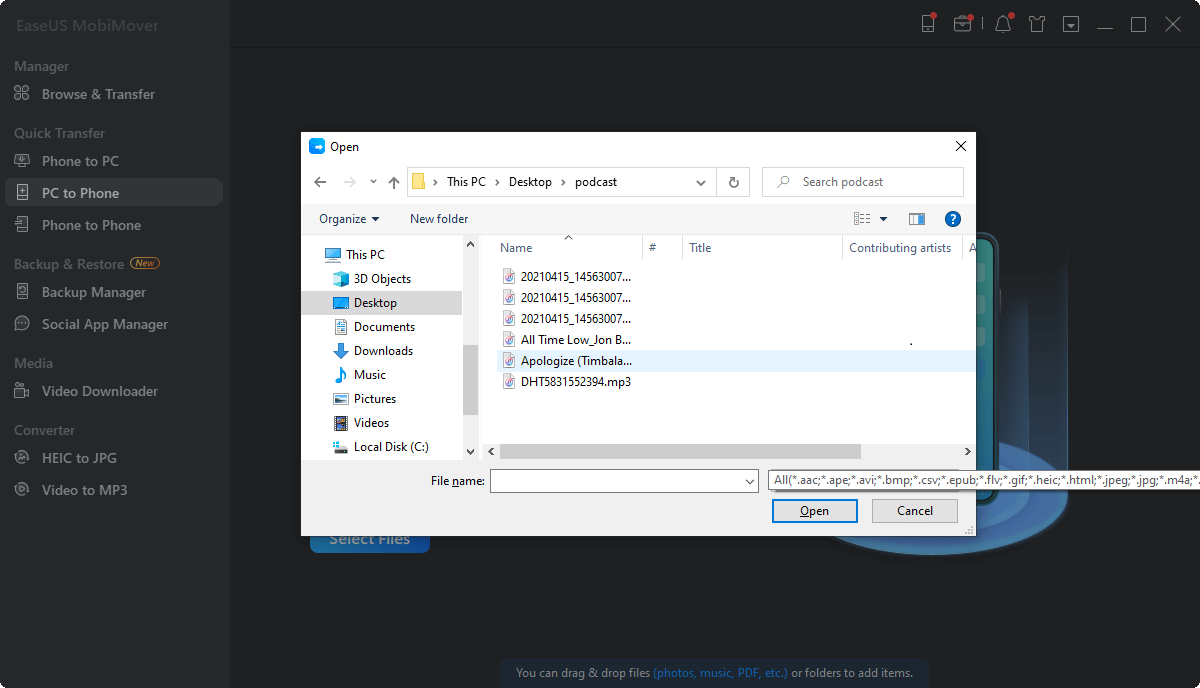
Step 2. In the new window, go to your computer to choose photos to transfer. Then, click the «Open» button to load the files.
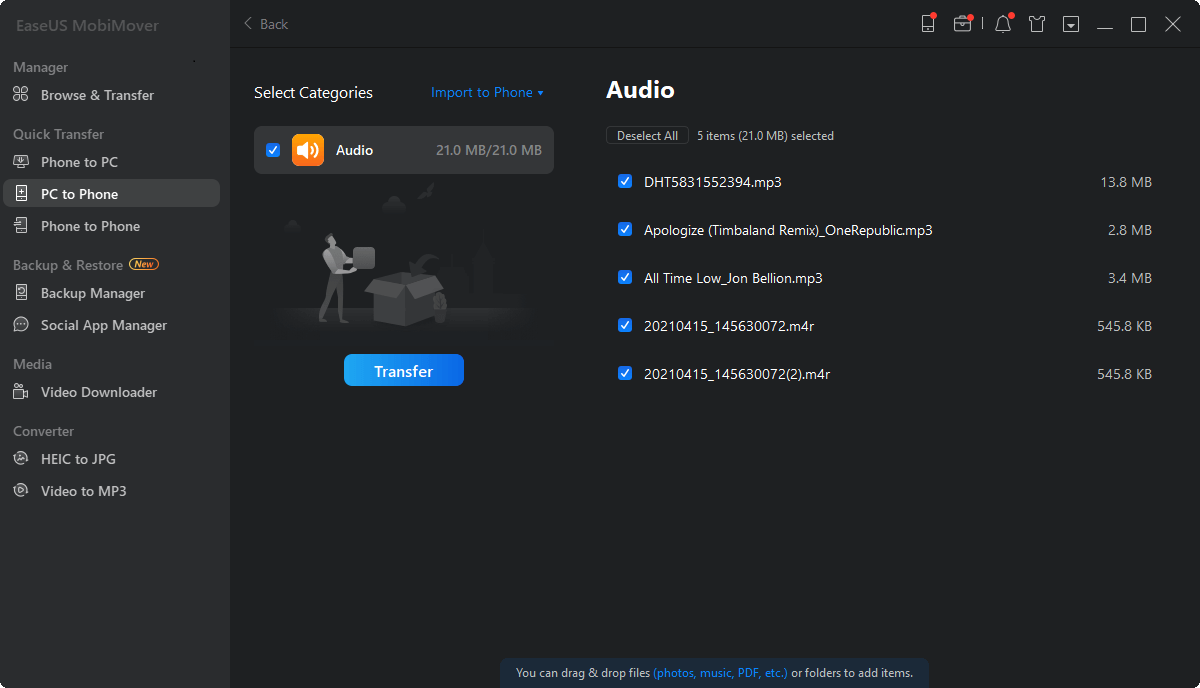
Step 3. You can click «Add Contents» to import more data. If the folder you’ve selected contains other file types except for photos, MobiMover will load them all. You can choose to transfer «Pictures» only or with other files together. Finally, click the «Transfer» button to transfer photos from computer to iPhone.
Other than being an iOS data transfer tool, EaseUS MobiMover also performs well as a free video & audio downloader. If you need to download YouTube videos to iPhone or download SoundCloud music to your computer, it will help, too.
Method 2. Sync Photos from Windows 10 to iPhone with iCloud Photos
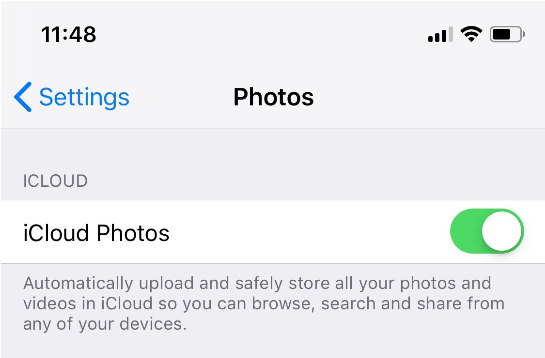
Don’t want to use a USB cable? Here is iCloud to help. With iCloud Photos enabled, you are able to sync photos and videos across your devices that use the same Apple ID account.
Make sure you have sufficient storage in iCloud and your devices are under stable network connections. Afterward, follow the steps below to learn how to transfer photos from Windows 10 to iPhone (or iPad) in two ways using iCloud.
If you have installed iCloud control panel on your PC:
Step 1. On your iPhone, go to «Settings» > [your name] > «iCloud» > «Photos» and turn on «iCloud Photos».
Step 2. On your Windows PC, open iCloud for Windows.
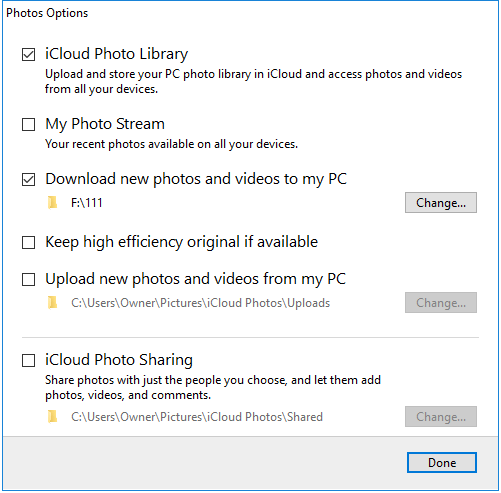
Step 3. Click «Options» next to the Photos option and enable «iCloud Photo Library».
Step 4. Turn on «Upload new photos and videos from my PC» and remember the folder shown underneath.
Step 5. Copy the photos you want to transfer to the folder to upload the items to iCloud storage.
Step 6. Go to the Photos app on your iOS device and you will see the pictures from your computer.
If you don’t want to install iCloud for Windows:
Step 1. Turn on «iCloud Photos» on your iPhone.
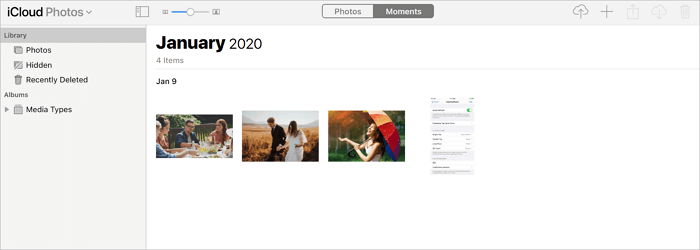
Step 2. On your PC, go to iCloud.com and sign in with the Apple ID account you use on your iPhone.
Step 3. Choose «Photos» and click the «Upload» icon to upload the photos that you want to transfer to your iPhone to iCloud.
Step 4. Go to the Photos app on your iOS device to check the pictures.
Method 3. Transfer Pictures from PC to iPhone with Google Photos
iCloud is not the only cloud service you can apply to transfer photos from PC to iPhone. Other popular services like Dropbox, OneDrive, and Google Photos are also helpful to copy photos and videos and more from computer to iPhone or iPad.
Let me show you how to transfer photos from Windows 10 to iPhone without iTunes using Google Photos.
Step 1. Go to visit Google Photos on your Windows PC and log in with your account.
Step 2. You can either click «Create» > «Album» to create a new album to save the photos or select «Upload» > «Computer» to upload photos directly.
Step 3. Afterward, click «Add photos» > «Select from computer» to add new photos to Google Photos from the folders on the PC.
Step 4. On your iPhone, go to the App Store and download Google Photos.
Step 5. Sign in with the account you use on Google Photos on your computer.
Step 6. Select and download the photos to your mobile device.
Tip 2. How to Transfer Photos from Windows 10 to iPhone Using iTunes
If you don’t mind the data loss or there are no files existing on your iPhone, transferring photos to your iPhone from PC using iTunes is also a workable way.
Step 1. Connect your iPhone to your PC with a USB cable and wait for iTunes to launch automatically.
Step 2. Unlock your device and trust the computer. If required, enter your iPhone passcode to continue.
Step 3. In iTunes, click the «Device» icon in the top left corner.
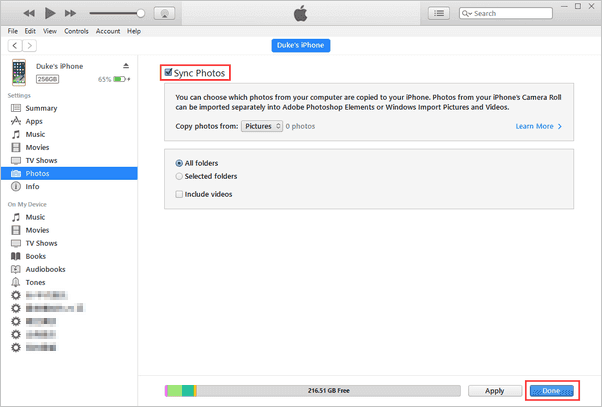
Step 4. Choose «Photos» in the left panel and check «Sync Photos».
Step 5. Select the photos you want to transfer from the option «Copy photos from».
Step 6. After the selection, click «Apply» to start syncing photos from Windows 10 to iPhone. When it has done, go to the Photos app on your iOS device to check the transferred items.
Bonus Tip. Transfer Photos from iPhone to PC Windows 10
If you find that the pictures you transfer to iPhone from Windows are not the items you really want to transfer, you have the chance to get them back. Of the methods for this purpose, the above 4 methods are included. Apart from them, there are two additional options: email and cloud service. Both are not the optimal choice, but in case that none of the above methods works, they’re still worth a mention. To learn how they work, you can check this detailed guide to transfer photos from iPhone to PC.
The Bottom Line
Isn’t it easy to transfer photos from Windows 10 to iPhone? Actually, all the ways above are also applicable to copy photos to iPhone from a PC running earlier Windows versions or from a Mac. Apply the one that fits your needs most to transfer pictures from PC to your iPhone with ease.
Published on January 30, 2023
(52 votes, average: 3.40 out of 5)
You might be wondering how to transfer photos from computer to iPhone. And we are here to help!
Were you looking for a way to transfer photos from iPhone to PC? We have an excellent comprehensive guide on how to do that.
There are many ways to import photos to iPhone, starting with iTunes and ending with different cloud solutions. In this article, you will find a comprehensive overview of all the ways to copy pictures from PC to iPhone. Keep on reading for detailed info on the best methods to transfer photos from PC to iPhone without iTunes below or choose one of the ways below..
- ⭐ Without iTunes ⭐
- YouTube guide
- With iTunes
- ⭐ Without iCloud ⭐
- Transfer photos with iCloud
- Google Drive
- Dropbox
- OneDrive
Transfer photos to iPhone from PC without iTunes
using specialized third-party software
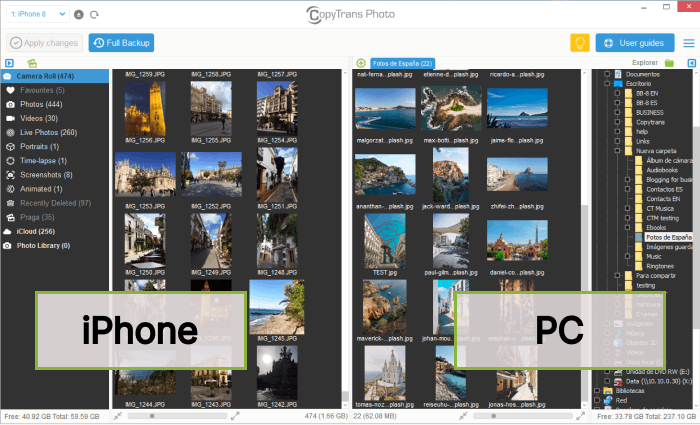
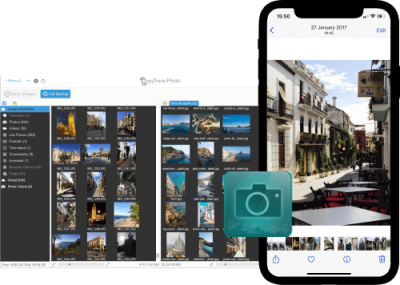
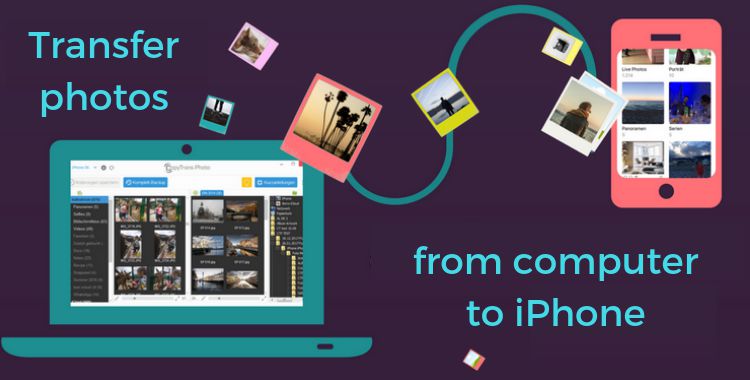
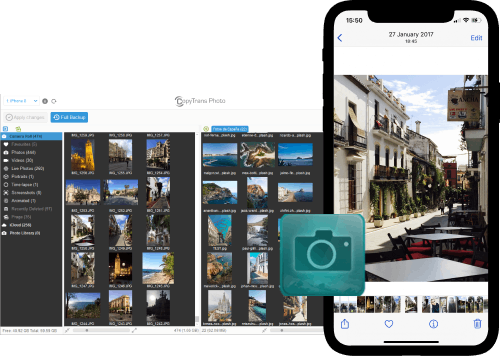
If you are looking for a quick way to copy pictures from PC to iPhone, we have a solution just for you: CopyTrans Photo. The app has an intuitive interface, gets things done quickly and you can see thumbnails of all the files you’re operating at any moment.
A new way to manage your iPhone photos
CopyTrans Photo
- Intuitive interface: drag-and-drop transfer
- Support the formats HEIC and ProRAW
- Transfer photos and videos between PC and iPhone
- Backup all your iPhone photos to PC at once with Full Backup feature
- Save photos without duplicates
- Compatible with all iOS devices, including iPhone 14
Download CopyTrans Photo
The process of transfer is intuitive, but you can always see our instructions below!
Here is how to get photos from PC to iPhone:
-
Download CopyTrans Photo and run it. Get CopyTrans Photo
If you need help installing, please refer to the installation guide.
-
Launch CopyTrans Photo. Connect your iPhone to PC with a USB cable. If prompted to trust PC, press “Trust”.
-
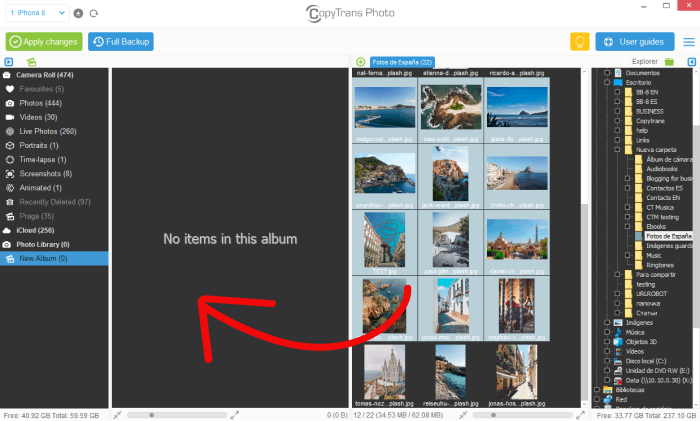
You will see your iPhone photos on the left and your PC pictures on the right:
-
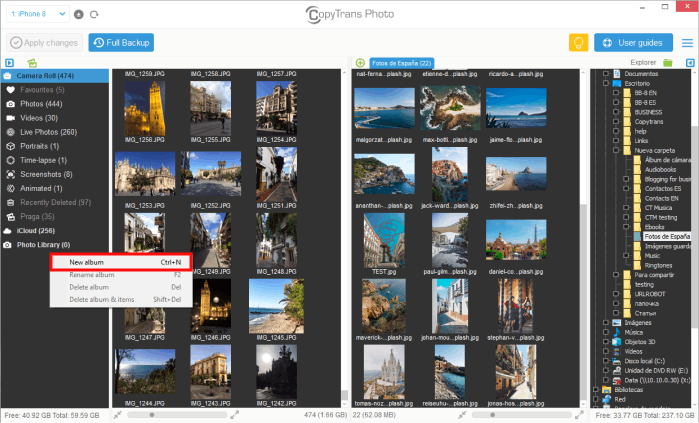
Create a new album on the left iPhone side. If you click on this album, the working area will display the contents (no files there for now).
-
Using the folder tree on the right PC side, navigate to the PC folder with the photos you want to transfer.
-
Select the pictures and Drag and Drop them from the right PC area to the left iPhone area.
-
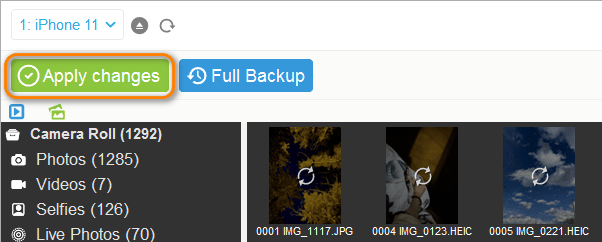
Click on “Apply Changes” and wait for the syncing process to complete.
-
All done! Your photos are now waiting for you in the folder “From my Mac” folder on your iPhone.
Why choose CopyTrans Photo?
- Transfer iPhone photos to PC and back
- All photo formats supported
- Do a full backup of your iPhone photos and videos – without duplicates!
- Save photos on your PC or external hard drive
- English speaking support, no ads, no hidden fees
Download CopyTrans Photo
The same method perfectly works in case you need to transfer photos from PC to iPad. Check out our YouTube guide below!
Transfer photos from PC to iPhone
YouTube guide
How to transfer photos from laptop to iPhone
using iTunes
The first app that comes to mind when you think about transferring photos to iPhone is, of course, iTunes. Apple-based solution, it will allow you to transfer files to your iPhone quickly. However, as with so many Apple products, the whole process is tainted by some weird-flavoured magic, leaving behind a bitter taste and a silent question of whether it was really worth it.
We would not recommend using this method because of the following disadvantages:
😣 You will only be able to sync one folder at any time. If you change the folder later, your previous images will be erased.
😲 The operation will erase all the images previously stored in Photo Library (your Camera Roll photos will stay intact).
😤 Images in the Photo Library can only be changed/deleted from the PC, and iTunes won’t let you delete the images separately – only do a full resync. To be able to create and edit the content of albums inside Photo Library, you can use CopyTrans Photo.
🙄 The sync will not be automatic anyway. You will need to relaunch it every time you need to introduce changes.
Upload photos to iCloud
using CopyTrans Cloudly
This option can help you sync PC photos to all your iOS devices at once, provided that you have iCloud Photos enabled. Once you upload photos to iCloud, they will automatically appear on all your devices that share the same Apple ID.
The following steps explain how to upload photos to iCloud via CopyTrans Cloudly:
-
Download and install CopyTrans Cloudly:
-
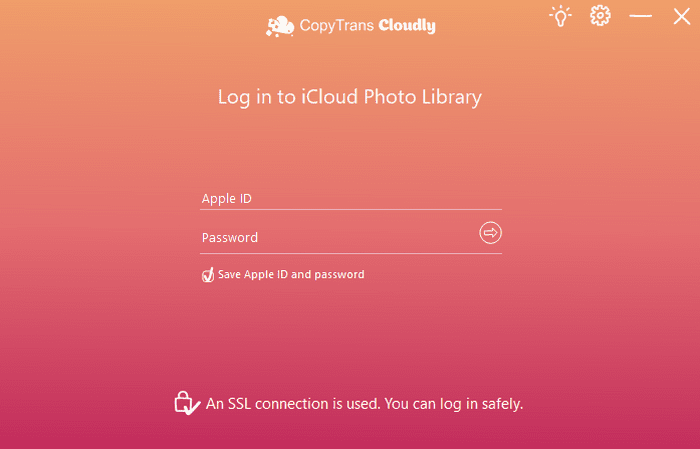
Launch CopyTrans Cloudly and log in with your iCloud credentials. SSL connection guarantees the safety of your personal data.
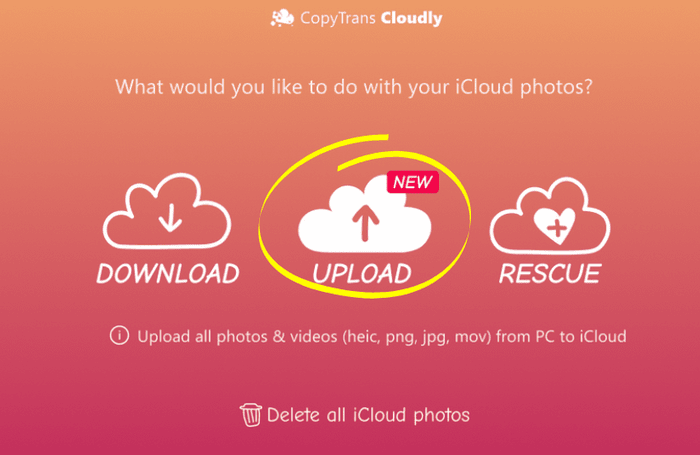
- Choose “Upload”.
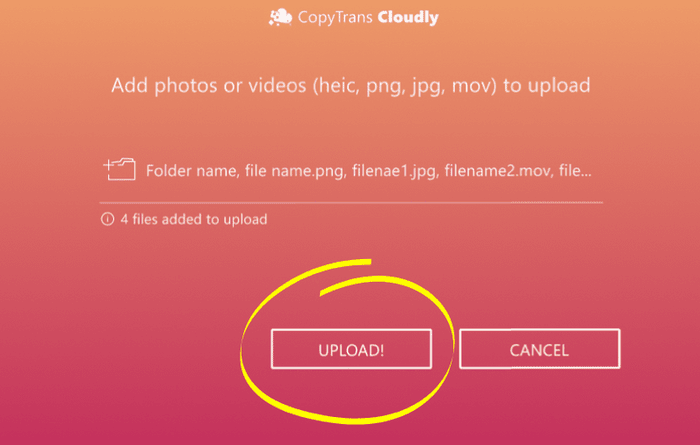
- Select the files you want to upload to iCloud. CopyTrans Cloudly works with .HEIC, .PNG and .JPEG images and .MOV, .MP4, .M4V video files.
- When everything is selected, click “Upload”.
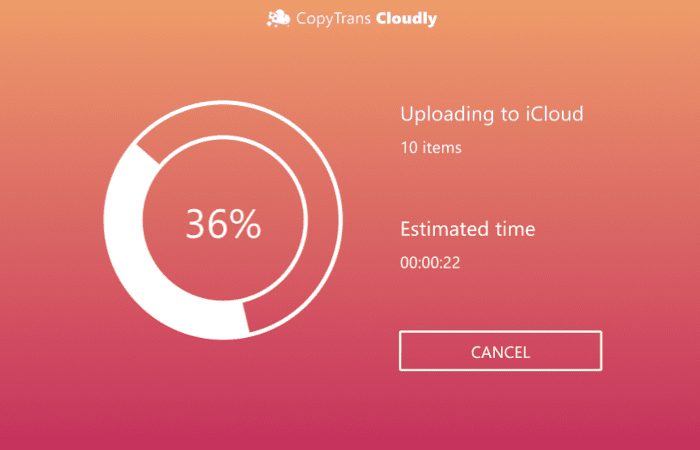
- Wait while CopyTrans Cloudly is doing the job.
- Now you know how to upload photos and videos to iCloud from PC using CopyTans Cloudly. And once the photos are in iCloud, they should appear on your device!
Download CopyTrans Cloudly
*100% clean and safe
YouTube guide
How to move photos to iCloud
using iCloud.com
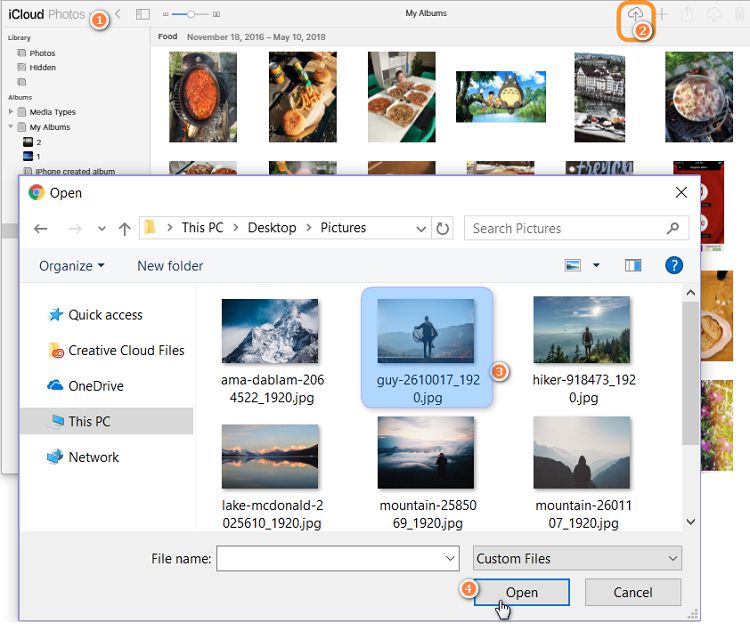
Another option is to use the web interface Apple provides to upload photos to iCloud. For that, open icloud.com in your web browser of choice.
You log in, select the Photos section in the main menu and immediately see your iCloud Photo Library on your computer screen. To put photos on iCloud, click on the “Upload photos” button at the top-right corner and select the photos you want to import.
The photos should immediately appear on your iPhone and any other device having the same iCloud account signed in. If that does not happen, check if iCloud Photo Library is enabled on your iPhone or iPad: Settings> Your Name> iCloud> Photos> iCloud Photos.
Disadvantages:
- Everything that you store in iCloud makes it to the Apple servers as well. If you want to delete some images forever, they will disappear from your account but not from the Apple servers. We even conducted an investigation and created a tool that can recover deleted photos from iCloud.
- On icloud.com, you can manually sort the uploaded images by album. But within an album, the photos are sorted by the transfer date and you cannot change this order online.
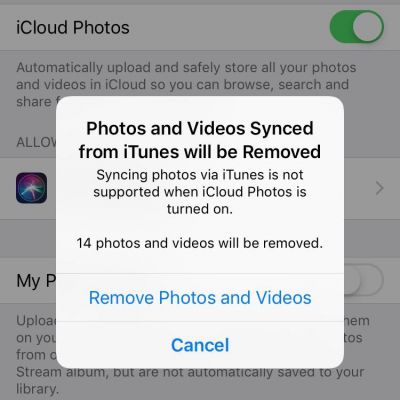
- Another major drawback is that if you disable iCloud Photo Library and turn it back on after some time, any pictures you previously added to iPhone with iTunes (or any other third-party app like CopyTrans Photo) will get deleted. That’s why you should be extra careful with this setting and regularly backup your cloud photos to a computer.
| Manage iPhone/iPad photos | iTunes | CopyTrans Photo |
| Transfer photos and videos from PC to iPhone | ✓ | ✓ |
| Transfer photos, videos and albums from iPhone to PC | ✗ | ✓ |
| Transfer photos, videos and albums from one iPhone to another iPhone/iPad | ✗ | ✓ |
| View iPhone photos, videos and albums on PC | ✗ | ✓ |
| Delete selected photos and videos from iPhone | ✗ | ✓ |
| Play Camera Roll videos | ✗ | ✓ |
| Retrieve lost PC photos from iPhone | ✗ | ✓ |
| Transfer photos from multiple PC locations to iPhone | ✗ | ✓ |
| Copy photos to iPhone from multiple PCs without replacing previously transferred photos | ✗ | ✓ |
| Organize iPhone photos from your PC | ✗ | ✓ |
| Transfer photos from iPhone to Android | ✗ | ✓ |
| Transfer photos from Android to iPhone | ✓ | ✓ |
How to get photos from PC to iPhone
via Google Drive
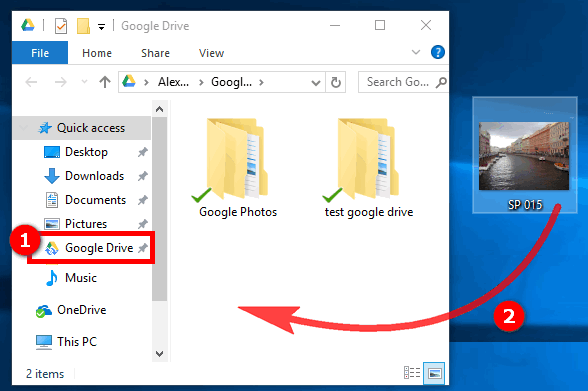
If you have a Google account, you are automatically eligible for 15Gb of free storage on Google Drive (originally SkyDrive). However, Google Drive shares this storage space with other apps, like Gmail and Google Photos.
In order to use this option, you will need to download the official Google Drive app on your computer and your iOS device. Once you run Google Drive on your PC, create a new folder and copy photos to iPhone. The folder will appear with the photos on iPhone in the Google Drive app.
You can create additional folders to transfer multiple photos to iPhone and move them between folders. There is also a possibility to sort photos within one folder by date or by name.
Disadvantages:
- The uploaded photos will not be saved in the native Photos app on iPhone but in the Google Drive app.
- You cannot edit the photos within the app without first copying them into the native folder – double work.
Transfer photos from PC to iPhone without iTunes
Dropbox
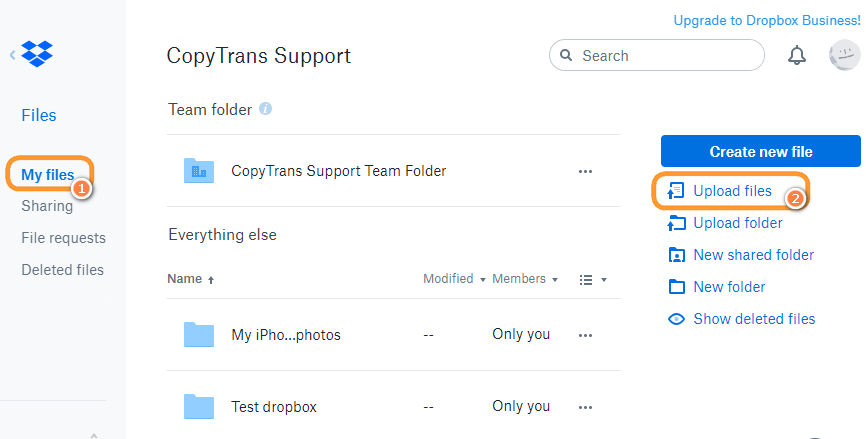
Dropbox offers only 2GB of free storage to their users. On the other hand, you do not have to install the program on the PC. In order to transfer photos from a computer to iPhone, save your data online on dropbox.com directly: log in, create a folder and upload the photos from the computer. After that, go to the Dropbox app on your iPhone to see your imported pictures.
Disadvantages:
- Unfortunately, you can only upload individual photos, since Dropbox does not allow importing a folder.
- Images will possibly lose in quality.
- Although you can import HEIC photos, there will be no possibility to open them.
Import photos to iPhone
with OneDrive
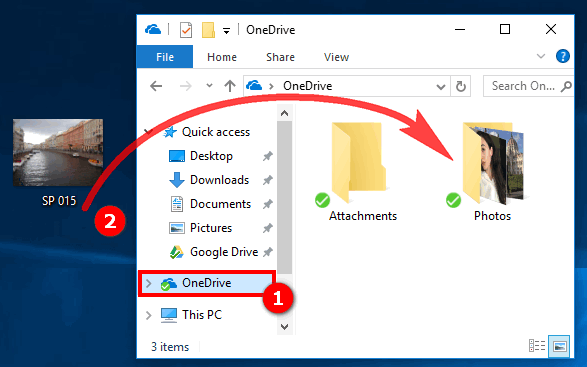
With Microsoft’s OneDrive you get 5Gb of storage space for free. Just like Google Drive, it requires you to install the official OneDrive app on both your computer and iDevice to transfer photos to iPhone. Drag the desired files or entire albums to the program window and after a few seconds, you will see the images the iPhone in the OneDrive app.
The photos are transferred in the original quality including the date created. You can also choose to sort the photos automatically by tags.
Disadvantages:
- The photos will not make it to the Photos app; instead, they will be placed to OneDrive app, which should be installed on the iPhone beforehand.
- OneDrive app does not provide built-in image editing, nor support for HEIC photos: if you place HEIC images in OneDrive, you won’t be able to view them or copy to the Photos app.
How to transfer photos from PC to iPhone
Conclusion
If you don’t trust cloud solutions, find iTunes hard to use and want to keep your photos in the native Photo app, CopyTrans Photo is the best solution for you to transfer photos from PC to iPhone. The program allows managing iPhone photos and videos on PC and has several unbeatable advantages such as managing Live Photos, viewing pictures in HEIC format, keeping excellent quality, order and EXIF files, and much more. Give it a go today!
CopyTrans 7 Pack
Special offer
CopyTrans 7 Pack is a bundle of simple apps for a better iPhone + Windows experience. Transfer photos between iPhone and PC, export and import contacts, manage iCloud photos, back up and restore iPhone, and much more…!
✔ Activate on 5 PCs;
✔ Manage 5 devices;
✔ Full iPhone management;
✔ 2 years of free updates;
✔ No subscription;
✔ $108 off.
GRAB 7 APPS and SAVE 80%!
* The offer includes an additional $3 discount and is only valid when purchasing CopyTrans 7 Pack for private use.
Marika (pronounce like ‘Merica) dreams of saving the world from boredom. Fairly believes that she was the one for the part of Wonder Woman in DC movies, but for now she is eager to make your CopyTrans journey remarkable.
Here’s how to do it.
- Plug your iPhone or iPad into your PC using a suitable USB cable.
- Launch the Photos app from the Start menu, desktop, or taskbar.
- Click Import.
- Click any photos you’d like to not import; all new photos will be selected for importing by default.
- Click Continue.
Step 1: Connect your iPhone to computer with its USB cable, and then run iTunes if it doesn’t open automatically. Step 2: Click Device tab > Select Photos > Check Sync Photos > Select where you want to sync photos (iPhoto, Photos or some specific folder) > Click Apply.
How do I transfer photos from computer to iPhone 8?
Step 1: Connect your iPhone 8/8 Plus to your computer and run iTunes. Step 2: Click the “Device tab” in iTunes and choose “Photos”. Step 3: Select the checkbox next to “Sync Photos” and choose the folder you’d like to import to your iPhone from the drop-down menu of “Copy photo from”. Step 4.
Can you transfer photos from laptop to iPhone?
Collect the photos to one folder on your laptop. Run iTunes and connect iPhone to your laptop. In the photos menu, click on “Sync photos from” option > Choose the folder you want to transfer > Select “Selected folders” option. Click “Apply” to start syncing the photos from laptop to iPhone.
How do I transfer pictures from my computer to my iPhone without using iTunes?
Step 1: Connect your iPhone to your computer and tap “Trust” on your device to continue. Start EaseUS MobiMover and choose the “PC to iDevice” mode to transfer data from computer to iPhone without iTunes. Step 2: Click “Add File” or “Add Folder” to select the files or folder that you want to transfer to your iPhone.
How do I transfer photos from computer to iPhone XR?
Method 1: Sync files from PC to iPhone (with data loss) Take transferring photos from PC to iPhone as an exmaple: Step 1: Connect your iPhone XS/XS Max/XR to your PCMac with a USB cable and run iTunes if it doesn’t open automatically. Step 2: Tap on the Device button and choose Photos.
How can I transfer files from PC to iPhone?
Steps to Transfer App Files from PC to iPhone
- Connect your iPhone to PC.
- Tap device icon on iTunes.
- Click “Apps” under “Settings”.
- Under “File Sharing”, you may see a list of apps and choose one. Then click “Add” button.
- Select the file to transfer from the right list. Click “Open” and then “Sync” button.
How do I transfer photos from USB to iPhone without iTunes?
Connect your iPhone to the computer using a USB cable that comes with your iPhone. Click the Device icon on iTunes. Then click Photos, check the box next to “Sync Photos”. Navigate to the folder of photos you want to transfer to your iPhone from the flash drive which you would like to copy music from.
How do you sync photos from your computer to your iPhone?
Move photos from your PC to iOS via iTunes
- Organize your images into folders and subfolders.
- Plug your iPad or iPhone into your Mac or PC.
- Launch iTunes, if it doesn’t open automatically.
- Click on the iOS device icon in the top bar, then click the Photos tab.
- Click the checkbox next to Sync Photos.
How do I transfer photos from my computer to my iPhone 8 without iTunes?
You should connect your iPhone 8 with iTunes via USB cable, then run iTunes. And click the iPhone icon and then Photos tab. Check “Sync Photos from” and select the folder where you want to sync photos, then click “Apply”. You can choose “All folder” or select certain folders as you want.
How do you transfer photos from laptop to phone?
Method 2 Using a USB Cable for Android on Windows
- Connect your phone to your computer. Attach one end of the charger cable to your Android and the other to your computer’s USB port.
- Open Start. .
- Open File Explorer. .
- Click your pictures’ folder.
- Select pictures to move.
- Click Home.
- Click Copy to.
- Click Choose location….
How do I transfer photos from laptop to iPhone 7?
Step 1: Connect your iPhone 7 to your computer and iTunes will open automatically. Step 2: Tap on the Device tab and select your iPhone 7. Step 3: Choose “Photos” under “Settings” and click the checkbox next to “Sync Photos”.
How can I transfer photos from my computer to my iPhone 6?
Step 1Launch iTunes and connect your iPhone to PC. Click the Device button, and select Photos under Summary option. Step 2Click Sync Photos from > Choose the folder on your Windows PC > Click Select Folder > Tap the Apply button to start transferring pictures from PC to your iPhone 6/6s.
How do I transfer photos from computer to iPhone using iTunes?
Sync your photos manually with iTunes
- Make sure that you have the latest version of iTunes.
- Open iTunes on your computer.
- Use the included USB cable to connect your iPhone, iPad, or iPod touch to your computer.
- Click on the device icon in iTunes.
- In the sidebar on the left side of the iTunes window, click Photos.
How do you export photos from PC to phone?
To transfer photos and videos from your phone to PC, connect your phone to the PC with a USB cable. Make sure the phone is on and unlocked, and that you’re using a working cable, then: On your PC, select the Start button and then select Photos to open the Photos app.
How do I transfer photos from iPhone to laptop without iTunes?
Part 2: Possible Ways to Transfer Photos from iPhone to Laptop without iTunes
- Step 1: Download, install and launch Tenorshare iCareFone on your PC or Mac.
- Step 2: Connect your iPhone to your computer using a USB cable.
- Step 3: The Files Manager tab on Windows is iCareFone’s default interface.
How do I transfer photos from PC to iPhone iOS 12?
Step 1: Open iCloud for Windows on your PC. Click Options next to Photos and enable iCloud Photo Library. Step 2: Make sure Upload new photos and videos from my PC is turned on. Click Change choose the photos you want to transfer from PC to new iPhone.
How do I transfer files from my computer to my iPhone using XS?
iPhone XS Max – How to Move Files to PC
- Make sure that you have the latest version of iTunes on your computer.
- Open the app on your computer and connect your iPhone.
- Find and select your phone on the left side of the screen.
- Click the “File Sharing” tab.
- Next, browse the files and select the ones that you’d like to transfer to your PC.
How do you transfer photos from PC to iPad without syncing?
Method 1 Using iTunes
- Connect the iPad to the PC.
- Click the iPad button.
- Click Photos.
- Check the box next to “Sync Photos.”
- Select the folder that contains the photos you want to sync.
- Select which photos (and videos) in the folder to sync.
- Click Sync.
- Stop syncing photos (optional).
How do I transfer files from Windows 10 to iPhone?
How to transfer iPhone and iPad photos using the Windows 10 Photos app
- Plug your iPhone or iPad into your PC using a suitable USB cable.
- Launch the Photos app from the Start menu, desktop, or taskbar.
- Click Import.
- Click any photos you’d like to not import; all new photos will be selected for importing by default.
How do I transfer files from Windows computer to iPhone using USB?
Step 1: Connect your iPhone to your computer using n USB cable through any of the USB ports available on your computer. Step 2: Open iTunes, click the “Files” tab and check the boxes to sync or transfer your files. Step 3: Select your desired destination folder for the files and click “Sync” to complete the transfer.
How do I transfer files from computer to iPhone using USB cable?
How to Move Files to an iPhone Through a USB Cable
- Launch iTunes, the free application from Apple that you use to manage your iPhone.
- Plug one end of the included USB cord into the iPhone, and plug the other end into a USB port on your computer.
- Click the icon of the iPhone, and then click the “Summary” tab in the iTunes window.
How do I transfer photos from my PC to my iPhone 8?
Step 1: Connect your iPhone 8/8 Plus to your computer and run iTunes. Step 2: Click the “Device tab” in iTunes and choose “Photos”. Step 3: Select the checkbox next to “Sync Photos” and choose the folder you’d like to import to your iPhone from the drop-down menu of “Copy photo from”. Step 4.
How do I transfer photos from my computer to my iPhone 8?
Step 1 Connect iPhone 8/X to your computer > Launch iTunes if it doesn’t open automatically. Step 2 Click your iPhone 8/X > Choose Photos > Check Sync Photos > Choose a folder that you want to sync photos > Click Apply button to begin the transferring process.
How do I transfer pictures from my computer to my iPhone 8?
Method 1: Transfer iPhone 8 photos to computer via USB.
- Step 1: Connect your iPhone 8/8 Plus to your computer with an USB cable, and tap Trust on your iPhone screen to let this computer access your data.
- Step 2: After connected successfully, open Computer, find the Portable Devices > iPhone 8 Plus.
Photo in the article by “Flickr” https://www.flickr.com/photos/williamhook/24312899908
These days, taking incredible, high-quality pictures with your iPhone is as easy as a couple of taps. But chances are, you still have pictures on your computer that you’d like to have on your phone, too. Whether they’re from a DSLR or an older iPhone, moving photos from your computer is relatively painless. Keep reading to see how you can transfer photos from your PC or Mac to your iPhone.
Three ways to transfer photos from a Windows PC to an iPhone
There are a couple of different options for transferring your photo library from your Windows computer to your iPhone. In this article, you’ll learn how to use iCloud, iTunes, and AnyTrans.
Before you move photos from your computer to an iPhone
Transferring a few gigabytes of photos to your phone will immediately gobble up a chunk of its storage. And not all of those photos will be worth saving, either: there’s always stuff like duplicates, blurry shots you took by accident, similar shots you took to choose the best angle and then forgot. So get ready beforehand and download Gemini Photos onto your iPhone.
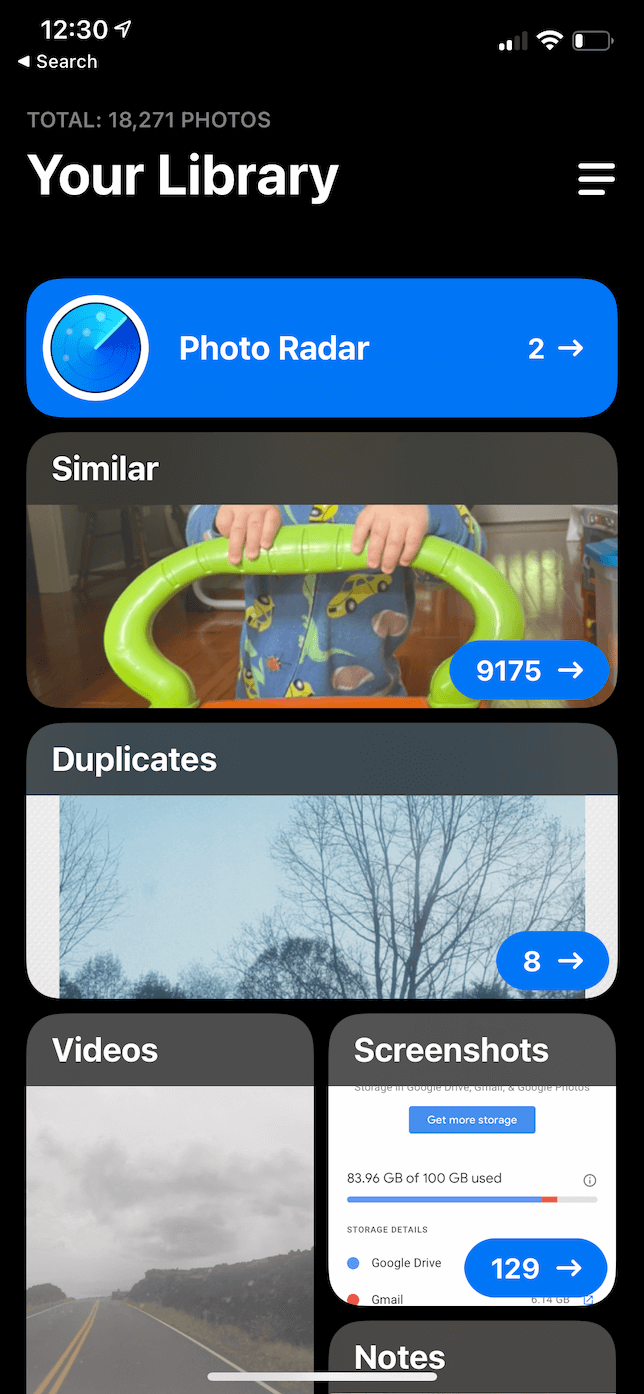
Gemini Photos will find and categorize all the photos you don’t need and help you delete them in a few taps. For example, if you accidentally transferred the same photos twice or transferred some pictures you already have on your iPhone, here’s how you find and delete those duplicates:
- Open Gemini Photos and let it scan your library.
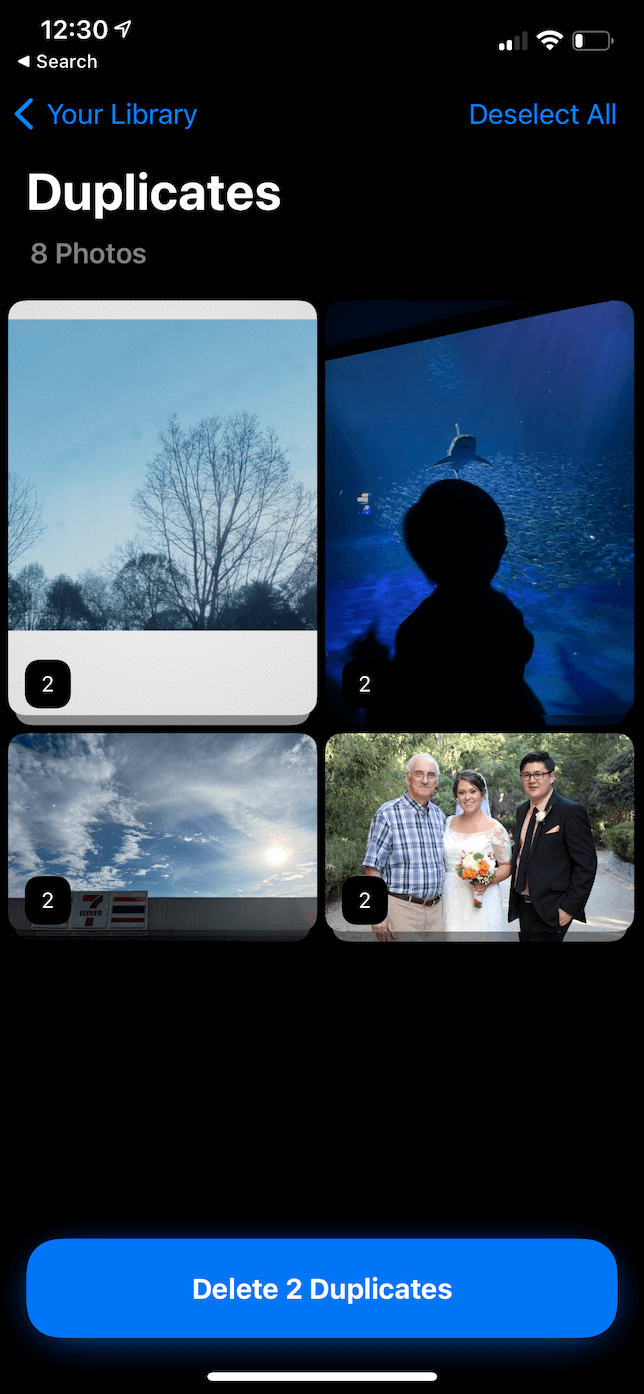
- Tap Duplicates to see which photos on your iPhone are exactly the same.
- Then tap Delete X Duplicates and confirm.
1. How to copy photos from a PC to an iPhone using iCloud
You can actually transfer your photos wirelessly from your computer to an iPhone by using iCloud. By setting up both devices to sync with the same iCloud account, your pictures will automatically transfer back and forth.
Follow these steps to transfer your photos from your PC to your iPhone using iCloud:
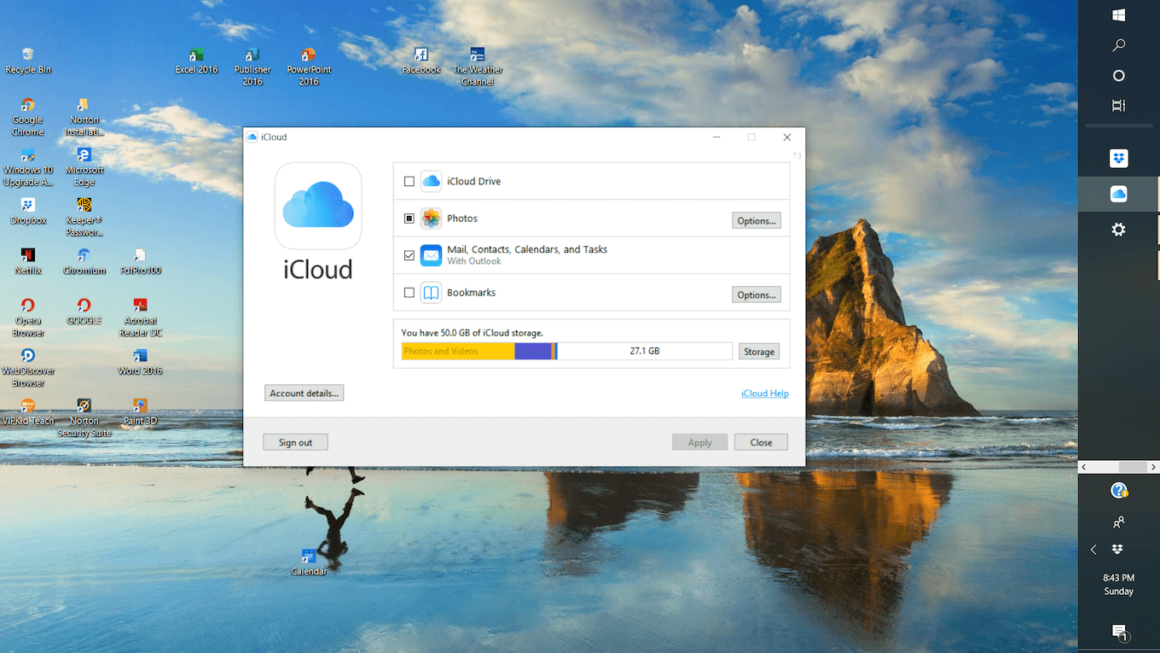
- On your PC, download iCloud for Windows.
- With iCloud for Windows open, log in to your account.
- Select the checkbox next to Photos.
- Click Apply.
- Open a File Explorer window.
- Under Favorites in the left sidebar, click iCloud Photos.
- Copy the photos into the Uploads folder.
Once you’ve set up iCloud on your computer, you’ll need to turn on iCloud Photos on your iPhone:
- On your iPhone, go to the Settings app.
- Tap [your name] > iCloud > Photos.
- Toggle on iCloud Photos.
The process of uploading your pictures to iCloud and then to your iPhone may take a few minutes. When the sync completes, you’ll be able to find your pics in the Photos app on your iPhone.
2. How to transfer photos from a PC to an iPhone with iTunes
If you don’t have an iCloud account, you can still transfer pictures by connecting your iPhone to your PC using a USB cable. Once you have your devices connected:
- Open iTunes.
- Click on the iPhone button in the top-left of the iTunes window.
- In the sidebar, click Photos.
- Check the box to Sync Photos.
- Choose either Pictures or Choose Folder in the drop-down menu.
- Select the option to sync all or only selected folders.
- Click Apply in the bottom-right corner.
Keep in mind that when you sync your photos this way, it overwrites the saved photo library on your iPhone. If this is the only computer you plan on using to sync photos with your phone, then it won’t cause any issues. It becomes a bigger problem, however, when you have pictures on multiple computers that you want to transfer to your iPhone.
3. How to transfer photos from a computer to an iPhone using AnyTrans
If you only have a couple of photos you want to transfer from your PC and don’t want to sync the entire photo library on that computer, you’ll want to use an app like AnyTrans. AnyTrans lets you move over select files and won’t erase the existing pictures on your iPhone.
When you have AnyTrans downloaded and installed on your computer:
- Connect your iPhone to your PC using a USB cable.
- Open AnyTrans.
- Click Device Manager in the sidebar.
- In the middle of the window, click the iPhone screen.
- Navigate to the photos on your computer.
- Select the pictures you want to transfer.
- Click Open.
After the transfer is finished, you’ll be able to unlock your iPhone and find your pictures in the Photos app.
Five ways to transfer photos from a Mac to an iPhone
As you might imagine, there’s no shortage of ways to transfer pictures from your Mac to your iPhone. In this section, you’ll learn how to move your photos using:
- iTunes
- Finder
- iCloud
- AirDrop
- AnyTrans
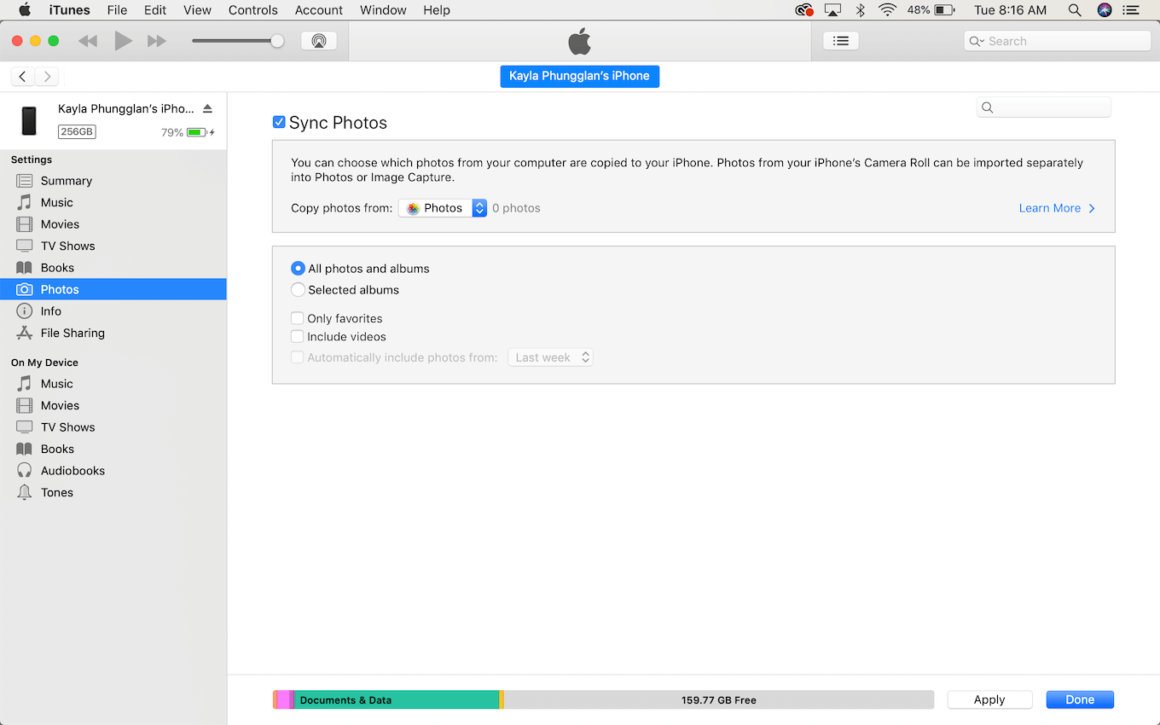
1. How to sync photos from a Mac to an iPhone using iTunes
Since the launch of the original iPhone, iTunes has been the primary way to sync your phone with your computer. But recently, Apple has been moving away from iTunes altogether and has even stopped including it in their macOS. That being said, if your Mac runs a macOS version older than Catalina, you can still use iTunes to sync your pictures.
Follow these steps to transfer pictures from your Mac:
- Connect your iPhone to your Mac using a USB cable.
- Open iTunes.
- Click the iPhone button near the top-left of the iTunes window.
- In the sidebar, click Photos.
- Check the box next to Sync Photos.
- From the drop-down menu, choose Photos, iPhoto, or Aperture to sync with your iPhone.
- Click Apply.
2. How to transfer photos from a Mac to an iPhone without iTunes
You can sync your pictures using the Finder if your computer is running macOS Catalina and doesn’t have iTunes anymore. After you plug your iPhone into your Mac:
- Click on the Finder icon to open a new window.
- In the sidebar, click on your iPhone’s name.
- Select Photos on the button bar. Note: If you have iCloud Photos turned on, you won’t see a Photos button.
- Check the box to Sync Photos to your device.
- From the drop-down menu, choose either the Photos app or select a folder.
- Click Apply.
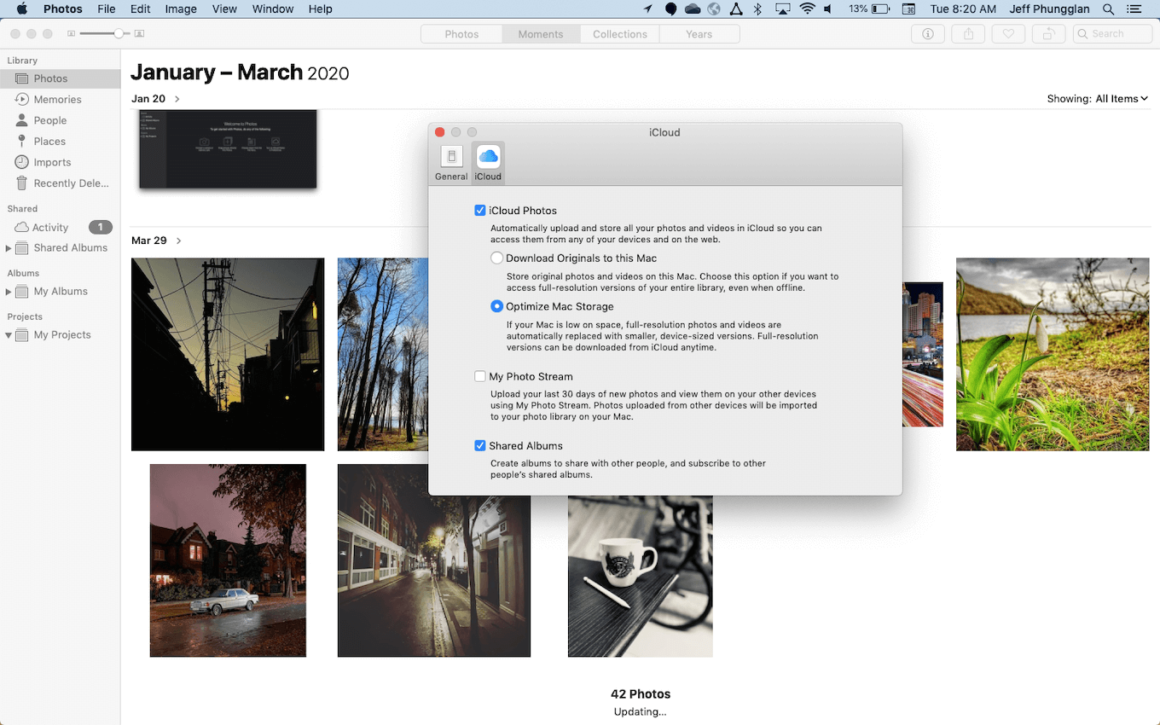
3. How to sync photos from a Mac to an iPhone with iCloud
You can also sync your photos from your Mac to your iPhone wirelessly using iCloud. To start syncing pictures using iCloud:
- On your iPhone, go to Settings > [your name] > iCloud > Photos.
- Verify that iCloud Photos is turned on.
- On your Mac, open the Photos app.
- Click Photos > Preferences.
- Select the iCloud tab.
- If your Mac isn’t signed in to iCloud, click Continue to open System Preferences and log in.
- Check the box next to iCloud Photos.
The pictures from your Mac will start uploading to iCloud, and you’ll see them in the Photos app on your iPhone. This method also works if you’re looking to transfer photos from an iPhone to a Mac, as your photos will sync between both your devices.
If your pictures aren’t showing up on your iPhone, go to Settings > [your name] > iCloud > Photos to make sure you’re logged in to the same iCloud account and verify that photo syncing is turned on.
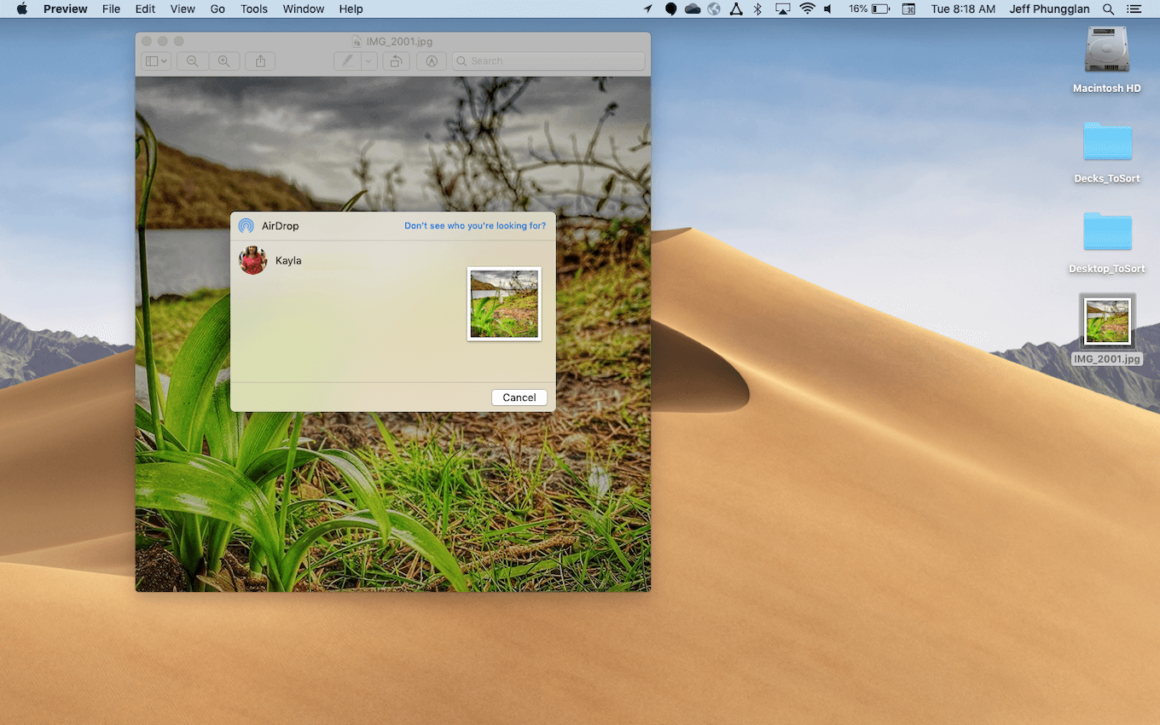
4. How to AirDrop photos from a Mac to an iPhone
If you only want to transfer a couple of pictures from your Mac, you can use AirDrop to quickly send them to your phone. Once you’ve found and selected your photos in Finder, you can move them to your iPhone by following these steps:
- Click the Share button at the top of the window.
- Select AirDrop.
- Click on your iPhone in the pop-up.
- Then click Done to finish.
When they’ve been successfully sent to your iPhone, you’ll be able to view them in the Photos app.
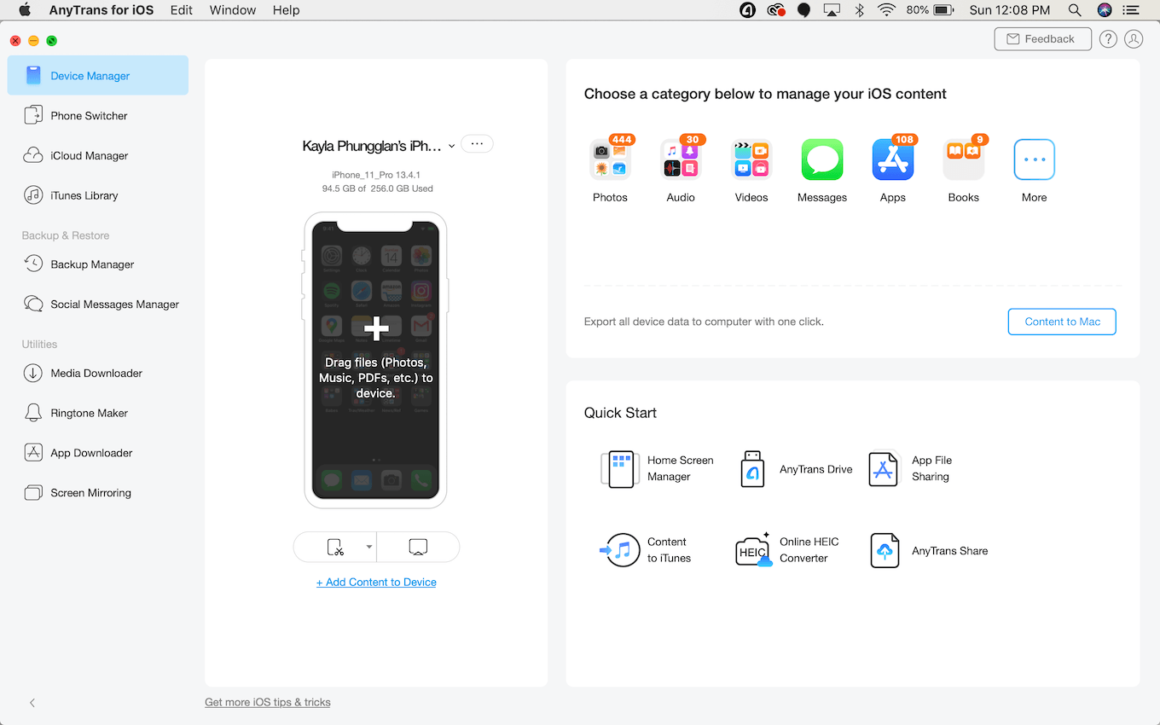
5. How to import photos from a Mac to an iPhone with AnyTrans
In the event that you have a lot of pictures you want to transfer to your iPhone, an easy solution is to use the app AnyTrans. It’s a quick way to transfer data from your Mac that doesn’t require iTunes.
Connect your phone to your computer using the USB cable after you’ve downloaded and installed AnyTrans:
- Open AnyTrans on your Mac.
- In the sidebar, click Device Manager.
- Click the iPhone screen in the middle window.
- A Finder window will open. Find and select the photos you want to move from your computer.
- Click Open.
- Make sure the box next to Photos is checked and click Next.
Once the sync has completed, the photos will show up on your iPhone in the Photos app. (Note that they will be in an album called From AnyTrans and will not appear in Recents.)
Once you’ve moved your pictures from your computer to your iPhone, you may notice some duplicates or similar-looking images in your photo library. You can quickly clean these up with the Gemini Photos iPhone app. Here’s how you can start decluttering your photo library:
- On your iPhone, download Gemini Photos from the App Store.
- Open Gemini Photos and let it scan your library.
- Tap Similar.
- Tap on a month or event to sort your pictures.
- Similar photos will be grouped together, allowing you to select the photos you want to delete in each set.
- Tap Move to Trash.
- Repeat this process for each group of similar photos.
- When you’ve finished going through all your similar photos, tap Empty Trash.
- Tap Your Library to go back through the other categories like Duplicates, Screenshots, and Notes.
- When you’re finished, go to the Photos app on your iPhone.
- Tap Recently Deleted > Select > Delete All to remove all the pictures from your iPhone.
Transferring your pictures to your iPhone from your computer, whether it’s a Mac or a Windows PC, couldn’t be easier. Hopefully, this article has helped you determine which method will work best for you. Also check our new article and discover what is the best photo transfer app for iPhone to use in 2021.
Хотите перенести фотографии, которые хранятся на вашем компьютере с Windows, на iPhone или iPad? Многие из нас делают снимки с помощью профессиональной камеры и сохраняют их на компьютере для последующей обработки, но если вы хотите получить к ним доступ на своем мобильном устройстве, вам необходимо сначала перенести их на свой iPhone или iPad с помощью iTunes. Да, кто-то скажет сейчас «Apple же прекратила поддержку iTunes!», однако на Windows это до сих пор действенный способ переместить фото.
Перенести фото с компьютера на iPhone или iPad можно несколькими способами
В ранних версиях macOS и Windows приложение iTunes используется для синхронизации контента с iPhone, iPad и iPod Touch с помощью проводного или беспроводного подключения. Раньше даже активировать устройство без iTunes было нельзя, сейчас же все гораздо проще. В macOS Catalina функции iTunes перешли к Finder, на Windows многие до сих пор его используют для переноса контента на iPhone и iPad.
Следует отметить, что речь пойдет о перемещении фото с компьютера на iOS, а не наоборот. Перенести фотографии с iPhone на Windows сейчас можно и без iTunes, есть встроенные в операционную систему инструменты для импорта изображений.
Как перенести фотографии с Windows на iPhone или iPad
Если вы ранее не синхронизировали свое устройство с iTunes, вы не сможете воспользоваться функцией беспроводной синхронизации c помощью Wi-Fi в iTunes, и потребуется подключить айфон кабелем. Прежде всего, убедитесь, что вы установили последнюю версию iTunes на свой компьютер, чтобы продолжить эту операцию.
- Подключите iPhone или iPad к компьютеру с Windows с помощью оригинального кабеля USB-Lightning (или USB-USB C) и откройте приложение «iTunes» на своем компьютере.
- Нажмите на значок iPhone или iPad, который находится прямо рядом с вкладкой Музыка, как показано на скриншоте ниже.
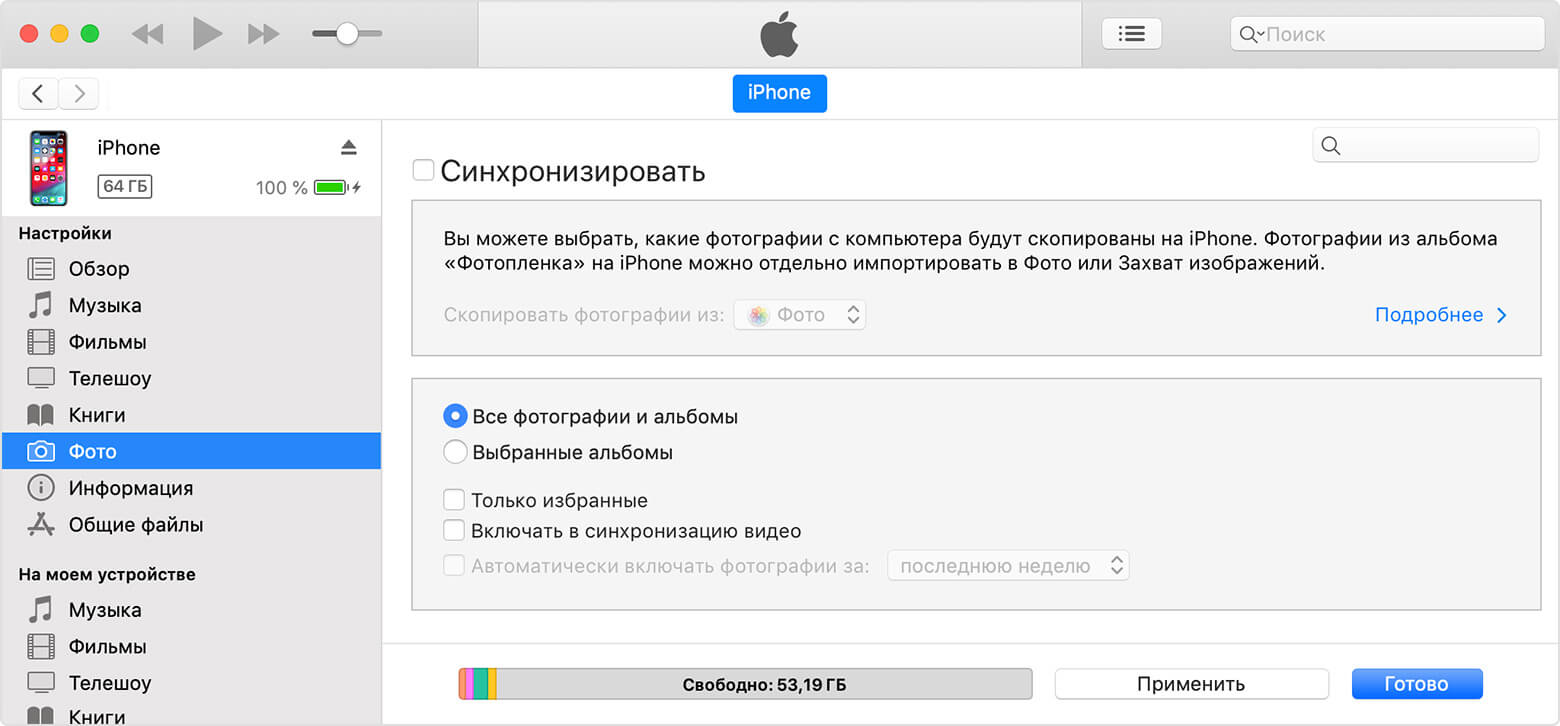
- Теперь перейдите в меню «Фото» в разделе «Настройки» на левой панели и установите флажок рядом пунктом с «Синхронизировать».
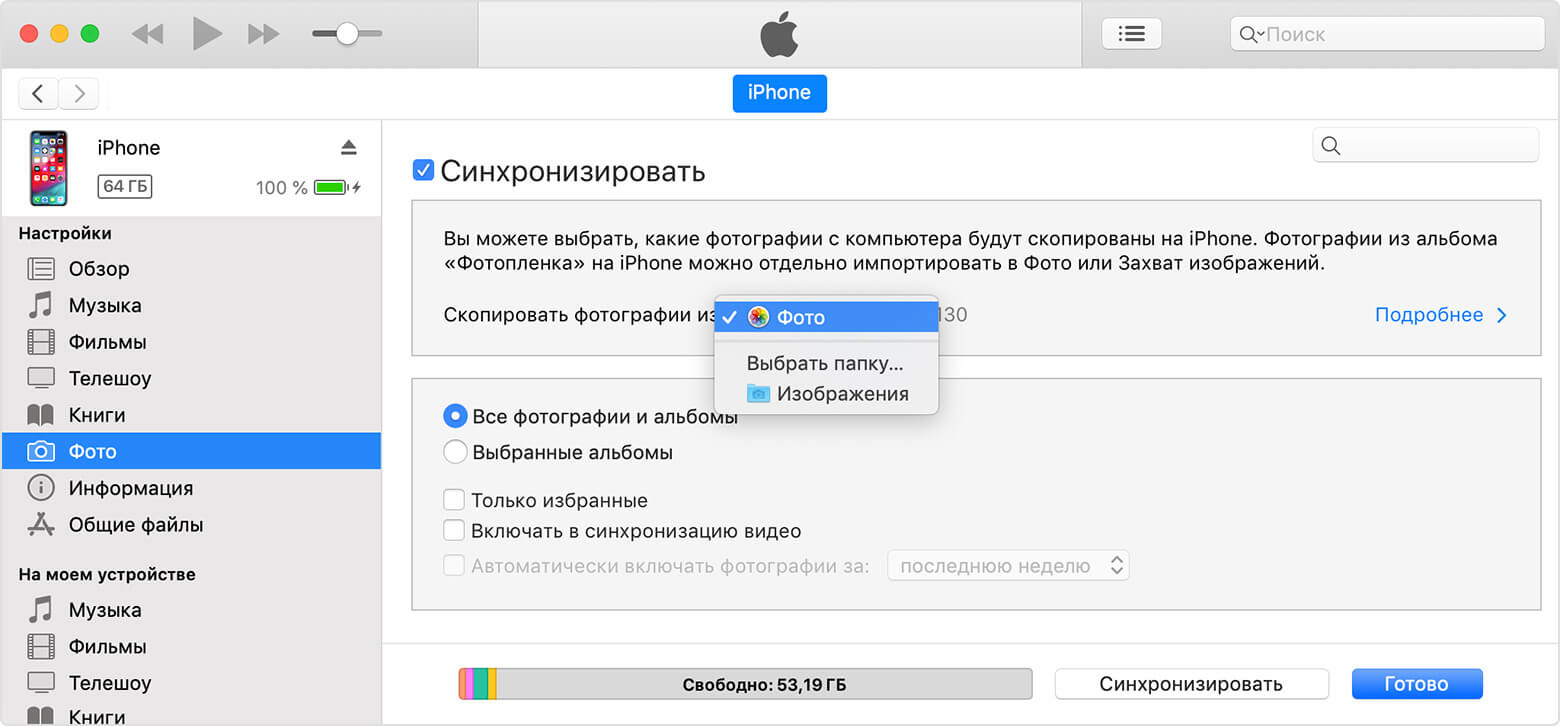
- Здесь вы заметите, что iTunes показывает папку, из которой он копирует фотографии. Если ваши фотографии не хранятся в этом месте, просто нажмите на имя папки — далее «Выбрать папку». Это действие откроет «Проводник» Windows.
- Выберите место, где хранятся фотографии, которые вы хотите перенести, и нажмите «Выбрать папку». Теперь просто нажмите «Синхронизировать» в iTunes.
- Далее iTunes запустит процесс синхронизации и начнет резервное копирование данных на вашем iPhone. В зависимости от количества фотографий и памяти устройства, синхронизация может занять несколько минут.
Перейти на страницу устройства в iTunes
Необходимо включить синхронизацию фото
Выберите папку, где хранятся ваши фотографии
Теперь, если вы перейдете в приложение «Фото» на своем iPhone или iPad, вы сможете получить доступ ко всем фотографиям, которые вы выбрали для синхронизации на своем компьютере.
Если у вас фотографии в формате HEIC, вам может быть полезной статья, чем его открыть.
Впрочем, подключение iPhone или iPad к компьютеру по проводу постепенно уходит в прошлое. Если вы не хотите полагаться на кабель USB-Lightning для передачи контента, вы можете включить синхронизацию по Wi-Fi в iTunes для беспроводной передачи данных. Однако, чтобы это работало, ваш ПК и iPhone / iPad должны быть подключены к одной и той же сети Wi-Fi.
Как передать фото с компьютера без iTunes
Благодаря таким сервисам, как iCloud, Dropbox и Google Drive, вам больше не нужно использовать iTunes для передачи фотографий и видео. Если вы настроили iCloud на своем ПК с Windows, вы можете легко синхронизировать все локально сохраненные фотографии с iCloud и получить к ним доступ на любом устройстве Apple, на котором выполнен вход в ту же учетную запись iCloud, в течение нескольких секунд. А если вы используете Mac, ваши изображения автоматически синхронизируются с iPhone и iPad при помощи iCloud.
WindowsОбзоры приложений для iOS и Mac
Несомненно, перенос фотографий между устройствами Apple при помощи AirDrop упрощает процесс в один клик, но как перенести фотографии с iPhone на Компьютер с Windows 11/10 или наоборот, с компьютера на iPhone.
Учесть тот факт, что в iPhone провод USB Type-C, то вы не сможете подключить телефон к компьютеру или ноутбуку через провод, так как в большинстве случаев нет данного порта. По этой причине, будем перемещать фотографии по единой сети WiFi и через интернет (облачным решением).
Перенос Видео и Фотографий через LANDrop
Скачайте и установите программу LANDrop на ПК с Windows 11/10 и iPhone.
Перенести видео и фотографии с iPhone на ПК
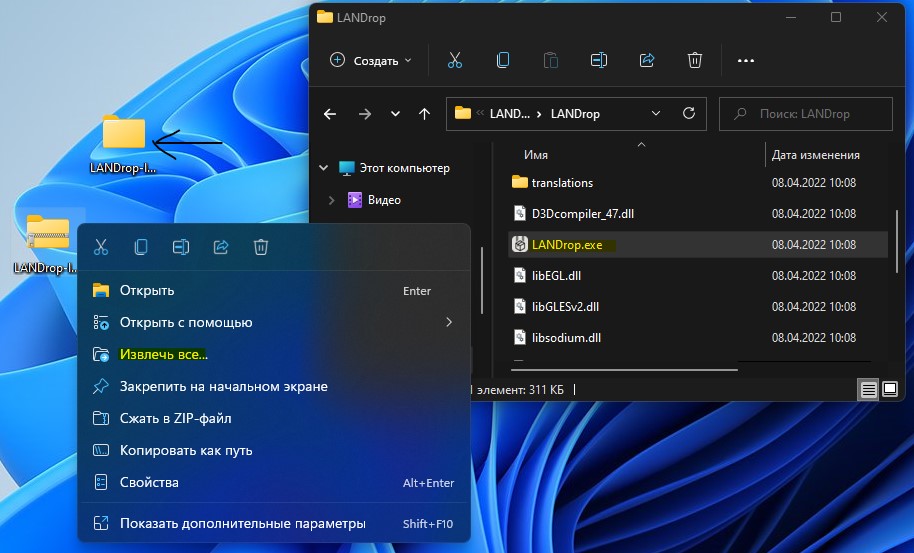
- Перетащите для удобства zip архив на рабочий стол
- Нажмите правой кнопкой по скаченному zip и выберите Извлечь все…
- Появится папка LANDrop в которой нужно запустить LANDrop.exe
- Программа будет запущена и будет отображаться на панели задач
2. Запустите программу на IOS iPhone и:
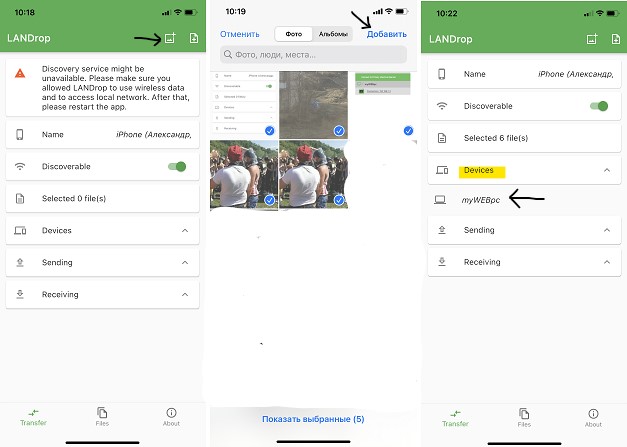
- Нажмите сверху на значок Select Photos/Video
- Выберите нужные фотографии и видео, после чего нажмите на Добавить
- Нажмите на Devices и выберите имя компьютера
Если ПК не отображается, то закройте приложение на телефоне и ПК и запустите их заново, после чего повторите выше действия.
3. Когда на телефоне нажмете на имя компьютера, то на рабочем столе Windows 11/10 отобразиться сообщение о принятии файлов. Нажмите Yes.
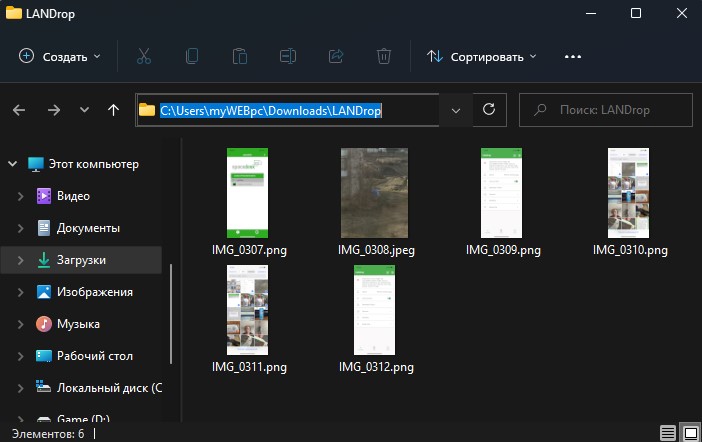
4. После чего фотографии и видео автоматически сохраняться на компьютер в папку загрузки LANDrop.
Перенести видео и фотографий с ПК на iPhone
1. Если нужно перенести фотографии с компьютера Windows 11/10 на iPhone, то запустите программу LANDrop на ПК и iPhone:
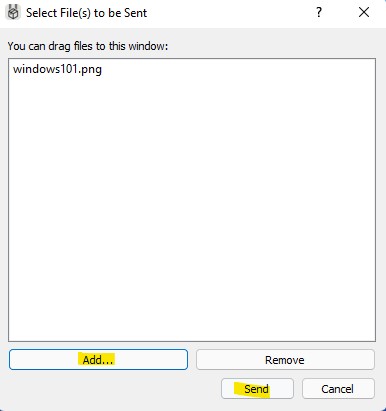
- Нажмите Add… и выберите нужные фото и видео для переноса на Iphone
- Далее нажмите Send
- Выберите свое устройство iPhone и снова нажмите Send
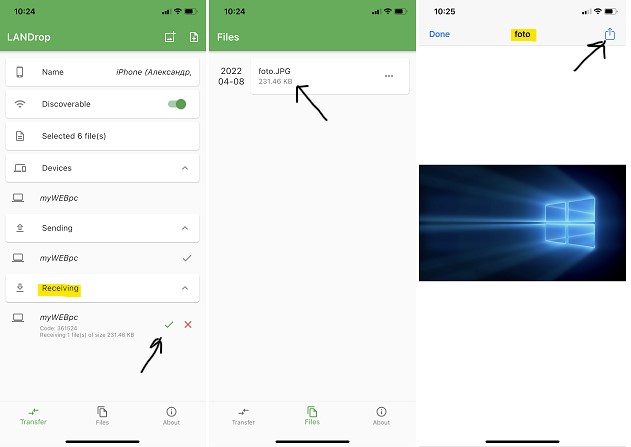
2. На телефоне нажмите принять в графе Receiving, после чего фото или видео будут загружены на телефон по WiFi. Нажмите снизу на Files и вы обнаружите принятые данные, которыми можно поделиться или переместить в нужное вам место (открыв приложение Файлы и папку LANDrop).
Перенести Видео и Фотографии через Telegram
Телеграмм имеет неограниченное место для загрузки данных в защищенную папку Избранное. Установите Telegram на Windows 11/10 и iPhone.
Перенос фото и видео с ПК Windows 11/10 на iPhone
- В телеграмме перейдите во вкладку Избранное
- Нажмите на скрепку, после чего выберите нужные фото и видео
- Появится окошко, где снимите галочку Сжатия, чтобы не снизить качество изображения
- Далее на iphone открываете Telegram и переходите в Избранное
- Нажмите и удерживайте нажатием по фото, чтобы выбрать какие нужно сохранить
- Можно нажать выбрать все элементы или вручную указывать
- Далее снизу нажмите по центру на иконку Отправить
- Выберите куда нужно сохранить
Перенос видео и фото с iPhone на Windows 11/10
- На iPhone перейдите во вкладку Избранное
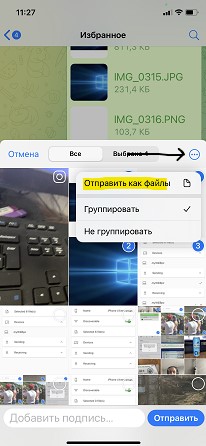
- Нажмите на скрепку, после чего выберите нужные фото и видео
- Далее нажмите на троеточие, и выберите Отправить как файлы, чтобы они не сжались
- Откройте Telegram на ПК с Windows 11/10
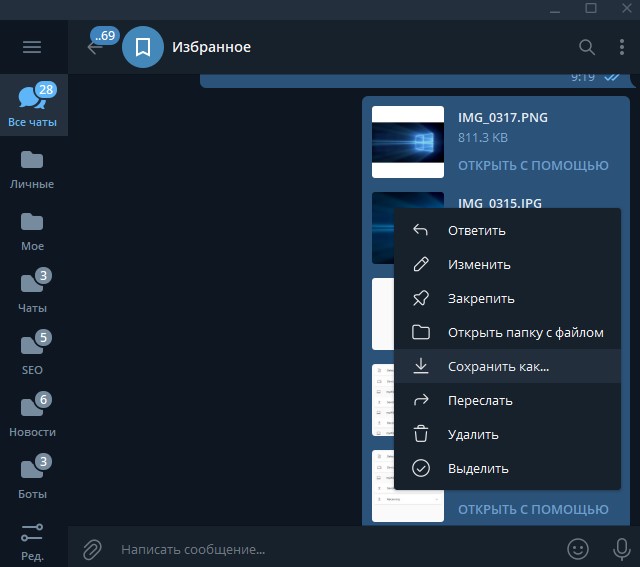
- Выделите мышкой нужные вам фото и видео, зажав левую кнопку мыши и перемещая её
- Далее нажмите правой копкой мыши по фото или видео и выберите Сохранить как
- Укажите удобное вам место на компьютере и сохраните данные
Смотрите еще:
- Как конвертировать формат фото HEIC в JPG
- Как сжать видео, чтобы уменьшить размер видеофайла
- Как отразить экран iPhone или iPad на ПК с Windows 11/10
- Android, IOS, Windows устройства в качестве второго монитора
- Как понизить высокий Пинг в играх
[ Telegram | Поддержать ]
Содержание
- Переносим фотографии с компьютера на iPhone
- Способ 1: Dropbox
- Способ 2: Documents 6
- Способ 3: iTunes
- Способ 4: iTools
- Способ 5: ВКонтакте
- Вопросы и ответы
Благодаря стремительному развитию технологий все стало немного проще. Например, на смену бумажным фотоальбомам пришли компьютеры и смартфоны, на которых гораздо удобнее хранить большие объемы фотографий и, при необходимости, переносить их с одного устройства на другое.
Ниже мы рассмотрим различные способы, позволяющие загрузить фотографии с компьютера на Apple-гаджет. Каждый из них будет удобен в своем случае.
Способ 1: Dropbox
В данном случае вы можете использовать любое облачное хранилище. Мы же рассмотрим дальнейший процесс на примере удобного сервиса Dropbox.
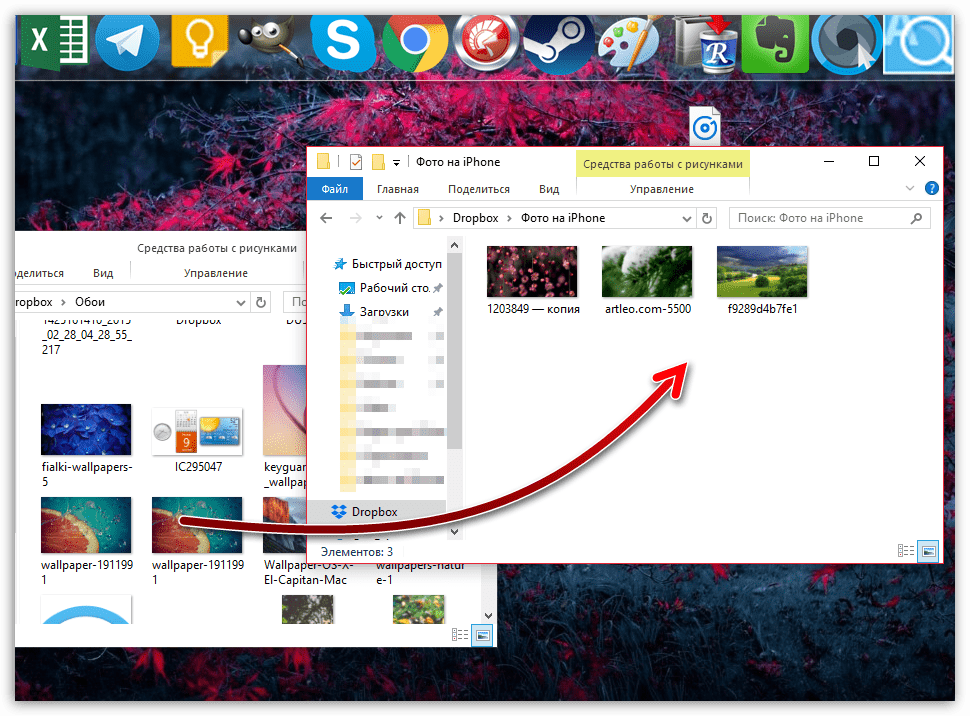
- Откройте на компьютере папку Dropbox. Переместите в нее фотоснимки. Начнется процесс синхронизации, длительность которого будет зависеть от количества и размера выгружаемых фотографий, а также скорости вашего интернет-соединения.
- Как только синхронизация будет завершена, можно запускать Dropbox на iPhone – все фотографии появятся на нем.
- В том случае, если вы хотите выгрузить снимки в память смартфона, откройте изображение, тапните в правом верхнем углу по кнопке меню, а затем выберите кнопку «Экспортировать».
- В новом окне выберите пункт «Сохранить». Подобные действия потребуется выполнить с каждым снимком.
Способ 2: Documents 6
Если и компьютер, и смартфон подключены к одной беспроводной сети, передать фотографии с компьютера можно с помощью Wi-Fi-синхронизации и приложения Documents 6.
Скачать Documents от Readdle
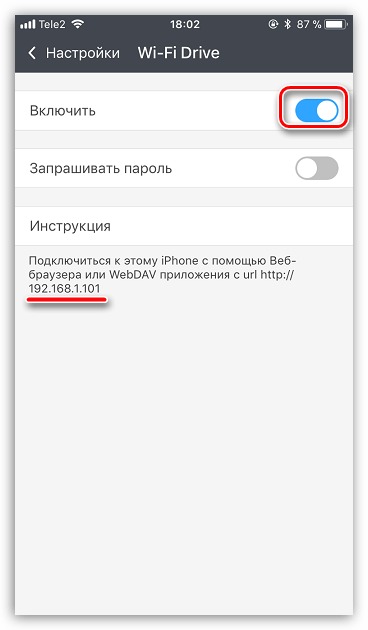
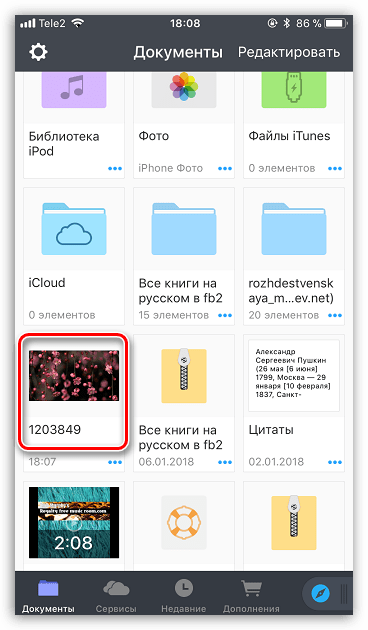
- Запустите на Айфон Documents. Для начала вам потребуется активировать передачу файлов по WiFi. Для этого тапните в верхнем левом углу по иконке с шестеренкой и выберите пункт «Wi-Fi Drive».
- Около параметра «Включить» переведите тумблер в активное положение. Чуть ниже отобразится URL-адрес, по которому потребуется пройти в любом браузере, установленном на компьютере.
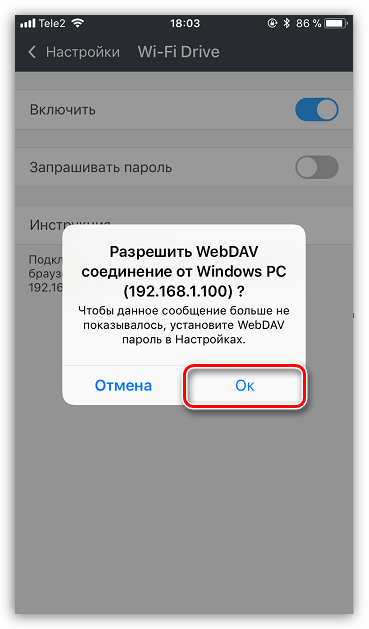
- На телефоне отобразится окно, в котором потребуется предоставить доступ компьютеру.
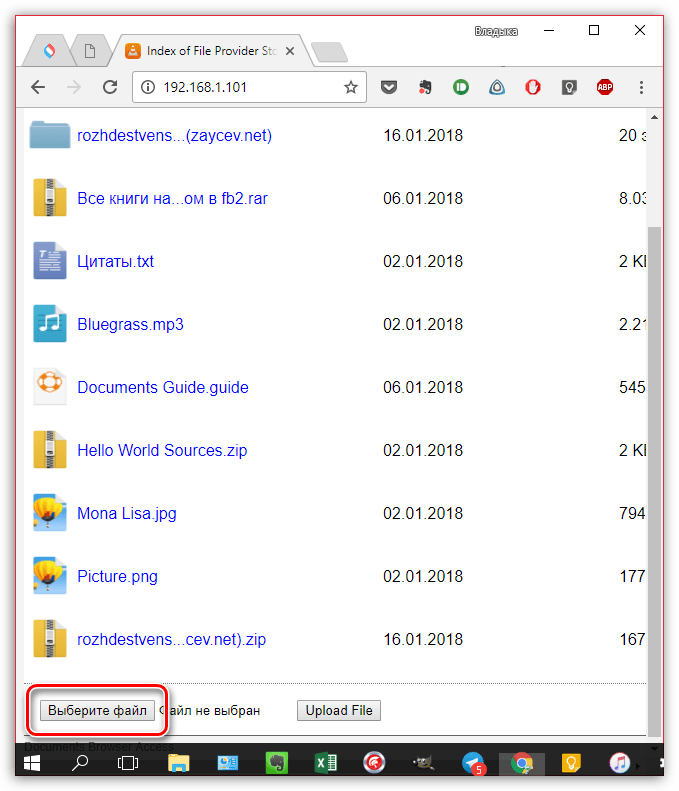
- На экране компьютера высветится окно со всеми файлами, имеющимися в Documents. Чтобы загрузить фотографии, в нижней части окна кликните по кнопке «Выберите файл».
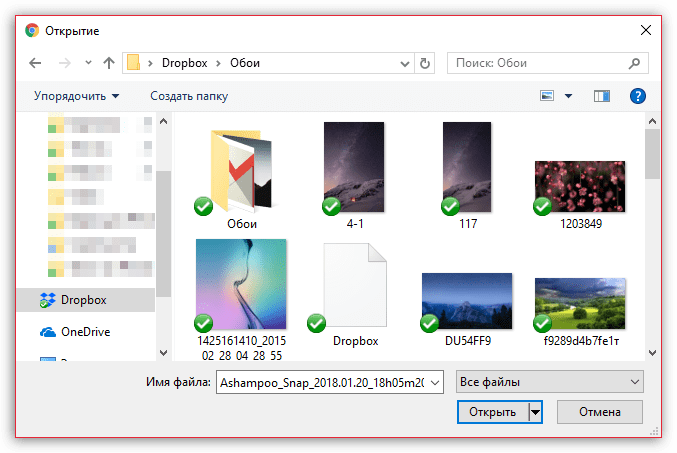
- Когда на экране появится Проводник Windows, выберите снимок, который вы планируете скинуть на телефон.
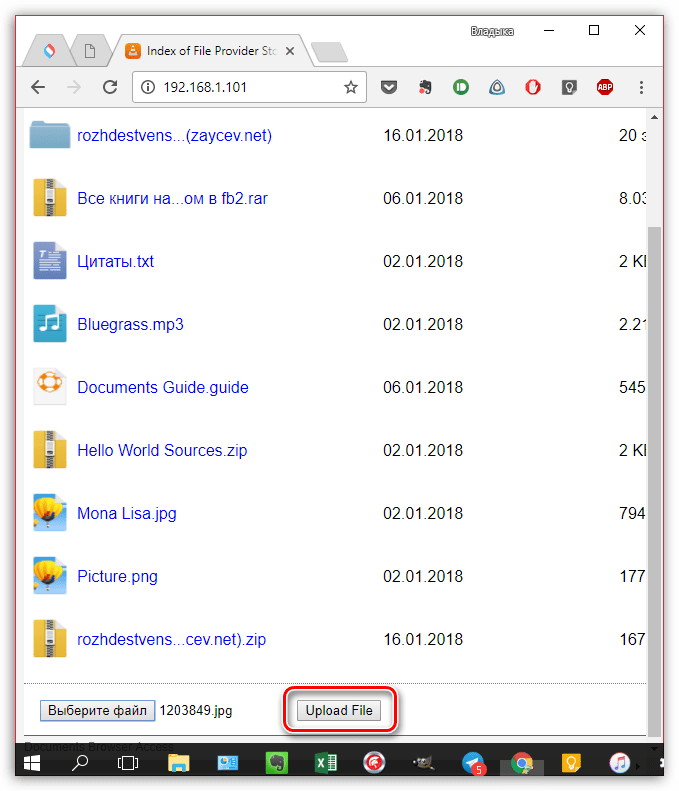
- Для старта загрузки изображения кликните по кнопке «Upload File».
- Спустя мгновение изображение появится в Documents на iPhone.
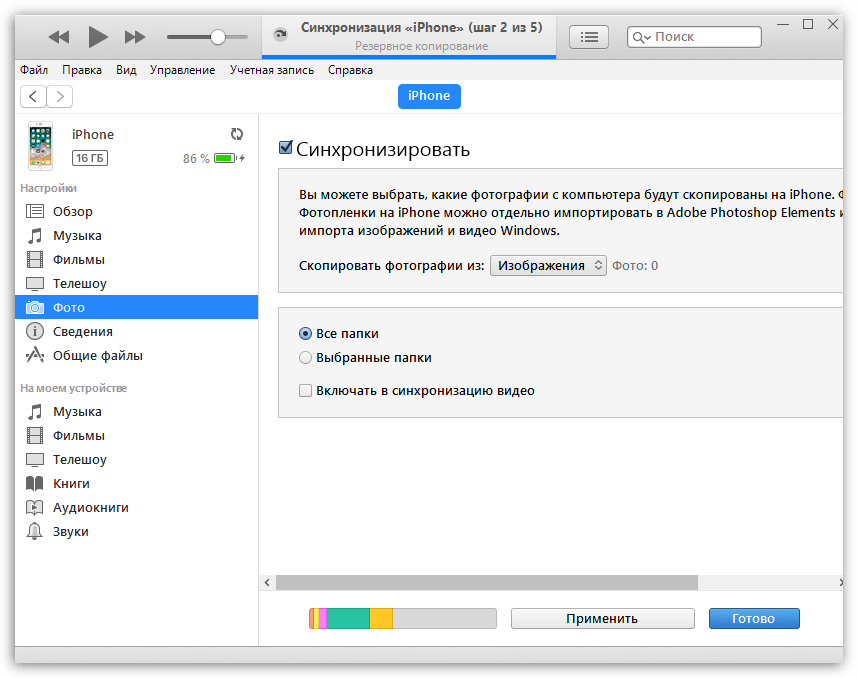
Способ 3: iTunes
Конечно же, фото с компьютера на Айфон могут быть перенесены и с помощью универсального инструмента iTunes. Ранее на нашем сайте уже освещался вопрос переноса фотографий на мобильное устройство с помощью данной программы, поэтому на нем мы останавливаться не будем.
Подробнее: Как перенести фотографии с компьютера на iPhone через iTunes
Способ 4: iTools
К сожалению, Айтюнс никогда не славился удобством и простотой, поэтому на свет появились качественные аналоги. Пожалуй, одним из лучших подобных решений является iTools.
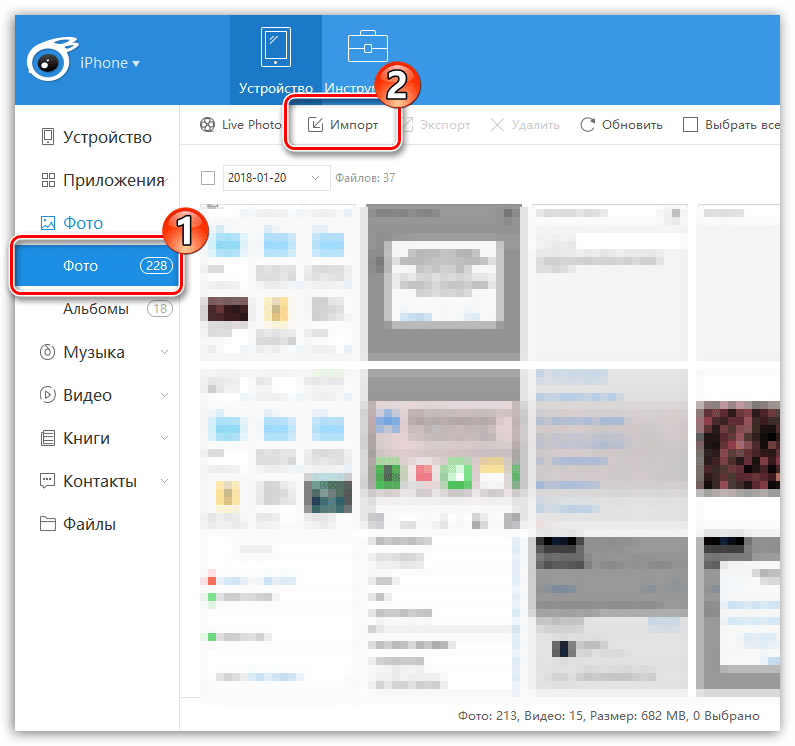
- Подключите смартфон к компьютеру и запустите iTools. В левой области окна программы пройдите ко вкладке «Фото». В верхней части окна кликните по пункту «Импорт».
- В открывшемся Проводнике Windows выберите одну или сразу несколько фотографий, которые планируется отправить на устройство.
- Подтвердите перенос изображений.
- Чтобы iTools смог перенести фотографии в Фотопленку iPhone, на компьютере дополнительно должен быть установлен компонент FotoTrans. Если он у вас отсутствует, программа предложит его инсталлировать.
- Следом начнется перенос изображений. Как только он будет завершен, все файлы появятся в стандартном приложении Фото на Айфон.
Способ 5: ВКонтакте
Такой популярный социальный сервис, как ВКонтакте, может использоваться и в качестве инструмента для переноса фотографий с компьютера на iOS-устройство.
Скачать ВКонтакте
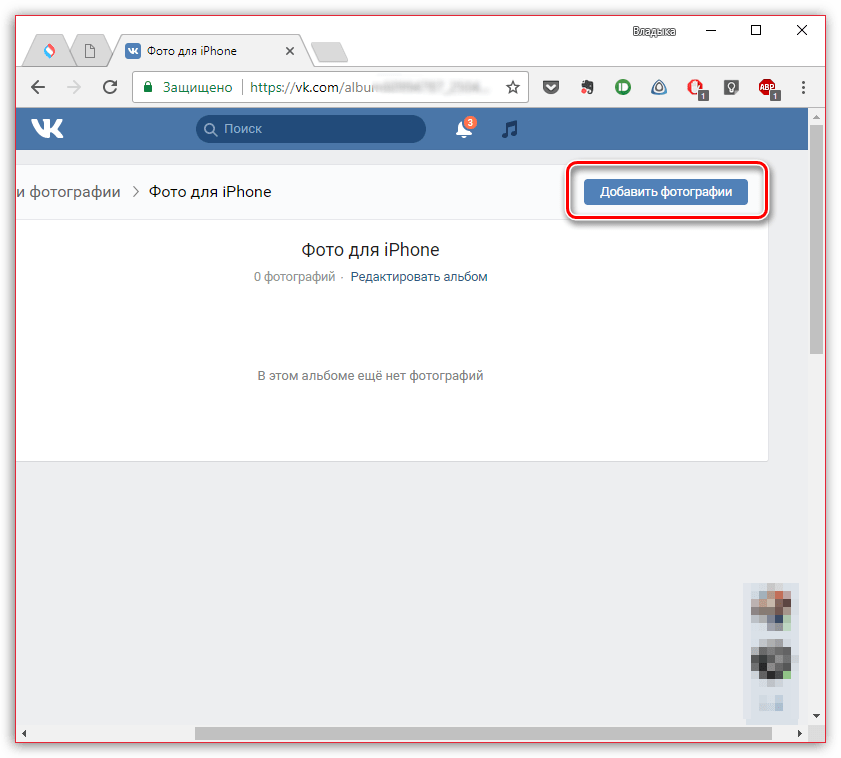
- Перейдите с компьютера на сайт сервиса VK. Пройдите в левой части окна к разделу «Фотографии». В верхнем правом углу кликните по кнопке «Создать альбом».
- Введите название для альбома. По желанию, установите настройки приватности, чтобы, например, изображения были доступны только вам. Кликните по кнопке «Создать альбом».
- Выберите в правом верхнем углу пункт «Добавить фотографии», а затем загрузите необходимые снимки.
- Как только изображения будут выгружены, можно запускать ВКонтакте на iPhone. Пройдя к разделу «Фотографии», на экране вы увидите ранее созданный приватный альбом с загруженными в него снимками.
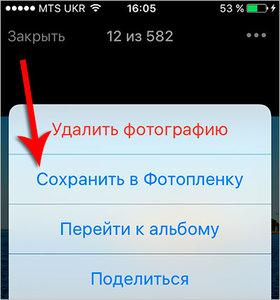
- Чтобы сохранить изображение на устройство, откройте его в полном размере, выберите в правом верхнем углу кнопку меню, а затем пункт «Сохранить в Фотопленку».
Благодаря сторонним инструментам появилась масса вариантов импорта изображений на Айфон с компьютера. Если какой-либо интересный и удобный способ не вошел в статью, поделитесь им в комментариях.
Еще статьи по данной теме:
Помогла ли Вам статья?
Сентябрь 4, 2019
— Mimihack, Факты
Как приятно проводить время с близкими за просмотром семейных фотографий, хранящих самые трепетные моменты. К сожалению, современные тенденции таковы, что основной массив снимков мы храним на ПК или в облачных хранилищах. В нашей статье мы расскажем, как с компьютера перекинуть фото на айфон, чтобы поделиться ими в социальных сетях или распечатать с помощью приложения Mimigram и собрать целый фотоальбом.
- iTunes
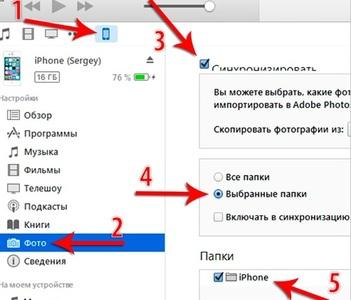
Одним из самых простых способов закинуть на айфон фото с компьютера является использование программы iTunes. Все, что от вас потребуется, — открыть раздел «Изображения» на ПК и создать в нем новую папку, куда необходимо перенести нужные фотографии. Далее следует выполнить несколько простых шагов:
- подключить смартфон к компьютеру;
- открыть приложение iTunes и раздел «Фото»
- синхронизировать айфон и ПК;
- выбрать папку с необходимыми фотографиями;
- применить изменения и дождаться окончания процесса копирования
Важно отметить, что, как только вы скачали фото, удалить изображения с iPhone не удастся. Для удаления снимков необходимо убрать синхронизацию в программе iTunes и принять изменения.
- Яндекс.Диск
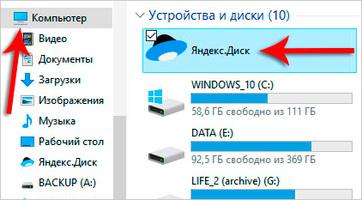
Использование Яндекс.Диска — прекрасный способ скачать фото с компьютера на айфон. Для скачивания необходимо установить специальную программу на ПК и смартфон. Далее на компьютере требуется открыть Яндекс.Диск, создать новую папку и копировать в нее необходимые снимки из галереи. После этого останется только включить Wi-FI и запустить приложение на телефоне. Здесь вы обнаружите новую папку с фотографиями, которые легко сохранить в память смартфона и загрузить в наше приложение для печати.

- Google Фото
Данный сервис позволяет хранить, редактировать и перекидывать фото с компьютера на айфон. Для переноса снимков необходимо выполнить несколько шагов:
- создать аккаунт в Google;
- установить приложение на ПК и выполнить вход;
- в настройках указать, какие папки с изображениями необходимо загрузить;
- после установки программы на смартфон выполнить вход и сохранить фото.
Преимуществами Google Фото является возможность хранить неограниченное количество фотографий, редактировать их по своему усмотрению, создавать коллажи и делиться снимками в социальных сетях.

- Проводник
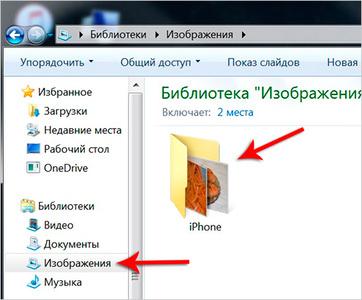
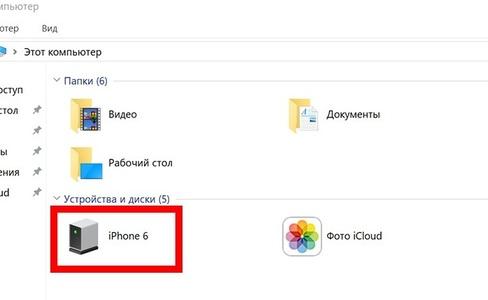
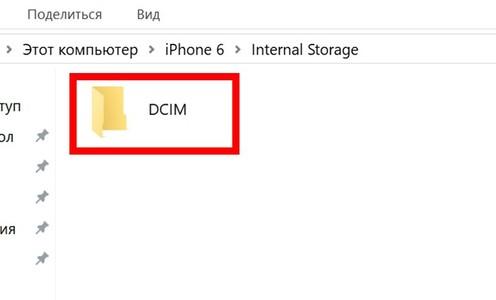
Стандартный способ, как скачать фото с компьютера на айфон. Все, что необходимо, присоединить смартфон к ПК с помощью шнура, в разделе «Компьютер» найти необходимое устройство и папку DCIM и перенести в нее копированные из галереи фото.
- Социальная сеть «ВКонтакте»
Данный способ перекинуть с компьютера фото на айфон также довольно прост. Потребуется зайти в социальную сеть с ПК, создать альбом и загрузить туда необходимые снимки. Остается только авторизоваться ВКонтакте с телефона и сохранить изображения. Помните, что, как правило, при скачивании фотографий из социальной сети их качество несколько ухудшается. А это значит, что заказать фотокнигу или фото в рамке в приложении Mimigram не получится. Поэтому рекомендуем использовать данный метод в последнюю очередь.
Как с айфона скачать фото на компьютер
Бывают ситуации, когда требуется скачать фотографии с айфона на комп или ноутбук. Например, когда необходимо выполнить редактирование и ретушь изображения в профессиональном фотошопе и других редакторах. Для этого также можно использовать несколько простых способов.
- iTunes. Как и в первом случае, когда необходимо перекинуть изображения с компа на смартфон, программа позволяет с легкостью скачивать фото с айфона. Для этого необходимо открыть приложение, выполнить синхронизацию устройств, перейти в раздел «Фото» и перенести необходимые снимки с одного устройства на другое. Данный способ осуществляется как с помощью беспроводной сети Wi-Fi, так и с помощью проводной.
- iCloud. Это облачное хранилище, с помощью которого можно в считанные минуты скачать фото и видео с айфона. Программа позволяет хранить резервные копии изображений, видео, заметок и т.д. Перенос снимков осуществляется в несколько шагов:
- присоединить смартфон к устройству;
- на ПК зайти в «Компьютер», выбрать иконку подключенного устройства, щелкнуть по ней правой кнопкой мыши и выбрать «Импорт».
- В строке «Импортировать изображения» выбрать место для выгрузки снимков и подтвердить импорт.
- В появившемся окне поставить флажки на те фото, которые надо скачать на компьютер.
- «Фотографии» в Windows. Самый простой способ. Достаточно подключить устройство к ПК через кабель, разрешить на смартфоне доступ к изображениям, войти во внутреннее хранилище смартфона, выбрать нужные снимки и скопировать их на компьютер.
- Социальная сеть «ВКонтакте». Как скачать фото с айфона на комп? Принцип идентичен тому, что выполняется при передаче снимков с ПК на смартфон.
Вариантов, с помощью которых можно передать изображения с одного устройства на другое, множество. Главное, чтобы в процессе скачивания не снизилось качество фото.
Для чего скачивать фотографии с компьютера на айфон? Например, чтобы все самые важные и значимые снимки были всегда под рукой. Или чтобы делать крутые подарки с помощью приложения Mimigram. В уникальной программе вы можете заказать изготовление красивой фотокниги, кружки или футболки с собственным фото всего в пару кликов. Приложение доступно для скачивания в App Store или Google Play.
Обратная ситуация, при которой мы хотим скачать фото с айфона на ноутбук или компьютер, возникает, когда требуется отредактировать изображения с помощью профессиональных программ перед печатью. Кроме того, память телефона не безгранична, и зачастую приходится переносить снимки, видео, крупные файлы, чтобы освободить лишние мегабайты.
Узнайте еще больше возможностей вашего смартфона в нашем блоге. Здесь вы найдете материалы не только о том, как скачать фото на компьютер и на айфон, но и как красиво обработать фотографии и быстро распечатать снимки с телефона.
Вам также могут понравиться
Наши продукты

