- Remove From My Forums
-
Question
-
We installed Windows 2019 server core for hosting Exchange 2019 server.
When we try to install OpenSSH.Server in server core,it got failed with below error whereas it is able to install OpenSSH.Server .
Request your help and support to fix the issue
1. PS C:Usersptashraf> Add-WindowsCapability -Online -Name OpenSSH.Server~~~~0.0.1.0
Add-WindowsCapability : Add-WindowsCapability failed. Error code = 0x80072efe
At line:1 char:1
+ Add-WindowsCapability -Online -Name OpenSSH.Server~~~~0.0.1.0
+ ~~~~~~~~~~~~~~~~~~~~~~~~~~~~~~~~~~~~~~~~~~~~~~~~~~~~~~~~~~~~~
+ CategoryInfo : NotSpecified: (:) [Add-WindowsCapability], COMException
+ FullyQualifiedErrorId : Microsoft.Dism.Commands.AddWindowsCapabilityCommand2. PS C:Usersptashraf> Add-WindowsCapability -Online -Name OpenSSH.Client~~~~0.0.1.0
Path :
Online : True
RestartNeeded : False
Ashraf
В современных версиях Windows уже есть встроенный SSH сервер на базе пакета OpenSSH. В этой статье мы покажем, как установить и настроить OpenSSH сервер в Windows 10/11 и Windows Server 2022/2019 и подключиться к нему удаленно по защищенному SSH протоколу (как к Linux).
Содержание:
- Установка сервера OpenSSH в Windows
- Настройка SSH сервера в Windows
- Sshd_config: Конфигурационный файл сервера OpenSSH
- Подключение по SSH к Windows компьютеру
- Логи SSH подключений в Windows
Установка сервера OpenSSH в Windows
Пакет OpenSSH Server включен в современные версии Windows 10 (начиная с 1803), Windows 11 и Windows Server 2022/2019 в виде Feature on Demand (FoD). Для установки сервера OpenSSH достаточно выполнить PowerShell команду:
Get-WindowsCapability -Online | Where-Object Name -like ‘OpenSSH.Server*’ | Add-WindowsCapability –Online
Или при помощи команды DISM:
dism /Online /Add-Capability /CapabilityName:OpenSSH.Server~~~~0.0.1.0
Если ваш компьютер подключен к интернету, пакет OpenSSH.Server будет скачан и установлен в Windows.
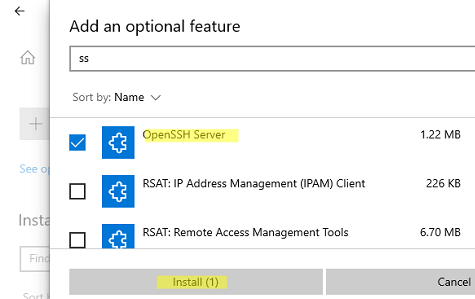
Также вы можете установить сервер OpenSSH в Windows через современную панель Параметры (Settings -> Apps and features -> Optional features -> Add a feature, Приложения -> Управление дополнительными компонентами -> Добавить компонент. Найдите в списке OpenSSH Server и нажмите кнопку Install).
На изолированных от интернета компьютерах вы можете установить компонент с ISO образа Features On Demand (доступен в личном кабинете на сайте Microsoft: MSDN или my.visualstudio.com). Скачайте диск, извлеките его содержимое в папку c:FOD (достаточно распаковать извлечь файл
OpenSSH-Server-Package~31bf3856ad364e35~amd64~~.cab
), выполните установку из локального репозитория:
Add-WindowsCapability -Name OpenSSH.Server~~~~0.0.1.0 -Online -Source c:FOD
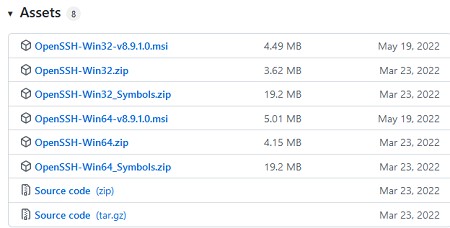
Также доступен MSI установщик OpenSSH для Windows в официальном репозитории Microsoft на GitHub (https://github.com/PowerShell/Win32-OpenSSH/releases/). Например, для Windows 10 x64 нужно скачать и установить пакет OpenSSH-Win64-v8.9.1.0.msi. Следующая PowerShell команда скачает MSI файл и установит клиент и сервер OpenSSH:
Invoke-WebRequest https://github.com/PowerShell/Win32-OpenSSH/releases/download/v8.9.1.0p1-Beta/OpenSSH-Win64-v8.9.1.0.msi -OutFile $HOMEDownloadsOpenSSH-Win64-v8.9.1.0.msi -UseBasicParsing
msiexec /i c:usersrootdownloadsOpenSSH-Win64-v8.9.1.0.msi
Также вы можете вручную установить OpenSSH сервер в предыдущих версиях Windows (Windows 8.1, Windows Server 2016/2012R2). Пример установки Win32-OpenSSH есть в статье “Настройка SFTP сервера (SSH FTP) в Windows”.
Чтобы проверить, что OpenSSH сервер установлен, выполните:
Get-WindowsCapability -Online | ? Name -like 'OpenSSH.Ser*'
State : Installed

Настройка SSH сервера в Windows
После установки сервера OpenSSH в Windows добавляются две службы:
- ssh-agent (OpenSSH Authentication Agent) – можно использовать для управления закрытыми ключами если вы настроили SSH аутентификацию по ключам;
- sshd (OpenSSH SSH Server) – собственно сам SSH сервер.
Вам нужно изменить тип запуска службы sshd на автоматический и запустить службу с помощью PowerShell:
Set-Service -Name sshd -StartupType 'Automatic'
Start-Service sshd

С помощью nestat убедитесь, что теперь в системе запущен SSH сервер и ждет подключений на порту TCP:22 :
netstat -na| find ":22"

Проверьте, что включено правило брандмауэра (Windows Defender Firewall), разрешающее входящие подключения к Windows по порту TCP/22.
Get-NetFirewallRule -Name *OpenSSH-Server* |select Name, DisplayName, Description, Enabled
Name DisplayName Description Enabled
---- ----------- ----------- -------
OpenSSH-Server-In-TCP OpenSSH SSH Server (sshd) Inbound rule for OpenSSH SSH Server (sshd) True

Если правило отключено (состоянии Enabled=False) или отсутствует, вы можете создать новое входящее правило командой New-NetFirewallRule:
New-NetFirewallRule -Name sshd -DisplayName 'OpenSSH Server (sshd)' -Enabled True -Direction Inbound -Protocol TCP -Action Allow -LocalPort 22
Рассмотрим, где храниться основные компоненты OpenSSH:
- Исполняемые файлы OpenSSH Server находятся в каталоге
C:WindowsSystem32OpenSSH
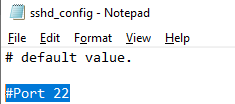
(sshd.exe, ssh.exe, ssh-keygen.exe, sftp.exe и т.д.) - Конфигурационный файл sshd_config (создается после первого запуска службы):
C:ProgramDatassh - Файлы authorized_keys и ssh ключи можно хранить в профиле пользователей:
%USERPROFILE%.ssh
Sshd_config: Конфигурационный файл сервера OpenSSH
Настройки сервере OpenSSH хранятся в конфигурационном файле %programdata%sshsshd_config. Это обычный текстовый файл с набором директив. Для редактирования можно использовать любой текстовый редактор (я предпочитаю notepad++). Можно открыть с помощью обычного блокнота:
start-process notepad C:Programdatasshsshd_config
Например, чтобы запретить SSH подключение для определенного доменного пользователя (и всех пользователей указанного домена), добавьте в конце файле директивы:
DenyUsers winitpro[email protected]
DenyUsers corp*
Чтобы разрешить подключение только для определенной доменной группы:
AllowGroups winitprosshadmins
Либо можете разрешить доступ для локальной группы:
AllowGroups sshadmins
По умолчанию могут к openssh могут подключаться все пользователи Windows. Директивы обрабатываются в следующем порядке: DenyUsers, AllowUsers, DenyGroups,AllowGroups.
Можно запретить вход под учетными записями с правами администратора, в этом случае для выполнения привилегированных действий в SSH сессии нужно делать runas.
DenyGroups Administrators
Следующие директивы разрешают SSH доступ по ключам (SSH аутентификации в Windows с помощью ключей описана в отдельной статье) и по паролю:
PubkeyAuthentication yes
PasswordAuthentication yes
Вы можете изменить стандартный SSH порт TCP/22, на котором принимает подключения OpenSSH в конфигурационном файле sshd_config в директиве Port.
После любых изменений в конфигурационном файле sshd_config нужно перезапускать службу sshd:
restart-service sshd
Подключение по SSH к Windows компьютеру
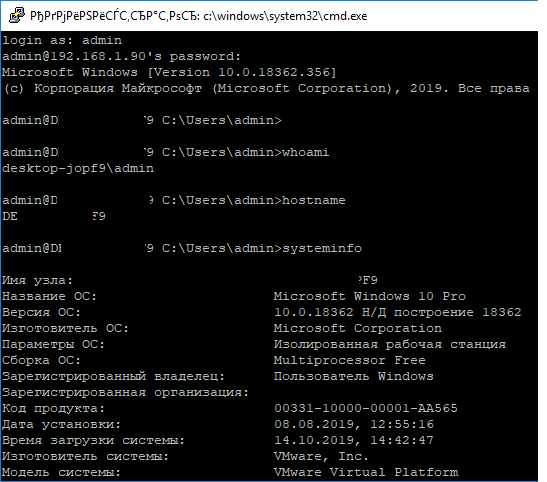
Теперь вы можете попробовать подключиться к своей Windows 10 через SSH клиент (в этом примере я использую putty).
Вы можете использовать встроенный SSH клиентом Windows для подключения к удаленному хосту. Для этого нужно в командной строке выполнить команду:
ssh [email protected]
В этом примере
alexbel
– имя пользователя на удаленном Windows компьютере, и 192.168.31.102 – IP адрес или DNS имя компьютера.
Обратите внимание что можно использовать следующие форматы имен пользователей Windows при подключении через SSH:
-
[email protected]
– локальный пользователь Windows -
[email protected]@server1
–пользователь Active Directory (в виде UPN) или аккаунт Microsoft/ Azure(Microsoft 365) -
winitpro[email protected]
– NetBIOS формат имени
В домене Active Directory можно использовать Kerberos аутентификацию в SSH. Для этого в sshd_config нужно включить параметр:
GSSAPIAuthentication yes
После этого можно прозрачно подключать к SSH сервер с Windows компьютера в домене из сессии доменного подключается. В этом случае пароль пользователя не указывается и выполняется SSO аутентификация через Kerberos:
ssh -K server1
При первом подключении появится стандартный запрос на добавление узла в список известных SSH хостов.
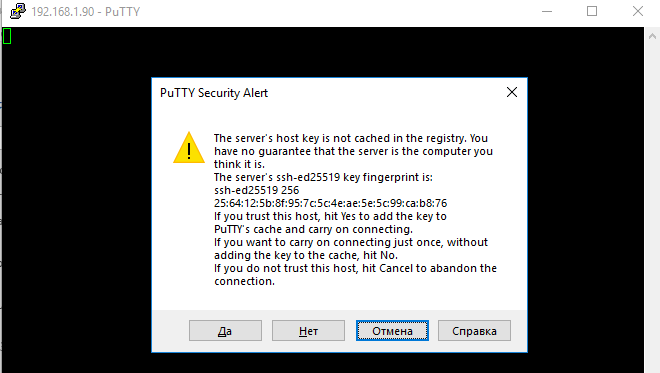
Нажимаем Да, и в открывшееся окне авторизуемся под пользователем Windows.
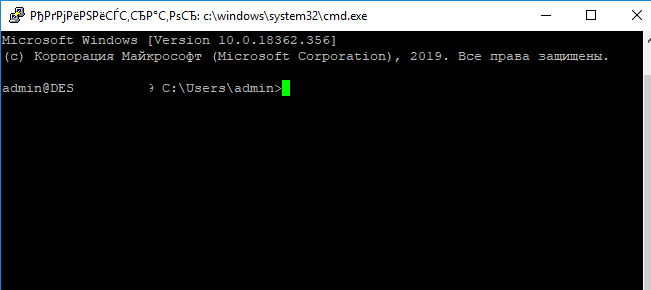
При успешном подключении запускается командная оболочка cmd.exe со строкой-приглашением.
[email protected] C:Usersadmin>
В командной строке вы можете выполнять различные команды, запускать скрипты и программы.
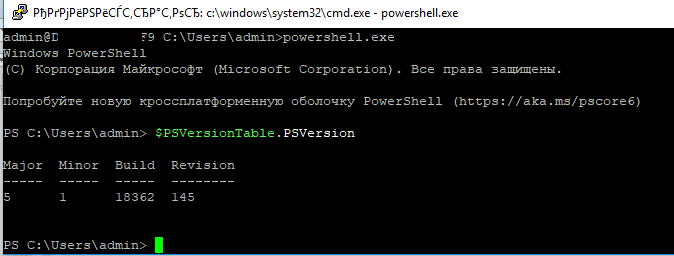
Я предпочитаю работать в командной строке PowerShell. Чтобы запустить интерпретатор PowerShell, выполните:
powershell.exe
Чтобы изменить командную оболочку (Shell) по умолчанию в OpenSSH с cmd.exe на PowerShell, внесите изменение в реестр такой командой:
New-ItemProperty -Path "HKLM:SOFTWAREOpenSSH" -Name DefaultShell -Value "C:WindowsSystem32WindowsPowerShellv1.0powershell.exe" -PropertyType String –Force
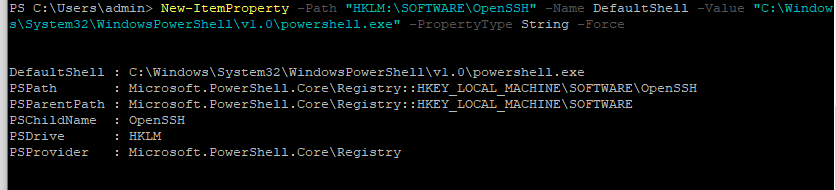
Осталось перезапустить SSH подключение и убедиться, что при подключении используется командный интерпретатор PowerShell (об этом свидетельствует приглашение
PS C:Usersadmin>
).
В SSH сессии запустилась командная строка PowerShell, в которой работают привычные функции: авто дополнение, раскраска модулем PSReadLine, история команд и т.д. Если текущий пользователь входит в группу локальных администраторов, то все команды в его сессии выполняются с повышенными правами даже при включенном UAC.
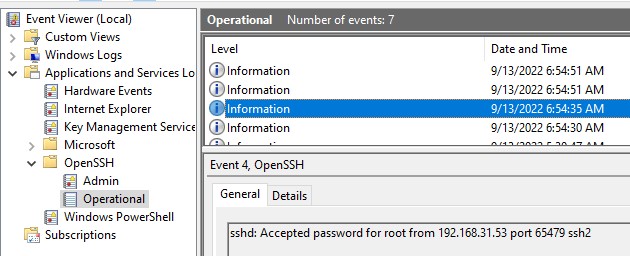
Логи SSH подключений в Windows
В Windows логи подключений к SSH серверу по-умолчанию пишутся не в текстовые файлы, а в отдельный журнал событий через Event Tracing for Windows (ETW). Откройте консоль Event Viewer (
eventvwr.msc
>) и перейдите в раздел Application and services logs -> OpenSSH -> Operational.
При успешном подключении с помощью к SSH серверу с помощью пароля в журнале появится событие:
EventID: 4
sshd: Accepted password for root from 192.168.31.53 port 65479 ssh2
Если была выполнена аутентификация с помощью SSH ключа, событие будет выглядеть так:
sshd: Accepted publickey for locadm from 192.168.31.53 port 55772 ssh2: ED25519 SHA256:FEHDEC/J72Fb2zC2oJNb45678967kghH43h3bBl31ldPs
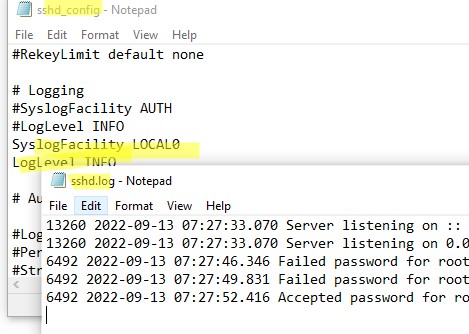
Если вы хотите, чтобы логи писались в локальный текстовый файл, нужно в файле sshd_config включить параметры:
SyslogFacility LOCAL0
LogLevel INFO
Перезапустите службу sshd и провеьте, что теперь логи SSH сервера пишутся в файл C:ProgramDatasshlogssshd.log
You do know you can install SSH directly in Windows 10 by using Add Feature option, correct? No need to download an external module/tool unless the builtin one does not provide all you are after.
Installation of OpenSSH For Windows Server 2019 and Windows 10
# Install the OpenSSH Client
Add-WindowsCapability -Online -Name OpenSSH.Client~~~~0.0.1.0

# Install the OpenSSH Server
Add-WindowsCapability -Online -Name OpenSSH.Server~~~~0.0.1.0
Using the GUI
How to Enable and Use Windows 10’s New Built-in SSH Commands
Yet, if you do decide to use external stuff, then, Always test destructive (CUD = Create, Update, delete) code before true implementation.
Find-Module -Name 'OpenSSHUtils' -Verbose

<#
VERBOSE: Repository details, Name = 'PSGallery', Location = 'https://www.powershellgallery.com/api/v2'; IsTrusted = 'False'; IsRegistered = 'True'.
VERBOSE: Repository details, Name = 'PSGallery', Location = 'https://www.powershellgallery.com/api/v2'; IsTrusted = 'False'; IsRegistered = 'True'.
VERBOSE: Using the provider 'PowerShellGet' for searching packages.
VERBOSE: The -Repository parameter was not specified.  PowerShellGet will use all of the registered repositories.
VERBOSE: Getting the provider object for the PackageManagement Provider 'NuGet'.
VERBOSE: The specified Location is 'https://www.powershellgallery.com/api/v2' and PackageManagementProvider is 'NuGet'.
VERBOSE: Searching repository 'https://www.powershellgallery.com/api/v2/FindPackagesById()?id='OpenSSHUtils'' for ''.
VERBOSE: Total package yield:'1' for the specified package 'OpenSSHUtils'.

Version              Name                                Repository           Description
-------              ----                                ----------           -----------
1.0.0.1              OpenSSHUtils                        PSGallery            Configure OpenSSH for Windows related security settings like file owner and permissions.
#>


Find-Module -Name 'OpenSSHUtils' -Verbose |
Save-Module -Path "$env:USERPROFILEDocumentsWindowsPowerShellModules" -Verbose -WhatIf
<#
VERBOSE: Repository details, Name = 'PSGallery', Location = 'https://www.powershellgallery.com/api/v2'; IsTrusted = 'False'; IsRegistered = 'True'.
VERBOSE: Repository details, Name = 'PSGallery', Location = 'https://www.powershellgallery.com/api/v2'; IsTrusted = 'False'; IsRegistered = 'True'.
VERBOSE: Using the provider 'PowerShellGet' for searching packages.
VERBOSE: The -Repository parameter was not specified.  PowerShellGet will use all of the registered repositories.
VERBOSE: Getting the provider object for the PackageManagement Provider 'NuGet'.
VERBOSE: The specified Location is 'https://www.powershellgallery.com/api/v2' and PackageManagementProvider is 'NuGet'.
VERBOSE: Searching repository 'https://www.powershellgallery.com/api/v2/FindPackagesById()?id='OpenSSHUtils'' for ''.
VERBOSE: Total package yield:'1' for the specified package 'OpenSSHUtils'.
VERBOSE: Repository details, Name = 'PSGallery', Location = 'https://www.powershellgallery.com/api/v2'; IsTrusted = 'False'; IsRegistered = 'True'.
VERBOSE: Using the provider 'PowerShellGet' for searching packages.
VERBOSE: Using the specified source names : 'PSGallery'.
VERBOSE: Getting the provider object for the PackageManagement Provider 'NuGet'.
VERBOSE: The specified Location is 'https://www.powershellgallery.com/api/v2' and PackageManagementProvider is 'NuGet'.
VERBOSE: Searching repository 'https://www.powershellgallery.com/api/v2/FindPackagesById()?id='OpenSSHUtils'' for ''.
VERBOSE: Total package yield:'1' for the specified package 'OpenSSHUtils'.
What if: Performing the operation "Save Package" on target "'OpenSSHUtils' to location 'C:UsersDanielDocumentsWindowsPowerShellModules'".
#>

Install-Module -Name 'OpenSSHUtils' -Verbose -WhatIf

<#
VERBOSE: Using the provider 'PowerShellGet' for searching packages.
VERBOSE: The -Repository parameter was not specified.  PowerShellGet will use all of the registered repositories.
VERBOSE: Getting the provider object for the PackageManagement Provider 'NuGet'.
VERBOSE: The specified Location is 'https://www.powershellgallery.com/api/v2' and PackageManagementProvider is 'NuGet'.
VERBOSE: Searching repository 'https://www.powershellgallery.com/api/v2/FindPackagesById()?id='OpenSSHUtils'' for ''.
VERBOSE: Total package yield:'1' for the specified package 'OpenSSHUtils'.
What if: Performing the operation "Install-Module" on target "Version '1.0.0.1' of module 'OpenSSHUtils'".
#>
Windows Server 2019 includes OpenSSH as an optional feature for the first time, thus simplifying installation and configuration. However, errors in earlier builds of the operating system prevent a successful activation of the Secure Shell (SSH) server. In Windows Server Update Services (WSUS) environments, OpenSSH has the same problems as Remote Server Administration Tools (RSAT).
Contents
- OpenSSH server is not included in the operating system
- Installation via the GUI
- Adding an OpenSSH server via PowerShell
- Faulty builds
- Problems with WSUS
- Activating SSH-Server
- Testing the connection
- Author
- Recent Posts

Wolfgang Sommergut has over 20 years of experience in IT journalism. He has also worked as a system administrator and as a tech consultant. Today he runs the German publication WindowsPro.de.
By porting OpenSSH to Windows, Microsoft made it easier to manage heterogeneous environments. You can remotely administer Linux computers via SSH from Windows, and thanks to the new OpenSSH server, the reverse is now also possible. In addition, PowerShell Core supports remoting via SSH, even between different OSes.
OpenSSH server is not included in the operating system
One would expect that a system component with such strategic importance is delivered as part of the operating system and can be installed as a feature via the Server Manager or PowerShell.
However, Microsoft has decided to provide OpenSSH as an optional feature (also called a «Feature on Demand»). This unifies the installation between the client and server OSes. The following description therefore also applies to Windows 10 from release 1803 onwards.
Installation via the GUI
To install OpenSSH server, start Settings and then go to Apps > Apps and Features > Manage Optional Features. As you can see from the list of installed components, the SSH client is already installed by default. The server, on the other hand, you need to add using the Add Features option.

Installing the OpenSSH server via the Settings app
In the list above, select OpenSSH server and click on the Install button that appears. Windows will now download the required files over the internet. If an error occurs, you will not receive a message from the Settings app, but it will simply jump back to the list of features.
Adding an OpenSSH server via PowerShell
In contrast, PowerShell provides more transparency. To find the exact name of the required package, enter the following command:
Get-WindowsCapability -Online | ? name -like *OpenSSH.Server*
Finally, add the name shown to Add-WindowsCapability:

Adding an OpenSSH Server via PowerShell
Alternatively, you can pass on the output via a pipe:
Get-WindowsCapability -Online | ? name -like *OpenSSH.Server* | Add-WindowsCapability -Online
Faulty builds
There are at least two reasons why you may encounter problems here. If the build of the system is older than 17763.194, you will see this error:
Add-WindowsCapability failed. Error code = 0x800f0950

The installation of OpenSSH server fails on earlier builds of Windows Server 2019.
In this case, you need a current cumulative update to fix the problem (documented here).
Problems with WSUS
A further hurdle arises if the server, which is usually the case, is updated via WSUS. Microsoft delivers features on demand bypassing WSUS, so you don’t get them via the internal update server.
Therefore, it is not unlikely that PowerShell will present the following error here:
Error with "Add-WindowsCapability". Error code: 0x8024002e
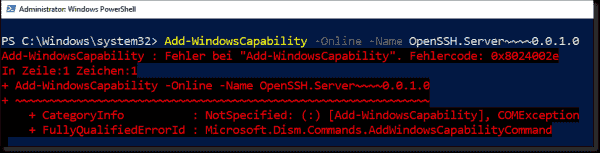
Error while installing OpenSSH as an optional feature in WSUS environments
In the eventlog, you will then find an entry with ID 1001 stating that the OpenSSH-Server-Package is not available.
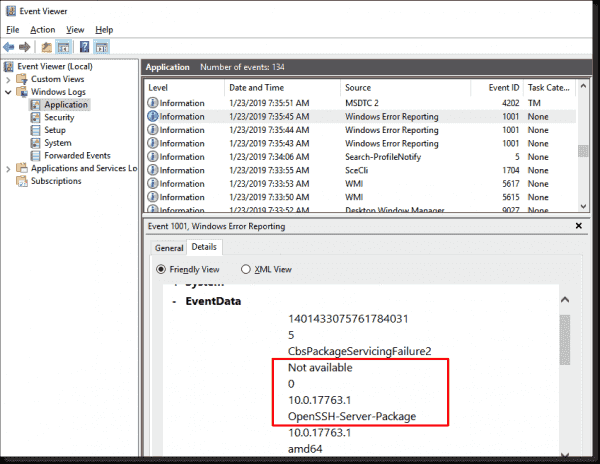
Eventlog entry when adding OpenSSH server as optional component in a WSUS environment
As with the RSAT, a remedy is to allow Windows to load optional features directly from Microsoft Update via group policy. This setting is «Specify settings for optional component installation and component repair,» and you can find it under Computer Configuration > Policies > Administrative Templates > System.

Allowing WSUS clients to access Windows Update using Group Policy
At the same time, you must ensure that neither the setting «Do not connect to Windows Update Internet locations» nor «Remove access to use all Windows Update features» is in effect.
The latter may have been enabled to prevent users from manually downloading feature updates. This primarily affects Windows 10 rather than the server.
Activating SSH-Server
OpenSSH Server installs two services that are not yet running and whose startup type is manual and disabled. If you want to use SSH regularly, you will want to start the services automatically.
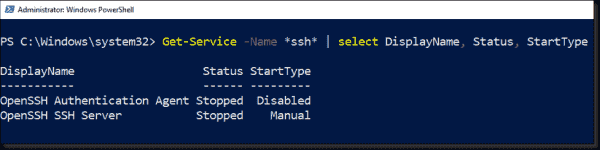
Displaying the startup type and status of SSH services with PowerShell
You can configure this via the GUI services, but the fastest way is by using PowerShell:
Set-Service sshd -StartupType Automatic
Set-Service ssh-agent -StartupType Automatic
To put the SSH server into operation immediately, you must also start the two services manually:
Start-Service sshd
Start-Service ssh-agent
This command:
Get-Service -Name *ssh* | select DisplayName, Status, StartType
checks if the settings for the two services are correct and whether they were started successfully. Now you can verify if the firewall rule for incoming SSH connections has been properly activated:
Get-NetFirewallRule -Name *SSH*
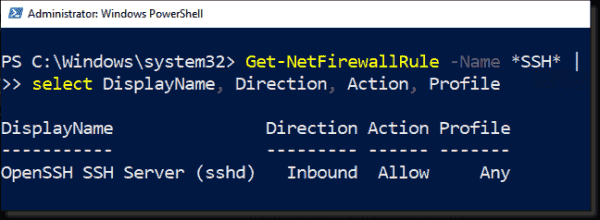
Checking the firewall rule for SSH
Testing the connection
If this condition is also fulfilled, the connection test is good to go. From a Windows 10 PC or a Linux computer, you can connect to the freshly configured server:
ssh <Name-of-Server>
This will direct you at the old command prompt, but you can also start PowerShell there.
Subscribe to 4sysops newsletter!
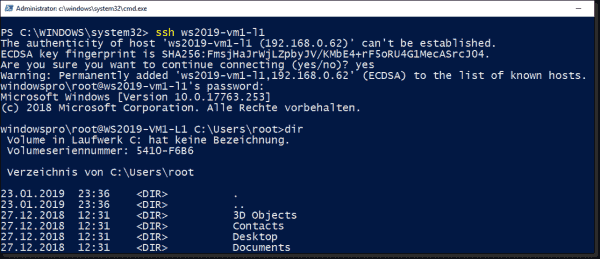
Establish a connection to a freshly installed SSH server
Finally, you should consider whether you would like to use public key authentication for security reasons. This also increases user comfort because you no longer have to enter a password. This guide describes how to do this.
![]()
![]()
- Remove From My Forums
-
Question
-
Hi Folks,
i am running Server 2019, Version: 1809, Build: 17763.678. When I try to install OpenSSH Server, I get the following errors:
From Apps & Features, Add a Feature
- OpenSSH Server Install failed, contact your administrator to get this feature
From Powershell
PS C:Windowssystem32> Add-WindowsCapability -Online -Name OpenSSH.Server~~~~0.0.1.0
Add-WindowsCapability : Add-WindowsCapability failed. Error code = 0x800f0954
At line:1 char:1
+ Add-WindowsCapability -Online -Name OpenSSH.Server~~~~0.0.1.0
+ ~~~~~~~~~~~~~~~~~~~~~~~~~~~~~~~~~~~~~~~~~~~~~~~~~~~~~~~~~~~~~
    + CategoryInfo          : NotSpecified: (:) [Add-WindowsCapability], COMException
    + FullyQualifiedErrorId : Microsoft.Dism.Commands.AddWindowsCapabilityCommand
Please advise on how to get past this error and install OpenSSH Server.
Thanks.
Answers
-
Might try gpedit.msc then;
Computer ConfigurationAdministrative TemplatesSystem
Specify settings for optional component installation and component repair EnabledAlso check the box for
Download repair content and optional features directly from Windows Update instead of Windows Server Update Services (WSUS)
Regards, Dave Patrick ….
Microsoft Certified Professional
Microsoft MVP [Windows Server] Datacenter ManagementDisclaimer: This posting is provided «AS IS» with no warranties or guarantees, and confers no rights.
-
Marked as answer by
Sunday, September 8, 2019 5:14 AM
-
Edited by
Dave PatrickMVP
Sunday, September 8, 2019 10:24 AM
-
Marked as answer by
содержание
шаги установки
Windows10 [SC] OpenSCManager не удалось 5 решение
Устранение неполадок, связанных с отклонением запроса на соединение SSH
OpenSSH на основе PowerShell:https://github.com/PowerShell/Win32-OpenSSH/releases
Подробные инструкции можно найти на Github.Wiki, шаги установки:
шаги установки
1. Введите ссылку для загрузки последней версии OpenSSH-Win64.zip.(64-битная система), Распаковать в D: DEVELOPEWORKS OpenSSH-Win64
2. Откройте cmd, cd в D: DEVELOPEWORKS OpenSSH-Win64(инструкция по установке), Выполнение заказа:
powershell.exe -ExecutionPolicy Bypass -File install-sshd.ps1
3. Работа команды SSH:
# Настроить автоматический запуск службы
sc config sshd start= auto

 # Сделать запуск службы вручную
sc config sshd start= demand

 # Запустить службу sshd
net start sshd

 # Удалить службу sshd
sc delete sshd

 # Остановить службу sshd
sc stop sshd
Запуск и установка автоматического запуска:
# Настроить автоматический запуск службы
sc config sshd start= auto

 # Запустить службу sshd
net start sshd
Служба уже установлена. Порт по умолчанию такой же, как 22. Имя пользователя и пароль по умолчанию — это имя и пароль учетной записи Windows. Конечно, брандмауэру все еще необходимо установить соответствующий порт для разрешения связи.
Windows10 [SC] OpenSCManager не удалось 5 решение
Эта проблема возникает из-за того, что пользователь не вошел в систему под управляющей учетной записью, поэтому при установке возникла проблема (недавно установленная система не имеет пароля для входа).
Выполнить -> Войти в regedit -> Найти по очередиHKEY_LOCAL_MACHINESoftwareMicrosoftWindowsCurrentVersionPoliciesSystemEnableLUA
Измените значение EnableLUA на 0, наконец, перезагрузите компьютер и сделайте это снова.
Устранение неполадок, связанных с отклонением запроса на соединение SSH
- Сервер не работает
- неправильный пароль
- изменить пароль
