В этой статье мы рассмотрим два способа организации условного разрешения имен в DNS сервере на Windows Server 2016: DNS conditional forwarding и DNS policy. Эти технологии позволяют настроить условное разрешение DNS имен в зависимости от запрошенного имени, IP адреса и местоположения клиента, времени суток и т.д.
Содержание:
- Настройка DNS Conditional Forwarder в Windows Server
- Настройка DNS Conditional Forwarding с помощью PowerShell
- Фильтрация запросов DNS, политики разрешения имен в Windows Server 2016
Условная пересылка DNS (Conditional Forwarding) позволяет перенаправить DNS запросы об определенном домене на определенные DNS-сервера. Обычно Conditional Forwarders используется, когда нужно настроить быстрое разрешение имен между несколькими внутренними приватными доменами, или вы не хотите, чтобы DNS запросы с вашего сервера пересылались через публичную сеть Интернет. В этом случае вы можете создать на DNS сервере правило DNS пересылки DNS запросов для определенной доменной зоны (только !!!) на определенный DNS сервер.
Настройка DNS Conditional Forwarder в Windows Server
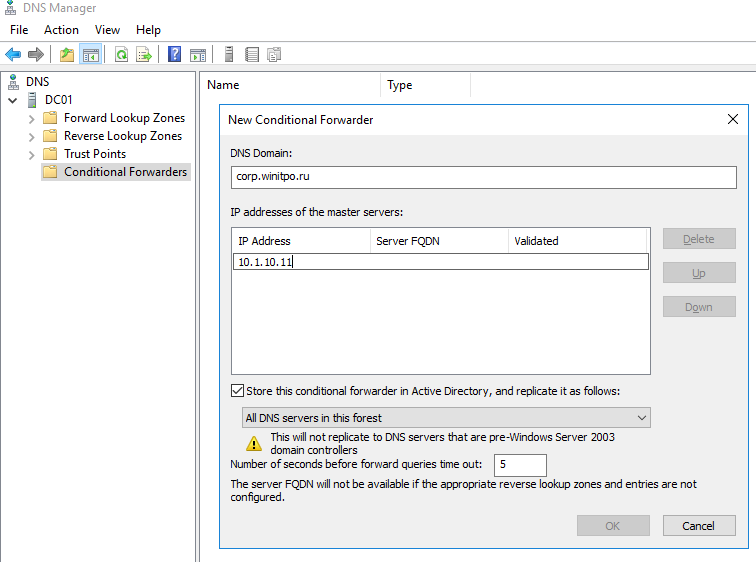
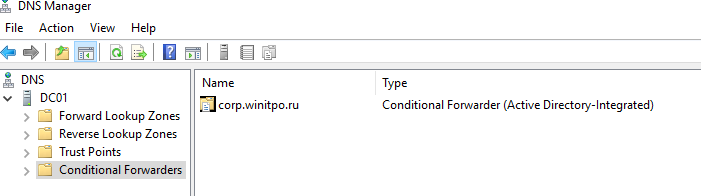
Попробуем настроить условное перенаправление DNS запросов для определенной доменной зоны на Windows Server 2016. Например, я хочу, чтобы все DNS запросы к зоне corp.winitpro.ru пересылались на DNS сервер 10.1.10.11.
- Запустите консоль управления DNS (
dnsmgmt.msc
); - Разверните ваш DNS сервер, щелкните правой кнопкой по разделу Conditional Forwarders и выберите New Conditional Forwarder;
- В поле DNS domain укажите FQDN имя домена, для которого нужно включить условную пересылку;
- В поле IP addresses of the master servers укажите IP адрес DNS сервера, на который нужно пересылать все запросы для указанного пространства имен;

- Если вы хотите хранить правило условной переадресации не только на этом DNS сервере, вы можете интегрировать его в AD. Выберите опцию “Store this conditional forwarder in Active Directory”;
- Выберите правило репликации записи conditional forwarding (All DNS servers in this forest, All DNS servers in this domain или All domain controllers in this domain).

Настройка DNS Conditional Forwarding с помощью PowerShell
Вы можете создать правило Conditional Forward для определенной DNS зоны с помощью PowerShell. Воспользуйтесь командлетом Add-DnsServerConditionalForwarderZone:
Add-DnsServerConditionalForwarderZone -Name dmz.winitpro.ru -MasterServers 192.168.1.11,192.168.101.11 -ReplicationScope Forest
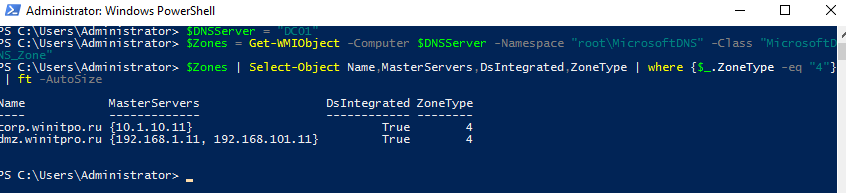
Чтобы вывести список DNS Conditional Forwarders на определенном сервере, выполните следующий PowerShell скрипт:
$DNSServer = "DC01"
$Zones = Get-WMIObject -Computer $DNSServer -Namespace "rootMicrosoftDNS" -Class "MicrosoftDNS_Zone"
$Zones | Select-Object Name,MasterServers,DsIntegrated,ZoneType | where {$_.ZoneType -eq "4"} | ft -AutoSize
Фильтрация запросов DNS, политики разрешения имен в Windows Server 2016
В Windows Server 2016 появилась новая фича в службе DNS сервера – DNS политики. DNS политики позволяют настроить DNS сервер так, чтобы он возвращал различные ответы на DNS запросы в зависимости от местоположения клиента (с какого IP адреса или подсети пришел запрос), интерфейса DNS сервера, времени суток, типа запрошенной записи (A, CNAME, PTR, MX) и т.д. DNS политики в Windows Server 2016 позволяют реализовать сценарии балансировки нагрузки, фильтрации DNS трафика, возврата DNS записей в зависимости от геолокации (IP адреса клиента) и многие другие сложные сценарии.
Вы можете создать политику как на уровне DNS сервера, так и на уровне всей зоны. Настройка DNS политик в Windows Server 2016 возможна только из командной строки PowerShell.
Попробуем создать простую политику, которая позволяет вернуть разный ответ на DNS запрос в зависимости от геолокации клиента. Допустим, вы хотите, чтобы клиенты в каждом офисе использовали собственный прокси на площадке. Вы создали политику назначения прокси в домене (на всех клиентах будет указано proxy.winitpro.ru). Но клиент из каждого офиса должен резолвить этот адрес по-разному, чтобы использовать для доступа свой локальный прокси-сервер.
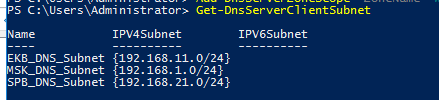
Я создал 3 подсети для разных офисов компании:
Add-DnsServerClientSubnet -Name "MSK_DNS_Subnet" -IPv4Subnet "192.168.1.0/24"
Add-DnsServerClientSubnet -Name "EKB_DNS_Subnet" -IPv4Subnet "192.168.11.0/24"
Add-DnsServerClientSubnet -Name "SPB_DNS_Subnet" -IPv4Subnet "192.168.21.0/24"
Эти команды придется выполнить на всех DNS серверах, на которых должна работать условная политика DNS. Эти записи не реплицируются в DNS и хранятся локально в реестре DNS сервера. Вы можете указать имя сервера с помощью параметра
-ComputerName dc01
.
Чтобы вывести список всех IP подсетей клиентов, выполните:
Get-DnsServerClientSubnet
Теперь нужно для каждого офиса создать отдельную DNS область:
Add-DnsServerZoneScope -ZoneName “winitpro.ru” -Name “MSKZoneScope”
Add-DnsServerZoneScope -ZoneName “winitpro.ru” -Name “EKBZoneScope”
Add-DnsServerZoneScope -ZoneName “winitpro.ru” -Name “SPBZoneScope”
Следующие команды добавят 3 DNS записи с одним именем, но указывающие на разные IP адреса в разных областях DNS:
Add-DnsServerResourceRecord -ZoneName “winitpro.ru” -A -Name “proxy” -IPv4Address “192.168.1.10” -ZoneScope “MSKZoneScope”
Add-DnsServerResourceRecord -ZoneName “winitpro.ru” -A -Name “proxy” -IPv4Address “192.168.11.10” -ZoneScope “EKBZoneScope”
Add-DnsServerResourceRecord -ZoneName “winitpro.ru” -A -Name “proxy” -IPv4Address “192.168.21.10” -ZoneScope “SPBZoneScope”
Вы можете вывести все ресурсные DNS записи для области с помощью команды:
Get-DnsServerResourceRecord -ZoneName “winitpro.ru” -ZoneScope SPBZoneScope

Теперь нужно создать DNS политики, которые свяжут IP подсети, DNS области и A записи.
Add-DnsServerQueryResolutionPolicy -Name “MSKResolutionPolicy” -Action ALLOW -ClientSubnet “eq,MSK_DNS_Subnet” -ZoneScope “MSKZoneScope,1” -ZoneName “winitpro.ru” –PassThru
Add-DnsServerQueryResolutionPolicy -Name “EKBResolutionPolicy” -Action ALLOW -ClientSubnet “eq,EKB_DNS_Subnet” -ZoneScope “EKBZoneScope,1” -ZoneName “winitpro.ru” -PassThru
Add-DnsServerQueryResolutionPolicy -Name “SPBResolutionPolicy” -Action ALLOW -ClientSubnet “eq,SPB_DNS_Subnet” -ZoneScope “SPBZoneScope,1” -ZoneName “winitpro.ru” –PassThru
В DNS политиках доступны следующие действия:
-
-Action ALLOW -
-Action DENY -
-Action IGNORE
Можно использовать следующие параметры в фильтре DNS:
-InternetProtocol "EQ,IPv4,NE,IPv6"
-TransportProtocol "EQ,UDP,TCP"
-ServerInterfaceIP "EQ,192.168.1.21"
-QType "EQ,A,AAAA,NE,PTR"
-TimeOfDay "EQ,9:00-18:00"
Вывести список всех DNS политик для DNS зоны на сервере можно так:
Get-DnsServerQueryResolutionPolicy -ZoneName winitpro.ru

Теперь с устройств из различных офисов проверьте, что DNS сервер на один и тот же запрос возвращает различные IP адреса прокси:
nslookup proxy.winitpro.ru
Можно запретить DNS серверу возвращать DNS адреса для определенного пространства имен (домена):
Add-DnsServerQueryResolutionPolicy -Name 'BlockFidhingPolicy' -Action IGNORE -FQDN "EQ,*.cberbank.ru"
In the last post, we already talked about how to install and setup DNS service on Windows Server 2019. In this article, we will talk about the steps on how to configure DNS zone transfer in Windows Server 2019.
A secondary zone contains the same information as the primary zone, and it can be used to resolve DNS requests. A secondary zone is a read-only copy of the existing primary zone from another DNS server. It can be used to provide fault tolerance and security in DNS infrastructure.
A DNS zone transfer is a process where a primary DNS server sends a DNS zone data to a secondary DNS server.
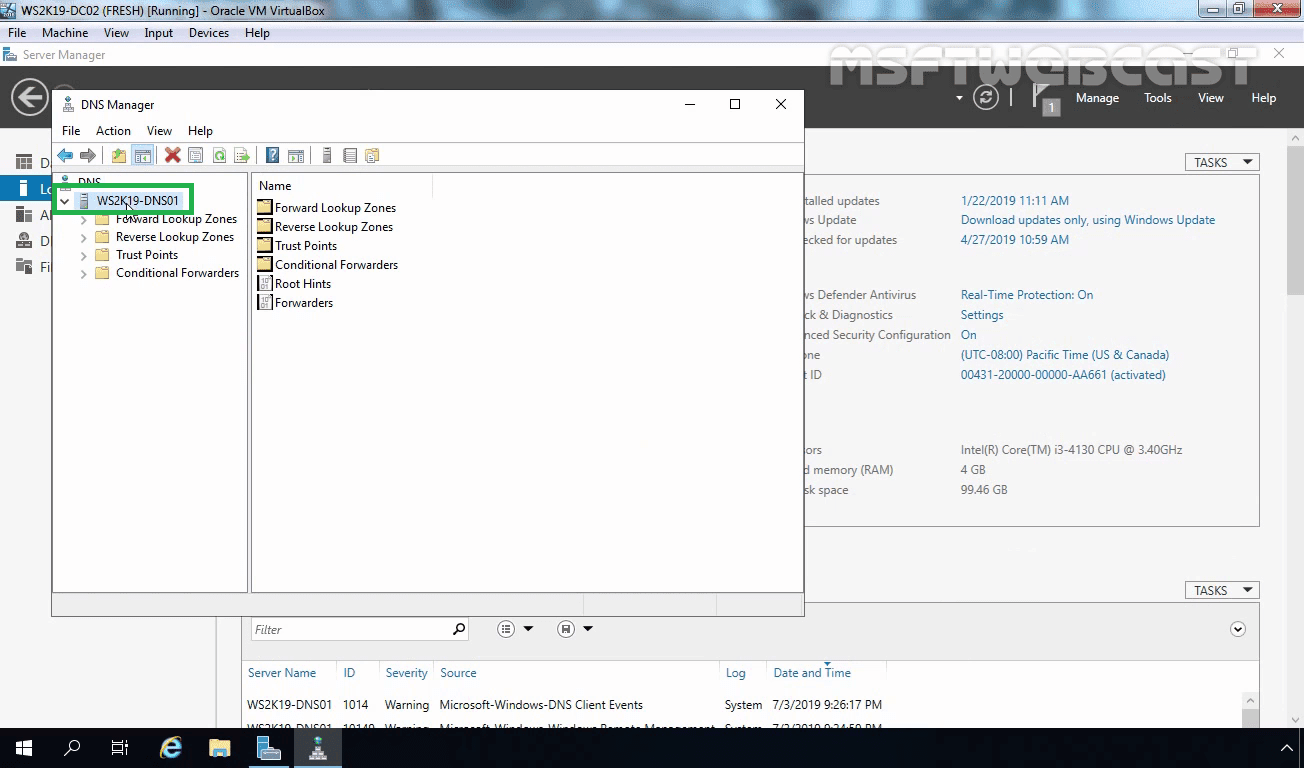
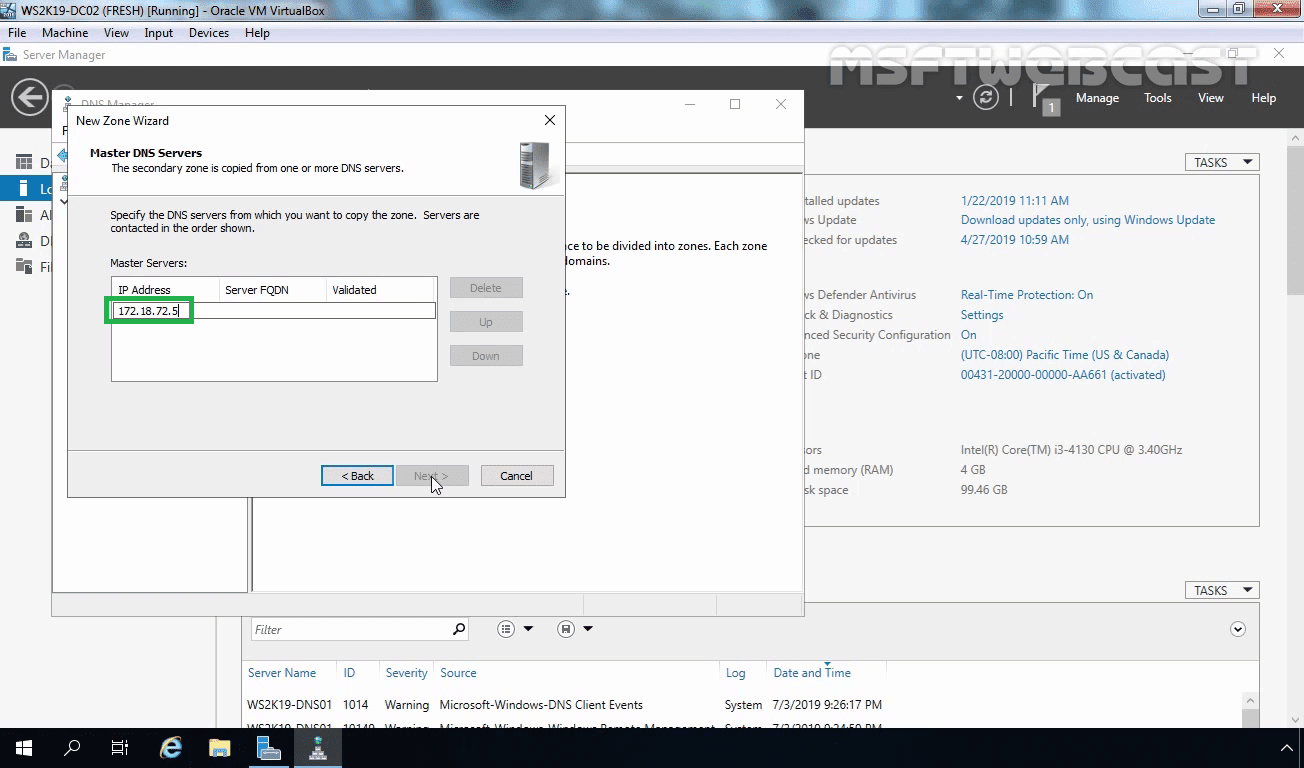
In this example, we have our DNS server WS2K19-DC01 as the Primary DNS server and WS2K19-DNS01 in which, we will create the secondary zone. The DNS zone name that we will replicate is mylab.local.

First, open the server manager console on the WS2K19-DNS01 server. (Where we are going to create a secondary DNS zone). We have already installed the DNS server role on this server.

Click on Tools and select DNS to open the DNS Manager console.

In the DNS Manager, expand the server name.
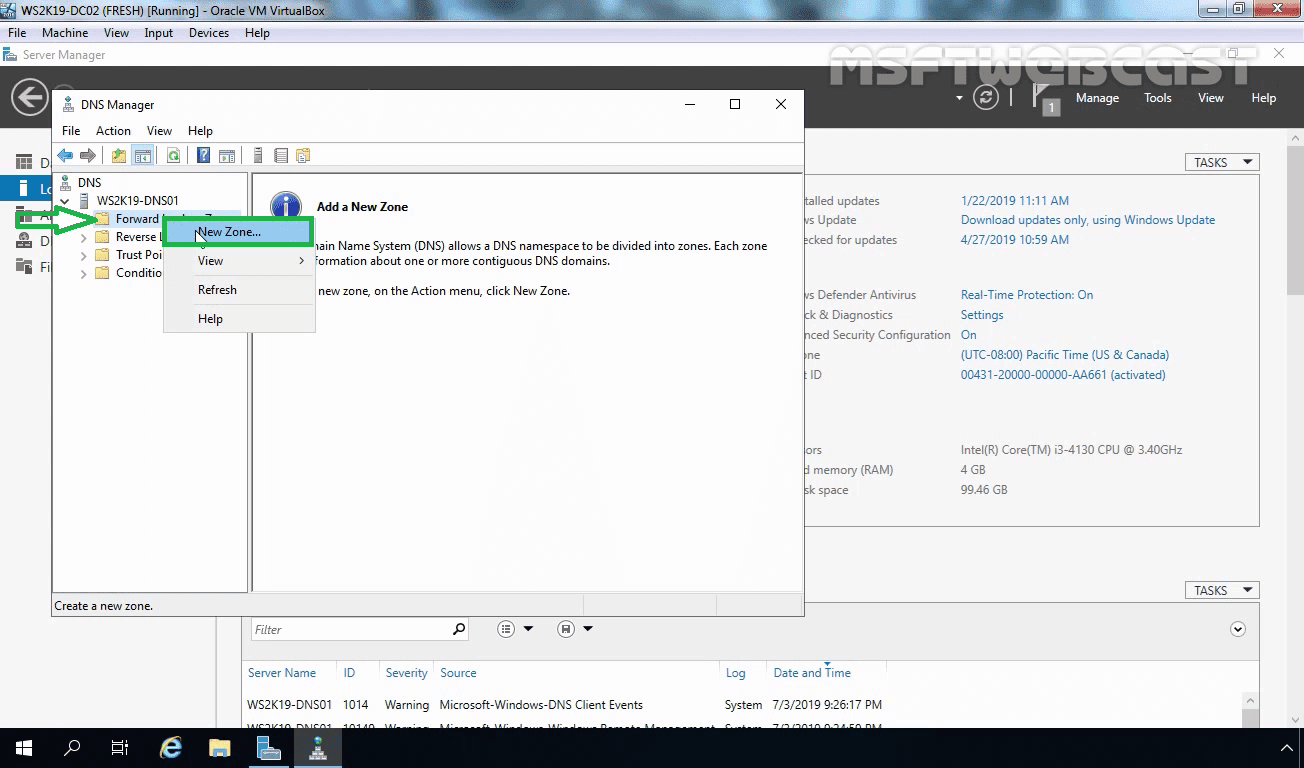
Right-click on Forward Lookup Zones and select New Zone.
Click on the Next to continue.

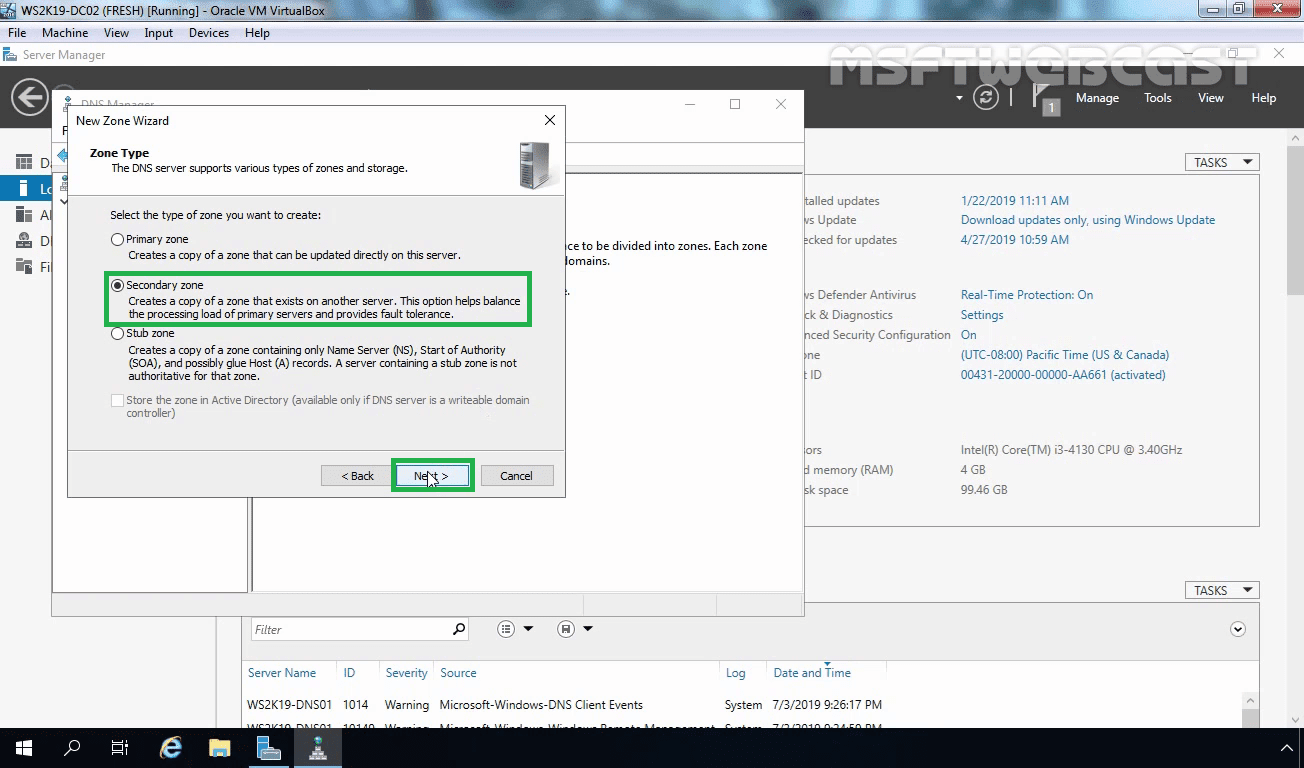
On the zone type selection, choose Secondary Zone and click next to proceed.
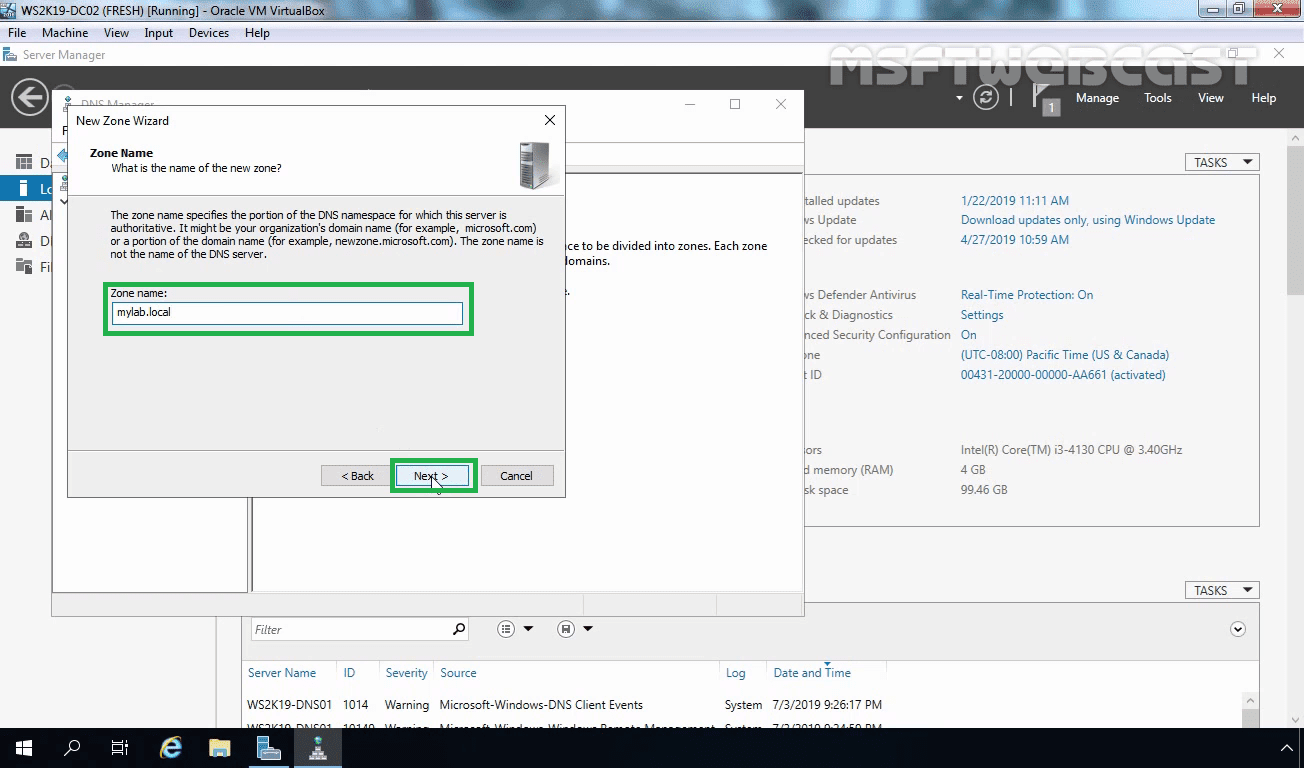
In the zone name field, type the zone name. In this example, we are creating a secondary zone for “mylab.local“. Click on next to continue.
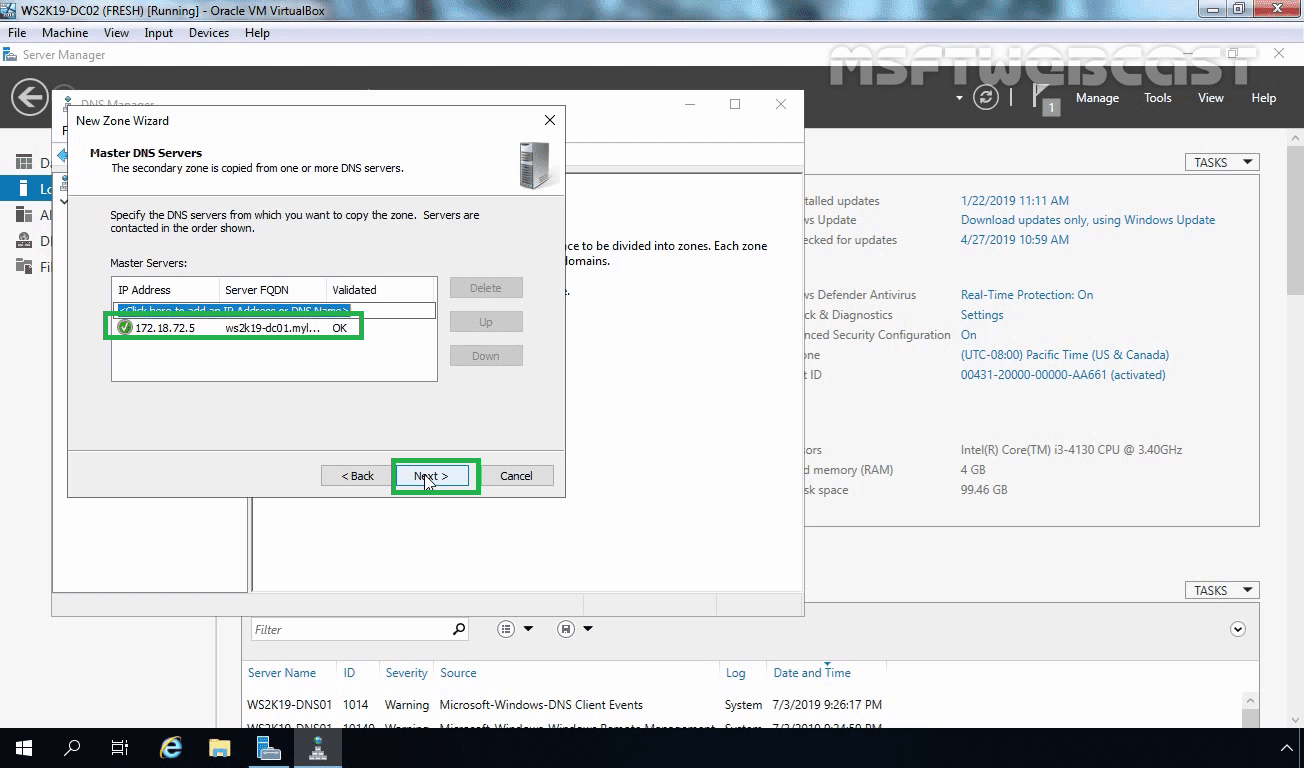
On this console, type in the Primary DNS servers FQDN or IP address then press Enter. In our case, the IP address of the Primary DNS server is 172.18.72.5. When you are done, hit the enter key.
A green check confirms that Secondary is able to communicate with Primary. You can add more than one Master DNS server address. Click on the Next button to continue.
Click on Finish to close the wizard.

Now if you browse to the secondary zone you just created, you may see this error message:

To fix this error, we have to ensure that the Primary DNS server has allowed zone transfer to this server. To configure zone transfer, go to the zone Properties in the primary server.

Click on the Zone Transfers tab. Select Allow zone transfer options.
![]()
Select the third option: “Only to the following servers”. Click on the Edit button to define the IP address of the secondary server. (Only listed servers will be able to receive the copy of the primary zone.)

Type the IP address of the secondary DNS server (which is 172.18.72.6). Click on the OK button.

We also need to add the secondary DNS servers IP address or FQDN in notify settings to get notification for zone updates from primary server. Click on apply and OK.

After we allow Zone transfer on the Primary DNS server. Now go back to WS2K19-DNS01.
Right-click on the secondary DNS zone (mylab.local) and select refresh.

Now you should be able to see all records in mylab.local zone.

If you still get an error message, you can right-click on the secondary zone name and select Transfer from Master or restart the DNS service once.
![]()
With this, we have successfully configured a DNS zone transfer in Windows Server 2019.
Post Views: 4,955
- Remove From My Forums
-
Question
-
помогите настроить DNS сервер, что бы при обращении к нему в локальной сети на определенный хост, он отдавал конкретный ip адрес этой локальной сети. сейчас он отдаёт внешний ip адрес.
Answers
-
Запомните правило: на компьютерах и серверах, которые в домене никаких других ДНС кроме доменного (обычно это контроллер домена) быть
не должно. Т.е. на втором сервере в ДНС прописываете его же IP, а ДНС Linux прописываете в Forwarding. Если это не поможет, нам нужна будет подробная информация: какое имя пытаетесь разрешить, есть ли это имя
во 2-ом ДНС
-
Marked as answer by
Monday, May 17, 2021 6:36 AM
-
Marked as answer by


Step 1. Login to your win server via RDP

Step 2. Open Server Manager

Step 3. Go to tools and open DNS

Step 4. In the DNS Manager, under your server, right-click on Reverse Lookup zones, and click on New Zone…

Step 5. In NEW ZONE wizard, click next

Step 6. Select Primary Zone and click Next.

Step 7. Select IPv4 Reverse Lookup Zone and click Next.

Step 8. Select Network ID, input your server IP and click Next.

Step 9. Select Create a new file name. A file name should automatically be created. Click Next.

Step 10. Click Finish.

Step 11. Expand Reverse Lookup Zones and click on the zone you just added.

Step 12. Open cmd and input the command:
C:UsersAdminnistrator>ipconfig /registerdns
![]()

Step 13. Add the pointer. Go to DNS Manager, right click on the mid screen, and click on «New Pointer (PTR)…».

Step 14.Add Host IP Address and Hostname, then click OK.

Pointer Added

Step 15. Exit your server and go to your main desktop. Open cmd and type the command
C:UsersAdministrator> nslookup your_server_ip
Example:
C:UsersDivyanshu>nslookup 103.127.30.85
Name:    1031273085.network.microhost.in
Address:  103.127.30.85
Thank you!
PostedDecember 20, 2021
UpdatedJanuary 3, 2023
| title | description | author | ms.author | ms.date | ms.topic | ms.service | ms.reviewer | manager | ms.openlocfilehash | ms.sourcegitcommit | ms.translationtype | ms.contentlocale | ms.lasthandoff | ms.locfileid |
|---|---|---|---|---|---|---|---|---|---|---|---|---|---|---|
|
Решение VMware для Azure от Клаудсимпле — Настройка DNS для частного облака Клаудсимпле |
Описывается, как настроить разрешение имен DNS для доступа к vCenter Server в частном облаке Клаудсимпле с локальных рабочих станций. |
Ajayan1008 |
v-hborys |
08/14/2019 |
article |
azure-vmware-cloudsimple |
cynthn |
dikamath |
63822050512421895b0cfed08fb141f77da20b03 |
910a1a38711966cb171050db245fc3b22abc8c5f |
MT |
ru-RU |
03/19/2021 |
97899258 |
Настройка DNS для разрешения имен для доступа к службе v-Center для частного облака с локальных рабочих станций
Чтобы получить доступ к серверу vCenter в частном облаке Клаудсимпле с локальных рабочих станций, необходимо настроить разрешение адресов DNS, чтобы сервер vCenter мог быть адресован по имени узла, а также по IP-адресу.
Получение IP-адреса DNS-сервера для частного облака
-
Войдите на портал клаудсимпле.
-
Перейдите к разделу ресурсы > частные облака и выберите частное облако, к которому нужно подключиться.
-
На странице Сводка частного облака в разделе Основные сведения скопируйте IP-адрес DNS-сервера частного облака.

Используйте любой из этих параметров для конфигурации DNS.
- Создание зоны на DNS-сервере для *. cloudsimple.io
- Создание сервера условной пересылки на локальном DNS-сервере для разрешения *. cloudsimple.io
Создание зоны на DNS-сервере для *. cloudsimple.io
Вы можете настроить зону в качестве зоны-заглушки и указать DNS-серверы в частном облаке для разрешения имен. В этом разделе приводятся сведения об использовании привязки DNS-сервера или DNS-сервера Microsoft Windows.
Создание зоны на DNS-сервере привязки
Конкретный файл и параметры для настройки могут зависеть от конкретной настройки DNS.
Например, для конфигурации сервера привязки по умолчанию измените файл/ЕТК/намед.конф на DNS-сервере и добавьте следующие сведения о зоне.
[!NOTE]
Эта статья содержит ссылки на термин slave (ведомый). Корпорация Майкрософт больше не использует его. Когда этот термин будет удален из программного обеспечения, мы удалим его из статьи.
zone "az.cloudsimple.io"
{
    type stub;
    masters { IP address of DNS servers; };
    file "slaves/cloudsimple.io.db";
};
Создание зоны на DNS-сервере Microsoft Windows
-
Щелкните правой кнопкой мыши DNS-сервер и выберите пункт создать зону.
-
Выберите зона-заглушка и нажмите кнопку Далее.
-
Выберите подходящий вариант в зависимости от среды и нажмите кнопку Далее.
-
Выберите зону прямого просмотра и нажмите кнопку Далее.
-
Введите имя зоны и нажмите кнопку Далее.
-
Введите IP-адреса DNS-серверов для частного облака, полученного на портале Клаудсимпле.
-
Нажмите кнопку Далее , если необходимо завершить установку мастера.


Создание сервера условной пересылки
Сервер условной пересылки перенаправляет все запросы разрешения DNS-имен на указанный серверу. При такой настройке любой запрос к *. cloudsimple.io перенаправляется на DNS-серверы, расположенные в частном облаке. В следующих примерах показано, как настроить серверы пересылки на различных типах DNS-серверов.
Создание сервера условной пересылки на DNS-сервере привязки
Конкретный файл и параметры для настройки могут зависеть от конкретной настройки DNS.
Например, для конфигурации сервера привязки по умолчанию измените файл/ЕТК/намед.конф на DNS-сервере и добавьте следующие данные условной пересылки.
zone "az.cloudsimple.io" {
    type forward;
    forwarders { IP address of DNS servers; };
};
Создание сервера условной пересылки на DNS-сервере Microsoft Windows
-
Откройте диспетчер DNS на DNS-сервере.
-
Щелкните правой кнопкой мыши пункт серверы условной пересылки и выберите пункт Добавить новый условный сервер пересылки.
-
Введите домен DNS и IP-адрес DNS-серверов в частном облаке и нажмите кнопку ОК.

— Advertisement —
Hello, how are you? Today we will continue to explore the functionalities of Windows Server. Specifically, we will talk about one of the most important roles. Indeed, a DNS server is of paramount importance within the system. Since this role, it has the function of translating IP addresses into domain names and vice versa. As a result, the functionality of the server will be considerably increased. Well, let’s see how to install and configure a DNS server in Windows Server 2019/2016.
How to install the DNS role in Windows Server 2019/2016.
Most commonly, this role has been installed along with the Active Directory role. Most commonly, this role has been installed along with the Active Directory role. So if you have reviewed our posts on Windows Server you should already know how to do it. However, I remind you of the steps. In the first place, from the Server Manager click on Add Roles and Features

Press Next to continue

Now select the type of installation. In this case, we will use the role or feature based installation.

Please select the server where the DNS server will be installed.

Below, you can see the DNS role already installed. If not, check the box and follow the instructions in the wizard.

Setting up a DNS server in Windows Server 2019/2016.
Once the installation is verified, it is time to configure the DNS role. To do this, once again we will use the Server Manager. Once there, please enter the Tools menu. Then, click on DNS:

Then the DNS manager will be displayed. Please right-click on the name of the server. Then select Configure a DNS Server.

The DNS Server Configuration Wizard will be displayed immediately. Press Next to continue.

Now it is time to select the optimal alternative for the zone to be used on the server. If you are using small networks, then I recommend creating a forward lookup zone.

Now please set the location of the primary server. This time, the server maintains the zone.

Then assign the name of the zone.

Now it’s time to set up how to receive updates. For security reasons, I recommend using the first option.

In this option, it is possible to configure the DNS server as a temporary reseller. This is very interesting, as it allows our DNS server to query other external DNS servers. This is in the case of those records that it is not able to resolve itself. With this in mind, please add the IP address of the external DNS server.

After this step, the assistant will have finished his work. After this step, the assistant will have finished his work.

Finally you will be able to see the area created correctly. Consequently, the DNS server administration is now available on Windows Server.

Conclusion
Well, in this simple way we have seen how to install and configure a DNS server in Windows Server 2019/2016. Therefore, the administrator has this important feature. All right, that’s it for now. Before saying goodbye I invite you to see our post about activating Wi-Fi in Windows Server. See you soon!