В Unix-подобных операционных системах подключить каталога NFS (Network File System) довольно просто, однако если вам понадобится использовать NFS шару в Windows, придется выполнить ряд дополнительных действий. В этой статье мы покажем, как в Windows 10 подключить NFS каталог, который находинся на UNIX системе. Все описанные инструкции будут работать в Windows 10 Pro (версия 10.0.14393 и выше).
- Установка клиента NFS (службы для NFS)
- Как разрешить запись в NFS каталог анонимному пользователю
- Как подключить NFS каталог в Windows 10
Содержание:
Установка клиента NFS (службы для NFS)
В первую очередь в Windows 10 нужно установить клиент NFS. Для установки необходимо выполнить следующие шаги:
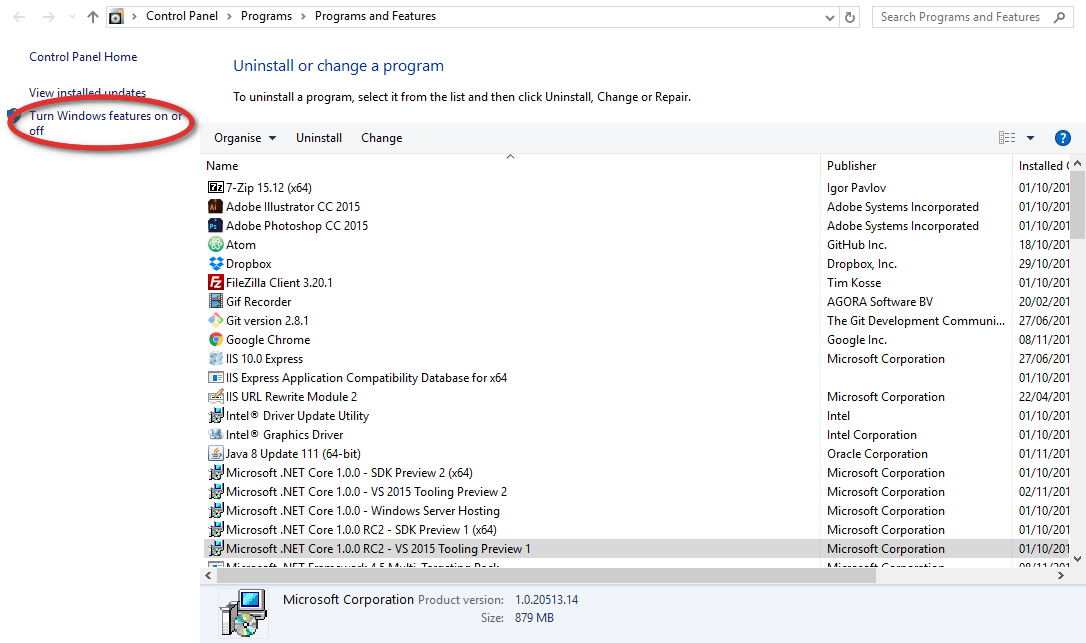
- Откройте раздел «Programs and Features».

- Щелкните по пункту «Turn Windows features on or off».

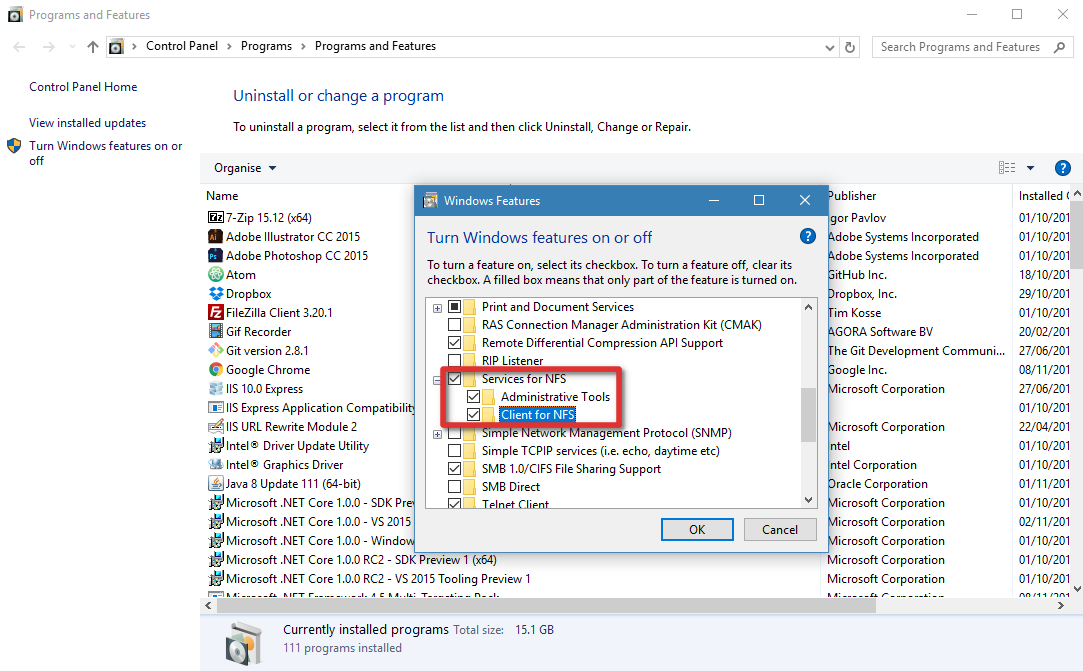
- В появившемся списке в разделе Services for NFS включите NFS клиента (Client for NFS), а затем нажмите «ОК».

- После установки нажмите кнопку «Close» и вернитесь на рабочий стол.

Как разрешить запись в NFS каталог анонимному пользователю
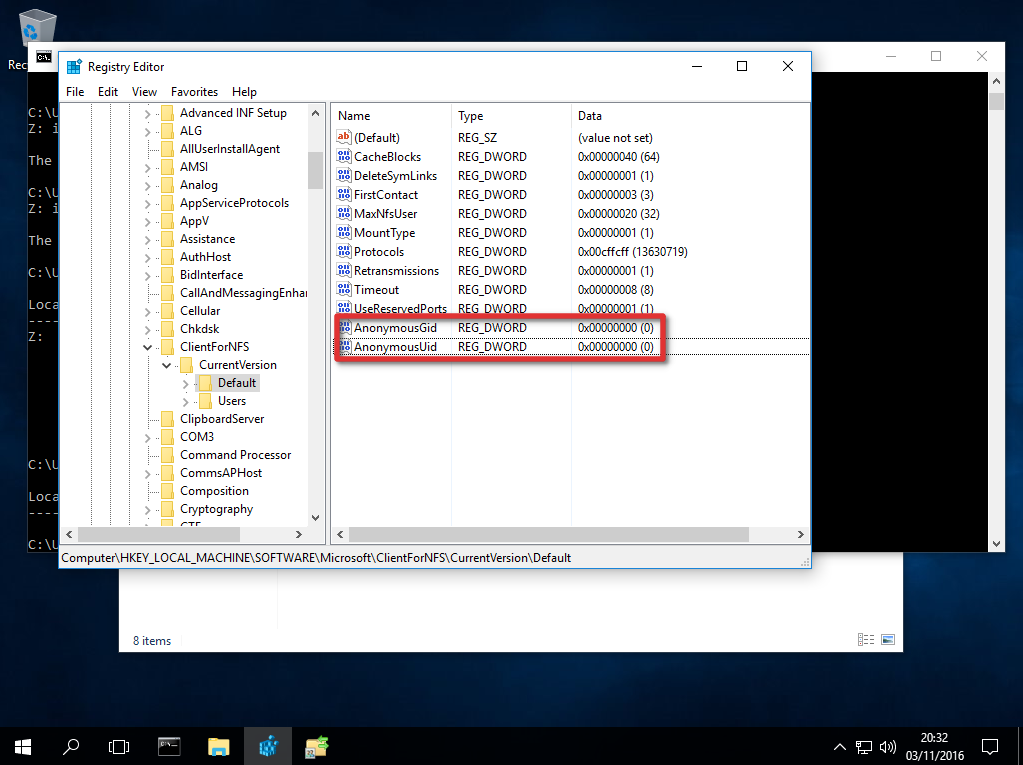
По умолчанию при подключении NFS каталога с UNIX системы, анонимному пользователю (anonymous) предоставляются права только на чтение. Чтобы предоставить анонимным пользователям право записи, необходимо изменить значения UID и GID, которые используются для монтирования NFS каталога в Windows. Пример стандартных настроек представлен на рисунке ниже.
Чтобы изменить значение полей UID и GID, нам потребуется внести изменения в реестр Windows.
- Откройте редактор реестра regedit.
- Перейдите в ветку реестра — HKEY_LOCAL_MACHINESOFTWAREMicrosoftClientForNFSCurrentVersionDefault.
- В каталоге «Default» создайте новый параметр типа DWORD (32бит) с именем AnonymousUid и назначьте UID, назначенный на каталог в UNIX, к которому открыт доступ через NFS.
- В ветке Default создайте ещё один параметр DWORD (32-бит) с именем AnonymousGid и назначьте GID, назначенный данному каталогу в UNIX.

- Для того, чтобы изменения вступили в силу вам необходимо перезапустить клиент NFS или перезагрузить компьютер.
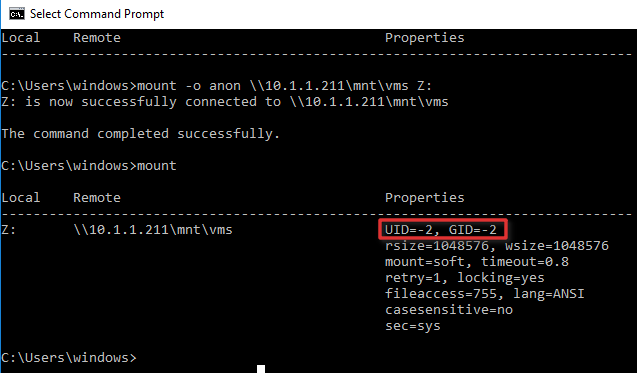
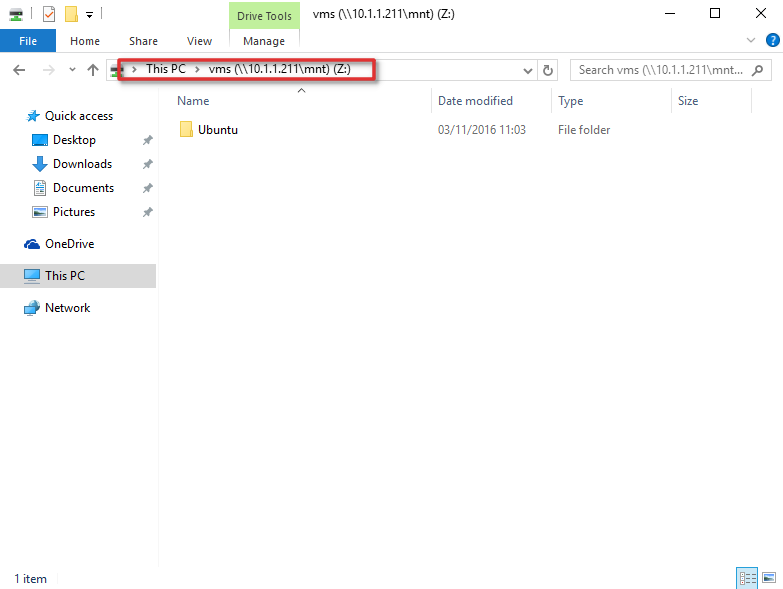
Список подключенных NFS каталогов и параметры монтирования можно вывести с помощью команды Mount без параметров.
Результат работы команды mount теперь должен выглядеть следующим образом:
Local Remote Properties
-------------------------------------------------------------------------------
Z: \10.1.1.211mntvms UID=0, GID=0
rsize=1078756, wsize=1078756
mount=soft, timeout=1.6
retry=1, locking=yes
fileaccess=755, lang=ANSI
casesensitive=no
sec=sys
Обратите внимание на значение полей UID и GID, которое равно 0. UID=0, GID=0 — означает, что общий ресурс монтируется под пользователем root.
Как подключить NFS каталог в Windows 10
Смонтировать NFS каталог в Windows 10 можно с помощью команды mount. Например, смонтируем NFS каталог и назначим ему букву диска Z:. Предположим, что ваше NAS устройство находится в той же сети, что и ваш компьютер с установленной операционной системы Windows, а IP-адрес устройства — 10.1.1.211. С помощью следующей команды можно смонтировать общий ресурс NFS в /mnt/vms.
Mount –o anon \10.1.1.211mntvms Z:
Z: is now successfully connected to \10.1.1.211mntvms.
The command completed successfully
Теперь общий ресурс создан, и мы можем получить доступ к данным. В нашем примере сетевой ресурс (диск) обозначается буквой «Z».
На этом настройка NFS завершена и вы сможете сохранять данные на свое NAS устройство через смонтированный NFS каталог. Обратите внимание, что при в первый раз открытие этого каталога выполняется довольно долго.
15 Aug 2021 — tsp
Last update 16 Aug 2021
 5 mins
TL;DR: Install NFS client feature (either from features menu or via DISM in
an elevated command prompt), use the mount and umount command to mount
and unmount via NFS in case anonymous user mapping is used.
- Introduction
- Installing the NFS client
- Mounting
- Anonymous
- Unauthenticated, with user mapping, no AD, no Kerberos
- With Kerberos
Introduction
Sometimes one just encounters Windows machines even if one tries to avoid this
as good as possible. Then sometimes one wants to allow them to access network
shares on a local network — Windows users are usually using the SMB protocol using
WINS to locate the machines. It’s entirely possible to support these protocols
using samba (and even possible running the LDAP / Kerberos suite that’s
called active directory by Microsoft even though that’s a little bit of work).
On the other hand it’s most of the time simpler to support NFS on the clients
instead of rolling out a second file sharing protocol in parallel. Fortunately
Microsoft now supports NFS even on more consumer side versions (professional edition)
of Windows and not only on the enterprise versions as before — though up to my
knowledge there is no way to mount NFS shares on home editions (but since they also
do not support different users for SMB, etc. they’re pretty much useless as soon
as one runs a network anyways). This blog post gives a short summary on how to
mount NFS shares on Windows machines (basically a note to myself how to do this
stuff).
Installing the NFS client
First of the NFS client is only supported since Windows 10 professional in the
professional versions, older versions (though they should not be in operating networked
anywhere anyways) one would require the enterprise versions.
One can either just use both Client for NFS and Administrative Tools
from the Services for NFS in Windows features dialog to install the NFS
client of use DISM from an elevated command prompt:
dism /online /Enable-Feature /FeatureName:ServicesForNFS-ClientOnly
dism /online /Enable-Feature /FeatureName:ClientForNFS-infrastructure
dism /online /Enable-Feature /FeatureName:NFS-administration
Mounting
Anonymous
If one has exported a share with a typical anonymous mapall mount (i.e. one
that has a -mapall=username value set in the /etc/exports on the server)
one can simply mount from a command prompt using
mount -o anon \serverpathtodirectory DRIVE:
In case one wants to mount
- The share
/nfs/testdata - On
nas.example.com - Onto drive
xon the windows machine
this would be
mount -o anon \nas.example.comnfstestdata x:
One can control the UID and GID that Windows is using for anonymous mounts using
the registry keys HKEY_LOCAL_MACHINESOFTWAREMicrosoftClientForNFSCurrentVersionDefaultAnonymousUID
and HKEY_LOCAL_MACHINESOFTWAREMicrosoftClientForNFSCurrentVersionDefaultAnonymousGID (both
are DWORD keys and accept the numeric user id and group id). Note that changing
these settings only takes effect after a reboot of the machine or a restart of
the NFS service.
In case one wants to use NFS in the old 90’th way without authentication (privileged
ports have been considered trusted since the client has been considered trusted
and Kerberos has not been a thing back then) one has to create the user and group
mappings Windows is using for it’s mountpoints. This is done using a passwd
and groups file at C:windowssystem32driversetcpasswd
and C:windowssystem32driversetcgroup
The typical format of lines inside these files is for passwd:
[USERNAME]:x:[UID]:[GID]:[GECOS],,,:c:users[USERNAME]
and for group:
[GROUPNAME]:x:[GID]:[UID]
For example in case one wants to identify the user exampleuser with the
Unix UID 1234 and the GID 567 the entries might look like the following:
exampleuser:x:1234:567:Just an example user,,,:c:usersexampleuser
and
Please note that the parser is rather picky:
- No empty lines at the end of the file or somewhere in between
- No extra blanks at the end of lines
- No duplicated users
- No non existing users
With Kerberos
This is by far the best idea. I won’t cover the setup of Kerberos in one’s network
in this blog post since this is a little bit more complex (it requires correctly
configured DNS and reverse DNS, a running KDC, etc.) but it’s totally worth it.
In case one has not configured Kerberos or user mapping one just has to perform
the standard setup sequence for Kerberos on the Windows client:
ksetup /setdomain EXAMPLE.COM
ksetup /setmachpassword <your kerberos password>
ksetup /addrealmflags EXAMPLE.COM sendaddress delegate
ksetup /mapuser * *
The last step maps all users from the network by name to local users. One can
few the current state of Kerberos:
To check if a user is capable of getting a Kerberos ticket one just as usual
uses klist to list current tickets.
Mounting an NFS share works similar to anonymous mounting — just specifying
Kerberos as security layer:
mount -o sec=krb5 server:/path/to/directory DRIVE:
Again using the same example:
- The share
/nfs/testdata - On
nas.example.com - Onto drive
xon the windows machine
mount -o sec=krb5 nas.example.com:/nfs/testdata x:
This article is tagged:
- System administration
- Windows
- Network
The NFS service can easily mount network disks locally for file synchronization, but Windows 10 Home Edition does not support this function. This article records a fundamental and painless solution that does not need to reinstall the system without changing Linux and not installing virtual machines.
Upgrade Windows 10
Upgrade the home version of Win10 to the enterprise version, and the system will have its own NFS service.
serial number
2020.06.02 Pro-test is valid, thanks: https://www.jianshu.com/p/3f9e2368e546 Share
J7QT3-3GCPG-9GVWT-CH2XR-GMRJM
VK7JG-NPHTM-C97JM-9MPGT-3V66T
Replace product serial number
- Right click My Computer -> Properties -> Change Product Key

- Enter the enterprise version key, close the current working program and save the work progress, all the way to the next step
 ]
]
Open NFS service
- Control Panel -> Programs and Features -> Check NFS Service -> OK

- Test in CMD, type mount -h to view output
C:UsersAdmin>mount -h
Usage: mount [-o options] [-u:username] [-p:<password | *>] <\computernamesharename> <devicename | *>

 -o rsize=size Set the size of the read buffer (in KB).
 -o wsize=size Set the size of the write buffer (in KB).
 -o timeout=time Set the timeout value (in seconds) for RPC calls.
 -o retry=number Set the number of retries for soft loading.
 -o mtype=soft|hard Set the loading type.
-o lang=euc-jp|euc-tw|euc-kr|shift-jis|big5|ksc5601|gb2312-80|ansi
                                                         Specify the encoding used for file and directory names.
 -o fileaccess=mode specifies the file access mode.
                                                         These patterns are used to create on the NFS server
                                                         New file. Use UNIX-style mode bit designation.
 -o anon Load as an anonymous user.
 -o nolock Disable locking.
 -o casesensitive=yes|no Specifies to perform a case-sensitive file search on the server.
-o sec=sys|krb5|krb5i|krb5p
Such output indicates that the NFS service started successfully.
by Vladimir Popescu
Being an artist his entire life while also playing handball at a professional level, Vladimir has also developed a passion for all things computer-related. With an innate fascination… read more
Updated on June 22, 2020
XINSTALL BY CLICKING THE DOWNLOAD FILE
This software will keep your drivers up and running, thus keeping you safe from common computer errors and hardware failure. Check all your drivers now in 3 easy steps:
- Download DriverFix (verified download file).
- Click Start Scan to find all problematic drivers.
- Click Update Drivers to get new versions and avoid system malfunctionings.
- DriverFix has been downloaded by 0 readers this month.
If you’ve ever wondered if you can set up a free NFS server on Windows 10, you came to the right place.
A Network File System is a file that allows the storage and gathering of data from a multiple-disk setup and directories on a shared network.
We all know that mounting an NFS (Network File System) share on a Unix-like OS is an easy task to accomplish. On a Windows 10 PC, things are not so straight-forward, but the operation can still be successful with the right guidance.
In today’s article we will discuss how to mount a free NFS share from a UNIX system, but on a Windows 10 running computer. Please follow the steps presented here carefully to avoid any issues. Read on to find out more.
Steps to set up a free NFS server on Windows 10
1. Install the NFS Client
- Click on the Cortana search box -> type in Control Panel -> choose the first option from the top.
- Click the Programs and Features option.

- Click the option Turn Windows features on or off from the left side menu.
- Inside the Windows Features window -> scroll down and check the box next to Services for NFS -> press Ok.
- This will start the installation process.
- After the process is completed, you can Close the Windows Features window and follow the next method.

Is Bluestacks not connecting to the server on Windows 10? Try this
2. Enable Write permissions for the Anonymous User (default)
- Press the Win+R keys on your keyboard -> type Regedit -> press Enter.

- Navigate to:
HKEY_LOCAL_MACHINESOFTWAREMicrosoftClientForNFSCurrentVersionDefault
- Open the Default folder by double-clicking on it.
- Right-click the right-side pane -> create a New DWORD (32-bit) Value -> name it AnonymousUid -> assign the UID found on the UNIX directory (shared by the NFS system).
- Create a new NEW DWORD (32-bit) Value -> name it AnonymousGid -> assign GID found on the UNIX directory.
- Reboot your PC.

For the sake of this example, we will assume that your NAS device is located on the same network as your Windows 10 PC and the IP address is xx.x.x.xxx.
Follow these steps to mount the NFS share:
- Press Win+X and launch the PowerShell (Admin).

- Type the following command
C:Userswindows>mount -o anon xx.x.x.xxxmntvms Z: - Press Enter
- After the command is entered, your NFS share server is ready to be accessed by visiting the Z: drive.

Note: It is worth knowing that the first time you will try to write to the NAS device, the share takes a long time. Please be patient.
In today’s article, we answered the question ‘how to set up a free NFS server on Windows 10 ‘.
Please make sure to follow the steps presented in this list carefully, as modifying any registry data incorrectly can affect the overall health and performance of your PC.
We would love to know if this guide helped you set up a free NFS server on Windows 10. If it did, please let us know by using the comment section below.
Still having issues? Fix them with this tool:
SPONSORED
If the advices above haven’t solved your issue, your PC may experience deeper Windows problems. We recommend downloading this PC Repair tool (rated Great on TrustPilot.com) to easily address them. After installation, simply click the Start Scan button and then press on Repair All.
![]()
Newsletter
Open Start > Control Panel > Programs. Select Turn Windows features on or off. Select Services for NFS. Click OK.
How do I use NFS on Windows 10?
The first thing we need to do is install the NFS Client which can be done by following the steps below: Step 1: Open Programs and Features. Step 2: Click Turn Windows features on or off. Step 3: Scroll down and check the option Services for NFS, then click OK.
How do I turn on NFS?
You can turn on these services as follows: Access Control Panel → Programs → Programs and Features → Turn Windows features on or off (see figure below). If you are mapping NFS share only, click on “Services for NFS” including “Administrative Tools” and “Client for NFS” (see figure below):
How do I start NFS on Windows?
To Start NFS Server from the Local System Account
- Click the Start button, point to Settings, click Control Panel, and then double-click Services.
- Select Solstice NFS Server and proceed as follows: To start the service manually, click Start. …
- Click Close. NFS Server will start the next time you start Windows NT.
Does Windows 10 support NFS?
Yes, it’s supported. If it is Windows 10 Pro or Enterprise version, you could follow the steps below to mount an NFS share. Please Note: Since the website is not hosted by Microsoft, the link may change without notice.
Is NFS or SMB faster?
Differences between NFS and SMB
NFS is suitable for Linux users whereas SMB is suitable for Windows users. … NFS generally is faster when we are reading/writing a number of small files, it is also faster for browsing. 4. NFS uses the host-based authentication system.
Does NFS work with Windows?
Using the NFS protocol, you can transfer files between computers running Windows and other non-Windows operating systems, such as Linux or UNIX. NFS in Windows Server includes Server for NFS and Client for NFS.
How do I restart NFS client on Windows 10?
Answers
- install “Service for Network File System”
- open Service console via services.msc.
- find and locate the “Client for NFS” service.
- click the “Restart” button below the menu.
- after some while, the system prompt up an warning dialog box with the following detailed information.
What is NFS in Windows 10?
Network File System (NFS) provides a file sharing solution that lets you transfer files between computers running Windows Server and UNIX operating systems using the NFS protocol.
How do I automatically start NFS server?
Automatically Start the NFS Server
Select Portmap and NFS and save the changes. ntsysv command is a simple interface for configuring runlevel services which are also configurable through chkconfig command. This entry is 4 of 15 in the Linux / UNIX NFS File Server Tutorial series.
How can I test my NFS connection?
Testing NFS access from client systems
- Create a test file: touch filename.
- Verify that the file exists.: ls -l filename.
- Enter: cat > filename. Type some text, and then press Ctrl+D to write text to the test file.
- Display the content of the test file. …
- Remove the test file: rm filename.
- Return to the parent directory: cd ..
How does NFS work?
Network File Sharing (NFS) is a protocol that allows you to share directories and files with other Linux clients over a network. Shared directories are typically created on a file server, running the NFS server component. Users add files to them, which are then shared with other users who have access to the folder.